Embed Size (px)
Citation preview

Quest® NetVault® SmartDisk 11.4.5
Installation/Upgrade Guide

© 2020 Quest Software Inc.
ALL RIGHTS RESERVED.
This guide contains proprietary information protected by copyright. The software described in this guide is furnished under a software license or nondisclosure agreement. This software may be used or copied only in accordance with the terms of the applicable agreement. No part of this guide may be reproduced or transmitted in any form or by any means, electronic or mechanical, including photocopying and recording for any purpose other than the purchaser’s personal use without the written permission of Quest Software Inc.
The information in this document is provided in connection with Quest Software products. No license, express or implied, by estoppel or otherwise, to any intellectual property right is granted by this document or in connection with the sale of Quest Software products. EXCEPT AS SET FORTH IN THE TERMS AND CONDITIONS AS SPECIFIED IN THE LICENSE AGREEMENT FOR THIS PRODUCT, QUEST SOFTWARE ASSUMES NO LIABILITY WHATSOEVER AND DISCLAIMS ANY EXPRESS, IMPLIED OR STATUTORY WARRANTY RELATING TO ITS PRODUCTS INCLUDING, BUT NOT LIMITED TO, THE IMPLIED WARRANTY OF MERCHANTABILITY, FITNESS FOR A PARTICULAR PURPOSE, OR NON-INFRINGEMENT. IN NO EVENT SHALL QUEST SOFTWARE BE LIABLE FOR ANY DIRECT, INDIRECT, CONSEQUENTIAL, PUNITIVE, SPECIAL OR INCIDENTAL DAMAGES (INCLUDING, WITHOUT LIMITATION, DAMAGES FOR LOSS OF PROFITS, BUSINESS INTERRUPTION OR LOSS OF INFORMATION) ARISING OUT OF THE USE OR INABILITY TO USE THIS DOCUMENT, EVEN IF QUEST SOFTWARE HAS BEEN ADVISED OF THE POSSIBILITY OF SUCH DAMAGES. Quest Software makes no representations or warranties with respect to the accuracy or completeness of the contents of this document and reserves the right to make changes to specifications and product descriptions at any time without notice. Quest Software does not make any commitment to update the information contained in this document.
If you have any questions regarding your potential use of this material, contact:
Quest Software Inc.Attn: LEGAL Dept.4 Polaris WayAliso Viejo, CA 92656
Refer to our website (https://www.quest.com) for regional and international office information.
Patents
Quest Software is proud of our advanced technology. Patents and pending patents may apply to this product. For the most current information about applicable patents for this product, please visit our website at https://www.quest.com/legal.
Trademarks
Quest Software, Quest, the Quest logo, vRanger, and NetVault are trademarks and registered trademarks of Quest Software Inc. For a complete list of Quest marks, visit https://www.quest.com/legal/trademark-information.aspx. All other trademarks and registered trademarks are property of their respective owners.
NetVault SmartDisk Installation/Upgrade GuideUpdated - April 2020Software Version - 11.4.5
Legend
WARNING: A WARNING icon indicates a potential for property damage, personal injury, or death.
CAUTION: A CAUTION icon indicates potential damage to hardware or loss of data if instructions are not followed.
IMPORTANT NOTE, NOTE, TIP, MOBILE, or VIDEO: An information icon indicates supporting information.

Contents
Introducing NetVault SmartDisk . . . . . . . . . . . . . . . . . . . . . . . . . . . . . . . . . . . . . . . . . . . . . . 5
NetVault SmartDisk: at a glance . . . . . . . . . . . . . . . . . . . . . . . . . . . . . . . . . . . . . . . . . . . . . . . 5
Key benefits . . . . . . . . . . . . . . . . . . . . . . . . . . . . . . . . . . . . . . . . . . . . . . . . . . . . . . . . . . . . . . . 5
Feature list . . . . . . . . . . . . . . . . . . . . . . . . . . . . . . . . . . . . . . . . . . . . . . . . . . . . . . . . . . . . . . . . 6
Target audience . . . . . . . . . . . . . . . . . . . . . . . . . . . . . . . . . . . . . . . . . . . . . . . . . . . . . . . . . . . . 6
Recommended additional reading . . . . . . . . . . . . . . . . . . . . . . . . . . . . . . . . . . . . . . . . . . . . . . 7
Understanding NetVault SmartDisk architecture . . . . . . . . . . . . . . . . . . . . . . . . . . . . . . . . 8
NetVault SmartDisk architecture: an overview . . . . . . . . . . . . . . . . . . . . . . . . . . . . . . . . . . . . . 8
Components . . . . . . . . . . . . . . . . . . . . . . . . . . . . . . . . . . . . . . . . . . . . . . . . . . . . . . . . . . . . . . 9
NetVault SmartDisk Instance . . . . . . . . . . . . . . . . . . . . . . . . . . . . . . . . . . . . . . . . . . . . . . 9
NetVault SmartDisk Storage Pools . . . . . . . . . . . . . . . . . . . . . . . . . . . . . . . . . . . . . . . . . . 9
Manifests . . . . . . . . . . . . . . . . . . . . . . . . . . . . . . . . . . . . . . . . . . . . . . . . . . . . . . . . . . . . . 10
Processes . . . . . . . . . . . . . . . . . . . . . . . . . . . . . . . . . . . . . . . . . . . . . . . . . . . . . . . . . . . . 10
Nondeduplicated backup process . . . . . . . . . . . . . . . . . . . . . . . . . . . . . . . . . . . . . . . . . . . . . 11
Nondeduplicated restore process . . . . . . . . . . . . . . . . . . . . . . . . . . . . . . . . . . . . . . . . . . . . . 12
Deduplicated backup process . . . . . . . . . . . . . . . . . . . . . . . . . . . . . . . . . . . . . . . . . . . . . . . . 13
Deduplicated restore process . . . . . . . . . . . . . . . . . . . . . . . . . . . . . . . . . . . . . . . . . . . . . . . . 14
Garbage Collection process . . . . . . . . . . . . . . . . . . . . . . . . . . . . . . . . . . . . . . . . . . . . . . . . . 15
Planning your NetVault SmartDisk deployment . . . . . . . . . . . . . . . . . . . . . . . . . . . . . . . . 16
Deployment strategy: an overview . . . . . . . . . . . . . . . . . . . . . . . . . . . . . . . . . . . . . . . . . . . . 16
Defining which data to deduplicate . . . . . . . . . . . . . . . . . . . . . . . . . . . . . . . . . . . . . . . . . . . . 16
Identifying the ideal targets for deduplication . . . . . . . . . . . . . . . . . . . . . . . . . . . . . . . . . 17
Understanding the cost of restoring deduplicated data . . . . . . . . . . . . . . . . . . . . . . . . . . 17
Identifying targets for nondeduplication . . . . . . . . . . . . . . . . . . . . . . . . . . . . . . . . . . . . . 17
Deduplicating similar data together . . . . . . . . . . . . . . . . . . . . . . . . . . . . . . . . . . . . . . . . . 17
Separating vs. combining deduplicated data in NetVault SmartDisk Instances . . . . . . . 18
Determining the size of the NetVault SmartDisk deployment . . . . . . . . . . . . . . . . . . . . . . . . 19
Calculating NetVault SmartDisk license capacity . . . . . . . . . . . . . . . . . . . . . . . . . . . . . . 19
Calculating the required number of NetVault SmartDisk Instances . . . . . . . . . . . . . . . . 20
Calculating the total required physical disk space for licensed capacity . . . . . . . . . . . . . 23
Choosing a deployment location for a NetVault SmartDisk Instance . . . . . . . . . . . . . . . . . . . 25
Reviewing deployment options for nondeduplicated instances . . . . . . . . . . . . . . . . . . . . 25
Reviewing deployment options for deduplicated instances . . . . . . . . . . . . . . . . . . . . . . . 29
Reviewing deployment options for disaster recovery . . . . . . . . . . . . . . . . . . . . . . . . . . . 31
Defining a Storage Pool strategy . . . . . . . . . . . . . . . . . . . . . . . . . . . . . . . . . . . . . . . . . . . . . . 34
Understanding space allocation for Storage Pools . . . . . . . . . . . . . . . . . . . . . . . . . . . . . 34
Understanding the optimal performance strategy . . . . . . . . . . . . . . . . . . . . . . . . . . . . . . 35
Installing NetVault SmartDisk . . . . . . . . . . . . . . . . . . . . . . . . . . . . . . . . . . . . . . . . . . . . . . . 37
Installing NetVault SmartDisk: an overview . . . . . . . . . . . . . . . . . . . . . . . . . . . . . . . . . . . . . . 37
System requirements . . . . . . . . . . . . . . . . . . . . . . . . . . . . . . . . . . . . . . . . . . . . . . . . . . . . . . . 37
Software requirements . . . . . . . . . . . . . . . . . . . . . . . . . . . . . . . . . . . . . . . . . . . . . . . . . . 37
Quest NetVault SmartDisk 11.4.5 Installation/Upgrade GuideContents
3
Hardware requirements . . . . . . . . . . . . . . . . . . . . . . . . . . . . . . . . . . . . . . . . . . . . . . . . . . 38
Authentication requirements . . . . . . . . . . . . . . . . . . . . . . . . . . . . . . . . . . . . . . . . . . . . . . 39
Installing the NetVault SmartDisk software . . . . . . . . . . . . . . . . . . . . . . . . . . . . . . . . . . . . . . 40
Installing on Linux or UNIX (excluding Solaris) . . . . . . . . . . . . . . . . . . . . . . . . . . . . . . . . 41
Installing on Solaris (SPARC, x86, or x86-64) . . . . . . . . . . . . . . . . . . . . . . . . . . . . . . . . 43
Installing on Windows . . . . . . . . . . . . . . . . . . . . . . . . . . . . . . . . . . . . . . . . . . . . . . . . . . . 45
Installing on Mac OS X . . . . . . . . . . . . . . . . . . . . . . . . . . . . . . . . . . . . . . . . . . . . . . . . . . 48
Licensing NetVault SmartDisk . . . . . . . . . . . . . . . . . . . . . . . . . . . . . . . . . . . . . . . . . . . . . . 50
License Keys: an overview . . . . . . . . . . . . . . . . . . . . . . . . . . . . . . . . . . . . . . . . . . . . . . . . . . 50
Obtaining the NetVault SmartDisk Machine ID . . . . . . . . . . . . . . . . . . . . . . . . . . . . . . . . . . . 51
Requesting a license key . . . . . . . . . . . . . . . . . . . . . . . . . . . . . . . . . . . . . . . . . . . . . . . . . . . . 51
Installing a license key on Linux, UNIX, or Mac OS X . . . . . . . . . . . . . . . . . . . . . . . . . . . . . . 51
Installing a license key on Windows . . . . . . . . . . . . . . . . . . . . . . . . . . . . . . . . . . . . . . . . . . . 52
Completing the installation process . . . . . . . . . . . . . . . . . . . . . . . . . . . . . . . . . . . . . . . . . 53
Using Garbage Collection . . . . . . . . . . . . . . . . . . . . . . . . . . . . . . . . . . . . . . . . . . . . . . . . . . . 53
Updating the Storage Pool directory structure . . . . . . . . . . . . . . . . . . . . . . . . . . . . . . . . . . . . 53
Adding NetVault SmartDisk Devices to your backup product . . . . . . . . . . . . . . . . . . . . . . . . 54
Protecting the NetVault SmartDisk unique identity . . . . . . . . . . . . . . . . . . . . . . . . . . . . . . . . 54
Uninstalling NetVault SmartDisk . . . . . . . . . . . . . . . . . . . . . . . . . . . . . . . . . . . . . . . . . . . . 55
Preserving data before removing NetVault SmartDisk . . . . . . . . . . . . . . . . . . . . . . . . . . . . . 55
Removing NetVault SmartDisk from Linux, UNIX (excluding Solaris), or Mac OS X . . . . . . . 55
Removing from Solaris (SPARC, x86, or x86-64) . . . . . . . . . . . . . . . . . . . . . . . . . . . . . . . . . 56
Removing from Windows . . . . . . . . . . . . . . . . . . . . . . . . . . . . . . . . . . . . . . . . . . . . . . . . . . . . 56
Reinstalling NetVault SmartDisk . . . . . . . . . . . . . . . . . . . . . . . . . . . . . . . . . . . . . . . . . . . . 57
Reinstalling: an overview . . . . . . . . . . . . . . . . . . . . . . . . . . . . . . . . . . . . . . . . . . . . . . . . . . . . 57
Prerequisites for reinstalling NetVault SmartDisk . . . . . . . . . . . . . . . . . . . . . . . . . . . . . . . . . 57
Reinstalling if identity.cfg is available . . . . . . . . . . . . . . . . . . . . . . . . . . . . . . . . . . . . . . . . . . . 58
Reinstalling if identity.cfg is not available . . . . . . . . . . . . . . . . . . . . . . . . . . . . . . . . . . . . . . . . 59
Upgrading NetVault SmartDisk . . . . . . . . . . . . . . . . . . . . . . . . . . . . . . . . . . . . . . . . . . . . . 61
Checking the status and taking the device offline . . . . . . . . . . . . . . . . . . . . . . . . . . . . . . . . . 61
Upgrading the software . . . . . . . . . . . . . . . . . . . . . . . . . . . . . . . . . . . . . . . . . . . . . . . . . . . . . 61
Troubleshooting . . . . . . . . . . . . . . . . . . . . . . . . . . . . . . . . . . . . . . . . . . . . . . . . . . . . . . . . . 62
Corrupted or missing installfiles subdirectory impedes removal or upgrade on Windows . . . 62
Installation failed when the same physical path was specified for the Staging Path and Store Path . . . . . . . . . . . . . . . . . . . . . . . . . . . . . . . . . . . . . . . . . . . . . . . . . . . . . . . . . . . . . . . . . . . . 62
About us . . . . . . . . . . . . . . . . . . . . . . . . . . . . . . . . . . . . . . . . . . . . . . . . . . . . . . . . . . . . . . . . 64
Technical support resources . . . . . . . . . . . . . . . . . . . . . . . . . . . . . . . . . . . . . . . . . . . . . . . . . 64
Quest NetVault SmartDisk 11.4.5 Installation/Upgrade GuideContents
4

1
Introducing NetVault SmartDisk
• NetVault SmartDisk: at a glance
• Key benefits
• Feature list
• Target audience
• Recommended additional reading
NetVault SmartDisk: at a glanceNetVault SmartDisk’s disk-based backup and data-deduplication option reduces storage costs with its powerful byte-level, variable-block-based software deduplication, which packs up to 12 times more protected data into the same storage area for a 92 percent reduction in storage footprint. Hardware costs are reduced by using existing storage infrastructure instead of requiring specific drives or appliances. Seamless integration with other Quest
Data Protection products, such as NetVault® Backup and vRanger®, speeds deployment while simplified ease-of-use reduces the level of storage expertise required to perform deduplicated disk-based backups.
To shrink backup windows with no additional affect on protected-server resources, you can schedule NetVault SmartDisk’s post-process deduplication option outside the backup window.
With NetVault SmartDisk, you have increased choices, including the ability to deploy multiple NetVault SmartDisk Instances to improve load balancing and performance; copy or move data between NetVault SmartDisk Instances, to VTL, or to tape-based devices to place redundant backups in offsite locations for failover and disaster-recovery purposes.
Key benefits• Reduces storage costs: NetVault SmartDisk reduces storage costs with its byte-level, variable-block-
based deduplication option. This option packs up to 12 times more protected data into the same storage area. It accomplishes this storage improvement by analyzing smaller amounts of data, thus avoiding the problem that occurs when fixed blocks mask changes and store duplicate data as unique.
NetVault SmartDisk is hardware-agnostic and works on most file systems, so hardware costs are reduced by using the existing storage infrastructure instead of requiring you to acquire specific drives or appliances. The ability to add more file-system paths to NetVault SmartDisk Storage Pools reduces costs by deferring storage expenditures into new budget periods when costs are lower or budget restraints may be eased and also ensures that storage does not sit unused.
Data stored in NetVault SmartDisk can have individual retention policies. These policies let you store the most recent copies on disk and move older data to an offsite location or to less expensive storage. This option provides a foundation for Lifecycle Management, which further reduces costs with tiered-storage deployments.
• Shrinks backup windows: To shrink backup windows with no additional affect on protected-server resources, you can schedule NetVault SmartDisk’s post-process deduplication option outside the backup window.
Quest NetVault SmartDisk 11.4.5 Installation/Upgrade GuideIntroducing NetVault SmartDisk
5

Even if you do not use the optional NetVault SmartDisk deduplication feature, you still receive all the advantages of disk-based backup. For example, you can perform more simultaneous backups with disk than you can by writing backups to tape in a serial process. Completing your backups faster ensures that the performance of the application, database, and files servers is not impacted during business hours by overrunning backup windows.
• Maximizes Flexibility: You can deploy multiple NetVault SmartDisk Instances to distribute network, disk, and deduplication resources, which improves load balancing and performance. Shared-storage support lets you share disk-based backup storage across heterogeneous platforms, which provides a single data-protection solution.
• Speeds Restores: NetVault SmartDisk improves restore times because the data is coming from random-access storage without having to find and mount tapes, and then search for the correct tape position. Most restore requests come in the first 14 to 30 days after backup. With disk-based backup, you can minimize downtime with shorter Recovery Time Objectives (RTOs), and you can focus on other critical tasks.
Feature list• Simplified disk-based backup
• Byte-level, variable-block software-based deduplication
• 12-to-1 deduplication ratio
• Hardware agnostic
• Post-process deduplication
• Rapid deployment with existing infrastructure
• Seamless integration with other products, such as NetVault Backup and vRanger
• Job-level deduplication
• Shared-storage support
• Easily extendible
• Retention-policy support
• Heterogeneous-platform support
• Web-based Distributed Authoring and Versioning (WebDAV)-authenticated access
Target audienceThis guide is intended for backup administrators and other technical personnel who are responsible for designing and implementing a backup strategy for the organization. A good understanding of the operating system (OS) on which NetVault SmartDisk is running is assumed.
Quest NetVault SmartDisk 11.4.5 Installation/Upgrade GuideIntroducing NetVault SmartDisk
6

Recommended additional readingThe following documentation is also available:
• Quest NetVault SmartDisk Administrator’s Guide: This guide describes how to configure and work with NetVault SmartDisk.
• Quest NetVault Backup Compatibility Guide: This guide lists the operating systems and versions supported by NetVault SmartDisk.
You can download these guides from https://support.quest.com/technical-documents.
Quest NetVault SmartDisk 11.4.5 Installation/Upgrade GuideIntroducing NetVault SmartDisk
7

2
Understanding NetVault SmartDisk architecture
• NetVault SmartDisk architecture: an overview
• Components
• Nondeduplicated backup process
• Nondeduplicated restore process
• Deduplicated backup process
• Deduplicated restore process
• Garbage Collection process
NetVault SmartDisk architecture: an overviewNetVault Backup is used as an example throughout this section; however, you can use any product that works with NetVault SmartDisk.
Figure 1. Instance
Quest NetVault SmartDisk 11.4.5 Installation/Upgrade GuideUnderstanding NetVault SmartDisk architecture
8

ComponentsNetVault SmartDisk includes the following components:
• NetVault SmartDisk Instance
• NetVault SmartDisk Storage Pools
• Manifests
• Processes
NetVault SmartDisk InstanceA Quest NetVault SmartDisk Instance includes one or more Storage Pools and a set of processes that perform disk-based backups; byte-level, variable-block software deduplication; and Garbage Collection. You can deploy a single NetVault SmartDisk Instance on a dedicated server, or a different server or client, and it can accept data streams from heterogeneous platforms. In addition, you can deploy multiple NetVault SmartDisk Instances to distribute network, disk, and deduplication resources, which improves load balancing and performance. When multiple NetVault SmartDisk Instances are deployed, Storage Pools and processes are not shared across the multiple NetVault SmartDisk Instances.
NetVault SmartDisk Storage PoolsA Quest NetVault SmartDisk Storage Pool includes one or more file-system volumes, which you can easily extend by adding more file-system paths. Each Storage Pool is associated with roles that it can perform. When configuring the Storage Pool, you can specify the preferred roles or the roles not allowed. Available roles include the Content Index (also referred to as Disk Index), Staging Store (also referred to as Staging), Chunk Index, and Chunk Store (also referred to as Storage). For example, Storage Pool A is used for the Content Index and the Chunk Index while Storage Pool B is only used for the Staging Store and Chunk Store. Storage Pool A can include fault-tolerant disks with good random-access performance, while Storage Pool B includes fault-tolerant disks with good streaming performance. When NetVault SmartDisk is analyzing the available Storage Pools, it chooses the optimal Storage Pool to use based on available space, the defined roles, and other current activity in the NetVault SmartDisk Instance.
Storage-Pool roles• Content Index: The Quest NetVault SmartDisk Content Index role is the index where the NetVault
SmartDisk Instance tracks the data it is protecting and whether it is stored in the Staging Store or the Chunk Store. The Content Index is relatively small and should reside in a Storage Pool made of fault-tolerant disks with good random-access performance.
• Staging Store: The Quest NetVault SmartDisk Staging Store role is where all nondeduplicated data streams are stored, whether they are awaiting post-processing deduplication or were not selected for deduplication. Data streams that were selected for deduplication are deleted from the Staging Store after the post-processing deduplication is completed. The Staging Store should reside in a Storage Pool made of fault-tolerant disks with good streaming performance.
• Chunk Index: The Quest NetVault SmartDisk Chunk Index role is a list of the unique Chunks and where each Chunk is stored in the Chunk Store. There is one Chunk Index per NetVault SmartDisk Instance. The Chunk Index should reside in a Storage Pool made of fault-tolerant disks with good random-access performance.
• Chunk Store: The Quest NetVault SmartDisk Chunk Store role is where the unique Chunks are stored. The Chunk Store should reside in a Storage Pool made of fault-tolerant disks.
Quest NetVault SmartDisk 11.4.5 Installation/Upgrade GuideUnderstanding NetVault SmartDisk architecture
9

ManifestsStored in a NetVault SmartDisk Storage Pool, a Quest NetVault SmartDisk Manifest is an ordered list of the Chunks that make up the data stream. It is used during the reconstruction of the data stream to ensure that the Chunks are reconstructed in the correct order. There is one Manifest per data stream.
Processes• Storage Service: The Quest NetVault SmartDisk Storage Service listens on a user-defined port for data
flowing to and from NetVault SmartDisk. There is one Storage Server process per data stream.
• Deduplicator: The Quest NetVault SmartDisk Deduplicator performs byte-level, variable-block software-based deduplication by breaking the data streams into unique Chunks. The Deduplicator uses the Chunk Store Daemon (CSD) to query the Chunk Index to determine if the Chunk is unique. When a Chunk is found in the Chunk Index, the Chunk Store Daemon stores the unique Chunk in the Chunk Store. There is one Deduplicator process per data stream.
• Chunk Store Daemon: The Quest NetVault SmartDisk Chunk Store Daemon is the only process that writes to the Chunk Index and Chunk Store. There is only one CSD per NetVault SmartDisk Instance. The CSD also manages the Garbage Collection process.
• percolatormonitor: The percolatormonitor is a privileged process that starts and monitors other NetVault SmartDisk Processes.
• percolatorslave: The percolatorslave is responsible for communication routing. It routes messages between NetVault SmartDisk Processes on the local machine and between NetVault SmartDisk and other remote servers.
• logd: The logd is the logging daemon that creates the NetVault SmartDisk logs and stores them in an internal database. It also sends them to the applicable system location, such as the Application log in the Windows Event Viewer.
• resourcemanager: The resourcemanager manages the combined number and size of all trace files by periodically deleting inactive files, that is, those files that are not associated with any running processes, starting with the oldest files first.
• superserver: The superserver is the high-level manager of all other processes. It coordinates operations, balances the load between file systems, and schedules deduplication and Garbage Collection.
• winservicerunner: On Windows, the winservicerunner runs the Windows Service and starts the percolatormonitor.
Quest NetVault SmartDisk 11.4.5 Installation/Upgrade GuideUnderstanding NetVault SmartDisk architecture
10

Nondeduplicated backup processFigure 2. Back up data without deduplicating it
1 After the user initiates a nondeduplicated NetVault Backup backup that is targeted to a NetVault SmartDisk Instance, the NetVault Backup Client streams data on the user-defined port to Storage Service.
2 The Storage Service stores the backup stream from the NetVault Backup Client in the Staging Store.
3 The Storage Service updates the Content Index to indicate where the backup is stored in the Staging Store.
4 The Storage Service updates the NetVault Backup Client to indicate that the backup stream has been successfully stored.
5 The NetVault Backup Client updates the NetVault Backup Server with a Backup Completed job status.
Quest NetVault SmartDisk 11.4.5 Installation/Upgrade GuideUnderstanding NetVault SmartDisk architecture
11

Nondeduplicated restore processFigure 3. Restore data that was not deduplicated
1 After the user initiates a restore of a nondeduplicated NetVault Backup backup that is targeted to a NetVault SmartDisk Instance, the NetVault Backup Client requests data on the user-defined port from the Storage Service.
2 The Storage Service queries the Content Index to determine whether the backup is stored in the Staging Store for nondeduplicated backups or the Chunk Store for deduplicated backups.
3 The Storage Service retrieves the backup stream from the Staging Store and streams the data to the NetVault Backup Client.
4 On completion of restoring the backup stream, the NetVault Backup Client updates the NetVault Backup Server with a Restore Completed job status.
Quest NetVault SmartDisk 11.4.5 Installation/Upgrade GuideUnderstanding NetVault SmartDisk architecture
12
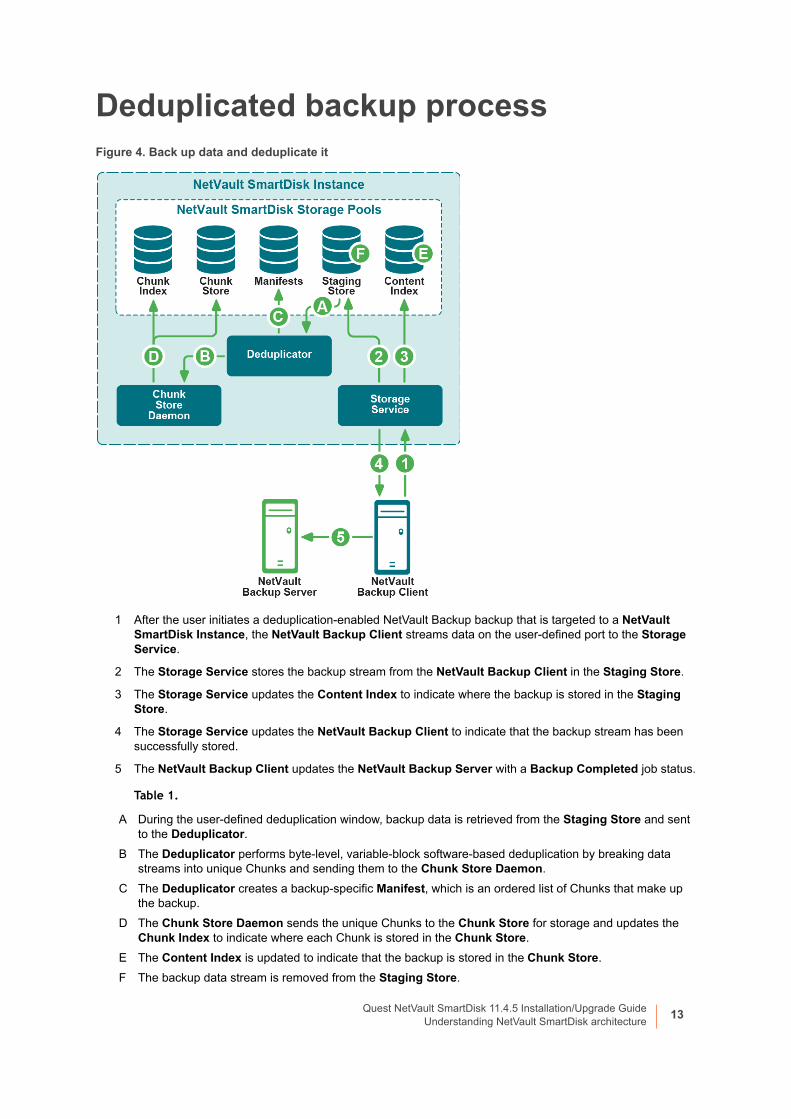
Deduplicated backup processFigure 4. Back up data and deduplicate it
1 After the user initiates a deduplication-enabled NetVault Backup backup that is targeted to a NetVault SmartDisk Instance, the NetVault Backup Client streams data on the user-defined port to the Storage Service.
2 The Storage Service stores the backup stream from the NetVault Backup Client in the Staging Store.
3 The Storage Service updates the Content Index to indicate where the backup is stored in the Staging Store.
4 The Storage Service updates the NetVault Backup Client to indicate that the backup stream has been successfully stored.
5 The NetVault Backup Client updates the NetVault Backup Server with a Backup Completed job status.
Table 1.
A During the user-defined deduplication window, backup data is retrieved from the Staging Store and sent to the Deduplicator.
B The Deduplicator performs byte-level, variable-block software-based deduplication by breaking data streams into unique Chunks and sending them to the Chunk Store Daemon.
C The Deduplicator creates a backup-specific Manifest, which is an ordered list of Chunks that make up the backup.
D The Chunk Store Daemon sends the unique Chunks to the Chunk Store for storage and updates the Chunk Index to indicate where each Chunk is stored in the Chunk Store.
E The Content Index is updated to indicate that the backup is stored in the Chunk Store.
F The backup data stream is removed from the Staging Store.
Quest NetVault SmartDisk 11.4.5 Installation/Upgrade GuideUnderstanding NetVault SmartDisk architecture
13

Deduplicated restore processFigure 5. Restore data that was deduplicated
1 After the user initiates a restore of a deduplicated NetVault Backup backup that is targeted to a NetVault SmartDisk Instance, the NetVault Backup Client requests the data on the user-defined port from the Storage Service.
2 The Storage Service queries the Content Index to determine whether the backup is stored in the Staging Store for nondeduplicated backups or the Chunk Store for deduplicated backups.
3 The Storage Service queries the backup’s Manifest for the first or next batch of Chunk Names in the backup.
4 The Storage Service queries the Chunk Store Daemon for the location of the Chunks in the Chunk Store.
5 Using Chunk Names from the Manifest, the Chunk Store Daemon queries the Chunk Index for pointers to the Chunks in the Chunk Store.
6 The Chunk Store Daemon provides the Storage Service with the location of the Chunks in the Chunk Store.
7 The Storage Service retrieves the Chunks from the Chunk Store and streams the Chunk to the NetVault Backup Client.
Step 4 through Step 7 repeat for each batch of Chunk Names in the Manifest.
8 On completion of restoring all Chunk Names in Manifest, the NetVault Backup Client updates the NetVault Backup Server with a Restore Completed job status.
Quest NetVault SmartDisk 11.4.5 Installation/Upgrade GuideUnderstanding NetVault SmartDisk architecture
14

Garbage Collection processWhen backups targeted to NetVault SmartDisk are retired, the data is removed from the backup database; however, the unique Chunks are not automatically removed from the Chunk Store. The NetVault SmartDisk Garbage Collection process is designed to remove orphaned Chunks from the Chunk Store and reclaim disk space. To do so, Garbage Collection maintains reference counts of added and deleted Chunks, and it deletes or rewrites partially used Chunk pages.
Garbage Collection cannot run at the same time as deduplication, because deduplication must write to the Chunk Store. During the configured Garbage Collection window, data waiting for deduplication is queued until Garbage Collection has completed. By default, the Garbage Collection window is from 18:00 through 06:00 every night. Because Garbage Collection has less impact on the speed at which new backups are staged than deduplication does, Quest recommends that you update the Garbage Collection windows to ensure that they match your backup windows. Outside the Garbage Collection window, Garbage Collection is only started if no data is being deduplicated or is queued for deduplication. If data becomes available for deduplication outside the Garbage Collection window and Garbage Collection is active, Garbage Collection is stopped and deduplication proceeds. For more information about scheduling Garbage Collection, see the Quest NetVault SmartDisk Administrator's Guide.
Quest also recommends scheduling regular Garbage Collection to avoid delays associated with collecting large amounts of data.
NOTE: If a backup job that uses deduplication is canceled, the Chunk Store space used by segments that have already been deduplicated is not reclaimed until the next Garbage Collection occurs. Space used by the Staging Store and license enforcement is reclaimed immediately.
Quest NetVault SmartDisk 11.4.5 Installation/Upgrade GuideUnderstanding NetVault SmartDisk architecture
15

3
Planning your NetVault SmartDisk deployment
• Deployment strategy: an overview
• Defining which data to deduplicate
• Determining the size of the NetVault SmartDisk deployment
• Choosing a deployment location for a NetVault SmartDisk Instance
• Defining a Storage Pool strategy
Deployment strategy: an overviewA NetVault SmartDisk deployment strategy includes multiple components, which you define before installing NetVault SmartDisk. To ensure a successful deployment, complete the following steps, which are described in detail in subsequent sections:
1 Define the data that you want to deduplicate.
2 Calculate the size of your NetVault SmartDisk Deployment.
3 Define the deployment location of the NetVault SmartDisk Instance.
4 Define a strategy for the NetVault SmartDisk Storage Pools.
NetVault Backup is used as an example throughout this section; however, you can use any product that works with NetVault SmartDisk.
Before calculating the required NetVault SmartDisk Capacity, ensure that the backups being targeted to NetVault SmartDisk are compatible with NetVault SmartDisk. For more information, see the Quest NetVault Backup Compatibility Guide.
Defining which data to deduplicateThe first step in defining your NetVault SmartDisk Deployment Strategy is determining which data to deduplicate. Not all data benefits from deduplication; therefore, it is important to determine which data is targeted to use the NetVault SmartDisk Deduplication Option to reduce its storage footprint.
Also, the longer the data is retained in NetVault SmartDisk, the better the deduplication ratios. The deduplication ratios improve because more duplicate Chunks are found thus enabling the ability to pack more data into the same storage footprint. This ability enables even more protected data to be available through disk-based media. To obtain the most ideal deduplication ratios, Quest recommends a retention period of 12 weeks or more.
IMPORTANT: While planning deployment of NetVault SmartDisk, you must deploy it on physical devices and you must use different paths for Staging and Store to ensure that load balancing is maintained. You cannot deploy NetVault SmartDisk on virtual machines. Also, if you intend to use deduplication, NetVault SmartDisk must reside on a dedicated NetVault SmartDisk machine; you cannot install it on the backup server or client.
Quest NetVault SmartDisk 11.4.5 Installation/Upgrade GuidePlanning your NetVault SmartDisk deployment
16

Identifying the ideal targets for deduplicationHigh deduplication ratios are achieved when multiple generations of the same data are targeted for the same NetVault SmartDisk Instance. Data that is an ideal target for deduplication includes the following:
• Structured databases, such as Oracle and SQL Server databases, that are protected by Quest NetVault Backup Plug-ins.
• Unstructured file-system data, such as data that is stored on File Servers protected by NetVault Backup Plug-in for FileSystem.
• Workstation data, such as desktops and laptops protected by NetVault Backup Workstation Client.
• Virtual Machine (VM) images from the same OS and similar applications, such as those protected by vRanger or NetVault Backup Plug-ins for VMware and Hyper-V.
• Email servers, such as Exchange and Domino systems that are protected by NetVault Backup Plug-ins for Exchange and Domino.
Understanding the cost of restoring deduplicated dataWhile data deduplication reduces storage costs by reducing the storage footprint, there is a cost incurred during the restore processes. During the restoration of a deduplicated backup, NetVault SmartDisk has to reassemble the Chunks as it restores the data. This reassembly process, also referred to as rehydration, lengthens the time to restore the data. Therefore, if the Recovery Time Objective (RTO) is important for a specific database, email, or file system, consider the trade-off between reducing storage costs and increasing RTO when you identify which data to deduplicate.
Identifying targets for nondeduplicationData that does not deduplicate well and should not be deduplicated includes:
• Encrypted data — this data does not deduplicate well because the data stream is unique
• Data with demanding RTOs
Deduplicating similar data togetherYou can increase deduplication ratios by targeting backups from the same database, file system, or application to the same NetVault SmartDisk Instance. When a backup is deduplicated and a previous backup from the same database, file system, or application has already been deduplicated by the NetVault SmartDisk Instance, only the unique or new Chunks that did not exist in the previous backup have to be stored in the Chunk Store. If a previously deduplicated backup does not exist in the NetVault SmartDisk Instance, most of the backup is considered unique data; this issue increases the number of unique Chunks that have to be stored in the Chunk Store.
When targeting backups to NetVault SmartDisk Instances, deduplication ratios decline if backups are targeted to random NetVault SmartDisk Instances. Quest recommends that you target backups from the same database, file system, or application to the same NetVault SmartDisk Instance.
NOTE: While email is an ideal target for deduplication, Single Instance Store (SIS), such as storage provided by Exchange, reduces deduplicated data; therefore, the deduplication ratio for the email server is not as high as other types of data.
Quest NetVault SmartDisk 11.4.5 Installation/Upgrade GuidePlanning your NetVault SmartDisk deployment
17

Separating vs. combining deduplicated data in NetVault SmartDisk InstancesAn entire NetVault SmartDisk is licensed as either nondeduplicated or deduplicated capacity. When the data stored in NetVault SmartDisk is a combination of nondeduplicated and deduplicated data, two deployment options are available:
• Create separate NetVault SmartDisk Instances, one for nondeduplicated data and one for deduplicated data.
• Create a single NetVault SmartDisk Instance in which nondeduplicated and deduplicated data reside together in the Storage Pools.
Using separate NetVault SmartDisk Instances for nondeduplicated and deduplicated dataWhen the data targeted for NetVault SmartDisk is a combination of nondeduplicated and deduplicated data, you can create multiple NetVault SmartDisk Instances: one for nondeduplicated data and one for deduplicated data. In this case, the Nondeduplicated Instance is licensed as NetVault SmartDisk Capacity and the Deduplicated Instance is licensed as NetVault SmartDisk Capacity with Deduplication Option.
This option lets you purchase the Deduplication Option for only the capacity that should be deduplicated. In this type of deployment, it is your responsibility to ensure that the correct NetVault SmartDisk Instance is targeted for backup. This deployment ensures that data intended for deduplication is deduplicated and that data not intended for deduplication is stored as nondeduplicated data.
Advantages
• You only purchase the Deduplication Option for deduplicated NetVault SmartDisk capacity, which is more cost effective.
• Nondeduplicated NetVault SmartDisk Instances have lower hardware requirements.
Disadvantages
• You must deploy and manage multiple NetVault SmartDisk Instances.
• Backups must explicitly target a deduplicated or nondeduplicated NetVault SmartDisk Instance or Device to ensure that data gets deduplicated or not.
Using a single NetVault SmartDisk Instance for nondeduplicated and deduplicated dataWhen the data targeted for NetVault SmartDisk is a combination of nondeduplicated and deduplicated data, you can create a single NetVault SmartDisk Instance.
This option requires that you purchase the Deduplication Option for the entire NetVault SmartDisk Instance, including the capacity for the backups that are not deduplicated.
Advantages
• Simplifies deployment by reducing the number of NetVault SmartDisk Instances.
• Backups can target the same NetVault SmartDisk Instance whether or not the backup is enabled for deduplication.
Quest NetVault SmartDisk 11.4.5 Installation/Upgrade GuidePlanning your NetVault SmartDisk deployment
18

Disadvantage
• The NetVault SmartDisk Deduplication Option must be purchased for both nondeduplicated and deduplicated NetVault SmartDisk Capacity.
Determining the size of the NetVault SmartDisk deploymentThe second step in defining your NetVault SmartDisk Deployment Strategy is to determine the size of your NetVault SmartDisk Deployment. To determine the size of your deployment, complete the following steps, which are described in detail in subsequent sections:
1 Calculate the NetVault SmartDisk Licensed Capacity.
2 Calculate the required number of NetVault SmartDisk Instances.
3 Calculate the total required physical disk space for licensed capacity.
Calculating NetVault SmartDisk license capacityNetVault SmartDisk is licensed by front-end terabytes (TBs). A front-end TB is the aggregate amount of data that you want NetVault SmartDisk to protect from all source or client machines that are targeting a single NetVault SmartDisk Instance. A front-end TB is measured by the amount of storage capacity occupied on the source storage by files that are to be backed up; this measurement is based on the capacity consumed before data reduction that might be achieved by using the optional NetVault SmartDisk Deduplication Option. Front-end source data can include OS-related data, file system data, database data, application data, and so on.
Because a front-end TB is the total amount of data that you intend to back up from all client or source storage devices, it helps you determine how much data you back up to NetVault SmartDisk. Front-end TBs are only counted once; it does not matter how many times you back up the same set of data or how long you retain each version of the backup data.
NetVault SmartDisk can accept backup data from multiple servers. You can also deploy multiple NetVault SmartDisk Instances, which can act as targets for clients connected to multiple servers. When calculating the licensed capacity for a NetVault SmartDisk Instance, you must include the capacity across all clients or sources targeting that NetVault SmartDisk Instance.
NetVault SmartDisk Licensed Capacity is not based on the following:
• The actual size of the Storage Pool, Staging Store, or Chunk Store.
• The actual size of the backups after deduplication.
• Retention period of data stored in NetVault SmartDisk.
• Number of copies residing in NetVault SmartDisk Instances.
NOTE: Only the data from a source machine that is being sent to NetVault SmartDisk must be included in the licensed capacity. If you are targeting other devices, such as real tape media, for some of the data residing on a source machine, that data does not count towards front-end capacity for NetVault SmartDisk licensing.
Quest NetVault SmartDisk 11.4.5 Installation/Upgrade GuidePlanning your NetVault SmartDisk deployment
19

Calculating the required number of NetVault SmartDisk Instances
Determining the number of deduplicated NetVault SmartDisk InstancesThree factors determine the number of NetVault SmartDisk Instances with the NetVault SmartDisk Deduplication Option enabled. If any of these factors are true, you must deploy multiple NetVault SmartDisk Instances. To determine the total number of NetVault SmartDisk Instances required, perform the following calculations:
• Unique Data Size > 15 TB for 64-bit OS and > between 1.8 TB and 2.5 TB for 32-bit OS, depending on the OS
• Ingest Rate > Maximum Sustained Network Bandwidth
• Deduplication Rate < Ingest Rate
The maximum result for the three calculations determines the number of NetVault SmartDisk Instances that must be deployed. For example, if the Unique Data Size calculation and the Deduplication Rate indicates that only one NetVault SmartDisk Instance is required, but the Ingest Rate calculation indicates that two NetVault SmartDisk Instances are required, you must deploy two NetVault SmartDisk Instances.
Unique Data Size > OS Bit Limit
The Unique Data Size is the amount of unique data that is stored inside the NetVault SmartDisk Instance. An additional NetVault SmartDisk Instance must be deployed for every 15 TB of unique data on a 64-bit OS and for every 1.8 TB through 2.5 TB of unique data on a 32-bit OS, depending on the OS. Use the following calculation to determine the number of NetVault SmartDisk Instances based on the Unique Data Size:
Size of Weekly Full Backups + ((Size of Weekly Full Backups * Weekly Change Rate)* Weekly Full Backup Retention Period)+ (Size of Daily Backups * (Number of Daily Backups between Weekly Full Backups* Daily Backup Retention Period))
Example:
100 GB = Size of Weekly Full Backups
10% = Weekly Change Rate
12 = Weekly Full Backup Retention Period in Weeks
10 GB = Size of Daily Backups
4 = Daily Backup Retention Period in Weeks
6 = Number of Daily Backups between Full Backups
100 + ((100 * 0.1) * 12) + (10 * (6*4)) =100 + ((10) * 12) + (10 * (24)) =100 + (120) + (240) = 460GB
• If the OS is 64-bit:
460/15360 = .029
Rounded Up to Next Whole Number = 1 NetVault SmartDisk Instance
IMPORTANT: If you intend to use deduplication, Quest recommends that you use the 64-bit (Pure64) versions of NetVault SmartDisk instead of the 32-bit or Hybrid versions whenever possible. Deduplication is memory-intensive; 32-bit memory allocation is limited, and capacity varies by OS and by usage.
Quest NetVault SmartDisk 11.4.5 Installation/Upgrade GuidePlanning your NetVault SmartDisk deployment
20

• If the OS is 32-bit:
460/1843.2 = 0.25
Rounded Up to Next Whole Number = 1 NetVault SmartDisk Instance
Ingest Rate > Network Bandwidth
The NetVault SmartDisk Ingest Rate is the rate at which data can be streamed into NetVault SmartDisk. Because data streams into the NetVault SmartDisk Instance through a user-defined port, the network bandwidth limits the speed at which data can be streamed. To ensure that all backups targeted to a NetVault SmartDisk Instance can complete during the backup window, divide the required ingest rate by the Maximum Sustained Network Bandwidth to determine the number of required NetVault SmartDisk Instances. Use the following calculation to determine the number of NetVault SmartDisk Instances based on the NetVault SmartDisk Ingest Rate and Network Bandwidth:
((Size of Weekly Full Backups * 1024) / (Number of Hours in Backup Window* 60 * 60))/ Maximum Sustained Network Bandwidth
Example:
100 GB = Size of Weekly Full Backups
8 = Number of Hours in Backup Window
100 = Maximum Sustained Network Bandwidth (MB/Sec)
((100 *1024) / (8 * 60* 60)) / 100 =((102400) / (28,800)) / 100 =3.55 / 100 = .035
Rounded Up to Next Whole Number = 1 NetVault SmartDisk Instance
Deduplication Rate < Ingest Rate
The NetVault SmartDisk Deduplication Rate is the rate at which NetVault SmartDisk deduplicates data. If NetVault SmartDisk deduplication is configured to run during the backup, the NetVault SmartDisk Deduplication Rate must be greater than or equal to the Ingest Rate to ensure that the deduplication process completes before the next weekly backup window begins.
Use the following to estimate the Deduplication Rates:
1 Determine the Single Core Deduplication Rate:
2 Multiply the Single Core Deduplication Rate by the number of Cores.
Use the following calculation to determine the number of NetVault SmartDisk Instances based on the Deduplication Rate and Ingest Rate:
(((Size of Weekly Full Backups) + (Size of Daily Backups * Number of Daily Backups between Weekly Full Backups)) * 1024)/ (Number of Seconds in Deduplication Window for 6 Days) / Deduplication Rate
Example:
100 GB = Size of Weekly Full Backups
10% = Weekly Full Backup Growth Rate
10 GB = Size of Daily Backups
Hardware Speed
24 to 36 Month Old Intel Core 1, AMD Athlon or Intel Celeron 10 to 20 MB/sec
12 to 24 Month Old Core 2 Duo, AMD Quad Core Opteron or Dual Core Xeon 20 to 40 MB/sec
0 to 12 Month Old Desktop or Server Core 2 Duo, Quad Core Xeon or Quad Core AMD
40 MB/sec or more
Quest NetVault SmartDisk 11.4.5 Installation/Upgrade GuidePlanning your NetVault SmartDisk deployment
21

6 = Number of Daily Backups between Full Backups
24 = Number of Hours in Daily Deduplication Window
50 = Deduplication Rate (MB/Sec)
(((100) + (10 * 6)) * 1024) / (24 * 6 * 60 * 60)) / 50 =(((100) + (60)) * 1024) / (518400)) / 50 =((160*1024)/518400)/50) =(163840/518400)/50) = .0063
Rounded Up to Next Whole Number = 1 NetVault SmartDisk Instance
Determining the required number of NetVault SmartDisk Instances
The maximum result for the following three calculations determines the number of NetVault SmartDisk Instances that must be deployed:
• Unique Data Size > 15 TB for 64-bit OS and > between 1.8 TB and 2.5 TB for 32-bit OS, depending on the OS
• Ingest Rate > Maximum Sustained Network Bandwidth
• Deduplication Rate < Ingest Rate
Example:
• Unique Data Size > OS Bit Limit = 1 NetVault SmartDisk Instance
• Ingest Rate > Network Bandwidth = 1 NetVault SmartDisk Instance
• Deduplication Rate < Ingest Rate = 1 NetVault SmartDisk Instance
The maximum result is one NetVault SmartDisk Instance; therefore, only one NetVault SmartDisk Instance is required in this example.
Determining the number of nondeduplicated NetVault SmartDisk InstancesA single factor determines the number of Nondeduplicated NetVault SmartDisk Instances:
Ingest Rate > Maximum Sustained Network Bandwidth
Ingest Rate > Network Bandwidth
The NetVault SmartDisk Ingest Rate is the rate at which data can be streamed into NetVault SmartDisk. Because data streams into the NetVault SmartDisk Instance through a user-defined port, the network bandwidth limits the speed at which data can be streamed. To ensure that all backups targeted to a NetVault SmartDisk Instance can complete during the backup window, divide the required ingest rate by the Maximum Sustained Network Bandwidth to determine the number of required NetVault SmartDisk Instances. Use the following calculation to determine the number of NetVault SmartDisk Instances based on the NetVault SmartDisk Ingest Rate and Network Bandwidth:
((Size of Weekly Full Backups * 1024) / (Number of Hours in Backup Window* 60 * 60))/ Maximum Sustained Network Bandwidth
Example:
100 GB = Size of Weekly Full Backups
8 = Number of Hours in Backup Window
100 = Maximum Sustained Network Bandwidth (MB/Sec)
((100 *1024) / (8 * 60* 60)) / 100 =((102400) / (28,800)) / 100 =
Quest NetVault SmartDisk 11.4.5 Installation/Upgrade GuidePlanning your NetVault SmartDisk deployment
22

3.55 / 100 = .035
Rounded Up to Next Whole Number = 1 NetVault SmartDisk Instance
Calculating the total required physical disk space for licensed capacityNetVault SmartDisk is licensed based on the front-end terabytes (TBs) or amount of data to be protected from all source machines. However, in Deduplicated NetVault SmartDisk Instances, Licensed Capacity does not match Physical Capacity or physical disk space. This mismatch is because the NetVault SmartDisk Deduplication Option packs up to 12 times more protected data into the same storage area for a 92 percent reduction in the storage footprint.
Determining the capacity for deduplicated NetVault SmartDisk InstancesA Deduplicated NetVault SmartDisk Instance can have a combination of both Deduplicated and Nondeduplicated data. In this configuration, calculating the total Physical Capacity or physical disk space is achieved by calculating the Physical Capacity for the Deduplicated Backups, calculating the Physical Capacity for the Nondeduplicated Backups, and adding the sums.
Deduplicated backups
The Physical Capacity or physical disk space required for Deduplicated Backups in Deduplicated NetVault SmartDisk Instances is equal to the Size of Weekly Full Backups plus the Unique Data Size. Use the following formula to calculate it:
(Size of Weekly Full Backups) +(Size of Weekly Full Backups + ((Size of Weekly Full Backups * Weekly Change Rate)* Weekly Full Backup Retention Period)+ (Size of Daily Backups * (Number of Daily Backups between Weekly Full Backups* Daily Backup Retention Period)))
Example:
100 GB = Size of Deduplicated Weekly Full Backups across all servers
10% = Weekly Change Rate
12 = Weekly Full Backup Retention Period in Weeks
10 GB = Size of Deduplicated Weekly Daily Backups
6 = Number of Daily Backups between Full Backups
4 = Daily Backup Retention Period in Weeks100 + (100 + ((100 * 0.1) * 12) + (10 * (6*4))) =100 + (100 + ((10) * 12) + (10 * (24))) =100 + (100 + (120) + (240)) = 560GB
Nondeduplicated backups
Use the following formula to calculate the Physical Capacity or physical disk space required for Nondeduplicated Backups in a Deduplicated NetVault SmartDisk Instance:
(Size of Nondeduplicated Weekly Full Backups * Weekly Full Backup Retention Period)+ (Size of Nondeduplicated Daily Backups * (Number of Daily Backups between Full Backups * Daily Backup Retention Period in Weeks))
Quest NetVault SmartDisk 11.4.5 Installation/Upgrade GuidePlanning your NetVault SmartDisk deployment
23
Example:
10 GB = Size of Nondeduplicated Weekly Full Backups
12 = Weekly Full Backup Retention Period in Weeks
1 GB = Size of Nondeduplicated Daily Backups
4 = Daily Backup Retention Period in Weeks
6 = Number of Daily Backups between Full Backups
(10 * 12) + (1 * (6 * 4)) =(120) + (1*(24)) =120 * 24 = 144GB
Total Required Disk Space = Deduplicated Backup Disk Space + Nondeduplicated Backup Disk Space
560 GB + 144 GB = 704 GB
The Total Required Disk Space is divided into the Staging Store and the Chunk Store. If you intend to use different file systems or disks for the Staging Store and the Chunk Store, it is important to know how much of the Total Required Disk Space is allocated to the Staging Store versus the Chunk Store. Use the following calculations to determine this amount.
Calculating Staging Store size
The amount of time a Deduplicated Backup remains in the Staging Store is different than the amount of time a Nondeduplicated Backup remains in the Staging Store. Therefore, to determine the total disk space required for the Staging Store, you must calculate the size required for both Deduplicated Backups and Nondeduplicated Backups.
Total Staging Store Disk Space = Deduplicated Backup Disk Space + Nondeduplicated Backup Disk Space
Deduplicated backups
During the NetVault SmartDisk Deduplicated Backup process, backups are initially streamed to the Staging Store where they remain until the deduplication process is finished. The Staging Store must be large enough to hold all the Deduplicated Backups while they await deduplication.
If the deduplication window overlaps the backup window, deduplication and backups occur at the same time. Each backup starts deduplicating after the backup job is finished. Also, large backups are broken into 400 GB segments. Each segment starts to deduplicate after it is received, even if the backup stream is still being streamed to the Staging Store. Therefore, the Staging Store only requires space to hold some portion of the total backup size. If the Staging Store runs out of space, backups pause until space becomes available, such as when a deduplication operation finishes.
The maximum disk space required for the Staging Store is equal to the Size of the Weekly Full Backups.
Nondeduplicated backups
Backups that are not deduplicated are streamed into the Staging Store, where they remain until they are retired. Therefore, calculating the size of the Staging Store for Nondeduplicated Backups is identical to calculating the required physical disk space for Nondeduplicated Backups in a Deduplicated NetVault SmartDisk Instance.
(Size of Nondeduplicated Weekly Full Backups * Weekly Full Backup Retention Rate)+ (Size of Nondeduplicated Daily Backups * (Number of Daily Backups between Full Backups * Daily Backup Retention Period in Weeks))
Example:
10 GB = Size of Nondeduplicated Weekly Full Backups
12 = Weekly Full Backup Retention Period in Weeks
1 GB = Size of Nondeduplicated Daily Backups
6 = Number of Daily Backups between Full Backups
Quest NetVault SmartDisk 11.4.5 Installation/Upgrade GuidePlanning your NetVault SmartDisk deployment
24

4 = Daily Backup Retention Period in Weeks
(10 * 12) + (1 * (6 * 4)) =(120) + (1*(24)) =120 * 24 = 144GB
Calculating Chunk Store size
The amount of physical disk space required for the Chunk Store is equal to the Unique Data Size. To calculate the Unique Data Size or the size of the Chunk Store, use the following formula:
Size of Weekly Full Backups + ((Size of Weekly Full Backups * Weekly Change Rate)* Weekly Full Backup Retention Period)+ (Size of Daily Backups * (Number of Daily Backups between Weekly Full Backups* Daily Backup Retention Period))
Example:
100 GB = Size of Weekly Full Backups
12 = Weekly Full Backup Retention Period in Weeks
10 GB = Size of Daily Backups
4 = Daily Backup Retention Period in Weeks
6 = Number of Daily Backups between Full Backups
100 + ((100 * 0.1) * 12) + (10 * (6*4)) =100 + ((10) * 12) + (10 * (24)) =100 + (120) + (240) = 460GB
Determining the capacity for nondeduplicated NetVault SmartDisk InstancesBecause deduplication is disabled, the Physical Capacity or physical disk space required for Nondeduplicated NetVault SmartDisk Instances is equal to the amount of data stored in NetVault SmartDisk. The Nondeduplicated NetVault SmartDisk Instance consumes the same amount of disk space for the Staging Store that is required to hold all backup data written to the NetVault SmartDisk Instance over the entire retention span for that data. For example, if you back up 1 TB of data every week and retain all that data for two weeks, you need 2 TB of physical storage capacity for your Staging Store. If you back up that same 1 TB of data and move it to tape before the next backup is run, you need 1 TB of physical storage capacity in your Staging Store.
Choosing a deployment location for a NetVault SmartDisk InstanceThe third step in defining your NetVault SmartDisk Deployment Strategy is deciding where you want to deploy your NetVault SmartDisk Instances. Whether the NetVault SmartDisk Instance is enabled for deduplication dictates the available deployment options.
Reviewing deployment options for nondeduplicated instancesYou can deploy NetVault SmartDisk Instances that do not have deduplication on the server, a heterogeneous client, or a dedicated server, and they can accept data streams from heterogeneous platforms. When multiple
Quest NetVault SmartDisk 11.4.5 Installation/Upgrade GuidePlanning your NetVault SmartDisk deployment
25

NetVault SmartDisk Instances are deployed, Storage Pools and processes are not shared across the multiple NetVault SmartDisk Instances. However, you cannot deploy multiple NetVault SmartDisk Instances on the same machine, whether it is a backup server, backup client, or a dedicated NetVault SmartDisk Server.
The following sections describe several deployment options that you might consider for deploying NetVault SmartDisk Nondeduplicated Instances. This list is not comprehensive. These descriptions use NetVault Backup only as an example.
Nondeduplicated instance deployed on a single NetVault Backup ServerIn the simplest deployment, when only one NetVault SmartDisk Nondeduplicated Instance is required for a NetVault Backup Domain with a single NetVault Backup Server, the NetVault SmartDisk Instance is deployed on the single NetVault Backup Server that uses file-system paths accessible by the NetVault Backup Server for the NetVault SmartDisk Storage Pools. The single NetVault Backup Server’s Clients that target backups to NetVault SmartDisk streams backup data on a user-defined port to the NetVault SmartDisk Instance where the backup is stored in the NetVault SmartDisk Storage Pools.
Figure 1. Single NetVault SmartDisk Instance in single NetVault Backup Server environment
Quest NetVault SmartDisk 11.4.5 Installation/Upgrade GuidePlanning your NetVault SmartDisk deployment
26

Nondeduplicated instance deployed in a multiple NetVault Backup Server environmentIn NetVault Backup environments where only one NetVault SmartDisk Instance is required for a NetVault Backup Domain with multiple NetVault Backup Servers, a single NetVault SmartDisk Instance can accept data streams from multiple NetVault Backup Servers. In the following example where a single NetVault SmartDisk Instance is deployed for multiple NetVault Backup Servers, the NetVault Backup Clients from both NetVault Backup Servers stream backup data on a user-defined port to the NetVault SmartDisk Instance that is deployed on one of the NetVault Backup Servers.
Figure 2. Single NetVault SmartDisk Instance in multiple NetVault Backup Server environment
In NetVault Backup environments where multiple NetVault SmartDisk Instances are required for a NetVault Backup Domain with multiple NetVault Backup Servers, you can deploy one NetVault SmartDisk Instance on each of the NetVault Backup Servers, or you can deploy one NetVault SmartDisk Instance on one NetVault Backup Server and on one or more NetVault Backup Clients. In the following example where two NetVault SmartDisk Instances are required and there are two NetVault Backup Servers, a single NetVault SmartDisk Instance is deployed on each of the NetVault Backup Servers. The NetVault Backup Clients from both NetVault Backup Servers can stream backup data on a user-defined port to either NetVault SmartDisk Instance that is deployed.
IMPORTANT: You cannot deploy multiple NetVault SmartDisk Instances on the same dedicated NetVault SmartDisk Server.
Quest NetVault SmartDisk 11.4.5 Installation/Upgrade GuidePlanning your NetVault SmartDisk deployment
27

Figure 3. Multiple NetVault SmartDisk Instances in multiple NetVault Backup Server environment
Quest NetVault SmartDisk 11.4.5 Installation/Upgrade GuidePlanning your NetVault SmartDisk deployment
28

Nondeduplicated instance deployed on a dedicated serverIn NetVault Backup environments where only one NetVault SmartDisk Instance is required for a NetVault Backup Domain with one or more NetVault Backup Servers and you want to have the backups across all the NetVault Backup Servers stored together, you can deploy a single NetVault SmartDisk Instance on a dedicated server that has no NetVault Backup Server or Client software installed. In the following example, data from all NetVault Backup Clients stream backup data on a user-defined port to the single NetVault SmartDisk Instance that is deployed on the dedicated server.
Figure 4. Single NetVault SmartDisk Server in multiple NetVault Backup Server environment
Reviewing deployment options for deduplicated instancesIn environments where only one NetVault SmartDisk Instance is required for a domain with one or more backup servers and you want the backups from all backup servers deduplicated together, you must deploy a single NetVault SmartDisk Instance on a dedicated server that has no backup server software installed.
IMPORTANT: You cannot deploy a deduplicated instance on the same machine on which NetVault Backup Server software is installed.
Quest NetVault SmartDisk 11.4.5 Installation/Upgrade GuidePlanning your NetVault SmartDisk deployment
29

In the following example, data from all NetVault Backup Clients stream backup data on a user-defined port to the single NetVault SmartDisk Instance that is deployed on the dedicated server.
Figure 5. Single NetVault SmartDisk Server in multiple NetVault Backup Server environment
In environments where multiple NetVault SmartDisk Instances are required for a domain, you must deploy each NetVault SmartDisk Instance on its own dedicated server. In the following example, two NetVault SmartDisk Instances are required and they are deployed on two dedicated NetVault SmartDisk Servers. The NetVault Backup Clients from both NetVault Backup Servers can stream backup data on a user-defined port to either deployed NetVault SmartDisk Instance.
IMPORTANT: You cannot deploy multiple NetVault SmartDisk Instances on the same machine, whether it be a backup server, backup client, or dedicated NetVault SmartDisk Server.
Quest NetVault SmartDisk 11.4.5 Installation/Upgrade GuidePlanning your NetVault SmartDisk deployment
30

Figure 6. Multiple NetVault SmartDisk Servers in multiple NetVault Backup Server environment
Reviewing deployment options for disaster recoveryThe data stored in a NetVault SmartDisk Instance is best protected from disaster if you deploy multiple NetVault SmartDisk Instances in a disaster-recovery scenario.
If you do not use deduplication, the primary NetVault SmartDisk Instance can be deployed on the backup server, backup client, or dedicated NetVault SmartDisk Instance. The secondary NetVault SmartDisk Instance is deployed on a dedicated backup server and connected to the primary backup server as a second NetVault SmartDisk Device. The secondary NetVault SmartDisk Instance is typically deployed in an offsite location to provide maximum protection.
If you do use deduplication, the primary NetVault SmartDisk Instance must be deployed on a dedicated NetVault SmartDisk Instance. The secondary NetVault SmartDisk Instance is deployed on a dedicated backup server and connected to the primary backup server as a second NetVault SmartDisk Device. The secondary NetVault SmartDisk Instance is typically deployed in an offsite location to provide maximum protection.
The backups that are targeted to the primary NetVault SmartDisk Instance are copied to the secondary NetVault SmartDisk Instance as the target for a secondary copy backup or as an independent Data Copy backup that specifies the primary NetVault SmartDisk Instance as the source and the secondary NetVault SmartDisk Instance as the destination.
Quest NetVault SmartDisk 11.4.5 Installation/Upgrade GuidePlanning your NetVault SmartDisk deployment
31

If a failure of only the primary NetVault SmartDisk Instance occurs, you can restore backups from the secondary NetVault SmartDisk Instance. Primary backups can also be targeted to the secondary NetVault SmartDisk Instance until the primary NetVault SmartDisk Instance is ready to resume the primary role.
Figure 7. Multiple nondeduplicated NetVault SmartDisk Instances deployed in disaster-recovery scenario
IMPORTANT: Third-party replication or mirroring technology is not supported for the replication of the NetVault SmartDisk Storage Pools. Data that is replicated using third-party technology, including deduplication appliance replication technology, is not recoverable.
Quest NetVault SmartDisk 11.4.5 Installation/Upgrade GuidePlanning your NetVault SmartDisk deployment
32

Figure 8. Multiple Deduplicated NetVault SmartDisk Instances deployed in disaster-recovery scenario
If a complete failure of the production site occurs or a failure of the primary backup server occurs, a backup server with the identical Machine Name as the primary backup server in the production site must be deployed in the disaster-recovery site. After the backup server with the identical Machine Name is running in the disaster-recovery site, the secondary NetVault SmartDisk Instance can be added to the backup server as a NetVault SmartDisk Device and scanned. After the backups have been scanned, they can be restored and the secondary NetVault SmartDisk Device can become a target for primary backups until the primary backup server is returned to working order.
After the primary backup server is ready to resume the production role, the secondary backup server is shut down. If backups were targeted to the secondary NetVault SmartDisk Instance while it performed the role of the primary NetVault SmartDisk Instance, it must be scanned back into the primary backup server.
IMPORTANT: A NetVault SmartDisk Device can only be scanned into a backup server that has the identical Machine Name as the original backup server that performed the backups.
NOTE: The primary and secondary backup servers cannot be running at the same time.
Quest NetVault SmartDisk 11.4.5 Installation/Upgrade GuidePlanning your NetVault SmartDisk deployment
33

Defining a Storage Pool strategyThe fourth step in defining your NetVault SmartDisk Deployment Strategy is defining your strategy for the NetVault SmartDisk Storage Pools.
Understanding space allocation for Storage PoolsBefore choosing a strategy for your NetVault SmartDisk Storage Pools, consider the following regarding how NetVault SmartDisk allocates space in the NetVault SmartDisk Storage Pools:
• You can add an unlimited number of Storage Pools to NetVault SmartDisk.
• You can add an unlimited number of volumes to each NetVault SmartDisk Storage Pool.
• Each NetVault SmartDisk Storage Pool is associated with roles that it can perform.
• When configuring a NetVault SmartDisk Storage Pool, you can identify it as a favorite for specific roles (favour), and you can indicate that it should never be used for specific roles (deny).
• There is no quota specified per-volume of the absolute amount of space NetVault SmartDisk can use; that is, you cannot say “use exactly 100 GB”. However, you can specify an amount of physical disk-storage that you want to set aside that NetVault SmartDisk cannot use. This option simplifies NetVault SmartDisk’s internal space-allocation policies so that Staging Store and Chunk Store processes can efficiently share volumes. Each role independently implements and honors the configured thresholds, which allows efficient parallel-processing without a requiring a single, centralized space allocator.
• Using the volume-size parameter, you can set aside a portion of the volume so that it cannot be used for NetVault SmartDisk. After the volume is full with NetVault SmartDisk or non-NetVault SmartDisk data, NetVault SmartDisk will not store anything else on the volume until space is made available.
• NetVault SmartDisk uses storage space in each volume up to a threshold amount that includes space directly set aside using the volume-size parameter, and the Last Resort Threshold (LRT) amount set by NetVault SmartDisk internally.
• NetVault SmartDisk first uses a volume for its intended role, for example, Chunk Store or Staging Store, but it also uses it for other purposes if necessary. Even if you supply a threshold, NetVault SmartDisk implements an LRT that stops NetVault SmartDisk from using a volume after there is less than a certain amount of space available and thus prevents the disk from becoming full. The LRT is calculated to include both a fixed amount of space (1 GB) and the space that would be required to make Garbage Collection possible, that is, the gc_reserve_bytes parameter. This situation means that the figure varies in size depending on the amount of data held in the Chunk Store; typically, you can expect the gc_reserve_bytes parameter to be at least 1.7 GB.
• If the LRT is large enough, NetVault SmartDisk properly allocates space when multiple Staging Store and Chunk Store processes are both writing to a volume that becomes too full. NetVault SmartDisk maintains an overall idea of how much space is used both by the Staging Store and the Chunk Store. This idea allows it to enforce the LRT and the volume-size limits.
• User thresholds and the NetVault SmartDisk LRT do not affect licensing. Licensing measures the amount of data accepted for protection by the NetVault SmartDisk Instance, regardless of whether the data has been deduplicated.
The following figure shows a graphical example of how space is organized in NetVault SmartDisk. This figure assumes that all volumes are mapped to one file system. Also, the space reserved for LRT is reserved on a per-volume basis; if your configuration uses multiple volumes, more LRT space might be allocated.
Quest NetVault SmartDisk 11.4.5 Installation/Upgrade GuidePlanning your NetVault SmartDisk deployment
34

Figure 9. Space allocation for NetVault SmartDisk
Understanding the optimal performance strategyConsider the following guidelines when assigning NetVault SmartDisk Storage Pool Roles:
• Content Index: Should be small and reside in a Storage Pool made of fault-tolerant disks with good random-access performance.
• Staging Store: Should reside in a Storage Pool made of fault-tolerant disks with good streaming performance.
• Chunk Index: Should reside in a Storage Pool made of fault-tolerant disks with good random-access performance.
• Chunk Store: Should reside in a Storage Pool made of fault-tolerant disks.
If the goal is optimal performance, using more disks to increase Input/Output Operations per Second (IOPS) and aggregate disk bandwidth improves NetVault SmartDisk performance more than using extra memory.
For example, if you are using a single RAID array, consider configuring four separate RAID 1 volumes, one for each Storage Pool Role. This configuration separates the IO workload for each volume across independent RAID volumes. You can tune performance further by restricting the number of independent disk operations — reads, writes, and deletes — allowed per volume to two operations, which avoids disk thrashing. In addition, configure the RAID array to support more bandwidth in and out of Staging Store.
This strategy is appropriate for NetVault SmartDisk Instances where staging, deduplication, and restores might occur simultaneously.
Also, Linux, UNIX, and Mac OS X systems support use of the noatime feature for file systems, usually as a mount option. Quest recommends that you enable this feature on your system to improve NetVault SmartDisk performance, especially for the Chunk Index and Chunk Store volumes. Using this feature can reduce the number of metadata writes required to update read-access times for files.
On Windows platforms, you can disable the New Technology File System (NTFS) Last Access Update feature, which can reduce disk accesses and increase performance. For instructions on disabling this feature, see the documentation for your specific OS.
NOTE: RAID recommendations also apply to storage-area network (SAN) and network-attached storage (NAS).
Unused space available for NetVault SmartDisk
Chunk Store
Staging Store
Garbage Collection Reserve
LRT
((100-X)/100)*T
Space currently used by OS, users, and non-NetVault SmartDisk applications
T=Total space available on an empty file systemX=Volume-size parameter
Quest NetVault SmartDisk 11.4.5 Installation/Upgrade GuidePlanning your NetVault SmartDisk deployment
35

Optimizing performance while protecting against data loss during power failuresAlthough enabling disk-write caches improves NetVault SmartDisk performance, power failures that occur before modified disk-cache contents have been written to nonvolatile magnetic storage can potentially cause data loss in NetVault SmartDisk. Because of this risk, it is critical that you understand how your underlying disk technology caches writes to disk. You can turn off disk-write caching, but due to the improvement in performance that write-caching offers, it is increasingly used despite the risk, and the risk is mitigated by using additional technology. A common mitigation technique is ensuring that power does not go off. In high-end server environments, with their uninterruptible power supplies (UPSs) and redundant power supplies, having unfilled cached writes is less of an issue.
Also, drives that employ write-caching have a write-flush feature that instructs the drive to send pending writes from the cache to the disk immediately. This command is sent before UPS batteries run out — if the system detects a power interruption — or just before the system is shut down for any other reason.
Finally, most disk array systems use nonvolatile random access memory (NVRAM) to protect data written to disk if there is a power failure. Quest recommends that you review your server and storage vendor’s product documentation to understand what steps are taken to ensure that disk writes are written to nonvolatile magnetic storage if there is a power failure.
Quest NetVault SmartDisk 11.4.5 Installation/Upgrade GuidePlanning your NetVault SmartDisk deployment
36

4
Installing NetVault SmartDisk
• Installing NetVault SmartDisk: an overview
• System requirements
• Installing the NetVault SmartDisk software
Installing NetVault SmartDisk: an overviewInstalling NetVault SmartDisk involves the following main steps:
• Verifying that the system requirements are in place.
• Installing the software.
• Installing the license key.
• Updating the Storage Pool structure, if applicable.
• Adding the NetVault SmartDisk Devices to your backup product.
• Protecting the NetVault SmartDisk identity.
System requirementsThe following sections identify the prerequisites that must be met before you install NetVault SmartDisk:
• Software requirements
• Hardware requirements
• Authentication requirements
Software requirementsNetVault SmartDisk has the following software requirements:
• Windows: NetVault SmartDisk has the following requirements on Windows:
▪ Microsoft Visual C++: If it is not already installed, NetVault SmartDisk automatically installs the applicable portions of the Microsoft Visual C++ 2005 SP1 Redistributable Package. No additional steps are required by you.
▪ System-memory requirements: Verify that your Windows system has at least 2 gigabytes (GB) plus 400 megabytes (MB) for every TB of data that the Chunk Store must address. If you use a 32-bit platform, you are limited to a Chunk Store of between 1.8 TB and 2.5 TB of unique data, depending on the OS.
Quest NetVault SmartDisk 11.4.5 Installation/Upgrade GuideInstalling NetVault SmartDisk
37

• Linux: NetVault SmartDisk has the following library requirements on Linux. Installation might fail if these packages are not installed on the system. For instructions on installing the required packages, see the relevant OS documentation.
▪ Asynchronous I/O Library: Depending on the Linux distribution, verify that the libaio.so.1 package is installed in the following directory:
▫ 32-bit OS: /lib or /usr/lib
▫ 64-bit OS: /lib64 or /usr/lib64
Some distributions of Linux do not install the Asynchronous I/O Library package by default. If necessary, install this package.
▪ Standard C++ Library
▫ NetVault SmartDisk Linux x86_Hybrid and Linux IA64 Builds: Verify that the libstdc++.so.6 package is installed in the /usr/lib directory. If NECESSARY, install the Standard C++ Library package.
▫ NetVault SmartDisk Linux x86_Pure64 Build: Verify that the libstdc++.so.5 package is installed in the /usr/lib64 directory. If necessary, install the Compatibility Standard C++ Library package.
Hardware requirementsNetVault SmartDisk has the following hardware requirements:
• Deduplicated NetVault SmartDisk Instances: If the NetVault SmartDisk Deduplication Option is enabled, verify that the following requirements are met:
▪ Processor requirements: Processor requirements vary based on the required NetVault SmartDisk Deduplication Rate (the rate at which NetVault SmartDisk deduplicates data) — the higher the Deduplication Rate requirements, the higher the processor requirements for the machine where NetVault SmartDisk software is installed.
The NetVault SmartDisk Deduplication Rate must be greater than or equal to the Ingest Rate to ensure that the deduplication process completes during the backup window or before the next weekly backup window begins. For more information, see Calculating the required number of NetVault SmartDisk Instances.
▪ Memory requirements:
▫ Required minimum: 2 GB
▫ Recommended minimum: An extra 400 MB per 1 TB of NetVault SmartDisk-unique data
Example
10 TB of NetVault SmartDisk Unique Data
2 GB + (400 MB * 10) = 2 GB + 4000 MB = 6 GB
For more information, see Calculating the required number of NetVault SmartDisk Instances.
• Nondeduplicated NetVault SmartDisk Instances: If the NetVault SmartDisk Deduplication Option is not enabled, verify that the following requirements are met:
▪ Processor requirements: Use a machine with a 24-to-36-month-old Intel Core 1, AMD Athlon, or Intel Celeron processor. Quest recommends that you use faster processors for best performance.
▪ Memory requirements: The minimum requirement is 512 MB.
IMPORTANT: If you intend to use deduplication, Quest recommends that you use the 64-bit (Pure64) versions of NetVault SmartDisk instead of the 32-bit or Hybrid versions whenever possible. Deduplication is memory-intensive; 32-bit memory allocation is limited, and capacity varies by OS and by usage.
Quest NetVault SmartDisk 11.4.5 Installation/Upgrade GuideInstalling NetVault SmartDisk
38

• Network requirement for all NetVault SmartDisk Instances: TCP/IP name resolution. After the machine that hosts the NetVault SmartDisk software has been identified, verify that the machine can resolve its own host name.
• Storage Pool requirements: For Storage Pool requirements based on whether your goal is simplified management or optimal performance, see Defining a Storage Pool strategy.
For additional information, see the Quest NetVault Backup Compatibility Guide.
Authentication requirements• Root-level or administrator account for installation: Root-level or administrator credentials are only
required for use during the installation process, removal process, and, if necessary, manually restarting the NetVault SmartDisk0 Services.
• NetVault SmartDisk Nonprivileged Group and User: Security group with full NetVault SmartDisk configuration and monitoring rights.
To create the NetVault SmartDisk Nonprivileged Group and Users, follow these guidelines:
▪ For Linux and UNIX, the following examples use sdusr and sdgrp for the user and group, respectively:
a If the nonprivileged group does not exist, create it.
# groupadd sdgrp
b If the nonprivileged user does not exist, create it and add it to the nonprivileged group.
# useradd -G sdgrp sdusr
c Define the password for the nonprivileged user.
# passwd sdusr
d If the nonprivileged user does exist, add it to the nonprivileged group.
# usermod -a -G sdgrp sdusr
▪ For Windows:
On Windows, you are not required to create the nonprivileged user before installation. You can enter the applicable information during the installation process. The installer verifies that the account meets all applicable system requirements before continuing with the installation process.
▪ For Mac OS X:
▫ Create the nonprivileged user by clicking Apple > System Preferences > Accounts. On the System Preferences dialog box, click Accounts. Use the Accounts dialog box to create a nonprivileged user.
▫ Use dseditgroup to add the nonprivileged user to an applicable group. The following example uses sdusr and sdgrp for the user and group, respectively.
sudo dseditgroup -o create sdgrpsudo dseditgroup -o edit -a sdusr -t user sdgrp
▪ For Linux, UNIX, and Mac OS X:
▫ If your OS does not create a corresponding nonprivileged group by default, create one and add the nonprivileged user to it.
▫ After you have created the nonprivileged user and group, add your root-level or administrator account to the same nonprivileged group.
• Enabling and configuring WebDAV authentication: During installation, you have the option of enabling authentication and configuring the credentials, specifying a user name and password. Enabling this option provides extra protection by preventing unauthorized users and backup clients from accessing the NetVault SmartDisk Instance that you are creating. That is, only clients that know these credentials can connect to the NetVault SmartDisk Instance. If you enable authentication on NetVault SmartDisk, also ensure that your
Quest NetVault SmartDisk 11.4.5 Installation/Upgrade GuideInstalling NetVault SmartDisk
39

backup software, such as vRanger or NetVault Backup, is able to manage the credentials; otherwise, backup jobs fail. For more information about managing WebDAV authentication in your backup software, see the documentation for the applicable backup software. If you do not enable authentication during the installation process, you can enable it later.
• UNC path and credentials if using a network share on Windows: You can specify a path that includes a network share, whether it is mapped or using Universal Naming Convention (UNC). To do so, the parent directory of the target directory must exist — the target directory does not have to exist yet — and you must have the access credentials.
Important notes regarding Windows and the nonprivileged userIf you are installing NetVault SmartDisk on Windows, the NetVault SmartDisk installer grants read- and write-access permission to the specified nonprivileged user during the installation process. This access, which lets NetVault SmartDisk report Windows Events, only applies to the Application log.
If you change the nonprivileged user by using smartdisk password, the same rights are granted to the new user. The rights are retained for the original user because the original user might be assigned to multiple services on the same system. For the same reason, this access is also retained if you remove NetVault SmartDisk.
The modified registry key is:
HKEY_LOCAL_MACHINE\SYSTEM\CurrentControlSet\Services\ Eventlog\Application
Therefore, if you know that a nonprivileged user is not needed for other services, manually update the registry key and user account.
Installing the NetVault SmartDisk softwareYou can install NetVault SmartDisk either by using the installation CD or the package downloaded from the website.
Throughout this document, an ellipsis (…) represents the path to where you installed NetVault SmartDisk. Replace the ellipsis with the applicable information.
• Important considerations
• Installing on Linux or UNIX (excluding Solaris)
• Installing on Solaris (SPARC, x86, or x86-64)
• Installing on Windows
• Installing on Mac OS X
Important considerations• If you are using NetVault Backup, do not install the product in the same directory as NetVault Backup is
installed. If you have to remove NetVault Backup for any reason, it removes NetVault SmartDisk as well if they are installed in the same directory.
NOTE: If you intend to use the NetVault Backup Use optimised replication between devices that support this feature option, available for NetVault Backup Data Copy and Duplicate operations, WebDAV authentication fails if the configured credentials are different on the source and destination NetVault SmartDisk Servers. Successful replication requires that either authentication is disabled on both instances, is enabled only on the source, or uses identical credentials on the source and destination NetVault SmartDisk Instances.
Quest NetVault SmartDisk 11.4.5 Installation/Upgrade GuideInstalling NetVault SmartDisk
40

• If you install NetVault SmartDisk on a double-byte Windows OS and you do not use the default directories for installation, verify that the new directories are created using single-byte characters; installation fails if you use double-byte characters.
• You cannot install the NetVault SmartDisk binaries — installation files — on an NFS share.
• During installation, you are prompted for two volume paths, which must be different. One volume contains the Staging Store, and the other contains the Chunk Index, Chunk Store, and Content Index. You can specify any supported File System that is listed in the Quest NetVault Backup Compatibility Guide. However, if you intend to use a third-party deduplication appliance, filer, or other form of NAS for the NetVault SmartDisk Storage Pools, you must use the network share for the appliance that is exported through Common Internet File System (CIFS) or Network File System (NFS) as the target for the Staging Store. You can specify one network share for each path during installation; if you need more shares for the Storage Pools, you can add them after installation is finished. For more information, see Completing the installation process. If the third-party appliance, filer, or NAS performs the deduplication, instead of the NetVault SmartDisk Deduplication Option, you cannot use the appliance’s network share as the target for the Chunk Store or Store Path.
Installing on Linux or UNIX (excluding Solaris)1 Verify that you have reviewed the authentication requirements and all other critical information.
For more information, see Authentication requirements and Important considerations.
2 Log in as root or sudo to root.
3 If you are using the CD, complete the following steps:
a Insert the CD into the CD drive, and mount the drive.
b Initiate a terminal session, and access the CD:
cd /cdrom/installation_files/<platform>/SmartDisk/smartdisk
4 If you are using the downloaded package, complete the following steps:
a Using your preferred method, decompress the downloaded file.
b Initiate a terminal session, and navigate to the smartdisk directory in which the decompressed files reside.
5 To start installation, type as root or sudo to root:
./install
With the installation successfully initiated, the setup process begins.
6 When the following prompt is displayed, type the number that corresponds to the language version that you want to install, and press Enter.
Select a Language1 English2 JapaneseEUC3 Chinese Simplified4 Korean
IMPORTANT: If you are using deduplication, you cannot deploy a deduplicated instance on the same machine on which NetVault Backup Server or Client software is installed.
NOTE: On systems that use automount, installation fails with error message bash: ./install: /bin/sh bad interpreter: Permission denied. To avoid this issue, mount the CD manually without the noexec mount option.
NOTE: Most prompts revealed during the installation process have a default selection. These options are displayed at the end of each prompt, enclosed in brackets ([ ]). To accept a default, press Enter.
Quest NetVault SmartDisk 11.4.5 Installation/Upgrade GuideInstalling NetVault SmartDisk
41

5 French6 GermanSelect Language? [1]:
7 When the following prompt is displayed, select the applicable option.
Have you read and agreed to the terms of the license?(y = yes, n = no, d = display license) (y n d) [d]: y
▪ y: Indicates Yes. To accept the agreement, type y, and press Enter. The installation process continues without displaying the license agreement.
▪ n: Indicates No. To decline the agreement, type n, and press Enter. The installation process stops.
▪ d: Indicates Display. This option is the default. To view the agreement, type d, and press Enter. The license agreement is displayed in sections with a percentage value shown at the bottom of the screen. This value accounts for how much of the agreement has been displayed. Each time you press Enter, more of the agreement is displayed and this value increases. Continuously holding down the Enter key will scroll through the entire agreement, and end with the next prompt.
8 Monitor the results when the checking mechanism runs that determines if the required libstdc++ and libaio libraries are installed on the system:
▪ If the required packages are installed on the system, a message is displayed and the installation continues.
Sample message:
libstdc++.so.6 is installed.libaio.so.1 is installed.
▪ If the correct version of either the libstdc++ and libaio package is not installed on the system, an error is displayed that indicates the missing library and the installation stops.
Sample error messages:
ERROR: SmartDisk requires libstdc++.so.5 to be installed.
ERROR: Please install the Compatibility Standard C++ Library package.
ERROR: SmartDisk requires libaio.so.1 to be installed on the system.
ERROR: Please install the appropriate Asynchronous I/O Access Librarypackage.
9 When the following prompt is displayed, indicate where you want NetVault SmartDisk installed.
Where should SmartDisk be installed? [/usr/smartdisk] :
10 When the nonprivileged-related prompts is displayed, enter the name of the nonprivileged user and the name of the user’s group:
Non privileged user? : <userName>you chose <userName>
Non privileged user's group? [<userName>] : usergroupyou chose <userGroup>
11 When the additional location-related prompts are displayed, indicate where you want NetVault SmartDisk installed.
IMPORTANT: Quest requires that you thoroughly review the license agreement before proceeding with the installation.
NOTE: Linux, UNIX, and Solaris do not differentiate between local drives and mounted drives. If you choose to use a mounted drive, for example, using NFS, for the Staging Path and Store Path, Quest strongly recommends that you use a subdirectory on the applicable drive. This step ensures that data is not written to the local directory if the mounted location becomes unavailable.
You must specify different physical paths for the Staging Path and Store Path.
Quest NetVault SmartDisk 11.4.5 Installation/Upgrade GuideInstalling NetVault SmartDisk
42

Staging path? [/usr/smartdisk/diskmanager/stage] :.Store path? (Note: A network share located on a third-party deduplicationappliance cannot be used for the Chunk Store.) [/usr/smartdisk/store] :
12 If you are installing NetVault SmartDisk on Linux, enter y for Yes or n for No when the following prompt is displayed:
Would you like to configure WebDAV authentication credentials? (y n) [y]:
13 If you entered y, enter the applicable user name and password when the corresponding prompts are displayed, making sure to press Enter after each entry.
The installer verifies that the information you enter is correct.
You chose Yes.WebDAV authentication username?:Please enter the WebDAV authentication password for SmartDisk:Please confirm password:
14 When the script is finished, verify that it indicates that the installation completed successfully.
Starting SmartDisk... success.Installation completed successfully.
Installing on Solaris (SPARC, x86, or x86-64)1 Verify that you have reviewed the authentication requirements and all other critical information.
For more information, see Authentication requirements and Important considerations.
2 Log in as root or sudo to root.
3 If you are using the CD, complete the following steps:
a Insert the CD into the CD drive, and mount the drive.
b Initiate a terminal session, and access the CD:
cd /cdrom/installation_files/<platform>/SmartDisk/smartdisk
4 If you are using the downloaded package, decompress the downloaded file using your preferred method.
For example:
gunzip smartdisk-solaris-x86_<version>-<date>.tar.gz
tar -xvf smartdisk-solaris-x86_<version>-<date>.tar
5 To start installation, type as root or sudo to root:
pkgadd -d smartdisk
With the installation successfully initiated, the setup process begins.
The following packages are available:1 smartdisk SmartDisk
(i386) 001
6 Enter the number that corresponds to the package you want to install, for example, 1, and press Enter.
NOTE: For the user name in the WebDAV credentials, NetVault SmartDisk currently supports the use of any ASCII characters except the quotation mark ("), comma (,), and colon (:). The are no restrictions for the corresponding password.
NOTE: Most prompts revealed during the installation process have a default selection. These options are displayed at the end of each prompt, enclosed in brackets ([ ]). To accept a default, press Enter.
Quest NetVault SmartDisk 11.4.5 Installation/Upgrade GuideInstalling NetVault SmartDisk
43

7 When the following prompt is displayed, type the number that corresponds to the language version that you want to install, and press Enter.
Select a Language1 English2 JapaneseEUC3 Chinese Simplified4 Korean5 French6 GermanSelect Language? [1]:
8 When the following prompt is displayed, select the applicable option.
Have you read and agreed to the terms of the license?(y = yes, n = no, d = display license) (y n d) [d]: y
▪ y: Indicates Yes. To accept the agreement, type y, and press Enter. The installation process continues without displaying the license agreement.
▪ n: Indicates No. To decline the agreement, type n, and press Enter. The installation process stops.
▪ d: Indicates Display. This option is the default. To view the agreement, type d, and press Enter. The license agreement is displayed in sections with a percentage value shown at the bottom of the screen. This value accounts for how much of the agreement has been displayed. Each time you press Enter, more of the agreement is displayed and this value increases. Continuously holding down the Enter key will scroll through the entire agreement, and end with the next prompt.
9 When the following prompt is displayed, indicate where you want NetVault SmartDisk installed.
Where should SmartDisk be installed? [/opt/smartdisk] :
10 When the nonprivileged-related prompts are displayed, enter the name of the nonprivileged user and the name of the user’s group:
Non privileged user? : <userName>you chose <userName>Non privileged user's group? [<userName>] : <userGroup>you chose <userGroup>
11 When the additional location-related prompts are displayed, indicate where you want NetVault SmartDisk installed.
Staging path? [/opt/smartdisk/diskmanager/stage] :.Store path? (Note: A network share located on a third-party deduplication
appliance cannot be used for the Chunk Store.) [/opt/smartdisk/store] :
12 When the following prompt is displayed, enter y for Yes or n for No:
Would you like to configure WebDAV authentication credentials? (y n) [y]:
▪ If you entered n, type y when the following confirmation prompt is displayed, and press Enter.
Do you want to continue with the installation of <smartdisk> [y,n,?]
▪ If you entered y, enter the applicable user name and password when the corresponding prompts are displayed, making sure to press Enter after each entry. The installer verifies that the information you enter is correct.
IMPORTANT: Quest requires that you thoroughly review the license agreement before proceeding with the installation.
NOTE: Linux, UNIX, and Solaris do not differentiate between local drives and mounted drives. If you choose to use a mounted drive, for example, using NFS, for the Staging Path and Store Path, Quest strongly recommends that you use a subdirectory on the applicable drive. This step ensures that data is not written to the local directory if the mounted location becomes unavailable.
You must specify different physical paths for the Staging Path and Store Path.
Quest NetVault SmartDisk 11.4.5 Installation/Upgrade GuideInstalling NetVault SmartDisk
44

You chose Yes.WebDAV authentication username?:Please enter the WebDAV authentication password for SmartDisk:Please confirm password:
13 When the following prompt is displayed, type y, and press Enter:
Do you want to continue with the installation of <smartdisk> [y,n,?]
14 When the installation script is finished, verify that it indicates that the program started and installation completed successfully.
Starting SmartDisk... successInstallation of <smartdisk> was successful.
Installing on WindowsDepending on whether you are installing NetVault SmartDisk on a local machine or a domain client, review the applicable notes before proceeding to Completing installation on a Windows local or domain client.
• Important note regarding installation on a local machine
• Important notes regarding installation on a domain client
• Important notes regarding the Staging and Store Paths
• Completing installation on a Windows local or domain client
Important note regarding installation on a local machineIf you are installing NetVault SmartDisk on a local machine, log in as an administrator before you begin the installation process.
Important notes regarding installation on a domain clientIf you are installing NetVault SmartDisk on a Windows Domain client, review the following guidelines before you begin the installation process.
• Verify that the machine on which you intend to install NetVault SmartDisk has been added to the Windows Domain.
• Use a Windows utility, such as dcpromo, to specify the controller (WDC001) for the domain (DomainSample).
• After you have specified the controller, add the intended NetVault SmartDisk machine, NetVault SmartDisk_client, to the domain (DomainSample). To add the client, you can log in to the client, NetVault SmartDisk_Client, and select My Computer > Properties > Computer Name > Change > Member of Domain > DomainSample.
If the client is unable to find the domain, add the Domain Controller's IP address to the client's list of preferred DNS server addresses. To add the address, use Control Panel > Network Connections > Local Area Connection > Properties > Internet Protocol > Properties > Use the following DNS server addresses.
NOTE: For the user name in the WebDAV credentials, NetVault SmartDisk currently supports the use of any ASCII characters except the quotation mark ("), comma (,), and colon (:). The are no restrictions for the corresponding password.
NOTE: In the following guidelines, sample names are used to represent the different components. The Windows Domain is named DomainSample; the Windows Domain Controller is named WDC001; and the machine identified for NetVault SmartDisk installation is NetVault SmartDisk_client. Also, the information presented varies based on the version of Windows that you are using.
Quest NetVault SmartDisk 11.4.5 Installation/Upgrade GuideInstalling NetVault SmartDisk
45

• After you have added the client to the domain, log in to the client as a domain user with sufficient privileges to install NetVault SmartDisk. The login might also have to include the privilege required to create the nonprivileged user account if the account does not exist.
• With this infrastructure in place, you can begin the installation process. During install, be aware of the following guidelines.
▪ During installation, enter the domain name, for example, DomainSample, in the Non-Privileged User dialog box.
▪ If you are letting NetVault SmartDisk create the nonprivileged user, complete the applicable steps.
• After installation is finished, verify that the new domain user has been created. To do so, log in to the Windows Domain Controller, and access Server Manager > Roles > Active Directory Domain Services > Active Directory Users and Computers > DomainSample > Users.
Figure 1. Server Manager
Important notes regarding the Staging and Store Paths• If you intend to use network shares for both the Staging Path and the Store Path, these paths must be
unique.
• You must specify different physical paths for the Staging Path and Store Path.
• The user context — domain or not — in which remote volumes are added for the Staging Path and Store Path is not related to the user context — local or domain — of the main NetVault SmartDisk installation. Therefore, if you must use a domain-user context for the remote Staging Path and Store Path volumes, use the standard format to complete the Username field. That is, use the <domainName>\<userName> format regardless of whether the <domainName> or <userName> is the same as what you specify elsewhere in the installation process.
• After installation is finished, you can add more volumes. For more information, see Updating the Storage Pool directory structure.
NOTE: The NetVault SmartDisk installer tries to find the user account database that is associated with the domain entered in the Domain field. If the field is blank, it represents the local machine. If the field is not blank, the machine must be able to locate the domain controller of the specified domain. There are multiple ways of ensuring that the domain controller is located, one of which is to log in to the client as a domain user as shown previously.
Quest NetVault SmartDisk 11.4.5 Installation/Upgrade GuideInstalling NetVault SmartDisk
46

Completing installation on a Windows local or domain client
1 Verify that you have reviewed the authentication requirements and all other critical information.
For more information, see Authentication requirements and Important considerations.
2 Verify that you have reviewed the local- or domain-related notes listed in the preceding sections.
3 If you are using the CD, insert the CD into the drive, and skip to Step 6.
4 If you are using the downloaded package, decompress the downloaded file, and navigate to the SmartDisk directory in which the decompressed files reside.
5 To start the installation wizard, double-click the install.exe file.
6 When the Installation Language dialog box is displayed, select the applicable language, and click OK.
7 When the Welcome dialog box is displayed, click Next.
8 When the License Agreement dialog box is displayed, review the license agreement, select I Agree, and click Next.
9 On the Non-Privileged User dialog box, enter the name and password of the nonprivileged user account that you want to use for NetVault SmartDisk, the Windows Domain, if applicable, and click Next.
If the account does not exist, the installer creates it for you.
The installer verifies that the specified account meets all applicable system requirements — based on your organization’s policies — before continuing with the installation process. If the requirements are not met, the installer cancels the installation process before installing any NetVault SmartDisk components.
10 If the user account that you entered in the previous step does not exist, select Yes, and click Next when the Preinstall Warnings dialog box is displayed.
11 On the Select Installation Folder dialog box, change the path if you do not want to use the default.
▪ To use a different directory, type the path in the Folder box, or click Browse to point to the new location.
▪ To see how much space NetVault SmartDisk requires for the selected installation directory and files, click Disk Cost, review the information about the SmartDisk Disk Space dialog box, and then click OK. The Disk Cost information is calculated only for the NetVault SmartDisk software binaries. It does not include the disk space required for the Staging Store or Chunk Store. To determine the disk space required for the Staging Store or Chunk Store, see Calculating the total required physical disk space for licensed capacity.
12 Click Next.
13 On the Staging Path Folder Configuration dialog box, indicate whether you want to use a Remote or Local directory, and then click Next.
14 Do one of the following:
▪ If you selected Remote — the default is Local — on the Select Remote Staging Path Folder dialog box, specify the path for the Staging Store; use the \\server\share format. Enter the user name and corresponding password required to access the remote path, and then click Next.
▪ If you selected Local, on the Select Staging Path Folder dialog box, specify the file-system path for the Staging Store, and then click Next.
15 On the Store Path Folder Configuration dialog box, indicate whether you want to use a Remote or Local directory, and then click Next.
IMPORTANT: Quest requires that you thoroughly review the license agreement before proceeding with the installation.
Quest NetVault SmartDisk 11.4.5 Installation/Upgrade GuideInstalling NetVault SmartDisk
47

16 Do one of the following:
▪ If you selected Remote — the default is Local — on the Select Remote Store Path Folder dialog box, specify the path for the Chunk Store; use the \\server\share format. Enter the user name and corresponding password required to access the remote path, and then click Next.
▪ If you selected Local, on the Select Store Path Folder dialog box, specify the file-system path for the Chunk Store, and then click Next.
17 On the WebDAV Authentication Configuration dialog box, do one of the following:
▪ If you do not want to configure WebDAV, the default is Yes, select No, and click Next.
▪ If you want to configure WebDAV, Yes is selected, click Next, enter the applicable user name and password on the WebDAV Authentication Credentials dialog box, and then click Next. The installer verifies that the information you enter is correct.
18 When the Confirm Installation dialog box is displayed, click Next.
19 When the Installation Complete dialog box is displayed, click Close.
20 If you are upgrading a Windows installation and a Windows Restart Now or Restart Later prompt is displayed, click the applicable button.
If necessary, NetVault SmartDisk automatically installs the supporting Microsoft Visual C++ files into the Global Assembly Cache. If these files are currently in use by a different application, the installer prompts you to restart the system. This behavior is standard Windows behavior.
Installing on Mac OS X1 Verify that you have created the required nonprivileged user and group, and that you have reviewed all
other critical information.
For more information, see Authentication requirements and Important considerations.
2 Log in as an administrator.
3 If you are using the CD, insert the CD into the drive, and skip to Step 6.
4 If you are using the downloaded package, decompress the downloaded file, and navigate to the SmartDisk directory in which the decompressed files reside.
5 To start the installation wizard, double-click the smartkdisk.pkg file.
6 When the Welcome to the Quest NetVault SmartDisk Installer dialog box is displayed, click Continue.
7 When the Software License Agreement dialog box is displayed, review the license agreement, and click Continue.
8 When the confirmation prompt is displayed, click Agree to accept the license agreement.
9 If the Select a Destination dialog box is displayed, select the hard drive on which you want to install the program, and click Continue.
In some situations, the Apple Installer automatically selects the volume and does not display this dialog box.
10 On the first Quest NetVault SmartDisk Setup dialog box, perform the following steps:
a In the User and Group fields, enter the nonprivileged user and group.
For more information, see Authentication requirements.
NOTE: For the user name in the WebDAV credentials, NetVault SmartDisk currently supports the use of any ASCII characters except the quotation mark ("), comma (,), and colon (:). The are no restrictions for the corresponding password.
IMPORTANT: Quest requires that you thoroughly review the license agreement before proceeding with the installation.
Quest NetVault SmartDisk 11.4.5 Installation/Upgrade GuideInstalling NetVault SmartDisk
48

b In the Store volume path and Staging volume path, enter the applicable locations if you do not want to use the defaults.
11 Click Continue.
12 If NetVault SmartDisk determines that the user or group is invalid and displays an Alert, click OK, correct the applicable information, and click Continue again.
13 If this installation is new, not an upgrade, do one of the following on the next Quest NetVault SmartDisk Setup dialog box:
▪ If you do not want to configure WebDAV, clear the Use Credentials check box, and click Continue.
▪ If you want to configure WebDAV, enter the applicable user name and password, and click Continue. This name and password might be different from the name and password entered for the nonprivileged user. The installer verifies that the information you enter is correct.
14 If you are performing an upgrade, click Continue when the next Quest NetVault SmartDisk Setup dialog box is displayed.
15 On the Standard Install on <drive> dialog box, click Install.
16 When the Installation was completed successfully dialog box is displayed, click Close.
NOTE: You must specify different physical paths for the Staging Path and Store Path.
NOTE: For the user name in the WebDAV credentials, NetVault SmartDisk currently supports the use of any ASCII characters except the quotation mark ("), comma (,), and colon (:). The are no restrictions for the corresponding password.
NOTE: Change Install Location is not currently supported.
Quest NetVault SmartDisk 11.4.5 Installation/Upgrade GuideInstalling NetVault SmartDisk
49

5
Licensing NetVault SmartDisk
• License Keys: an overview
• Obtaining the NetVault SmartDisk Machine ID
• Requesting a license key
• Installing a license key on Linux, UNIX, or Mac OS X
• Installing a license key on Windows
License Keys: an overviewEach NetVault SmartDisk Instance requires its own permanent license key, which is tied to a NetVault SmartDisk Machine ID that is unique to each NetVault SmartDisk Instance. If the Total NetVault SmartDisk Licensed Capacity is distributed across multiple NetVault SmartDisk Instances, provide the following information for each deployed NetVault SmartDisk Instance when you request permanent NetVault SmartDisk license keys:
• NetVault SmartDisk Instance Machine ID
• NetVault SmartDisk Instance Licensed Capacity
• NetVault SmartDisk Deduplication
While you can request NetVault SmartDisk license keys as you deploy NetVault SmartDisk Instances, it is important to understand that the nondeduplicated and deduplicated capacity for all NetVault SmartDisk Instances must be less than or equal to the Total NetVault SmartDisk Nondeduplicated and Deduplicated Licensed Capacity that has been licensed.
NOTE: Configuration and administration of NetVault SmartDisk is handled primarily through the NetVault SmartDisk Command Line Interface (CLI). Using the smartdisk.sh shell on Linux, UNIX, and Mac OS X, or the smartdisk.bat shell on Windows, you can perform basic functions such as accessing help regarding the available commands, and configuring, monitoring, starting, and stopping NetVault SmartDisk. On Windows, the .bat extension is optional. To eliminate the requirement to specify the extension on Linux, UNIX, and Mac OS X, NetVault SmartDisk uses a symbolic link from smartdisk to smartdisk.sh.
Also, if you specify a full path on Windows, you can use forward slashes (/) instead of backward slashes (\). Otherwise, use backward slashes.
To simplify the commands and code samples shown throughout this document, forward slashes are used and the .sh and .bat extensions are not shown.
Quest NetVault SmartDisk 11.4.5 Installation/Upgrade GuideLicensing NetVault SmartDisk
50

Obtaining the NetVault SmartDisk Machine IDEach NetVault SmartDisk Instance requires its own permanent license key, which is tied to a NetVault SmartDisk Machine ID that is unique for each NetVault SmartDisk Instance.
To obtain the NetVault SmartDisk Machine ID, use the following command:
…/foundation/bin/smartdisk license --querymachineid
Requesting a license key1 Use the NetVault SmartDisk Machine ID to submit a request at: https://support.questcom/licensing-
assistance.
2 After you receive the license key, install it using the steps provided in the following sections.
Installing a license key on Linux, UNIX, or Mac OS X
1 Log in as the NetVault SmartDisk nonprivileged user or administrator member of the nonprivileged group.
For more information, see Authentication requirements.
2 Initiate a terminal session, or open a command prompt.
3 Type:
…/foundation/bin/smartdisk license -t <licenseKey>
Replace <licenseKey> with the license key that you received.
The system displays the following message:
License installed successfully
NOTE: To avoid potential errors, Quest recommends that you use copy-and-paste functionality to copy the license key from the email to the command prompt.
Quest NetVault SmartDisk 11.4.5 Installation/Upgrade GuideLicensing NetVault SmartDisk
51

Installing a license key on Windows1 Log in as an administrator.
2 Initiate a terminal session, or open a command prompt.
3 Type:
…/foundation/bin/smartdisk license -t <licenseKey>
Replace <licenseKey> with the license key that you received.
The system displays the following message:
License installed successfully
NOTE: To avoid potential errors, Quest recommends that you use copy-and-paste functionality to copy the license key from the email to the command prompt.
Quest NetVault SmartDisk 11.4.5 Installation/Upgrade GuideLicensing NetVault SmartDisk
52

6
Completing the installation process
• Using Garbage Collection
• Updating the Storage Pool directory structure
• Adding NetVault SmartDisk Devices to your backup product
• Protecting the NetVault SmartDisk unique identity
Using Garbage CollectionIf you intend to use the optional deduplication feature, review your NetVault SmartDisk Garbage Collection configuration to ensure optimal NetVault SmartDisk performance. For details on configuring Garbage Collection, see the Quest NetVault SmartDisk Administrator's Guide.
Updating the Storage Pool directory structureDuring the installation of the NetVault SmartDisk software, you specified a directory for the Staging Path and the Store Path. Currently, the following NetVault SmartDisk components are installed in each of the directories that you specified:
• Staging Path (folder)
▪ Staging Store
• Store Path (folder)
▪ Chunk Index
▪ Content Index
▪ Chunk Store
The preceding list identifies the default structure. If your NetVault SmartDisk Storage Pool Strategy requires a different structure, update it before you add NetVault SmartDisk as a device to your backup product. Examples of other structures that you might use include a third-party deduplication appliance, filer, or other NAS that is mapped or accessible through UNC. You might also want to implement an optimal performance strategy for your NetVault SmartDisk Storage Pools, which might require a different structure.
For more information about strategies, see Defining a Storage Pool strategy.
For more information about extending NetVault SmartDisk Storage Pools, see the applicable topic in the Quest NetVault SmartDisk Administrator’s Guide.
Quest NetVault SmartDisk 11.4.5 Installation/Upgrade GuideCompleting the installation process
53

Adding NetVault SmartDisk Devices to your backup productBefore you can begin targeting NetVault SmartDisk for backups and restores, you must add a NetVault SmartDisk Device to your backup product. For more information, see the Quest NetVault SmartDisk Administrator’s Guide and the documentation that came with your product.
Protecting the NetVault SmartDisk unique identityEach NetVault SmartDisk installation of the software binaries creates a unique identity that is referenced in the NetVault SmartDisk Content Index and your backup product. NetVault SmartDisk’s unique identity is required in cases where the NetVault SmartDisk software binaries are reinstalled while retaining the data stored in the NetVault SmartDisk Storage Pools. For more information, see Reinstalling NetVault SmartDisk.
To ensure that you can reinstall the NetVault SmartDisk software binaries while retaining the data stored in the NetVault SmartDisk Storage Pools, protect the NetVault SmartDisk unique identity by backing up the following configuration file:
…/diskmanager/etc/identity.cfg
IMPORTANT: As explained previously, if you enabled authentication of WebDAV access, you must also ensure that your backup software is able to manage the credentials to ensure that your backup jobs succeed. For more information about managing WebDAV authentication in your backup software, see the documentation for the applicable backup software.
Quest NetVault SmartDisk 11.4.5 Installation/Upgrade GuideCompleting the installation process
54

7
Uninstalling NetVault SmartDisk
• Preserving data before removing NetVault SmartDisk
• Removing NetVault SmartDisk from Linux, UNIX (excluding Solaris), or Mac OS X
• Removing from Solaris (SPARC, x86, or x86-64)
• Removing from Windows
Preserving data before removing NetVault SmartDiskWhen you remove NetVault SmartDisk from a Windows or Solaris system, the data in the Staging Store and the Chunk Store is retained after removal of the NetVault SmartDisk software binaries.
For all other Linux- and UNIX-based systems and Mac OS X, the data in the Staging Store and the Chunk Store is deleted if the default directory was used during installation. If you want to retain the data in the Staging Store and the Chunk Store after you remove the NetVault SmartDisk software binaries, move the Staging Store and the Chunk Store to a secure location before removing the NetVault SmartDisk software binaries.
If you specified a different file-system path during installation, that is, you did not use the defaults, the data in the Staging Store and the Chunk Store is retained after removal of the NetVault SmartDisk software binaries.
Removing NetVault SmartDisk from Linux, UNIX (excluding Solaris), or Mac OS X
1 Log in as root, or use sudo, to run the following command:
…/foundation/bin/smartdisk uninstall
The system displays the following:
About to remove IDP installation from /…Are you sure you want to continue? (y n) [n]:
2 When the confirmation prompt is displayed, type y, and press Enter.
When the system displays the following, removal is finished:
Removal completed successfully
Quest NetVault SmartDisk 11.4.5 Installation/Upgrade GuideUninstalling NetVault SmartDisk
55

Removing from Solaris (SPARC, x86, or x86-64)
1 Log in as root or sudo to root, and type:
pkgrm smartdisk
The system displays the following:
The following package is currently installed:smartdisk SmartDisk
(i386) 001Do you want to remove this package? [y,n,?,q]
2 When the confirmation prompt is displayed, type y, and press Enter.
The system displays the following:
## Removing installed package instance <smartdisk>
This package contains scripts which will be executed with super-userpermission during the process of removing this package.
Do you want to continue with removal of this package? [y,n,?,q]
3 When the confirmation prompt is displayed, type y, and press Enter.
When the system displays the following, removal is finished:
Removal of <smartdisk> was successful.
4 After the program is removed, delete the directory where NetVault SmartDisk is installed.
Removing from Windows1 Access Control Panel > Add or Remove Programs.
2 In the Currently installed programs list, select Quest NetVault SmartDisk, and click Remove.
3 When the confirmation message is displayed, click Yes.
4 After the program is removed, delete the directory where NetVault SmartDisk was installed.
Quest NetVault SmartDisk 11.4.5 Installation/Upgrade GuideUninstalling NetVault SmartDisk
56

8
Reinstalling NetVault SmartDisk
• Reinstalling: an overview
• Prerequisites for reinstalling NetVault SmartDisk
• Reinstalling if identity.cfg is available
• Reinstalling if identity.cfg is not available
Reinstalling: an overviewIn a standard NetVault SmartDisk installation, the NetVault SmartDisk software binaries are installed on a volume that is separate from the NetVault SmartDisk Storage Pools. Reinstalling the NetVault SmartDisk software binaries is required in one of the following scenarios:
• NetVault SmartDisk is inoperable because a media failure occurred on the volume where the NetVault SmartDisk software binaries are installed.
• The OS of the machine where the NetVault SmartDisk Instance is running has become corrupted.
• NetVault SmartDisk was removed from a Windows or Solaris machine. During the uninstall, the software binaries were removed, but the data stored in the NetVault SmartDisk Storage Pools was left intact.
• NetVault SmartDisk was removed from a Linux or Mac OS X machine. Before the software binaries were uninstalled, the data in the NetVault SmartDisk Storage Pools was preserved as described in Preserving data before removing NetVault SmartDisk.
In the preceding scenarios, the data in the NetVault SmartDisk Storage Pools is still intact and can be used by a new installation of the NetVault SmartDisk software binaries. Each NetVault SmartDisk installation of the software binaries creates a unique identity that is referenced in the NetVault SmartDisk Content Index and your backup product; therefore, it is critical that you use the following procedures to ensure that the new NetVault SmartDisk installation of the software binaries points to the original NetVault SmartDisk Storage Pools. Failure to follow these steps renders NetVault SmartDisk unable to read or restore from the original NetVault SmartDisk Storage Pools.
Prerequisites for reinstalling NetVault SmartDiskEnsure that the following prerequisites are met before reinstalling the NetVault SmartDisk software binaries.
• All the original Storage Pool directories, which include the directories for the Content Index, Staging Store, Chunk Index, and Chunk Store, are available in their entirety and are not corrupted.
• All the original Storage Pool directories have been moved or copied to a different directory by using OS commands.
• All the original Storage Pool directories, which are now empty, are available for the new NetVault SmartDisk software binary installation and there is sufficient available disk space to store all the data that originally resided in these directories.
Quest NetVault SmartDisk 11.4.5 Installation/Upgrade GuideReinstalling NetVault SmartDisk
57

• The original “identity.cfg” configuration file is available. This file is located in the following directory:
▪ For Linux, UNIX, or Mac OS X:
…/diskmanager/etc
▪ For Windows:
…\diskmanager\etc
• The same version of the NetVault SmartDisk software is installed that was running on the original NetVault SmartDisk installation.
Reinstalling if identity.cfg is availableIf the original “identity.cfg” configuration file is available, reinstall the NetVault SmartDisk software binaries by performing the following steps:
1 Ensure that the NetVault SmartDisk nonprivileged user account has full access to the original NetVault SmartDisk Storage Pool directories.
For more information, see Authentication requirements.
2 Install the same version of the NetVault SmartDisk software that was originally running.
During installation, enter the original values for the following options:
▪ Non-privileged User Account
▪ Staging Path Folder or Staging Store Directory
▪ Store Path Folder or Chunk Store Directory
For more information, see Installing the NetVault SmartDisk software.
3 To ensure that the directory structure for the Content Index, Staging Store, Chunk Index, and Chunk Store matches the original NetVault SmartDisk installation, update the NetVault SmartDisk Configuration.
For more information, see Updating the Storage Pool directory structure.
4 Stop the NetVault SmartDisk Services.
For more information, see the Quest NetVault SmartDisk Administrator’s Guide.
5 Replace the “identity.cfg” file with the original file.
This file is located in the following directory:
▪ For Linux, UNIX, or Mac OS X:
…/diskmanager/etc
▪ For Windows:
…\diskmanager\etc
6 Use OS commands to copy the contents of the original Storage Pool directories, which were moved to a different directory, back to the original corresponding directories.
7 Start the NetVault SmartDisk Services.
For more information, see the Quest NetVault SmartDisk Administrator’s Guide.
8 If you are using NetVault Backup, complete the following steps:
a If a media failure occurred on the volume where the NetVault Backup Server software binaries are installed, thus rendering NetVault Backup Server inoperable, reinstall NetVault Backup with the identical NetVault Backup Machine Name.
b If the original NetVault Backup installation is still operational, use the NetVault Backup WebUI to remove the corresponding NetVault SmartDisk Device from the Manage Devices page.
Quest NetVault SmartDisk 11.4.5 Installation/Upgrade GuideReinstalling NetVault SmartDisk
58

This step changes the device-status indicator for the NetVault SmartDisk Device to Offline.
c To add the new NetVault SmartDisk Instance to NetVault Backup, use the Manage Devices page in the NetVault Backup WebUI.
d On the Manage Devices page, click the corresponding Manage Device icon.
e On the RAS Device Management page, click Scan.
Scanning a NetVault SmartDisk Device queries all the backups stored on the NetVault SmartDisk Device and makes them available for restores.
9 If you are using a different product, see the documentation that came with that product.
Reinstalling if identity.cfg is not availableIf the original “identity.cfg” configuration file is not available, reinstall the NetVault SmartDisk software binaries by performing the following steps:
1 Ensure that the NetVault SmartDisk nonprivileged user account has full access to the original NetVault SmartDisk Storage Pool directories.
For more information, see Authentication requirements.
2 Install the same version of the NetVault SmartDisk software that was originally running.
During installation, enter the original values for the following options:
▪ Non-privileged User Account
▪ Staging Path Folder or Staging Store Directory
▪ Store Path Folder or Chunk Store Directory
For more information, see Installing the NetVault SmartDisk software.
3 To ensure that the directory structure for the Content Index, Staging Store, Chunk Index, and Chunk Store matches the original NetVault SmartDisk installation, update the NetVault SmartDisk Configuration.
For more information, see Updating the Storage Pool directory structure.
4 Stop the NetVault SmartDisk Services.
For more information, see the Quest NetVault SmartDisk Administrator’s Guide.
5 Use OS commands to copy the contents of the original Storage Pool directories, which were moved to a different directory, back to the original corresponding directories.
6 Start the NetVault SmartDisk Services.
For more information, see the Quest NetVault SmartDisk Administrator’s Guide.
7 If you are using NetVault Backup, complete the following steps:
a If a media failure occurred on the volume where the NetVault Backup Server software binaries are installed, thus rendering NetVault Backup Server inoperable, reinstall NetVault Backup with the identical NetVault Backup Machine Name.
b If the original NetVault Backup installation is still operational, use the NetVault Backup WebUI to remove the corresponding NetVault SmartDisk Device from the Manage Devices page.
This step changes the device-status indicator for the NetVault SmartDisk Device to Offline.
NOTE: For more information about the preceding substeps, see the Quest NetVault Backup Installation Guide and the Quest NetVault Backup Administrator’s Guide.
Quest NetVault SmartDisk 11.4.5 Installation/Upgrade GuideReinstalling NetVault SmartDisk
59

c To add the new NetVault SmartDisk Instance to NetVault Backup, use the Manage Devices page in the NetVault Backup WebUI.
d On the Manage Devices page, click the corresponding Manage Device icon.
e On the RAS Device Management page, click Scan.
Scanning a NetVault SmartDisk Device queries all the backups stored on the NetVault SmartDisk Device and makes them available for restores.
f Stop the NetVault Backup Service.
g Stop the NetVault SmartDisk Services.
For more information, see the Quest NetVault SmartDisk Administrator’s Guide.
h Run the NetVault Database Checker using the nvmeddbcheck list command in the NetVault Backup CLI.
i Use the NetVault Database Checker output to identify the NetVault SmartDisk identity.
For example, if the output from the NetVault Database Checker includes an error similar to:
Failed to locate RAS device object forMid 770400003a9a164b225fada7380e000001000000
it indicates that the NetVault SmartDisk identity is 770400003a9a164b225fada7380e000001000000.
j To replace the current value for the Identity field with the one displayed in the NetVault Database Checker output, edit the “identity.cfg” file.
This file is located in the following directory:
▫ For Linux, UNIX, or Mac OS X:
…/diskmanager/etc
▫ For Windows:
…\diskmanager\etc
k Start the NetVault SmartDisk Services.
l Start the NetVault Backup Service.
m Use the NetVault Backup WebUI to remove the original corresponding NetVault SmartDisk Device from the Manage Devices page.
This step changes the device-status indicator for the NetVault SmartDisk Device to Offline.
n To add a NetVault SmartDisk Instance using the Force Add option, use the Manage Devices page in the NetVault Backup WebUI.
o On the Manage Devices page, click the corresponding Manage Device icon.
p On the RAS Device Management page, click Scan.
Scanning a NetVault SmartDisk Device queries all the backups stored on the NetVault SmartDisk Device and makes them available for restores.
8 If you are using a different product, see the documentation that came with that product.
NOTE: For more information about the preceding substeps, see the Quest NetVault Backup Installation Guide, Quest NetVault Backup Administrator’s Guide, and Quest NetVault Backup CLI Reference Guide.
Quest NetVault SmartDisk 11.4.5 Installation/Upgrade GuideReinstalling NetVault SmartDisk
60

Quest NetVault SmartDisk 11.4.5 Installation/Upgrade GuideUpgrading NetVault SmartDisk
9
61
Upgrading NetVault SmartDisk
• Checking the status and taking the device offline
• Upgrading the software
Checking the status and taking the device offlineQuest recommends that you upgrade NetVault SmartDisk when the NetVault SmartDisk Instance is not currently in use, that is, when it is not involved in a backup or restore operation, when data is not being deduplicated, and when Garbage Collection is not running. Quest also recommends that you take the corresponding backup device offline before performing the upgrade. If a job starts while the NetVault SmartDisk Device is offline and the NetVault SmartDisk Device is the only target for the job, the job fails until the device is back online.
To check the status and take the device offline in NetVault Backup, perform the following steps. For other backup products, see the documentation that came with the product
1 In the Navigation pane of the NetVault Backup WebUI, click Manage Devices.
2 For the applicable NetVault SmartDisk Device, click the Manage Device icon.
3 Verify that Jobs from this Server Using Device and Items Deduplicating are both 0, and that Garbage Collection State is Not in GC.
4 On the RAS Device Management page, click Offline.
5 Repeat these steps for each NetVault Backup Server on which the NetVault SmartDisk Instance has been added as a NetVault SmartDisk Device.
Upgrading the software1 Step through the installation process as outlined in Installing NetVault SmartDisk.
During the upgrade process, the installation utility automatically stops and restarts the NetVault SmartDisk Services
2 If you are upgrading a Windows installation and a Windows Restart Now or Restart Later prompt is displayed, click the applicable button.
If necessary, NetVault SmartDisk automatically installs the supporting Microsoft Visual C++ files into the Global Assembly Cache. If these files are currently in use by a different application, the installer prompts you to restart the system. This behavior is standard Windows behavior.
3 In the interface for your backup product, complete the applicable steps to bring the device online.

A
Troubleshooting
• Corrupted or missing installfiles subdirectory impedes removal or upgrade on Windows
• Installation failed when the same physical path was specified for the Staging Path and Store Path
Corrupted or missing installfiles subdirectory impedes removal or upgrade on WindowsThe directory in which NetVault SmartDisk is installed on Windows — for example, C:\Program Files\Quest\NetVault SmartDisk — should contain an installfiles subdirectory. If this subdirectory, or any of its contents, is deleted or moved, any attempt to uninstall or upgrade NetVault SmartDisk fails. This subdirectory contains components that are critical to the removal and upgrade processes.
If this subdirectory was modified, deleted, or moved, you can obtain it from the original installation package or from the most recent upgrade package. Copy the subdirectory and its contents to the location in which NetVault SmartDisk is installed, for example, C:\Program Files\Quest\NetVault SmartDisk.
Installation failed when the same physical path was specified for the Staging Path and Store PathIf you used the same path when you specified the Staging Path and Store Path, installation fails. If you are unsure whether using the same path is the reason that NetVault SmartDisk failed to install, review the error messages located in the following areas:
• On Linux and UNIX, the error message should be displayed in the console window.
• On Windows, the Installation Failed dialog box should specify the location of the log file. If you specified a Local destination, this file is located in the %TEMP% folder of the user that performs installation. For example:
C:\Documents and Settings\<NameOfUser>\Local Settings\Temp\preinstall.sh.output<xx>
NOTE: If the package that you used to install or upgrade NetVault SmartDisk is not available, you can try using a more recent package; however, this approach might not work if the management of upgrades or uninstalls has changed significantly between the two packages.
NOTE: If you specified a Remote destination, an error message is displayed through a pop-up message earlier in the installation process.
Quest NetVault SmartDisk 11.4.5 Installation/Upgrade GuideTroubleshooting
62
• On MAC OS X, the error message should be displayed in the following location:
/var/log/install.log
Quest NetVault SmartDisk 11.4.5 Installation/Upgrade GuideTroubleshooting
63

About us
Quest provides software solutions for the rapidly-changing world of enterprise IT. We help simplify the challenges caused by data explosion, cloud expansion, hybrid datacenters, security threats, and regulatory requirements. We are a global provider to 130,000 companies across 100 countries, including 95% of the Fortune 500 and 90% of the Global 1000. Since 1987, we have built a portfolio of solutions that now includes database management, data protection, identity and access management, Microsoft platform management, and unified endpoint management. With Quest, organizations spend less time on IT administration and more time on business innovation. For more information, visit www.quest.com.
Technical support resourcesTechnical support is available to Quest customers with a valid maintenance contract and customers who have trial versions. You can access the Quest Support Portal at https://support.quest.com.
The Support Portal provides self-help tools you can use to solve problems quickly and independently, 24 hours a day, 365 days a year. The Support Portal enables you to:
• Submit and manage a Service Request.
• View Knowledge Base articles.
• Sign up for product notifications.
• Download software and technical documentation.
• View how-to-videos.
• Engage in community discussions.
• Chat with support engineers online.
• View services to assist you with your product.
Quest NetVault SmartDisk 11.4.5 Installation/Upgrade GuideAbout us
64