Embed Size (px)
Citation preview

INSTALLATIONINSTRUCTIONS30" (76 CM) FREESTANDINGELECTRICRANGES
Table of ContentsRANGE SAFETY ............................................................................. 1
INSTALLATION REQUIREMENTS ................................................ 2Tools and Parts ............................................................................ 2
Location Requirements ................................................................ 2Electrical Requirements .............................................................. 3
INSTALLATION INSTRUCTIONS .................................................. 4
Unpack Range .............................................................................. 4Install Anti-Tip Bracket ................................................................. 5Electrical Connection ................................................................... 6
Verify Anti-Tip Bracket Location .................................................. 9Level Range .................................................................................. 9Complete Installation ................................................................. 10Moving the Range ...................................................................... 10
ANTI-TIP BRACKET TEMPLATE ............................................... 11
RANGESAFETY
Your safety and the safety of others are very important.We have provided many important safety messages in this manual and on your appliance. Always read and obey all safety
messages.
This is the safety alert symbol.
This symbol alerts you to potential hazards that can kill or hurt you and others.
All safety messages will follow the safety alert symbol and either the word "DANGER" or "WARNING."These words mean:
You can be killed or seriously injured if you don't immediatelyfollow instructions.
You can be killed or seriously injured if you don't followinstructions.
All safety messages will tell you what the potential hazard is, tell you how to reduce the chance of injury, and tell you what canhappen if the instructions are not followed.
Tip Over Hazard
A child or adult can tip the range and be killed.
Connect anti=tip bracket to rear range foot.
Reconnect the anti=tip bracket, if the range is moved.
Failure to follow these instructions can result in death or serious burns to children and adults.
iMPORTANT:Save for local electrical inspector's use.
W10196158B

INSTALLATIONREQUIREMENTS
Gather the required tools and parts before starting installation.Read and follow the instructions provided with any tools listedhere.
Tools needed
• Tape measure • 1¼. drive ratchet
• Flat-blade screwdriver • 1¼. nut driver
• Level • 3/8"and 8/16"nut driver
• Hammer • 1/8"(3.2 mm) drill bit (forwood floors)• Hand or electric drill
• Wrench or pliers • 3/16"(4.8 mm) carbide-tippedmasonry drill bit (for
• Marker or pencil concrete/ceramic floors)
• Masking tape
Parts suppliedCheck that all parts are included.
A
A. Anti-tip bracketB. Plastic anchors (2)C. #10 x 1 ½" screws (2)
Anti-tip bracket must be securely mounted to subfloor.Thickness of flooring may require longer screws to anchorbracket to subfloor. Longer screws are available from yourlocal hardware store.
Parts needed
If using a power supply cord kit:
• A UL listed power supply cord kit marked for use with ranges.The cord should be rated at 250 volts minimum, 40 amps or50 amps that is marked for use with nominal 13/8"(3.5 cm)diameter connection opening and must end in ring terminalsor open-end spade terminals with upturned ends.
• A UL listed strain relief.
Check local codes. Check existing electrical supply. See"Electrical Requirements" section.
It is recommended that all electrical connections be made by alicensed, qualified electrical installer.
IMPORTANT: Observe all governing codes and ordinances.
• It is the installer's responsibility to comply with installationclearances specified on the model/serial rating plate. Themodel/serial rating plate is located on the left side framebehind the storage drawer panel.
The range should be located for convenient use in thekitchen.
To eliminate the risk of burns or fire by reaching over heatedsurface units, cabinet storage space located above thesurface units should be avoided. If cabinet storage is to beprovided, the risk can be reduced by installing a range hoodthat projects horizontally a minimum of 5" (12.7 cm) beyondthe bottom of the cabinets.
Cabinet opening dimensions that are shown must be used.Given dimensions are minimum clearances.
The floor anti-tip bracket must be installed. To install the anti-tip bracket shipped with the range, see "Install Anti-TipBracket" section.
• Grounded electrical supply is required. See "ElectricalRequirements" section.
IMPORTANT: To avoid damage to your cabinets, check with yourbuilder or cabinet supplier to make sure that the materials usedwill not discolor, delaminate or sustain other damage. This ovenhas been designed in accordance with the requirements of ULand CSA International and complies with the maximum allowablewood cabinet temperatures of 194 ° (90°C).
Mobile Home - Additional Installation Requirements
The installation of this range must conform to the ManufacturedHome Construction and Safety Standard, Title 24 CFR, Part 3280(formerly the Federal Standard for Mobile Home Constructionand Safety, Title 24, HUD Part 280). When such standard is notapplicable, use the Standard for Manufactured HomeInstallations, ANSI A225.1/NFPA 501A or local codes.
Mobile home installations require:
• When this range is installed in a mobile home, it must besecured to the floor during transit. Any method of securingthe range is adequate as long as it conforms to the standardslisted above.
• Four-wire power supply cord or cable must be used in amobile home installation. The appliance wiring will need to berevised. See "Electrical Connection" section.
2

ProductDimensions
A
B
,%
E
A. 271%_'' (69.9 cm) max. depth with handleB. 46 _" (119.1 cm) overall height (max.) with leveling legs
screwed all the way in*C. 36" (91.4 cm) cooktop height (max.) with leveling legs screwed
aft the way in*D. 29%" (75.9 cm) widthE. 25" (63.5 cm) depthE Model/serial rating plate (located on the left side frame behind
storage drawer panel)
*Range can be raised approximately 1" (2.5 cm) by adjusting theleveling legs.
Cabinet Dimensions
Cabinet opening dimensions shown are for 25" (64.0 cm)countertop depth, 24" (61.0 cm) base cabinet depth and36" (91.4 cm) countertop height.
IMPORTANT: If installing a range hood or microwave hoodcombination above the range, follow the range hood ormicrowave hood combination installation instructions for
dimensional clearances above the cooktop surface.
A freestanding range may be installed next to combustible wallswith zero clearance.
..........,,i_i_iiiiiiiil_ iiiiliiiiiii!!iii!!
_iii ili;iiiiiii iii i!!ii;ilii
!iiiiiii_li,!@_......
\
A. 13" (33.0 cm) max. upper cabinet depthB. 30" (76.2 cm) min. opening widthC. For minimum clearance to top of cooktop, see NOTE*.D. 301/8'' (76.5 cm) min. opening widthE. Outlet - 8" (20.3 cm) to 22" (55.9 cm) from either cabinet,
51/_'' (14.0 cm) max. from floorF. %" (2.2 cm) min. required between cutout and cabinet door or
hinge.
*NOTE: 24" (61.0 cm) minimum when bottom of wood or metalcabinet is covered by not less than V4" (0.64 cm) flame retardantmillboard covered with not less than No. 28 MSG sheet steel,0.015" (0.4 mm) stainless steel, 0.024" (0.6 mm) aluminum or0.020" (0.5 mm) copper.
30" (76.2 cm) minimum clearance between the top of thecooking platform and the bottom of an uncovered wood or metalcabinet.
If codes permit and a separate ground wire is used, it isrecommended that a qualified electrical installer determine thatthe ground path and wire gauge are in accordance with localcodes.
Do not use an extension cord.
Be sure that the electrical connection and wire size are adequateand in conformance with the National Electrical Code, ANSI/NFPA 70-latest edition and all local codes and ordinances.
A copy of the above code standards can be obtained from:National Fire Protection AssociationOne Batterymarch ParkQuincy, MA 02269.
WARNING: Improper connection of the equipment-groundingconductor can result in a risk of electric shock. Check with a
qualified electrician or service technician if you are in doubt as towhether the appliance is properly grounded. Do not modify thepower supply cord plug. If it will not fit the outlet, have a properoutlet installed by a qualified electrician.

Electrical Connection
To properly installyour range, you must determine the type ofelectrical connection you will be using and follow the instructionsprovided for it here.
• Range must be connected to the proper electrical voltageand frequency as specified on the model/serial number ratingplate. The model/serial number rating plate is located behindthe control panel or on the oven frame behind the storagedrawer panel. Refer to the figures in the "ProductDimensions" section of the "Location Requirements" section.
• This range is manufactured with the neutral terminalconnected to the cabinet. Use a 3-wire, UL listed, 40- or50-amp power supply cord (pigtail) (see Range Rating chartbelow). If local codes do not permit ground through theneutral, use a 4-wire power supply cord rated at 250 volts,40 or 50 amps and investigated for use with ranges.
Range Rating* Specified Rating ofPower Supply Cord Kitand Circuit Protection
120/240 Volts 120/208 Volts Amps
8.8- 16.5 KW 7.8 - 12.5 KW 40 or 50"*16.6 - 22.5 KW 12.6 - 18.5 KW 50
*The NEC calculated load is less than the total connected loadlisted on the model/serial rating plate.
**If connecting to a 50-amp circuit, use a 50-amp rated cord withkit. For 50-amp rated cord kits, use kits that specify use with anominal 13/8"(34.9 mm) diameter connection opening.
A circuit breaker is recommended.
The range can be connected directly to the circuit breakerbox (or fused disconnect) through flexible or nonmetallicsheathed, copper or aluminum cable. See "ElectricalConnection."
• Allow 2 to 3 ft (61.0 cm to 91.4 cm) of slack in the line so thatthe range can be moved if servicing is ever necessary.
• A UL listed conduit connector must be provided at each endof the power supply cable (at the range and at the junctionbox).
• Wire sizes and connections must conform with the rating ofthe range.
• The wiring diagram is located on the back of the range orinside the storage drawer in a clear plastic bag.
If connecting to a 4-wire system:This range is manufactured with the ground connected to theneutral by a link. The ground must be revised so the greenground wire of the 4-wire power supply cord is connected to thecabinet. See "Electrical Connection."
Grounding through the neutral conductor is prohibited for newbranch-circuit installations (1996 NEC); mobile homes; andrecreational vehicles, or an area where local codes prohibitgrounding through the neutral conductor.
When a 4-wire receptacle of NEMA Type 14-50R is used, amatching UL listed, 4-wire, 250-volt, 40- or 50-amp, range powersupply cord (pigtail) must be used. This cord contains 4 copperconductors with ring terminals or open-end spade terminals withupturned ends, terminating in a NEMA Type 14-50P plug on thesupply end.
The fourth (grounding) conductor must be identified by a green orgreen/yellow cover and the neutral conductor by a white cover.Cord should be Type SRD or SRDT with a UL listed strain reliefand be at least 4 ft (1.22 m) long.
4-wire receptacle (14-50R)
The minimum conductor sized for the copper 4-wire powercord are:
40-amp circuit2 No.-8 conductors1 No.-10 white neutral1 No.-8 green grounding
If connecting to a 3-wire system:Local codes may permit the use of a UL listed, 3-wire, 250-volt,40- or 50-amp range power supply cord (pigtail). This cordcontains 3 copper conductors with ring terminals or open-endspade terminals with upturned ends, terminating in a NEMA Type10-50P plug on the supply end. Connectors on the appliance endmust be provided at the point the power supply cord enters theappliance. This uses a 3-wire receptacle of NEMA Type 10-50R.
3-wire receptacle (10-50R)
INSTALLATIONINSTRUCTIONS
3. Do not remove the shipping base at this time.
Excessive Weight Hazard
Use two or more people to move and install range.
Failure to do so can result in back or other injury.
1. Remove shipping materials, tape and film from range.
2. Remove oven racks and parts package from inside oven.
A. Shipping base

4= On Ranges Equipped with Storage Drawers:
Remove the storage drawer. Use a ¼" drive ratchet to lowerthe rear leveling legs one-half turn. Use a wrench or pliers tolower front leveling legs one-half turn.
AD
B
A. ¼" drive ratchet
B. Rear leveling legC. Wrench or priersD. Front levering leg
On Ranges Equipped with Warming Drawers:
Use wrench or pliers to lower the front and rear leveling legsone-half turn.
A BJ
C
2. Place template on the floor in cabinet opening so that the leftedge is against cabinet and top edge is against rear wall,molding or cabinet.
3. Tape template into place.
4. If countertop is not flush with cabinet opening edge, aligntemplate with overhang.
5=
If cabinet opening is wider than that specified in the "LocationRequirements" section, adjust template so range will becentered in cabinet opening.
To mount anti-tip bracket to wood floor, drill two %" (3.2 mm)holes at the positions marked on the bracket template.Remove template from floor.
A. Rear leveling legB. Front levering legC. Wrench or priers
Tip Over Hazard
A child or adult can tip the range and be killed.
Connect anti=tip bracket to rear range foot.
Reconnect the anti=tip bracket, if the range is moved.
Failure to follow these instructions can result in deathor serious burns to children and adults.
Contact a qualified floor covering installer for the best procedurefor drilling mounting holes through your type of floor covering.
Before moving range, slide range onto shipping base, cardboardor hardboard.
1. Remove template from the anti-tip bracket kit (found insidethe oven cavity) or from the back of this manual.
6=
7=
8=
To mount anti-tip bracket to concrete or ceramic floor, use a3/le" (4.8 mm) masonry drill bit to drill 2 holes at the positionsmarked on the bracket template. Remove template from floor.Tap plastic anchors into holes with a hammer.
Align anti-tip bracket holes with holes in floor. Fasten anti-tipbracket with screws provided.
Depending on the thickness of your flooring, longer screwsmay be necessary to anchor the bracket to the subfloor.Longer screws are available from your local hardware store.
Move range close enough to opening to allow for electricalconnections to be made. Remove shipping base, cardboardor hardboard from under range.
Make electrical connections as described in the "ElectricalConnection" section.

g. Move range into its final location making sure rear leveling legslides into anti-tip bracket.
10. If installing the range in a mobile home, you must secure therange to the floor. Any method of securing the range isadequate as long as it conforms to the standards in the"Location Requirements" section.
11. Continue installing your range using the following installationinstructions.
Power Supply Cord Direct Wire
Electrical Shock Hazard
Disconnect power before servicing.
Use a new 40 amp power supply cord.
Plug into a grounded outlet.
Failure to follow these instructions can result in death,fire, or electrical shock.
Electrical Shock Hazard
Disconnect power before servicing.
Use 8 gauge copper or 6 gauge aluminum wire.
ElectricaJiy ground range.
Failure to follow these instructions can result in death,fire, or electrical shock.
1=
2.
Disconnect power.
Remove the terminal block cover screws located on the backof the range. Pull cover down and toward you to removecover from range.
3. Add strain relief.
Style 1: Power supply cord strain relief
• Remove the knockout for the power supply cord.
• Assemble a UL listed strain relief in the opening.
C
A. Two mounting tabs each sideB. Terminal block coverC. Hex-head screws
A. UL listed strain relief
Tighten strain relief screw against the power supply cord.
6

Style 2: Direct wire strain relief
• Remove the knockout as needed for the flexible conduitconnection.
• Assemble a UL listed conduit connector in the opening.
t
A. Removable retaining nutB. Strain relief
• Tighten strain relief screw against the flexible conduit.
4. Complete installation following instructions for your type ofelectrical connection:
4-wire (recommended)
3-wire (if 4-wire is not available)
Electrical Connection Options
If your home has: And you will be Go to Section:connecting to:
4-wire receptacle A UL listed, 4-wire connection:(NEMA type 14-50R) 250-volt Power supply cord
minimum,40-amp, rangepower supplycord
4-wire direct A circuit breaker 4-wire connection:box or fused Direct wire
disconnect(12,7 cm)
3-wire receptacle(NEMA type 10-50R)
A UL listed,250-voltminimum,40-amp, rangepower supplycord
3-wire connection:Power supply cord
3-wire direct1"
(2.5 cm)._
A circuit breakerbox or fuseddisconnect
3-wire connection:Direct wire
4-wire connection: Power supply cord
Use this method for:
• New branch-circuit installations (1996 NEC)
• Mobile homes
• Recreational vehicles
• In an area where local codes prohibit grounding through theneutral
1. Remove the ground-link screw from the range frame. Savethe ground link screw and cup washer. Bend the ground-linkaway from the range so that it does not contact the range.
A. Ground-link screw
B. Cup washerC. Ground-link bent away from range
2. Connect the green ground wire from the power supply cord tothe range using the ground-link screw and cup washer. Theground wire must be attached first and must not contact anyother terminal.
3. Use a 1¼,,nut driver to remove the hex washer head screwsfrom the terminal blocks.
4. Connect the neutral (center) wire to the center terminalconnector using one of the hex washer head screws.Securely tighten screw for proper electrical connection.
E
D
F
G
H
A. Line 1
B. Green ground wireC. Ground-link screwD. Hex washer head
sore wE. Silver-colored terminal
block screw
F. Ground-link
G. Neutral (center) wireH. Line 2
I. UL listed strain reliefand 40- or 50-amprange power supplycord
5. Connect the other 2 wires (lines 1 and 2) to the outeraluminum terminal blocks.
6. Securely tighten screws for proper electrical connection.
7. Tighten strain relief screws.
8. Replace terminal block cover.

3-wire connection: Power supply cord
Use this method only if local codes permit connecting cabinet-ground conductor to neutral wire of power supply cord.
1. Use a 1¼,,nut driver and remove the hex washer head screwsfrom the aluminum terminal blocks.
2. Connect the neutral (center) wire to the center terminalconnector using one of the hex washer head screws.Securely tighten screw for proper electrical connection.
C
B
A
D
E
F
G
A. Line 1B. Ground-linkC. Hex washer head screwD. Silver-colored terminal
block screw
E. Neutral (center) wireF. Line 2G. UL fisted strain relief
and 40- or 50-amp rangepower supply cord
3. Connect the other 2 wires (lines 1 and 2) to the outer terminalscrews on the terminal block.
4. Tighten strain relief screws.
5. Replace terminal block cover.
Direct Wire Installation: Copper or Aluminum Wire
This range may be connected directly to the circuit breaker boxor fused disconnect. Depending on your electrical supply, makethe required 3-wire or 4-wire connection.
1. Strip outer covering back 3" (7.6 cm) to expose wires. Stripthe insulation back 1" (2.5 cm) from the end of each wire.
1Jt
(2.5cm)_,
.... p.-,
'i........... 3" ......(7.6 era)
2. Allow enough slack in the wire to easily attach the wiringterminal block.
3. Complete electrical connection according to your typeelectrical supply (4-wire or 3-wire electrical connection).
4-wire connection: Direct wire
Use this method for:
• New branch-circuit installations (1996 NEC)
• Mobile homes
• Recreational vehicles
1.
2.
In an area where local codes prohibit grounding through theneutral
Remove the ground-link screw from the range frame. Savethe ground-link screw and cup washer. Bend the ground-linkaway from the range so that it does not contact the range.
A. Ground-link screw
B. Cup washerC. Ground-link bent away from range
Connect the bare ground wire to the range using the ground-link screw and cup washer. The ground wire must beattached first and must not contact any other terminal.
E
F
A0
A. Bare wire from powersupply cable
B. Line 1C. Hex washer head screwD. Silver-colored terminal
block screw
E. Line 2
F. Neutral (white) wireG. UL fisted strain refief and
power supply cable
3. Loosen (do not remove) the hex washer head screw andinsert the neutral (white) wire under the screw clamp at thebottom of the center position terminal connector.
4. Insert the other 2 wires (lines 1 and 2) under the other 2 screwclamps.
A. Insert wire under screw clamp.B. Hex washer head screw
5. Securely tighten the hex washer head screws to35 Ibs-in. (4.0 N-m) minimum torque to make properelectrical connection.
6. Tighten the locking ring of the conduit connector.
7. Replace the terminal block cover.
8
3-wireconnection:Directwire
Use this method only if local codes permit connecting groundconductor to neutral supply wire.
1. Loosen (do not remove) the hex washer head screws andinsert the neutral (white) wire under the screw clamp at thebottom of the center position terminal connector.
E
B
A
G
2.
A. Line 1B. Ground-rinkC. Hex washer head screwD. Silver-colored terminal
block screw
E. Neutral (white) wireF. Line 2
G. UL listed strain refiefand power supplycable
Insert the other 2 wires (lines 1 and 2) under the other 2 screwclamps.
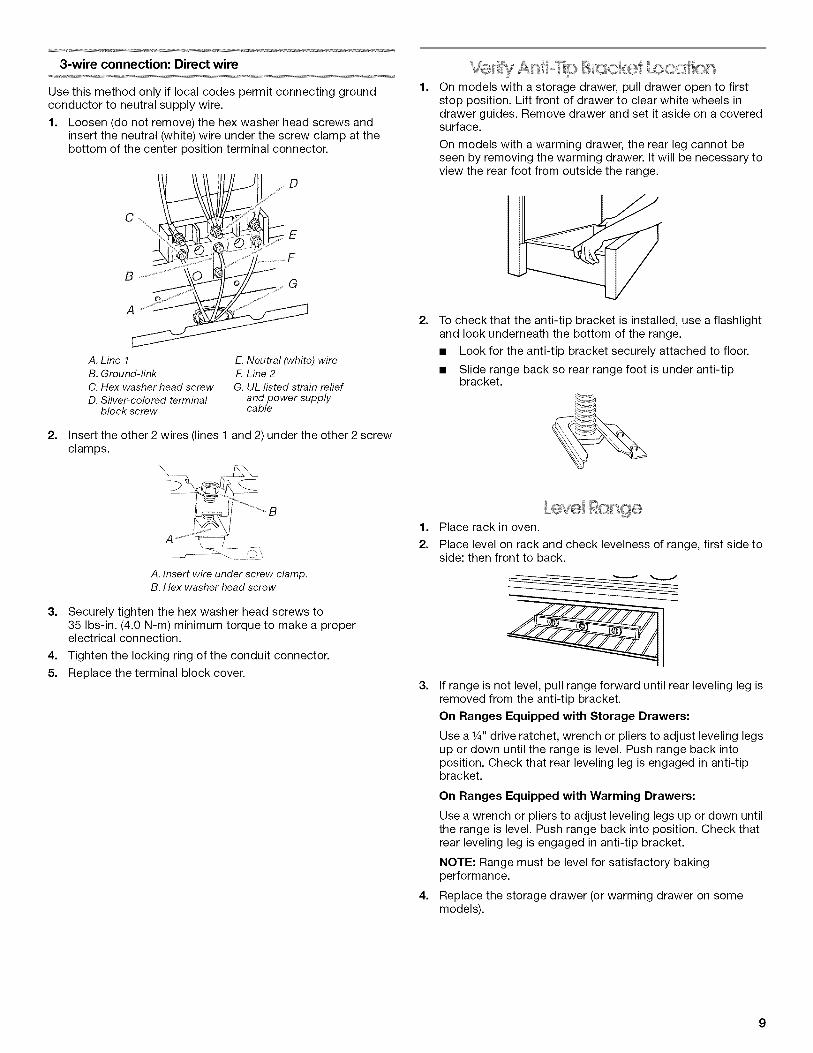
1=
2.
On models with a storage drawer, pull drawer open to firststop position. Lift front of drawer to clear white wheels indrawer guides. Remove drawer and set it aside on a coveredsurface.
On models with a warming drawer, the rear leg cannot beseen by removing the warming drawer. It will be necessary toview the rear foot from outside the range.
To check that the anti-tip bracket is installed, use a flashlightand look underneath the bottom of the range.
• Look for the anti-tip bracket securely attached to floor.
• Slide range back so rear range foot is under anti-tipbracket.
A. Insert wire under screw clamp.B. Hex washer head screw
3. Securely tighten the hex washer head screws to35 Ibs-in. (4.0 N-m) minimum torque to make a properelectrical connection.
4. Tighten the locking ring of the conduit connector.
5. Replace the terminal block cover.
1=
2.
evePlace rack in oven.
Place level on rack and check levelness of range, first side toside; then front to back.
3.
4=
If range is not level, pull range forward until rear leveling leg isremoved from the anti-tip bracket.
On Ranges Equipped with Storage Drawers:
Use a W' drive ratchet, wrench or pliers to adjust leveling legsup or down until the range is level. Push range back intoposition. Check that rear leveling leg is engaged in anti-tipbracket.
On Ranges Equipped with Warming Drawers:
Use a wrench or pliers to adjust leveling legs up or down untilthe range is level. Push range back into position. Check thatrear leveling leg is engaged in anti-tip bracket.
NOTE: Range must be level for satisfactory bakingperformance.
Replace the storage drawer (or warming drawer on somemodels).

1. Checkthatallpartsarenowinstalled.Ifthereisanextrapart,gobackthroughthestepstoseewhichstepwasskipped.
2. Checkthatyouhaveallofyourtools.3. Disposeof/recycleallpackagingmaterials.4. Checkthattherangeislevel.See"LevelRange."5. Useamildsolutionofliquidhouseholdcleanerandwarm
watertoremovewaxyresiduecausedbyshippingmaterial.Drythoroughlywithasoftcloth.Formoreinformation,readthe"RangeCare"sectionoftheUseandCareGuide.
6. Read"RangeUse"intherangeUseandCareGuide.7. Plugpowercordintoappropriateoutlet.Turnpoweron.8. Turnonsurfaceburnersandoven.SeetheUseandCare
Guideforspecificinstructiononrangeoperation.If range does not operate, check the following:
• Household fuse is intact and tight; or circuit breaker has nottripped.
• Range is plugged into an outlet.
• Electrical supply is connected.
• See "Troubleshooting" in the Use and Care Guide.
When the range has been on for 5 minutes, check for heat. Ifrange is cold, turn off the range and contact a qualifiedtechnician.
Tip Over Hazard
A child or adult can tip the range and be killed.
Connect anti=tip bracket to rear range foot.
Reconnect the anti=tip bracket, if the range is moved.
Failure to follow these instructions can result in deathor serious burns to children and adults.
When moving range, slide range onto cardboard or hardboard toavoid damaging the floor covering.
If removing the range is necessary for cleaning or maintenance:
For power supply cord-connected ranges:1. Slide range forward.
2. Unplug the power supply cord.
3. Complete cleaning or maintenance.
4. Plug in power supply cord.
5. Check that anti-tip bracket is installed:
• Look for the anti-tip bracket securely attached to floor.
• Slide range back so rear range foot is under anti-tipbracket.
6. Check that range is level.
For direct-wired ranges:
Electrical Shock Hazard
Disconnect power before servicing.
Replace all parts and panels before operating.
Failure to do so can result in death or electrical shock.
1. Disconnect power.
2. Slide range forward.
3. Complete cleaning or maintenance.
4. Check that anti-tip bracket is installed:
• Look for the anti-tip bracket securely attached to floor.
• Slide range back so rear range foot is under anti-tipbracket.
5. Check that range is level.
6. Reconnect power.
10

ANTI-TIPBRACKETTEMPLATE
Cut on dotted lines and place the left edge against the left side cabinet and the top edge against the rear wall.
Top edge
Use this template to anchor the left rear leg of range.
11

W10196158B© 2008.All rights reserved.
8/08Printed in U.S.A.