Embed Size (px)
Citation preview
12
INSTALLATION GUIDE AND
OPERATING MANUAL
ProSwitch® FlexPort- 2600M Managed Modular Copper and Fiber Switch
CORPORATE HEADQUARTERS MANUFACTURING/CUSTOMER SERVICE 5001 American Blvd. W., Suite 605 945 37th Avenue, NW Bloomington, MN 55437 Rochester, MN 55901 Phone: 800.441.5319 Phone: 800.328.2275 Phone: 952.831.5603 Phone: 507.285.1951
Web site: http://www.watersnet.com

WATERS NETWORK SYSTEMS™ ProSwitch®- 2600M, User’s Manual, 02/07 Page 2
TABLE OF CONTENTS
1.0 SPECIFICATIONS ...................................................................................................1 2.0 PACKAGE CONTENTS - PROSWITCH®- 2600M ..................................................3 2.1 Product Description............................................................................................3 2.2 Uplink Modules...................................................................................................3 3.0 INSTALLATION OF THE PROSWITCH®- 2600M..................................................3 3.1 Location of the ProSwitch®- 2600M....................................................................3 3.2 Rack Mounting the ProSwitch®- 2600M .............................................................4 3.3 Powering the 2600M ..........................................................................................4 3.4 The Modules ......................................................................................................4 3.5 Connecting the ProSwitch® – 2600M .................................................................5 3.6 Status of LEDs ...................................................................................................6 4.0 MANAGING THE SWITCH......................................................................................6 5.0 CONSOLE MANAGEMENT INTERFACE (CMI).....................................................9 6.0 WEB MANAGEMENT............................................................................................26 6.1 System Configuration Page..............................................................................27 6.2 PORT CONFIGURATION......................................................................................28 6.3 Spanning Tree..................................................................................................31 6.4 Dynamic MAC Address Table ..........................................................................32 6.5 Static MAC Address Table ...............................................................................33 6.6 MAC Security Configuration .............................................................................34 6.7 Port-based VLANs............................................................................................35 6.8 802.1Q VLAN Configuration.............................................................................36 6.9 Static 802.1Q VLAN .........................................................................................37 6.10 802.1Q VLAN Table .........................................................................................39 6.11 802.1x Configuration ........................................................................................39 6.12 Protected Port Configuration............................................................................41 6.13 Trunking ...........................................................................................................42 6.14 Mirror Settings..................................................................................................43 6.15 QoS Settings ....................................................................................................44 6.16 Ingress/Egress Rate Control ............................................................................45 6.17 Storm Control ...................................................................................................46 6.18 SNMP...............................................................................................................47 6.19 IGMP ................................................................................................................48 6.20 Statistics...........................................................................................................48 6.21 Maintenance Tools...........................................................................................49 6.22 Telnet and SNMP.............................................................................................49 6.23 Software Update and Backup...........................................................................50 7.0 TROUBLESHOOTING...........................................................................................51 7.1 Before Calling for Assistance ...........................................................................51 7.2 Return Material Authorization (RMA) Procedure..............................................52 7.3 Shipping and Packaging Information ...............................................................52 7.4 Warranty...........................................................................................................53
WATERS NETWORK SYSTEMS™ ProSwitch®- 2600M, User’s Manual, 02/07 Page 1
1.0 Specifications OPERATIONAL CHARACTERISTICS: MAC Address Table: Up to 8K Switching Mode: Store-and-forward Memory Buffer Size: 2 MB Filtering/Forwarding Rate Performance 10Mbps: 14,880 pps 100Mbps: 148,800 pps 1000Mbps: 1,488,000 pps MANAGEMENT OPTIONS: Web Based, SNMP, Console and Telnet DHCP Client SNMP Agent Version 1: MIB-II (RFC1213) Bridge MIB (RFC1493) Etherlike MIB Private MIB RMON: RMON MIB (RFC1757, Group 1, 2, 3, 9) VLAN: Tag and port-based/802.1Q GVRP support 4094 VLAN support/ 256 VLAN groups maximum Port Trunking: 3 groups Port Mirroring IGMP snooping function Port access control: 802.1x authentication QoS: 4 priority queues per port/Port-based/Tag-based Security: Static MAC address Spanning Tree Software Update: TFTP protocol and Xmodem LED INDICATORS: Power/Link/Activity/HDX/FDX System LED Power NETWORK STANDARDS: IEEE 802.3 IEEE 802.3u IEEE 802.3z IEEE 802.3ab IEEE 802.3x IEEE 802.1P/Q IEEE 802.1D IEEE 802.1x

WATERS NETWORK SYSTEMS™ ProSwitch®- 2600M, User’s Manual, 02/07 Page 2
EMI/SAFETY COMPLIANCE: FCC Part 15 Class A, CE COPPER CABLE CONNECTORS: Twisted Pair Shielded RJ45 FIBER CABLE CONNECTORS: MM FX port: 50/125um, 62.5/125mm MM FX port: 50/125um, 62.5/125mm SM FX port: 9/125um MM SX/LX port: 50/125um, 62.5/125mm SM SX/LX port: 9/125um, 62.5/125mm SC or ST connectors FIBER DISTANCE: 100Mbps Fiber MM: 2km; SM: 20km 1000Mbps Fiber MM: 220m; SM: 10km MANAGEMENT CONSOLE CABLE CONNECTOR: DB9 male, accepts industry standard null-modem cable POWER SUPPLY: Input Voltage: 100-240VAC/50/60Hz Power Consumption: 25 watts OPERATING ENVIRONMENT: Ambient Temperature: 32° to 122°F (0° to 50°C) Storage: -13° to 158°F (-25° to 70°C) Ambient relative humidity: 10% to 95% (non-condensing) MECHANICAL: Enclosure: Rugged high-strength sheet metal suitable for stand-alone or rack-mounting Cooling Method: Fan cooled PHYSICAL CHARACTERISTICS: Dimensions: 17.25” W x 10” D x 1.75” H (440mm x 254mm x 44mm) Weight: Switch Chassis: 6.12 lbs (2.8 kg) Copper Module: 0.41 lbs (18.4 kg) Fiber Module: 0.59 lbs (.27 kg) GIG Module: 0.11 lbs (.05 kg) WARRANTY: Limited Lifetime
WATERS NETWORK SYSTEMS™ ProSwitch®- 2600M, User’s Manual, 02/07 Page 3
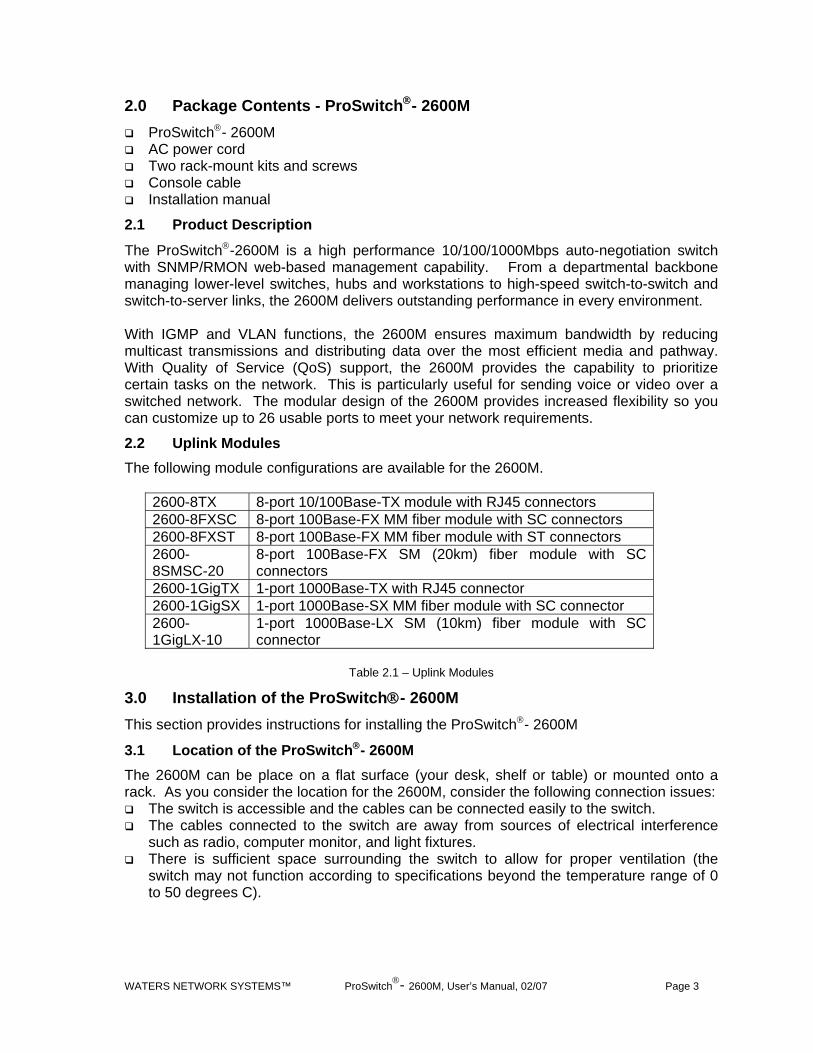
2.0 Package Contents - ProSwitch®- 2600M ProSwitch®- 2600M AC power cord Two rack-mount kits and screws Console cable Installation manual
2.1 Product Description
The ProSwitch®-2600M is a high performance 10/100/1000Mbps auto-negotiation switch with SNMP/RMON web-based management capability. From a departmental backbone managing lower-level switches, hubs and workstations to high-speed switch-to-switch and switch-to-server links, the 2600M delivers outstanding performance in every environment. With IGMP and VLAN functions, the 2600M ensures maximum bandwidth by reducing multicast transmissions and distributing data over the most efficient media and pathway. With Quality of Service (QoS) support, the 2600M provides the capability to prioritize certain tasks on the network. This is particularly useful for sending voice or video over a switched network. The modular design of the 2600M provides increased flexibility so you can customize up to 26 usable ports to meet your network requirements.
2.2 Uplink Modules The following module configurations are available for the 2600M.
2600-8TX 8-port 10/100Base-TX module with RJ45 connectors 2600-8FXSC 8-port 100Base-FX MM fiber module with SC connectors 2600-8FXST 8-port 100Base-FX MM fiber module with ST connectors 2600-8SMSC-20
8-port 100Base-FX SM (20km) fiber module with SC connectors
2600-1GigTX 1-port 1000Base-TX with RJ45 connector 2600-1GigSX 1-port 1000Base-SX MM fiber module with SC connector 2600-1GigLX-10
1-port 1000Base-LX SM (10km) fiber module with SC connector
Table 2.1 – Uplink Modules
3.0 Installation of the ProSwitch®- 2600M This section provides instructions for installing the ProSwitch®- 2600M
3.1 Location of the ProSwitch®- 2600M The 2600M can be place on a flat surface (your desk, shelf or table) or mounted onto a rack. As you consider the location for the 2600M, consider the following connection issues:
The switch is accessible and the cables can be connected easily to the switch. The cables connected to the switch are away from sources of electrical interference
such as radio, computer monitor, and light fixtures. There is sufficient space surrounding the switch to allow for proper ventilation (the
switch may not function according to specifications beyond the temperature range of 0 to 50 degrees C).

WATERS NETWORK SYSTEMS™ ProSwitch®- 2600M, User’s Manual, 02/07 Page 4
3.2 Rack Mounting the ProSwitch®- 2600M 1. Use the brackets and screws supplied in the rack mounting kit. 2. Use a cross-head screwdriver to attach the brackets to the side
of the intelligent Switch. 3. Position the 2600M on the rack by lining up the holes in the
brackets with the appropriate holes on the rack, and then use the supplied screws to mount the hub onto the standard EIA 19-inch rack.
3.3 Powering the 2600M The 2600M switch is equipped with a universal power supply that accepts AC input voltages from 100 to 240VAC and 50 to 60 Hz. To supply power to your switch: 1. Plug the connector of the power cord into the power port on the rear panel of your
switch. 2. Plug the other end of the power cord into an AC wall outlet. Note: Network cable segments can be connected or disconnected from the switch while the power is on, without interrupting the operation of the switch.
3.4 The Modules Warning: Before installing a module into the 2600M, you must disconnect the switch from the main power supply. The 2600M does not support the hot-swap function. The switch and the modules can be damaged if you do not turn off the power to the switch.
Handling Modules
The module can be easily damaged by electrostatic discharge. To prevent damage, please observe the following:
Do not remove modules from their packaging until you are ready for installation. Do not touch any of the pins, connections or components on the modules. Handle the modules on the edges and front panel. Always wear an anti-static wristband connected to a suitable grounding point. Always store or transport modules in appropriate anti-static packaging.
Module Installation
1. Ensure that the switch is disconnected from the main power supply and that you are wearing an anti-static wristband connected to a suitable grounding point.
2. Place the switch on a flat surface. 3. Loosen the screws of the cover on the module slot. Do not remove any other screws
from the switch. 4. Keep the blank module cover and screws in a safe place. If you remove the module at
any time, you must replace the blank module cover to prevent dust and debris from entering the switch and to aid the circulation of cooling air.
5. Follow the rails on both sides of the module slot to slide the module in slowly. 6. Push the module firmly to ensure connection with the module and the connector in the
switch. 7. Tighten the screws to firmly connect the module to the switch. 8. Power ON the switch.
WATERS NETWORK SYSTEMS™ ProSwitch®- 2600M, User’s Manual, 02/07 Page 5
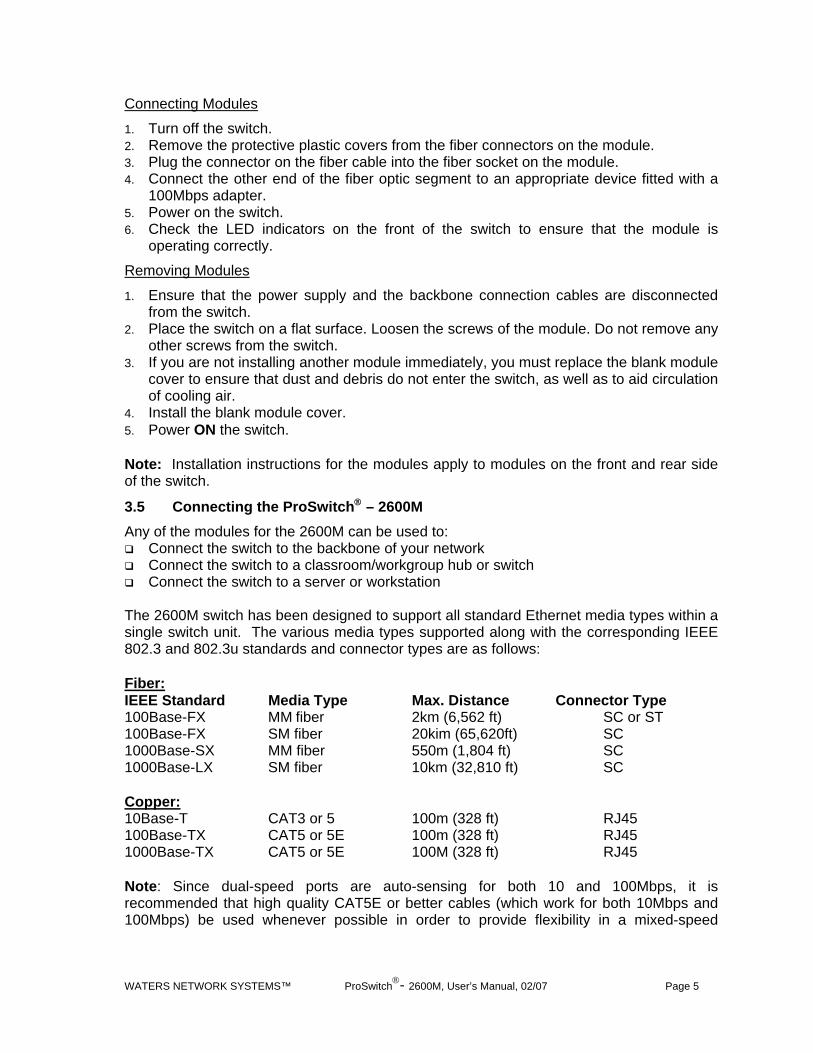
Connecting Modules
1. Turn off the switch. 2. Remove the protective plastic covers from the fiber connectors on the module. 3. Plug the connector on the fiber cable into the fiber socket on the module. 4. Connect the other end of the fiber optic segment to an appropriate device fitted with a
100Mbps adapter. 5. Power on the switch. 6. Check the LED indicators on the front of the switch to ensure that the module is
operating correctly.
Removing Modules
1. Ensure that the power supply and the backbone connection cables are disconnected from the switch.
2. Place the switch on a flat surface. Loosen the screws of the module. Do not remove any other screws from the switch.
3. If you are not installing another module immediately, you must replace the blank module cover to ensure that dust and debris do not enter the switch, as well as to aid circulation of cooling air.
4. Install the blank module cover. 5. Power ON the switch. Note: Installation instructions for the modules apply to modules on the front and rear side of the switch.
3.5 Connecting the ProSwitch® – 2600M Any of the modules for the 2600M can be used to:
Connect the switch to the backbone of your network Connect the switch to a classroom/workgroup hub or switch Connect the switch to a server or workstation
The 2600M switch has been designed to support all standard Ethernet media types within a single switch unit. The various media types supported along with the corresponding IEEE 802.3 and 802.3u standards and connector types are as follows: Fiber: IEEE Standard Media Type Max. Distance Connector Type 100Base-FX MM fiber 2km (6,562 ft) SC or ST 100Base-FX SM fiber 20kim (65,620ft) SC 1000Base-SX MM fiber 550m (1,804 ft) SC 1000Base-LX SM fiber 10km (32,810 ft) SC Copper: 10Base-T CAT3 or 5 100m (328 ft) RJ45 100Base-TX CAT5 or 5E 100m (328 ft) RJ45 1000Base-TX CAT5 or 5E 100M (328 ft) RJ45 Note: Since dual-speed ports are auto-sensing for both 10 and 100Mbps, it is recommended that high quality CAT5E or better cables (which work for both 10Mbps and 100Mbps) be used whenever possible in order to provide flexibility in a mixed-speed

WATERS NETWORK SYSTEMS™ ProSwitch®- 2600M, User’s Manual, 02/07 Page 6
network. Because the switch supports auto MDI/MDI-X detection, normal straight through cables for both workstation connection and hub or switch connection can be used. All ports are auto MDI/MDI-X, so you can use any of the ports to connect a port on another hub or switch with straight through or crossover cables
3.6 Status of LEDs
LED STATUS
CONDITION
Power ON Switch is receiving power.
ON Port has established a valid link. Link / Act
Flashing Data packets received or sent.
ON The connection is full duplex.
OFF The connection if half duplex.
FDX / Col
Flashing Packet collisions occurring for half duplex connection.
Table 3.1 – LEDs
The Link/Act LED is green. The speed display on the TX module is Green for 100Mbps and Yellow for 10Mbps. If 100Base-FX ports are installed, the operation speed must be set to 100Mbps and the operation mode must be set to full duplex. The 100Base-FX ports will not work if they are set to 10Mbps, half duplex or Auto.
4.0 Managing the Switch The 2600M switch can be managed by the following interfaces:
Console Interface (CLI) via the console port. Remote Console Management via a network connection. Telnet SNMP Network Management Station.
The following is a brief list of tasks that can be performed via the management functions along with an explanation of the function:
VLAN (Virtual Local Area Network)
Configuration of VLANs divides the switch into several broadcast domains to prevent network traffic between user groups. The 2600M supports 802.1Q tag-based and port-based VLANs. Users in the same VLAN can transfer data to each other. Network traffic will be blocked if users are in different VLANs. Use of VLANs can make the network more efficient by limiting heavy traffic to a VLAN instead of the entire network.
Trunking
If two switches are cascaded together, there could be a bottleneck at the cascading connection. Additional cables could reduce the bottleneck problem. However, additional cables can cause the switch to become unstable because of looping. The trunking function

WATERS NETWORK SYSTEMS™ ProSwitch®- 2600M, User’s Manual, 02/07 Page 7
treats additional cables as one connection between them. Traffic looping will not occur between these cables and switches will be more stable with a bigger bandwidth between them. The 2600M supports the trunking function.
Enable trunk function. Assign ports to a trunk. For example, assign Port 1, 2, 3 for Trunk 1.
Redundant Application
The trunk connection supports redundant function. If a trunk cable is broken, the traffic going through that cable will be transferred to another trunk cable automatically. For example, if a user on Port 6 is assigned to Port 1 in a Trunk and the Port 1 connection breaks, Port 2 will take over the traffic for Port 6 automatically.
Spanning Tree Protocol
Spanning tree is a protocol used to prevent network loops. If a network loop occurs, it will cause switches in the network to become unstable because the traffic will begin to loop in the network. If a network loop occurs, the spanning tree protocol will block one connection in the loop automatically. Note: If a network connection is changed, there will be a 30 second delay. Because there could be more than one switch in the network, you can configure this function to work for your network.
Port Mirror
This switch operates in store-and-forward algorithm, so it is not possible to monitor network traffic from another connection port. But the port mirror function could copy packets from a monitored port to another port for network monitoring. This switch also provides DA/SA filtering function for monitoring the traffic to/from a user.
QoS
QoS provides a configuration to set priorities for packets. For real-time network traffic (like video or audio), a higher priority is required. With the definition of packet priority, there could be eight levels of priority (from 0 to 7). The 2600M provides four priority level queues on each port. It can be configured for port-based or 802.1p tag-based. You can define the mapping (0 to 7) to the four priority queues.
Static MAC ID in ARL table
The switch learns the MAC address from user’s packets and keeps these MAD addresses in the ARL table for store-and-forward table lookup operation. These MAC addresses will be deleted from ARL table after some time if users do not send packets to the switch. This operation is called aging and the time is called aging time. It is normally five minutes, but you can change the time. If you want to keep MAC addresses in the ARL table for a port, you can assign MAC addresses to the ARL table. These MAC IDs are called static MAC addresses. The 2600M supports static MAC address assignments. The static MAC address assignment limits the MAC addresses than can be used or rejected on the assigned port when using the port security function. For example, assigning the MAC address “00-00-01-11-22-33” to Port 5 will keep this MAC ID alive on Port 5 but will also limit this MAC address to work on Port 5 only or reject it from Port 5. It depends on the port security mode setting.
WATERS NETWORK SYSTEMS™ ProSwitch®- 2600M, User’s Manual, 02/07 Page 8
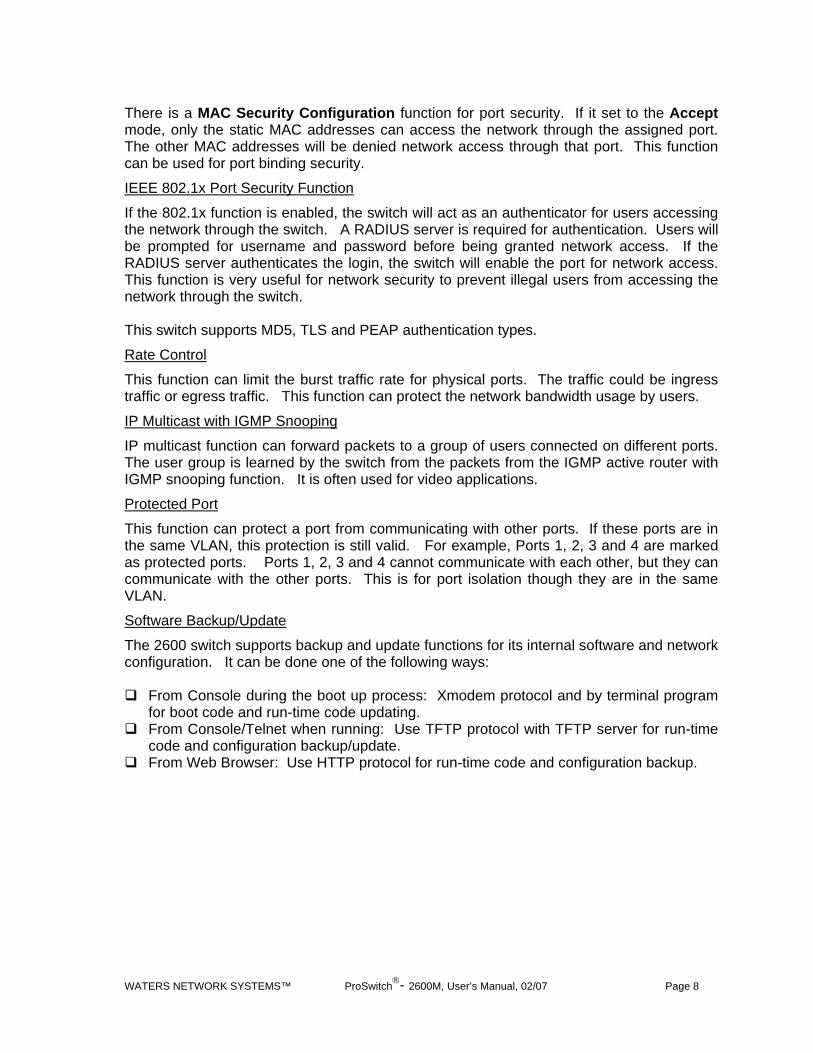
There is a MAC Security Configuration function for port security. If it set to the Accept mode, only the static MAC addresses can access the network through the assigned port. The other MAC addresses will be denied network access through that port. This function can be used for port binding security.
IEEE 802.1x Port Security Function
If the 802.1x function is enabled, the switch will act as an authenticator for users accessing the network through the switch. A RADIUS server is required for authentication. Users will be prompted for username and password before being granted network access. If the RADIUS server authenticates the login, the switch will enable the port for network access. This function is very useful for network security to prevent illegal users from accessing the network through the switch. This switch supports MD5, TLS and PEAP authentication types.
Rate Control
This function can limit the burst traffic rate for physical ports. The traffic could be ingress traffic or egress traffic. This function can protect the network bandwidth usage by users.
IP Multicast with IGMP Snooping
IP multicast function can forward packets to a group of users connected on different ports. The user group is learned by the switch from the packets from the IGMP active router with IGMP snooping function. It is often used for video applications.
Protected Port
This function can protect a port from communicating with other ports. If these ports are in the same VLAN, this protection is still valid. For example, Ports 1, 2, 3 and 4 are marked as protected ports. Ports 1, 2, 3 and 4 cannot communicate with each other, but they can communicate with the other ports. This is for port isolation though they are in the same VLAN.
Software Backup/Update
The 2600 switch supports backup and update functions for its internal software and network configuration. It can be done one of the following ways:
From Console during the boot up process: Xmodem protocol and by terminal program for boot code and run-time code updating.
From Console/Telnet when running: Use TFTP protocol with TFTP server for run-time code and configuration backup/update.
From Web Browser: Use HTTP protocol for run-time code and configuration backup.

WATERS NETWORK SYSTEMS™ ProSwitch®- 2600M, User’s Manual, 02/07 Page 9
5.0 Console Management Interface (CMI) You can manage the 2600M locally by connecting a personal computer or workstation with terminal emulation software, to the serial port of the 2600M. The appropriate cable is included with your switch. This management method is ideal when:
The network is unreliable. The switch has not been assigned an IP address. The network manager does not have direct network connection.
Equipment Required
Null modem cable, 9 position D-Sub, female to female. Computer with function RS-232C port (COMx) Terminal emulation program (HyperTerminal in Windows, Minicom in Linux or any other
emulation software). To use the Hyper Terminal Program with Windows, follow these instructions.
Hardware setup
1. Connect the console port on the switch to the COM port on the PC using console cable included with your switch.
Using HyperTerminal
1. Load the HyperTerminal program from the Start menu. Select Programs – Accessories – Communications – HyperTerminal.
2. If the connection file has not been created, follow the instructions on the screen to create a new connection named "2600M" (or something similar).
3. Select the COM1 port in the connect using field. 4. Set COM port parameters:
a. "Bits per second: 38400 b. Data Bits: 8 c. Parity Check: None d. Stop Bit: 1 e. Flow Control: None
5. Select OK. 6. Power on the switch 7. The login screen will be displayed on your screen once the initialization is complete.

WATERS NETWORK SYSTEMS™ ProSwitch®- 2600M, User’s Manual, 02/07 Page 10
8. The initialization screen will look similar to this example:
Figure 5.1 – Boot up screen
Logging into the Switch
1. Press Enter. 2. Enter the username and password. The default username is admin and the default
password is 123456. 3. After logging into the switch, a prompt will be displayed. You can use the help or ? to
display a list of commands.
Booting Program Version 1.05.00, built at 14:44:03, Jul 29 2005 RAM: 0x00000000-0x00800000, 0x0000cc78-0x007f3000 available FLASH: 0x05800000 - 0x05900000, 16 blocks of 0x00010000 bytes each. ==> enter ^C to abort booting within 3 seconds Start to run system initialization task [System Configuration] Company Name : Model Name : Intelligent Switch MAC Address : 00:00:01:23:45:67 Firmware Version: 3.02.02 < Mar 13 2006 15:13:36 > Press <ENTER> key to start. UCD-SNMP version 4.1.2

WATERS NETWORK SYSTEMS™ ProSwitch®- 2600M, User’s Manual, 02/07 Page 11
The following table lists the CLI commands and descriptions. Command Description Syntax
Help Commands (use ? to display Help Commands) help Help commands set Set commands show Show commands default Restore to factory default setting del Del commands find Find commands whoami Display current login user name reset Reset system ping Ping a specified host with IP address backup Backup run-time firmware of
configuration
Upgrade Upgrade run-time firmware or configuration file
exit Logout logout Logout Set Command (enter Set at the prompt to use the sub commands listed below) help Help commands ? Help commands 1qvlan Set 802.1q VLAN configuration
enable disable ingressfilter - Set ingress filter
enable or disable create - create new 802.1q VLAN
with specified VLAN ID and VLAN name
modify - Modify the setting of a 802.1q VLAN
pvid – Set the port VLAN ID of the specified port
mgrpvid – set the port VLAN ID of the management port
priority – set the priority for tag of specified port
mode – set the VLAN mode
Set 1qvlan
Additional information: The enable and disable sub-commands are used to enable/disable 802.1Q VLAN function of the switch. The ingressfilter sub-command is used to enable/disable VLAN filtering executed at ingress port. Enable: The VLAN filtering function will be executed when a packet is received at the ingress port. If the ingress port is in the same VLAN of the received packet, this packet will go to forwarding stage. Otherwise, the packet will be discarded by VLAN filtering at ingress port.

WATERS NETWORK SYSTEMS™ ProSwitch®- 2600M, User’s Manual, 02/07 Page 12
Command Description Syntax
Disable: The VLAN filtering function will be executed when the packet is forwarded to the egress port. The create sub-command is used to create a static 802.1Q VLAN. For example, “set 1qvlan create 20 ABC” will create a static 802.1Q VLAN with ID 20 and name “ABC”. The modify sub-command is used to modify a static 802.1Q VLAN setting. The syntax is: set 1qvlan modify Syntax: set 1qvlan modify [+|-] [port#] VLANID [1:<tagged>|0:<untagged> Examples: set 1qvlan +1+5-7 2 1 Description: Add port 1,5 to VLAN 2 as tagged port and remove port 7 from VLAN 2 The pvid sub-command is used to set Port VLAN ID. The Port VLAN ID is used as the VLAN ID for tag adding when untagged packet is translated to tagged packet. For example, “set 1qvlan pvid 3 10” will set the PVID of Port 3 as 10. The mgrpvid sub-command is used to select the VLAN group that is allowed to management the switch. Only the users in the selected VLAN can manage the switch by Http, Telnet and SNMP. For example, set 1qvlan mgrpvid 5 will allow the users in the VLAN with VLAN ID 5 to manage the switch remotely. The priority sub-command is used to set port priority for tag adding when untagged packet is translated to tagged packet. For example, set 1qvlan priority 3 2 will set the port priority of Port 3 as 2. The priority information in tag will be filled with 2 when the untagged packet coming to Port 3 is translated to tagged packet. The mode sub-command is used to select the VLAN mode for 802.1Q VLAN operation. There are three modes for VLAN function –SVL (Shared VLAN), IVL (Individual VLAN) and SVL/IVL. Syntax: set 1qvlan mode [0:SVL|1:IVL] Examples: set 1qvlan mode 0 Description: set current vlan mode as SVL 0: SVL mode 1: IVL mode 2: SVL/IVL mode SVL mode – the switch will do packet forwarding according to its MAC address directly. It is the normal VLAN operation of switch. IVL mode – the switch will do packet forwarding according to its MAC address and VLAN ID both. It can be used for special VLAN applications. SVL/IVL mode – its operation is the same as IVL mode but for untagged port is used as the uplink port in MDU/MTU application. For most VLAN applications, SVL mode is suggested. admin Set administrator name and password set admin age Set age time of the switch
0 = disable aging operation; 1~65535; set age [time}

WATERS NETWORK SYSTEMS™ ProSwitch®- 2600M, User’s Manual, 02/07 Page 13
Command Description Syntax
default is 300 Additional information: Disable aging is different from static MAC ID in ARL table. The connection port is fixed for a static MAC ID, but the connection port could be changed for a MAC ID with no aging. arl Add a static MAC address in the ARL
table Set ARL [xx-xx-xx-xx-xx-xx] [port#]
Additional Information: Set ARL 00-00-01-11-22-33 5 will add a static MAC ID 00-00-01-11-22-33 to port 5 and this MAC ID will never be aged out from port 5. Note: Because the static MAC address is fixed on the assigned port by the switch, the static MAC address can access network through the assigned port only. It will fail to access the network through other ports of the switch. automode Set auto negotiation or auto detect
mode of the port set automode
When a port is forced to some special setting instead of full auto-negotiation, this command can be used. There are two modes: an (autonegotiation) and ad (auto detection) an mode – if the auto function of a port is disabled in the port configuration, the switch will disable its auto-negotiation function; the auto-MDIX function of the port is also disabled. That is the real force-mode setting of the port. ad mode – if the auto. function of a port is disabled in port configuration, the switch will not disable its auto-negotiation function but just modify its auto-negotiation attribute for the speed/duplex mode setting; the Auto-MDIX function of the port is still enabled. Application: If the connected device is auto-negotiation enabled and you want to force the speed of the connection (for example, 10M/Half), select ad mode. If the connected device is in forced mode (for example, 10M/Half) and auto-negotiation is disabled, use an mode and set the port to the same configuration as the device in the port configuration function. You can select an mode or ad mode depending on your applications. For most connection cases, ad mode is suggested. For 100FX connection, it is recommended to use an mode and disable Auto. Set the port to 100/Full. dot1x Set 802.1x configuration
enable – set 802.1x to enable eisable – set 802.1x to disable authmode – set 802.1x auth
mode of a specified port authport – set authenticate port
of radius server quiettime – set 802.1x quiet
timeout period re_au – set 802.1x re-
authentication reauthcnt – set 802.1x re-
authentication max count reauthtime – set 802.1x re-
authentication timeout period reqcnt – set 802.1x max request
count rspi – set radius server address shkey – set 802.1x shared key
Ex: set dot1x enable
WATERS NETWORK SYSTEMS™ ProSwitch®- 2600M, User’s Manual, 02/07 Page 14
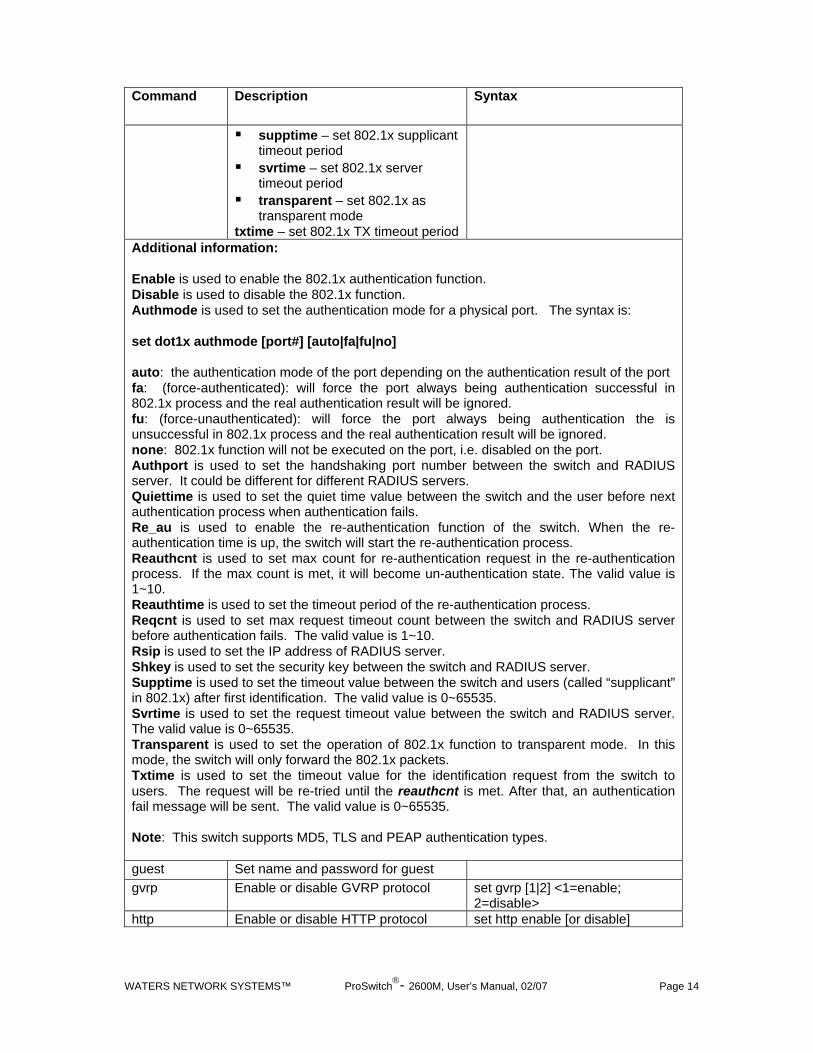
Command Description Syntax
supptime – set 802.1x supplicant timeout period
svrtime – set 802.1x server timeout period
transparent – set 802.1x as transparent mode
txtime – set 802.1x TX timeout period Additional information: Enable is used to enable the 802.1x authentication function. Disable is used to disable the 802.1x function. Authmode is used to set the authentication mode for a physical port. The syntax is: set dot1x authmode [port#] [auto|fa|fu|no] auto: the authentication mode of the port depending on the authentication result of the port fa: (force-authenticated): will force the port always being authentication successful in 802.1x process and the real authentication result will be ignored. fu: (force-unauthenticated): will force the port always being authentication the is unsuccessful in 802.1x process and the real authentication result will be ignored. none: 802.1x function will not be executed on the port, i.e. disabled on the port. Authport is used to set the handshaking port number between the switch and RADIUS server. It could be different for different RADIUS servers. Quiettime is used to set the quiet time value between the switch and the user before next authentication process when authentication fails. Re_au is used to enable the re-authentication function of the switch. When the re-authentication time is up, the switch will start the re-authentication process. Reauthcnt is used to set max count for re-authentication request in the re-authentication process. If the max count is met, it will become un-authentication state. The valid value is 1~10. Reauthtime is used to set the timeout period of the re-authentication process. Reqcnt is used to set max request timeout count between the switch and RADIUS server before authentication fails. The valid value is 1~10. Rsip is used to set the IP address of RADIUS server. Shkey is used to set the security key between the switch and RADIUS server. Supptime is used to set the timeout value between the switch and users (called “supplicant” in 802.1x) after first identification. The valid value is 0~65535. Svrtime is used to set the request timeout value between the switch and RADIUS server. The valid value is 0~65535. Transparent is used to set the operation of 802.1x function to transparent mode. In this mode, the switch will only forward the 802.1x packets. Txtime is used to set the timeout value for the identification request from the switch to users. The request will be re-tried until the reauthcnt is met. After that, an authentication fail message will be sent. The valid value is 0~65535. Note: This switch supports MD5, TLS and PEAP authentication types. guest Set name and password for guest gvrp Enable or disable GVRP protocol set gvrp [1|2] <1=enable;
2=disable> http Enable or disable HTTP protocol set http enable [or disable]

WATERS NETWORK SYSTEMS™ ProSwitch®- 2600M, User’s Manual, 02/07 Page 15
Command Description Syntax
idle Set idle time for console Default is 10 minutes
set idle [time] 30~3600 seconds
igmp Set IGMP configuration set igmp [enable or disable} loopback Set loopback detection of port
Enable loopback detection on port Disable loopback detection on port Release ports that loopback detected
set loopback [enable|disable|release]
mirror Set mirror configuration set mirror ingress div x : every x packets, capture one for mirror. For example, “set mirror ingress div 10” will capture one packet from every ten packets from ingress traffic. set mirror ingress mode xx : mirror all packets or mirror packets with some DA or SA only. For example, “set mirror ingress mode all” will mirror all packets. set mirror ingress mac xx-xx-xx-xx-xx-xx : if the mirror mode is for the packets with some DA/SA, users can assign the DA/SA with this command. set mirror ingress monitor xx,xx,xx :set the monitored ports. For example, “set mirror ingress monitor 1, 2, 5” will mirror the ingress traffic from port 1, 2 and 5. (Note: If the monitored traffic exceeds the maximum bandwidth of the capture port, flow control function will work on these monitored ports.) set mirror egress command This command is used to configure the mirror operation for egress traffic. Its syntax is similar to the mirror operation for ingress traffic. Please refer to “set mirror ingress command”. set mirror port command This command is used to set the capture port for mirror operation. For example, “set mirror port 3” will capture the mirror traffic to Port 3.
set mirror ? (or set mirror help) will display sub commands for mirror set mirror enable set mirror disable set mirror ingress div - Set mirror ingress/egress [div=%d] mode - Set mirror ingress/egress [mode=ALL/SA/DA] mac - Set mirror ingress/egress [mac=xx-xx-xx-xx-xx-xx] monitor - Set mirror ingress/egress [monitor=xx,xx,xx] set mirror ingress
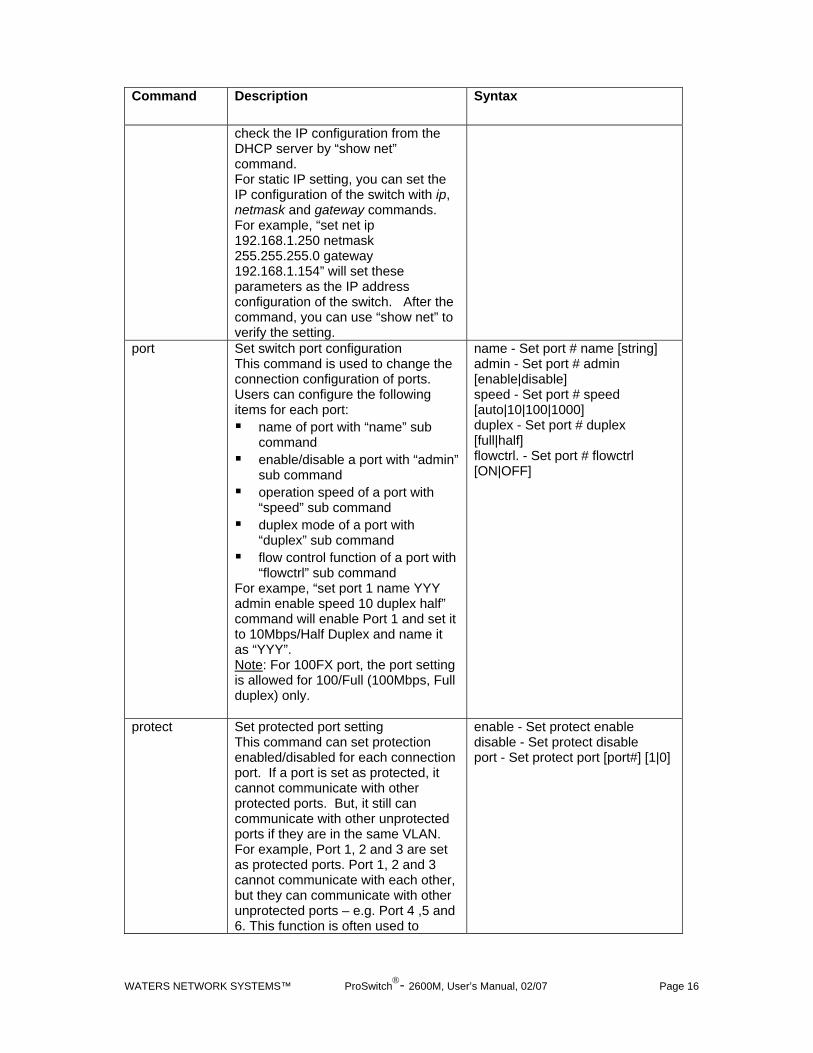
net Set network IP configuration This command is used to configure IP settings for the switch. This switch supports static IP setting or dynamic DHCP IP assignment. If DHCP function is enabled, the switch will try to obtain the IP configuration from the DHCP server. If a DHCP server is not found, the switch will use its default IP configuration. You can
set net [dhcp] [ip] [netmask] [gateway]
WATERS NETWORK SYSTEMS™ ProSwitch®- 2600M, User’s Manual, 02/07 Page 16
Command Description Syntax
check the IP configuration from the DHCP server by “show net” command. For static IP setting, you can set the IP configuration of the switch with ip, netmask and gateway commands. For example, “set net ip 192.168.1.250 netmask 255.255.255.0 gateway 192.168.1.154” will set these parameters as the IP address configuration of the switch. After the command, you can use “show net” to verify the setting.
port Set switch port configuration This command is used to change the connection configuration of ports. Users can configure the following items for each port: name of port with “name” sub
command enable/disable a port with “admin”
sub command operation speed of a port with
“speed” sub command duplex mode of a port with
“duplex” sub command flow control function of a port with
“flowctrl” sub command For exampe, “set port 1 name YYY admin enable speed 10 duplex half” command will enable Port 1 and set it to 10Mbps/Half Duplex and name it as “YYY”. Note: For 100FX port, the port setting is allowed for 100/Full (100Mbps, Full duplex) only.
name - Set port # name [string] admin - Set port # admin [enable|disable] speed - Set port # speed [auto|10|100|1000] duplex - Set port # duplex [full|half] flowctrl. - Set port # flowctrl [ON|OFF]
protect Set protected port setting This command can set protection enabled/disabled for each connection port. If a port is set as protected, it cannot communicate with other protected ports. But, it still can communicate with other unprotected ports if they are in the same VLAN. For example, Port 1, 2 and 3 are set as protected ports. Port 1, 2 and 3 cannot communicate with each other, but they can communicate with other unprotected ports – e.g. Port 4 ,5 and 6. This function is often used to
enable - Set protect enable disable - Set protect disable port - Set protect port [port#] [1|0]

WATERS NETWORK SYSTEMS™ ProSwitch®- 2600M, User’s Manual, 02/07 Page 17
Command Description Syntax
isolated ports in the same VLAN. pvlan Set members of port-based VLAN
groups Note: If a port does not belong to any VLAN, that port will be isolated from other ports – including the internal management interface of the switch
set pvlan [1:enable|0:disable] set pvlan name [vlan#] [vlan name] – Ex. Set pvlan name 1 vlan_1 - sets the name of VLAN 1 as vlan_1 set pvlan [+/-][port#][vlan#] – Ex. Set pvlan +1+2+3+4+5-7 1 – add ports 1, 2, 3, 4 and 5 to VLAN1 and remove port 7 form VLAN1
qos Set QoS configuration The switch supports four priority queues on each port – P0, P1, P2 and P3. Both port-based priority and 802.1P tag priority are supported. This command can be used to configure the QoS setting of the switch.
set qos enable command This command is used to enable QoS operation. set qos disable command This command is used to disable QoS operation. set qos priority command This command is used to configure port-based priority. All packets coming from high priority ports will always be forwarded to the highest priority queue P3. All packets coming from a low priority port will always be forwarded to the lowest priority queue P0. For example, “set qos priority 3 high” command will set Port 3 as a high priority port. set qos dot1p command This sub-command is used to enable/disable the 802.1P QoS operation for each connection port. For example, “set qos dot1p 3 on” will enable the 802.1P QoS operation at Port 3. If a tagged packet comes to Port 3, it will be forwarded with the priority setting in its tag. set qos mapping command This command is used to map the 802.1P priority 0~7 to the four priority queues. For example, “set qos mapping 3 1” command will map the 802.1P tag priority 3 to priority queue P1 and packets with tag priority 3 will be forwarded to priority queue P1 of egress port.
rate control Set rate control configuration This command is used to set the maximum traffic rate to/from connection ports of the switch.
set ratecontrol drop [0:disable|1:enable] Set packets drop for ingress limit set ratecontrol [ingress|egress]

WATERS NETWORK SYSTEMS™ ProSwitch®- 2600M, User’s Manual, 02/07 Page 18
Command Description Syntax
[port#] [N:0-240] Set port 1 ingress rate control with 10; Example: set ratecontrol ingress 1 10 Description: Set port 1 ingress rate control with 10*64K=640K No Limit of rate control, with N=0. Rate = N*64 Kb, with N=1~28. Rate = (N-27)*1Mb, with N=29~127. Rate = (N-115)*8Mb, with N=128~240 (only for Gigabit port). set ratecontrol drop [0|1] This subcommand is used to enable/disable the packet dropping operation when ingress traffic exceeds the maximum ingress rate. If it is set to “disable”, flow control operation will be used instead of packet dropping when traffic rate is exceeded. set ratecontrol [ingress|egress] [port#] [0-240]: This subcommand is used to set the maximum traffic rate for ingress/egress traffic through connection ports of the switch. The rate control could be from 64Kbps to 1000Mbps. N=0: rate control is disable, rate = No Limit. N=1~28: rate = Nx64Kbps, for 64K, 128K, …, 1792Kbps rate control N=29~127: rate = (N-27)x1Mbps, for 2M, 3M, …, 100Mbps rate control N=128~240: rate = (N-115)x8Mbps, for 104M, 112M, …, 1000Mbps Note: N=128~240 is for Port 25, 26 gigabit ports only.
security Set port security This command is used to set the security mode for static MAC address of connection ports. Please refer to “set arl” command for static address setting. Or, you can set static address from the “Dynamic
set security Set security [port#] [mode#] Example: Set security 1 1 Description: Set Security mode of port 1 to Accept mode for Static MAC addresses. mode 0 = No Security

WATERS NETWORK SYSTEMS™ ProSwitch®- 2600M, User’s Manual, 02/07 Page 19
Command Description Syntax
Mac Address Table” in web interface. The table will show the learned Mac addresses and you just need to select from the learned address list and add it to static address table. Additional Information: The MAC address filter-in function requires two conditions. The port security mode is set to “Accept”. Static MAC address is assigned on Port (for example, MAC 1 on Port 1). In this case, only MAC 1 can access network through Port 1. But there is also a limitation for MAC 1 - it can access network through Port 1 only because it is a static fixed address on Port 1.
mode 1 = Accept function mode 2 = Reject function For examples, “set security 1 1” will set Port 1 to accept the users with the static MAC addresses configured on Port 1.
rmon Set RMON function configuration set rmon [1|0] <1=enable, 0=disable>
snmp Set snmp configuration Use this command to configure the following items for SNMP operation. Name of the switch with “name”
sub-command. Location of the switch with
“location” sub-command. Contact for the switch with
“contact” sub-command. GET Community string with
“getcommunity” sub-command SET Community string with
“setcommunity” sub-command. TRAP Community string with
“trapcommunity” sub-command. TRAP IP Address with “tapip”
sub-command. Test TRAP Operation with “txtrp”
sub-command
set snmp [ ] name -set system name location - set system location contact - set system contact name getcommunity -set GET community setcommunity -set SET community trapcommunity - et TRAP community trapip - set TRAP IP address txtrap -send Trap for test
sta Set spanning tree configuration Additional information: priority (0~65535): Bridge
priority is use to select the root device, root port and designated port. The device with the highest priority (lowest value) becomes the STA root device. If all devices have the same priority, the device with the lowest MAC address will then become the root device.
set sta help or ? – help commands enable – enable spanning tree disable – disable spanning tree bridge – set spanning tree bridge configuration port – set spanning tree port configuration Syntax for set sta bridge: >set sta bridge priority - set bridge priority. hello - set bridge hello time

WATERS NETWORK SYSTEMS™ ProSwitch®- 2600M, User’s Manual, 02/07 Page 20
Command Description Syntax
hello (0~65535): the period to send the spanning tree maintenance packet if the switch is the root of the spanning tree. Default is 2 seconds.
age (6~40): the spanning tree aging time if no spanning tree maintenance packet is received. It will cause the spanning tree to re-create. Default is 20 seconds.
delay (4~30): the maximum waiting time before changing states (i.e., listening to learning to forwarding). This delay is required because every device must receive information about topology changes before it begins to forward frames. In addition, each port needs time to listen for conflicting information that would make it return to a blocking state; otherwise, temporary data loops might result.
Additional Information : Settings for set sta port : cost (1~65535): It is used to
determine the best path between devices if looping occurs. Lower values will be forwarded and should be assigned to ports with fast connections. Higher values will be blocked and should be assigned to ports with slow connections. The suggestion values are 100(50~600) for 10M, 19(10~60) for 100M and 4(3~10) for 1000M connections.
priority (0~255): If the path cost for all ports on a switch are the same, the port with the highest priority (lowest value) will be forwarded when looping happens. If more than one port has the same highest priority, the port with lowest port number will be forwarded.
age - set bridge maximum age delay - set bridge forward delay time set sta port is used to configure for ports of the switch Syntax: set sta port [port#] [cost=xxxx] [priority=xxxx]
stormcontrol Set storm control configuration This switch supports broadcast and flooding storm control functions. set stormcontrol rate: this subcommand is used to set the maximum storm rate that is allowed
set stormcontrol rate - set suppression rate for storm control bc – set broadcast control for each port fd – set flooding control for each

WATERS NETWORK SYSTEMS™ ProSwitch®- 2600M, User’s Manual, 02/07 Page 21
Command Description Syntax
for the control. set stormcontrol bc: this subcommand is for broadcast storm control. set stormcontrol fd: this subcommand is for flooding storm control.
port Syntax: set stormcontrol rate Syntax : set stormcontrol rate [rate value] Example 1: Set stormcontrol rate 10 Description: Set suppression rate for Storm Control function as 640Kb. Rate = No Limit, with N=0. Rate = N*64 Kb, with N=1~28. Rate = (N-27)*1Mb, with N=29~127. Syntax: set stormcontrol bc set stormcontrol [bc|fd] [all|none|byport|port#] [1|0] Example 1: Set stormcontrol bc all Description: Set storm control to suppress broadcast packet for all port. Example 2: Set stormcontrol fd none Description: Set storm control not to suppress flooding packet for all port. Examples 3: Set stormcontrol bc byport Description: Set storm control to suppress broadcast packet according to each port setting. Example 4: Set stormcontrol fd 1 1
trunk Set trunk configuration This switch supports three trunk groups (Trunk 1-3) maximum. The default is disabled and null trunk groups. enable and disable sub-commands are used to enable/disable trunk function of the switch. (1=enable; 0=disable) set trunk [1|2|3] [1|0] is a sub-command to enable/disable each trunk connection. set trunk [+/-] [port#] [trunk#] is sub-command to add/remove ports to/ from trunk groups. Only Port 1~8 is available for trunk operation.
Syntax:Set trunk [1|2|3] Example: set trunk 1 1 Description: Enable trunk 1. Syntax : Set trunk [+/-] [port#] [trunk#] Example: Set trunk +1+5-7 1 Description: Add port 1,5 to trunk group 1 and remove port 7 from trunk group 1
default This command restores the switch to default

WATERS NETWORK SYSTEMS™ ProSwitch®- 2600M, User’s Manual, 02/07 Page 22
Command Description Syntax
the factory default del This command can delete static
entried in the ARL table, delete a VLAN group and delete a trunk connection.
Examples: del 1qvlan - (deletes an 802.1q VLAN group) del arl – deletes a MAC address from ARL table del pvlan – deletes a port-based VLAN group del trunk – deletes a trunk connection
find This command can find a MAC address in the ARL table Additional Information: If the MAC is in the ARL table, the MAC address will be displayed. If it is not, the message “This MAC is not existed!” will be displayed. Dynamic means the MAC address is learned and cannot be aged out by the switch. Static means that the MAC address is fixed in the ARL table.
find arl
whoami This command will display the current login name.
reset This command is used to reset the switch.
ping Use ping to ping another device to verify network connection and activity.
backup The switch supports TFTP protocol for firmware and configuration update and backup. To use this command, you must load your TFTP server, and be ready to provide the IP address of the TFTP server and the backup filename for backup operation.
backup [firmware | config] ip filename Example: backup config 192.168.1.80 abcd will backup the configuration to the TFTP server 192.168.1.80 and the filename will be abcd.
upgrade This command is used to upgrade the firmware version and the configuration using the TFTP protocol
upgrade [firmware | config] ip filename ip is the IP address of TFTP server. filename is the upgrade file name in the TFTP server. Example: upgrade config 192.168.1.80 abcd command will load file “abcd” from TFTP server 192.168.1.80 as its configuration setting.
exit Use this command to logout. Same as the logout command.
logout Use this command to logout.

WATERS NETWORK SYSTEMS™ ProSwitch®- 2600M, User’s Manual, 02/07 Page 23
Command Description Syntax
Same as the exit command. Show subcommand list: ? Help commands show ? help Help command show help 1qvlan Displays 802.1q VLAN configuration Example: show 1qvlan [status
|static|table|port] status: show 802.1q, ingress filter and GVRP protocol status static: show static vlan table content table: show all vlan table content port: show the pvid and Priority for tag of ports Example: show 1qvlan status will display: 802.1Q VLAN: Enable Ingress Filter: Enable VLAN Mode : SVL
age Displays current aging time show age arl Displays ARL table
Example: >show arl dynamic [Dynamic Address Learning Table] Item Port Mac Address VID 1) CPU 00-00-01-64-64-64 1(0x001) 2) 8 00-00-e2-82-8c-e6 1(0x001) 3) 4 00-20-14-95-0a-32 1(0x001)
show arl [static|dynamic] static: shows static MAC address set in ARL table dynamic: shows dynamic MAC address learned in ARL table
automode Displays automode will show current setting for port configuration (either Auto Negotiation or Auto Detect) For Auto Negotiation mode, the switch will do auto-negotiation ON/OFF when the auto mode of port is enabled/disabled. Auto-MDIX function will be disabled when the auto-negotiation function of port is OFF. For Auto Detect mode, the switch will always keep auto-negotiation function ON but jmodify its attribution if the auto mode of port is disabled. The Auto-MDIX function will be always enabled in this mode. For applications, you should select Auto Detect mode if the connected device is auto-negotiation enabled. You can select Auto Negotiation mode if the connected device is auto-
show automode
WATERS NETWORK SYSTEMS™ ProSwitch®- 2600M, User’s Manual, 02/07 Page 24
Command Description Syntax
negotiation disabled. For most applications, Auto Detect mode is OK. For 100FX connection, you should select Auto Negotiation mode and disable Auto. Set the port to 100/Full.
cfg Displays model name, MAC ID, and firmware version
show cfg
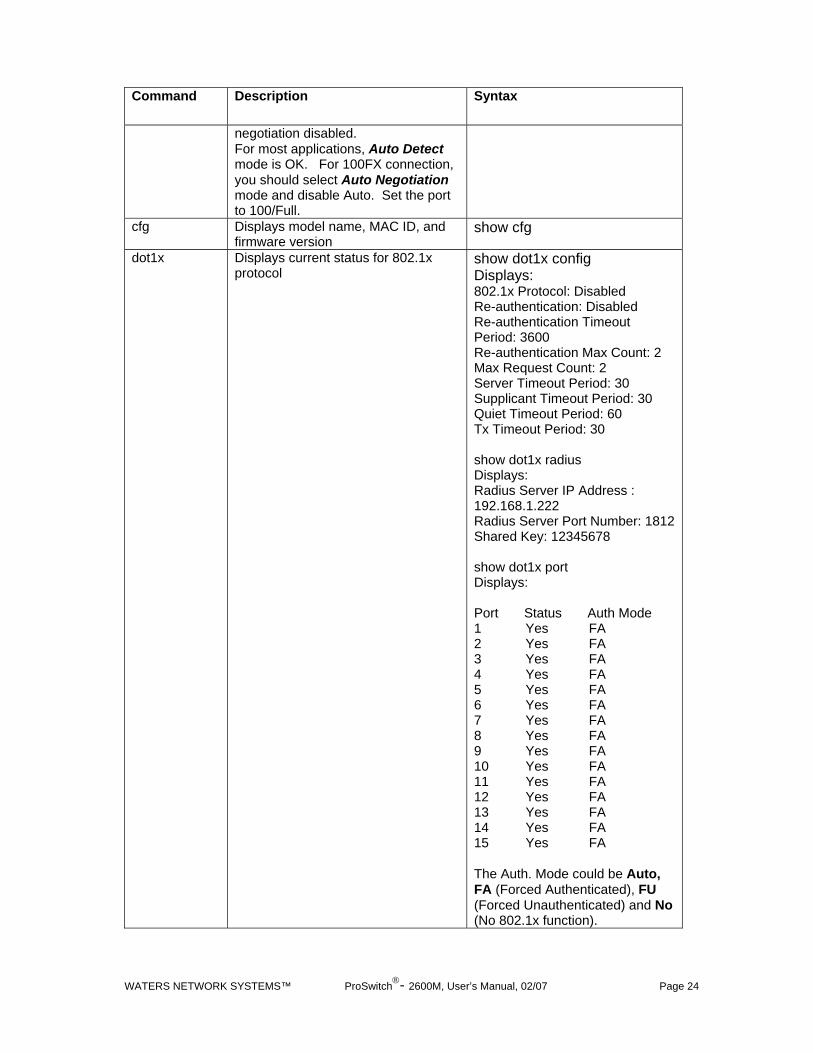
dot1x Displays current status for 802.1x protocol
show dot1x config Displays: 802.1x Protocol: Disabled Re-authentication: Disabled Re-authentication Timeout Period: 3600 Re-authentication Max Count: 2 Max Request Count: 2 Server Timeout Period: 30 Supplicant Timeout Period: 30 Quiet Timeout Period: 60 Tx Timeout Period: 30 show dot1x radius Displays: Radius Server IP Address : 192.168.1.222 Radius Server Port Number: 1812 Shared Key: 12345678 show dot1x port Displays: Port Status Auth Mode 1 Yes FA 2 Yes FA 3 Yes FA 4 Yes FA 5 Yes FA 6 Yes FA 7 Yes FA 8 Yes FA 9 Yes FA 10 Yes FA 11 Yes FA 12 Yes FA 13 Yes FA 14 Yes FA 15 Yes FA The Auth. Mode could be Auto, FA (Forced Authenticated), FU (Forced Unauthenticated) and No (No 802.1x function).

WATERS NETWORK SYSTEMS™ ProSwitch®- 2600M, User’s Manual, 02/07 Page 25
Command Description Syntax
guest Displays name and password for
guest show guest
gvrp Displays GVRP protocol setting show gvrp http Displays http protocol setting
If disabled, the web management interface for the switch will be off.
show http
idle Displays idle time for console logout If there is no keystroke during the amount of time set, the console and telnet interface will logout automatically.
show idle
igmp Displays igmp snooping function and the IP multicast groups that have been learned by the switch
show igmp
loopback Displays loopback detection setting The loopback function can detect packet loopback problems from a port. If a loopback is detected, the port will be disabled.
show loopback
mirror Displays mirror function configuration show mirror net Displays current IP address
If DHCP is enabled, this command will show the IP address received from the DHCP server.
show net
port Displays status and configuration for each port
show port
protect Displays protected port setting Protected ports are ports that cannot communicate with each other
show protect
pvlan Displays port based VLAN configuration
show pvlan
qos Displays QoS configuration for all ports
show qos
ratecontrol Displays rate control setting for each port
show ratecontrol
rmon Displays RMON configuration show rmon security Displays port security mode for static
MAC address show security
snmp Displays snmp configuration The Security Control could be No, Accept, or Reject modes. No is for no MAC address security. Accept is used for the static MAC addresses that can be accessed. Reject is used for the static MAC addresses that cannot be accessed.
show snmp
sta Displays spanning tree setting show sta stormcontrol Displays current packet storm control
configuration show stormcontrol

WATERS NETWORK SYSTEMS™ ProSwitch®- 2600M, User’s Manual, 02/07 Page 26
Command Description Syntax
Use this command to determine the maximum storm rate setting and the port list controlling the storm control
trunk Displays trunking configuration show trunk
6.0 Web Management The 2600M switch can be managed via your web browser. You can use the default IP to connect to the switch for the first time. The default IP address is 192.168.1.5. You can also connect to the switch via the console using the CLI commands listed in Section 5.0. Use the show net command to check the default address of the switch. If you want to change the IP from the CLI commands, use set net ip xxx.xxx.xxx.xxx netmask xxx.xxx.xxx.xxx gateway xxx.xxx.xxx.xxx to set the IP for your installation. The default values for the switch are listed below:
IP Address 192.168.1.5 Subnet Mask 255.255.255.0
Username admin
Password 123456
Table 6.1
Access your web browser, and type in http://192.168.1.5 (or the assigned IP address) in the address field. The login screen will be displayed. (see Table 5-1) requesting the username and password for login authentication. The default username is admin and password 123456. Click on the Login button. The login process now is completed. The management home page will be displayed.
Figure 6.1 – Management Home Page

WATERS NETWORK SYSTEMS™ ProSwitch®- 2600M, User’s Manual, 02/07 Page 27
The left side of the home page is a function list. You can use any of these menu options for status monitoring or switch configuration. The top of the screen displays the current link status for the switch. Three colors are used to show the status of ports: link up, link down and port disable. The middle of the screen shows the operation for switch configuration based on the selected function. This is the working area.
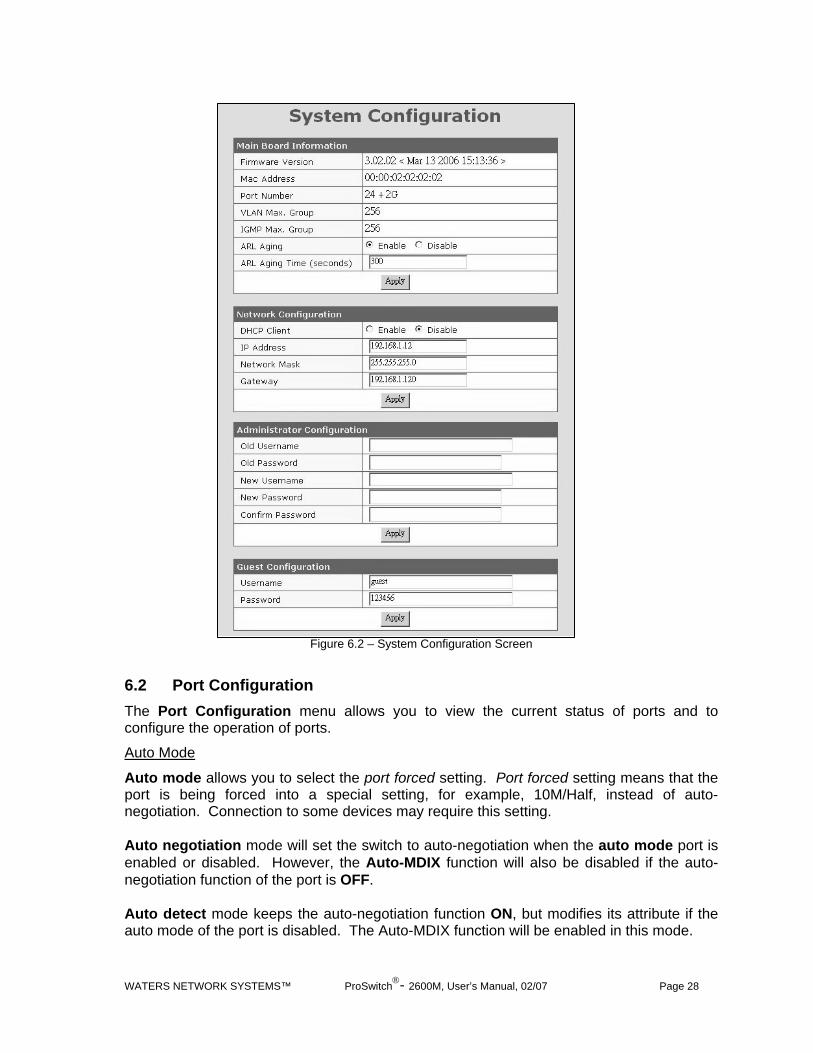
6.1 System Configuration Page The System Configuration is the home page of the switch. (Refer to Figure 6.2 on the next page) This page lists the firmware version of the switch and the MAC address of the switch. The following functions can be configured from this page: ARL Aging Time – The aging operation of the switch can be enabled, disabled and
modified at this screen. (Default is 300 seconds.) DHCP / IP Address / Network Mask / Gateway: IP address configuration of the switch
here can be configured here either by DHCP or static settings. Administrator Configuration: Use these fields to modify user name and password.
Guest Configuration: Use these fields to change the user name and password for the
guest account. The default user name is guest and the password is 123456. The guest account can only see the switch settings and cannot make any changes to the settings.
If any modifications have been made to the functions listed above, click Apply to activate the new settings.
WATERS NETWORK SYSTEMS™ ProSwitch®- 2600M, User’s Manual, 02/07 Page 28
Figure 6.2 – System Configuration Screen
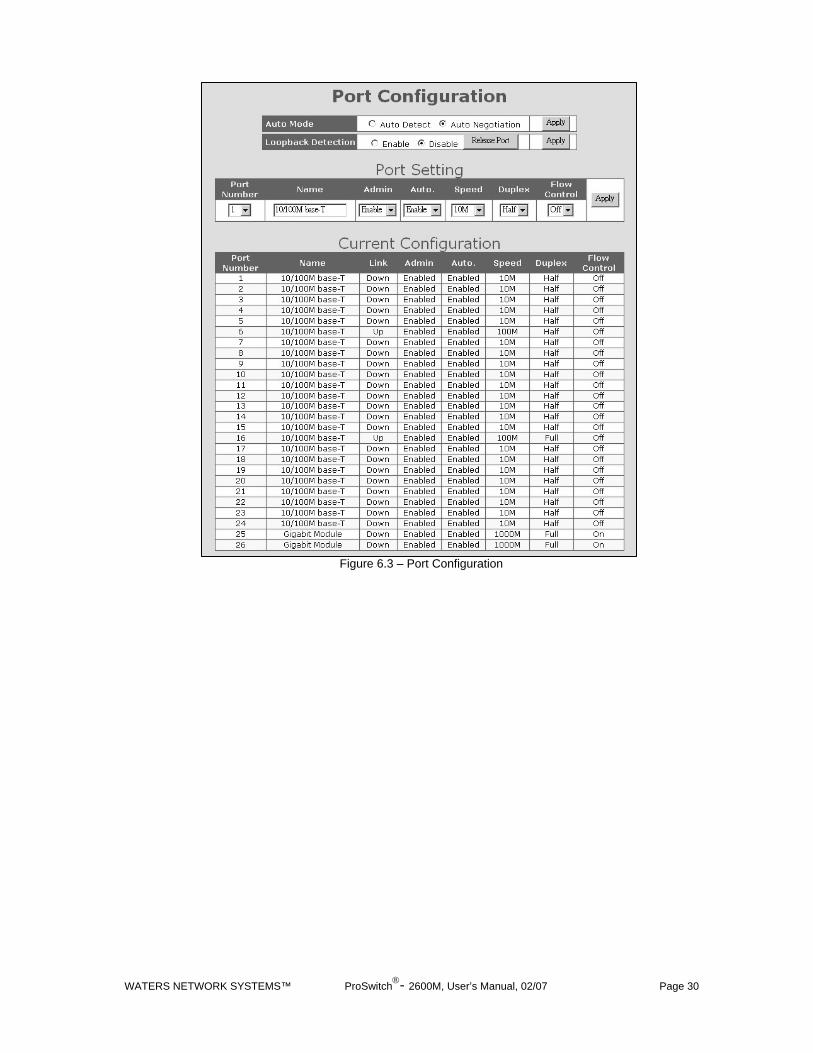
6.2 Port Configuration The Port Configuration menu allows you to view the current status of ports and to configure the operation of ports.
Auto Mode
Auto mode allows you to select the port forced setting. Port forced setting means that the port is being forced into a special setting, for example, 10M/Half, instead of auto-negotiation. Connection to some devices may require this setting. Auto negotiation mode will set the switch to auto-negotiation when the auto mode port is enabled or disabled. However, the Auto-MDIX function will also be disabled if the auto-negotiation function of the port is OFF. Auto detect mode keeps the auto-negotiation function ON, but modifies its attribute if the auto mode of the port is disabled. The Auto-MDIX function will be enabled in this mode.

WATERS NETWORK SYSTEMS™ ProSwitch®- 2600M, User’s Manual, 02/07 Page 29
Select Auto Detect mode if the connected device supports auto-negotiation enabled. Select Auto Negotiation mode if the connected device is auto-negotiation disabled. For most applications, Auto Detect mode is OK. But for 100FX connections, you should select Auto Negotiation mode and disable Auto. Set the port to 100/Full.
Loopback Detection
This switch can detect a loopback condition occurring on ports if this function is enabled. If a loopback condition is determined, the loopback port will be disabled. Use the Release button to release the disabled port when the loopback condition is removed. Use the following steps to set the port configuration: 1. Select the port number by using the drop down arrow under Port Number. 2. Choose the appropriate settings. 3. Click Apply to save the changes. The following list provides a description about these settings. Name - The name of the port used to help users to identify the connection. Admin - Enable/disable a port. Auto - Enable/disable the auto mode of ports. If auto is disabled, the Speed and
Duplex setting will become active. The auto mode could be auto-negotiation or auto-detect.
Speed - Select the operation speed when Auto has been disabled. Duplex: Select the duplex mode when Auto is disabled. Flow Control - Enable/disable flow control function to prevent packet lost.
The following list provides a description for the current settings listed under Current Configuration: Name - The name of the ports. Link - Link status of ports. Admin - Enable/disable status of ports. Auto - Auto-negotiation enable/disable status of ports. Speed - Current operation speed if the ports are up. Duplex - Current duplex mode setting if the ports are up. Flow Control - Current flow control status.
WATERS NETWORK SYSTEMS™ ProSwitch®- 2600M, User’s Manual, 02/07 Page 30
Figure 6.3 – Port Configuration

WATERS NETWORK SYSTEMS™ ProSwitch®- 2600M, User’s Manual, 02/07 Page 31
6.3 Spanning Tree The spanning tree menu is used to enable/disable the spanning tree function and configure the bridge parameters. Refer to the section in the CLI chart for detailed information about spanning tree settings. Click on Apply to make changes to spanning tree.
Figure 6.4 – Spanning Tree
Once the parameters are set, click on Configuration STA Port and the configuration page displayed below will appear.
Figure 6.5 – Spanning Tree Parameters
Select a port number from the drop down arrow next to Bridge Port Number to check the spanning tree status. Click on Apply after making any changes.

WATERS NETWORK SYSTEMS™ ProSwitch®- 2600M, User’s Manual, 02/07 Page 32
6.4 Dynamic MAC Address Table The Dynamic MAC Address Table screen will display the MAC address content for the ports. 1. Select the port from the drop down arrow next to Destination Port. 2. The MAC address learned by the switch on the port will be displayed. 3. Up to 128 MAC address will be shown. 4. You can select the MAC address to assign as static MAC addresses for the port. 5. Click Add to Static Address Table once you have chosen the port. 6. Click Static Address Table on the left side of the screen to check the static address
assignment. Note: Because of aging time operation of switch, incorrect MAC addresses can be found in the MAC Address Table. These incorrect MAC addresses are the devices that had access to the port at sometime. The switch learns the address and enters them into the learning table. The switch will clear them out once the aging time is up. You can shorten the aging time and refresh the screen to ensure that the correct MAC addresses are listed. Once the correct MAC addresses are listed, recover the aging time.
Figure 6.6 – Dynamic MAC Address Table

WATERS NETWORK SYSTEMS™ ProSwitch®- 2600M, User’s Manual, 02/07 Page 33
6.5 Static MAC Address Table The 2600M also supports static MAC address assignments. Static MAC addresses can be assigned by two methods: 1. Select from the MAC address list in the Dynamic MAC Address Table. OR 2. Enter a MAC address and select the port. 3. Add this entry to the Static MAC Address Table by clicking on Add MAC. The switch will not age out these static MAC addresses. There is a limitation for these static MAC addresses - they are allowed to work on the assigned port only because they are static fixed on the assignment port. If you want to delete an entry in the static MAC address table, click Delete and the static MAC address will be removed from the table.
Figure 6.7 – Static MAC Address Table
Port Security
You can configure the MAC Security Configuration function for port access security with a MAC address. The two modes that can be used are:
Accept mode - Only the static address can access the network via the port. Reject mode - Only the static address cannot access network via the port.

WATERS NETWORK SYSTEMS™ ProSwitch®- 2600M, User’s Manual, 02/07 Page 34
6.6 MAC Security Configuration This function is used to set the security modes for the static MAC address on the port. There are three options for this function: No Security - No MAC address access limitation for the port, i.e. every MAC address
could access the network through the port. Accept function - The port can accept the static MAC addresses only, i.e. only a user
with a static MAC address can access the network through the port. Reject function: Only the static address will be rejected by the port, i.e. other MAC
addresses (except static MAC addresses) can access the network through the port.
Figure 6.8 – MAC Security Configuration

WATERS NETWORK SYSTEMS™ ProSwitch®- 2600M, User’s Manual, 02/07 Page 35
6.7 Port-based VLANs This switch supports both 802.1Q VLAN and port-based VLAN functions. This screen can be used to configure port-based VLANs. There are three sections on the screen: The top section is used to choose the VLAN function. Choose between 802.1Q VLAN,
Port-based VLAN or Disabled for the VLAN function. The middle section of the screen is used to create and modify a port-based VLAN. Use
the following steps: 1. Select the VLAN ID number. 2. Enter a name for the VLAN. 3. Select the ports for the VLAN. You can use Select All if you want all of the ports
to be included. (Remove All can be used to remove all the ports from the VLAN at a later time.)
4. Click Apply to save the changes. The bottom section is the Port-based VLAN Table. This table displays the port-based
VLANs for the switch.
Figure 6.9 – Port-Based VLAN Settings

WATERS NETWORK SYSTEMS™ ProSwitch®- 2600M, User’s Manual, 02/07 Page 36
6.8 802.1Q VLAN Configuration This screen is used to configure the 802.1Q VLAN function. The following list describes the settings. VLAN Function – Use to select the VLAN mode: 802.1Q VLAN, Port-based VLAN and
Disabled. GVRP Protocol - Use to enable/disable the GVRP protocol. The GVRP protocol can
learn remote 802.1Q VLANs from other devices and add them to the dynamic 802.1Q VLAN table.
Ingress Filter - The ingress-filter function is used for VLAN filtering at the ingress port. If the packet and its ingress port are in the same VLAN, it will be forwarded. Otherwise, it will be discarded.
VLAN Mode – Use this function to select the VLAN modes of 802.1Q VLAN operation. There are three modes for 802.1Q VLAN function: SVL (Shared VLAN), IVL (Individual VLAN) and SVL/IVL. o SVL mode – the switch will forward packets according only to its MAC address. o IVL mode – the switch will forward packets according to its MAC address and its
VLAN ID. o SVL/IVL mode – its operation is the same as IVL mode, but for untagged port it is
used as the uplink port in MDU/MTU application. o For most VLAN applications, SVL mode is OK.
Management Port VID - This is the VLAN ID for the switch management interface. Only users in the same VLAN can manage the switch via the network. This adds to security for the network.
Port VID: This setting is for untagged packets translated to tagged packets. The port VID and priority setting will be used for tag adding in the translation. When untagged packets are forwarded to a tagged port, a tag will be added and the Port VID and priority setting will be applied to the tag.
Instructions: 1. Select the port number. 2. Set Port VID and Priority for Tag. 3. Click Apply to activate the settings.

WATERS NETWORK SYSTEMS™ ProSwitch®- 2600M, User’s Manual, 02/07 Page 37
Figure 6.10 – 802.1Q VLAN Configuration
6.9 Static 802.1Q VLAN To create an 802.1Q VLAN: 1. Enter the VLAN ID and VLAN Name in the fields under Create New Static VLAN. 2. Click Create. The valid VLAN ID is 1 ~ 4094. 3. Select the VLAN under Show Static VLAN Table. 4. The new VLAN is empty by default, so the next step is to select the ports. Select the
ports and mark them Untagged or Tagged. 5. Click Apply to complete the VLAN configuration. To modify an 802.1Q VLAN: 1. Select the VLAN Show Static VLAN Table. 2. Make the appropriate modifications to the VLAN. 3. Click Apply to activate the new setting. To delete an 802.1Q VLAN: 1. Select the VLAN under Show Static VLAN Table. 2. Click Delete to delete the 802.1Q VLAN. Tagged/Untagged Settings

WATERS NETWORK SYSTEMS™ ProSwitch®- 2600M, User’s Manual, 02/07 Page 38
The tagged port will always send out packets with a tag. If untagged packet is received, a tag will be added with the PVID setting of the ingress port before it is forwarded to the tagged port. The 802.1Q VLAN information will be carried in the tag. The untagged port will always send out packets without tag. If a tagged packet is received, the tag will be removed from the packet before forwarded to an untagged port. Note: Most network adapters or devices are untagged devices. If they are connected to a tagged port, they will not be able to access the network because of the tag in the packet. Only users in the same VLAN as the Management Port PVID (configured in “802.1Q VLAN) can manage the switch via Web/Telnet/SNMP. Users in other VLANs will not be able to manage the switch from the network.
Figure 6.11 – Static 802.1Q VLAN

WATERS NETWORK SYSTEMS™ ProSwitch®- 2600M, User’s Manual, 02/07 Page 39
6.10 802.1Q VLAN Table The 802.1Q VLAN table will show the activity for the VLAN. Both static and dynamic 802.1Q VLANs will be displayed in the table. To view the 802.1Q VLANs: 1. Select a VLAN under the Show VLAN Table section. 2. The current activity for the VLANs will be displayed. Note: If the GVRP protocol is enabled, this table will also display the learned remote 802.1Q VLANs.
6.12 – 802.1Q VLAN Table
6.11 802.1x Configuration The 802.1x function limits port access for users who can be authenticated. The function requires a Radius server for the authentication process. The switch acts as the authenticator. To configure 802.1x function settings: 1. Choose the 802.1x Authentication Status.
• Enable - enables 802.1x function in authentication mode • Disable - disables 802.1x function • Transparent – forwards only 802.1x packets
2. Chose the Re-authentication mode. This function will re-authenticate users after the specified timeout period.
3. Set the Re-authentication Timeout Period. 4. Set the Re-authentication Max Count. The Max Count is the maximum re-try count
between the switch and users before authentication fails. 5. Set the Max Request Count. 6. Set the Server Timeout Period. The Server Timeout Period is the timeout period for
the request between the switch and RADIUS server. 7. Set the Supplicant Timeout Period. This value is the timeout between the switch and

WATERS NETWORK SYSTEMS™ ProSwitch®- 2600M, User’s Manual, 02/07 Page 40
users (called “supplicant” in 802.1x) after the first identification. The valid value is 0~65535.
8. Set the Quiet Timeout Period. This value is the quiet time between the switch and the user before the next authentication process when authentication fails.
9. Set the Tx Timeout Period. This value sets the timeout for the identification request from the switch to users. The request will be re-tried until the Re-authentication Max Count is met. After that, a message will be sent that authentication has failed. The valid value is 0~65535.
10. Click Apply to save these settings. 11. Enter the Radius Server Configuration.
• Server IP address • Server port number • Shared key
12. Click Apply to save these settings.
6.13 – 802.1X Configuration
The Port Authentication Configuration is used to select the authentication mode for each port of the switch. Choose between the following settings: Auto – This is the normal 802.1X operational mode. The authentication status
(authenticated or unauthenticated) depends on the authentication result of the port. Force-Authorized - This mode will force the authenticating port to be authenticated in
the 802.1x process and the real authentication result will be ignored. Force-Unauthorized -This mode will force the authenticating port to fail in the
authentication process and the real authentication result will be ignored. None - This mode will disable 802.1x operation on the specified port.

WATERS NETWORK SYSTEMS™ ProSwitch®- 2600M, User’s Manual, 02/07 Page 41
6.14 – Port Authentication Configuration
6.12 Protected Port Configuration The Protected Port function allows you to isolate the traffic between protected ports. For example, if Ports 1, 2 and 3 are marked as protected, the traffic between these three ports will be blocked, even they are in the same VLAN. However, they still can communicate with other ports in the same VLAN. This function adds another level of security to the switch. 1. Select Enable. 2. Click Apply in the Protected Function section of the screen. 3. Select the ports that should be isolated from each other and click Apply. 4. If you want to choose all ports, click on Select All. Remove all can be used at a later
time to remove the protection from all of the ports

WATERS NETWORK SYSTEMS™ ProSwitch®- 2600M, User’s Manual, 02/07 Page 42
6.15 – Protected Port Setting
6.13 Trunking This switch supports three trunk connections which are disabled by default. Follow these steps to configure trunking: 1. Select Enable in the Trunk Function section of the screen. 2. Click Apply to enable the function. 3. Use Trunk 1 or Trunk 2 to create a trunk of the 10/100Mbps ports. 4. Use Trunk 3 to create a trunk for the Gigabit ports. 5. Click Apply to save the settings. 6. If you want to disable the trunk function, select Disable and click Apply. The switch will
clear the Trunk configuration. Note: The trunk connection supports the redundant function. If a trunk cable is broken, the traffic going through that cable will be transferred to another trunk cable in the trunk connection automatically.
6.16 – Trunk Settings

WATERS NETWORK SYSTEMS™ ProSwitch®- 2600M, User’s Manual, 02/07 Page 43
6.14 Mirror Settings To configure the Mirror function, follow these steps: 1. Select Enable in Mirroring. 2. Click Apply to enable the function. 3. Select the capture port. The monitored traffic will be forwarded to this port. 4. Select the monitored port from Ingress or Egress table – depending on the traffic
direction. 5. Select the filter mode. Choose between All packets or DA/SA address. If DA/SA is
selected, enter the special MAC address in the xx-xx-xx-xx-xx-xx format. 6. Enter the capture frequency. 7. Click Apply to save the settings. 8. If you want to disable the Mirror function, select Disable and click Apply.
6.17 – Mirror Settings

WATERS NETWORK SYSTEMS™ ProSwitch®- 2600M, User’s Manual, 02/07 Page 44
6.15 QoS Settings The 2600M switch supports four priority queues on each port for QoS operation. Use the following steps to configure the QoS function: 1. Select Enable in the QoS Function section of the screen. 2. Click Apply to enable the function. 3. If you are using port-based priority, select the ports for High and Low priorities in the
Port Priority section of the screen. The packets from high priority port will be forwarded to the highest priority queue on egress port. The packets from low priority port will be forwarded to the lowest priority queue on egress port.
4. Select the ports that enable the 802.1P priority function. Packets will be forwarded with the priority information in tag. Configure the 802.1P priority mapping to priority queue of port. The priority value is 0 ~ 7 for the 802.1P tagged packets.
5. Click Apply to activate the settings. To disable the QoS operation, select Disable and click Apply.
6.18 – QoS Settings
WATERS NETWORK SYSTEMS™ ProSwitch®- 2600M, User’s Manual, 02/07 Page 45
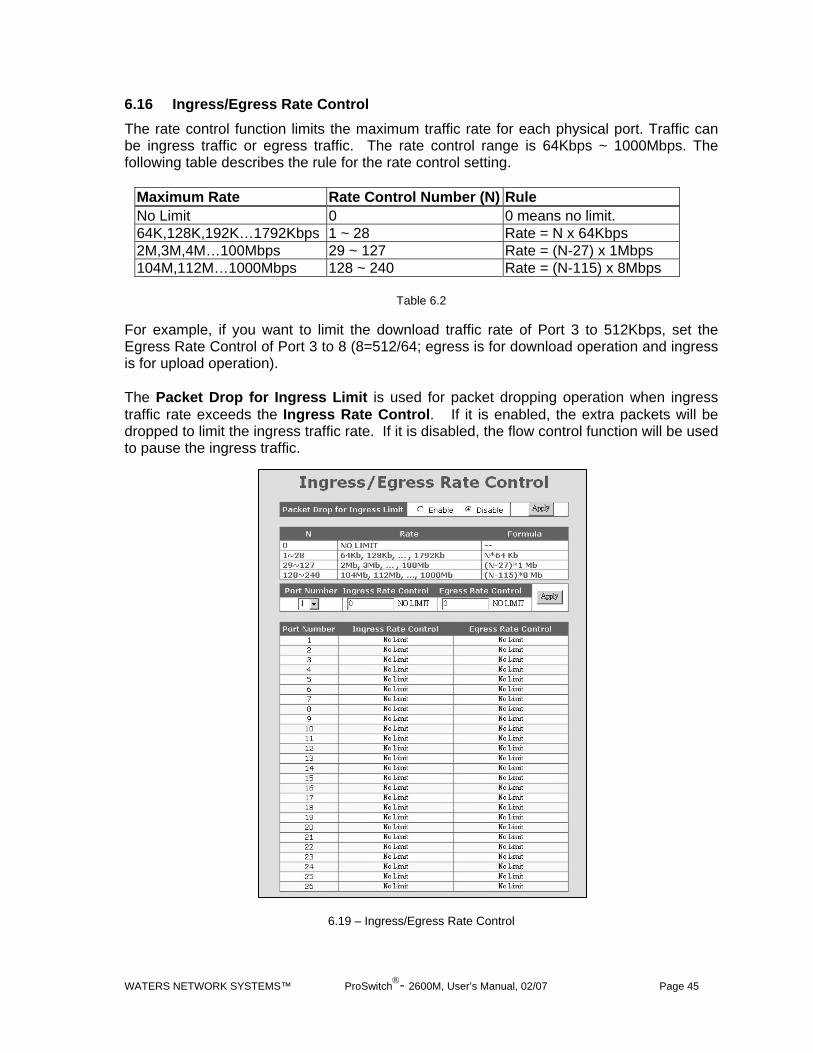
6.16 Ingress/Egress Rate Control The rate control function limits the maximum traffic rate for each physical port. Traffic can be ingress traffic or egress traffic. The rate control range is 64Kbps ~ 1000Mbps. The following table describes the rule for the rate control setting.
Maximum Rate Rate Control Number (N) Rule No Limit 0 0 means no limit. 64K,128K,192K…1792Kbps 1 ~ 28 Rate = N x 64Kbps 2M,3M,4M…100Mbps 29 ~ 127 Rate = (N-27) x 1Mbps 104M,112M…1000Mbps 128 ~ 240 Rate = (N-115) x 8Mbps
Table 6.2
For example, if you want to limit the download traffic rate of Port 3 to 512Kbps, set the Egress Rate Control of Port 3 to 8 (8=512/64; egress is for download operation and ingress is for upload operation). The Packet Drop for Ingress Limit is used for packet dropping operation when ingress traffic rate exceeds the Ingress Rate Control. If it is enabled, the extra packets will be dropped to limit the ingress traffic rate. If it is disabled, the flow control function will be used to pause the ingress traffic.
6.19 – Ingress/Egress Rate Control
WATERS NETWORK SYSTEMS™ ProSwitch®- 2600M, User’s Manual, 02/07 Page 46
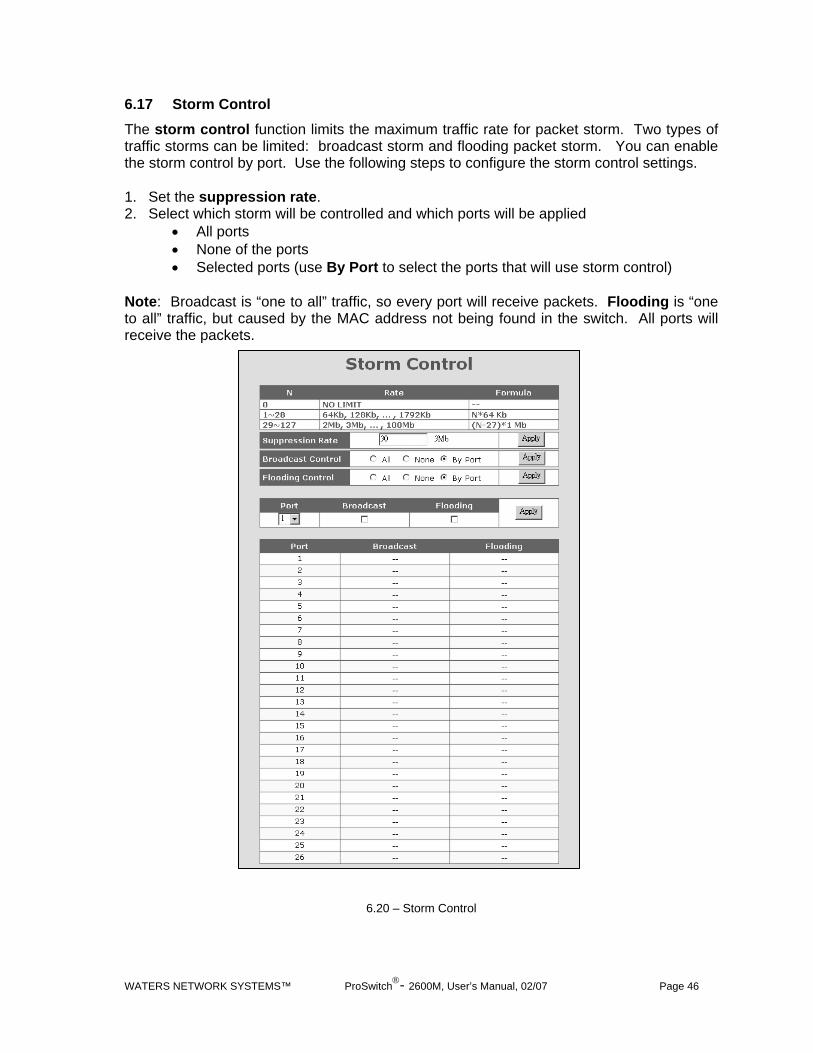
6.17 Storm Control The storm control function limits the maximum traffic rate for packet storm. Two types of traffic storms can be limited: broadcast storm and flooding packet storm. You can enable the storm control by port. Use the following steps to configure the storm control settings. 1. Set the suppression rate. 2. Select which storm will be controlled and which ports will be applied
• All ports • None of the ports • Selected ports (use By Port to select the ports that will use storm control)
Note: Broadcast is “one to all” traffic, so every port will receive packets. Flooding is “one to all” traffic, but caused by the MAC address not being found in the switch. All ports will receive the packets.
6.20 – Storm Control

WATERS NETWORK SYSTEMS™ ProSwitch®- 2600M, User’s Manual, 02/07 Page 47
6.18 SNMP Use this option to configure the SNMP settings. Once SNMP has been configured, you will be able to manage the switch from an SNMP management program. 1. In the RMON section of the screen choose enable or disable. RMON is disabled by
default. 2. Click Apply 3. Enter the System Information. 4. Click Apply 5. Enter the following information:
• GET/SET Community Name • Trap IP Address and Community Name
6. Click Apply to save the settings.
6.21 – SNMP Settings
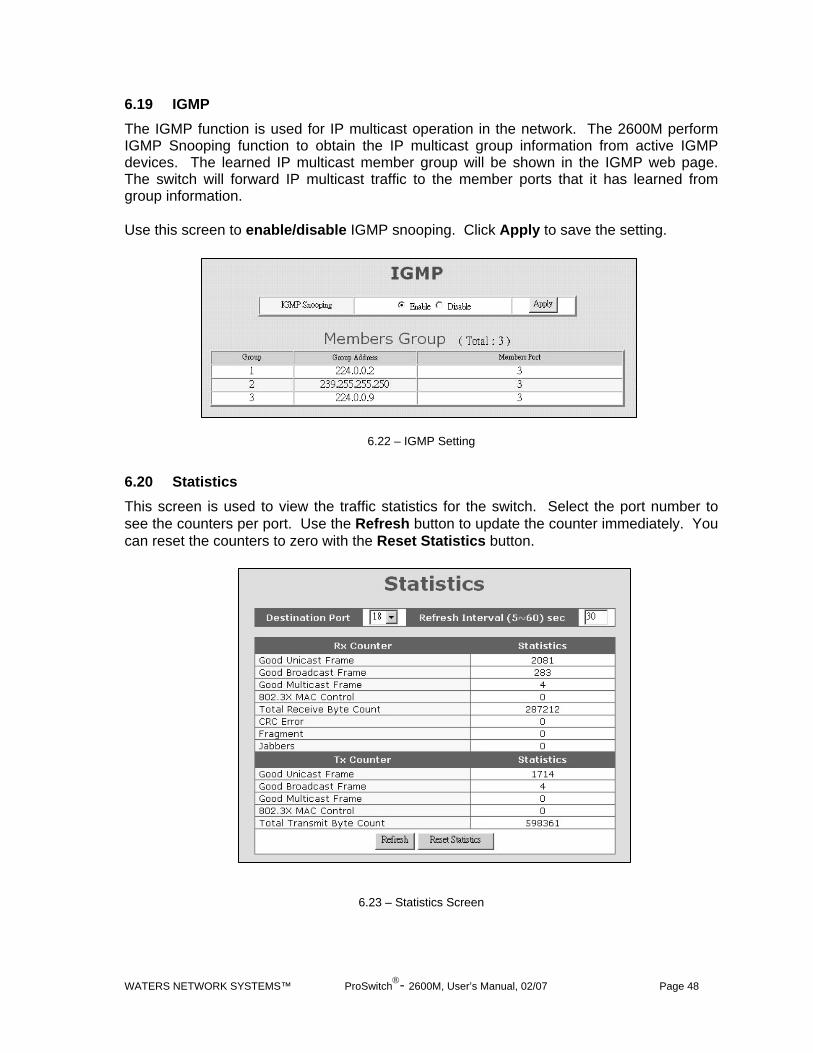
WATERS NETWORK SYSTEMS™ ProSwitch®- 2600M, User’s Manual, 02/07 Page 48
6.19 IGMP The IGMP function is used for IP multicast operation in the network. The 2600M perform IGMP Snooping function to obtain the IP multicast group information from active IGMP devices. The learned IP multicast member group will be shown in the IGMP web page. The switch will forward IP multicast traffic to the member ports that it has learned from group information. Use this screen to enable/disable IGMP snooping. Click Apply to save the setting.
6.22 – IGMP Setting
6.20 Statistics This screen is used to view the traffic statistics for the switch. Select the port number to see the counters per port. Use the Refresh button to update the counter immediately. You can reset the counters to zero with the Reset Statistics button.
6.23 – Statistics Screen

WATERS NETWORK SYSTEMS™ ProSwitch®- 2600M, User’s Manual, 02/07 Page 49
6.21 Maintenance Tools The following four functions are supported in the system maintenance tools: System Reset – resets the switch. System Restore – restores switch configuration to the factory default settings. System Backup/Restore – Backup will make a backup copy of the configuration.
Restore will import the backup configuration and restore it to the switch. System Upgrade – use this function to upgrade the system software.
6.24 – Maintenance Tools
6.22 Telnet and SNMP In order to use Telnet to manage the switch from a remote site, the IP/Mask/Gateway must be set. Once the address is set, use the Telnet command from the DOS window of your workstation. The operation from the Telnet access is the same as the console interface. The same settings must be configured in order to manage the switch with an SNMP management program. SNMP must be configured either from the console connection or the web interface before you can use SNMP to manage the switch. This switch supports SNMP Version 1 agent function and MIB II(Interface), Bridge MIB, Etherlike MIB and Private MIB. The default GET community name is public and SET community name is private. The switch supports up to five trap receivers with different trap community names.

WATERS NETWORK SYSTEMS™ ProSwitch®- 2600M, User’s Manual, 02/07 Page 50
6.23 Software Update and Backup This switch supports software configuration backup and update restore functions. Listed below are the three ways to perform these functions. 1. From console when booting – Use the Xmodem protocol and a terminal program.
This function can be used for run-time code and boot code updating. (Boot code works only at boot time - before the main program starts.) Follow this procedure:
• Press Ctrl-C when the switch is booting. The following message will be displayed:
Boot Menu =========================== 0: Start the Run-time code 1: Upgrade Run-time code 2: Upgrade Boot Code
=> Select:
• Press 0 to Start the Run-time code. This option will continue the booting
process. • Press 1 to Upgrade Run-time code. This option will try to update run-time code
(main code) from terminal program with the Xmodem protocol. If this option is selected, the following message will be shown:
“Waiting to receive file by Xmodem ....”
Next, select Send File from the terminal program. Select Xmodem protocol and the update file. Start the file upgrade.
• Press 2 to Upgrade Boot Code. This option will try to update the boot code from
the terminal program with the Xmodem protocol. Select Send File function of terminal program with the Xmodem protocol. Select the update file and start the file upgrade.
2. From console/Telnet when running – Use the TFTP protocol with a TFTP server on
the network. Refer to the description of the Upgrade function in the console operation of this manual.
3. From web browser – Use the web management interface (http protocol). Refer to the
description of the Tools function in Section 6.3.
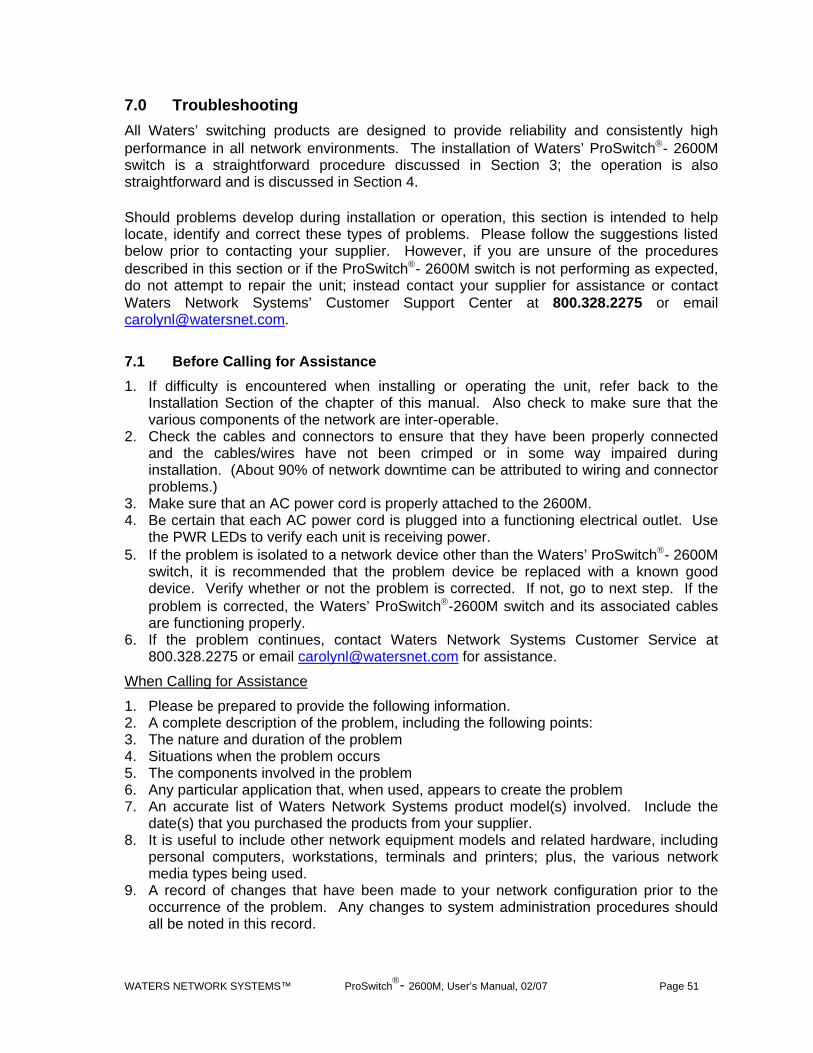
WATERS NETWORK SYSTEMS™ ProSwitch®- 2600M, User’s Manual, 02/07 Page 51
7.0 Troubleshooting All Waters’ switching products are designed to provide reliability and consistently high performance in all network environments. The installation of Waters’ ProSwitch®- 2600M switch is a straightforward procedure discussed in Section 3; the operation is also straightforward and is discussed in Section 4. Should problems develop during installation or operation, this section is intended to help locate, identify and correct these types of problems. Please follow the suggestions listed below prior to contacting your supplier. However, if you are unsure of the procedures described in this section or if the ProSwitch®- 2600M switch is not performing as expected, do not attempt to repair the unit; instead contact your supplier for assistance or contact Waters Network Systems’ Customer Support Center at 800.328.2275 or email [email protected].
7.1 Before Calling for Assistance 1. If difficulty is encountered when installing or operating the unit, refer back to the
Installation Section of the chapter of this manual. Also check to make sure that the various components of the network are inter-operable.
2. Check the cables and connectors to ensure that they have been properly connected and the cables/wires have not been crimped or in some way impaired during installation. (About 90% of network downtime can be attributed to wiring and connector problems.)
3. Make sure that an AC power cord is properly attached to the 2600M. 4. Be certain that each AC power cord is plugged into a functioning electrical outlet. Use
the PWR LEDs to verify each unit is receiving power. 5. If the problem is isolated to a network device other than the Waters’ ProSwitch®- 2600M
switch, it is recommended that the problem device be replaced with a known good device. Verify whether or not the problem is corrected. If not, go to next step. If the problem is corrected, the Waters’ ProSwitch®-2600M switch and its associated cables are functioning properly.
6. If the problem continues, contact Waters Network Systems Customer Service at 800.328.2275 or email [email protected] for assistance.
When Calling for Assistance
1. Please be prepared to provide the following information. 2. A complete description of the problem, including the following points: 3. The nature and duration of the problem 4. Situations when the problem occurs 5. The components involved in the problem 6. Any particular application that, when used, appears to create the problem 7. An accurate list of Waters Network Systems product model(s) involved. Include the
date(s) that you purchased the products from your supplier. 8. It is useful to include other network equipment models and related hardware, including
personal computers, workstations, terminals and printers; plus, the various network media types being used.
9. A record of changes that have been made to your network configuration prior to the occurrence of the problem. Any changes to system administration procedures should all be noted in this record.

WATERS NETWORK SYSTEMS™ ProSwitch®- 2600M, User’s Manual, 02/07 Page 52
7.2 Return Material Authorization (RMA) Procedure All returns for repair must be accompanied by a Return Material Authorization (RMA) number. To obtain an RMA number, call Waters Network Systems Customer Service at 800.328.2275 during business hours from 8:00 am to 5:00 pm (CT) email [email protected]. When calling, please have the following information readily available:
Name and phone number of your contact person Name of your company/institution Your shipping address Product name Packing List Number (or Sales Order Number) Failure symptoms, including a full description of the problem Waters Network Systems will carefully test and evaluate all returned products, will
repair products that are under warranty at no charge, and will return the warranty-repaired units to the sender with shipping charges prepaid (see Warranty Information, Appendix A, for complete details). However, if Waters cannot duplicate the problem or condition causing the return, the unit will be returned as: No Problem Found.
Waters Network Systems reserves the right to charge for the testing of non-defective units under warranty. Testing and repair of product that is not under warranty will result in a customer (user) charge.
7.3 Shipping and Packaging Information Should you need to ship the unit back to Waters Network Systems, please follow these instructions: Package the unit carefully. It is recommended that you use the original container if available. Units should be wrapped in a "bubble-wrap" plastic sheet or bag for shipping protection. (You may retain all connectors and this Installation Guide.) CAUTION: Do not pack the unit in Styrofoam "popcorn" type packing material. This material may cause electro-static shock damage to the unit. Clearly mark the Return Material Authorization (RMA) number on the outside of the shipping container. Waters Network Systems is not responsible for your return shipping charges. Ship the package to: Waters Network Systems Attention: Customer Service RMA Number: 945 37th Avenue, NW Rochester, MN 55901

WATERS NETWORK SYSTEMS™ ProSwitch®- 2600M, User’s Manual, 02/07 Page 53
7.4 Warranty Waters Network Systems’
Warranty Statement Waters Network Systems’ products are warranted against defects in materials and workmanship. The warranty period for each product will be provided upon request at the time of purchase. Unless otherwise stated, the warranty period is for the useable life of the product. In the event of a malfunction or other indication of product failure attributable directly to faulty materials and/or workmanship, Waters Network Systems will, at its option, repair or replace the defective products or components at no additional charge as set for herein. This limited warranty does not include service to repair damage resulting from accident, disaster, misuse, neglect, lightning, acts of God, tampering or product modification. Service under the warranty may be obtained by contacting Waters Network Systems and receiving a Return Material Authorization (RMA) number from Waters Network Systems. Returned product accompanied with the issued RMA number and prepaid shipping will be repaired or replaced by Waters Network Systems. Repaired or replaced products will be returned at no cost to the original Buyer and shipped via the carrier and method of delivery chosen by Waters Network Systems. Specific warranty by product family is as follows: ProSwitch-Secure: Limited Lifetime (see note) ProSwitch-SecureAir+: Limited Lifetime ProSwitch-Lite: 3 Years from date of manufacture (see note) ProSwitch-Xpress: Limited Lifetime ProSwitch-Xtreme: Limited Lifetime (see note) ProSwitch-FlexPort: Limited Lifetime ProSwitch-FixPort: Limited Lifetime ProSwitch-CS and CSX: 3 Years from date of manufacture (see note) ProMedia Converters 3 Years from date of manufacture (see note) Note: Warranty period for any and all external power supplies is one (1) year from date of purchase. EXCEPT FOR THE EXPRESS WARRANTY SET FORTH ABOVE, WATERS NETWORK SYSTEMS GRANTS NO OTHER WARRANTIES, EXPRESSED OR IMPLIED, BY STATUTE OR OTHERWISE, REGARDING THE PRODUCTS, THEIR FITNESS FOR ANY PURPOSE, THEIR QUALITY, THEIR MERCHANTABILITY, OR OTHERWISE. WATERS NETWORK SYSTEMS’ LIABILITY UNDER THE WARRANTY SHALL BE LIMITED TO PRODUCT REPAIR, OR REPLACEMENT OF THE BUYER’S PURCHASE PRICE. IN NO EVENT SHALL WATERS NETWORK SYSTEMS BE LIABLE FOR THE COST OF PROCUREMENT OF SUBSTITUTE GOODS BY THE CUSTOMER OR FOR ANY CONSEQENTIAL OR INCIDENTAL DAMAGES FOR BREACH OR WARRANTY.