Embed Size (px)
Citation preview
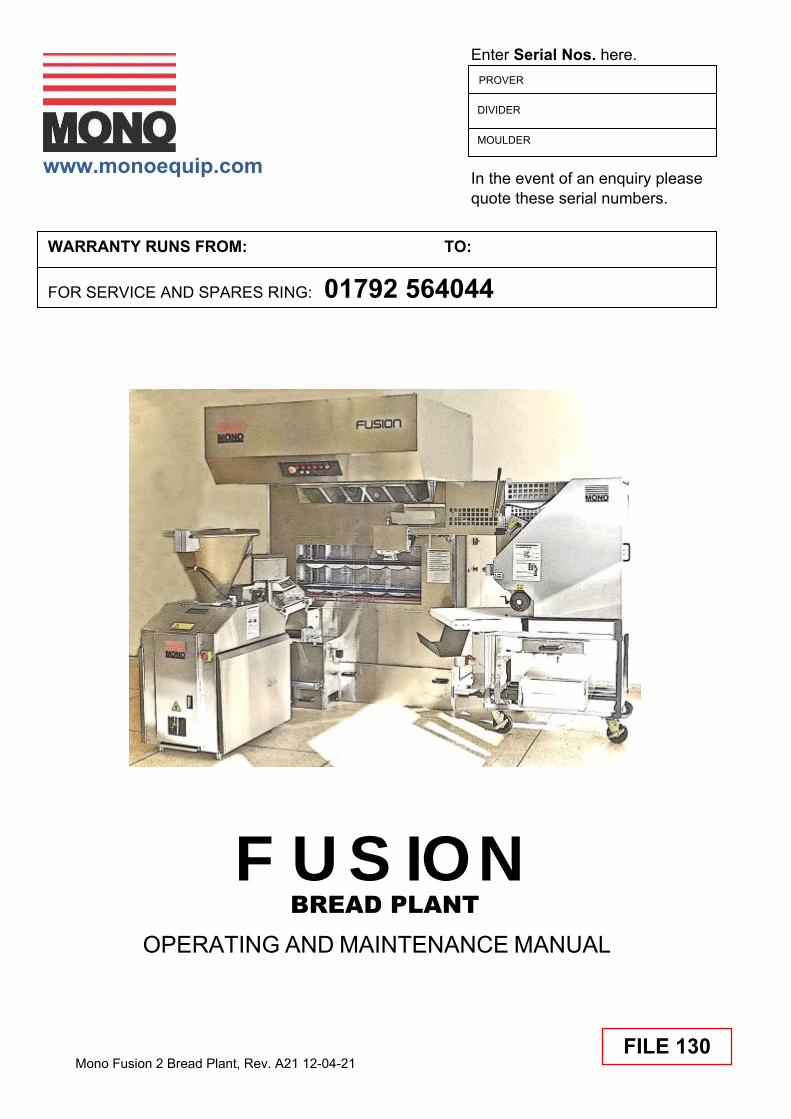
Mono Fusion 2 Bread Plant, Rev. A21 12-04-21
Enter Serial Nos. here.
In the event of an enquiry please quote these serial numbers.
FUSION BREAD PLANT
OPERATING AND MAINTENANCE MANUAL
DIVIDER
PROVER
MOULDER
WARRANTY RUNS FROM: TO:
FOR SERVICE AND SPARES RING: 01792 564044
www.monoequip.com
FILE 130
Mono Fusion 2 Bread Plant, Rev. A21 12-04-21
SAFETY SYMBOLS The following safety symbols are used throughout this product documentation and manual (available at www.monoequip.com). Before using your new equipment, read the instruction manual carefully and pay special attention to information marked with the following symbols.
IMPORTANT NOTICES
DO NOT TRY TO DISABLE ANY SAFETY DEVICES, THEY ARE FITTED FOR YOUR SAFETY.
NOTE: DIVIDER OIL DO NOT USE ORDINARY VEGETABLE OIL FROM SHOP SHELVES, IN THE DIVIDER THIS WILL FORM A GUM-LIKE RESIDUE, CAUSING STICKING AND POSSIBLE DAMAGE TO THE MACHINE.
MONO RECOMMENDS THE USE OF “CRODA SUPER WUNDROL”
(AVAILABLE FROM MONO. PART NUMBER “A900-25-272”)
Indicates a hazardous situation which, if not avoided, will result in death or serious injury.
Indicates a hazardous situation which, if not avoided, will result in electric shock.
Indicates a hazardous situation which, if not avoided, will result in minor or moderate injury.
WARNING
WARNING
CAUTION

Mono Fusion 2 Bread Plant, Rev. A21 12-04-21 3
ELECTRICAL SAFETY AND ADVICE REGARDING SUPPLEMENTARY ELECTRICAL PROTECTION Commercial bakeries, kitchens and food service areas are environments where electrical appliances may be located close to liquids, or operate in and around damp conditions, or where restricted movement for installation and service is evident. The installation and periodic inspection of the appliance should only be undertaken by a qualified, skilled and competent electrician, and connected to the correct supply suitable for the load as stipulated by the appliance data label. The electrical installation and connections should meet the necessary requirements of the local electrical wiring regulations and any electrical safety guidelines. We Recommend: Supplementary electrical protection with the use of a residual current device (RCD) Fixed wiring appliances incorporate a locally situated switch disconnector to connect to, which
is easily accessible for switching off and safe isolation purposes. The switch disconnector must meet the specification requirements of IEC 60947.
Your attention is drawn to: BS 7671:2018 – Guidance Note 8 – 8.13 : Other locations of increased risk It is recognised that there may be locations of increased risk of electrical shock other than those specifically addressed in Part 7 of BS 7671. Examples of such locations could include laundries where there are washing and drying machines in close proximity, and water is present, and commercial kitchens with stainless steel units, where once again, water is present. Where, because of the perception of additional risks being likely, the installation designer decides that an installation or location warrants further protective measures, the options available includes:
Automatic Disconnection of Supply (ADS) by means of a residual current device having a residual operating current not exceeding 30 mA;
Supplementary protective equipotential bonding; and
Reduction of maximum fault clearance time.
The provision of RCDs and supplementary bonding must be specified by the host organisation’s appointed installation designer or electrical contractor and installed by a suitably qualified and competent electrician so as to comply with Regulations 419.2 and 544.2.
The supply to this machine must be protected by a 30mA type B RCD

Mono Fusion 2 Bread Plant, Rev. A21 12-04-21 4

Mono Fusion 2 Bread Plant, Rev. A21 12-04-21 5
SECTION 1 - BREADPLANT ASSEMBLED INSTALLATION, CLEANING, MAIN CONTROLS, AND BREAD PLANT OPERATION SECTION 2 - DOUGH DIVIDER MAIN INSTRUCTIONS
SECTION 3 - MOULDER MAIN INSTRUCTIONS

Mono Fusion 2 Bread Plant, Rev. A21 12-04-21 6
CONTENTS
SECTION 1 - BREADPLANT ASSEMBLED 1.0 INTRODUCTION .......................... Description of plant ......................................... 9 2.0 GENERAL DIMENSIONS ............... Prover, Divider, Moulder. .............................. 10 2a. Overall dimensions ....................... Bread plant assembled ………… ........................ 11
3.0 SPECIFICATIONS ............................. Power, weight, and noise level. ..................... 12 4.0 SAFETY ............................................... Precautions when using the equipment ........ 13 5.0 INSTALLATION.................................. General, Divider, Moulder .............................. 14 6.0 ISOLATION .............. Emergency stop; turning off for cleaning and servicing ........ 19 7.0 CLEANING .................................................................................................................................. 21
Prover Daily cleaning .............................................................................................................. 21 Weekly cleaning ........................................................................................................... 22 Carrier pocket removal ................................................................................................ 22
Divider Daily cleaning .............................................................................................................. 23 Weekly cleaning ........................................................................................................... 26
Moulder Daily cleaning .............................................................................................................. 27 Weekly cleaning ........................................................................................................... 33
8.0 OPERATING INSTRUCTIONS ............................................................................................. 34 a. Operation of the bread plant .......................................................................................... 34
The controls explained ................................................................................................. 34 Warning lights .............................................................................................................. 36 Moulder infeed conveyor curling chain setting ............................................................. 37 Flour duster operation .................................................................................................. 38
b. How to operate the bread plant ..................................................................................... 34
9.0 ELECTRICAL INFORMATION ..... Wiring diagrams ...................................................... 40 PLEASE READ THESE MORE DETAILED SECTIONS BEFORE USING THIS PLANT SECTION 2 - Dough divider SECTION 3 - Moulder
(Page 50)
(Page 50)

Mono Fusion 2 Bread Plant, Rev. A21 12-04-21 7
SECTION 2 - DOUGH DIVIDER 1.0 INTRODUCTION .................................................................................................. 53 2.0 GENERAL DIMENSIONS ..................................................................................... 54 3.0 SPECIFICATIONS ................................................................................................ 54 4.0 SAFETY ................................................................................................................ 55 5.0 INSTALLATION .................................................................................................... 56 6.0 ISOLATION .......................................................................................................... 58 7.0 CLEANING INSTRUCTIONS ............................................................................... 59
Daily .............................................................................................................................. 59 Weekly .......................................................................................................................... 63
8.0 OPERATING......................................................................................................... 64 9.0 MAINTENANCE ................................................................................................... 67 10.0 TROUBLESHOOTING ......................................................................................... 69 11.0 SPARES AND SERVICE ...................................................................................... 76
FOR SERVICE AND SPARES RING: 01792 564044 12.0 ELECTRICAL INFORMATION SECTION ............................................................ 77
Mono Fusion 2 Bread Plant, Rev. A21 12-04-21 8
SECTION 3 – MOULDER 1.0 INTRODUCTION .................................................................................................. 84 2.0 OVERALL DIMENSIONS ..................................................................................... 84 3.0 SPECIFICATIONS ................................................................................................ 85 4.0 SAFETY ................................................................................................................ 86 5.0 INSTALLATION .................................................................................................... 87 6.0 ISOLATION .......................................................................................................... 88 7.0 CLEANING INSTRUCTIONS ............................................................................... 89
Daily .............................................................................................................................. 89 Weekly .......................................................................................................................... 95
8.0 OPERATING INFORMATION .............................................................................. 96 9.0 OPERATING INSTRUCTIONS ............................................................................. 97
Moulding between belts (French stick and petit pan) ................................................... 98 Moulding Between Rear Belt & Pressure Board (Tin and Bloomers) ........................... 99
10.0 MAINTENANCE ................................................................................................. 100 11.0 TROUBLESHOOTING ....................................................................................... 101 12.0 SPARES AND SERVICE .................................................................................... 102
FOR SERVICE AND SPARES RING: 01792 564044 13.0 MOULDER ELECTRICAL INFORMATION ........................................................ 103
Mono Fusion 2 Bread Plant, Rev. A21 12-04-21 9
1.0 INTRODUCTION
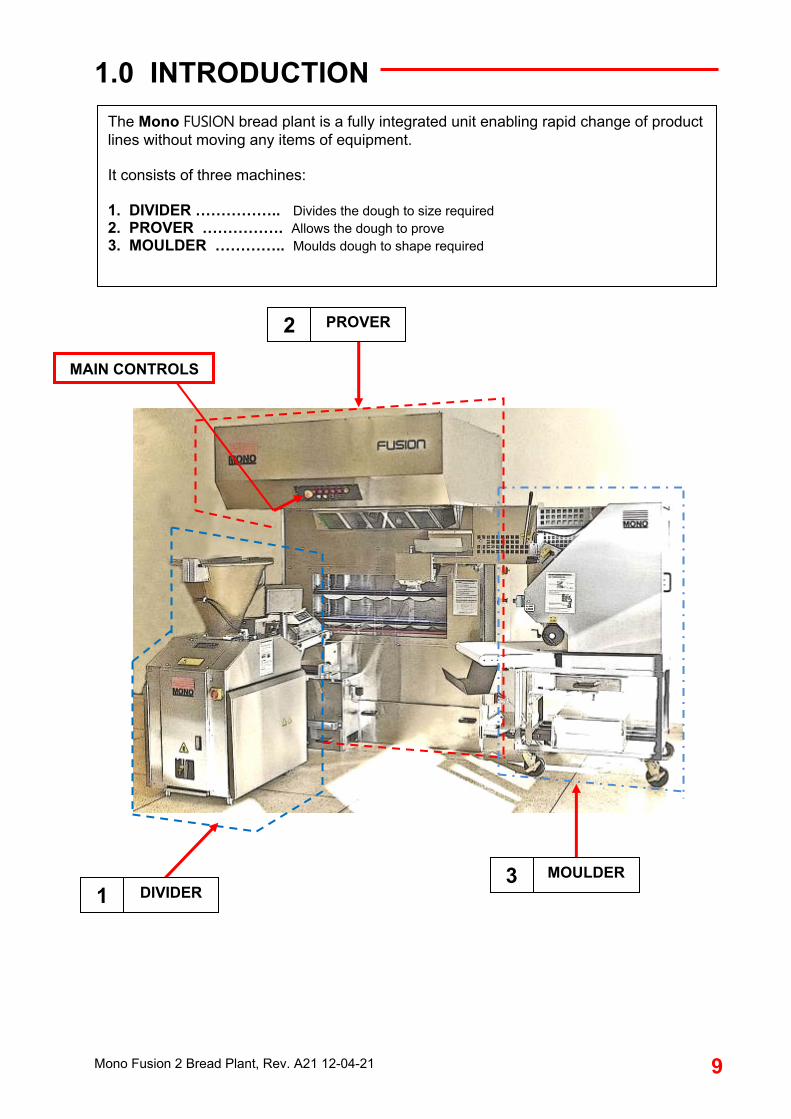
The Mono FUSION bread plant is a fully integrated unit enabling rapid change of product lines without moving any items of equipment. It consists of three machines: 1. DIVIDER …………….. Divides the dough to size required 2. PROVER ……………. Allows the dough to prove 3. MOULDER ………….. Moulds dough to shape required
MAIN CONTROLS
1 DIVIDER 3 MOULDER
2 PROVER

Mono Fusion 2 Bread Plant, Rev. A21 12-04-21 10
2.0 GENERAL DIMENSIONS
PROVER
MOULDER
DIVIDER
Height: 1825mm. Depth: 1205mm. Width: 1020mm.
Height: 1580mm Depth:
1065mm. (inc. conveyor 1400mm)
Width: 670mm
Height: 2515mm. Depth: 1650mm. Width: 1750mm.

Mono Fusion 2 Bread Plant, Rev. A21 12-04-21 11
2a OVERALL DIMENSIONS
PLAN VIEW TOTAL AREA REQUIRED = 2630 X 3200
HEIGHT (PROVER) = 2520
630mm
PROVER
MOULDER
DIVIDER
POWER SUPPLY IN 3 phase, neutral and earth, fused at 16amp.
The supply to this machine must be protected by a 30mA type B RCD
1650mm
2630mm
1900mm
3200mm FRONT
DIMENSIONS IN MILLIMETRES

Mono Fusion 2 Bread Plant, Rev. A21 12-04-21 12
3.0 SPECIFICATIONS
TOTAL PLANT 3 phase, neutral and earth, fused at 16amp (ALL MACHINES CONNECTED TOGETHER)
POWER: 4.81kW
PROVER
POWER: 0.86kW
WEIGHT:
NOISE LEVEL: Less than 85dB
MOULDER
POWER: 0.75kW
WEIGHT:
NOISE LEVEL: Less than 85dB
DIVIDER
POWER: 3.2kW
WEIGHT:
NOISE LEVEL: Less than 85dB
1470kg
430kg
500kg
The supply to this machine must be protected by a 30mA type B RCD

Mono Fusion 2 Bread Plant, Rev. A21 12-04-21 13
4.0 SAFETY 1 Never use a machine in a faulty condition and always report any damage. 2 Only trained engineers may remove any part that requires a tool to do so. 3 People undergoing training on this machine must be under direct supervision of a
fully trained person. 4 Use of this machine can prove dangerous if:
the machine is operated by untrained or unskilled staff the machine is not used for its intended purpose the machine is not operated correctly
5 Always ensure hands are dry before touching any electrical appliance (including cable, switches and plugs). 6 Do not operate the machine with any panels or guards removed.
All safety devices applied to the machine during manufacture and the operating instructions in this manual are required to operate this machine safely. The owner and the operator are responsible for operating this machine safely.
DO NOT TRY TO DISABLE ANY SAFETY DEVICES,
THEY ARE FITTED FOR YOUR SAFETY.
7 NEVER move machinery by pulling on the power cords or cables. 8 No loose clothing or jewellery should be worn while operating this machine
9 The bakery manager or the bakery supervisor must carry out daily safety checks on
this machine. 10 No one under the age of 16 may operate this machine. 11 No one under the age of 18 may clean this machine under any circumstances.
12 DO NOT STAND ON ANYTHING TO LOAD THE DIVIDER HOPPER. 13 DO NOT STAND ON OR STORE ITEMS ON THE PROVER ROOF.
ALL CLEANING AND MAINTENANCE OPERATIONS MUST BE MADE WITH MACHINE DISCONNECTED FROM THE POWER SUPPLY.
IF YOU ENCOUNTER ANY ISSUE WITH THIS EQUIPMENT THAT YOU HAVE NOT BEEN TRAINED FOR, YOU MUST CONTACT YOUR INSTORE TECHNICIAN OR MANAGER..
Mono Fusion 2 Bread Plant, Rev. A21 12-04-21 14
5.0 GENERAL INSTALLATION
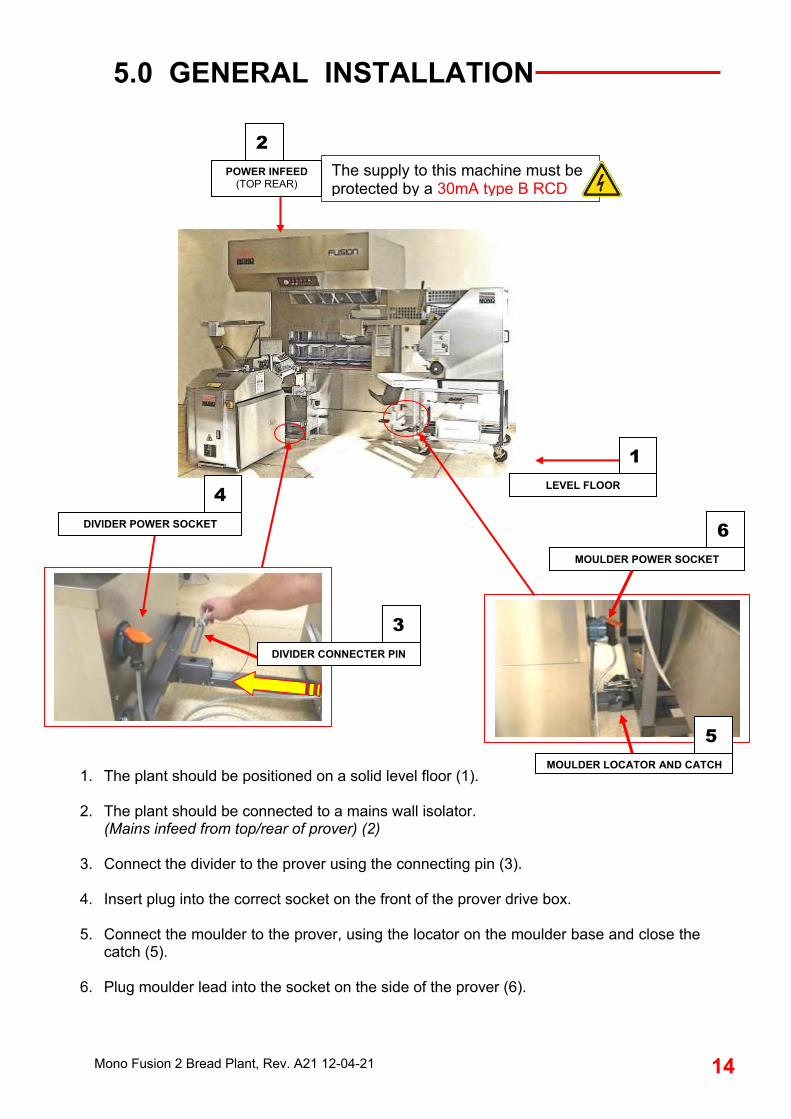
DIVIDER POWER SOCKET
MOULDER POWER SOCKET
DIVIDER CONNECTER PIN
MOULDER LOCATOR AND CATCH 1. The plant should be positioned on a solid level floor (1). 2. The plant should be connected to a mains wall isolator.
(Mains infeed from top/rear of prover) (2)
3. Connect the divider to the prover using the connecting pin (3).
4. Insert plug into the correct socket on the front of the prover drive box.
5. Connect the moulder to the prover, using the locator on the moulder base and close the catch (5).
6. Plug moulder lead into the socket on the side of the prover (6).
POWER INFEED (TOP REAR)
2
3
4
5
6
1 LEVEL FLOOR
The supply to this machine must be protected by a 30mA type B RCD
Mono Fusion 2 Bread Plant, Rev. A21 12-04-21 15
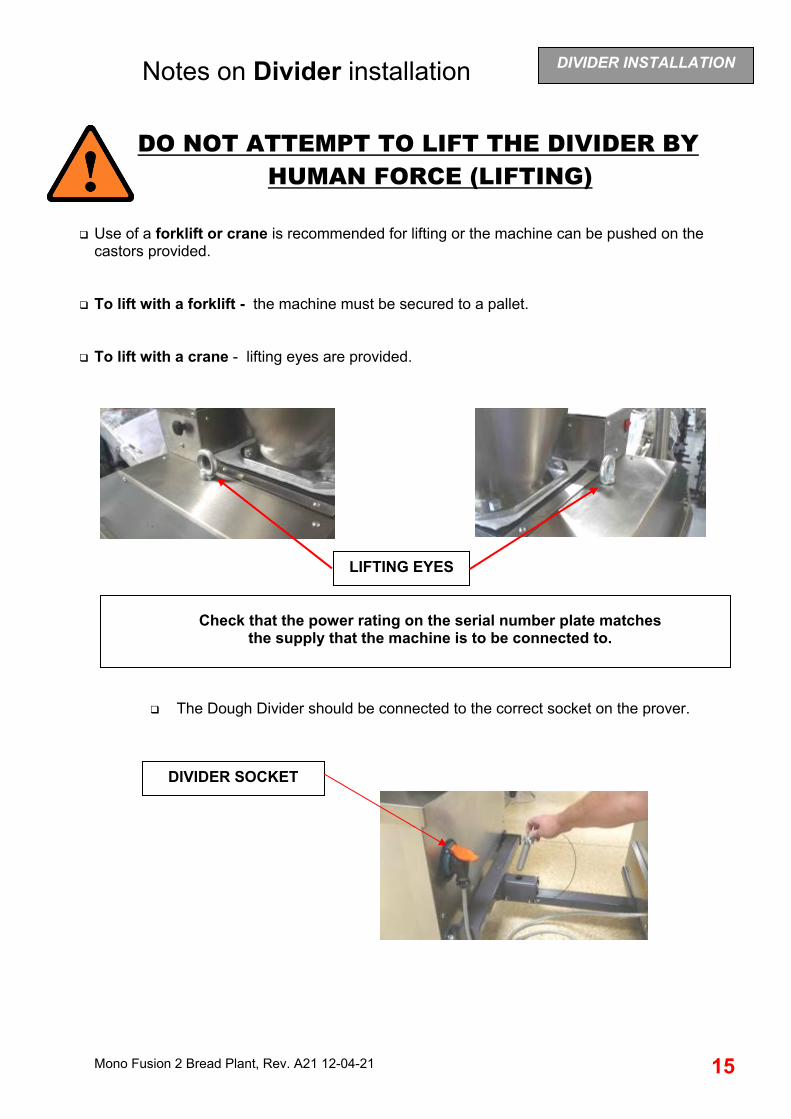
Notes on Divider installation
DO NOT ATTEMPT TO LIFT THE DIVIDER BY HUMAN FORCE (LIFTING)
Use of a forklift or crane is recommended for lifting or the machine can be pushed on the
castors provided.
To lift with a forklift - the machine must be secured to a pallet.
To lift with a crane - lifting eyes are provided.
Check that the power rating on the serial number plate matches the supply that the machine is to be connected to.
The Dough Divider should be connected to the correct socket on the prover.
DIVIDER SOCKET
DIVIDER INSTALLATION
LIFTING EYES

Mono Fusion 2 Bread Plant, Rev. A21 12-04-21 16
Connect the electrical cable to the socket on the prover drive box front. Check the machine after installation to ensure the belt moves in the correct direction
indicated (see arrow in photo below).
(If wrong - swap positions of any two of the three phase carrying wires in the plug. This should be factory set and not need to be done)
Fill oil tank to 2/3 level, with your company recommended food safe oil.
o WARNING!
DO NOT USE ORDINARY VEGETABLE OIL FROM SHOP SHELVES, IN THE DIVIDER THIS WILL FORM A GUM-LIKE RESIDUE,
CAUSING STICKING AND POSSIBLE DAMAGE TO THE MACHINE.
MONO RECOMMENDS THE USE OF “CRODA SUPER WUNDROL” (AVAILABLE FROM MONO. PART NUMBER “A900-25-272”)
DIVIDER INSTALLATION
OPEN DOOR
FILL LEVEL
OPEN OILBOX LID AND POUR IN OIL
3 1
2

Mono Fusion 2 Bread Plant, Rev. A21 12-04-21 17
Positioning Divider.
1 Ensure the divider is standing on a solid level floor. 2 Correctly position the divider using the male locator. 3 The locator should be pushed in until the end of it pushes up against the stop and
the holes line up. 4 Drop the keeper pin in the holes. 5 After the connection is made, lock the two front castors into place.
CONNECTING FRAME ON
PROVER
DIVIDER BODY
KEEPER PIN
DIVIDER INSTALLATION

Mono Fusion 2 Bread Plant, Rev. A21 12-04-21 18
Positioning Moulder.
1 Ensure the moulder is standing on a solid level floor. 2 Correctly position the moulder using the male locator on the base. 3 The locator should be pushed in until the end of it pushes up against the stop and
the clip lines up. 4 Fasten the clip
5 After the connection is made, lock the two locking castors into place.
CONNECTING FRAME ON
PROVER
MOULDER
MOULDER INSTALLATION
CLIP
PROVER

Mono Fusion 2 Bread Plant, Rev. A21 12-04-21 19
6.0 ISOLATION
TO STOP THE BREAD PLANT IN AN EMERGENCY
Switch off at the main isolator, or use the emergency stop button on the overhead panel
PROVER MAIN ISOLATOR
EMERGENCY STOP BUTTONS
WARNING Except in an emergency, do not halt the prover with dough in the carriers and leave it. Dough will adhere to the pockets and may cause the prover to malfunction. USE THE “PARK” BUTTON TO STOP THE PROVER IF NOT AN EMERGENCY.
TO STOP MOULDER
PROVER OVERHEAD PANEL
TO STOP DIVIDER EMERGENCY STOP BUTTON
EMERGENCY STOP BUTTON

Mono Fusion 2 Bread Plant, Rev. A21 12-04-21 20
7.0 CLEANING
SWITCH OFF AND ISOLATE THE MACHINES FROM MAINS SUPPLY BEFORE COMMENCING CLEANING
1. Except in an emergency, do not halt the prover with dough in the carriers and
leave it. Dough will adhere to the pockets and may cause the machine to malfunction. 2. ALWAYS CHECK THE POCKETS FOR ADHERING DOUGH AND REMOVE AS SOON
AS POSSIBLE. DO NOT WAIT FOR DAILY CLEANING IF IN DOUBT. 3. If not an emergency, use the “PARK” button.
This will stop the prover in the correct position.
4. NEVER LEAVE THE DIVIDER WITH DOUGH IN THE DOUGH CHAMBER AS PRESSURES CAN BUILD UP AS THE DOUGH PROVES.
NOTES
MAINS SUPPLY ISOLATOR
PROVER DIVIDER
MOULDER

Mono Fusion 2 Bread Plant, Rev. A21 12-04-21 21
PROVER CLEANING INSTRUCTIONS
1. Brush the infeed chute [1] ensuring the dough sensor and reflector are clean. 2. Remove the drive box drawer [2] and wash thoroughly, dry and replace. 3. Lift slightly and withdraw the cleaning drawer [3] and remove any dough. Wash thoroughly,
dry and replace. 4. Remove the clear transfer window [4] by lifting out of the location channels. Wash and dry. 5. Wipe the window location channels and replace the window. 6. Open the main overhang door [5] (lift, slide back, then hinge down) and check for fallen
pieces of dough inside. Brush rear of door and close. 7. Brush the conveyor area [6] and wipe clean the metalwork, paying attention to the inner
sides where dough can collect. 8. Wipe over the control box [7] with a damp cloth (do not allow moisture to enter the panel). 9. Brush down the outer sheeting of the machine.
DAILY CLEANING
KEEP WATER AWAY FROM THE MAIN CONTROL PANEL AND ELECTRICAL CONNECTION SOCKETS.
4
5 7
2
6
3 1
PROVER CLEANING
LEFT HAND VERSION SHOWN

Mono Fusion 2 Bread Plant, Rev. A21 12-04-21 22
As daily cleaning and also: - 1. Wipe over all outer sheeting and doors with sanitising solution.
KEEP WATER AWAY FROM THE MAIN CONTROL PANEL
AND ELECTRICAL CONNECTION SOCKETS.
2. Ensure the top roofing sheeting is clear and clean as required. Do not stand on or store items on the roof 3. Inspect the floor area inside and clean as required.
CARRIER and POCKET REMOVAL
1. Open the front windows to access carriers. 2. Although not necessary when cleaning and replacing pockets, carriers can be
removed if required by pulling chain sideways off the locating pins on the end of the carrier. It is not advisable to remove more than one at a time and note that the carriers are positioned at three link intervals. Note that the end roller should always be towards the rear.
3. Hold the carrier body and pull the blue carrier pocket gently upwards to unclip.
(Note that there are 6 pockets to a carrier and each one can be replaced individually without removing the carrier from the prover)
CAUTION ISOLATE THE PROVER FROM THE POWER SUPPLY BEFORE CLEANING.
WEEKLY CLEANING
CARRIER MOULDED CLIPS
PROVER CLEANING
Mono Fusion 2 Bread Plant, Rev. A21 12-04-21 23
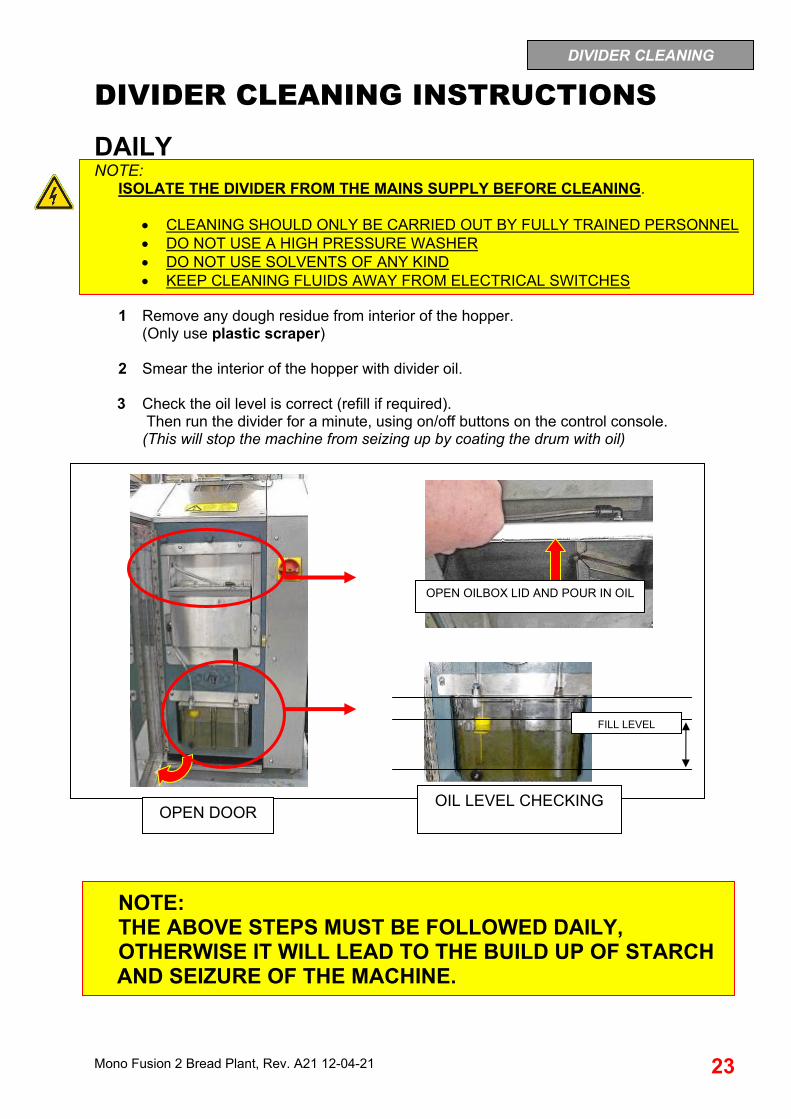
DIVIDER CLEANING INSTRUCTIONS
DAILY NOTE:
ISOLATE THE DIVIDER FROM THE MAINS SUPPLY BEFORE CLEANING.
CLEANING SHOULD ONLY BE CARRIED OUT BY FULLY TRAINED PERSONNEL DO NOT USE A HIGH PRESSURE WASHER DO NOT USE SOLVENTS OF ANY KIND KEEP CLEANING FLUIDS AWAY FROM ELECTRICAL SWITCHES
1 Remove any dough residue from interior of the hopper. (Only use plastic scraper) 2 Smear the interior of the hopper with divider oil.
3 Check the oil level is correct (refill if required). Then run the divider for a minute, using on/off buttons on the control console.
(This will stop the machine from seizing up by coating the drum with oil)
NOTE: THE ABOVE STEPS MUST BE FOLLOWED DAILY, OTHERWISE IT WILL LEAD TO THE BUILD UP OF STARCH AND SEIZURE OF THE MACHINE.
DIVIDER CLEANING
FILL LEVEL
OPEN OILBOX LID AND POUR IN OIL
OPEN DOOR OIL LEVEL CHECKING

Mono Fusion 2 Bread Plant, Rev. A21 12-04-21 24
OFF TAKE CLEANING
1 Unplug and remove the scales. 2 Loosen the two black knobs on the side of the pressure board. 3 Pivot the pressure board away from you.
Help may be required to hold the pressure board while cleaning takes place. 4 Remove any dough residue and brush exposed parts. 5 Scrape and wipe down the belt. (Only use plastic scraper). 6 Remove any dough residue from the conveyor metal work and belt surface. 7 Lower the pressure board and tighten the two black knobs on the side of the pressure
board. 8 Replace and plug in the scales.
LOOSEN KNOBS
PIVOT PRESSURE BOARD
1
2
DIVIDER CLEANING
REMOVE SCALES IF FITTED. Unplug and lift off.
BELT
Mono Fusion 2 Bread Plant, Rev. A21 12-04-21 25
EXTERNAL CLEANING
1 Brush off any flour residue and scrape as necessary. (Only use plastic scraper) 2 Brush off loosened dough. 3 Make up sterilising solution and hot water. 4 Clean the exterior of the divider as necessary working from top to bottom. 5 Swab dry with disposable tissue.
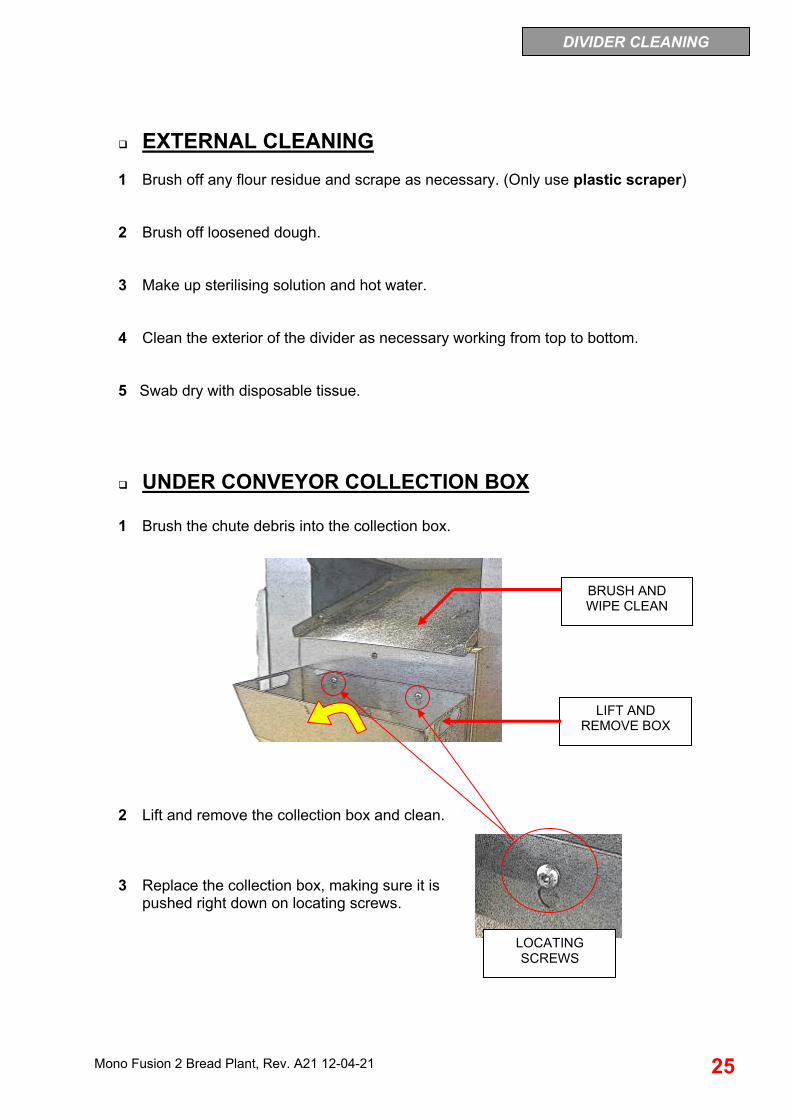
UNDER CONVEYOR COLLECTION BOX
1 Brush the chute debris into the collection box.
2 Lift and remove the collection box and clean.
3 Replace the collection box, making sure it is pushed right down on locating screws.
DIVIDER CLEANING
BRUSH AND WIPE CLEAN
LIFT AND REMOVE BOX
LOCATING
SCREWS
Mono Fusion 2 Bread Plant, Rev. A21 12-04-21 26
WEEKLY NOTE: CLEANING SHOULD ONLY BE CARRIED OUT BY FULLY TRAINED PERSONNEL
WARNING:
ISOLATE DIVIDER FROM MAINS SUPPLY
1. Scrub wheels with a small nylon cleaning brush
or scouring pad and hot water sterilising solution. 2 Clean entire exterior surfaces of the divider,
working from top to bottom.
DIVIDER CLEANING

Mono Fusion 2 Bread Plant, Rev. A21 12-04-21 27
MOULDER CLEANING INSTRUCTIONS
DAILY CLEANING INSTRUCTIONS NOTE! - PRIOR TO CLEANING, USE PLASTIC SCRAPERS TO
REMOVE SUBSTANTIAL DOUGH PIECES.
1. Isolate the mains supply (unplug from prover). 2. Open large front door.
MOULDER CLEANING
SIDE DOOR (BOTH SIDES)
CONVEYOR COVER
LARGE FRONT DOOR
REAR DOOR

Mono Fusion 2 Bread Plant, Rev. A21 12-04-21 28
4. Set sheeting gap to the widest mark and brush out residue from the area, using a plastic scraper on the rollers if required.
5. Clean any residue that has been trapped at the bottom of the belt.
Scrape exposed surface of the dough-moulding belt with plastic scraper.
7. Brush/vacuum the area.
MOULDER CLEANING
SET SHEETING GAP
Mono Fusion 2 Bread Plant, Rev. A21 12-04-21 29
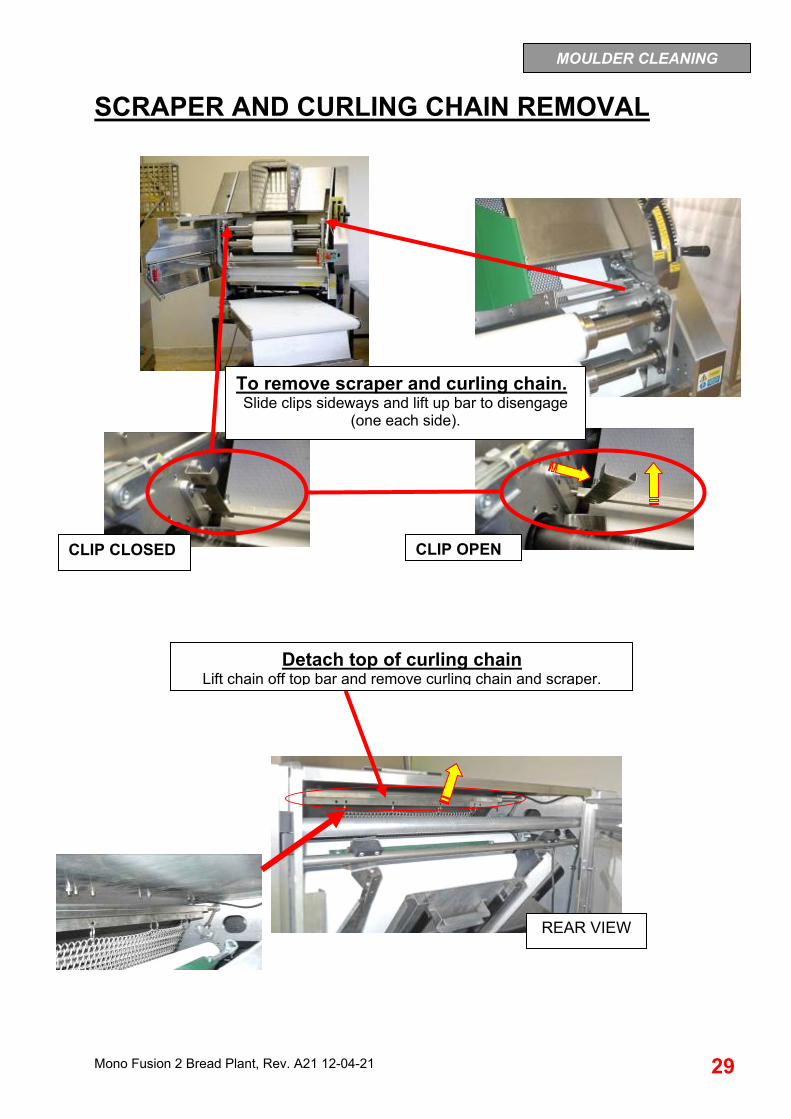
SCRAPER AND CURLING CHAIN REMOVAL
Detach top of curling chain Lift chain off top bar and remove curling chain and scraper.
CLIP CLOSED CLIP OPEN
To remove scraper and curling chain. Slide clips sideways and lift up bar to disengage
(one each side).
MOULDER CLEANING
REAR VIEW

Mono Fusion 2 Bread Plant, Rev. A21 12-04-21 30
To replace scraper and curling chain. Clean and then replace the curling chain by dropping it down the conveyor from the back and
clipping in place at the front. (Reverse of removal).
SLOT
CLIP

Mono Fusion 2 Bread Plant, Rev. A21 12-04-21 31
Pressure Board Removal
1. Fully lower the rear-moulding belt using lever (A) and fully lower the pressure board by adjusting handle (B) to setting “400” on the counter. Open the rear door.
2. Remove the pressure board by gripping the handle provided,
and then lift up and out.
3. Wash dough contact surfaces of the pressure board and side guides with sanitising solution and hot water. Dry with a cloth.
4. Remove any dough from the bottom belt with a plastic scraper.
5. Replace the pressure board, making sure the hooks on the board are fully
engaged. Close the rear door firmly to make the safety switch connection.
PRESSURE BOARD
A REAR BELT
B SET TO 400
PRESSURE BOARD HANDLE
MOULDER CLEANING

Mono Fusion 2 Bread Plant, Rev. A21 12-04-21 32
OFF TAKE CONVEYOR This should be scraped clean with a plastic scraper.
OFF TAKE TRAY Pull out the off take tray shelf and remove the plastic tray. Wash well and dry. Replace. And finally to complete “Daily Cleaning”
Brush down all external surfaces of the machine including the stand.
Sweep under machine to remove all debris from the floor.
Spot clean with dampened cloth, sanitising solution and hot water, paying particular attention to handles, levers and controls.
OFF TAKE CONVEYOR
MOULDER CLEANING
OFF TAKE TRAY

Mono Fusion 2 Bread Plant, Rev. A21 12-04-21 33
WEEKLY CLEANING INSTRUCTIONS AS DAILY INSTRUCTIONS AND ALSO: 1. Remove the moulder mains plug from the prover socket, release the brake castors
and unclip the positioning locator on the base. 2. Pull the moulder away from the prover. 3 Wipe the stand with a cloth dampened with sanitising solution and hot water. 4 Scrape and scrub the wheels on the machine. 5 Wipe down all external surfaces with sanitising solution and hot water.
Dry with a cloth.
MOULDER CLEANING

Mono Fusion 2 Bread Plant, Rev. A21 12-04-21 34
10 9 8 7 6 11
Dough pieces are transferred from the divider via a chute to a carrier pocket in the prover. As dough travels down the chute and into the pocket, an electronic eye is triggered which causes the carriers to move one position ready for the next dough piece. After two minutes of nothing passing the sensor (divider empty), a flashing light and buzzer starts to alert the operator. The prover can then either be run in empty mode, to empty the dough to the moulder, or the divider started and the prover loading continued.
8.0 OPERATION of the breadplant
MAIN CONTROL PANEL
2 3 5
CONTROL BUTTONS
WARNING LIGHTS
THE CONTROLS EXPLAINED
PLANT OPERATION
4 1

Mono Fusion 2 Bread Plant, Rev. A21 12-04-21 35
MAIN PANEL EMERGENCY STOP (1) Stops the prover in an emergency. Release by pushing and turning. NOTE. Do not use this to stop the prover except in an emergency, as dough position may cause problems. START BUTTON (2) Starts the prover in auto mode. (No movement will happen until dough passes the sensor on the chute.) PARK (3) Use this to stop the prover carriers in the best operating position. Always use this to stop the prover except in an emergency. EMPTY (4) For use when the divider has completed operation and the prover needs to continue moving to feed the moulder. COUNTER (5) Counts pieces of dough entering prover from divider. Press button to reset to 0 before a production run. NOTE. Reset is required after power is disrupted or the power is first switched on.
Warning Avoid stopping machine with dough left in the pockets, as after a time it will adhere to the pockets and cause the machine to malfunction. ALWAYS CHECK THE POCKETS FOR ADHERING DOUGH AND REMOVE AS SOON AS POSSIBLE. DO NOT WAIT FOR DAILY CLEANING IF IN DOUBT.
PLANT OPERATION

Mono Fusion 2 Bread Plant, Rev. A21 12-04-21 36
WARNING LIGHTS ACCESS DOOR (6) Main overhang cleaning door not positioned correctly. CARRIER STOP (7) Carrier stop switch activated. Switch off power at main isolator (1). Check for correct position of carriers in the overhang. Dough may have caused a carrier to swing incorrectly at the turnover stage. If removing the dough piece cannot rectify the cause, call for maintenance. SAFETY BAR (8) Red safety bar across lower edge of main windows has been activated. Clear obstruction and restart prover. CLEANING DOOR (9) Front lower cleaning door not positioned correctly. DRIVE BOX (10) Check that the drive box drawer is closed. The prover will not work unless the drawer is replaced after cleaning. DIVIDER EMPTY (11) After two minutes of nothing passing the sensor (divider is empty), a flashing light and buzzer starts to alert the operator.
109876 11
6
10
9
8
7
WARNING LIGHT FAULT POSITIONS
PLANT OPERATION
FLASHING LIGHT AND BUZZER
12TEST BUTTON
PRESS TO CHECK FAULT LIGHTS

Mono Fusion 2 Bread Plant, Rev. A21 12-04-21 37
MOULDER INFEED CONVEYOR CURLING CHAIN
Position the curling chain lever to the required position Either “loaf” or “French” as shown below.

Mono Fusion 2 Bread Plant, Rev. A21 12-04-21 38
FLOUR DUSTER OPERATION TO ENSURE AN EVEN FLOW, ONLY USE CLEAN, DRY FLOUR.
DUSTER LOCATION
OPEN LID AND FILL WITH DRY FLOUR, THEN CLOSE THE LID
TURN ON POWER WHEN REQUIRED
ADJUST THE FLOW BY LOOSENING THE BLACK KNOB AND MOVING TO THE
REQUIRED POSITION. RETIGHTEN KNOB.
1
2
3

Mono Fusion 2 Bread Plant, Rev. A21 12-04-21 39
1. Ensure the prover power is connected and main isolator is on. 2. Ensure that the divider is in position and plugged into the prover.
3. Ensure the moulder is in position and plugged into the prover. Adjust the moulding
settings for the product required.
4. Set the moulder infeed conveyor curling chain position.(Loaf or French). 5. Press the “start” button (2) on the prover and the reset button on the counter. The
prover will now be ready to receive dough.
6. Load the divider hopper with dough.
7. Start the divider (green button on divider) and adjust weights as instructed in the divider section of this manual.
8. When satisfied with the dough weights, allow the dough to enter the prover. The
prover will move to the next carrier every time it senses a dough piece.
9. If the prover does not sense a dough piece for 2 minutes, the “Divider Empty” light will flash and a sounder will be heard.
10. If the divider is empty or the light is flashing, push the empty button (4) and the
prover will keep moving to prove the dough and empty to the moulder.
11. When the dough reaches the moulder, the moulder will start and the moulded dough pieces should be collected and placed on trays or in tins as required.
12. If the prover needs to be stopped during operation, use the yellow “park” button (3),
not the emergency stop button. This will ensure that the prover is stopped in a position that will not allow dough pieces to jam the system. The moulder and prover offtake conveyor will continue to run for 30 seconds to ensure the dough path is cleared.
NOTE THE EMERGENCY STOP ON THE DIVIDER WILL STOP THE DIVIDER. THE EMERGENCY STOP ON THE MOULDER WILL STOP THE MOULDER. THE EMERGENCY STOP ON THE PROVER WILL STOP ALL MACHINES. If emergency stop switches are activated on the divider (opening hopper guard etc), the stop reset button on the divider control panel must be pressed. If the pressure board is opened (for cleaning etc), then the emergency stop switch must be pressed, twisted to release and then the reset switch pressed.
How to operate the FUSION BREADPLANT
PLANT OPERATION

Mono Fusion 2 Bread Plant, Rev. A21 12-04-21 40
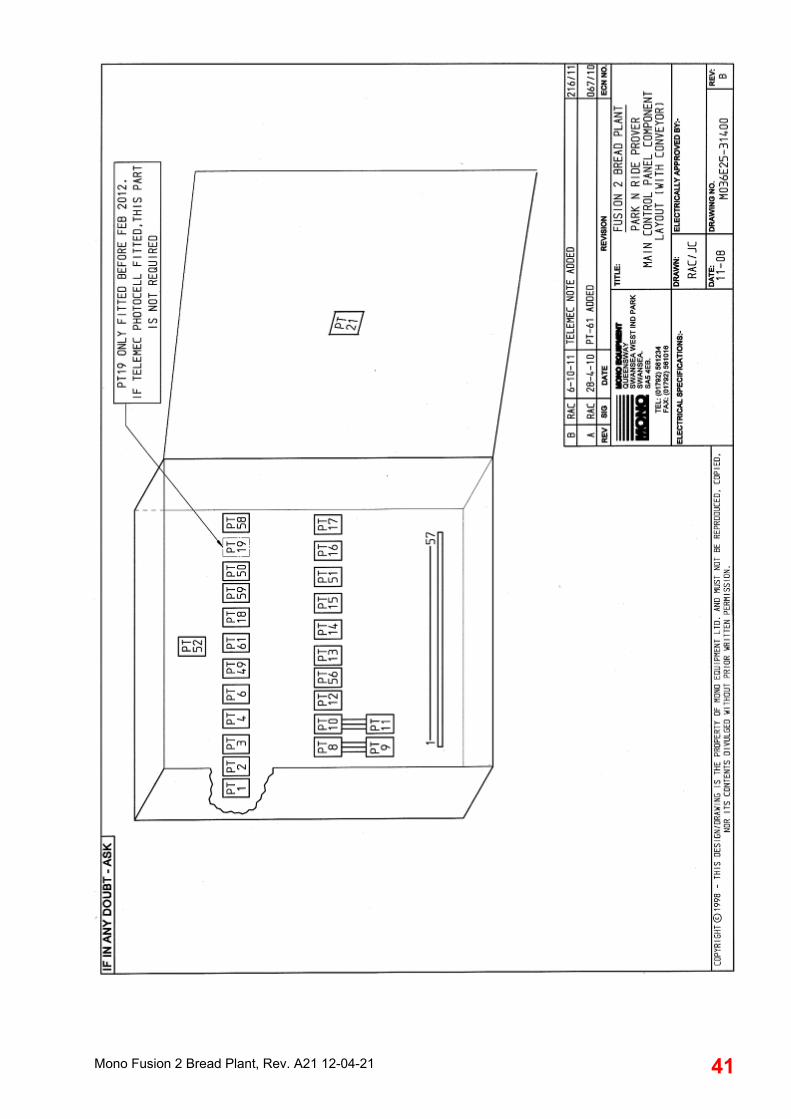
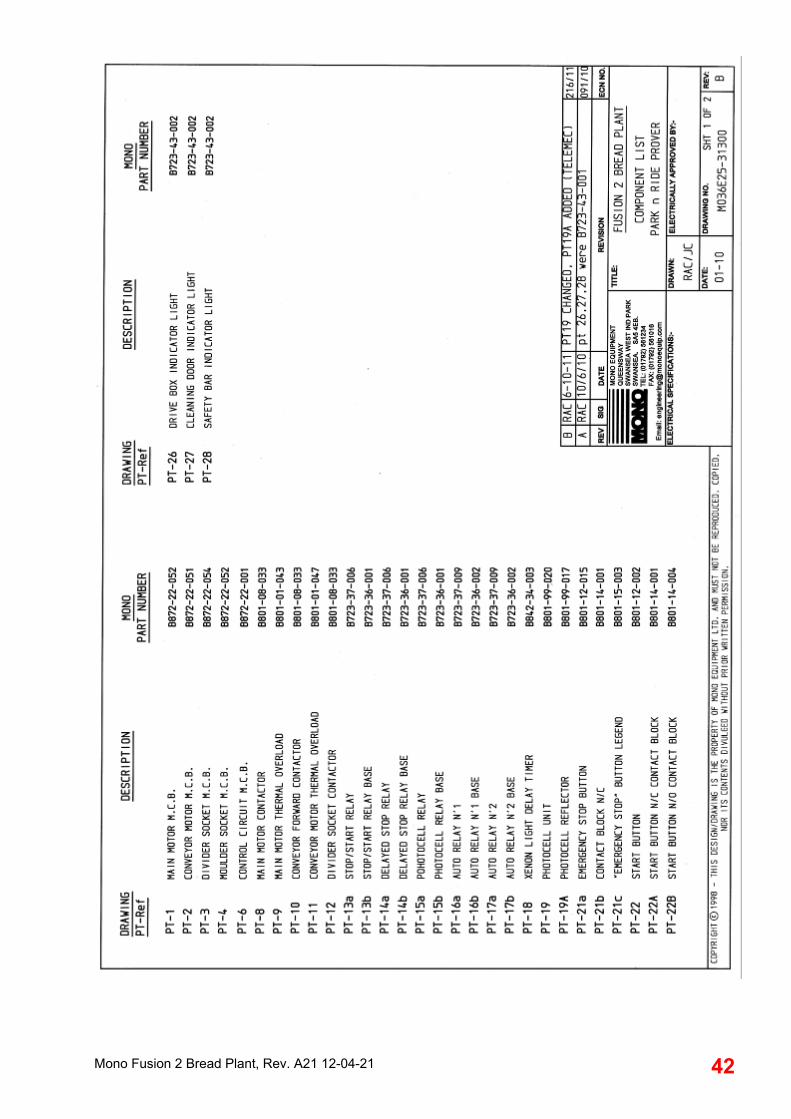
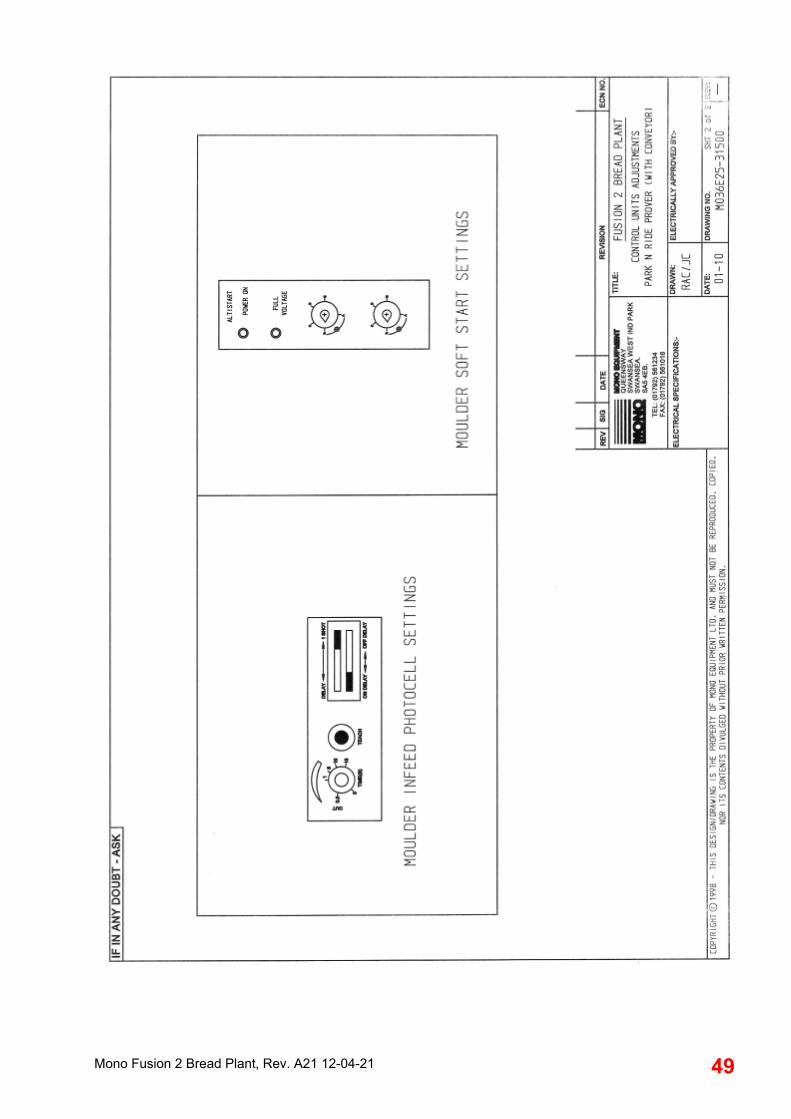
9.0 ELECTRICAL INFORMATION SECTION
FUSION PROVER
NOTE This section may not be correct for your model. Please contact MONO before using.
Mono Fusion 2 Bread Plant, Rev. A21 12-04-21 41
Mono Fusion 2 Bread Plant, Rev. A21 12-04-21 42

Mono Fusion 2 Bread Plant, Rev. A21 12-04-21 43

Mono Fusion 2 Bread Plant, Rev. A21 12-04-21 44
AFTER FEB 2012

Mono Fusion 2 Bread Plant, Rev. A21 12-04-21 45
UP TO FEB 2012

Mono Fusion 2 Bread Plant, Rev. A21 12-04-21 46

Mono Fusion 2 Bread Plant, Rev. A21 12-04-21 47

Mono Fusion 2 Bread Plant, Rev. A21 12-04-21 48
Mono Fusion 2 Bread Plant, Rev. A21 12-04-21 49

Mono Fusion 2 Bread Plant, Rev. A21 12-04-21 50
FULL OPERATING AND MAINTENANCE
MANUAL FOR THE
FUSION BREADPLANT DIVIDER

Mono Fusion 2 Bread Plant, Rev. A21 12-04-21 51
FAILURE TO KEEP TO THE CLEANING AND MAINTENANCE INSTRUCTIONS DETAILED IN THIS MANUAL COULD AFFECT THE WARRANTY and SAFETY OF
THIS MACHINE
o WARNING! --- DIVIDER OIL NOT USE ORDINARY VEGETABLE OIL FROM SHOP SHELVES, IN
THE DIVIDER.
THIS WILL FORM A GUM-LIKE RESIDUE, CAUSING STICKING AND POSSIBLE DAMAGE TO THE MACHINE.
MONO RECOMMENDS THE USE OF “CRODA SUPER WUNDROL”
(AVAILABLE FROM MONO. PART NUMBER “A900-25-272”)
IMPORTANT NOTES
Mono Fusion 2 Bread Plant, Rev. A21 12-04-21 52
CONTENTS – DOUGH DIVIDER
1.0 INTRODUCTION .................................................................................................. 53 2.0 GENERAL DIMENSIONS ..................................................................................... 54 3.0 SPECIFICATIONS ................................................................................................ 54 4.0 SAFETY ................................................................................................................ 55 5.0 INSTALLATION .................................................................................................... 56 6.0 ISOLATION .......................................................................................................... 58 7.0 CLEANING INSTRUCTIONS ............................................................................... 59
Daily .............................................................................................................................. 59 Weekly .......................................................................................................................... 63
8.0 OPERATING......................................................................................................... 64 9.0 MAINTENANCE ................................................................................................... 67 10.0 TROUBLESHOOTING ......................................................................................... 69 11.0 SPARES AND SERVICE ...................................................................................... 76
FOR SERVICE AND SPARES RING: 01792 564044 12.0 ELECTRICAL INFORMATION SECTION ............................................................ 77

Mono Fusion 2 Bread Plant, Rev. A21 12-04-21 53
1.0 INTRODUCTION
THE MONO DIVIDER is accurate, reliable and compact. It has a large capacity hopper, simple controls and adjustments.
The in-line discharge gives a very compact machine.
The dough divider has the capacity to accurately scale dough pieces,
Between 8oz (250g) and 36 oz (1000g).
NOTE THE DIVIDER WORKS ON VOLUME NOT WEIGHT.
DOUGH SUCKED FROM HOPPER
DOUGH EJECTED TO CONVEYOR PISTON CHAMBER
FULL
HOPPER FULL
1 2
3 4
Mono Fusion 2 Bread Plant, Rev. A21 12-04-21 54
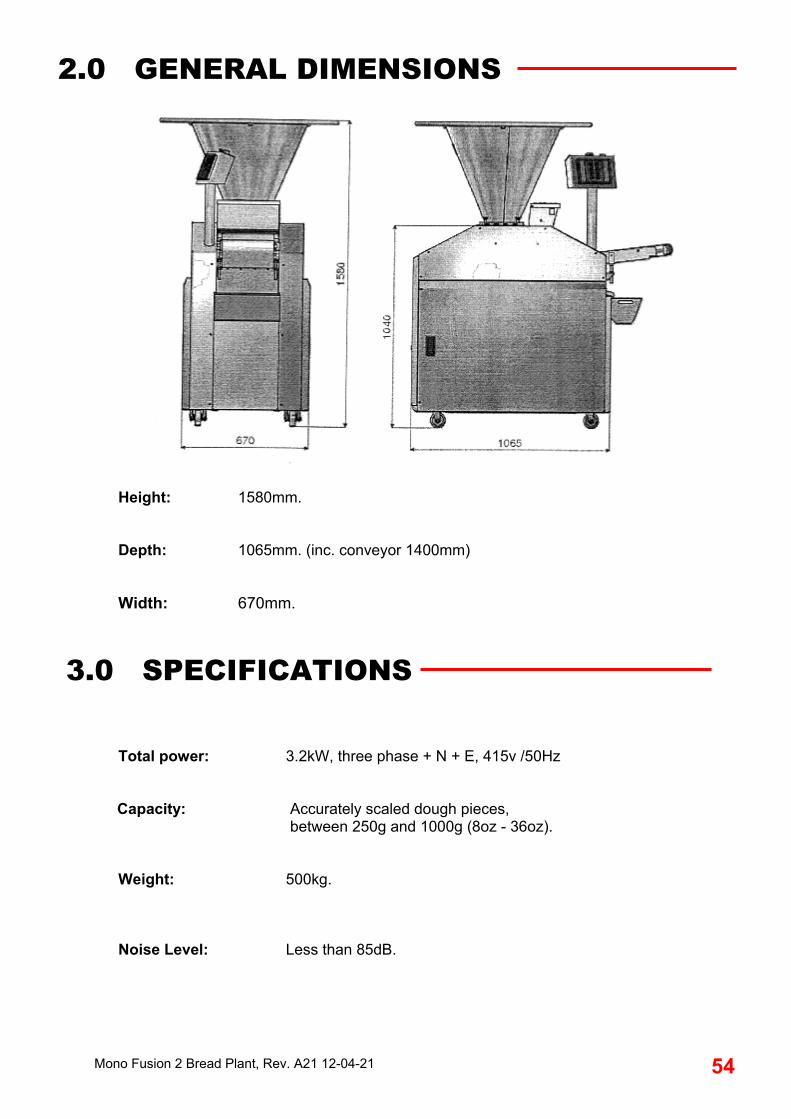
Height: 1580mm.
Depth: 1065mm. (inc. conveyor 1400mm)
Width: 670mm.
3.0 SPECIFICATIONS
Total power: 3.2kW, three phase + N + E, 415v /50Hz
Capacity: Accurately scaled dough pieces,
between 250g and 1000g (8oz - 36oz).
Weight: 500kg. Noise Level: Less than 85dB.
2.0 GENERAL DIMENSIONS

Mono Fusion 2 Bread Plant, Rev. A21 12-04-21 55
4.0 SAFETY 1 Never use a machine in a faulty condition and always report any damage. 2 Only trained engineers may remove any part that requires a tool to do so. 3 People undergoing training on the machine must be under direct supervision of a
fully trained person. 4 Use of the machine can prove dangerous if:
The machine is operated by untrained or unskilled staff The machine is not used for its intended purpose The machine is not operated correctly
5 Always ensure hands are dry before touching any electrical appliance (Including cable, switches and plugs). 6 Do not operate the machine with any panels or guards removed.
All safety devices applied to the machine during manufacture and the operating instructions in this manual are required to operate this machine safely. The owner and the operator are responsible for operating this machine safely.
7 NEVER move machinery by pulling on the power cords or cables. 8 No loose clothing or jewellery should be worn while operating the machine
9 The bakery manager or the bakery supervisor must carry out daily safety checks on
the machine. 10 No one under the age of 16 may operate this machine.
11 No-one under the age of 18 may clean this machine under any circumstances.
12 DO NOT STAND ON ANYTHING TO LOAD THE DIVIDER HOPPER.
ALL CLEANING AND MAINTENANCE OPERATIONS MUST BE MADE WITH THE DIVIDER
DISCONNECTED FROM THE POWER SUPPLY.
WARNING: NEVER LEAVE MACHINE WITH DOUGH IN AS PRESSURES BUILD UP AS THE DOUGH PROVES.
DO NOT TRY TO DISABLE ANY SAFETY DEVICES, THEY ARE FITTED FOR YOUR SAFETY.
IF YOU ENCOUNTER ANY ISSUE WITH THIS EQUIPMENT THAT YOU HAVE NOT BEEN TRAINED FOR, YOU MUST CONTACT YOUR INSTORE TECHNICIAN.

Mono Fusion 2 Bread Plant, Rev. A21 12-04-21 56
5.0 INSTALLATION
DO NOT ATTEMPT TO LIFT THE DIVIDER BY HUMAN FORCE (LIFTING)
Use of a forklift or crane is recommended for lifting, or the machine can be pushed into
position on the castors provided.
To lift with a forklift - the machine must be secured to a pallet.
To lift with a crane - lifting eyes are provided .
Check that the power rating on the serial number plate matches the supply that the machine is to be connected to.
The Dough Divider should be connected to the location socket on the prover drive box
front. Connect the divider to the correct position with the prover and insert keeper pin to hold.
DIVIDER BODY
DIVIDER POWER SOCKET
DIVIDER CONNECTER PIN
LIFTING EYES

Mono Fusion 2 Bread Plant, Rev. A21 12-04-21 57
Connect the electrical cable to the socket on the prover drive box front or power socket on
the wall if not being used as part of a bread plant. Check machine after installation to ensure the belt moves in the correct direction indicated
(see arrow in photo below).
(If wrong - swap positions of any two of the three phase carrying wires in the plug. With a plant this should be factory set and not need to be done)
Fill oil tank to 2/3 level, with your company recommended food safe oil.
o WARNING! DO NOT USE ORDINARY VEGETABLE OIL FROM SHOP SHELVES, IN THE DIVIDER
THIS WILL FORM A GUM-LIKE RESIDUE, CAUSING STICKING AND POSSIBLE DAMAGE TO THE MACHINE.
MONO RECOMMENDS THE USE OF “CRODA SUPER WUNDROL” (AVAILABLE FROM MONO. PART NUMBER “A900-25-272”)
OPEN DOOR
FILL LEVEL
OPEN OILBOX LID AND POUR IN OIL
3
1
2

Mono Fusion 2 Bread Plant, Rev. A21 12-04-21 58
6.0 ISOLATION TO STOP THE DOUGH DIVIDER IN AN EMERGENCY, Switch off at the PLANT MAIN ISOLATOR or use plant EMERGENCY BUTTON OR
EMERGENCY STOP BUTTON (TWIST TO RELEASE)
The DIVIDER EMERGENCY STOP BUTTON.
DIVIDER MAIN ISOLATOR

Mono Fusion 2 Bread Plant, Rev. A21 12-04-21 59
7.0 CLEANING INSTRUCTIONS
DAILY NOTE:
ISOLATE MACHINE FROM DIVIDER SUPPLY BEFORE CLEANING.
CLEANING SHOULD ONLY BE CARRIED OUT BY FULLY TRAINED PERSONNEL DO NOT USE A HIGH PRESSURE WASHER DO NOT USE SOLVENTS OF ANY KIND KEEP CLEANING FLUIDS AWAY FROM ELECTRICAL SWITCHES
1 Remove the dough residue from interior of the hopper. (Only use plastic scraper) 2 Smear interior of the hopper with divider oil.
4 Check oil level is correct. (see next page). Then run the machine for a minute, using on/off buttons. (This will stop the machine from seizing up by coating the drum with oil)
NOTE: THE ABOVE STEPS MUST BE FOLLOWED DAILY,
OTHERWISE IT WILL LEAD TO THE BUILD UP OF STARCH AND SEIZURE OF THE MACHINE.
Mono Fusion 2 Bread Plant, Rev. A21 12-04-21 60
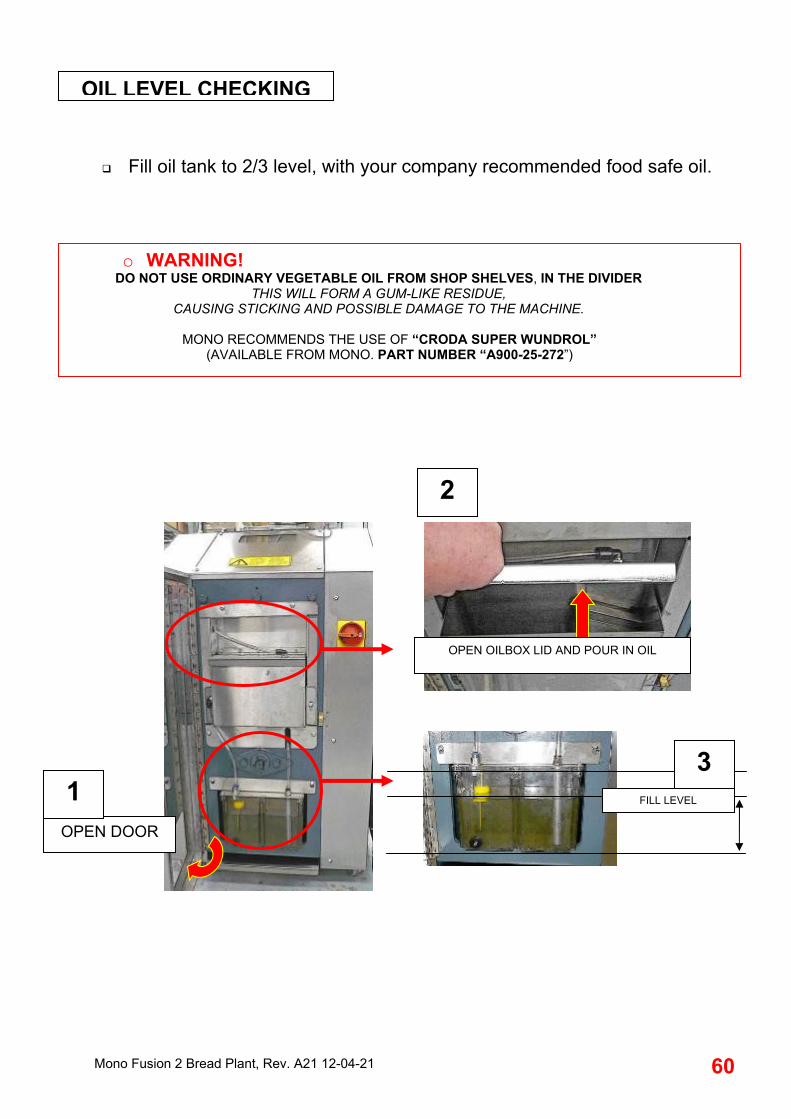
Fill oil tank to 2/3 level, with your company recommended food safe oil.
o WARNING! DO NOT USE ORDINARY VEGETABLE OIL FROM SHOP SHELVES, IN THE DIVIDER
THIS WILL FORM A GUM-LIKE RESIDUE, CAUSING STICKING AND POSSIBLE DAMAGE TO THE MACHINE.
MONO RECOMMENDS THE USE OF “CRODA SUPER WUNDROL”
(AVAILABLE FROM MONO. PART NUMBER “A900-25-272”)
OPEN DOOR
FILL LEVEL
OPEN OILBOX LID AND POUR IN OIL
3 1
2
OIL LEVEL CHECKING
Mono Fusion 2 Bread Plant, Rev. A21 12-04-21 61
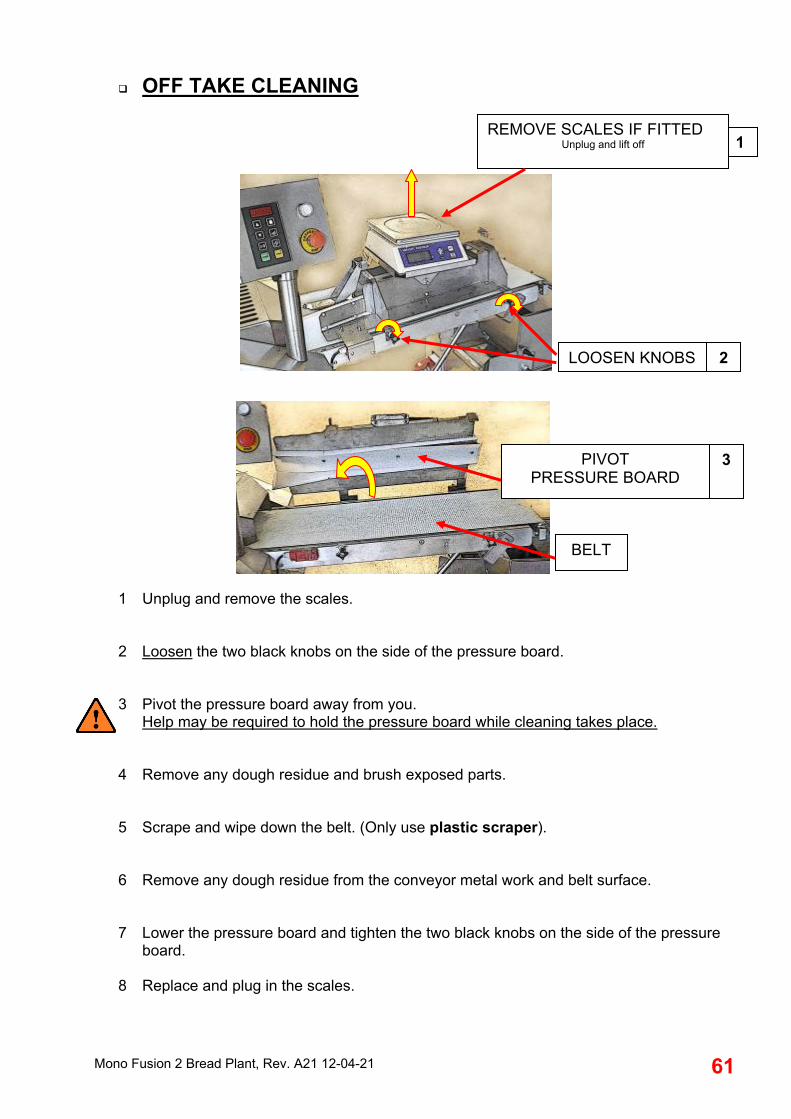
OFF TAKE CLEANING
1 Unplug and remove the scales. 2 Loosen the two black knobs on the side of the pressure board. 3 Pivot the pressure board away from you.
Help may be required to hold the pressure board while cleaning takes place. 4 Remove any dough residue and brush exposed parts. 5 Scrape and wipe down the belt. (Only use plastic scraper). 6 Remove any dough residue from the conveyor metal work and belt surface. 7 Lower the pressure board and tighten the two black knobs on the side of the pressure
board. 8 Replace and plug in the scales.
LOOSEN KNOBS
PIVOT PRESSURE BOARD
1
2
REMOVE SCALES IF FITTED Unplug and lift off
BELT
3

Mono Fusion 2 Bread Plant, Rev. A21 12-04-21 62
EXTERNAL CLEANING
1 Brush off any flour residue and scrape as necessary. (Only use plastic scraper) 2 Brush off loosened dough. 3 Make up sterilising solution and hot water. 4 Clean the exterior of the divider as necessary, working from top to bottom. 5 Swab dry with disposable tissue.
UNDER CONVEYOR COLLECTION BOX
1 Brush the chute debris into the collection box.
2 Lift and remove the collection box and clean. 3 Replace the collection box, making sure it is pushed right down on locating screws.
BRUSH AND WIPE CLEAN
LIFT AND REMOVE BOX
LOCATING
SCREWS
Mono Fusion 2 Bread Plant, Rev. A21 12-04-21 63
WEEKLY NOTE: CLEANING SHOULD ONLY BE CARRIED OUT BY FULLY TRAINED PERSONNEL
WARNING:
ISOLATE MACHINE FROM MAINS SUPPLY
1. Scrub wheels with a small nylon cleaning brush or scouring pad and hot water sterilising
solution. 2 Clean entire exterior surfaces of the machine working from top to bottom.

Mono Fusion 2 Bread Plant, Rev. A21 12-04-21 64
8.0 OPERATING 1 Check intermediate prover is switched on.
Press START BUTTON (2) on prover control panel . This starts the prover in auto mode. (No movement will happen until dough passes the sensor on the chute.)
2 Check that the hopper is clear of objects and Smear interior with divider oil.
o WARNING! DO NOT USE ORDINARY VEGETABLE OIL FROM SHOP SHELVES, IN THE DIVIDER
THIS WILL FORM A GUM-LIKE RESIDUE,CAUSING STICKING AND POSSIBLE DAMAGE TO THE MACHINE.
MONO RECOMMENDS THE USE OF “CRODA SUPER WUNDROL” (AVAILABLE FROM MONO. PART NUMBER “A900-25-272”)
CONTROL POD BUTTONS
DISPLAY
ADJUST UP
ADJUST DOWN
OPTION NOT USED
STOP START EMERGENCY STOP
STOP CIRCUIT RESET BUTTON
ADJUST WEIGHT
ADJUST SPEED
DOUGH COUNTER
1
3
7
6
1 1 2
4
5
8

Mono Fusion 2 Bread Plant, Rev. A21 12-04-21 65
3 Run the divider for two minutes to allow oil to circulate. (Press “START” (1) ) Then Stop the divider. (Press “STOP” (2) )
Note: To prevent contamination, It is advisable to thoroughly check the hopper and off take conveyor for traces of a previous dough.
4 Load dough into the hopper. 5 Run the machine (Press “START” (1) ) and check the first dough pieces out of the
discharge conveyor for weight and cleanliness.
Adjust weight by pressing the “weight adjust button” (3) and then use the “adjust up” button (4) or the “adjust down” button (5) to alter the weight.
Make a note of the number showing in the display window for future reference. (NOTE the number is only a reference to the setting and is not an indicator of weight, size etc.)
(REPLACE CLEAN DOUGH INTO THE HOPPER. DO NOT PUT BACK ON CONVEYOR)
Normally the first six dough pieces are put back into the hopper, as weight consistency is suspect in the initial dough pieces. If any dough pieces are contaminated with excess oil or traces of previous doughs e.g. Wholemeal, discard accordingly.
6 Run dough through the divider. Care must be taken with weights, especially towards the end of a batch of dough. 7 Check the oil level in the tank frequently throughout shift and top up, if required.
Note: - The divider is a volume divider that divides by size of dough piece, not by weight. Be aware that dough is a “live” product and will expand in size during the dividing Process, so check weigh adjustments will have to be made during a batch of dough. WARNING! NEVER LEAVE DIVIDER WITH DOUGH INSIDE, AS
PRESSURES CAN BUILD UP AS THE DOUGH PROVES

Mono Fusion 2 Bread Plant, Rev. A21 12-04-21 66
FLOUR DUSTER OPERATION TO ENSURE AN EVEN FLOW, ONLY USE CLEAN, DRY FLOUR.
DUSTER LOCATION
OPEN LID AND FILL WITH DRY FLOUR, THEN CLOSE THE LID
TURN ON POWER WHEN REQUIRED
ADJUST THE FLOW BY LOOSENING THE BLACK KNOB AND MOVING TO THE
REQUIRED POSITION. RETIGHTEN KNOB.
1
2
3
Mono Fusion 2 Bread Plant, Rev. A21 12-04-21 67
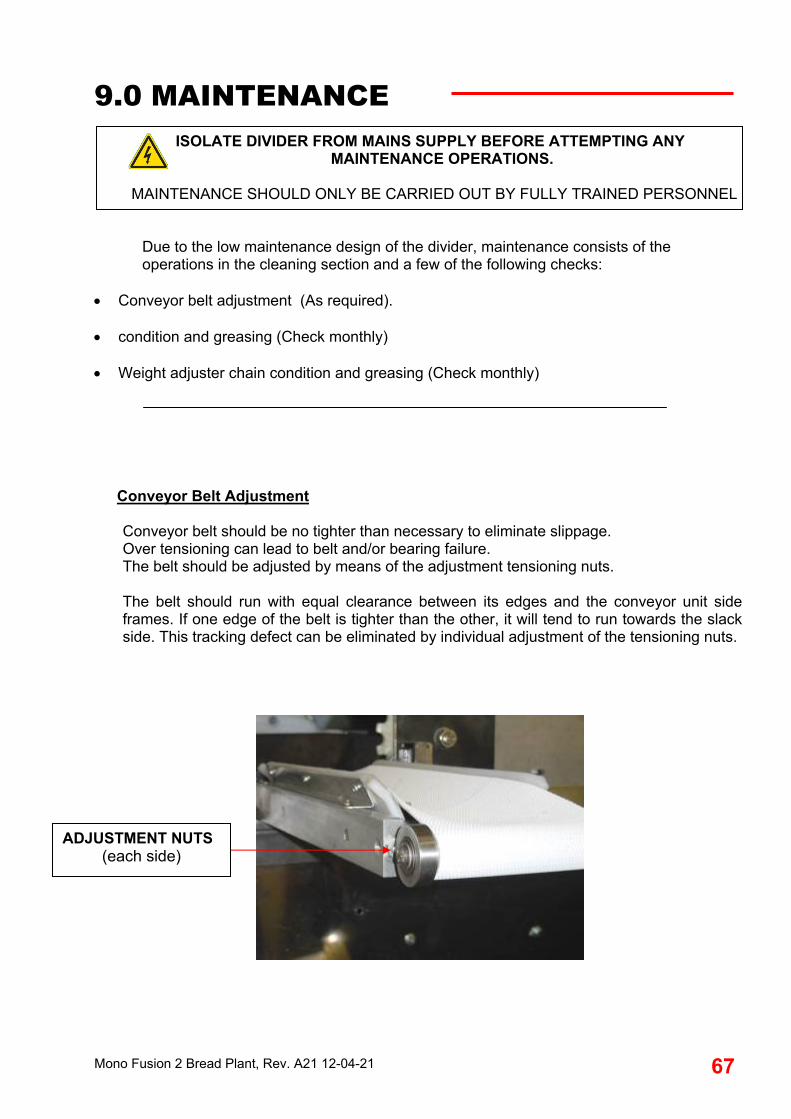
9.0 MAINTENANCE
ISOLATE DIVIDER FROM MAINS SUPPLY BEFORE ATTEMPTING ANY MAINTENANCE OPERATIONS.
MAINTENANCE SHOULD ONLY BE CARRIED OUT BY FULLY TRAINED PERSONNEL
Due to the low maintenance design of the divider, maintenance consists of the operations in the cleaning section and a few of the following checks:
Conveyor belt adjustment (As required). condition and greasing (Check monthly) Weight adjuster chain condition and greasing (Check monthly)
Conveyor Belt Adjustment Conveyor belt should be no tighter than necessary to eliminate slippage. Over tensioning can lead to belt and/or bearing failure. The belt should be adjusted by means of the adjustment tensioning nuts. The belt should run with equal clearance between its edges and the conveyor unit side frames. If one edge of the belt is tighter than the other, it will tend to run towards the slack side. This tracking defect can be eliminated by individual adjustment of the tensioning nuts.
ADJUSTMENT NUTS (each side)

Mono Fusion 2 Bread Plant, Rev. A21 12-04-21 68
Chain greasing
Open the side panels. (Remove 2 fixing screws each side and swing open).
Check that the main drive and weight adjusting chains are clean and greased.
MAIN DRIVE CHAIN
WEIGHT ADJUSTER CHAIN

Mono Fusion 2 Bread Plant, Rev. A21 12-04-21 69
10.0 TROUBLESHOOTING
Divider does not run
Check power is turned on at the isolator on the wall For part of a bread plant check that the plant is connected and turned on. Check plug into intermediate prover is correctly connected.
Check all safety switches are operating (hopper closed etc.). Check a red “stop button” is not depressed (Turn to release.) and stop circuit
reset button (8) has been pressed.
WARNING: IF THERE IS ANY POSSIBILITY OF DAMAGE TO PLUGS OR LEADS, ISOLATE DIVIDER FROM PROVER BEFORE CHECKING.
If divider still does not function after carrying out these checks, call out “Mono” service dept. (see page 73)

Mono Fusion 2 Bread Plant, Rev. A21 12-04-21 70
THE FOLLOWING SHOULD ONLY BE USED BY TRAINED SERVICE ENGINEERS

Mono Fusion 2 Bread Plant, Rev. A21 12-04-21 71

Mono Fusion 2 Bread Plant, Rev. A21 12-04-21 72
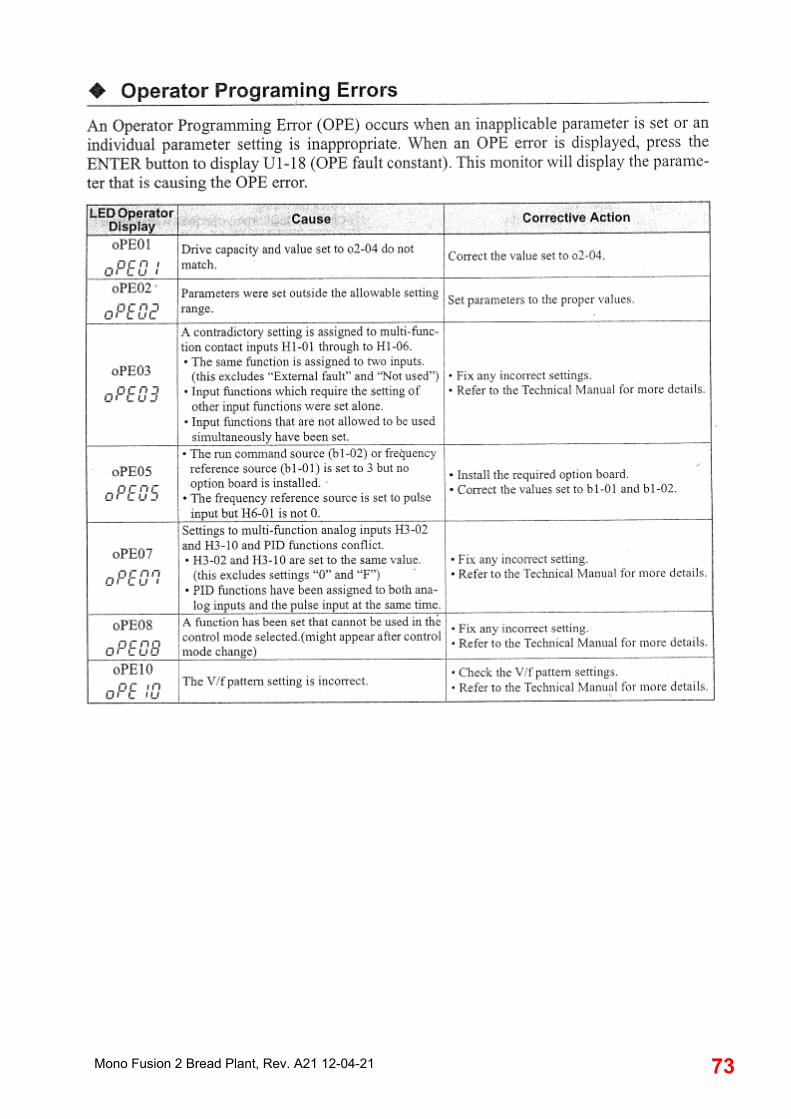
Mono Fusion 2 Bread Plant, Rev. A21 12-04-21 73
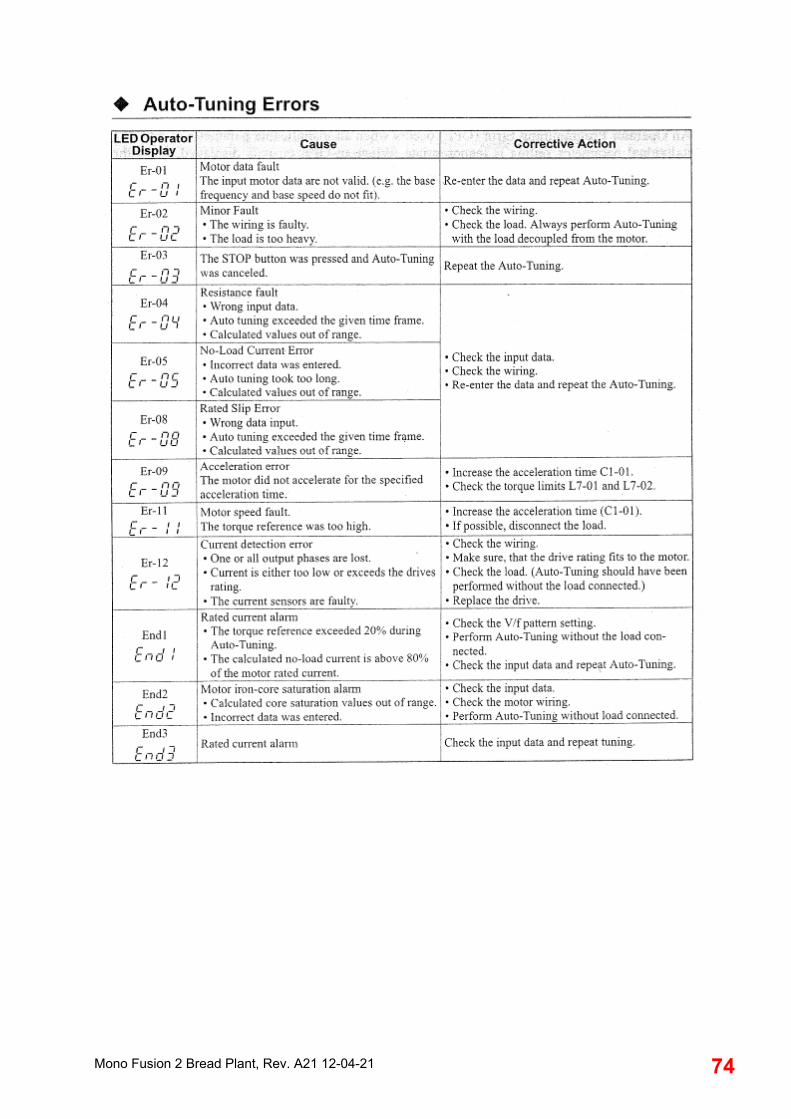
Mono Fusion 2 Bread Plant, Rev. A21 12-04-21 74

Mono Fusion 2 Bread Plant, Rev. A21 12-04-21 75
YASKAWA INVERTER DEFAULT SETTINGS

Mono Fusion 2 Bread Plant, Rev. A21 12-04-21 76
11.0 SPARES AND SERVICE
If a fault arises, please do not hesitate to contact the Customer Service Department, quoting the machine serial number
on the silver information plate of the machine and on the front cover of this manual .
SPARES and OVERSEAS SUPPORT:
Queensway Swansea West Industrial Estate
Swansea. SA5 4EB UK
email:[email protected] Web site:www.monoequip.com
Tel. 01792 561234 Fax. 01792 561016
MONO

Mono Fusion 2 Bread Plant, Rev. A21 12-04-21 77
12.0 ELECTRICAL INFORMATION SECTION
NOTE Due to continual improvements this section may not be correct for your model. Please contact MONO before using.

Mono Fusion 2 Bread Plant, Rev. A21 12-04-21 78
ELECTRICAL DISTRIBUTION

Mono Fusion 2 Bread Plant, Rev. A21 12-04-21 79
CONTROL CIRCUIT

Mono Fusion 2 Bread Plant, Rev. A21 12-04-21 80
EMERGENCY STOP MONITORING CIRCUIT
HO
PPER
SA
FETY
SW
ITC
H
OFF
TAKE
SW
ITC
H

Mono Fusion 2 Bread Plant, Rev. A21 12-04-21 81
MO
ULD
ER
FULL OPERATING AND MAINTENANCE
MANUAL FOR THE
BREADPLANT MOULDER

Mono Fusion 2 Bread Plant, Rev. A21 12-04-21 82
Ensure the moulder is set up and adequate tins and trays are available before starting the breadplant.
IMPORTANT NOTES
IF YOU ENCOUNTER ANY ISSUE WITH THIS EQUIPMENT THAT YOU HAVE NOT BEEN TRAINED FOR, YOU MUST CONTACT YOUR INSTORE
TECHNICIAN.

Mono Fusion 2 Bread Plant, Rev. A21 12-04-21 83
CONTENTS -- MOULDER SECTION 1.0 INTRODUCTION .................................................................................................. 84 2.0 OVERALL DIMENSIONS ..................................................................................... 84 3.0 SPECIFICATIONS ................................................................................................ 85 4.0 SAFETY ................................................................................................................ 86 5.0 INSTALLATION .................................................................................................... 87 6.0 ISOLATION .......................................................................................................... 88 7.0 CLEANING INSTRUCTIONS ............................................................................... 89
Daily .............................................................................................................................. 89 Weekly .......................................................................................................................... 95
8.0 OPERATING INFORMATION .............................................................................. 96 9.0 OPERATING INSTRUCTIONS ............................................................................. 97
Moulding between belts (French stick and petit pan) ................................................... 98 Moulding Between Rear Belt & Pressure Board (Tin and Bloomers) ........................... 99
10.0 MAINTENANCE ................................................................................................. 100 11.0 TROUBLESHOOTING ....................................................................................... 101 12.0 SPARES AND SERVICE .................................................................................... 102
FOR SERVICE AND SPARES RING: 01792 564044 13.0 MOULDER ELECTRICAL INFORMATION ........................................................ 103

Mono Fusion 2 Bread Plant, Rev. A21 12-04-21 84
1.0 INTRODUCTION MONO’s Moulder combines the capabilities of traditional bread and French stick moulding machines. Its small footprint and simple controls are of particular benefit in small bakeries and when used with an automatic bread plant. The Moulder will process up to 900 dough pieces an hour.
2.0 OVERALL DIMENSIONS Height: 1825mm. Depth: 1205mm. Width: 1020mm.

Mono Fusion 2 Bread Plant, Rev. A21 12-04-21 85
3.0 SPECIFICATIONS Total power: 0.75kW three phase Capacity: Up to 900 dough pieces processed every hour, between 250g (9oz) and 0.9kg
(2lb) in weight and between 125mm (5”) and 760mm (30”) Weight: 430kg Noise level: Less than 85dB.

Mono Fusion 2 Bread Plant, Rev. A21 12-04-21 86
4.0 SAFETY 1 Never use a machine in a faulty condition and always report damage. 2 No one under 16 may operate this machine. 3 No one under 18 may clean this machine. 4 Only trained and authorised persons may remove any part that requires a tool to do so. 5 Always ensure hands are dry before touching any electrical appliance (including cable and
plug). 6 All operatives must be fully trained. 7 People undergoing training on the machine must be under direct supervision of a trainer. 8 Do not operate with any panels removed. 9 All guards must be fixed in place with bolts or screws unless protected by a
safety switch. 10 No loose clothing or jewellery to be worn while operating the machine. 11 Switch off power at the mains isolate switch or isolate at the main control box 12 The Bakery Manager or the bakery Supervisor must carry out daily safety checks. 13 Warning: Do not attempt to scrape moulding belts when moulder is running. 14 Any internal maintenance must be by fully trained maintenance personnel. WARNING: Hand or bodily contact with moving belt surfaces may cause friction burns to skin.
This situation need not occur to successfully operate the moulder ALL CLEANING AND MAINTENANCE OPERATIONS MUST BE MADE WITH MACHINE DISCONNECTED FROM THE POWER SUPPLY
IF YOU ENCOUNTER ANY ISSUE WITH THIS EQUIPMENT THAT YOU HAVE NOT BEEN TRAINED FOR, YOU MUST CONTACT YOUR INSTORE TECHNICIAN.
Mono Fusion 2 Bread Plant, Rev. A21 12-04-21 87
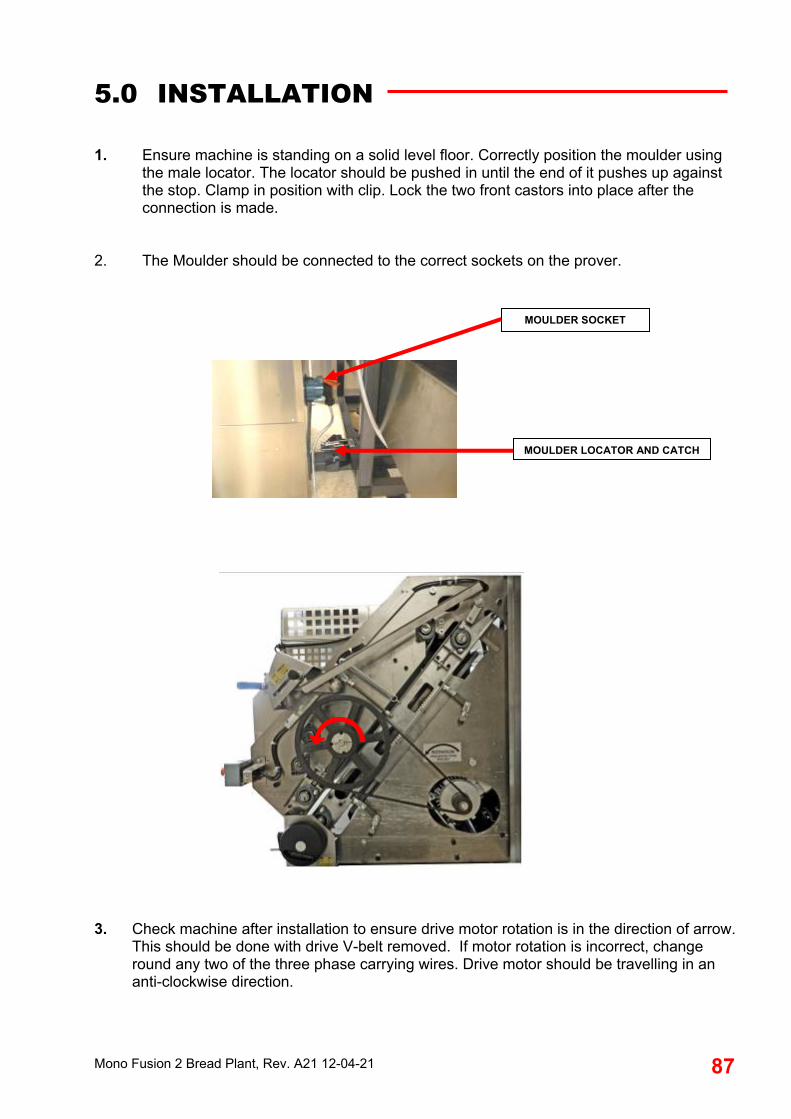
5.0 INSTALLATION 1. Ensure machine is standing on a solid level floor. Correctly position the moulder using
the male locator. The locator should be pushed in until the end of it pushes up against the stop. Clamp in position with clip. Lock the two front castors into place after the connection is made.
2. The Moulder should be connected to the correct sockets on the prover.
3. Check machine after installation to ensure drive motor rotation is in the direction of arrow. This should be done with drive V-belt removed. If motor rotation is incorrect, change round any two of the three phase carrying wires. Drive motor should be travelling in an anti-clockwise direction.
MOULDER SOCKET
MOULDER LOCATOR AND CATCH

Mono Fusion 2 Bread Plant, Rev. A21 12-04-21 88
To stop the moulder in an emergency, switch off at the prover main isolator,
or use the emergency stop button either on the plant control panel or the remote station .
6.0 ISOLATION
PROVER MAIN ISOLATOR
TO STOP MOULDER
PROVER OVERHEAD PANEL

Mono Fusion 2 Bread Plant, Rev. A21 12-04-21 89
NOTE:- SWITCH OFF AND ISOLATE FROM THE MAINS SUPPLY BEFORE
COMMENCING ANY CLEANING.
DAILY CLEANING INSTRUCTIONS NOTE! - USE PLASTIC SCRAPERS TO REMOVE SUBSTANTIAL DOUGH PIECES PRIOR TO CLEANING.
1. Isolate the mains supply. (see previous page) 2. Open large front door.
SIDE DOOR (BOTH SIDES)
CONVEYOR COVER
LARGE FRONT DOOR
REAR DOOR
7.0 CLEANING MOULDER CLEANING

Mono Fusion 2 Bread Plant, Rev. A21 12-04-21 90
4. Set sheeting gap to the widest mark and brush out residue from the area, using a plastic scraper on the rollers if required.
5. Clean any residue that has been trapped at the bottom of the belt.
Scrape exposed surface of the dough-moulding belt with plastic scraper.
7. Brush/vacuum the area.
MOULDER CLEANING
SET SHEETING GAP

Mono Fusion 2 Bread Plant, Rev. A21 12-04-21 91
SCRAPER AND CURLING CHAIN REMOVAL
Detach top of curling chain Lift chain off top bar and remove curling chain and scraper.
CLIP CLOSED CLIP OPEN
To remove scraper and curling chain. Slide clips sideways and lift up bar to disengage
(one each side).
MOULDER CLEANING
REAR VIEW

Mono Fusion 2 Bread Plant, Rev. A21 12-04-21 92
To replace scraper and curling chain. Clean and then replace the curling chain by dropping down conveyor from the back and
clipping in place at the front. (Reverse of removal).
SLOT
CLIP
Mono Fusion 2 Bread Plant, Rev. A21 12-04-21 93
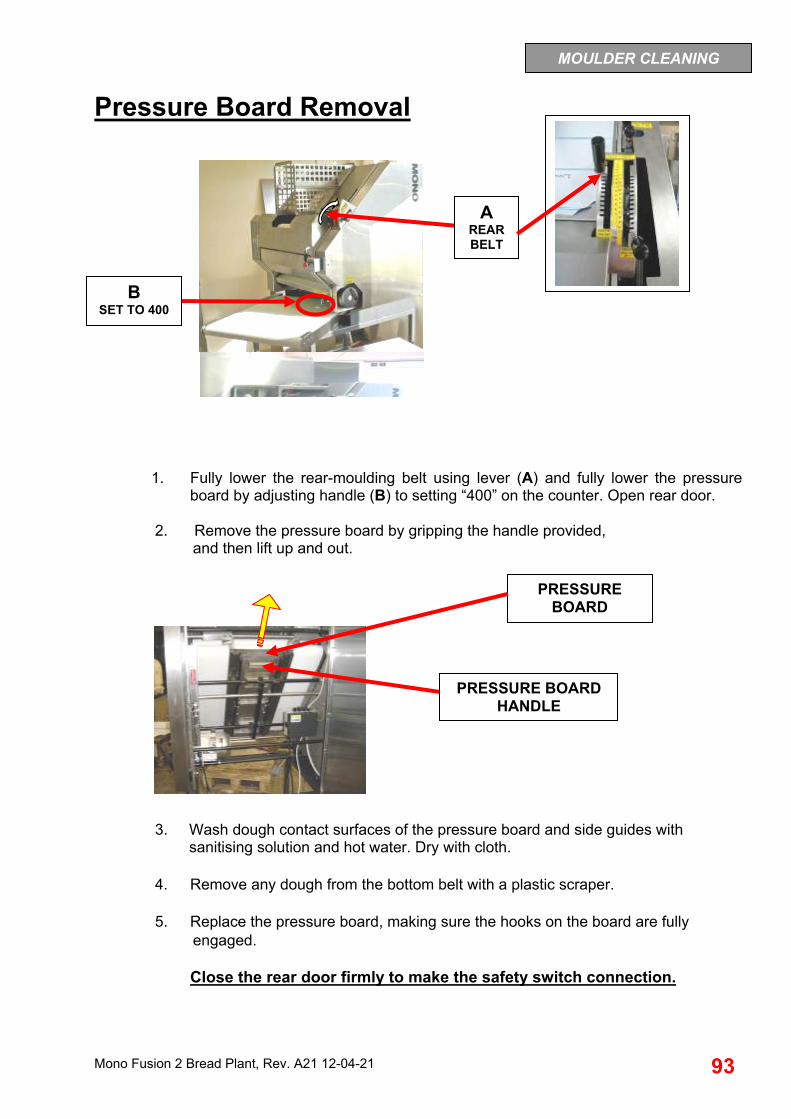
Pressure Board Removal
1. Fully lower the rear-moulding belt using lever (A) and fully lower the pressure board by adjusting handle (B) to setting “400” on the counter. Open rear door.
2. Remove the pressure board by gripping the handle provided,
and then lift up and out.
3. Wash dough contact surfaces of the pressure board and side guides with sanitising solution and hot water. Dry with cloth.
4. Remove any dough from the bottom belt with a plastic scraper.
5. Replace the pressure board, making sure the hooks on the board are fully
engaged.
Close the rear door firmly to make the safety switch connection.
PRESSURE BOARD
A REAR BELT
B SET TO 400
PRESSURE BOARD HANDLE
MOULDER CLEANING

Mono Fusion 2 Bread Plant, Rev. A21 12-04-21 94
OFF TAKE CONVEYOR Should be scraped clean with a plastic scraper.
OFF TAKE TRAY Pull out the off take tray shelf and remove the plastic tray. Wash well and dry. Replace. And finally to complete “Daily Cleaning”
Brush down all external surfaces of the machine including the stand.
Sweep under machine to remove all debris from the floor.
Spot clean with dampened cloth, sanitising solution and hot water, paying particular attention to handles, levers and controls.
OFF TAKE CONVEYOR
MOULDER CLEANING
OFF TAKE TRAY

Mono Fusion 2 Bread Plant, Rev. A21 12-04-21 95
WEEKLY CLEANING INSTRUCTIONS AS DAILY INSTRUCTIONS AND ALSO: 1. Remove the moulder mains plug from prover and unclip positioning locator on
base. 2. Pull the moulder away from prover. 3 Wipe the stand with a cloth dampened with disinfecting solution and hot water. 4 Scrape and scrub the wheels on the machine. 5 Wipe down all internal surfaces with disinfecting solution and hot water.
Dry with a cloth.

Mono Fusion 2 Bread Plant, Rev. A21 12-04-21 96
8.0 OPERATING INFORMATION 1 The Moulder should be used on a level floor for the best results. 2 All control levers, handles, etc are best adjusted when the moulder is running,
although they can be adjusted with the machine stationary. Machine cycle information.
1 The moulding elements consist of two dough guides, two differential sheeting rollers, a guide roller, a stripper roller, a removable curling chain, two endless polyurethane belts rotating in the same direction, a two position deflector, a pressure board, a pair of dough guides and an offtake tray.
2 Dough is delivered from the prover conveyor. The dough is then sheeted
through the two differential rollers into a pancake shape.
3 The dough piece is taken off the rollers by means of a stripper roller and guided by the remaining roller onto the endless polyurethane belt. Upon making contact with the belt the dough piece is immediately pressurised by the curling chain mat. The light pressure produced by the chain causes the dough piece to roll over on its self and produce a sausage shape.
4 At this stage in the moulding process the dough path can be selected, via
pushrod to be further processed either between front and rear belts or between the rear belt and pressure board.
5 Both of the moulding routes chosen will deposit the finished dough piece onto
an offtake tray.

Mono Fusion 2 Bread Plant, Rev. A21 12-04-21 97
Ensure the moulder is set up and adequate tins and trays are available before starting.
9.0 OPERATING INSTRUCTIONS
E A
D
C
B
All control levers, handles, etc are best adjusted when moulder is running, although they can be adjusted with the machine stationary.
Mono Fusion 2 Bread Plant, Rev. A21 12-04-21 98
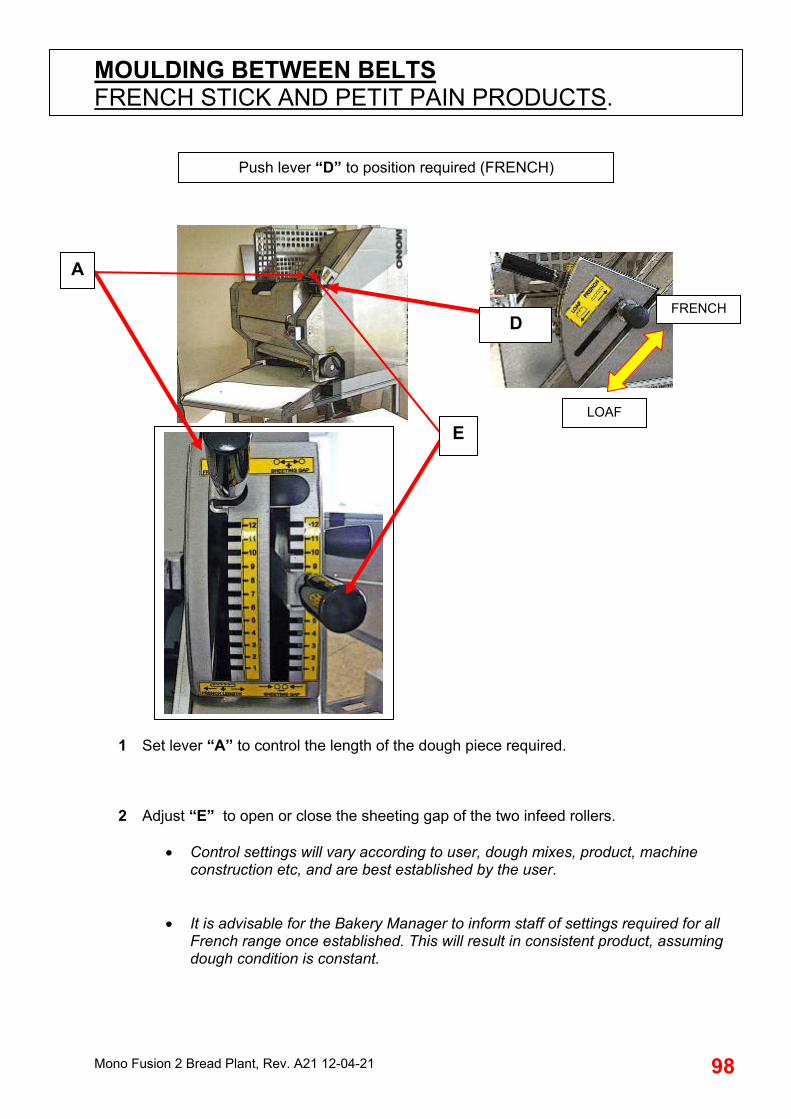
MOULDING BETWEEN BELTS FRENCH STICK AND PETIT PAIN PRODUCTS.
1 Set lever “A” to control the length of the dough piece required.
2 Adjust “E” to open or close the sheeting gap of the two infeed rollers.
Control settings will vary according to user, dough mixes, product, machine construction etc, and are best established by the user.
It is advisable for the Bakery Manager to inform staff of settings required for all
French range once established. This will result in consistent product, assuming dough condition is constant.
Push lever “D” to position required (FRENCH)
D FRENCH
LOAF
E
A

Mono Fusion 2 Bread Plant, Rev. A21 12-04-21 99
Scale to show distance between dough guides
When using hand wheel “C”
MOULDING BETWEEN REAR BELT AND PRESSURE BOARD TIN BREAD & BLOOMERS.
Push lever “D” to position required (LOAF)
1 Position control lever “A” to position 0 – this ensures the correct transfer of the dough
piece after curling and correct discharge onto the return conveyor. 2 Adjust handle “E” for the infeed sheeting gap.
3 Adjust handle “B” for the pressure board. Anti-clockwise will mean the numbers on the digital counter will increase and therefore the pressure on the dough will decrease. Clockwise will be the opposite. The number on the digital counter should be noted so it can be reproduced at a later date.
4 Adjust hand wheel “C” to control the length of the loaf. Hand wheel simultaneously positions the dough side guides equally about the centreline of the moulder. The distance between the dough guides is indicated by the metal pointer and the scale
5 After moulding, the dough piece should be transferred from the offtake to a waiting tray.
E
A
B
D
C

Mono Fusion 2 Bread Plant, Rev. A21 12-04-21 100
10.0 MAINTENANCE
1 Refer to cleaning instructions.
2 Maintenance other than cleaning must be carried out by trained maintenance personnel.
3 It is recommended that the bearings, chain, motor, etc. be greased every six months
4 If a belt is tracking to the left or the right. Call in maintenance contractor immediately
before any permanent damage can occur. MAINTENANCE ENGINEER NOTES
Moulding belts should be no tighter than necessary to eliminate slippage. Over tensioning can lead to belt and/or bearing failure. The belt should be adjusted by means of the adjustment tensioning screws (shown below).
The belts should run with equal clearance between its edges and the unit side frames. If one edge of the belt is tighter than the other, it will tend to run towards the slack side. This tracking defect can be eliminated by individual adjustment of the tensioning screws. Caution Adjustment screws should not be continually tightened (this will cause bearing failure or the moulding belt to stretch and break). It may be that one side is too tight so should be eased off a little. Bearings and bearing grub screws (2 per bearing) should also be checked as a seized bearing may be the cause of the moulding belt needing adjustment. If a bearing is replaced, the grub screws should be tightened and liquid thread lock applied. (On later models the grub screws should also be aligned with dimples in the roller shaft).
ADJUSTMENT TENSIONING SCREWS
(one side shown.)

Mono Fusion 2 Bread Plant, Rev. A21 12-04-21 101
11.0 TROUBLESHOOTING
The final dough temperature, after mixing, should not exceed the ideal. (typically 25 - 26 º C)
A dough conditioner containing a good relaxant is required.
French dough should be soft but not sticky.
Curling chain should be kept clean.

Mono Fusion 2 Bread Plant, Rev. A21 12-04-21 102
12.0 SERVICE AND SPARES
If a fault arises, please do not hesitate to contact the Customer Service Department, quoting the machine serial number
on the silver information plate of the machine and on the front cover of this manual .
SPARES and OVERSEAS SUPPORT:
Queensway Swansea West Industrial Estate
Swansea. SA5 4EB UK
email:[email protected] Web site:www.monoequip.com
Tel. spares +44(0)1792 564039 switchboard +44(0)1792 561234
Fax. 01792 561016
MONO

Mono Fusion 2 Bread Plant, Rev. A21 12-04-21 103
A900-21-109 Main drive V belt
“V” BELT AND DRIVE INFORMATION
A900-09-105 Motor drive Pulley
A900-09-108 Main Pulley
A900-06-259 Bearing
A900-06-259 Bearing
A900-06-259 Bearing
A900-06-227 Bearing
DUE TO CONTINUAL IMPROVEMENTS METALWORK MAY BE SLIGHTLY
DIFFERENT ON THE MODEL YOU HAVE
UNDER
A900-06-242 Bearing

Mono Fusion 2 Bread Plant, Rev. A21 12-04-21 104
PULLEY 48T A900-09-093 34T A900-09-094 28T A900-09-095 26T A900-09-096 24T A900-09-097 30T A900-09-098 BELT – DOUBLE SIDED LARGE A900-21-092 -- TIMING BELT A900-21-093
MOULDING BELT DRIVE INFORMATION
PART NO.
UNDER
UNDER
UNDER
A900-09-097 24T PULLEY
A900-06-259 BEARING
A900-21-092 TIMING BELT
A900-09-095 28T PULLEY
A900-21-093 TIMING BELT
A900-09-104 40T PULLEY
A900-09-094 34T PULLEY
A900-09-096 26T PULLEY
A900-06-227 BEARING
A900-06-259 BEARING
A900-06-259 BEARING
A900-06-259 BEARING
A900-09-098 30T PULLEY
A900-06-227 BEARING
A900-09-096 26T PULLEY
A900-09-093 48T PULLEY
A900-09-104 40T PULLEY
A900-06-242 BEARING
UNDER

Mono Fusion 2 Bread Plant, Rev. A21 12-04-21 105
13.0 MOULDER ELECTRICAL INFORMATION

Mono Fusion 2 Bread Plant, Rev. A21 12-04-21 106

Mono Fusion 2 Bread Plant, Rev. A21 12-04-21 107

Mono Fusion 2 Bread Plant, Rev. A21 12-04-21 108
Queensway Swansea West Industrial Estate
Swansea. SA5 4EB
UK
email:[email protected] Web site:www.monoequip.com
Tel. 01792 561234 Fax. 01792 561016
DISPOSAL CARE SHOULD BE TAKEN WHEN THE MACHINE COMES TO THE END OF ITS WORKING LIFE.
ALL PARTS SHOULD BE DISPOSED OF IN THE APPROPRIATE PLACE, EITHER BY RECYCLING OR OTHER MEANS OF DISPOSAL THAT COMPLIES WITH LOCAL REGULATIONS.
(IN UK, ENVIRONMENTAL PROTECTION ACT 1990 APPLIES)
DISPOSE OF UNUSED PRODUCT AND CONTAINERS CAREFULLY AND RESPONSIBLY
FOR SERVICE AND SPARES RING: 01792 564044 (24HRS)


![arXiv:1910.02490v3 [cs.RO] 4 Mar 2020 · ntics ORB-SLAM [22] mono g2o points 7 DSO [23] mono g2o points 7 VINS-mono [24] mono/IMU Ceres points 7 VINS-Fusion [25] mono/Stereo/IMU Ceres](https://img.dokumen.tips/doc/110x75/5f4b02b6de01ce6fc65af952/arxiv191002490v3-csro-4-mar-2020-ntics-orb-slam-22-mono-g2o-points-7-dso.jpg)