Embed Size (px)
Citation preview

Wood BlindsAlternative Wood Blinds
2" Aluminum Blinds
Installation and Care Instructions
Standard HeadMaster™ Hardware SystemLiteRise® Cordless System
Thank you for purchasing a Hunter Douglas product. Your new blind(s) has been custom built for you from the highest quality materials. Once in your window, it will provide you with a lifetime of beauty and trouble-free use. Before installing or operating your new blind(s), please review these instructions thoroughly to acquaint yourself with all of the procedures.
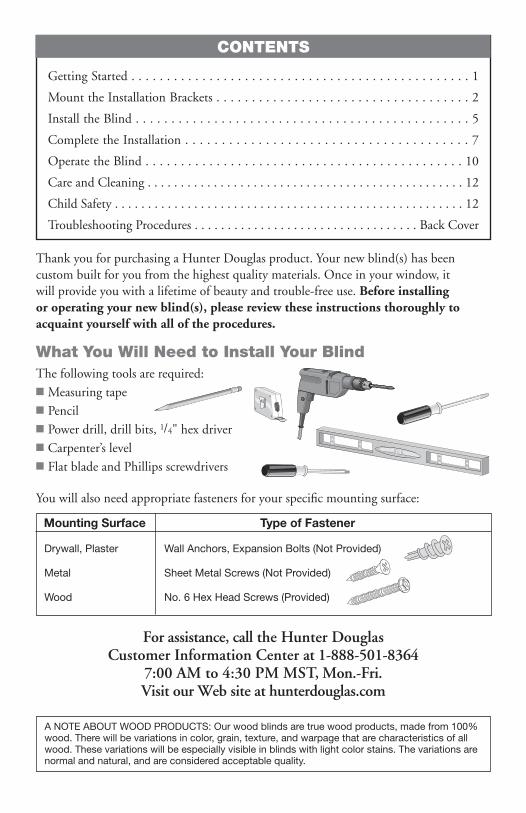
What You Will Need to Install Your BlindThe following tools are required:■ Measuring tape■ Pencil■ Power drill, drill bits, 1/4" hex driver■ Carpenter’s level■ Flat blade and Phillips screwdrivers
You will also need appropriate fasteners for your specifi c mounting surface:
CONTENTS
Getting Started . . . . . . . . . . . . . . . . . . . . . . . . . . . . . . . . . . . . . . . . . . . . . . . . 1
Mount the Installation Brackets . . . . . . . . . . . . . . . . . . . . . . . . . . . . . . . . . . . . 2
Install the Blind . . . . . . . . . . . . . . . . . . . . . . . . . . . . . . . . . . . . . . . . . . . . . . . 5
Complete the Installation . . . . . . . . . . . . . . . . . . . . . . . . . . . . . . . . . . . . . . . 7
Operate the Blind . . . . . . . . . . . . . . . . . . . . . . . . . . . . . . . . . . . . . . . . . . . . . 10
Care and Cleaning . . . . . . . . . . . . . . . . . . . . . . . . . . . . . . . . . . . . . . . . . . . . . . . . 12
Child Safety . . . . . . . . . . . . . . . . . . . . . . . . . . . . . . . . . . . . . . . . . . . . . . . . . . . . . 12
Troubleshooting Procedures . . . . . . . . . . . . . . . . . . . . . . . . . . . . . . . . . . Back Cover
Drywall, Plaster
Metal
Wood
Mounting Surface Type of Fastener
Wall Anchors, Expansion Bolts (Not Provided)
Sheet Metal Screws (Not Provided)
No. 6 Hex Head Screws (Provided)
For assistance, call the Hunter Douglas Customer Information Center at 1-888-501-8364
7:00 AM to 4:30 PM MST, Mon.-Fri.Visit our Web site at hunterdouglas.com
A NOTE ABOUT WOOD PRODUCTS: Our wood blinds are true wood products, made from 100% wood. There will be variations in color, grain, texture, and warpage that are characteristics of all wood. These variations will be especially visible in blinds with light color stains. The variations are normal and natural, and are considered acceptable quality.
BracketShim
Valance Clips(Woods andAluminum)
Valance Clips(Alt. Woods)
Corner Clipsfor Valance
Returns(Woods andAluminum)
Corner Clipsfor Valance
Returns(Alt. Woods)
End Bracket**
End Bracket**
Valance
End BracketSpacer Block*
Hold-Down Bracketand Pin (Optional)**
Hold-DownBracket and Pin
(Optional)**
Hold-DownBracketand Pin
(Optional)***
IntermediateBracket
IntermediateBracket
Spacer Block*
*21/2", 25/8" Slat Sizes **2", 21/2", 25/8" Slat Sizes ***1", 13/8" Slat Sizes
EndBracketSpacerBlock*
2" or 4" ExtensionBrackets (Optional)
ValanceSplice
(If Required)
End Brackets***
1
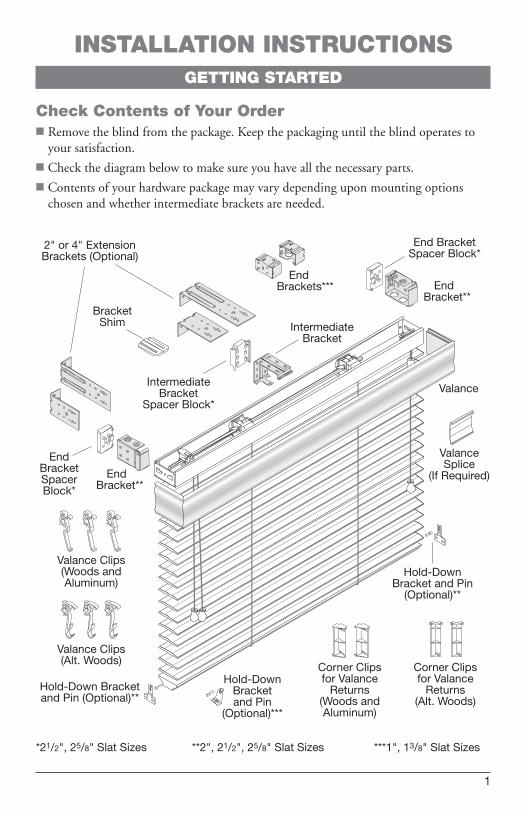
INSTALLATION INSTRUCTIONSGETTING STARTED
Check Contents of Your Order■ Remove the blind from the package. Keep the packaging until the blind operates to your satisfaction.
■ Check the diagram below to make sure you have all the necessary parts.
■ Contents of your hardware package may vary depending upon mounting options chosen and whether intermediate brackets are needed.
Spacer Blocks (21/2" and 25/8" Slat Sizes Only)Note: Spacer blocks are optional for 2" slat sizes.
■ Attach a spacer block to each of the two end brackets.
■ If one or more intermediate brackets is required (see chart above), attach a spacer block to each intermediate bracket.
■ If extension brackets will be used, do not attach spacer blocks.
SideMount
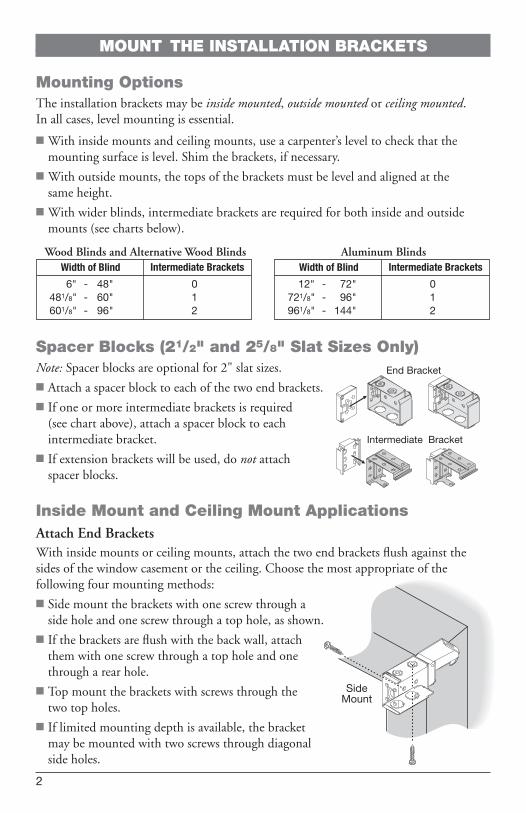
MOUNT THE INSTALLATION BRACKETS
Mounting OptionsThe installation brackets may be inside mounted, outside mounted or ceiling mounted. In all cases, level mounting is essential.
■ With inside mounts and ceiling mounts, use a carpenter’s level to check that the mounting surface is level. Shim the brackets, if necessary.
■ With outside mounts, the tops of the brackets must be level and aligned at the same height.
■ With wider blinds, intermediate brackets are required for both inside and outside mounts (see charts below).
Inside Mount and Ceiling Mount ApplicationsAttach End BracketsWith inside mounts or ceiling mounts, attach the two end brackets fl ush against the sides of the window casement or the ceiling. Choose the most appropriate of the following four mounting methods:
■ Side mount the brackets with one screw through a side hole and one screw through a top hole, as shown.
■ If the brackets are fl ush with the back wall, attach them with one screw through a top hole and one through a rear hole.
■ Top mount the brackets with screws through the two top holes.
■ If limited mounting depth is available, the bracket may be mounted with two screws through diagonal side holes.
2
End Bracket
Intermediate Bracket
Wood Blinds and Alternative Wood Blinds
6" - 48" 0 481/8" - 60" 1 601/8" - 96" 2
Intermediate BracketsWidth of BlindAluminum Blinds
12" - 72" 0 721/8" - 96" 1 961/8" - 144" 2
Intermediate BracketsWidth of Blind

3
Note: For blinds with 21/2" or 25/8" slats, spacer blocks are used with inside mounts to position the brackets a minimum of 3/8" from the glass. This prevents slats from rubbing the glass when tilting or when the blind is raised and lowered.
Specialty Shapes (Sloped Headrail)■ Only the top of each bracket can be fl ush against the casement.
■ Top mount the brackets with screws through the two top holes, as shown at right.
Intermediate Brackets (If Required)Evenly space the intermediate bracket(s) between the two end brackets.
■ Adjust spacing if needed to avoid interference with internal headrail mechanisms.
■ Attach with two screws through diagonal holes.
■ The backs of the end brackets and intermediate bracket(s) must align.
Note: With ceiling mounts, you may need to add a bracket shim to allow clearance for the valance clips.
Bracket ShimsIn addition to being used to gain clearance for valance clips with ceiling mounts, bracket shims are needed to add top clearance when a valance with optional dust cover is used and the blind is inside mounted, but the headrail is not fully recessed. (If the headrail is fully recessed or ceiling mounted, the optional dust cover would not be ordered.)
An additional 3/8" of clearance is needed to accommodate the height of the cornice clips, as shown in the illustration.
To gain this clearance, use the bracket shims included with your order (one for each installation bracket and two for each intermediate bracket).
■ With each installation bracket, fi rst fold the shim and then position it on top of the bracket to gain the required clearance.
■ With each intermediate bracket, stack two unfolded shims.
Note: Bracket shims may also be used whenever the mounting surface is uneven in order to mount the blind level.
TopMount
3/8" Clearance
CorniceClip
One ShimFolded Over
Two ShimsStacked
Installation Bracket
Intermediate Bracket

Mark
Mark
Measure and Mark1/4" Out from
Ends of Headrail
Outside Mount ApplicationsA fl at vertical surface at least 13/4" high is required for bracket attachment.
Mark End Bracket Locations■ Mark where the ends of the headrail will be located.
■ Either hold the headrail up to the mounting surface or measure the headrail and mark its width.
■ Then mark 1/4" to the outside of the headrail end marks.
Attach End Brackets■ Align the outside edge of each bracket with the outer marks.
■ The tops of the brackets must be aligned at the same height.
■ Attach the brackets with two screws through diagonal rear holes.
Intermediate Brackets (If Required)Evenly space the intermediate bracket(s) between the end brackets.
■ Adjust spacing if needed to avoid interference with internal headrail mechanisms.
■ The top of each intermediate bracket must align with the tops of the end brackets.
■ Attach the bracket(s) with two screws through diagonal holes.
Extension Brackets (Optional)Attach 2" or 4" extension brackets to the mounting surface in the same locations where the end brackets and intermediate brackets would be attached.
■ Align and level extension brackets with a carpenter's level.
■ Use two screws to mount each extension bracket.
■ Attach the installation brackets and intermediate brackets to the extension brackets using the screws and nuts provided, as shown at the top of the next page.
4

5
INSTALL THE BLIND
Valance Clips■ Attach valance clips 2" from each end of the headrail.
■ Space additional clip(s) evenly between the two end clips so that the valance clips are no more than 36" apart.
■ Wood and aluminum blinds only: If desired, the valance may be positioned 1/4" higher by pushing the clips only one notch down, as shown in the above illustration.
Note: The actual valance clips included with your order may differ in appearance from those shown. However, attachment to the headrail is the same for all valance clips.
Cornice Clips — Wood Blinds OnlyCornice clips are used instead of valance clips when the valance has a dust cover.
■ Attach a cornice clip 2" from each end of the headrail.
■ Space additional clip(s) evenly between the two end clips so that the cornice clips are no more than 36" apart.
End Bracket with2" Extension Bracket
Intermediate Bracketwith 2" Extension Bracket
End and Intermediate Bracketswith 4" Extension Bracket
■ To attach the cornice clips, hook the back of the clip to the rear lip of the headrail.
■ Push the clip down until it snaps securely in place.
StandardPosition
Raised Clip =Higher Valance
Wood and AluminumBlinds Only
Front of Headrail
2" 2"No More Than 36" No More Than 36"
Cornice Clip
Front ofHeadrail
6
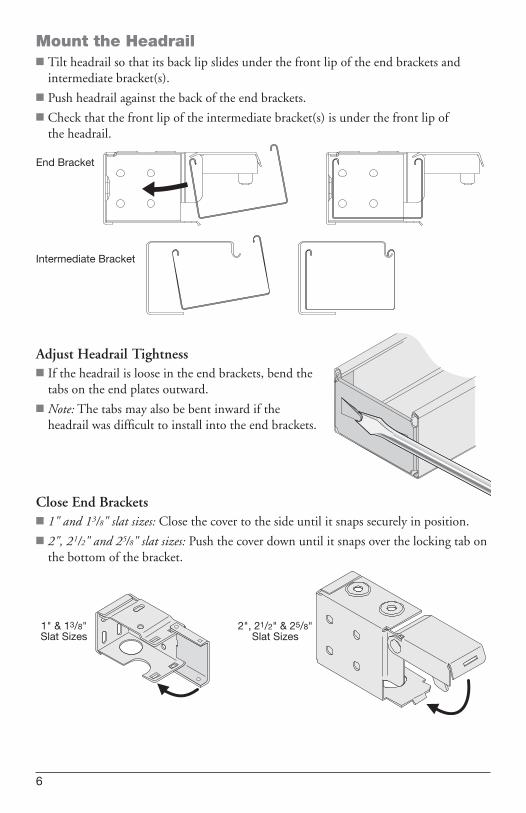
Mount the Headrail■ Tilt headrail so that its back lip slides under the front lip of the end brackets and intermediate bracket(s).
■ Push headrail against the back of the end brackets.
■ Check that the front lip of the intermediate bracket(s) is under the front lip of the headrail.
Adjust Headrail Tightness■ If the headrail is loose in the end brackets, bend the tabs on the end plates outward.
■ Note: The tabs may also be bent inward if the headrail was diffi cult to install into the end brackets.
Close End Brackets■ 1" and 13/8" slat sizes: Close the cover to the side until it snaps securely in position.
■ 2", 21/2" and 25/8" slat sizes: Push the cover down until it snaps over the locking tab on the bottom of the bracket.
End Bracket
Intermediate Bracket
1" & 13/8"Slat Sizes
2", 21/2" & 25/8"Slat Sizes

7
Attach the Valance Returns, If NecessaryIf the valance came with returns and they are not already attached, connect the returns to the valance using the corner clips provided.
Wood Blinds and Aluminum Blinds■ The notches on the rear of the valance and returns fi t into the grooves of the corner clips.
■ Slide the wider side of each clip onto the rear of the valance so that the shorter side aligns with the edge of the miter cut at each end.
■ Slide a return onto each corner clip until its miter is fl ush against the miter on the valance.
Alternative Wood Blinds ■ The tabs on the corner clips fi t into the notches on the valance, as shown below.
■ Slide the valance and returns onto the clips.
PlasticSleeve
Hook
Metal Shaft
Wand
COMPLETE THE INSTALLATION
Attach the Wand (If Ordered)If the blind was ordered with a wand tilter, attach the wand to the metal shaft. Note: Wands may appear different from the illustration, but assembly is the same.
■ Pull the plastic sleeve from the top of the wand and insert it over the metal shaft.
■ Insert the hook on the wand through the hole in the metal shaft.
■ Slide the plastic sleeve down over the hook until fi rmly seated.
■ Test the wand tilter. Approximately six revolutions of the wand should tilt the slats from fully closed up to fully closed down.
WandAttached
InsertOverShaft
HookThrough
Hole
Tabs Fit Into Notches
Miters Meet
CornerClip
Valance
ValanceReturn(Cross-Section)
Notch
Notch
8
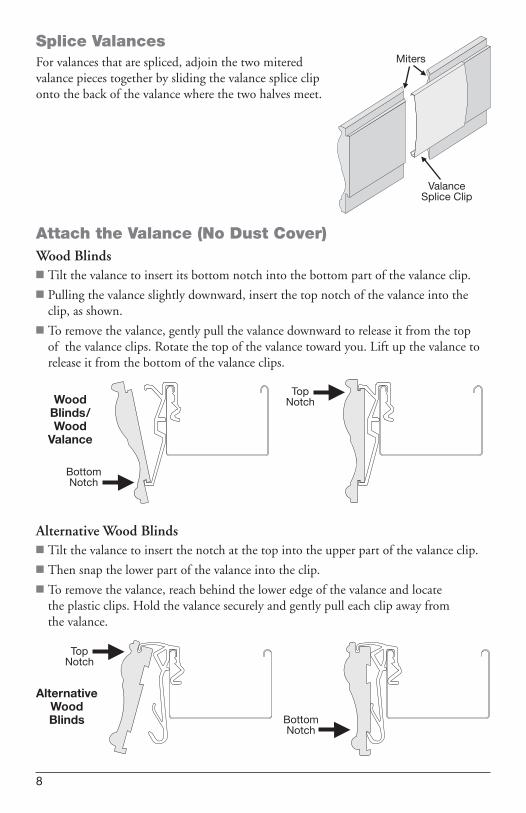
Attach the Valance (No Dust Cover)Wood Blinds ■ Tilt the valance to insert its bottom notch into the bottom part of the valance clip.
■ Pulling the valance slightly downward, insert the top notch of the valance into the clip, as shown.
■ To remove the valance, gently pull the valance downward to release it from the top of the valance clips. Rotate the top of the valance toward you. Lift up the valance to release it from the bottom of the valance clips.
Splice ValancesFor valances that are spliced, adjoin the two mitered valance pieces together by sliding the valance splice clip onto the back of the valance where the two halves meet.
Alternative Wood Blinds ■ Tilt the valance to insert the notch at the top into the upper part of the valance clip.
■ Then snap the lower part of the valance into the clip.
■ To remove the valance, reach behind the lower edge of the valance and locate the plastic clips. Hold the valance securely and gently pull each clip away from the valance.
ValanceSplice Clip
Miters
BottomNotch
TopNotchWood
Blinds/Wood
Valance
BottomNotch
TopNotch
AlternativeWoodBlinds

9
Attach the Valance (With Dust Cover)Wood Blinds Only■ Slide the valance dust cover onto the cornice clips, as shown in the illustration below.
■ If the blind is mounted to a door, secure the dust cover with a 1/4" wood screw through the slot in the cornice clip.
Notch the Dust Cover (21/2" and 25/8" Outside Mounts Only)Wood Blinds OnlyWhen spacer blocks are used to provide clearance for 21/2" and 25/8" slats, the valance dust cover must be notched to allow the valance returns to be fl ush against the wall.
■ Mark the location of the cornice clips on the dust cover.
■ Use a utility knife to notch the rear of the dust cover where the dust cover will fi t onto the cornice clips.
— The notch should be 1/2" deep and 3/4" wide, as shown.
1/2"
3/4"
Aluminum Blinds ■ Tilt the valance to insert its bottom notch into the bottom part of the valance clip.
■ Pulling the valance slightly downward, insert the top notch of the valance into the clip, as shown.
■ To remove the valance, pull down on the valance and pull out.
TopNotch
BottomNotch
AluminumBlinds
Valance
Dust CoverCornice Clip
Door MountsOnly:
Secure with 1/4"Wood Screw

10
■ Maintain the correct slot alignment as you attach the hold-down brackets to the jam, sill or outside mounting surface.
■ Slide the hold-down pins into the appropriate slot on the brackets.
■ If necessary with 2" outside-mounted blinds, the fi rst slot of the hold-down brackets may be used in place of a spacer block.
Attach Hold-Down Brackets (Optional)■ Drill a 1/8" hole centered in the ends of the bottom rail.
■ Insert a hold-down pin into each hole. Push the head of the pin against a fl at surface to seat it, or tap in place with a hammer.
■ To mount the hold-down brackets, fi rst fully lower the blind. Align the hold-down brackets with the pins in the bottom rail.
— Align the fi rst slot with 21/2" and 25/8" slat sizes.
— Align the second slot with 2" slat sizes.
— Place the pin in the slot hole with 1" and 13/8" slat sizes.
OPERATE THE BLIND
Tilting the Slats■ Wand tilt: Rotate the wand to tilt the slats to the desired angle.
■ Cord tilt: The two cords with individual tassels are for tilting the slats. Each cord tilts the slats in an alternate direction.
CordTilt
JambMount
SecondSlot
FirstSlot
SillMount
Outside Mount
2", 21/2"and 25/8"Slat Sizes
1" and 13/8"Slat Sizes

11
Raising and Lowering the BlindStandard HeadMaster™ Hardware SystemImportant: Whenever raising or lowering the blind, the slats must be in the open position.
■ Pull the single cord down and toward the center to raise and lower.
■ Hold the cord to the outside to lock the blind in position.
Raising andLowering
Raising and Lowering the BlindLiteRise® Cordless SystemImportant: Whenever raising or lowering the blind, the slats must be in the open position.
■ Grasp the handle or bottom rail and push up to raise the blind.
■ Grasp the handle or bottom rail and pull down to lower the blind.
■ Wood Blinds Only: An extension pole is available for operating the blind in hard-to-reach windows.
Handle(Country Woods® Blinds Only)
CARE AND CLEANING
Like any fi ne furnishings, Hunter Douglas wood, alternative wood and aluminum blinds should be cleaned regularly to keep them looking new.
Wood, Alternative Wood and Aluminum Blinds■ Dust regularly. Use a soft clean cloth, chemically-treated dust cloth or dusting mitt.
Lower the blind to its full length, tilt the slats almost all the way down and dust. Then tilt the slats almost all the way up and dust. (Not closing the slats all the way allows dusting where the slats overlap.)
■ Blinds may also be vacuumed. Use the brush attachment and tilt the slats up and down as described for dusting.
■ Another way to clean blinds is simply by wiping them with a soft, damp cloth.
Wood Blinds Only■ Stained blinds, like wood furniture, should be treated periodically with lemon oil or other wood preservative to protect their fi nish and enhance their luster.
Alternative Wood and Aluminum Blinds■ Wash only the slats using a non-abrasive mild detergent solution. Allow to air dry to preserve the dust repellant properties of the slats.
Aluminum Blinds Only■ For a more thorough cleaning, metal bottom rails and slats may be immersed in a bathtub. Do not immerse headrails or wood bottom rails.
Important: Hunter Douglas does not recommend ultrasonic cleaning of wood, alternative wood or aluminum blinds.
12
Young children can STRANGLE in cord loops and in the loop above the cord stop. They can also wrap cords around their necks and STRANGLE.
■ Always keep cords out of children’s reach.
■ Move cribs, playpens and other furniture away from cords. Children can climb furniture to get to cords.
CHILD SAFETY
WARNINGFor more safety information call 1-888-501-8364.

13
Cord Stop (Wood Blinds and Alternative Wood Blinds)■ This component breaks apart with minimal pressure should
a child or pet become entangled in the top lift cords.
■ It also acts as a stopper to prevent inner cords from being pulled through the blind, which can also create potential entanglement.
Reassembly of Cord Stop■ Reinsert any loose cords into the top notches of the cord stop. There is a notch on each side.
■ Line up the two halves of the cord stop and snap the pieces back together.
Break-Thru® Tassel (2" Aluminum Blinds)■ This component is designed to break apart should a child or pet become entangled in the lift cords.
Reassembly of Break-Thru Tassel■ Reinsert any loose cords into the top notches of the tassel. There is a notch on each side.
■ Line up the right and left sides of the tassel and snap the pieces back together.
FourCords
TwoCords
Snap TogetherCord CleatsHunter Douglas offers cord cleats and we recommend their use.1. Cord Cleats. Attach two cord cleats 6"
to 12" apart at a height where they will be out of the reach of children. Take into account that a child may stand on furniture attempting to reach the cords. Be sure the cleats are fi rmly secured. Once the cleats are attached, wrap excess cord around them after each use of the blind.
2. Cord Clip. Clip the cord to itself using a clamping device.
3. Tie. Wrap or tie the cord to itself.

PCN 8800012007 11/06
© 2006 Hunter Douglas Inc. ® Registered trademark of Hunter Douglas Inc. ™ Trademark of Hunter Douglas Inc.Patented in the U.S. and foreign countries. U.S. and foreign patents pending.
Break-Thru® is a registered trademark of Break-Thru Corporation.
The blind does not tilt. Check that the tilt cords are not tangled or knotted.
Check that the ladders have not become disengaged from the tape drums.
Check to be sure that the tiltrod is fully inserted into the tilt gear.
The blind does not raise and lower evenly.
PROBLEM SOLUTION
Check inside the headrail. Make sure no obstructions keep the mechanism from turning.
Check that lift cords are not pinched or tangled.
The blind will not fi t into the mount-ing brackets.
Make sure the mounting brackets are level and the mounting surface is fl at.
Lift cords are bunching by the safety cord stop.
Make sure the slats are in the open position. Raise and lower the blind.
Decorative tapes are wrinkled after installation.
Use a steamer to steam out the wrinkles. Do not stretch the tapes.
TROUBLESHOOTING