Embed Size (px)
Citation preview

Ingoldian Fungi: sorne field and laboratory techniques
Enrie DESCALS
SHNB
SOCIETAT O'HISTORIA NATURAL DE LES BALEARS
Descals, E. 1997. Ingoldian Fungi: some lield and laboratory techniques. BolI. Soco Hist. Nat. Balears, 40: 169-221. ISSN 0212. Palma de Mallorca.
So me preparatory techniques lor the taxonomic, chorological and preliminary ecological study 01 Ingoldian lungi (i.e. lungi with conidial shapes adapted lor anchorage in running waters) are discussed and detailed step by step; suggestions are also made lor their improvement. Three introductory topics concerning lield collection are lirst discussed, i.e.: criteria lor selecting sites and timing sampling procedures, the recording 01 complementary lield data and the planning 01 lield trips involving long-distance air trave!. The two main sections cover preliminary studies on species richness (by mean s 01 loa m surveys), and preparatory techniques lor description and herbarium preservation. The core 01 this contribution discusses pure culture: 1- isolation techniques, 2- recording colony characters, and 3- sporulation induction techniques. Isolation starts with asexual or sexual spores, either concentrated in stream loa m or produced on natural substrates, Isolation may be done in two basic ways depending on spore size and abundance: 1- very large spores occurring inlrequently are detected and identilied under the dissecting microscope and lifted with the aid 01 mounted hairs or micropipettes; 2- spores 01 any size may be spread on an antibiotic medium, allowed to adhere to agar-based isolation media, identilied under a compound microscope, relocated under the dissecting scioe with the aid 01 a linder slide and lifted manually. Anamorph induction is in contact with Iree water, i.e. in/on unchanged water (either standing, aerated or agitated), or in changed water (periodically or continuously) Alternatively, anamorph induction may be by means 01 moist incubation. Herbarium preservation relies mainly on microscope preparations, complemented by the use 01 preserved mycelial portions as well as 01 dried cultures. Keywords: Ingoldian Fungi, field techniques, /aboratory techniques.
FONGS INGOLDIANS: ALGUNES TÉCNIQUES DE CAMP I LABORATOR!. Algunes tecniques preparataries per a I'estudi taxonómic, corolagic i ecolagic deis longs ingoldians (Iongs amb lormes conidials adaptades a I'ancoratje en aigües corrents) són detallades i se suggereixen possibles millores d'aquestes. Se comenten tres temes introductoris: criteris per a la selecció de localitats i temporades de recol.lecció, el registre de dades de camp complementaries i la planilicació de campanyes de recol.lecció incloent vols a IIarga distancia. Les dues seccions principals cobreixen I'estudi preliminar de la riquesa especílica en aigües naturals (exploració a base d'escumes), i tecniques preparataries per a la descripció en cultiu pur i herborització. Se discuteixen tres aspectes lonamentals del cultiu pur: 1-tecniques d'a'lIIament, 2- caracterització de colanies, 3- tecniques d'inducció de I'esporulació. L'a'illament se la a partir de espores asexual s o sexuals, ja estiguin concentrades en escumes de rius o produ'ldes sobre substrats naturals. L'a'lllament és de dos tipus depenent de la mida i abundancia de les espores: 1- les espores de gran envergadura i poc Ireqüents són localitzades i identificades sota lupa binocular i a'lllades manualment amb I'ajuda de cabellS emmangats o micropipetes; i 2- les espores de qualsevol mida, un cop espargides sobre un medi antibiatic, són incubades per induir la seva adherencia sobre el medi; després són localitzades i identilicades sota el microscopi compost, i tot seguit són relocalitzades sota lupa amb I'ajuda d'un porta localitzador i a'lllades manualment. La inducció de I'anamorl se la posant en contacte el miceli amb aigua, és a dir: en aigua estanca, amb o sense aireació o agitació, o bé amb canvi (periadic o continu) de I'aigua. Alternativament se poden ler incubacions humides,
170 Bo/l. SOCo Hist. Nat. Balears, 40 (1997)
1- Introduction
L'herborització se basa en: 1- col.leccions de preparacions microscopiques, suplementades amb porcions de miceli esporulant guardades en conservant; i 2-colonies en cultiu pur dissecades. Paraules elau: fongs ingoldians, tecniques de camp, tecniques de laboratori.
Enric DESCALS, Institut Mediterrani d'Estudis Avanr;ats (CSIC-UIB), Edifici Mateu Orfila, Univ. /l/es Balears, 07071 Palma de Mal/orca, Spain.
Recepció del manuscrit: 17-oct-96; revisió acceptada: 6-nov-97.
INDEX
1- Introduction .......................................................................................................... 170 A- Criteria lor selecting and timing sampling procedures ........................... 171 B- Complementary lield data ........................................................................... 173 C- Suggestions lor lield trips involving long-distance air travel ................. 173
11- Preliminary lield studies on species richness: loam surveys ..................... 174 111- Preparatory techniques lor lungal identilication, description
and preservation ................................................................................................ 177 A- Studying lield material ................................................................................. 177 B- Laboratory sporulation 01 lungi on lield material .................................... 177 C- Pure culture studies ..................................................................................... 179
General isolation media ................................................................................ 182 Instruments lor microtechnique .................................................................... 184 Spore isolation techniques ............................................................................ 184
-Isolation 01 suspended spores ................................................................ 186 -Isolation 01 spores anchored on agar ................................................... 193
Isolating spores Irom teleomorphs on natural substrates ........................ 199 D- Working in the main laboratory
Basic lacilities and equipment ..................................................................... 203 Pure culture: 1- The vegetative phase ....................................................... 207
2- Anamorph induction .......................................................... 208 A- Standing water .......................................................... 209 B- Aerated water ............................................................ 212
Concentrating spores in water ......................................................................... 214 IV- Herbarium preservation ................................................................................... 216
The Ingoldian fungi (Descals, 1978), inaccurately referred to as the "aquatic hyphomycetes" (Ingold, 1942), are a loose assemblage of fungi bearing relatively large, modified conidia found in continental waters and humid habitats. Such conidia are known to occur especially in the hyphomycetes, but can also belong to ascomycetes, basidiomycetes, coelomycetes and even amphibious Entomophthorales (although the latter will be left out of this contribution because they are insect parasites and require different techniques for their study). Ingoldian fungi typically live in or
el ose to streams (Iess so in lentic habitats). Some may also colonize nonaquatic habitats (forest litter, plant canopies, etc ... ) and reproduce here as, anamorphs and/or teleomorphs. Most are known to be saprotrophic, but some may be plant parasites. Others may behave as endophytes in wood (Fisher & Petrini, 1989). The Ingoldian fungi are thus not a taxon nor an ecological group, but they do have in common what is believed to be a morphological adaptation of their conidia to colony establishment in fast-running waters (Webster, 1959).

E. Desea/s., /ngo/dian Fungi: fie/d and /aboratory teehniques 171
Conidial morphology will in most cases allow us to use a short-cut approach to the study of these fungi, Le.: instead of identifying fungi after blind isolation and culture of large numbers of them (as is generally done for exampie with soil and other aquatic fUr1gi), Ingoldian conidia are typically speciesdiagnostic, Le.: pure culture is needed only in some cases for confirmation of identification to species. Selective isolation of conidia recognizable in many cases to species greatly simplifies pure culture work, and the implications are discussed below.
By simply collecting and observing conidia in water or foam, or from submerged substrates, one can perform chorological and ecological studies on the Ingoldian component in stream communities (Barlocher, 1992), Le.: 1-Seasonality of sporulation can be estimated by identifying conidia trapped in foam or in water. 2- A number of ecological parameters can be correlated with conidial numbers in stream water. 3- Saprotrophic relationships between Ingoldian fungi and their substrates (e. g. substrate preference and decomposition rates) can be determined by recording sporulation levels on the substrates after controlled submersion (Le. baiting) followed by in vitro induction of conidiation. 4- Fungus-plant-invertebrate interactions of various kinds may also be analyzed and quantified at the species level without culture (e.g.: Suberkropp et a/., 1983). (Some of the under 3 and 4 studies, however, may presume a not fully proven direct correlation between conidial numbers and mycelial abundance or activity).
The study of the Ingoldian fungi is becoming increasingly popular since their discovery by Ingold (1942). There are now well over a thousand publications on these fungi, and a steadily growing
number of mycologists are recording and isolating them worldwide due to their relevance to stream ecology and, lately, for their possible pharmaceutical applications.
Techniques for their isolation, pure culture, in vitro conidiation and preservation are often unique to the group, but have so far not been compiled in detail. The main purpose here is a description of techniques which have been tested for a number of years and which may prove useful to other workers in the field. Many of those techniques have been learned or developed in Prof. J. Webster's laboratories at the University of Exeter (UK). A second aim is to highlight still unsatisfactory techniques and to suggest means for improving or replacing them.
It must be emphasized that many of the techniques discussed below are also applicable to hundreds of other aquatic as well as terrestrial fungi producing species-diagnostic conidia.
A-CRITERIA FOR SELECTING ANO TIMING SAMPLlNG PROCEOURES
Current aspects of interest in the study of the Ingoldian fungi are: 1- description and classification of anamorphs, 2- studies on life cycles and teleomorph connections, 3- preliminary studies on species richness, biogeography and conservation, 4- ecology (substrate decomposition and invertebrate relationships) and 5- pharmaceutical and other industrial uses.
1- Oescription and classification of anamorphs: Hundreds of Ingoldian anamorphs await description, and a number of the close to 300 known ones need redescription because morphological characters were not properly applied

172 BoII. Soco Híst. Nat. Balears, 40 (1997)
in the past, because new characters based on ontogeny or even .molecular aspects are being introduced, or because herbarium material is scanty, poorly preserved or altogether missing.
In some temperate streams, up to 80 or more taxa may be collected in a few drops of foam (e.g. Regelsberger et al., 1987). Habitats in warm elimates, however, have been much less studied. Foam is easier to find in soft or neutral to mildly acid waters, and possibly for this reason these have been more intensively explored than hard, alkaline or saline streams. But the latter may bear different mycotas. Undisturbed habitats rich in riparian plant species yield more Ingoldian fungi; but more extreme habitats, often with low plant species diversity, may support a significant number of undescribed fungi. Such is the case with acid moorlands.
2- Lite eycles: Only about 27 teleomorphs are known among the Ingoldian fungi (Webster 1992, Descals ined.), but it is believed that more will be found if we concentrate on isolating from sexual spores. For this purpose, one should search for streamside habitats with abundant and varied long-Iasting woody substrates (and possibly sometimes decomposing leaves) where the teleomorphs can complete their development. This takes place in most cases out of water. In cold and temperate climates, teleomorphs seem to be more abundant in the warmer seasons.
3- Biodiversity and conservation: These are hardly explored fields, but Ingoldian fungi may eventually have an indicator value for monitoring the effects of Mankind and/or of environmental (e.g. climatic) changes on freshwater habitats. Either endangered or well-preserved habitats could be the chosen
object of study in order to justify their preservation.
If conidial abundance and species diversity are the aims for studying any of the three aspects discussed aboye, the ideal eollecting sites are small streams flowing over rocky beds (in mountainous or hilly areas), with foam accumulation, upstream from any source of organic urban and agricultural waste. The catchment area should have a rich and varied, undisturbed native vegetation. In temperate climates, deciduous angiospermous trees are richer sources than conifers, although these usually bear characteristic mycota. A good clue to adequate collecting are as is the presence of trout and salmon angling sites along streams.
Conidial abundance is normally associated with availability of decaying submerged substrates, such as fallen leaves, and therefore the most productive collecting season in streams flowing through deciduous woods in cold and temperate climates tends to be in the autumn, although minor peaks may occur at other times. Very few critical seasonality studies have been carried out in streams flowing exclusively through conifers or in tropical latitudes, where leaf fall patterns are less marked.
Casual observations suggest that conidial numbers in stream foams rise drastically after heavy showers, as much riverbank litter (and to a lesser degree grassland) is also colonized by Ingoldian fungi (Webster, 1977). Their conidia may be produced aerially but dispersed in flood waters.
4- Ecology: The relevance of higher fungi capable of underwater substrate colonization (among which are the Ingoldian fungi) and as intermediaries in energy and food webs associated with running waters is well documented

E. Desea/s, /ngo/dian Fungi: fie/d and /aboratory teehniques 173
(Barlocher, 1992). For such studies, the choice of site is subject to selected experimental criteria rather than those based on fungal species abundance or variety.
If the goal is to discover new plant substrates for particular species one should obviously collect in first-order streams, not far from the source of the conidia.
5- Pharmaceutical and other industrial uses: Metabolites produced by the Ingoldian fungi are being studied at the present by the industry, mainly because these fungi are still relatively unknown. By now, most known species from temperate habitats have been screened. However, large culture collections are not often maintained; and, as techniques and target substances in the search of bioactive compounds keep changing, it is likely that well-known sites will have to be repeatedly tapped in the future. The choice of sites here depends on the specific needs of the industry.
B- COMPLEMENTARV FIELD DATA
These are geographical, climatological, vegetational and physio-chemical parameters (Table 1) which should be recorded for: 1- a more complete characterization of fungal species, and 2-a better understanding of the environmental conditions needed for in vitro reproduction.
Table 1. Complementary field data. Taula 1. Dades de camp complementa ríes.
water temperature " conductivity " pH
flow characteristics rock type
" pH
Other valuable information may be obtained from land survey maps (1: 25,000 to 1: 50,000, and including vegetation types) as well as from yearly public records kept for larger river basins, such as patterns of rainfall, water temperature, chemical parameters and flow rateo
c- SUGGESTIONS FOR FIELD TRIPS INVOL VING LONG-DIST ANCE AIR TRAVEL
Due to the specialized equipment needed, which is often not available at destination, long-distance air travel presents special problems for mycologists wanting to isolate Ingoldian fungi. What little experience has been gained by the author from such trips may be of use to some readers.
Ideally one should plan cooperative work with a local mycologist, who may have much to contribute; e.g.: suggesting collecting sites, arranging for transport and accomodation, translating, providing necessary basic gear, etc. If time allows, such trips are also an excellent opportunity for training local postgraduate students.
The equipment and material must be carefully selected and packed. If time is a limiting factor, or if working conditions are inadequate, one should aim for self-sufficiency. Media, for example, should be prepared prior to travelling.
-Hand luggage should be reserved for the more delicate and expensive
riparian vegetation on site " " upstream
altitude latitude longitude name of stream

174 BolI. Soco Hist. Nat. Balears, 40 (1997)
compound and dissecting microscope equipment (e.g. nosepieces, objectives, condenser lenses, eyepieces, filters), bulbs and cameras, as well as for cultures on the return trip.
-Flammable items such as alcohol, propane cartridges, etc., are not usually allowed on airplanes.
-Agar media should not be exposed to freezing. Large, modern airplanes normally have temperature-controlled luggage compartments, and poured agar media can be packed with the check-in luggage. But this may not be so in smaller aircraft on inland flights.
-For check-in luggage, can vas travelbags with an additional thick, polystyrene foam lining should be more shock-proof than hard-walled, Samsonitetype suitcases. Water tightness is a further aspect to considero
11- PRELlMINARV STUDIES ON SPECIES RICHNESS: FOAM SURVEVS
An idea of species richness of waterborne fungi may be obtained by examining natural foams, although the technique is not quantitative, as Ingoldian conidia are trapped with higher efficiency than others (Webster, 1959; Iqbal & Webster, 1973a) and information on foam trapping dynamics is lacking. Foam surveys fulti! an added useful purpose: selecting sites and seasons for later isolation of interesting species.
RECOMMENDED GEAR -Foam jars: wide-mouthed (ca. 5
cm diam.) screw-capped jars. Plastic is preferred for lightness and strength, but conidia may adhere less to glass.
-A spoon or kitchen skimmer. -Extensible rod for foam jars: foam
is sometimes in awkward spots out of arm's reach. It is relatively easy to fit a ring at the end of a rod, onto which one
may screw a foam jaro The ring may just be a pertorated lid of a same-sized jaro
-An inflatable boat may be handy for collecting foam in larger bodies of water.
-Fixative for foam. A few drops of 4% formalin or 90% methyl alcohol appear to be adequate for short-term preservation, and formalin-acetic-alcohol (FAA, Anon. 1968) may be used if storage is for longer periods. The fixative should not affect later treatments in slide preparation.
-Waders: thigh-high gum boots. A repair kit for punctures should be kept handy.
-Rucksack with general purpose gear (see below).
-A couple of buckets. -A container (e.g. a large tin can),
with the bottom cut off. -Field notebook.
PROCEDURE FOR FOAM SAMPLlNG -Label jars with a felt pen befo re
wetting. -Look for clean, thick scum below
waterfalls, along rapids, on the downstream side of any obstacles (e.g. boulders and woodpiles), along lakeshores where drift collects through wave and wind action, etc.
Foam that breaks down quickly in the jar will have trapped few conidia. Muddy scums harbour too many bacterial contaminants and debris.
-Scoop up the foam with the jar itself or with the lid or spoon, and IMMEDIATELV DECANT ALL EXCESS WATER, as the conidial concentration in water is much lower than in foam and this will have a strong diluting effect.
Foam is often scarce (especially when submerged leaves are not abundant) and several subsamples per site may be needed. Some of the foam will
E. Descals, Ingoldian Fungi: field and laboratory techniques 175
have liquefied between scoops, and when decanting, spores in this water from previous scoops will be lost. Therefore use a fresh jar for every scoop and compound the samples after the last scoop for the site.
For collecting foam along lakeshores, where it is often scanty and trapped among pebbles and vegetation, one may slightly dig an open-ended can into the ground and then pour some lake water into the can. This will raise the water level long enough for the foam to be collected. The use of an inverted funnel may even help concentrate the foam within.
-Do not liquefy the foam (by shaking the jar) if it is meant for spore isolation.
When you have returned to the vehicle:
-Fix sorne foam in a labelled vial as a voucher specimen.
-Note the collection number and complementary field data in the field notebook.
PREPARING SPORE DEPOSITS ON MICROSCOPE SUDES
MATERIALS -Mountant: conc. lactic acid with
sorne acid fuchsin (with or without phenol) are of standard use. However, semipermanent mountants may cause a significant loss of optical resolution. This is especially noticeable with differential interference contrast(DIC) optics. It is therefore preferable to do all the descriptive work from temporary water mounts, and only add chemicals afterwards for preservation. On the other hand, if one is doing large batches time is short, and there may be no alternative but to first fix the specimens.
The use of phenol is discouraged by safety regulations in some countries as it is carcinogenic, but contaminant fungi seem to be able to grow in lactic acid within microscope preparations, and a general biocide will have to be added.
Cotton blue is claimed to often result in serious crystal precipitation.
The synthetic resins OPX 8711 (Difco) or Merckoglas (Merck code 11-20 UN-1866/3.2 IMDG WGK2) have not proven satisfactory in recent trials, as the spores are severely distorted and standard stains are not readily mixed. (Although a stain may not be needed for phase or DIC optics). PVA is currently being used in certain laboratories for mounting myxomycete and other spores (Pando, pers. comm.), and maybe worth trying.
-Sealant: Semipermanent liquid mounts need
to be sealed, but there is so far no satisfactory sealant in the market. The commercial resin "Glyceel", which had become of widespread use (but no longer produced) will eventually shrink, and cracks appear precisely at the margin of the coverslip, allowing the evaporation of the mountant. The preparation will then need repairing, which is timeconsuming and often damages the contents. To correct this, Gams (ined., Ananet Newsletters 10:3, 17:7, accessible through Internet) suggests applying a
. second layer of Glyceel soon after the first. But if this is done too late, it will set unevenly and wrinkle severely.
It isclaimed that more .elastic nail polish brands containing nylon are more satisfactory.
Volkmann-Kohlmeyer & Kohlmeyer (1996, and in litt.) recommend the preparation of permanent slides by means of a "double-coverglass" technique, which might be adapted for lngoldian fungi.

176 BoII. Soco Hist. Nat. Balears, 40 (1997)
-Large coverslips (22x22, or 20x20 mm), grease-free slides in slide boxes and slide labels.
PROCEDURE FOR PREPARING SPORE DEPOSITS
-Air-dry 3-4 drops of foam placed on the centre of a slide. This may be done in the laboratory, where gentle heat may be applied for faster drying (e. g. under atable lamp or with a fanheater or hot plate).
-Drying a known volume of liquefied foam on each slide may allow the information to be at least partially comparable with other foam samples.
-If the stream water is alkaline or saline, salt crystallization will take place, and when an acid mountant is added (e.g. lactic acid), alkaline deposits will release abundant CO
2 under the
coverslip, spoiling the preparation. In this case, add a drop of the
mountant to the deposit and heat gently to release the gas befo re covering. AIternatively, the water in the spore suspension may be acidified prior to mounting. Another option may be to test Waterman's ink diluted to approx. 1/10 (an aqueous solution used by Iichenologists for observing asci, and successfullY used by us for staining conidia on membrane filters). This would not have an acid reaction. The preparation would not be permanent, however.
-For a very thin preparation, and al so to reduce gas release, remove the larger debris (sand grains, organic matter, insect parts, etc.) with a needle or forceps under the dissecting microscope prior to applying the coverslip.
-Add a small drop of mountant to a coverslip.
The drop is not placed on the slide to avoid touching any fungal material (including spores in foam) with the tip of
the dropper because this might get contaminated and transfer the spores to slides with other samples.
-Invert the coverslip and, to avoid trapping air, rest one side on the preparation with the aid of a needle and slowly lower over the dried spot.
-Heat gently over the Bunsen burner and, if necessary, apply slight pressure with a needle to release trapped gas bubbles.
-Seal and label the slide, noting down the collection code, date and mountant used. The latter record will be useful for reflooding if the slide needs repairing.
LlQUEFYING FOAM If an even spore concentration is
needed in the foam, for example for quantitative studies, or for spreading conidia on agar media for isolation, liquefy it by:
-Shaking the closed foam jar violently for a few times.
Shaking is not always effective, especially with some very thick scums. Gentle heat (applied el ose to the foam, for example with a hot metal) is effective but it may be detrimental to spore viability. Applying alcohol, or freezing, as well as anti-foaming agents, may be worth testing.
ARTIFICIAL FOAM If stream foam cannot be readily
found, it may be obtained artificially by reducing the surface tension of stream water with commercial detergents or wetting agents (e.g. Tween-80), resulting in foam production. A technique involving digging up a small reservoir under a waterfall is detailed in Iqbal (1983; 1995).
An alternative (but only briefly tested) way of concentrating spores in artificial foam would be the following:
E. Desea/s, /ngo/dían Fungí: fíe/d and /aboratory techníques 177
Sample a known volume of stream water in a bucket, add a drop of dilo Tween-80 to a second bucket, pour the water into this from a certain height (to create turbulence and hence foam), and then back into the first. Do this several times with the same water, scooping up the foam as it builds up and placing it in ajar, where it may then be processed (either for isolation or for preservation).
If the number of conidia of specific Ingoldian species trapped in the artificial foam in relation to that in the sample of stream water is proven to be constant, the above technique might allow for quantification.
Preliminary trials carried out in this laboratory by A. Díaz (unpubi.) on conidia from pure culture suggest that Tween- 80 does not affect viability.
111- PREPARATORY TECHNIQUES FOR FUNGAL IOENTIFICATION, OESCRIPTION ANO PRESERVATION
The source of the material to be studied may be: a- fungi naturally colonizing and sporulating on the substrates, either as conidiogenous structures or as free conidia in water or foam; b- the same fungi, but after having induced their sporulation in the laboratory; cfungi grown on artificial media but induced to sporulate either in the field (never done) or under controlled conditions in the laboratory.
III-A: STUOYING FIELO MATERIAL
Especially when describing new species, one should test that the morphology of conidiogenous structures and of free conidia produced in the laboratory (cases 2 and 3 above) is not different from that in nature. This may be done by fixing field material immedi-
ately after sampling, comparing fungal morphology with that produced in the laboratory, and, if differences are significant, illustrating and preparing voucher specimens.
Conidiophores are normally produced over the entire surface of leaves or wood, but these are usually opaque, and leaf clearing techniques, for exampie, are too severe on such delicate fungal material. Conidiophores must then be seen along the leaf margins and on the sides of woody tissues and petioles, or by examining scrapings mounted on slides. (Preparation of free conidia, e.g. in foam, has already been discussed).
There is a need for developing an efficient, preferably quantitative microtechnique for sampling conidiophores from natural substrates. Collodion peels have proven successful with plant material and are worth testing.
III-B: LABORATORY SPORULATION OF FUNGI ON FIELO MATERIAL
-Rinse field material in abundant water.
Tapwater will have fungal contaminants (occasionally even Ingoldian conidia) but may be used for short incubations if the aim is induction of conidiogenous structures.
The basic steps for submerged incubation are explained under anamorph induction below.
So far, natural substrates have been submerged in standing or aerated, often unchanged distilled water (DW). These conditions may not be ideal, as there is presumably a buildup of staling compounds interrupting or distorting sporulation processes. More natural continuous water flow or drip systems such as those applied to pure culture (see below) are now being tested.

178 BoII. SOCo Hist. Nat. Balears, 40 (1997)
Incubation in water containing antibacterial antibiotic solutions has not been tested, but may improve sporulation.
-Cool temperatures around 15°C lor cold -temperate species should be used to slow down bacterial growth .
-Incubating in glass Petri dishes may reduce the number 01 conidia adhering to the dish walls, but does not allow lor near- ultraviolet (NUV) irradiation, unless the glass is Pyrex.
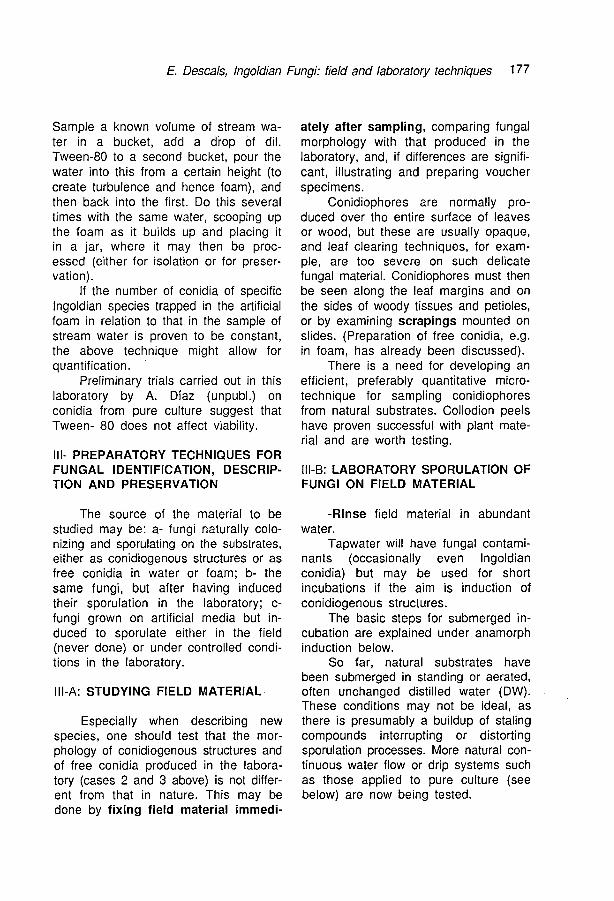
Fig. 1. Harvesting surface spores Irom moist-incubated substrates: the container is slowly flooded wlth dlstilled water, and the water surface touched with a broad loop, which may th en be spread on a slide or on
The effect 01 NUV on lungal sporulation on natural substrates has not been critically tested.
-Check lor sporulation alter one day, and then every 2-3 days lar at least 10 days.
antibiotic agar. . Fig . 1. RecoUecció d'espores superficials a partIr de substrats incubats amb humitat; /'aigua destll.lada es deixa entrar en el recipient lentament i per la superficie de /'aigua es passa una ansa de sembr~ ampla que després es frega sobre una preparaclo d 'agar antibiótico
Field material (as well as pure cultures) should always be subjected to moist incubation too, as not all Ingoldian fungi are aquatic sporulators (Fig . 1) .
1- STANDING WATER in Petri dishes: -Use a low substrate/water ratio
because 01 rapid build-up 01 bacterial and yeast population s, as well as 01 staling compounds Irom both lungi and bacteria. For example, place one small leal, or portions 01 a larger one, in a 9 cm diam. Petri dish containing 30 mi water.
-Filtered stream water may in some cases induce more sporulation than DW, and should be tested.
-Changing the water regularly should increase spore production and/or lengthen the sporulation phase.
The maximum time lor incubation to allow all resident species to sporulate under the aboye conditions is not known, but certainly two days, as re
ported in many publications, may not be sufficient.
AERATED WATER : -Place substrate in a glass con
tainer, e.g . a measuring cylinder or conical Ilask.
-Add DW without lilling up (as turbulence may cause some spilling) .
-Force air into the system, to just create gentle mi xi ng 01 the water. An aquarium pump system such as described under pure culture, but ignoring precautions lor sterile technique, is suitable (Fig. 2).
Excessive bubbling will thrust spores out 01 the suspension and these will be lost into the air or remain tapped on the walls .
-Incubate and check lor sporulation as lor standing water.

E. Desea/s, /ngo/dian Fungi: fie/d and /aboratory teehniques 179
Pure culture may be broken down into the lollowing activities: a- Field work
1- collection 01 lungal specimens, substrates and/or water
2- preparation lor isolation (il the linder slide technique explained below is used)
3- initial steps in preservation 01 voucher specimens lrom nature.
b- Work to take place in the improvised field laboratory (when on major collecting trips):
Fig. 2. Induction 01 conidiation on leaves with aerated water : air is bubbled Irom an aquarium pump into water containing leaves in a 250 mi conical Ilask. Air Ilow is regulated with a wheel clamp.
1- isolation into pure culture 2- initial description , espe
cially recording characters (e.g. through microphotography) that may be lost in later processing
Fig. 2. Inducció de conidiació sobre fulles vegetals amb aigua orejada, /'aire és pompeja des d 'una pompa d 'aquari fins a un matrau cónic de 250 mi, on hi ha fulles vegetals amb aigua. El flux de /'aigua es controla amb una grapa.
3- lurther preservation 01 voucher specimens Irom nature.
c- Work to take place in the main laboratory:
-For concentrating conidia, artilicial loam may be induced (see above).
III-C: PURE CULTURE STUDIES For the taxonomist, pure culture is
needed lor: 1- characterizing the morph which has been isolated, 2- providing irrelutable prool 01 pleomorphism (i.e. a genetic connection between the anamorph isolated and the resultant teleomorph and/or synanamorphs), 3-studying vegetative characters (otherwise mostly concealed in the colonized substrate), 4- increasing the number 01 diagnostic characters available lor study, some 01 which may even be artelactual (e .g. colon y zonations , aerial mycelium, pigmentation, etc.); 5- increasing the material available lor identilication , description and preservation; 6- studying any other characters, e.g. genetic, etc.
1-emulation 01 lield conditions lor inducing:
a-spore germination and vegeta ti ve growth
b-the anamorph(s) c-the teleomorph
2-observing and describing the above events 3-preservation 01 voucher specimens (Irom pure culture) .
FIELDWORK AIMED AT PURE CULTURE : SAMPLE COLLECTION
Field samples may be 01 three possible types:
1- the fungi or parts thereol: these can be propagules (i.e. conidia in water or loam) or the thallus itsell, e.g .: conidiogenous structures on , or mycelium in/on the substrate ;
2- the presumed natural substrates, which may be used lor pre-
180 BolI. SOCo Hist. Nat. Balears, 40 (1997)
paring natural media or for chemical analyses;
3- the medium in or on which fungi sporulate in nature, Le.: water. This may be needed for e.g. chemical analyses, or for replacing DW in media preparation or as an in vitro sporulation medium.
Soon after collecting, stream water should be filtered through 0.2 - 0.45 J.lm pore membranes: 1- to eliminate propagules which would mix with those produced later in pure culture, and 2- to stop microbially induced chemical changes (which could presumably affect sporulation). Autoclaving often causes serious salt precipitation, and hence an alteration in the chemical composition of water. Membrane filtration is therefore preferred, although it is slower and costlier.
SOURCES OF INGOLDIAN FUNGI 1- eonidia or sexual spores in
foam (see foam surveys, above) 2- eonidia or sexual spores in
water Although this has not been done,
water samples could presumably be directly plated onto isolation media if spore loads are in the many thousands per liter. The technique would allow for quantitative sampling.
3- eonidia on plant substrates. The conidiophores may already be present on the substrates at collection, but usually not in large quantities, due to invertebrate grazing and/or possibly to some form of chemical inhibition. However, a short but spectacular outburst of sporulation is typically observed after laboratory submersion for one to a few days.
It is not known if this artefactual sporulation peak also occurs in the case of moist incubation.
Plant substrates are particularly useful: 1- for detecting fungi producing
few conidia, as these would be too highly diluted in the stream and would not appear often enough in foam; 2-because, conidiogenous structures being present, species identification can be more accurate.
There is normally not enough time during collecting trips for incubation of natural substrates, and this will have to be done in the main laboratory. The material may therefore have to be sto red for several days, or even weeks, and it is not known to what degree transport conditions affect sporulation. Yeast and bacterial populations (and probably al so other fungi) are certainly known to build up quickly, interfering with isolation.
The effect of freezing or drying of plant substrates during transport on subsequent sporulation has not been tested.
4- the thallus in plant tissues. Substrates may be decomposing (the fungi acting as saprotrophs on leaves, twigs, dead tips of trailing submerged vegetation, as in Juncus and grasses, etc.), or alive (the fungi acting as parasites or endophytes, as mentioned above).
Plating out plant matter from streams onto isolation media (Le.: partiele plating techniques) will yield colonies of Ingoldian as well as of other fungi, both of which may be active underwater (see Barlocher & Kendrick, 1974; Cooke, 1974; Schoenlein-Crusius & Milanez, 1995). If the sampling procedure is quantitative and surface sterilization does not damage superficial mycelia, one may obtain a more accurate picture of the species composition and biomass of the submerged saprotroph community by particle plating than by any of the spore-collecting techniques. A critical comparison of these two approaches has not yet been made, but, as in any other sampling procedure for fungi, it is probably necessary to combine both.

E. Desea/s, /ngo/dian Fungi: fie/d and /aboratory teehniques 181
Particle plating is a well-known general sampling technique (see for exampie Kirby, 1987) and will not be dealt with here, except remind one that the isolation media should be dilute and supplemented with broad-spectrum antibacterial antibiotics, and that incubations should be in cool temperatures.
5- the thallus in FPOM (fine particulate organic matter) suspended in water. It is most probable that Ingoldian fungi are al so dispersed as minute mycelia in FPOM, but isolation might not prove easy as surface sterilization is not possible and there might be too strong competition from faster-growing mycelia or spores of contaminant fungi.
ISOLATING FROM SPORES: PLANNING THE TRIP AND BASIC FACILITIES AND EQUIPMENT'
-Vehicle: a 4-wheel drive may be necessary for fieldwork on unpaved roads. Otherwise, a vehicle with softer suspension is preferred for transporting delicate laboratory equipment. This should rest on a spring-Ioaded seat or other cushioned surface, and not directly on the floor.
It seems most efficient to select a base (a hotel room or field centre) with several streams within roughly an hour's drive, and work in that area for at least 3 days, in order to secure interesting isolates.
If time is limited long walks should be avoided, and collecting routes on mountainous areas should be planned on roads running more or less along contour lines crossing various streams. -The field laboratory should be kept cool to check contaminations from airborne fungi. In warm weather, a portable air conditioner might be useful. The room should be draught- and dustfree. In small rooms contaminations may be a serious problem.
-The design of a portable, collapsible horizontal air flow cabinet could substantially reduce the levels of aerial contaminants.
-A solid table, with a minimum of ca. 2 sq. m surface, is advisable to avoid water rocking in Petri dishes, if isolation is done from spore suspensions.
-A dissecting microscope reaching 100x magnification (e.g. with 20x eyepieces) with transmitted light and preferably an adjustable substage mirror, is necessary for manual spore isolation.
The adjustable mirror can create a partial dark field against which the illuminated, mostly hyaline, conidia stand out.
If the transmitted light base does not have an adjustable mirror, or if one wants to save weight when travelling by air, it is easy to improvise a base with an inverted plastic box (e.g. a rigid lunch or biscuit box) containing a small mirror fixed on a sled. The light may be projected onto the mirror from atable lamp or even from a battery-operated torch behind the box.
Supplementary high-power objectives are commercially available for dissecting microscopes (e.g. Leica). But the working distance for magnifications aboye 200x is uncomfortably short for micromanipulation.
-A routine compound microscope with mechanical stage, bright field optics and 10, 20 and 40x objectives, preferably with a built-in transformer to save space. The nosepiece should preferably come off for transport in hand luggage. Remember to take extra bulbs. Some microscopes have an extra adjustable mirror at the base which may be directed at an external source of light, in case of power failure.
Ideally one should always carry microphotographic equipment and a drawing tu be on field trips, where fresh specimens will be available from nature.
182 Bol/. SOCo Hist. Nat. Balears, 40 (1997)
But costlier, more delicate microscopes would then be needed. Microscopic and electronic equipment should in any case be adequately insured for travel.
-A portable ice chest (or cool box) (ca. 50x30x40 cm), preferably with a draining tap, and crushed ice. The ice chest should be sutticiently insulated so that ice can last in it for 24-36 h, in case of overnight travel. Ice blocks may be crushed by hitting them in a can vas sack against a hard floor. Alternatively one may use commercially available freezer packs.
-A water-tight container in the ice chest: 1- to protect "foam plates" (i.e. Petri dishes in which foam is spread for spore isolation) from 'being flooded in melting ice; and 2- to avoid direct contact of the ice with the agar in the Petri dishes. Frozen agar does not reconstitute, and the foam sample would thus be ruined. A max.lmin. thermometer in the ice chest is advisable.
There is no experience on low-temperature storage techniques for foam, but it has been possible to isolate viable conidia from icicles in streams. These had formed by slow freezing as air temperatures dropped through the night.
-A portable refrigerator (gas -or mains and car battery- operated) may be necessary on long trips if lodging conditions are primitive and ice is not available.
-A generous supply of media slopes poured in disposable sterile vials (e.g. Sarstedt Corp., Nürnbrecht, Germany, Code 55.526.006), where cultures can be kept until one returns to the main laboratory. These isolates can survive in cold storage for months if necessary, although it is not known how this affects sporulating capacity and metabolite production for possible industrial (e.g. pharmaceutical) applications. Slopes are prepared with an agar dispenser.
Slopes may be neatly arranged in portfolio-type folders lined with thin foam. This will save much time in sorting them out when isolating, and also reduces chances of mis-Iabelling vials.
If the purpose of the trip is largescale non-selective isolation and foam samples are rich and varied, a 2-week excursion involving ca. 6-8 h daily culture work could easily yield ca. 500 cultures per persono For highest efficiency there should be two people alternating field and laboratory work during daylight, and, if the days are short, both should be fully equipped for joint laboratory work at night.
If space or weight are not a limiting factor, one can save time by subculturing directly onto Petri dishes instead of vials. In this case one should take extra precautions to reduce aerial contaminations, which are much more likely than with vials.
GENERAL ISOlATION MEDIA An agar-based isolation medium
facilitates spore attachment onto its surface, which is believed to be a prerequisite for germination. Because transmitted light is needed, the medium should also be clear. Some cheaper brands of agar may contain much particulate matter and need filtration, or they may set poorly. Although malt extract seems to supply all the growth factors needed for most known Ingoldian fungi, the choice of isolation media and of their concentrations has not yet been carefully tested. A significant percentage of conidia do not germinate when plated on 0.1% MA (malt extract agar) with standard antibiotics. This may be due to ageing, an inadequate nutrient or vitamin supply and/or antibiotic toxicity. The addition of some yeast extract may provide a richer vitamin complement for germination. This would have to be added after autoclaving, or else filter-sterilized.
E. Desea/s, /ngo/dian Fungi: fie/d and /aboratory teehniques 183
-Antibacterial antibiotics are not always necessary. Ingold, for instance, never used them. But, if added to the isolation medium, one need not clean the isolates from bacteria as frequently or thoroughly, and one can al so work with dirtier sources (e.g. foams, or spore suspensions from longer-standing leaf or wood incubations), or incubate the isolation pi ates for longer periods. The antibiotics normally used are cheap, readily obtained and conveniently added to the media. Sometimes, however, bacterial colonies will spread rapidly and can be difficult to control, even with standard antibiotics. In this case, a concentrated solution of the same antibiotic, or of a different one, could presumably be poured over the spore spread on the isolation medium.
The following medium preved satisfactory for many years, both in temperate as well as tropical latitudes: one million IU penicillin plus 1 9 streptomycin sulphate in 1 litre of warm 0.1% MA after autoclaving. The medium should then be swirled, but without too much agitation, as this forms bubbles which will leave craters on the agar plates after setting.
-One 9 chloramphenicol added to liter 0.1 % MA befo re this is
autoclaved, is simpler to use and seems to be equally effective, although, as with streptomycin, it is nowadays difficult to find in some countries due to its health hazard.
-9 cm diam. polystyrene Petri dishes have always been used by us, but some mycologists might prefer 5 cm dishes.
-Prepare the isolation plates a few days befo re travelling (or in any case befo re starting isolations) for two reasons:
1- the agar medium will have dried up slightly, thus absorbing more rapidly
the water drops added at isolation (see below) than if these· are placed on freshly poured media.
(It is not known how changes in the osmotic potential of drying agar media may affect spore germinability).
2-contaminations, either due to insufficient autoclaving or from air spora at pouring, can be detected in time and fresh pi ates prepared.
Label and stack the poured dishes in closed polythene bags.
-If, due to an accident, fresh antibiotic media have to be prepared during the field trip, it is advisable to take along:
-extra 0.1% MA in test tubes, or better still in flat-based screw- capped bottles (10-20 mi per bottle), (e.g. McCartney bottles).
-a pan for melting the media in boiling water,
-a source of heat (e.g. a camping stove, or a small electric cooker),
-spare sterile polystyrene Petri dishes,
-a concentrated solution of the antibiotic(s), e.g. 1 9 chloramphenicol in 100 mi water (se e below),
-spare antibiotics (as powder). Pack them as exact doses rather than in larger containers, because it may not be possible to weigh with sterile technique,
-sterile plastic 10-ml pipettes graduated into 1 mi sections.
-Some sterile distilled water (SDW) in McCartney bottles as well as in 100 mi bottles may be needed for various other purposes (e.g. rinsing mounted hairs and micropipettes, rinsing foam plates prior to scanning with the finder, making up fresh antibiotic concentrate, hydrating media, etc ... ).
The procedure is as follows: Prior to the field trip prepare the
antibiotic concentrate:

184 Bo/l. SOCo Hist. Nat. Balears, 40 (1997)
-Autoclave 100 mi DW (distilled water) in a glass bottle (with autoclavable screw-cap).
-Add the antibiotic(s) (fu" strength) with sterile technique into th is water.
-Keep the antibiotlc concentrate in cold storage .
Penicillin and streptomycin will keep at least for several months in solution. However, alter long storage always check for presence of contaminant mycel ia before using .
-When needed : -Melt the media in boiling
water in the pan. (Remember to first loosen the screw caps slightly to avoid explosions , or the sucking in of the rubber seals at cooling).
Fig. 3. Technique lor sharpening the microscalpel: the needle is laid on a handle and the tip scraped downwards with the edge 01 another handle.
Fig. 3. Técnica per afilar el microescarpel/: /"agul/a es posa sobre el manee d'una espatula i el seu extrem fregat suaument amb la vorera d 'un altre manee.
-Pipette 1 mi aliquots of the concentrate using sterile technique into the polystyrene Petri dishes.
-Add 10 mi 0.1% MA to each dish (alter slight cooling) .
-Immediately mix the antibiotic solution with the medium by slightly tilting each plate clockwise and anticlockwise a few times.
-Allow the medium lo set on a hori -zontal surface .
INSTRUMENTS FOR MICROTECHNIOUE -Microscalpel : Use a f ine insect pin (size 00) .
Cut or burn off the head. Secure the base of the pin onto a handle .
Flatten the tip of the pin with a small hammer. Alternatively, lean the tip at a 302 angle on a metal surface (e. g. the flat face of the handle of a forceps or scalpel) (Fig. 3) . With the edge of another metal tool (e .g. any metal han die) scrape the tip 01 the needle firmly against the base and downwards lor several times. Check under the dissect-
ing microscope. Wipe off metal bits and, with lorceps, slightly arch the distal end 01 the microscalpel to facilitate scooping up the agar blocks with the spores.
Flame the tip 01 the microscalpel between manipulations, but only for an instant to reduce heat corrosion.
Scrape the microscalpel every now and then to remove rust and to re-flatten the surface. Do th is under the dissecting scope to ensure that the tip lies Ilat on the surlace.
-Fine watchmakers' forceps . -A mounted needle . -A standard broad-bladed sca lpel
(with spare blades). -A mounted surgica l scalpel (with
spare blades). -Table cloths, towelling and tissue
for benchwork.
SPORE ISOlATION TECHNIOUES: IN TRODUCTION
This section is mostly applicable to conidia, as sexual spores are seldom

E. Desea/s, /ngo/dian Fungi: fie/d and /aboratory teehniques 185
recognizable to species. Conidia are by far the main constituents of the Ingoldian spora in water or foam, although sigmoid ascospores, for example of some discomycetes, may also be present.
It is presumed that the Ingoldian fungi may be found in the following situations, which will have a bearing on the isolation technique(s) adopted (unproven cases are queried):
Conidiophores, in relation to water, may be: 1- aerial (in humid air, on partly submerged substrates), and/or 2- aquatic (in contact with free water), and then
a- superficial (e.g. the five-armed morphotype of Artieu/ospora tetrae/adia Ingold), and/or
b- submerged. Surface conidiophores release their
conidia on water, and these mostly remain superficial. Bandoni (1974) discussed the dynamics of spore dispersal on surface films. Spore surface properties may affect the sampling technique. For example, when pouring spore suspensions, surface spores may flow backwards and thus be left behind.
Depending on where the substrate is in relation to water, conidiophores may form:
1-on aerial plant parts which may be: living (phylloplane fungi, e.g.
Tripospermum myrtl) dead (e.g. saprotrophs in trunk holes, forest litter, etc.)
2-on submerged plant parts, which may be
2a-in open water living? (submerged roots of A/nus) dead (decaying leaves, twigs, etc.)
2b-in hyporrheic habitats? living? (roots) dead? (buried decaying plant matter)
The dispersal of Ingoldian conidia produced in hyporrheic habitats, i.e. those presumably produced on underground dead or living plant matter and dispersed in the liquid phase of soils underlying freshwater bodies, has not been studied.
Conidia will be passively dispersed in contact with water: A- from aerial conidiophores, whose conidia will be:
1- introduced into water bodies by rain splash, dew drops, etc., and either
a- remain on the surface or b- enter into suspension
2- dispersed aerially in/on spray droplets caused by wind, and either:
a- land on aerial plant surfaces (and germinate?) or
b- land on water B- from surface conidiophores, and then:
1- remain on the surface 2- enter into suspension -(and possibly re-surface by turbu
lence) C- from submerged conidiophores, from where they may:
1- remain underwater and: a- settle, become anchored and start
germination b- remain suspended for longer peri
ods (and eventually settle and germinate) 2- re-surface through turbulence,
and then: a- remain on the surface or b- be dispersed aerially in spray
droplets Conidia of Ingoldian fungi may ad
here readily to walls and instruments, and should thus be manipulated as little as possible. This adhesiveness is especially noticeable when suspensions (e.g. liquefied foam) are examined a couple of hours after being kept at room tem-
186 BolI. Soco Hist. Nat. Balears, 40 (1997)
perature. Large tangled masses of conidia mixed with debris will have formed, and recognition, let alone isolation, become practically impossible. It is not known whether such a flocculation process intervenes in natural freshwater purification.
PROCEDURE FOR ISOLATION
Spores dispersed in water (as those in air, but unlike those in soil) normally need to be CONCENTRATED for efficient observation, description, counting or isolation. Natural spore accumulations in foams and scums are especially abundant in turbulent waters with a presumably lower than normal surface tension. High concentrations may also be obtained by laboratory incubation of submerged substrates. Otherwise, spores have to beconcentrated artificially (see p. 175).
Spores may be ISOLATED in two basic ways: as spores SUSPENDED in water, or as spores previously spread and starting to germinate (ANCHORED) on agar. In the first case (efficient for species producing FEW, LARGE spores, such as conidia of Actinospora megalospora Ingold) these are detected and identified under the dissecting microscope, which has a poor optical resolution but covers a bread field of view. With the second method (much more efficient for smaller spores and al so for large ones if these are more frequent) the spore suspension is placed on an agar medium and the spores detected and identified with the higher-resolution optics but small field of view of the compound microscope.
80th techniques have the limitation that the spore has to then be manually removed and, if necessary, also manually cleaned of contaminants. This is
normally done under the dissecting microscope.
A third limitation is that neither observing spores on or in water, nor on the surface of agar, whether with the dissecting or compound microscope, gives the degree of resolution obtained in a water mount on a slide (unless a water immersion lens is used in the anchored-spore technique, as explained below). A number of conidia may thus still be misidentified at the isolation stage, and we therefore need to confirm identification after in vitro sporulation.
If spore isolation is carried out carefully (without the aid of a sterile airflow cabinet) and the suspension is not too contaminated with small-spored fungi or yeasts, one should expect to lose no more than 5% of the isolates.
For a better comparison of the two aboye techniques before describing them in detail, the steps will be outlined below.
1- ISOLATION OF SUSPENDED SPORES
The whole procedure has to take place in the field laboratory.
a-LlQUEFACTION of the spore suspension (i.e. foam) is needed.
b-SETTLlNG of the suspended fraction in a Petri dish should not exceed a few minutes in order to avoid spore adherence to the bottom.
Floating spores may not settle for a long time, and will then have to be isolated from the surface.
c-SCANNING of the suspension with the dissecting microscope at up to 100 power. Scanning is mainly done at the water surface and at the bottom, but conidia of some species may also remain suspended in the water column for longer periods (e.g. Tetrachaetum elegans Ingold).
d-IDENTIFICATION TO SPECIES (bften only approximate).

E. Desea/s, /ngo/dian Fungi: fie/d and /aboratory teehniques 187
e-TRANSFERRING (at lower magnification) onto the isolation medium, where germination will take place.
f-SUBCUL TURING of part of the incipient colony to a fresh medium.
Steps (e) and (d) could be performed under the compound microscope with a water immersion lens, which would improve optical resolution and facilitate identification. But there would still be the inconvenience of transferring the spore manually onto the isolation medium. Transferring the spore suspension to the dissecting scope and relocating the selected spore is not easy because the spore is not fixed onto a substrate. An alternative worth testing could be the Leica Kombi stereomicroscope, which is a dissecting microscope with a supplementary compound objective on the same nosepiece. It would be worth testing an immersion objective here.
An inverted microscope would provide relatively high optical resolution for identification, and would also enable direct isolation, but this has not been tested. It would also be costly, as two microscopes would be needed.
2-ISOLATION OF SPORES ANCHORED ON AGAR
In the field: a-LlQUEFACTION of the spore sus
pension is not needed, although it may provide a more even distribution of spores over the isolation medium.
-If the scum does not liquefy easily, it may be SPREAD over the isolation medium with a bent glass rod or wide loop. Spreading has a diluting effect.
b-FLOODING of the isolation plate with the spore suspension.
c-SETTLlNG of spores, to increase concentration on the isolation medium, but only if the sample is very poor.
d- A short incubation to allow ANCHORING of spores to the medium, probably through mucilage production and/or incipient germ tube formation.
Germination happens very soon after sampling. It will also take place in the ice chest while en route to the field laboratory. The germ hyphae must not be allowed to grow to the point of being confused with conidial branches, which would impair spore identification. This problem might occur with some species within 3 or 4 h of collecting if incubated at ca. 20-25°C, but if kept at ca. 4°C, spores of some Ingoldian species may still be efficiently isolated after even 36 h.
In the laboratory: e-SCANNING of spores on the iso
lation medium (under low power with the COMPOUND microscope), part of which will have been previously cut off and placed on the finder slide.
f-SPECIES IDENTIFICATION (under higher power of the compound microscope, which will be much more accurate than under the dissecting microscope).
g-Recording the LOCATION of the spore by means of a reference code on a finder slide.
h-RELOCATION of the spore under the dissecting microscope.
i-TRANSFER of the spore to another Petri dish with isolation medium.
j-SUBCUL TURE from the incipient colony to the growth medium.
It is possible to isolate spores spread on agarwithout the aid of a finder. The spores are then scanned, identified and removed under the compound microscope (Marvanová, pers. comm.). But this requires a steady hand and great concentration, as the image on the len s is inverted and the working distance is very small. The use of optics

188 BolI. SOCo Hist. Nat. Balears, 40 (1997)
wh ich do not invert the image, such as those available for the Olympus BX series, may obviate this problem.
The stepwise procedures for the isolation techniques are as follows :
a- ISOLATION OF SUSPENDED SPORES
Reminder: only efficient for large spores appearing infrequently.
If adhered onto the bottom of the dish, the spore , or part of it, may be detached with a mounted hair before transferring. (It is not known to what degree this may impair germination) .
Spores may be removed with a MICROPIPETTE from inside water , or from any level , with a mounted HAIR.
The hair technique is fast and clean, and especially effective for branched spores, but needs testing as it has been noticed that conidia, mainly sigmoid ones, collected from the water surface often will not germinate. This may be because dead conidia floa!.
MATERIALS -Both for rinsing the
mounted hair as well as for manipulating the micropipette , place near the dissecting seo pe a small volume of SDW (e.g . in a S-cm Petri dish), which may be left uncovered during isolation . The SDW should be changed every few hours to reduce airborne contaminations.
For the hair technique: -A mounted hair: glue the
base of a slightly arched, uncut hair (from the eyebrow, eyelashes, arm, etc.) onto the tip of a needle, for example with nail polish , and mount the needle on
from a toothbrush (J . Webster, pers. comm .).
To remove debris on the hair, this may be wiped or dug into the agar medium in a clean area.
Sterilization of the hair is not normally needed, but to achieve th is one may dip it in alcohol and rinse in SDW.
For the micropipette technique : -A pulled Pasteur pipette (Fig . 4),
prepared as follows: -hold one end in each hand, -roll the Pasteur pipette over a gas
burner or alcohol lamp. Apply the heat near the base of the th inner portion of glass (Fig . 5).
-When the glass softens, take it out of the flame and
-quickly but gently pull the two ends a few cm aparto
-Break off leaving ca. 2 cm of fine tubing . The length can be adjusted by nipping off bits from the end with forceps.
-With a hot needle bore a tiny hole through the top of the teat to allow wa-
a dissecting handle. Al terna- Fig. 4. Pulied Pasleur pipelle. tively, one may use a bristle Fig. 4. Pipeta Pasteur estirada a la flama.
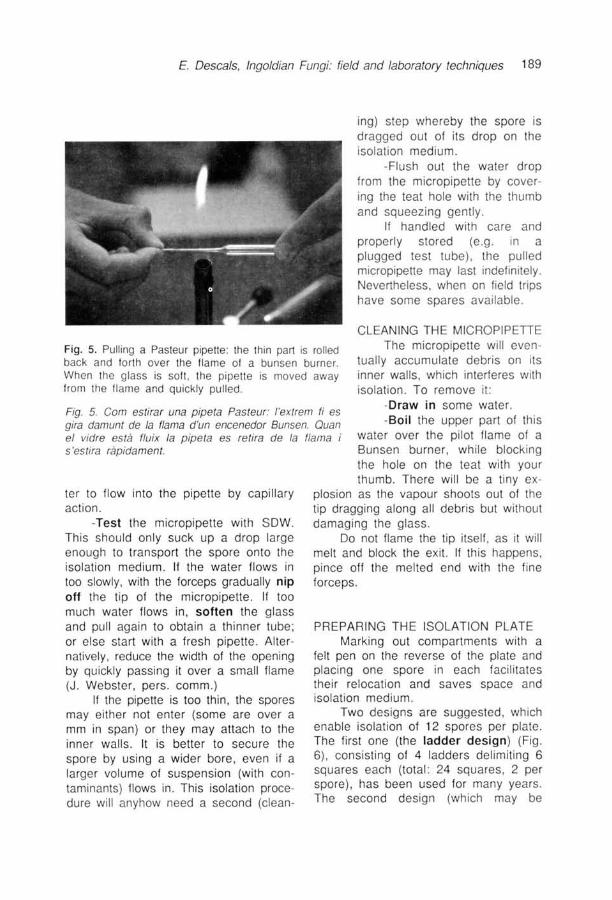
E. Desea/s, /ngo/dian Fungi: fie/d and /aboratory teehniques 189
ing) step whereby the spore is dragged out 01 its drop on the isolation medium.
-Flush out the water drop Irom the micropipette by covering the teat hole with the thumb and squeezing gently.
1I handled with care and properly sto red (e.g. in a plugged test tube), the pulled micropipette may last indelinitely . Nevertheless, when on lield trips have so me spares available .
CLEANING THE MICROPIPETIE
Fig. 5. Pulling a Pasteur pipette: the thin par! is rolled back and lorth over the llame 01 a bunsen burner. When the glass is solt, the pipette is moved away Irom the llame and quickly pu lled.
The micropipette will even tually accumulate debris on its inner walls , which interferes with isolation. To remove il:
Fig. 5. Com estirar una pipeta Pasteur: /'extrem ti es gira damunt de la flama d 'un encenedor Bunsen. Quan el vidre está fluix la pipeta es retira de la flama i s 'estira rápidament.
-Draw in some water. -Boil the upper part 01 this
water over the pilot llame 01 a Bunsen burner, wh ile blocking the hole on the teat with your thumb. There will be a tiny ex
ter to Ilow into the pipette by capi llary action .
-Test the micropipette with SOW. This should only suck up a drop large enough to transport the spore onto the isolation medium. 1I the water Ilows in too slowly, with the lorceps gradually nip off the tip 01 the micropipette . 1I too much water Ilows in, soften the glass and pull again to obtain a thinner tube ; or else start with a Iresh pipette . Alternatively, reduce the width 01 the opening by quickly passing it over a small llame (J. Webster, pers. comm .)
If the pipette is too thin, the spores may either not enter (some are over a mm in span) or they may attach to the inner walls. It is better to secure the spore by using a wider bore , even il a larger volume 01 suspension (with contaminants) flows in . This isolation procedure will anyhow need a second (clean-
plosion as the vapour shoots out 01 the tip dragg ing along all debris but without damaging the glass.
Do not llame the tip itsell , as it will melt and block the exit. 1I this happens, pince off the melted end with th e line lorceps.
PREPARING THE ISOLATION PLATE Marking out compartments with a
lelt pen on the reverse 01 the plate and placing one spore in each lacilitates their relocation and saves space and isolation medium.
Two designs are suggested, wh ich enable isolation 01 12 spores per plate. The lirst one (the ladder design) (Fig. 6), consisting 01 4 ladders delim iting 6 squares each (total : 24 squares , 2 per spore), has been used lor many years . The second design (which may be

190 BolI. SOCo Hist. Nat. Balears, 40 (1997)
Fig. 6. Example of ladder-like line grid for isolation of spores in suspension. Fig. 6. Exemple d'entramat lineal, del tipus escala, per amar espores en suspensió.
Fig. 7. Example of spoke-like design for isolation of spores in suspension. Fig. 7. Exemple de disseny amb forma de raig per amar espores en suspensió.
called the spoke design) (Fig. 7), consisting of 24 radial sectors (also 2 per spore) enclosed in concentric circles,
has not been tested, but should give each spore a larger surface area for growth, thus reducing chances of contamination from neighbouring sectors.
When using the ladder design a spore is first placed on a square in one of the two inner ladders, allowed to germinate and then transferred onto the neighbouring square on the outer ladder. The are a of agar medium enclosing the two inner ladders (which will bear contaminants) can eventually be cut off with a flamed scalpel as a single block and discarded.
When using the spoke design each spore is placed in an outer sector, allowed to germinate and then transferred to the neighbouring inner sector. The outer ring of agar can likewise be eventually discarded to reduce the risk of contamination.
CONTROLLlNG UNICELL CONTAMINANTS (bacteria, yeasts)
Unicell contaminants Iying near the spores sometimes develop into colonies which swamp the isolate and interfere with or even interrupt germination or growth. In order to avoid this, one may carry out the following simple operation, which is especially useful for slow-growing colonies:
-Befo re isolating, punch the centre of each of the outer squares (in the ladder design) or of the inner sectors (in the spoke design) on the isolation plates with the tip of a glass tube at least 2 mm wide (e.g. an unpulled Pasteur pipette). Take out the resulting cylinders to a depth of about 2-3 mm. The agar blocks with the germinating spores will be placed in these wells. If contaminant unicell colonies develop within, they will normally remain trapped long enough to allow the hyphae to grow out into the clean agar, from where they may be subcultured.

E. Desea/s, /ngo/dian Fungi: fie/d and /aboratory teehniques 191
If wells have not been dug, and a conidium is being swamped by a unicell colony, it may be saved by transferring to a freshly dug well in a clean area.
Alternatively, apply a small glass ring on the contaminated spore. The ring will act as a barrier for the unicell colony, while the hyphae grow underneath and away from the ringo
The procedure would be: -Cut 5 mm sections of thin glass
tubing (ca. 3 mm diam.). -Holding a ring with the forceps, dip
in alcohol and light this over a flame. -After it has cooled down, and still
holding it with the forceps, slightly dig the ring end-on into the agar encompassing the contaminated spore.
PROCEDURES FOR ISOLATING SUSPENDED SPORES:
-Pour liquefied foam into a glass Petri dish, to a depth of 3-4 mm. If not enough, add SDW.
If the suspension in the dish is too shallow, convection currents will not allow the spores to settle. It may also be impossible to break the air/water boundary layer with the micropipette, because this cannot go deep enough.
-Allow spores to settle for a few mino on the bench, avoiding heat sources under the Petri dish, which will al so create convection currents.
THE HAIR TECHNIOUE -With the flamed top of a needle
handle, touch the surface of SDW and place the resulting drop on the centre of each inner square (or outer sector) in the isolation plate (see aboye).
-Place this plate on the side of the dissecting microscope.
-With the dissecting microscope, scan the spore suspension for spores.
-Swing to highest power to identify the spores.
-If necessary, push away with the mounted hair any spores or debris nearby.
-Transfer the spore with the tip of the mounted hair.
Spores settled on the bottom or suspended in water may be easily stroked up to right under the water surface, from where they may be lifted.
-Ouickly place the spore in the drop on the isolation plate. Uncover the plate as little as possible.
Ensure that the spore comes off by wiping the tip of the hair a few times over the agar surface, inside the drop.
-In a notebook write down the ¡solate code and sketch the spore to represent shape and approximate size.
-If the drops of SDW in each compartment have dried up on the agar befo re or after a spore has been placed in them, add more. (This step should be avoided).
-When all transfers have been made for that dish relocate the first spore under the dissecting scope.
(This could be done under the compound microscope to better observe and identify the spore and to detect possible contaminants, but it would imply leaving the dish open for too long and exposed to contaminations, unless one is working in a sterile air-flow cabinet).
If a spore cannot be immediately spotted in its drop, do not assume that it is lost. Adjust the light beam with the sub-stage mirror to enhance contrast with the background. If it still has not been found, it will appear on the agar surface after the drop dries up. (But avoid this, as the spore will still rest amongthe debris and contaminants).
-With the mounted hair, drag the spore to the edge of the drop. The dragging action helps detach debris and contaminants off the spore surface.

192 BolI. SOCo Hist. Nat. Balears, 40 (1997)
-11 the underside 01 the lid is covered with condensation droplets, replace the lid with another clean , dry one during observation.
(Condensation may be serious when dishes have been recently taken out Irom the cold) .
Some germ hyphae are dillicult to detect , and one must again adjust the orientation 01 the sub-stage mirror lor contras\.
-With a Ilamed scalpel , remove contaminant colonies as they appear.
Fig. 8. Single-sporing: once Ihe spore (arrow) has been dragged with the mounled hair onlo a clean area, two marks on either side will aid in its locatioll .
II small contaminant colonies (usually Cladosporium, Penicillium or Aspergillus) have started to sporulate:
Fig. 8. Aillament monospóric una vega da que /'espora s'ha granat amb el pel sobre una superficie neta, es fan dues marques a bandes oposades per facilitar la seva localitzaciá.
-Fi x them with a drop 01 90% alcohol belore removing them, to avoid lurther contamination. Alternatively, one may burn them off with a needle , or with
Especially il the loa m is very rich, old or dirty, the drop may be heavily contaminated and one should always move the spore out 01 il:
-With the mounted hair , pull a short, slender channe l 01 water out 01 the drop.
-Sweep the spore to the end 01 this channel.
-With smaller spores, mark their location by lightly piercing holes in the medium with the Ilamed microscalpel on either side (Fig. 8).
-Repeat the above steps lor all other spores on the dish .
-Label the dish. -Incubate the dish al room tem-
perature . -Check daily lor germination and
contaminants without opening the dish. The most dangerous lungi are some 01 the airborne Mucorales , as their colonies may swamp a plate in a couple 01 days.
the commercia lly produced Pyropen (Webster , pers . comm.)
Surlace hyphae 01 some contaminants (e.g. mucoraceous on es) overgrowing a selected spore can sometimes be neatly lifted with the needle and discarded .
-As soon as a spore has produced a short germ hypha check under high est power with the dissecting scope lor contaminations.
-With the Ilamed microscalpel, cut into the medium around the spore, and as close as possible (o il.
II the conidium is large and much branched (e.g. Oendrospora) and has germinated Irom various cell s, it is saler to transler only a small portion 01 it, or 01 the germ hyphae.
-Transfer the resulting agar block with the microscalpel and place it in the well in its neighbouring (smaller) com-partmenl.
E. Desea/s, /ngo/dian Fungi: fie/d and /aboratory teehniques 193
When all spores have been transferred:
-under the dissecting microscope, and with the surgical needle, cut out the inner two ladders (or the outer ring in the spoke design) as a single piece, flaming always between cuts. Take care not to cut through any colonies, contaminant or not, as you will sow new colonies throughout the dish.
-Turn the dish over sorne tissue paper and
-discard this piece of medium by flicking it off from one end with the scalpe!.
Note: the aboye steps require opening the isolation pi ate several times. This will normally result in sorne airborne contamination. It is thus important to carry out the motions swiftly.
-When the spores have developed into distinct microcolonies (this happens in one to several days), with the surgical needle transfer a small block of agar from their margin to fresh medium.
-Label the new container with the three basic data: isolate code, date of transfer and habit sketch· of the spore.
-Incubate these cultures at room temperature, or in the refrigerator if they grow quickly, until you have returned to the main laboratory.
THE MICROPIPETTE TECHNIQUE -Sterilize the micropipette. -Allow SDW from the 5-cm dish to
flow by capillarity into the micropipette. -Withdraw the micropipette from the
water, cover the teat hole with the thumb and squeeze to force out sorne of this water. (This same volume will later flow in with the spore). Release pressure on the teat slowly to keep air bubbles from being drawn in.
-Under the dissecting microscope, locate the spore you want, which may be settled or in suspension.
-Dip the tip of the micropipette onto the selected spore, and watch it flow in.
If it flows in too slowly (e.g. the micropipette had too much water to start with), it will be left behind when you withdraw the pipette from the suspension. To avoid this, start with less water in the pipette.
-Withdraw the micropipette as soon as the spore has been sucked in.
-Yo u may then dip in for sorne more SDW, as a larger volume helps eject the spore onto the medium and dilutes possible contaminants.
-Uft the lid of the isolation plate slightly, cover the teat hole with your thumb and squeeze the water with the spore onto the appropriate compartment.
As the drop flows out, it sometimes rolls up onto the outside of the micropipette wall and the spore is lost. To avoid this:
-make the drop touch the agar surface as it flows out. 00 not sera pe the agar surface as the spore might get lost in the scars.
-Close the dish and draw in SOW for the next spore befo re the micropipette dries up. This keeps any remaining debris from drying up and adhering to the inner wall.
-Check regularly that the spores are being isolated. If not so, flush the micropipette with boiling SOW, as explained aboye.
-Proceed with the rest of the spores as aboye.
ISOLATION OF SPORES ANCHOREO ON AGAR
Most Ingoldian fungi are now being isolated by us with this technique, as it offers several important advantages over the spore-suspension technique:
1- Spores can be identified under the compound microscope with much

194 BolI. SOCo Hist. Nat. Balears, 40 (1997)
greater accuracy. 2- Relatively small spores, down to 5 11m in span or less , can also be isolated (as long as one can relocate them, or their more visible colonies, under the dissecting microscope in the transler stage) . 3- The spores on the "Ioam plates", il these are kept relrigerated , may remain recognizable even many hours alter collecting (depend ing on the species), thus allowing lor much more collection and/or isolation time; i.e.: one can co llect much lurther away (e ven alte r overnight trips) ; or, alternatively, rich samples can be scanned more thoroughly. 4- The isolation plate is lelt open much less time , chances lor contamination thus being minimized. 5- Isolating a germinating spore greatly increases the chances 01 8stablishing the culture. 6- The technique is more rapid. 7- Less skill is required .
Fig. 9. Single-sporing with the England finder: detail 01 the letter-number pattern engraved on the slide. Letters are sequentially arranged vertically and numbers horizontally: each resulting circle is enclosed in a square itsell subdivided into subsquares 1-4.
Fig. 9. ArJ/ament monospóric 8mb el localitzador Engfand: detal/ del patró gravat sobre la porta. Les l/e tres es graven seqüencialment en sentit vertical i la numeració horitzontal: cada cercle resultant s'inclou en un quadre que, a la vegada, es subdivideix en 4 subquadres 1-4.
MATERIALS The slide finder: This is a stand
ard-sized microscope slide bearing a photograph ically reduced grid pattern , each compartment being identified with letter and/or number coordinates arranged sequentially along the horizontal and vertical axes . A piece 01 agar medium Irom the "Ioam plate" is placed on the linder, the spores are located individually under the compound microscope , the coord inates directly underneath each spore are noted and the spores relocated under the dissecting seo pe lor manual lilting.
A commercially produced device, the "New England" linder, is available as item code S7 from Graticules Ud ., Morley Rd ., Tonbridge , Kent TN9 1 RN
(UK) (Fig . 9) . But one may build a much cheaper and equally uselul finder by printing a similar template on paper and photographing it on a 35 mm diapositive film . The frame on the film may then be cut up and glued with nail pol ish on a microscope slide under a coversl ip.
As the finder slide may break and is indispensable for this technique, it is advisable to have so me spares.
-Isolation plates: With a finepointed felt pen , draw a 6 x 6 grid pattern (Fig. 10) on the reverse of an isolation plate . Each 01 the squares on the grid can be identilied by its two coordinates.
-A small central well may be plugged out in each square for control ling unicell contaminants (see aboye) .

E. Desea/s, /ngo/dian Fungi: fie/d and /aboratory teehniques 195
Al 6
F
Fig. 10. Example 01 line grid lor spore isolation with linder. Fig. 10. Exemple d'entramat lineal per aTllar espores amb el localitzador.
-Field dissecting microscope or pocket compound microscope (optional) :
Either of these is advisable for quickly deciding whether the foam samples need diluting . Valuable time and effort may thus be saved . High-quality port-able compound microscopes with battery-powered built-in lamps are commercially available (e.g. Nikon), but these are costly and delicate. Alternatively, use a spare dissecting microscope with transmitted light. (A transmitted-light base may be improvised, as explained aboye). The spore concentration in the foam can thus be quickly judged, even at 25 x.
-Isolator (optional) : This device replaces an ob-
is dug into the agar enclosing the spore by racking the nosepiece down a lew mm and then racking it up again. The resu lting cylinder is then relocated under the dissecting scope, translerred with a microscalpel onto fresh isolation medium.
The isolator may be uselul because: 1- time is saved in translerring the marked spores; 2- a less steady hand is required lor manipulating the spore. On the other hand one may have less control over contaminant spores in the vicinity. It is also somewhat cumberso me il one needs to flame the isolator tip between spores.
The Keyworth isolator (Ivor Saint Co., 50 Clarendon Ave ., Leamington Spa, England) (Keyworth 1959) (Fig. 11) may be used to replace the objective lens next to the 10x one (e.g. the 100x); not the 20x objective , because this will be needed lor observing spores in more
jective on the nosepiece 01 a compound microscope . At its bottom end is a tiny, sharpedged tube which is used to mark the location 01 the spore: it
Fig. 11. Keyworth isolator screwed onto the nosepiece in place 01 the oil immersion objective. (Reproduced lrom Tuite, 1969). Fig. 11. Aillador Keyworth situat en el l/oc de /'objectiu d'immersió d'oli (reprodurt de Tuite , 1969).

196 BolI. Soco Hist. Nat. Balears, 40 (1997)
J.
I
- Collect the loam in ajar and take it to the vehicle .
Also collect a small amount 01 stream water lor diluting the loam sample, il necessary .
- Shake the jar lirmly several times to help liquely the loam.
- Label a pi ate with the isolation medium.
- Pour some 01 the suspension into this .
- Swirl the pi ate gently to wet the entire surlace .
Fig. 12. Darley isolator: the cutter is mounted on a flexible ring which fits on the objective (Reproduced from Tuite, 1969).
- Decant all the excess spore suspension back into the jar, and use this lor preparing a voucher specimen.
Fig. 12. AiHador de Darley: /'anell tallador es monta sobre un anell flexible que abrac;a /'objectiu (reprodui"t de Tuite, 1969).
- II the loam is scanty, pour the excess directly into a small labelled vial, lix and keep as voucher specimen .
detail. When a spore has been located with the 10x object ive , the isolator is swung down and used as detailed above.
The Darley isolator (Tuite 1969) (Fig . 12) is a 1-mm diam. metal biscuit culter held on a clamp which embraces the same low-power objective used lor spotting the spore. It has the great advantage over the Keyworth isolator that one can see the spore while marking it. The mechanical stage can then be steered to keep the spore in the middle 01 the lield as the biscuit cutter is lowered onto it, and thus reduce the chances 01 damaging or losing it. PROCEDURE FOR ISOLATING SPORES ANCHORED ON AGAR
- As the loam sample may need dilut ing, put two " foam plates" per planned sample in the box in the ice chest. No more than three or lour sampies should suffice lor one day's isolation work , even il they are not rich .
-11 the suspension is not rich , do not decant, and let it settle on the surlace 01 the agar medium to increase spore density.
-11 the spore load is rich or suspected to be rich , the remaining suspension may be diluted with the same stream water or with SDW and poured as above into a different, also pre-Iabelled dish .
-Scums that do not break down readily may be spread over the agar medium with a bent glass rod or wide loop.
-Sto re the inoculated plates in the box within the ice chest.
-Transport to the lield laboratory, keeping the ice chest as horizontal as possible to maintain spore suspensions on agar evenly spread on the medium.
-In the laboratory, most 01 the spores should by now be ancho red to the agar. (11 not, incubate at room tem perature lor an hour or so).

E. Desea/s, /ngo/dían Fungí: fíe/d and /aboratory teehníques 197
-Sto re the foam plates in the refrigerator.
It may be wise to put a max.lmin. thermometer alongside the pi ates in the refrigerator, as this will often operate at higher temperatures (especially those in hotel kitchens, which are opened frequently). If so, it may be advisable to keep the foam plates in the ice chest, or in a portable refrigerator.
-When isolating, bring out the foam plates from the refrigerator (one at a time to retard germination).
-Once most spores have germinated, you may gently rinse the surface of the agar in the foam plate with excess SDW to eliminate some debris. However, this may cause some valuable, slow-germinating spores to be lost when decanting.
Do not use DW from a wash bottle, as this is often contaminated with yeasts.
If you use the isolator, it may not be advisable to add SDW, as contaminants may flow into the cuts in the agar.
Note (The following approach has not been tested): If the agar surface is rinsed at a fixed time after applying the spore suspension and the washings decanted onto another isolation plate, one may be able to select for slow-germinating spores; i. e.: spores of weed species (such as He/íseus /ugdunensís Sacc. & Thérry) usually become anchored and germinate faster than rarer, more interesting species. At rinsing, the former should remain adhered onto the medium, while the latter ungerminated ones are washed onto the antibiotic medium in the second plate, where they may be incubated for longer periods.
-Examine the foam plate and look for an area where the spores are conveniently spaced for isolation.
. -With a flamed scalpel, cut out a rectangular slab of agar medium slightly narrower than the printed area on the
finder slide. The length of the slab will depend on the richness of the sample. About 3 cm would be adequate in most cases.
Make vertical cuts so that the margins of the slab can be examined without difficulty.
-Dig under this slab with a spatula and transfer it onto the finder slide.
-Return the "foam plate" to cold storage for later sampling, if it were to prove interesting.
-You may want to keep the agar surface of the slab wet by regularly adding drops of SDW.
This is done: 1- to improve optical resolution. (The meniscus surrounding spores Iying on agar tends to impair vision and thus species recognition). 2- To keep the agar surface from drying, as it would then become gummy and difficult to cut. It will also shrink unevenly, and you will need to refocus often as you sean. Agar dries up faster on the edges of the slab. You may want to transfer valuable spores from here first. 3- To keep contaminant airborne spores from germinating on the agar.
-With the 10x objective of the compound microscope, sean the entire surface of the slab using the mechanical stage.
-Identify the selected spores under the highest possible power (usually 20-25x). The objective should have enough working distance so that it will not touch the agar or become misty with condensation.
-Check for nearby contaminant spores.
-Swing back to the 10x objective and rack down the nosepiece to read the finder eoordinates immediately underneath it. Record these in the laboratory notebook. Sketch the spore shape and note presence of nearby contaminants that may need removing.

198 BolI. SOCo Hist. Nat. Balears, 40 (1997)
-To save time, transfer all spores on ly alter you linish scanning the whole agar slab.
-If an isolator is used, punch out the spores as you lind th em, and transler all 01 them afterwards.
II a contaminant is present nearby , do not use the isolator and lift the spore with the microscalpel , as explained below. The contaminant spore or microcolony may also be burnt off with a "Pyropen" (J . Webster, pers. comm .).
-Transfer the linder slide to the dissecting microscope. II the image under the compound microscope is inverted, lirst turn the slide around 180º.
Fig. 13. Single-sporing: detail 01 the U-shaped moat plowed out around the spore. The piece 01 agar supporting th is is then lifted Irom underneath wlth the tip of a microscalpel.
-Rack down to the level 01 the grid and relocate the coordi nates, rack the nosepiece up and you should lind the selected spore on the agar surface. (11 in
Fig. 13. Ai"IIament monosp6ric: detall del canal amb forma d"'u" aixecat enrevoltant /'espora (punta de la fletxa). El bocí d 'agar que el sostén s 'eleva després empenyent des d 'abaix amb la punta del microescarpell (fletxa).
doubt, check the spore shape with your habit sketch in the notebook) .
-Remove contaminants and debris, il necessary , with the mounted hair or the Ilamed microscalpel, or burn them.
-To clean around the spore, with the microscalpel plough up three moats around il. The agar should be lifted from underneath and the resul ting flaps turned over and AWAY Irom the spore. The Ilaps need not be removed (Fig . 13) .
In this way the contaminants will have been neatly separated and the spore left in the middle 01 a tiny peninsula .
-Flame the microscalpel every time alter it touches the agar medium .
-Finally , finish cutting out the agar block by making a deep cut in the agar joining the ends 01 the U-shaped moat (Fig . 13). Do not lift a Ilap here.
-Lift the resulting agar block with the microscalpel by piercing it underneath lrom the middle moat (the bottom 01 the U) and sl iding the block upwards whi le leaning against the opposite wall (i.e . the lourth cut).
-Transfer the agar block with the spore to a well in the isolation plate .
It does not matter in which position the agar block is laid on the agar medium.
(Between translers 01 the agar blocks to th e isolation plate , it is advisable to place this inverted on the bench . The bottom 01 the dish can then be lilted and turned over in one step , without there being a need to li rst uncover il. It is also easier to locate the correct square lor transler) .
-When all translers have been made, incubate the isolation pi ate and proceed as above.
E. Desea/s, /ngo/dían Fungí: fíe/d and /aboratory teehníques 199
The agar slab on the finder slide will obviously be exposed to some aerial contamination by fungal spores during isolation, but this does not pose problems, as only a minute portion of the agar medium is sampled.
ISOLATING SPORES FROM TELEOMORPHS ON NATURAL SUBSTRATES
This highly interesting aspect in the study of Ingoldian fungi is being sadly neglected, although it should provide valuable information on systematic affinities and ecological aspects.
Teleomorphs (e.g. discomycetes, such as Míladína, Hymenoseyphus, Hya/oseypha, Mollísía, Orbí/ía, etc., and Lophíostoma- and Massarína-like Loculoascomycetes, or even corticiaceous and gelatinous basidiomycetes) are often present on decaying wood from aquatic habitats. Alternatively teleomorphs may be induced after longer incubation in moist chambers under daylight + NUV at cool temperatures. (Ideal conditions are unkncwn in most cases). Smaller fruit bodies may possibly be also found on leaves, although these usually are anamorphic (pycnidia, spermodochia, etc.).
RECOMMENDED FIELD GEAR -Pocket knife (preferably chained to
trousers), rucksack with : chisels and mallet, folding handsaw, lightweight toolbox with compartments for individual collections, large polythene bags for bulky wood, smaller polythene bags for leaves, paper bags for Pyreno- and Loculoascomycetes, specimen vials and plastic jars for delicate apothecia, felt pens, altimeter, field notebook.
An ice chest will be needed in warm weather.
LABORATORY MATERIAL -A wide loop (ca. 1.5 cm diam.).
This can be made by coiling a bacterial
inoculation needle or any soft wire around a cylindrical object e. g. a felt peno
PROCEDURE -Collect twigs, surface portions of
branches and trunks in various stages of decomposition. Exposed but wet substrates, such as half-buried trunks along riverbanks, or wood trapped in large piles amongst boulders, in gorges or below waterfalls are often well colonized by Ingoldian fungi.
-Chisel or peel off surface wood, or cut off twigs with pruning shears. If delicate apothecia are present, store in labelled vials (where they can be secured by adding a green leaf or some moss; but not litter, as this may contaminate the sample with other saprotrophs), or in compartments of the toolbox.
-Muddy samples may be rinsed ín sítu in polythene bags by adding some stream water and shaking vigorously. Repeat until washings are clear. (It may be worth examining the washings for Ingoldian conidia).
-Keep the specimens damp but not wet (as this will increase unicell contaminations) until they are further processed in the laboratory. Storing perithecia or pseudothecia for a few days does not seem to affect ascospore germination. This may also be true for some apothecia, although they may be then invaded by other fungal mycelia.
-Insecticides and acaricides may be sprayed on during storage to stop invertebrates from feeding on fruit bodies and mycelia.
Two basic techniques may be used for isolating ascospores (or any other spores, whether sexual or asexual, and whether produced in or on fruit bodies): 1- in "hymenial squashes", normally used for perithecia or pseudothecia and for very small apothecia, a portio n of the

200 BoII. SOCo Hist. Nat. Balears, 40 (1997)
hymenium is squashed and spread on the isolation medium, whence the germinating ascospores will be transferred to clean medium; 2- in "aseospore deposits", normally used for apothecia, ascospores are allowed to shower over the isolation medium and, once germinated, some are transferred to clean medium.
Spore isolates from a single fruit body obviously belong to a single species. But nearby fruit bodies may however belong to different species, and their isolates should bear separate codeso
HYMENIAL SQUASHES
MATERIALS -Prepare an isolation plate by
drawing a line pattern on the reverse of a polystyrene Petri dish poured with isolation medium (Fig. 14).
The two halves of the dish may be used for isolating from two different fruit bodies. The central swath keeps the material from the two fruit bodies from mixing. The two swaths on either side are meant for spreading the corresponding squashed centrum contents. Upon germination, single ascospores and/or asci will be transferred to the squares in the corresponding ladder for further growth and subculturing.
PROCEOURE -Oip a microscope slide held with
forceps in 90% alcohol, and flame. -Place several drops of SDW in a
row from one end of the slide to the centre. The central drop, where the centrum will be squashed, should be larger.
-Under the dissecting scope, sean the substrate for fruitbodies.
-There should preferably be a troop
of similar fruitbodies for later descriptive purposes.
-Check that the contents have not been ejected or eaten by arthropods by slightly piercing the wall with the microscalpel.
-With a needle or microscalpel remove a single fruitbody, avoiding as much substrate as possible.
-Place it in the outer drop on the slide.
-With two needles or microscalpels, detaeh debris from the fruit body.
-When isolating from perithecia or pseudothecia, if spores are seen oozing out of the ostiole or forming a dried-up mass on it, transfer them en masse directly to the central drop.
-Lift the fruitbody to the next drop. (Do not drag it across, as you will carry contaminants along).
-Clean off more debris if necessary, always flaming instruments between transfers.
Fig. 14. Example of line grid for isolation of sexual spores from a hymenial squash. Fig. 14. Exemple d'entramat lineal per amar espores sexuals d'una maceració himenial.

E. Desea/s, /ngo/dian Fungi: fie/d and /aboratory teehniques 201
-Repeat until the fruitbody is in the central drop. Carefully wipe out the other drops.
-Drag the fruitbody to the edge or even out of the drop, where it will sit on the glass and be easier to handle than if Iying in deeper water. . -Squash the centrum or hymenium with the needle and microscalpel, or with the flattened tip of a thick copper wire.
-Check that free ascospores are present, as the fruitbody may be immature.
-Drag the fruitbody wall out of the drop. This may be mounted separately for descriptive purposes.
-Stir the macerate in the drop to obtain an even suspension.
-Spread SDW with a flamed wide loop over one of the swaths on the isolation plate. (If water is absorbed quickly by the agar, keep wetting). Do not scrape the agar surface.
-Depending on the ascospore concentration, transfer one or more loopfuls of the macerate and spread evenly over the swath. The transfer may al so be done with a micropipette.
-Check that the ascospore or ascus concentration on the medium is ·'adequate for comfortable isolation.
-Incubate the isolation plate overnight or longer at room temperature. Keep it in a closed polythene bag to reduce evaporation.
-Under the highest power of the dissecting microscope, or preferably by means of the finder slide under the compound microscope (see aboye), scan for germinating ascospores and for asci containing germinating ascospores.
If the fruit body is heterothallic, a single-ascus isolate (if at least half + 1 ascospores grow) should provide the two mating types. The single-ascospore isolates may produce somewhat less vigorous colonies than single-ascus or multi-
ascospore isolates, but they are useful for confirmation of pure culture.
-With the microscalpel, transfer tiny agar blocks with germinating material to individual squares on the ladder, labelling these accordingly (e.g. na" for single ascospores, nA" for single asci, nma" for more than one ascospore).
-With the flamed surgical needle or scalpel, cut off and discard the piece of agar medium containing the swath with the spore spreads, which will have contaminants.
-Inctlbate at room temperature until colonies are large enough for subculturing from the margin onto growth media. Colonies that look different may be contaminants.
For preservation of voucher specimens:
-The remains of the squash on the slide should be air-dried and mounted, and kept as the nisolation slide". The wall material of peri- or pseudothecia may be mounted on a different slide to keep the centrum squash preparation as thin as possible.
-Also preserve the dried substrate with the remaining fruitbodies.
-Label all specimens and slides individually.
ASCOSPORE DEPOSITS (These are meant mainly for
apothecia, but may be used for perithecia or pseudothecia too, if large enough.)
-Invert an isolation plate and draw a line across the centre of the base with a felt peno On one half will be deposited the spore cloud from the apothecium, and on the other will be the ascospore transfers. For this step draw laddea (Fig. 15a).
-Label the dish. Build an agar support for the
apothecium (Fig. 15b), so that it dries

202 BolI. SOCo Híst. Nat. Ba/ears, 40 (1997)
up less quickly and its hymenium can be conveniently oriented towards the agar:
-With a flamed scalpel cut out an agar block ca 5 mm square from the isolation plate and lay it on the underside of its lid, off centre, e.g. 1-2 cm from the margino If the apothecium is small it may be necessary to superimpose agar blocks to bring it closer to the agar surface.
-In the opposite half of the lid lay a small wad of wet paper tissue.
This keeps the isolation plate damp while being used. SOW may be added to the wad regularly for longer incubations.
-Select an apothecium that looks ripe.
-Record macroscopic characters. Do a habit sketch with the dissecting microscope.
Fig. 15. Example of line grid for self-isolation of sexual spores. a: top view; b: side view. Fig. 15. Exemple d'entramat lineal per a I'autoai"llament d'espores sexuals. a: visió frontal, b: visió lateral.
-Uft the apothecium (if stipitate, slice it off its base, which may be dirty) and with forceps place it vertically on the agar support, with the disc facing the underlying medium.
-Replace the lid. -Under the plate, draw a circumfer-
ence with a felt pen, enclosing the area where the ascospores are expected to land.
-Incubate the dish inverted for larger apothecia, or upright if these are small (under 2 mm diam.), or if a poor deposit is expected.
Ascospores landing on the agar will form a "cloud" or deposit. To allow the ascospores to be spread out, the hymenium should not be too c10se to the agar.
Incubate the isolation plate at room temperature and ex po sed to daylight to induce ascospore ejection, and keep inside a polythene bag to retain moisture and protect from contaminants.
-In many cases an ascospore deposit should be visible after overnight incubation.
-It may be very tenuous and require careful examination with the dissecting microscope, either inverting the plate and looking through the agar with a dissecting scope (which would require a clear, filtered medium), or through the lid of the upright dish after rotating this a few degrees to get the apothecium out of the line of view.
-When the ascospores have started germinating, isolate 2 or 3 of them by cutting out small cubes with the microscalpel.
At the edge of the deposit they should be further apart.
-Place the isolated material individually in the squares of the neighbouring ladder.
-Also do a couple of multiascospore transfers by taking larger
E. Desea/s, /ngo/dian Fungi: fie/d and /aboratory teehniques 203
agar blocks from the centre of the cloud. (These may include contaminants from the surface of the disc; it is thus important to do parallel single-ascospore isolates and compare colony morphologies).
-If one should want to obtain further isolates from the same fruitbody, rotate the lid so me 45º and re-incubate to obtain a new spore deposit.
-Remove the apothecium from the isolation pi ate and
-Prepare an "isolation slide" with some of the remaining hymenium (see aboye).
-Air-dry the apothecium as soon as possible and
-Preserve for descriptive and herbarium purposes, in case the culture eventually produces an Ingoldian anamorph.
For Corticiaceae and other basidiomycetes commonly associated with the Ingoldian fungi, use similar techniques. Because basidiospore ejection may not be as efficient as with ascospores, the isolation pi ate should probably be kept upright to allow them to fall on the plate.
WORKING IN THE MAIN LABORATORY This section will discuss the pro
cessing of material for observation, description and identification, as well as the preservation for herbarium purposes.
Description and identification procedures for Ingoldian fungi are specialized activities which need discussing separately (Descals ined.). Une drawing techniques have been suggested by Seifert, Gams, Descals, etc. (see various issues of the Ananet Newsletters, e.g. 15:9, accessible through Internet).
BASIC FACILITIES ANO EQUIPMENT Ideally there should be: 1- a prepa
ration room; 2- a sterilization room; 3- a
general purpose laboratory; 4- cool-temperature room(s); 5- a microscopy room and 6- a working herbarium.
It is assumed that there will be an office and taxonomic library, as well as adequate storage facilities.
1- Preparation room: this should preferably be at so me distance from the laboratory and other facilities, to reduce chances of mite infestation.
Besides the usual biology preparation room requirements, there should be:
-Air-conditioning with adequate temperatures throughout the year for incubation of field material.
-Window(s) not exposed to direct sunlight (north-facing in the northern Hemisphere), for room-temperature induction of fruiting in field material.
-Refrigerator(s) for field material and antibiotics.
-A precision balance for media preparation.
-pH meter and conductimeter, for determinations on water and special media.
-Membrane filtration equipment with vacuum pump.
-Cupboards for storing dry media and nutrient salts, as well as autoclaved media and SDW in bottles and conical flasks.
2- Sterilization room: -autoclave, with capacity for at least
a 10 liter bottle if a continuous waterflow system is to be used for anamorph induction (se e below),
-a source of DW, -a safety cabinet for solvents and
flammables.
3-The general-purpose laboratory: This should be draught- and dust
free and have: -Year-round air conditioning (as for
the preparation room).

204 BolI. Soco Hist. Nat. Balears, 40 (1997)
-Window(s) with indirect daylight, for fruiting induction of pure cultures.
-A sterile air-flow cabinet for subculturing.
-A microwave oven for melting agar media, which will have been stored in bottles or flasks. Plug them with cottonwool and then cover with aluminium foil. Before putting in the microwave oven, remove the foil or cover this with more cotton.
-A hot-water bath tor keeping the melted media warm, if pouring large batches into plates.
-If only one cool-temperature room is available, a glass-fronted cool cabinet (as used in supermarkets) in case the máchinery in the cool-temperature room breaks down while incubations are underway. The cabinet should also be equipped with NUV and daylight lamps.
-Two refrigerators (one for media poured in plates and slopes, and the other for a working culture collection). Both should have freezer compartments, in case one breaks down. It is convenient to have a third refrigerator tor field material, unless this has been treated against mites.
-A Iyophilizer may be useful if a working culture collection is to be maintained.
4- Cool-temperature room(s) -There should ideally be two such
rooms, 1- to enable different incubation regimes; 2- for keeping field material separate from pure cultures, thus reducing the risk of mite infestations; 3- as a precaution for possible breakdowns.
For inducing sporulation in cold-temperate species, set one room at 15ºC. Ventilation should be minimal, as this will increase air contaminations and dry up the incubating material.
-A mechanical shaker may prove usetul for anamorph induction by agitation (see below).
-A sink or drain, tor the continuous water-flow system.
-a ca. 2 x 1.5 m workbench, on which there should be:
-a cool-white and NUV light frame: often needed either before or during sporulation. The plates are spread underneath.
As this takes up much space, it may be worth testing if lateral irradiation of plates is effective. The light tubes could then be placed vertically and the dishes stacked up on the sides.
Two smaller frames would allow for different light regimes run simultaneously.
-A source of pressurized air-flow tor anamorph induction (see under "aeration" below).
-Extra space and sockets will be needed in the room for wheeling in either the dissecting or microscopy benches, or the continuous water flow module (see below), for which there should be a ramp instead of a step, and a wide door.
4- The microscopy room: -One U-shaped station per re
searcher, made up of three separate modules: the material is first taken to a dissection bench, then to the microscopy bench and finally to the preservation bench. The benches should preferably be on wheels for ease of transport for example into the constant-temperature rooms, or into teaching laboratories for demonstrations. The seat should be height-adjustable and wheeled.
1- The dissection bench (on the right tor right-handed workers) should have
-the dissecting microscope within -a horizontal air flow cabinet (with-
out a front shield). There should be enough depth and height for installing optical fibre lighting for the dissecting
E. Desea/s, /ngo/dian Fungi: fie/d and /aboratory teehniques 205
scope and photographic and drawing equipment.
Underneath the bench: -a drawer unit for dissecting equip
ment. 2- The central "microscope
bench", which should be vibration-free for microphotography. On it will be:
-The compound microscope, equipped with phase-contrast, DIC and fluorescence optics, and microphotographic and drawing equipment, all of it necessary for descriptive purposes.
3- The "preservation bench" is meant for preparing material for herbarium use after having been observed.
The space underneath these two benches is available for:
-cabinets and drawer units for microscopy accessories, films, etc.
-Cupboards for: -taxonomic literatúre -working collections (microscope
preparations kept in slide boxes) -and reference material: pho
tograph, negative, contact and colour slide collections, photocopies of published figures and of original drawings.
5- The herbarium, with: -Light- and preferably fire-proof cabi
nets for storing microscope slide boxes, specimens in FAA (formalin-acetic- alcohol), dried culture collections and field material.
The herbarium should be dampand pest-proof.
PURE CULTURE Taxonomic characters are derived
from: the vegetative phase and/or the anamorph(s) and/or the teleomorph. Some aspects will be briefly discussed before detailing the procedures.
1-VEGETATIVE GROWTH. Spore germination and colony growth requirements need not be the same, and should be considered separately.
Germination requirements are generally met with semi natural media such as 0.1 % MA (with or without antibiotics), or possibly with water agar, although conidia of a number of species consistently fail to germinate on this, and others do so only occasionally (e.g. F/abellospora aeuminata Descals). It is possible that some antibacterial antibiot¡cs may be toxic at the concentrations normally used, or that MA lacks some nutritional requirement(s).
Colony characters are mostly obtained under artificial conditions, Le. on semisolid (agar-based) media in closed vessels (Petri dishes) which impede gas exchange and elimination of noxious metabolites. But such characters are nevertheless of taxonomic use at the present.
Some of the more commonly recorded ones are colony growth rate and topography, morphology of the aerial mycelium, margin outline, mycelial or diffusible pigments, concentric zonations affecting vegetative or reproductive processes, surface matting, sclerotia and other survival structures, odours, crystals, exudations, etc.
Although Ingoldian fungi are assumed to be saprotrophic, there is ampie evidence for substrate preferences in nature. Furthermore, a number of species remain undescribed in pure culture because of excessively slow and restricted growth, at least in some cases due probably to nutritional deficiencies in the media. There is here much scope for research.
Ingold (1942 and later papers) grew his "aquatic hyphomycetes" on 2% MA, and this still seems to be a standard growth medium for description. Some colony pigments, such as the melanins

206 BolI. Soco Hist. Nat. Balears, 40 (1997)
of numerous Ingoldian fungi, are not produced if the malt extract concentration is reduced. A number of other taxonomically useful pigments, as well as other characters, are also better expressed on 2% MA than on weaker media, and it should be used if only for this purpose.
Maintaining fertile cultures of Ingoldian fungi is cumbersome and labour-intensive because subculturing must be with conidia. Consequently culture collections are not normally maintained, even in most of the larger public institutions.
2-ANAMORPH INDUCTION Cultures of Ingoldian fungi, in con
trast with those of most other culturable fungi, seldom produce conidia without being placed in contact with water, except in some cases when weaker sporulation media, e.g. 0.1 % MA, are used. If conidia happen to be formed (e.g. in Heliscus lugdunensis Sacc. et Sydow, Lemonniera terrestris Tubaki, etc.), conidia may be of different morphology than when submerged. Portions of the colonies therefore need to be transferred to other containers (e.g. Petri dishes or conical flasks) and partly or wholly submerged in free water. The various procedures currently used are time-consuming and subject to contamination.
An ideal sporulation chamber for Ingoldian (and possibly many other) fungi still has to be designed. It should at least meet the following requirements: 1- its walls should be transparent to the Iight wavelengths required for sporulation; 2- staling compounds (both volatile and soluble) should be readily removed; 3- it should allow for aerial and aquatic (superficial or submerged) sporulation; 4- sporulating material (Le. free conidia or whole conidiogenous struc-
tures, as well as any fruit bodies) should be easily sampled without the chamber becoming contaminated.
A simple polystyrene or Pyrex container, such as a small tissue culture flask, with inlets and outlets for continuous water and gas flow should meet most of the aboye requirements.
An improvement of the continuous water flow chamber used by Descals et al. (1976), which also enables microscopic observation, would be of great value for monitoring conidiogenesis, an important source of taxonomic information. For this purpose, at least part of the chamber should provide good optical resolution (Le.: be less than 1 mm deep).
3- Even after longer incubation, TELEOMORPHS seldom develop in culture, although microconidia presumed to have a spermatial role are seen more often. The cause(s) for failed or incomplete sexual reproduction may be genetic (the required mating types may not be present in single-spore isolates) or environmental (e.g. Iight requirements), and need intensive study. Multiascospore isolates of several Ingoldian species have sometimes produced ascomata after extended incubation of semisubmerged colony portions exposed to NUV + cool white Iight (Fig. 16).
The techniques for preparing teleomorphs obtained in pure culture for taxonomic study are those detailed aboye for natural substrates.
RECORDING TAXONOMIC CHARACTERS
A simple card file, oro alternatively, a database operated from a lap-top computer beside the microscopes, are necessary for recording the progress of cultures through the vegetative and reproductive growth phases. For example: on each card write the isolate code, the

E. Desea/s, /ngo/dian Fungi: fie/d and /aboratory teehniques 207
much cheaper paper tape (used by painters) may also be used. The latter has the disadvantage 01 being opaque, and thus contaminant colonies along the periphery 01 the dish are not so qu ickly spotted . Paralilm needs to be cut into strips belore spreading along the rim 01 the dish.
Sealing with adhesive tape can be done quite expediently and neatly in the lollowing way :
-place the inverted plate on the bench.
Fig. 16. Apotheeia 01 Mollisia sp. developing on slowly drying sliee 01 monoeonidial isolate 01 Filosporella el. annelidiea.
-A stretch 01 tape somewhat longer than the perimeter 01 the dish is pulled out (without cutting). (The length 01 tape needed may be marked on the bench) .
Fig. 16. Apoteci de Mollisia sp. desenvolupant-se sobre una lIesea prima d'un eultiu monoeonidial de Filosporella ef. annelidiea .. -The tape roll is laid on the
bench on one side 01 the dish. -The tip 01 the tape is al
lixed on its side dates and the various operations or observations, e.g.: pigment development , radial growth rate , conditions 01 incubation lor both vegetative growth and re production (asexual or sexual) , location 01 conidiophores and conidia with respect to water , presence 01 secondary conidia and herbarium inlormation, such as the number 01 microscope slides prepared and their contents (e .g. whether developing stages or detached conidia).
CONTAINERS FOR PURE CULTURE -Conical f1asks (01 mostly 1 and 2
liter volumes). -Polystyrene Petri dishes. Adhesive tape is needed lor seal
ing Petri dishes, as cultures 01 most Ingoldian lungi grow relatively slowly and would otherwise dry up or become contaminated .
The use 01 a 2.5 cm wide transparent tape is probably the lastest way 01 sealing dishes neatly, but Paralilm or
-and the dish, resting on the bench, is rolled around the tape and this then cut off.
1- THE VEGETATIVE PHASE
PROCEDURE -With a lelt pen , draw a diametric
line , or a radius 01 standard length (e .g. 5 or 2.5 cm respectively) on the underside 01 the Petri plate . This may be done to record colony growth rate (see below) .
-Point-inoculate centrally onto the plate .
(Mass inoculation , done by spreading a conidial suspension or mycelial macerate over the surface 01 the medium, may be convenient lor obtaining lully grown colonies in a very short time. This technique is commonly used when carrying out physiological experiments).
208 BolI. Soco Hist. Nat. Balears, 40 (1997)
-Seal the plate. -Label the lid of the plate with the
isolate code, the date and a tiny habit sketch of the source spore, to give you an idea of its shape and size.
This is useful for selecting the magnification at which conidia will be searched foro Smaller Ingoldian conidia may only be detected with 100x magnification.
-Incubate the cultures under diffuse light and at room temperature or, if characters have to be recorded more accurately, under controlled temperature and light conditions.
-Check every other day first, and then weekly, for fungal contaminants (especially near the edge of the dishes).
Some fungal contaminants may not be detected until much later (e.g. when cultures are submerged and one then finds different kinds of conidia). It is conceivable that a contaminating sterile mycelium may never be detected.
-In the sterile air cabinet, subculture contaminated plates, or cut out contaminated portions of the medium if still small.
Some yeasts and bacteria are difficult to remove, as they follow hyphal growth close behind the tips. Other antibiotics should then be tested.
-Record radial growth rate: e.g. the diameter (or the radius) of the colony when this has covered the line drawn under the dish, or after a fixed number of days. Note the date and incubation temperature along this line.
-Check for fruit bodies: teleomorphs, pycnidialspermodochia, etc.
-Record pigment development (on 2% MA).
-Scan carefully for mycophagous mites.
These can easily infest plates, even if sealed. Mites seem to prefer dematiaceous cultures. They may leave
very conspicuous meandering tracks among the condensation droplets under the lids of the dishes or contaminant colonies on the agar medium. Mites will quickly lay eggs, which can be detected on the colony under the dissecting microscope. If a single mite is found, the whole collection must be cnecked and the incubation rooms and cultures fumigated or sprayed with acaricides. (Mite control should in any case be done routinely).
2- ANAMORPH INDUCTION Miura & Kudo's (1970) medium has
been suggested as an alternative to 0.1 % MA for sporulation, but further work is needed.
Two methods of induction are currentiy used (i.e.: unchanged standing and aerated water), and three more are suggested (agitated water and continuous water renewal, either as flowing or as dripping water). AII involve putting the mycelium in contact with free water to partly simulate natural conditions. Below is a summary of the five techniques, for easier contrast.
1- Standing unchanged water: a relatively small portion of the stock culture on agar medium is placed in SDW (20-30 mi) in a 9 cm diam polystyrene Petri dish.
Exposure ot the cultures to coolwhite and NUV lights may be important tor inducing conidial production, one ot the most striking responses to NUV being that ot Mycocentrospora acerina (Hartig) Deighton.
The standing water technique is popular because: 1- it is simple; 2- it allows tor detecting conidia with the dissecting microscope and sampling without too much damage to the culture; 3- it gives the culture a chance to sporulate aboye or at the water surface, and 4- it

E. Desea/s, /ngo/dian Fungi: fie/d and /aboratory teehniques 209
done in a microscope chamber (e.g. the hanging drop technique) it allows lor direct monitoring 01 conidiogenous processes. But a signilicant proportion 01 species sporulate poorly this way, il at all , most probably because staling com pounds are not eliminated Irom the water or colony . In most cases , as with natural substrates, sporulation levels reach a pronounced peak within roughly a couple 01 days, lollowed by an irreversible decline and eventual interruption. In lewer cases, conidia develop slowly lor several weeks (e.g. Anavirga dendromorpha Descals & Webster, Casaresia sphagnorum G. Fragoso).
Conidial production would probably improve with the aboye three techniques il water were replaced periodically. The lollowing technique is promising and deserves lurther testing :
4- The continuous water renewal technique, by means 01 a Ilow system (Descals, 1978; Descals et a/., 1976) has proven successlul with a number 01 Ingoldian species (Sanders & Webster, 1980) . 1I incubation is done in an observation chamber (Fig. 17), it allows lar direct observation 01 conidiogenesis . A continuous supply el SDW may be ap-
2- Aerated unchanged water: il the culture does not sporulate in standing water , a portion 01 the colon y may be submerged in aerated water, e.g . in 250 mi SDW in a glass conical Ilask connected to a lorced sterile-air system . This enhances sporulation in some species, and apparently even triggers it in others . The main objections are that conidial development cannot be lollowed in situ because 01 turbulence , the staling effect is present, preparing the Ilasks and sampling lor conidia is cumbersome the contents 01 the Ilask olten becoming contaminated with bacteria. The effect 01 aeration has not yet been explained, although it may help disperse sporulation inhibitors Irom the hyphal milieu through turbulence .
3- Agitated water: this technique has not been tested critically . It seems to have the same effect as aeration in some species, but the set-up (a bench shaker) and manipulations are simpler. However, there will still be a staling effect.
Fig. 17. Induction 01 conidiation in continuously changing water: a coverslip is placed on the bot1om 01 the observation chamber and sealed with hot paraffin ; hall a disc Irom an agar colony is placed on this coverslip, a second coverslip is placed aboye the halldisc and sealed in the same way. The observat io n chamber is placed under the objective and water is then allowed to flow slowly in and out 01 the chamber. Fig. 17. Inducció de conidiació en aigua amb renovació contínua es col.loca un cubre objectes a la base de la cambra d 'observació i es segeJla amb parafina calenta ; la meitat d 'un disc d 'una colónia d 'agar es posa sobre el cubre i un segon cubre es col.loca sobre el mig disc i es segeJla de la mateixa manera. La cambra d 'observació es posa sota /'objectiu i després es deixa fluir /'aigua lentament dintra i fora de la cambra.

210 BolI. Soco Hist. Nat. Balears, 40 (1997)
plied through gravity flow or by means of a peristaltic pump. 5- If the cause of optimal sporulation is simply the elimination of staling compounds, it may suffice to just apply a continuous drip system (Kegel, 1906).
The last three techniques will not be discussed further.
Synanamorphs, as already me ntioned, are known in a number of Ingoldian fungi, and may be easily confused with Penicillium-like contaminants. But they develop mostly underwater (although some may form aerially). They may appear in small, scattered patches and may thus be difficult to detect.
PROCEDURE FOR ANAMORPH INDUCTION:
A- STANDING WATER If one only intends to confirm iden
tifications of known species, one may submerge batches of up to 50 cultures, as most likely not all will sporulate at the same time. However, for careful, time-consuming taxonomic work (describing, iIIustrating, preserving, etc.), one should submerge less cultures.
-Fill 1-litre conical flasks or bottles up to about 3/4 with DW and autoclave. (Larger containers may be too heavy for pouring comfortably).
-In the air flow cabinet of the dissection bench: put the cultures to be sampled for submersion, an equal number of empty sterile polystyrene Petri dishes, SDW (calculate ca. 0.5 Iiter per 15 plates) , 90% alcohol- for flaming, a broad-bladed scalpel, a spatula and a felt peno
-Condensation droplets under the lid of the Petri dish bearing the culture may interfere with visiono They may be shaken off by knocking the dish side-
ways firmly several times, for example against one's free hand.
-Alternatively, replace the lid during observation with a dry one. A glass lid is recommended, as it may be flamed after each use to avoid cross contaminations.
-First scan the plates under a dissecting microscope and record the presence of fruit bodies (apothecia, perithecia, pycnidia, spermodochia, synnemata, etc).
Do not describe material from these cultures until you are sure that the above fruit bodies do not belong to contaminants.
-Unseal the culture dish: run a hot scalpel along the tape, underneath and around the rim of the lid. Hold the scalpel perpendicularly to the side of the dish as you slice around the tape, to keep the blade from pushing slivers of tape onto the agar and contaminating the culture.
-Look for conidiophores or conidia (e.g. Heliscus lugdunensis, Lemonniera terrestris, etc.). produced prior to submersion. Also look inside the agar. Goniopila monticola (Dyko) Marvanová & Descals, for example, may produce clusters of conidia here, especialiy in media with high water activity (e.g. 0.1 % MA).
Conidiogenous structures of Ingoldian fungi produced aerially may need to be described, as they are often morphologically distinct from aquatic ones.
-If the colony has developed much aerial mycelium, which is often the case on 2% MA, with the flamed scalpel first scrape some off the area which will be sampled.
Cottony aerial mycelium traps air and the sampled portions of culture do not sin k easily in water. Nevertheless, in some species sporulation takes place on aerial mycelium.

E. Desea/s, /ngo/dian Fungi: fie/d and /aboratory teehniques 211
-With the Ilamed scalpel, slice across the colony down to the base 01 the dish and Irom the centre to the edge. Cut a large piece and at least one ve ry thin (Fig. 18).
Sampling from across the co lony radius is important , as sporulation sometimes is better on either older or younger mycelium , depending on the species . Sporulation mostly occurs on the cut surlaces. This wounding ellect needs to be studied.
Fig . 18. Induction 01 conidiation in standing water: the colony is sliced more or less radially with a Ilamed scalpel, the thin colony slice settles on the bOllom 01 the dish, while the broad one si ts semisubmerged. Fig. 18. Inducció de conidiació en aigua estanca: la colónia es talla més o manco radialment amb un microescarpell préviament flamejat. Les tlesques primes de la colónia s'es(onsen mentres la lIesca gruixada roman semisubmergida.
Fig. 19. Thick slab and thin slice 01 co lony, placed in standing water. Fig. 19. Llesques gruixada i prima d 'una colónia col.locades dins aigua estanca.
It is possible that some species need to reach physiologica l maturity for sporulation. In others , however , sporulation occurs even a couple 01 days alter conidial germination .
-With the scalpel, transfer the colony slices and large piece of the colony (preferably in one operation ) to an empty sterile Petri dish (Fig. 19).
-Add SDW to this dish. To do this , stack the Petri dishes in
sets of 10 and start pouring SDW from the bottom plate upwards. Put a few dummy dishes underneath the stack, which makes it easier for pouring water into the lower plates.
When placed in water, the thin colony si ices should sink and allow for underwater sporulation. The large piece should remain exposed at the top , to also enable sporulation at the water surface or aerially.
A number of Ingoldian fUilgi do not sporulate underwater but do so at the surface , at least under the described

212 BolI. SOCo Hist. Nat. Balears, 40 (1997)
conditions. There is a need to study these aspects.
-One could adjust the pH and eonduetivity of the SDW to approach those of the source stream, especially if this is strongly alkaline, acid (moorland water pH may be very low) or saline (e.g. high in sulphates). The pH should then be monitored during incubation, as it may change drastically.
-Label the lid of this "sporulation plate" with the three usual data: isolate code, date of submersion and a sketch of the inoculum spore.
It is worth testing filtered stream water, as it may stimulate sporulation.
-Before incubation, with the dissecting microscope briefly sean the sporulation plates for presence of aerially produced conidia, as they may have been missed on the original plate, especially if small or produced in low numbers.
-Ineubate the dishes at 15 - 20°C (for cold-temperate species) in the cooltemperature room, under NUV + cool white light.
Higher temperatures may be needed for species from warmer climates. 15ºC may be below the optimum even for temperate species, but it slows down sporulation processes allowing more time for working with cultures. (It is not known whether this slowing down of the sporulation rate may significantly affect mode of conidiogenesis and/or anamorph morphology in some species).
-Check the plates under the dissecting microscope for sporulation. This may be necessary in some species even after only 24 h (e.g. Anguillospora rosea sp. ined.).
It is suspected that a significant change of temperature (going from 15ºC in the cool-temperature room to for example 25ºC in the microscopy room) may upset sporulation at least in some
species, and possibly irreversibly. If this is the case, wheel the dissection bench into the constant-temperature room and observe there or, alternatively, induce sporulation at room temperature.
-First sean the eolony for possible presence of teleomorph initials.
If present, they should be allowed to continue development under the same environmental conditions.
-Sean the water from surface to bottom for free eonidia, using the appropriate enlargement on the dissecting microscope.
-If there are none or only a few, proceed with the incubation.
-Compare conidial dimensions and degrees of branching between the time of release and at later stages, if there is any suspicion that these may vary.
-Sean the edges of the submerged slices and the edges and exposed surface of the large semi-exposed piece of colony for conidiogenous structures.
-Sample, describe and preserve the specimens (se e below).
The conidiophores should also be described after eonidial proliferation, (which may take a few days), as this is an important diagnostic character.
Some species require many days to initiate sporulation. Others seem to sporulate only on new mycelium produced in contact with water, and this may also take some time to develop and mature.
B- AERATED WATER
MATERIALS -Pressurized air flow system in the
constant-temperature room. If pressurized air ducts are not
available in the cool- temperature room, an air pump may be used. Small commercial aquarium pumps (Fig. 2) will

E. Desea/s, /ngo/dian Fungi: fie/d and /aboratory teehniques 213
supply enough pressure for several aeration flasks.
-Connect the pump to rubber or latex tubing with T-connectors. The free ends of the tubes are then connected to the air filters on the aeration flasks. There should be a clamp for each flask, to regulate air flow.
-Aeration flasks: -Attach ca. 10 cm of latex tubing to
one end of a commercially produced air filter or cartridge. A cheap substitute is a 10 x 2 cm glass tu be stuffed with cottonwool and with both ends flamepulled to produce necks that will allow connecting to the latex tubing.
-Connect a piece of glass tubing (which may be a Pasteur or a volumetric pipette) to the other end of the latex tubing. The glass tube should be inserted almost to the bottom of the aeration flask.
-Add 150-200 mi DW to a 250 mi conical flask.
-Plug the flask by rolling a strip of cottonwool around the top of the glass tu be and fit the cotton plug snuggly into the neck of the flask. You should be able to lift the flask from the air-filter without the plug coming off.
-Prepare as many flasks as cultures will be submerged.
-A piece of aluminium foil wrapped over the cottonwool plug after this has been fitted in the neck of the flask helps prevent aerial contamination when longer incubations are foreseen. But remember that incoming air will have to get out.
-Autoclave flasks for 30 mino at the standard 121°C.
Store flasks in a dust-free cabinet and allow water to cool befo re introducing the culture pieces.
PROCEDURE -In the air-flow cabinet, lift the lid of
the culture dish and -cut several thin, radial slices from
the centre to the margin of the colony. -Open the aeration flask and flame
the neck. -Transfer the colony pieces. -Again flame the neck and -replace the cotton plug. -When all flasks have been inocu-
lated, connect them to the pressurized air system in the cool-temperature room.
-Switch on the pump and regulate the rate of forced air flowing into the flasks.
Water should bubble very gently. Excessive bubbling will cause too much evaporation, damage the mycelium, wet the cottonwool plug (on which contaminants will grow) , and project conidia onto this plug. Bubbling rates should be checked regularly, as they tend to vary with time.
-Incubate as for standing water. -To check for sporulation decant a
few mi of suspension into a clean glass Petri dish.
Floating conidia may stay behind, and therefore some swirling immediately prior to decanting will bring them into suspension.
When sporulation is heavy, conidia tend to accumulate on the inner walls just aboye the level where the bubbles break. Resuspend by swirling the flask before decanting.
-Allow a few minutes for suspended conidia to settle in the dish, for easier localization.
-Proceed as for standing water. Alternatively, conidial production in
the flask may be monitored through an inverted microscope.
If sterile conditions are not needed, as for aeration of leaves or wood from streams, a simple and inexpensive sys-

214 BoII. Soco Hist. Nat. Balears, 40 (1997)
tem may be devised: use 250 mi softdrink plastic bottles with screw caps. Perforate these and introduce the tubing from the aquarium pump. Seal around the hole with a quick-setting cement. The outgoing air flow is regulated by tightening or loosening the screw cap.
CONCENTRATING SPORES IN WATER Conidia may not be in high enough
numbers for observation, description, identification or counting. This is the case with stream water samples, and often also after laboratory incubation.
There is therefore a need for concentrating spores, and this may be done by at least one or any combination of the following techniques:
membrane filtration sedimentation evaporation by means of:
heat ventilation vacuum
centrifugation impaction foaming by means of detergents
Membrane filtration is practically the only technique used by mycologists working with Ingoldian fungi. It is accurate, simple and fast and may be carried out in the field with stream water.
Its handicaps are: 1- conidia have to be stained (phase contrast or differenti al interference contrast optics (DIC, e.g. Nomarsky) do not work) and sit on an opaque or granular background; the optical resolution can be seriously affected and detail needed for critical identification may be lost. This is the case even with transparent filters produced by Millipore; 2- if too much vacuum is applied, the conidia may be mangled and thus more difficult to identify; 3- in many cases conidia do not lie flat on the filter, which al so impairs identification; and 4-
it is an expensive technique for many countries.
The other techniques, or combinations of them, would seem to be cumbersome at first thought, but do not appear to have been thoroughly tested and therefore optimized.
Sedimentation is a standard technique used on phyto- and zooplankton by limnologists. Its main handicap is that the sedimented samples have to be observed with an inverted microscope, where resolution is not the best. But this could possibly be solved if sedimentation is carried out in a burette and the bottom portion collected and observed.
If water samples have to be large in order to be representative (e.g. half to one liter),as is the case in field studies, evaporation would seem too slow a technique.
But it could be combined with sedimentation as follows: the bottom volume (e.g. 50 mi) of the spore suspension collected from a burette could be placed on a disc of cellophane attached by its margins onto a Petri dish (for example with some silicone rubber) and air dried in front of a fan heater (this would take ca. 2 h). The spores adhered to the cellophane could then be mounted under coverslips placed directly on it and observed under the microscope, or the cellophane disc could be lifted from the Petri dish and pieces of it cut up and mounted on slides.
Centrifugation is possible with even a simple table centrifuge. The sampie would then have to be resuspended (this might cause damage), dried on slides and mounted as aboye.
Impaction onto an adhesive surface, for example by placing an adhesive-coated slide in an aerated or agitated water sample, deserves testing.
The use of artificial foam has been discussed aboye, although the technique does not seem easily quantifiable.

E. Desea/s, /ngo/dian Fungi: fie/d and /aboratory teehniques 215
The aboye techniques would need pre-treating the conidia for the following reasons :
So me conidia may be floating , and will need sinking if a representative sampie is to be taken . Sinking techniques have not been studied, although the use of heat , possibly in a microwave oven , might be successful. Anti -foaming agents might also be effective .
Conidia olten have mucilaginous ends which render them adhesive. The percentage conidia that may be lost through manipulation is not known, but could be significan!. Techniques for neutralizing the mucilages have not been worked out , but KOH (added as pellets) appears to be effective. This treatment should of course not precede the impaction technique mentioned aboye.
A third problem is rapid conidial germination. But this can be easily controlled by chemical fixation .
The membrane filtration technique will be detailed below, as it is the standard one used by ecologists far sampling stream water.
MEMBRANE FIL TRATION
MATERIAL -filter membranes: 5 - ~lm
pore membranes are traditionally used .
-Stainless steel filtration equipment (e .g. Millipore) is expensive but preferred over more delicate glass for field work.
-Immersion oil. -Polystyrene Petri dishes (as
many as samples), preferably stacked in -acarrier rack . -Half- and one-liter plastic measur-
ing cylinders. Conidia are supposedly less prone
to adhere to glass walls , but this needs further study.
PROCEOURE -Collect stream water in the meas
uring cylinder and filter a representative volume with its replicates .
-Filter with the minimum necessary vacuum to avoid deforming the more delicate , long-limbed spores .
-Place 2-3 drops of lactofuchsin on the base of a clean , empty Pe tri dish.
-With forceps, lay the membrane upright on the mountant drops. These will eventually soak through . (Do not place the mountant on the membrane, as spores may be washed away). .
-A hand-operated pump: this is commercially produced by various companies. A simpler, less costly model is used in hospitals for body fluid extraction (Fig . 20) .
Fig. 20. Hand-operated pump (wi thout manometre) available from hospital suppliers.
-Lactofuchsin -Waterman's or other wa-
ter-soluble ink , diluted.
Fig. 20. Pompa manual (sense manómetre) que proporcionen els distriburdors als hospitals.
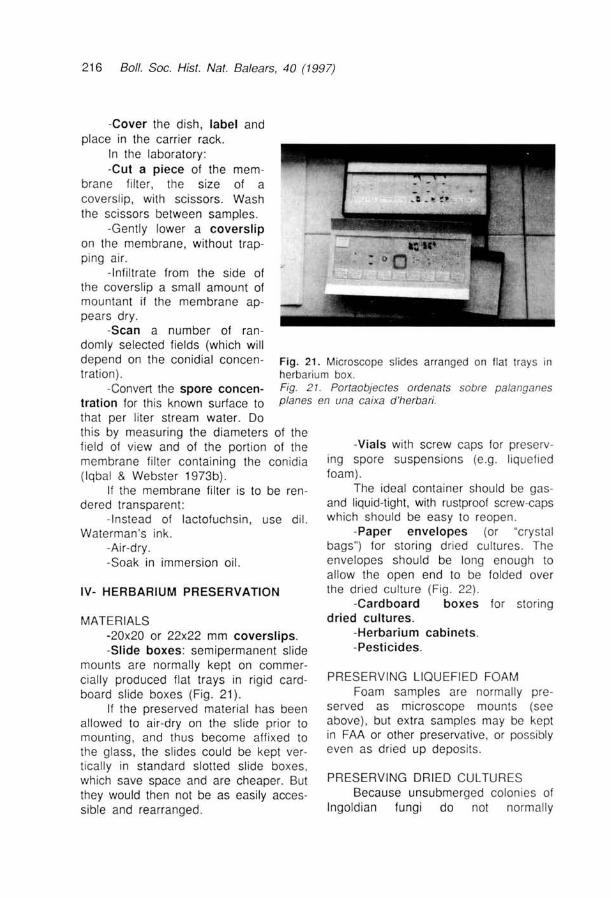
216 BolI. SOCo Hist. Nat. Balears, 40 (1997)
-Cover the dish, label and place in the carrier rack.
In the laboratory: -Cut a piece of the mem
brane filter, the size of a coverslip, with scissors. Wash the scissors between samples .
-Gently lower a coverslip on the membrane, without trapping airo
-Infiltrate from the side of the coverslip a small amount of mountant if the membrane appears dry.
-Sean a number of ran domly selected fields (which will depend on the conidial concentration) .
Fig. 21 . Microscope slides arranged on tlal Irays in herbarium box.
-Convert the spore concentration for this known surface to that per liter stream water. Do
Fig. 21 . Portaobjectes ordenats sobre palanganes planes en una caixa d'herbari.
th is by measuring the diameters of the field of view and of the port ion of the membrane filter containing the conid ia (Iqbal & Webster 1973b).
If the membrane filter is to be ren de red transparent:
-Instead of lactofuchsin , use dil. Waterman's ink.
-Air-dry. -Soak in immersion oil.
IV- HERBARIUM PRESERVATION
MATERIALS -20x20 or 22x22 mm coverslips. -Slide boxes: semipermanent slide
mounts are normally kept on commercially produced flat trays in rigid cardboard slide boxes (Fig . 21).
If the preserved material has been allowed to air-dry on the slide prior to mounting , and thus become affixed to the glass, the slides could be kept vertically in standard slotted slide boxes, which save space and are cheaper. But they would then not be as easi ly accessible and rearranged.
-Vials with screw caps for preserving spore suspensions (e.g. liquefied foam) .
The ideal container shou ld be gasand liquid-tight, with rustproof screw-caps wh ich should be easy to reopen .
-Paper envelopes (or "crystal bags") for storing dried cultures . The envelopes should be long enough to allow the open end to be folded over the dried cul ture (Fig . 22) .
-Cardboard boxes for storing dried cultures.
-Herbarium cabinets. -Pesticides.
PRESERVING LlQU EFIED FOAM Foam samples are normally pre
served as microscope mounts (see above), but extra samples may be kept in FAA or other preservative, or possibly even as dried up deposits.
PRESERVING DRIED CULTURES Because unsubmerged colonies of
Ingoldian fungi do not normally
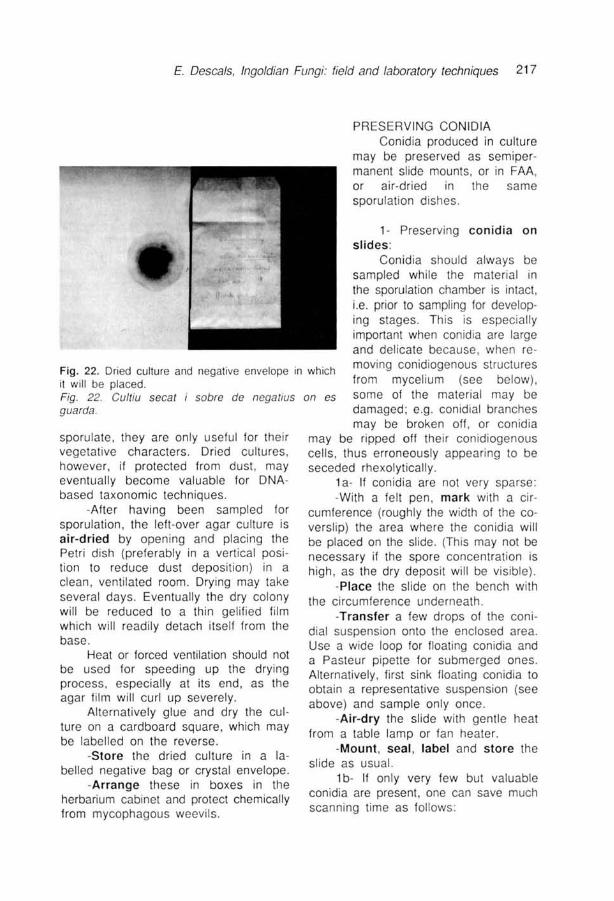
E. Desea/s, /ngo/dian Fungi: fie/d and /aboratory teehniques 217
PRESERVING CONIDIA Conidia produced in culture
may be preserved as semipermanent slide mounts , or in FAA, or air-dried in the same sporulation dishes .
1- Preserving con idia on sl ides:
Fig . 22. Dried culture and negative envelope in which
Conidia should always be sampled while the material in the sporulation chamber is intact, i.e . prior to sampling lor developing stages . This is especia lly important when conid ia are large and delicate because, when re moving conid iogenous structures Irom mycelium (see below), it will be placed.
Fig . 22. Cultiu secat i sobre de negatius guarda.
sporulate, they are only uselul for the ir vegetative characters. Dried cultures , however, il protected from dust , may eventually become valuable lor DNAbased taxonomic techniques.
-Alter having been sampled lor sporulation, the left-over agar culture is ai r-dried by opening and placing the Petri dish (preferably in a vertical posi tion to reduce dust deposition) in a clean , ventilated room. Drying may take several days. Eventually the dry colony will be reduced to a thin gelilied lilm which will readily detach itsell Irom the base.
Heat or lorced ventilation should not be used for speeding up the drying process , especially at its end , as the agar film will curl up severely.
Alternatively glue and dry the cul ture on a cardboard square , which may be labelled on the reverse .
-Store the dried culture in a labelled negative bag or crystal envelope.
-Arrange these in boxes in the herbarium cabinet and protect chemically from mycophagous weevils .
on es some 01 the material may be damaged; e.g. conidial branches may be broken off , or conidia
may be ripped off their conidiogenous cells , thus erroneously appearing to be seceded rhexolytically .
1 a- II conidia are not very sparse : -With a lelt pen, mark with a cir
cumlerence (roughly the width 01 the coverslip) the area where the conidia will be placed on the slide. (This may not be necessary il the spore concentration is high , as the dry deposit will be visib le) .
-Place the slide on the bench with the circumlerence underneath .
-Transfer a lew drops 01 the coni dial suspension onto the enclosed area. Use a wide loop lor Iloating conidia and a Pasteur pipette lor submerged ones . Alternatively , l irst sink Iloating conidia to obtain a representative suspension (see above) and sample only once .
-Air-dry the slide with gentle heat Irom atable lamp or lan heater.
-Mount , seal , label and store the slide as usual.
1 b- II only very lew but valuable conidia are present, one can save much scanning time as lollows:

218 BoII. Soco Hist. Nat. Balears, 40 (1997)
-With a felt pen, mark a small circumference (ca. 3 mm diam.) underneath a slide.
-With the flamed upper tip of a handle, place a tiny drop of water on the circle.
-Uft conidia with a mounted hair and place in the drop.
-Air-dry and preserve as aboye. -Alternatively, suspended conidia
may be transferred individually with a capillary pipette on the slide and airdried as aboye.
-The exact location of smaller conidia may be marked later by inking dots on the coverslip around them with a fine felt pen or with a drawing peno
2- Preserving conidia in FAA There does not seem to be pub
lished information on this, but presumably conidia from pure culture could be fixed and kept indefinitely in vials with FAA or a stained mountant, as for stream foam.
3- Preserving air-dried conidia Excess conidia may be preserved
by air-drying them on the inside of the inverted dish lid (which is shallower than the dish base and therefore takes up less space in negative envelopes). For this:
-First treat conidia to induce sinking, to neutralize their mucilages and to fix them (see aboye).
-If necessary, concentrate conidia (se e aboye).
-Place sorne of the spore suspension in the inverted lid of the Petri dish.
-Air-dry with the fan heater. -For later observation directly on the
lid: -Locate an area with conidia. -Place a small drop of mountant
on a coverslip. -Turn over the coverslip, rest one
end and lower gently over the conidial deposit to avoid trapping airo
-Remove the mechanical stage on the compound microscope.
-Observe conidia on the microscope stage.
Note: Differential interference contrast optics may not be satisfactory when observing through polystyrene Petri dishes, as evidenced by the strong colour aberrations when the polarizer is rotated.
If conidia have beco me anchored onto the base of the dish, it is difficult to release them without damage. Also, when there are very few conidia it may be too time-consuming to transfer them individually to slides. One can then dry the material in the sporulation dish base itself, and preserve it as follows:
-Pre-treat the conidia as aboye. -Uncover the dish, nesting the base
on the inverted lid to retain the isolate data written on the latter.
-Air-dry as aboye. -Preserve the dish in a negative
envelope. -To save space, the lateral walls of
the dish may be trimmed off with strong scissors, or with a hot scalpel or wire.
PRESERVING CONIDIOGENOUS STRUCTURES
-Place a large drop of DW on the centre of a clean slide.
-Under the dissecting microscope, locate an area of the colony piece with conidiogenous structures.
When sporulation is at the surface, e.g. on the large colony piece, and if the water level is slightly too low, the resulting meniscus around this may interfere with vision, and one should then add sorne more water.
-With a microscalpel, and holding the colony piece with a needle or forceps, detach the conidiophore(s) with a minimal amount of mycelium.

E. Desea/s, /ngo/dian Fungi: fie/d and /aboratory teehniques 219
a- If the sporulating material is made up of dense forests of small conidiophores:
-Transfer the material onto the drop of DW on the slide.
-With lintless tissue paper, draw off excess water in the drop.
The material will then sit on the glass surface and not slide away when manipulated.
-Secure it on the slide with a nee-die.
-With microscalpel and needle, slice the colony piece into several smaller pieces.
-Spread these over an area slightly smaller than that of the coverslip.
-Rest the coverslip over this mate-rial.
-To flatten the preparation, you may need to apply slight pressure, but taking ca re not to displace the coverslip laterally, as this may upset the natural arrangement and branching patterns of the conidiophores and/or conidia.
Alternatively heat gently over a flame. The agar will melt suddenly and the mount will flatten itself. This technique works well, but sometimes the conidiogenous structures will have been distorted and mangled by the hot melting agar as it spreads. The heat may in some cases damage or shrink the cell contents.
Another way of applying gentle heat to a slide preparation is by rubbing the underside with a second heated slide (J. Webster, pers. comm.).
-When all the observations in water have been completed, the slide may be preserved by:
-infiltrating a small drop of mountant from the side of the coverslip and
-warming gently over a flame. -Excess liquid is drawn from the
opposite end with tissue papero
-Wipe the edges of the coverslip, seal and store as usual.
b- If conidiophores are very long and delicate, they become badly tangled when manipulated. Instead:
-Transfer the previously detached material to the slide with an unpulled (wide-mouthed) Pasteur pipette.
-The excess liquid on the slide will roll off by slightly tilting the slide.
-This is then wiped off with some tissue paper.
-With two needles, spread out the conidiophores very gently.
This is often tedious, as conidiophores may adhere to each other and to the instruments.
Alternatively, conidiogenous structures may be removed from the sporulation chamber thus:
-Hold a coverslip with forceps. -Submerge the coverslip slowly un-
der the previously detached sporulating material, which will be suspended in the water.
-Secure this material on the coverslip with a needle while slowly lifting it from the water.
-Turn over the coverslip and lower onto a microscope slide.
Acknowledgments
The author is grateful to Emeritus Prof. J. Webster (formerly at Univ. Exeter), to Dr. M. Gessner, EAWAG (Switzerland), to Prof. J. Lalucat (UIB), Dr. F. Pando (Royal Bol. Garden, Madrid) for useful suggestions and to the referees, Prof. X. Llimona and Dr. Muntanyola (Univ. Barcelona), and Dr. M.A. Calvo (Univ. Autónoma de Barcelona), for correcting the manuscript. This work was written during the tenure of DGICYT Project PB 95-0129-003-03 (Flora Micológica Ibérica 111) and as a guest of

220 Bol/. Soco Hist. Nat. Balears, 40 (1997)
the Limnology Laboratories of the Univ. IlIes Balears, with whose staff the author is deeply indebted.
Mr. A. Díaz is acknowledged for assistance in the design of various equipment. The enthusiastic and inspired support offered by Dr. Laura Lorenzo and postgraduate students of the Univ. Comahue at San Carlos de Bariloche, Argentina, during a recent course to which the author had been invited, greatly helped design and improve several of the techniques detailed above.
References
Anon. 1968. Plant Pathologists' Pocketbook. Commonw. Mycol. Inst., Surrey, 190 pp.
Barlocher, F. 1992. Ecology of aquatic hyphomycetes. Berlin, Springer, 225 pp.
Barlocher, F., & Kendrick, B. 1974. Dynamics of the fungal population on leaves in a stream. J. Ecol. 62: 761-791.
Bandoni, R. J. 1974. Mycological observations on the aqueous films covering decaying leaves and other litter. Trans. mycol. Soco Japan, 15: 309-315.
Cooke, W. B. 1974. Fungi in polluted water and sewage 111. Fungi in a small polluted stream. Sewage Industr. Wastes 26: 790-794.
Descals, E. 1978. Taxonomic studies of freshwater hyphomycetes and related fungi. Doct. Dissert., Univ. Exeter, UK, 198 pp.
Descals, E., Marvanová, L. & Webster, J. in prep. Aquatic hyphomycetes. Schweizerbart, Stuttgart.
Descals, E., Nawawi, A. & Webster, J. 1976. Developmental studies in Actinospora and three similar aquatic
hyphomycetes. Trans. Br. mycol. Soc., 67: 207-222.
Fisher, P. J. & Petrini, O. 1989. Two aquatic hyphomycetes as endophytes in Alnus glutinosa roots. Mycol. Res., 92: 367-368.
Ingold, C. T. 1942. Aquatic hyphomycetes of decaying alder leaves. Trans. Br. mycol. Soc., 25: 339-417.
Iqbal, S.H. 1983. Efficiency of artificial foam to trap conidia of freshwater hyphomycetes in streams. 111 Interntl. Mycol. Congr., Tokyo, Abstr. 123.
Iqbal, S.H. 1995. Further studies on the efficiency of artificial foam in trapping conidia of Ingoldian fungi. Can. J. Bot., 73: 1176-1185.
Iqbal, S. H. & Webster, J. 1973a. The trapping of aquatic hyphomycete spores by air bubbles. Trans. Br. mycol. Soc., 60: 37-48.
Iqbal, S. H. & Webster, J. 1973b. Aquatic hyphomycete spora of the River Exe and its tributaries. Trans. Br. mycol. Soc., 61: 331- 346.
Kegel, W. 1906. Varicosporium elodeae, ein Wasserpilz mit auffallender Konidienbildung. Ber. Deutsch. Bot. Ges., 24: 213- 216.
Keyworth, W. G. 1959. A modified LaRue cutter for selecting spores and hyphal tips. Trans. Br. mycol. Soc., 42: 53-54.
Kirby, J.J.L. 1987. A comparison of serial washing and surface-sterilization. Trans. mycol. Soco Jap., 11: 116-118.
Miura, K. & Kudo. M. Y. 1970. An agar medium for aquatic hyphomycetes. Trans. mycol. Soco Japan, 11: 116-118.
Regelsberger, B., Messner, K. & Descals, E. 1987. Species diversity in Aquatic Hyphomycetes in four Austrian streams. Mycotaxon, 30: 439-454.

E. Desca/s, /ngo/dian Fungi: fie/d and /aboratory techniques 221
Sanders, P. F. & Webster, J. 1980. Sporulation responses of some aquatic hyphomycetes to flowing water. Trans. Br. myco/. Soc., 74: 601-605.
Schoenlein-Crusius, 1. H. & Milanez, A. 1. 1995. Fungal succession on A/chornea trip/inervia (Spreng.) M. Arg. leaves submerged in a stream in the Atlantic rainforest, Sao Paulo State, Brazil. Abstr., VI Interntl. Marine Mycol. Symp., Porstmouth, July 1994.
Suberkropp, K., Arsuffi, T. L, & Anderson, J. P. 1983. Comparison of degradative ability, enzymatic activity, and palatability of aquatic hyphomycetes grown on leaf litter. App/. Environm. Microbio/., 46: 237-244.
Tuite, J. 1969. Plant Pathological Methods. Fungi and Bacteria. Burgess Pub. Co., Minn., USA, 239 pp.
Volkmann-Kohlmeyer, B. & Kohlmeyer, J. 1996. How to prepare truly perma-
nent microscope slides. The Myc%gist, 10: 107-108.
Webster, J. 1959. Experiments with spores of aquatic hyphomycetes 1. Sedimentation and impaction on smooth surfaces. Ann. Bo1. (London) (N.S.) 23: 595-611.
Webster, J. 1977. Seasonal observations on "aquatic" hyphomycetes on oak leaves on the. ground. Trans. Br. myco/. Soc., 68: 108-111.
Webster, J. 1990. Anamorph-teleomorph relationships of Ingoldian hyphomycetes. IV Interntl. Mycol. Congr., Regensburg. Abstr. 165.
Webster, J. 1992. Anamorph-teleomorph relationships. In: F. Barlocher (Ed.). The ecology of aquatic hyphomycetes. Springer, Berlin, pp. 99-117.
Webster, J. & Towfik, F. H. 1972. Sporulation of aquatic hyphomycetes in relation to aeration. Trans. Br. myco/. Soc., 59: 353-364.