Embed Size (px)
Citation preview

solar.schneider-electric.com
Important Safety Instructions
This document contains important safety instructions that must be followed during installation procedures (if applicable). Read and keep this Solutions Guide for future reference.
Read these instructions carefully and look at the equipment to become familiar with the device before trying to install, operate, service or maintain it. The following special messages may appear throughout this bulletin or on the equipment to warn of potential hazards or to call attention to information that clarifies or simplifies a procedure.
Safety Information
AC Coupling of Inverters:Forming an AC-Coupled system with Conext™ XW+/SW Inverter/Chargers and Conext CL/RL/TL/TX PV Inverters
Solutions Guide
Conext XW+/SW Battery Inverters
976-0240-01-01 Rev D
The addition of either symbol to a “Danger” or “Warning” safety label indicates that an electrical hazard exists which will result in personal injury if the instructions are not followed.
This is the safety alert symbol. It is used to alert you to potential personal injury hazards. Obey all safety messages that follow this symbol to avoid possible injury or death.
DANGER
DANGER indicates a hazardous situation which, if not avoided, will result in death or serious injury.
CAUTION
WARNING indicates a hazardous situation which, if not avoided, could result in death or serious injury.
WARNING
CAUTION indicates a hazardous situation which, if not avoided, could result in minor or moderate injury.

AC Coupling Solutions Guide
2 976-0240-01-01
Table of Contents
This Solutions Guide outlines how the Conext XW+/SW Battery Inverters and Conext CL/RL/TL/TX PV Inverters can be interconnected to form an AC-Coupled system.
This Solutions Guide contains the following sections:
• “Scope” on page 3
• “Audience” on page 3
• “Prerequisite” on page 4
• “Overview” on page 4
• “What is AC Coupling?” on page 5
• “What is DC Coupling?” on page 6
• “AC-Coupled versus DC-Coupled Systems” on page 6
• “AC Coupling Limitations” on page 7
• “Battery Charging in AC Coupling” on page 9
• “Regulating Battery Charging in AC Coupling” on page 10
• “AC-Coupled Smart Charge” on page 13
• “Installation Notes” on page 15
• “Configuration Settings” on page 16
NOTICE
NOTICE is used to address practices not related to physical injury.
DANGER
RISK OF FIRE, ELECTRIC SHOCK, EXPLOSION, AND ARC FLASH
This Solutions Guide is in addition to, and incorporates by reference, the relevant product manuals for each product in the Conext XW+/SW Battery Inverters and Conext CL/RL/TL/TX PV Inverters. Before reviewing this Solutions Guide you must read the relevant product manuals. Unless specified, information on safety, specifications, installation, and operation is as shown in the primary documentation received with the products. Ensure you are familiar with that information before proceeding.
Failure to follow these instructions will result in death or serious injury.

AC Coupling Solutions Guide
976-0240-01-01 3
ScopeThis Solutions Guide provides planning information and safety guidelines for designing an AC-Coupled system. It applies to Conext XW+/SW Battery Inverters and Conext CL/RL/TL/TX PV Inverters.
This Solutions Guide provides information and references products provided by Schneider Electric. AC Coupling with Conext XW+/SW Battery Inverters has not been tested with other manufacturer’s products. Consult the manufacturers for information on their brands of PV inverters and products,
AudienceThis Solutions Guide is intended for qualified persons who are designing or installing an AC-Coupled system. To design and install a system that is safe and will operate correctly, qualified installers must have training and experience in solar power systems. For safety, it is important to correctly follow these instructions and any applicable electrical and building codes. Qualified installers have an awareness of the hazards involved in performing electrical installation work and how to reduce those hazards. Only qualified personnel should perform the instructions contained in this Solutions Guide.
DANGER
HAZARD OF ELECTRIC SHOCK, EXPLOSION, OR ARC FLASH
Conext XW+/SW Battery Inverters and Conext CL/RL/TL/TX PV Inverters contain no user serviceable parts. Attempting to service the inverters yourself may result in a risk of electrical shock or fire and will void your warranty. Internal capacitors remain charged and hazardous after all power is disconnected.
To reduce the risk of electrical shock, authorized service personnel must disconnect both AC and DC power from Conext XW+/SW Battery Inverters and Conext CL/RL/TL/TX PV Inverters before attempting any maintenance or cleaning or working on any circuits connected to them. Putting the inverter in Standby mode will not reduce this risk.
To reduce the chance of short-circuits, authorized service personnel must use insulated tools when installing or working with this equipment.
Failure to follow these instructions will result in death or serious injury.
AC Coupling Solutions Guide
4 976-0240-01-01
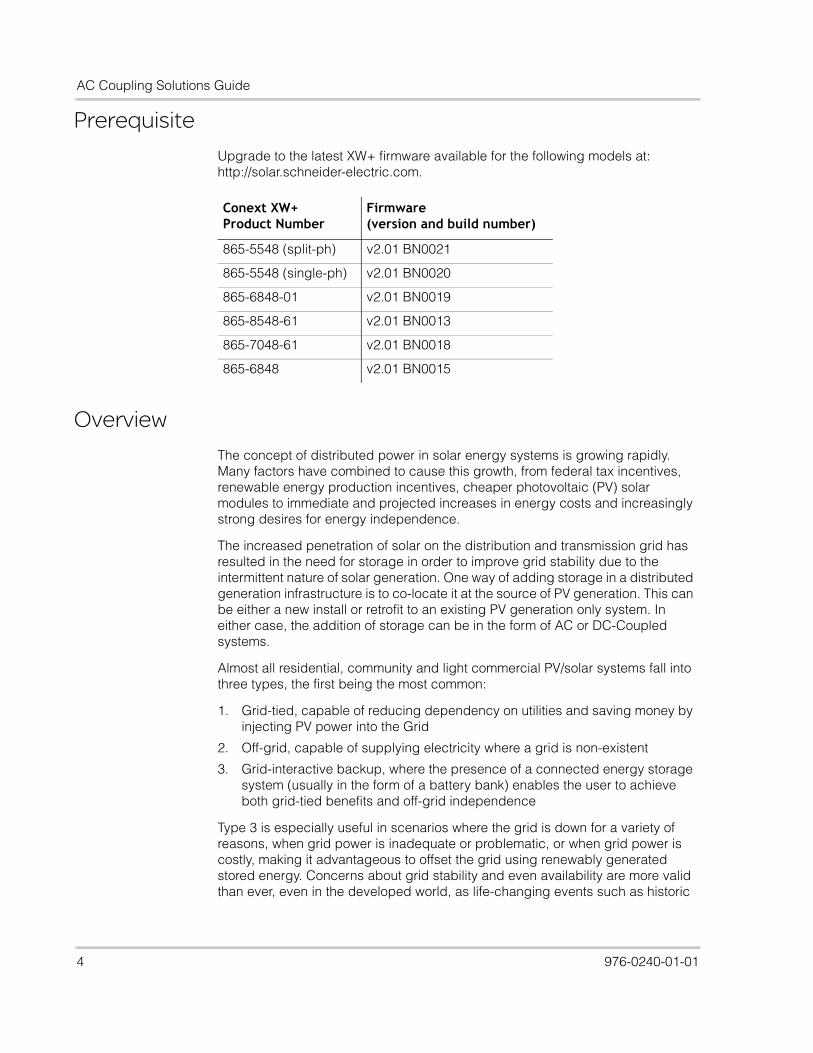
Prerequisite
Upgrade to the latest XW+ firmware available for the following models at: http://solar.schneider-electric.com.
Overview
The concept of distributed power in solar energy systems is growing rapidly. Many factors have combined to cause this growth, from federal tax incentives, renewable energy production incentives, cheaper photovoltaic (PV) solar modules to immediate and projected increases in energy costs and increasingly strong desires for energy independence.
The increased penetration of solar on the distribution and transmission grid has resulted in the need for storage in order to improve grid stability due to the intermittent nature of solar generation. One way of adding storage in a distributed generation infrastructure is to co-locate it at the source of PV generation. This can be either a new install or retrofit to an existing PV generation only system. In either case, the addition of storage can be in the form of AC or DC-Coupled systems.
Almost all residential, community and light commercial PV/solar systems fall into three types, the first being the most common:
1. Grid-tied, capable of reducing dependency on utilities and saving money by injecting PV power into the Grid
2. Off-grid, capable of supplying electricity where a grid is non-existent
3. Grid-interactive backup, where the presence of a connected energy storage system (usually in the form of a battery bank) enables the user to achieve both grid-tied benefits and off-grid independence
Type 3 is especially useful in scenarios where the grid is down for a variety of reasons, when grid power is inadequate or problematic, or when grid power is costly, making it advantageous to offset the grid using renewably generated stored energy. Concerns about grid stability and even availability are more valid than ever, even in the developed world, as life-changing events such as historic
Conext XW+Product Number
Firmware(version and build number)
865-5548 (split-ph) v2.01 BN0021
865-5548 (single-ph) v2.01 BN0020
865-6848-01 v2.01 BN0019
865-8548-61 v2.01 BN0013
865-7048-61 v2.01 BN0018
865-6848 v2.01 BN0015

AC Coupling Solutions Guide
976-0240-01-01 5
storms, tsunamis, and other disasters are combining with increasingly routine brownouts, blackouts and other interruptions to raise anxiety levels about electricity supply to meet growing demand worldwide.
In areas where a lot of renewable energy is added to the grid, the extra peak-generated electricity can actually destabilize the grid by oversupplying PV power. The intermittent nature of renewable sources is another problem. Once the sun stops shining or wind stops blowing, PV arrays and turbines are effectively turned off, and that loss of peak electricity places even greater demands back on the grid which can’t always maintain the need.
For these and other reasons, there are clear benefits to storing renewably generated electricity for use when it is more advantageous. Energy storage can offset electricity use during peak times, provide off-grid independence during outages and emergencies, and contribute to greater grid stability. This is why energy storage based systems represent the fastest growth area in solar installation today, and why industry surveys show battery inverters will eclipse PV grid-tied “string” inverters in the next two years.
What is AC Coupling?
When a PV inverter is connected to the output of a battery inverter, the system is referred to as an AC-Coupled system. In this configuration, the PV inverter is exposed to the output voltage of the battery inverter, making the PV inverter operate and inject power to the AC output connecting the two inverters. The inverters are thus “coupled” with each other and are able to share distributed energy to the required loads.
Figure 1 AC-Coupled System Diagram
Mains AC Box XW+ Inverter/Charger
AC Critical LoadSub Panel/Box
Conext RL/CL/TL Inverters
tuptuO PVtuptuO retrevnI W+XGrid − AC Input 1

AC Coupling Solutions Guide
6 976-0240-01-01
What is DC Coupling?A DC-Coupled battery inverter system is one where a solar array is connected through a charge controller directly to the system battery. In a DC-Coupled system the battery inverter may use solar power to run AC loads in invert mode or it may provide battery charging when the sun is not present by going into charge mode.
AC-Coupled versus DC-Coupled Systems
A residential or light industrial AC-Coupled system is one where all the energy sources and loads are connected directly to a common AC output.
The benefits of an AC-Coupled system over a DC-Coupled system are:
• DC infrastructure is kept to a minimum and smaller gauge wire can be used for high-voltage (< 1000 V) string PV arrays, thereby reducing heavy gauge battery interconnects, making installation easier and less expensive.
• Improved array-to-load energy conversion efficiency when AC loads use power at the same time as solar energy is produced.
• Improved array-to-grid efficiency due to the removal of a conversion step.
In an AC-Coupled system, the array is connected to the grid through a PV inverter:
DC (array) PV Inverter AC (grid/load)
In a DC-coupled system, the array is connected to the grid first through a charge controller and then through a battery grid-tie inverter/charger:
DC (array) Charge Controller DC bus Battery Grid-tie Inverter AC (grid)
The dual conversion results in reduced conversion efficiency.
Figure 2 DC-Coupled System Diagram
XW+ Inverter/Charger
AC Critical LoadSub Panel/Box
Grid − AC Input 1
Solar Charge Controller
Mains AC Box
XW+ Inverter Output

AC Coupling Solutions Guide
976-0240-01-01 7
The weaknesses of an AC-Coupled system over a DC-coupled system are:
• Lower array-to-load efficiency if demand does not occur at the same time as solar production, since energy must first be stored in the battery for later use. When using energy which was first stored in the battery, the conversion steps are:
PV Array PV Inverter Battery Inverter Energy in/out of battery Battery Inverter AC loads
• Grid-tie string inverters are often more expensive than solar charge controllers.
AC Coupling Limitations
AC coupling is a relatively generic implementation that covers operation of battery inverters with PV inverters. Plenty of public literature exists on this topic along with prescriptions on how AC-Coupled systems can be installed but it may not always be possible to adequately implement an AC-Coupled system.
PV Inverter Compatibility
The most common limitation is compatibility of the PV inverter and battery inverter. PV Inverters feature protection mechanisms that detect when a grid fails in order to cease generating power. The feature protects against unintentionally supplying power to a dead grid that might be under service. Some implementations of Anti-Islanding protection on PV Inverters use a grid impedance check as a mechanism to detect a failed grid. Grid impedance exceeding a preset threshold would trigger a grid fault in the PV inverter. Battery inverters typically have higher output impedance compared to the grid. This impedance might exceed the islanding threshold set in some PV inverters, rendering the system incompatible.
For this reason, it should not be a foregone conclusion that AC coupling will automatically work with any mix of PV inverter and battery inverter brands. Always check the recommendations of your equipment manufacturer.
AC Coupling in Generator Based Systems
In systems consisting of a generator as the secondary source of AC power, it is undesirable to allow the PV inverter to come online when the generator is forming the grid (that is, battery inverter in bypass mode and/or charging from generator). In conditions where PV generation exceeds AC load and battery charging consumption, excess PV power could flow to the generator with potentially damaging effects. Additionally, some makes of PV inverters are susceptible to failure when AC-Coupled with a generator. Always check the recommendations of your equipment manufacturer. For operation with a backup generator, see “AC Coupling with a Generator in the System” on page 14.

AC Coupling Solutions Guide
8 976-0240-01-01
Lithium Ion Battery Incompatibility
An AC-Coupled Conext XW+ cannot be used in conjunction with a Lithium Ion battery pack.
Battery Inverter/PV Inverter Sizing
The Conext XW+ can be connected in various configurations from just a single unit to multiple units in parallel and as a three phase configuration or as a large multi-cluster system. Regardless of the system size however, as a rule of thumb, the maximum power of any one PV inverter must not be more than the power rating of the Conext XW+ to which it is connected. The PV inverter’s rated power should not exceed the Conext XW+ rated power and AC current, and it must match the phase configuration. For specific settings of other PV inverters, refer to the PV inverter manufacturer.
In three phase configurations utilizing Conext XW+ battery inverters, it is recommended to use the Conext CL three phase inverters in order to provide balanced power on the three phases.
Single Phase RL inverters can also be used one unit per phase but a recommended power matching PV Inverter to battery inverter (PVI:BI) not exceeding 1:1. Absolute maximum power matching under any conditions must not exceed the lesser of:
• PVI:BI capacity of 2:1 or
• the rated AC transfer capacity of the inverter
Note: Conext CL is offered only in 480V WYE configuration while the XW+ NA only supports 208V in WYE configuration. A step down transformer of a power rating greater than total capacity of connected PV inverters must be installed between PV inverters and the XW+ system.
Table 1 Sizing Examples
XW+ Configuration PV Inverter Sizing Battery Bank
Single Inverter Install (120V, 120/240V, or 230V)
For example, for XW 6848 use a 6800W PV inverter or less
Recommended PV inverter power rating should be equal to or less than the XW+ installed capacity. Oversizing is possible to a maximum of twice the power rating of an XW+ or maximum AC transfer capacity (that is, 48A). Use the lesser of the two.
single

AC Coupling Solutions Guide
976-0240-01-01 9
Battery Charging in AC CouplingIn the configuration outlined in Figure 1 below, when operating, the PV inverter increases its AC output current allowing power to be injected onto the AC output of the Battery Inverter (that is, Conext XW+ and Conext SW). The output of the Conext XW+ is under the influence of this increased AC output power and as a result, internal control loops respond by attempting to lower its AC output voltage. Consequently, the Conext XW+ power bridge enters into a mode where power flows from the AC output to its DC battery connection, which raises the voltage at the battery terminals and causes the battery to charge. The downside of AC coupling is that a secondary means is required to regulate power flow to the battery.
Multiple Inverters (120V and 230V)
Maximum of two inverters in parallela
Recommended PV inverter power rating should be equal to or less than the XW+ installed capacity. Oversizing is possible to a maximum of twice the power rating of an XW+ or maximum AC transfer capacity (that is, 48A per inverter). Use the lesser of the two.
single or one per inverter
Multiple Inverters (Split Phase 120V/240V)
Maximum of three inverters in parallela
Recommended PV inverter power rating should be equal to or less than the XW+ installed capacity. Oversizing is possible to a maximum of twice the power rating of an XW+ or maximum AC transfer capacity (that is, 48A). Use the lesser of the two.
single or one per inverter
Three Phase system (120V and 230V)
Maximum of two inverters per phasea
Recommended PV inverter power rating should be equal to or less than the XW+ installed capacity. Oversizing is possible to a maximum of twice the power rating of an XW+ or maximum AC transfer capacity (that is, 48A per phase). Use the lesser of the two.
one bank per three inverters
a.For larger systems refer to Conext XW+ Multi-Cluster Power System Planning Guide (document partnumber: 975-0648-01-01).
Table 1 Sizing Examples
XW+ Configuration PV Inverter Sizing Battery Bank

AC Coupling Solutions Guide
10 976-0240-01-01
For operation with a backup generator, see “AC Coupling with a Generator in the System” on page 14.
Regulating Battery Charging in AC CouplingThe Conext family of multi-mode battery inverters are highly versatile and capable of supporting different configurations and applications. Battery charge regulation in Conext battery inverters is accomplished using a frequency shift variation technique (frequency/power ramp) that utilizes active power reduction versus frequency features of PV inverters. This is a key feature of smart inverters and may be absent in older legacy PV inverters.
Operation with Partial Curtailing PV Inverter
The Conext Battery Inverter exploits the PV inverter’s ability to linearly reduce output power as grid frequency progresses beyond a particular threshold. However, power reduction is not all the way down to zero, which still limits the level of battery charging control achievable. As such, only partial power curtailment is possible, up to about 50% of the PV inverter’s output. Smart Inverters are almost standard in most European markets (for example, compliant to VDE-AR-N-4105 or equivalent) and generally available on the market. Currently, IEEE 1547.1 compliant inverters are not likely to have this capability. It is not a requirement in the current revision of the standard but is likely to change soon. This configuration is suitable for grid backup or grid interactive applications.
Theory of operation:
When AC-Coupled with a smart PV Inverter, the Conext XW+ monitors the battery voltage and current continuously. As the battery bank charges and its voltage or current approaches the desired Bulk, Absorption or Float transition condition, the Conext XW+ starts to increase its AC frequency, commanding the PV inverter to reduce output power. The Conext XW+ will continue this behavior until the desired battery voltage is established and maintained. If the battery no longer needs charging, the AC frequency will cross the disconnect threshold and the PV inverter will disconnect, stopping the charging process.
As battery voltage drops, the Conext XW+ AC frequency also reduces until it is within the limits of the PV inverter (maximum 50% power reduction). Although this feature can be used to regulate the PV inverter so that the system battery is correctly charged, a 50% reduction may not always be adequate to achieve full charge cycle regulation. After a reconnect delay (typically 5 minutes) the PV
NOTICE
RISK OF BATTERY DAMAGE
Do not use a Lithium Ion battery pack in AC-Coupled inverters.
Failure to follow this instruction can result in battery damage.

AC Coupling Solutions Guide
976-0240-01-01 11
inverter reconnects and the cycle repeats. This behavior is most likely to be observed part way through the Absorption phase or Float phase depending on the size of the PV inverter, batteries and loads, especially in a system consisting of a large PV inverter with small AC loads.
A small smart PV inverter may not exhibit the above behavior until late in the Absorption or Float phase. If the system AC loads are large enough, this cyclic charging behavior could be minimal or absent all together. For example, the PV Inverter starts to reduce output linearly from 50.2 Hz at a rate of 40% per Hz. At 51.5 Hz the output will have reduced by roughly 50%. Above this threshold, the PV Inverter will stop power generation and disconnect from the grid until grid frequency recovers.
This mode is acceptable for grid interactive applications with less frequent outages where optimal charging can be obtained using grid power.
Operation with Full Curtailing PV inverters
PV inverters such as the Conext RL and CL feature a mode designed to achieve full output power reduction as frequency increases (Micro Grid Mode). This mode allows the grid-forming inverter to accurately regulate charging by adjusting its AC frequency and regulating PV inverter power through all phases of the charging cycle.
Note: This mode is a special configuration of the PV Inverter used only for off grid applications, where compliance with grid interconnect requirements is not mandated. This mode must not be used in a grid interactive system since the necessary parameters on the PV Inverter would void local grid code compliance.
Theory of operation:
When AC-Coupled and operating in Micro Grid Mode, the Conext XW+ monitors the battery bank’s voltage and charging current. As the battery bank charges and its voltage approaches the desired Bulk, Absorption or Float transition condition, the Conext XW+ (and Conext SW) starts to increase its AC frequency, commanding the PV inverter to reduce output power. The Conext XW+ will continue this behavior until the desired battery voltage is established and maintained. The ability for frequency and power relationship to reduce PV inverter output over the full range means the Conext charge algorithm will allow for battery voltage to be maintained at prescribed levels for each of the charging phases - Bulk, Absorption and Float.
If the battery no longer needs charging, the Conext battery inverter frequency will reach and hold the maximum frequency to keep the PV inverter from outputting any power. In the event that the battery voltage continues to increase, the Conext battery inverter will initiate a frequency jump to maximum allowed an attempt to disconnect the PV inverter using a “high grid frequency” condition.

AC Coupling Solutions Guide
12 976-0240-01-01
Figure 3 Battery voltage and current behavior with limited throttle PV Inverter.
PV Inverter Power (P. inv) versus Grid Frequency (F. grid) Relationship (off grid)

AC Coupling Solutions Guide
976-0240-01-01 13
AC-Coupled Smart ChargeAC Couple Smart Charge is a feature of the Conext SW (not available on Conext XW+) that prioritizes battery charging over energy export to local AC loads connected upstream of the Conext CSW battery Inverter. AC Coupling must be enabled for this feature to be functional.
In AC-Coupled configuration and with grid present, the Conext SW monitors flow of power from its load port (AC Output) to the utility grid input (AC Input). When power flow to the grid is detected and the battery needs charging, the Conext SW initiates a bulk charging cycle by switching to charge mode and drawing AC power to charge the battery. It only draws enough energy to keep the flow of power to the grid to zero. As long as the battery is able to accept the energy, the Conext SW will continue diverting excess PV production to the battery. Once the battery bank is at a level such that not all excess energy from the PV Inverter is being absorbed, the balance will then flow out to upstream loads in the house that are not connected to the Conext SW’s AC output port.
If PV production is lost for a prolonged period of time and the battery bank discharges below the Recharge Volts setting, the Conext SW will initiate a normal charge cycle and use power from the grid to charge the battery. See the section on “Basic Settings” in the Conext SW Owner’s Guide (document part numbers: 975-0636-01-01, 975-0638-01-01). In all of the above modes of operation, only the PV Inverter exports energy to the grid. The Conext SW itself cannot sell to the grid - it simply passes energy from the PV inverter to the grid. For this reason, the PV Inverter must be fully grid code compliant as it assumes responsibility for anti-islanding protection.
NOTICE
RISK OF INCOMPATIBLE EQUIPMENT
Check that the PV Inverter warranty covers off-grid applications, specifically AC coupling with a battery- based inverter.
Check that the PV Inverter is capable of operating when it is AC-Coupled with the inverter/charger which forms the local grid. PV Inverters with an impedance sensing anti-islanding scheme are not compatible with the inverter/charger.
Check that the PV Inverter can be configured to curtail power when the grid frequency rises above 50.5 Hz and that power ceases to flow when the frequency reaches 52.0 Hz.
Failure to follow these instructions could result in damage to equipment not covered by warranty.

AC Coupling Solutions Guide
14 976-0240-01-01
AC Coupling with a Generator in the System
While running a generator in an AC-Coupled system, the generator will provide AC power to the Conext XW+ and through the Conext XW+ to the PV Inverter. The PV Inverter will detect this and begin to inject energy to the system. Generators and other AC sources are not designed to accept backfed power, so there must be a way to disallow the concurrent operation of the AC source and PV Inverters on the system. This can be done manually or through the use of interlocked AC transfer contactors.
In all cases, while the generator is running, the PV Inverter must be disconnected from the circuit. PV harvest is only possible when the generator is not running and the Conext XW+ is inverting.
It is possible to use a disconnect switch to automatically disconnect the PV Inverters when the generator is operating. To do this, a pair of interlocked disconnect switches can be installed. One is placed between the generator output and the AC2 (GEN) input, and a second one between the PV Inverter and critical load panel.
Note: The power metering on the Conext XW+ may not work reliably when it is in voltage source invert mode and power is flowing back into the batteries.
NOTICE
RISK OF DAMAGE TO THE GENERATOR
Never connect a generator to the AC Input terminal of a battery inverter configured for AC coupling. The inverter will not be able to regulate the current being backfed into the AC input and may backfeed AC current into the generator.
Failure to follow this instruction can result in equipment damage.
NOTICE
RISK OF BATTERY DAMAGE
• To prevent battery damage in a micro-grid AC system, use only firmware which has the AC coupling feature implemented. Always be sure to use the latest firmware available for your inverter. For firmware upgrade instructions, see the Conext Configuration Tool User’s Guide (document part number: 975-0365-01-01) available on solar.schneider-electric.com.
• Do not use a Lithium Ion battery pack in AC-Coupled inverters.
Failure to follow this instruction can result in battery damage.

AC Coupling Solutions Guide
976-0240-01-01 15
Installation NotesEach PV Inverter requires its own AC breaker in the critical load sub panel that is connected to the AC load (output) of the Conext XW+. Although there is room to add breakers for the PV Inverters directly into the Conext XW+ Power Distribution Panel, it is easier to install the Conext RL breakers in the AC sub panel. These breakers must be installed according to the Conext XW+ Installation Guide (document part number: 975-0239-01-01). The sub-panel may also contain load breakers.
To install an AC-Coupled system:
1. Install one or more battery inverters according to the procedures outlined in their respective Installation Guides.
2. Install one or more Conext CL/RL/TL/TX PV Inverters according to their Installation Guides, with the following exception: instead of connecting the PV inverter's AC output to the main service panel, connect it to the AC transfer switch and the Conext XW+ AC Load Panel (sub-panel).
Figure 4 AC-Coupled System with Generator
XW+ Inverter/Charger
AC Critical LoadSub Panel/Box
RL/CL/TL Inverters
Generator − AC Input 2
Grid − AC Input 1
Either/orInterlockedAC Switch
GT/TX Output
Mains AC Box
XW+ Inverter Output

AC Coupling Solutions Guide
16 976-0240-01-01
Configuration Settings
Conext XW+ / Conext SW Settings
Note: For Conext XW+ configuration settings, see the Conext XW+ Owner’s Guide (document part number: 975-0240-01-01).
Check if AC Coupling (AC_COUPLING) is enabled. The default is Disabled.
◆ Using the SCP, on the Conext XW+ device screen, go to Advanced Features > Adv Features > AC_COUPLING [Enabled]
In AC Coupling, the maximum battery charge current is up to 120Adc (non-adjustable).Fstop is hard coded to 52/62. Set PVI Stop to less than 52/62. Adjust AI limits to 53/63 or less. Conext XW+ will bump frequency to 54/64 if Vbatt is greater than Vbulk + 4V for 48V.
For AC/DC-Coupled systems, Conext XW+ detects if the load is negative and uses this information to indicate AC Coupling. This plus battery rising equals frequency shift.
Note: For Conext SW configuration settings, see the Conext SW Installation Guides (document part numbers: 975-0636-01-01, 975-0638-01-01).
Check if AC Coupling (AcCouple) is enabled. The default is Disabled.
◆ Using the SCP, on the Conext SW device screen, go to Advanced Features > Adv Features > AcCouple [Enabled]
WARNING
RISK TO BATTERY
Make sure that AC Coupling feature is enabled on the battery inverters. If disabled, the battery may be exposed to overcharging which can damage the battery.
Failure to follow these instructions can cause damage to the battery.
Table 2 AC Coupling Inverter (XW+/CSW) Configuration Settings
Mode Recommended Setting
Search Disabled
Grid Support (XW+)AC Support (CSW)
Enableda
a.For grid-connected systems
Grid Sell (XW+ only) Disabledb
b.For off grid system with an AC generator
AC Couplingc
c.AC Coupling feature must be set only on the Conext XW+and CSW. It can be found in the Conext XW+ and CSW Ad-vanced Features menu
Enabled

AC Coupling Solutions Guide
976-0240-01-01 17
When setting the frequency, use the same start frequency as the PV Inverter, i.e. 50.2 or 60.2 Hz. Then set the maximum frequency 0.1 Hz lower than the frequency corresponding to zero power production on the PV inverter. In this example, the setting would be 51.2 or 61.2 Hz.
See the respective product manuals for the Conext CL/RL/TL/TX PV Inverters to access off grid mode. Configure the following inverter settings:
• Select off grid mode on the PV Inverter as detailed in its product manual.
• Set the frequency for start of power reduction. We recommend using VDE-AR-N 4105 default for start (50.2 Hz) but any other setting can be used. For 60 Hz systems, use 60.2 Hz.
• Set the frequency when PV Inverter power output will be zero. We suggest at least 1 Hz higher, 51.2 (or 61.2) Hz.
• Set the high frequency disconnect on the PV Inverter about 0.3 Hz higher or 51.5 (or 61.5) Hz.
For further assistance, contact Schneider Electric technical support at solar.schneider-electric.com.
Conext RL Settings for Operation with XW+ and CSW
Figure 5 Conext RL Configuration for XW+ Setting Part 1
3
4
2
5
6
1

AC Coupling Solutions Guide
18 976-0240-01-01
Figure 6 Conext RL Configuration for CSW Setting Part 1
Table 3 Conext RL Configuration Settings Part 1
# Setting Description
1 MicroGrid This parameter sets the micro grid mode (see “Operation with Full Curtailing PV inverters” on page 11. Set this parameter to Enable in conjunction with AC Coupling.
2 Ramp Up Power %
Range: 10% to 6000%
This parameter sets the response speed of the PV inverter to increase its output power. A value of 100% means that PV inverter will reach its full power output in 60 seconds, similarly a value of 200% means PV inverter will reach its full power output in 30 seconds. Recommended setting is 200% for this field when configuring the PV inverter for off-grid ac-coupled mode. A higher value leads to oscillations; a lower value leads to reduced harvest.
Note: The ramp-rate of the output power is affected by available PV power & MPPT tracking.
3
4
2
5
6
1

AC Coupling Solutions Guide
976-0240-01-01 19
3 P-F Control
Options: Rated, None,
This parameter when set to ‘Rated’ configures the PV inverter into a control mode where its output power is linked to the frequency of the voltage sensed at its AC input terminals. And follows a Power-Frequency ramp defined by Gradient and Frequency Start
4 Frequency Start This parameter sets the threshold for frequency beyond which the PV inverter follows the Power-Frequency droop function. Typical value of 50.2Hz is recommended, however in large off-grid ac-coupled systems, PV inverters can be staggered to start at different frequencies for finer response.
5 Gradient This parameter defines the slope of Power-Frequency droop function, i.e. the proportionality between the Power and Frequency. When a gradient is set it will compute the Stop frequency automatically. It is important to ensure that the gradient chosen results in a stop frequency less than 51.95 to match the AC-coupling control through XW+ and CSW to achieve a 0W power output.
6 Frequency Stop This parameter is automatically calculated based on the Freq. Start and Gradient selected. At this Frequency, the PV inverter will still remain connected but generate near 0W.
Table 3 Conext RL Configuration Settings Part 1
# Setting Description

AC Coupling Solutions Guide
20 976-0240-01-01
Figure 7 Conext RL Configuration for XW+ Setting Part 2
Figure 8 Conext RL Configuration for CSW Setting Part 2
2
3
1
4
2
3
1
4

AC Coupling Solutions Guide
976-0240-01-01 21
Table 4 Conext RL Configuration Settings Part 2
# Setting Description
1 Country This parameter sets the anti-islanding and control settings of the PV inverter. When installing the PV inverter in an off-grid AC-coupling system, either choose the country type ‘Micro-grid’ if available else configure to the country type ‘Customer’ and configure the parameter group 2, 3, 4.
2 Reclosure Time This parameter sets the re-connect time for the PV inverter once it has been anti-islanded due to voltage and/or frequency out of range. A default value of 30 seconds is recommended. In off-grid mode of operation with correct settings of the Gradient/Stop-Frequency, the PV Inverter would only anti-island due to voltage sags or swell common with starting of high-surge loads.
3 Uac Protection This parameter group sets the limits for detecting a voltage to be out of range and stop power production and disconnect the PV inverter from the grid. There are two group of settings Over- & Under-voltage. Example settings:
If the voltage exceeds ‘U High Off’ value for ‘U High Off Time’ seconds, the power-export is stopped. But if recovers within ‘U High Off Time’, it continues operation. ‘U High Off Slow’ is typically a lower value. If the voltage exceeds this value for ‘U High Off Slow Time’, PV inverter disconnects from the grid.
Similarly set the U High On, U High On Slow and the group for U Low
Note: PV inverters in an ac-coupled system often are subjected to voltage rises due to impedance of long cables or fluctuations when pumps start. It is important to factor site conditions and suitably relax the voltage limits
4 Frequency Protection This parameter group sets the limits for detecting a frequency to be out-of-range and stop power production and disconnect the PV inverter from the grid. There are two group of settings: Over-Freq and Under-Freq with similar logic as the Over-voltage and Under-voltage protection explained above. Ensure that the protection setpoints are between Freq. Stop and 54Hz/64Hz for 50Hz/60Hz system.

AC Coupling Solutions Guide
22 976-0240-01-01
Copyright © 2014-2015 Schneider Electric. All Rights Reserved. All trademarks are owned by Schneider Electric Industries SAS or its affiliated companies.
Exclusion for Documentation
Unless specifically agreed to in writing, seller
(A) MAKES NO WARRANTY AS TO THE ACCURACY, SUFFICIENCY OR SUITABILITY OF ANY TECHNICAL OR OTHER INFORMATION PROVIDED IN ITS MANUALS OR OTHER DOCUMENTATION;
(B) ASSUMES NO RESPONSIBILITY OR LIABILITY FOR LOSSES, DAMAGES, COSTS OR EXPENSES, WHETHER SPECIAL, DIRECT, INDIRECT, CONSEQUENTIAL OR INCIDENTAL, WHICH MIGHT ARISE OUT OF THE USE OF SUCH INFORMATION. THE USE OF ANY SUCH INFORMATION WILL BE ENTIRELY AT THE USER’S RISK; AND
(C)REMINDS YOU THAT IF THIS MANUAL IS IN ANY LANGUAGE OTHER THAN ENGLISH, ALTHOUGH STEPS HAVE BEEN TAKEN TO MAINTAIN THE ACCURACY OF THE TRANSLATION, THE ACCURACY CANNOT BE GUARANTEED. APPROVED CONTENT IS CONTAINED WITH THE ENGLISH LANGUAGE VERSION WHICH IS POSTED AT SOLAR.SCHNEIDER-ELECTRIC.COM.
Document Number: 976-0240-01-01 Revision Number: Rev D Date: June 2015
Contact Information solar.schneider-electric.com
Please contact your local Schneider Electric Sales Representative or visit our website at:http://solar.schneider-electric.com/tech-support/