Embed Size (px)
Citation preview

Eagle Peak 8 ft x 6 ft Foldable Green House Canopy
Sprout Series w/ Easy Peak Single Person Setup
Item # GH48EPT-GRN-AZ
INSTRUCTION MANUAL
Do not return your canopy to the place of purchase.
For warranty service, repair parts, or product questions please
email: [email protected]
Thank you for choosing Eagle Peak !

WARRANTY
For warranties, please do NOT ship your product or parts back to the manufacturer without contacting EAGLE PEAK Consumer Support first at [email protected], the consumer purchaser must obtain prior authorization from EAGLE PEAK Consumer Support first. Our Consumer Support will determine whether a return is required and may request pictures of the unit in place of a return.
Please read and save the owners manual instructions before attempting to use your canopy.
1 Year limited warranty
Please email [email protected] before returning the product to our shop. Global Shade Corporation warrants for a period of 1 year from the original date of purchase, this product against any defects in materials or workmanship. At its discretion, Global Shade Corporation may provide replacement parts for defective parts to original purchaser after its own review and examination. Original receipt or proof of purchase as well as proof of defect is required. Global Shade Corporation will not be responsible for shipping costs incurred outside the continental USA. Warranty is valid for the original purchaser for 1 year from the date of purchase and is not transferable.
This Warranty Does Not Cover
• This 1 Year Limited Warranty does not cover normal wear and tear, accidental or deliberate damage of the product, abuse or misuse, or use of this product that does not comply with the product instructions including damage from inclement weather conditions, such as wind, rain, hail, or other forces of nature. In case of inclement weather, take down and store the canopy, remove and store valuables, and seek appropriate shelter.
• Certain regions are extreme on canopy tops of any type. If you live in Arizona, Florida, Nevada, New Mexico, Texas, Hawaii or altitudes above 3000 feet the warranty period for your canopy top will be limited to 6 months from the date of original purchase.• This warranty does not cover any product purchased through non authorized dealers and/or online auction websites.• This warranty shall be void as to any product which has been altered or modified in any manner.
Global Shade Corporation does not warrant against and under no circumstances shall Global Shade Corporation be liable or responsible for any personal loss, injury, or direct or indirect incidental or consequential damages resulting from the use of this product.This product is designed and intended for commercial and recreational usage. Prolonged exposure to UV rays will cause any fabric to fade and deteriorate and is NOT covered by this 1 Year Limited Warranty.All replacement products or parts will assume the remaining warranty of the original product. This warranty gives you specific legal rights. You may also have other rights, which vary from state to state.
It is your responsibility to read and save these instructions before attempting to set up your canopy. We would also like to suggest that you follow these safety precautions, care and maintenance tips when using your canopy.1. Never set up or continue to use in any rain, wind or storm conditions, especially lightning storms. Damage can occur to your canopy and put you and others in potential danger.2. We suggest that you take your time in order to avoid bending the frame or pinching your fingers or hands while opening and closing the frame.3. Avoid setting up your canopy on steep inclines.4. Do not use your canopy for permanent shelter. It is designed for temporary use only.5. Keep your canopy away from heat and flames at all times. Do not barbecue or build fires under your canopy.6. Never leave your canopy unattended.7. Hand wash the canopy using only mild soap and water. Never use harsh detergents, abrasives or bleach. Do not machine wash fabric components.8. Never fold or store your canopy when it is wet or damp. Let it dry completely to avoid mildew.9. The frame MUST be staked or properly weighted down at all times.10. For best results in keeping your top clean and avoid small rips and tears, it is recommended that the top be removed from the frame and stored in the carry bag after each use.

1
PACKING INCLUDES
Hardware
A - Canopy Frame (1pc) B - Canopy Top With Sidewalls (1pc)
AA - Stake (10pcs) BB - Spiral Stake (4pcs) CC - Rope (4pcs)
Part List

2
SET UP THE CANOPY
Step 1 OPENING THE CANOPY FRAME
Step 2 ATTACHING THE CANOPY TOP
● Lift and partially pull the canopy frame apart.
● Unfold the canopy top, unzip the door and place on top of the canopy frame. Avoid the peak cap hooking the lining of the canopy top.
● Secure the canopy top to the corners of the canopy frame using velcro.
Unzip
Velcro

3
SET UP THE CANOPY
Step 3
Step 4
Click
● From under the canopy, use one hand to push the central bottom hub straight up until it clicks into the central pole.
LOCKING THE FRAME
ADJUSTING THE CANOPY HEIGHT
● Press the push button on each leg and raise or lower to adjust the canopy height.

4
SET UP THE CANOPY
Step 5 VELCRO CONNECTION
Velcro
Velcro
● Secure the canopy top to the corners of the canopy frame using the Velcro connections.● Secure the canopy top to the legs of the canopy frame using the Velcro connections.

SECURING THE CANOPY IN PLACE
5
SET UP THE CANOPY
Step 6
X6 loop
loop
X4
X4X4
● Unzip the doors and insert a spiral stake into the footpad of each canopy leg.● Insert stakes into the loops at bottom of sidewall.● Tie four ropes to the corners of the top fabric. Measure out from the each leg to a proper distance and secure four stakes to the ground. Tie the ropes to the stakes in the ground. Ensure the rope has the proper tension by adjusting the plastic adjusters on the ropes.
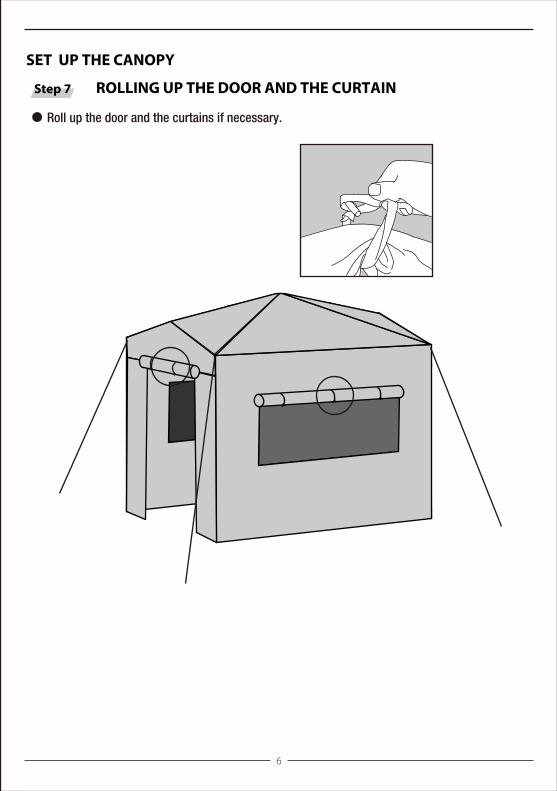
ROLLING UP THE DOOR AND THE CURTAIN
● Roll up the door and the curtains if necessary.
6
SET UP THE CANOPY
Step 7

7
TAKE DOWN THE CANOPY
Step 8
● Pull up all stakes from the ground. ● Press the push button on each leg and retract the legs to their original height.● Get underneath the canopy.Rotate/twist the center hub counterclockwise to unlock the frame.● Take off the PE top, lift one corner of the frame until all legs are raised off the ground except for the 1 leg on the opposite corner. Push inward until the frame is fully closed.
8
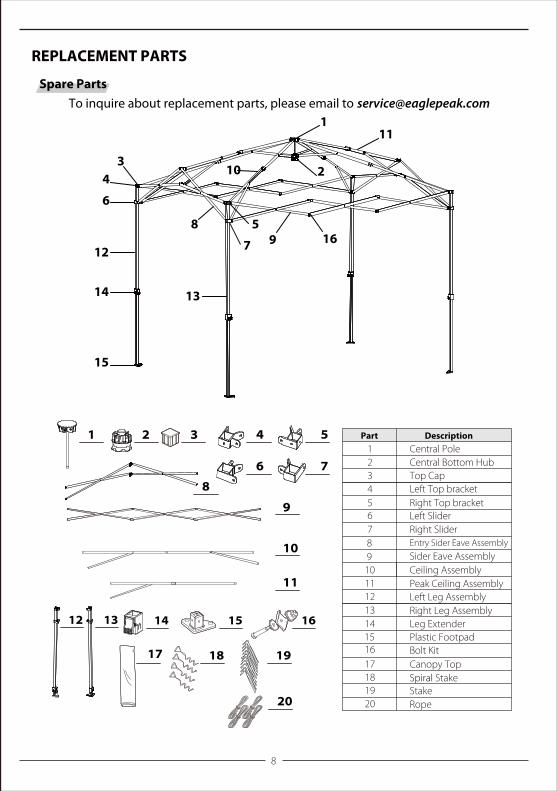
REPLACEMENT PARTS
Spare Parts
To inquire about replacement parts, please email to [email protected]
23
10
11
98
16
4
6
5
712
14
15
Part Description
1 Central Pole
8
Ceiling Assembly
2 Central Bottom Hub
9
Peak Ceiling Assembly
3 Top Cap
10
Left Leg AssemblyRight Leg Assembly
4 Left Top bracket5
Left SliderRight Top bracket
Right Slider6
Entry Sider Eave Assembly7
Sider Eave Assembly
1213
Plastic Footpad
11
15
1716 Bolt Kit
Spiral StakeStakeRope
181920
14
Canopy Top
Leg Extender
1 3 4 5
10
17 18 19
11
20
16
2
6 7
9
8
1312 14 15
13