Embed Size (px)
Citation preview

1
“iClass – Interactive Class on Cloud”
User Manual for Teacher
Version: T-1.1-PLKCJY
Date: February 2013

2
1 Access iClass teacher platform................................................................................................................... 3
2 Teacher login .............................................................................................................................................. 3
3 Create courses, topics and activities .......................................................................................................... 4
3.1 Create a new course ............................................................................................................................ 4
3.2 Create a new topic............................................................................................................................... 5
3.3 Create a new activity ........................................................................................................................... 6
3.3.1 Create a “Drawings” activity ........................................................................................................ 7
3.3.2 Create a “Keywords” activity ..................................................................................................... 10
3.3.3 Create “MC Questions” activity ................................................................................................. 12
3.3.4 Create an “E-book” activity ........................................................................................................ 14
3.3.5 Create an “Web Browser” activity ............................................................................................. 17
4 Presentation mode ................................................................................................................................... 19
4.1.1 Presentation mode of “Drawings” and “E-book” ...................................................................... 22
4.1.2 Presentation mode of “Keywords” ............................................................................................ 23
4.1.3 Presentation mode of “MC Questions” ..................................................................................... 24
5 Functions in course page ......................................................................................................................... 27
5.1 Top menu of the course page ............................................................................................................ 27
5.1.1 “Edit” button: ............................................................................................................................. 27
5.1.2 “Join” button: ............................................................................................................................. 29
5.1.3 “Teacher” / “Student” button .................................................................................................... 29
5.1.4 “Sort” button ............................................................................................................................. 30
5.2 Top menu of the topic view ............................................................................................................... 30
5.2.1 “Add” button .............................................................................................................................. 30
5.2.2 “Visible” / “Invisible” button...................................................................................................... 31
5.2.3 “Sort” button ............................................................................................................................. 31

3
1 Access iClass teacher platform
iClass teacher platform is a web-based application. The URL of our platform is as follow:
http://plkcjy.iclass.hk/
Since our platform is developed based on HTML5, therefore the following HTML5-supported browsers are
recommended in order to access our platform:
� Molliza Firefox 4.0 or above [Windows, Linux, Mac OS]
� All version of Google Chrome [Windows, Linux, Mac OS, Android]
� All version of Safari [Mac OS]
� Microsoft Internet Explorer 9.0 or above [Windows]
In order to avoid the crash for displaying the content, the recommended screen size for projection is 1024 x
768 pixels.
2 Teacher login
Enter username and password and then click “Login”.
Username
Password
Login

4
3 Create courses, topics and activities
3.1 Create a new course
Click the “+” button to add a course.
Enter the course code and course name, and then click the “tick” icon to confirm.
“+” button
Course code
Course name
Confirm button

5
A confirmation message will be pop up, click “Confirm”.
3.2 Create a new topic
Click “+ Topic” to add a new topic.
Enter the topic name in the text field. Click the “Tick” icon after entering the topic name.
Confirm button
“+” Topic button
Topic name
Confirm button

6
3.3 Create a new activity
Click “+ Activity” icon.
You are required to create some activities under this topic, the following activities are available:
� “Drawings”: for students to draw on a plain paper or a pre-uploaded worksheet
� “Keywords”: for students to share their ideas as keywords and display on the teacher screen
� “MC Questions”: for students to answer some MC questions or surveys
� “E-Book”: for students to read and work on a e-book
� “Web Browser”: for students to access a web-site specified by the teacher
Click “+ Activity”

7
3.3.1 Create a “Drawings” activity
Click the “Drawings” icon.
Enter the Activity name.
“Drawings” icon
Activity name

8
Select the Backdrops for drawing, click “Select File”. You may also drag-and-drop an image into the image
box directly.
Teacher can upload a backdrop, e.g. a worksheet, a map, or a graph paper…etc. to the system so that
students can work on it. Teacher can also upload some stickers as well.
Select the image file, click “Open”.
Click “Select File”
Select an image file
Confirm button

9
The image will be loaded to the resource box. Click on the image to select it. You may add a backdrop as
well as stickers to the “Drawings” activity.
Click “Add” on the top right hand corner of the page to finish the process.
Click Image to select
Click “Add”

10
A new activity called “Draw curve on graph” is added.
3.3.2 Create a “Keywords” activity
Click the “Keywords” icon.
New activity is added
“Keywords” icon

11
Enter the activity name.
Enter the label of the tag(s). The keyword activity can support up to 6 tags. A tag means one aspect of
discussion, for example:
i) 1 tag: a list opinion
ii) 2 tags: Pros and cons of an issue
iii) 3 tags: ideas at different level, e.g. local level, national level and international level
iv) 4 tags: SWOT analysis – Strengths, weaknesses, opportunities and treats
v) 6 tags: ideas of the six thinking hats
Click “Add” on the top right hand corner after you have finished entering all questions.
Activity name
6 Different Tags
Click “Add”

12
Then a new activity called “List different shapes” will be created.
3.3.3 Create “MC Questions” activity
Click “MC Questions” icon.
“MC Questions” icon
New activity is added
13
Enter the activity name, e.g. “Mid term quiz”. Click the “Add Question” button to add questions.
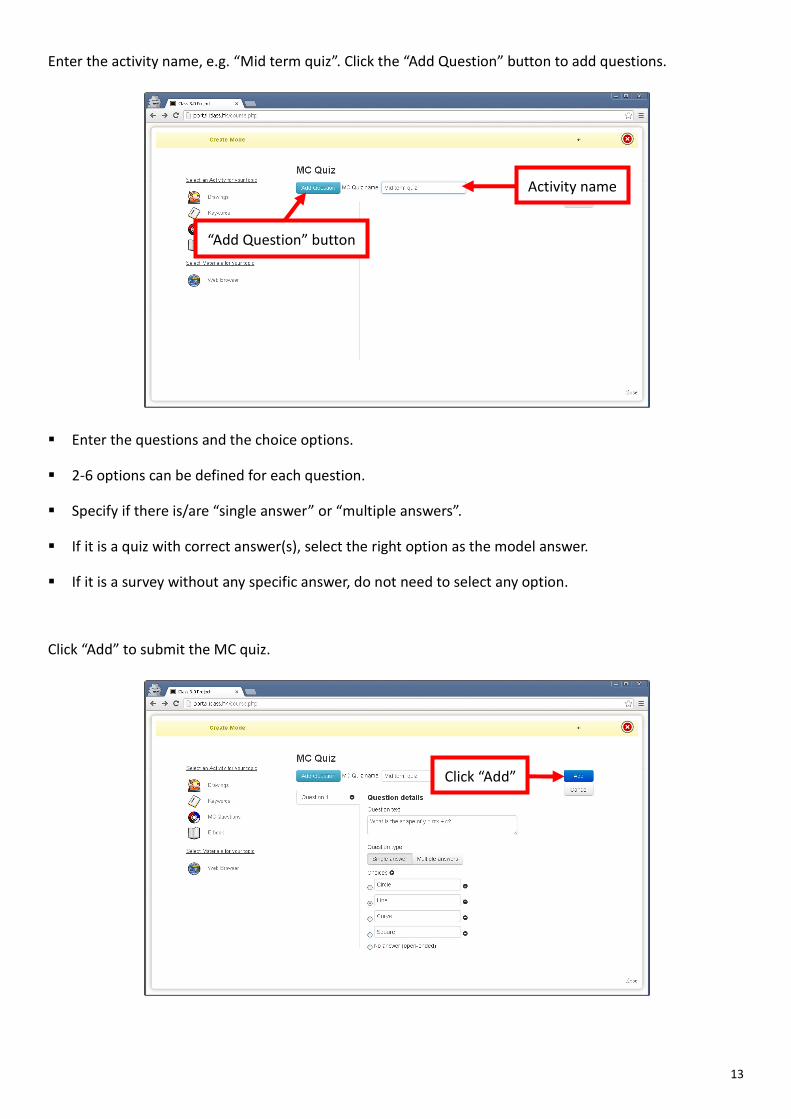
� Enter the questions and the choice options.
� 2-6 options can be defined for each question.
� Specify if there is/are “single answer” or “multiple answers”.
� If it is a quiz with correct answer(s), select the right option as the model answer.
� If it is a survey without any specific answer, do not need to select any option.
Click “Add” to submit the MC quiz.
Activity name
“Add Question” button
Click “Add”

14
Then a new activity called “Mid Term Quiz” is created.
3.3.4 Create an “E-book” activity
Click the “E-book” icon.
New activity is added
“E-book” icon

15
Enter the activity name. Click “Select Files” to upload files with PDF format. You may also drag-and-drop the
files into the box.
Click the thumbnail to select one PDF file.
Activity name
Click “Select File”
Click thumbnail to select

16
Click “Add” to submit the activity.
Then a new activity called “Reference Notes” is created.
New activity is added
Click “Add”

17
3.3.5 Create an “Web Browser” activity
Click the “Web Browser” icon.
Enter the web address and name of website. Note that the web address must contain “http://” as the
prefix.
“Web Browser” icon
Web address
Name of website

18
Click “Add” to submit the activity.
Then a new “Web Browser” activity is created. Note that all the “Web Browser” content will be grouped
into a single activity called “Reference Websites”.
Click “Add”
New activity is added

19
4 Presentation mode
After the activities are posted by teachers, student can get the respective teaching materials by using their
own devices via our student platform (iOS or HTML5). Responds will be made by students, and the
responds from student will be received. The result will then be displayed in the teacher platform.
Click on any activity on the course page to enter the presentation mode for respective activity. Note that
you should be in teacher mode in order to enter the presentation mode.
The functions of the top tool bar are shown as follow:
“Show answers”/“Hide answers” button:
When “Show answers” button is shown, the answer is now invisible to the students. This is the default
setting after an activity is created. You can click the button to toggle the setting.
When “Hide answers” button is shown, the answer is now visible to the students. You can click the button
to toggle the setting.
“Show answer” button
“Hide answer” button
Answer is now visible
Answer is now invisible

20
“Submission” button:
When the “Submission” button is green in color, the submission is now enabled. This is the default setting
after an activity is created. You can click the button to toggle the setting.
When the “Submission” button is red in color, the submission is now disabled. Students can no longer
submit their answers. You can click the button to toggle the setting.
“Previous”, “Next” and “Refresh” button:
Currently displayed activity can be changed by using the “Previous” and “Next” button.
Click the “Refresh” button to reload the page.
Green “Submission” button
Red “Submission” button
Submission enabled
Submission disabled
“Previous” button
“Next” button
“Refresh” button
21
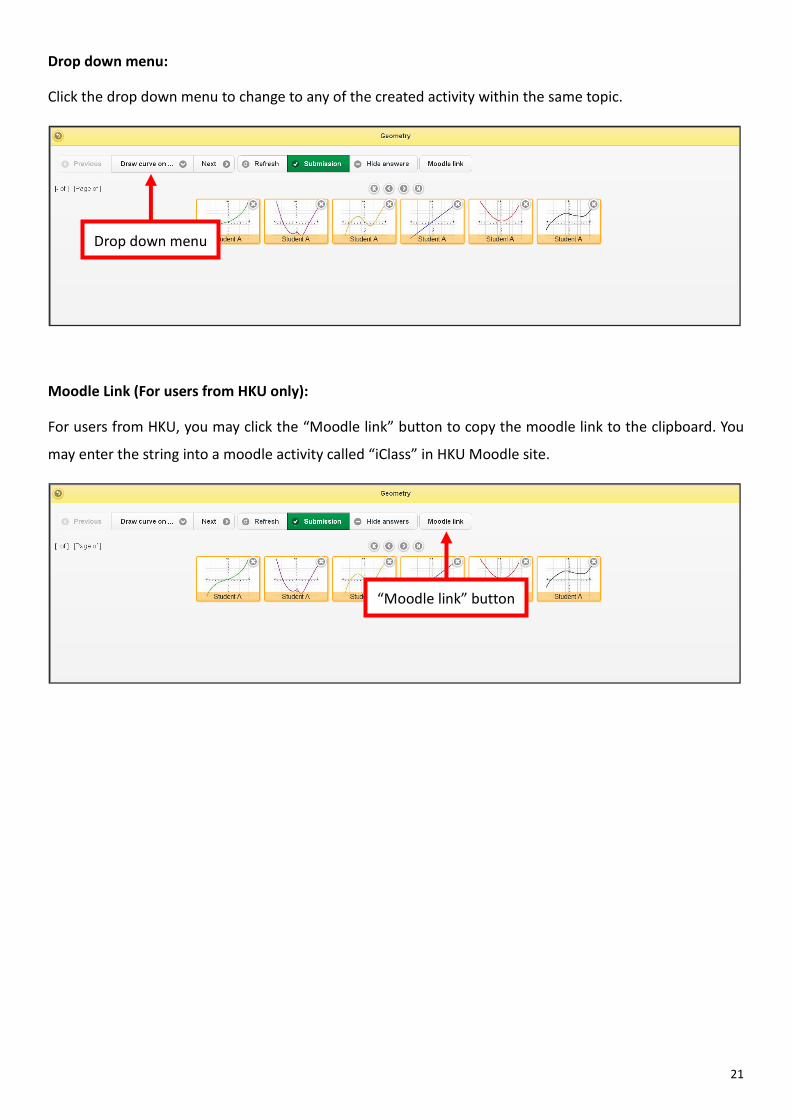
Drop down menu:
Click the drop down menu to change to any of the created activity within the same topic.
Moodle Link (For users from HKU only):
For users from HKU, you may click the “Moodle link” button to copy the moodle link to the clipboard. You
may enter the string into a moodle activity called “iClass” in HKU Moodle site.
Drop down menu
“Moodle link” button

22
4.1.1 Presentation mode of “Drawings” and “E-book”
All the thumbnails will be displayed. Student name will be displayed on the bottom of the thumbnail
images. The later the submission time, the topper the display order.
You may click the delete button on the top right hand corner of the thumbnail to delete the unfavorable
image.
You may click the thumbnail to show the image in full screen.
Thumbnail images
Student name
Delete button
Click to enlarge

23
4.1.2 Presentation mode of “Keywords”
There are currently 3 display modes for “Keywords” presentation, which can be switched on the left menu.
Tag Cloud: The more the frequency of appearance, the larger the font size. Click the “+” button to enlarge.
List view: This is a list view to show who answer what.
“Tag Cloud” view
“List view” view
Larger font size
Answers
Student list
Click to enlarge
24
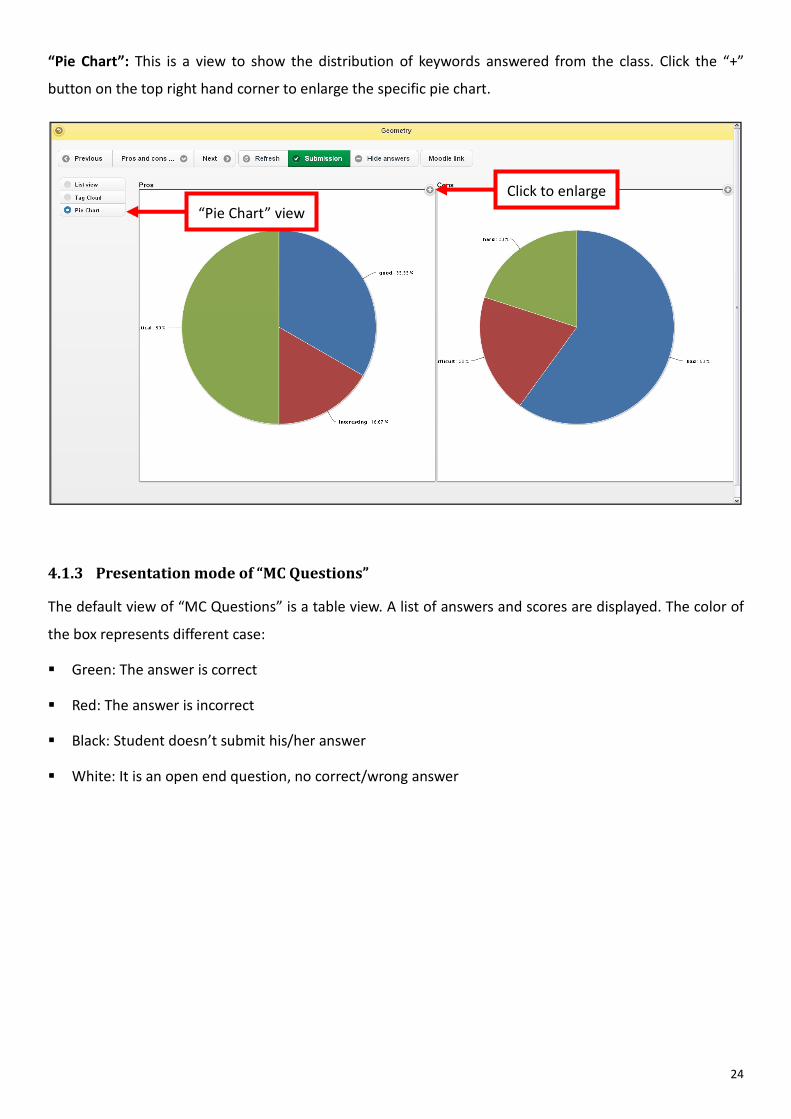
“Pie Chart”: This is a view to show the distribution of keywords answered from the class. Click the “+”
button on the top right hand corner to enlarge the specific pie chart.
4.1.3 Presentation mode of “MC Questions”
The default view of “MC Questions” is a table view. A list of answers and scores are displayed. The color of
the box represents different case:
� Green: The answer is correct
� Red: The answer is incorrect
� Black: Student doesn’t submit his/her answer
� White: It is an open end question, no correct/wrong answer
“Pie Chart” view
Click to enlarge
25
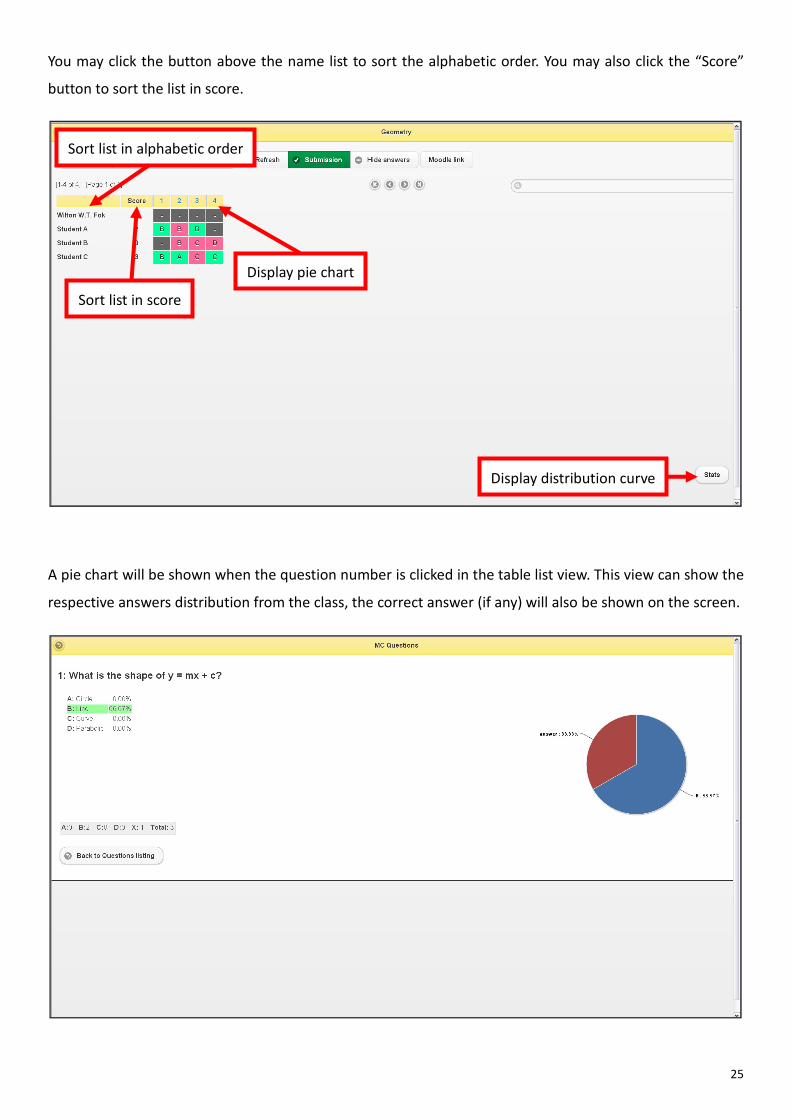
You may click the button above the name list to sort the alphabetic order. You may also click the “Score”
button to sort the list in score.
A pie chart will be shown when the question number is clicked in the table list view. This view can show the
respective answers distribution from the class, the correct answer (if any) will also be shown on the screen.
Sort list in alphabetic order
Sort list in score
Display pie chart
Display distribution curve

26
A score distribution will be shown when the “Stats” button is clicked in the table list view, which is located
at the bottom right hand corner of the table list view.

27
5 Functions in course page
5.1 Top menu of the course page
The functions of different buttons are listed as follow:
5.1.1 “Edit” button:
Password is required to use the edit function.
Top menu of the course page
Password is required

28
This is the course edit page. You can rename/edit/delete all the topics/activities inside your course. You can
also delete your course and set your offline topic in this page.
You may delete any student within your course by clicking the “Student” button.
Set offline topic
Delete course
“Student” button

29
5.1.2 “Join” button:
“Join Code” and the respective QR code of the course will be shown. This code is used for course
enrollment.
5.1.3 “Teacher” / “Student” button
“Teacher” button: It is now in teacher mode. This is the default setting when you enter the course. Click
this button to toggle the setting.
“Student” button: It is now in student mode. This is what a student can be viewed in a course. Click this
button to toggle the setting.
Join Code
Teacher mode
Student mode

30
5.1.4 “Sort” button
Click this button and the topic order can be sorted. You can drag-and-drop the topic to change its display
order. Click the “Save” button after you have done.
5.2 Top menu of the topic view
The functions of different buttons are listed as follow:
5.2.1 “Add” button
This button is used to add new activities into the topic. You may refer to section 4.3 for detail.
“Save” button
Drag-and-drop to change order
Top menu of the topic view
“Add’ button

31
5.2.2 “Visible” / “Invisible” button
When the green eye is shown, the whole topic is visible to student.
When the red eye is shown, the whole topic is invisible to students.
5.2.3 “Sort” button
The order of the activity list can be sorted when the “Sort” button is clicked. You can drag-and-drop the
activity to its display order. After that, click “Save” button to save the action.
The whole topic is now visible
The whole topic is now invisible
“Save” button
Drag-and-drop to change order