Embed Size (px)
Citation preview

11
ICE CREAM MAKERATTACHMENT
INSTRUCTIONS
FOR THE WAY IT’S MADE.™
®
1-800-541-6390Details Inside
This attachment is designed exclusively for usewith all KitchenAid® household stand mixers.
Model KICA

1
Table of ContentsHassle-Free Replacement Warranty...........................................Inside Front Cover
Product Registration Card ........................................................Inside Front Cover
Important Safeguards........................................................................................2
Warranty ...........................................................................................................3
For the 50 United States and District of Columbia.......................................3
For Puerto Rico ...........................................................................................4
Arranging for Service After the Warranty Expires.........................................4
Arranging for Service Outside the 50 United States and Puerto Rico ...........4
Ordering Accessories and Replacement Parts .....................................................4
Ice Cream Maker Attachment ............................................................................5
Assembling the Ice Cream Maker Attachment ...................................................6
For Tilt-Head Mixer......................................................................................6
For Bowl-Lift Mixer......................................................................................8
Tips for Making Perfect Ice Cream ...................................................................10
Using the Ice Cream Maker Attachment ..........................................................11
Care and Cleaning ...........................................................................................12
Recipes ............................................................................................................13
We’re so confidentthe quality of ourproducts meets theexacting standards ofKitchenAid that, if yourIce Cream Maker
Attachment should fail within the firstyear of ownership, KitchenAid willarrange to deliver an identical orcomparable replacement to your doorfree of charge and arrange to haveyour “failed” Ice Cream MakerAttachment returned to us. Yourreplacement unit will also be coveredby our one-year full warranty. Pleasefollow these instructions to receivethis quality service.
If you reside in the 50 UnitedStates and your KitchenAid® IceCream Maker Attachment should failwithin the first year of ownership,simply call our toll-free CustomerSatisfaction Center at 1-800-541-6390,8 a.m. to 8 p.m., Monday throughFriday, 10 a.m. to 5 p.m., Saturday,Eastern Time. Give the consultant yourcomplete shipping address. (No P.O.Box Numbers, please.)
When you receive your replacementIce Cream Maker Attachment, use thecarton and packing materials to pack-up your “failed” Ice Cream MakerAttachment. In the carton, includeyour name and address on a sheet ofpaper along with a copy of the proofof purchase (register receipt, creditcard charge slip, etc.).
For a detailed explanation of warrantyterms and conditions, including how toarrange for service outside the UnitedStates, see pages 3 and 4.
Hassle-Free Replacement Warranty
Proof of Purchase and Product Registration
Always keep a copy of the salesreceipt showing the date of purchaseof your Ice Cream Maker Attachment.Proof of purchase will assure you ofin-warranty service.
Before you use your Ice CreamMaker Attachment, please fill out andmail your product registration cardpacked with the unit. This card will
enable us to contact you in theunlikely event of a product safetynotification and assist us in complyingwith the provisions of the ConsumerProduct Safety Act. This card does notverify your warranty.
Please complete the following foryour personal records:
Model Number _______________________________________________________
Serial Number ________________________________________________________
Date Purchased _______________________________________________________
Store Name __________________________________________________________

32
Length of Warranty:
One Year Full Warrantyfrom date of purchase.
KitchenAid Will PayFor Your Choice of:
Hassle-Free Replacementof your Ice CreamMaker Attachment. Seeinside front cover fordetails on how toarrange for service, orcall the CustomerSatisfaction Center toll-free at 1-800-541-6390.
ORThe replacement partsand repair labor coststo correct defects inmaterials andworkmanship. Servicemust be provided by anAuthorized KitchenAidService Center. See theKitchenAid® Ice CreamMaker AttachmentWarranty for PuertoRico on page 4 fordetails on how toarrange for service.
KitchenAid Will NotPay For:
A. Repairs when Ice Cream MakerAttachment is used in other thannormal single familyhome use.
B. Damage resultingfrom accident,alteration, misuse or abuse.
C. Any shipping orhandling costs todeliver your Ice Cream MakerAttachment to an AuthorizedService Center.
D. Replacement partsor repair labor costs for Ice CreamMaker Attachmentoperated outside the 50 United Statesand District ofColumbia.
KITCHENAID DOES NOT ASSUME ANY RESPONSIBILITY FOR INCIDENTALOR CONSEQUENTIAL DAMAGES. Some states do not allow the exclusion orlimitation of incidental or consequential damages, so this exclusion may notapply to you. This warranty gives you specific legal rights and you may alsohave other rights which vary from state to state.
This warranty extends to the purchaser and any succeeding owner for Ice CreamMaker Attachments operated in the 50 United States and District of Columbia.
KitchenAid® Ice Cream Maker AttachmentWarranty for the 50 United States
and District of Columbia
Your safety and the safety of others are very important.
We have provided many important safety messages in this manual and on yourappliance. Always read and obey all safety messages.
This is the safety alert symbol.
This symbol alerts you to potential hazards that can kill or hurt youand others.
All safety messages will follow the safety alert symbol and eitherthe word “DANGER” or “WARNING.” These words mean:
You can be killed or seriously injuredif you don’t immediately followinstructions.
You can be killed or seriously injuredif you don’t follow instructions.
All safety messages will tell you what the potential hazard is, tell you how toreduce the chance of injury, and tell you what can happen if the instructions arenot followed.
DANGER
WARNING
IMPORTANT SAFEGUARDSWhen using electrical appliances, basic safety precautions should always befollowed including the following:
1. Read all instructions.2. To protect against risk of electrical shock, do not put mixer in water or
other liquid.3. Close supervision is necessary when any appliance is used by or near
children.4. Unplug mixer from outlet when not in use, before putting on or taking off
parts and before cleaning.5. Avoid contacting moving parts. Keep fingers out of discharge opening.6. Do not operate the mixer with a damaged cord or plug or after the mixer
malfunctions, or is dropped or damaged in any manner. Return the mixerto the nearest Authorized Service Center for examination, repair orelectrical or mechanical adjustment.
7. The use of attachments not recommended or sold by KitchenAid maycause fire, electric shock or injury.
8. Do not use the mixer outdoors.9. Do not let the cord hang over the edge of table or counter.
10. Do not let cord contact hot surface, including the stove.11. This attachment should not be operated by children and the unit should
be out of reach of children during operation.12. This product is designed for household use only.
SAVE THESE INSTRUCTIONS

Dasher — engages with the DriveAssembly to spread, scrape, and mix icecream batter within the Freeze Bowl.
NOTE: Freeze Bowl must becompletely frozen to make ice cream.
IMPORTANT: Never wash the FreezeBowl in dishwasher.
5
Ice Cream Maker Attachment
Freeze Bowl — once completelyfrozen, liquid within the double wallsof the bowl provides thorough, evenfreezing of ice cream batterthroughout the mixing process.
Freeze Bowl Adapter Ring —attaches to the bottom of the FreezeBowl to fit select Tilt-Head models.
Drive Assembly — attaches to theMotor Head; drives the Dasher on allKitchenAid® Stand Mixers.
4
KitchenAid® Ice Cream Maker AttachmentWarranty for Puerto Rico
A limited one year warranty extendsto the purchaser and any succeedingowner for Ice Cream MakerAttachments operated in Puerto Rico.During the warranty period, all servicemust be handled by an AuthorizedKitchenAid Service Center. Pleasebring the Ice Cream Maker
Attachment, or ship it prepaid andinsured, to the nearest AuthorizedService Center. Call toll-free 1-800-541-6390 to learn the location of aService Center near you. Your repairedIce Cream Maker Attachment will bereturned to you prepaid and insured.
For service information, call toll-free 1-800-541-6390 or write to: Customer Satisfaction Center,KitchenAid Portable Appliances, P.O.Box 218, St. Joseph, MI 49085-0218.
Arranging for Service After the Warranty Expires
Consult your local KitchenAid dealeror the store where you purchased the
Ice Cream Maker Attachment forinformation on how to obtain service.
Arranging for Service Outside the 50 United States and Puerto Rico
To order accessories or replacementparts for your Ice Cream MakerAttachment, call toll-free 1-800-541-6390 or write to:
Customer Satisfaction Center,KitchenAid Portable Appliances, P.O.Box 218, St. Joseph, MI 49085-0218.
Ordering Accessories and Replacement Parts
WARNING
Electrical Shock HazardUnplug before servicing.
Failure to do so can result in death or electrical shock.

To Attach Drive Assembly:
1. Be sure speed-control is still OFFand the mixer is unplugged.
2. Motor Head should still be tilted,and the Freeze Bowl and Dashershould be in place.
3. Determine your mixer model bychecking for a spring on theBeater Shaft, then position theDrive Assembly as illustrated forproper placement.
4. Slip the Drive Assembly onto theMotor Head and press upwarduntil it is securely in place.
5. Lower the Motor Head to engagethe Drive Assembly with the Dasher.
6. Make sure the Motor Head isdown completely.
7. Place locking lever in the LOCKposition.
8. Before mixing, test the lock byattempting to raise the Motor Head.
9. Plug the mixer into a grounded 3-prong outlet.
76
Assembling the Ice Cream Maker Attachmentfor Tilt-Head Mixer*
Assembling the Ice Cream Maker Attachmentfor Tilt-Head Mixer*
To Assemble Freeze Bowl and Dasher:
NOTE: Use the Freeze Bowl immediatelyupon removal from freezer, as it beginsto thaw once removed.
IMPORTANT: Do not pour ice creambatter into the Freeze Bowl until all partsare assembled and the mixer is running.
1. Be sure speed-control is OFF, mixer isunplugged, motor head is tilted, andmixing bowl is removed.
2. Place the Dasher inside the Freeze Bowl.
3. Place the Freeze Bowl on the Bowl-Clamping Plate.
Off/0 Stir
2 4 6 8 10CAUTION: Unplug before inserting of removing parts
4. Gently turn the Freeze Bowl incounterclockwise direction (oppositedirection of mixing bowl) to secure.The Freeze Bowl should fit the Bowl-Clamping Plate tightly. If thebowl feels loose, follow instructionsin the following note.
NOTE: Some Tilt-Head models willrequire the adapter ring to fitproperly. First, attach the Freeze BowlAdapter Ring to the bottom of theFreeze Bowl with a counterclockwiseturn, then follow steps 3-4.
Off/0 S
tir 2 4 6 8 1
0CAUTION: Unplug before inserting of removing parts
CAUT
ION: U
nplu
gbe
fore
inse
rting
orre
mov
ingpa
rts
CAUTION: Unplug before inserting or removing parts.
Off/0 Stir 2 4 6 8 10
Off S tir 2 4 6 8 10
MOTOR HEAD
BOWL-CLAMPING
PLATE
BEATERSHAFT
Spring No SpringNo Step Step
* For Bowl-Lift Mixer, see page 8 and 9. * For Bowl-Lift Mixer, see page 8 and 9.
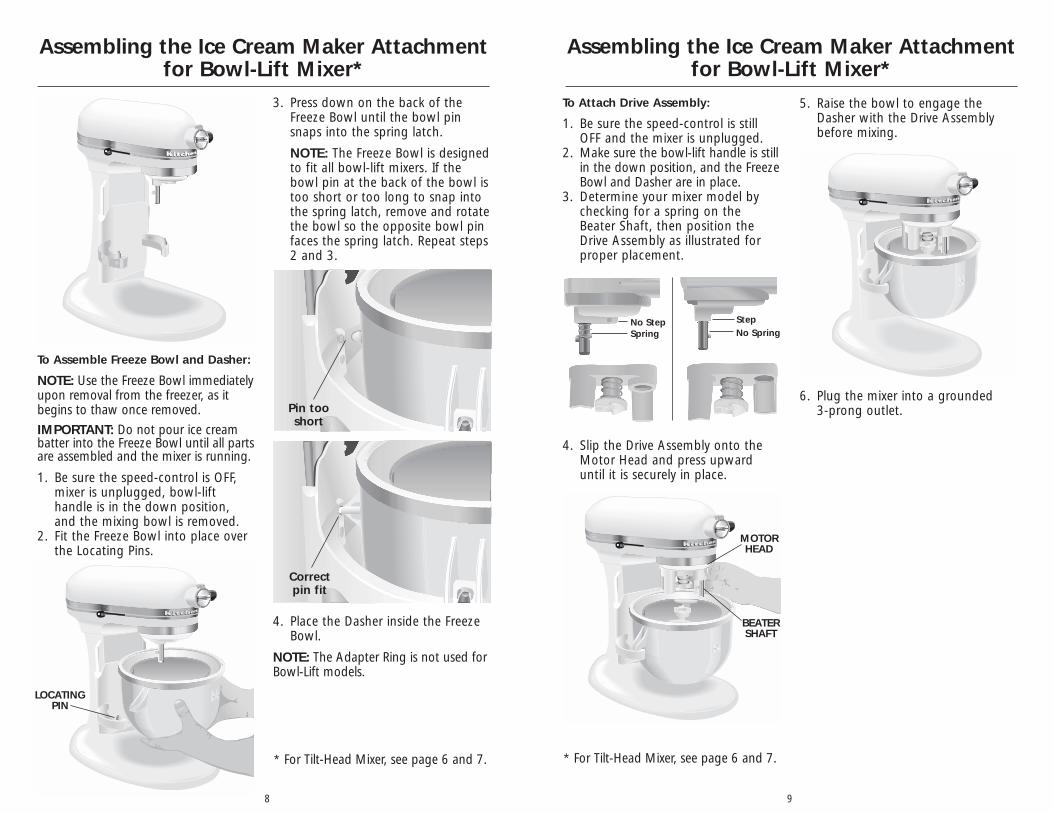
5. Raise the bowl to engage theDasher with the Drive Assemblybefore mixing.
6. Plug the mixer into a grounded 3-prong outlet.
To Attach Drive Assembly:
1. Be sure the speed-control is stillOFF and the mixer is unplugged.
2. Make sure the bowl-lift handle is stillin the down position, and the FreezeBowl and Dasher are in place.
3. Determine your mixer model bychecking for a spring on theBeater Shaft, then position theDrive Assembly as illustrated forproper placement.
4. Slip the Drive Assembly onto theMotor Head and press upwarduntil it is securely in place.
98
Assembling the Ice Cream Maker Attachmentfor Bowl-Lift Mixer*
Assembling the Ice Cream Maker Attachmentfor Bowl-Lift Mixer*
To Assemble Freeze Bowl and Dasher:
NOTE: Use the Freeze Bowl immediatelyupon removal from the freezer, as itbegins to thaw once removed.IMPORTANT: Do not pour ice creambatter into the Freeze Bowl until all partsare assembled and the mixer is running.
1. Be sure the speed-control is OFF,mixer is unplugged, bowl-lifthandle is in the down position,and the mixing bowl is removed.
2. Fit the Freeze Bowl into place overthe Locating Pins.
OFF/010
2 4 6 8
STIRRESET
3. Press down on the back of theFreeze Bowl until the bowl pinsnaps into the spring latch.
NOTE: The Freeze Bowl is designedto fit all bowl-lift mixers. If thebowl pin at the back of the bowl istoo short or too long to snap intothe spring latch, remove and rotatethe bowl so the opposite bowl pinfaces the spring latch. Repeat steps2 and 3.
4. Place the Dasher inside the FreezeBowl.
NOTE: The Adapter Ring is not used forBowl-Lift models.
Pin tooshort
Correctpin fit
LOCATINGPIN
MOTORHEAD
BEATERSHAFT
Spring No SpringNo Step Step
* For Tilt-Head Mixer, see page 6 and 7. * For Tilt-Head Mixer, see page 6 and 7.

11
NOTE: If the Dasher begins to slip andmake a clicking noise, this is an audibleindicator that the ice cream is done.
5. Remove the Dasher and FreezeBowl and, using a rubber spatula ora plastic or wooden spoon, transferice cream to dessert dishes or to anairtight container for storage.
NOTE: The Ice Cream MakerAttachment will create a soft-consistency ice cream. For firmerconsistency, store ice cream in anairtight container in the freezer for 2-4 hours.IMPORTANT: Do not store ice creamin the Freeze Bowl in the freezer.Prying hard ice cream out of theFreeze Bowl with metal scoops orutensils may damage the Freeze Bowl.
Using the Ice Cream Maker AttachmentTo Use:IMPORTANT: Pouring batter into theFreeze Bowl before starting the mixermay cause the batter to freezeprematurely and lock the dasher.
1. Store the Freeze Bowl in the freezerfor a minimum of 15 hours.
2. Prepare ice cream batter in advance(see “Tips for Perfect Ice Cream”).
3. Assemble and engage the FreezeBowl, Dasher, and Drive Assembly.
4. Set the mixer to “stir” speed andpour the ice cream batter into theFreeze Bowl; mix 20-30 minutes, orto desired consistency. Add anysolid ingredients such as fruits,nuts, candies, or chocolate chips,after 12-15 minutes of the mixingprocess.
10
Tips for Making Perfect Ice Cream• The Freeze Bowl must be
completely frozen to make icecream or other frozen desserts.
• For best results, store the FreezeBowl in the back of your freezerwhere the temperature is coldestfor at least 15 hours. Adjustingyour freezer to its coldest settingwill help the Freeze Bowl makefirmer ice cream faster.
• Storing the Freeze Bowl in thefreezer at all times allows you theflexibility to make your favoritefrozen desserts on a whim.
• For recipes that need to be pre-cooked, allow the mixture to cool completely in the refrigerator.
• All batter recipes need to becompletely chilled in the refrigeratorbefore making ice cream.
• Most ice cream recipes call for acombination of cream, milk, eggs,and sugar. The type of cream youchoose will determine how rich inflavor and how creamy the textureof the finished result. The higherpercentage of fat in the cream, thericher and creamier your ice creamwill be. Any combination can beused, as long as the liquidmeasurement stays the same.Lighter ice creams can be made byusing more milk than cream, or byeliminating cream. Skim milk willwork, but there will be anoticeable difference in texture.
TYPE OF CREAM FAT %
Heavy Cream...............................36%Whipping Cream.........................30%Light Cream ................................18%Half and Half ..............................10%
• When mixing an ice cream recipethat calls for solid ingredients suchas fruits, nuts, candies, orchocolate chips, it is best to waituntil the final two minutes of themixing process to add them.
• Ice Cream making is a two-partprocess: conversion and ripening.Mixing batter into ice cream is theconversion process in which the icecream consistency will be similar tosoft serve. The ripening processtakes place in the freezer, wherethe ice cream will harden over aperiod of 2-4 hours.
• Follow recommended mixerspeeds. Faster speeds will slow theconversion process.
• Batter volume grows significantlyduring the conversion process.Initial batter volume should notexceed 46 oz. to produce 2 quartsof ice cream.
• Keep in mind that freezing subduessweetness, so recipes won’t tastequite as sweet once they are frozen.

1312
Care and CleaningAllow the Freeze Bowl to reach roomtemperature before attempting toclean it.
The Drive Assembly, Dasher, and BowlAdapter Ring are dishwasher-safe.
Wash the Freeze Bowl in hot waterwith mild detergent. Thoroughly drythe Freeze Bowl before storing it inthe freezer.
IMPORTANT: Never wash the FreezeBowl in the dishwasher. Hand-washwith warm water and mild detergentonly.
French Vanilla Ice Cream21⁄2 cups half-and-half
8 egg yolks1 cup sugar
21⁄2 cups whipping cream4 teaspoons vanilla1⁄8 teaspoon salt
In medium saucepan over medium heat, heat half-and-half until very hot but not boiling, stirringoften. Remove from heat; set aside.
Place egg yolks and sugar in mixer bowl. Attachbowl and wire whip to mixer. Turn to Speed 2 andmix about 30 seconds, or until well blended andslightly thickened. Continuing on Speed 2, verygradually add half-and-half; mix until blended.Return half-and-half mixture to medium saucepan;cook over medium heat until small bubbles formaround edge and mixture is steamy, stirringconstantly. Do not boil. Transfer half-and-halfmixture into large bowl; stir in whipping cream,vanilla, and salt. Cover and chill thoroughly, at least8 hours.
Assemble and engage freeze bowl, dasher, anddrive-body interface as directed in attachmentinstructions. Turn to STIR Speed (Speed 1). Using acontainer with a spout, pour mixture into freezebowl. Continue on STIR (Speed 1) for 15 to 20minutes or until desired consistency. Immediatelytransfer ice cream into serving dishes, or freeze inan airtight container.
Yield: 16 servings (1⁄2 cup per serving).
Per Serving: About 260 cal, 3 g pro, 16 g carb, 20 gtotal fat, 12 g sat fat, 165 mg chol, 50 mg sod.
VARIATIONS
Fresh Strawberry Ice CreamIn medium bowl, combine 2 cups chopped, freshstrawberries (or other fresh fruit) and 2 to 3teaspoons sugar, if desired. Let stand while icecream is processing. Add during last 3 to 5 minutesof freeze time.
Yield: 20 servings (1⁄2 cup per serving).
Per Serving: About 210 cal, 3 g pro, 14 g carb, 16 gtotal fat, 10 g sat fat, 135 mg chol, 40 mg sod.
Cookies ’n Cream Ice CreamAdd 11⁄2 cups chopped, cream-filled chocolatesandwich cookies (or other cookies, nuts, or candy)during last 1 to 2 minutes of freeze time.
Yield: 19 servings (1⁄2 cup per serving).
Per Serving: About 230 cal, 3 g pro, 16 g carb, 18 gtotal fat, 10 g sat fat, 140 mg chol, 70 mg sod.

1514
Minted Mango Sherbet1 cup sugar3 cups whole milk1⁄4 cup light corn syrup3 ripe mangoes, peeled,
seeded, and chopped(about 3 cups)
2 tablespoons freshlime or lemon juice
2 teaspoons finelychopped fresh mint,if desired
In medium saucepan, combine sugar, milk, and cornsyrup. Heat over medium heat, stirring often, untilvery hot but not boiling. Remove from heat; set aside.
Place mangoes and lime juice in food processorwork bowl; use the multipurpose blade to processuntil smooth. Add mango mixture and mint to milkmixture. Cover and chill thoroughly, at least 8 hours.
Assemble and engage freeze bowl, dasher, anddrive-body interface as directed in attachmentinstructions. Turn to STIR Speed (Speed 1). Using acontainer with a spout, pour mixture into freezebowl. Continue on STIR (Speed 1) for 7 to 12minutes or until desired consistency. Immediatelytransfer sherbet into serving dishes, or freeze in anairtight container.
Yield: 14 servings (1⁄2 cup per serving).
Per Serving: About 130 cal, 2 g pro, 29 g carb, 2 gtotal fat, 1 g sat fat, 5 mg chol, 30 mg sod.
Triple Chocolate Ice Cream2 cups whipping
cream, divided2 squares (1 oz. each)
semisweet bakingchocolate, cut intochunks
2 squares (1 oz. each)unsweetened bakingchocolate, cut intochunks
2 cups half-and-half1 cup sugar1⁄3 cup unsweetened
cocoa powder8 egg yolks4 teaspoons vanilla1⁄8 teaspoon salt4 bars (1.55 oz. each)
milk chocolate,chopped (about 11⁄2 cups)
In small saucepan, place 1⁄2 cup whipping cream,semisweet chocolate, and unsweetened chocolate.Heat over medium-low heat until chocolate melts,stirring frequently. Remove from heat; set aside. In medium saucepan over medium heat, heat half-and-half until very hot but not boiling, stirringoften. Remove from heat; set aside.
In small bowl, combine sugar and cocoa powder. Setaside. Place egg yolks in mixer bowl. Attach bowl andwire whip to mixer. Turn to Speed 2 and gradually addsugar mixture; mix about 30 seconds, or until wellblended and slightly thickened. Continuing on Speed 2, very gradually add chocolate mixture andhalf-and-half; mix until well blended.
Return half-and-half mixture to medium saucepan;stirring constantly, cook over medium heat until smallbubbles form around edge and mixture is steamy. Do not boil. Transfer half-and-half mixture into largebowl; stir in remaining 11⁄2 cups whipping cream,vanilla, and salt. Cover and chill thoroughly, at least 8 hours.
Assemble and engage freeze bowl, dasher, and drive-body interface as directed in attachment instructions.Turn to STIR Speed (Speed 1). Using a container witha spout, pour mixture into freeze bowl. Continue onSTIR (Speed 1) for 10 to 15 minutes or until desiredconsistency, adding milk chocolate during last 1 to 2minutes of freeze time. Immediately transfer ice creaminto serving dishes, or freeze in an airtight container.
Yield: 16 servings (1⁄2 cup per serving).
Per Serving: About 340 cal, 5 g pro, 30 g carb, 24 gtotal fat, 15 g sat fat, 160 mg chol, 50 mg sod.

1716
Fresh Pineapple Sorbet1 cup cold water 1 cup sugar1⁄4 cup light corn syrup1⁄8 teaspoon salt
51⁄2 cups chilled freshpineapple chunks(about 1 pineapple),divided
1 tablespoon fresh limeor lemon juice
In medium bowl, combine water, sugar, corn syrup,and salt. Mix well to dissolve sugar; set aside. Finelychop 1⁄2 cup pineapple; set aside.
Place remaining 5 cups pineapple in food processorwork bowl with multipurpose blade; add lime juiceand process until smooth. Add sugar mixture; processuntil blended. (Process in batches if necessary.)
Assemble and engage freeze bowl, dasher, and drive-body interface as directed in attachment instructions.Turn to Stir Speed (Speed 1). Using container withspout, pour mixture into freeze bowl. Continue onSTIR (Speed 1) for 15 to 20 minutes or until desiredconsistency, adding reserved 1⁄2 cup chopped pineappleduring last 2 to 3 minutes of freeze time. Immediatelytransfer sorbet into serving dishes, or freeze in anairtight container.
Yield: 16 servings (1⁄2 cup per serving).
Per Serving: About 80 cal, 0 g pro, 20 g carb, 0 gtotal fat, 0 g sat fat, 0 mg chol, 25 mg sod.
VARIATION
Peach SorbetSubstitute 51⁄2 cups sliced, peeled, and pittedpeaches (fresh or frozen, thawed) for pineapple.Prepare and freeze as directed.
Yield: 16 servings (1⁄2 cup per serving).
Per Serving: About 90 cal, 1 g pro, 22 g carb, 0 gtotal fat, 0 g sat fat, 0 mg chol, 25 mg sod.
Caramel Pecan Ice Cream31⁄2 cups whole milk
1 can (14 oz.)sweetenedcondensed milk
1 cup prepared hotcaramel orbutterscotch carameltopping (about 12 oz.)
1 package (3.4 oz.)instant cheesecakepudding and piefilling mix
1 teaspoon vanilla1⁄8 teaspoon salt
1-11⁄2 cups coarselychopped pecans
In medium bowl, place all ingredients except pecans.Whisk until well blended and pudding is dissolved.Cover and chill thoroughly, at least 6 hours.
Assemble and engage freeze bowl, dasher, and drive-body interface as directed in attachment instructions.Turn to STIR Speed (Speed 1). Using container withspout, pour mixture into freeze bowl. Continue onSTIR (Speed 1) for 15-20 minutes or until desiredconsistency, adding pecans during last 1 minute offreeze time. Immediately transfer ice cream intoserving dishes, or freeze in an airtight container.
Yield: 16 servings (1⁄2 cup per serving).
Per Serving: About 240 cal, 5 g pro, 35 g carb, 10 gtotal fat, 3.5 g sat fat, 15 mg chol, 230 mg sod.

® Registered trademark/™ Trademark/the shape of the mixer is a trademark of KitchenAid, U.S.A.
9708409 © 2004. All rights reserved. (dZw304)
FOR THE WAY IT’S MADE.™
®