Embed Size (px)
Citation preview
ibm.com/redbooks Redpaper
Front cover
LDAP Authentication for IBM DS8000 Storage
Bert DufrasneJuan Brandenburg
Configure the required Tivoli Storage Productivity Center 5.2
Add Identity Security Manager and Jazz for Service Management
Benefit from single sign-on

International Technical Support Organization
LDAP Authentication for IBM DS8000 Storage
July 2014
REDP-4505-01
© Copyright International Business Machines Corporation 2009, 2014. All rights reserved.Note to U.S. Government Users Restricted Rights -- Use, duplication or disclosure restricted by GSA ADP ScheduleContract with IBM Corp.
Second Edition (July 2014)
This edition applies to the IBM DS8870 with Licensed Machine Code (LMC) 7.7.20.xx.xx (bundle version 87.20.xxx.xx) or later.
Note: Before using this information and the product it supports, read the information in “Notices” on page v.
Contents
Notices . . . . . . . . . . . . . . . . . . . . . . . . . . . . . . . . . . . . . . . . . . . . . . . . . . . . . . . . . . . . . . . . . .vTrademarks . . . . . . . . . . . . . . . . . . . . . . . . . . . . . . . . . . . . . . . . . . . . . . . . . . . . . . . . . . . . . . vi
Preface . . . . . . . . . . . . . . . . . . . . . . . . . . . . . . . . . . . . . . . . . . . . . . . . . . . . . . . . . . . . . . . . . viiAuthors. . . . . . . . . . . . . . . . . . . . . . . . . . . . . . . . . . . . . . . . . . . . . . . . . . . . . . . . . . . . . . . . . . viiBecome a published author . . . . . . . . . . . . . . . . . . . . . . . . . . . . . . . . . . . . . . . . . . . . . . . . . . viiComments welcome. . . . . . . . . . . . . . . . . . . . . . . . . . . . . . . . . . . . . . . . . . . . . . . . . . . . . . . viii
Chapter 1. Benefits of LDAP user authentication for the DS8000 . . . . . . . . . . . . . . . . . 11.1 DS8000 basic user management and access. . . . . . . . . . . . . . . . . . . . . . . . . . . . . . . . . 21.2 Directory services and LDAP . . . . . . . . . . . . . . . . . . . . . . . . . . . . . . . . . . . . . . . . . . . . . 51.3 Overview of LDAP-based authentication for the DS8000 . . . . . . . . . . . . . . . . . . . . . . . . 71.4 Benefits for DS8000 administrators and users . . . . . . . . . . . . . . . . . . . . . . . . . . . . . . . . 8
Chapter 2. Implementing LDAP authentication for the DS8000 . . . . . . . . . . . . . . . . . . 112.1 Test environment . . . . . . . . . . . . . . . . . . . . . . . . . . . . . . . . . . . . . . . . . . . . . . . . . . . . . 122.2 Install the LDAP servers . . . . . . . . . . . . . . . . . . . . . . . . . . . . . . . . . . . . . . . . . . . . . . . . 132.3 Install and configure the Tivoli Storage Productivity Center servers . . . . . . . . . . . . . . . 132.4 Create the certificates and the truststore file. . . . . . . . . . . . . . . . . . . . . . . . . . . . . . . . . 14
2.4.1 Create the certificate and the truststore file on TPC_server1 . . . . . . . . . . . . . . . . 142.4.2 Set up TPC_server2 . . . . . . . . . . . . . . . . . . . . . . . . . . . . . . . . . . . . . . . . . . . . . . . 192.4.3 Copy the truststore file from TPC_server1 to TPC_server2 . . . . . . . . . . . . . . . . . 24
2.5 Configure the DS8000 for LDAP authentication . . . . . . . . . . . . . . . . . . . . . . . . . . . . . . 242.5.1 Configuring DS8000 LDAP authentication by using the GUI . . . . . . . . . . . . . . . . 242.5.2 Configuring DS8000 LDAP authentication by using the DS CLI . . . . . . . . . . . . . . 30
Chapter 3. User, group, and role administration . . . . . . . . . . . . . . . . . . . . . . . . . . . . . . 333.1 DS8000 to LDAP groups mappings using the DS GUI . . . . . . . . . . . . . . . . . . . . . . . . . 343.2 DS8000 to LDAP groups mappings using the DSCLI . . . . . . . . . . . . . . . . . . . . . . . . . . 35
Appendix A. Installing Tivoli Storage Productivity Center 5.2 onWindows Server 2008 R2 . . . . . . . . . . . . . . . . . . . . . . . . . . . . . . . . . . . . . . 37
A.1 Preparation steps . . . . . . . . . . . . . . . . . . . . . . . . . . . . . . . . . . . . . . . . . . . . . . . . . . . . . 38A.2 Install Jazz for Service Management . . . . . . . . . . . . . . . . . . . . . . . . . . . . . . . . . . . . . . 39A.3 Install Tivoli Storage Productivity Center . . . . . . . . . . . . . . . . . . . . . . . . . . . . . . . . . . . 42
Appendix B. Configuring Tivoli Storage Productivity Center for DS8000 LDAP authentication . . . . . . . . . . . . . . . . . . . . . . . . . . . . . . . . . . . . . . . . . . . . . . . 47
B.1 Configure WebSphere Integrated Solutions Center for Tivoli Storage Productivity Center with LDAP. . . . . . . . . . . . . . . . . . . . . . . . . . . . . . . . . . . . . . . . . . . . . . . . . . . . . 48
B.2 Configure federated repositories . . . . . . . . . . . . . . . . . . . . . . . . . . . . . . . . . . . . . . . . . 50B.3 Add a base entry to a realm . . . . . . . . . . . . . . . . . . . . . . . . . . . . . . . . . . . . . . . . . . . . . 51B.4 Set additional properties . . . . . . . . . . . . . . . . . . . . . . . . . . . . . . . . . . . . . . . . . . . . . . . . 54B.5 Manage users and groups . . . . . . . . . . . . . . . . . . . . . . . . . . . . . . . . . . . . . . . . . . . . . . 56B.6 Configure Tivoli Storage Productivity Center for LDAP . . . . . . . . . . . . . . . . . . . . . . . . 59B.7 Configure WebSphere Integrated Solution Center for Jazz for Service
Management with LDAP. . . . . . . . . . . . . . . . . . . . . . . . . . . . . . . . . . . . . . . . . . . . . . . . 60
Appendix C. Installing IBM Security Directory Server. . . . . . . . . . . . . . . . . . . . . . . . . . 63C.1 Install the server . . . . . . . . . . . . . . . . . . . . . . . . . . . . . . . . . . . . . . . . . . . . . . . . . . . . . . 64
© Copyright IBM Corp. 2009, 2014. All rights reserved. iii
C.2 Configure the server instance. . . . . . . . . . . . . . . . . . . . . . . . . . . . . . . . . . . . . . . . . . . . 67
Appendix D. LDAP structure overview . . . . . . . . . . . . . . . . . . . . . . . . . . . . . . . . . . . . . . 75D.1 Directory tree details. . . . . . . . . . . . . . . . . . . . . . . . . . . . . . . . . . . . . . . . . . . . . . . . . . . 76D.2 Directory with DS8000 user information . . . . . . . . . . . . . . . . . . . . . . . . . . . . . . . . . . . . 77
Related publications . . . . . . . . . . . . . . . . . . . . . . . . . . . . . . . . . . . . . . . . . . . . . . . . . . . . . 79IBM Redbooks publications . . . . . . . . . . . . . . . . . . . . . . . . . . . . . . . . . . . . . . . . . . . . . . . . . 79Other publications . . . . . . . . . . . . . . . . . . . . . . . . . . . . . . . . . . . . . . . . . . . . . . . . . . . . . . . . 79Online resources . . . . . . . . . . . . . . . . . . . . . . . . . . . . . . . . . . . . . . . . . . . . . . . . . . . . . . . . . 79How to get IBM Redbooks publications . . . . . . . . . . . . . . . . . . . . . . . . . . . . . . . . . . . . . . . . 80Help from IBM . . . . . . . . . . . . . . . . . . . . . . . . . . . . . . . . . . . . . . . . . . . . . . . . . . . . . . . . . . . 80
iv LDAP Authentication for IBM DS8000 Storage
Notices
This information was developed for products and services offered in the U.S.A.
IBM may not offer the products, services, or features discussed in this document in other countries. Consult your local IBM representative for information on the products and services currently available in your area. Any reference to an IBM product, program, or service is not intended to state or imply that only that IBM product, program, or service may be used. Any functionally equivalent product, program, or service that does not infringe any IBM intellectual property right may be used instead. However, it is the user's responsibility to evaluate and verify the operation of any non-IBM product, program, or service.
IBM may have patents or pending patent applications covering subject matter described in this document. The furnishing of this document does not grant you any license to these patents. You can send license inquiries, in writing, to: IBM Director of Licensing, IBM Corporation, North Castle Drive, Armonk, NY 10504-1785 U.S.A.
The following paragraph does not apply to the United Kingdom or any other country where such provisions are inconsistent with local law: INTERNATIONAL BUSINESS MACHINES CORPORATION PROVIDES THIS PUBLICATION “AS IS” WITHOUT WARRANTY OF ANY KIND, EITHER EXPRESS OR IMPLIED, INCLUDING, BUT NOT LIMITED TO, THE IMPLIED WARRANTIES OF NON-INFRINGEMENT, MERCHANTABILITY OR FITNESS FOR A PARTICULAR PURPOSE. Some states do not allow disclaimer of express or implied warranties in certain transactions, therefore, this statement may not apply to you.
This information could include technical inaccuracies or typographical errors. Changes are periodically made to the information herein; these changes will be incorporated in new editions of the publication. IBM may make improvements and/or changes in the product(s) and/or the program(s) described in this publication at any time without notice.
Any references in this information to non-IBM websites are provided for convenience only and do not in any manner serve as an endorsement of those websites. The materials at those websites are not part of the materials for this IBM product and use of those websites is at your own risk.
IBM may use or distribute any of the information you supply in any way it believes appropriate without incurring any obligation to you.
Any performance data contained herein was determined in a controlled environment. Therefore, the results obtained in other operating environments may vary significantly. Some measurements may have been made on development-level systems and there is no guarantee that these measurements will be the same on generally available systems. Furthermore, some measurements may have been estimated through extrapolation. Actual results may vary. Users of this document should verify the applicable data for their specific environment.
Information concerning non-IBM products was obtained from the suppliers of those products, their published announcements or other publicly available sources. IBM has not tested those products and cannot confirm the accuracy of performance, compatibility or any other claims related to non-IBM products. Questions on the capabilities of non-IBM products should be addressed to the suppliers of those products.
This information contains examples of data and reports used in daily business operations. To illustrate them as completely as possible, the examples include the names of individuals, companies, brands, and products. All of these names are fictitious and any similarity to the names and addresses used by an actual business enterprise is entirely coincidental.
COPYRIGHT LICENSE:
This information contains sample application programs in source language, which illustrate programming techniques on various operating platforms. You may copy, modify, and distribute these sample programs in any form without payment to IBM, for the purposes of developing, using, marketing or distributing application programs conforming to the application programming interface for the operating platform for which the sample programs are written. These examples have not been thoroughly tested under all conditions. IBM, therefore, cannot guarantee or imply reliability, serviceability, or function of these programs.
© Copyright IBM Corp. 2009, 2014. All rights reserved. v
Trademarks
IBM, the IBM logo, and ibm.com are trademarks or registered trademarks of International Business Machines Corporation in the United States, other countries, or both. These and other IBM trademarked terms are marked on their first occurrence in this information with the appropriate symbol (® or ™), indicating US registered or common law trademarks owned by IBM at the time this information was published. Such trademarks may also be registered or common law trademarks in other countries. A current list of IBM trademarks is available on the Web at http://www.ibm.com/legal/copytrade.shtml
The following terms are trademarks of the International Business Machines Corporation in the United States, other countries, or both:
AIX®DB2®DS8000®Enterprise Storage Server®i5/OS™IBM®
Jazz™RDN®Redbooks®Redpaper™Redbooks (logo) ®System Storage®
System x®Tivoli®WebSphere®z/OS®
The following terms are trademarks of other companies:
Linux is a trademark of Linus Torvalds in the United States, other countries, or both.
Microsoft, Windows, and the Windows logo are trademarks of Microsoft Corporation in the United States, other countries, or both.
Java, and all Java-based trademarks and logos are trademarks or registered trademarks of Oracle and/or its affiliates.
Other company, product, or service names may be trademarks or service marks of others.
vi LDAP Authentication for IBM DS8000 Storage
Preface
The IBM® DS8000® series includes the option to replace the locally based user ID and password administration with a centralized directory based approach. This offers a single sign-on capability for multiple DS8000 servers and, possibly, other servers in your environment.
This IBM Redpaper™ publication helps DS8000 storage administrators understand the concepts and benefits of a centralized directory. It provides information that is required for implementing a DS8000 authentication approach that is based on the Lightweight Directory Access Protocol (LDAP).
This edition applies particularly to the IBM DS8870 with Licensed Machine Code (LMC) 7.7.20.xx.xx or later.
Authors
This paper was produced by a team of specialists from around the world working with the IBM International Technical Support Organization (ITSO).
Bert Dufrasne is an IBM Certified IT Specialist and Project Leader for IBM System Storage® disk products at the ITSO San Jose Center. He has worked at IBM in various IT areas. He has written many IBM Redbooks® publications and has developed and taught technical workshops. Before joining the ITSO, he worked for IBM Global Services as an Application Architect. He holds a Master’s degree in Electrical Engineering.
Juan Brandenburg is a Product Field Engineer for the DS8000 in the United States. He is a graduate of the University of Arizona and holds a Bachelor’s of Engineering Management degree in Computer Engineering. His areas of experience for hardware include the DS8000 series and IBM System x® servers. Juan has been working for IBM for nine years in the areas of storage engineering and disaster recovery solutions. He has many years of experience in scripting for Linux, IBM AIX®, and Microsoft Windows environments. Juan has continuously participated in IBM technical competitions and has won awards, such as the Distinguished Engineer Award for the 2006 Tech Connect competition and the Golden Eagle Coin in 2013, for excellent product delivery and customer satisfaction.
A special thank you to Flavio Gondim De Morais of IBM Brazil for his help in setting up the environment that was used in preparation of this paper.
Thanks to the following people for their contributions to this project:
Jeff Cook, Jean-Francois Lepine, Stephen Manthorpe, and Maged Sallam
Become a published author
Join us for a two- to six-week residency program. Help write a book dealing with specific products or solutions, while getting hands-on experience with leading-edge technologies. You will have the opportunity to team with IBM technical professionals, Business Partners, and Clients.
© Copyright IBM Corp. 2009, 2014. All rights reserved. vii
Your efforts will help increase product acceptance and customer satisfaction. As a bonus, you will develop a network of contacts in IBM development labs, and increase your productivity and marketability.
Find out more about the residency program, browse the residency index, and apply online at:
ibm.com/redbooks/residencies.html
Comments welcome
Your comments are important to us.
We want our papers to be as helpful as possible. Send us your comments about this paper or other IBM Redbooks in one of the following ways:
� Use the online Contact us review Redbooks form found:
ibm.com/redbooks
� Send your comments by e-mail:
� Mail your comments:
IBM Corporation, International Technical Support OrganizationDept. HYTD Mail Station P0992455 South RoadPoughkeepsie, NY 12601-5400
viii LDAP Authentication for IBM DS8000 Storage
Chapter 1. Benefits of LDAP user authentication for the DS8000
The IBM DS8000 storage system allows directory services-based user authentication. This capability relies on some of the unique features of IBM Tivoli® Storage Productivity Center, IBM WebSphere® Integrated Server, and IBM Jazz™ for Service Management in conjunction with the Lightweight Directory Access Protocol (LDAP).
The DS8000 still supports local user management (basic user management). Maintaining local repositories of users and their permissions is simple and convenient when dealing only with a small number of users and a small number of DS8000 servers or other systems. However, as the number of users and interconnected systems grows, authentication management quickly becomes difficult and time-consuming.
The benefits of a centralized user management approach can be substantial when considering the size and complexity of the overall IT environment. In this chapter, we review some of the benefits of this approach. Although the benefits from LDAP can be significant, you must also evaluate the substantial planning that is required and the complexity of deploying centralized directory services if they are not already in place.
We also briefly review the DS8000 local user management and user access methods. In addition, we provide an overview of the LDAP-based authentication, the technology used, and the potential benefits.
© Copyright IBM Corp. 2009, 2014. All rights reserved. 1
1.1 DS8000 basic user management and access
Basic user management for the DS8000 is based on the definition of user IDs, passwords, roles, and permissions. This information is stored in a user repository and maintained locally at the DS8000 Hardware Management Console (HMC). The user repository is specific to a particular DS8000 and cannot be shared with other DS8000 servers in the enterprise. Consequently, if the same individuals must be both administrators and users of multiple DS8000 servers within the enterprise, their user IDs, passwords, and roles must be created separately and maintained individually for each DS8000 server.
An administrator user ID is preconfigured in the DS8000 with the following defaults:
User ID adminPassword admin
Whenever a user is added, an initial password is assigned by the administrator. At the first sign-on, users must change their passwords. The user ID is deactivated if an invalid password is entered and the number of attempts is more than the limit defined by the administrator as part of the security settings.
The password for each user account must adhere to the following rules:
� Length must be between 6 and 16 characters� Must begin and end with a letter� Must have at least five letters� Must contain at least one number� Cannot be identical to the user ID� Cannot be a previous password
General password settings include the time in days after which passwords expire and a number that identifies the number of failed logins that are allowed.
User management is restricted to the following predefined user roles:
Administrator Allows access to all storage management console server service methods and all storage image resources
Logical operator Allows access to service methods and resources that relate to logical volumes, hosts, host ports, logical subsystems, and volume groups, excluding security methods
Physical operator Allows access to physical configuration service methods and resources, including Storage Complex, Storage Image, Rank, Array, and Extent Pool objects
Copy Services operator Allows access to all Copy Services service methods and resources, excluding security methods
Monitor Allows access to list and show commands and provides access to all read-only, non-secure management console server service methods and resources
No access Does not allow access to any service method or storage image resources (y default, this user role is assigned to any user account in the security repository that is not associated with any other user group)
Communication between the DS8000 HMC and the administrative clients is managed by a client/server connection between the DS Network Interface server (also known as the IBM Enterprise Storage Server® Network Interface, or ESSNI server) on the HMC and the host
2 LDAP Authentication for IBM DS8000 Storage
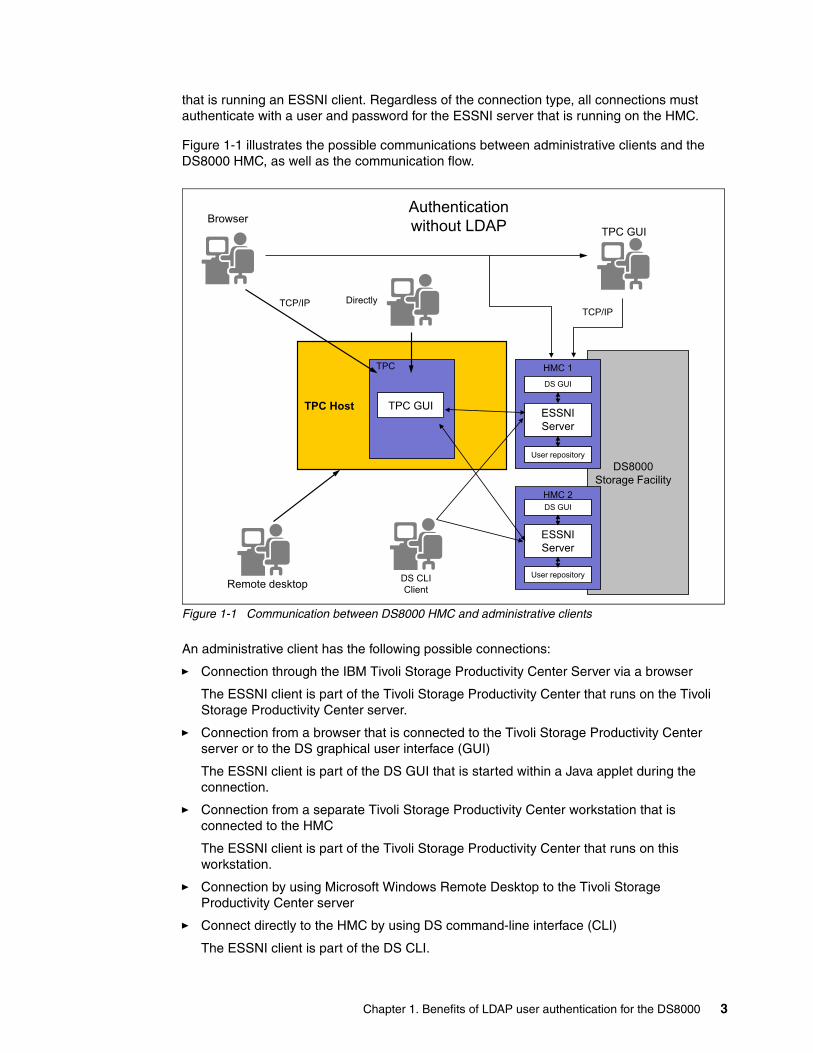
that is running an ESSNI client. Regardless of the connection type, all connections must authenticate with a user and password for the ESSNI server that is running on the HMC.
Figure 1-1 illustrates the possible communications between administrative clients and the DS8000 HMC, as well as the communication flow.
Figure 1-1 Communication between DS8000 HMC and administrative clients
An administrative client has the following possible connections:
� Connection through the IBM Tivoli Storage Productivity Center Server via a browser
The ESSNI client is part of the Tivoli Storage Productivity Center that runs on the Tivoli Storage Productivity Center server.
� Connection from a browser that is connected to the Tivoli Storage Productivity Center server or to the DS graphical user interface (GUI)
The ESSNI client is part of the DS GUI that is started within a Java applet during the connection.
� Connection from a separate Tivoli Storage Productivity Center workstation that is connected to the HMC
The ESSNI client is part of the Tivoli Storage Productivity Center that runs on this workstation.
� Connection by using Microsoft Windows Remote Desktop to the Tivoli Storage Productivity Center server
� Connect directly to the HMC by using DS command-line interface (CLI)
The ESSNI client is part of the DS CLI.
DS8000Storage Facility
ESSNIServer
HMC 2
User repository
DS GUI
ESSNIServer
User repository
DS GUI
HMC 1
TPC GUI
TPC
TPC Host
Directly
TPC GUI
TCP/IPTCP/IP
Browser
Remote desktop DS CLIClient
Authentication without LDAP
Chapter 1. Benefits of LDAP user authentication for the DS8000 3
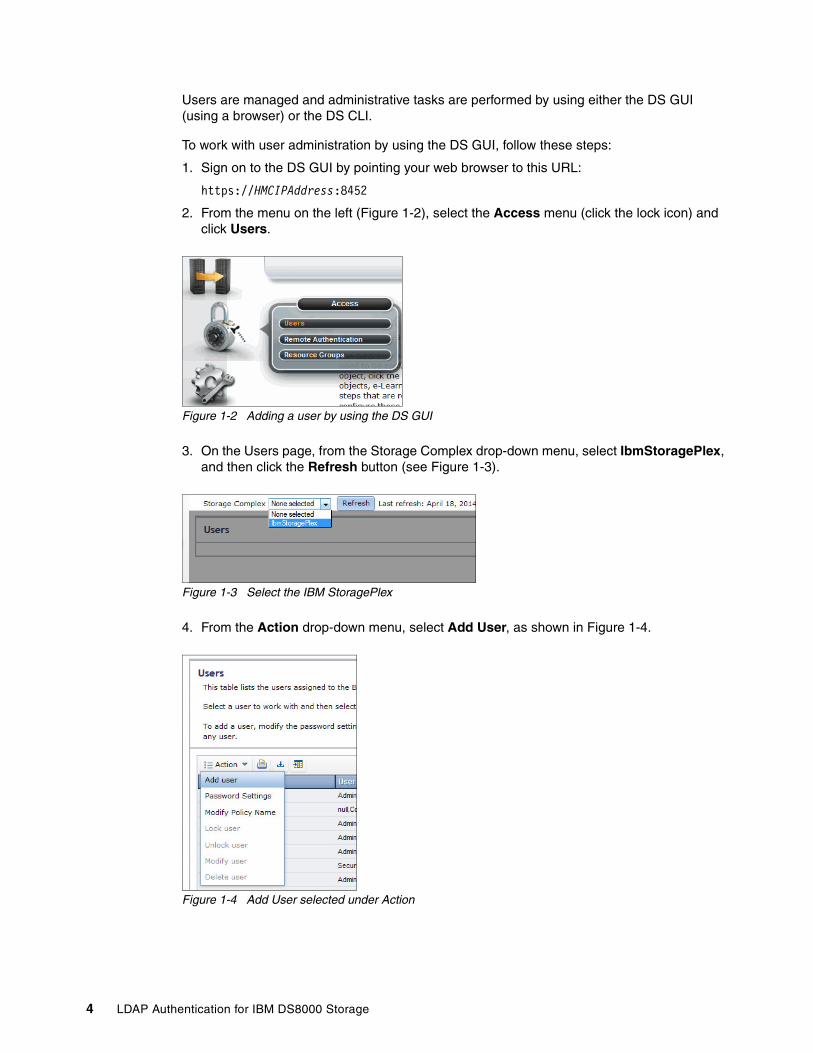
Users are managed and administrative tasks are performed by using either the DS GUI (using a browser) or the DS CLI.
To work with user administration by using the DS GUI, follow these steps:
1. Sign on to the DS GUI by pointing your web browser to this URL:
https://HMCIPAddress:8452
2. From the menu on the left (Figure 1-2), select the Access menu (click the lock icon) and click Users.
Figure 1-2 Adding a user by using the DS GUI
3. On the Users page, from the Storage Complex drop-down menu, select IbmStoragePlex, and then click the Refresh button (see Figure 1-3).
Figure 1-3 Select the IBM StoragePlex
4. From the Action drop-down menu, select Add User, as shown in Figure 1-4.
Figure 1-4 Add User selected under Action
4 LDAP Authentication for IBM DS8000 Storage
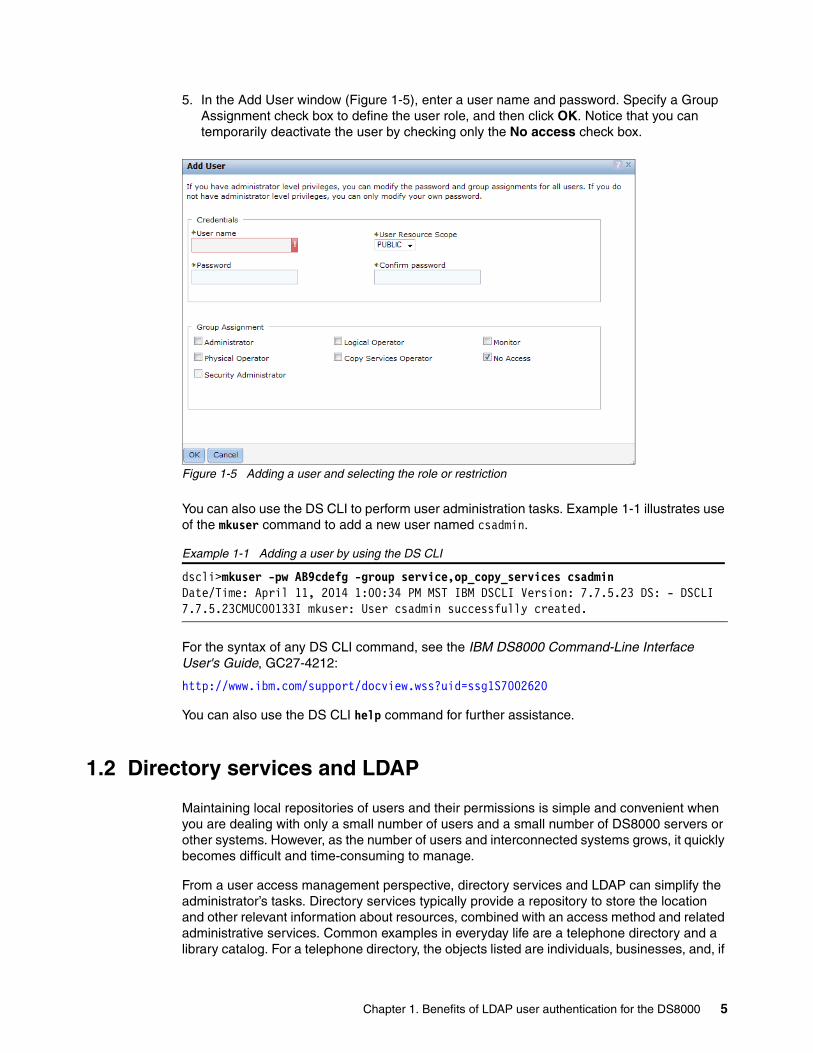
5. In the Add User window (Figure 1-5), enter a user name and password. Specify a Group Assignment check box to define the user role, and then click OK. Notice that you can temporarily deactivate the user by checking only the No access check box.
Figure 1-5 Adding a user and selecting the role or restriction
You can also use the DS CLI to perform user administration tasks. Example 1-1 illustrates use of the mkuser command to add a new user named csadmin.
Example 1-1 Adding a user by using the DS CLI
dscli>mkuser -pw AB9cdefg -group service,op_copy_services csadminDate/Time: April 11, 2014 1:00:34 PM MST IBM DSCLI Version: 7.7.5.23 DS: - DSCLI 7.7.5.23CMUC00133I mkuser: User csadmin successfully created.
For the syntax of any DS CLI command, see the IBM DS8000 Command-Line Interface User's Guide, GC27-4212:
http://www.ibm.com/support/docview.wss?uid=ssg1S7002620
You can also use the DS CLI help command for further assistance.
1.2 Directory services and LDAP
Maintaining local repositories of users and their permissions is simple and convenient when you are dealing with only a small number of users and a small number of DS8000 servers or other systems. However, as the number of users and interconnected systems grows, it quickly becomes difficult and time-consuming to manage.
From a user access management perspective, directory services and LDAP can simplify the administrator’s tasks. Directory services typically provide a repository to store the location and other relevant information about resources, combined with an access method and related administrative services. Common examples in everyday life are a telephone directory and a library catalog. For a telephone directory, the objects listed are individuals, businesses, and, if
Chapter 1. Benefits of LDAP user authentication for the DS8000 5
applicable, the services that they provide. Such information can be retrieved by name (white pages) or service categories (yellow pages).
In computer terms, a directory is a specialized database, also called a data repository, that stores typed and ordered information about objects. Directories allow users or applications to find resources that have the characteristics that are necessary for a particular task. A directory can also be used to store user IDs, passwords, and other credentials of system users. For example, the World Wide Web cannot function without a directory of available websites. This directory is what is referred to as a Domain Name Service or Domain Name System (DNS). The DNS allows users to search the Web for servers without any knowledge of the network address, host name, or IP address.
A directory is often described as a database, but a specialized one that has characteristics that set it apart from general-purpose relational databases. One special characteristic of directories is that they are accessed (read or searched) more often than they are updated (written). Hundreds of people might look up an individual’s phone number or thousands of print clients might look up the characteristics of a particular printer, but the phone number or printer characteristics rarely change.
Because the number of different networks and applications has grown, the number of specialized directories of information has also grown, resulting in islands of information that are difficult to share and manage. The ability to maintain and access all of this information in a consistent and controlled manner can provide a focal point for integrating a distributed environment into a consistent and easily accessed system.
LDAP is an open industry standard that has evolved to meet these needs. LDAP defines a standard method to access and update information in a directory. LDAP has gained wide acceptance as the directory access method of the Internet and is, therefore, widely used within corporate intranets.
LDAP defines a communication protocol. That is, it defines the transport and format of messages that are used by a client to access data in an X.500-like directory. LDAP does not define the directory service itself. When people talk about “the LDAP directory,” they are referring to the information that is stored and that can be retrieved by the LDAP protocol.
All LDAP servers share many basic characteristics because they are based on the Request for Comments (RFCs) industry standard. However, because of implementation differences, they are not all completely compatible with each other when a standard is not defined. For more information about RFCs, particularly regarding LDAP RFC 4510-4533, see the Request for Comments (RFC) page on the IETF.org website:
http://www.ietf.org/rfc.html
The implementation of a directory service is based on a client/server relationship. If an application expects data from an object that is stored in a directory, the application must integrate with a client that connects to the directory server. The servers read the database and send the data back to the client application.
For a more detailed description of LDAP, see the IBM Redbooks publication titled Understanding LDAP - Design and Implementation, SG24-4986.
The following directory servers are among the most common:
� IBM Security Directory Server
http://publib.boulder.ibm.com/infocenter/tivihelp/v2r1/topic/com.ibm.IBMDS.doc_6.3.1/welcome.htm
6 LDAP Authentication for IBM DS8000 Storage
For installation and configuration steps, see Appendix C, “Installing IBM Security Directory Server” on page 63.
� Microsoft Active Directory
http://www.microsoft.com/windowsserver2008/pt/br/ad-main.aspx
� OpenLDAP
http://www.openldap.org/
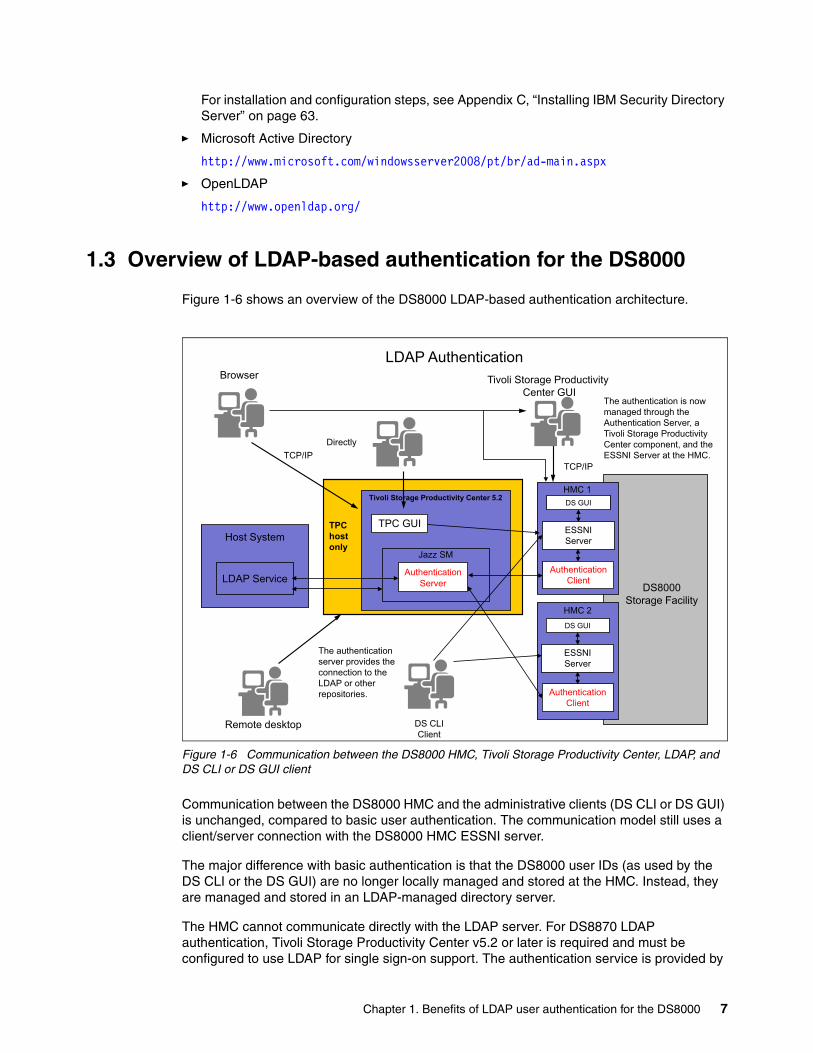
1.3 Overview of LDAP-based authentication for the DS8000
Figure 1-6 shows an overview of the DS8000 LDAP-based authentication architecture.
Figure 1-6 Communication between the DS8000 HMC, Tivoli Storage Productivity Center, LDAP, and DS CLI or DS GUI client
Communication between the DS8000 HMC and the administrative clients (DS CLI or DS GUI) is unchanged, compared to basic user authentication. The communication model still uses a client/server connection with the DS8000 HMC ESSNI server.
The major difference with basic authentication is that the DS8000 user IDs (as used by the DS CLI or the DS GUI) are no longer locally managed and stored at the HMC. Instead, they are managed and stored in an LDAP-managed directory server.
The HMC cannot communicate directly with the LDAP server. For DS8870 LDAP authentication, Tivoli Storage Productivity Center v5.2 or later is required and must be configured to use LDAP for single sign-on support. The authentication service is provided by
TPC GUI
Tivoli Storage Productivity Center 5.2
ESSNIServer
HMC 1
TPC host only
HMC 2
Directly
Tivoli Storage Productivity Center GUI
TCP/IPTCP/IP
Browser
Remote desktop
AuthenticationServer
DS CLIClient
Authentication Client
Authentication Client
Jazz SM
LDAP Service
Host System
LDAP Authentication
The authentication server provides the connection to the LDAP or other repositories.
The authentication is now managed through the Authentication Server, a Tivoli Storage Productivity Center component, and the ESSNI Server at the HMC.
ESSNIServer
DS8000Storage Facility
DS GUI
DS GUI
Chapter 1. Benefits of LDAP user authentication for the DS8000 7
Jazz for Service Management, which is included with Tivoli Storage Productivity Center, and must be installed from the Tivoli Storage Productivity Center installation program.
The HMC can still support basic authentication. The authentication method that is used (either basic or LDAP) is determined by setting an authentication policy in the DS GUI User Administration area. By default, the HMC is not configured to use LDAP. The initial authentication policy is set to the basic method. The two methods (basic or LDAP) are mutually exclusive.
To use LDAP authentication, the authentication type for the DS8000 must be changed to Storage Authentication Service (SAS). The SAS policy includes all of the information that is required for the LDAP connection and authentication. This information includes the host name or the IP address of the authentication server. It also includes the location of the truststore file, which is a digitally signed certificate of the authentication server. The certificate is used to establish a Secure Sockets Layer (SSL) connection between the authentication server and the authentication clients. The communication between the LDAP server and authentication server can also be configured to use a secure connection through SSL, but that is not required.
The Tivoli Storage Productivity Center 5.2 that provides the authentication server also includes the IBM WebSphere Integrated Solutions Console, which is used to administer and manage the authentication server. When provided with the correct authority, this console can also be used to administer LDAP user and groups through a web browser that is started on any host.
For example, when using the DS CLI, the connection from a user standpoint is still established as it was without LDAP. The user establishes the connection by specifying the IP address of the HMC and is prompted for a user ID and password. Now, because the DS8000 has an active SAS policy, the Authentication Client sends the user request to the authentication server. The authentication server validates the user’s credentials with LDAP. If valid, an authentication OK token is returned to the ESSNI server, which executes the command against the DS8000. In Figure 1-6 on page 7, this sequence is noted by the circled numbers.
1.4 Benefits for DS8000 administrators and users
When applications access a standard common directory that is properly designed rather than using application-specific directories, redundant and costly administration can be eliminated and security risks are more controllable. With DS8000 basic authentication, user administration is isolated and must be separately maintained. Each DS8000 in your environment has its own local user repository.
DS8000 authentication through LDAP offers the following benefits:
� Centralized user management from one or more LDAP servers
The user IDs and the role definition are stored and managed in one central location.
� Integration with existing directory services
If you already use a directory service, you can integrate DS8000 users and, if needed, create a separate DS8000 LDAP group.
Note: Tivoli Storage Productivity Center users are also managed by LDAP.
8 LDAP Authentication for IBM DS8000 Storage
� More flexible user management
You have different ways to add, change, or remove a user ID or to reset a password:
– Directly, with the LDAP server GUI
– On the web (for example, the IBM Security Directory Server Web Administration Tool)
– By using the WebSphere Integrated Solutions of Version 5.2 of the Tivoli Storage Productivity Center
– By using the same user ID to access all DS8000 systems in your enterprise
– With password policy management
� Even though LDAP support can provide single sign-on (SSO) capability by using the same credentials to access multiple DS8000 servers, you can still create separate user IDs for one person and maintain those user IDs by using LDAP. This is important if the same person needs to access multiple DS8000 servers with different authorization levels. Security isolation with multiple DS8000 systems remains possible with LDAP.
Tip: Use LDAP if it is already in use or if you have a large pool of DS8000 systems and other LDAP-enabled servers to administer them.
Chapter 1. Benefits of LDAP user authentication for the DS8000 9

10 LDAP Authentication for IBM DS8000 Storage
Chapter 2. Implementing LDAP authentication for the DS8000
In this chapter, we explain how to implement Lightweight Directory Access Protocol (LDAP) authentication for the IBM DS8000 storage system. The implementation involves the following high-level tasks:
1. Install the LDAP servers2. Install and configure the Tivoli Storage Productivity Center servers3. Create the certificates and the truststore file4. Configure the DS8000 for LDAP authentication
2
© Copyright IBM Corp. 2009, 2014. All rights reserved. 11
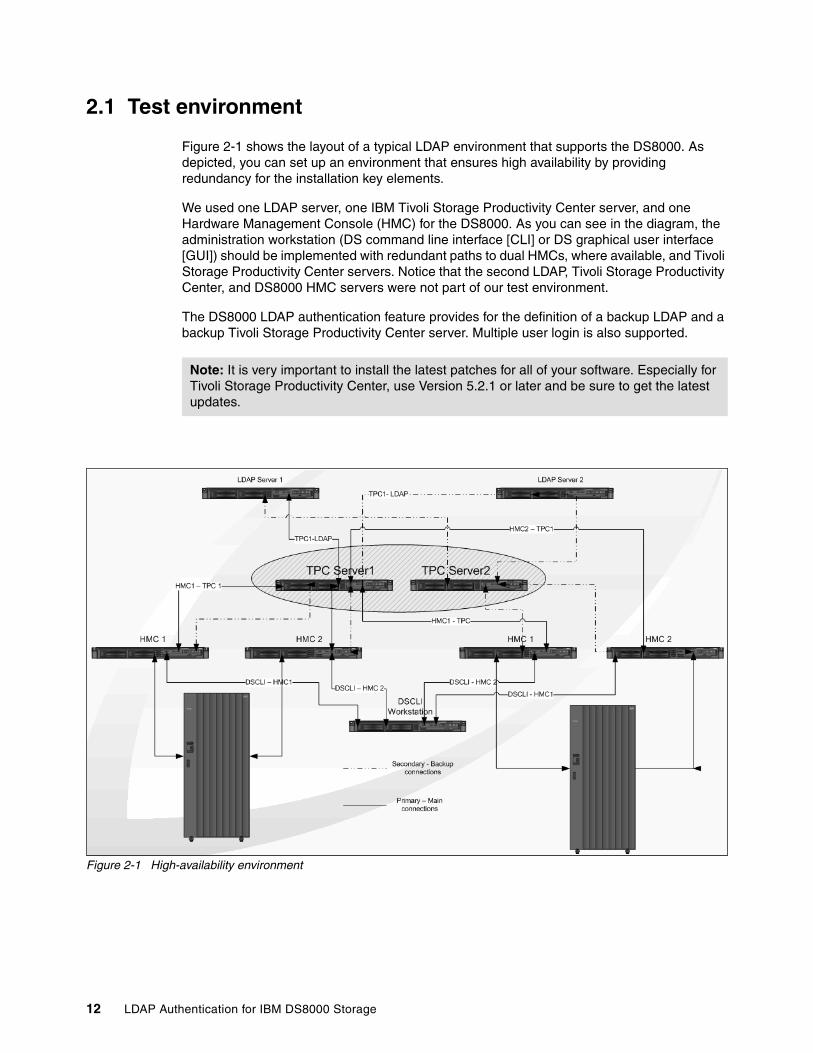
2.1 Test environment
Figure 2-1 shows the layout of a typical LDAP environment that supports the DS8000. As depicted, you can set up an environment that ensures high availability by providing redundancy for the installation key elements.
We used one LDAP server, one IBM Tivoli Storage Productivity Center server, and one Hardware Management Console (HMC) for the DS8000. As you can see in the diagram, the administration workstation (DS command line interface [CLI] or DS graphical user interface [GUI]) should be implemented with redundant paths to dual HMCs, where available, and Tivoli Storage Productivity Center servers. Notice that the second LDAP, Tivoli Storage Productivity Center, and DS8000 HMC servers were not part of our test environment.
The DS8000 LDAP authentication feature provides for the definition of a backup LDAP and a backup Tivoli Storage Productivity Center server. Multiple user login is also supported.
Figure 2-1 High-availability environment
Note: It is very important to install the latest patches for all of your software. Especially for Tivoli Storage Productivity Center, use Version 5.2.1 or later and be sure to get the latest updates.
12 LDAP Authentication for IBM DS8000 Storage
2.2 Install the LDAP servers
As described in Chapter 1, “Benefits of LDAP user authentication for the DS8000” on page 1, the main benefit of a LDAP-based authentication is the centralized user management that it allows. Therefore, if you already have an operating LDAP server in your environment, use the same server for DS8000 user authentication. We used the default Microsoft 2008 R2 Active Directory for the testing environment that we set up in preparation for this book.
If you do not have an LDAP server installed yet, you can use the IBM Security Directory Server. For detailed installation instructions, see Appendix C, “Installing IBM Security Directory Server” on page 63. In a Linux environment, you can use an OpenLDAP server.
Remember to provision a second (standby) LDAP server for redundancy.In this paper, we refer to those LDAP servers as LDAP server1 and LDAP server2.
2.3 Install and configure the Tivoli Storage Productivity Center servers
IBM Tivoli Storage Productivity Center is storage infrastructure management software that centralizes, automates, and simplifies the management of complex and heterogeneous storage environments. You can download it from the Tivoli Storage Productivity Center page:
http://www.ibm.com/systems/storage/software/center/
If you are configuring for a DS8870 storage system, you do not need a second Tivoli Storage Productivity Center server, but it is highly desirable for redundancy. We refer to those Tivoli Storage Productivity Center servers as TPC_server1 and TPC_server2.
Tivoli Storage Productivity Center Version 5.2 has new features. One important change is that the Tivoli Integrated Portal has been replaced by the IBM WebSphere Integrated Solutions Console, which includes Jazz for Service Management software.
Jazz for Service Management brings together the Open Services for Lifecycle Collaboration (OSLC) community’s open specifications for linking data and other shared integration services, including administrative, dashboard, reporting, and security services. The Tivoli Storage Productivity Center runs two different WebSphere applications within the same server. One keeps track of monitoring and reporting with Tivoli Common Reporting 5.1 and the other one runs separately with Jazz and Tivoli Common Reporting for LDAP. For more information, see the Jazz for Service Management documentation in the IBM Knowledge Center (see “Related publications” on page 79 for a link).
If you install a new Tivoli Storage Productivity Center server, see the installation instructions in Appendix A, “Installing Tivoli Storage Productivity Center 5.2 on Windows Server 2008 R2” on page 37.
If you already have Tivoli Storage Productivity Center 5.2 servers installed but not configured for LDAP authentication, use the Jazz web portal from the WebSphere Integrated Solutions Console in the Tivoli Storage Productivity Center server to configure the Tivoli Storage Productivity Center servers. For more information, see Appendix B, “Configuring Tivoli Storage Productivity Center for DS8000 LDAP authentication” on page 47.
After the Tivoli Storage Productivity Center servers are installed and configured for LDAP, proceed to the next section, 2.4, “Create the certificates and the truststore file” on page 14.
Chapter 2. Implementing LDAP authentication for the DS8000 13
2.4 Create the certificates and the truststore file
The certificate and the truststore file from the Tivoli Storage Productivity Center server or servers are needed to implement Secure Sockets Layer (SSL) communication between the DS8000 HMC and the Tivoli Storage Productivity Center server. The certificate and truststore are shared between the Tivoli Storage Productivity Center servers and HMCs.
2.4.1 Create the certificate and the truststore file on TPC_server1
The Tivoli Storage Productivity Center v5.2 server administration is done through the WebSphere Integrated Solutions Console by using Jazz for Service Management (in previous versions, administration was through the Tivoli Integrated Portal). The WebSphere Integrated Solutions Console is packaged with Tivoli Storage Productivity Center, but it is not automatically installed. To have all of the components that are required for LDAP configuration, you must also install Jazz for Service Management as part of the Tivoli Storage Productivity Center installation. The WebSphere Integrated Solutions Console provides a GUI front-end for administration from a web browser.
See Appendix A, “Installing Tivoli Storage Productivity Center 5.2 on Windows Server 2008 R2” on page 37 for more information.
To create the certificate and truststore file, follow these steps:
1. Open a web browser and point it to the WebSphere Integrated Solutions Console for Jazz, which is typically accessible from the following URL:
https://TPC-IP-Address:16316/ibm/console
The default Tivoli Storage Productivity Center installation secures the HTTPS transport with a self-signed certificate. Depending on the browser that you use, you might receive an exception message and need to accept that certificate as a trusted certificate.
2. Export the certificate:
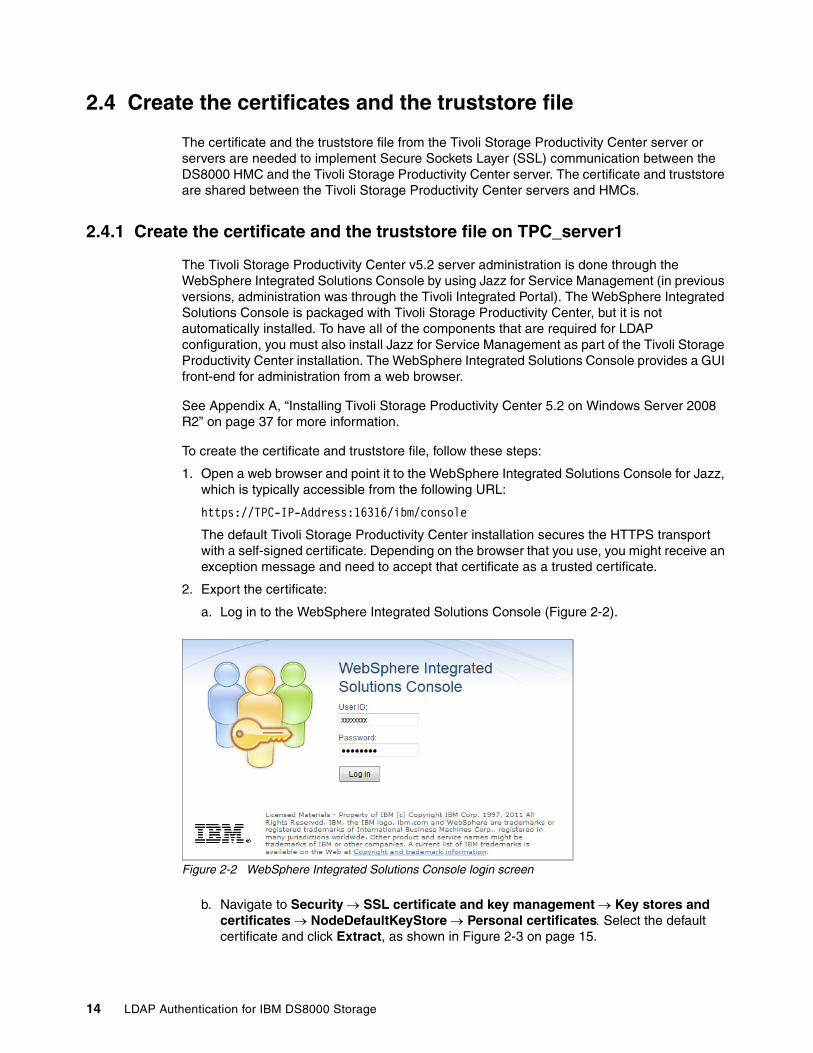
a. Log in to the WebSphere Integrated Solutions Console (Figure 2-2).
Figure 2-2 WebSphere Integrated Solutions Console login screen
b. Navigate to Security SSL certificate and key management Key stores and certificates NodeDefaultKeyStore Personal certificatesSelect the default certificate and click Extract, as shown in Figure 2-3 on page 15.
14 LDAP Authentication for IBM DS8000 Storage
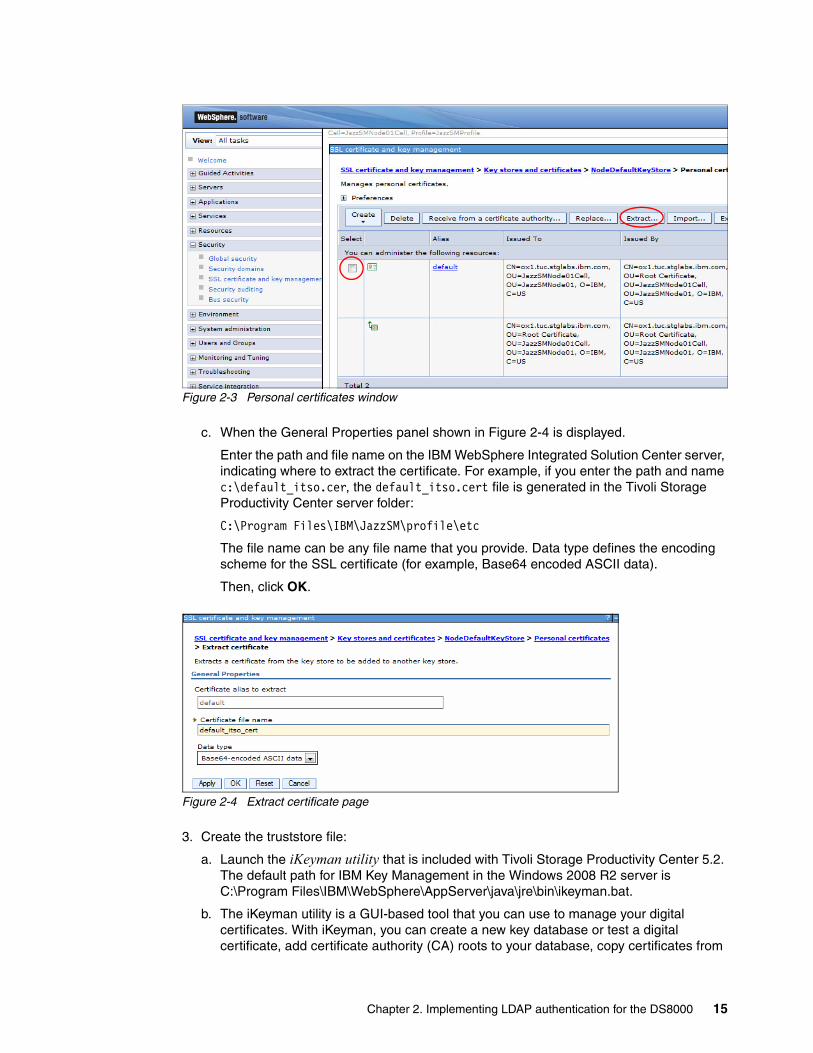
Figure 2-3 Personal certificates window
c. When the General Properties panel shown in Figure 2-4 is displayed.
Enter the path and file name on the IBM WebSphere Integrated Solution Center server, indicating where to extract the certificate. For example, if you enter the path and name c:\default_itso.cer, the default_itso.cert file is generated in the Tivoli Storage Productivity Center server folder:
C:\Program Files\IBM\JazzSM\profile\etc
The file name can be any file name that you provide. Data type defines the encoding scheme for the SSL certificate (for example, Base64 encoded ASCII data).
Then, click OK.
Figure 2-4 Extract certificate page
3. Create the truststore file:
a. Launch the iKeyman utility that is included with Tivoli Storage Productivity Center 5.2. The default path for IBM Key Management in the Windows 2008 R2 server is C:\Program Files\IBM\WebSphere\AppServer\java\jre\bin\ikeyman.bat.
b. The iKeyman utility is a GUI-based tool that you can use to manage your digital certificates. With iKeyman, you can create a new key database or test a digital certificate, add certificate authority (CA) roots to your database, copy certificates from
Chapter 2. Implementing LDAP authentication for the DS8000 15
one database to another, request and receive a digital certificate from a CA, set default keys, and change passwords.
c. The application can be run by double-clicking on the .bat file or invoking it from the Windows command prompt.
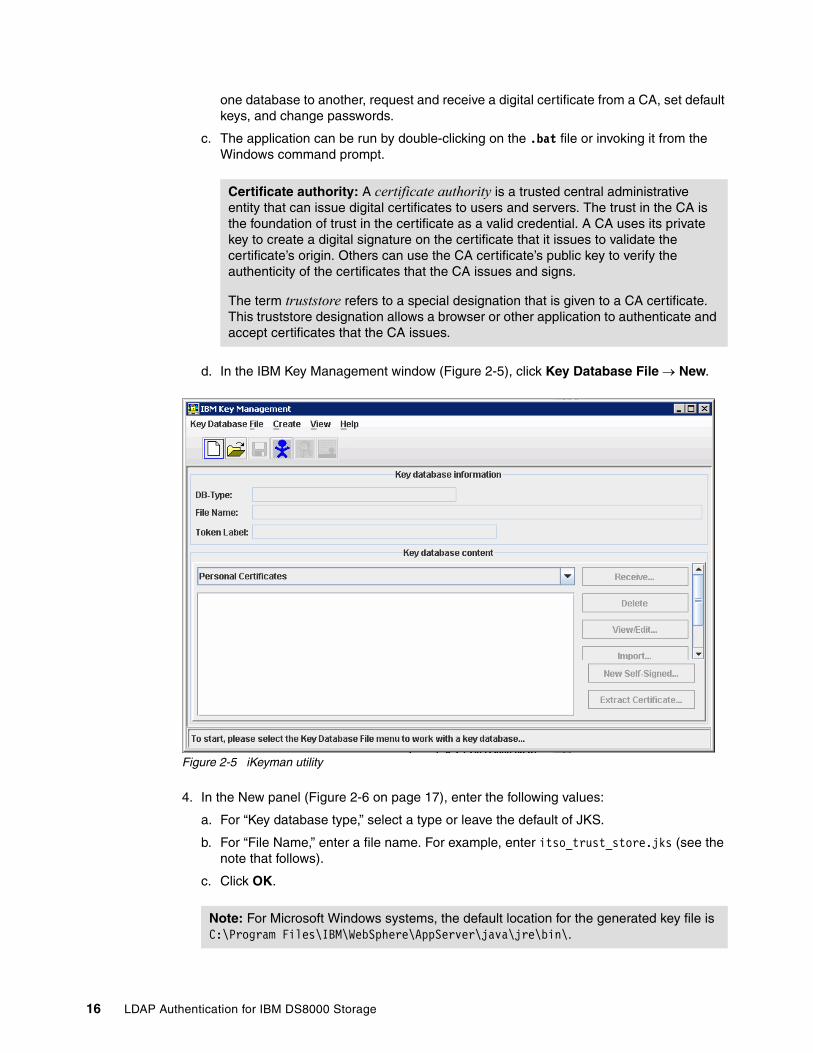
d. In the IBM Key Management window (Figure 2-5), click Key Database File New.
Figure 2-5 iKeyman utility
4. In the New panel (Figure 2-6 on page 17), enter the following values:
a. For “Key database type,” select a type or leave the default of JKS.
b. For “File Name,” enter a file name. For example, enter itso_trust_store.jks (see the note that follows).
c. Click OK.
Certificate authority: A certificate authority is a trusted central administrative entity that can issue digital certificates to users and servers. The trust in the CA is the foundation of trust in the certificate as a valid credential. A CA uses its private key to create a digital signature on the certificate that it issues to validate the certificate’s origin. Others can use the CA certificate’s public key to verify the authenticity of the certificates that the CA issues and signs.
The term truststore refers to a special designation that is given to a CA certificate. This truststore designation allows a browser or other application to authenticate and accept certificates that the CA issues.
Note: For Microsoft Windows systems, the default location for the generated key file is C:\Program Files\IBM\WebSphere\AppServer\java\jre\bin\.
16 LDAP Authentication for IBM DS8000 Storage
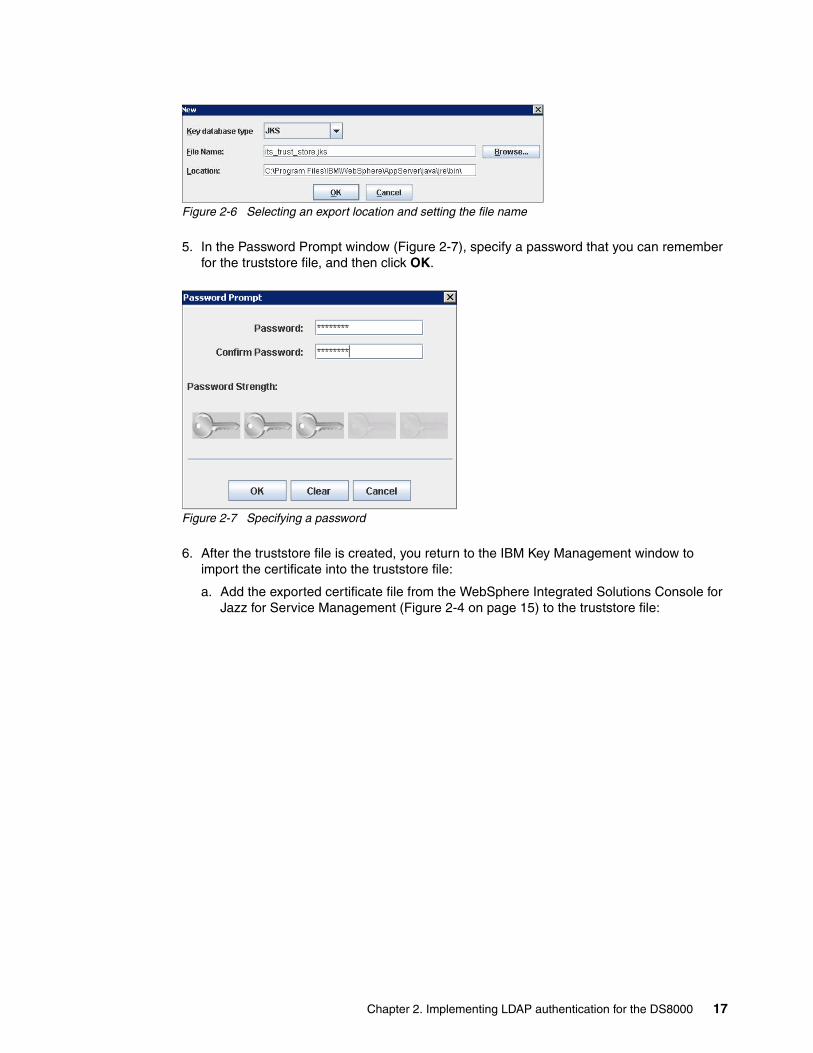
Figure 2-6 Selecting an export location and setting the file name
5. In the Password Prompt window (Figure 2-7), specify a password that you can remember for the truststore file, and then click OK.
Figure 2-7 Specifying a password
6. After the truststore file is created, you return to the IBM Key Management window to import the certificate into the truststore file:
a. Add the exported certificate file from the WebSphere Integrated Solutions Console for Jazz for Service Management (Figure 2-4 on page 15) to the truststore file:
Chapter 2. Implementing LDAP authentication for the DS8000 17
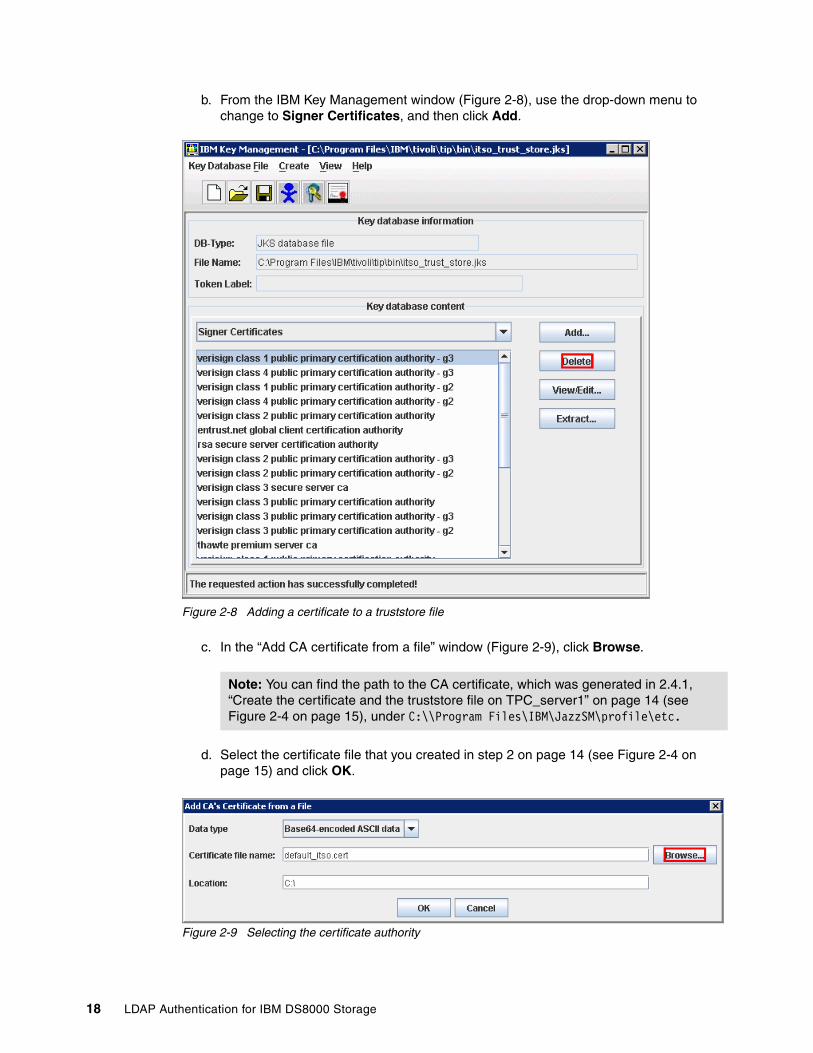
b. From the IBM Key Management window (Figure 2-8), use the drop-down menu to change to Signer Certificates, and then click Add.
Figure 2-8 Adding a certificate to a truststore file
c. In the “Add CA certificate from a file” window (Figure 2-9), click Browse.
d. Select the certificate file that you created in step 2 on page 14 (see Figure 2-4 on page 15) and click OK.
Figure 2-9 Selecting the certificate authority
Note: You can find the path to the CA certificate, which was generated in 2.4.1, “Create the certificate and the truststore file on TPC_server1” on page 14 (see Figure 2-4 on page 15), under C:\\Program Files\IBM\JazzSM\profile\etc.
18 LDAP Authentication for IBM DS8000 Storage
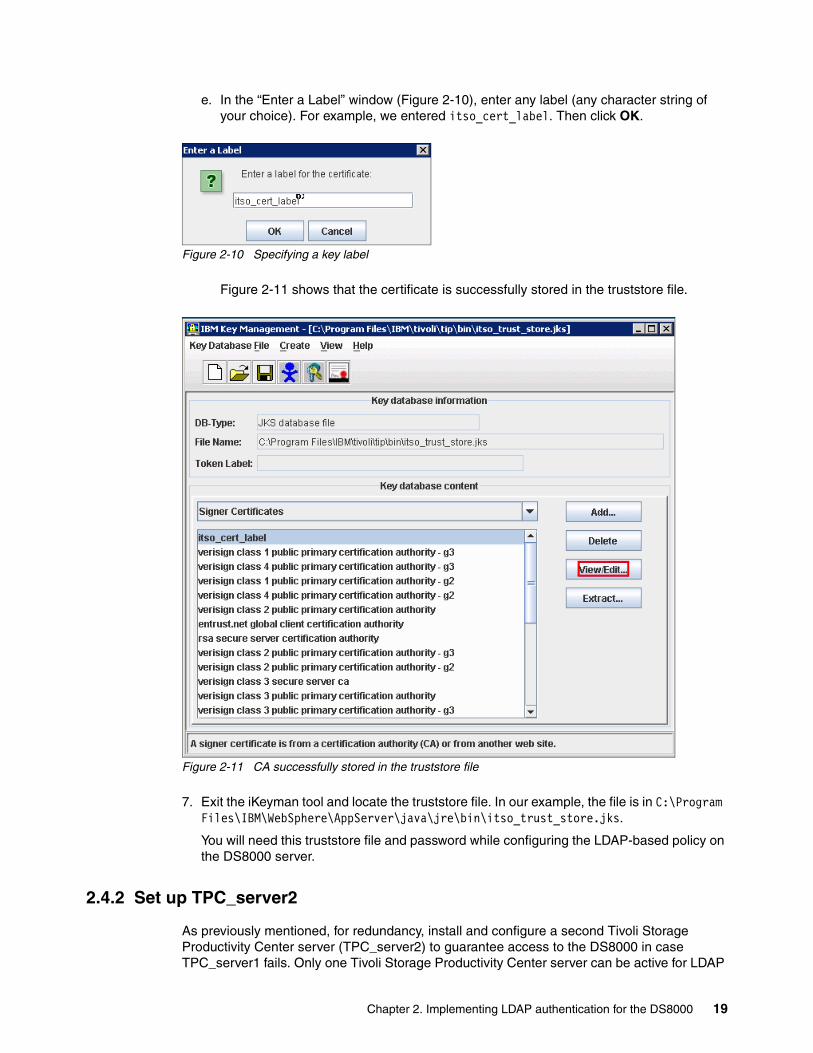
e. In the “Enter a Label” window (Figure 2-10), enter any label (any character string of your choice). For example, we entered itso_cert_label. Then click OK.
Figure 2-10 Specifying a key label
Figure 2-11 shows that the certificate is successfully stored in the truststore file.
Figure 2-11 CA successfully stored in the truststore file
7. Exit the iKeyman tool and locate the truststore file. In our example, the file is in C:\Program Files\IBM\WebSphere\AppServer\java\jre\bin\itso_trust_store.jks.
You will need this truststore file and password while configuring the LDAP-based policy on the DS8000 server.
2.4.2 Set up TPC_server2
As previously mentioned, for redundancy, install and configure a second Tivoli Storage Productivity Center server (TPC_server2) to guarantee access to the DS8000 in case TPC_server1 fails. Only one Tivoli Storage Productivity Center server can be active for LDAP
Chapter 2. Implementing LDAP authentication for the DS8000 19
authentication. TPC_server2 is typically in standby mode and takes over in case of a failure at TPC_server1. Implement TPC_server2 preferably on the same hardware configuration as TPC_server1 but imperatively with the same LDAP server and branch information as TPC_server1.
For basic Tivoli Storage Productivity Center installation, see the instructions in Appendix A, “Installing Tivoli Storage Productivity Center 5.2 on Windows Server 2008 R2” on page 37. The additional setup tasks described in this section are required.
LTPA is intended for distributed, multiple application server and machine environments. The LTPA protocol enables WebSphere Application Server to provide security in a distributed environment by using cryptography. Application servers distributed in multiple nodes can securely communicate by using this protocol.
It also provides a single sign-on (SSO) feature so that a user is required to authenticate only once. The LTPA protocol uses cryptographic keys to encrypt and decrypt user data that passes between the servers. These keys must be shared between the different servers, assuming that all of the servers involved use the same LDAP or custom registry. The default LTPA keys are automatically generated during installation.
All of the Tivoli Storage Productivity Center Server processes (Jazz, node, WebSphere Application Server) share the same set of keys. If key sharing is required between different servers, export them from one server and import them into the other server. For security purposes, the exported keys are encrypted with a user-defined password. This same password is needed when importing the keys into another server.
Export and import the LTPA keysOn TPC_server2, export and import the LTPA keys by using either the CLI or the Tivoli Storage Productivity Center GUI.
For details on this procedure, see the Tivoli Storage Productivity Center documentation in the IBM Knowledge Center:
http://ibm.co/1t5Ugow
Using the CLI to export and import the LTPA keysTo use the CLI to export and import the LTPA keys, follow these steps
1. Export the LTPA keys that were initially created when installing TPC_server1:
a. On TPC_ server2, open a command window and go to the <WIS for Jazz installation directory>/bin folder, which we will refer as the WIS bin folder hereafter.
b. Enter the wsadmin command as Example 2-1 on page 21shows to export LTPA keys from TPC_server1 to a file on TPC_server2.
Note: The Tivoli Storage Productivity Center servers and Jazz for Service Management are implemented as IBM WebSphere Application Servers, which can securely communicate by using the Lightweight Third Party Authentication (LTPA) protocol.
Note: This is the default path for the WebSphere Integrated Solutions for Jazz in Windows:
C:\Program Files\IBM\WebSphere\AppServer\bin
20 LDAP Authentication for IBM DS8000 Storage
Example 2-1 wsadmin command to export LTPA keys
wsadmin -user <WIS_admin id> -password <WIS_admin password> -lang jython -port <wis_soap_port> -host <tpc_server1 hostname/IP> -f "<tpc_install_dir on TPC server>TPC5.2.1/TPC/TPC/scripts/tip/exportLTPAKeys.py" "<LTPA keys file name>" <ltpaKeysPassword>
Where:
-user User name from the WebSphere Integrated Solutions administrator.
-password Password from the WebSphere Integrated Solutions administrator.
-lang jython The scripting language used for the export script (-f).
-port Port on which WebSphere Integrated Solutions listens. The default is port 16311.
-host Host name or IP address for the WebSphere Integrated Solution Center server for Jazz.
-f Export script path in the local Tivoli Storage Productivity Center server installation directory: directory/TPC5.2.1/TPC/TPC/scripts/tip/
The script name is exportLTPAkeys.py.
LTPA keys file name Name (or path and file name) of the exported LTPA file.
ltpaKeysPassword Password that is used to encrypt and decrypt the LTPA keys. During import, this password must match the password that is used to export the keys at another LTPA server (for example, another application server). During export, remember this password so that you can enter it during import.
Example 2-2 illustrates the command that we used in our test environment to export the keys. The exportedLTPAkeyfile file is generated. It contains the LTPA keys of TPC_server1 that we import to TPC_server2. The exportLTPAKeys are part of your TPC5.2.1 installation directory:
C:/Users/Administrator/Documents/TPC5.2.1/TPC/TPC/scripts/tip
See Appendix A, “Installing Tivoli Storage Productivity Center 5.2 on Windows Server 2008 R2” on page 37 for more details on the installation path.
Example 2-2 Exporting the key
C:\Program Files\IBM\WebSphere\AppServer\bin>wsadmin -user tpcadmin2 -password super321 -lang jython -port 16313 -host 9.11.112.112 -f "C:/Users/Administrator/Documents/TPC5.2.1/TPC/TPC/scripts/tip/exportLTPAKeys.py" "c:/share/exportedLTPAkeyfile" passw0rd
2. Import the LTPA key:
a. In the same command window on TPC_server2, enter the following wsadmin command that is shown in Example 2-3 on page 22 to import the LTPA keys into WebSphere Integrated Solutions and then into the device server. The parameters have the same meaning as explained in step 1 on page 20.
Note: Use forward slashes when specifying the path names for files.
Chapter 2. Implementing LDAP authentication for the DS8000 21

Example 2-3 wsadmin command to import keys
wsadmin -user <wis_admin id> -password <wis_admin password> -lang jython -f "<tpc_install_dir on TPC_Server2>TPC5.2.1/TPC/TPC/scripts/tip/importLTPAKeys.py" "<LTPA keys file name>" <ltpaKeysPassword>
The device server discovers storage subsystems and storage area network (SAN) fabrics. Then, it gathers information about storage subsystems and SAN fabrics and analyzes their performance. The device server controls the communication with agents and the data collection from agents that scan SAN fabrics. It is also responsible for creating and monitoring replication relationships between storage devices.
Example 2-4 shows the key being imported into the device server.
Example 2-4 Importing the key into the device server
C:\Program Files\IBM\WebSphere\AppServer\bin>wsadmin -user tpcadmin2 -password passw0rd -lang jython -f "c:/Users/Administrator/Documents/TPC5.2.1/TPC/TPC/scripts/tip/importLTPAKeys.py " c:/share/exportedLTPAkeyfile" passw0rd
b. Change the directory to the device server’s WIS\bin folder and run the same command, as shown in Example 2-5.
Example 2-5 Importing the key into the TPC -TIP folder
C:\Program Files\IBM\WebSphere\AppServer\bin>wsadmin -user tpcadmin2 -password passw0rd -lang jython -f "c:/Users/Administrator/Documents/TPC5.2.1/TPC/TPC/scripts/tip/importLTPAKeys.py " c:/share/exportedLTPAkeyfile" passw0rd
Using the GUI to export and import the LTPA keysFollow these steps to use the Tivoli Storage Productivity Center to export and import the keys:
1. Export the LTPA key:
a. To access the Tivoli Storage Productivity Center administrative console (WebSphere Integrated Solutions Console for Jazz), type the following URL in a web browser:
http://server_name:port_Number/ibm/console
b. In the left pane, select Security Global Security LTPA.
c. In the window that opens (Figure 2-12 on page 23), enter the following information:
i. Under “Cross-cell single sign-on,” in the Password and Confirm password fields, enter the password to encrypt the LTPA keys. Remember the password so that you can use it later when you import the key into the other server.
ii. In the “Fully qualified key file name” field, specify the fully qualified path to the location where you want to store the exported LTPA keys. You must have permission to write to that file.
iii. Click Export keys to export the keys to the location that you specified.
iv. Click OK to confirm the changes, and click Save to save your configuration.
Note: Use forward slashes when specifying the path names for files.
Note: The default port for Jazz in Windows is 16311.
22 LDAP Authentication for IBM DS8000 Storage
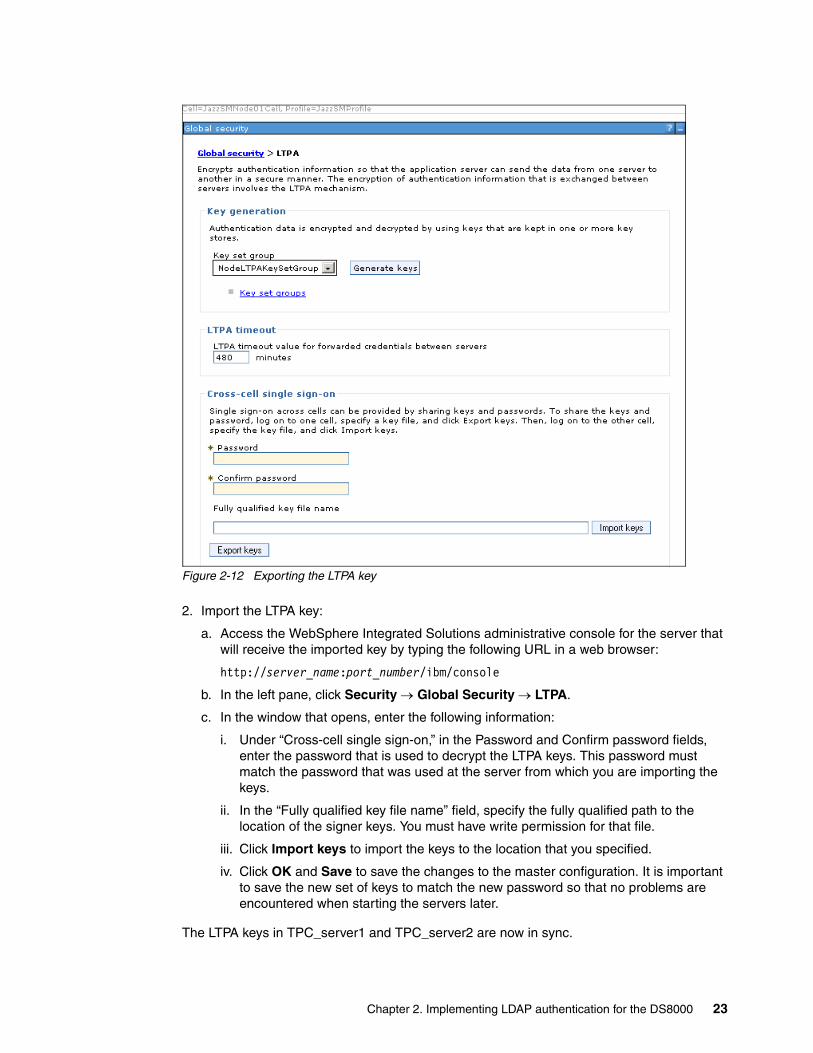
Figure 2-12 Exporting the LTPA key
2. Import the LTPA key:
a. Access the WebSphere Integrated Solutions administrative console for the server that will receive the imported key by typing the following URL in a web browser:
http://server_name:port_number/ibm/console
b. In the left pane, click Security Global Security LTPA.
c. In the window that opens, enter the following information:
i. Under “Cross-cell single sign-on,” in the Password and Confirm password fields, enter the password that is used to decrypt the LTPA keys. This password must match the password that was used at the server from which you are importing the keys.
ii. In the “Fully qualified key file name” field, specify the fully qualified path to the location of the signer keys. You must have write permission for that file.
iii. Click Import keys to import the keys to the location that you specified.
iv. Click OK and Save to save the changes to the master configuration. It is important to save the new set of keys to match the new password so that no problems are encountered when starting the servers later.
The LTPA keys in TPC_server1 and TPC_server2 are now in sync.
Chapter 2. Implementing LDAP authentication for the DS8000 23
2.4.3 Copy the truststore file from TPC_server1 to TPC_server2
For TPC_server2 to take over in case a TPC_server1 failure, both servers must have access to identical truststore files. Copy the truststore file that was created for TPC_server1 to TPC_server2 (see 2.4.1, “Create the certificate and the truststore file on TPC_server1” on page 14).
2.5 Configure the DS8000 for LDAP authentication
The DS8000 must be configured to use LDAP authentication. You can use either the DS GUI or the DS CLI for the configuration. The LDAP and Tivoli Storage Productivity Center server must be running for this configuration. Follow the instructions in Appendix B, “Configuring Tivoli Storage Productivity Center for DS8000 LDAP authentication” on page 47.
Next, you are ready to configure the DS8000 for LDAP authentication.
2.5.1 Configuring DS8000 LDAP authentication by using the GUI
To configure DS8000 LDAP authentication from the DSGUI, complete these steps:
1. Open the DS8000 Storage Manager by using the administrative user ID and password, and then click OK.
2. In the DS8000 Storage Manager menu (left pane), select Remote Authentication from the Access menu for the lock icon, as shown in Figure 2-13 on page 25.
Note: The DS8000 Storage Manager can be accessed from a web browser,using this address:
https://ds8000HMCIP:8452
24 LDAP Authentication for IBM DS8000 Storage
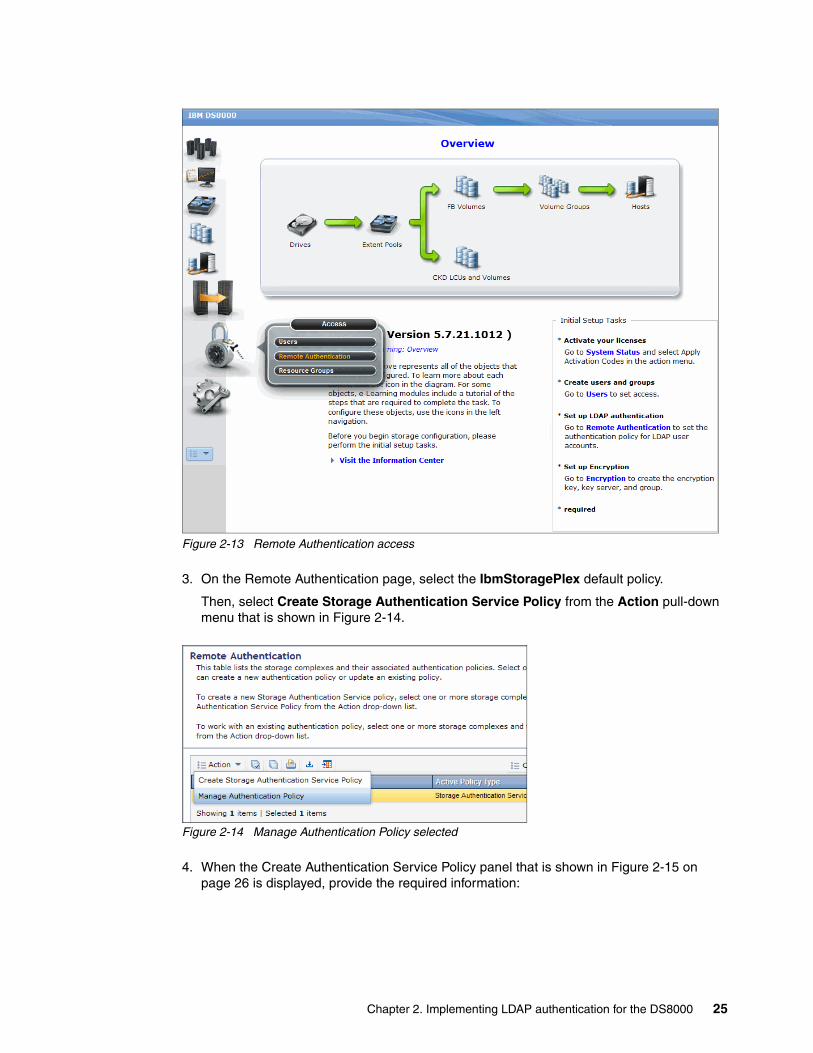
Figure 2-13 Remote Authentication access
3. On the Remote Authentication page, select the IbmStoragePlex default policy.
Then, select Create Storage Authentication Service Policy from the Action pull-down menu that is shown in Figure 2-14.
Figure 2-14 Manage Authentication Policy selected
4. When the Create Authentication Service Policy panel that is shown in Figure 2-15 on page 26 is displayed, provide the required information:
Chapter 2. Implementing LDAP authentication for the DS8000 25
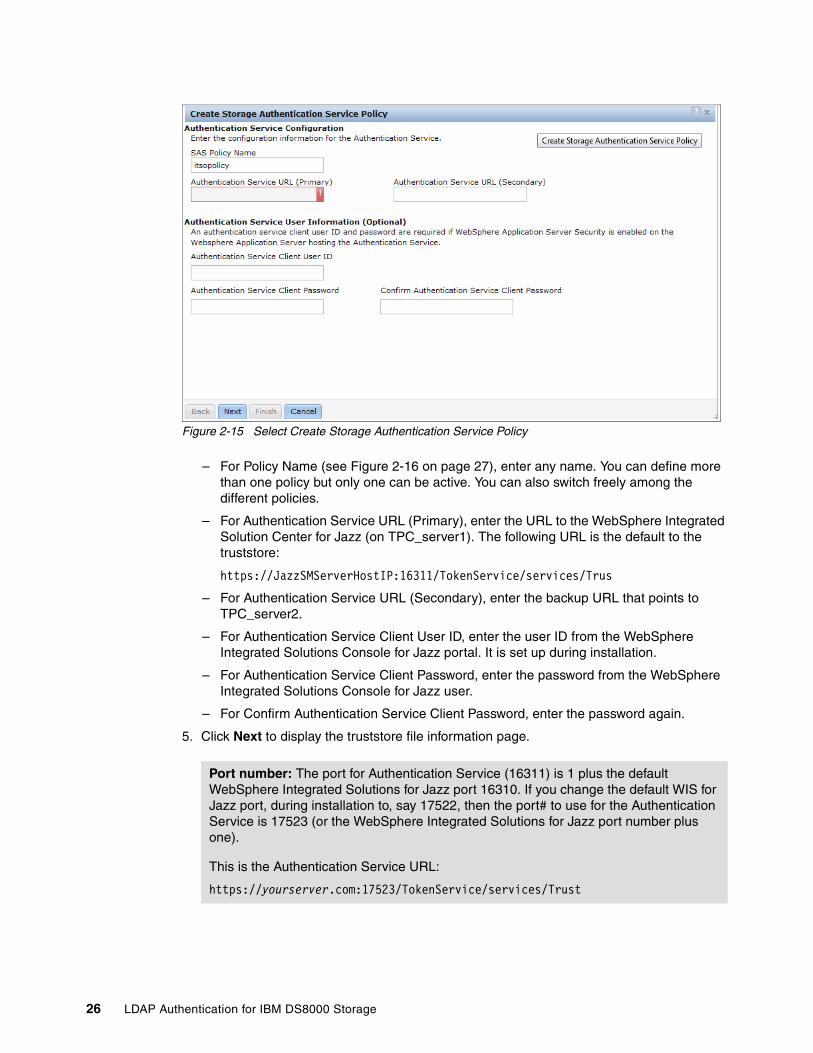
Figure 2-15 Select Create Storage Authentication Service Policy
– For Policy Name (see Figure 2-16 on page 27), enter any name. You can define more than one policy but only one can be active. You can also switch freely among the different policies.
– For Authentication Service URL (Primary), enter the URL to the WebSphere Integrated Solution Center for Jazz (on TPC_server1). The following URL is the default to the truststore:
https://JazzSMServerHostIP:16311/TokenService/services/Trus
– For Authentication Service URL (Secondary), enter the backup URL that points to TPC_server2.
– For Authentication Service Client User ID, enter the user ID from the WebSphere Integrated Solutions Console for Jazz portal. It is set up during installation.
– For Authentication Service Client Password, enter the password from the WebSphere Integrated Solutions Console for Jazz user.
– For Confirm Authentication Service Client Password, enter the password again.
5. Click Next to display the truststore file information page.
Port number: The port for Authentication Service (16311) is 1 plus the default WebSphere Integrated Solutions for Jazz port 16310. If you change the default WIS for Jazz port, during installation to, say 17522, then the port# to use for the Authentication Service is 17523 (or the WebSphere Integrated Solutions for Jazz port number plus one).
This is the Authentication Service URL:
https://yourserver.com:17523/TokenService/services/Trust
26 LDAP Authentication for IBM DS8000 Storage
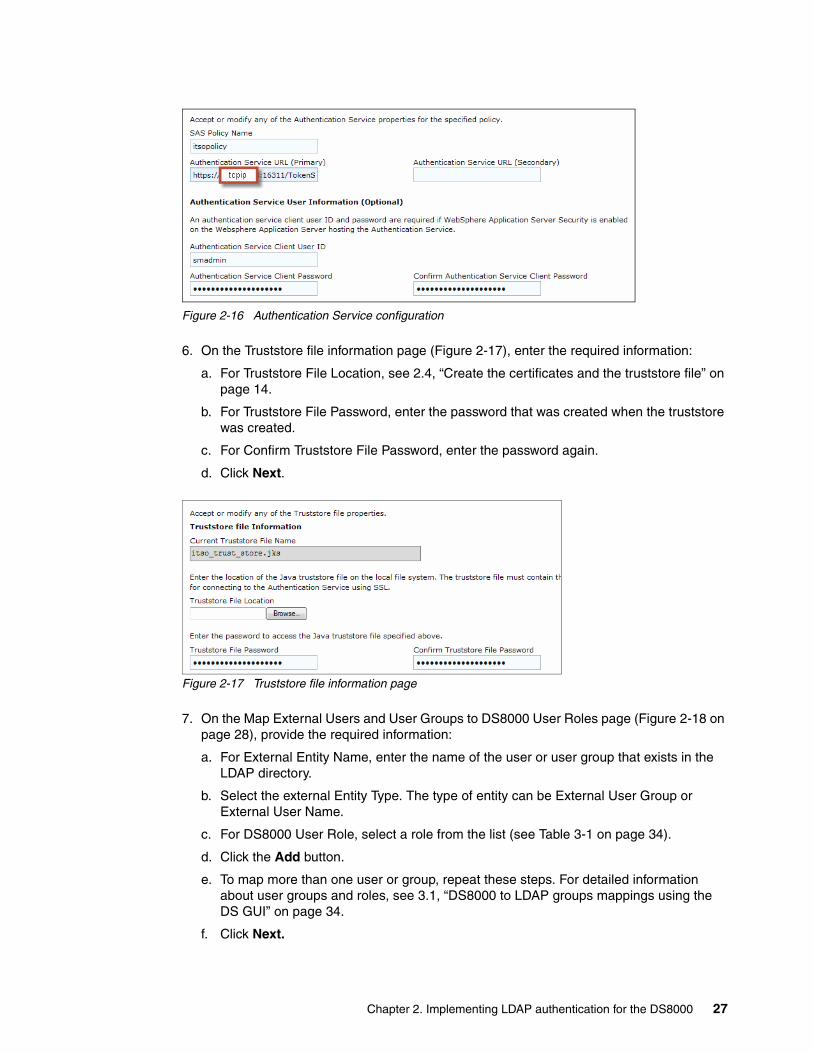
Figure 2-16 Authentication Service configuration
6. On the Truststore file information page (Figure 2-17), enter the required information:
a. For Truststore File Location, see 2.4, “Create the certificates and the truststore file” on page 14.
b. For Truststore File Password, enter the password that was created when the truststore was created.
c. For Confirm Truststore File Password, enter the password again.
d. Click Next.
Figure 2-17 Truststore file information page
7. On the Map External Users and User Groups to DS8000 User Roles page (Figure 2-18 on page 28), provide the required information:
a. For External Entity Name, enter the name of the user or user group that exists in the LDAP directory.
b. Select the external Entity Type. The type of entity can be External User Group or External User Name.
c. For DS8000 User Role, select a role from the list (see Table 3-1 on page 34).
d. Click the Add button.
e. To map more than one user or group, repeat these steps. For detailed information about user groups and roles, see 3.1, “DS8000 to LDAP groups mappings using the DS GUI” on page 34.
f. Click Next.
Chapter 2. Implementing LDAP authentication for the DS8000 27
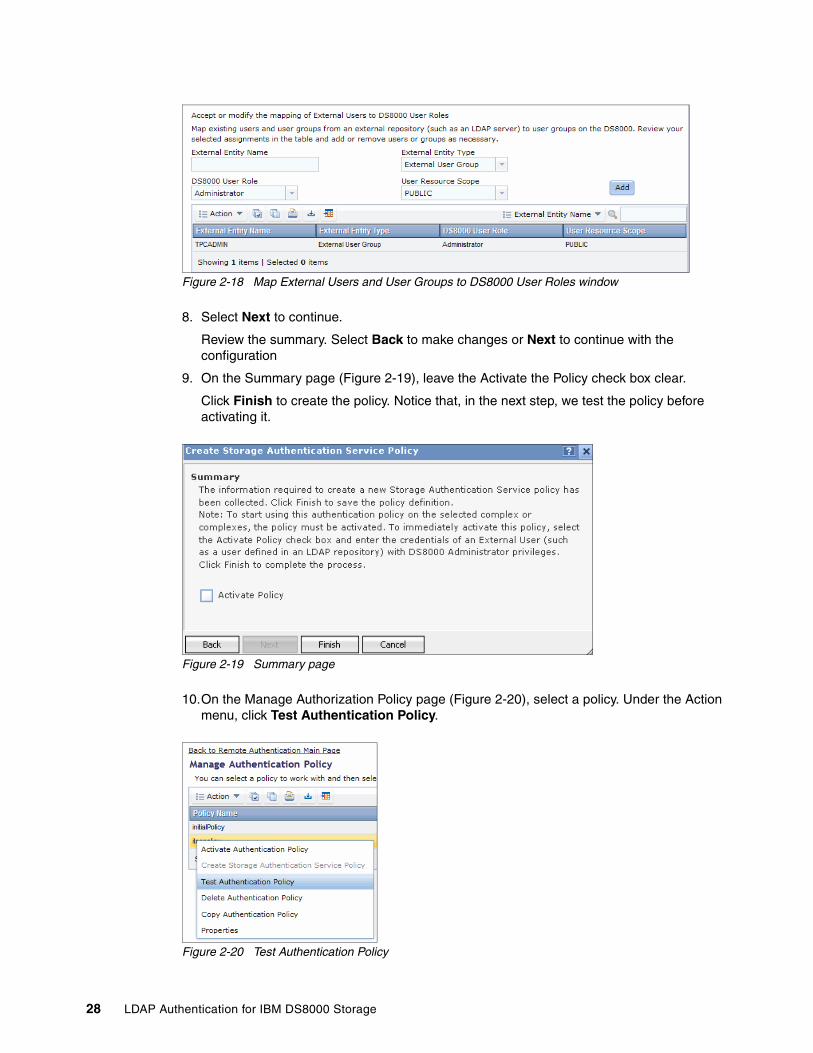
Figure 2-18 Map External Users and User Groups to DS8000 User Roles window
8. Select Next to continue.
Review the summary. Select Back to make changes or Next to continue with the configuration
9. On the Summary page (Figure 2-19), leave the Activate the Policy check box clear.
Click Finish to create the policy. Notice that, in the next step, we test the policy before activating it.
Figure 2-19 Summary page
10.On the Manage Authorization Policy page (Figure 2-20), select a policy. Under the Action menu, click Test Authentication Policy.
Figure 2-20 Test Authentication Policy
28 LDAP Authentication for IBM DS8000 Storage
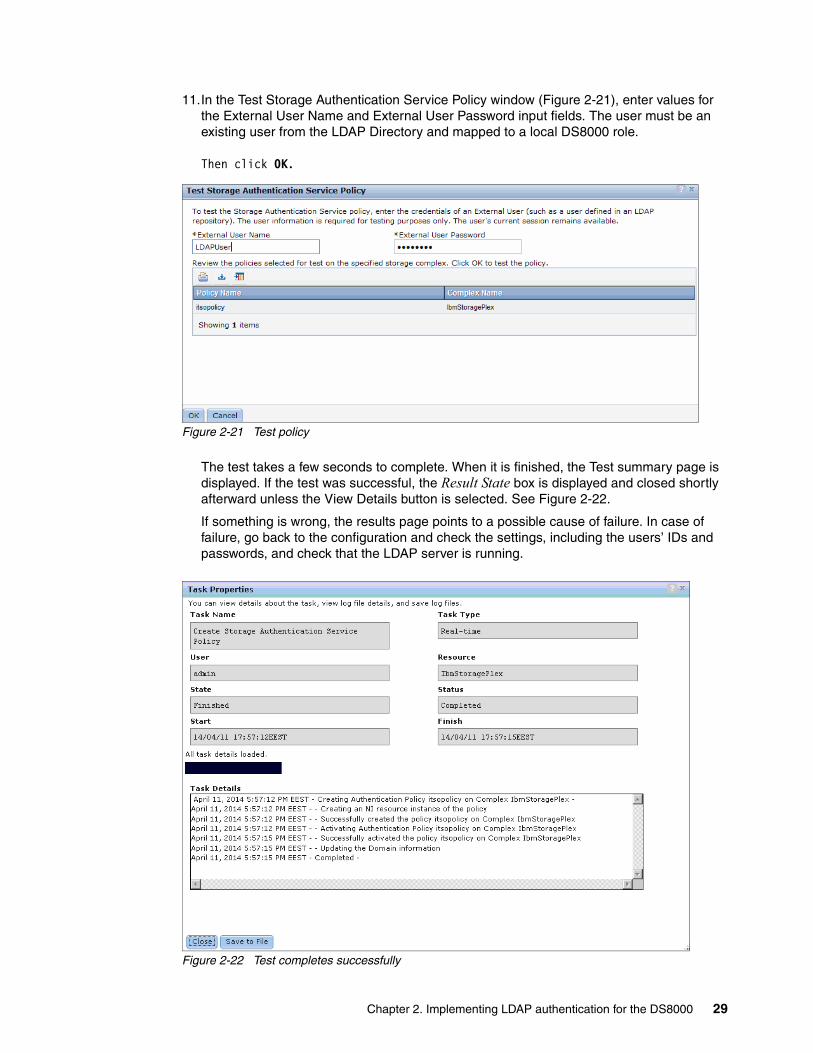
11.In the Test Storage Authentication Service Policy window (Figure 2-21), enter values for the External User Name and External User Password input fields. The user must be an existing user from the LDAP Directory and mapped to a local DS8000 role.
Then click OK.
Figure 2-21 Test policy
The test takes a few seconds to complete. When it is finished, the Test summary page is displayed. If the test was successful, the Result State box is displayed and closed shortly afterward unless the View Details button is selected. See Figure 2-22.
If something is wrong, the results page points to a possible cause of failure. In case of failure, go back to the configuration and check the settings, including the users’ IDs and passwords, and check that the LDAP server is running.
Figure 2-22 Test completes successfully
Chapter 2. Implementing LDAP authentication for the DS8000 29
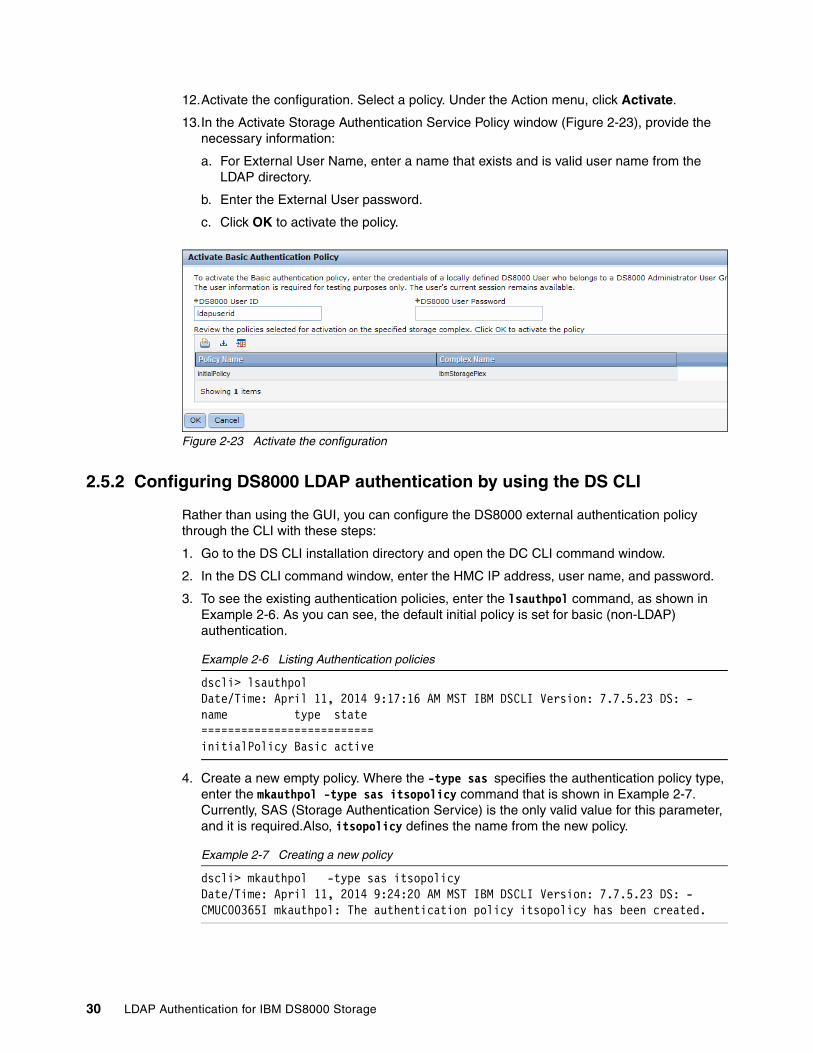
12.Activate the configuration. Select a policy. Under the Action menu, click Activate.
13.In the Activate Storage Authentication Service Policy window (Figure 2-23), provide the necessary information:
a. For External User Name, enter a name that exists and is valid user name from the LDAP directory.
b. Enter the External User password.
c. Click OK to activate the policy.
Figure 2-23 Activate the configuration
2.5.2 Configuring DS8000 LDAP authentication by using the DS CLI
Rather than using the GUI, you can configure the DS8000 external authentication policy through the CLI with these steps:
1. Go to the DS CLI installation directory and open the DC CLI command window.
2. In the DS CLI command window, enter the HMC IP address, user name, and password.
3. To see the existing authentication policies, enter the lsauthpol command, as shown in Example 2-6. As you can see, the default initial policy is set for basic (non-LDAP) authentication.
Example 2-6 Listing Authentication policies
dscli> lsauthpolDate/Time: April 11, 2014 9:17:16 AM MST IBM DSCLI Version: 7.7.5.23 DS: -name type state==========================initialPolicy Basic active
4. Create a new empty policy. Where the -type sas specifies the authentication policy type, enter the mkauthpol -type sas itsopolicy command that is shown in Example 2-7. Currently, SAS (Storage Authentication Service) is the only valid value for this parameter, and it is required.Also, itsopolicy defines the name from the new policy.
Example 2-7 Creating a new policy
dscli> mkauthpol -type sas itsopolicyDate/Time: April 11, 2014 9:24:20 AM MST IBM DSCLI Version: 7.7.5.23 DS: -CMUC00365I mkauthpol: The authentication policy itsopolicy has been created.
30 LDAP Authentication for IBM DS8000 Storage
5. Add a policy server or policy servers to the policy, as shown in Example 2-8, by entering the setauthpol command with the -action setauthserver and -loc parameters, where the -loc parameter is the URL to the TPC_server1.
Example 2-8 Setting the policy server
dscli> setauthpol -action setauthserver -loc https://tpcserverip:16311//TokenService/services/Trust itsopolicyDate/Time: April 11, 2014 9:27:10 AM MST IBM DSCLI Version: 7.7.5.23 DS: -CMUC00366I setauthpol: The authentication policy itsopolicy has been modified.
6. Add the keystore file to the policy. Enter the setauthpol command with the -action settruststore parameter and the -loc parameter, where the value is the location of the truststore file (see 2.4, “Create the certificates and the truststore file” on page 14). Use the -pw parameter for the truststore file password. See Example 2-9.
Example 2-9 Setting the key
dscli> setauthpol -action settruststore -loc c:\key_itso.jks -pw passw0rd itsopolicyDate/Time: April 11, 2014 9:29:25 AM MST IBM DSCLI Version: 7.7.5.23 DS: -CMUC00366I setauthpol: The authentication policy itsopolicy has been modified.
7. Add the authentication user to the policy by entering the setauthpol command with -action setsasuser parameter, as shown in Example 2-10.
Example 2-10 Setting the ESS user
dscli> setauthpol -action setsasuser -username wsadmin -pw passw0rd itsopolicyDate/Time: April 11, 2014 9:31:24 AM MST IBM DSCLI Version: 7.7.5.23 DS: -CMUC00366I setauthpol: The authentication policy itsopolicy has been modified.
8. Map existing users and user groups from the LDAP server to user groups on the DS8000 by entering the setauthpol command with the -action setmap parameter and -groupmap User:Group values, as shown in Example 2-11.
Example 2-11 Mapping a user to a group
dscli> setauthpol -action setmap -groupmap admin:Administrators itsopolicyDate/Time: April 11, 2014 9:32:54 AM MST IBM DSCLI Version: 7.7.5.23 DS: -CMUC00366I setauthpol:Authentication policy itsopolicy successfully modified.
For detailed information about user groups and roles, see 3.2, “DS8000 to LDAP groups mappings using the DSCLI” on page 35
9. Now that the policy is set up, check it as Example 2-12 shows.
The policy is in inactive state.
Example 2-12 Listing of the available policies
dscli> lsauthpol itsopolicyDate/Time: April 11, 2014 9:35:47 AM MST IBM DSCLI Version: 7.7.5.23 DS: -name type state=========================itsopolicy SAS inactive
10.To view the configuration parameters, enter the showauthpol command, as shown in Example 2-13 on page 32.
Chapter 2. Implementing LDAP authentication for the DS8000 31
Example 2-13 Showing the configuration parameters
dscli> showauthpol itsopolicyDate/Time: April 11, 2014 9:36:52 AM MST IBM DSCLI Version: 7.7.5.23 DS: -name itsopolicytype SASstate inactivelocation https://tpcIP:16311//TokenService/services/Trusttruststore itsopolicy_trustStore.jkssasuser wsadmin
11.Test the configuration by entering the testauthpol command, as shown in Example 2-14.
Example 2-14 Testing the configuration
dscli> testauthpol -username wsadmin -pw passw0rd itsopolicyDate/Time: April 11, 2014 9:38:28 AM MST IBM DSCLI Version: 7.7.5.23 DS: -CMUC00366I testauthpol:Authentication policy itsopolicy successfully verified.
12.If the test completed successfully, active the policy by entering the chauthpol command with the -activate parameter, as shown in Example 2-15.
Example 2-15 Activating the policy
dscli> chauthpol -quiet -activate -username wsadmin -pw passw0rd itsopolicyDate/Time: April 11, 20014 9:55:54 AM MST IBM DSCLI Version: 7.7.5.23 DS: -CMUC00366I setauthpol:Authentication policy itsopolicy successfully modified.
13.Check the state for the policy by entering the lsauthpol command (Example 2-16).
Example 2-16 Listing the policy
dscli> lsauthpol itsopolicyDate/Time: April 11, 2014 10:06:34 AM MST IBM DSCLI Version: 7.7.5.23 DS: -name type state============================itsopolicy SAS active
32 LDAP Authentication for IBM DS8000 Storage
Chapter 3. User, group, and role administration
In this chapter, we explain how to map IBM DS8000 users and roles with Lightweight Directory Access Protocol (LDAP) users and groups.
3
© Copyright IBM Corp. 2009, 2014. All rights reserved. 33
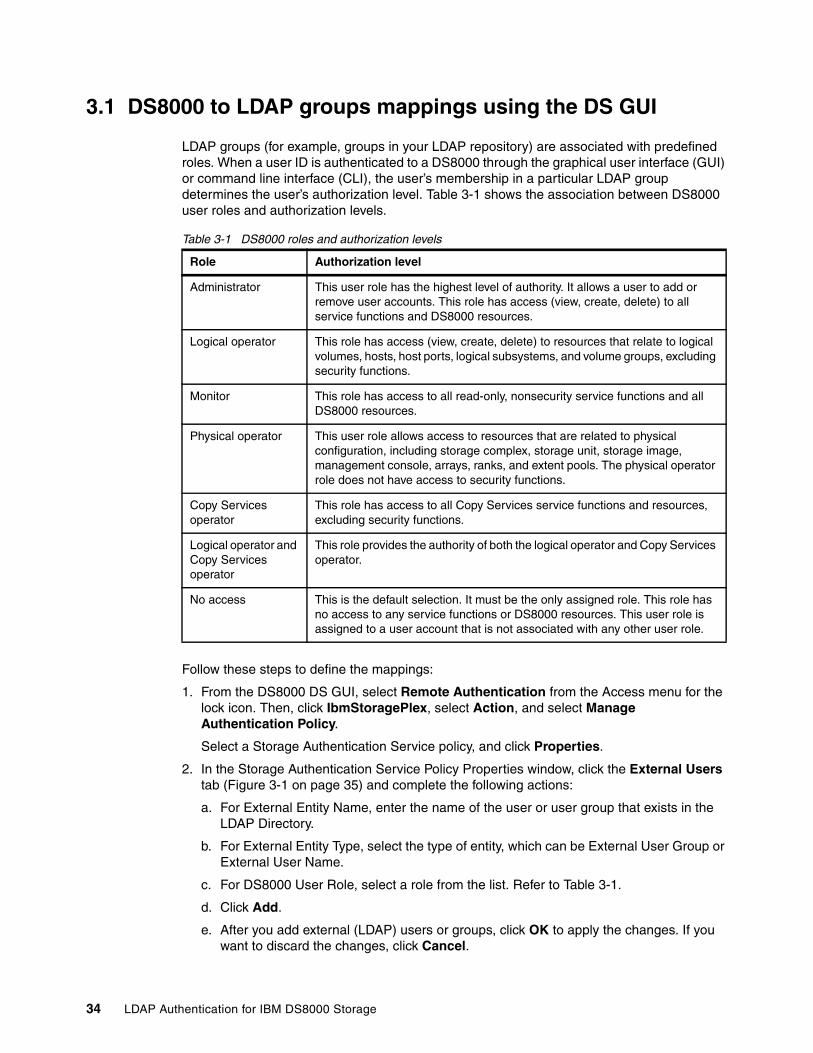
3.1 DS8000 to LDAP groups mappings using the DS GUI
LDAP groups (for example, groups in your LDAP repository) are associated with predefined roles. When a user ID is authenticated to a DS8000 through the graphical user interface (GUI) or command line interface (CLI), the user’s membership in a particular LDAP group determines the user’s authorization level. Table 3-1 shows the association between DS8000 user roles and authorization levels.
Table 3-1 DS8000 roles and authorization levels
Follow these steps to define the mappings:
1. From the DS8000 DS GUI, select Remote Authentication from the Access menu for the lock icon. Then, click IbmStoragePlex, select Action, and select Manage Authentication Policy.
Select a Storage Authentication Service policy, and click Properties.
2. In the Storage Authentication Service Policy Properties window, click the External Users tab (Figure 3-1 on page 35) and complete the following actions:
a. For External Entity Name, enter the name of the user or user group that exists in the LDAP Directory.
b. For External Entity Type, select the type of entity, which can be External User Group or External User Name.
c. For DS8000 User Role, select a role from the list. Refer to Table 3-1.
d. Click Add.
e. After you add external (LDAP) users or groups, click OK to apply the changes. If you want to discard the changes, click Cancel.
Role Authorization level
Administrator This user role has the highest level of authority. It allows a user to add or remove user accounts. This role has access (view, create, delete) to all service functions and DS8000 resources.
Logical operator This role has access (view, create, delete) to resources that relate to logical volumes, hosts, host ports, logical subsystems, and volume groups, excluding security functions.
Monitor This role has access to all read-only, nonsecurity service functions and all DS8000 resources.
Physical operator This user role allows access to resources that are related to physical configuration, including storage complex, storage unit, storage image, management console, arrays, ranks, and extent pools. The physical operator role does not have access to security functions.
Copy Services operator
This role has access to all Copy Services service functions and resources, excluding security functions.
Logical operator and Copy Services operator
This role provides the authority of both the logical operator and Copy Services operator.
No access This is the default selection. It must be the only assigned role. This role has no access to any service functions or DS8000 resources. This user role is assigned to a user account that is not associated with any other user role.
34 LDAP Authentication for IBM DS8000 Storage
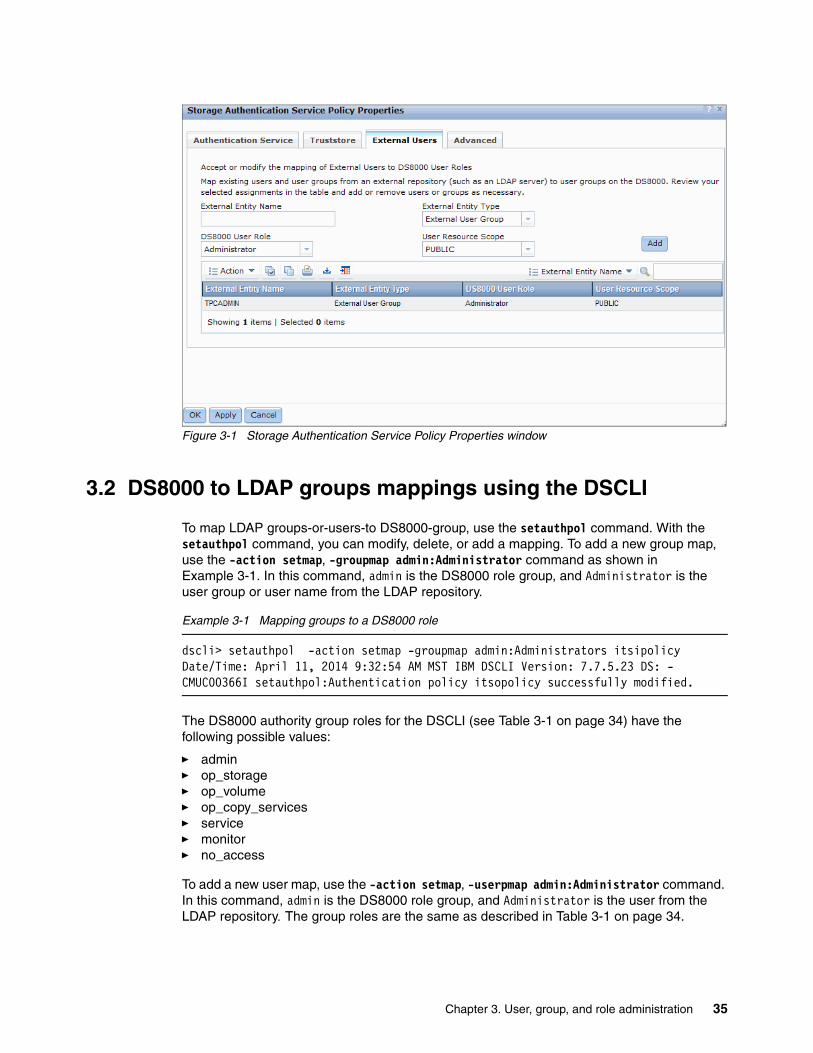
Figure 3-1 Storage Authentication Service Policy Properties window
3.2 DS8000 to LDAP groups mappings using the DSCLI
To map LDAP groups-or-users-to DS8000-group, use the setauthpol command. With the setauthpol command, you can modify, delete, or add a mapping. To add a new group map, use the -action setmap, -groupmap admin:Administrator command as shown in Example 3-1. In this command, admin is the DS8000 role group, and Administrator is the user group or user name from the LDAP repository.
Example 3-1 Mapping groups to a DS8000 role
dscli> setauthpol -action setmap -groupmap admin:Administrators itsipolicyDate/Time: April 11, 2014 9:32:54 AM MST IBM DSCLI Version: 7.7.5.23 DS: -CMUC00366I setauthpol:Authentication policy itsopolicy successfully modified.
The DS8000 authority group roles for the DSCLI (see Table 3-1 on page 34) have the following possible values:
� admin� op_storage� op_volume� op_copy_services� service� monitor� no_access
To add a new user map, use the -action setmap, -userpmap admin:Administrator command. In this command, admin is the DS8000 role group, and Administrator is the user from the LDAP repository. The group roles are the same as described in Table 3-1 on page 34.
Chapter 3. User, group, and role administration 35

36 LDAP Authentication for IBM DS8000 Storage
Appendix A. Installing Tivoli Storage Productivity Center 5.2 onWindows Server 2008 R2
This appendix explains how to install the IBM Tivoli Storage Productivity Center 5.2, including Jazz for Service Management. In this installation, we mostly use the default values, which are suitable for a majority of environments. It is important to note that the Tivoli Storage Productivity Center v5.2 installation wizard will run twice. The first time is to set up Jazz, and the second time is to set up Tivoli Storage Productivity Center.
A
Prerequisites: To install a Tivoli Storage Productivity Center v 5.2 server on Windows Server 2008 R2, you must have the latest Windows Service Packs and Microsoft hot fixes installed. Make sure that you have also installed the latest version of IBM DB2® Server for Windows, compatible with Tivoli Storage Productivity Center v 5.2.
© Copyright IBM Corp. 2009, 2014. All rights reserved. 37
A.1 Preparation steps
After several preliminary checks, you will install Jazz for Service Management because it is required to use LDAP. Then, you proceed with the Tivoli software installation.
Before you start the Tivoli Storage Productivity Center installation, complete the following preparation steps:
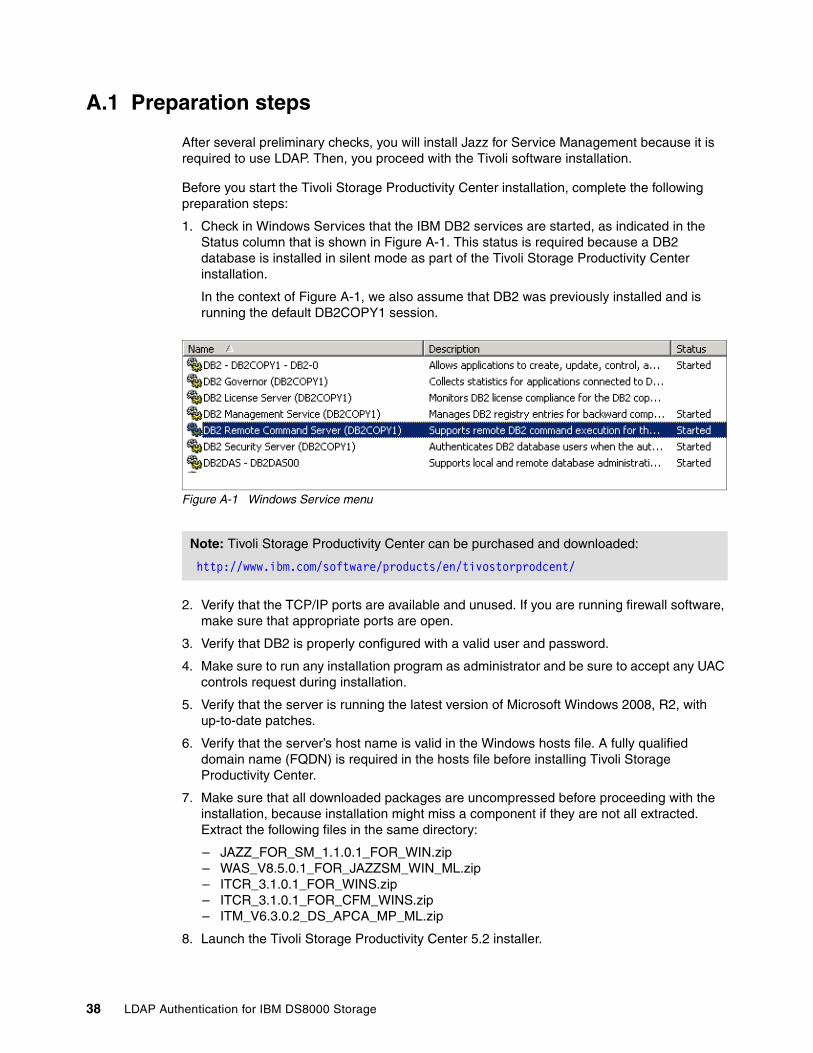
1. Check in Windows Services that the IBM DB2 services are started, as indicated in the Status column that is shown in Figure A-1. This status is required because a DB2 database is installed in silent mode as part of the Tivoli Storage Productivity Center installation.
In the context of Figure A-1, we also assume that DB2 was previously installed and is running the default DB2COPY1 session.
Figure A-1 Windows Service menu
2. Verify that the TCP/IP ports are available and unused. If you are running firewall software, make sure that appropriate ports are open.
3. Verify that DB2 is properly configured with a valid user and password.
4. Make sure to run any installation program as administrator and be sure to accept any UAC controls request during installation.
5. Verify that the server is running the latest version of Microsoft Windows 2008, R2, with up-to-date patches.
6. Verify that the server’s host name is valid in the Windows hosts file. A fully qualified domain name (FQDN) is required in the hosts file before installing Tivoli Storage Productivity Center.
7. Make sure that all downloaded packages are uncompressed before proceeding with the installation, because installation might miss a component if they are not all extracted. Extract the following files in the same directory:
– JAZZ_FOR_SM_1.1.0.1_FOR_WIN.zip– WAS_V8.5.0.1_FOR_JAZZSM_WIN_ML.zip– ITCR_3.1.0.1_FOR_WINS.zip– ITCR_3.1.0.1_FOR_CFM_WINS.zip– ITM_V6.3.0.2_DS_APCA_MP_ML.zip
8. Launch the Tivoli Storage Productivity Center 5.2 installer.
Note: Tivoli Storage Productivity Center can be purchased and downloaded:
http://www.ibm.com/software/products/en/tivostorprodcent/
38 LDAP Authentication for IBM DS8000 Storage
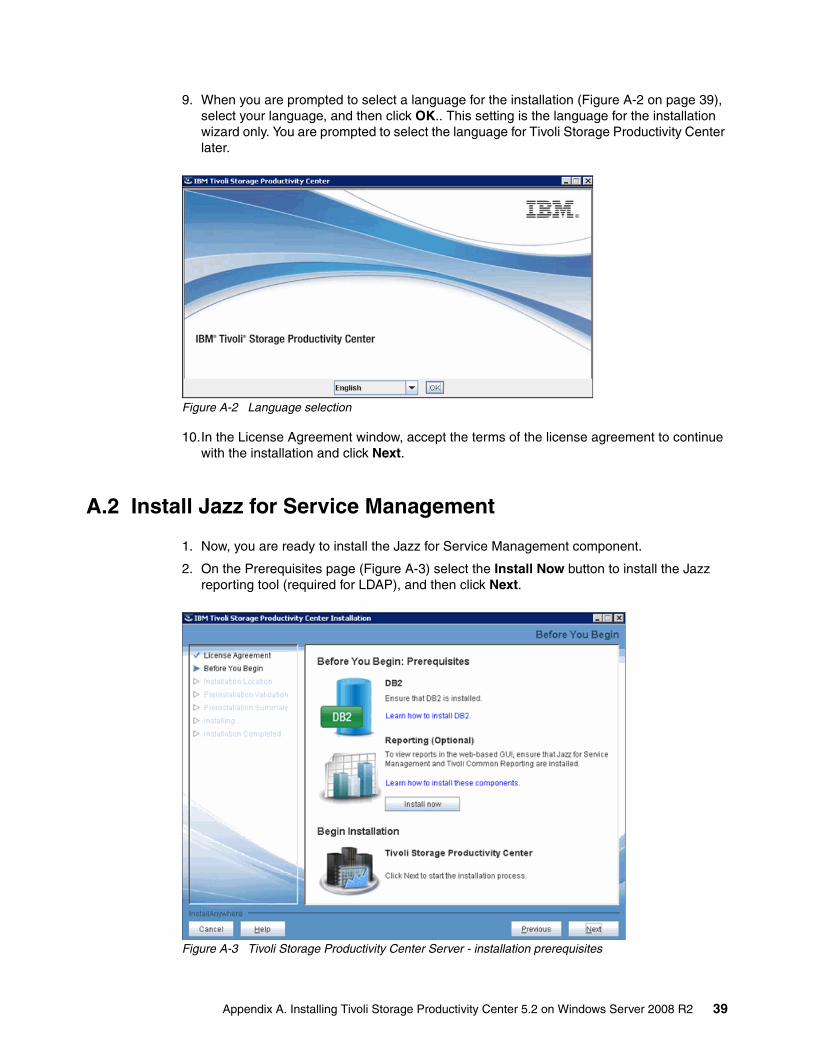
9. When you are prompted to select a language for the installation (Figure A-2 on page 39), select your language, and then click OK.. This setting is the language for the installation wizard only. You are prompted to select the language for Tivoli Storage Productivity Center later.
Figure A-2 Language selection
10.In the License Agreement window, accept the terms of the license agreement to continue with the installation and click Next.
A.2 Install Jazz for Service Management
1. Now, you are ready to install the Jazz for Service Management component.
2. On the Prerequisites page (Figure A-3) select the Install Now button to install the Jazz reporting tool (required for LDAP), and then click Next.
Figure A-3 Tivoli Storage Productivity Center Server - installation prerequisites
Appendix A. Installing Tivoli Storage Productivity Center 5.2 on Windows Server 2008 R2 39
3. Next, choose a path and click Install Now.
It is important to remember this path because it stores important data, such as scripts for exporting LTPA keys. For our test environment, we used this path:
C:\Users\Administrator\Documents\TPC 5.2\JAZZ_SM\
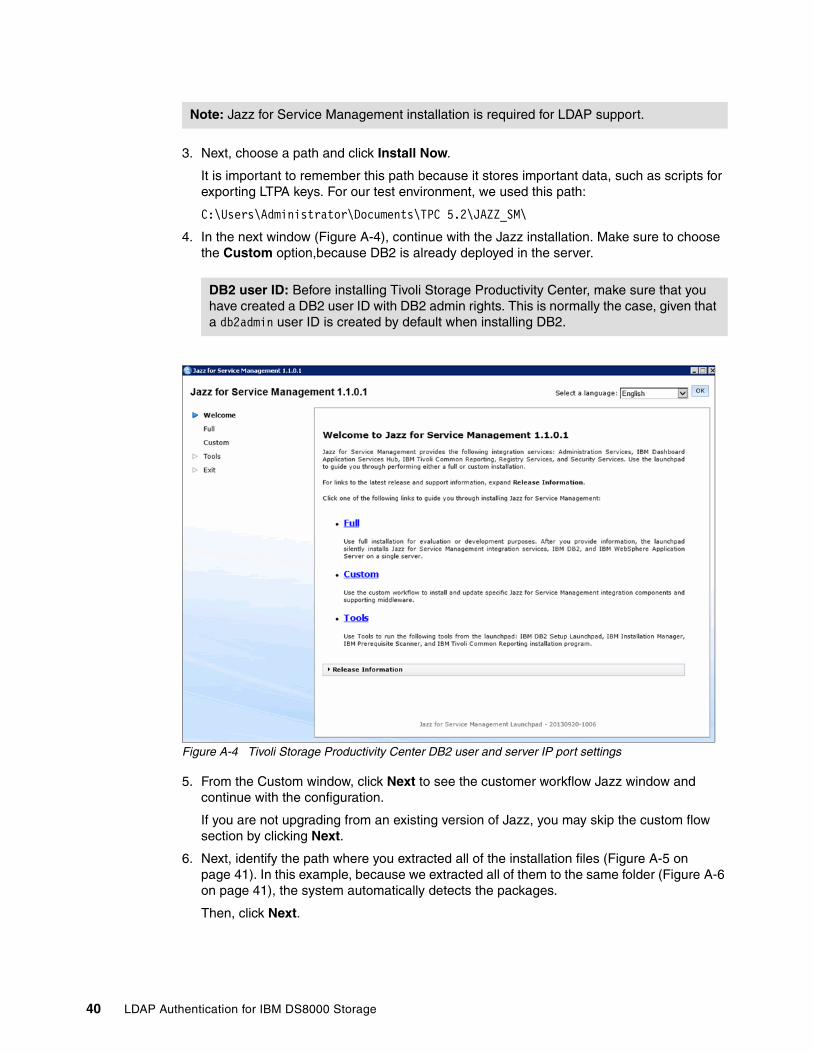
4. In the next window (Figure A-4), continue with the Jazz installation. Make sure to choose the Custom option,because DB2 is already deployed in the server.
Figure A-4 Tivoli Storage Productivity Center DB2 user and server IP port settings
5. From the Custom window, click Next to see the customer workflow Jazz window and continue with the configuration.
If you are not upgrading from an existing version of Jazz, you may skip the custom flow section by clicking Next.
6. Next, identify the path where you extracted all of the installation files (Figure A-5 on page 41). In this example, because we extracted all of them to the same folder (Figure A-6 on page 41), the system automatically detects the packages.
Then, click Next.
Note: Jazz for Service Management installation is required for LDAP support.
DB2 user ID: Before installing Tivoli Storage Productivity Center, make sure that you have created a DB2 user ID with DB2 admin rights. This is normally the case, given that a db2admin user ID is created by default when installing DB2.
40 LDAP Authentication for IBM DS8000 Storage
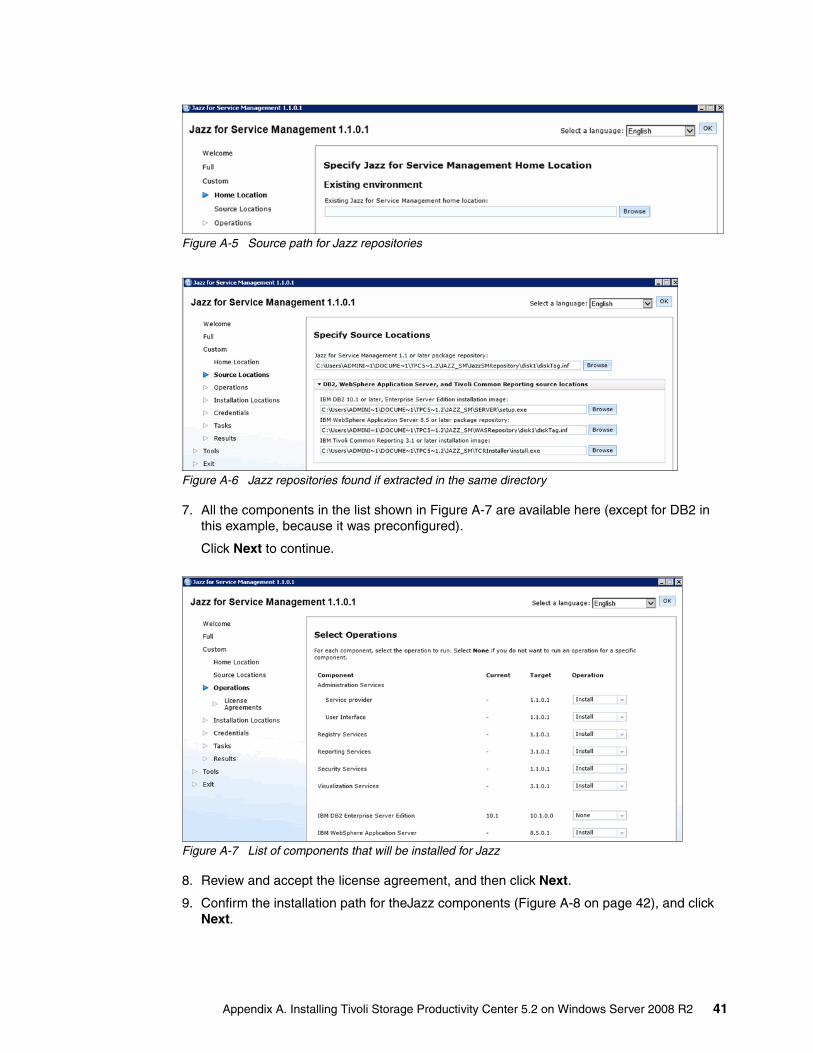
Figure A-5 Source path for Jazz repositories
Figure A-6 Jazz repositories found if extracted in the same directory
7. All the components in the list shown in Figure A-7 are available here (except for DB2 in this example, because it was preconfigured).
Click Next to continue.
Figure A-7 List of components that will be installed for Jazz
8. Review and accept the license agreement, and then click Next.
9. Confirm the installation path for theJazz components (Figure A-8 on page 42), and click Next.
Appendix A. Installing Tivoli Storage Productivity Center 5.2 on Windows Server 2008 R2 41
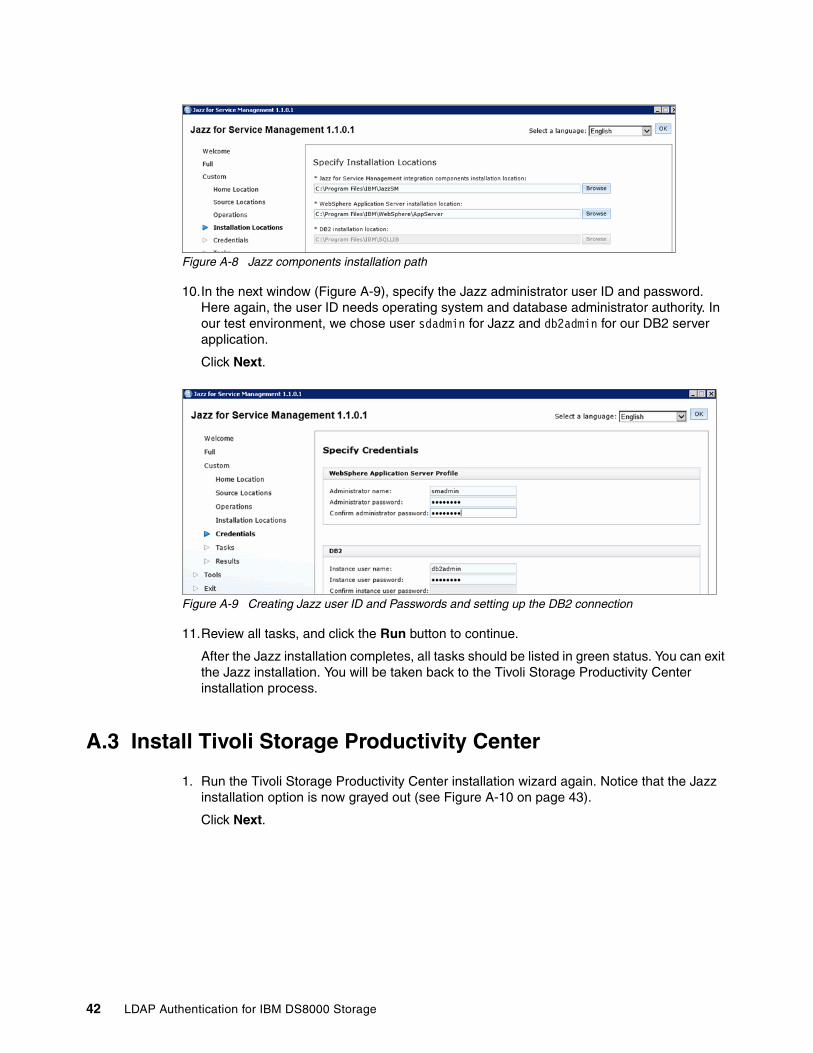
Figure A-8 Jazz components installation path
10.In the next window (Figure A-9), specify the Jazz administrator user ID and password. Here again, the user ID needs operating system and database administrator authority. In our test environment, we chose user sdadmin for Jazz and db2admin for our DB2 server application.
Click Next.
Figure A-9 Creating Jazz user ID and Passwords and setting up the DB2 connection
11.Review all tasks, and click the Run button to continue.
After the Jazz installation completes, all tasks should be listed in green status. You can exit the Jazz installation. You will be taken back to the Tivoli Storage Productivity Center installation process.
A.3 Install Tivoli Storage Productivity Center
1. Run the Tivoli Storage Productivity Center installation wizard again. Notice that the Jazz installation option is now grayed out (see Figure A-10 on page 43).
Click Next.
42 LDAP Authentication for IBM DS8000 Storage
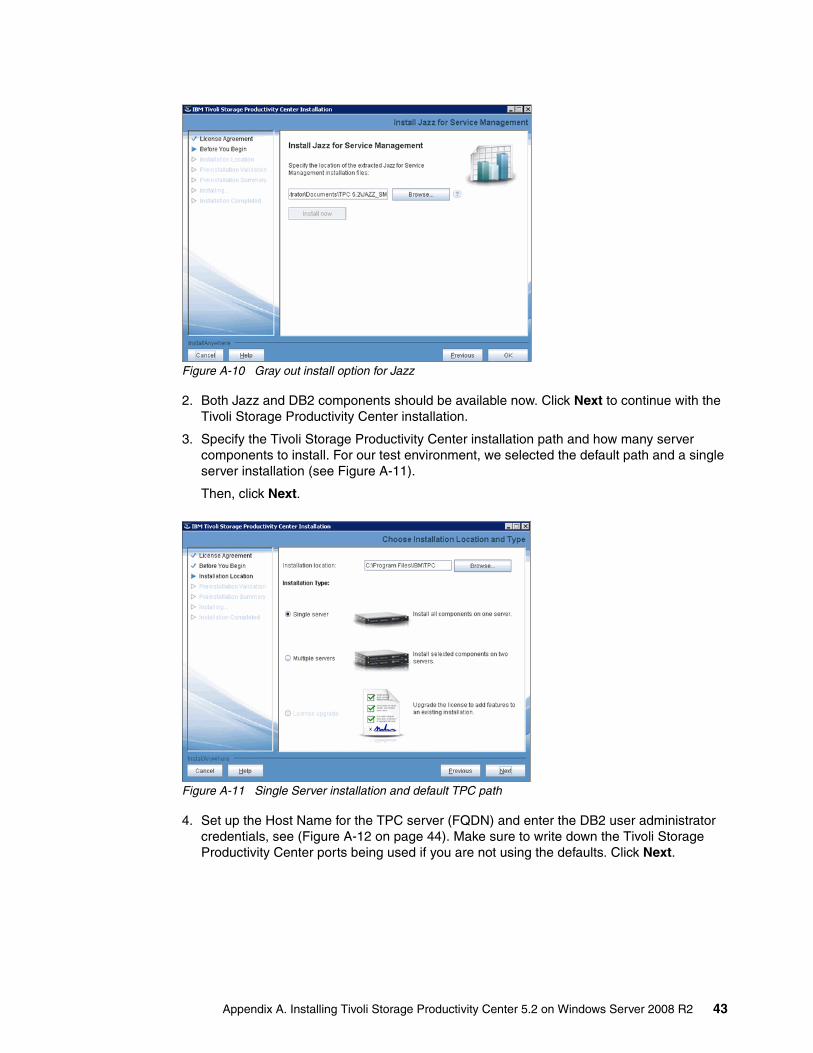
Figure A-10 Gray out install option for Jazz
2. Both Jazz and DB2 components should be available now. Click Next to continue with the Tivoli Storage Productivity Center installation.
3. Specify the Tivoli Storage Productivity Center installation path and how many server components to install. For our test environment, we selected the default path and a single server installation (see Figure A-11).
Then, click Next.
Figure A-11 Single Server installation and default TPC path
4. Set up the Host Name for the TPC server (FQDN) and enter the DB2 user administrator credentials, see (Figure A-12 on page 44). Make sure to write down the Tivoli Storage Productivity Center ports being used if you are not using the defaults. Click Next.
Appendix A. Installing Tivoli Storage Productivity Center 5.2 on Windows Server 2008 R2 43
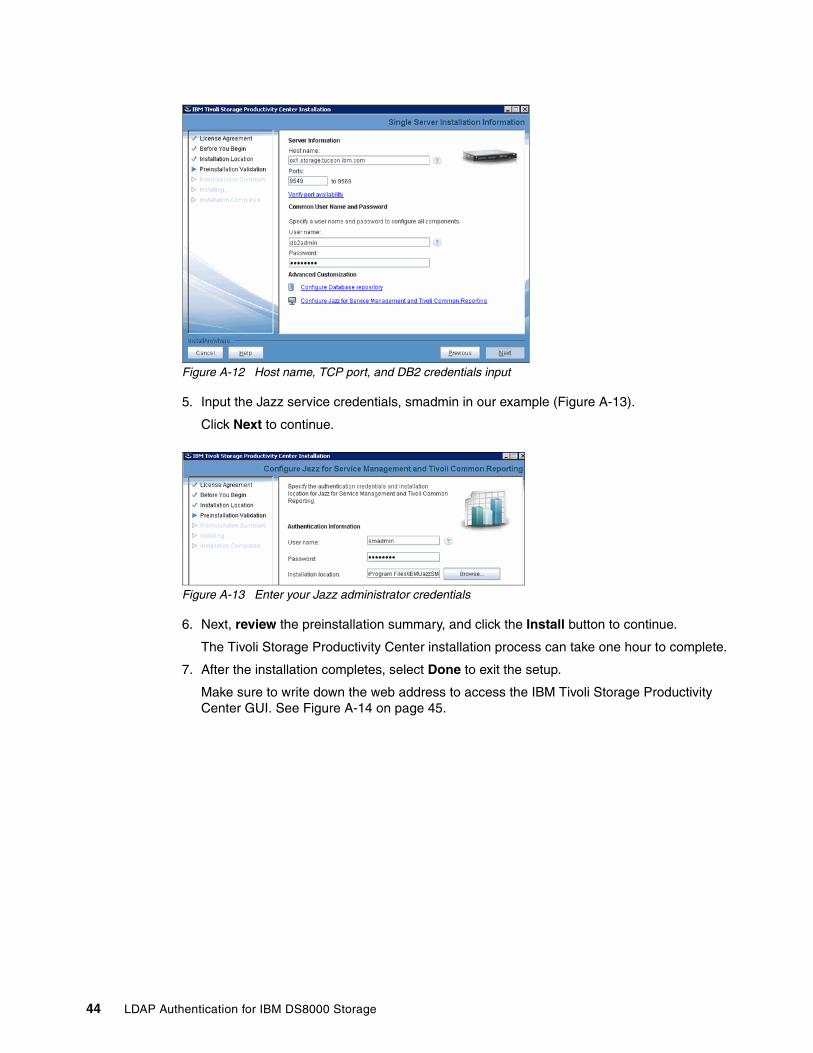
Figure A-12 Host name, TCP port, and DB2 credentials input
5. Input the Jazz service credentials, smadmin in our example (Figure A-13).
Click Next to continue.
Figure A-13 Enter your Jazz administrator credentials
6. Next, review the preinstallation summary, and click the Install button to continue.
The Tivoli Storage Productivity Center installation process can take one hour to complete.
7. After the installation completes, select Done to exit the setup.
Make sure to write down the web address to access the IBM Tivoli Storage Productivity Center GUI. See Figure A-14 on page 45.
44 LDAP Authentication for IBM DS8000 Storage
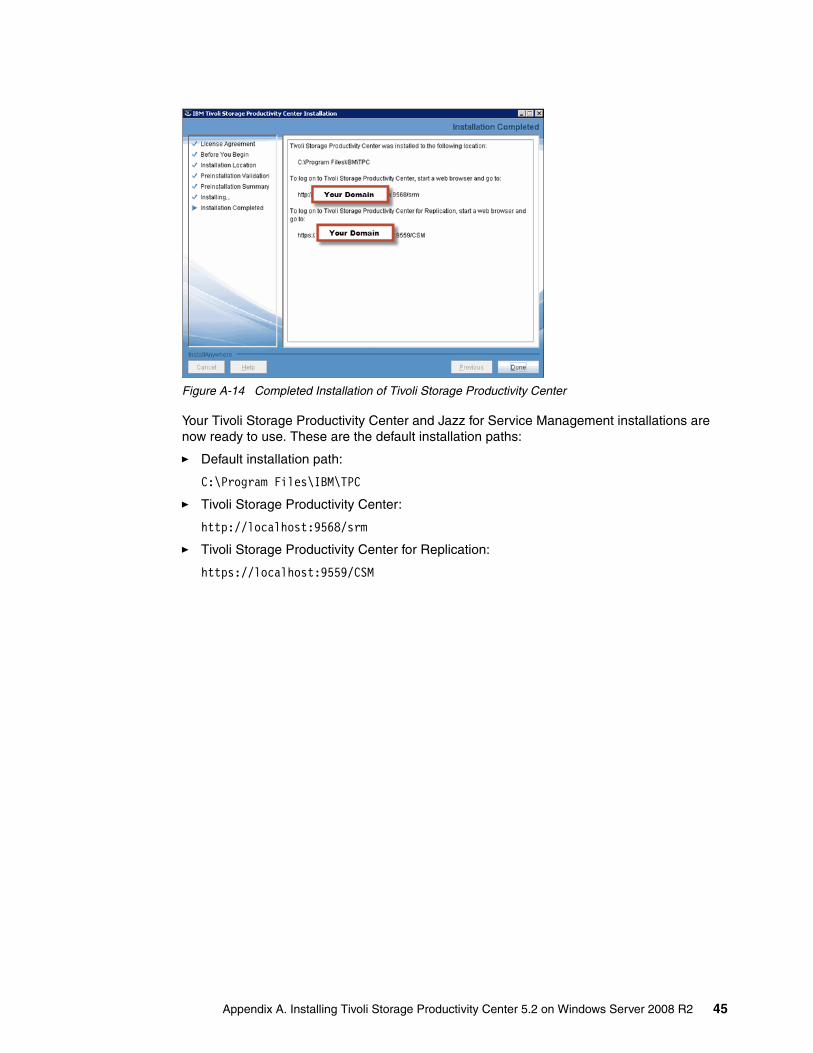
Figure A-14 Completed Installation of Tivoli Storage Productivity Center
Your Tivoli Storage Productivity Center and Jazz for Service Management installations are now ready to use. These are the default installation paths:
� Default installation path:
C:\Program Files\IBM\TPC
� Tivoli Storage Productivity Center:
http://localhost:9568/srm
� Tivoli Storage Productivity Center for Replication:
https://localhost:9559/CSM
Appendix A. Installing Tivoli Storage Productivity Center 5.2 on Windows Server 2008 R2 45

46 LDAP Authentication for IBM DS8000 Storage
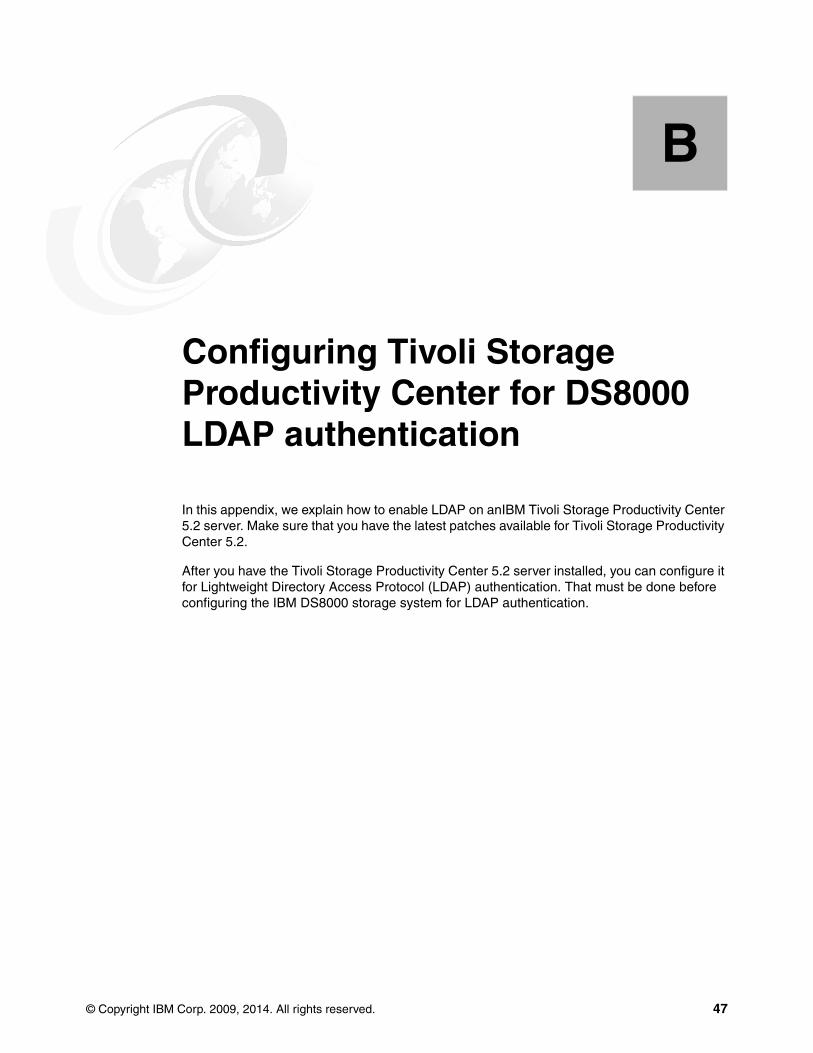
Appendix B. Configuring Tivoli Storage Productivity Center for DS8000 LDAP authentication
In this appendix, we explain how to enable LDAP on anIBM Tivoli Storage Productivity Center 5.2 server. Make sure that you have the latest patches available for Tivoli Storage Productivity Center 5.2.
After you have the Tivoli Storage Productivity Center 5.2 server installed, you can configure it for Lightweight Directory Access Protocol (LDAP) authentication. That must be done before configuring the IBM DS8000 storage system for LDAP authentication.
B
© Copyright IBM Corp. 2009, 2014. All rights reserved. 47
B.1 Configure WebSphere Integrated Solutions Center for Tivoli Storage Productivity Center with LDAP
LDAP is enabled from the IBM WebSphere Integrated Solutions Center (ISC) and the Jazz Service Management consoles. You must configure the ISC for Tivoli Storage Productivity Center before configuring Jazz for Service Management for LDAP.
This section illustrates how to configure the ISC for the Tivoli Storage Productivity Center. The ISC uses port 9563 for Tivoli Storage Productivity Center access.
Follow these steps to configure theWebSphere Integrated Solutions Center with Tivoli Storage Productivity Center for LDAP:
1. Log in to the ISC for Tivoli Storage Productivity Center with an administrative privilege account. In our test environment, we use db2admin. From the main widow, select Security Global Security. See Figure B-1 for details.
Figure B-1 Accessing the Global Security settings for LDAP configuration in the ISC
2. Make sure to check the following check boxes:
a. Select Enable administrative security.
By selecting this option, you enable administrative security for this application server domain. Administrative security requires users to authenticate before obtaining administrative control of the application server. When enabling security, set the authentication mechanism configuration, and specify a valid user ID and password (or
Note: Remember that to access the WebSphereISC for Tivoli Productivity Center in the Tivoli Storage Productivity Center server, you must log in to the following address from a local browser:
https://localhost:9563/ibm/console/
48 LDAP Authentication for IBM DS8000 Storage
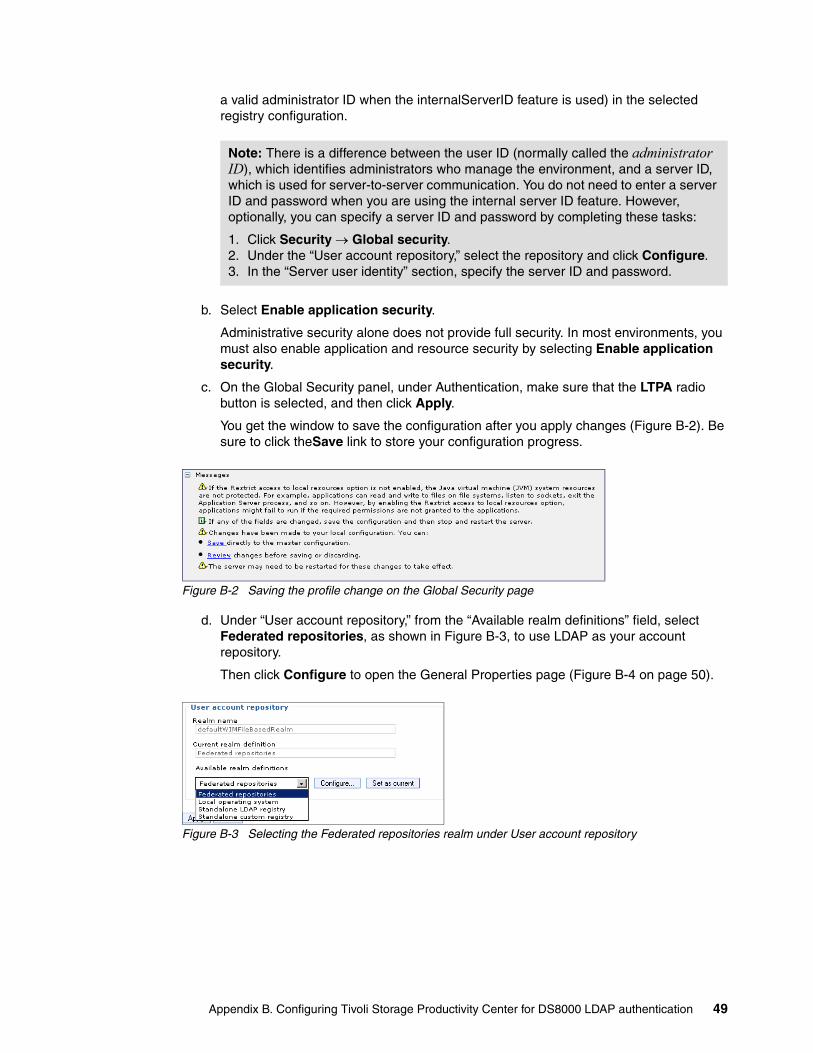
a valid administrator ID when the internalServerID feature is used) in the selected registry configuration.
b. Select Enable application security.
Administrative security alone does not provide full security. In most environments, you must also enable application and resource security by selecting Enable application security.
c. On the Global Security panel, under Authentication, make sure that the LTPA radio button is selected, and then click Apply.
You get the window to save the configuration after you apply changes (Figure B-2). Be sure to click theSave link to store your configuration progress.
Figure B-2 Saving the profile change on the Global Security page
d. Under “User account repository,” from the “Available realm definitions” field, select Federated repositories, as shown in Figure B-3, to use LDAP as your account repository.
Then click Configure to open the General Properties page (Figure B-4 on page 50).
Figure B-3 Selecting the Federated repositories realm under User account repository
Note: There is a difference between the user ID (normally called the administrator ID), which identifies administrators who manage the environment, and a server ID, which is used for server-to-server communication. You do not need to enter a server ID and password when you are using the internal server ID feature. However, optionally, you can specify a server ID and password by completing these tasks:
1. Click Security Global security. 2. Under the “User account repository,” select the repository and click Configure. 3. In the “Server user identity” section, specify the server ID and password.
Appendix B. Configuring Tivoli Storage Productivity Center for DS8000 LDAP authentication 49
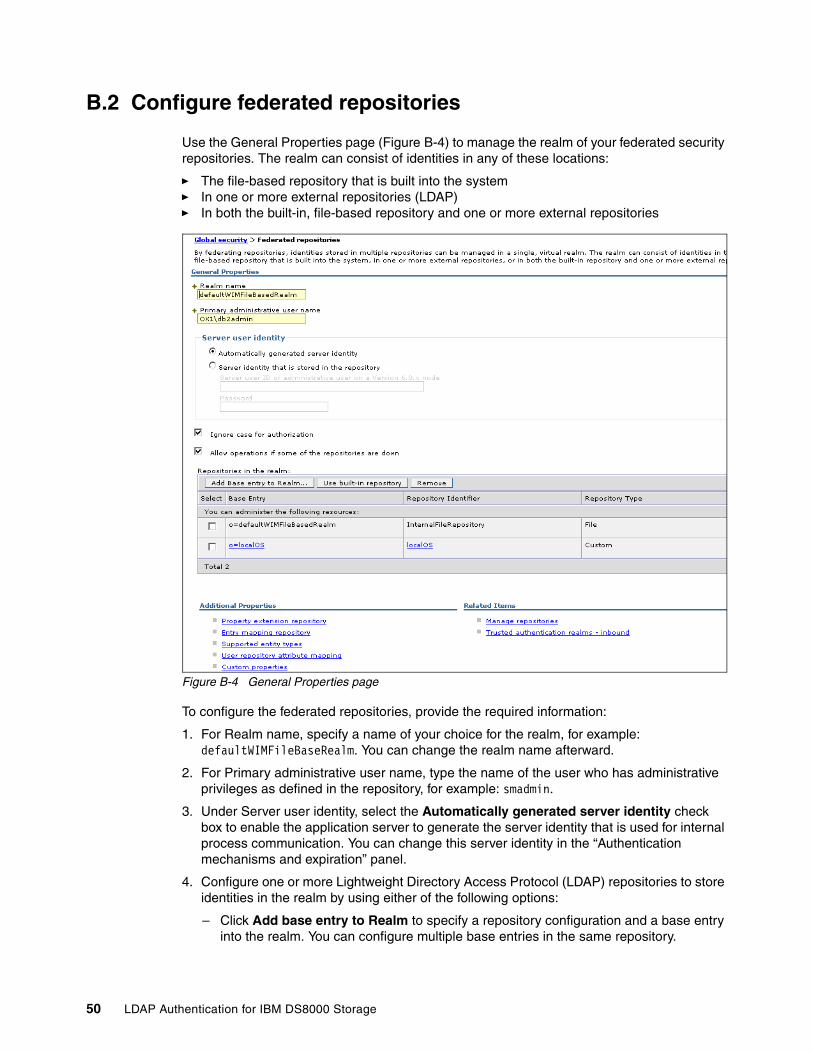
B.2 Configure federated repositories
Use the General Properties page (Figure B-4) to manage the realm of your federated security repositories. The realm can consist of identities in any of these locations:
� The file-based repository that is built into the system� In one or more external repositories (LDAP)� In both the built-in, file-based repository and one or more external repositories
Figure B-4 General Properties page
To configure the federated repositories, provide the required information:
1. For Realm name, specify a name of your choice for the realm, for example: defaultWIMFileBaseRealm. You can change the realm name afterward.
2. For Primary administrative user name, type the name of the user who has administrative privileges as defined in the repository, for example: smadmin.
3. Under Server user identity, select the Automatically generated server identity check box to enable the application server to generate the server identity that is used for internal process communication. You can change this server identity in the “Authentication mechanisms and expiration” panel.
4. Configure one or more Lightweight Directory Access Protocol (LDAP) repositories to store identities in the realm by using either of the following options:
– Click Add base entry to Realm to specify a repository configuration and a base entry into the realm. You can configure multiple base entries in the same repository.
50 LDAP Authentication for IBM DS8000 Storage
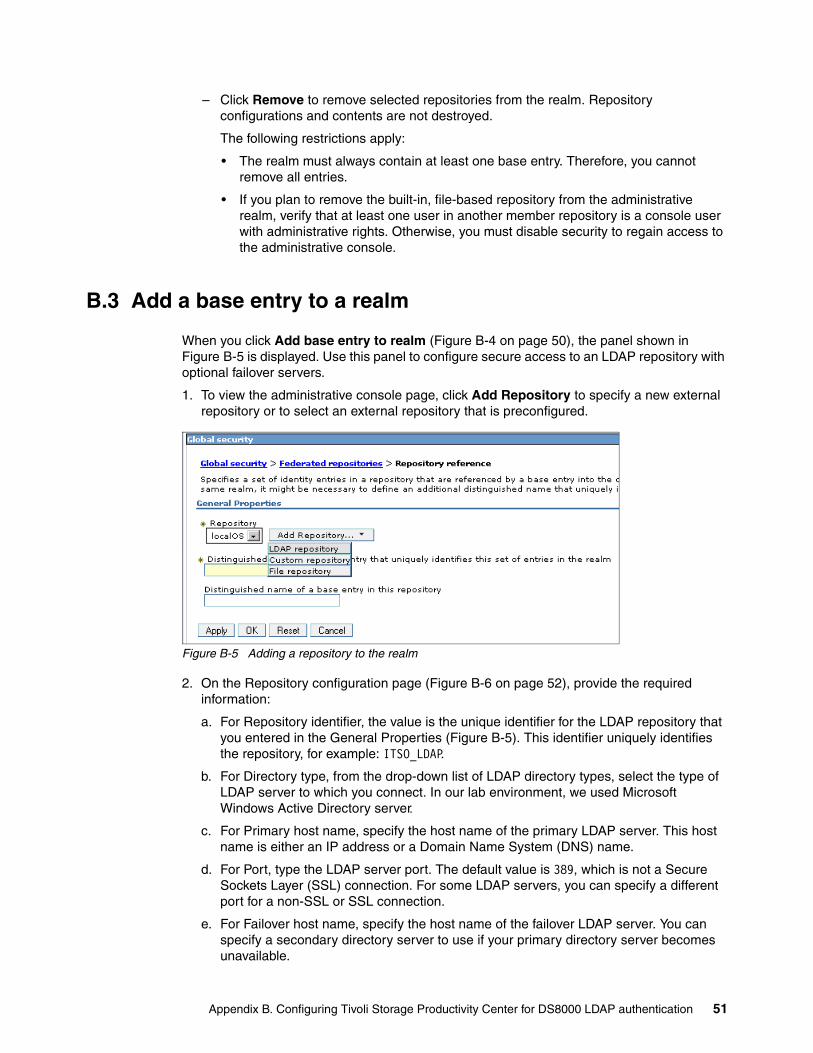
– Click Remove to remove selected repositories from the realm. Repository configurations and contents are not destroyed.
The following restrictions apply:
• The realm must always contain at least one base entry. Therefore, you cannot remove all entries.
• If you plan to remove the built-in, file-based repository from the administrative realm, verify that at least one user in another member repository is a console user with administrative rights. Otherwise, you must disable security to regain access to the administrative console.
B.3 Add a base entry to a realm
When you click Add base entry to realm (Figure B-4 on page 50), the panel shown in Figure B-5 is displayed. Use this panel to configure secure access to an LDAP repository with optional failover servers.
1. To view the administrative console page, click Add Repository to specify a new external repository or to select an external repository that is preconfigured.
Figure B-5 Adding a repository to the realm
2. On the Repository configuration page (Figure B-6 on page 52), provide the required information:
a. For Repository identifier, the value is the unique identifier for the LDAP repository that you entered in the General Properties (Figure B-5). This identifier uniquely identifies the repository, for example: ITSO_LDAP.
b. For Directory type, from the drop-down list of LDAP directory types, select the type of LDAP server to which you connect. In our lab environment, we used Microsoft Windows Active Directory server.
c. For Primary host name, specify the host name of the primary LDAP server. This host name is either an IP address or a Domain Name System (DNS) name.
d. For Port, type the LDAP server port. The default value is 389, which is not a Secure Sockets Layer (SSL) connection. For some LDAP servers, you can specify a different port for a non-SSL or SSL connection.
e. For Failover host name, specify the host name of the failover LDAP server. You can specify a secondary directory server to use if your primary directory server becomes unavailable.
Appendix B. Configuring Tivoli Storage Productivity Center for DS8000 LDAP authentication 51
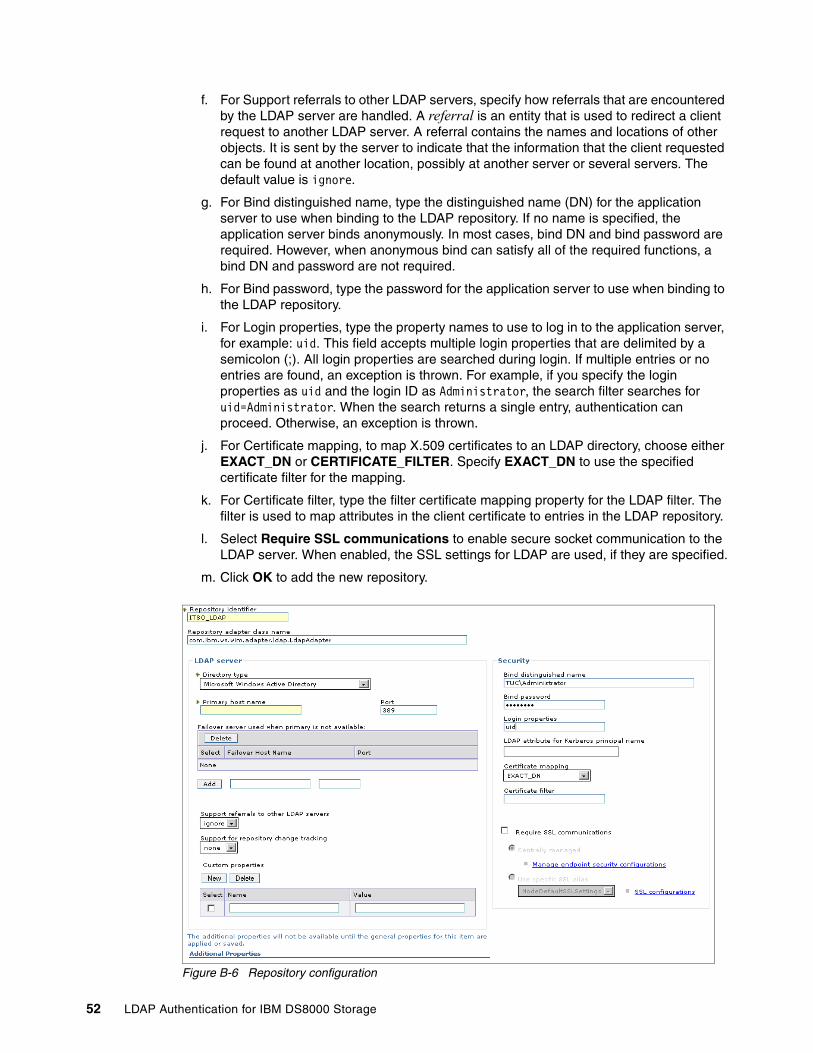
f. For Support referrals to other LDAP servers, specify how referrals that are encountered by the LDAP server are handled. A referral is an entity that is used to redirect a client request to another LDAP server. A referral contains the names and locations of other objects. It is sent by the server to indicate that the information that the client requested can be found at another location, possibly at another server or several servers. The default value is ignore.
g. For Bind distinguished name, type the distinguished name (DN) for the application server to use when binding to the LDAP repository. If no name is specified, the application server binds anonymously. In most cases, bind DN and bind password are required. However, when anonymous bind can satisfy all of the required functions, a bind DN and password are not required.
h. For Bind password, type the password for the application server to use when binding to the LDAP repository.
i. For Login properties, type the property names to use to log in to the application server, for example: uid. This field accepts multiple login properties that are delimited by a semicolon (;). All login properties are searched during login. If multiple entries or no entries are found, an exception is thrown. For example, if you specify the login properties as uid and the login ID as Administrator, the search filter searches for uid=Administrator. When the search returns a single entry, authentication can proceed. Otherwise, an exception is thrown.
j. For Certificate mapping, to map X.509 certificates to an LDAP directory, choose either EXACT_DN or CERTIFICATE_FILTER. Specify EXACT_DN to use the specified certificate filter for the mapping.
k. For Certificate filter, type the filter certificate mapping property for the LDAP filter. The filter is used to map attributes in the client certificate to entries in the LDAP repository.
l. Select Require SSL communications to enable secure socket communication to the LDAP server. When enabled, the SSL settings for LDAP are used, if they are specified.
m. Click OK to add the new repository.
Figure B-6 Repository configuration
52 LDAP Authentication for IBM DS8000 Storage

3. On the next page (Figure B-7), add the repository details:
a. For Distinguished name that uniquely identifies this set of entries in the realm, add the DN that uniquely identifies this set of entries in the realm. If multiple repositories are included in the realm, define an additional DN that uniquely identifies this set of entries within the realm, for example: dc=tucson,dc=ibm,dc=com.
b. For Distinguished name of a base entry in this repository, which will have all users and Tivoli Storage Productivity Center groups under the same OU group, add the LDAP DN of the base entry within the repository. The entry and its descendents are mapped to the subtree that is identified by the unique base name entry field, for example: dc=tucson,dc=ibm,dc=com. This could also be the entire root tree for LDAP.
We used the following settings for our lab environment:
OU=TPC,DC=TUC,DC=STGLAB,DC=IBM,DC=COM
If this field is left blank, the subtree defaults to the root of the LDAP repository.
c. Click OK to save the changes.
Figure B-7 Repository details
As Figure B-8 shows, the ITSO_LDAP repository was added successfully to the realm.
Figure B-8 Repositories in the realm
4. Click Apply to save the configuration.
5. In the Messages box (Figure B-9), click Save to save the changes to the configuration.
After this is complete, log out of the ISC with the Tivoli Storage Productivity Center portal and restart the service. (From Windows services, right-click IBM WebSphere Application Server v8.0 TPCWebServer, and select Restart.)
Figure B-9 Messages box with options for saving and reviewing changes
Appendix B. Configuring Tivoli Storage Productivity Center for DS8000 LDAP authentication 53
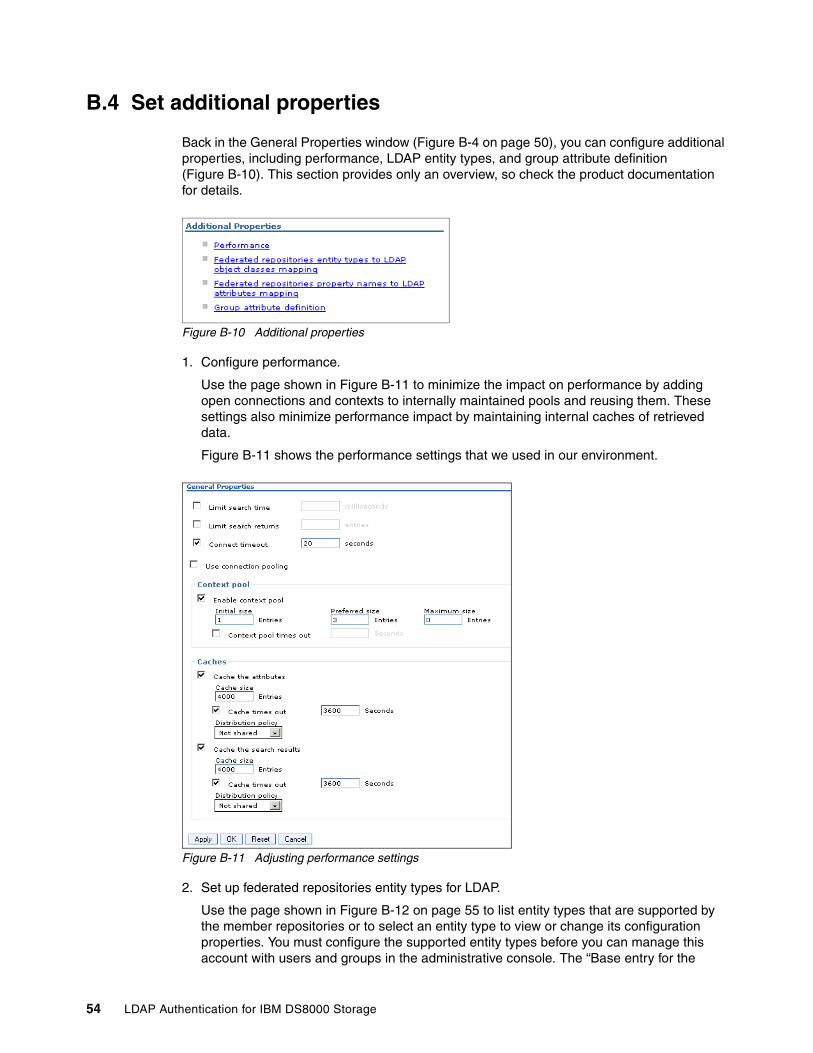
B.4 Set additional properties
Back in the General Properties window (Figure B-4 on page 50), you can configure additional properties, including performance, LDAP entity types, and group attribute definition (Figure B-10). This section provides only an overview, so check the product documentation for details.
Figure B-10 Additional properties
1. Configure performance.
Use the page shown in Figure B-11 to minimize the impact on performance by adding open connections and contexts to internally maintained pools and reusing them. These settings also minimize performance impact by maintaining internal caches of retrieved data.
Figure B-11 shows the performance settings that we used in our environment.
Figure B-11 Adjusting performance settings
2. Set up federated repositories entity types for LDAP.
Use the page shown in Figure B-12 on page 55 to list entity types that are supported by the member repositories or to select an entity type to view or change its configuration properties. You must configure the supported entity types before you can manage this account with users and groups in the administrative console. The “Base entry for the
54 LDAP Authentication for IBM DS8000 Storage
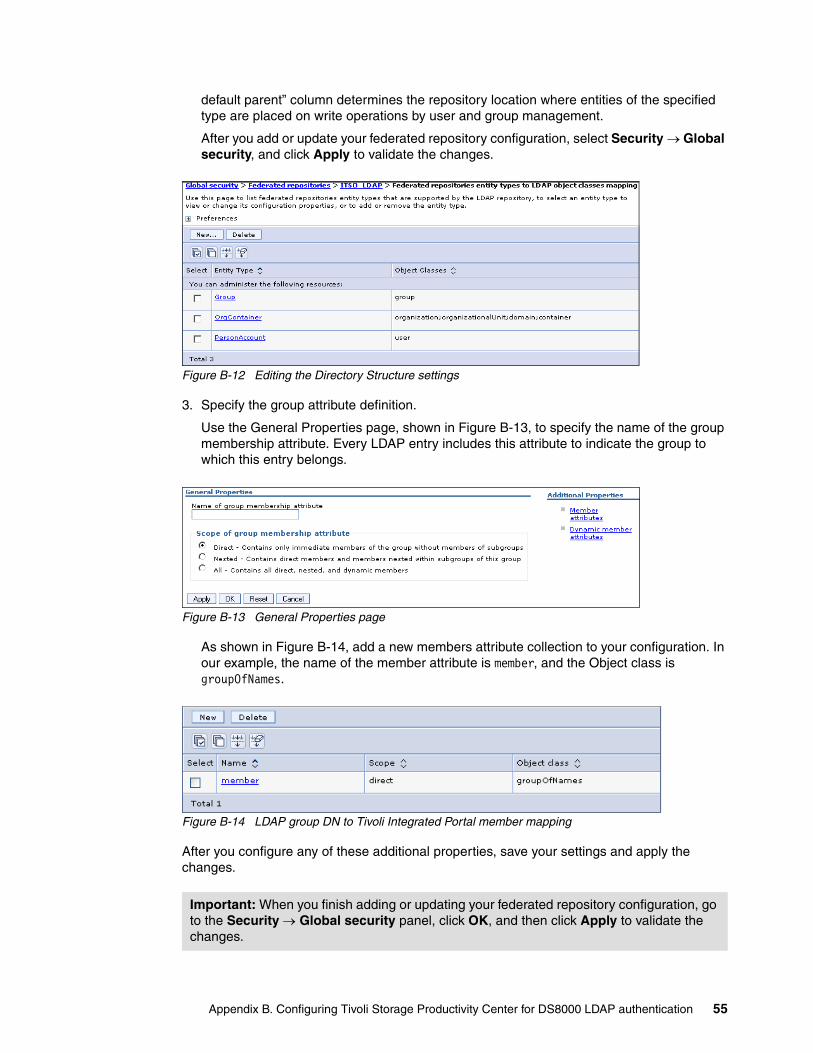
default parent” column determines the repository location where entities of the specified type are placed on write operations by user and group management.
After you add or update your federated repository configuration, select Security Global security, and click Apply to validate the changes.
Figure B-12 Editing the Directory Structure settings
3. Specify the group attribute definition.
Use the General Properties page, shown in Figure B-13, to specify the name of the group membership attribute. Every LDAP entry includes this attribute to indicate the group to which this entry belongs.
Figure B-13 General Properties page
As shown in Figure B-14, add a new members attribute collection to your configuration. In our example, the name of the member attribute is member, and the Object class is groupOfNames.
Figure B-14 LDAP group DN to Tivoli Integrated Portal member mapping
After you configure any of these additional properties, save your settings and apply the changes.
Important: When you finish adding or updating your federated repository configuration, go to the Security Global security panel, click OK, and then click Apply to validate the changes.
Appendix B. Configuring Tivoli Storage Productivity Center for DS8000 LDAP authentication 55
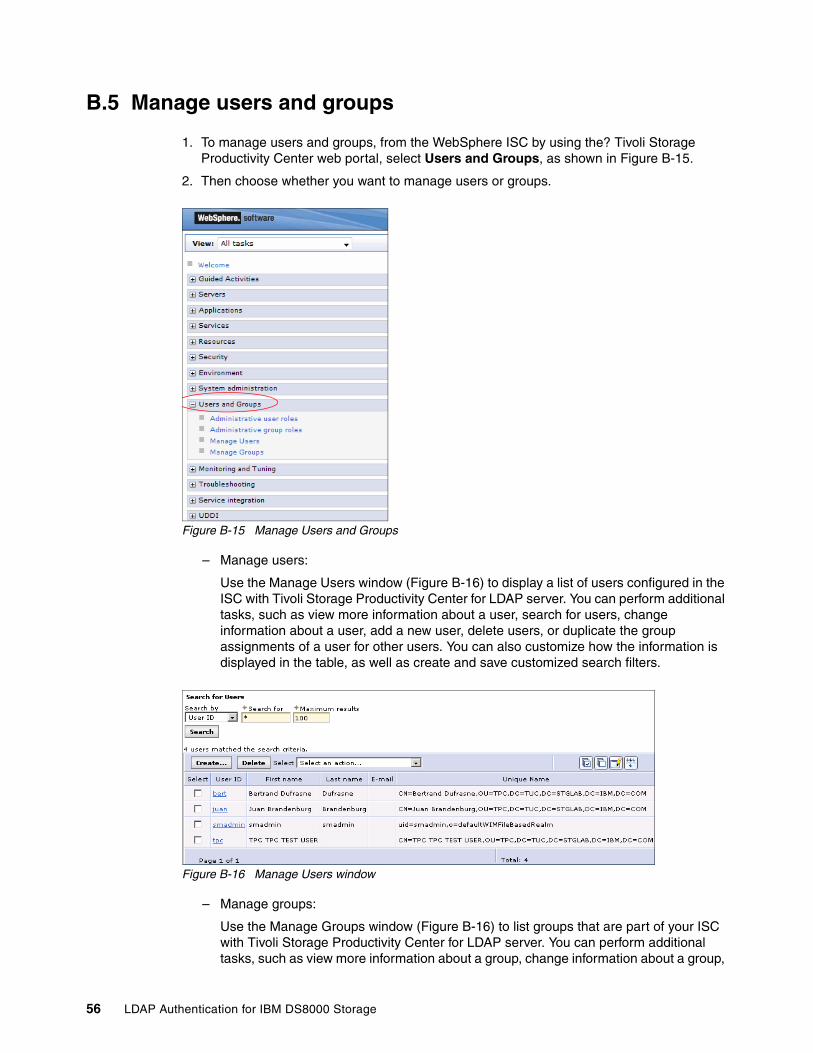
B.5 Manage users and groups
1. To manage users and groups, from the WebSphere ISC by using the? Tivoli Storage Productivity Center web portal, select Users and Groups, as shown in Figure B-15.
2. Then choose whether you want to manage users or groups.
Figure B-15 Manage Users and Groups
– Manage users:
Use the Manage Users window (Figure B-16) to display a list of users configured in the ISC with Tivoli Storage Productivity Center for LDAP server. You can perform additional tasks, such as view more information about a user, search for users, change information about a user, add a new user, delete users, or duplicate the group assignments of a user for other users. You can also customize how the information is displayed in the table, as well as create and save customized search filters.
Figure B-16 Manage Users window
– Manage groups:
Use the Manage Groups window (Figure B-16) to list groups that are part of your ISC with Tivoli Storage Productivity Center for LDAP server. You can perform additional tasks, such as view more information about a group, change information about a group,
56 LDAP Authentication for IBM DS8000 Storage
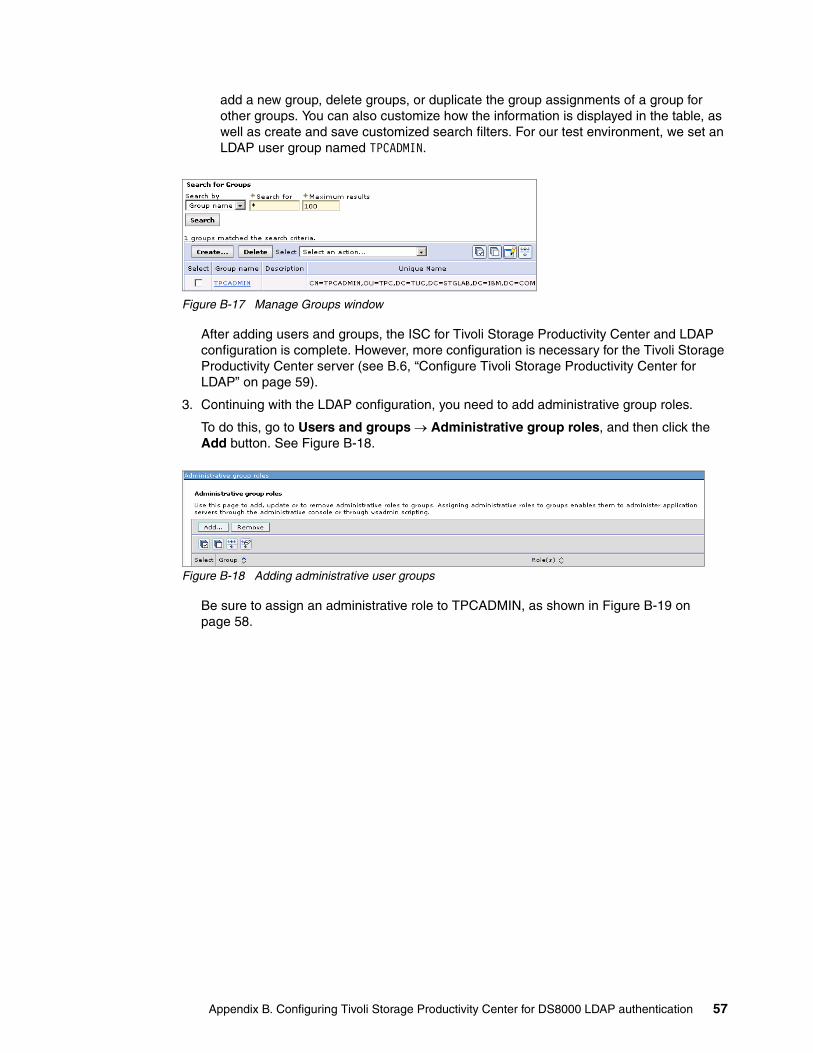
add a new group, delete groups, or duplicate the group assignments of a group for other groups. You can also customize how the information is displayed in the table, as well as create and save customized search filters. For our test environment, we set an LDAP user group named TPCADMIN.
Figure B-17 Manage Groups window
After adding users and groups, the ISC for Tivoli Storage Productivity Center and LDAP configuration is complete. However, more configuration is necessary for the Tivoli Storage Productivity Center server (see B.6, “Configure Tivoli Storage Productivity Center for LDAP” on page 59).
3. Continuing with the LDAP configuration, you need to add administrative group roles.
To do this, go to Users and groups Administrative group roles, and then click the Add button. See Figure B-18.
Figure B-18 Adding administrative user groups
Be sure to assign an administrative role to TPCADMIN, as shown in Figure B-19 on page 58.
Appendix B. Configuring Tivoli Storage Productivity Center for DS8000 LDAP authentication 57
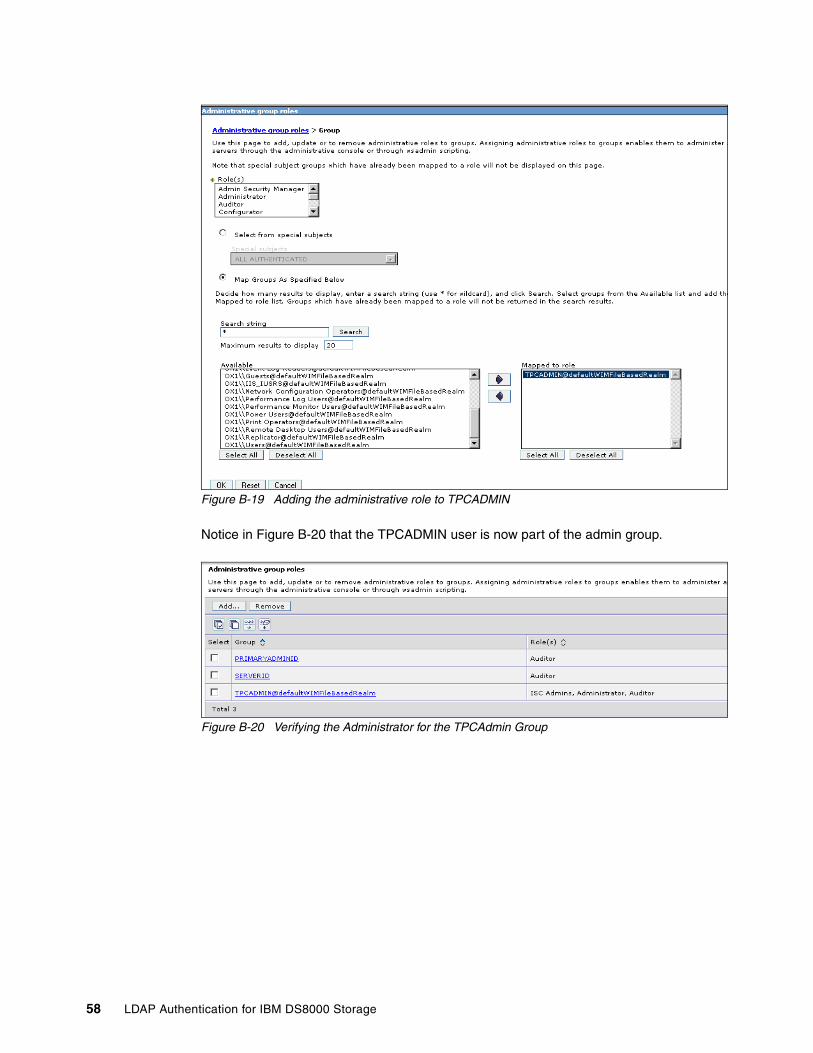
Figure B-19 Adding the administrative role to TPCADMIN
Notice in Figure B-20 that the TPCADMIN user is now part of the admin group.
Figure B-20 Verifying the Administrator for the TPCAdmin Group
58 LDAP Authentication for IBM DS8000 Storage
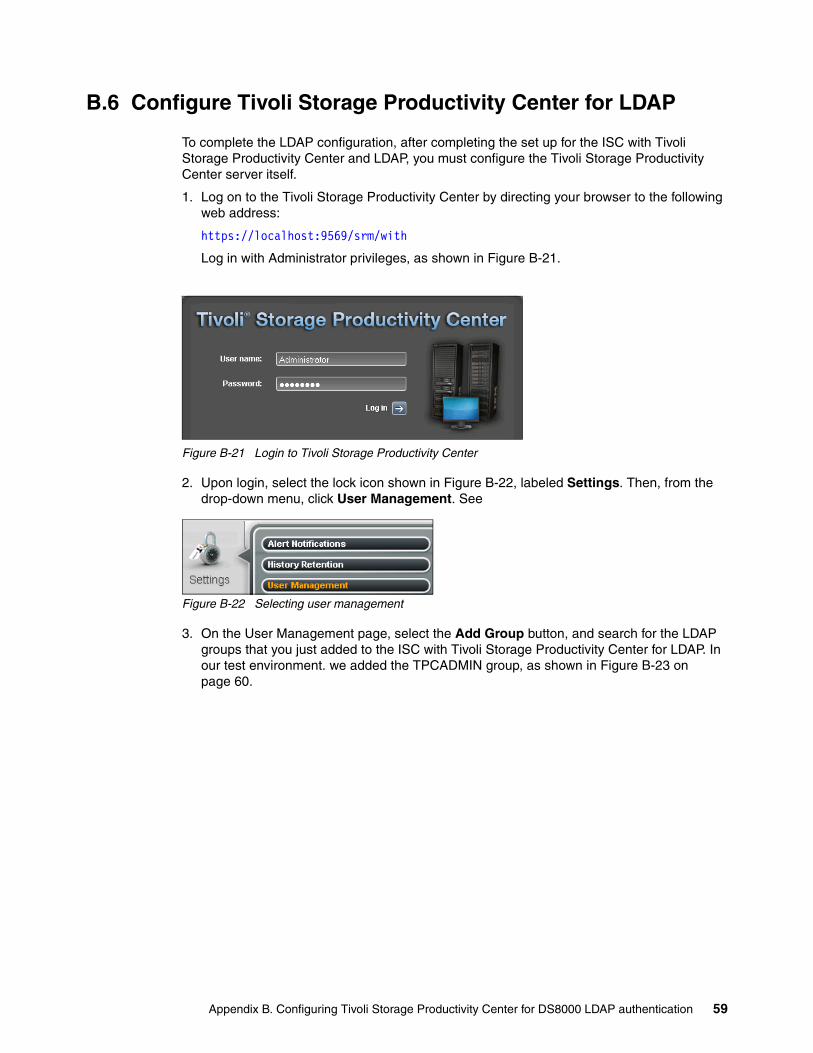
B.6 Configure Tivoli Storage Productivity Center for LDAP
To complete the LDAP configuration, after completing the set up for the ISC with Tivoli Storage Productivity Center and LDAP, you must configure the Tivoli Storage Productivity Center server itself.
1. Log on to the Tivoli Storage Productivity Center by directing your browser to the following web address:
https://localhost:9569/srm/with
Log in with Administrator privileges, as shown in Figure B-21.
Figure B-21 Login to Tivoli Storage Productivity Center
2. Upon login, select the lock icon shown in Figure B-22, labeled Settings. Then, from the drop-down menu, click User Management. See
Figure B-22 Selecting user management
3. On the User Management page, select the Add Group button, and search for the LDAP groups that you just added to the ISC with Tivoli Storage Productivity Center for LDAP. In our test environment. we added the TPCADMIN group, as shown in Figure B-23 on page 60.
Appendix B. Configuring Tivoli Storage Productivity Center for DS8000 LDAP authentication 59
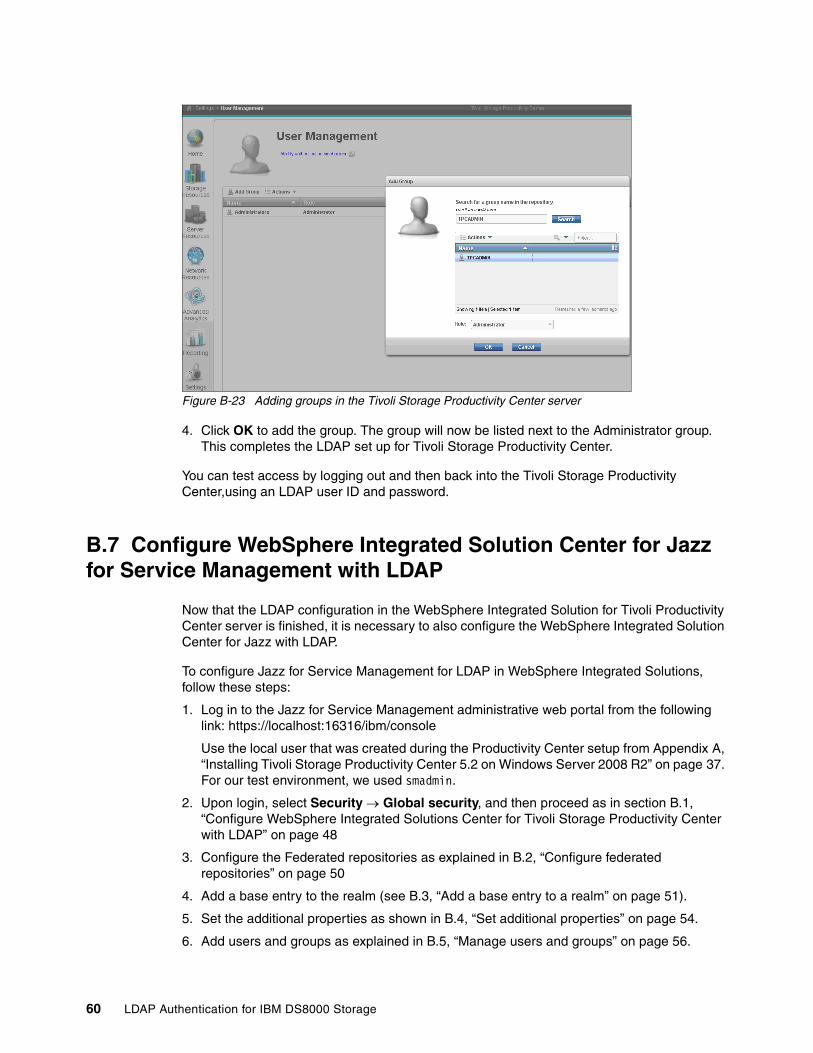
Figure B-23 Adding groups in the Tivoli Storage Productivity Center server
4. Click OK to add the group. The group will now be listed next to the Administrator group. This completes the LDAP set up for Tivoli Storage Productivity Center.
You can test access by logging out and then back into the Tivoli Storage Productivity Center,using an LDAP user ID and password.
B.7 Configure WebSphere Integrated Solution Center for Jazz for Service Management with LDAP
Now that the LDAP configuration in the WebSphere Integrated Solution for Tivoli Productivity Center server is finished, it is necessary to also configure the WebSphere Integrated Solution Center for Jazz with LDAP.
To configure Jazz for Service Management for LDAP in WebSphere Integrated Solutions, follow these steps:
1. Log in to the Jazz for Service Management administrative web portal from the following link: https://localhost:16316/ibm/console
Use the local user that was created during the Productivity Center setup from Appendix A, “Installing Tivoli Storage Productivity Center 5.2 on Windows Server 2008 R2” on page 37. For our test environment, we used smadmin.
2. Upon login, select Security Global security, and then proceed as in section B.1, “Configure WebSphere Integrated Solutions Center for Tivoli Storage Productivity Center with LDAP” on page 48
3. Configure the Federated repositories as explained in B.2, “Configure federated repositories” on page 50
4. Add a base entry to the realm (see B.3, “Add a base entry to a realm” on page 51).
5. Set the additional properties as shown in B.4, “Set additional properties” on page 54.
6. Add users and groups as explained in B.5, “Manage users and groups” on page 56.
60 LDAP Authentication for IBM DS8000 Storage
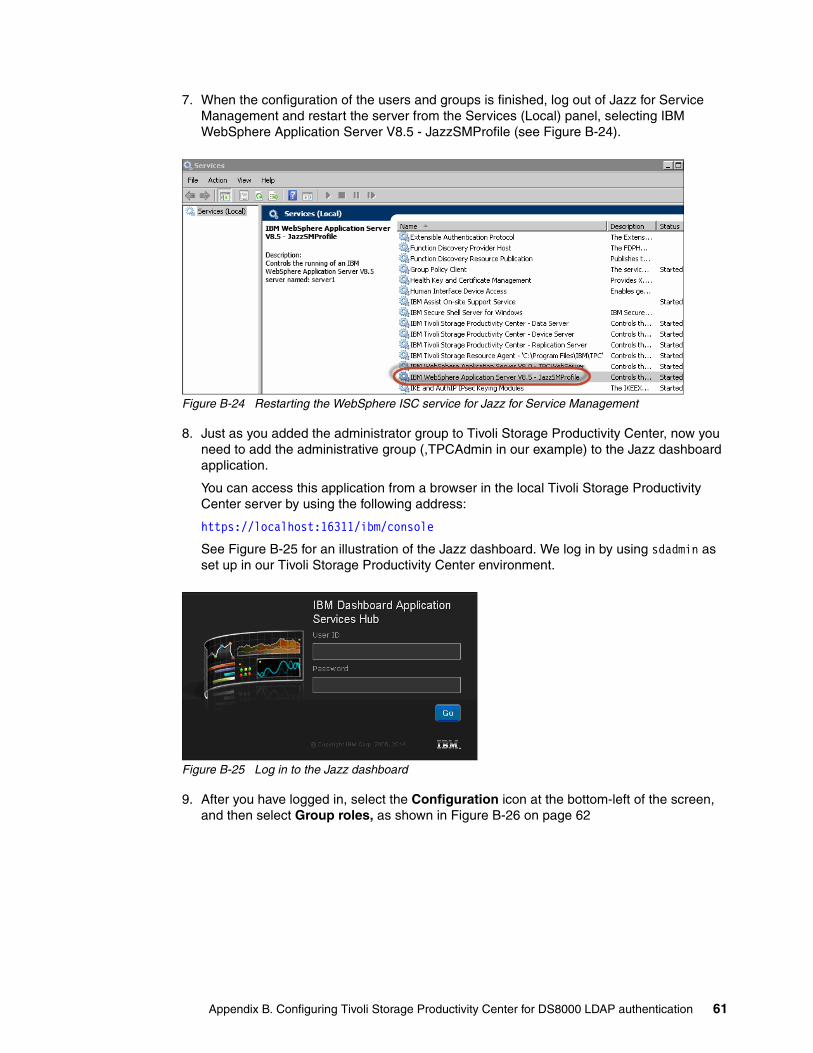
7. When the configuration of the users and groups is finished, log out of Jazz for Service Management and restart the server from the Services (Local) panel, selecting IBM WebSphere Application Server V8.5 - JazzSMProfile (see Figure B-24).
Figure B-24 Restarting the WebSphere ISC service for Jazz for Service Management
8. Just as you added the administrator group to Tivoli Storage Productivity Center, now you need to add the administrative group (,TPCAdmin in our example) to the Jazz dashboard application.
You can access this application from a browser in the local Tivoli Storage Productivity Center server by using the following address:
https://localhost:16311/ibm/console
See Figure B-25 for an illustration of the Jazz dashboard. We log in by using sdadmin as set up in our Tivoli Storage Productivity Center environment.
Figure B-25 Log in to the Jazz dashboard
9. After you have logged in, select the Configuration icon at the bottom-left of the screen, and then select Group roles, as shown in Figure B-26 on page 62
Appendix B. Configuring Tivoli Storage Productivity Center for DS8000 LDAP authentication 61
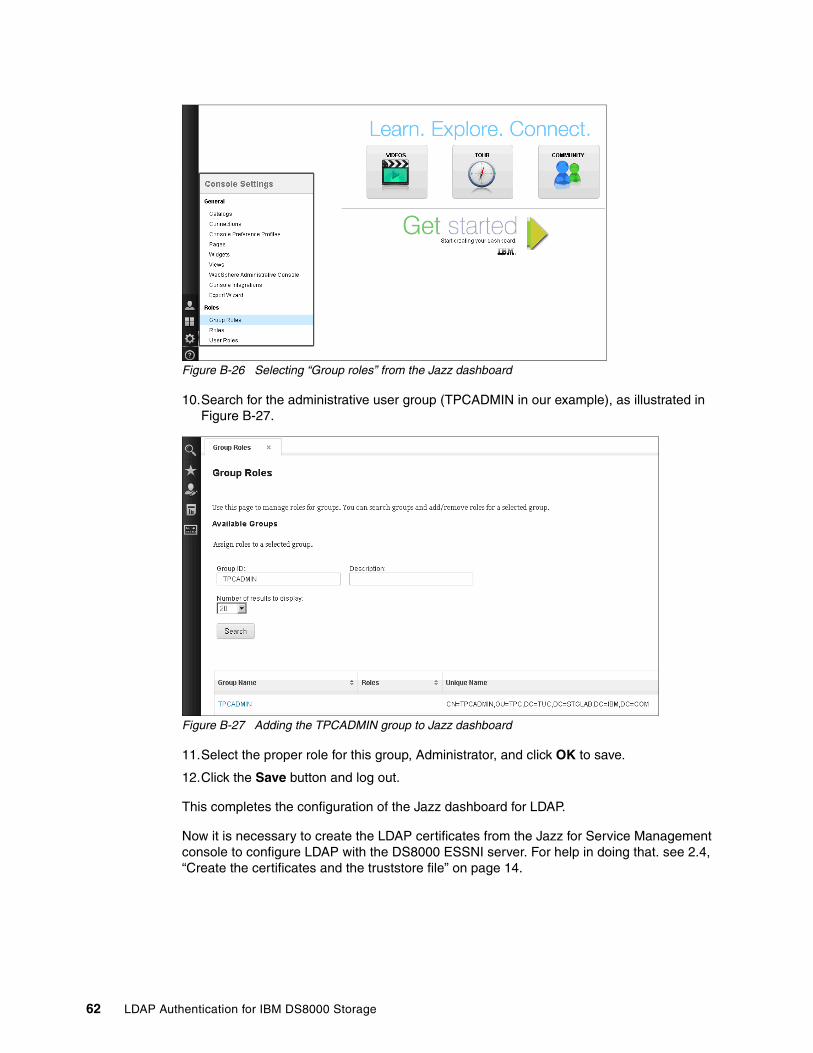
Figure B-26 Selecting “Group roles” from the Jazz dashboard
10.Search for the administrative user group (TPCADMIN in our example), as illustrated in Figure B-27.
Figure B-27 Adding the TPCADMIN group to Jazz dashboard
11.Select the proper role for this group, Administrator, and click OK to save.
12.Click the Save button and log out.
This completes the configuration of the Jazz dashboard for LDAP.
Now it is necessary to create the LDAP certificates from the Jazz for Service Management console to configure LDAP with the DS8000 ESSNI server. For help in doing that. see 2.4, “Create the certificates and the truststore file” on page 14.
62 LDAP Authentication for IBM DS8000 Storage
Appendix C. Installing IBM Security Directory Server
The IBM Security Directory Server (formerly known as the IBM Tivoli Directory Server) uses the Lightweight Directory Access Protocol (LDAP) to provide a trusted identity data infrastructure for authentication in the following ways:
� It provides identity management for companies that want to deploy a robust and scalable identity infrastructure.
� It uses LDAP identity infrastructure software and meets LDAP v3 industry compliance standards.
� It enhances proxy server capabilities with flow control for managing requests and paging search results for single and multiple partitions and a smart fail-back mechanism to restore servers safely.
� It maintains high availability with master and subordinate and peer-to-peer replication capabilities, plus scheduled online or offline backup and remote restore.
� It supports virtual list views so that you can scroll forward or backward through entries in a large sorted data set and can record deleted entries.
� It supports leading platforms, including IBM AIX, IBM i5/OS™, IBM z/OS®, Oracle Solaris, Microsoft Windows Server, HP-UX, and SUSE and Red Hat Linux software.
In this appendix, we explain how to install and configure IBM Security Directory Server v6.3 in a Microsoft Windows Server environment.
C
© Copyright IBM Corp. 2009, 2014. All rights reserved. 63
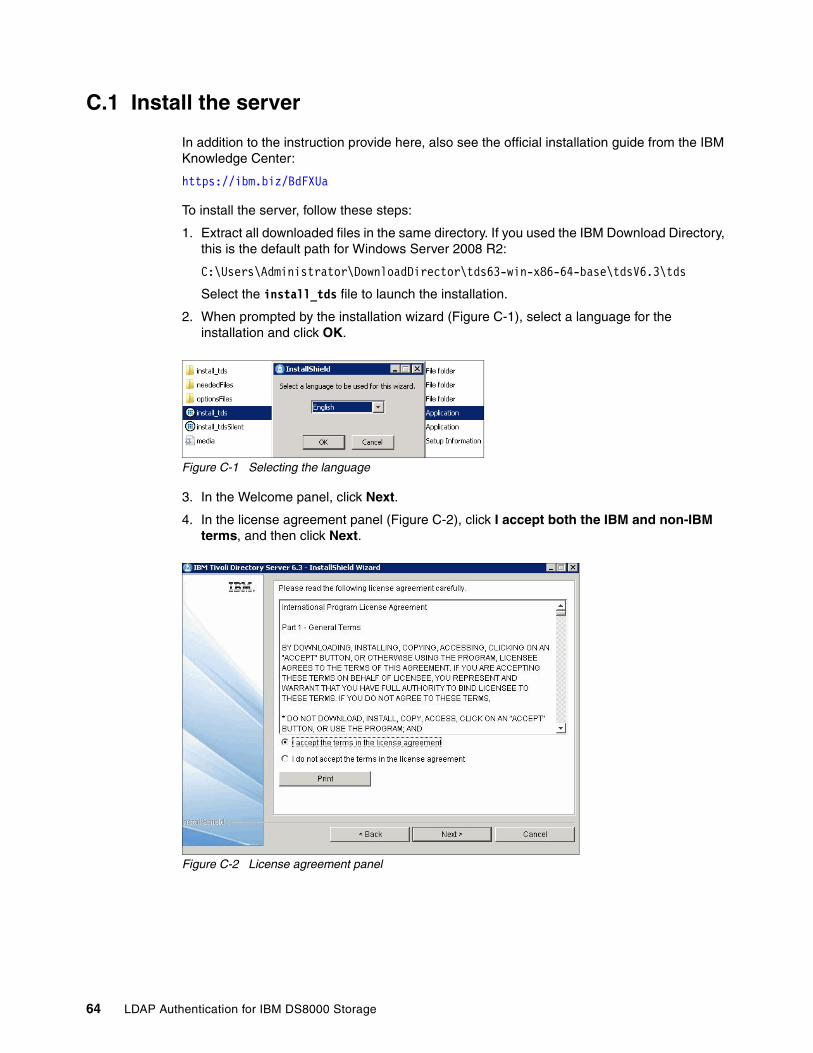
C.1 Install the server
In addition to the instruction provide here, also see the official installation guide from the IBM Knowledge Center:
https://ibm.biz/BdFXUa
To install the server, follow these steps:
1. Extract all downloaded files in the same directory. If you used the IBM Download Directory, this is the default path for Windows Server 2008 R2:
C:\Users\Administrator\DownloadDirector\tds63-win-x86-64-base\tdsV6.3\tds
Select the install_tds file to launch the installation.
2. When prompted by the installation wizard (Figure C-1), select a language for the installation and click OK.
Figure C-1 Selecting the language
3. In the Welcome panel, click Next.
4. In the license agreement panel (Figure C-2), click I accept both the IBM and non-IBM terms, and then click Next.
Figure C-2 License agreement panel
64 LDAP Authentication for IBM DS8000 Storage
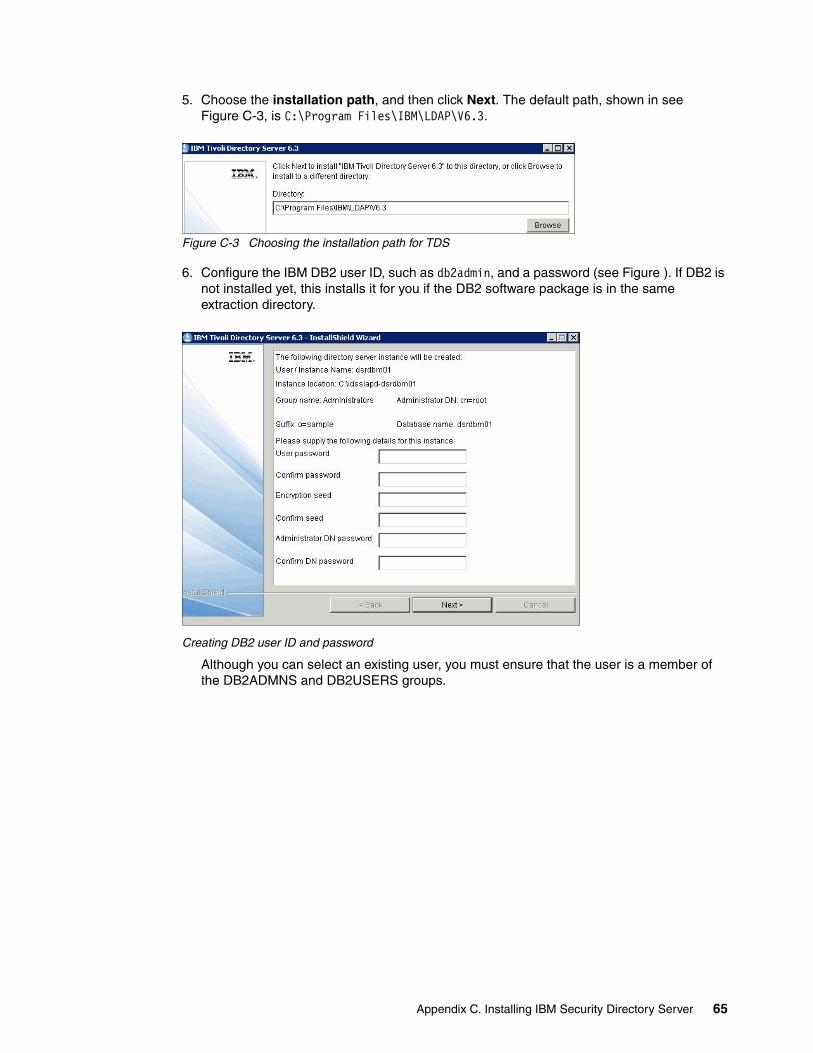
5. Choose the installation path, and then click Next. The default path, shown in see Figure C-3, is C:\Program Files\IBM\LDAP\V6.3.
Figure C-3 Choosing the installation path for TDS
6. Configure the IBM DB2 user ID, such as db2admin, and a password (see Figure ). If DB2 is not installed yet, this installs it for you if the DB2 software package is in the same extraction directory.
Creating DB2 user ID and password
Although you can select an existing user, you must ensure that the user is a member of the DB2ADMNS and DB2USERS groups.
Appendix C. Installing IBM Security Directory Server 65
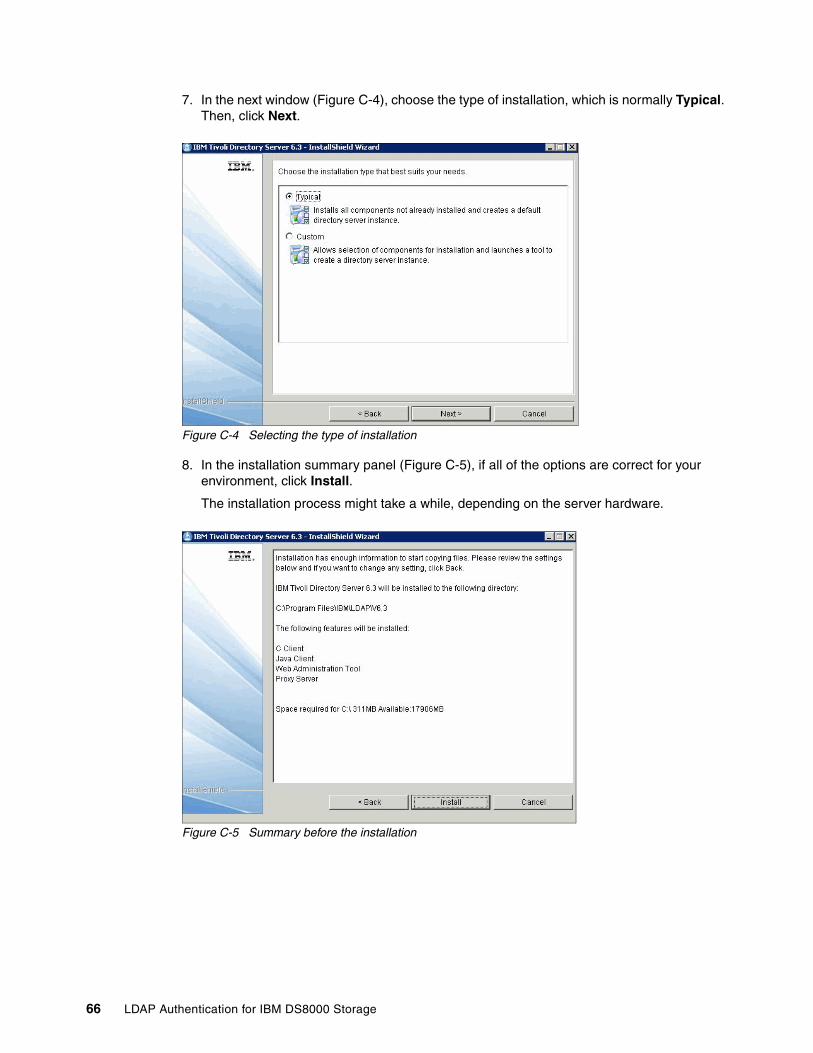
7. In the next window (Figure C-4), choose the type of installation, which is normally Typical. Then, click Next.
Figure C-4 Selecting the type of installation
8. In the installation summary panel (Figure C-5), if all of the options are correct for your environment, click Install.
The installation process might take a while, depending on the server hardware.
Figure C-5 Summary before the installation
66 LDAP Authentication for IBM DS8000 Storage
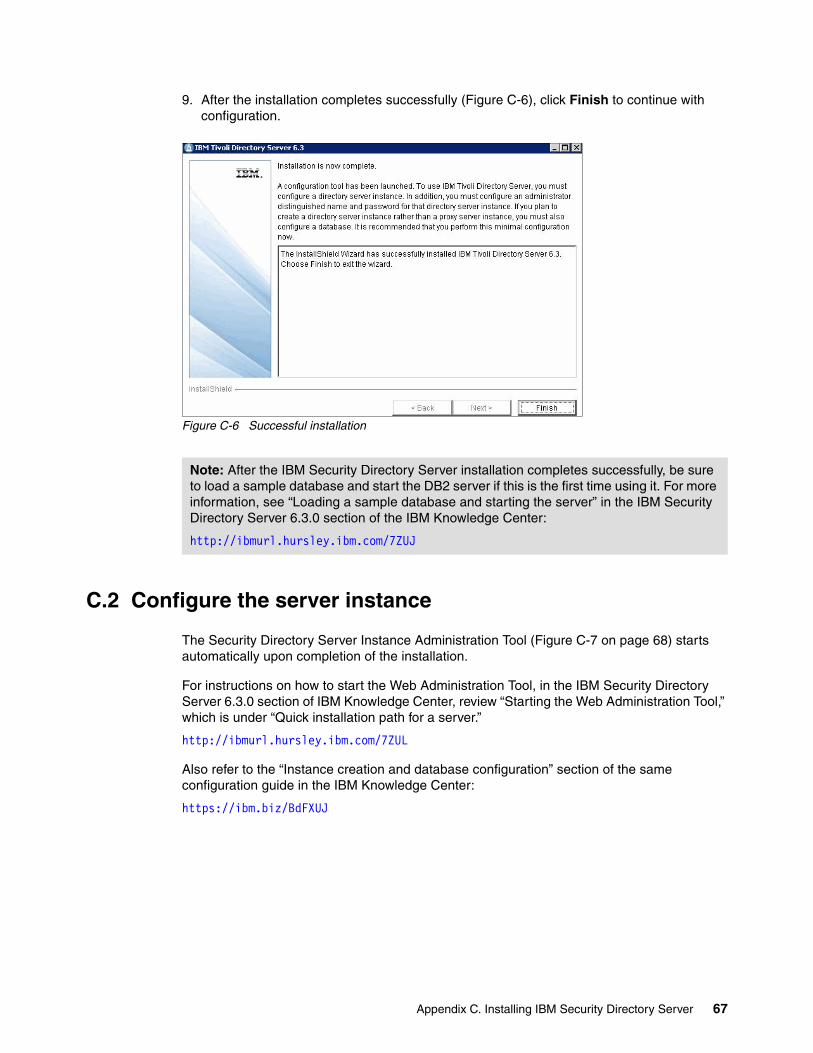
9. After the installation completes successfully (Figure C-6), click Finish to continue with configuration.
Figure C-6 Successful installation
C.2 Configure the server instance
The Security Directory Server Instance Administration Tool (Figure C-7 on page 68) starts automatically upon completion of the installation.
For instructions on how to start the Web Administration Tool, in the IBM Security Directory Server 6.3.0 section of IBM Knowledge Center, review “Starting the Web Administration Tool,” which is under “Quick installation path for a server.”
http://ibmurl.hursley.ibm.com/7ZUL
Also refer to the “Instance creation and database configuration” section of the same configuration guide in the IBM Knowledge Center:
https://ibm.biz/BdFXUJ
Note: After the IBM Security Directory Server installation completes successfully, be sure to load a sample database and start the DB2 server if this is the first time using it. For more information, see “Loading a sample database and starting the server” in the IBM Security Directory Server 6.3.0 section of the IBM Knowledge Center:
http://ibmurl.hursley.ibm.com/7ZUJ
Appendix C. Installing IBM Security Directory Server 67
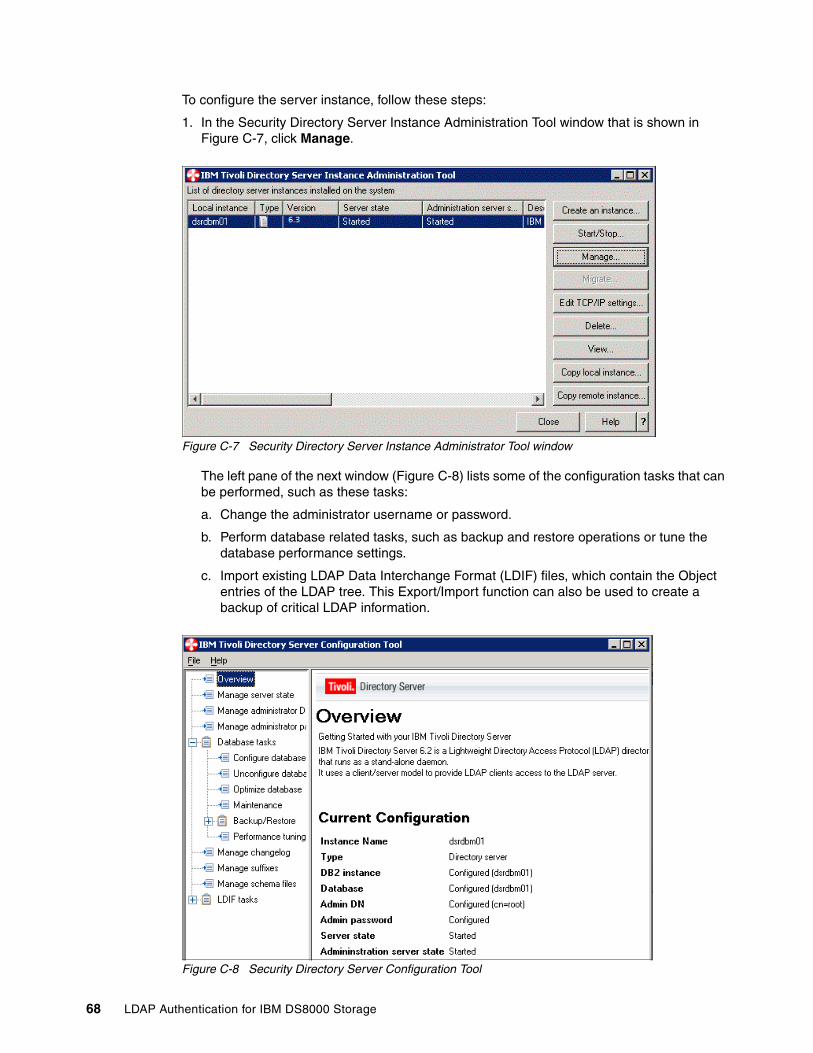
To configure the server instance, follow these steps:
1. In the Security Directory Server Instance Administration Tool window that is shown in Figure C-7, click Manage.
Figure C-7 Security Directory Server Instance Administrator Tool window
The left pane of the next window (Figure C-8) lists some of the configuration tasks that can be performed, such as these tasks:
a. Change the administrator username or password.
b. Perform database related tasks, such as backup and restore operations or tune the database performance settings.
c. Import existing LDAP Data Interchange Format (LDIF) files, which contain the Object entries of the LDAP tree. This Export/Import function can also be used to create a backup of critical LDAP information.
Figure C-8 Security Directory Server Configuration Tool
68 LDAP Authentication for IBM DS8000 Storage
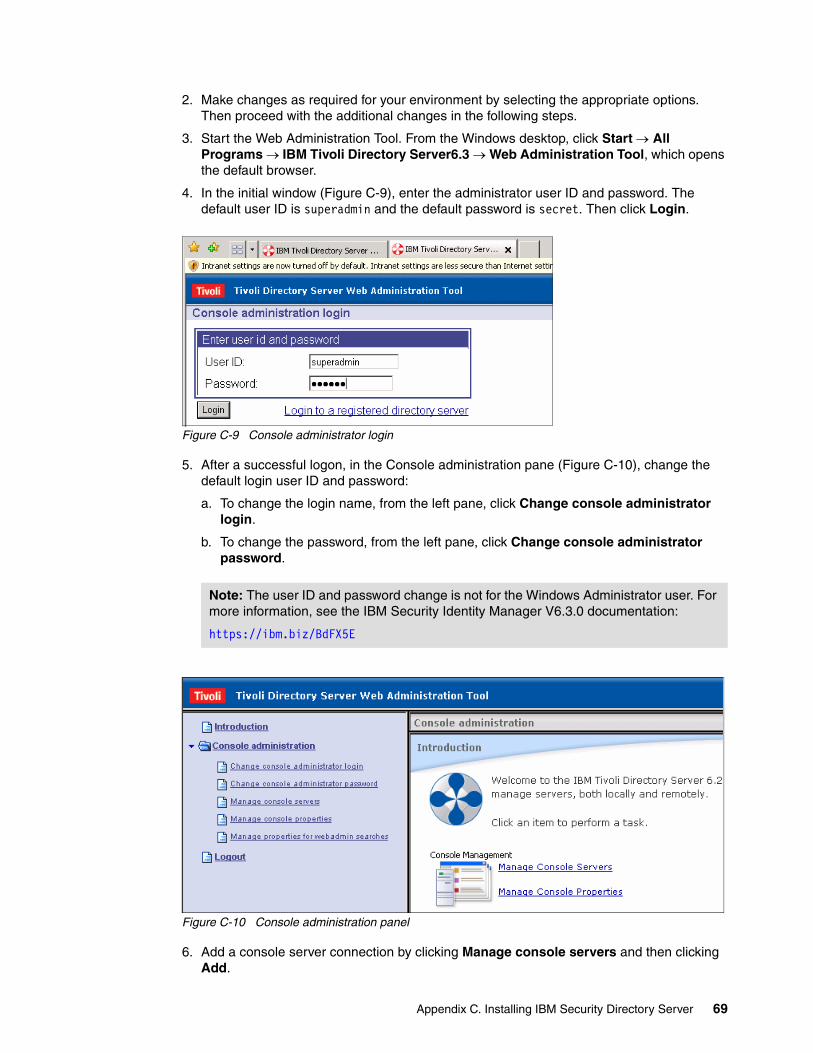
2. Make changes as required for your environment by selecting the appropriate options. Then proceed with the additional changes in the following steps.
3. Start the Web Administration Tool. From the Windows desktop, click Start All Programs IBM Tivoli Directory Server6.3 Web Administration Tool, which opens the default browser.
4. In the initial window (Figure C-9), enter the administrator user ID and password. The default user ID is superadmin and the default password is secret. Then click Login.
Figure C-9 Console administrator login
5. After a successful logon, in the Console administration pane (Figure C-10), change the default login user ID and password:
a. To change the login name, from the left pane, click Change console administrator login.
b. To change the password, from the left pane, click Change console administrator password.
Figure C-10 Console administration panel
6. Add a console server connection by clicking Manage console servers and then clicking Add.
Note: The user ID and password change is not for the Windows Administrator user. For more information, see the IBM Security Identity Manager V6.3.0 documentation:
https://ibm.biz/BdFX5E
Appendix C. Installing IBM Security Directory Server 69
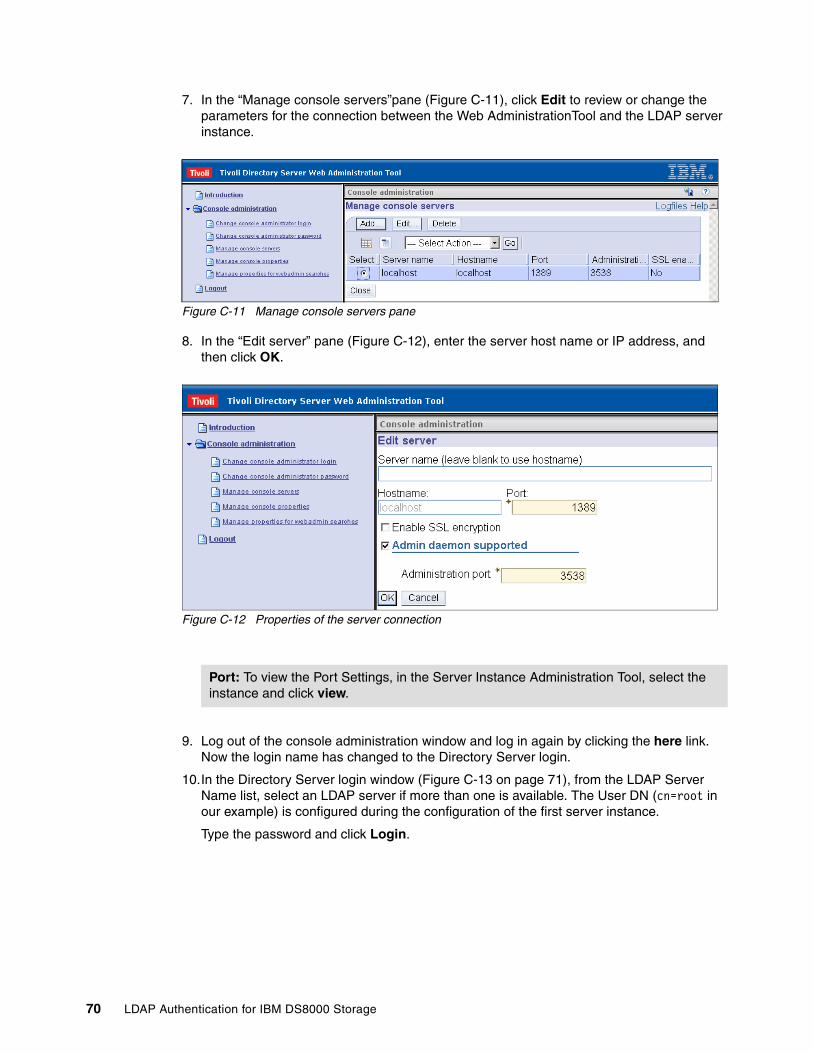
7. In the “Manage console servers”pane (Figure C-11), click Edit to review or change the parameters for the connection between the Web AdministrationTool and the LDAP server instance.
Figure C-11 Manage console servers pane
8. In the “Edit server” pane (Figure C-12), enter the server host name or IP address, and then click OK.
Figure C-12 Properties of the server connection
9. Log out of the console administration window and log in again by clicking the here link. Now the login name has changed to the Directory Server login.
10.In the Directory Server login window (Figure C-13 on page 71), from the LDAP Server Name list, select an LDAP server if more than one is available. The User DN (cn=root in our example) is configured during the configuration of the first server instance.
Type the password and click Login.
Port: To view the Port Settings, in the Server Instance Administration Tool, select the instance and click view.
70 LDAP Authentication for IBM DS8000 Storage
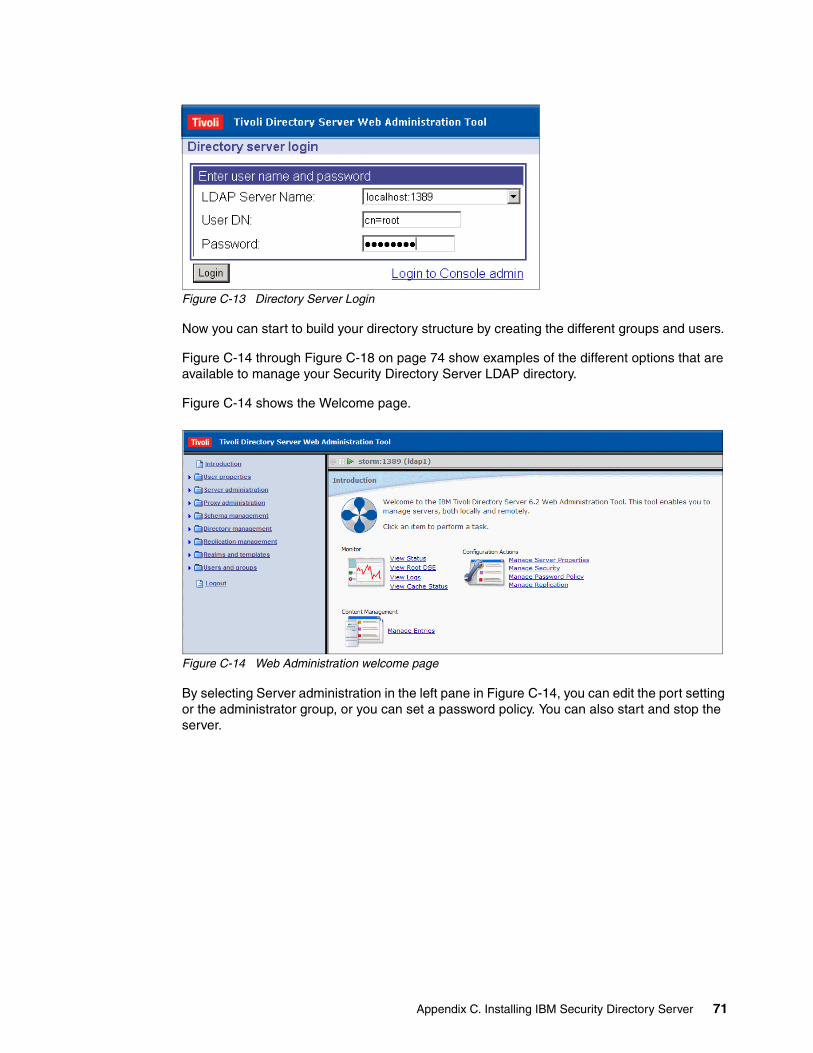
Figure C-13 Directory Server Login
Now you can start to build your directory structure by creating the different groups and users.
Figure C-14 through Figure C-18 on page 74 show examples of the different options that are available to manage your Security Directory Server LDAP directory.
Figure C-14 shows the Welcome page.
Figure C-14 Web Administration welcome page
By selecting Server administration in the left pane in Figure C-14, you can edit the port setting or the administrator group, or you can set a password policy. You can also start and stop the server.
Appendix C. Installing IBM Security Directory Server 71
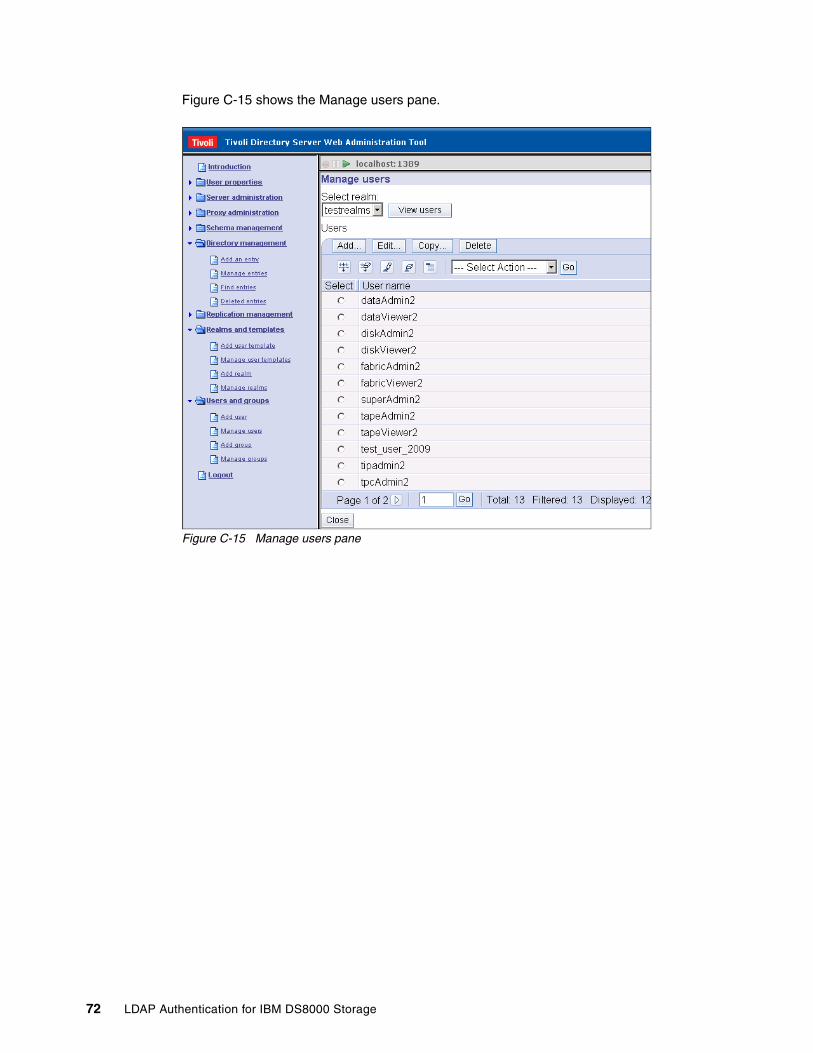
Figure C-15 shows the Manage users pane.
Figure C-15 Manage users pane
72 LDAP Authentication for IBM DS8000 Storage
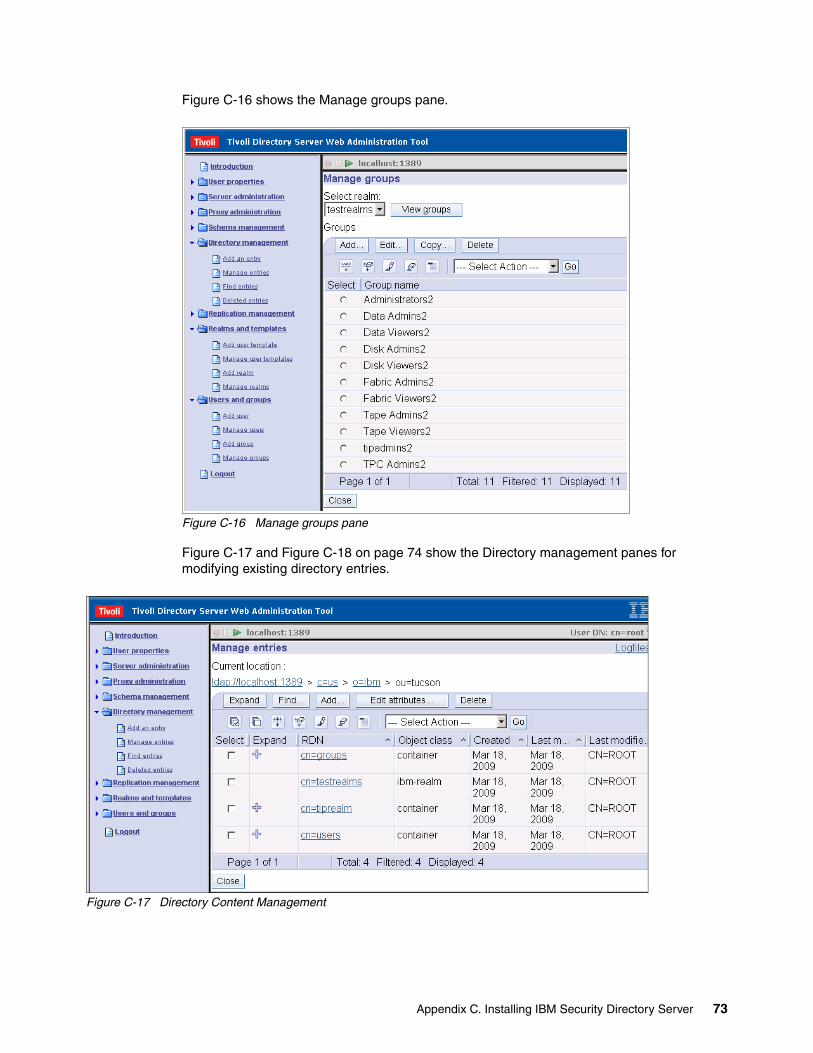
Figure C-16 shows the Manage groups pane.
Figure C-16 Manage groups pane
Figure C-17 and Figure C-18 on page 74 show the Directory management panes for modifying existing directory entries.
Figure C-17 Directory Content Management
Appendix C. Installing IBM Security Directory Server 73
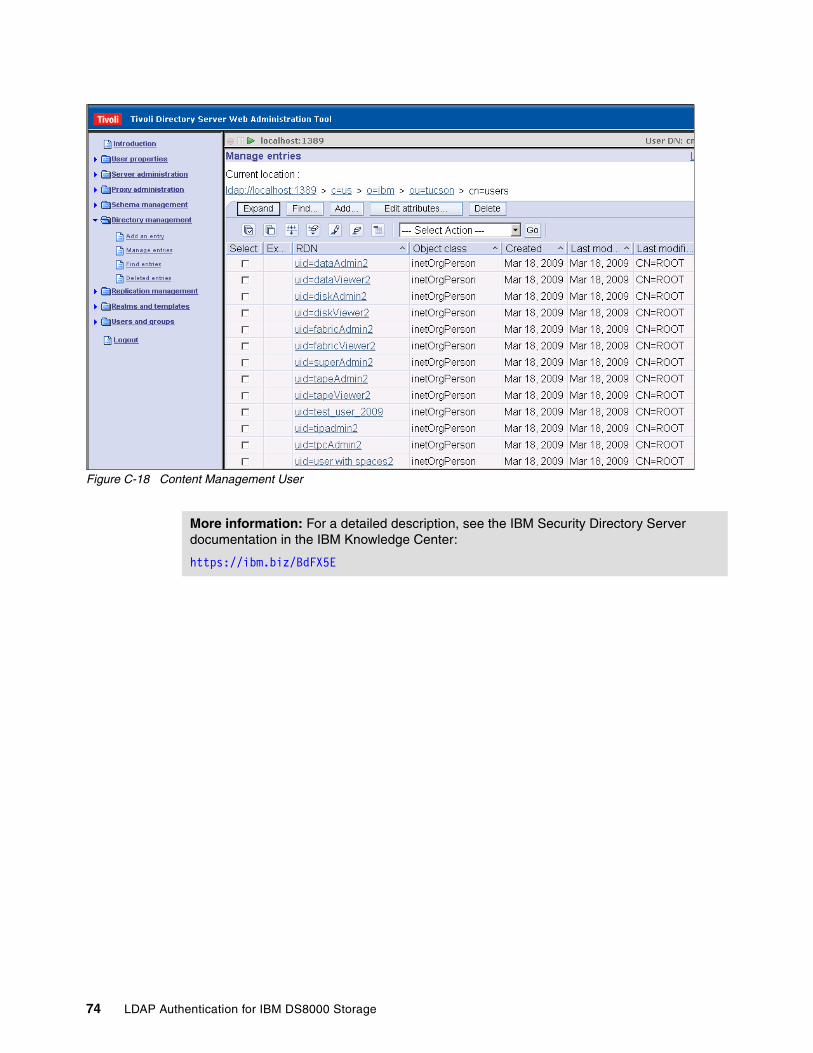
Figure C-18 Content Management User
More information: For a detailed description, see the IBM Security Directory Server documentation in the IBM Knowledge Center:
https://ibm.biz/BdFX5E
74 LDAP Authentication for IBM DS8000 Storage
Appendix D. LDAP structure overview
In this appendix, we provide a brief overview of the LDAP structure. The structure of the directory used with LDAP looks like an upside down tree, with the root on the top. This is known as a directory information tree (DIT). The directory starts with a root directory and branches into the different sections.
The root of a directory service structure is tied to a domain. There are some circumstances where it is necessary to divide the information into two or more domain trees or directory information trees. This is known as a domain forest.
Similar to a file directory on a PC, the branches in the directory service tree contain information or specific attributes for an object. Some of the object attributes are built by the position of that object within the tree structure, and some attributes are given separately.
D
© Copyright IBM Corp. 2009, 2014. All rights reserved. 75
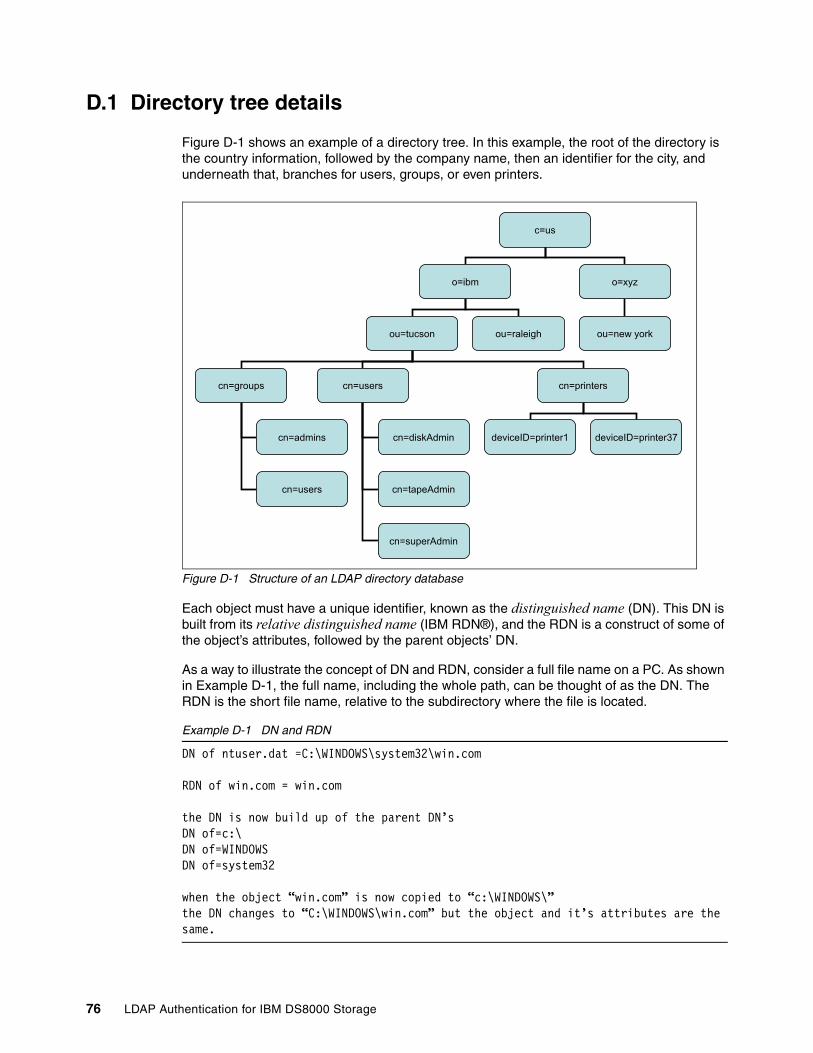
D.1 Directory tree details
Figure D-1 shows an example of a directory tree. In this example, the root of the directory is the country information, followed by the company name, then an identifier for the city, and underneath that, branches for users, groups, or even printers.
Figure D-1 Structure of an LDAP directory database
Each object must have a unique identifier, known as the distinguished name (DN). This DN is built from its relative distinguished name (IBM RDN®), and the RDN is a construct of some of the object’s attributes, followed by the parent objects’ DN.
As a way to illustrate the concept of DN and RDN, consider a full file name on a PC. As shown in Example D-1, the full name, including the whole path, can be thought of as the DN. The RDN is the short file name, relative to the subdirectory where the file is located.
Example D-1 DN and RDN
DN of ntuser.dat =C:\WINDOWS\system32\win.com
RDN of win.com = win.com
the DN is now build up of the parent DN’sDN of=c:\DN of=WINDOWSDN of=system32
when the object “win.com” is now copied to “c:\WINDOWS\”the DN changes to “C:\WINDOWS\win.com” but the object and it’s attributes are the same.
c=us
o=ibm o=xyz
ou=tucson ou=raleigh
cn=groups cn=users cn=printers
cn=admins
cn=users
cn=diskAdmin
ou=new york
deviceID=printer1 deviceID=printer37
cn=tapeAdmin
cn=superAdmin
76 LDAP Authentication for IBM DS8000 Storage
The DN is not fixed for an object, so it can change. In our example, when the file is moved to a different subdirectory, the full file name (DN) changes. This is also the case for the DN of an object in directory services. Whenever some attributes of the object change, the DN of that object also changes.
To uniquely identify objects, the LDAP server assigns a Universally Unique Identifier (UUID) to each object. Compared to the DN, the UUID never changes until the object is deleted.
D.2 Directory with DS8000 user information
Example D-2 shows an illustration from the test directory, which contains DS8000 user information that we used in preparation of this paper.
Example D-2 User attributes
dn: uid=diskAdmin,cn=users,ou=tucson,o=ibm,c=usobjectclass: inetOrgPersonobjectclass: personobjectclass: organizationalPersoncn: disksn: adminmail: [email protected]: diskAdminuserpassword: passw0rduuid: 25a8c2e8-1a3f-4ac4-b1b5-32d9b9188000
This example shows how the DN was built from different attributes of the user. (LDAP lets you define which attributes must be listed for a valid DN.) For our client for DS8000 users, we configured a default of cn=users,ou=tucson,o=ibm,c=us and uid as the specific user attribute.
Appendix D. LDAP structure overview 77

78 LDAP Authentication for IBM DS8000 Storage
Related publications
The publications that are listed in this section are particularly suitable for a more detailed discussion of the topics that are covered in this Redpaper.
IBM Redbooks publicationsFor more information about ordering the following publications, see “How to get IBM Redbooks publications” on page 80. Some of the documents that are referenced here might be available in softcopy only:
� IBM DS8870 Architecture and Implementation, SG24-8085
http://www.redbooks.ibm.com/abstracts/sg248085.html?Open
Other publicationsThe following publications also are relevant as further information sources. Some of the documents that are referenced here might be available in softcopy only:
� IBM DS8870 Introduction and Planning Guide, GC27-4209
http://www.ibm.com/support/docview.wss?uid=ssg1S7004088
� IBM DS8000 Series Command-Line Interface User's Guide, GC27-4212
http://www.ibm.com/support/docview.wss?uid=ssg1S7002620
Online resourcesThe following websites also are user for further information:
� Data storage feature activation webpage
https://www.ibm.com/storage/dsfa/home.wss
� IBM DS8000 series V7.2 documentation
http://publib.boulder.ibm.com/infocenter/dsichelp/ds8000ic/index.jsp
� IBM Security Directory Server documentation
� https://ibm.biz/BdFX5EIBM System Storage Interoperation Center (SSIC)
http://www.ibm.com/systems/support/storage/config/ssic
� Jazz for Service Management Version 1.1.0.2 documentation
http://ibm.co/WslIzo
� Planning IP Security Configuration
http://ibm.co/1nOGlLs
© Copyright IBM Corp. 2009, 2014. All rights reserved. 79
How to get IBM Redbooks publicationsYou can search for, view, or download IBM Redbooks publications, Redpapers, Hints and Tips, draft publications, and Additional materials, and order hardcopy IBM Redbooks publications or CD-ROMs.
http://www.ibm.com/redbooks
Help from IBM� IBM Support and downloads
http://www.ibm.com/support
� IBM Global Services
http://www.ibm.com/services
80 LDAP Authentication for IBM DS8000 Storage

®
REDP-4505-01
INTERNATIONAL TECHNICALSUPPORTORGANIZATION
BUILDING TECHNICAL INFORMATION BASED ON PRACTICAL EXPERIENCE
IBM Redbooks are developed by the IBM International Technical Support Organization. Experts from IBM, Customers and Partners from around the world create timely technical information based on realistic scenarios. Specific recommendations are provided to help you implement IT solutions more effectively in your environment.
For more information:ibm.com/redbooks
Redpaper™
LDAP Authentication for IBM DS8000 Storage
Configure the required Tivoli Storage Productivity Center 5.2
Add Identity Security Manager and Jazz for Service Management
Benefit from single sign-on
The IBM DS8000 series includes the option to replace the locally based user ID and password administration with a centralized directory-based approach. This offers a single sign-on capability for multiple DS8000 servers and, possibly, other servers in your environment.
This IBM Redpaper publication helps DS8000 storage administrators understand the concepts and benefits of a centralized directory. It provides information that is required for implementing a DS8000 authentication approach that is based on the Lightweight Directory Access Protocol (LDAP).
This edition applies particularly to the IBM DS8870 with Licensed Machine Code (LMC) 7.7.20.xx.xx or later.
Back cover