Embed Size (px)
Citation preview

HS-P82Portable Multitrack Field Recorder
D01088920A
OWNER'S MANUAL

2 TASCAM HS-P82
The exclamation point within an equilateral triangle is intended to alert the user to the presence of important operating and maintenance (servicing) instructions in the literature accompanying the appliance.
The lightning flash with arrowhead symbol, within equilateral triangle, is intended to alert the user to the presence of uninsulated “dangerous voltage” within the product’s enclosure that may be of sufficient magnitude to constitute a risk of electric shock to persons.
CAUTION: TO REDUCE THE RISK OF ELECTRIC SHOCK, DO NOT REMOVE COVER (OR BACK). NO USER-SERVICEABLE PARTS INSIDE. REFER SERVICING TO QUALIFIED SERVICE PERSONNEL.
WARNING: TO PREVENT FIRE OR SHOCK HAZARD, DO
NOT EXPOSE THISAPPLIANCE TO RAIN OR
MOISTURE.
This appliance has a serial number located on the rear panel. Please record the model number and serial number and retain them for your records.
Model number
Serial number
TO THE USER
This equipment has been tested and found to comply with the limits for a Class A digital device, pursuant to Part 15 of the FCC Rules. These limits are designed to provide reasonable protection against harmful interference when the equipment is operated in a commercial environment. This equipment generates, uses, and can radiate radio frequency energy and, if not installed and used in accordance with the instruction manual, may cause harmful interference to radio communications.Operation of this equipment in a residential area is likely to cause harmful interference in which case the user will be required to correct the interference at his own expense.
CAUTIONChanges or modifications to this equipment not expressly approved by TEAC CORPORATION for compliance could void the user's authority to operate this equipment.
For U.S.A.In North America use only on 120V supply.
IMPORTANT SAFETY INSTRUCTIONS

TASCAM HS-P82 3
Do not expose this apparatus to drips or splashes.•
Do not place any objects filled with liquids, such • as vases, on the apparatus.
Do not install this apparatus in a confined space • such as a book case or similar unit.
The apparatus draws nominal non-operating • power from the AC outlet with its POWER or STANDBY/ON switch not in the ON position.
The apparatus should be located close enough • to the AC outlet so that you can easily grasp the power cord plug at any time.
The mains plug is used as the disconnect device, • the disconnect device shal l remain readi ly operable.
If the product uses batteries (including a battery • pack or installed batteries), they should not be exposed to sunshine, fire or excessive heat.
CAUTION for products that use replaceable lithium • batteries: there is danger of explosion if a battery is replaced with an incorrect type of battery. Replace only with the same or equivalent type.
Caution should be taken when using earphones or • headphones with the product because excessive sound pressure (volume) from earphones or head-phones can cause hearing loss.
If you are experiencing problems with this product, • contact TEAC for a service referral. Do not use the product until it has been repaired.
1 Read these instructions.
2 Keep these instructions.
3 Heed all warnings.
4 Follow all instructions.
5 Do not use this apparatus near water.
6 Clean only with dry cloth.
7 Do not block any ventilation openings. Install in accordance with the manufacturer's instructions.
8 Do not instal l near any heat sources such as radiators, heat registers, stoves, or other apparatus (including amplifiers) that produce heat.
9 Do not defeat the safety purpose of the polarized or grounding-type plug. A polarized plug has two blades with one wider than the other. A grounding type plug has two blades and a third grounding prong. The wide blade or the third prong are provided for your safety. If the provided plug does not fit into your outlet, consult an electrician for replacement of the obsolete outlet.
10 Protect the power cord from being walked on or pinched particularly at plugs, convenience receptacles, and the point where they exit from the apparatus.
11 Only use attachments/accessories specified by the manufacturer.
12 Use only with the cart, stand, tripod, bracket, or table specified by the manufacturer, or sold with the apparatus. When a cart is used, use caution when moving the cart/apparatus combination to avoid injury from tip-over.
13 Unplug this apparatus during lightning storms or when unused for long periods of time.
14 Refer all servicing to qualified service personnel. Servicing is required when the apparatus has been damaged in any way, such as power-supply cord or plug is damaged, liquid has been spilled or objects have fallen into the apparatus, the apparatus has been exposed to rain or moisture, does not operate normally, or has been dropped.
IMPORTANT SAFETY INSTRUCTIONS

4 TASCAM HS-P82
CAUTIONS ABOUT BATTERIES
This product uses batteries. Misuse of batteries could cause a leak, rupture or other trouble. Always abide by the following precautions when using bat-teries.
Never recharge non-rechargeable batteries. The • batteries could rupture or leak, causing fire or injury.
When installing batteries, pay attention to the • polarity indications (plus/minus (+/–) orientation), and install them correctly in the battery compart-ment as indicated. Putting them in backward could make the batteries rupture or leak, causing fire, injury or stains around them.
When you store or dispose of batteries, isolate their • terminals with insulating tape or similar to prevent them from contacting other batteries or metallic objects.
When throwing used batteries away, follow the • disposal instructions indicated on the batteries and the local disposal laws.
Do not use batteries other than those specified. • Do not mix and use new and old batteries or differ-ent types of batteries together. The batteries could rupture or leak, causing fire, injury or stains around them.
Do not carry or store batteries together with small • metal objects. The batteries could short, causing leak, rupture or other trouble.
Do not heat or disassemble batteries. Do not put • them in fire or water. Batteries could rupture or leak, causing fire, injury or stains around them.
If the battery fluid leaks, wipe away any fluid on • the battery case before inserting new batteries. If the battery fluid gets in an eye, it could cause loss of eyesight. If fluid does enter an eye, wash it out thoroughly with clean water without rubbing the eye and then consult a doctor immediately. If the fluid gets on a person’s body or clothing, it could cause skin injuries or burns. If this should happen, wash it off with clean water and then consult a doctor immediately.
Remove the batteries if you do not plan to use • the unit for a long time. Batteries could rupture or leak, causing fire, injury or stains around them. If the battery fluid leaks, wipe away any fluid on the battery compartment before inserting new batteries.
IMPORTANT SAFETY INSTRUCTIONS

TASCAM HS-P82 5
Contents
1 − Introduction .........................................7Features ........................................................... 7Included items ................................................. 7Conventions used in this manual ................... 7Intellectual property rights ............................ 7Precautions for placement and use ............... 8Beware of condensation ................................ 8Cleaning the unit ............................................ 8Cleaning the display ....................................... 8About CF cards ................................................ 8
Precautions for use .................................... 8
2 − Names and functions of parts .............9Front panel ...................................................... 9Rear panel .................................................... 11Right side panel ........................................... 11Left side panel .............................................. 12Home Screen ................................................ 13
3 − Preparation ......................................... 16Inserting and removing CF cards ................ 16
Inserting CF cards ..................................... 16Removing CF cards ................................... 16
Power supply ................................................. 16Using the AC adaptor ................................... 17Using batteries installed in the unit ............ 17
Types of batteries that can be used internally .................................................. 17Installing internal batteries ..................... 17Removing batteries .................................. 18Inserting batteries into the battery case (BC-10AA) ................................................. 18Precautions for the use of batteries ...... 18
Using an external DC power source ............ 18Attaching a V-Mount type battery ......... 18
About the display ......................................... 19Adjusting the display angle .................... 19Adjusting the display and indicator brightness ................................................. 19Cautions on the display ........................... 19
Turning the power ON and OFF ................... 20Setting the time of the built-in clock .......... 20Battery display .............................................. 21Panel lock function ...................................... 22DIGITAL I/O connector .................................. 22Recording duration ....................................... 22
4 − Recording and Playback ....................23Preparing to record....................................... 23
Formatting a CF card .............................. 23Create a new project .............................. 24Set the master clock ................................. 25Set the recording tracks .......................... 25Set the file format ................................... 25Make other recording settings ............... 26
Connecting microphones and headphones ............................................. 26Setting the inputs .................................... 27Adjust the input level .............................. 28Monitor the input ................................... 28
Make a recording .......................................... 28Stop recording ......................................... 29RETAKE ..................................................... 29Voice memo and slate tone function .... 29
Play a recording ............................................ 29Select a project/scene/take ...................... 29Start playback .......................................... 30Mixing the playback sound ..................... 30CALL .......................................................... 30
5 – Projects................................................ 31File formats.................................................... 31
Monophonic and polyphonic modes ...... 31About project screens ................................... 31
Project screen .......................................... 31Scene screen ............................................ 31Take screen .............................................. 32
Project operations......................................... 32Creating new projects ............................. 32Editing the project name ....................... 33Changing a project name later ............... 33Editing the name of the first scene ........ 33Loading projects ...................................... 34Rebuilding projects .................................. 34Erasing a project ...................................... 34
Scene operations ........................................... 35Creating new scenes ................................ 35Loading scenes ......................................... 35Rebuilding scenes .................................... 36Copying scenes ......................................... 36Erasing scenes .......................................... 37
Take operations ............................................. 37Loading takes ........................................... 37Erasing takes ............................................ 37Adding and removing “@” to take names ....................................................... 38
6 – Internal Settings and Operations ......39Menu screen ................................................. 39Recording settings (REC SETUP) ................... 39
REC TRACKS page ................................... 39FILE FORMAT page .................................. 39OPTIONS page ......................................... 39
Playback settings (PLAY SETUP) ................... 40Sync and time code settings (SYNC T/C)...... 40
CLOCK page ............................................ 40TIMECODE page ...................................... 41SETUP page ............................................. 41I/O page ................................................... 42Editing output time code user bits ......... 42

6 TASCAM HS-P82
Edit the START TIME ................................ 42Mixer settings (MIXER SETUP) ..................... 43
INPUT page .............................................. 43SIGNAL PROCESSING page ..................... 43LOW CUT FILTER (button) ........................ 43SETUP page ............................................. 44CHx NAME (button) ................................. 44Limitation on the number of characters 44
Channel settings (CHANNEL SETUP) ............ 44Level meter settings (METER SETUP) ........... 45System settings (SYSTEM SETUP) ................. 46
PREFERENCES page ................................. 46ALARM TONE page ................................. 46CLOCK ADJUST page .............................. 46
Managing CF cards and the USB connection (CF/USB MANAGE) ........................................ 47Version display (VERSION INFO) .................. 47
7 – Mark and Locate Functions ...............48Mark functions .............................................. 48
Adding marks ........................................... 48Using keys to locate to marks ................ 48Mark list screen ....................................... 48Locating to marks .................................... 48Viewing mark information ...................... 48Erasing marks ........................................... 49Editing marks ........................................... 49
Manual locate function ............................... 50
8 – Transferring Data between the Unit and a Computer ................................ 51
Operating system requirements .................. 51Connecting with a computer ....................... 51
Disconnecting from a computer ............. 52Folder structure ............................................ 53File names ...................................................... 53
9 – Troubleshooting .................................54
10 – Messages ..........................................55
11 – Specifications ....................................60General .......................................................... 60Input and output ......................................... 60
Analog audio input and output ............ 60Digital audio input and output ............. 60Control inputs and outputs ..................... 60
Audio performance ...................................... 61Computer compatibility ............................... 61Other specifications ...................................... 61Dimensional drawings .................................. 62Blcok diagram ............................................... 63
Contents

TASCAM HS-P82 7
Thank you very much for purchasing a TASCAM HS-P82 Portable Multitrack Field Recorder. Please read this manual thoroughly before using the unit so that you understand correct operating procedures and can use its functions fully. We hope that you enjoy using this unit for many years.
Please keep this manual so that you can read it at any time. A digital copy of this manual can also be downloaded from our website (http://www.tascam.com/)
Features
CF cards used as recording media (Ultra DMA • compatible)
Recording possible at 16 or 24 bit with sampling • frequencies of 44.1, 48, 88.2, 96, 176.4 or 192 kHz as well as 48 kHz pull-up or pull-down
10-channel recording possible (8 input + 2 stereo mix at • sampling frequencies of 44.1 or 48 kHz)
Mic/line inputs can provide +48V phantom power• Large 3.5-inch color TFT display that is easy to read• Intuitive operation using a touch panel interface • Operation possible using 10 AA batteries or an NP • battery installed in the unit
External battery input connector (XLR-4-32) • Broadcast Wave Format (BWF) compatible • Built-in mic (monaural) is convenient for voice memos• SMPTE time code input and output • Pre-recording function • Digital input section includes a sample rate converter• Transfer files to a computer using the USB 2.0 connector • PC keyboard (PS/2) connector • Protection against file loss from sudden power outages •
Included items
This product includes the following items.
Take care when opening the package not to damage the items. Keep the package materials for transportation in the future.
Please contact the store where you purchased this unit if any of these items are missing or have been damaged during transportation.
Main unit• .........................................................................1AC adaptor (TASCAM PS-1225L)• .................................1Power cord for AC adaptor• ..............................................1Battery case (TASCAM BC-10AA)• ................................1V-Mount bracket• .............................................................1V-Mount bracket screw kit• ..............................................1Warranty card• ..................................................................1Owner's manual (this manual)• ........................................1
CAUTION
Be sure to use the supplied AC adaptor (TASCAM-P1225L) and the power cord for the AC adaptor. Use of a different adaptor could cause malfunction, fire or electric shock.
Conventions used in this manual
In this manual, we use the following conventions:
Keys, jacks and other parts on the main unit and external • devices are indicated like this: MENU
Messages on the unit’s display are shown like this: • ON
“CompactFlash card” is abbreviated as “CF card.”• Additional information is provided as necessary as tips, • notes and cautions.
TIP
These are tips about how to use the unit.
NOTE
These provide additional explanations and describe special cases.
CAUTION
Failure to follow these instructions could result in injury, damage to equipment or lost recording data, for example.
Intellectual property rights
TASCAM is a registered trademark of TEAC • Corporation.
CompactFlash is a US registered trademark of SanDisk • Corporation.
Microsoft, Windows, Windows Vista, and Windows 7 are • either registered trademarks or trademarks of Microsoft Corporation in the United States and/or other countries.
Apple, Macintosh, Mac OS and Mac OS X are • trademarks of Apple Inc.
IDX and V-Mount are trademarks of IDX Company, Ltd.• Other company names, product names and logos in this • document are the trademarks or registered trademarks of their respective owners.
Any data, including, but not limited to information, described herein are intended only as illustrations of such data and/or information and not as the specifications for such data and/or information. TEAC Corporation disclaims any warranty that any use of such data and/or information shall be free from infringement of any third party’s intellectual property rights or other proprietary rights, and further, assumes no liability of whatsoever nature in the event of any such infringement, or arising from or connected with or related to the use of such data and/or information.
1 − Introduction

8 TASCAM HS-P82
This product is designed to help you record and reproduce sound works to which you own the copyright, or where you have obtained permission from the copyright holder or the rightful licensor. Unless you own the copyright, or have obtained the appropriate permission from the copyright holder or the rightful licensor, your unauthorized recording, reproduction or distribution thereof may result in severe criminal penalties under copyright laws and international copyright treaties. If you are uncertain about your rights, contact your legal advisor. Under no circumstances will TEAC Corporation be responsible for the consequences of any illegal copying performed using the recorder.
Precautions for placement and use
The guaranteed operating temperature range of this • product is 0º - 40º C (32º- 104º F).
In order to promote the emission of heat, do not place • anything on top of this product.
Do not place this product on top of a powered amplifier • or other equipment that emits heat.
Beware of condensation
If the unit is moved from a cold to a warm place, or used immediately after a cold room has been heated or otherwise exposed to a sudden temperature change, condensation could occur. Should this happen, leave the unit for one or two hours before turning the unit on.
Cleaning the unit
Wipe the unit with a soft dry cloth to clean it. Do not use any benzine, paint thinner, alcohol or other chemical agents. Doing so could damage the surface of the unit or cause fading.
Cleaning the display
Slightly wipe the display with a soft dry cloth that does not shed dust (e.g. a cleaning cloth). Avoid wiping with a stiff cloth or rubbing with force. Doing so could damage the surface of the LCD. Do not use benzene, thinner, manicure remover, alcohol or similar substances.
About CF cards
The capacities and performance of your HS-P82 will vary based on the speed and abilities of the Compact Flash (CF) media used. Older and some cheaper Compact Flash (CF) cards use slower memory components and little internal buffering which results in poor recording performance. Newer CF cards, not only perform reading and writing faster, but also come in larger storage size.
The HS-P82 supports only Type I Compact Flash media. Type I cards are typically FLASH-ROM based and provide higher performance and durability than hard disk cards.
A list of CF cards that we have confirmed to work with this unit is provided on our website (http://www.tascam.com).
CAUTION
We can accept no responsibility for any loss of the data you record using this product onto a CF card.
Precautions for useCompactFlash cards are precision devices. To prevent damage to the card or the slot, please observe the following cautions.
Do not leave a CF card in an extremely hot or cold • location.
Do not leave a CF card in an extremely damp location.•
Do not allow a CF card to become wet.•
Do not place any object on top of a CF card, or twist • or bend it.
Do not subject a CF card to strong impact.•
1 − Introduction

TASCAM HS-P82 9
Front panel
1 Input trim knobsUse to adjust the input levels of the analog mic inputs. (See “Adjust the input level” on page 28.)
2 HOME key Press to open the Home Screen.
Press the MENU key while pressing and holding the HOME key to open the LOCK SETUP screen. (See “Panel lock function” on page 22.)
Turn the DATA dial while pressing and holding the HOME key to adjust the brightness of the color display, the SLATE indicator and the PAUSE, REC and PLAY [CALL] keys.
Push and turn the DATA dial while pressing and holding the HOME key to adjust only the brightness of the color display.
3 MENU key Press to open the MENU screen.
Press the MENU key while pressing and holding the HOME key to open the LOCK SETUP screen. (See “Panel lock function” on page 22.)
4 Color display This 3.5-inch TFT color display with a resolution of 320 x 240 shows various types of information and responds to touch.
5 DATA dial Turn the DATA dial to change settings, and press it to use it as an ENTER key. When setting parameter values, press while turning to change them in large increments (coarse mode). When a pop-up window is open, this works as an OK or CLOSE button.
Turn the DATA dial while pressing and holding the HOME key to adjust the brightness of the color display, the SLATE indicator and the PAUSE, REC and PLAY [CALL] keys.
Push and turn the DATA dial while pressing and holding the HOME key to adjust only the brightness of the color display.
6 PAUSE key/indicator Press this key during playback to put the unit in playback standby. This key lights when in standby.
Press this key while recording to put the unit in recording standby. This key lights when in standby.
Press this key when the unit is stopped to put the unit in recording standby. This key lights when in standby.
7 REC key/indicator When a recordable CF card is installed and the unit is stopped, press this key to start recording to a new file.
When in recording standby, press this key to resume recording to a new file or the current file.
This key lights when recording.
If you press this key while recording, recording to the current file stops, but recording continues on a new file.
CAUTION
If you press the REC key less than 4 seconds after • beginning recording, the unit will not start recording a new take.
If a file with the take number 999 exists, recording another • take is not possible.
8 PHONES jack/knob Connect stereo headphones to this 6.3 mm (1/4”) standard stereo phones jack. Use the PHONES knob to adjust the headphone output level.
CAUTION
Before connecting headphones, turn the PHONES knob to the minimum volume. Failure to do so could cause sudden loud noises to occur, which might damage your hearing or equipment.
2 − Names and functions of parts

10 TASCAM HS-P82
9 SLATE key/indicator and SLATE micPress and hold the SLATE key more than 0.5 sec to record the sound input through the SLATE mic or the internal oscillator tone to all tracks that are being recorded. The indicator lights while being pressed.
NOTE
In order to prevent accidental operation of the SLATE key, • it must be held down briefly to turn this function ON.
Set whether the signal from the built-in microphone or a • tone is recorded on the PREFERENCES page of the SYSTEM SETUP screen. (See “PREFERENCES page” on page 46.)
0 switch Press to turn the power ON and OFF. When you turn OFF the power, a pop-up message for power off appears.
q PROJECT key Press to open the PROJECT screen. (See “Projects” on page 31.)
w EXIT/CANCEL [PEAK CLEAR] keyPress to cancel input or item selection. On the Home Screen, this functions as the PEAK CLEAR button. Press this to clear peak hold marks from the level meters.
When the MENU screen or PROJECT screen is open, press this to return to the Home Screen. On other screens, press this to return to the previous screen. When a pop-up window is open, press this to cancel an operation.
e STOP [RETAKE] key Press to stop recording or playback.
Press this while pressing and holding the SHIFT key to erase the last recorded take and retake the recording.
While recording, press this key to stop recording and stop the unit at the beginning of the last recorded file.
r Ô [Â] key (search backwards) When stopped/in playback standby/during playback:
Press briefly to skip to the beginning of the current • take (file) or the previous file, and stop/continue playback standby/resume playback at the beginning of that take (file).
Press to search backwards while pressing. •
Press this key while pressing the • SHIFT key to move to the previous mark, and stop/continue playback standby/resume playback.
r [ ]̄ key (search forward) When stopped/in playback standby/during playback:
Skip to the beginning of the next take (file), and stop/• continue playback standby/resume playback at the beginning of that take (file).
Press to search forward while pressing. •
While pressing the • SHIFT key, press this key to move to the next mark, and stop/continue playback standby/resume playback.
t PLAY [CALL] key/indicator When stopped or in playback standby, press this key to start playback. The key lights during playback.
While pressing the SHIFT key, press this to use the CALL function (locate to the point where playback was last started from standby).
Press this key when in recording standby to start recording. The PLAY key does not light in this case.
y SHIFT key When stopped/in playback standby/during playback:
Press the • Ô [Â] while pressing and holding this key to move to the previous mark, and stop/continue playback standby/resume playback.
Press the • [ ]̄ key while pressing and holding this key to move to the previous mark, and stop/continue playback standby/resume playback.
Press the • PLAY [CALL] key while pressing and holding this key, to use the CALL function (locate to the point where playback was last started from standby).
Press the • STOP [RETAKE] key while pressing and holding this key to erase the last recorded take and retake the recording.
u MARK key Press this key to add a mark at the current time. The maximum number of marks, including automatic marks, possible in a single file (take) is 99. (See “Mark functions” on page 48.)
2 − Names and functions of parts

TASCAM HS-P82 11
Right side panel
a LINE OUT connectors Connect a monitor speaker system or other equipment to these balanced XLR analog connectors (1: GND, 2: HOT, 3: COLD) that output the internally-mixed stereo signal.
s MIC/LINE selection switches Set these switches according to the type of input signal.
MIC 0: Use when inputting a microphone.
MIC –25: Use when inputting a microphone. This applies a 25 dB pad to the mic input.
LINE: Use for line level input.
d MIC/LINE IN connectorsThese are XLR balanced analog input connectors (1: GND, 2: HOT, 3: COLD). Their standard and maximum
input levels depend on the settings of the MIC/LINE selection switches.
CAUTION
Confirm that phantom power is OFF before connecting a • line level device to a MIC/LINE IN connector. If you connect a line level device while phantom power is ON, that device or this unit could be damaged.
Confirm that phantom power is OFF before connecting or • disconnecting a condenser microphone to a MIC/LINE IN connector. If you connect a microphone while phantom power is ON, that mic or this unit could be damaged.
Do not connect an unbalanced dynamic microphone to an • XLR connector that is supplying phantom power. Doing so could damage the microphone or this unit.
2 − Names and functions of parts
Rear panel
i Battery compartment Open the cover to install batteries. See page 17 for information about the types of batteries that can be used.
o V-Mount bracket attachment holes You can attach the included V-Mount bracket here. (See “Attaching a V-Mount type battery” on page 18.)
p Kensington lock mounting hole

12 TASCAM HS-P82
Left side panel
f Cord holder Use this to hold the cord of the included TASCAM PS-1225L adaptor designed for this unit to prevent the plug from becoming disconnected.
g DC IN connector Connect the included TASCAM PS-1225L adaptor designed for this unit here.
h COMPACT FLASH SLOT 2 (CF 2)Insert a CF card here.
j COMPACT FLASH SLOT 1 (CF 1)Insert a CF card here.
k EXT DC IN connector Connect external DC power here. Use a supply with an output voltage of DC 11-16 and an output current of 2A or more. The connector is XLR-4-32 (1: –, 2: NC, 3: NC, 4: +).
l DIGITAL I/O connector Use this D-sub 25-pin AES3-2003/IEC60958-4 (AES/EBU) format connector for digital audio input and output. Transmission occurs at double speed when the sampling frequency is 88.2/96 kHz and at quad speed when 176.4/192 kHz. The digital input section includes a sampling rate converter that is compatible with 32–216 kHz sampling frequencies.
; CASCADE/WORD/VIDEO (IN 2) connector Use this BNC connector to input cascade, word clock (44.1, 48, 88.2, 96, 176.4 or 192 kHz as well as 48 kHz pull-up or pull-down) or video reference (NTSC/PAL black burst, HDTV Tri-Level) signals.
z CASCADE/WORD (OUT 2) connector Use to output word sync signals (44.1, 48, 88.2, 96, 176.4 or 192 kHz as well as 48 kHz pull-up or pull-down).
x TIME CODE/DIGITAL (OUT 1) connector Use this BNC connector to output SMPTE time code. Internal settings can be changed to allow AES3-2003/AES-3id-2001 (AES/EBU) format digital audio signal to be output. Transmission occurs at double speed when the sampling frequency is 88.2/96 kHz and at quad speed when 176.4/192 kHz.
c TIME CODE (IN 1) connector Use this BNC connector to input SMPTE time code.
v USB connector Use a USB 2.0 cable to connect this unit to a computer. Driver software is not necessary. The computer recognizes each of the CF card slots in this unit as a unique mass storage device, so two separate devices appear on the computer if both slots contain cards. Use the USB connection to transfer audio files on the CF cards in this unit to the computer.
b KEYBOARD connector Connect an IBM PC-compatible keyboard with a PS/2 interface, and use it to input project, scene, and channel names, for example. By default, the unit is set to use a US keyboard. When using a Japanese keyboard, since the key allocation is different, change the setting on the PREFERENCES page of the SYSTEM SETUP screen.
2 − Names and functions of parts

TASCAM HS-P82 13
Home Screen
Press the HOME key to open the Home Screen.
Home Screen - Playback
1 Transport status The current transport state is shown.
Playback
Playback standby
Stopped
Backward search
Forward search
Recording
Recording standby
2 Time counter The current time displayed is either the elapsed time or the remaining time. Touch this part of the screen to change the time display mode.
3 Time display mode This shows the current time display mode. Touch this part of the screen to change the time display mode.
No indicator: elapsed time from the beginning of the take is shown.
REMAIN: remaining time until the end of the take is shown. When recording, the remaining time until the “Max File Size” is reached is shown.
TOTAL: Elapsed time from the beginning of the scene is shown.
TOTAL REMAIN: Remaining time until the end of the scene is shown. When recording, the remaining amount of time that can be recorded on the currently selected CF card, which depends on the current recording settings, is shown.
T/C: The time code for the file being recorded or played is shown.
4 Time code status (button/indicator)
When accurate time code is input and the input time code matches the time code settings made on the unit, this indicator appears green.
When the input time code does not match the time code settings made on the unit, this indicator appears to be unlit.
Touch this part of the screen to open the SYNC T/C screen. (See “Sync and time code settings (SYNC T/C)” on page 40.)
5 Audio synchronization status (button/indicator)
When the selected Master clock is synchronized, this indicator appears green.
This blinks when the selected Master clock is out of range or unavailable.
Touch this part of the screen to open the SYNC T/C screen. (See “Sync and time code settings (SYNC T/C)” on page 40.)
6 Power supply status
This image appears when the unit is operating using the included AC adaptor designed for this unit.This image, which shows the amount of remaining battery charge, appears when the unit is operating using an external battery.This image, which shows the amount of remaining battery charge, appears when the unit is operating using batteries installed in the battery compartment.
When using an external battery or batteries inside the unit, when the remaining charge becomes low the ( ) or ( ) icon blinks.
Touch this part of the screen to open the BATTERY screen. (See “Battery display” on page 21.)
NOTE
If the “Icon Type” on the “BATTERY” screen is set to “VOLTS,” the battery icon shows the power voltage.
External battery
Internal battery
7 Scene/take name This shows the mode of the currently active file and the scene/take name.
Polyphonic mode (Multitrack WAV file)
Monophonic mode (Single track WAV file)
2 − Names and functions of parts

14 TASCAM HS-P82
Touch this part of the screen to open the PROJECT (current project/scene take list) screen. (See “Project operations” on page 32.)
8 SOLO indicators, track numbers, level meters, track name display and recording functionsA track’s number appears black if it can be used for recording and gray if it is unavailable. (Availability depends on the sampling frequency setting.) The track number areas also act as overload indicators, turning red during overloads. When the limiter is operating, the track number areas turn blue.
During playback, the meters show the playback levels. At all other times, the level of the track input signal is shown on each track that is enabled for recording.
The track name display areas (4 characters or less) below the level meters also show the track recording status.
When the MIC/LINE selection switch is set to MIC 0 or MIC –25, if you turn the input trim knob, the track name display area below the meters shows the gain value for a while.
When the input source is set to a digital input, the following messages appear:
If there is no corresponding input, • AESx-x NO SIGNAL.
If the input signal differs from the settings made in the • unit, AESx-x UNLOCK.
If the Cbit information of the input signal is no audio, • AESx-x NOT AUDIO.
If the Cbit information of the input signal is non • professional, AESx-x NOT PRO.
If other Cbit information of the input signal differs • from actual operation mode, AESx-x Cbit ERROR.
AESx-x NO SIGNAL
AESx-x UNLOCK
If you touch a level meter, that channel is soloed. Yellow highlighting appears around the level meter and the number of a channel that is soloed. The level meters of the other channels are dimmed.
The following settings can be made for the display of the level meters in the METER SETUP screen from the MENU screen.
Peak hold time •
Release time •
Overload light level •
Reference level line display ON/OFF•
9 SOLO indicator If any channel is being soloed, the SOLO indicator lights yellow, and the SOLO level knob is shown. Turn the DATA dial when the channel is soloed to adjust its level while soloed.
Yellow highlighting appears around the level meter and the number of a channel that is soloed. The level meters of the other channels are dimmed.
To choose a channel to solo, touch its level meter.
Home Screen, Playback
Home Screen, Record setting
Home Screen, Recording
2 − Names and functions of parts

TASCAM HS-P82 15
PAN/LVL Screen, Playback
Information Screen, Playback
0 Recording media This shows which of the two CF slots is being used, as well as the remaining recording time for the current sampling frequency, bit rate and number of recording tracks. The background of the media that is currently being used appears green during playback and red when recording. If there is no media in the slot, dashes are shown and the background is grey.
If the card has no project, NoProject appears. When a CF card is inserted during recording into an empy, unused slot, UNMOUNT appears. When recording is stopped, either the remaining recording time or NoProj-ect appears.
When an unformatted CF card is inserted, UNFORMAT appears.
Press this part of the screen to open the CF SELECT screen (media selection screen). (See “Formatting a CF card” on page 23.)
q REC TRACKS button Press this button to show the record function buttons and the buttons to edit the take number (Next Take).
Next Take
The take number can be set using one letter from the alphabet and a number from 1 to 999. Touch the alphabet area (it becomes yellow) and use the +/- buttons or the DATA dial to change the value. Press the number area to highlight it in yellow and turn the DATA dial to change the value.
In solo mode, the alphabet and the number area cannot be selected.
When the unit is put in recording standby, the file name of the take to be recorded is shown above the scene/take name button on the Home Screen.
In the following cases, --- appears and the value cannot be changed.
No project or scene is loaded•
The selected CF card is unavailable•
The current take is 999•
w PAN/LVL button Press this button to open a screen with pan pots and level adjustments for stereo mix recording and the output signal from PHONES and LINE OUT.
If you press a PAN or 2MixLVL knob on a channel, the parameter can be controlled with the DATA dial.
If two channels are linked, the PAN knob functions as a balance adjustment knob.
When in solo mode, PAN or 2MixLVL knob cannot be selected.
e INFO button Press this button to show the current settings of the unit and information about the loaded file.
The Sys. Info screen shows the current settings of this unit. Touch this part of the screen to open the SYNC T/C screen.
The File Info screen shows information about the currently loaded file. Touch this part of the screen to open the PROJECT screen.
r Mark List button Press this button to open the mark list. (See “Mark list screen” on page 48.)
t Manual Locate button Press this button to open the screen for locating manually. (See “Manual locate function” on page 50.)
2 − Names and functions of parts

16 TASCAM HS-P82
Inserting and removing CF cards
Inserting CF cardsInsert a CF card into COMPACT FLASH SLOT 1 or SLOT 2 on the left side panel of the unit in order to use it for recording and playback.
NOTE
CF cards can be inserted whether or not the power is ON or OFF.
1 Open the CF card slot.
2 Insert the CF card with the correct orientation. With the labeled side up, insert the end with the connector completely.
3 Close the cover.
NOTE
If you cannot close the slot cover, remove the CF card once and press the square button to the right of the slot in and then reinsert the card.
Removing CF cardsTurn the unit power OFF or stop operations before removing a CF card.
CAUTION
Never remove a CF card during recording or playback, while transmitting data by USB or doing anything else that accesses the CF card.
1 Open the CF card slot cover.
2 Press the square button to the right of the CF card slot to bring the button out.
3 Press the square button in again to partially eject the CF card.
4 Pull the CF card out by hand.
Power supply
Power can be supplied to this unit by one of the following options: the included TASCAM PS-1225L AC adaptor designed for this unit, an external battery or batteries installed in the unit. If more than one source of power is available, the AC adaptor power is used before batteries and the external DC battery is used before batteries installed in the unit. If the voltage of the power source being used goes below the minimum set on the battery screen or the power plug of the AC adaptor/external battery is disconnected, the unit does the following.
If the • Battery Caution item on the ALARM TONE page of the SYSTEM SETUP screen is set to ON, a warning sound is output through the headphones output.
If another power source is available, a message appears • and the power source changes in the order described above.
3 − Preparation

TASCAM HS-P82 17
Touch the CLOSE button or press the DATA dial to close the message.
If no other power source is available, a warning message • appears, and the unit automatically stops recording and playback after 20 seconds and then shuts down. Provide one of power sources.
If an external battery that has a voltage higher than the • NOMINAL value is connected while the internal battery is used, the following message appears.
Using the AC adaptor
Connect the included TASCAM PS-1225L AC adaptor designed for this unit to the DC IN connector on the left side panel.
TASCAMPS-1225L
DC plug
AC outlet
A hook (cord holder) to fix the cord of the AC adaptor is also on the left side panel. Wrap the cord around the hook when connecting it to prevent it from being disconnected during use.
CAUTION
Always use the included TASCAM PS-1225L AC adaptor designed for this unit. Use of a different adapter could cause malfunction, fire or electric shock.
Using batteries installed in the unit
Types of batteries that can be used internallyThe following types of batteries can be used in this unit.
AA alkaline batteries (10) (use the BC-10AA battery • case)
AA NiMH batteries (10) (use the BC-10AA battery case)• NiMH NP-type battery• Lithium-ion NP-type battery •
NOTE
This unit does not have the ability to recharge batteries. When using a rechargeable battery or batteries, charge before use in a suitable charging device.
Installing internal batteriesLoosen the screw and open the cover of the battery compartment on the rear panel, and insert the battery case (TASCAM BC-10AA) or NP-type battery.
Then close the cover and tighten the screw.
3 − Preparation

18 TASCAM HS-P82
Removing batteriesOpen the cover of the battery compartment by loosening the screw on the rear panel, and push the lever on the right side of the battery compartment down. This unlocks and ejects the battery (or case).
Inserting batteries into the battery case (BC-10AA)
1 Open the cover of the battery case (TASCAM BC-10AA).
2 Insert 10 AA batteries with the correct +/- orientation.
3 Close the cover.
Precautions for the use of batteries Misuse of batteries could result in leakage, rupture or • other trouble. Please read the warnings on the batteries and page 4 of this manual carefully.
When changing batteries, replace all 10 batteries at the • same time.
Using an external DC power source
The unit can be powered by connecting an external DC power source with an output voltage of 11-16V and an output current of 2A or more to the EXT DC IN connector (XLR-4-32) on the left side panel of this unit.
For how to use V-Mount type batteries, see the instructions included with the battery. In the following examples of
external DC power use, the attachment procedures for a V-Mount type battery from IDX Company, Ltd. are described.
Attaching a V-Mount type battery
1 As shown in the following illustration, remove the cover attached to the V-Mount external battery adaptor (IDX C-EB (XLR)).
The a screws are required in step 2.
The b spacers are not needed so store them with the cover.
a
b a
a
a
b
b
b
IDXV-Mount cover
IDXV-Mount adaptor
2 Attach the V-Mount bracket to the rear panel using the included V-Mount bracket screw kit (c) as shown in the following illustration.
Check the TOP and BOTTOM indications for the V-Mount bracket and attach it with the correct orientation.
3 Attach the V-Mount external battery adaptor (IDX C-EB (XLR)) to the V-Mount bracket that is attached to the rear panel using the a screws removed in step 1.
a
a
a
a
c
c
c
cV-Mount bracket
IDXV-Mount adaptor
3 − Preparation

TASCAM HS-P82 19
4 Connect the cable from the V-Mount external battery adaptor (IDX C-EB (XLR) to the EXT DC IN connector on the left side panel.
5 Insert the V-Mount battery into the V-Mount external battery adaptor (IDX C-EB (XLR).
About the display
Adjusting the display anglePull the bottom of the display forward, as shown in the following illustration, to allow the angle to be adjusted. Push the bottom of the display (at the TASCAM logo) back in to restore it to its flat position.
CAUTION
Do not push the display screen itself.
Adjusting the display and indicator brightnessTurn the DATA dial while pressing and holding the HOME key to adjust the brightness of the display, the PAUSE, REC and PLAY [CALL] keys and the SLATE indicator.
Push and turn the DATA dial while pressing and holding the HOME key to adjust only the brightness of the color display.
Cautions on the displayThe display can easily be scratched, so do not use • pointed objects, including fingernail tips, to touch it. Always touch it with your fingers.
Do not press the display forcefully with a finger or poke • it with a pen, toothpick or other pointed object. Doing so could scratch the display or cause malfunction.
The display touch panel is comprised of a film and glass. • Do not apply a strong force to its surface. Doing so could break the glass.
When using the display, do not put a hand on the panel • or push around the display forcefully. Doing so could prevent accurate position detection.
Do not place anything on top of the display or otherwise • put weight on the same place for a long time. Doing so could cause the panel to warp or result in inaccurate position detection.
Do not apply a commercially available screen protection • film to the display. Doing so could prevent normal operation.
Slightly wipe the display with a soft dry cloth that does • not shed dust (e.g. a cleaning cloth). Avoid wiping with a stiff cloth or rubbing with force. Doing so could damage the surface of the LCD. Do not use benzene, thinner, manicure remover, alcohol or similar substances.
NOTE
The display is produced with extremely high-precision manufacturing technologies. More than 99.99% of the pixels operate to specification. Less than 0.01% of the pixels may occasionally misfire or appear as red or black dots.
This has no effect on the recorded sound and does not constitute a malfunction.
3 − Preparation

20 TASCAM HS-P82
Turning the power ON and OFF
Push the switch on the front panel down to turn the power ON.
The following Start Up screen appears.
To turn the power OFF, push the switch on the front panel down again. A confirmation screen appears to verify that you want to turn the power OFF. Follow the instructions on the screen to turn the power OFF.
NOTE
When using an external DC power source or an internal battery, a voltage of at least 11 V is necessary when starting up.
Setting the time of the built-in clock
1 Press the MENU key on the front panel to open the MENU screen.
2 Touch the SYSTEM SETUP button to open the SYSTEM SETUP screen.
3 Touch the CLOCK ADJUST tab to open the screen where you can set the built-in clock.
4 Touch the item that you want to change, and use the DATA dial on the front panel to change the value.
5 Touch the SET button, or push the DATA dial to confirm the setting.
NOTE
After purchasing this unit, set the clock before making your first recording. If you do not set the clock, the time stamps on recording files will not be correct
3 − Preparation

TASCAM HS-P82 21
Battery display
At the top right of every screen is a button that opens the power screen.
Touch this button to open the BATTERY management screen.
STATUS
This shows the currently active power source.
AC/DC EXT/BATT
The indicator for the currently active power source appears green.
The current voltage for each power source is shown beneath its HEALTH label.
The type of battery currently installed in the unit is shown beneath the BATT label.
NONE: No internal battery is installed
NP: Shown when an NP type battery is installed
PACK: Shown when a battery case (BC-10AA) is installed
The following settings can be made for the DC EXT and BATT items.
MINIMUM• : Set the minimum battery voltage between 9.0 V and 13.0 V in 0.5 V steps (default value: 10.5V)
NOMINAL• : Set the usual voltage to 12.0 V (default value), 13.2 V, 14.4 V, 14.8 V or 15.0 V
The recommended values depending on the type of battery are as follows.
NP type batteries
Type of batteries Minimum voltage Nominal voltage
NiMH 12.0 V 11.0 V 12.0 V
NiMH 13.2V 12.0 V 13.2 V
Li-Ion 14.4V 13.0 V 14.4 V
Li-Ion 14.8 V 13.0 V 14.8 V
Deep cycle lead 12 V
10.5 V 12.0 V
Batteries (using the supplied battery case BC-10AA)
Type of batteries Minimum voltage Nominal voltage
NiMH rechargeable batteries (AA)
10.5 V 12.0 V
Alkaline batteries (AA)
9.0 - 9.5 V 15.0 V
The minimum and nominal voltages in the above tables are typical values of commercially available batteries. Please set them according to the battery manual.
CAUTION
If the minimum voltage is too low, there is a danger of damaging rechargeable batteries through excessive discharge.
NOTE
A great amount of power is required to provide phantom power to a condenser microphone. If you use a condenser microphone while running the unit on AA batteries (NiMH rechargeable or alkaline), the operation time will be greatly shortened because of their low capacities. If you need to operate the unit for a long time, use the AC adaptor or a battery with great capacity.
Touch the area of the value that you want to change. When the background color changes, use the DATA dial to set the value.
ICON TYPE (Battery status display):
You can set the battery status display icon type by touching the BARS ( / ) or VOLTS ( / ) button. The default value is BARS.
3 − Preparation

22 TASCAM HS-P82
Panel lock function
Press the MENU key while pressing and holding the HOME key on the front panel to open a screen where you can disable or enable all operation from the front panel.
The front panel is divided into three sections. You can lock and unlock each of these sections separately.
If you try to operate a control that is locked, the following pop-up message appears.
DIGITAL I/O connector
The DIGITAL I/O connector on the left side panel is a D-sub 25-pin AES3-2003/IEC60958-4 (AES/EBU) digital audio input and output connector. The pin assignments are as follows.
Digital In Digital Out
1
1425
13
Recording duration
The table below shows the amount of recording time possible on CF cards of various capacities for each available recording format.
File recording format and number of recordable
tracks
CF card capacity
8 GB 16 GB 32 GB
16-bit, 44.1 kHz, 8 tracks
3 hours 9 minutes
6 hours 18 minutes
12 hours 36 minutes
16-bit, 44.1 kHz, 8 tracks + stereo mix
2 hour 31 minutes
5 hours 2 minutes
10 hours 5 minutes
16-bit, 48 kHz, 8 tracks
2 hours 54 minutes
5 hours 47 minutes
11 hours 34 minutes
16-bit, 48 kHz, 8 tracks + stereo mix
2 hours 19 minutes
4 hours 38 minutes
9 hours 16 minutes
24-bit, 44.1 kHz, 8 tracks
2 hours 6 minutes
4 hours 12 minutes
8 hours 24 minutes
24-bit, 44.1 kHz, 8 tracks + stereo mix
1 hour 41 minutes
3 hours 22 minutes
6 hours 43 minutes
24-bit, 48 kHz, 8 tracks
1 hour 56 minutes
3 hours 51 minutes
7 hours 43 minute
24-bit, 48 kHz, 8 tracks + stereo mix
1 hour 33 minutes
3 hours 5 minute
6 hours 10 minutes
24-bit, 88.2 kHz, 8 tracks
1 hour 3 minutes
2 hours 6 minutes
4 hours 12 minutes
24-bit, 96 kHz, 8 tracks
58 minutes 1 hour 56 minutes
3 hours 51 minutes
24-bit, 176.4 kHz, 4 tracks
1 hour 3 minutes
2 hours 6 minutes
4 hours 12 minutes
24-bit, 192 kHz, 4 tracks
58 minutes 1 hour 56 minutes
3 hours 51 minutes
The recording times shown above are estimates. They • might differ depending on the CF card in use.
The recording times shown above are not continuous • recording times, but rather they are the total possible recording times for the CF card.
3 − Preparation

TASCAM HS-P82 23
4 − Recording and Playback
In this chapter, we explain basic procedures for recording with a microphone. The display on this unit functions as a touch panel. Operate the unit using its keys, switches and touch panel display buttons.
NOTE
This unit can record a maximum of 8 separate tracks and a stereo track (when the sampling frequency is set to 44.1 or 48 KHz). The maximum number of input channels is 8. The stereo track records a stereo mix of the 8 recorded tracks.
On every screen except the Home Screen, a “ ” button appears at the top left. Touch this button to return to the previous screen.
Preparing to record
Formatting a CF card
CAUTION
Formatting a CF card erases all the data on it.•
Format a CF card with this unit. (If a CF card is formatted • with another equipment or PC, some malfunction may occur.)
Format CF cards with this unit. (If a CF card is formatted • with other equipment or a PC, errors may occur.)
1 Press the MENU key on the front panel to open the MENU screen.
2 Touch the CF/USB MANAGE button to open the CF/USB MANAGE screen.
3 Touch the SELECT button next to the CF SELECT item to open the CF SELECT screen.
4 Touch the button for the CF card that you want to format to select it. The background of the selected CF card appears yellow.
5 Touch the SET button to confirm and return to the CF/USB MANAGE screen.
6 Touch the QUICK button next to the FORMAT item. The following pop-up message appears.
NOTE
If no CF card is inserted in that slot, the pop-up message appears: “CF1/CF2 Is not available.”
7 Touch the OK button on the pop-up message. During formatting, the following pop-up message appears.

24 TASCAM HS-P82
When formatting completes, the following pop-up message appears.
8 Touch the CLOSE button on the pop-up message. The CREATE PROJECT screen automatically opens.
9 To make a new project, follow the procedures starting with step 2 in the following “Create a new project” section.
NOTE
Format CF cards with this unit. (If a CF card is formatted with other equipment or a PC, errors may occur.)
Create a new project
1 Press the PROJECT key on the front panel to open the PROJECT screen.
2 Touch the CREATE PROJECT button to open the CREATE PROJECT screen.
The CREATE PROJECT screen has two pages.
On the first page, you can set the project name, the name of the first created scene, the sampling frequency, and the sampling frequency written to BWF chunks.
Touch the NEXT button to open the next page.
Set the frame type for the project or select the default factory preset from this page.
For details about each item, see “Creating new projects” on page 32.
3 After you complete making the settings touch the CREATE PROJECT button.
NOTE
If a project with the same project name already exists, the CREATE PROJECT button appears gray and you will not be able to create a new project. If this happens, press the "Project Name" button on the screen (The Project Name Edit screen opens). Then, change the project name. After that, press the "Enter" button on the screen or press the DATA dial.
4 Press the okay button on the confirmation pop-up message that appears.
The Home Screen reopens.
4 − Recording and Playback

TASCAM HS-P82 25
Set the master clock
1 Press the HOME key on the front panel to open the Home Screen.
2 Touch the SYNC button to open the SYNC T/C screen where you can set the clock.
3 Select the master clock that you want to use from the MASTER item on the SYNC T/C screen.
Set the recording tracks
1 Press the HOME key on the front panel to open the Home Screen.
2 Touch the REC TRACKS button to open the REC TRACKS page of the REC SETUP screen.
On the REC TRACKS page, you can turn ON the record function of the tracks that you want to record (arm tracks for recording). Touch the record function buttons below the level meters to turn each track record function ON or OFF.
When a track’s record function is ON, the button background appears red.
NOTE
When the sampling frequency is 44.1 kHz or 48 kHz, to • record a stereo mix at the same time as the separate tracks (1-8), turn the LR 2MIX record function ON. The internal mixer creates a stereo mix of the other tracks.
You can also open the “REC TRACKS” page to set the • record function by pressing the MENU key to open the “MENU” screen and touching the “REC SETUP” button.
Set the file format
1 Press the MENU key on the front panel to open the MENU screen.
2 Touch the REC SETUP button to open the REC SETUP screen.
4 − Recording and Playback
26 TASCAM HS-P82
3 Touch the FILE FORMAT tab to open the following screen.
On the FILE FORMAT page, you can set the file mode, bit length, maximum file size, and behavior when a recording is paused. For details, see “FILE FORMAT page” on page 39.
Make other recording settingsTouch the OPTIONS tab to open the following screen.
On the OPTIONS page, you can set the pre-recording time and the use of auto markers. For details, see “OPTIONS page” on page 39.
Connecting microphones and headphones
Connect a microphone to the MIC/LINE connector.
Set all the MIC/LINE switches next to the input connectors on the right side panel to MIC 0.
Microphones
Connect headphones to the PHONES connector on the front panel. Keep the headphones knob turned to MIN (all the way to the left) when connecting headphones.
Headphones
When using a condenser mic, follow the procedures below to turn phantom power ON.
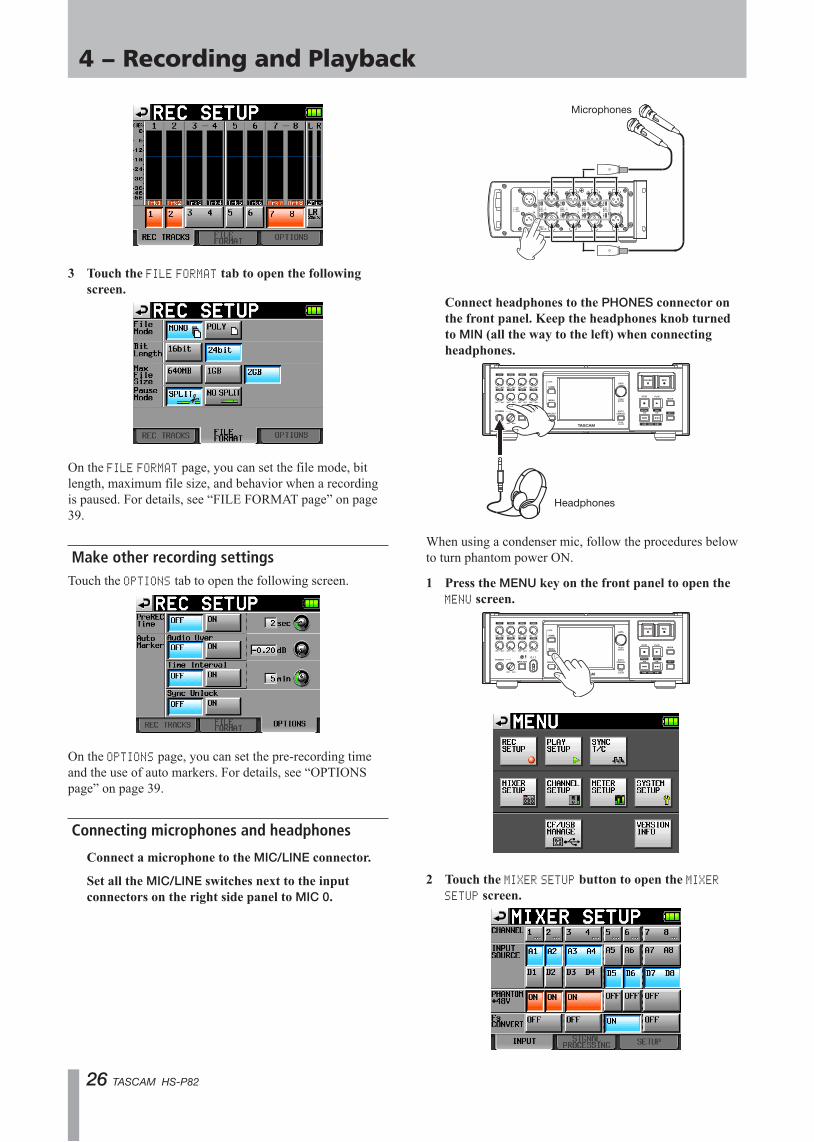
1 Press the MENU key on the front panel to open the MENU screen.
2 Touch the MIXER SETUP button to open the MIXER SETUP screen.
4 − Recording and Playback
TASCAM HS-P82 27
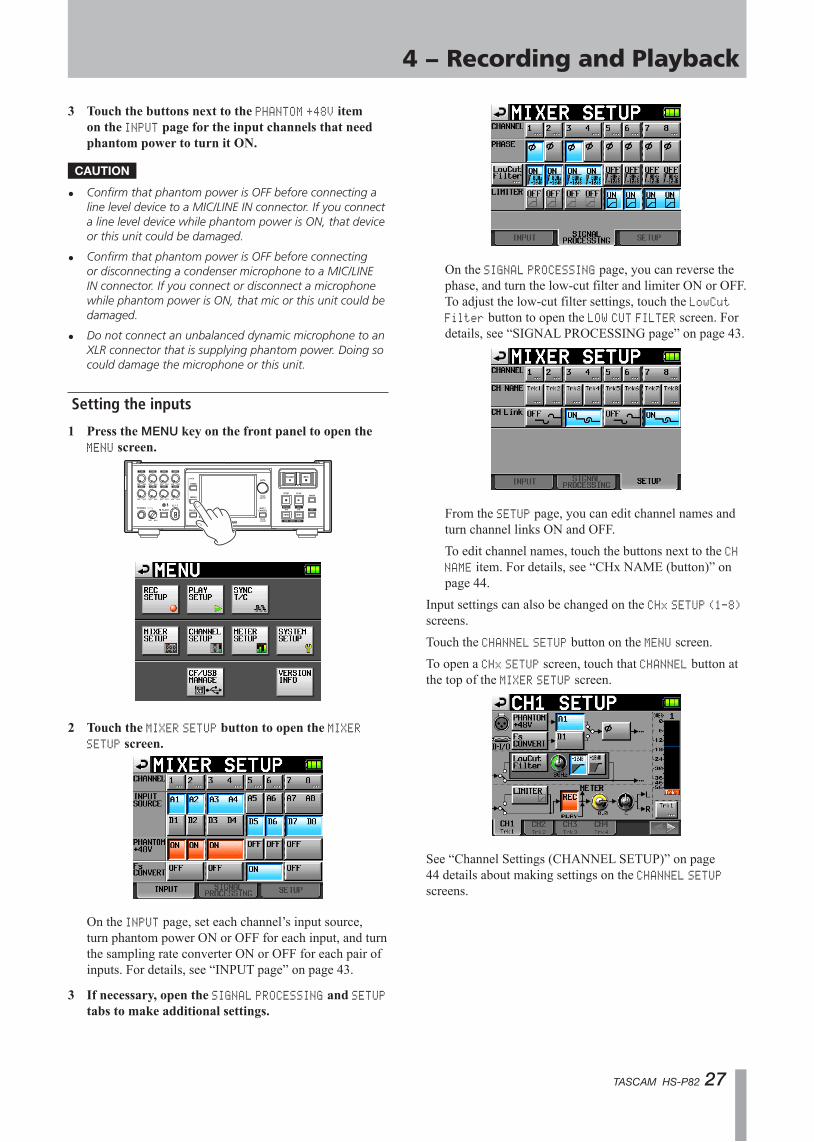
3 Touch the buttons next to the PHANTOM +48V item on the INPUT page for the input channels that need phantom power to turn it ON.
CAUTION
Confirm that phantom power is OFF before connecting a • line level device to a MIC/LINE IN connector. If you connect a line level device while phantom power is ON, that device or this unit could be damaged.
Confirm that phantom power is OFF before connecting • or disconnecting a condenser microphone to a MIC/LINE IN connector. If you connect or disconnect a microphone while phantom power is ON, that mic or this unit could be damaged.
Do not connect an unbalanced dynamic microphone to an • XLR connector that is supplying phantom power. Doing so could damage the microphone or this unit.
Setting the inputs
1 Press the MENU key on the front panel to open the MENU screen.
2 Touch the MIXER SETUP button to open the MIXER SETUP screen.
On the INPUT page, set each channel’s input source, turn phantom power ON or OFF for each input, and turn the sampling rate converter ON or OFF for each pair of inputs. For details, see “INPUT page” on page 43.
3 If necessary, open the SIGNAL PROCESSING and SETUP tabs to make additional settings.
On the SIGNAL PROCESSING page, you can reverse the phase, and turn the low-cut filter and limiter ON or OFF. To adjust the low-cut filter settings, touch the LowCut Filter button to open the LOW CUT FILTER screen. For details, see “SIGNAL PROCESSING page” on page 43.
From the SETUP page, you can edit channel names and turn channel links ON and OFF.
To edit channel names, touch the buttons next to the CH NAME item. For details, see “CHx NAME (button)” on page 44.
Input settings can also be changed on the CHx SETUP (1-8) screens.
Touch the CHANNEL SETUP button on the MENU screen.
To open a CHx SETUP screen, touch that CHANNEL button at the top of the MIXER SETUP screen.
See “Channel Settings (CHANNEL SETUP)” on page 44 details about making settings on the CHANNEL SETUP screens.
4 − Recording and Playback

28 TASCAM HS-P82
Adjust the input level
1 Press the HOME key on the front panel to open the Home Screen.
2 Use a connected mic to input sound, and adjust the input level using the input trim knob so that the level meter on the screen does not overload. If the mic input level is too high, set the MIC/LINE selection switch next to the MIC/LINE connector to MIC –25, and then adjust the input level with the input trim knob again.
The channel name display area beneath the meter shows the gain value for a while.
NOTE
By pressing in an input trim knob, you can prevent it from accidental operation. When a knob is out, it can be turned.
Monitor the input Touch the PAN/LVL button on the Home Screen to open the following screen where you can adjust the level and pan knobs. The mixed signal of all the channels after these adjustments is sent to the outputs for headphones and external speakers and can be monitored.
When in solo mode, PAN or 2MixLVL knob cannot be selected.
You can also make these adjustments on the CHx SETUP screens.
NOTE
If the sampling frequency is set to 44.1 or 48 kHz, you can simultaneously record the stereo mix of the channels with their levels and pan positions adjusted.
Make a recording
Press the REC key to start recording.
The transport status display at the top left of the Home Screen changes into the recording status display and part of the background of the Home Screen becomes red, indicating that the unit is recording. The time counter starts at the same time.
4 − Recording and Playback

TASCAM HS-P82 29
If you press the REC key while recording, recording to the current file stops, but recording continues on a new file.
NOTE
If you press the REC key less than 4 seconds after • beginning recording, the unit will not start recording a new take.
If a file with the take number 999 exists, recording another • take is not possible.
Stop recordingPress the STOP [RETAKE] key to stop recording.
RETAKEPress the STOP (RETAKE) key while pressing and holding the SHIFT key to erase the last recorded take.
If a 2Mix take was recorded simultaneously, it is also erased.
If the REC key was pressed during recording to record multiple consecutive takes, retake is possible only from the beginning of the recording of the last take.
Voice memo and slate tone function Press and hold the SLATE key on the front panel more than 0.5 sec to momentarily record the signal through the built-in mic on the front panel or a slate tone signal. Set whether the mic input signal or the internal oscillator tone is recorded on the PREFERENCES page of the SYSTEM SETUP screen. (See “PREFERENCES page” on page 46.)
NOTE
In order to prevent accidental operation of the SLATE key, it must be held down briefly to turn this function ON.
Play a recording
Select a project/scene/take
1 Press the PROJECT key on the front panel tool to open the PROJECT screen.
NOTE
Alternatively, press the scene/take name area on the Home Screen to open the “PROJECT screen.
2 Touch the “ ®” button next to the project that you want to play to open the scene selection screen.
3 Touch the “ ®” button next to the scene that you want to play to open the take selection screen.
4 Touch the “ ®” button next to the take that you want to play.
If the take is currently in the selected project, a Load selected take? pop-up message appears.
If the take is not currently in the selected project, a Selected take is in another project pop-up message appears.
4 − Recording and Playback

30 TASCAM HS-P82
The message above appears when the take is in the current project.
The message above appears when the take is not in the current project.
5 Touch the OK button in the confirmation pop-up message.
When loading completes, the Home Screen reopens.
Start playbackPress the PLAY [CALL] key.
Press the PAUSE key to pause playback.
Press the PLAY [CALL] key again to resume playback.
Press the STOP [RETAKE] key to stop playback.
Press the Ô [Â] and [ ]̄ keys briefly to change the take. Press and hold these keys to search backward or forward during playback.
NOTE
On the PLAY SETUP screen, you can set whether only the currently selected take is played or whether all the takes within the current scene are played. (See “Playback settings (PLAY SETUP)” on page 40.)
Mixing the playback soundUse the internal mixer function to mix the recorded tracks into stereo and output them to the line output and PHONES connectors.
1 Press the HOME key on the front panel to open the Home Screen.
2 Touch the PAN/LVL button on the Home Screen to open the PAN/LVL page.
PAN knobs: Use these to adjust the left-right position sent to the stereo bus.
2Mix LVL knob: Use these to adjust the level sent to the stereo bus.
When in solo mode, PAN or 2MixLVL knob cannot be selected.
3 Touch the knob that you want to adjust.
Use the DATA dial on the front panel to adjust this parameter.
TIP
Press the DATA dial as you turn it to make adjustments in larger increments. This is useful for making rough adjustments quickly.
CALLWhile pressing the SHIFT key, press the PLAY (CALL) key to use the CALL function (locate to the point where playback was last started from standby), and put the unit in playback standby mode.
4 − Recording and Playback

TASCAM HS-P82 31
5 – Projects
This unit manages audio files in projects. Each CF card contains project folders, and each project folder contains scene folders. These scene folders contain audio files called takes.
Project: Contains all the materials for one program or work
Scene: Includes all the materials for a certain part of a project
Take: A recording that is part of a scene
File formats
This unit can record and play the following types of file formats.
File format: BWF• Sampling frequencies: 44.1, 48, 48 pull-down, 48 • pull-up, 88.2, 96, 176.4 and 192 kHz
Bit length: 16 or 24 • Number of tracks: • 1–8 tracks (at 44.1, 48, 88.2 or 96 kHz) 1–8 tracks + stereo mix (at 44.1 or 48 kHz) 1–4 tracks (at 176.4 or 192 kHz)
File mode: monophonic or polyphonic •
Monophonic and polyphonic modesIn monophonic mode, each track is recorded as an independent monaural BWF file.
In polyphonic mode, multiple tracks are recorded together as a BWF file.
When transferring a file to an audio application that is compatible with polyphonic files, multiple tracks can be input at once.
The 2mixfile is always recorded as a polyphonic file (stereo file).
About project screens
Press the PROJECT key on the front panel to open the PROJECT screen. The last used PROJECT screen page (project selection, scene selection or take selection) opens.
Project screen
Directory display: The current directory level and number of projects is shown. (In the example above, the root directory of CF card 1 contains 12 projects.)
NUM OF SCENE: This shows the number of scenes in each project.
Fs: This shows the sampling frequency of the project. The values are abbreviated. 44.1 kHz is shown as “44k,” 48 kHz –0.1% (pull-down) as “48k–,” 48 kHz +0.1% (pull-up) as “48k+,” 88.2 kHz as “88k” and 176.4 kHz as “176k.”
ENTER: Press a project “ ®” button to show the contents of that project.
Project name buttons: Touch to select a project or projects.
INFO button: Touch to open a pop-up window that shows information about the project that is currently selected.
If no project is selected, press this button to show information about the current CF card.
CREATE PROJECT button: Touch to open the CREATE PROJECT screen.
MULTI SELECT button: Touch to enable the selection of multiple projects.
MENU button: Touch to open a pop-up menu where you can select LOAD, REBUILD, EDIT NAME and DELETE.
Scroll buttons: Use these buttons to scroll to the beginning or end of the list or scroll one page (five lines) forward or backward. You can also scroll through the list one line at a time using the DATA dial.
Touch the project/scene name shown to the left of the battery icon to open a screen that shows the list of takes in the current project/scene.
Scene screen
Project name display: The current project name is shown.

32 TASCAM HS-P82
NUM OF TAKE: This shows the number of takes in each scene.
TOTAL TIME: This shows the total recording time of the takes in this scene.
ENTER: Press a scene “ ®” button to show the contents of that scene.
Scene name buttons: Touch to select a scene or scenes.
INFO button: Touch to open a pop-up window that shows information about the scene that is currently selected.
If no scene is selected, press this button to show information about the current project.
MAKE SCENE button: Touch to open the MAKE SCENE screen.
MULTI SELECT button: Touch to enable the selection of multiple scenes.
MENU button: Touch to open a pop-up menu where you can select LOAD, REBUILD, COPY, and DELETE.
Scroll buttons: Use these buttons to scroll to the beginning or end of the list or scroll one page (five lines) forward or backward. You can also scroll through the list one line at a time using the DATA dial.
Touch the project/scene name shown to the left of the battery icon to open a screen that shows the list of takes in the current project/scene.
Take screen
Scene name display: The current scene name is shown.
LENGTH: This shows the length of each take.
ENTER: Press a take “ ®” button to load the take.
Take name buttons: Touch to select a take or takes.
INFO button: Touch to open a pop-up window that shows information about the take that is currently selected.
If no take is selected, press this button to show information about the current scene.
CIRCLE TAKE button: Touch to add or remove the @ to the take name.
MULTI SELECT button: Touch to enable the selection of multiple takes.
MENU button: Touch to open a pop-up menu where you can select LOAD, REBUILD, and DELETE.
Scroll buttons: Use these buttons to scroll to the beginning or end of the list or scroll one page (five lines) forward
or backward. You can also scroll through the list one line at a time using the DATA dial.
Project operations
Creating new projects
1 Press the PROJECT key on the front panel to open the PROJECT screen.
2 Touch the CREATE PROJECT button on the PROJECT screen to open the CREATE PROJECT screen. This screen has two pages.
On the first page of the CREATE PROJECT screen, you can make the following settings.
Project Name: Touch the Project Name button to open the screen where you can edit the project name.
On the PROJECT NAME screen, the maximum number of characters allowed is indicated by the yellow background. The maximum number of characters for project and scene names is 31. Extra characters are discarded.
Scene Name: Touch the Scene Name button to open a screen where you can change the name of the first scene.
Fs: Set that sampling frequency of the project.
48k-0.1% sampling frequency is pull-down compatible, and 48k+0.1% is pull-up compatible.
BWF Chunk Fs: Set the sampling frequency for BWF chunks. To use the actual sampling frequency of the recordings, select Actual Rate. For pull-up/pull-down, select Fake Rate to write 48k instead of 48k±0.1%.
NEXT: Open the next page.
The second page of the CREATE PROJECT screen has the following settings.
5 – Projects

TASCAM HS-P82 33
Frame Type: Set the Time code Frame Type.
OTHERS: Use the Current Settings of other parameters to create a project or select Factory Preset to use the default settings.
3 After you complete making the settings, touch the CREATE PROJECT button.
NOTE
If a project with the same project name already exists, the CREATE PROJECT button appears gray and you will not be able to create a new project. If this happens change the project name.
4 Touch the OK button when the confirmation pop-up message appears.
When creation of the project completes, the Home Screen reopens.
NOTE
Immediately after creation, the new project becomes the • current project.
The letter “C” appears on the folder icon to the left of the • name of the currently active project on the “PROJECT” screen.
Editing the project name
1 Touch the Project Name button on the CREATE PROJECT screen to open the PROJECT NAME screen as shown below.
Character buttons: Use these to input the project name.
BS button: Use this to erase the character to the left of the cursor.
DEL button: Use this to erase the character to the right of the cursor.
Shift button: Touch this to switch between numerals and symbols and uppercase and lowercase Roman letters.
Caps button: Use to input uppercase letters.
Space button: Use to input a space.
<– / –> buttons: Use these to move the cursor.
Enter button: Touch this to confirm the input name.
NOTE
When the “PROJECT NAME” screen is open, you can also use an external keyboard that is connected to the KEYBOARD connector on the left side panel to input names.
2 Touch the Enter button on the PROJECT NAME screen or press the DATA dial to confirm the project name.
Changing a project name later
1 Select the project that you want to change on the PROJECT screen.
2 Touch the MENU button to open a pop-up menu.
NOTE
When multiple projects are selected, the “LOAD” and “EDIT NAME” items are not available.
3 Touch the EDIT NAME button in the pop-up menu to open the PROJECT NAME screen.
4 Input the project name using the procedures described above.
5 Touch the ENTER button on the PROJECT NAME screen or press the DATA dial to confirm the project name and return to the PROJECT screen.
Editing the name of the first scene
Touch the Scene Name button on the CREATE PROJECT screen to open the following screen.
Follow the same procedures as in “Editing the project name” on page 33 to change the scene name.
5 – Projects

34 TASCAM HS-P82
NOTE
The scene name cannot be changed later because it is also used for take file names.
Loading projects
1 Press the PROJECT key on the front panel to open the PROJECT screen.
2 Select the project that you want to load.
3 Touch the MENU button to open a pop-up menu.
NOTE
When multiple projects are selected, the “LOAD” and “NAME EDIT” items are not available.
4 Touch the LOAD button in the pop-up menu.
5 Touch the OK button or press the DATA dial when the confirmation pop-up message appears.
After loading completes the Home Screen opens.
NOTE
When a project is loaded, the last loaded scene is also loaded. The highest numbered take in that scene is also loaded
Rebuilding projectsRebuild a project to play data files that were not recorded by the unit, including scenes that were copied from another project within the unit, and audio files that were copied from a computer to a scene within the unit (files copied from a computer must be a format that the unit can play).
1 Press the PROJECT key on the front panel to open the PROJECT screen.
2 Select the project that you want to rebuild.
Touch the MULTI SELECT button on the PROJECT screen to allow the selection of multiple projects.
3 Touch the MENU button on the PROJECT screen to open a pop-up menu.
4 Touch the REBUILD button in the pop-up menu.
5 Touch the OK button or press the DATA dial when a confirmation pop-up message appears.
During rebuilding, a progress status pop-up appears. When rebuilding completes, the pop-up disappears and the Home Screen opens.
NOTE
If you rebuild when no project has been selected in the PROJECT screen, the selected CF card is rebuilt entirely.
Erasing a project
1 Press the PROJECT key on the front panel to open the PROJECT screen.
2 Select the project that you want to erase.
Touch the MULTI SELECT button on the PROJECT screen to allow the selection of multiple projects.
3 Touch the MENU button on the PROJECT screen to open the pop-up menu.
5 – Projects

TASCAM HS-P82 35
4 Touch the DELETE button in the pop-up menu.
5 Touch the OK button or press the DATA dial when a confirmation pop-up message appears.
During erasure, a progress status pop-up appears. When erasure completes, the pop-up disappears.
CAUTION
When you erase a project, every scene and take in the project is also erased.
Scene operations
Creating new scenes
1 Touch the PROJECT key on the front panel to open the PROJECT screen.
2 Touch the “®” button of the project where you want to add a scene to open the scene screen.
3 Touch the MAKE SCENE button to open the MAKE SCENE screen where you can name the scene.
Follow the same procedures as in “Editing the project name” on page 33 to name the scene.
NOTE
You cannot use the “@” symbol at the beginning of a scene name.
4 Touch the Enter button or press the DATA dial to open a confirmation pop-up message. Touch the OK button or press the DATA dial to confirm the scene name.
The new scene becomes the current scene immediately after it is created.
During the creation of a scene, a progress status pop-up appears. When scene creation completes, the pop-up disappears and the Home Screen reopens.
Loading scenes
1 Press the PROJECT key on the front panel to open the PROJECT screen.
2 Touch the “®” button for the project that contains the scene that you want to load to open the scene screen.
3 Select the scene that you want to load.
4 Touch the MENU button to open a pop-up menu.
5 Touch the LOAD button in the pop-up menu.
5 – Projects

36 TASCAM HS-P82
6 Touch the OK button or press the DATA dial when a confirmation pop-up message appears.
When loading completes, the Home Screen opens.
NOTE
The letter “C” appears on the folder icon to the left of the scene name of the currently selected scene.
Rebuilding scenesRebuild a scene to play data files that were not recorded by the unit, including scenes that were copied from another project within the unit and audio files that were copied from a computer to a scene within the unit (files copied from a computer must be a format that the unit can play).
1 Press the PROJECT key on the front panel to open the PROJECT screen.
2 Touch the “®” button for the project that contains the scene that you want to rebuild to open the scene screen.
3 Select the scene that you want to rebuild. Touch the MULTI SELECT button to enable the selection of multiple scenes.
4 Touch the MENU button to open a pop-up menu.
5 Touch the REBUILD button in the pop-up menu item.
6 Touch the OK button or press the DATA dial when a confirmation pop-up message appears.
During rebuilding, a progress status pop-up appears. When rebuilding completes, the pop-up disappears.
NOTE
You can also rebuild a scene from that scene’s take selection screen.
Copying scenesYou can copy scenes between CF1 and CF2 (two CF cards are necessary).
If you copy a scene, the same directory structure is created at the copy destination.
CAUTION
To play copied scenes on this unit, you must rebuild the • destination project or the scene.
If you copy a scene with a different sampling frequency • into a project, the scene cannot be rebuilt.
1 Press the PROJECT key on the front panel to open the PROJECT screen.
2 Press the “®” button for the project that contains the scene that you want to copy to open the scene screen.
3 Select the scene that you want to copy. Touch the MULTI SELECT button to enable the selection of multiple scenes.
4 Touch the MENU button on the PROJECT screen to open a pop-up menu.
5 Touch the COPY button in the pop-up menu.
6 Touch the OK button or press the DATA dial when a confirmation pop-up message appears.
During copying, a progress status pop-up appears. When copying completes, the pop-up disappears and the Home Screen opens.
5 – Projects

TASCAM HS-P82 37
NOTE
If a scene with the same name already exists on the destination CF card, a message confirming that you want to overwrite the existing scene appears. Touch the OK button or press the DATA dial to overwrite the existing file and copy the selected scene to the destination.
Erasing scenes
1 Press the PROJECT key on the front panel to open the PROJECT screen.
2 Press the “®” button for the project that contains the scene that you want to erase to open the scene screen.
3 Select the scene that you want to erase. Touch the MULTI SELECT button to enable the selection of multiple scenes.
4 Touch the MENU button on the PROJECT screen to open a pop-up menu.
5 Touch the DELETE button in the pop-up menu.
6 Touch the OK button or press the DATA dial when a confirmation pop-up message appears.
During erasure, a progress status pop-up appears. When erasure completes, the pop-up disappears.
CAUTION
When you erase a scene, every take in that scene is also • erased.
You cannot edit scene names. •
Take operations
Loading takes
1 Press the PROJECT key on the front panel to open the PROJECT screen.
2 Press the “®” button for the project that contains the take that you want to load.
3 Press the “®” button for the scene that contains the take that you want to load.
4 Select the take that you want to load.
5 Touch the MENU button to open a pop-up menu.
6 Press the LOAD button in the pop-up menu.
NOTE
Or, press the “®” button next to the take that you want to load.
7 Touch the OK button or press the DATA dial when a confirmation pop-up message appears
When loading completes, the Home Screen opens.
Erasing takes
1 Press the PROJECT key on the front panel to open the PROJECT screen.
2 Press the “®” button for the project that contains the take that you want to erase.
3 Press the “®” button for the scene that contains the take that you want to load.
5 – Projects

38 TASCAM HS-P82
4 Select the take that you want to erase. Touch the MULTI SELECT button to enable the selection of multiple scenes.
5 Touch the MENU button to open a pop-up menu.
6 Touch the DELETE button in the pop-up menu.
7 Touch the OK button or press the DATA dial when a confirmation pop-up message appears.
During erasure, a progress status pop-up appears. When erasure completes, the pop-up disappears.
Adding and removing “@” to take namesSelect a take and touch the “CIRCLE @ TAKE” button to add or remove “@” to the take name.
TIP
You can use this to mark the good takes, for example.
CAUTION
You cannot edit take names.
5 – Projects

TASCAM HS-P82 39
6 – Internal Settings and Operations
In this chapter, we explain the unit’s internal settings in detail.
Menu screen
Press the MENU key on the front panel to open the following MENU screen.
• REC SETUP button
Use to make recording settings.
• PLAY SETUP button
Set the unit to play only one take or play every take.
• SYNC T/C button
Makes settings related to synchronization and time code.
• MIXER SETUP button
Make settings related to the mixer.
• CHANNEL SETUP button
Make settings for each channel.
• METER SETUP button
Make level meter settings.
• SYSTEM SETUP button
Make system settings.
• CF/USB MANAGE button
Manage CF cards and USB operations.
• VERSION INFO button
Show the system version.
Recording settings (REC SETUP)
The REC SETUP screen has three tabbed pages: REC TRACKS, FILE FORMAT and OPTIONS. Touch the tabs at the bottom of the screen to open the corresponding page.
REC TRACKS page Turn the record function ON and OFF for each track.
Touch the record function buttons below the level meters to turn the record function ON for the tracks that are to be recorded and OFF for the tracks that are not to be recorded. When the record function is ON, the button background appears red.
(Default setting status: all buttons OFF.)
FILE FORMAT page Use this to make file format settings.
File Mode
Set the mode for recording files.
MONO (default value): Each track is handled as a monaural file.
POLY: Multiple tracks are handled as a single combined file.
Bit Length
Set the quantization bit rate for recording files.
Setting buttons: 16bit, 24bit (default value)
Max File Size
Set the maximum size for recording files.
Setting buttons: 640MB, 1GB, 2GB (default value)
Pause Mode
Set whether or not to divide files when a recording is paused.
Setting buttons: SPLIT (default value), NO SPLIT
OPTIONS page Make settings related to the pre-recording and auto markers.

40 TASCAM HS-P82
PreREC Time
Set the pre-recording time and ON/OFF settings. Turn this function ON/OFF and set the time in seconds. (Default setting: OFF)
To set the recording time, touch the knob. You can adjust the value using the DATA dial. The range of setting values is 1–5 seconds. (Default value: 2 seconds)
Auto Marker
Make settings related to auto markers.
Audio Over: Use this to add markers when the set audio level is detected. Turn this function ON or OFF. (Default setting: OFF.)
To set the audio detection level in decibels, touch the knob. You can adjust the value using the DATA dial. The range of setting values is –0.2 dB to –0.03 dB. (Default value: –0.2 dB)
Settings made here are reflected in the “Over Level” setting on the METER SETUP screen.
Time Interval: Use this to add marks at fixed time intervals. Turn this function ON or OFF and set the time interval. (Default setting: OFF)
To set the time, touch the knob. You can adjust the value using the DATA dial. The range of setting values is 1–10 minutes.
(Default value: 5 minutes)
Sync Unlock: Use this to add a mark when synchronization with the master clock is lost. Turn this function ON or OFF. (Default setting: OFF)
Playback settings (PLAY SETUP)
Play Mode
Set how the playback of takes is handled.
One Take: Only the currently selected take is played back.
All Take: All the takes in the currently loaded project are played back.
(Default setting: One Take)
Sync and time code settings (SYNC T/C)
Use the SYNC T/C screen to make synchronization and time code settings. This screen has four pages: CLOCK, TIME-CODE, SETUP and I/O. Touch the tabs at the bottom of the
screen to open the corresponding page.
CLOCK page View various clock status information and select the clock used for synchronization.
Select the master clock to use from the MASTER item options.
INT (default value): Use this unit’s internal clock.
WORD: Synchronize with the word clock input through the CASCADE/WORD/VIDEO IN connector.
VIDEO: Synchronize with the video clock input through the CASCADE/WORD/VIDEO IN connector.
AES (1-2, 3-4, 5-6, 7-8): Synchronize with the clock of the AES/EBU digital signal input through the DIGITAL I/O connector.
You cannot select an input as the master clock if the sampling rate converter is ON for that input.
NOTE
A check mark appears on the button of the currently active • master clock.
If synchronization from an external clock is interrupted, • the unit’s internal clock becomes active. In this case, a check mark appears on the INT button to show that it has become the active clock, and an “x” appears on the button of the external clock that had been selected.
NOTE
The statuses of the digital input signals (AESx-x IN) are shown in the STATUS item as follows.
When locked "Locked (xx.xxxkHz)"
When sampling frequency conversion is ON "Locked (xx.xxxkHz FsCnv)"
When unlocked "Unlocked (xx.xxxkHz)"
When there is no signal
6 – Internal Settings and Operations
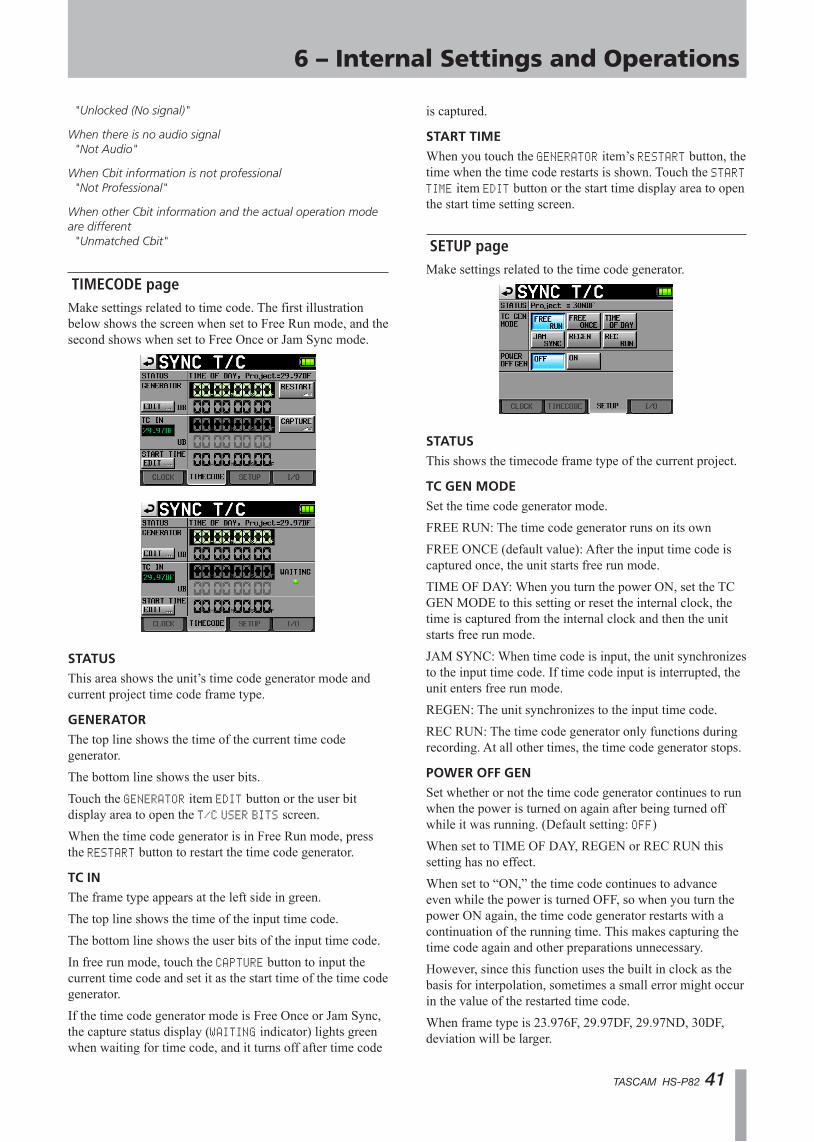
TASCAM HS-P82 41
"Unlocked (No signal)"
When there is no audio signal "Not Audio"
When Cbit information is not professional "Not Professional"
When other Cbit information and the actual operation mode are different "Unmatched Cbit"
TIMECODE page Make settings related to time code. The first illustration below shows the screen when set to Free Run mode, and the second shows when set to Free Once or Jam Sync mode.
STATUS
This area shows the unit’s time code generator mode and current project time code frame type.
GENERATOR
The top line shows the time of the current time code generator.
The bottom line shows the user bits.
Touch the GENERATOR item EDIT button or the user bit display area to open the T/C USER BITS screen.
When the time code generator is in Free Run mode, press the RESTART button to restart the time code generator.
TC IN
The frame type appears at the left side in green.
The top line shows the time of the input time code.
The bottom line shows the user bits of the input time code.
In free run mode, touch the CAPTURE button to input the current time code and set it as the start time of the time code generator.
If the time code generator mode is Free Once or Jam Sync, the capture status display (WAITING indicator) lights green when waiting for time code, and it turns off after time code
is captured.
START TIME
When you touch the GENERATOR item’s RESTART button, the time when the time code restarts is shown. Touch the START TIME item EDIT button or the start time display area to open the start time setting screen.
SETUP page Make settings related to the time code generator.
STATUS
This shows the timecode frame type of the current project.
TC GEN MODE
Set the time code generator mode.
FREE RUN: The time code generator runs on its own
FREE ONCE (default value): After the input time code is captured once, the unit starts free run mode.
TIME OF DAY: When you turn the power ON, set the TC GEN MODE to this setting or reset the internal clock, the time is captured from the internal clock and then the unit starts free run mode.
JAM SYNC: When time code is input, the unit synchronizes to the input time code. If time code input is interrupted, the unit enters free run mode.
REGEN: The unit synchronizes to the input time code.
REC RUN: The time code generator only functions during recording. At all other times, the time code generator stops.
POWER OFF GEN
Set whether or not the time code generator continues to run when the power is turned on again after being turned off while it was running. (Default setting: OFF)
When set to TIME OF DAY, REGEN or REC RUN this setting has no effect.
When set to “ON,” the time code continues to advance even while the power is turned OFF, so when you turn the power ON again, the time code generator restarts with a continuation of the running time. This makes capturing the time code again and other preparations unnecessary.
However, since this function uses the built in clock as the basis for interpolation, sometimes a small error might occur in the value of the restarted time code.
When frame type is 23.976F, 29.97DF, 29.97ND, 30DF, deviation will be larger.
6 – Internal Settings and Operations

42 TASCAM HS-P82
POWER ON POWER OFF POWER ONT/C GEN MODE POWER OFF GEN
OFFFREE RUN- -:- - 07:00 08:00 - -:- - 07:00 08:00 09:00
START TIME07:00:00 - -:- - 07:00 08:00 09:00 10:00 11:00 12:00ON
Time 10:00 11:00 12:00 13:00 14:00 15:00 16:00
Master Timecode 10:00 11:00 12:00 13:00 14:00 15:00 16:00
OFFFREE ONCE
- -:- - 11:00 12:00 - -:- - 00:00 15:00 16:00
- -:- - 11:00 12:00 13:00 14:00 15:00 16:00ON
POWER ON POWER OFF POWER ONT/C GEN MODE POWER OFF GEN
OFFFREE RUN07:00 08:00 09:00 10:00 07:00 08:00 09:00
START TIME07:00:00 07:00 08:00 09:00 10:00 11:00 12:00 13:00ON
Time 10:00 11:00 12:00 13:00 14:00 15:00 16:00
Master Timecode 10:00 11:00 10:00 11:00 - -:- - 10:00 11:00
OFFFREE ONCE
10:00 11:00 12:00 13:00 00:00 10:00 11:00
10:00 11:00 12:00 13:00 14:00 15:00 16:00ON
OFFJAM SYNC
10:00 11:00 10:00 11:00 00:00 10:00 11:00
10:00 11:00 10:00 11:00 12:00 10:00 11:00ON
OFFJAM SYNC
- -:- - 11:00 12:00 - -:- - 00:00 15:00 16:00
- -:- - 11:00 12:00 13:00 14:00 15:00 16:00ON
CAPTURECAPTURE
CAPTURECAPTURE
CAPTURE CAPTURE
CAPTURECAPTURE
Case 1: Master timecode is continuing
Case 2: Master timecode is not continuing
“CAPTURE” means the unit recognizes the incoming timecode.
I/O page Set the output sources for BNC OUT1 and BNC OUT2.
STATUS
This shows the status of synchronization signals.
BNC OUT1
Set the signal output through the TIME CODE/DIGITAL (OUT 1) connector.
Setting buttons: TIME CODE, AES3id 2MIX (default value)
BNC OUT2
Set the signal output through the CASCADE/WORD (OUT 2) connector.
Setting buttons: WORD OUT(default value), WORD THRU
Editing output time code user bitsOn the TIMECODE page, touch the GENERATOR item EDIT button or the user bits display area to open the T/C USER BITS screen.
Enter the eight digits of data in hexadecimal (base 16) format.
If you begin input without selecting a digit, input will occur in order from the smallest place.
Touch a digit to select it for input. When selected the digit’s background color becomes yellow. Use the number buttons or the DATA dial to enter two digits (two byte) at a time.
Touch the ENTER button to confirm the value.
Touch the CLEAR button to reset all digits to 0.
TIP
Use this for the date, for example. •
You can use a PS/2 keyboard to set these values. Press the • ESC key to reset all the digits to 0.
Edit the START TIMEOn the TIMECODE page, touch the START TIME item EDIT button or the start time display area to open the setting screen where you can set the time code generator start time.
Use the FRAME EDIT button on the START TIME screen to determine whether or not to input the frame value. The first screen below shows the screen with frame edit ON, and the second one shows it OFF
6 – Internal Settings and Operations

TASCAM HS-P82 43
Use the number buttons to input the start time for the time code generator.
If you begin input without selecting a digit, input will occur in order from the smallest place.
Touch a digit to select it for input. When selected, the digit’s background color becomes yellow. Use the number buttons for the DATA dial to enter two digits at a time.
Touch the ENTER button to confirm.
Touch the CLEAR button to reset the values to 0.
TIP
You can use a PS/2 keyboard to set these values. Press the ESC key to reset all the digits to 0.
Mixer settings (MIXER SETUP)
Make mixer settings on this screen.
The MIXER SETUP screen has 3 pages: INPUT, SIGNAL PROCESSING and SETUP. Touch the tabs at the bottom of the screen to open the corresponding page.
INPUT page Make input settings on this page.
INPUT SOURCE
Set the input source for each channel (A1–A8: analog inputs, D1–D8: digital inputs). (Default settings: A1–A8)
PHANTOM POWER +48V
Turn the phantom power for each input ON or OFF. (Default settings: all OFF)
Fs CONVERT
Turn the sampling rate converter ON or OFF for each pair of inputs. (Default settings: all OFF)
NOTE
You cannot turn Fs CONVERT ON for the digital input selected for the master clock.
Press a channel button on the top line to open the corresponding CHx SETUP screen.
SIGNAL PROCESSING page Turn phase inversion, low-cut filters and limiters ON and OFF on this page.
PHASE (ø buttons)
Touch these buttons to turn phase inversion ON or OFF (The phase is fixed at 180º). (Default settings: all OFF)
Low Cut Filter
Touch these to turn the low-cut filter ON or OFF. Touch the LowCut Filter button to open the LOW CUT FILTER setting screen. (Default settings: all OFF)
LIMITER
Turn the limiter ON and OFF. (Default settings: all OFF)
Press a channel button on the top line to open the corresponding CHx SETUP screen.
LOW CUT FILTER (button)Touch the LowCut Filter...” button on the SIGNAL PRO-CESSING page of the MIXER SETUP screen to open the LOW CUT FILTER screen.
ON/OFF
Turn the low-cut filter ON or OFF. (Default settings: all OFF)
FREQ
Touch the knob for the cutoff frequency that you want to adjust. Use the DATA dial to adjust it. The setting values are 40Hz, 80Hz (defaule) and 120Hz.
6 – Internal Settings and Operations

44 TASCAM HS-P82
SLOPE
Set the filter slope. (Default setting: all –12dB)
Press a channel button on the top line to open the corresponding CHx SETUP screen.
SETUP page Access the channel name editing screen and turn channel links ON and OFF on this page.
CH NAME
Touch these buttons to edit the name of the corresponding channel.
CH Link
Touch these buttons to turn channel links ON and OFF. (Default settings: all OFF)
The following parameters are shared by link channels.
2MIX volume
SOLO
LOW CUT FILTER
LIMITER
REC FUNCTION
INPUT SOURCE (analog/digital selection)
Phantom power ON/OFF
The signals sent from linked channels to the 2MIX bus are affected by the balance setting. (Left channels are sent only to the L bus and right channels are sent to the R bus.)
When channels are linked, if one of the channel inputs overloads, the limiter is applied to both channels. However, the blue appearance of the track number when limiting is activated is not affected by the link, so only the channel with the overloading input appears blue.
Press a channel button on the top line to open the corresponding CHx SETUP screen.
CHx NAME (button)Edit the name of the selected channel on this screen.
Use the Shift and Caps buttons to change the available character types.
Follow the same procedures to enter names as in “Editing the project name” on page 33. A maximum of 4 characters are allowed in channel names.
Limitation on the number of characters On the CH NAME screen (PROJECT NAME screen, SCENE NAME screen, and CHx NAME screen), the maximum number of characters allowed is indicated by the yellow background. Characters on the grey background are discarded when you touch the Enter button.
Channel settings (CHANNEL SETUP)
Make settings for each channel.
Select the channel using the tabs at the bottom of the screen.
PHANTOM +48V button: Turn phantom power ON or OFF. (Default setting: OFF)
Fs CONVERT button: Turn the sampling rate converter ON or OFF. (Default setting: OFF)
Ax/Dx (numbered by channel) button: select the input source. (Default setting: A1–A8)
ø button: Turn phase inversion ON or OFF. (Default setting: OFF)
Low Cut Filter button: Turn the low-cut filter ON or OFF. (Default setting: OFF)
Low Cut Filter knob: Touch the knob to adjust the low-cut filter cutoff frequency. Use the DATA dial to adjust it. (Ssettings: 40Hz, 80Hz (default) and 120Hz).
–12dB/–18dB buttons: Set the low-cut filter slope. (Default setting: –12dB)
LIMITER button: Turn the limiter ON or OFF. (Default setting: OFF)
REC button: Turn the record function ON or OFF. When ON, the button background and the level meter channel name become red. (Default value: off)
6 – Internal Settings and Operations

TASCAM HS-P82 45
Level knob: Touch the knob to adjust the level sent to the stereo bus. When its background color turns yellow, use the DATA dial to adjust it. Setting values range from “–∞” dB – +10 dB. (Default setting: 0dB)
Pan pot knob: Touch the knob to adjust the stereo position of the signal sent to the stereo bus. When its background color turns yellow, use the DATA dial to adjust it. Setting values range from L100 to R100 with C as the center value. (Default setting: C)
Level meter: During playback, the meter shows the playback level. For tracks that have the record function ON and are not playing back, the meter shows the input signal level.
The area at the bottom of the level meter shows the track name (4 characters or less) and acts as a record function indicator. If the MIC/LINE selection switch for the current channel is set to MIC 0 or MIC –25, the name area momentarily shows the gain value when you turn the input trim knob. If the input source is set to a digital and there is no signal on the corresponding digital input or the input signal differs from the unit setting, the channel meter display appears gray and the following messages appear.
If there is no corresponding input, • AESx-x NO SIGNAL.
If the input signal differs from the settings made in the • unit, AESx-x UNLOCK.
If the Cbit information of the input signal is no audio, • AESx-x NOT AUDIO.
If the Cbit information of the input signal is non • professional, AESx-x NOT PRO.
If other Cbit information of the input signal differs • from actual operation mode, AESx-x Cbit ERROR.
Channel name button: Touch this button at the lower right of the screen to edit the name of the channel.
˙ or ¥ button: Touch this button to open the setting screen of the next channel.
When channels are linked, the screen appears as follows.
The channel setup screen for the stereo (L/R) channel has fewer options and appears as follows.
Level meter settings (METER SETUP)
Make level meter settings on this screen.
Peak Hold Time knob: Touch this to set the peak hold time. Use the DATA dial to adjust the time. The setting values are 0 sec, 1 sec, 2 sec and inf (hold forever). (Default value: 1 sec)
Release Time knob: Touch this to set the release time. Use the DATA dial to adjust the time. The setting values are Slow, Normal and Fast. (Default setting: Normal)
Over Level knob: Touch this to set the level at which the overload indicator lights (the amount in dB below the maximum level). Use the DATA dial to adjust the level. The setting value range is –0.20 dB (default value), –0.17 dB, –0.13 dB, –0.10 dB, –0.06 dB, or –0.03 dB.
These settings are reflected in the Audio Over setting of the Auto Marker item on the OPTIONS page of the REC SETUP screen.
Ref. Level Line button: Touch to turn the reference level line ON or OFF. (Default setting: ON)
NOTEIf you press the EXIT/CANCEL [PEAK CLEAR] key when the Home Screen is open, the peak hold display resets.
6 – Internal Settings and Operations
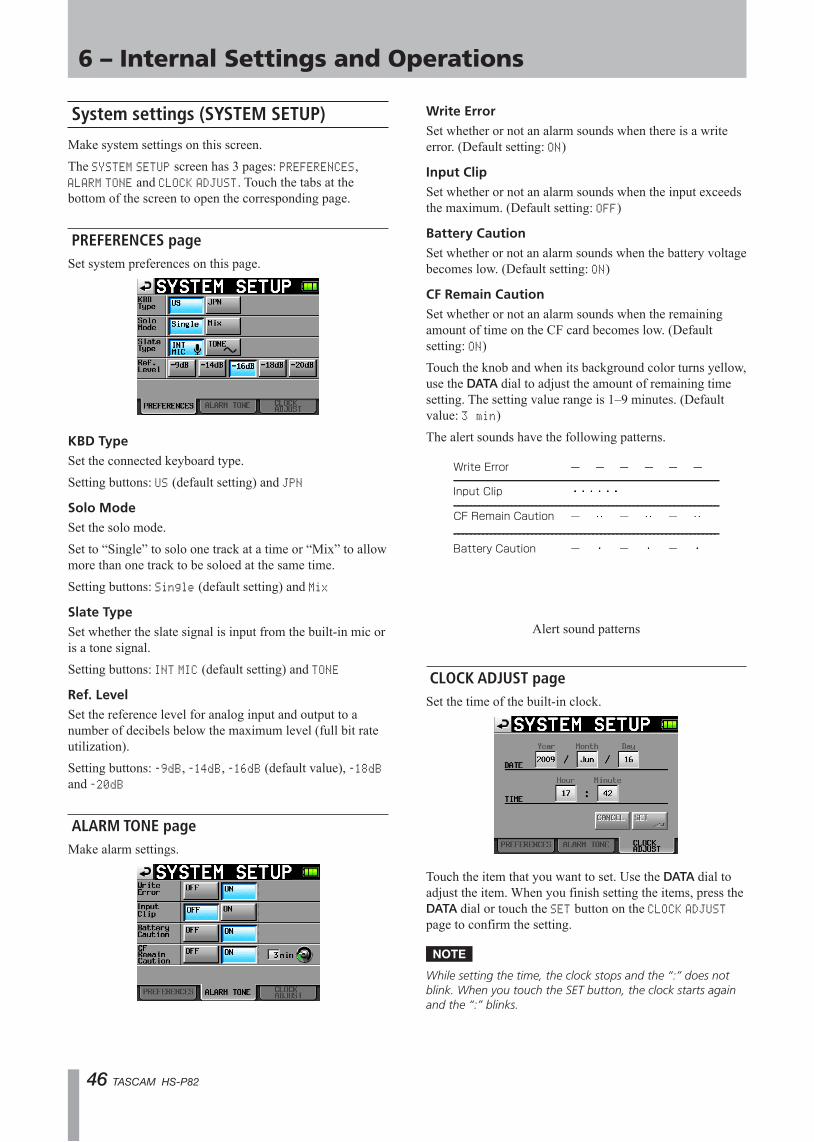
46 TASCAM HS-P82
System settings (SYSTEM SETUP)
Make system settings on this screen.
The SYSTEM SETUP screen has 3 pages: PREFERENCES, ALARM TONE and CLOCK ADJUST. Touch the tabs at the bottom of the screen to open the corresponding page.
PREFERENCES page Set system preferences on this page.
KBD Type
Set the connected keyboard type.
Setting buttons: US (default setting) and JPN
Solo Mode
Set the solo mode.
Set to “Single” to solo one track at a time or “Mix” to allow more than one track to be soloed at the same time.
Setting buttons: Single (default setting) and Mix
Slate Type
Set whether the slate signal is input from the built-in mic or is a tone signal.
Setting buttons: INT MIC (default setting) and TONE
Ref. Level
Set the reference level for analog input and output to a number of decibels below the maximum level (full bit rate utilization).
Setting buttons: –9dB, –14dB, –16dB (default value), –18dB and –20dB
ALARM TONE page Make alarm settings.
Write Error
Set whether or not an alarm sounds when there is a write error. (Default setting: ON)
Input Clip
Set whether or not an alarm sounds when the input exceeds the maximum. (Default setting: OFF)
Battery Caution
Set whether or not an alarm sounds when the battery voltage becomes low. (Default setting: ON)
CF Remain Caution
Set whether or not an alarm sounds when the remaining amount of time on the CF card becomes low. (Default setting: ON)
Touch the knob and when its background color turns yellow, use the DATA dial to adjust the amount of remaining time setting. The setting value range is 1–9 minutes. (Default value: 3 min)
The alert sounds have the following patterns.
Write Error
Input Clip
CF Remain Caution
Battery Caution
Alert sound patterns
CLOCK ADJUST page Set the time of the built-in clock.
Touch the item that you want to set. Use the DATA dial to adjust the item. When you finish setting the items, press the DATA dial or touch the SET button on the CLOCK ADJUST page to confirm the setting.
NOTE
While setting the time, the clock stops and the “:” does not blink. When you touch the SET button, the clock starts again and the “:” blinks.
6 – Internal Settings and Operations

TASCAM HS-P82 47
Managing CF cards and the USB connection (CF/USB MANAGE)
Use this screen to manage CF cards and USB connections.
CURRENT MEDIA
This shows the currently selected card.
CF SELECT
Touch this to open the CF SELECT screen where you can choose the CF card for recording and playback.
FORMAT
Format the CF media using either QUICK or FULL format options.
QUICK: This only formats file management information.
FULL: This formats the entire disc.
NOTE
CF cards with capacities of 2 GB or less that have been formatted by this unit might be seen by computers as having no open capacity, preventing files and folders from being written.
USB
Connect the unit with a computer. (See “Connecting with a computer” on page 51.)
Version display (VERSION INFO)
Show the unit’s SYSTEM version.
Touch the bottom center of the screen to show the version of the internal device data.
6 – Internal Settings and Operations

48 TASCAM HS-P82
7 – Mark and Locate Functions
Mark functions
Adding marksOne file (take) can have a maximum of 99 marks, including automatically-created marks.
Use the following two methods to create marks.
Push the • MARK key on the front panel.
Use the auto marker function (see OPTION page on page • 39.)
Depending on the auto marker function, marks are automatically added when a certain audio level is exceeded, at regular time intervals and when synchronization errors occur.
Marks are named according to how they were made.
MARK key: MARK XX
Audio level: OVER XX
At time interval: TIME XX
When a synchronization error occurs: UNLK XX
The following automatic marks cannot be turned ON or OFF.
Recording start point: REC xx
Recording end point: END xx
Pre-recordings start point: PRE xx
Using keys to locate to marks Press the Ô [Â] or [ ]̄ key while pressing and holding the SHIFT key to locate to the previous or next mark.
Mark list screen Touch the Mark List button on the Home Screen to open the MARK LIST screen.
NAME button: Touch to reorder the marks by name descending or ascending.
TIME button: Touch to reorder the marks by time descending or ascending.
Mark name and mark time buttons: Touch to select the mark.
Locate buttons (“ ”): Touch one of these to locate to the corresponding mark.
LIST INFO button: Touch this to see a list of the number of marks by type in the currently selected take.
RENUMBER button: Renumber the marks. Reorder marks by time ascending, and change the numbers at the ends of the mark names to reflect that order.
DELETE button: When a mark is selected, touch the DE-LETE button to erase that mark.
Edit button: When a mark is selected, touch the Edit button to edit that mark.
Scroll buttons: Use these buttons to scroll to the beginning or end of the list or scroll one page (five lines) forward or backward. You can also scroll through the list one line at a time using the DATA dial.
Locating to marks
Touch the “ ” button to locate to that mark.
Viewing mark informationTouch the LIST INFO button on the MARK LIST screen to open the mark list information screen that shows a list of the number of marks by type in the currently loaded take.
Touch the LIST INFO button again to return to the MARK LIST screen.
NOTE
After recording, the MARK LIST screen might show a TOTAL number of marks that is 2 or 3 greater than the sum of the

TASCAM HS-P82 49
MANUAL MARK, TIME, OVER and UNLK marks. This is because the total includes REC, END and PRE (when using prerecording) marks that are always created during recording.
Erasing marks
1 Select the mark that you want to erase on the MARK LIST screen or type of mark that you want to erase on the MARK LIST information screen.
MARK LIST screen
MARK LIST information screen
2 Touch the DELETE button.
3 When a confirmation pop-up message appears, press the OK button or the DATA dial to erase the mark or marks.
Editing marks
1 Select the mark that you want to edit on the MARK LIST screen.
2 Touch the Edit button to open the MARK EDIT screen. Touch the FRAME EDIT button to set whether or not the frame value can be edited. The first screen below shows this option ON, and the second shows it OFF.
3 Touch a number button to edit a mark. Use the DATA dial to change the time for the selected number.
Press the ENTER button to confirm the setting and return to the MARK LIST screen.
Touch the CLEAR button to reset the input values.
TIP
You can use a PS/2 keyboard to set these values. Press the Enter key to confirm and press the ESC key to reset all the digits to 0.
7 – Mark and Locate Functions

50 TASCAM HS-P82
Manual locate function
You can directly input a time and locate to it. Touch the Manual Locate button on the Home Screen to open the MANUAL LOCATE screen. Touch the FRAME EDIT button to set whether or not the frame value can be edited. The first screen below shows this option ON, and the second shows it OFF.
There are three locate modes.
ABS: Input an actual time and locate to it.
+: Input an amount of time to go forward from the current time and locate to the new time.
–: Input an amount of time to go back from the current time and locate to the new time.
Input the time using the number buttons. You can also select a number field and use the DATA dial to adjust the time.
Press the LOCATE button to locate to the new time and return to the Home Screen.
Touch the CLEAR button to reset the input values.
TIP
You can use a PS/2 keyboard to set these values. Press the Enter key to confirm and press the ESC key to reset all the digits to 0.
7 – Mark and Locate Functions

TASCAM HS-P82 51
8 – Transferring Data between the Unit and a Computer
By connecting this unit with a computer by USB, you can transfer data and check the composition of folders and files. Be aware, however, if you change or erase a file inside a project, or change any names, the HS-P82 might not be able to play that project.
Precautions when copying files to a ªcomputer
Please be aware of the following when copying files from a CF card formatted for the HS-P82 to a computer.
If you plan to play a project correctly on an HS-P82 • again at a later date, copy the entire project folder and do not change any part of it. If you change the composition of the folder or copy only the WAV files, the unit might not be able to play the project with the correct number of tracks or track numbers, for example.
Precautions when copying files from a ªcomputer
Please be aware of the following when copying files to a CF card formatted for the HS-P82 from a computer.
To play a copied file, execute the REBUILD option on • the project selection page of the PROJECT screen.
The HS-P82 can only play back linear PCM WAV files • that have sampling frequencies of 44.1, 48, 88.2, 96, 176.4 or 192 kHz and bit rates of 16 or 24 bits. It cannot play any other type of file. The HS-P82 cannot recognize files in formats other than WAV. The unit will ignore other types files.
Files with different sampling frequencies cannot be used • in the same project. Only add files to an existing project that have the same sampling frequency as the project. Files that have sampling frequencies that are different from the project setting cannot be played.
File and folder names that use Japanese and other • multi-byte characters cannot be displayed correctly.
Do not copy files larger than 2 GB to a CF card formatted • for the HS-P82. Doing so could cause operation of the unit to become unstable and other files on the CF card to be damaged.
In this chapter, references to a “computer” mean a personal computer running a Windows or Macintosh operating system that is compatible with this unit. See the following section.
NOTE
Connect this unit with a computer to transmit audio data • recorded on it to the computer.
CF cards with capacities of 2 GB or less that have been • formatted by this unit might be seen by computers as having no open capacity, preventing files and folders from being written.
Operating system requirements
This unit can be connected with computers running the following operating systems.
Windows
Windows XP, Windows Vista or Windows 7
Mac OS X
Mac OS X 10.2 or later
When this unit is connected to a computer, it will be recognized as a removable disk. Special drivers are not necessary.
NOTE
Transmission of data between this unit and a computer is conducted at USB 2.0 speed (maximum). Use of a USB 2.0 compatible cable is necessary to achieve this speed.
Connecting with a computer
By connecting this unit with a computer by USB, you can transfer audio data recorded by the unit to the computer
Use the USB port on this unit to connect it to a computer.
1 Connect this unit and the computer by a USB cable.
Computer
USB
2 Touch the CF/USB MANAGE button on the MENU screen to open the CF/USB MANAGE screen.
3 Touch the CONNECT button next to the USB item. The following pop-up message appears.

52 TASCAM HS-P82
4 Touch the OK button to start the connection with the computer. The following screen appears while the unit is connected to a computer.
CAUTION
This unit receives power from batteries or an AC adaptor. It • cannot be powered by USB.
Do not connect the unit to a computer by USB when the • battery level is low. If the power is disrupted during data transfer, data could be lost and that data might not be recoverable.
Disconnecting from a computerUse the following procedures to disconnect from a computer. Always follow these procedures carefully because failure to do so could result in damage to some files.
CAUTION
Do not interrupt the USB connection or disconnect the USB cable during data transfer. Doing so could damage data on the computer or this unit.
1 Close connections from the computer. The HS-P82 has two CF card slots. Use the following procedures to close the connections for each card.
Disconnecting from Windows XP, Windows Vista or Windows 7
Right-click the CF card device (the E drive in the illustration) that you want to eject using Windows Explorer and select eject.
NOTE
If you click the Safely Remove Hardware icon in the system tray (usually at the bottom right of the screen) and eject the hardware, both CF cards in the HS-P82 slots are ejected. To reconnect with the computer, disconnect and reconnect the USB cable once.
Disconnecting from a Macintosh
Drag the HS-P82 icon for this device to the trash, select it and type Command + E or select “Eject” from the File menu to eject a card.
NOTE
Depending on the OS version and settings, you can also eject the card by clicking the eject icon next to the HS-P82 drive shown in the Finder window or by control-clicking the icon and selecting “Eject” from the contextual menu.
At this point, it is safe to remove CF cards from the unit. You can also insert a different CF card and continue recording.
2 Close the connection from this unit.
To close the connection with the computer from this unit, touch the CANCEL button. The following message appears in a pop-up window.
8 – Transferring Data between the Unit and a Computer

TASCAM HS-P82 53
Touch the OK button in the pop-up window to close the connection with the computer and return to the CF/USB MANAGE screen. Touch the CANCEL button to return to the USB mode pop up window.
3 Disconnect the USB cable.
Folder structure
The folder structure is as shown below. You can check the structure of folders and files by connecting the HS-P82 to a computer. Be aware, however, if you change or erase a file inside a project, or change any names, the HS-P82 might not be able to play that project.
ROOT
Project01
Project02
Scene001 (Example of Poly)
Scene001-T001.wav
Scene001-T002_ST.wavScene001-T002.wav
Scene002 (Example of Mono)
Scene002-T001
::
Scene002-T001_1.wavScene002-T001_2.wavScene002-T001_3.wavScene002-T001_4.wavScene002-T001_5.wavScene002-T001_6.wavScene002-T001_7.wavScene002-T001_8.wav
Scene002-T002
Scene002-T001_ST.wavScene002-T002_ST.wav
Scene002-T002_1.wavScene002-T002_2.wavScene002-T002_3.wavScene002-T002_4.wavScene002-T002_5.wavScene002-T002_6.wavScene002-T002_7.wavScene002-T002_8.wav
::
Scene001-T001_ST.wav
NOTE
Poly files are created directly in the scene folder.
Mono files are created inside folders that are made for each take inside the scene folder.
File names
The format used in naming files is as follows.
1-8 track poly files
[Scene name]-[take name prefix][take number].wav
1-8 track mono files
[Scene name]-[take name prefix][take number][track number].wav
2mix files
[Scene name]-[take name prefix][take number]_ST.wav
8 – Transferring Data between the Unit and a Computer

54 TASCAM HS-P82
9 – Troubleshooting
If the operation of this unit becomes irregular, please check the following things before requesting repair. If the following measures do not resolve the problem, contact the store where you purchased the device or a TEAC Repair Center
Power does not turn on. ªConfirm that the plug is fully inserted in the power outlet • when you use the supplied AC adaptor.
Confirm that the cable is fully inserted in the unit when • you use the V-Mount external battery adaptor.
Confirm that the battery has enough remaining power.•
Media is not recognized. ªConfirm that the CF card is securely inserted into the CF • slot.
Playback is not possible. ªConfirm that the file is of a compatible sampling • frequency (44.1/48/48pull-down/48pull-up/88.2/96/176.4/192 kHz) and bit rate (16/24).
There is no sound. ªReconfirm the connections of your monitoring system • and check the level of your amplifier.
Recording is not possible. ªReconfirm connections.• Adjust the recording levels.•
Setting changes that I made are not ªremembered.
This unit backs up settings each time they are changed. • However, backup might fail if the power is turned off too soon after making a setting change. Do not turn the power off immediately after changing a setting.
I hear noise. ªConfirm that all cable connections are secure.•
The touch panel does not work properly. ªDo not use commercially-available protective film for • LCD screens on the touch panel.
Confirm that the panel lock function is not engaged and • locking the display.
I cannot create a new project. ªConfirm that a project with the same name does not • already exist.
If the amount of space remaining on the CF card is too • small, a new project cannot be created. Erase unnecessary data and then try again.

TASCAM HS-P82 55
10 – Messages
The following is a list of messages shown in pop-up windows by this unit. The HS-P82 displays pop-up windows according to conditions. Refer to this list to learn more about each message as well as how to respond to them.
Message Details and responses Remarks
--- error ---
INFO WRITINGAn error occurred while writing information.
--- FORMAT ---
Completed.Format has completed.
--- FULL FORMAT ---
FORMAT CFn?
This will erase all data on card
Really Continue?
Full format will be executed. n = 1 or 2
--- FULL FORMAT ---
Formatting CFn...Full format is occurring. n = 1 or 2
--- QUICK FORMAT ---
FORMAT CFn?
This will erase all data on card
Really Continue?
Quick format will be executed. n = 1 or 2
--- QUICK FORMAT ---
Formatting CFn...Quick format is occurring. n = 1 or 2
--- RETAKE ---
Delete last take?
""tttttttttt""
A retake will be executed. tttttttt = the name of the take to be deleted
--- Shutdown ---
working...The unit is shutting down.
--- USB Mode ---
Touch OK To Disable USBUSB mode will be disabled.
--- USB Mode ---
Touch OK To Enable USBUSB mode will be enabled.
--- USB Mode ---
USB Mode Enabled.
Touch CLOSE To end
USB mode is enabled.
AC Adapter Power Lost,
Switched to NAC power has been lost, so a different power source (N) has been activated.
N = "EXTERNAL DC" or "INTERNAL BATTERY"
AESn-n Input: Fs convert On
Cannot select as Master clock.The sampling rate converter is ON for the digital input that you tried to set as the clock master.
n-n = 1-2, 3-4, 5-6, 7-8
Cannot Change Now
Currently **ingThis item cannot be changed during playback or recording.
** = "Play" or "Record"
Cannot Copy
Not enough space on CFnThere is not enough available space on the copy destination card.
n = 1 or 2
Cannot Copy.
Scene already exists on CFn.
Overwrite Scene?
A scene with the same name already exists at the copy destination. Do you want to overwrite that scene?
n = 1 or 2
Cannot create more than
100 projects.The maximum number of projects has already been reached, so a new project cannot be created.
Cannot create new mark point..
Mark point already exists
at the same timestamp.
You tried to create a mark at a time where a mark already exists. You cannot create a mark at the same time as another mark.
Cannot create new project.
Media Full.The card does not have enough space, so you cannot create a new project.
Cannot increment Take.
Interval is too short.The interval is not long enough to allow the unit to increment the take.
Cannot make more than
1000 scenes.The maximum number of scenes has already been reached, so a new scene cannot be created.
Cannot make new scene.
Medial Full.The card does not have enough space, so you cannot create a new scene.
Cannot Power Off Now
Currently **ingYou cannot turn the power OFF during playback or while recording.
** = "Play," "Record" or“Work”
Cannot RECORD.
(Internal state error)Something is preventing recording.
Cannot RECORD.
Media Full.The CF card does not have enough space, so you cannot record.
Cannot RECORD.
Take limit reached.
Please change to another Scene
Since the maximum number of recordable takes or the take number has been reached, recording is not possible. Change the scene.

56 TASCAM HS-P82
Message Details and responses Remarks
Cannot Retake.
No Recent Take History.You cannot retake.
Cannot set Mark point.
Mark limit reached.You cannot create more than 99 marks.
Cannot turn Fs convert On.
AESn-n Input is already
Master Clock.
You tried to turn the sampling rate converter on for the digital input that is selected as the master clock.
n-n = 1-2, 3-4, 5-6, 7-8
CFn DEVICE ERROR The CF card cannot be recognized. n = 1 or 2
CFn Format failed An error occurred during formatting, and formatting could not be completed.
n = 1 or 2
CFn has no projects.
Please create a project.The CF card does not have even one project.
CFn is not available. There is no CF card. n = 1 or 2
CFn is not usable You cannot copy. n = 1 or 2
CFn MEDIUM ERROR The unit failed to read the card. n = 1 or 2
CFn not recommended format
for Recording/Playing.The media was not formatted by this unit, so proper recording and playback cannot be guaranteed.
n = 1 or 2This appears when the card is formatted with a cluster size that is smaller than the standard of this unit.
CFn not recommended
for Recording/Playing.
(not UltraDMA)
This card does not meet the specifications required by the system, so using it for recording/playback is not recommended.
n = 1 or 2
CFn Read Error An error occurred when reading the card. n = 1 or 2
CFn unrecognized format
Please Format this card.This card has been formatted in a format other than FAT. Format it for use with this unit.
n = 1 or 2
CFn unsupported type This card does not meet the specifications required by the system, so it cannot be used.
n = 1 or 2
CFn Write Error An error occurred when writing to the card. n = 1 or 2
CFn(vvvvvvvv)
NUM OF PROJECTS : p
USED SIZE : u
FREE SIZE : f
TOTAL SIZE : t
This shows information about the CF card n = 1 or 2vvvvvvvv = volume levelp: project number, u: capacity usedf: unused capacity, t: total capacity of CF card
Completed The operation has completed.
Copy N selected scene
to CFn?Confirm that you want to copy the selected scene(s).
N = number of selected scenesn = 1 or 2
Copying scene... The scene is being copied.
Create new project?
""pppppppp""
""ssssssss""
Fs:**kHz, Frame Type:**F
Confirm that you want to create a new project.
pppppppp = name of project to be createdssssssss = name of first scene to be created
Create Project failed The creation of the project failed.
Creating Project... The project is being created.
Delete all marks
of this type?
(Count:N)
Confirm the deletion of marks of the selected type.
N = number of marks of selected mark type
Delete N selected marks? Confirm the deletion of the selected marks. N = number of marks
Delete N selected project? Confirm the deletion of the selected projects. N = number selected
Delete N selected scene? Confirm the deletion of the selected scenes. N = number selected
Delete N selected take? Confirm the deletion of the selected takes. N = number selected
Deleting Project... The project is being deleted.
Deleting Scene... The scene is being deleted.
Deleting Take... The take is being deleted.
10 – Messages

TASCAM HS-P82 57
Message Details and responses Remarks
Digital Input Error
AES1-2 (Unlocked)
AES3-4 (no signal)
AES5-6 (not audio)
AES7-8 (unmatched Cbit)
An error occurred with the digital input selected for the input signal.
• Unlocked: not synchronized with system
• no signal: no signal is being input
• not audio: Cbit information of input signal is not audio
• not professional: Cbit information of input signal is consumer
• unmatched Cbit: other Cbit information of input signal is different from actual operation mode
External Clock Lost,
Switched to InternalSynchronization with an external clock was disrupted, so the internal clock was activated.
External Clock Regained
Switch to External?Synchronization with an external clock became possible again.
EXTERNAL DC Power Lost,
Switched to INTERNAL BATTERYExternal DC power was lost, so the internal battery was activated.
EXTERNAL DC power
now available,
Switch to EXTERNAL DC?
While operating using the internal battery, external DC power became available.
EXTERNAL DC Voltage too low,
Switched to INTERNAL BATTERYThe voltage of the external DC battery became low, so the internal battery was actived.
Input Volume Locked
Input Volume
is locked
The input volume control has been locked to prevent misoperation.
INTERNAL BATTERY Power Lost,
Switched to EXTERNAL DCThe internal battery was removed, so the external DC power source was activated.
INTERNAL BATTERY Voltage too low,Switched to EXTERNAL DC
The voltage of the internal battery became low, so the external DC power source was activated.
Last loaded project has
no scenes.
Please make new scene.
The most recently loaded project does not have any scenes. Create a new scene.
Last loaded project
cannot be found.
Please select a project.
The last selected project cannot be found. Select a different project.
Last loaded scene
cannot be found.
Please select a scene.
The last selected scene cannot be found. Select a scene.
Load selected project?
""pppppppp""Confirm that you want to load the selected project.
pppppppp = name of project to load
Load selected Scene?
""ssssssss""Confirm that you want to load the selected scene.
ssssssss = name of scene to load
Load selected Take?
""tttttttt""Confirm that you want to load the selected take.
tttttttt = name of take to load
Loading Project... The project is loading.
Loading Scene... The scene is loading.
Loading Take... The take is loading.
Lost all power.
Shutdown automatically
in 20 seconds.
All power sources have been lost. The unit will automatically shut down in 20 seconds.
Make new scene?
""ssssssss""Confirm that you want you want to make a new scene.
ssssssss = scene name
Make Scene failed Creation of the scene failed.
Making Scene... The scene is being created.
Mark Point set The mark has been created.
New Scene Name must not
start with ""@""The scene name is not allowed. A scene name must not start with the "@" mark.
No Call Point The call point does not exist.
10 – Messages

58 TASCAM HS-P82
Message Details and responses Remarks
No Mark Point The mark point does not exist. You tried to skip marks before the Mark point was accorded. This disappears automatically after 2 seconds.
No Tracks Armed for Record The record function is not ON for any tracks.
Operation failed. The operation could not be completed for some reason.
Operation failed.
Internal File / Folder
limit reached.
The maximum number of files and folders that can be created has been reached, so the operation could not be completed.
Operation failed.
Cannot find this ***.
Please Rebuild.
The selected project/scene/take could not be found, so the operation could not be completed. Rebuild the selected item.
*** = project, scene or take
Operation failed.
Internal File / Folder
limit reached.
The maximum number of files or folders has been reached, so you cannot create a new folder.
Operation failed.
Path Name is too long.The path name has more characters than allowed, so the operation could not be completed.
This message appears when making a scene or recording results in a file path name of more than 255 characters. This can occur if you give projects and scenes long names using a computer.
Play Error. An error occurred during playback.
Play Error
Buffer underrunDuring playback, the unit failed to read the data in time.
Power Off ?
Touch OK to confirmConfirm that you want to turn the power OFF.
pppppppp
SCENES : n
Fs : f
TIMECODE : t
This shows project information pppppppp = project namen: number of scenesf: sampling frequencyt: type of timecode frame
Project Delete failed. Deletion of the project failed.
Project Load failed. Loading of the project failed.
Project Rename failed Changing the name of the project failed.
Project save failed. An error occurred while saving the project, and saving failed. Use the CLOSE button to close the pop-up window.The FAT file system might be broken.Format the CF card or use a different one.Formatting will erase all data on the card.
Reading Media... The media is being read.
Reading Data... Data is being read.
Rebuild all Projects? Confirm that you want to rebuild all projects.
Rebuild current Project? Confirm that you want to rebuild the current project.
Rebuild current Scene? Confirm that you want to rebuild the current scene.
Rebuild failed Rebuilding failed.
Rebuild selected Project? Confirm that you want to rebuild the selected project.
Rebuild selected Scene? Confirm that you want to rebuild the selected scene.
Rebuilding All... All projects are being rebuilt.
Rebuilding project... The project is being rebuilt.
Rebuilding scene... The scene is being rebuilt.
RECORD Error An error occurred during recording.
RECORD Error
Buffer overflowThe buffer became full during recording, and writing to the card was too late.
RECORD stopped.
Media Full.The CF card ran out of space, so recording stopped
10 – Messages

TASCAM HS-P82 59
Message Details and responses Remarks
Renaming Project
""pppppp""
to ""nnnnnn""
The project is being renamed. pppppp = old project namennnnnn = new project name
Renumber marks? Confirm that you want to remember the marks
Scene Copy failed Copying failed.
Scene Delete failed. Deletion of the scene failed.
Scene Load failed. Loading of the scene failed.
Screen Locked
Touch Panel Locked OutThe touch panel has been locked to prevent misoperation.
Screen Locked
LCD Section LockedThe LCD section has been locked to prevent misoperation.
Selected take is in
another project.
Load that project
and selected Take?
The selected take belongs to a different project.
ssssssss
TAKES : n
Fs : f
TOTAL SIZE : u
TOTAL TIME : t
Scene information display ssssssss = scene namen: number of takesf: sampling frequencyu: space used t: total time of all takes
Starting USB USB mode is being enabled.
Switched to AC Adapter. The AC power source is now being used.
Take Delete failed. Deletion of the take failed.
Take Load failed. Loading of the take failed.
There is no project.
Please create a project.There is no project so the recording cannot be made. Please make a project.
There is no scene
Please make a scene.There is no scene so the recording cannot be made. Please make a scene.
This name already exists. A project, scene or take that has the same name already exists.
Transport Locked
Transport Keys
are locked
The transport keys have been locked to prevent misoperation.
tttttttt
date
fs/bit/FileMode/NumOfTracks
SIZE: u
LENGTH: *h**m**s**
Take information display tttttttt = take namedate: year/month/day hour: minutes fs: sampling frequencybit: bit rateFileMode: MONO or POLYNumOfTracks: number of tracksu: space used
Writing System File... Recording information is being written when recording has stopped.
10 – Messages

60 TASCAM HS-P82
11 – Specifications
General
Recording media
CF card (CompactFlash card)
File system
FAT32
File format
BWF (Monophonic, Polyphonic)
Number of channels
8 channels (44.1/48/88.2/96 kHz)
8 channels + stereo mix (44.1/48 kHz)
4 channels (176.4/192 kHz)
Quantization bit rate
16 bit/24 bit
Sampling frequency
44.1/47.952/48/48.048/88.2/96/176.4/192 kHz (47.952/48.048: 48 kHz ± 0.1% pull-up/pull-down)
Reference clock
Internal, Word in, Video in, Digital in (CH 1-2, CH 3-4, CH 5-6, CH 7-8)
Timecode frame rate
23.976, 24, 25, 29.97 DF, 29.97 NDF, 30 DF, 30 NDF
Built-in mic
Omnidirectional, monaural
Limiter
Attach time: 3 msec
Release time: 300 msec
Threshold: -5 dBFS
Ratio: 32:1
Low cut filter
Cut off frequency: 40/80/120 Hz
Slope: –12 dB/OCT. –18dB/OCT
Input and output
Analog audio input and output
MIC IN/LINE IN connectors (1-8)
Connector: XLR-3-31 (1: GND, 2: HOT, 3: COLD)
When • LINE is selected:
Input impedance: 10 kΩ
Nominal input level (Ref. level: –9 dB): + 6 dBu (1.55 Vrms)
Nominal input level (Ref. level: Other than –9 dB): + 4 dBu (1.23 Vrms)
Maximum input level: +15 dBu (4.36 Vrms), +18 dBu (6.16 Vrms), +20 dBu (7.75 Vrms), + 22 dBu (9.76 Vrms), +24 dBu (12.28 Vrms) [Selection]
When • MIC –25 is selected:
Input impedance: 2.4 kΩ
Minimum input level: –45 dBu (4.36 Vrms)
Maximum iput level: +11 dBu (2.75 Vrms)
When • MIC 0 is selected:
Input impedance: 2.4 kΩ
Minimum input level: –70 dBu (0.25 mVrms)
Maximum iput level: –14 dBu (0.15 Vrms)
LINE OUT connectors (L/R)
Connector: XLR-3-32 (1: GND, 2: HOT, 3: COLD)
Output impedance: 100Ω or less
Nominal output level (Ref. level: –9 dB): + 6 dBu (1.55 Vrms)
Nominal output level (Ref. level: Other than –9 dB): + 4 dBu (1.23 Vrms)
Maximum output level: +15 dBu (4.36 Vrms), +18 dBu (6.16 Vrms), +20 dBu (7.75 Vrms), + 22 dBu (9.76 Vrms), +24 dBu (12.28 Vrms) [Selection]
PHONES connector
Connector: 6.3 mm (1/4”) stereo standard jack
Maximum output level: 100 mW + 100 mW or more (THD+N 1% or less, into 32 Ω)
Digital audio input and output
DIGITAL I/O connector
Connector: D-Sub 25 pin connector
Format: AES3-2003/IEC60958-4 (AES/EBU)
Minimum input voltage: 200 mVp-p
Maximum input voltage: 7 Vp-p
Output voltage: 3.5 Vp-p
DIGITAL OUT connectors
Connector: BNC connector
Format: AES3-2003/AES-3id-2001 (AES/EBU)
Output volatage: 1 Vp-p/75Ω
Control inputs and outputs
EXT DC IN connector
Connector: XLR4-32 connector (1: –, 2: NC, 3: NC, 4: +)
Input voltage: 11-16 V (2A)
CASCADE/WORD/VIDEO IN connector
Connector: BNC connector
Input voltage: 5 V TTL equivalent
Input impedance: 75Ω ±10%

TASCAM HS-P82 61
Allowable frequency deviation of external synch: ±100 ppm
CASCADE/WORD OUT connector
Connector: BNC connector
Output voltage: 5 V TTL equivalent
Output impedance: 75Ω ±10%
Sampling frequency: 44.1/47.952/48/48.048/88.2/96/ 176.4/192 kHz (47.952/48.048: 48 kHz ± 0.1% pull-up/pull-down)
TIME CODE IN connector
Connector: BNC connector
Input voltage: 0.5 - 5 Vp-p
Input impedance: 10 kΩ
TIME CODE OUT connector
Connector: BNC connector
Output voltage: 2.0 Vp-p
Output impedance: 600Ω
USB port
Port: USB B-type 4-pin Format: USB2.0 HIGH SPEED (480 MHz)
KEYBOARD connector
Connector: mini-DIN connector (PS/2)
Audio performance
Frequency response
INPUT (MIC/LINE) → LINE OUT:
20 Hz - 20 kHz 0 dB (±0.5 dB) Fs = ALLat 40 kHz –1 dB (±1.0 dB) Fs = 88.2/96 kHzat 80 kHz –3 dB (+1/–2 dB) Fs = 176.4/192 kHz
Distortion
INPUT (LINE) → LINE OUT: 0.003% or less (Reference level: When –20 dB, +23 dBu input, 1 kHz, AES-17 LPF)
INPUT (MIC –25) → LINE OUT: 0.02% or less (Reference level: When –20 dB, –10 dBu input, Trim +20 dB 1 kHz, AES-17 LPF)
INPUT (MIC 0) → LINE OUT: 0.02% or less (Reference level: When –20 dB, –35 dBu input, Trim +20 dB 1 kHz, AES-17 LPF)
S/N ratio
INPUT (LINE) → LINE OUT: 110 dB or more (22 kHz LPF A-weighted)
INPUT (MIC –25) → LINE OUT: 100 dB or more (22 kHz LPF A-weighted)
INPUT (MIC 0) → LINE OUT: 100 dB or more (22 kHz LPF A-weighted)
Computer compatibility
See the TASCAM web site (www.tascam.com) for the most recent information about OS compatibility.
Windows
Pentium 300 MHz or faster
128 MB or more memory
USB port (USB 2.0)
Macintosh
Power PC G3, G4, Intel Mac 266 MHz or faster
64 MB or more memory
USB port (USB 2.0)
Recommended USB host controller
Intel chipset
Supported OS
Windows XP, Windows Vista, Windows 7
Macintosh Mac OS X 10.2 or later
Other specifications
Power
AC 100-240 V, 50-60 Hz (AC adaptor PS-1225L)
10 AA batteries (Alkaline or NiMH)
External DC battery (DC 11-16 V, 2A or more)
Battery operation time (continuous operation)
NP type battery (Li-Ion: 14.8 V/4.6 Ah (68 W))
About 5 hours (JEITA playback time)
About 5 hours (JEITA recording time)
AA type battery (NiMH)
About 2 hours (JEITA playback time)
About 2 hours (JEITA recording time)
(48 kHz, 24-bit, 8 ch, with phantom power OFF. Varies with operating conditions.)
Power consumption: 18 W
Dimensions (W x H x D)
270 x 99.7 x 260 mm (excluding protrusions)
Weight: 3.65 kg (not including batteries)
Operating temperature range: 0–40ºC
11 – Specifications
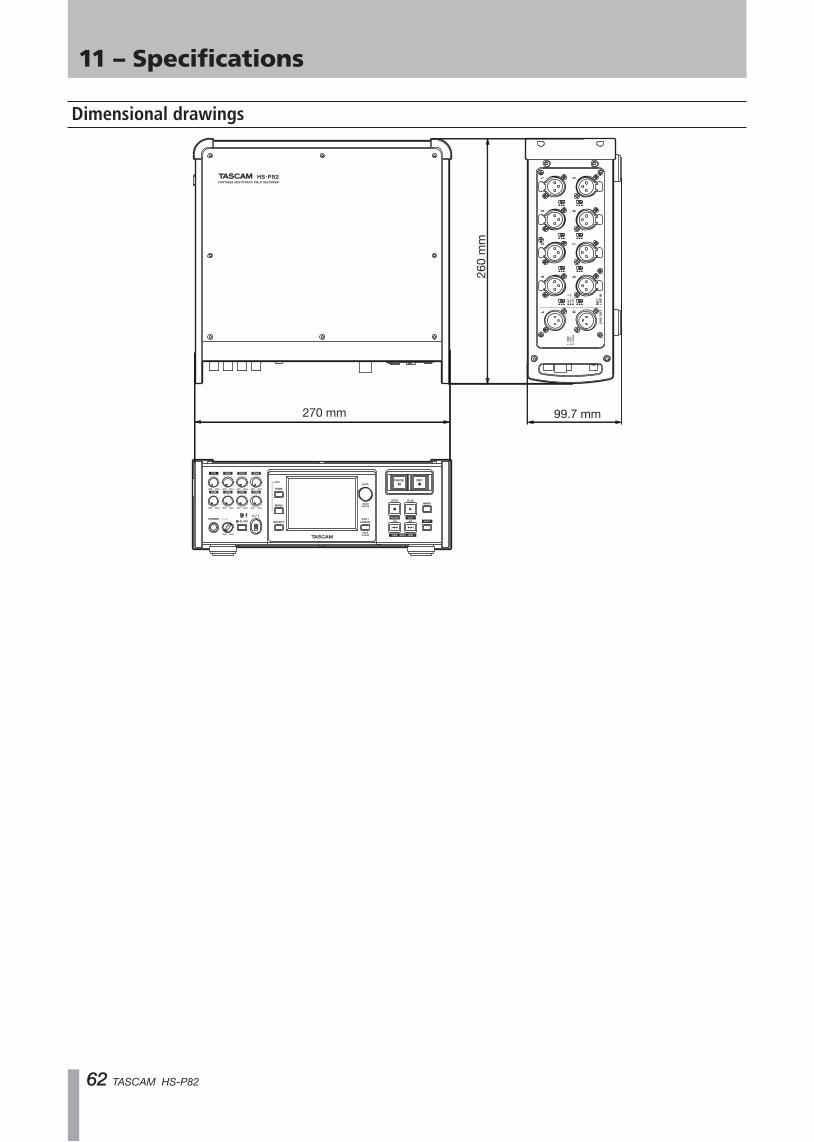
62 TASCAM HS-P82
Dimensional drawings
270 mm 99.7 mm
260
mm
11 – Specifications

TASCAM HS-P82 63
Blcok diagram
Inpu
t/s
late2m
ixre
cfu
nc
Inpu
t/s
late
rec
/pla
y
rec
/pla
y
Ster
eo o
ut(A
ES
/EB
U)
Met
er
A/D
limite
r
Met
er
MIC
/MIC
(-25
dB)/L
INE
48v
trim
Ana
log
inpu
t 1 to
8
Dig
ital i
nput
1 to
8
XLR
D-s
ub 2
5 pi
n
Anal
og o
utpu
t
Dig
ital o
utpu
t
ch 1
to 8
Pla
y Tr
acks
D/A
D/A
- -
L R
Phon
es
alar
m to
ne
D/A
D/A
D-s
ub
25 p
in
XLR
Trac
k8
CF
Car
d
Trac
k 1
Trac
k 2
Trac
k 3
Trac
k 4
Trac
k 5
Trac
k 6
Trac
k 7
Trac
k 8
Trac
k1
solo
Solo
bus
sSt
ereo
bus
sV
olum
eP
an
Pho
nes
leve
l
Mas
ter L
evel
-
SR
C
A/D
Inte
rnal
Mic
.(fo
r Sla
te)
Test
Ton
e(1
k S
ine)
Ste
reoT
rack
BNC
Ste
reoT
rack
Clip
LCF
audi
o IF
CF
Car
d
limite
r
Clip
Clip
Rec
ord
Trac
ks
Cha
nnel
1
solo
Vol
ume
solo
Vol
ume
solo
Vol
ume
solo
Vol
ume
solo
Volu
me
Met
er
solo
Vol
ume
Met
er
solo
Vol
ume
Pan
Pan
Pan
Pan
Pan
Pan
Pan
Cha
nnel
8
Trac
k2
Trac
k3
Trac
k4
Trac
k5
Trac
k6
Trac
k7
audi
o IF
audi
o IF
slat
e so
urce
sele
ct
limite
r on
LCF
onP
hant
om o
n
inpu
t/sla
tere
c/pl
ay
Inpu
t/s
late
solo
rec/
play
/sla
te
limite
r on
rec
/pla
yM
eter
Inpu
t/s
late
rec/
play
Met
er
Inpu
t/s
late
rec/
play
Met
er
Inpu
t/s
late
rec/
play
Met
er
Inpu
t/s
late
rec/
play
Met
er
solo
solo
solo
solo
solo
solo
solo
solo
Rec
func
.
Rec
func
.
Rec
func
.
Rec
func
.
Rec
func
.
Rec
func
.
Rec
func
.
Rec
func
.
2mix
rec
func
.
rec/
slat
e
11 – Specifications

HS-P82
TEAC CORPORATION www.tascam.jpPhone: +81-42-356-91431-47 Ochiai, Tama-shi, Tokyo 206-8530, Japan TEAC AMERICA, INC. www.tascam.comPhone: +1-323-726-0303 7733 Telegraph Road, Montebello, California 90640 USA TEAC CANADA LTD. www.tascam.comPhone: +1905-890-8008 Facsimile: +1905-890-9888 5939 Wallace Street, Mississauga, Ontario L4Z 1Z8, Canada TEAC MEXICO, S.A. de C.V. www.teacmexico.netPhone: +52-55-5010-6000Río Churubusco 364, Colonia Del Carmen, Delegación Coyoacán, CP 04100, México DF, México TEAC UK LIMITED www.tascam.co.ukPhone: +44-8451-302511 Suites 19 & 20, Building 6, Croxley Green Business Park, Hatters Lane, Watford, Hertfordshire, WD18 8TE, UK TEAC EUROPE GmbH www.tascam.dePhone: +49-611-71580 Bahnstrasse 12, 65205 Wiesbaden-Erbenheim, Germany
Printed in China