Embed Size (px)
Citation preview

HOWTO: How to configure VPN SSL roadwarrior to gateway
‘How-to’ guides for configuring VPNs with GateDefender Integra Panda Security wants to ensure you get the most out of GateDefender Integra. For this reason, we offer you all the information you need about the characteristics and configuration of the product. Refer to http://www.pandasecurity.com/ and http://www.pandasecurity.com/enterprise/support/ for more information.
‘How-to’ guides for Panda GateDefender Integra The software described in this document is delivered under the terms and conditions of the end user license agreement and can only be used after accepting the terms and conditions of said agreement.
The anti-spam technology in this product is provided by Mailshell. The web filtering technology in this product is provided by Cobion.
Copyright notice © Panda 2007. All rights reserved. Neither the documents nor the programs that you may access may be copied, reproduced, translated or transferred to any electronic or readable media without prior written permission from Panda, c/ Buenos Aires, 12 48001 Bilbao (Biscay) Spain.
Registered Trademarks Panda Security™. TruPrevent: Registered in U.S.A Patent and Trademark Office. Windows Vista and the Windows logo are trademarks or registered trademarks of Microsoft Corporation in the United States and other countries. All other product names may be registered trademarks of their respective owners. D. L. BI-1915-07 © Panda 2007. All rights reserved.

INDEX
HOW TO CONFIGURE VPN SSL ROADWARRIOR-TO-GATEWAY ................................................. 3 1.1 SCENARIO SETUP ............................................................................................................................... 3 1.2 SERVER SIDE CONFIGURATION (PANDA GATEDEFENDER INTEGRA)....................................................... 5
1.2.1 IP addresses................................................................................................................................ 5 1.2.2 Certificates ................................................................................................................................. 6 1.2.3 SSL VPN server .......................................................................................................................... 9
1.3 CLIENT SIDE CONFIGURATION .......................................................................................................... 11 1.3.1 MS Windows 2000/XP .............................................................................................................. 11 1.3.2 Linux (Debian 3.1 Sarge distribution)...................................................................................... 14
1.4 ESTABLISHING A VPN CONNECTION ................................................................................................. 15 1.5 FURTHER CONSIDERATIONS.............................................................................................................. 16 1.6 CONFIGURATION CHECKING.............................................................................................................. 17
Symbols and styles used in this documentation Symbols used in this documentation:
Note. Clarification and additional information. Important. Highlights the importance of a concept. Tip. Ideas to help you get the most from your program. Reference. Other references with more information of interest. Fonts and styles used in the documentation:
Bold: Names of menus, options, buttons, windows or dialog boxes. Codes style: Names of files, extensions, folders, command line information or configuration files, for example, scripts. Italics: Names of options related with the operating system and programs or files with their own name.
Panda GateDefender Integra Page 2 of 18

How to configure VPN SSL roadwarrior-to-gateway
How to configure VPN SSL roadwarrior-to-gateway (Secure Socket Layer) Security protocol to safeguard access to information circulating through Internet protocols (HTTP, SMTP, FTP, etc.) symmetrically encrypting the data. Access to this data is only possible with the correct key.
Panda GateDefender Integra includes a VPN system to create your own virtual private networks, widening the reach of your network and ensuring confidential connections.
The purpose of this guide is to describe the steps to create a SSL virtual private network (VPN) with Panda GateDefender Integra, using real data.
Note: It is taken for granted that the Panda GateDefender Integra appliance is already configured, at least basically, and working. For further information about how to install and configure Panda GateDefender Integra, refer to the Installation Guide.
Important: Panda GateDefender Integra must be working in Router mode. Otherwise, you will not be able to use the VPN system.
1.1 Scenario setup The illustration below shows a typical roadwarrior-to-gateway SSL VPN scenario:
Figure 3.1: SSL roadwarrior-to-gateway VPN
Panda GateDefender Integra Page 3 of 18

Roadwarrior has an address dynamically assigned by the ISP and will access Integra’s LAN, by means of a secure tunnel using the SSL protocol. The figure shows that the eth0 interface has been assigned a public IP. In the most common configurations, Integra’s eth0/WAN interface will usually have a private IP address and will be one of the devices with the NAT option enabled located between Integra and the ISP connection (for example ADSL router/modem, cable modem, etc.), which will have a public IP (dynamic or static). This approach has been used to simplify the document and focus on the VPN configuration. For more information, refer to the How-to guides available about SNAT and DNAT configurations and port mapping. The server will listen on UDP port 1194 for an incoming roadwarrior connection request. Clients on Integra’s LAN side must have configured Integra’s LAN IP 192.168.10.1 as a gateway to the SSL address group 10.11.12.0/24 (as an implicit route or default gateway) to make them accessible for the roadwarriors. Look at the section below on how-to configure routes on the roadwarrior side. Index
Panda GateDefender Integra Page 4 of 18

1.2 Server side configuration (Panda Gatedefender Integra)
1.2.1 IP addresses
The first step when configuring SSL VPN consists of:
• Defining the SSL address group that will be used immediately after the initial connection to the SSL VPN server external local IP address 62.14.249.65, in order to create peer VPN IP addresses on both ends of the VPN tunnel.
• Defining the group of IP addresses that correspond to the SSL local subnet, the one which you want your roadwarrior be able to connect to.
To define SSL address group, follow the steps described below:
1. Access the Definitions section of the main Panda GateDefender Integra console menu. 2. Select IP addresses. 3. In the Groups section, click on Add.
A descriptive name of the group must be provided (ssl address group will be used for this how-to) to the Name field and IP range (10.11.12.0/24 will be used in this how-to) in the IP/Mask radio button section.
4. Click on Add IP.
Finally, click on Add to save the changes.
IMPORTANT: Remember that the SSL address group range should be a private range which is currently unused on both local networks (the server and the roadwarrior ones). What’s more, for design reasons, it must be higher than /29.
In order to define the SSL local subnet, follow the steps described below:
1. Access the Definitions section of the main Panda GateDefender Integra console menu. 2. Select IP addresses. 3. In the Groups section, click on Add.
A descriptive name of the group must be provided (ssl local address is used for this how-to) the Name field and IP range (192.168.10.0/24 will be used in this how-to) in the IP/Mask radio button section.
4. Click on Add IP.
Finally, click on Add to save the changes. The settings will be configured as shown in figure 3.2:
Panda GateDefender Integra Page 5 of 18

Figure 3.2
1.2.2 Certificates
Certificates are required for authentication purposes. You need to import the public certificate of CA which signed the roadwarrior certificates. It is also necessary to import the Integra VPN gateway local certificate that will be used to authenticate the Integra VPN server itself.
In order to import the CA certificates, follow the procedure below:
1. Go to the VPN section of the main Panda GateDefender Integra console menu. 2. Select Digital certificate management. 3. In the CA certificates section, click on Import.
• Enter the Certificate name (ca will be used in this how-to) • Click on Browse… to select the certificate you want to import. • Click on Import once you have chosen a CA certificate that you wish to import.
Panda GateDefender Integra Page 6 of 18
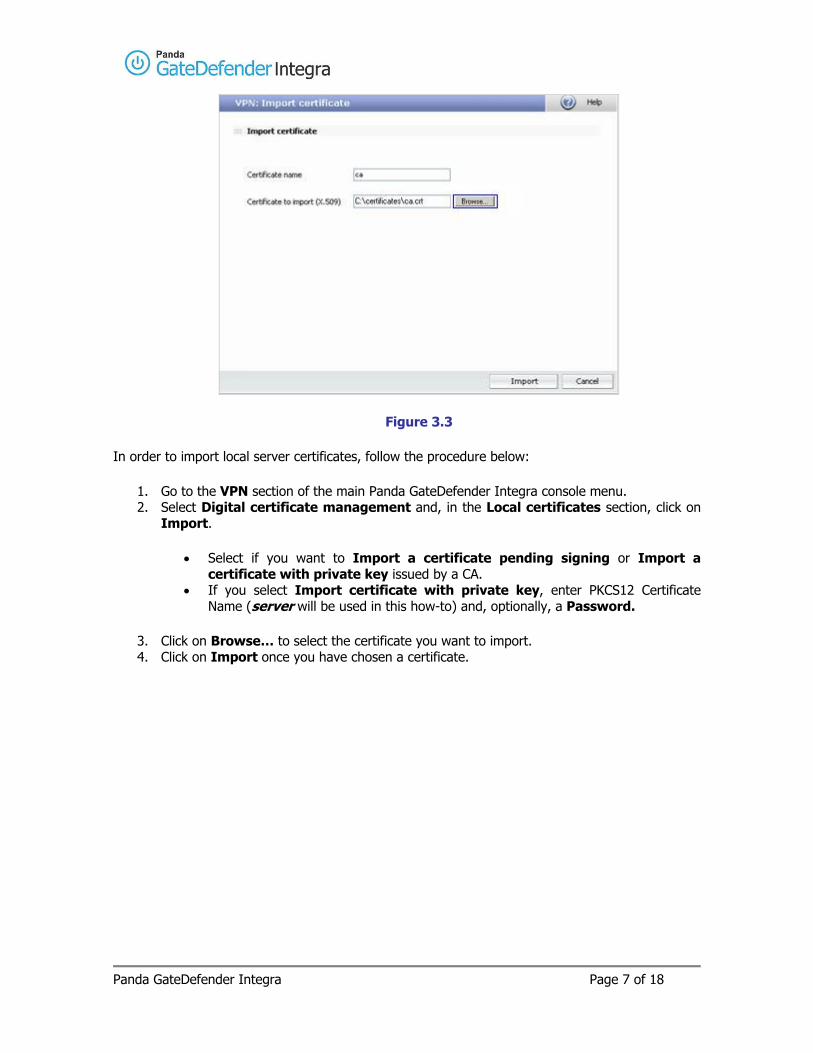
Figure 3.3
In order to import local server certificates, follow the procedure below:
1. Go to the VPN section of the main Panda GateDefender Integra console menu. 2. Select Digital certificate management and, in the Local certificates section, click on
Import.
• Select if you want to Import a certificate pending signing or Import a certificate with private key issued by a CA.
• If you select Import certificate with private key, enter PKCS12 Certificate Name (server will be used in this how-to) and, optionally, a Password.
3. Click on Browse… to select the certificate you want to import. 4. Click on Import once you have chosen a certificate.
Panda GateDefender Integra Page 7 of 18

Figure 3.4
Once the CA and server certificates have been imported successfully, the corresponding configuration screen displayed is similar to that shown in figure 3.5
Figure 3.5
Note that if you select Import certificate with private key, it allows you to import only local certificates that conform with the PKCS12 format (file has p12 or pfx extension).
Panda GateDefender Integra Page 8 of 18

1.2.3 SSL VPN server
Finally, the steps below describe how to configure a SSL VPN using previously defined elements.
1. Go to the Panda GateDefender Integra administration console. 2. Click on VPN in the panel on the left. 3. Then, select VPN management. 4. Click on SSL VPN management and select the Remote users tab. 5. Click on Add to define the new VPN.
There you will find the parameters required to configure a VPN in Panda GateDefender Integra using the SSL protocol (as shown in figure 3.6):
o Name: enter a descriptive name for the VPN (VPN ssl RW will be used for this how-to).
o Server port: enter the connection server port (1194 will be used for this how-to). o Protocol: Choose between the TCP and UDP protocols (UDP will be used in this
how-to). o Local certificate of the server: Use the drop-down menu to select the name of
the certificate you want (server will be used for this how-to). o Users: Select the type of user you want:
1. User CA certificate: The roadwarrior identified with a certificate must
present the CA signature. Use the drop-down menu to select the CA certificate you want (ca will be used for this how-to).
2. Local Users: List of the Common Names of the X.509 certificates with which the users will identify themselves. These common names can be obtained from the CN field of the client.crt certificate. This field is optional. (none will be used for this how-to).
3. Radius server: Select the RADIUS server to be used by Panda GateDefender Integra to authenticate users.
o Address groups: Enter the range of IP addresses (network and subnet mask) from which the IP will be assigned to roadwarriors. (ssl address group will be used for this how-to which is 10.11.12.0/24. In fact, subnet /30 will be used given the limitations of the tun/tap virtual devices).
o External local IP: Enter the external IP address of the SSL VPN server (62.14.249.65 will be used in this how-to).
o Local subnets: Subnet addresses that will be sent to the roadwarriors so they can enter it in their own routing tables. (ssl local subnet will be used for this how-to which is 192.168.10.0/24).
You also have the option to include the DNS and WINS servers IP addresses. By clicking on the icon associated with the DNS and WINS options, you can change the text field for a drop-down menu and choose the value to assign to each option. Click on OK to save the changes.
Panda GateDefender Integra Page 9 of 18

Figure 3.6
Index
Panda GateDefender Integra Page 10 of 18

1.3 Client side configuration
1.3.1 MS Windows 2000/XP OpenVPN implementation of SSL/TLS protocol will be used on a roadwarrior side. Installation files can be found at this location: http://www.openvpn.se/ OpenVPN as well OpenVPN GUI are an open-source project and are licensed under the GPL. Once you install OpenVPN apart from the binaries and configuration files, the virtual tun/tap adapter will also be installed. It should check its presence in the network settings.
The steps below describe how to configure an SSL roadwarrior using OpenVPN.
The following certificates must be placed in the folder C:\Program files\OpenVPN\config (or the path that you choose during installation):
1- client1.crt --> client certificate (signed public key). 2-client1.key --> client key (secret private key that should not leave your roadwarrior computer). 3-ca.crt --> CA certificate (certificate from CA that signed server certificate; in this how-to will be the same for the server and roadwarrior).
Copy the file client.ovpn from C:\Program files\OpenVPN\sample-config directory and make the necessary changes to have the content as follows: ############################################## # Sample client-side OpenVPN 2.0 config file # # for connecting to multi-client server. # # # # This configuration can be used by multiple # # clients, however each client should have # # its own cert and key files. # # # # On Windows, you might want to rename this # # file so it has a .ovpn extension # ############################################## # Specify that we are a client and that we # will be pulling certain config file directives # from the server. client # Use the same setting as you are using on # the server. # On most systems, the VPN will not function # unless you partially or fully disable # the firewall for the TUN/TAP interface. ;dev tap dev tun # Windows needs the TAP-Win32 adapter name
Panda GateDefender Integra Page 11 of 18

# from the Network Connections panel # if you have more than one. On XP SP2, # you may need to disable the firewall # for the TAP adapter. ;dev-node MyTap # Are we connecting to a TCP or # UDP server? Use the same setting as # on the server. ;proto tcp proto udp # The hostname/IP and port of the server. # You can have multiple remote entries # to load balance between the servers. remote 62.14.249.65 1194 ;remote my-server-2 1194 # Choose a random host from the remote # list for load-balancing. Otherwise # try hosts in the order specified. ;remote-random # Keep trying indefinitely to resolve the # host name of the OpenVPN server. Very useful # on machines which are not permanently connected # to the internet such as laptops. resolv-retry infinite # Most clients don't need to bind to # a specific local port number. nobind # Downgrade privileges after initialization (non-Windows only) ;user nobody ;group nobody # Try to preserve some state across restarts. persist-key persist-tun # If you are connecting through an # HTTP proxy to reach the actual OpenVPN # server, put the proxy server/IP and # port number here. See the man page # if your proxy server requires # authentication. ;http-proxy-retry # retry on connection failures ;http-proxy [proxy server] [proxy port #] # Wireless networks often produce a lot # of duplicate packets. Set this flag # to silence duplicate packet warnings. ;mute-replay-warnings # SSL/TLS parms. # See the server config file for more # description. It's best to use # a separate .crt/.key file pair # for each client. A single ca # file can be used for all clients. ca ca.crt cert client1.crt
Panda GateDefender Integra Page 12 of 18

key client1.key # Verify server certificate by checking # that the certicate has the nsCertType # field set to "server". This is an # important precaution to protect against # a potential attack discussed here: # http://openvpn.net/howto.html#mitm # # To use this feature, you will need to generate # your server certificates with the nsCertType # field set to "server". The build-key-server # script in the easy-rsa folder will do this. ;ns-cert-type server # If a tls-auth key is used on the server # then every client must also have the key. ;tls-auth ta.key 1 # Select a cryptographic cipher. # If the cipher option is used on the server # then you must also specify it here. ;cipher x # Enable compression on the VPN link. # Don't enable this unless it is also # enabled in the server config file. comp-lzo # Set log file verbosity. verb 3 # Silence repeating messages ;mute 20
Index
Panda GateDefender Integra Page 13 of 18

1.3.2 Linux (Debian 3.1 Sarge distribution) OpenVPN implementation of the SSL/TLS protocol will be used on a roadwarrior side. For source and rpm packages, you can consult the OpenVPN site: www.openvpn.net OpenVPN as well OpenVPN GUI are open source projects and are licensed under the GPL.
• Install openvpn with:
#apt-get install openvpn
• First, you should check if the tun modules were included when kernel was installed: # cat /boot/config-2.4.x-x-x | grep CONFIG_TUN
(could be installed as a module CONFIG_TUN=m or as integral part of the kernel CONFIG_TUN=y)
Otherwise, you need to activate CONFIG_TUN in the kernel configuration file (Device Drivers -> Network device support -> Universal TUN/TAP device driver support) and compile/install it again.
• Next, check if tun device exist: # ls –la /dev /net
If not, then create it with:
# mkdir /dev/net # mknod /dev/net/tun c 10 200 # chmod 0700 /dev/net/tun
• The last step will be to apply the same modifications on /etc/openvpn/client.conf
file as described above for the MS Windows 2000/XP client1.ovpn configuration file. Index
Panda GateDefender Integra Page 14 of 18

1.4 Establishing a VPN connection To initiate an SSL VPN tunnel from MS Windows 2000/XP roadwarrior:
• Right-click on OpenVPN client1.ovpn file. • Select “Connect” from the pop-up menu, if everything is properly configured, you will
be connected to the new virtual network. • If everything is configured properly, a window will be displayed showing a message
ending with the Initialization Sequence Completed lines as shown below:
When running in this fashion, several keyboard commands are available:
• F1 -- Conditional restart (doesn't close/reopen TAP adapter) • F2 -- Show connection statistics • F3 -- Hard restart • F4 -- Exit
Note that OpenVPN can be started also as a service on Windows. To initiate SSL VPN tunnel from linux roadwarrior:
# cd /etc/openvpn # openvpn client.conf (certificates client1.crt and ca.crt and key client1.key must be in the same directory)
For more details about managing openvpn client, refer to the following site: www.openvpn.net Index
Panda GateDefender Integra Page 15 of 18

1.5 Further considerations If the Panda GateDefender Integra’s firewall capabilities are used, then all the corresponding configuration rules of its firewall will be automatically entered. But if you use a personal firewall or broadband router with firewall features or if there are routers or firewalls between the VPN client and the Integra VPN gateway server, the following port and protocol must be enabled for SSL VPN on all firewalls and routers that are between the VPN client and the Integra VPN gateway server: For this how-to, the server port/protocol that should be open is 1194/UDP. Note that if firewall capabilities are enabled on Windows XP, uncheck the box corresponding to TAP-Win32 adapter. The firewall can be accessed by Control Panel -> Security Center -> Windows Firewall -> Advanced. If the SNAT option is enabled for the local network that intervenes in the VPN in any of the GateDefender Integra configurations -the Static key or certificates-, you need to add a NAT rule with a higher priority than the previous rule. This rule should ensure that the change of source IP header belonging to SNAT is not applied to the VPN traffic before the packets are routed to the tunnel. To do this, the Keep original address check box must be selected:
Figure 3.7
The example in the screenshot shows the rule to add to ensure that traffic from network 192.168.10.0 can be correctly routed through the VPN tunnel to the roadwarriors’ network 10.11.12.0.
Panda GateDefender Integra Page 16 of 18

1.6 Configuration checking To check your SSL VPN configuration, please follow the procedure described below:
1. Access the Panda GateDefender Integra administration console. 2. Click on VPN in the panel on the left. 3. Then select VPN Monitor which will allow you to see the status of all established VPN
connections (as shown in figure 3.8).
Figure 3.8
Any of the roadwarriors can verify the configuration on its Windows 2000/XP independently. In order to carry out such a task, the command prompts that should be used are:
• The ipconfig /all command shows that an additional IP address has been assigned to the TAP-Win32 Adapter (if you are the first roadwarrior connected using the configuration described in this how-to, your IP address will be 10.11.12.6 and the next one 10.11.12.10 because in fact, subnetwork /30 is used instead of /24 due to the implementation limits of TAP interface).
• The ping –n 10 192.168.10.100 command, pings from the roadwarrior to one of the
hosts that reside on the internal network behind Integra VPN gateway and should see the response from the remote host.
At the same time, a network traffic monitoring tool, such as Ethereal, can be used in order to check if all the traffic between a roadwarrior and the gateway is encrypted. The encrypted SSL packets will only be seen when observing traffic in the external network interface whereas the unencrypted packets (in this case icmp reply and response packets) will be seen in the TAP-Win32 interface. Index
Panda GateDefender Integra Page 17 of 18

© Panda 2007 0707-PGDIHT03-03-EN
Panda GateDefender Integra Page 18 of 18


![KORUS업무포털사용자등록및로그인가이드 - Kangwon · II - 2 SSL VPN 계정신청(최초1회) - 서식참조 I. SSL VPN 접속 [ SSL VPN 사용자ID 신청리스트]](https://img.dokumen.tips/doc/110x75/5f06912d7e708231d418a10a/koruseeeeeoeeeeoe-kangwon-ii-2-ssl-vpn-eoe1oe.jpg)