Embed Size (px)
Citation preview
SAP Business One How-To Guide
PUBLIC
How to Set Up an Automated Dunning Process
Applicable Release:
SAP Business One 8.8
All Countries
English
July 2009

Table of Contents
Introduction..................................................................................................................................... 3 About This Guide................................................................................................................... 3
The Dunning Process in SAP Business One............................................................................... 4 Introduction ............................................................................................................................ 4 Glossary................................................................................................................................. 4 About Dunning Terms............................................................................................................ 5
Automating the Dunning Process ................................................................................................ 6 Customizing Dunning Letter Layouts..................................................................................... 6 Defining Dunning Terms........................................................................................................ 8 Specifying a Default Dunning Term for Customers ............................................................. 12 Working with Dunning Options for Customers .................................................................... 13 The Dunning Wizard............................................................................................................ 16
Credit Memos and Incoming Payments Not Based on an Invoice............................. 16 Due Dates in Credit Memos and Incoming Payments ............................................... 16 Invoices with Several Payments................................................................................. 16
Creating and Running a Dunning Wizard............................................................................ 17 Running a Saved Dunning Wizard ...................................................................................... 27 Displaying the Dunning History Summary Report ............................................................... 29 Printing Dunning Letters and Dunning Reports................................................................... 31
Change to the Dunning Letter Printing Process......................................................... 31 Printing the Dunning Wizard Recommendation Report ............................................. 31 Printing the Dunning History Summary Report .......................................................... 31
Copyrights, Trademarks, and Disclaimers ................................................................................ 32
© SAP AG 2009
2

How to Set Up an Automated Dunning Process
Introduction From the moment your company sells goods or services, you need to monitor incoming payments to ensure that your customers pay their bills on time. When debts become overdue, collection activities are required. Dunning is the process of sending dunning notices to customers with overdue payment items, requesting payment of the outstanding amount by a specified date.
To help you track open invoices and monitor the payment behavior of your customers, SAP Business One includes the dunning wizard. This wizard monitors all outstanding documents and transactions that represent overdue debt and automatically generates late notices that increase in urgency over time. In addition, the dunning wizard lets you share customer payment information with other departments within your company.
Access to the Dunning Functions
Superusers and users with full authorizations can access the dunning functions. For more information about authorizations, see the document How to Define Authorizations in Releases 2007 A and 2007 B in the documentation area of SAP Business One Customer Portal (http://service.sap.com/smb/sbocustomer/documentation).
By default, the Dunning Levels menu option in the SAP Business One Main Menu is hidden. When it is visible, this option displays the Dunning Levels – Setup window, in which you see the default dunning levels. These defaults also appear in the Dunning Terms – Setup window.
To make the Dunning Levels menu option visible, in the menu bar, choose Tools → Form Settings.
Alternatively, click (Form Settings) in the toolbar.
About This Guide The information in this guide is a review for all users, and it helps new users to understand, define, and automate the dunning process.
The first section is an overview of dunning, which includes a glossary of terms. Next, is an explanation of the dunning setup process, including examples of dunning terms. These examples can help you decide how to use dunning terms at your company. Finally, this guide includes the procedures required to automate the dunning process.
© SAP AG 2009 3

How to Set Up an Automated Dunning Process
The Dunning Process in SAP Business One This section shows you how the dunning process works. It also lists terminology and the specific elements of dunning that you must consider before setting up this process for your company.
Introduction The dunning process in SAP Business One helps you monitor customer payments, track payment history, and send letters to customers with overdue invoices. You define when to send letters for overdue invoices. Each date you set, for example, 30, 60, and 90 days overdue, is called a dunning level. You can charge increasingly higher letter fees and interest on outstanding balances with each successive dunning level.
The dunning levels, plus any fees and the dunning interest rate applied to the customer’s account are called the dunning terms.
Any open customer document that exceeds a dunning level is tracked by the dunning wizard and displayed in a report. From the report, you can print dunning letters. A typical letter lists the open documents and the number of days past due and summarizes any fees or interest on the open documents.
Glossary The following table lists dunning terms and definitions:
Term Description
Dunning interest rate A late payment fee based on a percentage of the overdue amounts in unpaid invoices.
Dunning letter A reminder or warning letter used to collect outstanding payments.
Dunning level Level of communication to customers for accounts receivable.
Dunning is a methodical process of contacting customers to collect unpaid bills. It generally starts at the first level with a reminder and progresses on to warning letters and severe warnings as accounts become seriously overdue.
Dunning term The fees and interest rate charged to customers who reach a dunning level.
The dunning wizard compares a selected dunning level to all open customer documents, such as A/R invoices. If a customer reaches a dunning level, the dunning terms are specified in a dunning letter.
© SAP AG 2009 4

How to Set Up an Automated Dunning Process
Term Description
Dunning wizard A tool that enables the creation and transmission of letters to customers who have not paid their open invoices within a given time range and reminds them of overdue payments.
In addition, the dunning wizard keeps track of customers’ payment behavior in a database to make this information available to authorities.
About Dunning Terms Your first consideration when setting up a dunning process should be your customers and their payment history. If your customers pay their bills on time, you may need only one dunning term, or you may need several terms with more frequent dunning letters and increased fees and interest.
When you define your dunning terms, you customize the content of the letter layout for each dunning level. Typically, dunning levels are 30, 60, and 90 days past the invoice due date. You determine the tone of the letter for each level.
Example This example compares two sample dunning terms:
Standard - for customers who rarely are late with payments
Advanced - for customers who frequently are late with payments
Standard and Advanced are sample names.
Dunning Term Dunning Levels Dunning Letters Fee Per Letter? Charge Interest?
Standard Three: 30, 60, and 90 days after invoice is due
1 letter per dunning level (default). The tone is friendly, yet increasingly firm with each successive letter.
No No
Advanced Five: 15, 30, 45, 60, and 75 days after invoice is due
1 letter per dunning level (default). The tone is frank and increasingly direct with each successive letter.
Yes, increases with each dunning level
Yes, increases with each dunning level
© SAP AG 2009 5

How to Set Up an Automated Dunning Process
Automating the Dunning Process This procedure gives you an overview of the tasks required to automate the dunning process for your company.
Procedure
To automate the dunning process, you must do the following:
1. Decide how many dunning levels to use in your company and customize a letter layout for each level using Print Layout Designer.
For more information, see Customizing Dunning Letter Layouts.
2. Define dunning terms for your customers.
For more information, see Defining Dunning Terms.
3. Specify a default dunning term before using the dunning wizard.
For more information, see Specifying a Default Dunning Term for Customers.
4. Create and run dunning wizards.
For more information, see Creating and Running a Dunning Wizard and Running a Saved Dunning Wizard.
5. After running your wizards, display dunning wizard history data and refine your dunning process, as necessary.
For more information, see Displaying the Dunning History Summary Report.
Customizing Dunning Letter Layouts This procedure shows you how to customize dunning letter layouts with your company’s information using Print Layout Designer. A dunning letter is required for each dunning level you define. If you plan to use 6 dunning levels, then you must customize 6 letter layouts.
SAP Business One includes 10 dunning letter layouts. Letter layouts 01, 02, and 03 are predefined as the first, second, and third late notices. Letter layouts 04 through 10 are blank layouts.
After you have customized the letter layouts for the dunning levels in your company, you can choose to print the letters generated by the dunning wizard. The letters display your changes and additions, as well as the details of the customer’s open invoices at the selected dunning level.
For more information about customizing layouts, see the document How to Customize Printing Layouts with Print Layout Designer in the documentation area of SAP Business One Customer Portal (http://service.sap.com/smb/sbocustomer/documentation).
Prerequisite
You have read about setting up the dunning process in Automating the Dunning Process.
Procedure
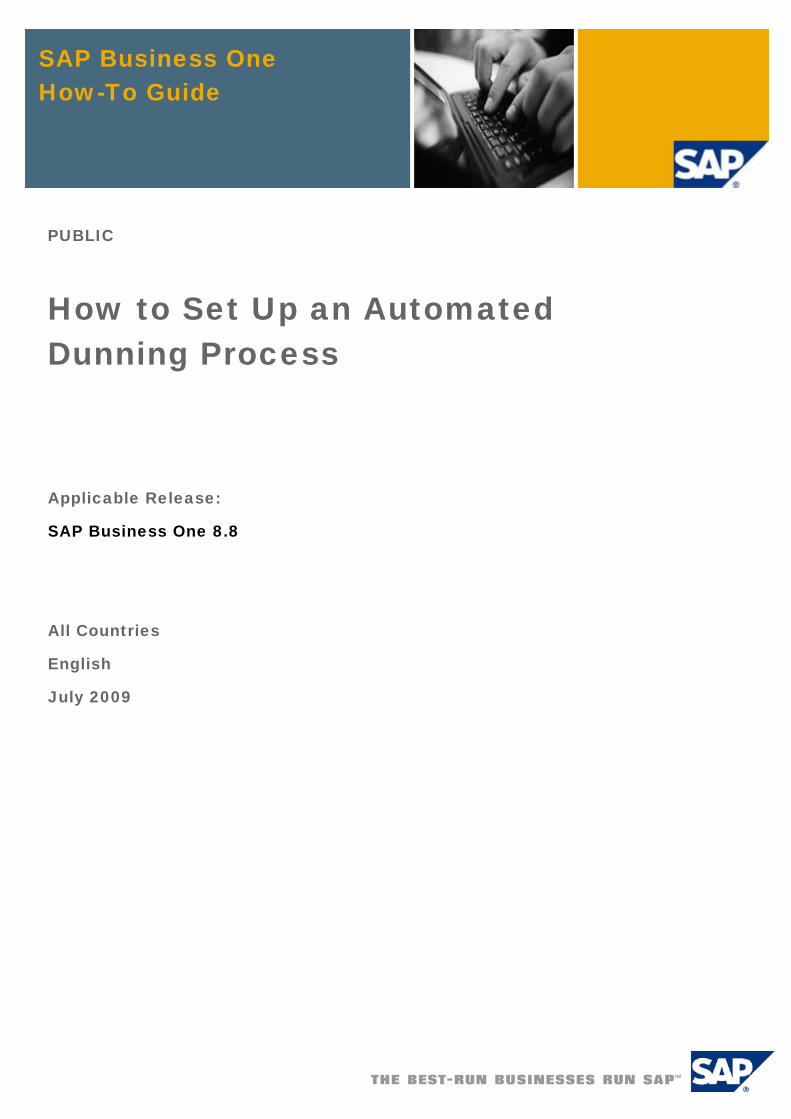
1. From the SAP Business One Main Menu, choose Administration → Setup → Business Partners → Dunning Terms.
The Dunning Terms – Setup window appears.
2. Choose Tools → Print Layout Designer in the menu bar or click (Print Layout Designer) in the toolbar.
The Layout Designer – Selection Criteria window appears.
© SAP AG 2009 6

How to Set Up an Automated Dunning Process
The Dunning Letter 01 layout appears by default in the Choose Document Type field, as shown in the following window:
3. In the Choose Document Type field, select the dunning letter layout to edit.
4. Choose the Edit Layout button.
The layout you selected appears.
The areas of the layout you need to customize are highlighted.
The dunning wizard completes the company name and address areas.
The middle part of the layout displays the customer’s overdue documents and their respective amounts.
© SAP AG 2009 7

How to Set Up an Automated Dunning Process
The following represents the default layout for dunning letter 01:
5. Insert your company logo and modify the layout content as necessary.
6. When you have finished, to close Print Layout Designer, choose File → Exit in the menu bar.
A system message is displayed.
7. To save your changes, choose Yes.
You are returned to the Layout Designer – Selection Criteria window. You can either select another layout for editing or choose the OK button to close the window.
Defining Dunning Terms Use the Dunning Terms – Setup window to define the terms that are used by the dunning wizard.
As you define dunning terms for your company, note that you are required to create a default dunning term. The default is applied to new customers as they are created and to all customers without a dunning term.
The key aspect of the dunning term is the dunning level, which triggers a letter and can include a letter fee and interest on the customer’s outstanding balance. You can use up to 10 dunning levels.
For more information about setting up the dunning process, see Automating the Dunning Process.
Prerequisite
You have customized a dunning letter layout for each dunning level in your company.
For more information, see Customizing Dunning Letter Layouts.
© SAP AG 2009 8
How to Set Up an Automated Dunning Process
Procedure
1. From the SAP Business One Main Menu, choose Administration → Setup → Business Partners → Dunning Terms.
The Dunning Terms – Setup window appears.
2. Specify a Code and a Name for the dunning term.
When creating dunning terms, you should use codes and names that the users in your company can easily understand.
3. The option you select in the Dunning Letter Method field determines which options are displayed in the Dunning Terms – Setup window. For example, if you select One Letter per Invoice, then the Apply Letter Layout by Highest Level checkbox as well as the Letter per BP Term and Bank Interest % options are not displayed.
From the Dunning Letter Method dropdown list, select one of the following options:
One Letter per BP Generates 1 letter that includes all the overdue invoices for the customer. If you select this option and the Apply Letter Layout by Highest Level (described in the next step) is deselected, you can override the dunning terms for each dunning level. To override the dunning terms for the customer, complete the Letter per BP Term section of the window as follows:
Specify a Minimum Balance for all open transactions. A dunning letter is generated only when the total open amount is above the minimum balance.
Specify a Fee per Letter. The value you specify is a fixed fee for the letter (even though the letter may reference several invoices). If the customer has multiple open invoices, and you routinely charge a fee per invoice, you may not want to use the One Letter per BP option.
To apply interest on all open invoices, select the Include Interest checkbox. You specify the interest options in the Bank Interest % section of the window.
© SAP AG 2009 9
How to Set Up an Automated Dunning Process
One Letter per Dunning Level Generates 1 letter that includes all invoices on the same dunning level.
One Letter per Invoice Generates 1 dunning letter for each overdue invoice.
4. To use the letter layout of the highest dunning level assigned to the invoices for that dunning letter, select the Apply Letter Layout by Highest Level checkbox. For example, if there are 2 invoices with a dunning level of 1, and 1 invoice with a dunning level of 2, the letter layout assigned to dunning level 2 is used.
This option is available only when you select either the One Letter per Dunning Level or the One Letter per BP option.
5. In the Dunning Level section of the window, either add, edit, or remove dunning levels as follows:
To… Do This…
Add a dunning level or edit the default dunning level values
a. In the Letter Layout column, from the dropdown list select one of the following:
The dunning letter number that corresponds to the dunning level. For example, to add dunning level 4, choose Dunning Letter 04.
The Dunning All layout, which is a general layout suitable for all dunning levels
b. In the Effective After(Days) field, specify the number of days after which the dunning level is effective (required).The value of the field is accumulative from one level to the next.
For example, two dunning levels are defined. In the Effective After(Days) field, the value for level 1 is 30 days and the value for level 2 is 10 days. The level 1 dunning letter becomes effective 30 days after the due date of the invoice. The level 2 dunning letter becomes effective 10 days after the level 1 dunning letter was generated.
c. In the Fee Per Letter field, if required, you can specify a fee (fixed amount) for the dunning level.
If interest is calculated on the amount of the invoice, this fee is added to the interest.
d. In the Minimum Balance field, you can specify a minimum balance amount for the dunning level.
e. In the Interest field, if required, you can select the checkbox to calculate interest on the open invoices at the dunning level.
In the Bank Interest % section of the window, proceed as follows:
i. In the Number of Days in Year field, specify a different number, if required. The default value is 360.
ii. In the Annual Interest Rate field, specify the yearly interest rate.
iii. In the Number of Days in Month field, specify a different number, if required. The default value is 30 days.
f. To save your changes, choose the Update button.
To add another dunning level, repeat this procedure.
© SAP AG 2009 10

How to Set Up an Automated Dunning Process
To… Do This…
Remove a dunning level
a. Right-click anywhere on the dunning level row and choose Delete Row.
b. To save your changes, choose the Update button.
In the Dunning Terms – Setup window below, the fees, interest, and a fourth dunning level are specified.
6. Specify an exchange rate option using the radio buttons as follows:
To use the exchange rate defined in the invoice, select Use Original Exchange from Invoice.
To use the exchange rate defined on the day the dunning letters are generated, select Use Current Exchange Rate. Use this option when calculating interest in foreign currency.
7. Specify an interest calculation option using the radio buttons as follows:
To calculate interest on the remaining sum of the debt, select Calculate Interest on Remaining Account. This is the default option.
To calculate interest on the original sum of the debt, select Calculate Interest Value on Original Sum.
8. Choose the Add button to save the dunning term.
The Dunning Terms – Setup window appears again, ready for you to define another dunning term. The dunning level information from the last term defined is displayed in the window by default.
9. To close the window, either define another dunning term or choose the Cancel button.
© SAP AG 2009 11

How to Set Up an Automated Dunning Process
Specifying a Default Dunning Term for Customers This procedure shows you how to specify a default dunning term for new customers and how SAP Business One applies the default to customers without a dunning term.
If you do not want the default applied to all existing customers, you must select a dunning term for each customer in the Business Partner Master Data window. For more information about selecting dunning terms for customers, see Working with Dunning Options for Customers.
You can use the Data Transfer Workbench to select dunning terms for customers automatically. For more information, see the document How to Use Data Transfer Workbench in the documentation area of SAP Business One Customer Portal (http://service.sap.com/smb/sbocustomer/documentation).
For more information about the dunning set up process, see Automating the Dunning Process.
Prerequisite
Before selecting a default dunning term, at least one dunning term must exist. For more information, see Defining Dunning Terms.
Procedure
1. From the SAP Business One Main Menu, choose Administration → System Initialization → General Settings.
The General Settings window appears. The BP tab is displayed by default.
2. From the Def. (Default) Dunning Term for Customer dropdown list, select a default dunning term.
This term is the default for all new customers.
CAUTION SAP Business One applies the default to each existing customer without a dunning term assigned to them. Consider this when you select the default.
© SAP AG 2009 12

How to Set Up an Automated Dunning Process
3. Choose the OK button.
If there are customers who do not have a dunning term assigned to them, a system message appears. To assign these customers the default dunning term, choose the OK button.
Working with Dunning Options for Customers This procedure shows you how to use the Business Partner Master Data window to do the following:
• Display the customer’s current dunning term and select a new one
• Block or unblock dunning letters for the customer
• Display the last dunning level reached
• Display the date of the last printed dunning letter
For more information about the dunning setup process, see Automating the Dunning Process.
Procedure
1. From the SAP Business One Main Menu, choose Business Partners → Business Partner Master Data.
The Business Partner Master Data window appears, displaying the General tab.
2. In the Code field, specify the business partner code.
© SAP AG 2009 13

How to Set Up an Automated Dunning Process
3. Choose the Find button.
The window displays the selected customer’s data. The window below shows the Payment Terms tab, on which you can see and change the dunning term for the customer.
4. Proceed as follows:
To… Do This…
Display or change the current dunning term for the customer
a. Select the Payment Terms tab.
The Dunning Term field is displayed, as shown in the window above.
b. To change the term, select a new term in the Dunning Term field.
c. Choose the Update button.
The new term is used in future dunning wizard runs.
© SAP AG 2009 14
How to Set Up an Automated Dunning Process
To… Do This…
Block or unblock dunning letters for the customer
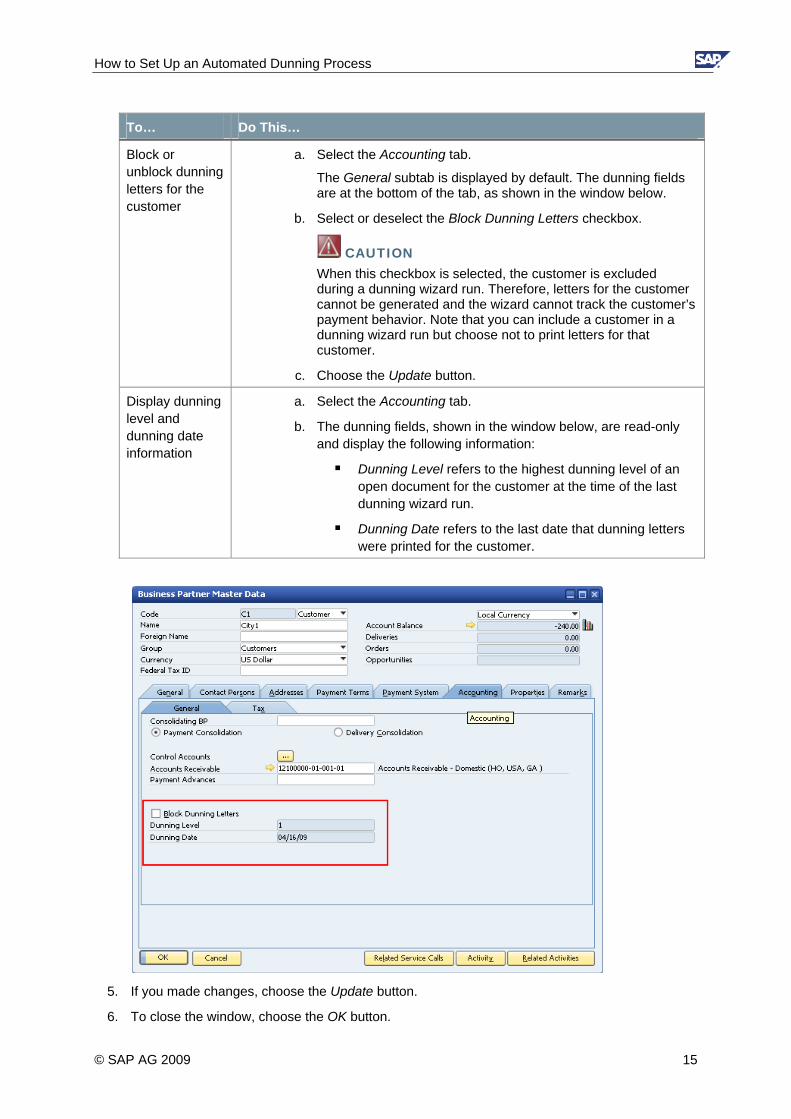
a. Select the Accounting tab.
The General subtab is displayed by default. The dunning fields are at the bottom of the tab, as shown in the window below.
b. Select or deselect the Block Dunning Letters checkbox.
CAUTION When this checkbox is selected, the customer is excluded during a dunning wizard run. Therefore, letters for the customer cannot be generated and the wizard cannot track the customer’s payment behavior. Note that you can include a customer in a dunning wizard run but choose not to print letters for that customer.
c. Choose the Update button.
Display dunning level and dunning date information
a. Select the Accounting tab.
b. The dunning fields, shown in the window below, are read-only and display the following information:
Dunning Level refers to the highest dunning level of an open document for the customer at the time of the last dunning wizard run.
Dunning Date refers to the last date that dunning letters were printed for the customer.
5. If you made changes, choose the Update button.
6. To close the window, choose the OK button.
© SAP AG 2009 15

How to Set Up an Automated Dunning Process
The Dunning Wizard This section describes the transactions and documents that the dunning wizard analyzes. It also gives you an overview of how customer credit memos and payments are checked, calculated, and displayed by the dunning wizard.
For more information about how the dunning wizard processes credit memos and payments, see Creating and Running a Dunning Wizard.
The dunning wizard tracks the following transactions and documents:
• Open A/R invoices (including partially paid and partially credited invoices)
• A/R credit memos
• Manual journal entries with at least one row posted to a customer
• Opening and closing balance transactions
• Incoming payments
For more information about the dunning setup process, see Automating the Dunning Process.
Credit Memos and Incoming Payments Not Based on an Invoice If a customer has credit memos or incoming payments that are not based on invoices, and the option to include memos and payments not based on invoices is selected, the credit postings are displayed in the dunning wizard’s recommendation report (step 5 of the wizard).
Whether or not the credit memos or incoming payments are displayed depends on the dunning terms defined for the customer. If the One Letter per BP dunning option is selected, credit memos and incoming payments are displayed at the beginning of the recommendation report, and SAP Business One includes them in the calculation and when checking the Minimal Balance field.
When you print the dunning letters, credit memos and incoming payments are displayed with a negative sign ( – ). If the dunning term One Letter per Invoice or One letter per Dunning Level is specified for the customer, the credit memos and incoming payments are displayed at the end of the recommendation report. These documents are set to dunning level 0 and, therefore, are excluded from the dunning letter.
Due Dates in Credit Memos and Incoming Payments If the due date for credit memos or incoming payments is less than or equal to the dunning wizard’s run date, the document appears in the recommendation report and the displayed due date is the wizard’s run date. If the due date of the credit posting is a future date, credit memos and incoming payments do not appear in the report and are not taken into account.
Invoices with Several Payments If an invoice has several payments applied, each payment appears as a separate invoice in the recommendation report. Since payments may have different due dates, it is possible that each payment is assigned to a different dunning level.
© SAP AG 2009 16
How to Set Up an Automated Dunning Process
Creating and Running a Dunning Wizard This procedure shows you to how to select the customers and types of documents to include in a wizard, how to work with the wizard’s recommendations, and how to print dunning letters or select other processing options.
For more information about the dunning setup process, see Automating the Dunning Process.
Prerequisites
You have used the following procedures to exclude specific invoices and customers from the wizard:
• To exclude a specific invoice, proceed as follows:
a. From the SAP Business One Main Menu, choose Sales A/R → A/R Invoice.
b. In the A/R Invoice window, specify the customer and the invoice to exclude.
c. Select the Logistics tab.
d. Select the Block Dunning Letters checkbox and choose the Add button.
To include the invoice in future runs, after the dunning run, deselect the checkbox.
• To exclude a customer and all their invoices, proceed as follows:
a. From the SAP Business One Main Menu, choose Business Partners → Business Partner Master Data.
b. In the Business Partner Master Data window, specify the business partner code in the Code field and choose the Find button.
c. On the Accounting tab, select the General subtab.
d. Select the Block Dunning Letters checkbox and choose the Update button.
To include the customer’s invoices in future runs, after the dunning run, deselect the checkbox.
© SAP AG 2009 17

How to Set Up an Automated Dunning Process
Procedure
1. From the SAP Business One Main Menu, choose Sales – A/R → Dunning Wizard.
The dunning wizard appears. Use the navigation buttons as follows:
To close the wizard without saving your changes, choose the Cancel button.
To return to the previous window, choose the Back button.
To go to the next step in the wizard, choose the Next button.
© SAP AG 2009 18
How to Set Up an Automated Dunning Process
2. Choose the Next button.
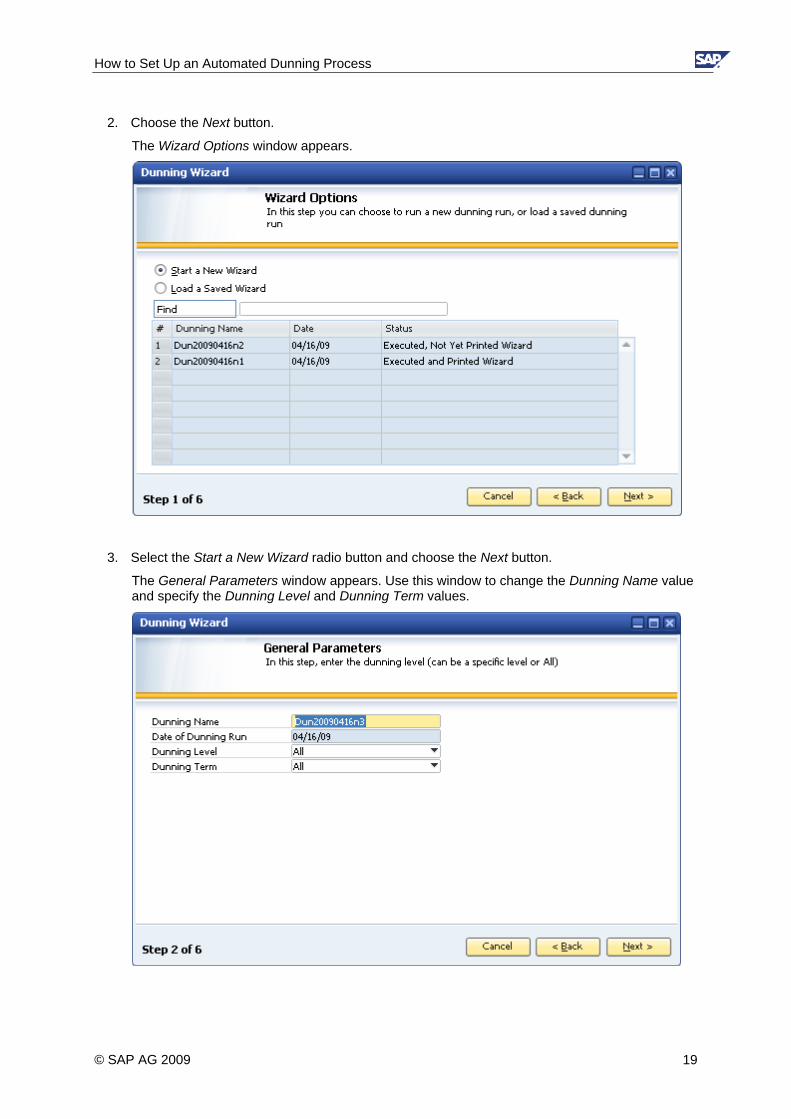
The Wizard Options window appears.
3. Select the Start a New Wizard radio button and choose the Next button.
The General Parameters window appears. Use this window to change the Dunning Name value and specify the Dunning Level and Dunning Term values.
© SAP AG 2009 19

How to Set Up an Automated Dunning Process
4. Complete the fields on the General Parameters window as follows:
Field User Action and Values
Dunning Name By default, the Dunning Name value is calculated according to the formula: Dun + system date + incremental number. You can change the name if necessary.
Date of Dunning Run Displays the current date. This field is not editable.
Dunning Level From the dropdown list, select a dunning level or select All, which combines the dunning levels together.
Dunning Term Select a particular dunning term or select All. The terms available are taken from the Dunning Terms – Setup window.
If you select All, all customers who are assigned a dunning term and have at least one open document are included in the run.
If you select a particular dunning term, only customers with the selected dunning term assigned to them are included in the dunning run.
5. Choose the Next button.
The Business Partners – Selection Criteria window appears.
6. Specify the customers to include in the wizard, as follows:
To remove all existing customers from the selection table, choose the Clear Table button.
To display the BP Properties window, which lets you specify a range of customers to include in the dunning wizard, choose the Add button.
© SAP AG 2009 20

How to Set Up an Automated Dunning Process
To include customers with a zero balance who may have unpaid or partially paid A/R invoices, and other open transactions, select the checkbox Include Customers with Credit or Zero Balance.
Note If the Block Dunning Letters checkbox in the Business Partner Master Data window is selected, you cannot select a customer for inclusion in a dunning wizard run.
7. Choose the Next button.
The Document Parameters window appears. Use this window to specify the range of invoice dates and define the document types and letter parameters.
8. Select the range of invoices to include by posting date, due date, or both. Click to select From and To dates.
Note The To fields display the current date by default. You can change the date, if necessary.
9. Select one or more of the following options in the Document Types section of the window:
Include Payments Not Based on Invoice Automatically includes payments not based on invoices in the dunning wizard (as long as the payments have not been internally reconciled). These payments appear with a negative sign ( – ) in a separate row of the dunning wizard. Installment payments for invoices are not displayed in a separate row, but still figure into the calculation, since the wizard runs only on the open amount.
Include Credit Memos Not Based on Invoices Automatically includes credit memos that are not based on invoices in the dunning wizard (as long as the payments have not been internally reconciled). These credit memos appear with a negative sign ( – ) in a separate row of the dunning wizard. Credit memos based on invoices are not displayed in a separate row in the wizard, but still figure into the calculation, since the wizard runs only on the open amount.
© SAP AG 2009 21
How to Set Up an Automated Dunning Process
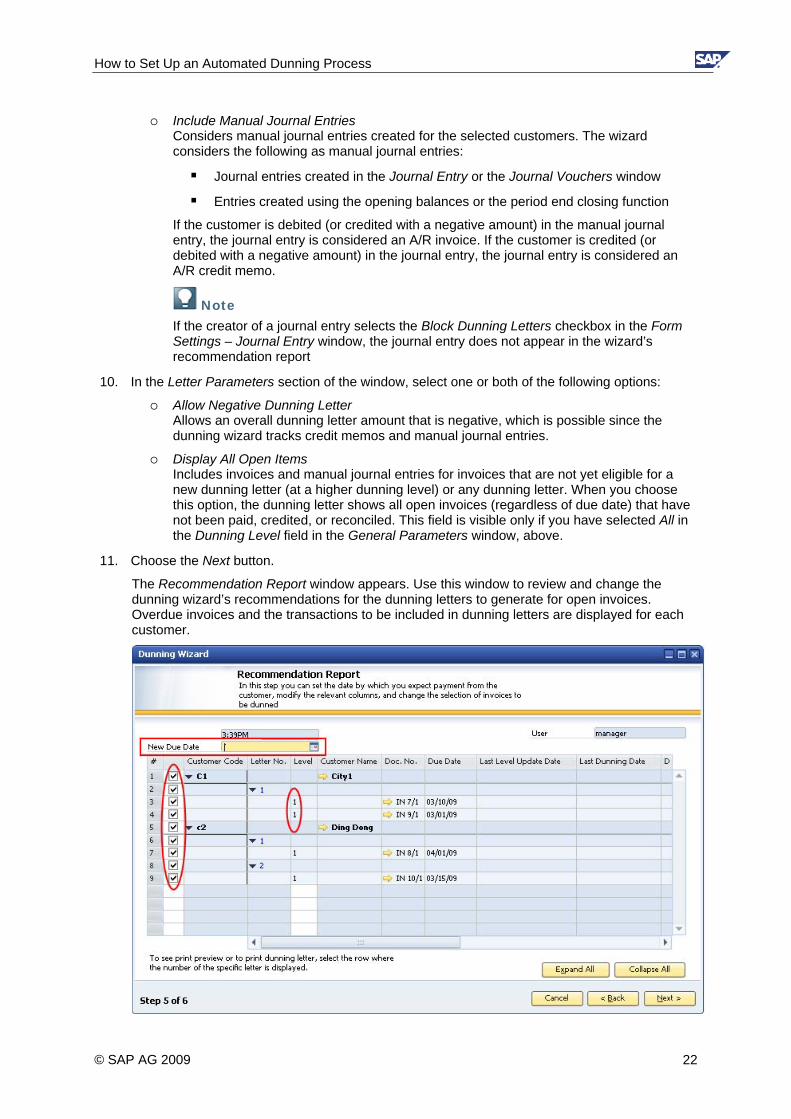
Include Manual Journal Entries Considers manual journal entries created for the selected customers. The wizard considers the following as manual journal entries:
Journal entries created in the Journal Entry or the Journal Vouchers window
Entries created using the opening balances or the period end closing function
If the customer is debited (or credited with a negative amount) in the manual journal entry, the journal entry is considered an A/R invoice. If the customer is credited (or debited with a negative amount) in the journal entry, the journal entry is considered an A/R credit memo.
Note If the creator of a journal entry selects the Block Dunning Letters checkbox in the Form Settings – Journal Entry window, the journal entry does not appear in the wizard’s recommendation report
10. In the Letter Parameters section of the window, select one or both of the following options:
Allow Negative Dunning Letter Allows an overall dunning letter amount that is negative, which is possible since the dunning wizard tracks credit memos and manual journal entries.
Display All Open Items Includes invoices and manual journal entries for invoices that are not yet eligible for a new dunning letter (at a higher dunning level) or any dunning letter. When you choose this option, the dunning letter shows all open invoices (regardless of due date) that have not been paid, credited, or reconciled. This field is visible only if you have selected All in the Dunning Level field in the General Parameters window, above.
11. Choose the Next button.
The Recommendation Report window appears. Use this window to review and change the dunning wizard’s recommendations for the dunning letters to generate for open invoices. Overdue invoices and the transactions to be included in dunning letters are displayed for each customer.
© SAP AG 2009 22
How to Set Up an Automated Dunning Process
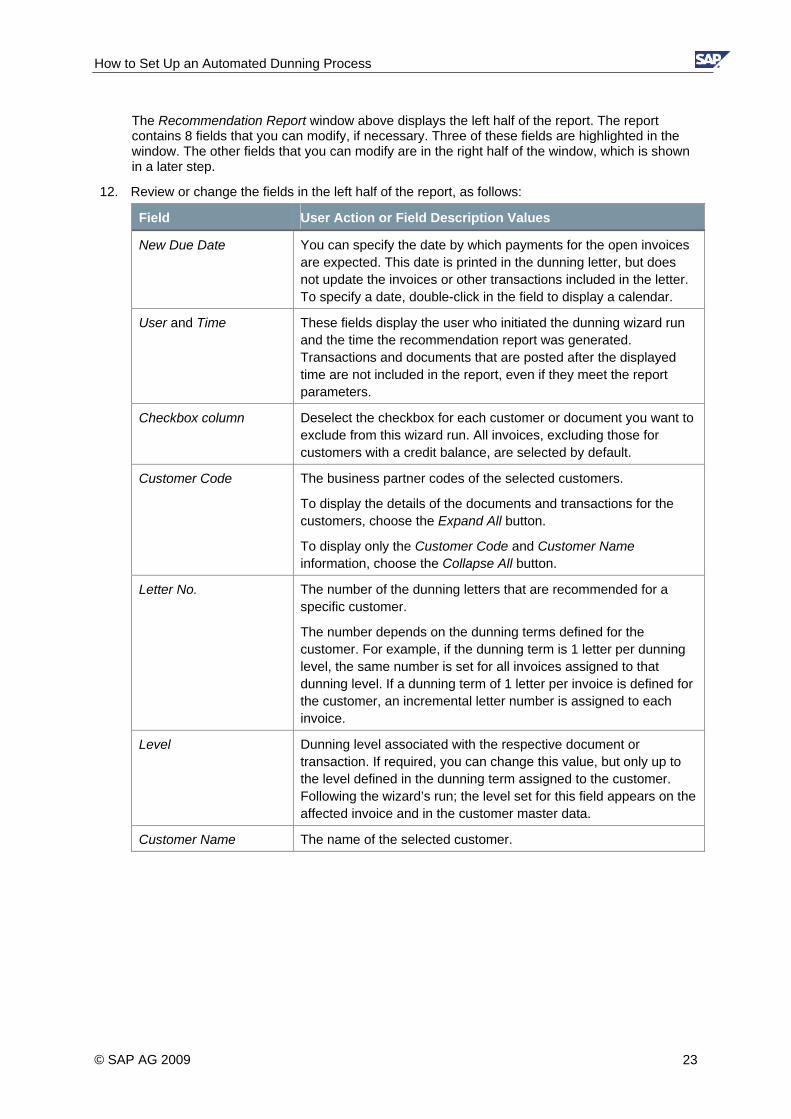
The Recommendation Report window above displays the left half of the report. The report contains 8 fields that you can modify, if necessary. Three of these fields are highlighted in the window. The other fields that you can modify are in the right half of the window, which is shown in a later step.
12. Review or change the fields in the left half of the report, as follows:
Field User Action or Field Description Values
New Due Date You can specify the date by which payments for the open invoices are expected. This date is printed in the dunning letter, but does not update the invoices or other transactions included in the letter. To specify a date, double-click in the field to display a calendar.
User and Time These fields display the user who initiated the dunning wizard run and the time the recommendation report was generated. Transactions and documents that are posted after the displayed time are not included in the report, even if they meet the report parameters.
Checkbox column Deselect the checkbox for each customer or document you want to exclude from this wizard run. All invoices, excluding those for customers with a credit balance, are selected by default.
Customer Code The business partner codes of the selected customers.
To display the details of the documents and transactions for the customers, choose the Expand All button.
To display only the Customer Code and Customer Name information, choose the Collapse All button.
Letter No. The number of the dunning letters that are recommended for a specific customer.
The number depends on the dunning terms defined for the customer. For example, if the dunning term is 1 letter per dunning level, the same number is set for all invoices assigned to that dunning level. If a dunning term of 1 letter per invoice is defined for the customer, an incremental letter number is assigned to each invoice.
Level Dunning level associated with the respective document or transaction. If required, you can change this value, but only up to the level defined in the dunning term assigned to the customer. Following the wizard’s run; the level set for this field appears on the affected invoice and in the customer master data.
Customer Name The name of the selected customer.
© SAP AG 2009 23
How to Set Up an Automated Dunning Process
Field User Action or Field Description Values
Doc. No. Displays the document type, document number, and the specific document row number to which the dunning run is applied.
For example, the value IN 172/1 indicates that the dunning run is applied to A/R invoice number 172, row number 1 in the journal entry created by the A/R invoice.
If the document type is JE (journal entry), OB (opening balance), or BC (closing balance), the row numbering starts with 0 and not with 1. The value JE 285/0 represents the first row in journal entry number 285.
Due Date The due date of the document or transaction included in this dunning run.
Last Dunning Date Date of the last dunning run, if a transaction or document was included in a previous dunning run.
Last Level Update Date The last date on which the dunning level was updated.
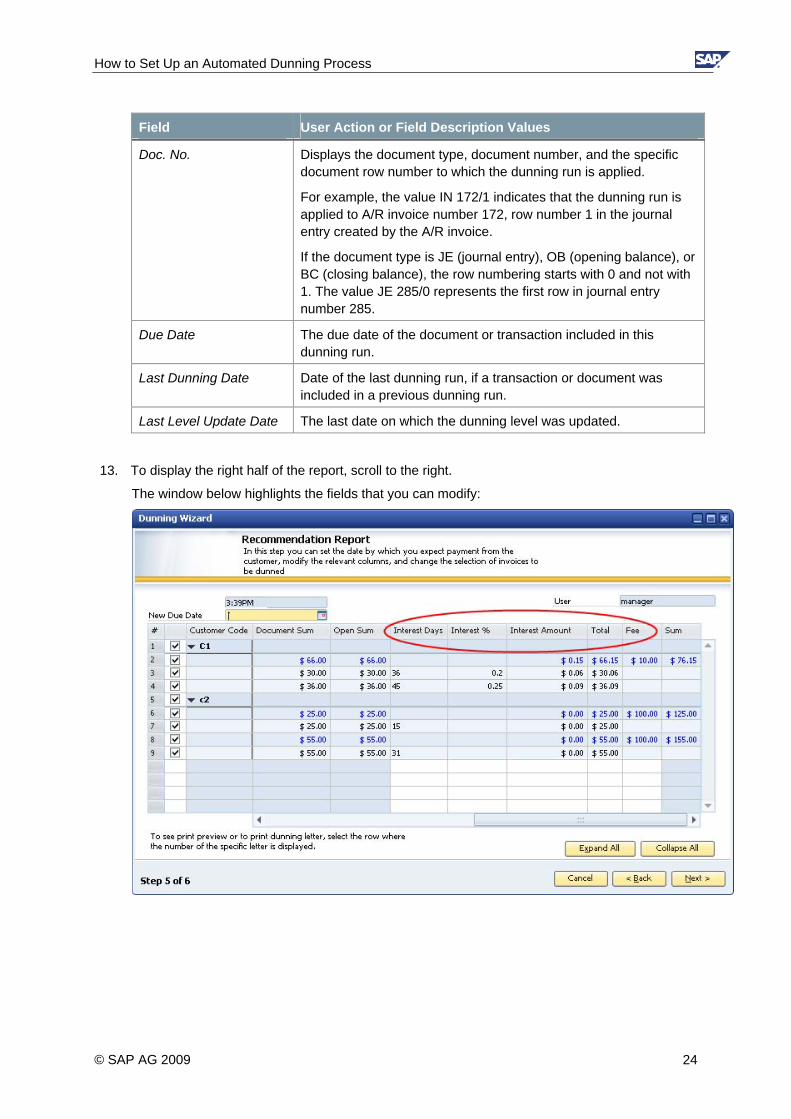
13. To display the right half of the report, scroll to the right.
The window below highlights the fields that you can modify:
© SAP AG 2009 24
How to Set Up an Automated Dunning Process
14. Review or change the fields appearing in the right half of the report, as follows:
Field User Action or Field Description Values
Document Sum The original total amount of the document or journal entry. Negative amounts represent transactions for which the customer is credited, such as incoming payments or credit memos.
Open Sum The amount of the document or transaction that is not yet paid, credited, or reconciled. This is the amount included in this dunning run. Negative amounts represent transactions that credit the customer, such as A/R credit memos. These transactions are not included in the run.
Interest Days The number of days for which interest is calculated. You can change this value, if required.
The days are counted from the due date of the document or transaction and are based on the number of days in one month, as defined in the Dunning Terms – Setup window.
Interest % The interest rate for the dunning period. You can change this value, if required.
The calculation is based on a formula that uses the annual interest rate and the number of interest days in the year, as defined in the Dunning Terms – Setup window. For example:
Number of days in year: 360
Annual interest rate: 14%
Interest days: 53
Interest % = Interest days multiplied by the annual interest rate, divided by the number of days in year, or:
(53 x 14%) / 360 = 2.06%
Interest Amount The interest amount calculated for this document or transaction. You can change this value, if required.
The calculation is based on the definitions in the DunningTerms – Setup window.
Total The total amount tracked by the wizard per document or transaction, including the interest, if any. You can change this value, if required.
In the letter row, the total is the amount included in this letter (from all the transactions and documents), including the interest amounts for each document or transaction. If you change the total or interest amount of a specific transaction or document, the total of the letter is updated accordingly.
Fee The fee per letter, as defined in the Dunning Terms – Setup window. If you change this amount, the new fee is applicable to the current letter only.
Sum The total amount per letter, including the interest and fee.
© SAP AG 2009 25
How to Set Up an Automated Dunning Process
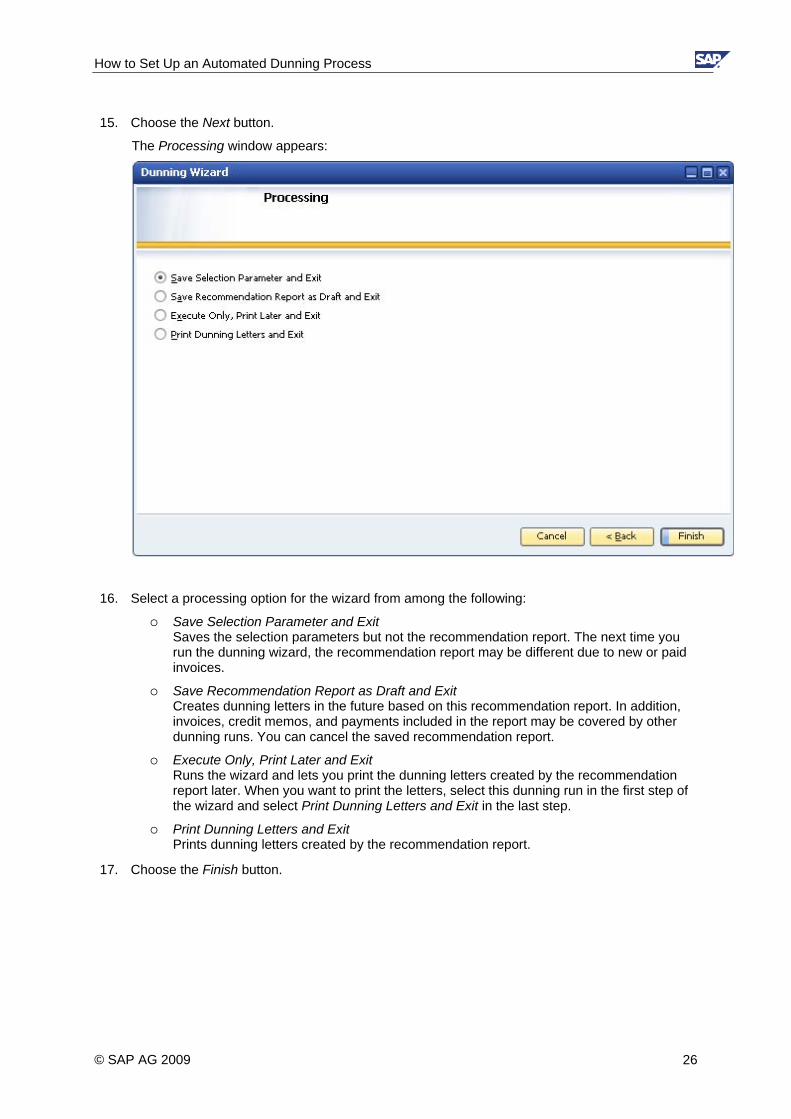
15. Choose the Next button.
The Processing window appears:
16. Select a processing option for the wizard from among the following:
Save Selection Parameter and Exit Saves the selection parameters but not the recommendation report. The next time you run the dunning wizard, the recommendation report may be different due to new or paid invoices.
Save Recommendation Report as Draft and Exit Creates dunning letters in the future based on this recommendation report. In addition, invoices, credit memos, and payments included in the report may be covered by other dunning runs. You can cancel the saved recommendation report.
Execute Only, Print Later and Exit Runs the wizard and lets you print the dunning letters created by the recommendation report later. When you want to print the letters, select this dunning run in the first step of the wizard and select Print Dunning Letters and Exit in the last step.
Print Dunning Letters and Exit Prints dunning letters created by the recommendation report.
17. Choose the Finish button.
© SAP AG 2009 26

How to Set Up an Automated Dunning Process
Running a Saved Dunning Wizard Each dunning wizard you create is saved and can be reused. When you select an existing wizard, you cannot change its parameters, such as which customers and the type of invoices to include in the wizard. You can run the wizard to see its recommendation report and print the dunning letters, if necessary.
If you previously created a wizard and selected Execute Only, Print Later and Exit in the final step, you can run the wizard again and this time choose to print the letters.
For more information about the dunning setup process, see Automating the Dunning Process.
Prerequisite
You have created and saved a wizard. For more information, see Creating and Running a Dunning Wizard.
Procedure
1. From the SAP Business One Main Menu, choose Sales – A/R → Dunning Wizard.
The Wizard Options window appears. The Load a Saved Wizard radio button is selected by default.
If you have a long list of dunning wizards, use the Find field to locate a wizard. Specify a partial or full name of an existing wizard. The first dunning run that matches your search parameters appears.
The window displays the existing wizards. You see the name and creation date of the wizard. You also see the wizard’s status, which can be one of the following:
Saved Parameters The dunning wizard has not been run and the recommendation report has not been created.
Draft The recommendation report has been created, but the dunning wizard has not been run. The report is saved as a draft.
© SAP AG 2009 27

How to Set Up an Automated Dunning Process
Executed and Printed Wizard The dunning wizard has been run and dunning letters were created.
2. Click to select a wizard.
3. In subsequent windows, keep choosing the Next button until the Processing window appears.
The window below shows that you can review the wizard’s settings, but you cannot change them.
4. Select a processing option for the wizard from among the following:
Save Selection Parameter and Exit Saves the selection parameters but does not save the recommendation report. The next time you run the dunning wizard, the report may be different due to new or paid invoices.
Save Recommendation Report as Draft and Exit Creates dunning letters in the future based on this recommendation report. In addition, invoices, credit memos, and payments included in the report are covered by other dunning runs. You can cancel the saved report.
Execute Only, Print Later and Exit Runs the wizard and lets you print the dunning letters created by the recommendation report later. When you want to print the letters, select this dunning run in the first step of the wizard and select Print Dunning Letters and Exit in the last step.
Print Dunning Letters and Exit Prints dunning letters created by the recommendation report.
5. Choose the Finish button.
© SAP AG 2009 28
How to Set Up an Automated Dunning Process
Displaying the Dunning History Summary Report After each dunning wizard run, all customer payment information is saved. This procedure shows you how to work with the Dunning History Summary report, which shows you trends in customer payment behavior. The dunning letters and invoice details in the report are taken from previous dunning wizard runs.
For more information about the dunning setup process, see Automating the Dunning Process.
Prerequisite
You have completed one or more dunning wizard runs. For more information, see Creating and Running a Dunning Wizard or Running a Saved Dunning Wizard.
Procedure
1. From the SAP Business One Main Menu, choose Business Partners → Business Partner Reports → Dunning History Report.
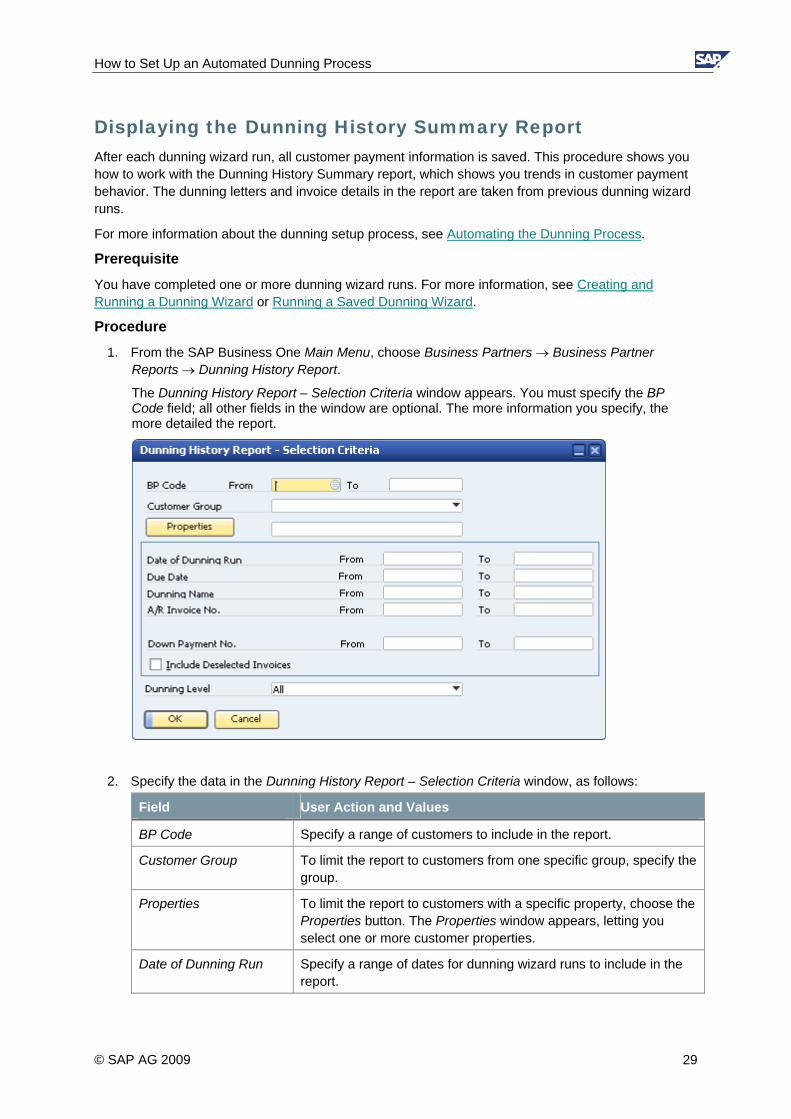
The Dunning History Report – Selection Criteria window appears. You must specify the BP Code field; all other fields in the window are optional. The more information you specify, the more detailed the report.
2. Specify the data in the Dunning History Report – Selection Criteria window, as follows:
Field User Action and Values
BP Code Specify a range of customers to include in the report.
Customer Group To limit the report to customers from one specific group, specify the group.
Properties To limit the report to customers with a specific property, choose the Properties button. The Properties window appears, letting you select one or more customer properties.
Date of Dunning Run Specify a range of dates for dunning wizard runs to include in the report.
© SAP AG 2009 29
How to Set Up an Automated Dunning Process
Field User Action and Values
Due Date Specify a range of dates. Invoices with due dates within the range are included in the report.
Dunning Name Specify the dunning wizard names to include in the report.
A/R Invoice No. Specify a range of invoices to include in the report.
Down Payment No. Specify a range of down payment document numbers to include in the report.
Include Deselected Invoices
Includes invoices from the dunning recommendation report that were deselected (dunning letters not printed).
Dunning Level Select a specific dunning level to include only the invoices related to that level, or select All to include invoices related to all dunning levels in the report.
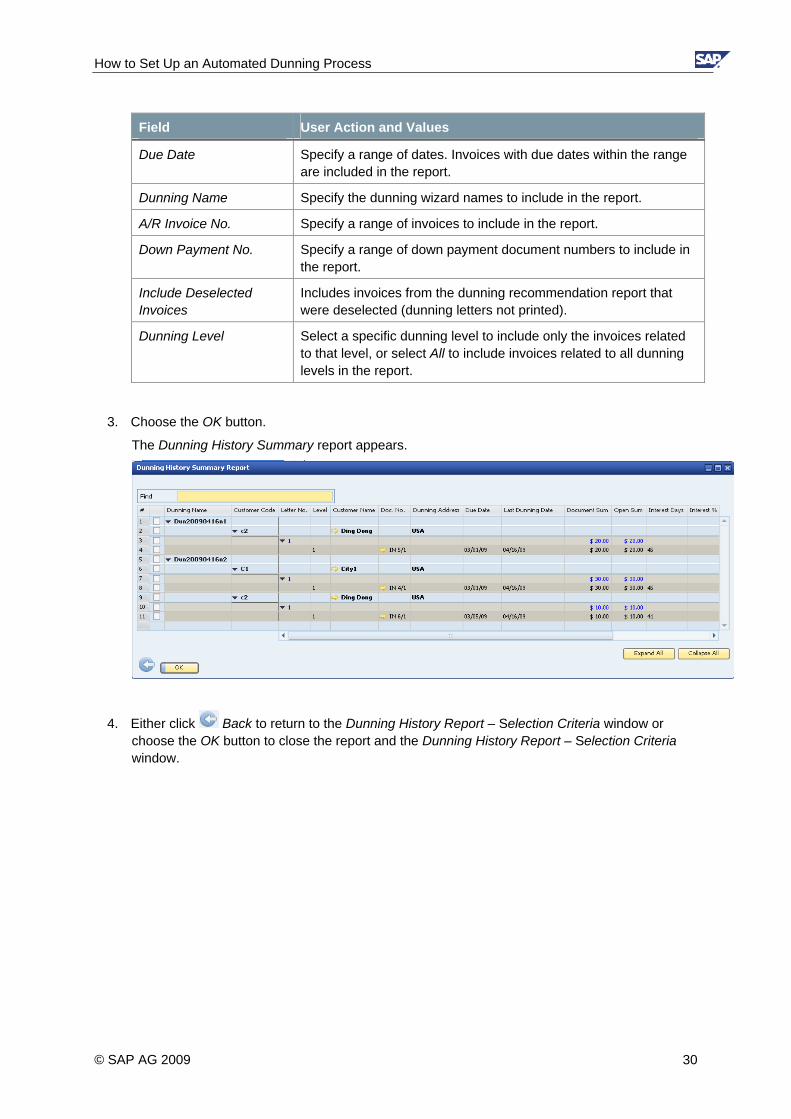
3. Choose the OK button.
The Dunning History Summary report appears.
4. Either click Back to return to the Dunning History Report – Selection Criteria window or choose the OK button to close the report and the Dunning History Report – Selection Criteria window.
© SAP AG 2009 30

How to Set Up an Automated Dunning Process
Printing Dunning Letters and Dunning Reports SAP Business One lets you print dunning letters and dunning reports using default printing layouts.
Change to the Dunning Letter Printing Process In previous releases of SAP Business One, you could print dunning letters from the Customer Receivables Aging report. This is no longer possible. However, as in the past, you can print dunning letters for all overdue customer documents—or for specific documents—using the dunning wizard. The wizard also lets you save and reuse wizards, and you have the option to print letters immediately or in the future.
For information about defining and customizing dunning letters, see Customizing Dunning Letter Layouts.
Printing the Dunning Wizard Recommendation Report Procedure
1. From the SAP Business One Main Menu, choose Sales – A/R → Dunning Wizard.
2. Create and run a dunning wizard. For information, see Creating and Running a Dunning Wizard.
3. When displaying a dunning wizard’s recommendation report (step 5 of the wizard), from the
Tools menu, choose Print Layout Designer, or click in the toolbar.
4. Choose the preferred printing layout.
5. Print the report.
Printing the Dunning History Summary Report Procedure
1. From the SAP Business One Main Menu, choose Business Partners → Business Partner Reports → Dunning History Report.
2. Complete the fields in the Dunning History Report – Selection Criteria window and run the report.
3. From the Tools menu, choose Print Layout Designer, or click in the toolbar.
4. Choose the preferred printing layout.
5. Print the report.
Note You can edit the default layouts or create new ones by using Print Layout Designer (PLD). For more information about Print Layout Designer, see the document How to Customize Printing Layouts with Print Layout Designer, which you can download from the documentation area of SAP Business One Customer Portal (http://channel.sap.com/sbocustomer).
© SAP AG 2009 31

How to Set Up an Automated Dunning Process
Copyrights, Trademarks, and Disclaimers
© Copyright 2009 SAP AG. All rights reserved.
The current version of the copyrights, trademarks, and disclaimers at http://service.sap.com/smb/sbocustomer/documentation is valid for this document.
© SAP AG 2009 32