Embed Size (px)
Citation preview

~ 1 ~
HOW TO INSPECT THE EXTERIOR
The purpose of this publication is to provide accurate and useful information to home
inspectors for the inspection of the exterior of residential properties.
This manual covers the components and materials of the exterior at a typical residential
property, including: siding types; site drainage; moisture intrusion; windows and doors;
flashing; garages; exterior structures; and other exterior systems and components. This
book also covers the inspection process and InterNACHI’s Residential Standards of Practice.
This book is also a handy resource that inspectors can use on the job. It also serves as a
study and review aid for InterNACHI’s How to Inspect the Exterior online course and exam.
Authors: Ben Gromicko, Director of Education,
International Association of Certified Home Inspectors
Rob London, Senior Technical Writer and Researcher,
International Association of Certified Home Inspectors
Nick Gromicko, Founder,
International Association of Certified Home Inspectors
Contributing Ron Huffman, PE, MBA, Exterior Design Institute, and
Author: President, Exteriors and Stucco Evaluation Consultants, Inc.
Graphics: Lisaira Vega and Wylie Robinson
Editor & Layout: Kate Tarasenko / Crimea River
To order, visit: www.InspectorOutlet.com
© Copyright 2010-2012 International Association of Certified Home Inspectors
All rights reserved.
www.NACHI.org

~ 2 ~
Introduction………………….……............................................................ 4
Section 1: Inspection Tools.............................................................. 5
Section 2: Inspection Procedures...……….……............................. 7
Section 3: InterNACHI’s Residential Standards of Practice......... 8
Section 4: Exterior Details and Components................................. 15
Section 5: Doors…….…………….….…………................................. 21
Section 6: Windows…………….…...…………….............................. 24
Section 7: Siding: The Basics…………...………............................. 31
Section 8: Wood Siding….………………….…………....................... 39
Section 9: Aluminum and Steel Siding…………............................. 52
Section 10: Vinyl Siding……………………….………......................... 53
Section 11: Structural Insulated Panels…………………................... 60
Section 12: Brick, Stone and Stucco…..……………......................... 63
Section 13: Asbestos Cement-Based Siding…..……....................... 76
Section 14: Clay and Slate Shingle Siding…..………....................... 80
Section 15: Asphalt Shingle Siding….……..……..…........................ 83
Section 16: Masonry Exterior Wall Covering……..…....................... 85
Section 17: Inspecting the Visible Masonry Foundation….............. 104
Section 18: Eaves, Soffits and Fascia…...…..……..…....................... 120
Section 19: The Wall Assembly……...………..……..…....................... 123
Section 20: Housewrap………………..………..……..…....................... 125
HOW TO INSPECT THE EXTERIOR

~ 3 ~
Section 21: Waterproofing and Damp-Proofing…..…....................... 129
Section 22: Permanent Wood Foundations………..…....................... 131
Section 23: Common Problems with Walls………...…....................... 134
Section 24: The Flashing of Wall Components………....................... 144
Section 25: Understanding Exterior Drainage Systems……............ 155
Section 26: Windows and Doors…………………………..……............ 174
Section 27: Egress Doors……………..………..……..…....................... 181
Section 28: Exterior Stairways and Ramps….……..…....................... 182
Section 29: Exterior Structures………………..……..…....................... 194
Section 30: Inspecting Decks…………………..……..…....................... 197
Section 31: Inspecting a Garage……..………..……..…....................... 216
Section 32: Garage Door-Opener Inspection..……..…....................... 223
Section 33: Other Exterior Systems…………..……..…....................... 227
Section 34: Chimneys………………….………..……..…....................... 229
Section 35: Defensible Space…………………..……..…....................... 231
Section 36: Retaining Walls……………………..……..…....................... 233
Section 37: Driveways, Walkways and Pavement....…....................... 239
Section 38: Buried Oil Tanks…………..………..……..…....................... 240
Section 39: Other Exterior Considerations…...……..…....................... 241
Section 40: Water Management and Damage Prevention:
A Guide for Homeowners………....……..…....................... 250
~ 4 ~
INTRODUCTION
Publication Objectives
The purpose of this publication is to provide accurate and useful information for performing
an inspection of the exterior at a residential property. It covers the components and
materials of the exterior that may be present during a residential inspection, including
siding, windows and doors, flashing, grading, the garage, and other exterior systems and
components. This guide also covers the inspection process according to InterNACHI’s
Standards of Practice for Performing a General Home Inspection.
Learning Objectives
The student should demonstrate an understanding of this guide's content by reading and
studying the material, taking the practice quizzes at the end of selected sections, and by
taking the online course in its entirety, and successfully passing a timed online exam. After
successful completion of all of these elements, the student shall be able to perform an
inspection of the exterior of a residential home according to the InterNACHI Residential
Standards of Practice.
Section 3 lists the particular section of the InterNACHI Residential Standards of Practice that
is relevant to the inspection of the exterior. The full text of the Standards can be read
online at www.nachi.org/sop.htm.
If you are a home inspector in a state that requires licensure or certification, or if your state
regulates property inspectors in some way, find out if regulations exist as to state-specific
standards of practice. Such regulations are promulgated by the regulatory agency that
administers the licensure, registration or certification of home inspectors.

~ 5 ~
SECTION 1: INSPECTION TOOLS
Inspectors should keep a basic toolkit readily available for every inspection, and some of
these items are listed below. More in-depth and comprehensive inspections of the exterior
can be conducted by using some specialized tools that are also included in this list.
First, make sure you're dressed for the job:
Overalls or coveralls protect your clothes, and they’re handy when moving through
a crawlspace or getting under a low deck or porch.
You can put on some shoe covers or booties prior to entering the house that you
are inspecting. Booties protect the floors. This demonstrates care and
consideration of your client's home.
Personal protective equipment (PPE) includes a simple pair of gloves. Gloves
protect your hands from insect bites, scratches from vegetation, dirt and soil, debris,
splinters, and cuts from sharp edges of building components. There are different
types for different situations, such as leather, canvas and rubber. Make sure they fit
snugly.
Kneepads protect your knees while you're crawling around, particularly when the
ground surface is rough and covered with rocks and stones.
Some basic tools include the following:
A flashlight is essential for inspecting under the deck and porch, behind dense
vegetation, and in the shaded areas of the property, especially when access is
limited.
A tape measure can be used to measure the spacing of railing spindles, the rise and
run of ramps and stairs, the height of a railing, the width of an egress door, the area
of visible damage, the dimensions of a joist, and much more.
A magnet can be used to tell the difference between aluminum siding and steel
siding, or galvanized steel flashing from copper flashing.
A level or plumb bob can be used to check walls, posts and columns for plumb and
level. A level can be used to check the slope of a walk, driveway, garage floor, and
hard surface at the house's perimeter.
A screwdriver, awl or probe can be used to check for wood rot or damage. A
screwdriver may be needed to remove an access panel or some type of cover.
Binoculars can be used to look where physical, up-close access is restricted. The
soffit and fascia components cannot be inspected closely without the use of a ladder
or binoculars.

~ 6 ~
A ladder can be used to gain access to those higher-up areas that are not readily
accessible or visible from the ground level. Many inspectors use a ladder to reach
the gutter, eaves and roof.
Exterior inspections can be enhanced using the following specialized tools:
A moisture meter can be used to detect or confirm moisture, as well as water
intrusion problems, and wood that may be saturated with water. There are meters
that are non-invasive and meters that have invasive probes. Learn more by taking
InterNACHI's How to Inspect for Moisture Intrusion course online at
www.nachi.org/moisturecourse.htm.
You should be professionally trained and certified to use an infrared camera.
Thermography is an effective tool to use when inspecting for moisture intrusion and
for areas of energy loss. InterNACHI members can take NACHI.TV’s introductory
video course on infrared thermography for free at www.nachi.tv/ppv/11.
~ 7 ~
SECTION 2: INSPECTION PROCEDURES
Step Back
Many inspectors begin each home inspection by inspecting the exterior. The exterior
inspection should start by observing the home from the street or at the end of the
driveway. Look at the house in its entirety. Check for things that may not be level, plumb
or square. Many major structural problems will be apparent only when viewed from a
distance. Up close, many things on the house may seem okay, but it's a different picture
when the house is observed from farther away. Step back and take a few moments to look
at the whole house. Check its outlining shape, its main design, and its structural features.
Figure out the various components of the house by stepping back. Identify the location of
some of the systems, such as the electrical service, central cooling unit, egress openings,
chimney structures, garage, parking area, side doors, fences, plumbing entrance, outlying
exterior structures, landscaping features, property boundaries, shared utilities or
components, and driveways and sidewalks, as well as restrictions or obstacles to your
inspection, the prevailing wind direction, the southern-facing side of the house, and much
more. Check the large trees that are near the house structure. From afar, you may be able
to identify different types of siding materials used on the house. By stepping back and
looking at the house, you can get the big picture.
Move Closer
Next, move closer to the house and get a better, more detailed look. Many inspectors
follow the front walk or driveway that leads to the house as they approach. You may
choose a clockwise direction to move around the perimeter of the house. In this close-up
inspection of the exterior, you are looking for details by getting behind vegetation, looking
under things, and crawling under, reaching up, looking in, touching, measuring and probing.
Time
The exterior, including the roof system, may take up a third of the total time of the home
inspection.
Water
Water is the main concern when inspecting the exterior. It is the greatest destroyer of
houses.

~ 8 ~
SECTION 3: InterNACHI’s
STANDARDS of PRACTICE for PERFORMING
a GENERAL HOME INSPECTION
Introduction
This section covers the relevant portions of InterNACHI's Residential Standards of Practice,
including comments on the Standards, and what an inspector may observe outside on the
house, including the exterior wall cladding.
At the end of this section, you should be able to:
list four things an inspector is required to inspect; and
list four things an inspector is not required to inspect.
The Standards can be read in their entirety online at www.nachi.org/sop.htm.
Inspectors can also take Introduction to InterNACHI's Residential Standards of Practice
course online at www.nachi.org/intro-residential-sop-course.htm.
The Residential SOP
The following information is excerpted from the InterNACHI Residential Standards of
Practice for inspecting the exterior of a residential property.
1. Definitions and Scope
1.1. A general home inspection is a non-invasive, visual examination of the accessible
areas of a residential property (as delineated below), performed for a fee, which is designed
to identify defects within specific systems and components defined by these Standards that
are both observed and deemed material by the inspector. The scope of work may be
modified by the Client and Inspector prior to the inspection process.
I. The general home inspection is based on the observations made on the date of the
inspection, and not a prediction of future conditions.
II. The general home inspection will not reveal every issue that exists or ever could
exist, but only those material defects observed on the date of the inspection.

~ 9 ~
1.2. A material defect is a specific issue with a system or component of a residential
property that may have a significant, adverse impact on the value of the property, or that
poses an unreasonable risk to people. The fact that a system or component is near, at or
beyond the end of its normal useful life is not, in itself, a material defect.
1.3. A general home inspection report shall identify, in written format, defects within
specific systems and components defined by these Standards that are both observed and
deemed material by the inspector. Inspection reports may include additional comments and
recommendations.
[…]
3.2. Exterior
I. The inspector shall inspect:
A. the exterior wall-covering material, flashing and trim;
B. all exterior doors, decks, stoops, steps, stairs, ramps, porches, railings, eaves, soffits
and fascia;
C. and report as in need of repair any improper spacing between intermediate
balusters, spindles and rails for steps, stairways, ramps, balconies and railings;
D. a representative number of windows;
E. the vegetation, surface drainage, retaining walls and grading of the property when
they may adversely affect the structure, especially due to moisture intrusion;
F. and describe the exterior wall covering.
II. The inspector is not required to:
A. inspect or operate screens, storm windows, shutters, awnings, fences, outbuildings,
or exterior accent lighting.
B. inspect items that are not visible or readily accessible from the ground, including
window and door flashing.
C. inspect or identify geological, geotechnical, hydrological or soil conditions.
D. inspect recreational facilities or playground equipment.
E. inspect seawalls, breakwalls or docks.
F. inspect erosion-control or earth-stabilization measures.
G. inspect for safety-type glass.
H. inspect underground utilities.
I. inspect underground items.
J. inspect wells or springs.
K. inspect solar, wind or geothermal systems.
L. inspect swimming pools or spas.
M. inspect wastewater treatment systems, septic systems or cesspools.
N. inspect irrigation or sprinkler systems.
O. inspect drainfields or dry wells.
P. determine the integrity of multiple-pane window glazing or thermal window seals.
Also, as listed in the SOP under 2.2. Exclusions, the inspector is not required to determine
property boundary lines or encroachments.

~ 10 ~
Comments
When we inspect the exterior of a house, we are not providing an architectural service. We
are not practicing the art and science of building design for the construction of any
structure. We are not commenting upon the use of the space within or the surrounding
structures, or the design or design development, or the preparation of construction contract
documents, or the administration of the construction contract. We are strictly adhering to
the InterNACHI Residential Standards of Practice. We are employing the best non-invasive,
visual-only inspection techniques to perform the inspection of the exterior.
The inspection is not technically exhaustive. That means that the inspection is not a
comprehensive or detailed examination beyond the scope of a real estate home inspection,
which would involve or include, but would not be limited to: dismantling, specialized
knowledge or training, special equipment, measurements, calculations, testing, research,
analysis, or other means.
Consider communicating to your client that there may be problems with the property that
exist during the inspection that will not be found or discovered because they are beyond the
scope of a home inspection.
We inspect the exterior. That means that we have to visually look at readily accessible
systems and components safely, using normal operating controls, and accessing readily
accessible panels and areas in accordance with the Standards of Practice. Something is
accessible if it can be approached or entered by the inspector safely and without difficulty,
fear or danger.
A component is defined as a permanently installed or attached fixture, element or part of a
system. A piece of kickout flashing at the gutter area is an example of a component of a
stucco siding system.
We can activate a component. Activating means to turn on, supply power to or enable
systems, equipment or devices to become active by normal operating controls. An example
would be to turn on the exterior light fixture at the entry door area.
The condition of a component is its visible and conspicuous state. An inspector can report
the component’s condition as being functional. A component can be functional, or
performing, or able to perform, a function. A physically damaged light fixture that is in
pieces is in a condition that is not functional.
In the inspection report, we can describe, in written format, a system or component by its
type or other observed characteristics in order to distinguish it from other components used
for the same purpose.
An inspector is required to describe and identify, in written format, material defects
observed. A material defect is a condition of a residential real property, or any portion of it,
that would have a significant, adverse impact on the value of the real property, or that
involves an unreasonable risk to people on the property.
Inspection reports may include recommendations regarding conditions reported, or
recommendations for correction, monitoring or further evaluation by professionals, but this
is not required.

~ 11 ~
At the exterior, the inspector shall look at the siding or exterior wall cladding. We are
required to inspect and describe the exterior wall covering. We should be able to identify
the type of stucco or EIFS that is installed (if present). We should be able to identify the
type of wood siding installed (if present). We also have to look at the associated flashing
and trim, but only those items, including window and door flashing, that are visible or
readily accessible from the ground.
We are not required to use a ladder to inspect the exterior of a house. We are not required
to move a ladder from place to place or from upper-floor window to upper-floor window.
Many inspectors use binoculars to get a better look at components that are above their
heads. When moving around the house, look up and inspect the eaves, soffits and fascia
components.
Inspectors should look at all of the exterior doors. While inspecting each exterior door,
check each storm door (if present). One of the most common problems with a storm
door is the retractor mechanism. The weatherstripping is often in need of repair or
replacement.
We are required to inspect only a representative number of windows. When an inspector
moves around the exterior, it may be that the first-floor windows are more accessible than
any second-floor windows. Some inspectors will move a ladder to a particular window that
is above what is readily accessible, but this is not required.
We are not required to inspect for safety-type glass, such as that at sliding glass doors, for
example. Inspectors should report as in need of repair any windows that are obviously
fogged or display other evidence of condensation caused by failed seals.
When we walk around the house, we should check the decks, stoops, steps, stairs, ramps,
porches and railings. We should report to our client any spacing between intermediate
balusters, spindles or rails for steps, stairways, ramps, balconies and railings that would
permit the passage of an object greater than 4 inches in diameter.
Part of the inspection of the exterior includes checking the vegetation. We don’t want any
vegetation, bushes or trees in direct contact with the house's exterior cladding.
The surface drainage should be proper. We do not have to inspect underground items, such
as surface-water drainage systems. An inspector should be able to report the condition of
the grading when that grading may have an adverse effect on the structure.
The condition of retaining walls should be inspected, especially when the retaining wall is
likely to adversely affect the structure. We are not required to inspect for erosion-control
and earth-stabilization measures. Inspectors are not required to inspect seawalls,
breakwaters or breakwalls, or docks.
The inspector is not required to inspect or operate screens, storm windows, storm doors,
shutters or awnings.
We do not have to inspect fences, but many inspectors do if they believe that the fence may
affect the structure of the house. Many decks, patios and landscaping have exterior accent
lighting, but that type of lighting is not within the scope of a home inspection.

~ 12 ~
The exterior inspection does not include outbuildings. Many inspectors charge an additional
fee to inspect outbuildings. Home inspectors are not required to inspect recreational
facilities or playground equipment.
Many inspectors include the inspection of a garage or carport with the inspection of the
exterior. According to the InterNACHI Residential Standards of Practice, you are not
required to inspect the garage or carport. If the garage is detached or a carport is present,
the inspector may charge an extra fee to include that in the inspection. The inspector is
required to inspect the garage door and garage door opener by operating it by remote
control (if available), and then by the installed automatic door control.
In summary, an inspector should be able to inspect and identify all of the major systems
and components of the exterior. An inspection report shall describe and identify, in written
format, the inspected systems, structures and components of the dwelling, and shall
identify material defects observed. Inspection reports may contain recommendations
regarding conditions reported, or recommendations for correction, monitoring or further
evaluation by professionals, but this is not required.

~ 13 ~
QUIZ 1
1. T/F: The inspector shall inspect for safety-type glass.
True
False
2. T/F: The inspector shall inspect the flashing that is not visible or readily accessible from the ground.
True
False
3. T/F: The inspector shall describe the exterior wall covering.
True
False 4. T/F: The inspector shall inspect all of the windows.
True
False
5. T/F: The inspector shall inspect the fascia.
True
False
6. T/F: The inspector shall inspect all exterior doors.
True
False
Answer Key is on the next page.

~ 14 ~
Answer Key to Quiz 1
1. T/F: The inspector shall inspect for safety-type glass.
Answer: False
2. T/F: The inspector shall inspect the flashing that is not visible or readily accessible
from the ground.
Answer: False
3. T/F: The inspector shall describe the exterior wall covering.
Answer: True
4. T/F: The inspector shall inspect all of the windows.
Answer: False
5. T/F: The inspector shall inspect the fascia.
Answer: True
6. T/F: The inspector shall inspect all exterior doors.
Answer: True

~ 15 ~
SECTION 4: EXTERIOR DETAILS and COMPONENTS
This section deals with the common building details and styles that may be observed during
an inspection of the exterior.
At the end of this section, you should be able to identify and describe some common
architectural details of a residential property.
Cornice
A cornice can be any horizontal decorative
trim located at the top of any building or
architectural element. The term cornice
comes from the Italian cornice, meaning
―ledge.‖ A cornice usually refers to the
horizontal decorative trim at the top of an
exterior wall and below the roof edge of a
building, but a cornice can be over a door or
window.
The function of the projecting cornice is to
throw rainwater free of a building’s walls. At
a residential structure, this function is
handled by projecting gable ends, roof eaves
and gutters. The cornice may include
decorative trim. Highly decorative trim is
often called an entablature.
Entablature
An entablature is a major element of
classical architecture. It can refer to the
structure of moldings and bands located
horizontally above columns. It can be
divided into the architrave (the supporting
member), the frieze (a strip that may or
may not be ornamented), and the cornice
(the projecting member).

~ 16 ~
Pediment
A pediment is a classical architectural element consisting of the triangular space found
above the horizontal structure (entablature) or columns. Pediments can be found over
doors and entries. They can be straight, curved or broken. A pediment is typically found at
a porch roof or above an exterior door at a house.
Portico
A portico (from the Italian) is a porch leading to the entrance of a building with a roof
structure over a walkway, and supported by columns or enclosed by walls.
Dentils
A cornice may have dentils. A dentil (Latin
for "tooth") is a small, tooth-shaped block
used as a repeating ornament within a
cornice.

~ 17 ~
Bracket
Brackets are ornamental supports
that appear at the cornice. They may
be shaped into scrolled patterns or be
more simple. Brackets are often
found in pairs.
Eaves
An eave is the edge of a roof. Eaves
can provide weather protection by
projecting beyond the exterior wall of
the building. Some buildings, such as
Craftsman bungalows, have very wide
eaves with decorative brackets. An
eave may also refer to the lower part
of a sloped roof that projects beyond the wall or soffit.
In solar building practices, the eave may be extended to control the amount of sunlight and
heat entering a window.
Quoin
Quoins are used as a detail at the corner of two
walls. Quoins typically project from the face of the
walls on both sides of the corner. Quoins can
function as the cornerstones of brick or stone walls.
Quoins may be structural or may be simply
decorative. The most common form of decorative
use for quoins is as an alternating pattern of
rectangular blocks that wrap around the wall,
mimicking the pattern of stone blocks or bricks as
they would wrap around a corner and thus join the
two walls.
Architects and builders use quoins to give the
impression of strength and firmness to the outline of
a building. Quoins are often used on houses that
are stucco-clad to give the same impression.
Quoins usually extend the full height of the walls. They can appear to be of a different
color, shape or texture than the rest of the wall.
~ 18 ~
Columns
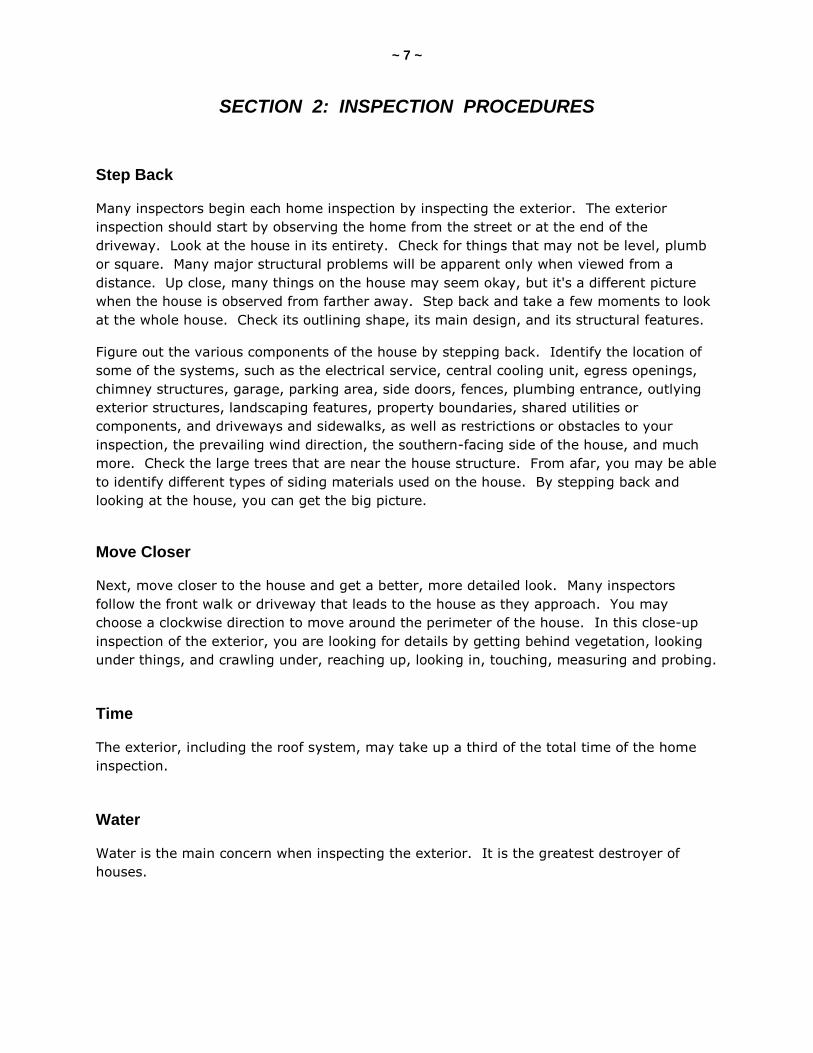
A column typically refers to a vertical structural element that transmits the weight of the
structure above to other structural elements below. A column can have certain
proportional and decorative features.
Columns can be structurally functional or simply decorative. Columns can be round, square,
rectangular, straight or tapered. Column styles are defined by their capitals, which are the
tops of the columns. If the column projects from the house wall, it is called a pilaster. The
pilaster is used to give the appearance of a supporting column.

~ 19 ~
QUIZ 2
1. A(n) __________ is a classical architectural element consisting of the triangular space found
above the horizontal structure or columns.
portico
cornice
pediment
2. A(n) ________ usually refers to the horizontal decorative trim at the top of an exterior wall and
below the roof edge of a building, but it can be found over a door or window, too.
entablature
portico
pediment
cornice
3. A __________ is a porch leading to the entrance of a building with a roof structure over a
walkway, and supported by columns or enclosed by walls.
bracket
dentil
portico
4. __________ are used as a detail at the corner of two walls that typically project from the face
of the walls on both sides of the corner.
Columns
Porticos
Quoins
5. A __________ refers to a vertical structural element that transmits the weight of the structure
above to other structural elements below.
column
lite
transom
pediment
Answer Key is on the next page.

~ 20 ~
Answer Key to Quiz 2
1. A pediment is a classical architectural element consisting of the triangular space
found above the horizontal structure or columns.
2. A cornice usually refers to the horizontal decorative trim at the top of an exterior
wall and below the roof edge of a building, but it can be found over a door or window,
too.
3. A portico is a porch leading to the entrance of a building with a roof structure over a
walkway, and supported by columns or enclosed by walls.
4. Quoins are used as a detail at the corner of two walls that typically project from
the face of the walls on both sides of the corner.
5. A column refers to a vertical structural element that transmits the weight of the
structure above to other structural elements below.

~ 21 ~
SECTION 5: DOORS
This section deals with the common details and styles of doors that may be observed during
an inspection of the exterior.
At the end of this section, you should be able to:
• list the different types of the most common doors;
• describe how each type of door operates; and
• list the components of a typical panel door.
A door is a moveable barrier used to cover an opening. A door can be opened to provide
egress. It can be closed and secured using a lock. When a door is open, it brings in light
and ventilation. Doors assist in preventing the spread of fire. Doors can reduce noise.
There are all kinds of doors. There are many names for doors, depending on their purpose.
The most common type of door consists of a single rigid panel that fills the doorway.
Different types of doors include the following:
• A Dutch door is divided in half horizontally.
• Saloon doors are a pair of swinging doors that are often found in public bars and
restaurants separating the commercial kitchen from the dining area.
• A blind door is designed to blend in with the adjacent wall finish.
• A French door has window panes that fill the full length of the door.
• A louvered door has fixed or movable wooden fins.
• A flush door is completely smooth, with a hollow-core interior, used primarily as an
interior door.

~ 22 ~
• A moulded door has a similar structure as that of a flush door, but the skin surface
is moulded.
• A brace door is made from vertical planks secured together by two horizontal planks
and kept square by a diagonal plank.
• A bi-fold door has several sections that fold in pairs.
• A sliding glass door is made of glass, slides open, and sometimes has a screen.
Hinged
Most doors are hinged along one side. The door swings or pivots away from the opening in
one direction. A swing door has hinges that allow it to swing either outward or inward.
Typical French doors have two swinging door panels that swing either in or out.
Sliding
Sliding doors move along the horizontal plane. The bottom of a slider door has wheels with
grooves that keep the bottom of the door steady on a track. Slider doors are commonly
found at the rear of a house leading to a backyard, patio or deck. Doors that slide inside a
pocket cavity inside a wall are called pocket doors.
DOOR COMPONENTS
Exterior doors are typically panel doors, or moulded doors that appear to be panel doors.
Panel doors are also called stile and rail doors. Panel doors are built with frame-and-panel
construction components.
Stiles
Stiles are vertical boards that run the full height of the door and compose its right and left
edges. The hinges are mounted to the fixed side, known as the hanging stile. The handle,
lock, bolt and/or latch are mounted on the swinging side, known as the latch stile.
Rails
Rails are horizontal boards at the top, bottom and (optionally) in the middle of a door that
join the two stiles. The top rail and bottom rail are named for their positions. The bottom
rail is also known as the kick rail. A middle rail at the height of the door bolt is called the
lock rail.
Panels
Panels are large, wide boards that fill the space between the stiles, rails and mullions. The
panels typically fit into grooves in the other pieces and help to keep the door rigid. Panels
may be flat or raised in raised-panel designs.

~ 23 ~
Mullions
These are smaller, optional vertical boards that run between two rails and split the door into
two or more columns of panels.
Muntins
These are the vertical members that divide the door into smaller panels.
Lites
Lites are pieces of glass used in place of a panel, essentially giving the door a window.

~ 24 ~
SECTION 6: WINDOWS
This section deals with the common details and styles of windows that may be observed
during an inspection of the exterior.
At the end of this section, you should be able to:
• list the different types of the most common windows;
• describe how each type of window operates; and
• list the components of a typical double-hung window.
Fixed
Fixed windows are sometimes referred to as picture windows. A fixed window does not
open.
Picture Window
A picture window is a very large fixed window in a wall. Picture windows are intended to
provide an unimpeded view.

~ 25 ~
Double-Hung
A double-hung window has two operable sashes
that move. Many older and historic homes have
double-hung windows. This window is a
traditional style of window in the U.S. The
window has two parts (sashes) that overlap
slightly and slide up and down inside the
frame. Most new double-hung sash windows
use spring balances to support the sashes.
Traditionally, counterweights were used. The
weights are attached to the sashes using
pulleys of either a cord or chain.
Horizontal-Sliding
A horizontal-sliding sash window has two or more sashes that overlap slightly and slide
horizontally within the frame. In the United Kingdom, these are sometimes called Yorkshire
sash windows. The entire window may have sliders or, more typically, only one sash will
slide. These sliders are similar to patio door sliders, where one slider door is fixed and the
other slides.
Single-Hung
Shingle-hung windows have a fixed and an operable sash. The operable sash is usually
located on the bottom, and the fixed sash is located at the top of the window.
Casement
A casement window
is one that is hinged,
usually at the side,
and sometimes at
the top or bottom.
The sash swings in
or out much like a
door, comprised of a
side-hung, top-hung
or bottom-hung
sash, or a
combination of these
types. In the U.S.,
these windows are
usually opened using
a crank.

~ 26 ~
In Europe, they tend to use friction mechanisms and espagnolette locking. A crank, stay or
friction hinge is necessary when the window opens outward in order to hold the window in
position.
Awning (Casement) Window
An awning window is a casement window that is hinged at the top. The window hangs
horizontally by the hinges. It swings outward like an awning. It typically opens outward
and operates with a crank.
Hopper (Casement) Window
A hopper window is a casement window that has hinges on the bottom. Usually, the
window opens inward, toward the living space, rather than outward.
Jalousie or Louver
A jalousie window consists of parallel glass and acrylic or wooden louvers set in a frame.
The louvers are locked together onto a track so that they may be tilted open and shut in
unison to control air flow through the window. When the window is closed, the louvers
overlap each other in a shingle pattern.
Jalousie windows are best suited for porches that are not climate-controlled and are in mild-
winter climates. They are common on mid-20th-century homes in Florida and other
southern states in the U.S. They are also common in Hawaii.
They are good for providing ventilation. They are not weathertight. They are not good
insulators in northern climates if energy efficiency is a concern. They can remain open
during rain and yet keep most of the rain from entering because of the shingle orientation.
Transom
A transom window is located above a
door. In an exterior door, the transom
window is typically fixed. In an interior door,
it may open. In an older house, the function
of an interior transom window that opens was
to provide ventilation before the forced-air
HVAC system was introduced.
~ 27 ~
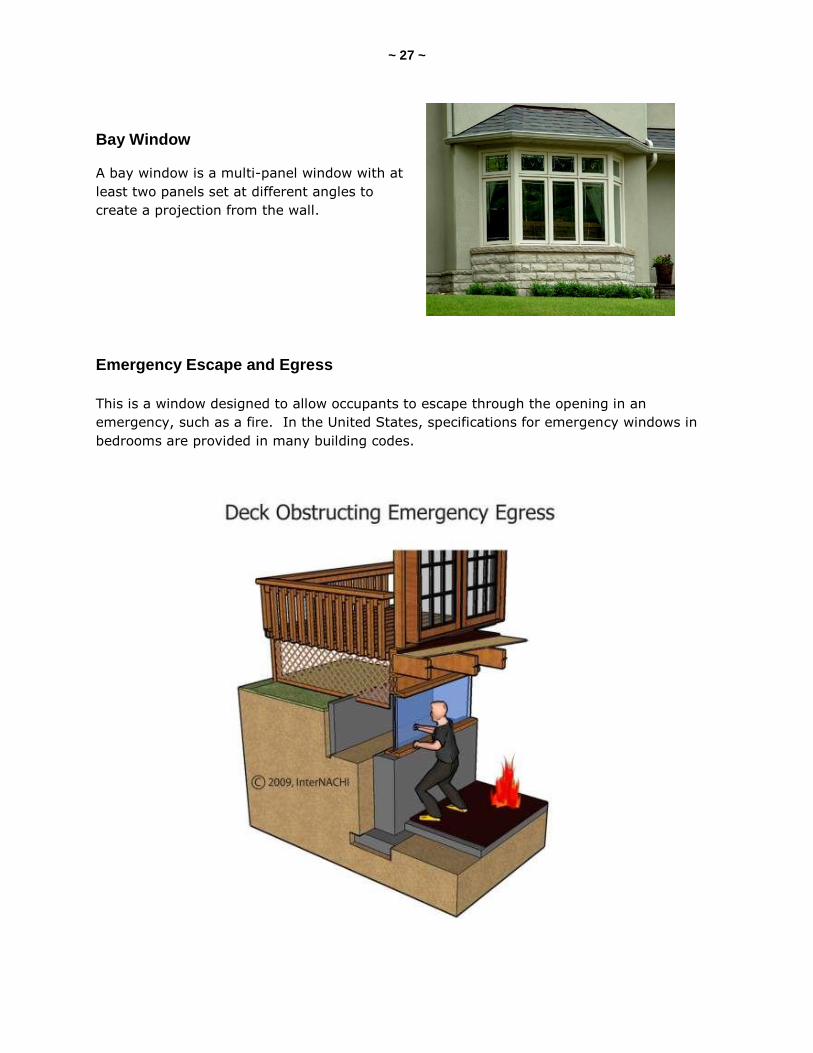
Bay Window
A bay window is a multi-panel window with at
least two panels set at different angles to
create a projection from the wall.
Emergency Escape and Egress
This is a window designed to allow occupants to escape through the opening in an
emergency, such as a fire. In the United States, specifications for emergency windows in
bedrooms are provided in many building codes.

~ 28 ~
Lite or Light
The terms ―lite‖ and ―light‖ are
interchangeable and refer to a glass
pane. Several lites may be installed in a
window. For example, a fixed window
has one lite. A single-light can refer to
one piece of glass in a sash. A horizontal
slider has two lites, with one sash fixed
and the other a slider. A double-light
refers to two lites of a window.
Muntins
The lites in a window sash are divided horizontally and vertically by narrow strips of wood or
metal called muntins. Muntins divide a sash into smaller lites or panes.
In many modern windows, the muntins are not true muntins, but are decorative only. Fake
muntins are mounted either on the interior-side of the glass, or they are installed between
two panes of a double-glazed window. They may be made of wood, metal or plastic. In the
U.K., these are called glazing bars.
Mullion
A mullion is a structural element that divides adjacent
window units. ―Mullion‖ is often confused with
―muntin," which is the term for the small strips of
wood or metal that divide a sash into smaller glass
panes or lites.
A mullion acts as a structural member, and it carries
the dead load of the weight above the opening.

~ 29 ~
QUIZ 3
1. A ___________ window has two operable sashes that move.
top-hung
casement
single-pane
double-hung
2. The sash of a(n) ____________ window swings in or out.
awning
jalousie
double-hung
casement
3. A ________ window has hinges on the bottom and opens inward toward the living space.
single-hung
hopper
flopper
sliding
4. A ________ window is located above the door.
single-pane
lite
transom
bay
5. The lites in a window sash are divided horizontally and vertically by narrow strips of wood or
metal called _________.
muntins
mullions
strips
lights (Continued on next page.)

~ 30 ~
6. _________ are vertical boards that run the full height of the door and compose its right and left
edges.
Mullions
Rails
Stiles
Muntins
7. _______ are the horizontal boards at the top, bottom and (optionally) in the middle of a door
that join the two stiles.
Rails
Muntins
Mullions
Stiles
Answer Key to Quiz 3
1. A double-hung window has two operable sashes that move.
2. The sash of a casement window swings in or out.
3. A hopper window has hinges on the bottom and opens inward toward the living space.
4. A transom window is located above the door.
5. The lites in a window sash are divided horizontally and vertically by narrow strips of wood or metal called muntins.
6. Stiles are vertical boards that run the full height of the door and compose its right and left edges.
7. Rails are the horizontal boards at the top, bottom and (optionally) in the middle of a door that join the two stiles.

~ 31 ~
SECTION 7: SIDING — THE BASICS
This section deals with the general description of the wall envelope that is observed during
an inspection of a home’s exterior.
At the end of this section, you should be able to:
list the systems and components included in the wall envelope; and
describe the function of siding.
Wall Envelope
Exterior walls provide the house with a weather-resistant exterior wall envelope. The
exterior wall envelope (or building envelope) includes the following components and
systems:
siding (or cladding);
roof covering;
glazing;
exterior walls, windows and door assemblies;
skylight assemblies (if present); and
other components that enclose the house.
The exterior wall envelope should be designed and constructed in a manner that prevents
the accumulation of water within the wall assembly by providing a water-resistant barrier
behind the exterior veneer (or exterior wall covering), and a means of draining water that
enters or passes through the siding to the exterior. Siding is that which is installed on the
outer surface of the exterior wall envelope.

~ 32 ~
The building envelope can be a weak and susceptible system of the house. Siding failures
often result in water intrusion and major structural problems over a large section of the
house. A small component of the siding may result in disproportionately greater structural
damage.
Siding
For purposes of the information presented here, the term ―siding‖ includes the exterior wall
covering and cladding. All of these terms are used interchangeably. The siding system
includes:
wall surfaces;
eaves, soffit and fascia;
windows and doors;
trim and flashing; and
sealant or caulking.
Siding is the exterior wall covering or
cladding of a house. It is the "skin" of a
house's exterior. Its primary function is to
keep out the weather and provide the
building’s aesthetic look. It protects
against wind, rain and snow. It takes a
blow from a baseball or the scraping from a
tree branch. Apart from providing the
external appearance of the house, the
primary function of cladding is to protect
the structure from weather, particularly to
shed rainwater.
This may be achieved by using one of the
following:
porous materials. Porous materials, such as brick, absorb water during rain and
subsequently dry out. If the wall is thick and the permeability is low, the water will
not penetrate during a rainstorm. A cavity is normally designed in the wall of porous
materials to provide a pathway for possible water intrusion;
sealed construction. Impermeable siding materials permit the intrusion of water only
at the joints. Sealing the joints creates an impermeable layer that is continuous; or
a rainscreen. The purpose of a rainscreen siding material is to protect the wall from
direct rain. The joints may allow some water penetration, but an air gap and water-
resistant barrier behind the siding limit the penetration. An air gap with ventilation
is designed into the wall to encourage drying out.

~ 33 ~
Fastening
Many siding materials are held securely in place with fasteners, including nails. Siding is
usually nailed through the sheathing and into the structural members, such as studs.
Masonry veneer walls use brick metal ties to hold the brick wall in place, secured to the
house's exterior wall framing.
Stone and brick used as exterior siding materials need support to hold their weight, such as
a foundation, footing or ledge. Vinyl cladding is lighter in weight and can simply be
attached to the framing by nails or hung with fasteners.
Insulation Value of Siding
Siding material is not considered insulation. Typically, siding is not a good insulator. Siding
sold with thin, insulated panels can provide a little insulation value, but not enough to be
calculated as a significant energy-saving benefit. True insulation building materials include
fiberglass, cellulose, foam, and ridge sheet siding.
For houses that were constructed in the 1950s, insulated siding was considered a big benefit
because the walls of these older homes were barely insulated. Nowadays, the insulation
value of siding materials is minor compared to a modern home with properly, well-insulated
walls.
Some construction practices include installing large, rigid sheets of insulation behind the
siding that is being installed. The insulation may be made of polystyrene, polyurethane or
polyisocyanurate. The insulation sheets will noticeably increase the insulation value of the
wall.

~ 34 ~
Careful consideration must be made when deciding to install large, rigid sheets of insulation
on an older house that does not have a continuous interior vapor-retarder. The insulation
may trap moisture in the wall behind the insulation, eventually causing water damage. The
moisture problem is reduced if very thick, rigid sheets of insulation are installed instead of
thin ones. The thicker insulation will keep the wall warm and prevent condensation
formation inside the wall. A Canadian practice is to add this type of insulation with an
R-value that is two times that of the value of the wall.
There have been problems with installing some siding materials over large, rigid sheets of
insulation. Wood siding can crack if not installed properly over this type of insulation. The
manufacturer’s recommendation must be considered when the siding is installed.
Siding Types
There are many different types of siding. As an inspector, you may see a wide variety
of materials installed on the outside of houses. Siding may be made of wood, metal, plastic
(vinyl), masonry or composite materials. It may be attached directly to the building's
structure or to an intermediate layer of sheathing. You may see shingles or shakes, bricks
or stone, aluminum or vinyl, or combinations of siding materials on the same home. You
may see siding that is painted or stained, or wood siding on top of brick, or stucco installed
on top of steel siding materials. You may see wood siding installed vertically, horizontally or
diagonally.
The following types of siding are commonly used over wood-frame and masonry
construction:
aluminum siding;
cement-fiber panels or siding;
exterior insulation finish systems (EIFS);
stucco;
vinyl;
wood panels or siding; and
masonry, brick and stone.
Each of these coverings differs in performance as well as permeability. The most common
sidings are wood-based, such as solid wood, plywood, shingles, shakes, hardboard and
particleboard.
While vinyl is a non-permeable material, vinyl siding is designed to be water-resistant, not
waterproof. Vinyl siding is not designed to prevent water intrusion. All siding is designed to
shed water, but concrete and masonry materials are known to absorb water and release it
through evaporation.

~ 35 ~
Siding may be formed of horizontal boards, vertical boards (known in many countries as
weatherboarding), shingles and sheet materials. In all four cases, avoiding wind and rain
infiltration through the joints is a major challenge met by overlapping, by covering or
sealing the joint, or by creating an interlocking joint.
The next sections cover the following types and materials of siding:
wood;
metal;
vinyl;
brick, stone and concrete;
stucco and EIFS;
asphalt shingles;
cement-based siding;
clay and slate shingles; and
plywood, hardboard and oriented strand board (OSB).
These sections discuss how to recognize each type of the siding materials, what problems
may arise, and how to find those problems when inspecting the siding.
There is a wealth of information that can be drawn from other sources about siding.
InterNACHI encourages you to continue to learn about siding throughout your entire career
as a home inspector.

~ 36 ~
Some issues related to siding are not covered in detail in this manual because they are
beyond the visual scope of a home inspection, or because there are different requirements
among different geographical areas and municipal authorities.
We encourage you to understand what is required in your part of the country and what is
required by your local authority having jurisdiction (AHJ). These issues include, but are not
limited to, the requirements related to:
sheathing;
thickness;
minimum fastening and support;
building paper or housewrap;
acceptable materials; and
installation methods.
General Requirements
There are general requirements for all exterior siding systems. The general requirements
include:
providing the house with a weather-resistant envelope;
having functional flashing;
preventing water intrusion into the walls; and
protecting against condensation.
Layers
The siding should not be considered the only barrier to water intrusion. The housewrap,
flashings and underlayment must be used to shed and direct water away from the building.
The best principle is to have layers of materials installed so that water cannot get behind
any one layer and into an opening.
High Wind
Exterior walls are designed and built to withstand code-specified wind speeds. Basic wind
speeds can be found using wind maps. Wind speeds are generally greater in coastal areas,
so the effects of high winds on exterior wall-covering materials are a primary concern. The
basic wind speeds as related to building cladding are up to 110 mph. In areas where the
basic wind speed is greater than 110 mph, special building codes, standards and practices
should be applied.

~ 37 ~
SIDING MATERIALS CHART
Material
Durability
Accepts Staining
Accepts Painting
Maintenance
Requirements
Weather- tightness
Resistance to Damage
Insula-
tive Value
WOOD SIDING
solid wood fair good fair low, unless
painted good good poor
plywood fair good fair high good fair
poor
shingles and shakes
fair good fair low, unless
painted good poor poor
hardboard poor fair good low, if
pre-finished good fair poor
overlaid particleboard
poor fair good low, unless
painted good fair poor
METAL SIDING
aluminum fair n/a fair low good poor
poor
steel fair n/a fair low good good
poor
SYNTHETIC SIDING
vinyl fair n/a poor low good good
poor
fiberglass- reinforced
plastic
*
n/a poor low good good poor
manufactured stone
*
n/a poor low good good poor
insulated panels
*
n/a
*
* good good good
MASONRY SIDING &
COVERING
brick
good
n/a
good
low
varies with porosity
good
poor
stone
good
n/a
good
low
varies with porosity
good
poor
stucco/EIFS
fair
n/a
fair
low
fair
fair
poor, unless EIFS
concrete good n/a good low good good
poor
* = Depends on material, manufacturer and/or other factors
n/a = not applicable

~ 38 ~
QUIZ 4
1. The _________ is the exterior wall covering or cladding of a house and is considered the house's "skin."
fastening
barrier
siding
paint
2. Apart from providing the external appearance of the house, the primary function of cladding is to protect the structure from weather—particularly, to shed _______.
ice
snow
UV radiation
rainwater
3. The joints in exterior siding may allow some water penetration, but an air gap and __________ behind the siding limit any penetration.
insulation and vapor barrier
fasteners
plastic tape on the joints
water-resistant barrier
Answer Key to Quiz 4
1. The siding is the exterior wall covering or cladding of a house and is considered the house's "skin."
2. Apart from providing the external appearance for the house, the primary function of cladding is to protect the structure from weather—particularly, to shed rainwater.
3. The joints in exterior siding may allow some water penetration, but an air gap and water-resistant barrier behind the siding limit any penetration.

~ 39 ~
SECTION 8: WOOD SIDING
This section deals with the common details of wood siding that may be observed during an
inspection of the exterior.
At the end of this section, you should be able to:
list the different types and styles of wood siding; and
identify common concerns related to wood siding.
Solid Wood or Lumber Siding
Solid wood or lumber siding may be the most common siding. It is attractive, durable,
readily available, and relatively easy to install. Wood siding can be installed vertically,
horizontally, diagonally, or in any combination.
Wood siding does not strengthen the structure, so corner bracing is needed. However, solid
wood logs on a log home provide both siding and structural strength.
Maintenance
Maintenance of wood siding is often neglected. Your clients should understand the need to
check the siding and maintain it. They should pay particular attention to the changes in
direction and material, the ends of the wood pieces, and the penetrations.
Many siding problems are caused by improperly applied paint. Paint on siding may blister,
peel, crack, fade or chalk. Some paint problems are caused by interior moisture that passes
through the wall and lifts the paint.
Semi-transparent, oil-based stains can be applied to wood siding. Most beveled wood
sidings have one rough-sawn side that absorbs paint and stain well. Unlike paint, stains do
not lift (blister), peel, crack or chalk. Some woods can be allowed to weather without any
stain applied. Vertical-grain, all-heartwood redwood and cedar are two ideal woods used for
exterior siding.
Check for dense vegetation around the home. Climbing vines, such as ivy, that are close to
or on the siding should be trimmed or removed. Vegetation holds moisture and water up
against the siding, which can be detrimental to the siding's condition over time.
Installation
Siding should be installed tight enough to prevent problems related to water intrusion, but it
should be loose enough to allow it to adequately dry after a rainstorm. Good wood siding
has high drying potential. Sunlight dries out wood siding, but it does not simply cause
evaporation. The sun actually drives the water into the wood. It can drive moisture all the
way through the wood siding.

~ 40 ~
This is why it is important for the wood siding to have good drying potential, with air
movement on the backside of the wood.
Natural wood siding should be installed over building paper regardless of the sheathing
materials used. Building paper is a water barrier rather than a moisture barrier. It is
recommended to prevent water from entering the wall cavity. Foam sheathing is a separate
consideration. Caulk can be used where siding abuts openings and trim. Latex, latex-
silicone blends, polyurethane, and polysulfide caulks generally perform satisfactorily. Caulks
that are 100% silicone should not be used.
Nails
Correct nails and nailing practices are essential in the proper application of wood siding. In
general, siding and box nails are used for face nailing, and casing nails are used for blind
nailing. Nails must be corrosion-resistant and, preferably, rust-proof. Stainless steel is the
best choice. Aluminum nails may be used. High tensile-strength aluminum is an
economical choice. Hot-dipped galvanized nails are the least expensive, but may result in
discoloration if precautions are not taken. Hot-dipped nails can rust and stain the wood
over time. Other fasteners that are corrosion-resistant may perform satisfactorily. Some
fasteners can cause black iron stains, which can be permanent. Nails can be exposed or
hidden, depending on the siding type.
You may find that the siding is nailed into the studs, nailed into the solid wood strapping
behind the siding, or just nailed into the sheathing.
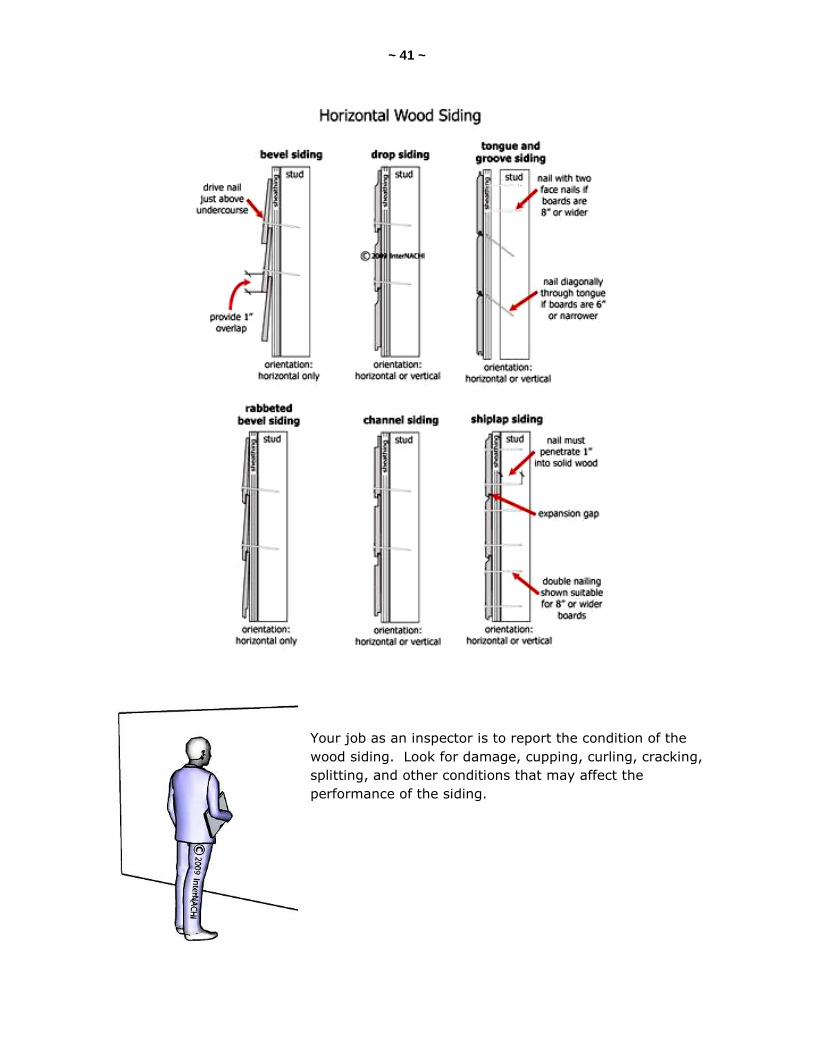
~ 41 ~
Your job as an inspector is to report the condition of the
wood siding. Look for damage, cupping, curling, cracking,
splitting, and other conditions that may affect the
performance of the siding.

~ 42 ~
Examples of Solid Wood Siding
Common siding installation patterns include:
beveled (rabbeted, feather-edge or clapboard);
boards are thicker at the bottom than at the top;
are installed horizontally;
with a 1-inch overlap; and
usually installed with one nail per stud.
Board and Batten
Characteristics of
this installation
include:
vertical
planks are
the boards;
narrow
strips are
the
battens;
battens
cover the
joint
between
the boards;
installation
is always vertical and never horizontal; and
boards are spaced ½-inch apart.

~ 43 ~
Tongue and Groove (T&G)
Characteristics of this installation include:
siding can be horizontal or vertical;
one nail per 6-inch-wide boards;
nails can be driven diagonally for 6-inch-
wide boards; and
two nails per 8-inch or wider boards.
Shiplap
Characteristics of this installation include:
looks like tongue and groove;
can be horizontal or vertical;
one nail per 6-inch-wide boards; and
two nails per 8-inch or wider boards.
In general, there should be more nails, and possibly an
open gap, for boards 8 inches or wider.
There are many different species of wood used as wood
siding. Cedar and redwood are used because of their
natural decay-resistant resins. Shorter boards shrink
less than longer ones. Wood boards that are 8 inches wide perform better than boards that
are wider than 8 inches because narrow boards shrink less. Thicker boards perform better
because they are less likely to cup, curve or split. Rough-textured wood holds finish and
stains better than smooth boards. Wood with a low moisture content and few knots
performs well. Inspectors are not required to identify the type of species and grade of wood
siding during a home inspection.
Siding that Lasts
Wood siding material that is not suitable for exteriors, improperly installed, or improperly
finished will often fail within a few years.

~ 44 ~
Plywood Siding
Plywood is a structural panel. Plywood siding is popular because it is less expensive to
install than solid wood siding. It is readily available and easily installed. Plywood siding
adds to the strength of a house's structure. Most plywood siding requires an exterior wood
finish. Rough-surface plywood is ideal for paint and stain.
Plywood is made of thin sheets of wood veneer, or plies, which are glued together and
arranged in layers. The grain of the layers is usually at 90° to adjacent layers, with the face
layer's grain running the length of the panel. The alternating direction of the grain gives the
sheet strength and stiffness. Plywood siding is more stable than solid wood siding with
changes in moisture content. Plywood swells only slightly when saturated. Just like other
wood, plywood can rot, deteriorate, delaminate and crack at the surface.
Exterior Floor Coverings
Houses near the ocean are almost always elevated. The space underneath the house is
exposed to the elements unless it has been covered with exterior sheathing, siding, or
another weather-resistant covering. Plywood is commonly used. Applying sheathing to the
bottom of the floor structure can minimize corrosion of the framing fasteners and
connections by limiting the salt spray and other coastal environmental factors. The exterior
covering also protects any insulation installed on the floor structure. Exterior-grade
sheathing should be used in this application, and stainless steel or hot-dipped, galvanized
nails or screws should be used.
Installing rated roof sheathing at under-floor applications, and securing it to the floor
framing using the same nailing schedule as that required for roof sheathing, is an adequate
method of securing the sheathing. To prevent moisture from being trapped, the floor-joist
cavity created by the under-floor exterior sheathing should be vented.
Shingles and Shakes
Shingles and shakes are popular
siding materials because they are
durable and available in several wood
species, lengths and types. Shingles
and shakes do not add strength to the
house structure. They require a good
nailing base, such as wood or plywood
sheathing. One of the most durable
wood species for shingles and shakes
is western red cedar.

~ 45 ~
Types
Wood shingles and shakes are usually western red cedar, white cedar, redwood or cypress.
They have a natural resistance to wood rot. Pine may be used, but it is usually pressure-
treated to resist rot. Western cedar has grades. The best grade is 100% heartwood. There
is also 100% edge grain, and 100% clear of knots.
Installation
Wood shingles are usually installed for siding in two layers to create a double layer.
Shakes may be taper-split, hand-split, re-sawn, straight-split or taper-sawn. Butt joints
should be installed over studs or other support components.
Nails
Nails for wood shingles and wood shakes can be copper, stainless steel or hot-dipped,
galvanized nails. Staples are sometimes used. You may see two nails or fasteners per
shingle.
Not all of the nails will be going into the studs. Most will be going into the sheathing behind
the siding. Building paper or housewrap is usually installed to protect the sheathing and
provide a drainage plane.

~ 46 ~
Joints
Butt joints on vertical siding are usually cut at an angle or on a bevel. The upper
board should overlap the lower board. Ideally, the joints on diagonal siding should be cut
so that the joints are both vertical and mitered. Joints in courses should be staggered, not
lined up vertically connected.
Common Problems
The most common problems with wood shakes and shingles include:
splitting;
warping;
finish problems; and
rot.
Splits
Water can easily travel through splits in boards. There is open, exposed wood inside the
split that can result in deterioration at that area. Split wood may be caused by shrinkage of
the wood, a poor nailing schedule, rusting nails, physical damage, butt ends too tight, or
other conditions. Butt ends should be spaced about ⅜-inch apart to allow for swelling.
Warping
Warping usually appears because one side of the wood is wet or moist and the other side is
dry. Warped wood is not weather-tight and may allow water to penetrate the wall.
Sometimes, a warped piece of siding can be carefully nailed back into place. Flattening the
warped wood usually results in creating a crack. Look for screws or nails along a crack in a
warped piece of wood siding, which may be an indication of an attempt to flatten it.
Hardboard
Hardboard is a popular
type of fiberboard that is
made from wood fibers
designed with a specific
density. It is
compressed into a
dense, wood fiberboard.
Synthetic adhesives
provide bonding
between the fibers.

~ 47 ~
Hardboard has a uniform composition and appearance. There are no grains, knots or
natural deficiencies.
Hardboard siding is denser than wood siding. Hardboard does not delaminate, split or warp
like natural, conventional wood boards. It does not expand or contract as much as natural
wood does. It holds paint well. Hardboards are sometimes pre-finished.
Hardboard can be embossed and textured to appear like natural wood, plywood or stucco.
It can be installed over sheathing or directly to the wall framing. Lapped hardboard does
not strengthen the house structure.
Hardboard can be affected by moisture. It can rot. It swells more than natural wood when
it is wet.
OSB Siding
OSB stands for oriented strand board. It is formed of wood wafers mixed with a waterproof
resin binder. It is then laid flat and oriented. Heat is applied, and wafers are formed into
panels.
Unlike general waferboard, the wafers in an OSB panel are oriented so that they align
parallel with the length of the panel, giving it significant strength.
If exposed to the elements, OSB will absorb moisture quickly and swell, and the wafers and
layers will delaminate. The edges of OSB are particularly susceptible to moisture and
physical damage.
Particleboard Siding
Particleboard is available as overlaid particleboard siding and as waferboard.
Overlaid particleboard siding has a particleboard core, overlaid on both sides, with a resin-
impregnated fiber sheet. It has a smooth surface.
Waferboard is particleboard with large wood flakes left exposed. It does not absorb paint or
stain well and should not be used as exterior siding. Waferboard is typically used for
sheathing under the siding. Waferboard is made of wafers that are not oriented the
way OSB is.
CONSIDERATIONS
Buckling and Cracking
Buckling and cracking are commonly found with hardboard. When hardboard is used as
siding, the wood must be allowed to expand and contract along the length of the board.
Buckling and cracking of wood siding materials can be caused by nailing too tightly, or
because adjacent boards are butted together too tightly. A space of 1/16-inch to 1/8-inch
should exist in between the edges of adjacent sheets of OSB or plywood.
~ 48 ~
The space allows room for expansion and contraction. Hardboard siding should have a
space of 3/16-inch in between the pieces.
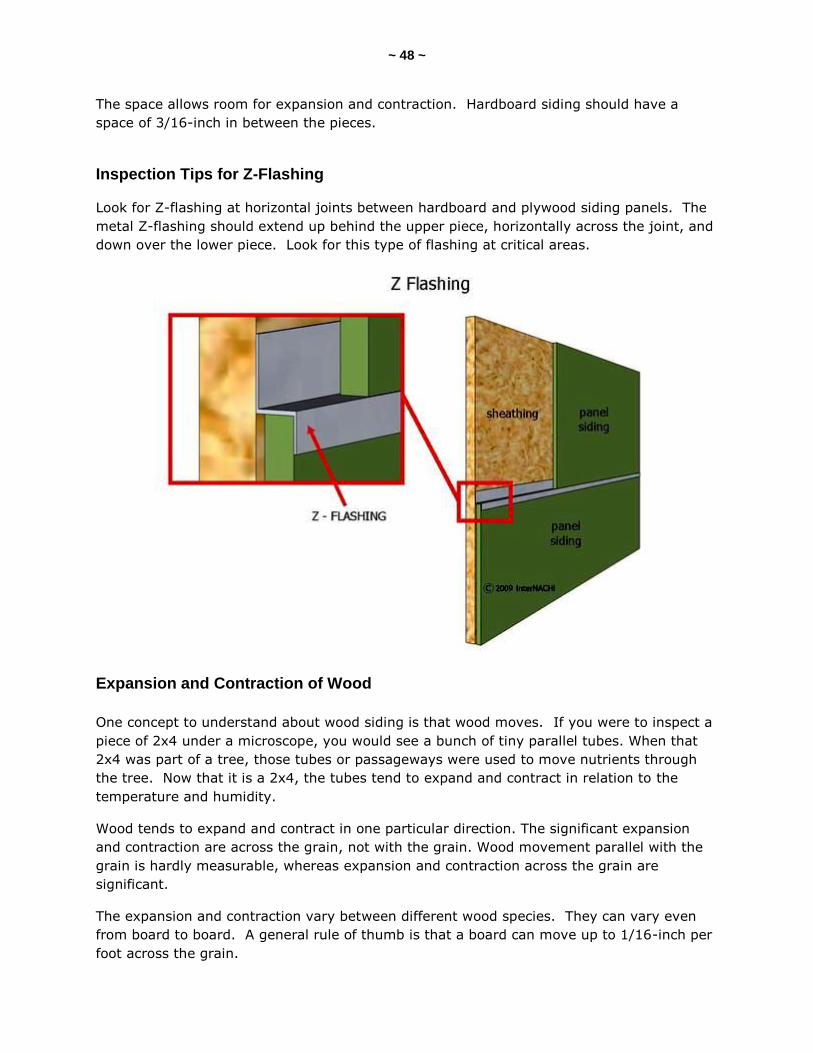
Inspection Tips for Z-Flashing
Look for Z-flashing at horizontal joints between hardboard and plywood siding panels. The
metal Z-flashing should extend up behind the upper piece, horizontally across the joint, and
down over the lower piece. Look for this type of flashing at critical areas.
Expansion and Contraction of Wood
One concept to understand about wood siding is that wood moves. If you were to inspect a
piece of 2x4 under a microscope, you would see a bunch of tiny parallel tubes. When that
2x4 was part of a tree, those tubes or passageways were used to move nutrients through
the tree. Now that it is a 2x4, the tubes tend to expand and contract in relation to the
temperature and humidity.
Wood tends to expand and contract in one particular direction. The significant expansion
and contraction are across the grain, not with the grain. Wood movement parallel with the
grain is hardly measurable, whereas expansion and contraction across the grain are
significant.
The expansion and contraction vary between different wood species. They can vary even
from board to board. A general rule of thumb is that a board can move up to 1/16-inch per
foot across the grain.

~ 49 ~
Manufactured panels, such as plywood and particleboard, include so much glue that
expansion and contraction are virtually nonexistent.
Finish Problems
Paint and stain are considered to be necessary by most people who want to extend the life
of their wood siding. Paint and stain can give the house a desirable appearance and
protection against weathering. On an inspection, you may find that wood siding has paint
or stain that is in poor condition. The siding on the south side will usually weather and
deteriorate before the other sides of the house because of its exposure to the sun.
Paint
Paint is a surface finish of a liquid or mastic composition that contains pigments. After
application in a thin layer to a substrate, such as wood siding, it is converted to an opaque,
solid film.
Pigments
Pigments are granular solids incorporated into the paint liquid that give it color, durability
and texture. Some paints contain dyes instead of or in combination with pigments.
Pigments are either synthetic or natural. Synthetic pigments include engineered molecules
and synthetic silica. Natural pigments include clay, mica, calcium carbonate, and silica.
Pigments can make the paint opaque and, as a result, protect the substrate from weather
and ultraviolet light.
Lead
Some pigments are toxic, such as the lead pigments that are used in lead paint. Lead was
banned from being manufactured for residential use in 1978 by the U.S. Consumer Product
Safety Commission. Paint manufacturers replaced white lead pigments with the less toxic
substitute, titanium white (titanium dioxide). You can learn more about lead paint,
including remediation techniques, in InterNACHI's online Lead Safety for Renovation, Repair
and Painting course.
Binder
The film-forming component of paint is called the binder. The binder binds the pigments
together, and strongly influences such properties as gloss potential, exterior durability,
flexibility and toughness. A binder can be categorized according to its drying or curing
mechanism.

~ 50 ~
Drying
Drying and curing are two different things. Drying refers to evaporation of a solvent.
Curing refers to polymerization of a binder. There are paints that only dry, and there are
those that only cure. There are also those that dry and then cure. Paints dry when the
solvent evaporates, and a solid film forms when the solvent evaporates.
Latex
Latex paints cure by a process called coalescence, where first the water and then the
solvent evaporate and draw together, softening the latex binder particles and fusing them
together into irreversibly bound networked structures.
Paint or Stain in Poor Condition
Paint or stain may be in poor condition for a number of reasons, including:
age;
poor quality;
UV deterioration;
physical damage;
excess moisture;
weathering; and/or
poor application practices.
Inspection Tips for Paint
Look for cracking, peeling, checking and blistering paint conditions. Poor paint conditions
could be the result of many things, including moisture problems. Peeling paint is often
caused by poor preparation of the surface prior to painting. Cracking may be caused by old
age, and the expansion and contraction of the wood. Blistering could be caused by
moisture. Try to note the general condition of the paint surface of the siding as a whole,
and then move in closer and report any smaller areas that are significantly deteriorated.
Chalking
―Chalking‖ refers to the white, powdery film on the surface of paint. As the paint weathers
and the binder slowly degrades by ultraviolet radiation and moisture, chalking can occur.
Over time, the binder's hold on the pigment is released. After years of being hit by sunlight,
paint simply starts to wear or erode away. This exposes the pigments beneath, and since
they are no longer bound into the paint film, they are easily wiped off. This result
is chalking. Old paint is likely to be chalky. The chalk is the powder that is deposited on
your finger when you rub it over old, chalky paint.

~ 51 ~
Chalk can run down the wall's surface beneath and cause cosmetic problems with the wall's
appearance.
Chalk can be considered to be in the same category as dust and dirt. Chalk can be
removed. Once removed, the surface can be re-painted. The surface can be simply
dampened with fresh water and scrubbed with a bristled brush or broom.
Rot
When the moisture content of wood is above 20%, and the external temperature is between
40° F and 115° F, wood rot may be found. If you find rot, look for the source of the
moisture. The source can be from a roof leak, gutter leak, openings or gaps in joints,
condensation, air movement, wood installed close to grade or in contact with soil,
inadequate drying, or other conditions. Oftentimes, the source of water penetration into a
wall comes from the poor building practices around the windows and doors or wall
attachments, such as light fixtures. Wood siding is susceptible to rot at the ends of the
boards. Cut boards should be sealed or painted in order to resist wood rot.
Outside corners are good places to look for wood rot because imperfections in the corner
joints and connections may expose the end grains to moisture. Mitered corner joints are
not the best practice. Outside corner boards and metal outside corner details perform
better than mitered joints.
Inspection Tips for Rot
Inspect for rot by pressing the
wood with your hand or
finger. Tap on wood with the
back of your screwdriver. A
non-invasive moisture meter
can be used to confirm
suspicious conditions. Probing
the wood may confirm
whether it is deteriorated, wet
or rotting. Look closely at
wood near the ground
surface. Check the end grains
and joints. Check the siding
for adequate clearance from
the roof surface.

~ 52 ~
SECTION 9: ALUMINUM and STEEL SIDING
This section deals with the common details of aluminum and steel siding that may be
observed during an inspection of the exterior.
At the end of this section, you should be able to describe the common concerns with both
aluminum and steel siding.
Aluminum
Aluminum is among the most common siding materials. Aluminum siding can be made
to look like wood, including vertical shingle and shake styles. Aluminum expands and
contracts with temperature changes, so installation by a skilled installer is important.
Aluminum does not add to structural strength. It is installed over sheathing.
Aluminum siding dents easily. To protect against dents, many manufacturers offer a thin
backerboard of insulation that fits behind each panel. The insulation can reduce noise and
slightly increase the insulation value of the siding. If scratched, the exposed aluminum will
not rust. Scratches can be touched up with a special paint or material.
Aluminum siding can conduct electricity, and grounding may be an installation requirement.
Repainting aluminum is similar to repainting a car and requires preparation, appropriate
paint selection, and proper application.
Steel
Steel siding is less common than aluminum. The most popular styles of steel siding look
like smooth or textured beveled wood siding. Many colors and styles are available. The
installation of steel siding requires special skill and tools.
Steel siding is resistant to dents, but if the finish becomes scratched or chipped, repair will
be needed to prevent rust from developing. Steel siding can be repainted.
Steel siding can conduct electricity, and grounding may be an installation requirement.
Grounding Metal Siding
Some jurisdictions require that metal siding be grounded. Grounding the metal siding is a
safety measure. Check with your local AHJ as to whether grounding the metal siding is a
requirement.

~ 53 ~
SECTION 10: VINYL SIDING
This section deals with the common details of vinyl siding that may be observed during an
inspection of the exterior.
At the end of this section, you should be able to:
describe how vinyl siding functions; and
list the common concerns related to vinyl siding.
Vinyl siding is the exterior cladding of choice for homeowners, remodeling contractors and
builders. Compared to other siding products, vinyl is attractive, durable, easy to maintain,
and cost-effective.
Vinyl siding is made of extruded polyvinyl chloride (PVC). The color permeates through the
material. Scratches do not need to be repainted. If the vinyl is scratched, the scratch is the
same color. The color does not peel or chip off the surface.
Vinyl will not fade, rust or dent easily. It comes in a wide variety of colors and styles. Vinyl
siding is manufactured to resemble wood, brick and stone. Vinyl is flexible except in
extremely cold weather, when it becomes brittle. Vinyl siding does not support combustion
but may soften and distort under high temperatures.
Maintaining vinyl siding is easy. Maintenance consists of an occasional spray and wash with
a hose. Mild detergents can be used.
Vinyl siding has always been designed as an exterior cladding, not a water-resistant barrier.
Vinyl siding is designed to allow the material underneath it to breathe; therefore, it is not a
watertight covering. Vinyl siding provides a supplemental rainscreen that enhances the
water-resistive barrier system by reducing the amount of water that reaches the underlying
water-resistant barrier.
Vinyl siding is made from organic materials and will melt or burn when exposed to a source
of flame or heat, such as barbecue grills. Combustible materials, such as dry leaves, mulch
and trash, should be kept away from vinyl siding.
Inspection Tips for Vinyl Siding
Installed panels and accessories must move freely from side to side.
Fasteners should be installed in the center of the nailing slot.
Fasteners should penetrate a minimum of ¾-inch into a nailable surface. The
nailable surface could be substantial sheathing or furring strips.

~ 54 ~
The head of the fastener should not be tightly driven against the siding nail hem.
There should be approximately 1/32-inch of clearance, about the thickness of a
dime, between the fastener head and the siding panel.
Fasteners that are not driven straight and level may cause distortion and buckling of
the panel.
A minimum of ¼-inch clearance should be left at all openings and stops to allow for
normal expansion and contraction.
Caulk should not be installed where the panels meet the receiver of inside corners,
outside corners, or J-trim. Caulk should not be applied at the overlap joints.
Vinyl should not be face-nailed or stapled through the siding. Face nailing can result
in ripples in the siding.
Lap joints should be staggered. Two joints should not line up vertically.
Building paper or housewrap should be installed behind vinyl siding. Wind-driven
rain can easily get behind vinyl siding. Horizontal vinyl siding has drainage holes or
slots in the bottom to allow water that gets behind the siding to drain.
Vinyl Siding Moves
Vinyl siding expands and contracts constantly in relation to temperature. Think of vinyl
siding as loosely floating on the wall's surface.

~ 55 ~
Surface-mounted fixtures, such as exterior lights, should not be mounted directly onto the
vinyl siding. Fixtures such as lights, electric meters, window shutters and hose bibbs should
be mounted on mounting blocks. If a fixture is installed on the siding, the fasteners that go
through the siding will restrict the siding's movement when it expands and contracts.
Fasteners for Vinyl Siding
Aluminum, galvanized steel, or other corrosion-resistant nails, staples or screws can be
used when installing vinyl siding. Aluminum trim pieces require aluminum or stainless steel
fasteners. All fasteners must be able to penetrate a minimum of ¾-inch into framing or
furring. Review your local building codes for variations that may apply to specific
geographic areas.
Nails should be 5/16-inch minimum in diameter. Shanks should be ⅛-inch in diameter.
Screw fasteners can be used if the screws do not restrict the normal expansion and
contraction movements of the vinyl siding panel on the wall. Screws must be centered in
the slot with approximately 1/32-inch space between the screw head and the vinyl. Screws
must be able to penetrate not less than ¾-inch into framing or furring of corrosion-
resistant, self-tapping sheet metal type.
Vinyl siding should terminate in a J-molding around the windows and doors. J-molding is
not flashing. It simply holds the ends of the siding pieces in place and creates a smooth
termination edge.

~ 56 ~
QUIZ 5
1. T/F: Wood siding can be installed vertically, horizontally, diagonally, or in any combination.
True
False
2. T/F: Natural wood siding should be installed over building paper, regardless of the sheathing materials used.
True
False
3. Correct _______ and _______ practices are essential in the proper installation of wood siding.
fasteners..... caulking
screws..... pounding
nails..... painting
nails..... nailing
4. T/F: A common wood siding pattern is a 1-inch overlap.
True
False
5. ________ and redwood are used because of their natural decay-resistant resins.
Pine
Cedar
Spruce
Maple
6. T/F: Wood shingles and shakes do not add strength to the house's structure.
True
False
7. T/F: Ideally, joints in courses of wood siding should be staggered.
True
False (Continued on next page.)

~ 57 ~
8. T/F: Hardboard will delaminate, split and warp.
True
False
9. If exposed to the elements, ________ will absorb moisture quickly, making it swell, so it is particularly susceptible to moisture and physical damage.
OSB
vinyl
waferboard
10. One concept to understand about wood siding is that wood __________.
contracts
expands
does all these things
moves
11. The manufacture of lead paint for residential use was banned in _______ by the U.S. Consumer Product Safety Commission.
1978
2010
1990
1962
12. ____________ refers to the formation of a white, powdery film on the surface of paint, which is produced as the binder slowly degrades from exposure to ultraviolet radiation and moisture.
Whitening
Aluminizing
Chalking
Powderizing
13. Wood rot may be found when the wood's moisture content is above ____.
20%
30%
40%
60% (Continued on next page.)
~ 58 ~
14. T/F: Aluminum expands and contracts with temperature changes.
True
False
15. Aluminum siding _______ easily, so many manufacturers offer a thin backerboard of insulation that fits behind each panel.
absorbs water
dents
warps
burns
16. Maintaining ______ siding is easy.
wood
vinyl
17. There should be a clearance of approximately 1/32-inch between the fastener head and the __________ siding panel.
vinyl
wood
OSB
hardboard
brick
18. T/F: Building paper or housewrap should not be installed behind vinyl siding.
True
False
Answer Key is on the next page.

~ 59 ~
Answer Key to Quiz 5
1. T/F: Wood siding can be installed vertically, horizontally, diagonally, or in any combination. Answer: True
2. T/F: Natural wood siding should be installed over building paper, regardless of the sheathing materials used. Answer: True
3. Correct nails and nailing practices are essential in the proper installation of wood siding.
4. T/F: A common wood siding pattern is a 1-inch overlap. Answer: True
5. Cedar and redwood are used because of their natural decay-resistant resins.
6. T/F: Wood shingles and shakes do not add strength to the house's structure. Answer: True
7. T/F: Ideally, joints in courses of wood siding should be staggered. Answer: True
8. T/F: Hardboard will delaminate, split and warp. Answer: False
9. If exposed to the elements, OSB will absorb moisture quickly, making it swell, so it is particularly susceptible to moisture and physical damage.
10. One concept to understand about wood siding is that wood does all these things.
11. The manufacture of lead paint for residential use was banned in 1978 by the U.S. Consumer Product Safety Commission.
12. Chalking refers to the formation of a white, powdery film on the surface of paint, which is produced as the binder slowly degrades from exposure to ultraviolet radiation and moisture.
13. Wood rot may be found when the wood's moisture content is above 20%.
14. T/F: Aluminum expands and contracts with temperature changes. Answer: True
15. Aluminum siding dents easily, so many manufacturers offer a thin backerboard of insulation that fits behind each panel.
16. Maintaining vinyl siding is easy.
17. There should be a clearance of approximately 1/32-inch between the fastener head and the vinyl siding panel.
18. T/F: Building paper or housewrap should not be installed behind vinyl siding. Answer: False

~ 60 ~
SECTION 11: STRUCTURAL INSULATED PANELS (SIPs)
This section deals with the common details of structural insulated panels that may be
observed during an inspection of the exterior.
At the end of this section, you should be able to:
describe how structural insulated panel siding functions; and
list the common concerns related to the siding.
Structural insulated panels (SIPs) are high-performance building panels used in floors, walls
and roofs for residential and light commercial buildings. SIPs are manufactured under
factory-controlled conditions. The panels are typically made by sandwiching a core of rigid
foam plastic insulation between two structural skins of oriented strand board (OSB). Other
skin material can be used for specific purposes.
These panels are designed to be part of the structural support members of the outer walls.
They are used in post-and-beam construction, and can form a complete wall system with an
exterior wall covering, insulation, and an interior wall surface. The result is a building
system that is extremely strong, energy-efficient and cost-effective. Building with SIPs
saves time, money and labor.
Like an I-Beam
SIPs are structurally self-sufficient. The structural characteristics of SIPs are similar to that
of a steel I-beam. The OSB skins act as the flange of the I-beam, while the rigid foam core
provides the web. This design is extremely strong and eliminates the need for additional
framing. In roof applications, SIPs rely on beams and purlins for support. SIPs can span
long distances, allowing a minimal amount of structural supports to be used.
Similar to Conventional Framing
The majority of construction with SIPs is very similar to conventional framing. SIPs accept
dimensional lumber and are fastened together using staples, nails or screws. Proper sealing
is especially crucial in an SIP structure. All joints need to be sealed with specially-designed
SIP sealing mastic or low-expanding foam sealant, and/or SIP tape. Voids between panels
and unused electrical chases need to be filled with low-expanding foam.
Modifications
On-site modification can be easily done. A few additional SIP-specific tools are needed.
Panels can be cut using a beam saw or a beam-cutting attachment on a circular saw. The
foam core can then be recessed for splines or dimensional lumber using a hot-wire foam
scoop or a specialized angle-grinder attachment to recess the core.

~ 61 ~
Air Barriers
Air barriers or vapor barriers are not required in SIP buildings because properly sealed SIPs
create a code-compliant air barrier with a permeability rating of less than 1 perm. In
addition, the foam core of SIPs is solid and continuous throughout the wall, eliminating the
convection and condensation issues that can occur in cavity walls.
Mold Prevention
An airtight SIP building envelope forms the basis of a successful mold-control strategy. The
extremely low levels of air infiltration in SIP buildings allow for incoming air to be provided
in controlled amounts by air-handling equipment. In addition to creating an airtight
structure, SIPs are solid and free of any cavities in the wall where moisture can condense
and cause unseen mold growth.
Siding Attachment
Builders should consult the siding manufacturer’s installation instructions for how to attach
their product to SIPs. Because SIPs use very little solid lumber, an increased fastener
schedule is typically required when attaching exterior cladding.
If the siding manufacturer does not offer recommendations for attaching their product to
SIPs, a licensed architect or engineer can calculate the appropriate fastener frequency by
obtaining fastener pull-out capacities from the SIP manufacturer.
It is also important that proper moisture-management procedures be followed when
applying any type of cladding to SIPs. With the exception of metal and vinyl siding, all
claddings should be installed with a drainage gap between the cladding, as well as a
weather-resistant barrier in climates that receive an average of more than 20 inches of
annual rainfall.

~ 62 ~
QUIZ 6
1. T/F: SIP panels are typically made by sandwiching a core of rigid foam plastic insulation
between two structural skins of OSB.
True
False
2. T/F: SIPs are self-sealing, so they don't require any additional sealing at the joints.
True
False
3. T/F: An air or vapor barrier is not required in SIP buildings because properly sealed SIPs
create a code-compliant air barrier with a permeability rating of less than 1 perm.
True
False
Answer Key to Quiz 6
1. T/F: SIP panels are typically made by sandwiching a core of rigid foam plastic
insulation between two structural skins of OSB.
Answer: True
2. T/F: SIPs are self-sealing, so they don't require any additional sealing at the joints.
Answer: False
3. T/F: An air or vapor barrier is not required in SIP buildings because properly sealed
SIPs create a code-compliant air barrier with a permeability rating of less than
1 perm.
Answer: True

~ 63 ~
SECTION 12: BRICK, STONE and STUCCO
Brick
Clay brick has been used for centuries as a siding material.
Brick is durable.
It is attractive with its many types, colors and textures.
Brick houses are known to be quiet.
Brick does not burn, rot, support termites, suffer hail damage, or conduct electricity.
Brick is structurally strong.
A common practice is to use brick as a facing material. A full-size brick is commonly laid in
front of a concrete, concrete-block or framed wall.
Brick is heavy and requires support with a footing.
Metal ties are used to connect the brick to the house framing, or the brick may be
connected to a concrete or block wall with cement mortar.
An air gap between the brick and the framing provides some insulation value.
Brick siding needs some maintenance, such as maintaining the mortar joints, and
preventing moisture from entering the wall.
Brick can last the lifetime of the house.
Stone
Stone has been used for centuries as an exterior covering material. Stone is durable.
It comes in many sizes, colors and patterns.
Manufactured stone is a combination of cement, light aggregates, and colored oxides.
It can be difficult to distinguish manufactured stone from real, natural stone.
Stucco and EIFS
Describe and Identify
The InterNACHI Residential Standards of Practice state that an inspection report shall
describe and identify, in written format, the inspected systems, structures and components
of the dwelling, and shall identify material defects observed. The difficulty is in the
identification of the exterior covering material.

~ 64 ~
When the siding appears to be stucco, it may not be enough for many inspectors to simply
identify the covering as ―stucco.‖ You may decide that it is in the best interests of your
client to know what type (or types) of stucco is installed on the house, and to correctly
identify whether the cladding is EIFS. With professional training, a home inspector should
be able to identify the type of stucco that is installed on the house, as well as identify
common concerns and defects related to the material, and then communicate his/her
findings in an inspection report.
This section does not go into exhaustive detail about performing a stucco and EIFS
inspection, so you should consider taking a professional training course, such as
InterNACHI's How to Inspect Stucco and EIFS online video course (worth 16 Continuing
Education credit hours). This course will teach you about the best non-invasive, visual-only
inspection techniques used to inspect stucco and EIFS, as required by the InterNACHI
Residential Standards of Practice.
To be able to identify the stucco system, you must understand the system’s components.
You should understand the basic components of the most common stucco systems. Some
homes have multiple systems installed on them. At times, it may not be possible to identify
the system. Occasionally, you will find that the cladding is not a standard system but,
rather, a combination of components or systems.
General Information
Stucco is used as an exterior covering or coating on residential buildings and is common in
many parts of the U.S. Stucco is durable. Traditional stucco is made of lime, sand and
water. Modern stucco is made of Portland cement, sand and water. Lime can be added to
decrease the permeability and increase the workability of modern stucco. Sometimes,
proprietary additives, such as synthetic acrylics and glass fibers, are added to improve the
stucco's strength and flexibility.
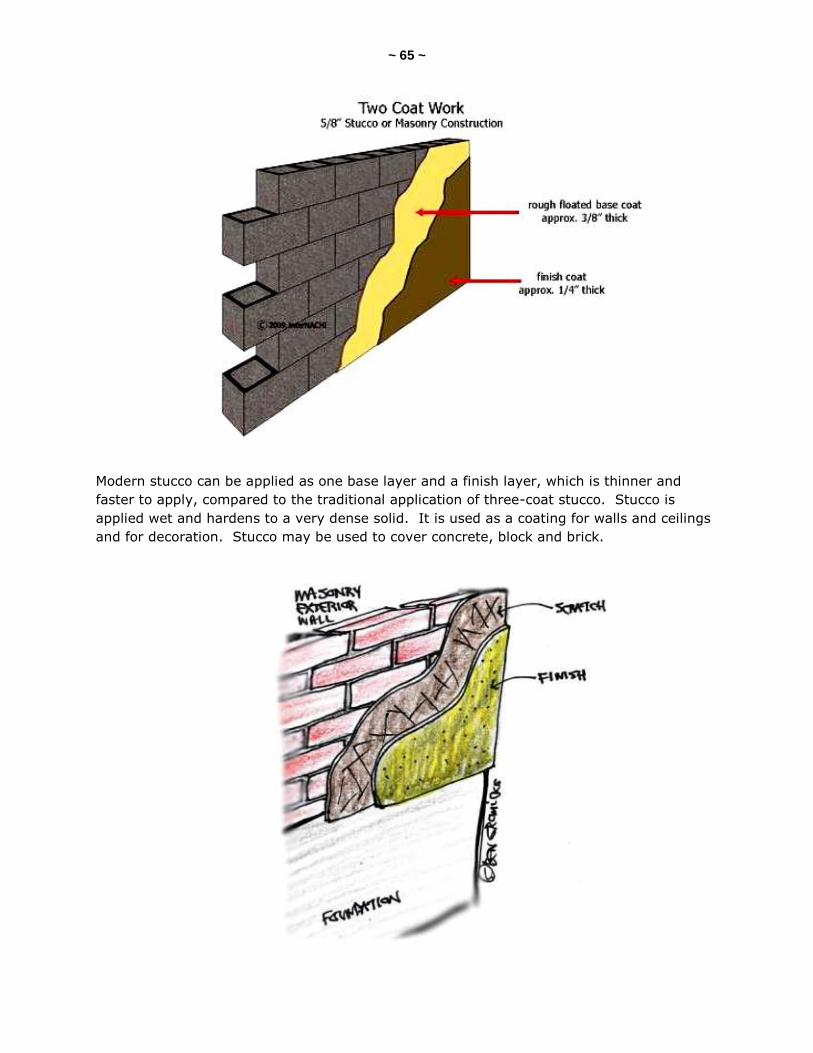
~ 65 ~
Modern stucco can be applied as one base layer and a finish layer, which is thinner and
faster to apply, compared to the traditional application of three-coat stucco. Stucco is
applied wet and hardens to a very dense solid. It is used as a coating for walls and ceilings
and for decoration. Stucco may be used to cover concrete, block and brick.
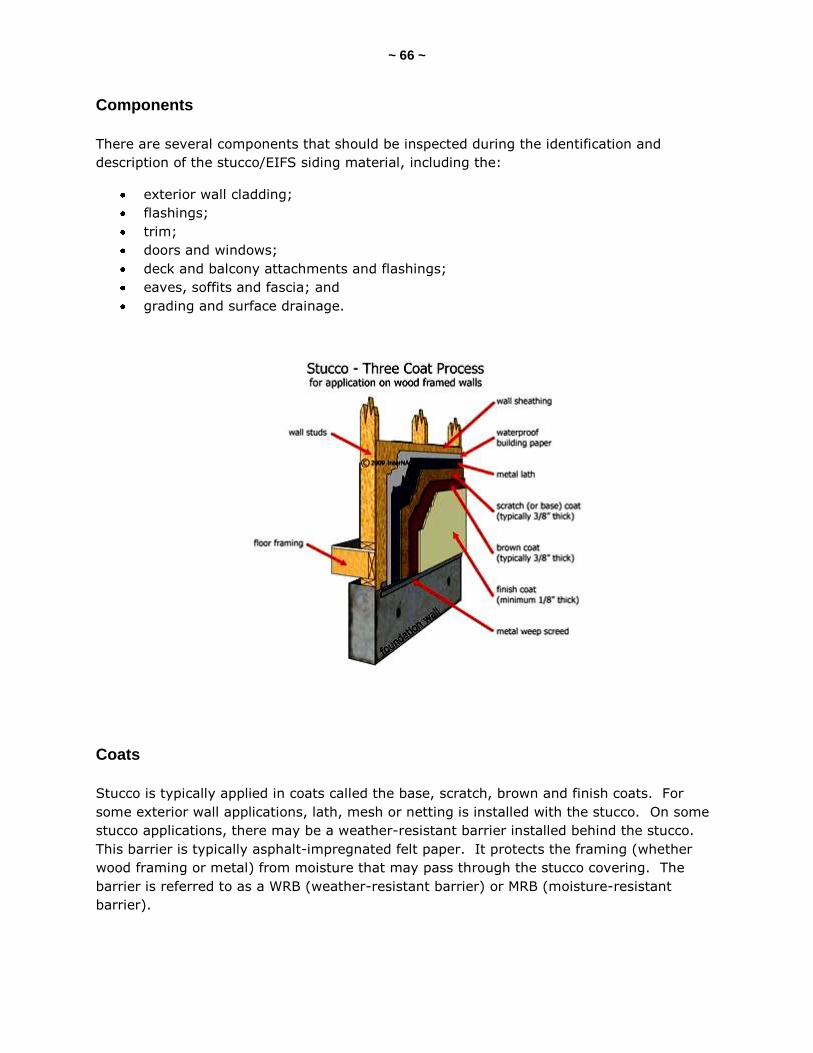
~ 66 ~
Components
There are several components that should be inspected during the identification and
description of the stucco/EIFS siding material, including the:
exterior wall cladding;
flashings;
trim;
doors and windows;
deck and balcony attachments and flashings;
eaves, soffits and fascia; and
grading and surface drainage.
Coats
Stucco is typically applied in coats called the base, scratch, brown and finish coats. For
some exterior wall applications, lath, mesh or netting is installed with the stucco. On some
stucco applications, there may be a weather-resistant barrier installed behind the stucco.
This barrier is typically asphalt-impregnated felt paper. It protects the framing (whether
wood framing or metal) from moisture that may pass through the stucco covering. The
barrier is referred to as a WRB (weather-resistant barrier) or MRB (moisture-resistant
barrier).

~ 67 ~
The WRB or MRB is usually an asphalt-saturated paper, but there is a variety of
manufactured plastic-based sheets known as building wraps and stucco wraps. The
properties of the weather barrier should protect the framing from rain and moisture and, at
the same time, allow the free passage of any water vapor generated inside the building so it
can escape through the wall.
There is a wide variety of stucco accessories, such as weep screeds, control and expansion
joints, corner aids, and architectural ―plant-on‖ details that can be incorporated into the
stucco application. Wire lath is used to give the plaster something to attach to and to add
strength.
Stucco is valued as an exterior covering material for its attractiveness, versatility and
durability. Portland cement can last indefinitely without requiring maintenance. Stucco is
versatile. It can be directly applied to brick and concrete, or applied to a lath (paper or wire
mesh) over wood frame or other material.
Weep Screeds
A corrosion-resistant weep screed or plastic weep screed should be provided at or below the
foundation plate line on the exterior stud walls. The weep screed should be placed a
minimum of 4 inches above the earth, or 2 inches above paved areas, and should be of a
type that will allow trapped water to drain to the exterior of the building.

~ 68 ~
Inspection Tips for Weep Screeds
If you cannot easily access, reach or see the bottom of the wall and the weep screed, then
the installer of the stucco probably had a difficult time down there, as well. If it’s difficult to
reach, there may be a problem there. Wear knee pads while inspecting the stucco at
ground level. Use a mirror with an extension arm to check the bottom wall's termination for
the proper installation of weep screeds.
Barrier or Face-Seal PB-EIFS
This is the most common type of EIFS. PB stands for polymer-based. The barrier of the
system's design prevents water from getting behind the exterior surface.
Components of a barrier include:
EPS insulation adhesively or mechanically attached to a substrate;
a polymer-based base coat with embedded fiberglass mesh; and
an acrylic finish coat.
Things to look for to identify a barrier PB-EIFS-clad home:
the presence of EPS foam insulation (by itself, EPS does not mean the cladding is
EIFS);
the presence of fiberglass mesh;
thin (about 1/16-inch) lamina of base coat, mesh and finish coat;
the wall surface gives slightly to hand pressure;
there are typically no accessories, although PVC starter tracks or casing beads are
allowed;
it sounds hollow when tapped; and
adhesive is used to attach it to the substrate (OSB, plywood, etc.).

~ 69 ~
The base coat for PB-EIFS:
is trowel-applied;
has a weather-resistant layer;
has a fiberglass mesh that provides its impact and crack resistance;
encapsulates the mesh with a base coat; and
is applied in a thickness of 1/16-inch.
Moisture-Drainage MD-EIFS
The basic installation appears very similar to barrier PB-EIFS, with one additional
component. A moisture barrier and drainage plane are first placed over the moisture-
sensitive substrates. PVC accessories are permitted, but not required. Most systems have
a weep screed (PVC starter track with weep holes), but not all systems. Historically, they
were mechanically fastened; thus, they flex more than PB-EIFS. However, the most
advanced systems are now adhesively attached. Each system is proprietary, so there are
many variations.
An MD-EIFS-clad home can be identified by:
the moisture barrier over the substrate;
the EPS foam insulation (by itself, EPS does not mean the cladding is EIFS);
the fiberglass mesh;
the thin lamina of about 1/16-inch;
the wall surface giving slightly to hand pressure;
the presence of optional accessories, such as PVC starter tracks or other drainage
provisions at the bottom of the wall;
the hollow sound it makes when tapped; and
its mechanical attachment to the substrate (OSB, plywood, etc.), although new
systems are adhesively attached to liquid-applied membranes.

~ 70 ~
Polymer Modified or PM-EIFS
PM systems were popular in some locations around the U.S. but were not extensively used.
PM components include:
extruded polystyrene (XPS), mechanically attached;
heavy fiberglass mesh, mechanically attached;
thicker basecoat of ¼-inch to ⅜-inch;
control and expansion joints (to limit panels to 144 square feet); and
plastic or metal trim accessories.
Things to look for to identify a PM-EIFS-clad home:
the presence of XPS foam insulation;
an exposed heavy, open-weave fiberglass mesh;
a thick lamina of ¼-inch to ⅜-inch;
the wall surface is hard and firm;
the presence of PVC or metal accessories;
it sounds solid when tapped;
it is mechanically attached to the substrate (OSB, plywood, etc.); and
there is typically no drainage plane or moisture-resistive barrier.

~ 71 ~
Modern Polyisocyanurate or PI-EIFS
These systems perform much better but have lost the economy they originally had.
Most current PI systems require:
a substrate;
a moisture-resistant barrier;
joints that are base-coated and meshed; and
PI insulation board that is fully meshed and base-coated.
Direct-Applied Exterior Finish System or DA or DEFS
Historically, DEFS had lamina directly applied to an approved substrate, such as
DensGlass® (a product of Georgia-Pacific) or cement board (not insulation board).

~ 72 ~
Current specifications call for cement board in all exposed wall areas, while DensGlass® or
its equivalent is approved in protected areas. Originally, mesh was required only at joints in
approved substrate. Now, all manufacturers require that the mesh cover the entire wall
surface. DEFS uses system accessories. Each system is proprietary, so there are many
variations.
Traditional or Three-Coat Stucco
Basic components and characteristics include:
Portland cement stucco;
a moisture barrier, metal lath and accessories on moisture-sensitive substrates, but
not on concrete or masonry substrates;
it is hard and prone to cracking;
it requires control or expansion joints every 144 square feet over lath, and 250
square feet without lath;
it uses a metal or PVC casing bead, or J-bead or weep screed; and
it has scratch, brown and finish coats.

~ 73 ~
One-Coat Stucco System
Basic components and characteristics include:
many are proprietary, requiring ICC Evaluation Reports;
it is composed of Portland cement stucco with polymers and fiberglass
reinforcement;
it requires a moisture barrier on moisture-sensitive substrates;
it has a hard surface, which helps resist impact damage;
control joints are required, but spacing should be specified by the design professional
(typically, to limit panels to 144 square feet);
it has a metal lath (stucco netting or diamond lath);
it uses a metal casing bead, or J-bead or weep screed; and
it has a minimum ⅜-inch base coat, plus a finish coat.
The incidence of cracking
depends on the materials used
and the installation techniques.
There may or may not be foam
insulation behind stucco; it can
have EPS or XPS insulation
behind the system. This does not
make it an EIFS system as
defined by the stucco or
insurance industries. One-coat
stucco systems are very popular
since problems with EIFS have
surfaced.

~ 74 ~
QUIZ 7
1. T/F: Modern stucco is made of Portland cement, sand and water.
True
False
2. The most common type of EIFS is _______.
MD-EIFS
PI-EIFS
barrier or face-seal PB-EIFS
PM-EIFS
3. T/F: An MD-EIFS system employs a moisture barrier over its substrate.
True
False
4. T/F: Traditional or 3-coat stucco systems require a moisture barrier, metal lath and accessories on moisture-sensitive substrates.
True
False
5. Control joints are required, but their spacing should limit panels to ____ square feet.
400
144
100
10
6. Traditional or 3-coat stucco systems have ____________ coats.
scratch, brown and finish
scratch, white and finish
scratch, gray and finish
7. T/F: One-coat stucco systems are made with Portland cement with polymers and fiberglass reinforcing.
True
False Answer Key is on the next page.

~ 75 ~
Answer Key to Quiz 7
1. T/F: Modern stucco is made of Portland cement, sand and water. Answer: True
2. The most common type of EIFS is barrier or face-seal PB-EIFS.
3. T/F: An MD-EIFS system employs a moisture barrier over its substrate. Answer: True
4. T/F: Traditional or 3-coat stucco systems require a moisture barrier, metal lath and accessories on moisture-sensitive substrates. Answer: True
5. Control joints are required, but their spacing should limit panels to 144 square feet.
6. Traditional or 3-coat stucco systems have scratch, brown and finish coats.
7. T/F: One-coat stucco systems are made with Portland cement with polymers and fiberglass reinforcing. Answer: True

~ 76 ~
SECTION 13: ASBESTOS CEMENT-BASED SIDING
This section deals with the common details of asbestos cement-based siding that may be
observed during an inspection of the exterior.
At the end of this section, you should be able to:
describe what asbestos cement-based siding is; and
list the common concerns related to the siding.
Asbestos and cement were first combined in the United States in the early 1900s to form an
innovative, new building material. Asbestos cement is a composite material that consists of
cement reinforced with asbestos fibers. Asbestos-cement siding shingles can be made to
imitate the appearance of wood siding shingles in shape and appearance.
Asbestos fibers are a health hazard when inhaled. Asbestosis is a form of lung cancer
that is caused by inhaling asbestos fibers. Because of the health risk, strict environmental
regulations for working with asbestos were established in the U.S. Health risks were shown
to be greatest during mining and production processes, but minimal during the installation
and use of asbestos-cement products.
According to the U.S. EPA, a material containing asbestos is deemed potentially hazardous
only in its friable state, which is when the material can be crumbled, pulverized, or reduced
to a powder by hand pressure. Asbestos cement is not considered friable and, therefore,
not hazardous because the cement binds the asbestos fibers and prevents their release into
the air under normal-use conditions. However, asbestos-cement products are classified as
friable when deterioration disturbs the asbestos. Asbestos-cement products are classified
as friable when mechanical means are used for chipping, grinding, sawing or sanding,
thereby allowing particles to become airborne.
If the asbestos-cement siding material is not disturbed, no hazard exists and no precautions
are required. It is highly recommended that periodic inspections be conducted. Be sure to
advise your clients about the need for this.
Maintain and Manage
Maintenance of asbestos-cement siding material includes performing visual inspections to
evaluate its condition, keeping the siding clean, and making minor repairs, as necessary. It
is important to maintain the environment around the house and to protect the asbestos-
cement siding materials. Asbestos cement is brittle. It has little resistance to impact. The
siding is susceptible to cracking and chipping. To protect the asbestos-cement siding
material, one could plant small shrubs or flower beds between the bottom of the wall and
the grass lawn. This landscaping feature will serve to protect the siding from lawnmower
damage. A piece of trim detail could be added to the bottom of the asbestos-cement siding
to reduce its vulnerability to cracking and chipping. Trimming the branches from nearby
trees and bushes will protect the siding from damage.

~ 77 ~
Repair
When repair to asbestos-cement siding is needed, the least amount of siding should be
discarded and the greatest possible amount of original material should be retained.
Cracking
If you see hairline cracks in the asbestos-cement siding, clear epoxy can be used in the
cracks. Epoxy is susceptible to UV radiation from the sun and may need periodic
maintenance. A grout of cement and water can be used to repair slightly larger cracks. To
repair cracks greater than ⅛-inch, a thick grout with sand added to the mix can be used.
Fasteners
If the fasteners for the asbestos-cement product have become deteriorated or have
broken due to corrosion, they should be replaced with fasteners of a more durable metal.
Stainless steel is generally recommended because of its superior corrosion resistance.
Fasteners, such as nails, should be long enough to hold the materials securely.
Discoloration
Discoloration can be caused by surface contamination. Stains can result from a leaching of
other material, such as corrosion runoff. A change in color can be caused directly by the
environment, such as UV radiation from the sun. Discoloration could be normal, but it may
indicate a chemical reaction, decreasing the durability of the material.
Cleaning involves the use of solutions of varying strengths while using the gentlest physical
means possible, without causing adverse conditions to the material. Mechanical methods
for cleaning can promote asbestos fibers to become airborne and, therefore, should be used
only by following strict asbestos regulations.
If discoloration or staining cannot be removed, the asbestos-cement siding could be
painted, but this adds an additional maintenance factor.
Efflorescence
Efflorescence appears on many cement products that are exposed to weathering. This form
of crystalline growth indicates that water is passing through the material, which can
promote deterioration of the asbestos cement. Efflorescence is usually observed at the
beginning of the material’s life.

~ 78 ~
Biological Growth
Biological growth on the exterior of asbestos cement can be a problem in sheltered
environments and on northern exposures. Shade trees located close to a building can shield
sunlight and result in prolonged dampness of the asbestos-cement building product,
promoting biological formations, such as moss and algae. These growths can stimulate
surface deterioration and staining.
Replacement
Asbestos-cement siding material commonly deteriorates by cracking and chipping. Repairs
are not usually performed on cracked or chipped pieces. Replacement is usually
recommended. The replacement piece should be of a non-asbestos, fiber-cement type.
Replacing several pieces of asbestos-cement siding is easy to do because it has been
manufactured in standard sizes, shapes, colors and textures. There are siding materials
that have been manufactured to replicate asbestos-cement siding pieces. There are non-
asbestos reinforced cement, fiberboard with asphalt, fiberglass, metal and vinyl available,
too.
Inspection Tips for Asbestos-Cement Siding
Where siding is damaged, moisture can enter the building. Look for cracked and
mechanically damaged pieces of siding. Mechanical damage can be caused by balls, stones,
ladders and children. Be sure to check along the bottom edge and corners of the siding.

~ 79 ~
QUIZ 8
1. According to the U.S. EPA, a material containing asbestos is deemed potentially hazardous only in its _____ state.
freezing
damaged
friable
dusty
frying
2. T/F: If the asbestos-cement siding material is not disturbed, no hazard exists and no precautions are required.
True
False
Answer Key to Quiz 8
1. According to the U.S. EPA, a material containing asbestos is deemed potentially
hazardous only in its friable state.
2. T/F: If the asbestos-cement siding material is not disturbed, no hazard exists and no
precautions are required.
Answer: True

~ 80 ~
SECTION 14: CLAY and SLATE SHINGLE SIDING
This section deals with the common details of clay and slate shingle siding that may be
observed during an inspection of the exterior.
At the end of this section, you should be able to:
describe how to identify clay and slate shingles; and
list the common concerns related to the siding.
Clay and slate shingles are among the most historic building materials. Traditionally, clay
tiles were formed by hand and, later, by machine-extrusion of natural clay, then textured or
glazed with color, and fired in high-temperature kilns. The inherently fragile nature of clay
shingles dictates that special care and precautions be taken to preserve and repair them.
Clay roofing materials are commonly curved, whereas clay siding material is typically flat.
Clay and slate are resistant to water, sunlight and wind. They are not combustible. They
are heavy and not prone to uplift by wind. Clay and slate shingles, when correctly installed,
require little or no maintenance.
The fastening system used to secure shingles to a wall often fails and needs to be replaced,
as opposed to replacing the shingles themselves. When the fastening system has
deteriorated, or the wall support structure has failed, clay and slate shingles can be
removed relatively easily, then necessary repairs can be made, and the shingles can be re-
installed with new corrosion-resistant fasteners. Broken and damaged shingles should be
replaced promptly to prevent further damage to adjacent shingles and the supporting wall
structure.
Clay and slate shingles have the longest life expectancies among siding materials –-
generally, 100 to 400 years. But regular maintenance is still recommended to prolong their
life. A regular maintenance inspection of the clay or slate siding can help determine the
condition, potential causes of failure, and the source of any leaks, and will help in
developing a program for the preservation and repair of the shingles.
Clay and slate shingles are most likely to deteriorate because of frost damage and
deterioration or failure of the fasteners. The deterioration of the metal flashing around the
shingles can also lead to performance failure of the siding.

~ 81 ~
Clay and slate shingles are heavy, so it is important that the wall structure that supports the
material be sound. If water damage has occurred behind the clay or slate siding materials,
the evidence of damage may not be readily visible. Once the heavy siding materials start to
lose their attachment to the substrate, they will then start to slide, slip, turn and fall. Their
condition will then become apparent.
Efflorescence
Clay and slate shingles vary in quality from tile to tile. Efflorescence of soluble salts on the
surface of a clay shingle may indicate that it has excessive porosity, which results from
under-firing during its manufacture. Poor-quality, porous shingles are susceptible to
breaking and exterior surface-spalling during freeze-thaw cycles. By letting in moisture,
porous shingles can permit a wooden wall structure behind the siding to rot.
Damage
Clay and slate siding can be damaged by a variety of things, including tree branches,
stones, balls, and heavy-impact hail.
Patching a clay or slate shingle with roofing tar, caulk, asphalt, pieces of metal, or non-
matching clay tiles is inappropriate. Such treatments are visually incompatible. They also
have the potential to cause physical damage. Water can collect behind these patches and
accelerate the deterioration of the wooden structural components of the wall and the
fastening system. During the expansion and contraction of a freeze-thaw cycle, ice buildup
at patches can break surrounding tiles. Patching is not recommended; replacement of clay
or slate siding pieces that are in poor condition is the best recommendation to make to
homeowners.
Inspection Tips
Look for obvious damage, such as cracking and deterioration. Press on the clay and slate
shingles with your hand. Check for movement of the pieces. Check for failure of the
fasteners. Check for patching of the shingles. Observe and note any replacement shingles.
If there has been any patching or repairs performed, ask the owner of the property for more
information about the performance of the siding material in the past.

~ 82 ~
QUIZ 9
1. T/F: The fastening system used to secure shingles to a wall often fails and needs to be replaced, as opposed to replacing the shingles themselves.
True
False
2. T/F: Clay and slate shingles have the longest life expectancy among all siding materials, lasting between 100 and 400 years.
True
False
3. T/F: Clay and slate siding can easily withstand damage from a variety of things, including tree branches, stones, balls, and heavy-impact hail.
True
False
Answer Key to Quiz 9
1. T/F: The fastening system used to secure shingles to a wall often fails and needs to be replaced, as opposed to replacing the shingles themselves. Answer: True
2. T/F: Clay and slate shingles have the longest life expectancy among all siding materials, lasting between 100 and 400 years. Answer: True
3. T/F: Clay and slate siding can easily withstand damage from a variety of things, including tree branches, stones, balls, and heavy-impact hail. Answer: False

~ 83 ~
SECTION 15: ASPHALT SHINGLE SIDING
This section deals with the common details of asphalt shingle siding that may be observed
during an inspection of the exterior.
At the end of this section, you should be able to:
describe how asphalt shingle siding functions; and
list the common concerns related to the siding.
Asphalt shingles are sometimes used for siding material. The shingles used are the same
used for a roof-covering system. When the roof-covering asphalt shingles are installed as
siding, they need to be installed differently. The self-sealing tabs of asphalt shingles will not
function because the shingles are installed vertically. The overlying shingle will not adhere
to the shingle below. Roofing cement is commonly used to secure the layers of shingles to
each other. Loose shingle tabs are susceptible to being blown or torn off by the wind.
Fastening
Asphalt shingles installed as siding need six nails or staples per shingle. This is because
gravity pulls more on shingles installed vertically, and more fasteners are needed when the
shingles are installed on a wall, as opposed to when they're installed on a sloped roof.
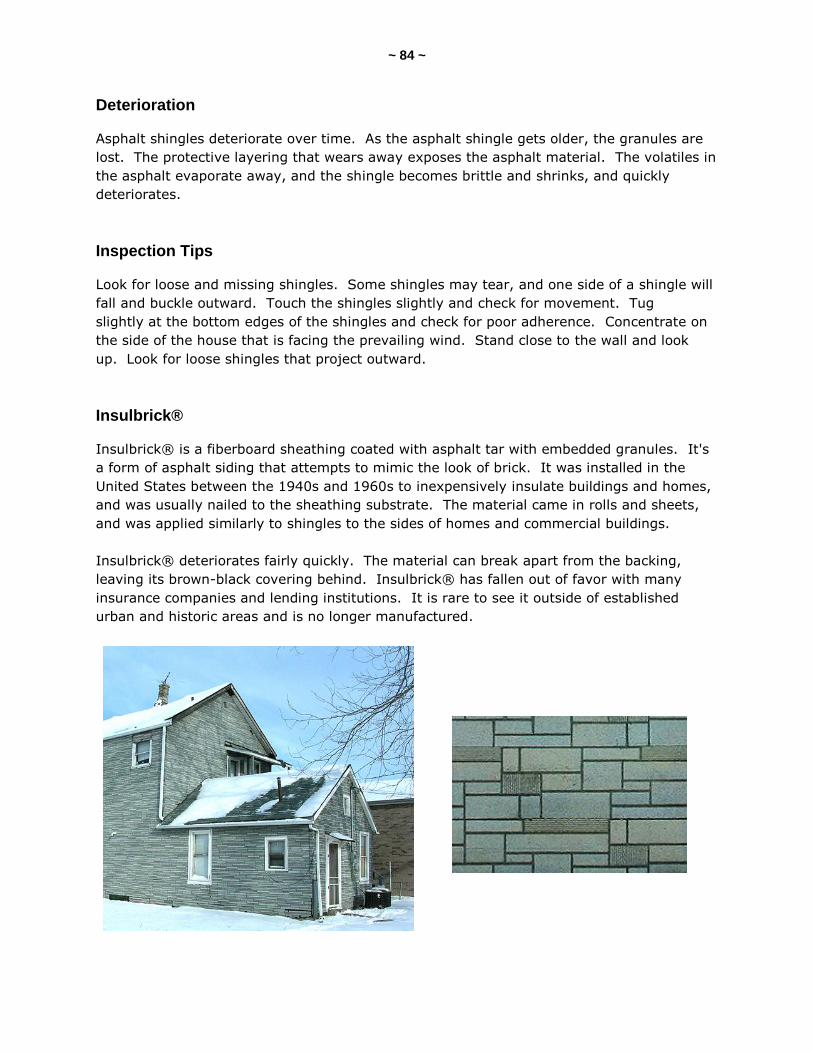
~ 84 ~
Deterioration
Asphalt shingles deteriorate over time. As the asphalt shingle gets older, the granules are
lost. The protective layering that wears away exposes the asphalt material. The volatiles in
the asphalt evaporate away, and the shingle becomes brittle and shrinks, and quickly
deteriorates.
Inspection Tips
Look for loose and missing shingles. Some shingles may tear, and one side of a shingle will
fall and buckle outward. Touch the shingles slightly and check for movement. Tug
slightly at the bottom edges of the shingles and check for poor adherence. Concentrate on
the side of the house that is facing the prevailing wind. Stand close to the wall and look
up. Look for loose shingles that project outward.
Insulbrick®
Insulbrick® is a fiberboard sheathing coated with asphalt tar with embedded granules. It's
a form of asphalt siding that attempts to mimic the look of brick. It was installed in the
United States between the 1940s and 1960s to inexpensively insulate buildings and homes,
and was usually nailed to the sheathing substrate. The material came in rolls and sheets,
and was applied similarly to shingles to the sides of homes and commercial buildings.
Insulbrick® deteriorates fairly quickly. The material can break apart from the backing,
leaving its brown-black covering behind. Insulbrick® has fallen out of favor with many
insurance companies and lending institutions. It is rare to see it outside of established
urban and historic areas and is no longer manufactured.

~ 85 ~
SECTION 16: MASONRY EXTERIOR WALL COVERING
This section deals with the common details of masonry exterior wall covering that may be
observed during an inspection of the exterior.
At the end of this section, you should be able to:
describe how a masonry exterior wall covering functions;
describe the advantages and disadvantages of masonry exterior wall coverings;
list the common concerns related to masonry exterior wall coverings;
describe the differences between veneer and load-bearing;
list the most common mortar joints;
describe the function of weep holes; and
describe how to control moisture at a masonry exterior wall.
Masonry is the building of structures from individual units laid in and bound together by
mortar, and the term also refers to the units themselves. The common materials of masonry
construction are brick, stone (such as marble, granite, travertine and limestone), concrete
block, glass block, and tile. Masonry is generally a highly durable form of construction.
However, the materials used, the quality of the mortar, the workmanship, and the pattern
the units are assembled in can greatly affect the durability of the overall masonry
construction.
Masonry is commonly used for the walls of houses, but its popularity depends sometimes on
the geographical area. Brick and concrete block are common types of masonry. They may
be either load-bearing (structural) or used as a veneer.
There is a variety of stone material that can be used for the masonry exterior siding. Stone
may be hard, such as granite, or soft, such as limestone and sandstone.
Concrete bricks and blocks are created by the chemical reaction between Portland cement,
sand, aggregate and water. Concrete may be plain or decorative, small or large, poured-in-
place or pre-cast. Concrete may be shaped like bricks or made to look like stone.
Advantages of Masonry Siding
Masonry provides good fire protection.
Brick and stone can increase the thermal mass of a building, which can increase
comfort in the heat of summer and the cold of winter. Masonry can be used
effectively for passive solar applications.
Masonry walls are more resistant to projectiles (such as debris from strong winds
and impact from hailstones) than walls made of wood or other softer, less dense
materials.

~ 86 ~
Disadvantages
Frost damage can deteriorate masonry exterior walls. This type of damage is
common with certain types of brick.
Masonry is a heavy building material and requires support from a strong foundation
(usually reinforced concrete) to avoid settling and cracking.
Concrete Blocks
Concrete blocks may be found on the exterior. Blocks of cinder concrete, called
cinderblocks and breezeblocks, as well as traditional concrete or concrete blocks, are
referred to as concrete masonry units, or CMUs. They differ from brick units in a few ways.
They are usually much larger than bricks. Cinder and concrete blocks have much lower
rates of water absorption than brick. They are typically used as the structural core for
veneered brick masonry. They are also used for the walls of detached garages and
outbuildings.
A CMU wall can be reinforced by filling the open voids inside the block unit with concrete,
with or without steel rebar. Steel reinforcement gives a CMU wall much greater lateral and
tensile strength than unreinforced walls.
Some concrete blocks are colored. Some employ a split face, which is a technique that
results in two blocks manufactured as one unit and then split in two. This gives the blocks a
rough face that replicates the appearance of natural, quarried stone, such as brownstone.
There have been many issues with split-face concrete blocks absorbing moisture and
causing major water penetration and problems with moisture intrusion.
Manufactured Stone
Manufactured stone, cultured stone, and man-made stone veneers are popular alternatives
to natural stone. Natural stone has become very expensive in many areas. Manufactured
stone veneers are typically made from concrete. Natural stones are re-created using molds,
aggregate, and colorfast pigments. To the untrained inspector's eye, there may be no
obvious, visual difference between veneers of natural stone and manufactured stone.
Load-Bearing or Veneer?
Masonry walls may be load-bearing, or they may be part of the structural support of the
building, or they may be a veneer, acting as siding. To determine whether brick is load-
bearing, you can look to see if there are header courses. Header courses of brick may
indicate that the masonry wall is load-bearing. The absence of a header course or the
presence of weep holes in the brick may suggest that the masonry is a veneer.

~ 87 ~
Veneer
A masonry veneer wall is installed on one or both sides of a structurally independent wall,
usually constructed of wood or masonry. In this context, the brick masonry is primarily
decorative and not structural.
The veneer can provide ornamentation, protection, insulation, or a combination of these
features. It does not provide any structural strength to the wall, nor does it carry any load
other than its own weight.

~ 88 ~
The brick veneer is generally connected to the structural wall by brick ties, which are metal
strips that are attached to the structural wall as well as to the mortar joints of the brick
veneer.
Typically, there is an air gap between the brick veneer and the structural wall. Since
masonry may not be considered completely waterproof, the structural wall behind the
veneer usually has a water-resistant surface, such as tar paper or a housewrap material.
Weep holes may be installed at the bottom of the brick veneer to drain moisture that
accumulates inside the air gap.
Characteristics of a veneer wall:
weep holes are installed;
there are usually no arches;
lintels are installed; and
there are no header bricks.
Characteristics of a solid, load-bearing wall:
there are no weep holes;
it typically has arches;
there are usually no lintels; and
header bricks are installed.
Brick Ties
Two types of ties are approved for the attachment of masonry veneer to wood
construction: corrugated sheet metal ties and metal strand wire ties. Both are corrosion-
resistant.

~ 89 ~
The clearance between the veneer and the wood structural wall is limited and varies based
on which type of tie is installed.
Where the veneer is attached to the wood wall by corrugated sheet metal ties, the air gap
separating the veneer from the wall should not be less than 1 inch. Each tie should be
spaced no more than 24 inches on-center horizontally and vertically. Each tie should
support no more than about 3 square feet of wall area.
Common Problems with Masonry Exteriors
Some common problems with masonry exteriors include:
cracking;
spalling;
clearance;
mortar deterioration;
weep holes;
moisture;
efflorescence; and
bowing.
Cracking
Part of the exterior inspection includes looking for cracks in the masonry exterior wall
covering. Cracks in the individual masonry units are easier to see than cracks in the mortar
joints. Cracks in the mortar joints are usually found where the mortar connects with the
masonry unit, which is difficult to see.

~ 90 ~
Common causes of cracks in the exterior masonry wall include:
settlement;
premature form removal;
low-quality concrete;
poor backfill practices;
thermal expansion and contraction;
frost damage; and
physical damage.
Cracks are commonly caused by the house settling. They can also be caused by the
masonry units expanding and contracting because of the changes in temperature or by the
absorption of moisture.
Cracks may allow water to penetrate the building. They may be cosmetic. And cracks may
indicate major structural problems.
Cracks are commonly found at lintels. When a lintel develops rust, the steel expands and
pushes up on the masonry units of the wall. A rusting lintel can cause horizontal and step
cracks in the masonry. The cracks then expand outward from the top corners of door and
window openings.
Spalling
Masonry deterioration may happen by spalling, which is mechanical weathering that can be
caused by freezing, thawing, thermal expansion and contraction, and salt deposition. Direct
spraying of water onto masonry can cause mechanical damage and spalling. Spalling can be
described as crumbling or flaking at the masonry's surface.
~ 91 ~
Freeze-thaw cycles can cause damage by moisture freezing inside cracks in the masonry.
Upon freezing, its volume expands, causing large forces that crack and spall off the outer
surface. As this cycle repeats, the outer surface undergoes spalling and can result in major
damage. The severity of the damage is related to the amount of moisture absorbed, the
porosity or permeability of the brick, and the number of freeze-thaw cycles.
Spalling can be caused by:
moisture being wicked up from the ground;
moisture entering the masonry wall as a vapor;
exposure to direct rainfall;
water spilling onto the surface from the gutter system or roof surface;
sandblasting, pressure-washing, and chemical cleaning of the masonry wall surface;
and
the application of a non-breathable wall sealer.
Salt Spalling
Salt spalling is a specific type of weathering that can occur in brick, natural stone, tiles and
concrete. Dissolved salt is carried through the material in water and then crystallizes inside
the material near the surface as the water evaporates. As the salt crystals expand, this
builds up shear stresses that break away and create spalling at the surface.
Some homeowners believe that porous building materials can be protected against salt
spalling by treatment with water-repellent sealants that penetrate deeply enough to keep
water with dissolved salts well away from the surface. Expert advice should be sought to
ensure that any coating applied is compatible with the substrate in terms of
its breathability, which is the ability to allow the release of vapors from inside while
preventing water intrusion, or other serious problems can be created.
During your inspection, you may be told that the masonry has been recently cleaned and
then sealed. Some sealants are silicone-based and are not permeable. Such a sealant will
act like a plastic skin and will trap moisture.
It must always be assumed that water — possibly arriving in the form of vapor from the
interior — will collect behind the wall surface, and it must be allowed to both drain and
evaporate. Many bricks and stones have been damaged beyond repair by the well-
intentioned application of the wrong coating, once the coated masonry has gone through a
few freeze-thaw cycles.
You may not be able to confirm if a masonry wall has been sealed, but you will be able to
inspect and report the condition of the masonry.

~ 92 ~
Clearance
Most types of bricks should be kept above the ground's surface with adequate clearance.
Some bricks are designed for use underground. If you see spalling at the bricks near grade
level, and the bricks above appear to be in good condition, then these bricks may not have
been intended for use underground.
Mortar Deterioration
Although good-quality bricks may outlast civilizations, the mortar that bonds them can crack
and crumble after a number of years. Water penetration is the greatest degrader of mortar,
and different mortar joints allow for varying degrees of water resistance. Mortar joints in
brickwork also take up a large amount of a wall’s surface area and have a significant
influence on the wall’s overall appearance. Some joint profiles accentuate their individual
designs, while others merge the bricks and mortar to form a flush, homogeneous surface.
The following are the most common types of mortar joints.
Concave Joint
This popular type of joint is formed in mortar
through the use of a curved, steel-jointing tool. It
is very effective at resisting rain penetration due
to its recessed profile and the tight seal formed by
compacted mortar. Patterns are emphasized on a
dense, smooth surface, and small irregularities
are hidden.
V-Joint
This type of joint can be made with a V-shaped jointer
or a trowel soon after the bricks are laid. Ornamental
and highly visible, the joint conceals small irregularities
and is highly attractive. Like the concave joint, the V-
joint is water-resistant because its formation compacts
the mortar and its shape directs water away from the
seal.

~ 93 ~
Weathered Joint
Mortar is recessed increasingly from the bottom to
the top of the joint, with the top end not receding
more than ⅜-inch into the wall. The straight,
inclined surfaces of the bed (horizontal) joints tend
to catch the light and give the brickwork a neat,
ordered appearance. This joint is less compacted
than the concave and V-joints, although it is still
suitable for exterior building walls.
Grapevine Joint
While most popular during America’s Colonial
period, this design is often replicated in newer
brickwork. It is created with a grapevine jointer,
which is a metal blade with a raised bead that
creates an indented line in the center of the
mortar joint. These lines are often rough and
wavy, simulating the generally straight yet slightly
irregular appearance of a grapevine. It is
commonly used on matte-finish and antique-finish
brickwork.
Extruded (Squeezed) Joint
This joint design requires no tooling and is
formed naturally as excess mortar is squeezed
out from between the bricks. The result is a
rustic, textured appearance that is especially
attractive in garden settings. This design is not
recommended for exterior building walls due to
the tendency for exposed mortar to break away,
degrading the wall’s appearance.

~ 94 ~
Beaded Joint
Raising a rounded, bead-shaped segment of the
mortar away from the mortar surface produces
this old-fashioned, formal design. Although
beaded joints can create interesting shadows,
they are not recommended for exterior use due
to their exposed ledges.
Struck Joint
This joint is formed in a fashion similar to the
weathered joint, except that the bottom edge
instead of the top edge is recessed. It is a very poor
insulator against water, as it will allow water to
collect on its bottom ledge.
Raked Joint
For this design, mortar is raked out to a
consistent depth. Although often left roughened,
it can be compacted for better water resistance.
This design highly emphasizes the joint and is
sometimes used in modern buildings in order to
match the historic appearance of their locales.
Unless it is compressed, it is not as water-
resistant as other mortar joints because the
design incorporates ledges, which will collect
water as it runs down the wall. Also, when mortar
is removed from the joints, it becomes smeared
on the surfaces of the brick at the recesses. To
remove the mortar, contractors often
aggressively clean the walls with pressurized
water or acid solutions, which can open up
additional voids and increase the possibility of
water penetration.
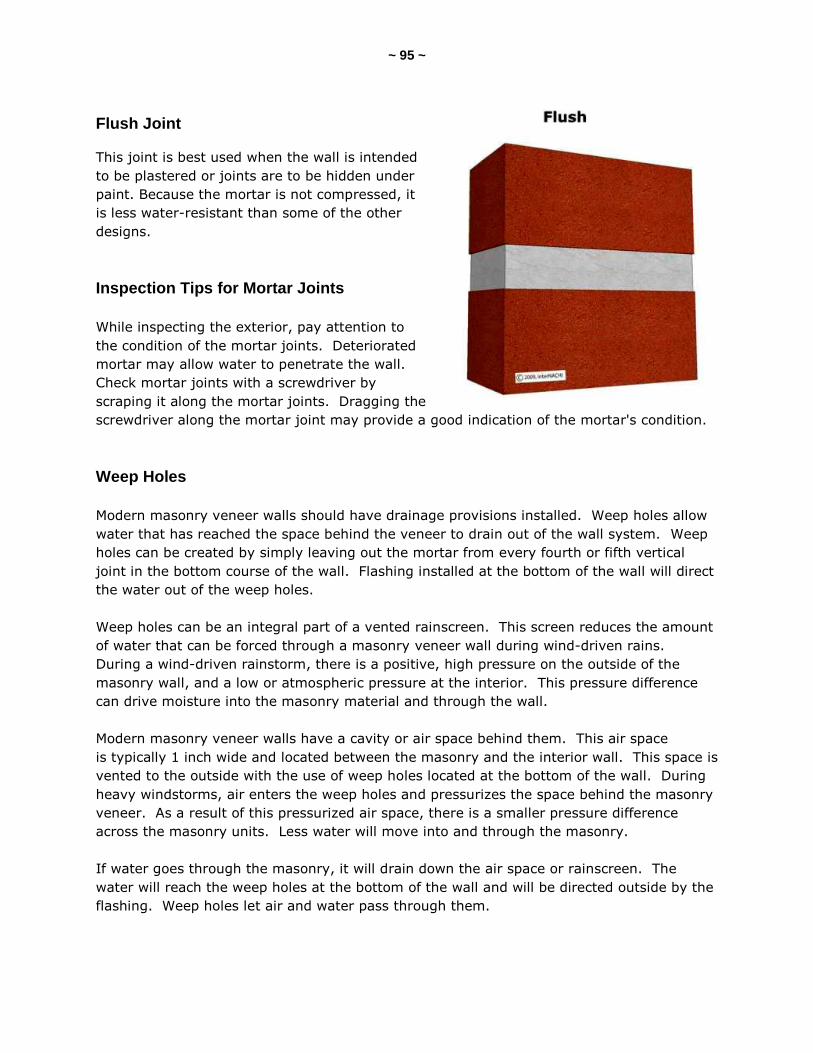
~ 95 ~
Flush Joint
This joint is best used when the wall is intended
to be plastered or joints are to be hidden under
paint. Because the mortar is not compressed, it
is less water-resistant than some of the other
designs.
Inspection Tips for Mortar Joints
While inspecting the exterior, pay attention to
the condition of the mortar joints. Deteriorated
mortar may allow water to penetrate the wall.
Check mortar joints with a screwdriver by
scraping it along the mortar joints. Dragging the
screwdriver along the mortar joint may provide a good indication of the mortar's condition.
Weep Holes
Modern masonry veneer walls should have drainage provisions installed. Weep holes allow
water that has reached the space behind the veneer to drain out of the wall system. Weep
holes can be created by simply leaving out the mortar from every fourth or fifth vertical
joint in the bottom course of the wall. Flashing installed at the bottom of the wall will direct
the water out of the weep holes.
Weep holes can be an integral part of a vented rainscreen. This screen reduces the amount
of water that can be forced through a masonry veneer wall during wind-driven rains.
During a wind-driven rainstorm, there is a positive, high pressure on the outside of the
masonry wall, and a low or atmospheric pressure at the interior. This pressure difference
can drive moisture into the masonry material and through the wall.
Modern masonry veneer walls have a cavity or air space behind them. This air space
is typically 1 inch wide and located between the masonry and the interior wall. This space is
vented to the outside with the use of weep holes located at the bottom of the wall. During
heavy windstorms, air enters the weep holes and pressurizes the space behind the masonry
veneer. As a result of this pressurized air space, there is a smaller pressure difference
across the masonry units. Less water will move into and through the masonry.
If water goes through the masonry, it will drain down the air space or rainscreen. The
water will reach the weep holes at the bottom of the wall and will be directed outside by the
flashing. Weep holes let air and water pass through them.

~ 96 ~
Inspection Tips for Weep Holes
Inspectors should check for weep holes at veneer walls. You should check for damage that
may be caused by the lack of weep holes. Look at the top of the foundation wall on the
inside of the house where the house structure meets the top of the foundation. An absence
of weep holes may be indicated by water marks or moisture found in this area. Watermarks
in this location may also indicate a problem with the flashing at the weep hole area. But
flashing at weep holes will likely not be readily visible to an inspector. Remember to pay
attention to the wall or walls that face wind-driven rains.
Inspection Tips for Moisture
Remember that water is the enemy of masonry. Closely inspect:
areas near the bottom of walls;
at wall penetrations;
behind downspout pipes;
below gutters;
at attached handrails;
below windows;
behind dense vegetation where water may be held up against the masonry exterior
wall covering; and
any areas that might accumulate water.
Best Practices for Controlling Moisture at Brick Veneers
The main function of the building envelope is to keep out moisture. When it comes to brick
veneer walls, you should understand some of the best practices that may be applied to
prevent moisture problems. The following are some of the best practices that you may see
at a brick veneer:
The appropriate brick type and mortar for the weather conditions should be present.
This is not readily ascertainable during a typical home inspection.
If there is a way to check behind the veneer during an inspection, look for an air
space, which should be at least 1 inch. Some installers create an air space of 2
inches wide. It should be wide enough to accommodate rigid insulation board.
A flexible and strong through-wall flashing membrane could be installed. The
membrane should be one that will not disintegrate over time (5 ounces per square
foot of copper is time-proven). It should run to the exterior face of the mortar joint.
All that you will usually see is the outer edge of the flashing popping through the
mortar joint surface.
The through-wall flashing should be lapped. The overlaps may be a minimum of 6
inches and fully sealed.

~ 97 ~
Upright legs 12 inches high may be installed on the supporting wall. End dams
should be provided at all corners and discontinuities. The end dams should be
sealed.
The through-wall flashing should be step-flashed and overlapped by 8 to 16 inches
along the slopes.
The brick ties, reinforcing termination bars, and fasteners should be stainless steel.
Where rigid insulation is installed, the joints of the boards should be spray-foamed.
A flexible, impermeable membrane could be applied on the supporting wall surface.
100% cotton rope wick weeps — not polyester strands — should be used at the weep
holes. The weep holes could be installed to weep the through-wall flashing at 16
inches on center. The weep holes are essentially connected to each other by linking
each wick. Each rope wick is run horizontally in the wall cavity 16 inches to the next
wick, and then the rope turns vertically for 8 inches. The wick should extend out
from the face of the wall by ½-inch to catch air and evaporate and wick the moisture
out.
Expansion joints may be installed in the veneer.
Mortar net mesh could be installed above each level of through-wall flashing to
prevent mortar droppings from clogging the cavity.
Efflorescence
Efflorescence often occurs on masonry, particularly brick, when water moves through a wall
and brings out salts to the surface that are not commonly bound as part of the concrete. As
the water evaporates, the salts are left behind. The salts appear as white, fluffy deposits
that can usually be simply brushed off by hand. The resulting white deposits are referred to
as efflorescence. Efflorescence is sometimes referred to as salt-petering. Since primary
efflorescence brings out salts that are not ordinarily part of the cement stone, it is not a
structural concern but, rather, an aesthetic one.
Bowing
Inspectors sometimes find masonry veneer walls that show signs of bowing. Bowing occurs
when a masonry veneer wall projects outward, away from the wood framing or masonry
structure behind the veneer. Bowing is typically found on old buildings. Masonry veneer
walls have metal tie attachments. The ties are intended to connect and securely attach the
veneer wall to the structural wall behind the veneer. In older homes, the ties may be
simple nails. In newer homes, the current building practice is to use corrugated, galvanized
steel strips. They are shaped like an L-bracket and are about 1 inch wide. The vertical part
of the L-shaped tie is nailed to the building, and the horizontal part sticks outward and is
embedded into the mortar joint. Metal ties are not readily visible during an inspection.

~ 98 ~
A bowing wall may indicate a problem with the attachment to the structure. The ties may
have pulled out of the structural frame of the building. They may have pulled out of the
mortar joint, or rusted or deteriorated, or there may be inadequate lateral support.
Ultimately, a bowing wall may result in a catastrophic failure.
A bowing wall is usually bulging outward from its middle. The top of the wall is held in place
by the roof structure, and the bottom of the wall is held in place by the load of the wall
placed on the foundation.
Sometimes, a new wood frame structure built with green wood may shrink. However, the
masonry will not shrink, and the shortening of the wood frame structure may result in the
failure of ties and the bowing out of the masonry veneer at the midpoint of the wall.
Bowing sometimes occurs around the window and door openings, or near the top of the
wall.
Metal plates or stars installed on the wall surface may indicate that a structural attempt has
been made to secure the wall in place. These attachments may have been installed during
original construction or sometime afterward. The plates or stars may be on opposite sides
of a masonry building and tied together with steel rods or cable connections.
Inspection Tips for Bowing Walls
Look for water penetration caused by the bowing. When a wall bows out, gaps and
openings around windows and doors may be created. Weathertightness may be lost. When
looking for bowing walls, look up and down the walls by placing your line of sight tightly
along the wall surface. A long level or plumb bob may be used to confirm your
observations.
Foundation Cracks and Water
It is important to understand that all concrete and masonry construction will develop cracks
due to shrinkage effects. As these cracks widen over time (usually, due to small amounts of
differential settlement in the soil supporting the foundation), the pathways for water
intrusion through the foundation increase.
Visible cracks are usually a concern to homeowners even though they often have little effect
on the structural integrity of the foundation. The question becomes how to best control
these cracks.

~ 99 ~
The optimum location for reinforcement to control cracking and prevent differential
settlement is at the top and bottom of the foundation wall in a horizontal direction.
Horizontal reinforcing of this type should be considered in addition to adhering to code-
required vertical reinforcement. By placing horizontal reinforcement, the wall acts as a deep
beam, even after cracks initially form due to the effects of shrinkage during the concrete's
curing process. If the wall is adequately tied or doweled to the footing, then the
reinforcement in the bottom of the wall may be placed horizontally along the length of the
footing. The reinforcement at the top of the wall is known in masonry construction as the
bond beam. Alternatively, truss-type reinforcing wire may also be used between horizontal
courses of masonry block.
Epoxy Sealant for Masonry Cracks
An epoxy sealant can be injected into cracks of masonry foundation walls. Poured concrete
foundation walls are often found to have cracks. These cracks are typically shrinkage cracks
and not an indication of major structural problems. The only problem with a shrinkage
crack in a poured concrete foundation wall, other than cosmetic appearance, is water
penetration through the crack. Epoxy sealant is an easy and relatively inexpensive solution
to the water problem.
To seal the cracks this way, they must first be cleaned and exposed, and maybe even
enlarged in some areas. A sealant is then applied over and along the crack. It serves as a
barrier for the injection material, and also holds the injection nozzle in place so that no
drilling of the foundation is necessary.

~ 100 ~
The resin compound is a moisture-activated, flexible material that provides a permanent
seal, even if there is future movement in the foundation. Next, the epoxy is injected. The
epoxy is a two-part material consisting of resin and a hardener. When mixed, these liquids
create a SuperGlue®-like bond. Injecting a crack with epoxy resin is ideal for cracks where
there will be little or no movement in the foundation.
Epoxy sealant can be applied at block foundation walls and at concrete floors of basements
and garages.

~ 101 ~
QUIZ 10
1. Asphalt shingles installed as siding need _____ nails or staples per shingle.
eight
12
six
four
2. T/F: Roofing cement is commonly used to secure the layers of shingles to each other.
True
False
3. T/F: Siding material is considered insulation.
True
False
4. T/F: Properly prepared concrete block accepts paint well.
True
False
5. T/F: Masonry provides good fire protection.
True
False
6. Brick and stone can increase the ___________ of a building, which improves comfort in the heat of summer and the cold of winter.
thermal mass
structural integrity
weight
7. Masonry is a heavy building material and requires support by a strong _________ to avoid settling and cracking.
mortar reinforcement
foundation
attachment (Continued on next page.)

~ 102 ~
8. T/F: Header courses of brick may indicate that the masonry wall is load-bearing.
True
False
9. The absence of a header course or the presence of weep holes in the brick may suggest that the masonry is a ___________.
solid block
solid masonry
veneer
10. There is typically _______ between the brick veneer and the structural wall.
a structural I-beam
cellulose insulation
water-resistant drywall
an air gap
11. __________ may allow water to penetrate the building and may be merely cosmetic, or they may indicate major structural problems.
Weep holes
Mechanically damaged areas
Cracks
Penetration holes
12. T/F: Most types of bricks should be kept above the ground surface with adequate clearance.
True
False
13. Masonry veneer walls should provide a drainage capability in the form of ___________.
drain plugs
water pipes
moisture ties
weep holes
14. T/F: A bowing veneer wall may indicate a problem with its attachment to the structure.
True
False (Continued on next page.)

~ 103 ~
15. ___________ often occurs on brick masonry when water moves through a wall and brings out salts to the surface that are not commonly bound as part of the concrete.
Weeping
Staining
Efflorescence
Answer Key to Quiz 10
1. Asphalt shingles installed as siding need six nails or staples per shingle.
2. T/F: Roofing cement is commonly used to secure the layers of shingles to each other.
Answer: True
3. T/F: Siding material is considered insulation.
Answer: False
4. T/F: Properly prepared concrete block accepts paint well.
Answer: True
5. T/F: Masonry provides good fire protection.
Answer: True
6. Brick and stone can increase the thermal mass of a building, which improves comfort
in the heat of summer and the cold of winter.
7. Masonry is a heavy building material and requires support by a strong foundation to
avoid settling and cracking.
8. T/F: Header courses of brick may indicate that the masonry wall is load-bearing.
Answer: True
9. The absence of a header course or the presence of weep holes in the brick may
suggest that the masonry is a veneer.
10. There is typically an air gap between the brick veneer and the structural wall.
11. Cracks may allow water to penetrate the building and may be merely cosmetic,
or they may indicate major structural problems.
12. T/F: Most types of bricks should be kept above the ground surface with adequate
clearance.
Answer: True
13. Masonry veneer walls should provide a drainage capability in the form of
weep holes.
14. T/F: A bowing veneer wall may indicate a problem with its attachment to the structure.
Answer: True
15. Efflorescence often occurs on brick masonry when water moves through a wall and
brings out salts to the surface that are not commonly bound as part of the concrete.
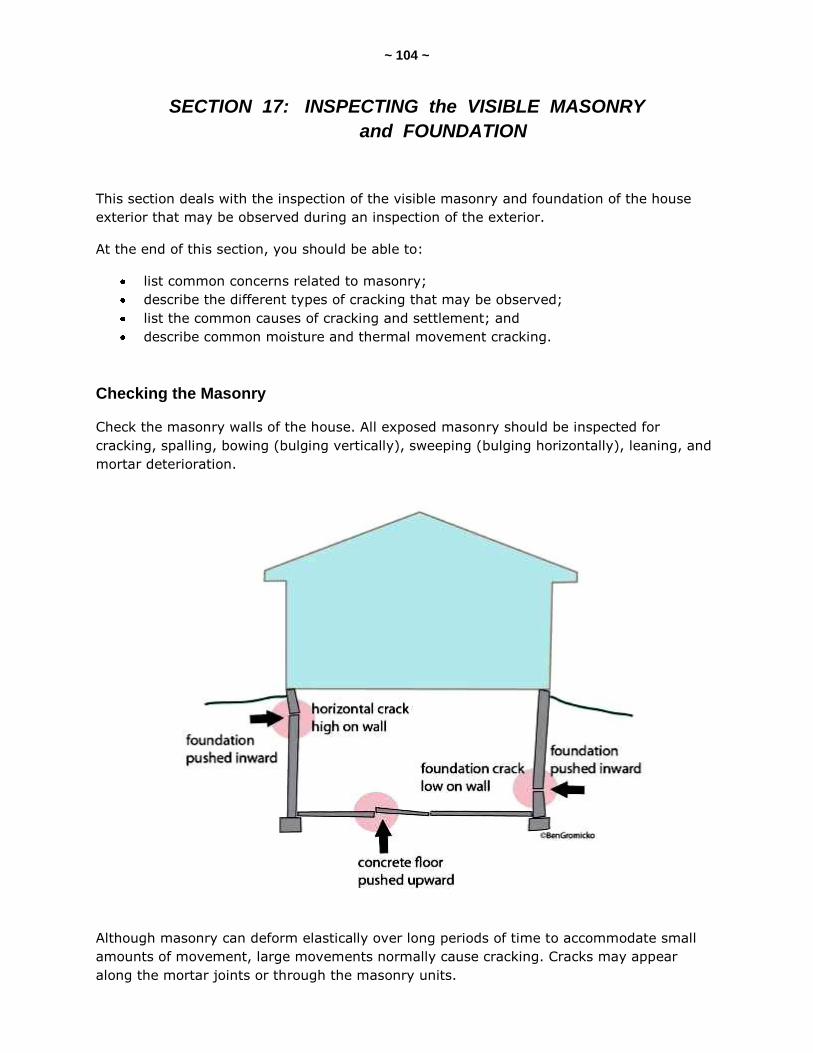
~ 104 ~
SECTION 17: INSPECTING the VISIBLE MASONRY
and FOUNDATION
This section deals with the inspection of the visible masonry and foundation of the house
exterior that may be observed during an inspection of the exterior.
At the end of this section, you should be able to:
list common concerns related to masonry;
describe the different types of cracking that may be observed;
list the common causes of cracking and settlement; and
describe common moisture and thermal movement cracking.
Checking the Masonry
Check the masonry walls of the house. All exposed masonry should be inspected for
cracking, spalling, bowing (bulging vertically), sweeping (bulging horizontally), leaning, and
mortar deterioration.
Although masonry can deform elastically over long periods of time to accommodate small
amounts of movement, large movements normally cause cracking. Cracks may appear
along the mortar joints or through the masonry units.

~ 105 ~
Cracking can result from a variety of problems, including:
differential settlement of the foundation;
drying shrinkage, particularly in concrete block;
expansion and contraction due to ambient thermal and moisture variations;
improper support over openings;
the effects of freeze-thaw cycles;
the corrosion of iron and steel wall reinforcement;
differential movement between building materials;
expansion of salts; and
the bulging or leaning of walls.
Cracks should always be further evaluated to determine their
cause and whether corrective action is required.
Cracking May Be the Result of Bad Practice
Good concrete construction practices are also important to minimize foundation cracking
and porous concrete (voids) that can create a greater potential for water intrusion at the
foundation. Good concreting practices include: the use of an appropriate mix design, such
as minimum 3,000 psi concrete; maintaining a low water-to-cement ratio by minimizing
the use of water to decrease concrete porosity; and vibrating the concrete for good
consolidation in forms.

~ 106 ~
Look for Signs of Movement
A clean crack indicates recent movement. A dirty or previously filled crack may be inactive.
Correlate the width of larger cracks to the age of the building. A ½-inch crack in a new
building may be a sign of rapid settlement, but in a building 50 years old, it may indicate a
very slow movement of only 1/100 of an inch per year.
Crack movement can be measured with a commercially available joint-movement indicator.
This device is temporarily fastened over the crack and a scribe records movement over a
period of time.
Cyclical
Cyclical movements may take six months or more to measure, but diurnal movements can
be recorded over a few days. Cracks associated with thermal expansion and contraction
may open and close with the season. These are cyclical cracks, which may gradually expand
as accumulating mortar debris jams them farther apart after each cycle. Such cracks should
be cleaned and protected with flexible sealants. Re-mortaring cyclical cracks will hold them
open and cause more cracking.
When there are major masonry problems, an inspector should recommend further
evaluation by an expert, such as a structural engineer. If problems appear to be due to
differential settlement, evaluation by a soil engineer may also be required.
Mortar Deterioration
The age of the building may be a good
clue in evaluating its mortar problems.
The two important qualities of mortar
are its ability to bond to masonry and
its internal strength. Older mortar (or
mortar of any age that uses hydrated
lime) will be softer and may require re-
pointing, but otherwise will make a
sound wall.
Moisture
Most often, mortar deterioration is found in areas of excessive moisture, such as near
leaking downspouts, below windows, and at the tops of walls. In such cases, the remedy is
to redirect the water flow and re-point the mortar joints. Re-pointing should be performed
with mortar of a composition similar to or compatible with the original mortar. The use of
high-strength mortar to re-point mortar of a lower strength can do serious damage to the
masonry because the pointing can't flex with or act in a way similar to the rest of the joint.

~ 107 ~
It is useful to remember that mortar acts as a drainage system to equalize hydrostatic
pressure within the masonry. Nothing should be done to reduce its porosity and thereby
block water flow to the exterior surface.
Deterioration of Brick
The spalling, dusting or flaking of brick masonry units may be due to either mechanical or
chemical damage. Mechanical damage is caused by moisture entering the brick and
freezing, resulting in spalling of the brick’s outer layers. Spalling may continue, or it may
stop on its own after the outer layers that trapped the interior moisture have broken off.
Chemical damage is due to the leaching of chemicals from the ground into the brick,
resulting in internal deterioration. External signs of such deterioration are a dusting or
flaking of the brick. Very little can be done to correct existing mechanical and chemical
damage except for actually replacing the brick. Mechanical deterioration can be slowed or
stopped by directing water away from the masonry surface and by pointing mortar joints to
slow water entry into the wall.
Masonry Foundations and Piers
At the foundation walls (stone, brick, concrete or concrete block foundations), look for the
following problems.

~ 108 ~
Uneven Settlement
Uneven or differential settlement can be a major structural problem in small residential
buildings. Serious settlement problems are relatively uncommon. Many signs of masonry
distress are incorrectly diagnosed as settlement-related when, in fact, they are due to
moisture and thermal movements.
Indications of Settlement
Indications of differential settlement include:
vertical distortion or cracking of masonry walls;
warped interior and exterior openings;
sloped floors; and
sticking doors and windows.
Settlement most often occurs early in the life of a building, or when there is a dramatic
change in underground conditions. Often, such settlement is associated with improper
foundation design, particularly inadequate footers and foundation walls.
Other causes of settlement are:
soil consolidation under the footings;
soil shrinkage due to the loss of moisture to nearby trees or large plants;
soil swelling due to inadequate or blocked surface of the house's drainage;
soil heaving due to frost;
soil heaving due to excessive root growth of nearby trees;
the gradual downward drift of clay soil on slopes;
changes in the water table level;
soil erosion around footers from poor surface drainage, faulty drains, leaking water
mains, or other underground water movements. Occasionally, underground water
may scour away earth along only one side of a footer, causing its rotation and the
subsequent buckling or displacement of the foundation wall above; and
soil compaction or movement due to vibration from heavy equipment, vehicular
traffic, construction blasting, or from ground tremors (earthquakes).

~ 109 ~
Gradual differential settlement over a long period of time may produce no masonry cracking
at all, particularly in walls with older and softer bricks and high-lime mortars. The wall will
elastically deform instead. More rapid settlement, however, produces cracks that taper,
being largest at one end and diminishing to a hairline at the other, depending on the
direction and location of settlement below the wall.

~ 110 ~
Cracking is most likely to occur at corners and adjacent to openings, and usually follows a
rough diagonal along mortar joints (although individual masonry units may be split).
Settlement cracks — as opposed to the similar-appearing shrinkage cracks that are
especially prevalent in concrete block — may extend through contiguous building elements,
such as floor slabs, masonry walls above the foundation, and interior plaster work.
Tapering cracks, or cracks that are nearly vertical and whose edges do not line up, may
occur at the joints of projecting bay windows, porches and additions. These cracks indicate
differential settlement due to inadequate foundations or piers under the projecting element.
Often, settlement slows a short time after construction, and a point of equilibrium is
reached when movement no longer occurs.
Minor settlement cracking is structurally harmful only if long-term moisture leakage through
the cracks adversely affects building elements. Large differential settlements, particularly
between foundation walls and interior columns or piers, are more serious because they will
cause movements in contiguous structural elements, such as beams, joists, floors and roofs,
that must be evaluated for loss of bearing and, occasionally, fracture.
Repair
If the foundation needs repair, it can be accomplished by the addition of new structural
elements, such as pilasters, or by pressure-injecting concrete epoxy grout into the
foundation wall. If movement continues and cracking is extensive, it is possible that the
problem can be rectified only by underpinning. Older buildings with severe settlement
problems may be very costly to repair.
Masonry Piers
Masonry piers are often used to support internal loads on small residential buildings, or to
support projecting building elements, such as bay windows, porches and additions. In some
cases, they support the entire structure. Piers often settle differentially and, over a long
period of time, particularly when they are exposed to the weather, they tend to deteriorate.
Pier Problems
Piers should be plumb, without major settlement, in good condition, and adequate in
accepting bearing loads. Their width-to-height ratio should not exceed 1:10. Those that are
deficient should be repaired or replaced. When appearance is not a factor (as is often the
case), piers can be supplemented by the addition of adjacent supports.
Settlement or rotation of the pier footing can cause a lowering or tilting of the pier and
subsequent loss of bearing capacity. Wood-frame structures adjust to this condition by
flexing and redistributing their loads, or by sagging. Masonry walls located over settled piers
will crack.

~ 111 ~
Frost-heaving of the footing or pier, a condition caused by the lack of an adequate footing
or one of insufficient depth, can raise or tilt a pier. This could show up as movement similar
to that caused by settlement or rotation of the footing. Such a condition is most common
under porches and decks.
Above-ground piers exposed to the weather are subject to freeze-thaw cycles and
subsequent physical damage. Deterioration of the pier could be caused by exposure, poor
construction, or over-stressing. Piers for many older residential structures are often of
poorly constructed masonry that deteriorates over the years. A sign of over-stressing of
piers is vertical cracking or bulging.
Problems with piers can result in problems with bearing of wooden components. Structural
wooden components can lose bearing when piers move or deteriorate.
Check for beam rotation. Beam rotation can cause point-bearing situations leading to
localized crushing. Ensure that all beams are relatively square and level.

~ 112 ~
Shrinkage Cracking
Cracking can form from the drying shrinkage in concrete-block foundation walls. As they dry
in place, the shrinkage of concrete block walls often results in patterns of cracking similar to
that caused by differential settlement, resulting in tapering cracks that widen as they move
upward diagonally. These cracks usually form during the building’s first year. In existing
buildings, they will appear as old cracks and exhibit no further movement.
Although such cracks are often mistaken for settlement cracks, shrinkage cracks usually
occur in the middle third of the wall, and the footer beneath them remains intact. Shrinkage
cracking is rarely serious, and in an older building may have been repaired previously. If the
wall is unsound, its structural integrity sometimes can be restored by pressure-injecting
concrete epoxy grout into the cracks, or by adding pilasters.
Sweeping or Horizontal Cracking
The sweeping or horizontal cracking of brick or concrete-block foundation walls may be
caused by improper back-filling, vibration from the movement of heavy equipment or
vehicles close to the wall, or by the swelling or freezing and heaving of water-saturated soil
adjacent to the wall.

~ 113 ~
Shown above: horizontal cracking or sweeping
Similar to drying shrinkage, sweeping or horizontal cracking may have occurred during the
original construction and been compensated for at that time. Such distress, however, is
potentially serious, as it indicates that the vertical supporting member (the foundation wall)
that is carrying a portion of the structure above is ―bent‖ or ―broken.‖ It may be possible to
push the wall back into place by careful hydraulic jacking, and then reinforcing it with the
addition of interior buttresses, or by pressure-injecting concrete epoxy grout into the wall. If
outside ground conditions allow, the wall can be relieved of some lateral pressure by
lowering the ground level around the building.
Soil
When expansive soils
are suspected as the
cause of the cracking,
examine the exterior for
sources of water, such
as broken leaders or
poor surface drainage.
If the damage is above
the local frost depth, or
if damage occurred
during an especially cold
period, the culprit may
be frost-heaving.

~ 114 ~
Above-Ground Masonry Walls
Brick Wall Cracking Associated with Thermal and Moisture Movement
Above-ground brick walls expand in warm weather, particularly if facing south or west, and
contract in cool weather. This builds up stresses in the walls that may cause a variety of
cracking patterns, depending on the configuration of the wall and the number and location
of openings. Such cracks are normally cyclical and will open and close with the season. They
will grow wider in cold weather and narrower in hot weather.
Look for cracking at the corners of long walls, walls with abrupt changes in cross-section
(such as at a row of windows), walls with abrupt turns or jogs, and in transitions from one-
to two-story walls. These are the weak points that have the least capacity for stress.
Common moisture and thermal movement cracking includes:
horizontal or diagonal cracks near the ground at piers in long walls due to horizontal
shearing stresses between the upper wall and the wall where it enters the ground.
The upper wall can thermally expand, but its movement at ground level is moderated
by earth temperatures. Such cracks extend across the piers from one opening to
another;
along the line of least resistance. This condition is normally found only in walls of
substantial length;
vertical cracks near the end walls due to thermal movement. A contracting wall does
not have the tensile strength to pull its end walls with it as it moves inward, causing
it or the end walls to crack vertically where they meet;
vertical cracks in short offsets and setbacks caused by the thermal expansion of the
longer walls that are adjacent to them. The shorter walls are ―bent‖ by this thermal
movement and crack vertically;
vertical cracks near the top and ends of the façade due to the thermal movement of
the wall. This may indicate poorly bonded masonry. Cracks will tend to follow
openings upward; and
cracks around stone sills and lintels caused by the expansion of the masonry against
both ends of a tight-fitting stone piece that cannot be compressed.
Cracks associated with thermal and moisture movement are usually only cosmetic
problems. After their cause has been determined, they should be repaired with a flexible
sealant, since filling such cyclic cracks with mortar will simply cause the masonry to crack in
another location. Inspectors are not structural engineers. Cracks should be examined by a
structural engineer.
Brick Wall Cracking
Brick wall cracking can be associated with freeze-thaw cycles and corrosion.

~ 115 ~
Brick walls often exhibit distress due to the expansion of freezing water, or the rusting of
embedded metals.
Look for:
cracking around sills, cornices, eaves, chimneys, parapets, and other elements
subject to water penetration, which is usually due to the migration of water into the
masonry. The water expands upon freezing, breaking the bond between the mortar
and the masonry and, eventually, displacing the masonry itself. The path of the
water through the wall is indicated by the pattern of deterioration;
cracking around iron or steel lintels, which is caused by the expansive force of
corrosion that builds up on the surface of the metal. This exerts great pressure on
the surrounding masonry and displaces it because corroded iron can expand to many
times its original thickness. Structural iron and steel concealed within the masonry, if
exposed to moisture, can also corrode and cause cracking and displacement of its
masonry cover. Rust stains usually indicate that corrosion is the cause of the
problem; and
the joint between the masonry and a steel lintel that supports the masonry over an
opening, to make sure it is clear and open. If the joint has been sealed, the sealant
should be removed.
These conditions can usually be corrected by repairing or replacing corroded metal
components and by repairing and re-pointing the masonry. Where cracking is severe,
portions of the wall may have to be reconstructed. Cracks should be further examined by a
structural engineer.
Cracking and Structural Failure
Cracking or displacement of a wall may be associated with the structural failure of building
elements. Structure-related problems, aside from those caused by differential settlement
and earthquakes, are usually found over openings and, less commonly, under roof eaves
and in areas of structural overloading.

~ 116 ~
Such problems include:
cracking or displacement of masonry over openings, resulting from the deflection or
failure of the lintels or arches that span the openings. In older masonry walls with
wood lintels, cracking will occur as the wood sags or decays. Iron and steel lintels
also cause cracking as they deflect over time. Concrete and stone lintels occasionally
bow and sometimes crack;
masonry arches of brick or stone may crack or fail when there is wall movement, or
when their mortar joints deteriorate. When such lintel deflections or arch failures
occur, the masonry above may be supporting itself and will exhibit step cracks,
beginning at the edges of the opening and joining in an inverted ―V‖ above the
opening’s midpoint. Correcting such problems usually means replacing failed
components and rebuilding the area above the opening;
cracking or outward displacement under the eaves of a pitched roof due to failure in
the horizontal roof ties that results in the roof spreading outward. The lateral thrust
of the roof on the masonry wall may cause it to crack horizontally just below the
eaves, or to move outward with the roof. The roof will probably be leaking, as well.
When this occurs, examine the roof structure carefully to ascertain whether there is
a tying failure. If so, additional horizontal ties or tension members will have to be
added and, if possible, the roof pulled back into place. The damaged masonry can
then be repaired. The weight also can be transferred to interior walls. Jacking of the
ridge and rafters is possible, too; and
masonry walls that sometimes show signs of bulging as they age. The wall itself may
bulge, or the bulge may only be in the outer withe. Bulging often develops so slowly
that the masonry doesn’t crack and, therefore, it may go unnoticed for a long period
of time. The bulging of the whole wall is usually due to thermal or moisture
expansion of the wall’s outer surface, or to contraction of the inner withe. This
expansion is not completely reversible because once the wall and its associated
structural components are pushed out of place, they can rarely be completely pulled
back into their original positions.
Bulging of Walls
When wall bulges occur in solid masonry walls, the walls may be insufficiently tied to the
structure, or their mortar may have lost its bond strength. Large bulges must be tied back
to the structure; the star-shaped anchors on the exterior of masonry walls of many older
buildings are examples of such ties. Check local building ordinances on their use. Small
bulges in the outer masonry course often can be pinned to the inner course, or dismantled
and rebuilt.
The effects of the cyclical expansion of a wall are cumulative and, after many years, the wall
will show a detectable bulge. Inside the building, separation cracks will develop on the
inside face of the wall at floors, walls and ceilings.

~ 117 ~
Bulging of only the outer masonry withe is usually due to the same gradual process of
thermal and/or moisture expansion, and masonry debris accumulates behind the bulge and
prevents the course from returning to its original position.
In very old buildings, small wall bulges may result from the decay and collapse of an
internal wood lintel or wood-bonding course, which can cause the inner course to settle and
the outer course to bulge outward.
Leaning of Walls
Masonry walls that lean represent an
uncommon and serious condition that is
usually caused by poor design and
construction practices, particularly
inadequate structural tying or poor
foundation work.
Brick Veneer Walls
Brick veneer walls are subject to the forces of differential settlement, moisture- and
thermal-related cracking, and the effects of freezing and corrosion.
Look for:
cracks caused by frame shrinkage, which are most likely to be found around fixed
openings where the independent movement of the veneer wall is restrained;
bulging, which is caused by inadequate or deteriorated ties between the brick and
the wall that it is held upon; and
vertical cracking at corners or horizontal cracking near the ground caused by thermal
movement of the wall, which is similar to that in solid masonry and masonry cavity
walls, but possibly more pronounced in well-insulated buildings because of the
reduction in the moderating effect from interior temperatures. Thermal cracks are
cyclic and should be filled with a flexible sealant. Where there is severe cracking,
expansion joints may have to be installed.
Problems Associated with Parapet Walls
Parapet walls often exhibit signs of distress and deterioration due to their full exposure to
the weather, the splashing of water from the roof, differential movement, the lack of
restraint by vertical loads or horizontal bracing, and the lack of adequate expansion joints.

~ 118 ~
At parapets, look for:
horizontal cracking at the roof line due to differential thermal movement between the
roof line and the wall below that is exposed to moderating interior temperatures. The
parapet may eventually lose all bond except that from friction and its own weight,
and may be pushed out by ice formation on the roof;
bowing due to thermal and moisture expansion when the parapet is restrained from
lengthwise expansion by end walls or adjacent buildings. The wall will usually bow
outward, since that is the direction of least resistance;
overhanging the end walls when the parapet is not restrained on its ends. The
problem is often the most severe when one end is restrained and the other is not;
random vertical cracking near the center of the wall due to thermal contraction; and
deterioration of parapet masonry due to excessive water penetration through
inadequate coping or flashing, if any, which, when followed by freeze-thaw cycles,
causes masonry spalling and mortar deterioration.
Fire Damage to Brick Masonry Walls
Masonry walls exposed to fire will resist damage in proportion to their thickness. Examine
the texture and color of the masonry units and probe their mortar. If they are intact and
their basic color is unchanged, they can be considered serviceable. If they undergo a color
change, consult a qualified structural engineer. Hollow masonry units should be examined
for internal cracking, where possible, by cutting into the wall. Such units may need
replacement if seriously damaged.

~ 119 ~
QUIZ 11
1. T/F: A clean crack may indicate recent movement.
True
False
2. Mechanical damage can be caused by moisture entering the brick and freezing, resulting in
_______ of the brick’s outer layers.
spalling
swaying
leaching
3. _____________ of brick or concrete-block foundation walls may be caused by improper back-
filling, vibration from the movement of heavy equipment or vehicles close to the wall, or by the
swelling and heaving of water-saturated dirt.
Spalling
Sweeping
Mopping
4. T/F: Structure-related problems, aside from those caused by differential settlement or
earthquakes, are usually found over openings and, less commonly, under roof eaves or in
areas of structural overloading.
True
False
Answer Key to Quiz 11
1. T/F: A clean crack may indicate recent movement.
Answer: True
2. Mechanical damage can be caused by moisture entering the brick and freezing,
resulting in spalling of the brick’s outer layers.
3. Sweeping of brick or concrete-block foundation walls may be caused by improper
back-filling, vibration from the movement of heavy equipment or vehicles close to the
wall, or by the swelling and heaving of water-saturated dirt.
4. T/F: Structure-related problems, aside from those caused by differential settlement or
earthquakes, are usually found over openings and, less commonly, under roof
eaves or in areas of structural overloading.
Answer: True

~ 120 ~
SECTION 18: EAVES, SOFFITS and FASCIA
This section deals with the details of the eaves, soffit and fascia components of the house
that may be observed during an inspection of the exterior.
At the end of this section, you should be able to:
describe how the eaves, soffit and fascia function; and
list some common concerns with the eaves, soffit and fascia.
The eaves refer to the edge of a roof that overhangs the exterior wall.
The soffit refers to the building material that forms a ceiling surface from the top of the
exterior wall to the outer edge of the roof or fascia board, bridging the space between the
siding and the roofline, otherwise known as the eaves.
The fascia refers to any horizontal surface that spans across the top of columns or across
the top of a wall. The word fascia is derived from the Latin word for band or door frame.
Specifically, it is used to describe the horizontal fascia board that caps the end of the roof
rafters. The fascia can be used to hold the rain gutter. For a low-sloped roof, it is the
border around the roof’s perimeter.

~ 121 ~
The materials used at the soffits and fascia are made from wood, aluminum, fiber-cement,
OSB, plywood and vinyl.
Many soffits have vents that allow air to flow into the unconditioned roof spaces. Vents
installed on upper portions of the roof structure allow that air to continue to flow out of the
roof space.
Inspection Tips
Look at the soffit and fascia from the ground level, as well as from a ladder. If you’re using
a ladder to get up on the roof's surface or to the roof's edge, that would be an ideal time to
inspect the soffit and fascia.
The fascia board is not readily visible when it is installed to support a rain gutter. When
there is a drainage problem with the rain gutter, or if the roof is shedding water improperly,
the fascia board is often deteriorated by moisture. Be sure to understand the limitations of
your visual-only inspection of the eaves, and remember that there is a potential for
concealed problems at the fascia board located behind the gutter.
When the soffit and fascia have been covered by aluminum or vinyl, there is a potential for
concealed damage at these areas, as well. Damage could be covered up by the capping
material. It is simply not possible to see everything.
When you walk around the property, look up and inspect the eaves. It will be difficult to
inspect when the house is two or three stories tall. Inform your client of your inspection's
restrictions. Look for loose and missing sections. Look for water damage and water stains.
Check the apparent attachment of the gutter to the fascia board. Look for peeling paint.
Look for missing, blocked and damaged ventilation materials.
Wood rot at the soffit or fascia board may be caused by:
roof leaks at the edge;
roof penetrations that are causing leaks;
drip edge problems;
flashing leaks;
ice dams;
loose sections that are allowing water to penetrate; and
overflowing gutters.
Be sure to check around the chimney flashing where the stack passes through the soffit. A
leaking flashing at the chimney stack will cause water stains and water damage in that
area. Check anything that penetrates or passes through the roof and soffit, such as an
electrical conduit or mast. Flashing problems are common at these areas.

~ 122 ~
Paint located at the eaves that is in poor condition may indicate a moisture problem.
Peeling paint could be caused by normal failure with age and/or exposure to weather. So,
be careful in your deductions.
High Winds
Aluminum and vinyl soffits are highly prone to failure when exposed to high winds. If the
soffits fail, wind-driven rain can enter the area above the top of the wall and cause water
intrusion problems. Loss of soffits can increase internal pressures and lead to loss of the
roof sheathing and, eventually, building failure.
To perform adequately under
high winds, soffits must be
able to resist suction
pressure (downward) and
positive pressure (upward).
Some building codes in
certain geographical areas
mandate that these areas be
built to resist design-wind
pressures.

~ 123 ~
SECTION 19: THE WALL ASSEMBLY
This section deals with the general terms and details of a typical wall assembly.
At the end of this section, you should be able to:
list some of the components of a typical wall assembly; and
describe the function of a WRB.
A typical wall assembly can be understood using the following illustration.
In a typical wall assembly, the following components may be present:
wall studs or structural members;
interior finish;
insulation;
air and/or vapor barrier;
sheathing;
building paper or housewrap;
siding or exterior wall covering;
flashing;
flooring; and
foundation.

~ 124 ~
The studs or structural members of the wall are usually not visible. They are the
components of the wall that carry live and/or dead loads. They are designed to carry the
floor load, roof load, the dead load from the siding, and the live load from the wind.
Interior finishes (drywall, plaster, or some other material) separate the interior from the
exterior by restricting air movement through the wall.
Vapor barriers are installed according to building codes and practices of the local
geographical area. In cold-winter climates, vapor barriers are generally installed on the
interior-side of a wall assembly behind the interior finish.
Insulation is installed in between the structural members of a wood frame wall. Insulation
can also be installed behind the siding, or behind the interior finish wall. The thickness of
the insulation (or its R-value) and the type of insulation depend on the climate and the local
building requirements. Home inspectors do not typically see the insulation inside a wall.
The purpose of sheathing installed on a wall is usually for adding strength. The typical
building practice is to install the sheathing on the exterior side of the wall. The sheathing
provides a substrate for wall components, such as the building paper. Sheathing may be
plywood, OSB, wooden planks, fiberboard, exterior gypsum board, cement board, and
insulation board. If rigid insulation boards or panels were installed, their primary function is
to control heat energy.
Water-Resistive Barrier (WRB)
Structural components can be adversely affected by moisture. Due to the potential for
water accumulation within a wall, a water-resistant membrane is required behind any
exterior siding and veneer. Under certain conditions, asphalt felt or a similar water-
resistant barrier is not necessary. It is permissible to eliminate the membrane in a
detached building, and where the siding and finish materials provide the needed protection.
One layer of No. 15 asphalt felt or other approved water-resistive barrier, free from
holes and breaks, should be applied over studs or sheathing of all exterior walls, behind the
siding or veneer. The felt or material should be applied horizontally. The upper layer
should overlap the lower layer a minimum of 2 inches. Where joints occur, the material
should be lapped vertically at least 6 inches.
The functions of building felt paper include:
providing a moisture-resistant barrier;
providing a path for drainage; and
allowing vapor to move through the wall from inside the house to the exterior.
In new construction, asphalt building felt paper is being increasingly replaced by the use of
housewrap.

~ 125 ~
SECTION 20: HOUSEWRAP
In this section, the function of housewrap and its attributes are examined, and common
problems associated with its use are reviewed.
Housewrap has two functions:
to minimize air flow through a wall; and
to stop and drain liquid water that has penetrated through the siding.
Housewrap is not a vapor retarder. It is designed to allow water vapor to pass through.
The choice to use housewrap or building paper depends on the climate and the preference
of the installer/contactor or owner. Both materials can provide adequate protection.
Housewrap must be installed properly or it could be more detrimental than beneficial.
Proper installation, especially in lapping, is the key to employing housewrap successfully.
Housewrap serves as a dual-purpose weather barrier. It not only minimizes the flow of air in
and out of a house, but it also stops liquid water and acts as a drainage plane. Housewrap is
not a vapor retarder. The unique characteristic of housewrap is that it allows water vapor to
pass through it while blocking liquid water. This permits damp, humid air to escape from the
interior of the home while preventing outside liquid water in the form of rain from entering
the home.
Almost all exterior finishes allow at least some water penetration. If water continually soaks
the wall sheathing and framing members, problems such as rot and mold growth could
occur. Housewrap stops water that passes through the siding and allows it to drain away
from the structural members.
Humid Climates
In humid climates with heavy rainfall, housewrap is recommended to prevent water damage
to the framing. Its use in drier climates may not be as critical because materials are allowed
to adequately dry, although housewrap also prevents air movement through the wall cavity,
which is beneficial for insulating purposes.
Housewrap vs. Building Paper
It is important to know what attributes are most important for a particular climate.
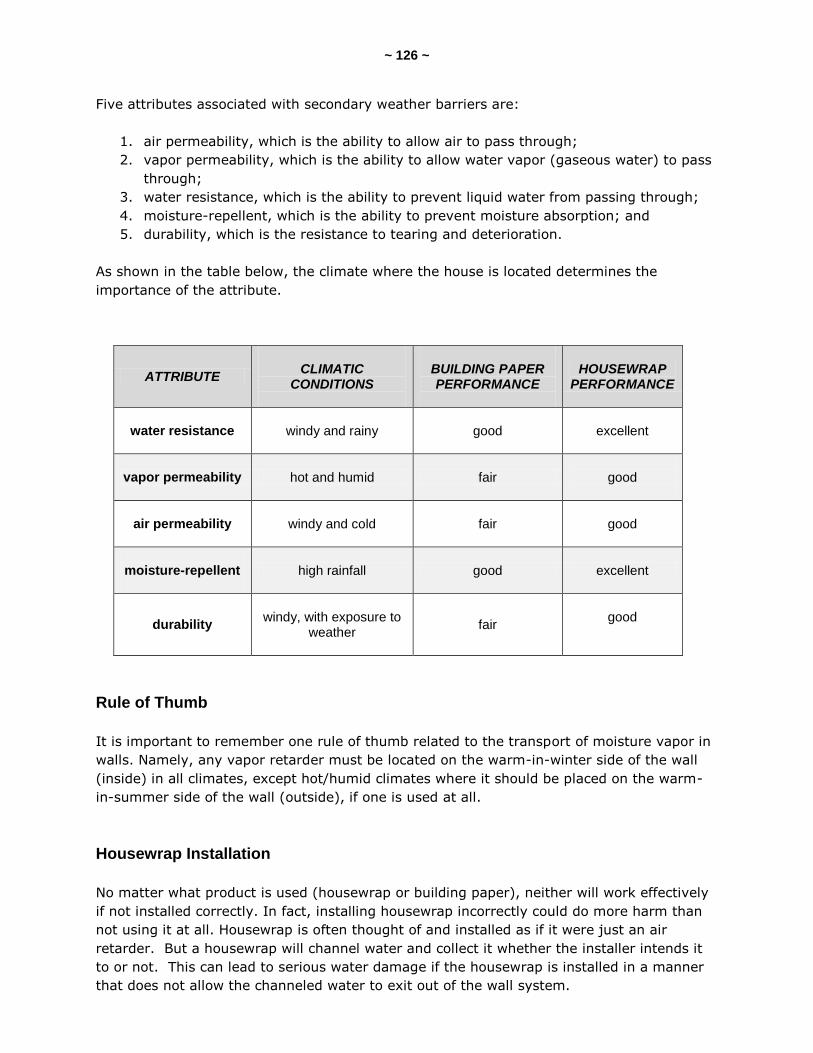
~ 126 ~
Five attributes associated with secondary weather barriers are:
1. air permeability, which is the ability to allow air to pass through;
2. vapor permeability, which is the ability to allow water vapor (gaseous water) to pass
through;
3. water resistance, which is the ability to prevent liquid water from passing through;
4. moisture-repellent, which is the ability to prevent moisture absorption; and
5. durability, which is the resistance to tearing and deterioration.
As shown in the table below, the climate where the house is located determines the
importance of the attribute.
ATTRIBUTE
CLIMATIC
CONDITIONS
BUILDING PAPER PERFORMANCE
HOUSEWRAP PERFORMANCE
water resistance windy and rainy good
excellent
vapor permeability hot and humid fair
good
air permeability windy and cold fair
good
moisture-repellent
high rainfall good excellent
durability windy, with exposure to
weather fair
good
Rule of Thumb
It is important to remember one rule of thumb related to the transport of moisture vapor in
walls. Namely, any vapor retarder must be located on the warm-in-winter side of the wall
(inside) in all climates, except hot/humid climates where it should be placed on the warm-
in-summer side of the wall (outside), if one is used at all.
Housewrap Installation
No matter what product is used (housewrap or building paper), neither will work effectively
if not installed correctly. In fact, installing housewrap incorrectly could do more harm than
not using it at all. Housewrap is often thought of and installed as if it were just an air
retarder. But a housewrap will channel water and collect it whether the installer intends it
to or not. This can lead to serious water damage if the housewrap is installed in a manner
that does not allow the channeled water to exit out of the wall system.

~ 127 ~
Inspection Tips for Housewrap
The following are inspection tips for checking successful installation of housewrap at new
construction:
the manufacturer’s instructions are followed;
the housewrap is installed before the windows and doors are installed;
the upper layer is lapped over the lower layer;
horizontal joints are lapped at least 6 inches;
vertical joints are lapped 6 to 12 inches, depending on potential wind-driven rain
conditions;
1-inch minimum staples or roofing nails are used and spaced 12 to 18 inches on-
center throughout;
joints are taped with housewrap tape;
a drainage provision is installed at the bottom of the siding;
the housewrap is extended over the sill plate and foundation joint; and
the housewrap is installed such that water will never be allowed to flow to the inside
of the wrap.
Inspect for These Common Problems
incomplete wrapping:
Gable ends are often left unwrapped, leaving a seam at the low end of the gable.
This method works to prevent air intrusion, but water that gets past the siding will
run down the unwrapped gable end and get behind the housewrap at the seam. Also,
it is common for builders to pre-wrap a wall before standing it. If this is done, the
band joist is left unwrapped. The band joist can be wrapped by inserting a strip 6 to
12 inches underneath the bottom edge of the wall wrap. In addition, outside corners
are often missed.
improper lapping:
This often occurs because the housewrap is thought of as an air retarder alone.
When applying the housewrap, keep in mind that it will be used as a vertical
drainage plane, just like the siding.
doors and windows:
Improper integration with flashing around doors and windows can create moisture
intrusion problems.

~ 128 ~
QUIZ 12
1. T/F: Housewrap joints should be taped with housewrap tape.
True
False
2. T/F: When installing housewrap, the lower layer should always be lapped over the upper layer.
True
False
3. T/F: Housewrap is designed to prevent water vapor from passing through.
True
False
4. T/F: One function of housewrap is to minimize air flow through a wall.
True
False
5. T/F: One function of housewrap is to allow liquid water to penetrate.
True
False
Answer Key to Quiz 12
1. T/F: Housewrap joints should be taped with housewrap tape. Answer: True
2. T/F: When installing housewrap, the lower layer should always be lapped over the upper layer. Answer: False
3. T/F: Housewrap is designed to prevent water vapor from passing through. Answer: False
4. T/F: One function of housewrap is to minimize air flow through a wall. Answer: True
5. T/F: One function of housewrap is to allow liquid water to penetrate. Answer: False

~ 129 ~
SECTION 21: WATERPROOFING and DAMP-PROOFING
This section deals with the waterproofing and damp-proofing that may be observed during
an inspection of the exterior.
At the end of this section, you should be able to:
describe the functions of waterproofing and damp-proofing; and
describe the differences between the two.
Waterproofing and damp-proofing both relate to moisture protection. They are often
misapplied and incorrectly used by inspectors. The term waterproofing is often used when
damp-proofing is really meant. Damp-proofing does not provide the same degree of
moisture protection as waterproofing.
Building codes typically require damp-proofing of foundation walls that retain earth and
enclose interior spaces and floors below grade. Damp-proofing should be applied from the
top of the footing to the finished grade.
Damp-proofing for masonry walls involves applying a Portland cement parging to the
exterior of the wall.
The parging should be damp-proofed by one of the following:
bituminous coating;
acrylic-modified cement;
surface-bonding cement;
a permitted waterproofing material; or
other approved methods or materials.
The use of waterproofing measures is reserved for conditions where a high water table or
other severe soil-water conditions are known to exist. Strictly speaking, waterproof does not
mean watertight, as with a boat hull. It simply involves the application of a more
impermeable membrane on the foundation wall.
With some exceptions, walls should be waterproofed using one of the following materials:
2-ply hot-mopped felt;
55-pound roll roofing;
6-mil polyvinyl chloride;
6-mil polyethylene;
40-mil polymer-modified asphalt;
60-mil flexible polymer cement;
⅛-inch cement-based, fiber-reinforced waterproofing coating; or
60-mil solvent-free, liquid-applied synthetic rubber.
~ 130 ~
6-Mil Polyethylene Sheet
The use of 6-mil poly as a waterproofing membrane on a basement foundation helps to
bridge small cracks, and also minimizes the rate of moisture transport through the
foundation wall by means of capillary action and vapor transmission. These sources of
moisture transport add to moisture levels inside the basement and above-grade portions of
the home. In an NAHB survey of foundation construction practices and moisture-related
problems, basement walls with a 6-mil poly covering were 11 times less likely to experience
leakage problems compared to typical damp-proofing.
Best Practices
The waterproofing method is recommended as a best practice, especially if the basement is
intended to be used for storage or living space. Waterproofing may involve the simple
application of damp-proofing, plus a layer of 6-mil poly on the exterior below-grade portions
of a basement foundation wall. Other single-ply or built-up membranes may also be used.
Damp-proofing is the application of one or more coating of impervious compounds to
prevent the passage of water vapor through walls under slight pressure.
Waterproofing is the application of a combination of sealing materials and impervious
coatings to prevent the passage of moisture in either a vapor or liquid form under conditions
of significant hydrostatic pressure.
Parging
A concrete parge coat is a thin coat of a cementitious mortar applied to a masonry surface.
A typical parge coat is 1/16-inch to ¼-inch thick. The parge coat can be applied to a
foundation wall. Concrete block walls are typically parge-coated before a bituminous damp-
proofing coat is applied. The parging provides a smooth surface for the damp-proofing
material. Poured concrete foundation walls are smooth enough that they typically do not
require a parge coat.
Inspection Tips
At the top of the foundation wall that is exposed, you may see the top of the parge coat or
the top edge of the black-colored bituminous damp-proofing. The parge coat is not the
damp-proofing feature but is the surface upon which the damp-proofing is applied.

~ 131 ~
SECTION 22: PERMANENT WOOD FOUNDATIONS (PWFs)
This section deals with the details of permanent wood foundations that may be observed
during an inspection of the exterior.
At the end of this section, you should be able to:
describe how a permanent wood foundation functions; and
list some common concerns with permanent wood foundations.
While traditional basement walls are made from masonry materials, such as concrete and
stone, inspectors should be prepared to encounter permanent wood foundations (PWFs).
When pressure-treated wood was developed in the 1960s, it became possible for wood to be
used in foundation walls without being prohibitively vulnerable to damage from insects and
moisture. By the 1970s, PWFs gained wide acceptance.
Some builders and manufacturers claim that wood foundations offer a number of
advantages over masonry foundations, including the following:
Wood foundations are simpler, quicker and cheaper to construct than masonry
foundations. However, they don't last as long as masonry foundations and are less
durable in the long term.
The design of PWFs requires that dry soil be maintained around the foundation. This
means that a properly constructed and maintained basement with wood walls
will remain dry and mildew-free. Basement mildew, leakage and dampness are
common in houses with masonry foundations.

~ 132 ~
Finishing a basement is easier when walls are made from wood. Insulation is placed
between the wall studs to which drywall can be attached.
The basement will be warmer because wood is a better insulator than masonry, and
the foundation wall studs provide large cavities for insulation. However, wood
foundation walls are typically much thinner than masonry walls. Also, masonry can
be insulated.
Inspectors can check for the following indicators that wood basement walls are experiencing
problems:
If dampness is present, its source should be identified. Dampness may be due to a
rising water table, an inadequate drainage system, or inadequate damp-proofing.
Water from an interior source, such as an air conditioner or a high-efficiency furnace,
does not indicate a compromised PWF.
Inspectors can check for exterior wood decay by probing the wall from the outside
with a rod. It is usually adequate to probe at every 8 feet. If decayed wood is
detected by probing, it is likely that decay exists elsewhere in the wall.
If the interior wall is not covered by drywall, it may be possible to inspect for wood
decay below grade from the inside of the house.
Evidence of foundation leakage may be discovered at butt joints where sealant may
not have been used.
Buckling can occur due to constant pressure over the course of years, or by the
back-filling process.
Outside, a moisture barrier should be present and it should rise above grade.
The foundation walls may be bowed, especially at the wall next to the basement
stairs.

~ 133 ~
Damp-Proofing
PWFs rely on adequate damp-proofing. Inspectors can refer to the 2006 International
Residential Code (IRC) for specifics regarding this subject.
Plywood panel joints in the foundation walls should be sealed their full length with a
caulking compound capable of producing a moisture-proof seal under the conditions of
temperature and moisture content appropriate for the installation.
A 6-mil-thick polyethylene film should be applied over the below-grade portion of exterior
foundation walls prior to backfilling. Joints in the polyethylene film should be lapped 6
inches and sealed with adhesive. The top ledge of the polyethylene film should be bonded to
the sheathing to form a seal. Film areas at grade should be protected from mechanical
damage and exposure by a pressure preservative-treated lumber or plywood strip attached
to the wall several inches above finish-grade level, and extending approximately 9 inches
below grade. The joint between the strip and the wall should be caulked full-length prior to
fastening the strip to the wall. Other coverings appropriate to the architectural treatment
may also be used. The polyethylene film should extend down to the bottom of the wood
footing plate but should not overlap or extend into the gravel or crushed-stone footing.
In summary, permanent wood foundations are relatively new and somewhat rare, but
inspectors should know the defects that are commonly associated with them.

~ 134 ~
SECTION 23: COMMON PROBLEMS with WALLS
Certain problems and concerns are common to all walls and siding installations.
This section covers the following issues with walls, including:
inadequate clearance from the ground surface;
inadequate clearance from the roof cover;
dense vegetation;
wood and soil contact; and
water intrusion.
Inadequate Clearance from the Ground
There should be adequate clearance from the ground to the bottom of the siding. Generally
speaking, there should be 6 to 8 inches of clearance. Some of the foundation wall should be
visible above the ground surface and below the siding. Homeowners may not like the
appearance of the exposed foundation, but that area should not be covered up with siding.
Siding should extend over the top of the foundation wall to protect that area of the
structure. If the siding is 8 inches above the ground surface, then the top of the foundation
should be at least 9 to 10 inches above the ground surface.
Brick may be found below grade and that may be acceptable, depending on the type of
brick. In some cases, the brick may be designed for use underground. If the brick was
designed to be underground, then there should not be major deterioration or water damage
found.

~ 135 ~
Most other sidings, including wood, stucco, fiber-cement, metal, vinyl, and wood-based
siding, should have adequate clearance from the ground.
Damage from inadequate clearance may include:
wood rot;
rust;
staining;
clogged or restricted drainage provisions;
water-damaged wood siding; and
deteriorated paint.
Major problems may occur if the drainage provisions are clogged or restricted. If the
moisture drainage provisions of an EIFS are below grade, then the system will not function
properly. Water will not be able to drain out of the siding system. Water may enter the
structure through the weep or drainage holes. Major water damage, such as spalling to
masonry brick siding, may occur.
Inside the house, major damage may be found when the drainage provisions of the siding
are below grade. Wood rot, water intrusion, and insect infestation may be found at the sill
plate, floor joist ends, sheathing and stud walls.
Inspection Tips
As you walk around the exterior, look closely at the overall grading, the slope of the ground
nearest the house structure, and the distance between the siding and the ground surface.
Pay attention to the exposed foundation. Check to see whether at least 6 inches of exposed
foundation is visible all around the perimeter of the structure. If you see any contact
between the siding and the ground, move in closer to inspect using a probe and a moisture
meter. Check for water damage at the siding material. Look for drainage provisions.

~ 136 ~
Oftentimes, a property owner will add dirt or landscaping materials up against the siding to
cover the exposed foundation. Maybe the property owner was doing some landscape work,
or the original grading was simply poorly done. Whatever the reason, there should be
adequate clearance between the bottom of the siding and the ground surface to prevent
major damage to the siding and water intrusion into the structure.
Inadequate Clearance from the Roof Cover
The best building practice is to have some distance or clearance between the bottom of the
siding and the roof surface. The siding, no matter what type of material, should not come
into contact with the roof-covering material. In general, you should find at least 1 inch of
clearance during your inspection. With adequate clearance installed, you may be able to
confirm the type, condition, and proper installation of flashing at the roof-wall intersection.
Wood siding is particularly vulnerable to moisture damage. Wood siding in contact with a
roof's surface will wick moisture. End grains of wood and cut edges of wood siding,
particularly plywood siding, can easily absorb or wick moisture.

~ 137 ~
Inspection Tips
Look for at least 1 inch of clearance. If you are walking on the roof, it may be easy to kneel
down to get a better look at the bottom of the siding. Use your hand to feel the condition of
the siding along the roof surface. Sometimes, pushing on the siding may reveal concerns
about the condition of that roof-wall intersection. If there is no clearance at that roof area,
then probe for damage and use a moisture meter.
If the siding is damaged, water may penetrate the exterior covering and enter the
structure. Adequate clearance between the siding and roof surface is essential.
Dense Vegetation
Some vines and ivy grow on structures. Some do damage and some don’t. Some cause
cosmetic problems when they are pulled off the house and removed. All vines and ivy tend
to hold moisture up against the house siding. They provide paths for water intrusion into
the structure. They provide paths for insects to enter the house. Vines can move the siding,
loosen fasteners, and cause separations and openings in the exterior covering.
Vines should be kept off of wood siding, away from trim and flashing, off of soffits and
fascia, and clear from gutter and downspout systems. Vines should be prevented from
growing on and under siding, particularly aluminum.
Dense vegetation with vines and ivy is an inspection restriction. The wall covering may not
be completely inspected because of the vegetation. Access to components on the outside of
the house may be restricted physically, as well as visually. This type of restriction should be
noted in the inspection report.
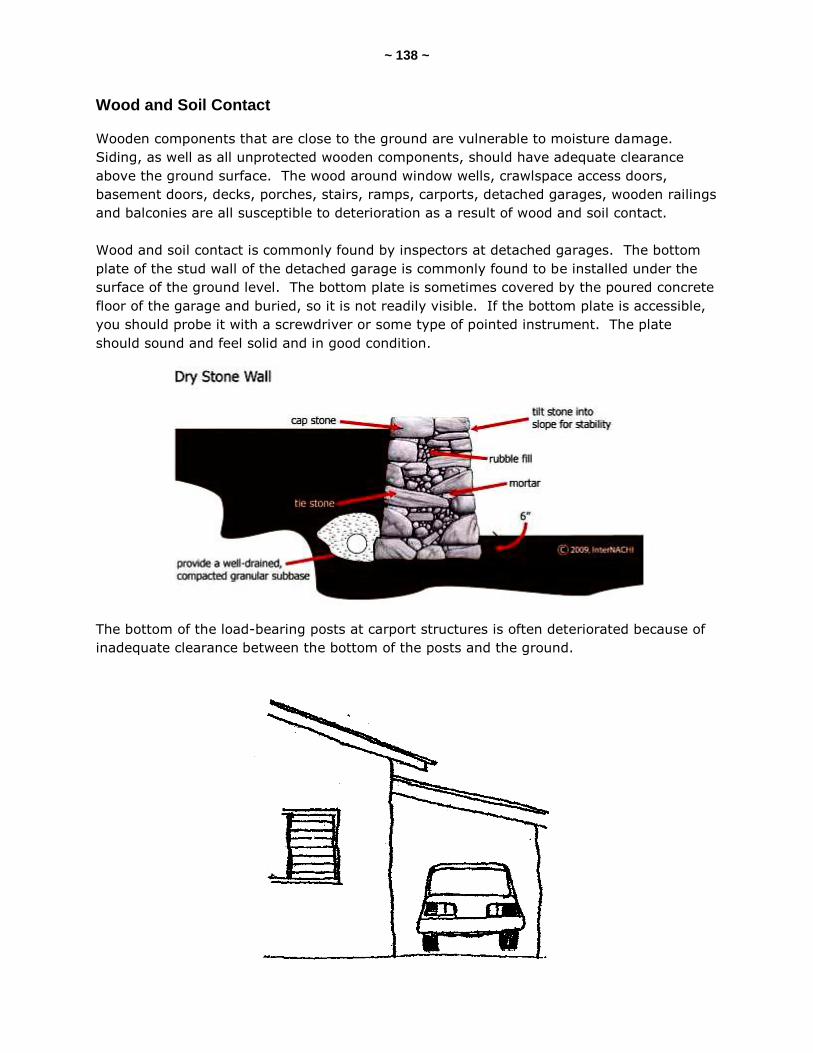
~ 138 ~
Wood and Soil Contact
Wooden components that are close to the ground are vulnerable to moisture damage.
Siding, as well as all unprotected wooden components, should have adequate clearance
above the ground surface. The wood around window wells, crawlspace access doors,
basement doors, decks, porches, stairs, ramps, carports, detached garages, wooden railings
and balconies are all susceptible to deterioration as a result of wood and soil contact.
Wood and soil contact is commonly found by inspectors at detached garages. The bottom
plate of the stud wall of the detached garage is commonly found to be installed under the
surface of the ground level. The bottom plate is sometimes covered by the poured concrete
floor of the garage and buried, so it is not readily visible. If the bottom plate is accessible,
you should probe it with a screwdriver or some type of pointed instrument. The plate
should sound and feel solid and in good condition.
The bottom of the load-bearing posts at carport structures is often deteriorated because of
inadequate clearance between the bottom of the posts and the ground.

~ 139 ~
Retaining walls made of wood are often found to be deteriorated because they are in
contact with the ground.
Planter boxes that are installed against the side of a house cause problems related to
wooden components in contact with soil.
Inspection Tips
Places to look for wood and soil contact include:
the bottom of the siding;
where the foundation meets a wooden structure;
the bottoms of doors;
window sills and jambs;
window wells;
crawlspace access panels;
retaining walls;
outdoor planters;
carports;
detached garages;
porch, deck and balcony support posts;
the bottom of wooden railing posts; and
the bottom of wooden exterior stairs.
Protection Against Decay
Protection from decay should be provided in the following locations by the use of naturally
durable wood or wood that is preservative-treated:
wood joists closer than 18 inches, or wood girders closer than 12 inches to exposed
ground in crawlspaces or unexcavated areas located within the building foundation's
perimeter;
all wood framing members that rest on concrete or masonry exterior foundation
walls and are less than 8 inches from exposed ground;
sills and sleepers on a concrete slab that is in direct contact with the ground;
ends of wood beams entering masonry walls having clearances less than ½-inch all
around; and
wood siding, sheathing, and wall framing components on the exterior having
clearances less than 6 inches from the ground.

~ 140 ~
For those areas of a house that are subject to decay, the lumber must be pressure
preservative-treated or of a wood species having a natural resistance to decay. Such
naturally durable wood includes the heartwood of decay-resistant redwood, cedar, black
locust, and black walnut.
Crawlspaces and unexcavated areas under a house usually contain moisture-laden air. The
foundation walls and the concrete floor of a slab-on-grade foundation absorb moisture from
the ground and, by capillary action, move it to wooden framing components with which they
are in contact. Damage to the wood could be possible unless adequate clearance is
maintained or the appropriate building material is used.

~ 141 ~
All structural, load-bearing wood members in contact with the ground should be suitable for
ground-contact use. Lumber or plywood required to be pressure preservative-treated
should have the quality mark of an approved agency.
Wood Rot
Wood rot may be easily overlooked. Rot or water damage may have been patched quickly
and painted over prior to your inspection. Without close observation or physically touching
the damaged component, wood rot or water damage may be missed during your
inspection. Inspectors often use their fingers or thumb to press on the suspect components
to check for damage and rot. Be very careful when using a screwdriver or probe while
inspecting windows and doors. You do not want to create more problems than actually
exist.
Water Intrusion
To be able to inspect for moisture intrusion and related problems, an inspector should
understand the basics of how moisture can move through a house.
Moisture and water vapor move in and out of a house in three ways:
with air currents;
by diffusion through building materials; and
by heat transfer.
Of these three, air movement accounts for more than 98% of all water vapor movement in
building cavities. Air naturally moves from a high-pressure area to a lower one by the
easiest path possible — generally, through any available hole or crack in the building
envelope. Moisture transfer by air currents is very fast — in the range of several hundred
cubic feet of air per minute. Thus, to control air movement, a house should have any
unintended air paths carefully and permanently sealed.

~ 142 ~
The other two driving forces — diffusion through building materials and heat transfer — are
much slower processes. Most common building materials slow moisture diffusion to a large
degree, although they never stop it completely. Insulation also helps reduce heat transfer or
flow.
The laws of physics govern how damp air reacts within various temperature conditions. The
study of damp air properties is technically referred to as psychrometrics. A psychrometric
chart is used by professionals to determine at what temperature and moisture concentration
water vapor begins to condense. This is called the dew point. By understanding how to find
the dew point, you will better understand how to diagnose moisture problems in a house.
Relative humidity (RH) refers to the amount of moisture contained in a quantity of air
compared to the maximum amount of moisture that the air could hold at the same
temperature. As air warms, its ability to hold water vapor increases; this capacity decreases
as air cools. For example, according to the psychrometric chart, air at 68º F (20º C) with
0.216 ounces of water (H2O) per pound of air (14.8g H2O ÷ kg air) has a 100% RH. The
same air at 59º F (15º C) reaches 100% RH with only 0.156 ounces of water per pound of
air (10.7g H2O ÷ kg air). The colder air holds about 28% of the moisture that the warmer
air does. The moisture that the air can no longer hold condenses on the first cold surface it
encounters (the dew point). If this surface is within an exterior wall cavity, the result will be
wet insulation and framing.
In addition to air movement, the temperature and moisture content can also be controlled.
Since insulation reduces heat transfer or flow, it also moderates the effect of temperature
across the building envelope's cavity. In most U.S. climates, properly installed vapor-
diffusion retarders can be used to reduce the amount of moisture transfer. Except in
deliberately ventilated spaces, such as attics, insulation and vapor-diffusion retarders work
together to reduce the opportunity for condensation to form and accumulate in a house's
ceilings, walls and floors.

~ 143 ~
No wall is 100% waterproof, especially considering that there will be wall openings and
penetrations that compromise the siding materials. If caulk is used as a primary barrier to
moisture penetration through openings, it should be checked during an inspection. Flashing
should be installed in the appropriate areas.
Inspection Tips
Look at the exterior siding for obvious water damage and signs of deterioration. You won’t
be able to tell much about water intrusion by looking at certain siding materials, such as
vinyl and aluminum. But wood siding may offer clues as to the condition of the wall and the
possibility of moisture intrusion. If the siding is deteriorating, that may be a good indication
of some damage behind it. Look closely at the siding and try to determine where liquid
water may penetrate the siding. Look for large openings where air may enter walls through
the siding. When you are inside, look for indications of water intrusion. Water intrusion
does not always show up on the building's interior.

~ 144 ~
SECTION 24: THE FLASHING of WALL COMPONENTS
and MOISTURE PROBLEMS
This section deals with the details of the flashing of wall components and related moisture
problems that may be observed during an inspection of the exterior.
At the end of this section, you should be able to:
describe the locations where flashing should be installed;
list some common concerns with flashing around windows, doors and ledgers;
list important features of flashing and caulking; and
describe the function of kickout or diverter flashing.
Water penetration and accumulation in walls are most commonly associated with flashing
and detailing problems around windows, doors, and other penetrations through the
weather-resistant wall envelope. This section explains recommended flashing details for
common applications in residential construction.
These points are intended to enhance or help fulfill the basic objective for flashing of the
weather-resistant wall envelope, as found in the 2006 IRC:
R703.8 Flashing. Approved corrosion-resistive flashing shall be provided in the exterior
wall envelope in such a manner as to prevent entry of water into the wall cavity or
penetration of water to the building structural framing components. The flashing shall
extend to the surface of the exterior wall finish. Approved corrosion-resistant flashings
shall be installed at all of the following locations:
1. exterior window and door openings. Flashing at exterior window and door
openings shall extend to the surface of the exterior wall finish or to the water-
resistive barrier for subsequent drainage;
2. at the intersection of chimneys or other masonry construction with frame or
stucco walls, with projecting lips on both sides under stucco copings;
3. under and at the ends of masonry, wood or metal copings and sills;
4. continuously above all projecting wood trim;
5. where exterior porches, decks or stairs attach to a wall or floor assembly of
wood-frame construction;
6. at wall and roof intersections; and
7. at built-in gutters.

~ 145 ~
Understanding and Inspecting Flashing
In the illustrations in this section, there are some typical yet very important flashing details
provided as general guidelines for correct installation techniques. They are not presented as
the only solutions to flashing — because there are certainly many other viable solutions —
but as examples of workable approaches for protecting shell penetrations from water
intrusion.
Window flashing and deck-ledger flashing are essential for preventing water damage to wall
assemblies. A kickout flashing is important to protect against water intrusion. A variety of
manufactured windowsill and door threshold flashing components (such as pre-molded pan
flashings) are also available in lieu of site-built flashing components. These components are
used to expel any water leakage at the base of windows and doors.
The illustration below shows window flashing details that can be used depending on when
windows are installed related to the envelope's weather barrier (housewrap or building
paper).

~ 146 ~
These illustrations show the
flashing details at the jamb and the
sill that are designed to provide
protection against water intrusion
in more severe weather conditions.

~ 147 ~
This is an illustration of a flashing practice at a deck attachment to a house's exterior wall.
The illustration at right shows flashing details
at a brick veneer wall.

~ 148 ~
Flashing
Flashing is designed to protect against water intrusion at joints, changes in direction of
certain building components, and between different materials. Flashing that is not
functioning properly will allow water to penetrate the exterior envelope of the house.
Flashing can be made of galvanized steel, aluminum, alloys of steel and aluminum, copper,
lead, and other materials. Flashings can be made of a single component or of two
components, such as a step- and a counter-flashing combined. Counter-flashing protects
the step-flashing by overlapping it. Siding material may act as a counter-flashing.
Head flashing, sometimes called drip-cap flashing, is installed over windows and doors.
Head flashings are installed on houses with siding. Head flashings are sometimes not
installed when a window is significantly recessed, or when the window is close to the top of
the wall and there’s a roof overhang above the window.
Flashing and Caulking
Caulk refers to the caulking substance and to the process of applying it. In the building
trade, caulking refers to the activity of closing up joints and gaps in buildings, making the
joints watertight. The function of caulking is to provide thermal insulation, to control water
penetration, and to provide noise mitigation.
Water intrusion around windows and doors is a common concern. Water intrusion around
windows and doors may be significant because the problem could be concealed and not
discovered for many years.

~ 149 ~
An exhaustive tutorial on the numerous types of windows and doors and their installation
requirements according to each manufacturer are well beyond the scope of an inspection
and this manual.
However, you can use common sense and experience to guide you through your
understanding and inspection of windows and doors, and their related flashing and caulking
installations. Imagine the way water moves down the exterior wall. Imagine how water
may be diverted away from critical areas around the windows and doors. Imagine how
water is driven against the siding materials, comes in contact with the flashing or caulking,
and is diverted away from the exterior wall and its components. Your understanding of how
water travels down the exterior wall siding will help you to focus on areas around the
windows and doors that may need closer observation or further investigation. Properly
installed flashing and caulking should divert water away from the house and not cause or
contribute to water intrusion problems.
Caulk Type
Service Life (in years)
Indoor / Outdoor
Paintable?
Uses
Comments
acrylic latex 2 to 10 mostly indoors,
protected or painted
yes patching and filling holes
low flexibility, significant shrinkage
silicone latex 10 to 15 indoors
and outdoors yes
general- purpose
low flexibility
silicone 20+ indoors
and outdoors no
general-purpose,
bathroom, kitchen
very flexible, good UV
resistance
butyl rubber 7 to 10
outdoors, narrow
openings in wood, metal,
glass, masonry
no
gutters, storm windows, metal
to masonry, metal to metal
low flexibility
polysulfide
rubber 20+ anywhere yes outdoors
needs protection from UV
polyurethane 20+ anywhere
yes
outdoors, driveway seams
good adhesion to
surfaces
weatherstrip / caulking cord
up to 20 indoors and
outdoors no
sealing and plugging holes
good for energy savings
There are many different caulks available. Be sure to inspect for caulking that is in poor
condition that may lead to water intrusion. Note any recently applied caulking and inspect
closely at those areas. New caulking may indicate a repair by the homeowner, or it could
be an indication of regular maintenance.
Sealants for Through-Wall Penetrations
Utility penetrations through foundation walls should be carefully sealed on the exterior face
of the wall prior to placement of waterproofing materials and backfill. High-quality urethane
caulks are most suitable for this application.

~ 150 ~
Inspection Tips
The wall construction should be inspected for penetrations due to voids or other problem
areas (such as form ties) and appropriately repaired and sealed.
Check for water damage and rot at horizontal surfaces, including windowsill areas and door
tread areas. The bottom corners of the side jambs at windows and doors are important
areas to inspect. You can use the handle-side of a screwdriver to tap on wood to listen for
soft-sounding areas that may be damaged.
Kickout Flashing
Kickout (or kick-out) flashing, also known as diverter flashing, is a special type of flashing
that diverts rainwater away from the cladding and into the gutter. When installed
properly, it provides excellent protection against the penetration of water into the building
envelope.
Several factors can lead to rainwater intrusion, but a missing kickout flashing, in particular,
often results in concentrated areas of water accumulation, and potentially severe damage to
exterior walls. Inspectors should make sure that kickouts are present where they are
needed and that they are installed correctly. Water penetration into the cladding can
occasionally be observed on the exterior wall in the form of vertical water stains, although
inspectors should not rely on visual identification alone. There may be severe damage with
little or no visible evidence.
Problems to Look For
Inspectors may observe the following problems associated with kickout flashing:
The kickout was never installed.
The need for kickout flashing developed fairly recently and the builder may not have
been aware that one was required. The increased amount of insulation and building
wrap that is used in modern construction makes buildings less breathable and more
likely to sustain water damage. Kickout flashing prevents rainwater from being
absorbed into the wall and is more essential than ever.
Kickout flashing is critical:
o anywhere a roof and exterior wall intersect, where the wall continues past the
lower roof edge and gutter. If a kickout flashing is absent in this location,
large amounts of water may miss the gutter, penetrate the siding, and
become trapped inside the wall; and
o where gutters terminate at the side of a chimney.

~ 151 ~
The kickout was improperly installed.
o The bottom seam of the flashing must be watertight. If it is not, water will
leak through the seam and may penetrate the cladding.
o The angle of the diverter should never be less than 110°.
The kickout was modified by the homeowner.
o Homeowners who do not understand the importance of kickouts may choose
to alter them because they can be unsightly. A common way this is done is to
shorten their height to less than the standard 6 inches (although some
manufacturers permit 4 inches), which will greatly reduce their effectiveness.
Kickout flashings should be the same height as the sidewall flashings.
o Homeowners may also make kickout flashings less conspicuous by cutting
them flush with the wall.
In summary, kickout flashing should be present and properly installed in order to direct
rainwater away from the cladding.

~ 152 ~
QUIZ 13
1. T/F: Damp-proofing does not provide the same degree of moisture protection as does waterproofing.
True
False
2. __________ is the application of one or more coatings of impervious compounds that prevent the passage of water vapor through walls under slight pressure.
Damp-proofing
Waterproofing
Drywalling
3. T/F: The design of PWFs requires that dry soil be maintained around the foundation.
True
False
4. T/F: Plywood panel joints in foundation walls should be sealed their full length with a caulking compound.
True
False
5. Generally speaking, there should be _____ inches of clearance between the siding and the ground surface.
2 to 3
6 to 8
8 to 12
10 to 18
6. T/F: Where a roof meets an exterior wall, the best building practice is to leave some distance or clearance between the bottom of the exterior wall covering and the roof surface.
True
False
(Continued on next page.)

~ 153 ~
7. T/F: To protect against decay, the ends of wood beams entering masonry walls should have a clearance of at least ½-inch all around.
True
False
8. T/F: Moisture or water vapor can move in and out of a house with air currents.
True
False
9. __________ is designed to protect against water intrusion at joints, changes in direction, and between different materials.
Sealant
Flashing
Insulation
Siding
10. Kickout flashing, also known as diverter flashing, is a special type of flashing that diverts rainwater away from the cladding and into the _______.
driveway
gutter
soffit
downspout
Answer Key is on the next page.
~ 154 ~
Answer Key to Quiz 13
1. T/F: Damp-proofing does not provide the same degree of moisture protection as does
waterproofing.
Answer: True
2. Damp-proofing is the application of one or more coatings of impervious compounds that
prevent the passage of water vapor through walls under slight pressure.
3. T/F: The design of PWFs requires that dry soil be maintained around the foundation.
Answer: True
4. T/F: Plywood panel joints in foundation walls should be sealed their full length with a
caulking compound.
Answer: True
5. Generally speaking, there should be 6 to 8 inches of clearance between the siding and
the ground surface.
6. T/F: Where a roof meets an exterior wall, the best building practice is to leave some
distance or clearance between the bottom of the exterior wall covering and the
roof surface.
Answer: True
7. T/F: To protect against decay, the ends of wood beams entering masonry walls should
have a clearance of at least ½-inch all around.
Answer: True
8. T/F: Moisture or water vapor can move in and out of a house with air currents.
Answer: True
9. Flashing is designed to protect against water intrusion at joints, changes in direction,
and between different materials.
10. Kickout flashing, also known as diverter flashing, is a special type of flashing that diverts
rainwater away from the cladding and into the gutter.

~ 155 ~
SECTION 25: UNDERSTANDING EXTERIOR DRAINAGE SYSTEMS
This section deals with the details of exterior drainage of the property that may be observed
during an inspection of the exterior.
At the end of this section, you should be able to:
describe how the site surface drainage functions;
describe how the foundation drainage functions;
describe how the roof drainage functions; and
list some common concerns related to an exterior drainage system.
Foundation drainage serves a number of roles. First, it removes ―free water‖ from the
foundation perimeter, which reduces the lateral or sideways load on the foundation wall. It
also lowers the groundwater level in the vicinity of the building footprint, should it become
elevated above the basement-floor level during a particularly wet season or year.
Remember that basements should not be used where groundwater levels are frequently
near the basement's floor level.
Current model building codes require
that drains be provided around all
foundations that enclose habitable
space, such as basements. However,
exceptions are made for soils that are
naturally well-drained. Unless a site-
specific soil investigation is done, or
extensive local experience confirms
that groundwater levels are
consistently deep, soil should not be
assumed to be well-drained.
Where the foundation drainage system
cannot be drained to daylight by
gravity, a sump and pump must be
used to collect the water and
discharge it to a suitable outfall (such
as a rock pad and swale) a safe
distance away from the building's
foundation. Furthermore, use of a
drainage layer underneath the entire
basement floor slab (coupled with weeps to a drainage system around the outside perimeter
of the foundation) may be a more effective way to eradicate conditions where the potential
for high groundwater levels near the basement floor elevation may exist. Experience has
shown that trying to seal moisture out of a foundation is not nearly as effective as diverting
the moisture with a drainage system before it gets inside the living space.

~ 156 ~
Site Surface Drainage
Inspecting site drainage is important. Site drainage refers to the control of surface water by
the design of the land of a property in relation to the location of the house structure. Proper
surface drainage prevents wet basements, damp crawlspaces, eroded banks, and the
possible failure of foundations. Water that is not diverted away from the foundation may
eventually penetrate its walls or cause moisture problems for the foundation system.
There should be adequate slopes of the land and ground around a property. Slope refers to
the land around the house that is graded at an angle. The slopes of the ground should be
directed toward appropriate and approved drainage devices that are capable of carrying
concentrated runoff.
Slopes are divided into classifications, from level to very steep. A property that has a steep
slope graded away from the house structure has fewer surface water problems than a
slope that is level.
Surface drainage should be diverted to a storm sewer so as not to create a hazard. Gutters
and downspouts are used to direct roof water to the appropriate drainage points.
Drains or swales are effective measures that provide the necessary slope from the house
structure. Property lots should be graded so as to drain surface water away from the
foundation walls. When the overall lot drainage is toward the house, swales can be used to
direct surface water away from the foundation.
The grade should slope a minimum of 6 inches within the first 10 feet. There are exceptions
to this rule when drains and swales are provided. Minimum slopes are often based on the
ground frost and moisture conditions of the local area. The soil permeability and the
drainage type are also important.

~ 157 ~
Your task should include walking the perimeter of the house and the surrounding land.
Verify that the site appears to be adequately sloped away from the house.
Soil
Soil composition is another factor in understanding the performance of the graded site to
control surface water. Soil is made up of varying mixtures of sand, silt, loam and clay. The
soil composition determines the permeability and percolation rates. Permeability of soil
refers to the ability of the soil to absorb water. The percolation rate refers to the speed at
which standing water is absorbed into the soil. Clay soil is less permeable than sandy soil.
The rate of percolation of sandy soil is greater than that of clay soil.
Soil that is composed of either sand or clay is problematic. Clay soil expands when it gets
wet, and it shrinks when it dries. During expansion, the clay soil can actually lift a
foundation. During shrinkage, the soil can allow the foundation to drop or sink. Soil that is
composed primarily of sand becomes very heavy during a wet period, causing significant
hydrostatic pressure against a foundation wall.
Foundation Drainage
Drains are usually placed around houses to remove groundwater that may be adjacent to
the foundation wall. Such drains prevent leakage into the interior space below grade, such
as a basement or crawlspace. Drainage pipes or tiles are important in areas that have
moderate to heavy rainfall and soils with a low permeability rate.
Drains should be installed around all concrete and masonry foundations that are below
grade and enclose a habitable or usable space. Drainage tiles, gravel or crushed stone,
drains, perforated pipe, or other approved systems or materials should be installed at the
areas to be protected. The drainage tiles should discharge by gravity or some mechanical
means into an approved drainage point.
Drainage systems are not required if the foundation is in an area with sandy, gravely soils
or well-drained ground.
Roof and Surface Drainage
During a typical home inspection of the exterior, the inspector should check the vegetation,
surface drainage, and retaining walls when these are likely to adversely affect the
structure.
This section covers the roof drainage systems, surface drainage, grading, driveways,
walkways and retaining walls.

~ 158 ~
A home inspector is not a soil engineer. You don’t have to identify geological conditions or
soil conditions. A home inspector should be able to understand that water and erosion may
affect a house.
There are many home systems, components, conditions and ancillary structures that are
beyond the scope of a home inspection. Many inspectors inspect these systems and
components as a courtesy or for an additional fee. They may include pools, tennis courts,
hot tubs, playground equipment, ponds, fences, gardens, septic components, etc.
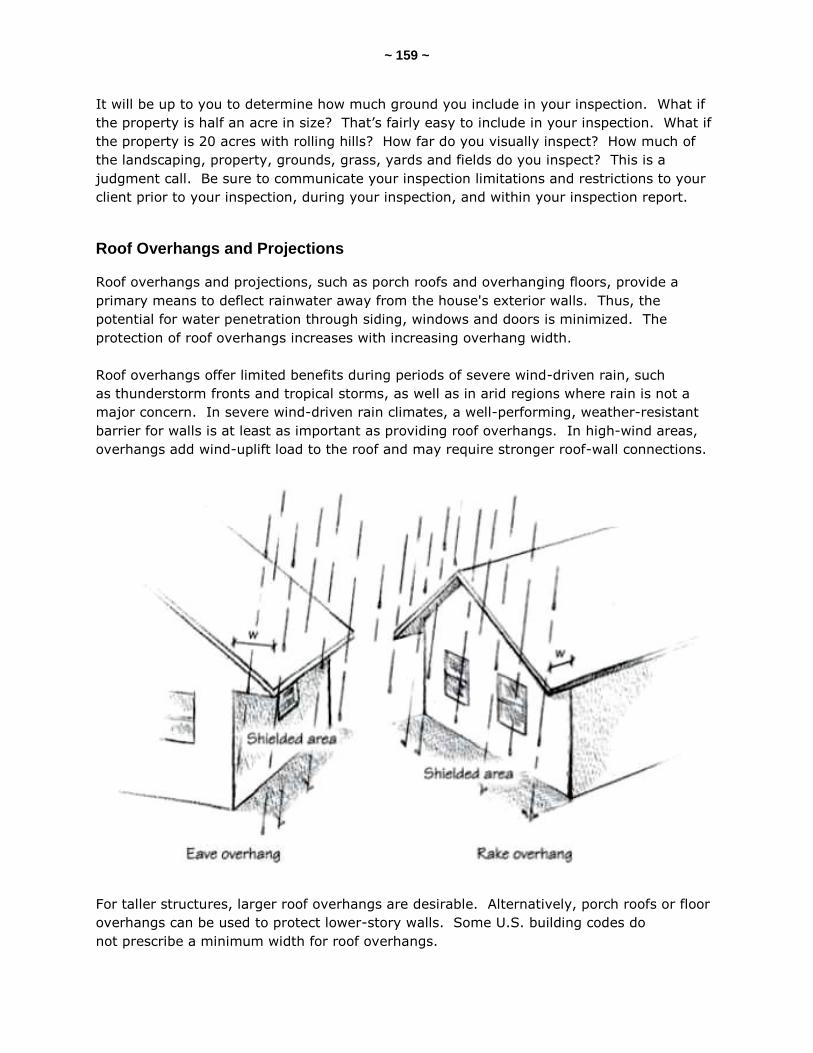
~ 159 ~
It will be up to you to determine how much ground you include in your inspection. What if
the property is half an acre in size? That’s fairly easy to include in your inspection. What if
the property is 20 acres with rolling hills? How far do you visually inspect? How much of
the landscaping, property, grounds, grass, yards and fields do you inspect? This is a
judgment call. Be sure to communicate your inspection limitations and restrictions to your
client prior to your inspection, during your inspection, and within your inspection report.
Roof Overhangs and Projections
Roof overhangs and projections, such as porch roofs and overhanging floors, provide a
primary means to deflect rainwater away from the house's exterior walls. Thus, the
potential for water penetration through siding, windows and doors is minimized. The
protection of roof overhangs increases with increasing overhang width.
Roof overhangs offer limited benefits during periods of severe wind-driven rain, such
as thunderstorm fronts and tropical storms, as well as in arid regions where rain is not a
major concern. In severe wind-driven rain climates, a well-performing, weather-resistant
barrier for walls is at least as important as providing roof overhangs. In high-wind areas,
overhangs add wind-uplift load to the roof and may require stronger roof-wall connections.
For taller structures, larger roof overhangs are desirable. Alternatively, porch roofs or floor
overhangs can be used to protect lower-story walls. Some U.S. building codes do
not prescribe a minimum width for roof overhangs.

~ 160 ~
Roof Drainage, Gutters and Downspouts
While roof overhangs and porch roofs protect building walls from impinging rain, gutters
serve to protect building walls and foundations from roof water runoff. Roof gutters,
downspouts and leaders or diverters form the initial components of a drainage system for
the building and site. During an inspection, check for proper design of gutters and
downspouts for water-shedding and steep-slope roof systems.
Drainage of low-slope roofs is accomplished in one of three ways: without gutters or
downspouts; with gutters and downspouts; or by downspouts that go down through a
building’s interior. Drainage without gutters or downspouts can damage the exterior wall
with overflow. If the roof has no gutters or downspouts, carefully check the exterior walls
for signs of water damage.

~ 161 ~
Most functional gutters have a minimum ratio of gutter depth-to-width of 3:4. The front
edge is typically ½-inch lower than the back edge. The minimum width is generally 4
inches, except on the roofs of canopies and small porches. If there is a screen or similar
device to prevent anything but water from flowing into the gutter, its performance during a
rainstorm should be checked to be sure water can actually enter the gutter. Check gutters
without screens or similar devices to be sure that basket strainers are installed at each
downspout.
All gutters need to be kept clean and clear of debris. They should slope uniformly, without
sags, to downspouts. Gutter and downspout components are typically made of galvanized
steel, aluminum, copper and plastic.
Buildings with pitched roofs may have a variety of drainage systems. With a sufficient
overhang, water can drain directly to the ground without being collected at the roof edge.
Common problems with guttering are related to installation and maintenance. Home
inspectors are not required to check if properly sized components have been installed.
Sizing is beyond the scope of a home inspection. Home inspectors can check to
see whether the guttering is appropriately sloped toward adequately sized downspouts,
and whether the discharge is directed away from the building perimeter.
Properly Sized Roof Drainage System
Checking whether the roof drainage system is properly sized is beyond the scope of a
typical home inspection. There are two steps to checking a steep-slope roof drainage
system that uses standard guttering products. They include referring to the rainfall
intensity and the roof drainage system's spacing and layout.

~ 162 ~
Puddles Are Not Good
The ground surface beneath decks, porches and other parts of a building that are supported
by posts or cantilevered structures should be checked. It should not have any low-lying
areas but should be sloped so that water will not collect and puddle there. Settled backfill
allows water to collect next to the foundation wall and penetrate into the basement.

~ 163 ~
Downspouts Need Adjustment
Water from the roof reaches the ground through gutters and downspouts or by flowing
directly off roof edges. Because downspouts create concentrated sources of water in the
landscape, where they discharge is important. Downspouts should not discharge where
water will flow directly onto or over a walkway, driveway or stairs. The downspouts on a
building on a hillside should discharge on the downhill-side of the building. The force of the
water leaving a downspout is sometimes great enough to damage the adjacent ground, so
some protection at grade is needed, such as a splash block or a paved drainage chute. In
urban areas, it is better to drain downspouts to an underground storm water drainage
system, if there is one, or at a lower grade away from buildings.
Water that flows directly off a roof that lacks gutters and downspouts can cause damage
below. Accordingly, some provision in the landscaping may be needed, such as a gravel bed
or paved drainage way.
Gutters
Joints at the gutters should be soldered or sealed with mastic. Otherwise, they’ll leak. The
steeper the roof pitch, the lower the gutter should be placed. On roofs with lower slopes,
gutters should be placed close to the roof’s surface. Hangers should be placed no more
than 3 feet apart. Where ice and snow are long-lasting, hangers should be placed no more
than 18 inches apart. The strength of a gutter’s fastening to the roof fascia or building
exterior should be strong and secure. Rusted fasteners and missing hangers should be
replaced.
Ice Dams
Ice dams can form on pitched-roof
overhangs in cold climates subject
to prolonged periods of freezing
weather, especially those climates
with a daily average January
temperature of 30º F (-1º C) or
colder. Heat loss through the roof
and heat from the sun (even in
freezing temperatures) can cause
snow on a roof to melt. As water
runs down the roof onto the
overhang, it can freeze and form
an ice dam just above the gutter.
The ice dam traps water from
melting snow and forces it back
under the roof-covering
material and into the building’s
interior.

~ 164 ~
Watch the edge of the roof overhang for evidence of ice dams, and look at the eaves and
soffit for evidence of deterioration and water damage. If the house has an attic, the
underside of the roof deck at the exterior walls can be checked for signs of water intrusion.
Downspouts
The rule of thumb for downspouts is at least
one downspout for every 40 feet of gutter.
For roofs with gutters, make sure that the
downspouts discharge so that the water will
drain away from the foundation.
Downspouts can be checked for size. The
minimum is generally 7 square inches,
except for small roofs and canopies. There
should be attachments or straps at the top,
at the bottom, and at each intermediate
joint.
Downspout fasteners can rust, deform,
become loose or fail. On buildings with
multiple roofs, one roof sometimes drains
onto another roof. Where that happens,
water should not be discharged directly
onto the roofing material. The best practice
is to direct the water from higher gutters so
that it discharges into lower gutters through
downspout pipes.
Occasionally, wooden gutters and
downspouts are used, usually in older and
historic residences. They may be built into
roof eaves and concealed by roof fascia. Wooden gutters are especially susceptible to rot
and deterioration and should be monitored.
Pitched roofs on older buildings may end at a parapet wall with a built-in gutter integrated
with the roof flashing. At this location, drainage is accomplished by a scupper, which is a
metal-lined opening through the parapet wall that discharges into a leader head box that, in
turn, discharges to a downspout. The leader head box should have a strainer. Check the
scupper for deterioration and open seams. All metal roof flashings, scuppers, leader head
boxes and downspouts should be made of similar metals to prevent galvanic corrosion.

~ 165 ~
Inspection Standards
The inspector shall inspect the roof covering from the ground or eaves, vents, flashing,
skylights, chimney, and other roof penetrations. The inspector is not required to walk on the
roof, perform a water test, or warrant the roof. Skylights are notorious for leaking water.
Predicting when, how or where a leak will develop is beyond the scope of a visual home
inspection.
Checking the Site and Foundation
A building site, which is comprised of the grounds surrounding the structure, is a vital factor
in providing for a moisture-resistant home. Understanding the moisture and drainage
conditions at a home is perhaps the first and most important step in inspecting for a
moisture-resistant foundation. Building foundations should be located on sites in a manner
that prevents moisture problems by providing for adequate drainage of on- and off-site
surface water flows, including roof water runoff. Groundwater conditions should also be
considered during an inspection of a home with moisture-related problems. The foundation
type, foundation elevations, and the foundation's moisture-resistant detailing are related
factors that are dependent on a number of site characteristics.
Many sites are considered ―normal‖ and fall within standard conditions addressed in the
residential building code. However, the use of marginal sites without the proper site design
(which is becoming more common) can result in costly mistakes, such as foundation
structural and moisture problems. Appropriate foundation elevations and drainage patterns
for the site should be considered.
Check the Site’s Drainage
When a house is built, a site plan should be developed to do more than just locate the
building and utilities on the site, and demonstrate compliance with setbacks and other
zoning requirements.

~ 166 ~
The site plan should also consider a drainage plan that indicates the slope of the
surrounding land and drainage patterns that convey surface waters away from the building
site. For sites that generally provide natural drainage away from the building location, the
main concern is establishing an appropriate foundation elevation to maintain drainage
immediately adjacent to the foundation.
Model building standards typically require a minimum of 6 inches of fall in ground level over
a distance of 10 feet from the perimeter of the building. Providing for additional slope is a
good method to offset future settlement of foundation backfill next to the building, unless
the soil is moderately compacted or tamped during the backfill process.
Conditions that warrant careful consideration by an inspector at any site include:
the local high water table that is within 4 to 8 feet of the lowest proposed foundation
floor or grade level;
natural depressions that collect or channel on- and off-site flows;
natural springs or wet areas on site;
soft or loose soils (indicative of poor bearing capacity);
building development that will result in more than 10% to 20% of impervious-area
coverage on the site;
steep slopes that may be unstable or easily eroded (greater than a 25% slope);
signs of existing erosion, such as gullies, slope failures, etc.;
sensitive areas that may be affected by proposed development, such as natural
streams, wetlands or other features;
off-site surface water flows directed onto and across the proposed site;
inadequate building offset from adjacent steep slopes that generate increased
surface water runoff. A minimum offset of 15 feet from the toe of a 1:3 or 33% or
greater slope is generally recommended, but special conditions may warrant a
greater or lesser amount of offset; and/or
a 100-year floodplain located on site or near the building location.
Poor site drainage of surface water is perhaps the most important contributor to foundation
moisture problems. Thus, the factors listed above should be considered during an
inspection.
Wetness of the site, soil-bearing conditions, and slope of the site are key factors in making
a decision as to whether to build, and how to build a house. When poor site conditions
exist, they can often be overcome technically, provided there are no land-use restrictions
involved. However, the added cost of design and non-conventional foundation construction
(such as an elevated foundation and/or special drainage features) should be considered a
significant part of the expense of building a house.

~ 167 ~
It is usually very costly to correct site drainage problems and foundation moisture issues
after the fact. Therefore, the inspector must be very careful regarding recommendations
that s/he makes about a site with poor drainage.
Inspection of Drainage Slopes
Proper grading to provide positive flow of surface water and roof water runoff and gutter
discharge is one of the simplest and most important features on a building site. When
possible, the minimum 6-inch fall in finish grade over a distance of 10 feet from the building
(minimum 5% slope) should be exceeded and extended. This is particularly important if
backfill practices are not reasonably controlled to prevent settlement. On very flat sites, this
may require mounding of the foundation pad and coordination of appropriate foundation
elevations to promote drainage. On sloped sites, excavation and grading in the up-slope
direction must provide for sufficient drainage away from the building perimeter and against
the direction of natural water flow on the site. For sites with very steep slopes, this may
require use of a retaining wall at the toe of a steep slope.
Backfill and Site-Grading Problems Make for Wet Basements
In one survey of basement leakage problems, about 85% of the moisture problems
appeared only after rainstorms or melting snow, which is a strong indication of the
importance of site drainage in preventing foundation moisture problems. Of these incidences
of basement leakage problems, about 40% were associated with improper surface grading,
25% were related to improper downspout drainage, and another 25% were associated with
settling of backfill that resulted in improper surface grading after the passage of time —
typically, within the first year after construction. Thus, a majority of basement water
problems are associated with backfill and site grading.
Backfill
Backfill soil should be placed in a manner that prevents settlement and potential surface
water flow toward the foundation. This may require that backfill soil be placed in 6-inch to
8-inch layers or lifts, and modestly compacted with light construction equipment or tamped
to prevent settlement over time. Heavy compaction efforts, which are typical of commercial
building and roadway construction, should not be promoted, as this may damage residential
foundation walls. The goal is to compact the soil sufficiently to prevent future settlement
from the process of natural consolidation of loosely placed soil. In addition, backfill should
not be placed without first installing the floor system or temporary bracing to support the
foundation walls.
Finally, the upper layers of the backfill should be of moderately low-permeability soil with
some clay content to help reduce the direct infiltration of rainwater adjacent to the
foundation. Where only pervious soils are available for backfill, the slope of the grade away
from the perimeter of the foundation should be increased, or an impervious skirt of 6-mil
polyethylene may be placed about 12 inches below grade.

~ 168 ~
Good Backfill
It is notoriously difficult to control grading and backfilling operations in typical residential
construction. On many sites, the common practice is to place the backfill with the least
amount of effort required to ―fill the hole.‖ Proper backfill practices and grading will ensure
that a foundation remains dry to a greater degree than all the other recommendations
provided in this section.
Property Drainage
Convey the following advice to your client:
During a heavy rainstorm without lightning, grab an umbrella and go outside. Walk around
your house and look around at the roof and property. A rainstorm is the perfect time to look
at how the roof, downspouts and grading perform. Observe the drainage patterns of the
entire property, as well as the property of your neighbor. The ground around your house
should slope away from all sides. Downspouts, surface gutters and drains should be
directing water away from the foundation.
CHECK THE FOLLOWING
Poor Drainage
Most problems with moisture in basements and crawlspaces are caused by poor site
drainage. The ground should slope away from window wells, outside basement stairs, and
other means of egress. The bottom of each of these areas should be sloped to a drain.

~ 169 ~
Each drain should have piping that connects it to a storm water drainage system (if there is
one), or that drains to either a discharge at a lower grade or into a sump pit that collects
and discharges the water away from the building.
The property owner must monitor and maintain the drains and piping. Drains and piping
should be open and clear of leaves, earth and debris. A garden hose can be used to check
water flow, although its discharge cannot accurately approximate storm conditions.
Hillside
Where a building is situated on a hillside, it is more difficult to slope the ground away from
the building on all sides. On the high-ground side of the building, the slope of the ground
toward the building could be interrupted by a surface-drainage system that collects and
disposes of rainwater runoff. Swales, often referred to as ditches, can be used to direct
surface water away from the foundation. There are two general types of surface-drainage
systems: an open system, consisting of a swale, sometimes with a culvert at its end to
collect and channel water away; and a closed system, consisting of gutters with catch
basins.
Sump Pumps
Sump pumps are self-activating electric pumps that protect homes from moisture intrusion.
They are usually installed below basement or crawlspace floors to remove rising
groundwater and surface runoff before it has a chance to seep into the home. Accumulated
water can cause interior damage and encourage the growth of mold, mildew and fungus.
Pumps should be maintained and equipped with all necessary components in order to
ensure their reliability.

~ 170 ~
Discharge Location
Inspectors are not required to check for a proper discharge location. They can note an
improper discharge if they see it, but searching outdoors for the discharge is not
recommended.
The following is general information that can be passed on to the homeowner:
Water must be discharged at least 20 feet from the building.
Water should not drain back into the house. Recycling water places unnecessary
strain on the pump and can weaken the structure’s foundation.
Water should not drain onto a neighbor’s property without their approval.
Many jurisdictions do not permit residential runoff to be pumped into public sewer
systems.
Pumped water should never drain into a residence’s septic system. Especially during
heavy rain, a septic drainfield can become saturated and will struggle to handle the
normal flow of water from the house. Additional water from the sump pump can
damage the septic system.
Sump pumps are used to remove excess water that would otherwise cause property
damage. There are multiple types and they all monitor water levels so that they do not rise
higher than predetermined levels. Proper maintenance and inspection will ensure the
pump's efficiency and prolong its service life.
Sump Pumps Should Not Recycle
When a sump pump is used to keep a building's interior dry, the discharge should drain
away from the building and should not add to the sub-surface water condition that the sump
pump is meant to control.
Naturally Wet
Look around the entire site for the presence of springs, standing water, saturated or boggy
ground, a high water table, and dry creeks and other seasonal drainage paths, all of which
may affect surface drainage.
Landscaping
Well-maintained landscaping and other improvements are important for the enjoyment of a
healthy and durable property.

~ 171 ~
Plants, Trees and Shrubs
Check the location and condition of all trees and shrubbery. Those that are overgrown
should be pruned or trimmed. Where trees or bushes have overgrown, complete removal
may be necessary.
Trees Need to Be Trimmed
Overhanging branches should not interfere with a chimney’s draft, damage utility wires, or
deposit leaves and twigs on the roof or inside gutters and drains. Trees and shrubbery that
are very close to exterior walls or roofs can cause damage. They can make it difficult to
perform homeowner maintenance, repairs and inspections. Branches around the perimeter
of the house should be pruned back. Tree roots under concrete walks can cause damage.
Roots are usually exposed near the surface and can be cut back. Tree roots can cause
foundations to crack by pushing against them from the outside. Homeowners should
consider hiring an arborist, who is a specialist in the cultivation and care of trees and
shrubs, including tree surgery, and the diagnosis, treatment and prevention of tree
diseases, as well as the control of pests. Find a certified arborist in the U.S. at the National
Arborists website at www.natlarb.com.
Your task as an inspector is to look for tree branches that are near the house structure.
Look for branches that overhang the roof. Leaves and twigs from overhanging branches
may clog the gutters. The branches are also attractive to insects, particularly wood-
destroying carpenter ants. Tree branches can also cause property damage in a windstorm.
Pay attention to branches that are in contact with or near overhead electrical, cable and
phone lines.
Proper maintenance of the trees, landscaping and shrubbery can help prevent site and roof
drainage problems.
Fences
Fences are usually installed to provide
physical and visual privacy. Fences should be
plumb. Some problems with fences are that they
can lean over and fall apart. Check wooden fences
for the development of rot and insect infestation.
Check metal fences for rust. All gates and their
hardware should have proper fittings, operation
and clearances. Fences are often addressed in
homeowner association bylaws and deed
covenants. Homeowners should pay special
attention to the fence's location in relation to
their property lines. Neighbors can get quite un-
neighborly about property lines that are violated.

~ 172 ~
QUIZ 14
1. Foundation _________ removes “free water” from the foundation's perimeter, which reduces the lateral load on the foundation walls.
reinforcement
damp-proofing
drainage
sealant
2. T/F: Current model building codes require that drains be provided around all foundations that enclose habitable space, such as basements.
True
False
3. __________ drainage refers to the control of the surface water with the design of the land of a property in relation to the location of the house structure.
Groundwater
Foundation
Site
Perimeter
4. T/F: Clay soil expands when it gets wet and it shrinks when it dries.
True
False
5. T/F: Roof overhangs and projections, such as porch roofs and overhanging floors, provide a primary means of deflecting rainwater away from the house's exterior walls.
True
False
6. T/F: Common problems with guttering are typically related to its installation and maintenance.
True
False
(Continued on next page.)

~ 173 ~
7. The rule of thumb for downspouts is at least one downspout for each _____ feet of gutter.
10
20
40
80
8. T/F: Backfill soil should be placed in a manner that prevents settlement and potential surface water flow toward the foundation.
True
False
Answer Key to Quiz 14
1. Foundation drainage removes “free water” from the foundation's perimeter, which
reduces the lateral load on the foundation walls.
2. T/F: Current model building codes require that drains be provided around all
foundations that enclose habitable space, such as basements.
Answer: True
3. Site drainage refers to the control of the surface water with the design of the
land of a property in relation to the location of the house structure.
4. T/F: Clay soil expands when it gets wet and it shrinks when it dries.
Answer: True
5. T/F: Roof overhangs and projections, such as porch roofs and overhanging floors,
provide a primary means of deflecting rainwater away from the house's exterior
walls.
Answer: True
6. T/F: Common problems with guttering are typically related to its installation and
maintenance.
Answer: True
7. The rule of thumb for downspouts is at least one downspout for each 40 feet
of gutter.
8. T/F: Backfill soil should be placed in a manner that prevents settlement and potential
surface water flow toward the foundation.
Answer: True

~ 174 ~
SECTION 26: WINDOWS and DOORS
This section deals with the details of the windows and doors of a house that may be
observed during an inspection of the exterior.
At the end of this section, you should be able to:
describe how windows and doors function;
list some common concerns with windows and doors; and
describe fogged windows.
A window is a transparent opening in a wall that allows the passage of light, air and sound.
Modern windows can be glazed or covered in some other transparent or translucent
material.
A door is an opening in a wall that allows egress. A door provides access in and out of a
house.
A properly installed window or door, when closed tightly, should be watertight. Windows
and doors can be made of many different types of materials, including wood, steel, vinyl
and aluminum. You should inspect the windows and doors from both sides.
During the inspection of the exterior, an inspector can check the windows that are readily
accessible. The windows on the second or third floors are not readily accessible, and your
client should understand the restrictions of your inspection. Lower-floor windows are often
restricted from inspection by bushes and dense vegetation. Windows that are not readily
accessible for maintenance may likely be the windows in the poorest condition. The
windows that are not readily accessible will likely be the windows that you will not be able
to carefully and thoroughly inspect.
Common Problems
When inspecting the windows and doors, pay attention to their condition, operation and
locking mechanisms, along with any physical damage or water damage.
Common problems with both windows and doors include:
mechanical damage;
paint problems;
flashing defects;
deteriorated caulk;
damaged screens;
cracked glass;
fogged windowpanes or lost seals;
putty or glazing problems;
wood rot; and
water damage.

~ 175 ~
Water intrusion problems at the windows and doors are difficult to assess from the exterior.
You will get a complete understanding of the windows and doors after inspecting them from
both the interior and exterior.
Windowsills and Door Sills
A sill at a window or door should be sloped. Windows and doors have nearly horizontal
surfaces that can collect water. Functional sills are sloped to divert water away from the
window or door. Windowsills have a projection designed to divert water away from the
exterior wall.
One detail to check for at a windowsill is something that creates a capillary break. Under
the projection of the windowsill, there should be a detail such as a groove or cut. This detail
should run along the length of the windowsill and parallel to the wall. This capillary break
stops water from running under the projection and back to the wall and forces the water to
drip.
Windowsills deteriorate because of exposure to weather, UV radiation from the sun, and
normal wear. Wooden windowsills are prone to wood rot. Masonry windowsills may crack.
Vinyl windowsills may crack or become functionally damaged. Metal windowsills may rust or
corrode. The chance of deterioration is greater when the windowsill is not sloped properly,
lacks a drip edge, or experiences delayed maintenance.
Inspection Tips for Windowsills
Be careful when using a probing instrument. Consider using your fingers or thumb to press
on suspected damaged areas at the windowsills. Check the bottom corners and edges for
water damage and rot. Note any repairs that appear to be recent or poorly made.

~ 176 ~
Window air conditioners often have deteriorated, damaged windowsills. The condensate
water that is produced by window air conditioners is often the cause of major water
intrusion and wood damage.
Be sure to note cracked and damaged glass, missing and damaged window screens, fogged
windowpanes, and lost seals. You should report as in need of repair any windows that are
obviously fogged or display other evidence of broken seals. Cracked glass is a safety
hazard. Missing and damaged screens are not typically considered to be major problems,
and are usually not within the scope of a home inspection. Many inspectors will make notes
about the window screens as a courtesy for their clients.
Windowsill Height
Every year, children fall from windows. A large percentage of those falls occur through
windows with a low sill height. The restrictions of sill height are intended to raise the height
of the opening at the sill above the center of gravity of a small child, thus reducing the
number of falls.
Where the opening of an operable window is located more than 72 inches above the ground
outside, the lowest part of the clear opening of the window shall be a minimum of 24 inches
above the finished floor of the room in which the window is located. From the outside, it is
not possible to see the height measurements of the window from inside the room, but this is
a safety issue that you could keep in mind while inspecting both sides of a particular
window.
The exterior inspection of a window is directly related to the interior inspection of the same
window. Both sides should be inspected.
Putty
Glazing putty is made by
mixing a base of finely
ground chalk with linseed
oil. There are a number of
synthetic alternatives, such
as polybutene-based
putties. On older windows,
glazing putty is used to
secure the panes of glass
in the sashes or muntins.
Newer windows do not
normally have putty
installed. Cracked,
deteriorated or missing
putty indicates an old
window with delayed
maintenance.

~ 177 ~
Putty in poor condition may allow air drafts, rattling and water penetration. Sometimes,
you will find silicone or caulk applied on older single-pane windows in areas where the
glazing putty is missing or in need of repair.
Weatherstripping
Window and door weatherstripping are generally of three types: metal, foam plastic, or
plastic stripping. Each type should have a good fit. Check the metal for dents, bends and
straightness. Check foam plastic for resiliency, and check plastic stripping for brittleness and
cracks. Make sure the weatherstripping is securely held in place.
Fogged Windows
Almost all air contains water vapor, which is the gas phase of water composed of tiny water
droplets. The molecules in warm air are far apart from one another and allow the
containment of a relatively large quantity of water vapor. As air cools, its molecules get
closer together and squeeze the tiny vapor droplets closer together, as well. A critical
temperature, known as the dew point, exists where these water droplets are forced so close
together that they merge into visible liquid in a process called condensation. Condensation
is the accumulation of liquid water on relatively cold surfaces.
Household air is humidified from high levels of water vapor in human (and animal)
exhalation, plant transpiration, and fixtures and appliances in the home, such as showers
and clothes dryers. This humidity can rise significantly higher than that in the outside air
because of the insulating design of a house. Cold indoor surfaces can cool the surrounding
air enough to force vapor to condense. This often happens on single-pane windows because
they lack the necessary thermal insulation available to newer and high-quality windows.
Double-pane windows have a layer of gas (usually argon or air) trapped between the two
panes of glass and should be insulated enough to prevent the accumulation of condensation.
If this type of window appears misty or foggy, it means that its seal has failed and the
window needs to be repaired or replaced.
Silica Desiccant
A desiccant is an absorptive material designed to maintain dryness within its vicinity. A
common type of desiccant is silica gel, a porous plastic used to prevent spoilage in various
food products. A tightly packed assortment of silica pellets is contained inside the aluminum
perimeter strip of a window to dehumidify incoming household air that was not stopped by
the window’s seal. If not for this substance, incoming air could condense on the glass.
Silica gel has an immense surface area — approximately 800 m²/g — which allows it to
absorb water vapor for years. Eventually, the silica pellets will become saturated and will no
longer be able to prevent condensation from forming. A double-paned window that appears
foggy has failed and needs to be repaired or replaced.
~ 178 ~
Why Double-Paned Windows Fail
Although double-paned windows appear to be stable, they actually experience a daily cycle
of expansion and contraction caused by thermal pumping. Sunlight heats the air space
between the panes and causes the gas there to heat up and pressurize. Expanding gas
cannot leave the chamber between the panes, and this causes the glass to bulge outward
during the day and contract at night to accommodate the changing pressures. This motion
acts like the bellows of a forge, pumping minute amounts of air in and out of the air space
between the panes. Over time, the constant pressure fluctuations caused by thermal
pumping will stress the seal and challenge its ability to prevent the flow of gas in and out of
the window chamber. If it is cold enough, incoming humid air has the potential to condense
on the window surface.
Can Failed Windows Be Repaired?
Inspectors should be aware that there are companies that claim to be able to repair misty
windows through a process known as ―defogging.‖
This repair method proceeds in the following order:
1. A hole is drilled into the window, usually from the outside, and a cleaning solution is
sprayed into the air chamber.
2. The solution and any other moisture are sucked out through a vacuum.
3. A defogger device is permanently inserted into the hole that will allow the release of
moisture during thermal pumping.
Inspectors should know that there is currently a debate as to whether this process is a
suitable repair for windows that have failed, or if it merely removes the symptom of this
failure. Condensation appears between double-paned windows when the seal is
compromised, and removal of this water will not fix the seal itself. A window ―repaired‖ in
this manner, although absent of condensation, might not provide any additional insulation.
This method is still fairly new and opinions about its effectiveness range widely. Regardless,
defogging certainly allows for cosmetic improvement, which is of some value to
homeowners. It also removes any potential damage caused by condensation in the form of
mold and rot.
Window condensation will inevitably lead to irreversible physical window damage. This
damage can appear in the following two ways:
1. riverbedding. Condensed vapor between the glass panes will form droplets that run
down the length of the window. Water that descends in this fashion has the tendency
to follow narrow paths and carve grooves into the glass surface. These grooves are
formed in a process similar to canyon formation; and
2. silica haze. Once the silica gel has been saturated, it will be eroded by passing air
currents, accumulating as white ―snowflakes‖ on the window surface. It is believed
that if this damage is present, the window must be replaced.

~ 179 ~
Thermal Imaging as a Detection Tool
The presence of condensation in double-paned windows means that they have failed, but
the absence of condensation does not mean the window is functional. This latter fact is
especially true in hot, dry environments and when the temperature inside of a house is the
same as the temperature outside. A method has recently been developed that uses infrared
(IR or thermal) imaging to provide a better determinant of faulty windows.
Home inspectors can become trained to use
thermal imaging cameras to test for heat
transfer through windowpanes and other interior
locations. An IR camera can be used to identify
failed windows by imaging unusual temperature
gradients. Even the slightest entry of cold
outside air into the home that would ordinarily
go unnoticed will stand out as a dark blue haze
in an IR image. A trained inspector can stand
either outside or inside the house and watch for
the escape of warm air or the entrance of cool
air. A trained inspector can compare images of
individual windows in a residence and look for
anomalies.
In summary, condensation in double-paned windows indicates that the window has failed
and needs to be replaced. Condensation, while it can damage windows, is itself a symptom
of a lack of integrity of the window’s seal. A failing seal will allow air to transfer in and out of
the window, even if it is firmly closed. Inspectors should be aware of this process and know
when to recommend that a client’s window be replaced.
Shutters
Homeowners should periodically check the shutters’ operation and observe their condition
and fit, and confirm the adequacy of the shutters for their purpose: privacy, light control,
security, and/or protection against bad weather.
Window shutters are generally of two types: decorative and functional. Decorative shutters
are fixed to the exterior wall on either side of a window. Check the shutter’s condition for
change, and pay attention to its mounting to the wall. Functional shutters are operable and
can be used to close off a window.
Shutters close to the ground can be examined from the ground. Shutters out of reach from
the ground should be examined from inside the house. In hurricane regions, check shutters
to see if the shutter manufacturer has certified them for hurricane use. If they provide
protection to windows and glass doors, determine if they have been tested for impact-
resistance to windborne debris.

~ 180 ~
Awnings
Check the condition of the awnings. The attachment to the exterior wall can become loose.
An attachment device in the mortar joint of a brick wall that is in poor condition can be
easily pulled or slid outward. Some windows and glazed exterior doors have awnings over
them for sun control or protection from the weather, but some are decorative only. Awnings
are usually made of metal, plastic or fabric on a metal or plastic frame. Some are fixed in
place, while others are operable and can be folded up against the exterior wall. If an awning
can be used for sun control, its effect on energy conservation is typically a personal
judgment.

~ 181 ~
SECTION 27: EGRESS DOORS
Regardless of the size of the house, at least one egress door should be provided. The
required door should provide access from the habitable portion of the home to the outside
without going through a garage.
Door Measurement
The required door must be a side-hinged door, and it must be at least 3 feet wide and 6 feet
and 8 inches tall. Other doors do not need to meet these minimum dimensions. They can
be of any size and need not be a swinging-type.
All egress doors shall be readily openable from the inside without the use of a tool, key, or
special knowledge or effort. This standard permits a wide variety of hardware options.
Landing Width
The width of a landing should not be less than the door's width. The minimum dimension of
every landing is 36 inches measured in the direction of travel.
Check the Floors or Landing at the Doors
On each side of each exterior door, there should be a floor or landing. The floor or landing
should not be more than 1½ inches below the top of the threshold.
There are three exceptions:
1. If the door does not swing over the landing, then the exterior landing can be, at
most, 7¾ inches below the top of the threshold. This is applicable to all exterior
doors, including the required egress door. The screen and storm doors are allowed
to swing over the landing. This is the most common exception.
2. If a stairway with (at most) two risers is at the exterior-side of a door, other than the
required egress door, a landing on the outside is not required, provided the door
does not swing over the stairway. Again, the screen or storm door is allowed to
swing over the stairway.
3. A floor at all exterior doors, other than the required egress door, should not be more
than 7¾ inches lower than the top of the threshold. It is also acceptable to raise the
threshold of an exterior door, other than the egress door, up to 7¾ inches above the
floor on the interior-side.

~ 182 ~
SECTION 28: EXTERIOR STAIRWAYS and RAMPS
RAMPS
There are three main points to check at a ramp inspection. They are:
1. slope;
2. landings; and
3. handrails.
Slope
Ramps should not have a slope greater than 1 unit vertical in 12 units horizontal, or an
8.3% slope.
EXCEPTION: In areas where it is not possible to comply with the 1:12 slope, ramps may
have a maximum slope of 1:8, or a 12.3% slope.
Landings
A minimum 3-foot by 3-foot landing should be installed in the following four locations:
1. at the top of the ramp;
2. at the bottom of the ramp;
3. where doors open onto ramps; and
4. where ramps change direction.
Handrails
There should be a handrail on at least one side of all ramps that have a slope greater than
the 1:12 slope maximum. What is typically found is that most installers install a handrail on
all ramps, regardless of the slope.
The height of the ramp's handrail is measured from the finished surface of the ramp. The
minimum is 34 inches, and the maximum is 38 inches.
Continuity
Handrails should be continuous for the full length of the ramp.
Termination
Handrails should end at a newel post, wall or safety terminal.

~ 183 ~
Space
The space between a handrail at a ramp and the wall should be at least 1½ inches.
Length
The maximum rise for any run shall be 30 inches.
If the slope of a ramp is between 1:12 and 1:16, the maximum rise shall be 30 inches and
the maximum horizontal run shall be 30 feet. If the slope of the ramp is between 1:16 and
1:20, the maximum rise shall be 30 inches and the maximum horizontal run shall be 40
feet.
STAIRWAYS
Ground Contact at Wooden Stairs
Exterior wood steps shall not be in direct contact with the ground unless suitably treated
with a wood preservative. Wooden stair components in contact with the ground or in
contact with concrete exposed to weather shall be of approved pressure preservative-
treated wood suitable for ground-contact use.
Handrails
Any stairway of four or more risers should have a handrail on at least one side.
Handrail Height
The height of a handrail is measured vertically
from the sloped plane adjoining the tread nosing
or leading edge. The handrail height should be
at least 34 inches and not more than 38 inches.

~ 184 ~
Continuity
The handrail should be continuous for the full length of the flight of stairs, measured from a
point directly above the top riser to a point directly above the bottom riser of the flight.
Continuity can be interrupted by a newel post at a turn.
Attachment
The handrail should have attachment devices to transfer to the structural wall a
concentrated load of 200 pounds applied at any point in any direction.
Width of the Stairway
Stairways should be at least 36 inches wide. This is measured at all points above the
handrail height and below the required headroom height.
RISERS AND TREADS
Risers
The minimum riser height is 4 inches and the maximum is 7¾ inches. Any significant
variation that would interfere with the rhythm of a person’s natural stride should be
avoided. The greatest riser height within any flight of stairs should not exceed the smallest
by more than ⅜-inch.
Treads
The minimum tread depth is 10 inches. For winders, this is measured at the 12-inch walk
line. The greatest tread depth within any flight of stairs should not exceed the smallest by
more than ⅜-inch. The walking surface of the stairway treads and landings should be
sloped no steeper than 1 unit vertical in 12 units horizontal, which is a 1/4:12 ratio, or a 2%
slope.

~ 185 ~
On stairways with solid risers, there should be a nosing of at least ¾-inch and not more
than 1¼ inches. The radius of a nosing curve should be no greater than 9/16-inch. A
nosing is not required when the tread depth is 11 inches or more.
Guards
Guards should be constructed to prevent adults from falling over them and to prevent
children from crawling through them. The height of a guard is measured vertically from the
sloped plane adjoining the tread nosing or leading edge.
Guard Strength
The design strength of a guard should resist a 200-pound concentrated load applied at any
point in any direction along the handrail or the top of the guard. Intermediate rails and
balusters should be able to withstand a horizontal load of 50 pounds on an area equal to 1
square foot.
Height
All decks and porches (including those with insect screening), landings, balconies,
mezzanines, galleries, ramps, and raised-floor surfaces located more than 30 inches above
the floor or ground should have guards. A guard is necessary at those elevated floor areas
because a fall from that height can result in injury.
The minimum height of the horizontal guard should be 36 inches. Open sides of stairways
with a total rise of more than 30 inches above the floor or ground should have guards not
less than 34 inches in height.
Ladder Effect
Guards should not have
horizontal or ornamental
patterns, members,
attachments or openings
that will facilitate climbing.

~ 186 ~
Spheres
Horizontal guards at raised floor
areas, balconies and porches should
have intermediate rails or
ornamental enclosures that do not
allow the passage of a 4-inch-
diameter sphere.
(In Canada, openings through any
guard shall be of a size that will
prevent the passage of a spherical
object having a diameter of 100
mm, unless it can be shown that it
will not represent a hazard.)
Open risers should not allow the
passage of a 4-inch-diameter
sphere. On stairs with a total rise
of 30 inches or less, the size of the
open riser is not limited.
The triangular area formed by a
tread, riser and guard should not
allow passage of a 6-inch-diameter
sphere.
The opening at guards on the sides
of stair treads should not allow the
passage of a 4⅜-inch-diameter
sphere.

~ 187 ~
Handrail Grip
The handrail grip (or handgrip) should be graspable
along the entire length of the handrail. The handgrip
shape should provide a graspable surface. It should
allow the user to maintain a consistently secure and
natural grasp on the handrail, without twisting the
fingers or requiring release. The handgrip can be
circular or non-circular.
Attachment
Required egress stairways, decks, balconies, and
similar means of egress should be anchored to the primary structure to resist both vertical
and lateral forces. The use of toenails or nails subject to withdrawal is not permitted.
EMERGENCY ESCAPE-AND-RESCUE OPENINGS
An exterior window, egress door, or similar component can serve as a means of escape and
access for rescue in case of an emergency.
Check for a Required Opening
It will be difficult to determine whether a window is a required emergency escape-and-
rescue opening. While moving around the exterior of the house, check all lower-floor and
basement windows while keeping in mind this potential requirement. Before completely
understanding which rooms have which types of windows and related requirements, you
may have to go into the lowest level of the house and finish the interior inspection. To
completely inspect a particular window, door or egress opening, you have to inspect that
component from both sides. You may find yourself going back and forth, inside and outside
a house, to complete your inspection of a basement that has issues related to a required
egress door or window.
Basements and every sleeping room should have at least one emergency escape-and-rescue
opening. Such openings should open directly onto a public street, public alley, yard or
court.
The emergency escape-and-rescue opening should be operational from the inside without
the use of tools, keys, or special knowledge.

~ 188 ~
Window Wells
The horizontal area of the window well for an emergency escape-and-rescue opening should
be at least 9 square feet. It should have a horizontal projection and width of at least 36
inches each way.
EXCEPTION: Ladders or steps may project into the space 6 inches.
Ladders or Stairs
Wells with a vertical depth of at least 44 inches should have a permanent ladder or steps,
with an inside width of 12 inches minimum, and at least 3 inches from the wall, and should
be spaced no greater than 18 inches apart vertically.

~ 189 ~
Bulkhead
Bulkheads should be checked. Open the bulkhead. When you open it to its fully-open
position, it should meet the minimum net-clear opening requirements.
Covers
Bars, grilles, covers and screens are permitted over the opening, provided that the
minimum net-clear opening requirements are met. Such devices should be removable from
the inside without the use of a key, tool, special knowledge, or force greater than that which
is needed for normal operation of the emergency escape-and-rescue opening.
Decks and Porches
Emergency escape-and-rescue openings are allowed to be under decks and porches,
provided that the opening can still be fully opened, and there is an egress path of at least
36 inches in height to a yard or court.
Basement Walkouts
A typical basement walkout is a below-grade entrance to a basement. There should be a
set of stairs and a landing at the bottom of the stairs. The walls and steps of a walkout are
commonly made of concrete, but can be made of a variety of materials, including wood. A
walkout may be covered with a permanent roof structure, or it may be open. The walkout
may have a cover that can be opened or removed.
Drainage Provision
If the walkout is not covered and is open to rainfall or water penetration, then a drain
provision is needed at the bottom of the walkout stairway. Sometimes, there is a drainage
grate or track in front of the tread of the door. Rainfall and snow can fill up an open
walkout that has drainage problems. Overflowing gutters may also deposit a lot of water
into an open walkout.
Drains at the bottom of the walkout stairway usually do not have traps because the outdoor
traps may freeze in the cold winter. Instead of seeing a trap fitting, you may see part of a
pipe that extends toward a floor drain that has a trap. That drain would be located within
the house's perimeter, where it is warm. This allows the outside drain at the bottom of a
walkout stairway to use a water trap of a floor drain.

~ 190 ~
The drain may be connected to the underground drainage provision of the foundation
perimeter. On a sloped lot, the drain may simply discharge out to grade, away from the
house.
The drain may be missing, damaged, cracked, open and not covered with a grille or grate
piece, clogged, filled with water, or under repair.
When inspecting a walkout, check for the following:
cracks in the walls of the walkout stairway;
leaning or bowing of the walls;
cracking or heaving steps;
cracking, settlement or heaving of the landing at the bottom of the stairway;
the presence of drainage at the bottom of the stairway;
surface drainage around the walkout; and
clogging or failure of the drain.
Drainpipe
A walkout drain and drainpipe should be at least 3 inches in diameter. If the drain appears
smaller than that, you may report it as being an installation defect and currently unreliable.
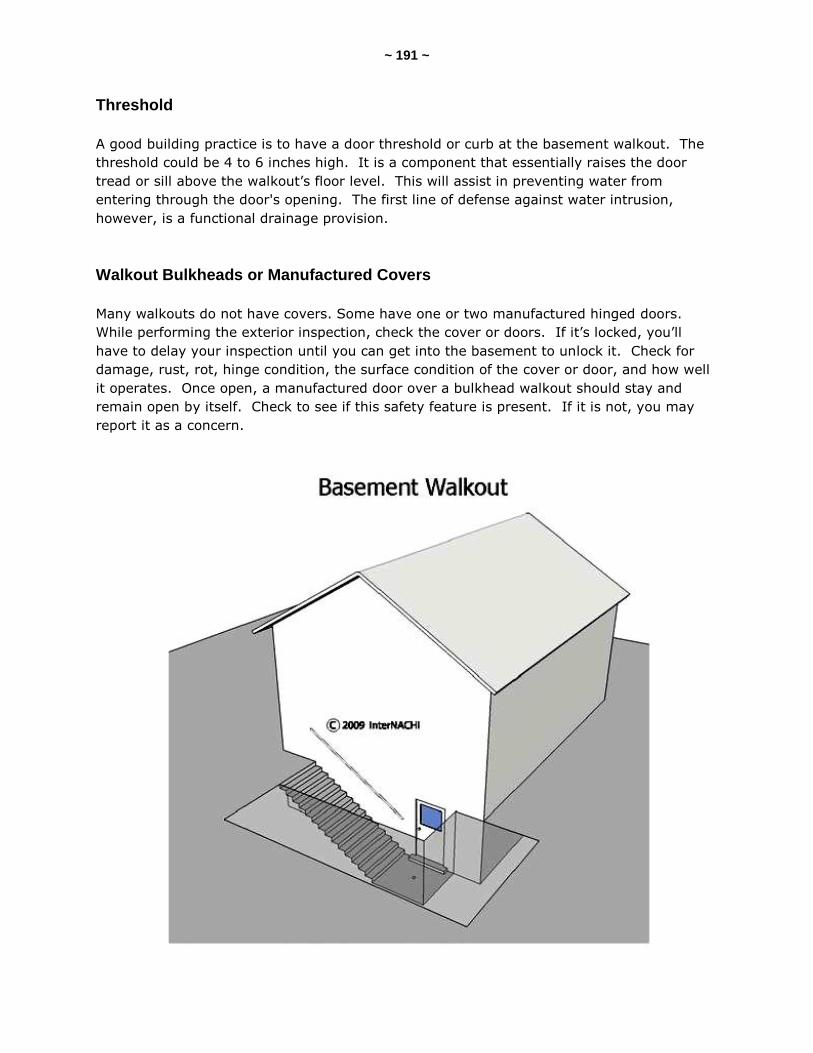
~ 191 ~
Threshold
A good building practice is to have a door threshold or curb at the basement walkout. The
threshold could be 4 to 6 inches high. It is a component that essentially raises the door
tread or sill above the walkout’s floor level. This will assist in preventing water from
entering through the door's opening. The first line of defense against water intrusion,
however, is a functional drainage provision.
Walkout Bulkheads or Manufactured Covers
Many walkouts do not have covers. Some have one or two manufactured hinged doors.
While performing the exterior inspection, check the cover or doors. If it’s locked, you’ll
have to delay your inspection until you can get into the basement to unlock it. Check for
damage, rust, rot, hinge condition, the surface condition of the cover or door, and how well
it operates. Once open, a manufactured door over a bulkhead walkout should stay and
remain open by itself. Check to see if this safety feature is present. If it is not, you may
report it as a concern.

~ 192 ~
QUIZ 15
1. A sill at a window or door should be _________.
sloped
stainless steel
level
painted
2. Window ______ in poor condition may allow air drafts, rattling and water penetration.
locks
glass
rails
putty
3. Can "foggy" windows be repaired?
Yes
No
4. Regardless of the size of the house, at least one _______ door should be provided.
side
wooden
egress
laundry
steel
5. T/F: The required door must be a side-hinged door at least 4 feet wide and 6 feet, 8 inches tall.
True
False
6. T/F: Typically, ramps should not have a slope greater than 1 unit vertical in 12 units horizontal.
True
False (Continued on next page.)

~ 193 ~
7. T/F: Any stairway of four or more risers should have a handrail on at least one side.
True
False
8. If the walkout is not covered and is open to rainfall or water penetration, then a ________ provision is needed at the bottom of the walkout stairway.
drainage
stepping
clogging
sealant
debris
Answer Key to Quiz 15
1. A sill at a window or door should be sloped.
2. Window putty in poor condition may allow air drafts, rattling and water penetration.
3. Can "foggy" windows be repaired?
Answer: Yes
4. Regardless of the size of the house, at least one egress door should be provided.
5. T/F: The required door must be a side-hinged door at least 4 feet wide and 6 feet,
8 inches tall.
Answer: False
6. T/F: Typically, ramps should not have a slope greater than 1 unit vertical in 12 units
horizontal.
Answer: True
7. T/F: Any stairway of four or more risers should have a handrail on at least one side.
Answer: True
8. If the walkout is not covered and is open to rainfall or water penetration, then
a drainage provision is needed at the bottom of the walkout stairway.

~ 194 ~
SECTION 29: EXTERIOR STRUCTURES
This section covers exterior structures, including decks, balconies, porches, garages, and
more. Components of these structures include steps, railings, columns and beams.
Inspectors should be aware of some of the common problems found at these exterior
structures, the implications of problems, and how to inspect for such conditions.
Decks, porches, balconies, verandas and patios are outdoor architectural elements that are
often confused with one another. An explanation of their intended use, history and design
allow for useful distinctions, although a certain degree of exception and overlap is
unavoidable.
Decks
A typical deck is a large, raised wooden floor attached to the back of a house and contained
by a perimeter railing for safety. Decks are rarely covered, and usually have a rough or
informal look that is not integrated with the rest of the house's design. They are usually
raised above the ground surface. The floor system is open to allow water to pass through.
Decks are usually supported by posts and the house wall or foundation. They are typically
intended to be locations for large outdoor social gatherings, such as barbecues and parties.
Access to the deck may be from the ground through a stairway or from the house through a
back door.
Deck Facts:
The word "deck," in this context, is generalized from decks on a ship.
It originates from the Middle Low German word verdeck, meaning ―covering.‖
The first commercial boardwalk in the United States, which is considered a deck, was
built in Atlantic City, New Jersey.

~ 195 ~
Porches
A porch is a wooden structure that forms a covered entrance to a doorway at ground level.
A porch is usually located at the front of the house. A typical porch has a roof, steps and a
guardrail around it. The porch usually has outdoor furniture set on it. Porches and their
roof structures are supported by posts or columns and the house wall or foundation.
Porch Facts:
Porches are used as anterooms where muddy shoes and wet coats, etc., can be shed
before entering the house.
The word porch originates from the Latin word porta, which means ―gate‖ or
―entrance.‖
While many houses in the southern United States, as well as Victorian-style houses,
have large porches suitable for social gatherings, most modern porches are too small
for comfortable social use, and merely add to the visual appeal of the building.
Porches are typically integrated with the house's architecture by using similar design
elements.
Balconies
A balcony is a platform that protrudes from the wall of an upper floor of a building and is
enclosed by a guardrail. Balconies are usually at least one story-level above the ground
surface. Balconies are often highly decorative, especially in wealthy and scenic areas. They
are not designed as social areas but, rather, add an outdoor ambiance to the indoors.
Access is by an interior door. There are no steps. There is no access to the ground level.
Balconies can be supported by columns and the house wall. They can be supported by
tension structural members. Balconies can be supported underneath by structural brackets,
or they can be cantilevered.
Balcony Facts:
In William Shakespeare’s "Romeo and Juliet,"
Juliet famously courted Romeo from her
balcony. The small balcony design typically
associated with that scene is often referred to
as a Juliet balcony. Balconies can be large enough to resemble
decks, but they do not provide access to the
ground.
The word balcony originates from the Italian
word balcone, which means ―large window.‖
Balconies can be made of wood, iron, stone,
and many other masonry materials.

~ 196 ~
Verandahs
A verandah (or veranda) is a long, roofed, open gallery built around a central structure and
supported by pillars. Verandahs are often long enough to extend around the front and sides
of a structure.
Their origins are uncertain, but they are known to be a hybrid of East Indian and European
styles. The purpose of the verandah is social, although in a more relaxed, everyday sense
than is the case of a deck or patio.
Verandah Facts:
Verandah is alternately spelled veranda.
Verandah appears in Hindi and several other native Indian languages, although it
appears to be an adaptation of the Portuguese and Spanish baranda.
Australia and New Zealand have their own unique style of verandah. Some
verandahs in these countries are roof-like structures that surround commercial
buildings, often on every floor. Their purpose is to provide protection from the sun.
Patios
A typical patio is a paved, roofless surface adjoining a residence that is generally intended
for dining and recreation. These open-air living spaces are at ground level and are usually
made from cement, stone, slate, or a combination of these materials.
Patio Facts:
The word patio originates from the Latin word patere, meaning ―to lie open.‖
Patio is Spanish for ―backyard‖ or ―back garden.‖
In Australia, a patio often refers to any kind of outdoor verandah or balcony.

~ 197 ~
SECTION 30: INSPECTING DECKS
This section deals with some of the details of a deck inspection that may be performed
during an inspection of the exterior. It is excerpted from InterNACHI’s comprehensive Deck
Inspections online course and book.
At the end of this section, you should be able to:
know how to inspect a deck; and
list some common concerns related to a deck structure.
More than 2 million decks are built and replaced each year in North America. InterNACHI
estimates that of the 45 million existing decks, only 40% are completely safe.
Because decks appear to be simple to build, many people do not realize that decks are, in
fact, structures that need to be designed to adequately resist certain stresses. Like any
other house or building, a deck must be designed to support the weight of people, snow
loads, and objects (such as plants, furniture, barbecue grills, etc.). A deck must be able to
resist lateral and uplift loads that can act on it as a result of wind or seismic activity. Deck
stairs must be safe and handrails graspable. And, finally, deck rails should be safe for
children by having proper infill spacing.
A deck failure is any failure of a deck that could lead to injury, including rail failure, or total
deck collapse. There is no international system that tracks deck failures, and each is
treated as an isolated event, rather than a systemic problem. Very few municipalities
perform investigations into the cause of a failure, and the media are sometimes more
concerned with injuries than the causes of deck collapses.

~ 198 ~
Rail failure occurs much more frequently than total deck collapses; however, because rail
failures are less dramatic than total collapses and normally don't result in death, injuries
from rail failures are rarely reported.
Here are some interesting facts about deck failure:
More decks collapse in the summer than during all the other seasons combined.
Almost every deck collapse occurred while the decks were occupied or under a heavy
snow load.
There is no correlation between deck failure and whether the deck was built with or
without a building permit.
There is no correlation between deck failure and whether the deck was built by a
homeowner or a professional contractor.
There is a slight correlation between deck failure and the age of the deck.
About 90% of deck collapses occurred as the result of the separation of the deck
from the house via the deck ledger board, allowing the deck to swing away from the
house. It is very rare for deck floor joists to break mid-span.
Many more injuries are the result of rail failure, rather than complete deck collapse.
Deck stairs are notorious for lacking graspable handrails.
Many do-it-yourself homeowners, and even contractors, don't believe that rail infill
spacing codes apply to decks.
This section does not address specific building codes, balconies, lumber species, grade
marks, decks made of plastics or composites, mold, or wood-destroying insects. This
section focuses on single-level residential wood decks. Recommendations found within this
section exceed the requirements of InterNACHI's Standards of Practice for Performing a
General Home Inspection.
A proper deck inspection relies heavily on the professional judgment of the inspector. The
following information will help improve the accuracy of the inspector’s observations.
Required Deck Inspection Tools:
flashlight;
measuring tape;
ladder;
level;
plumb bob;
probing tool; and
hammer.

~ 199 ~
Optional Inspection Tools:
moisture meter;
magnet; and
calculator.
A deck inspection should progress in much the same order as deck construction. Inspectors
should start at the bottom. If a deck is deemed unsafe from underneath, the inspector
should not walk out onto the deck to inspect the decking, handrails, etc. The inspector
should stop and report the safety issues.
People tend to gather near the railings of a deck, so a greater load is likely carried by the
posts. Hot tubs filled with water and people are heavy and can weigh a couple of tons.
Most decks are designed for loads of 40 to 60 pounds per square foot. Hot tubs require
framing that can support more than 100 pounds per square foot.
Building codes require decks to be designed to carry a uniformly distributed load over the
entire deck. If evenly distributed, half of the load is carried by the deck-to-house
connection, and the other half is carried by the posts.
Footings and Posts
Required footing depths vary based on local building codes. The depth is normally below
the frost line, or 12 inches where frost lines are not applicable.
On steep properties, the slope of the ground around the footing could affect the footing's
stability. The "7-Foot Rule" states that there should be a least 7 feet between the bottom of
a footing and daylight.
Posts in contact with soil should be pressure-treated and oriented so the cut end is above
grade.
The footing near the home may not be placed on undisturbed soil. Some codes consider soil
to be undisturbed if it hasn't been disturbed in more than five years.
Posts can lift out of pre-cast concrete piers, and piers can slide. Posts should be connected
to their footings so that the posts don't lift up or slip off.
Lawn sprinkler systems that regularly keep the deck wet contribute to decay of wooden
components. Downspouts should not discharge near deck posts. Puddles contribute to post
decay. Wood can decay and degrade over time with exposure to the elements. Decay is a
problem that worsens with time. Wooden members within the deck frame that have
decayed may no longer be able to perform the function for which they were installed. Paint
can hide decay from an inspector, so it should be noted in the report.
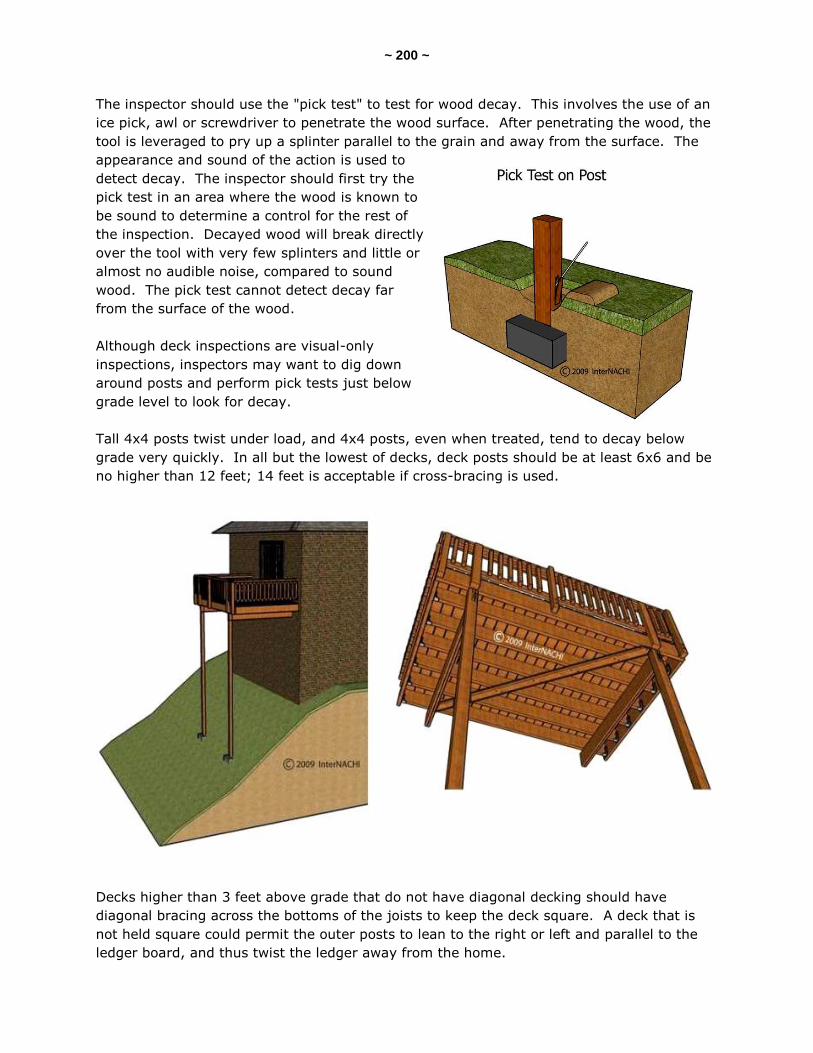
~ 200 ~
The inspector should use the "pick test" to test for wood decay. This involves the use of an
ice pick, awl or screwdriver to penetrate the wood surface. After penetrating the wood, the
tool is leveraged to pry up a splinter parallel to the grain and away from the surface. The
appearance and sound of the action is used to
detect decay. The inspector should first try the
pick test in an area where the wood is known to
be sound to determine a control for the rest of
the inspection. Decayed wood will break directly
over the tool with very few splinters and little or
almost no audible noise, compared to sound
wood. The pick test cannot detect decay far
from the surface of the wood.
Although deck inspections are visual-only
inspections, inspectors may want to dig down
around posts and perform pick tests just below
grade level to look for decay.
Tall 4x4 posts twist under load, and 4x4 posts, even when treated, tend to decay below
grade very quickly. In all but the lowest of decks, deck posts should be at least 6x6 and be
no higher than 12 feet; 14 feet is acceptable if cross-bracing is used.
Decks higher than 3 feet above grade that do not have diagonal decking should have
diagonal bracing across the bottoms of the joists to keep the deck square. A deck that is
not held square could permit the outer posts to lean to the right or left and parallel to the
ledger board, and thus twist the ledger away from the home.
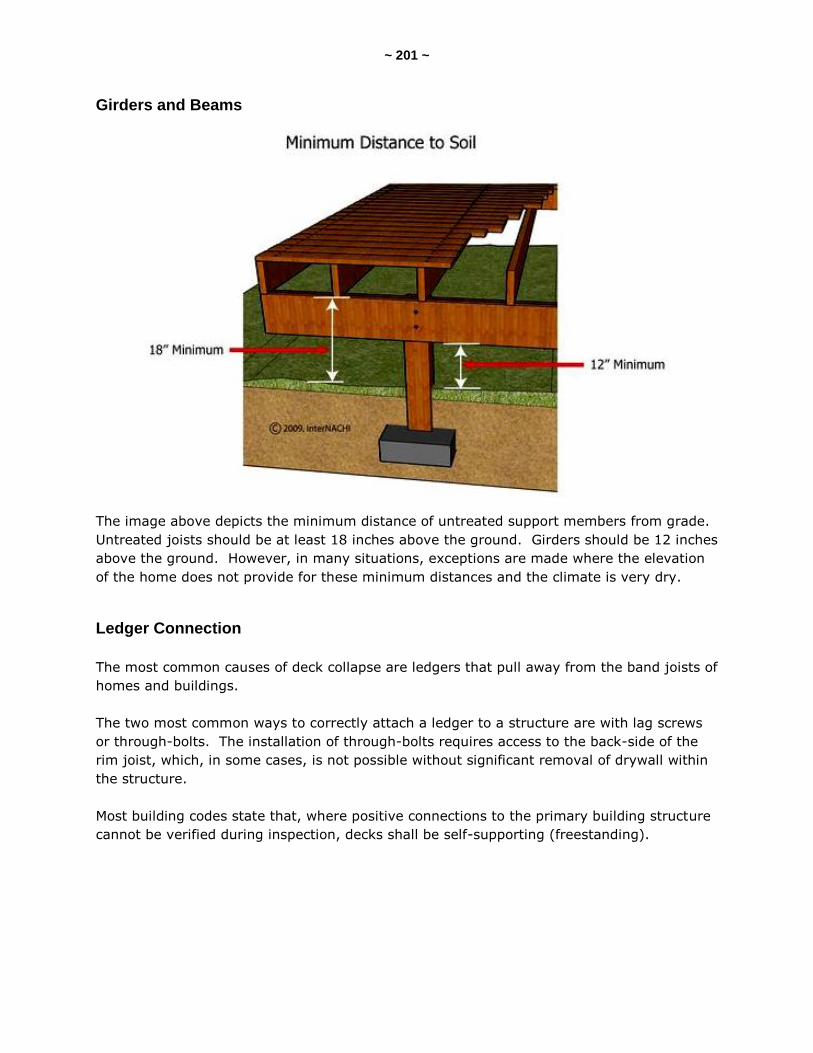
~ 201 ~
Girders and Beams
The image above depicts the minimum distance of untreated support members from grade.
Untreated joists should be at least 18 inches above the ground. Girders should be 12 inches
above the ground. However, in many situations, exceptions are made where the elevation
of the home does not provide for these minimum distances and the climate is very dry.
Ledger Connection
The most common causes of deck collapse are ledgers that pull away from the band joists of
homes and buildings.
The two most common ways to correctly attach a ledger to a structure are with lag screws
or through-bolts. The installation of through-bolts requires access to the back-side of the
rim joist, which, in some cases, is not possible without significant removal of drywall within
the structure.
Most building codes state that, where positive connections to the primary building structure
cannot be verified during inspection, decks shall be self-supporting (freestanding).

~ 202 ~
Determining the exact required spacing for the ledger fasteners is based on many factors,
including:
joist length;
type of fastener;
diameter of fastener;
sheathing thickness;
the use of stacked washers;
wood species;
moisture content of the wood;
integrity of the band joist; and
deck loads...
...and so is beyond the scope of a visual inspection. However, the number of ledger
fasteners required is primarily determined by the length of the joists. InterNACHI's ledger-
fastener spacing formula provides inspectors with this rule of thumb:
On-center spacing of ledger fasteners in inches = 100 ÷ joist length in feet.
A deck with substantially fewer ledger fasteners than that recommended by InterNACHI's
formula may be unsafe.
The image above shows the minimum distance of fasteners to the edges and ends of a
ledger board. Lag screws or bolts should be staggered vertically, placed at least 2 inches
from the bottom or top, and 5 inches from the ends of the ledger board. Some codes
permit the lag screws or bolts to be as close as 2 inches from the ends of the ledger board;
however, avoiding the very ends of the ledger boards minimizes splitting from load stress.
Through-bolts should be a minimum of ½-inch in diameter and have washers at the bolt
head and nut. Lag screws should also be a minimum of ½-inch in diameter and have
washers. Expansion and adhesive anchors should also have washers.
Deck ledgers should be comprised of pressure-treated wood that is at least 2x8.

~ 203 ~
Ledger Board and Band Joist Contact
The image at left depicts washers being used as
spacers between the ledger board and band joist,
which is incorrect.
In some cases, the ledger board and band joist
are intentionally kept separated by a stack of
washers on the lag screws or bolts to allow water
to run between the two boards. In other cases,
there is insulation between the two boards. Even
worse is when the siding or exterior finish system
was not removed prior to the installation of the
ledger board. Situations where the ledger board
and band joist are not in direct contact
significantly reduce the strength of the ledger
connection to the structure and are not
recommended by InterNACHI, unless the two
members are sandwiching structural sheathing.
The image at right depicts a ledger board and
band joist sandwiching the structural sheathing.
This is a correct installation.
All through-bolts should have washers at the bolt
head and nut.
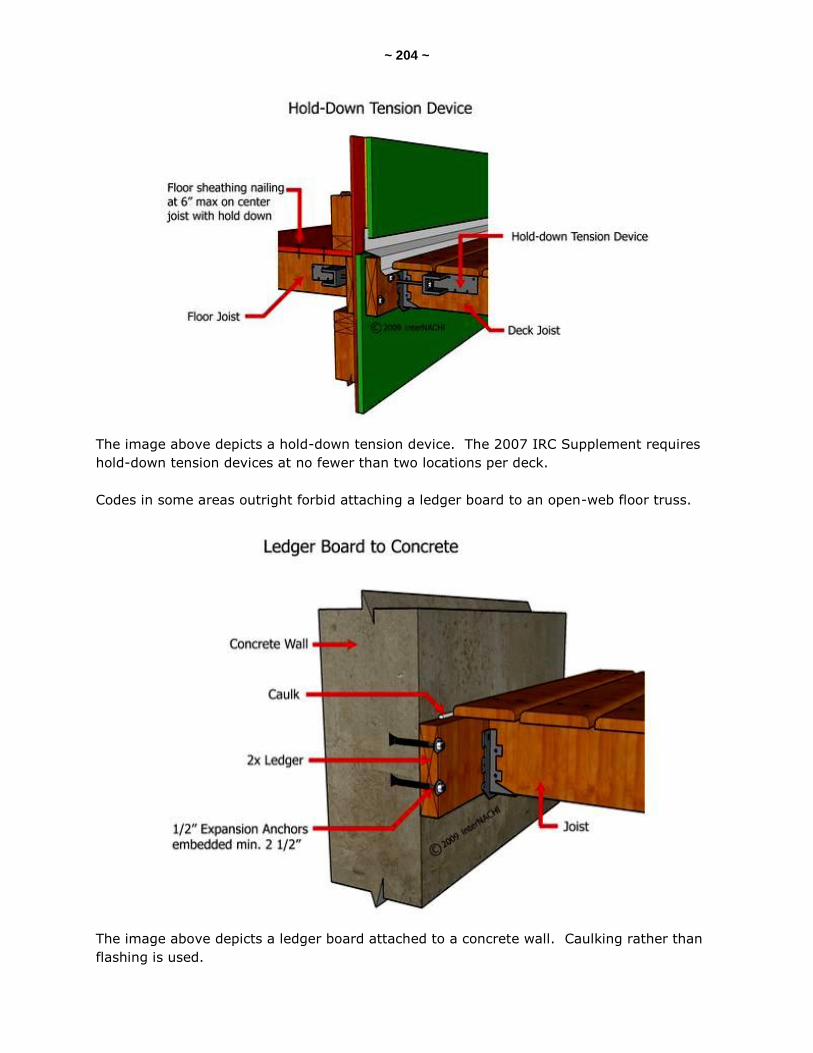
~ 204 ~
The image above depicts a hold-down tension device. The 2007 IRC Supplement requires
hold-down tension devices at no fewer than two locations per deck.
Codes in some areas outright forbid attaching a ledger board to an open-web floor truss.
The image above depicts a ledger board attached to a concrete wall. Caulking rather than
flashing is used.

~ 205 ~
The image above depicts a ledger board attached to hollow masonry. When the ledger is
attached to a hollow masonry wall, the cell should be grouted.
The image above depicts a ledger board improperly supported by brick veneer. Ledger
boards should not be supported by stone or brick veneer.
Ledger boards should not be attached directly (surface-mounted) to stucco or EIFS, either.
Stucco and EIFS have to be cut back so that ledger boards can be attached directly to band
joists. However, cut-back stucco and EIFS are difficult to flash and weather-proof.

~ 206 ~
Ledger Board Flashing
The image above depicts both over and under ledger board flashing. The ledger board
should always be flashed even when the home or building has a protective roof overhang.
Aluminum flashing is commonly available but should not be used. Its contact with pressure-
treated wood or galvanized fasteners can lead to rapid corrosion of the aluminum.
The image above depicts a deck ledger attached to an overhang. Decks should not be
attached to overhangs.

~ 207 ~
The image above depicts proper framing for around chimneys and bay windows that are up
to 6 feet wide. Framing around chimneys and bay windows that is more than 6 feet wide
requires additional posts.
Cracks
As wood ages, it is common for cracks to develop. Large cracks (longer than the depth of
the member) or excessive cracking overall can weaken deck framing. Toe-nailed
connections are always at risk for splitting. Splitting of lumber near connections should be
noted by the inspector.
Connectors and Fasteners
The inspector should note missing connectors and fasteners. All lag screws and bolts should
have washers.
Depending on how the deck was built, vital connections may have degraded over time due
to various factors. Issues such as wobbly railings, loose stairs, and ledgers that appear to
be pulling away from the adjacent structure are all causes for concern. The tightness of
fasteners should be checked. If it is not possible to reach both sides of a bolt, it may be
struck with a hammer. The ring will sound hollow with vibration if the fastener is loose. The
ring will sound solid if the connection is tight. The hammer test is subjective, so the
inspector should hammer-test bolts that can be confirmed as tight or loose, and compare
the sounds of the rings to develop a control.
Corrosion of Connectors and Fasteners
All screws, bolts and nails should be hot-dipped galvanized, stainless steel, silicon bronze,
copper, zinc-coated or corrosion-resistant.
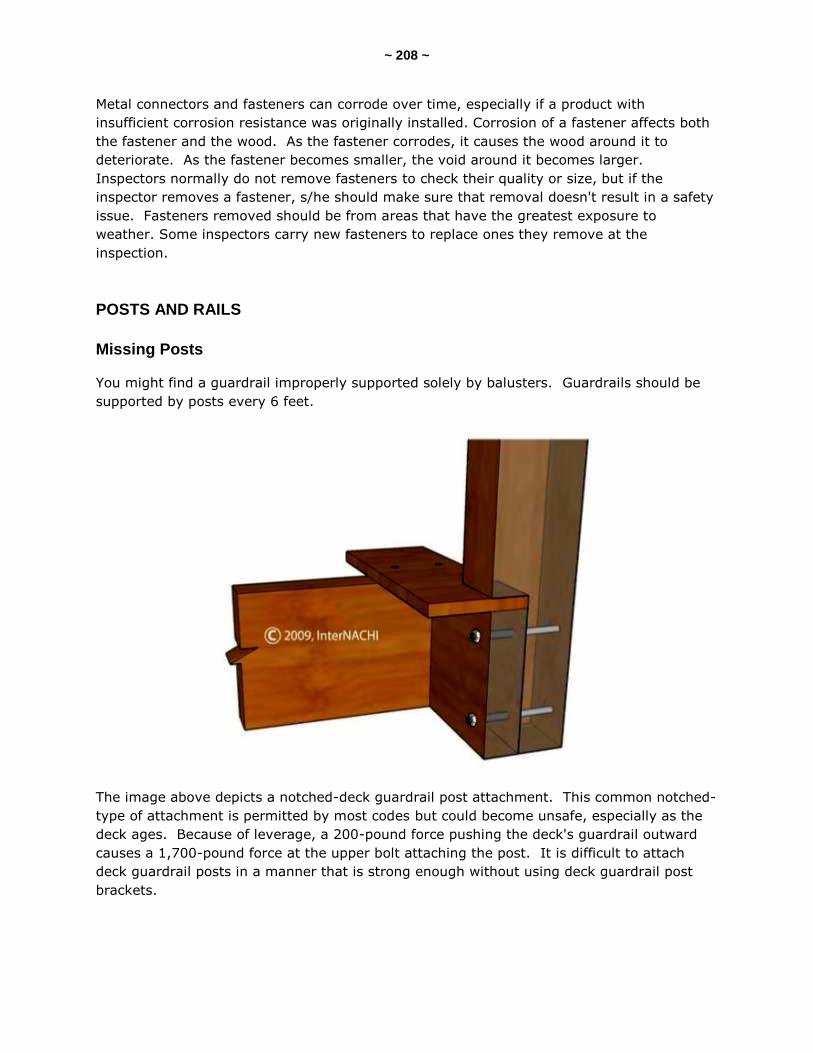
~ 208 ~
Metal connectors and fasteners can corrode over time, especially if a product with
insufficient corrosion resistance was originally installed. Corrosion of a fastener affects both
the fastener and the wood. As the fastener corrodes, it causes the wood around it to
deteriorate. As the fastener becomes smaller, the void around it becomes larger.
Inspectors normally do not remove fasteners to check their quality or size, but if the
inspector removes a fastener, s/he should make sure that removal doesn't result in a safety
issue. Fasteners removed should be from areas that have the greatest exposure to
weather. Some inspectors carry new fasteners to replace ones they remove at the
inspection.
POSTS AND RAILS
Missing Posts
You might find a guardrail improperly supported solely by balusters. Guardrails should be
supported by posts every 6 feet.
The image above depicts a notched-deck guardrail post attachment. This common notched-
type of attachment is permitted by most codes but could become unsafe, especially as the
deck ages. Because of leverage, a 200-pound force pushing the deck's guardrail outward
causes a 1,700-pound force at the upper bolt attaching the post. It is difficult to attach
deck guardrail posts in a manner that is strong enough without using deck guardrail post
brackets.

~ 209 ~
Notched Guardrail Post
The image at right depicts a notched-
deck guardrail post attachment. This
notched-around-decking-type of
attachment is permitted by most
codes, but it could become unsafe,
especially as the deck ages. Because
of leverage, a 200-pound force
pushing the deck's guardrail outward
causes a 1,700-pound force at the
upper bolt attaching the post. It is
difficult to attach deck guardrail posts
in a manner that is strong enough
without using deck guardrail post
brackets.
The image at left depicts a deck
guardrail post properly
attached with brackets.
Because of leverage, a 200-
pound force pushing the deck's
guardrail outward causes a
1,700-pound force at the upper
bolt attaching the post. It is
difficult to attach deck guardrail
posts in a manner that is
strong enough without using
deck guardrail post brackets.

~ 210 ~
Level-Cut Posts and Balusters
The end grain of vertical posts and balusters should
not be cut level. The image at left depicts a post and
balusters properly cut at angles in order to shed
water. The end grain of vertical posts and balusters
should be cut at an angle.
Improper Guardrail Height
Most residential codes require the top of the guardrail
to be at least 36 inches from the deck surface.
Infill spacing should not permit a 4-inch sphere to pass
through.
Ladder-type guardrail infill on high decks is prohibited by some local codes because it makes
it easy for children to climb over.
STAIRS
Deck Stair Stringer
The image above depicts a deck stair stringer. Stair stringers shall be made of 2x12
lumber, at a minimum, and no less than 5 inches wide at any point.
Stair Stinger Span
Stringers should be no more than 36 inches apart.
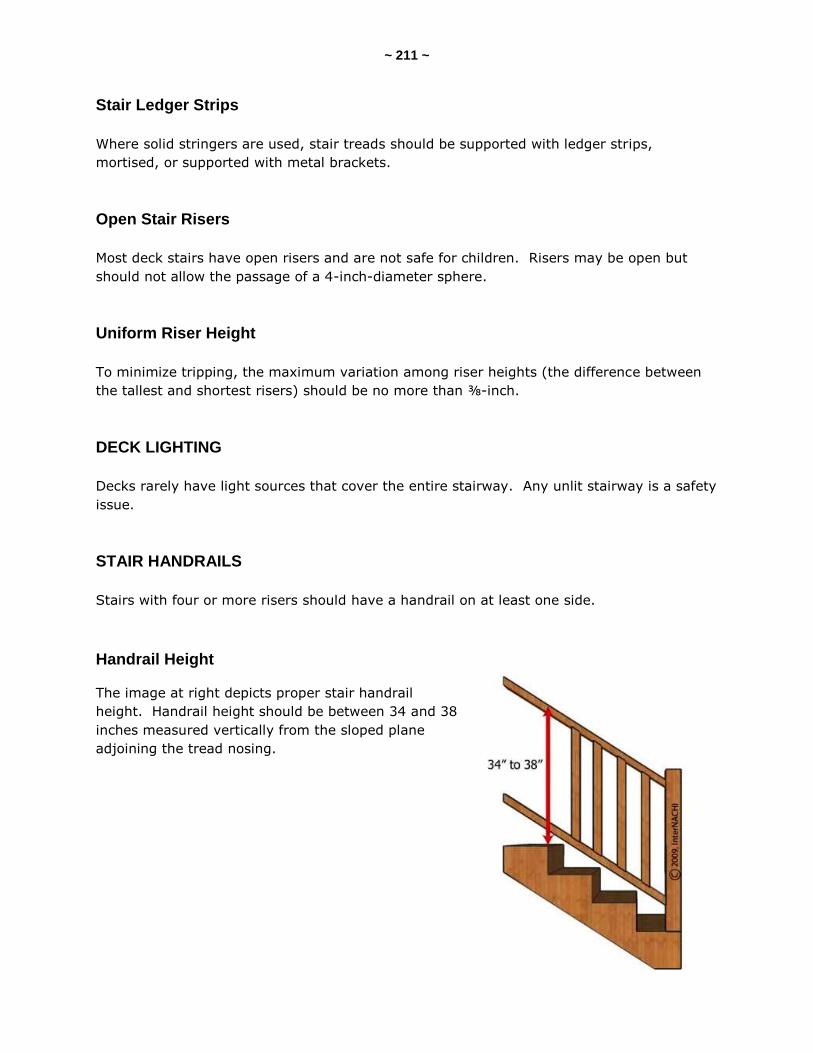
~ 211 ~
Stair Ledger Strips
Where solid stringers are used, stair treads should be supported with ledger strips,
mortised, or supported with metal brackets.
Open Stair Risers
Most deck stairs have open risers and are not safe for children. Risers may be open but
should not allow the passage of a 4-inch-diameter sphere.
Uniform Riser Height
To minimize tripping, the maximum variation among riser heights (the difference between
the tallest and shortest risers) should be no more than ⅜-inch.
DECK LIGHTING
Decks rarely have light sources that cover the entire stairway. Any unlit stairway is a safety
issue.
STAIR HANDRAILS
Stairs with four or more risers should have a handrail on at least one side.
Handrail Height
The image at right depicts proper stair handrail
height. Handrail height should be between 34 and 38
inches measured vertically from the sloped plane
adjoining the tread nosing.

~ 212 ~
Graspable Handrails
The image at right depicts a stair
handrail that is not graspable. Many
deck handrails improperly consist of
2x6 lumber or decking. Handrails
should be graspable, continuous and
smooth.
These three images depict graspable
handrails. Many deck handrails
improperly consist of 2x6 lumber or
decking. Handrails should be graspable,
continuous and smooth.
Stair handrails should have posts at
least every 5 feet.

~ 213 ~
ELECTRICAL RECEPTACLES
As of 2008, the National Electric Code (NEC) requires at least
one receptacle outlet on decks that are 20 square feet or
larger.
The image at left depicts a weatherproof receptacle cover. The
deck receptacle should have a weatherproof cover.
DECK LOCATION
Decks should not be located where they might
obstruct septic tank accesses, underground fuel
storage tanks, well heads, or buried power lines.

~ 214 ~
QUIZ 16
1. More than ___________ decks are built and replaced each year in North America.
2 million
10 million
100 million
5 billion
2. T/F: Posts in contact with soil should be pressure-treated.
True
False
3. In all but the lowest of decks, deck posts should be at least _______.
2x4 inches
4x4 inches
6x6 inches
8x6 inches
4. T/F: The most common causes of deck collapse are ledgers that pull away from the band joists of homes and buildings.
True
False
5. InterNACHI's ledger-fastener spacing formula provides inspectors with this rule of thumb: On-center spacing of ledger fasteners in inches = 100 ÷ joist length in _____.
feet
inches
6. All through-bolts should have ______ at the bolt head and nut.
sealant
tapered ends
washers
Answer Key is on the next page.

~ 215 ~
Answer Key to Quiz 16
1. More than 2 million decks are built and replaced each year in North America.
2. T/F: Posts in contact with soil should be pressure-treated. Answer: True
3. In all but the lowest of decks, deck posts should be at least 6x6 inches.
4. T/F: The most common causes of deck collapse are ledgers that pull away from the band joists of homes and buildings. Answer: True
5. InterNACHI's ledger-fastener spacing formula provides inspectors with this rule of thumb: On-center spacing of ledger fasteners in inches = 100 ÷ joist length in feet.
6. All through-bolts should have washers at the bolt head and nut.

~ 216 ~
SECTION 31: INSPECTING A GARAGE
This section deals with the details of garages and carports that may be included as part of
the inspection of the exterior.
At the end of this section, you should be able to:
describe the function of a firewall of a garage; and
list some common concerns related to a garage.
A typical garage is an enclosed, four-walled structure. Garages can be attached or detached
from the house. One side of a garage has a door to accommodate an automobile. There is
typically an egress door on the side of the garage. The floor of the garage is commonly
concrete. Some detached garages have gravel, wooden or dirt floors. Other types of
structures and carports can be categorized as being open, enclosed or partially enclosed.
Carports
A typical carport is an open building with posts. A carport does not have a door for an
automobile. The carport floor is usually of the same material as the driveway. The carport
structure may be freestanding or attached to the house structure at the wall or the roof.
The garage and carport structures are often included during the inspection of the exterior.
While outside, you could easily inspect the carport. Detached garages take longer to
inspect than attached garages because there are more structural issues to be concerned
with. Attached garages are often simply inside the house’s main structural design.
~ 217 ~
An attached garage shares many systems and components with the rest of the house,
including the foundation. Detached garages have their own separate footings, structural
components, roof system, siding, electrical system and components, doors and windows,
interior components, etc.
Inspecting a garage is similar to inspecting a house. A detached garage and a house have
the same types of items to inspect, including the systems and components related to the
exterior.
A garage inspection may include the following:
roof system;
gutters and downspouts;
exterior grading;
siding;
windows and doors;
electrical system;
foundation and structure;
garage floor;
interior;
HVAC; and
plumbing.
There are certain concerns that are particular to a garage. Some of them are related to fire
and safety issues.
You should know about the following issues when inspecting a garage:
firewalls;
openings;
fire doors;
the attic access;
the garage door; and
combustion appliances.
Firewalls for Attached Garages
Aside from the information about firewalls in this section, you should understand that you
should know and always refer to your local building codes. Your local building requirements
may exceed the 2006 International Building Code (IRC) that is referred to in this section.
Garage firewall materials installed on the walls and ceiling of the garage must meet certain
requirements, which are designed to protect the structure and its occupants. The
requirements slow the spread of fire and keep hazardous gases controlled.

~ 218 ~
The fire-resistance rating at a garage wall, ceiling or door refers to the period of time the
surface (gypsum, drywall, plaster) will serve as a barrier to the spread of fire. It indicates
how long it can hold back a fire before it spreads to adjacent or attached areas of the
house. Ratings of fire resistance are expressed in hours. Terms such as half-hour fire
rating, one-hour fire rating, and two-hour fire rating are commonly used.
It is very important to check with the local authority having jurisdiction (AHJ) for
clarification on the matters of fire-resistance requirements before you report any violations
or defects. When in doubt, check with your local building official.
Opening Protection
Openings from a garage directly into a room used for sleeping are not permitted. Look for
those openings. Look for any type of louvered air register in the attached garage. This may
be an open pathway to the house's interior.
Although the drywall or other approved material provides an adequate fire separation at the
walls and ceilings between the house and the garage, it is important that all other openings
in the firewall be appropriately protected. The type of door construction or fire rating of the
door is a strict requirement.
The door between an attached garage and a dwelling unit should be a solid wood door not
less than 1⅜ inches thick, or a solid or honeycomb-core steel door not less than 1⅜ inches
thick, or a 20-minute fire-rated door. Interior doors, such as the ones you may find at a
bedroom, are allowed, but not as the door which separates the garage and the adjacent
room.
The code covers only the door itself and not the door assembly. The door assembly does
not have to meet a fire rating. The type of door construction or fire rating of the door is
important.
Self-Closing Door
Doors should have proper weatherstripping to create an airtight barrier between the garage
and the living quarters. In many jurisdictions, a self-closing device on the door may be
required. One more feature that helps to preserve the garage firewall is a self-closing
door.

~ 219 ~
You may recommend a self-closing mechanism to your clients purchasing older homes. It is
inexpensive, and all that is needed is to replace a couple of standard door hinges with
spring-type, and adjust the door so it will close fully and completely by itself. In many
jurisdictions, a self-closing garage door is required on new construction.
Ducts
Where any ducts pass through the drywall surface of the garage-side of the firewall, the
duct material must be a minimum of No. 26 gauge (0.019-inch) galvanized steel. There
should be no plastic or aluminum pipes or hoses (thin-wall or flexible) penetrating the walls
or ceiling. If there is no other way to run those pipes, they should be insulated, boxed out,
and finished with Type X 5/8-inch drywall, taped and compounded.
There must not be any openings in the ductwork within the garage area.
Drywall at Ceilings and Walls
It is common for a fire to start in an attached garage. The fire may grow unnoticed by the
occupants and become a significant hazard. Therefore, a minimum amount of fire
protection is needed.
There should be at least ½-inch drywall (gypsum board) applied on the garage-side to
separate the garage from the residence and its attic space.
~ 220 ~
Garages located below a habitable room shall be separated by at least 5/8-inch Type X
drywall (gypsum board) or equivalent.
This standard requires a minimum level of fire protection from the garage to the dwelling
unit. It allows the occupants time to escape. The separation also restricts the spread of fire
from the garage to the dwelling unit until the fire can be controlled and extinguished.
All drywall seams at the ceiling and wall must be taped or finished with joint compound.
Some jurisdictions may require fire-rated joint tape for this purpose. The garage firewall
should have no missing or damaged drywall. All penetrations must be sealed. A fire-rated
caulk can be applied at small gaps around the pipes, air ducts, door frames, etc.
Curb
Many building codes require a step or a curb between the house door and the garage floor.
That places the floor of the house slightly above or elevated higher than the garage floor
surface. The step may be a minimum of 4 inches. This curb could prevent spilled gasoline
vapors from drifting into the house.
Electrical Box in the Firewall Ceiling
An opening in the firewall may not be obvious. For example, consider an electrical outlet
box in the ceiling of a garage, with a habitable space above the garage.
There are outlet and device boxes available that are listed for use in fire-resistance-rated
partitions without the use of putty pads, mineral wool or fiberglass. There are non-metallic
outlet boxes that can be installed in a garage firewall that meet the fire-resistance
standard. As an inspector, you will not be able to determine visually if the box is fire-rated.
They will be listed and identified by the manufacturer, but this identification goes well
beyond the Standards of Practice. In an older home, the box will likely not be fire-rated.
A box in the garage ceiling or wall must not be installed back-to-back with another box.
For both metallic and non-metallic electrical outlet boxes, the maximum gap around the box
is 1/8-inch for a firewall.
Putty pads are moldable pads that can be used to wrap metal electrical boxes, or inserted
on the inside back wall of metal electrical boxes. When exposed to fire, the pad expands
and seals off any openings. A ⅛-inch thick pad provides a one-hour fire-resistance rating.
Garage Floor
The garage floor should be a non-combustible material and sloped toward the floor drain (if
one is installed) or toward the vehicle door opening. The slope of the garage surface allows
for water on the garage floor to drain away.

~ 221 ~
Garage floors that are structural or suspended floors should be inspected by a specialist.
Loads on a structural floor are considerable, and distress on the floor structure may not be
readily apparent to a home inspector during a home inspection. You cannot simply get a
sense of whether a garage floor is structurally strong enough to support the weight of a
car. If you see any cracks or deterioration in the structural or suspended floor, you should
recommend further evaluation by an expert or specialist.
Poor Drainage at the Garage Floor
You should look at the garage floor to see that it is relatively uniform and is sloped properly
toward the vehicle door opening.
If there are structural problems with the concrete floor in the garage, there may be cracking
at the corners or along the walls of the garage. Sometimes, you may find large sections of
the garage floor that have cracked and settled. Sometimes, you may see that the entire
garage floor has settled, but uniformly. That’s okay if there is still proper slope toward the
vehicle door opening. If there is a floor drain, the floor needs to slope toward that drain
properly.
Attic Access
An attic access installed in the garage is an important part of a firewall. An open access to
the attic space above the garage may create a vacuum, and a garage fire may be sucked
into that attic. The garage attic access should be closed at all times.
One-story and ranch-style homes with an attached garage typically have no ceiling in the
garage and an open attic above the house.

~ 222 ~
In such situations, the garage firewall or house separation wall should extend all of the way
to the roof, or a garage firewall ceiling should be installed.
You may find a garage attic access that may not be equivalent to the firewall. A common
garage attic access is a square piece of plywood or drywall, usually resting on four pieces of
wood trim. Drywall may be approved by the local AHJ, but the trim neither provides a
proper seal nor has a required fire rating. Be careful here. Make sure you know what the
local building requirements and standards are in your area.
Attic pull-down stairs finished with a ¼-inch-thick plywood paneling may be considered by
the local AHJ as a violation of the firewall or separation between the attic and garage. The
pull-down stairway assembly rarely provides a proper seal along the opening. Have your
local code-enforcement inspector or officer comment on it.
Separation
In order to protect a house from a garage fire that is in a detached garage, a minimum
degree of spatial separation is required. Where a separation of a least 3 feet is not
provided, a minimum of one layer of ½-inch gypsum board or drywall should be installed on
the interior-side of the garage.
Mechanical Systems
Gasoline leakage or spillage in a garage can sometimes happen. This could be a hazardous
situation. Gasoline vapors will evaporate from liquid puddles at the floor level. Any
potential ignition source should be elevated to keep open flame, spark-producing elements
and heating elements above the gasoline's vapor level.
An appliance with an open flame, spark-producing element or heating element should be
elevated such that the source of ignition is at least 18 inches above the garage floor.
Impact
Appliances and equipment located in a garage or carport should be protected from impact
by an automobile. Appliances and equipment exposed to impact by vehicles could create a
hazardous situation if their fuel connections are broken, loosened or damaged. The
appliances and equipment should be protected by a barrier, such as a curb wheel stop or
pipe stanchions.

~ 223 ~
SECTION 32: GARAGE DOOR-OPENER INSPECTION
The garage door is the largest moving object in a house. Its parts are under high tension.
All repairs and adjustments should be performed by a trained garage door systems
technician. To find a technician, refer your clients to the International Door Association
(www.doors.org). If the garage door appears inoperable, do not attempt to operate the
garage door opener.
Manual-Release Handle
Begin inside the garage, with the garage door fully closed. Check for a manual-release
handle or the means of manually detaching the door from the garage door opener. The
handle should be colored red and easy to see. The handle should be accessible and no
more than 6 feet above the garage floor.
Garage Door Panels
From inside the garage with the door fully closed, check the condition of the door panels.
There shouldn’t be any cracks, loose pieces, separations or damage.
Warning Labels
From inside the garage with the door fully closed, look for the following warning labels:
1) a spring warning label attached to the spring assembly;
2) a general warning label attached to the back of a door panel;
3) a warning label attached to the wall in the vicinity of the wall control button; and
4) two warning labels attached to the door in the vicinity of the bottom corner brackets.

~ 224 ~
NOTE: Some newer doors have tamper-resistant bottom corner brackets that do not
require these warning labels.
Springs and Hardware
With the door still in the closed position, look at the springs for damage. Don’t operate the
door if a spring is broken. Operating the door with a damaged component can cause
serious injury or death. Recommend that the door not be used until the damaged spring is
replaced by a trained door systems technician. Visually check the door’s hinges, brackets
and fasteners. If the door has an opener, the door must have an opener reinforcement
bracket that is securely attached to the door’s top section. The header bracket of the
opener rail must be securely attached to the wall or header using lag bolts or concrete
anchors.
Door Operation
Close the door fully. If the door has an opener, pull the manual release to disconnect the
door from the opener. Without straining yourself, manually lift and operate the door by
grasping the door in a safe place where your fingers cannot be pinched or injured. If the
door is hard to lift, then it is out of balance. This is a hazardous condition, and correction
by a technician should be recommended.
Raise the door to the fully-open position. Then close the door. The door should move freely
and without difficulty, but it should not open or close more quickly than the force applied. If
the door is difficult to open or close, the door should be inspected by a trained door systems
technician.
The rollers should stay in the track. If any rollers fall out of the track, the door system
should be repaired by a trained door systems technician.
After conducting this check, reconnect the door to the opener, if present. This is generally
done by activating the opener until it reconnects itself to the door.
Spring Containment
The counter-balance system is usually comprised of torsion springs mounted above the door
header, or extension springs, which are usually found next to the horizontal track. When
springs break, containment helps to prevent broken parts from flying around dangerously in
the garage. Torsion springs are already mounted on a shaft, which inherently provides
containment. If the door has extension springs, verify that spring containment is present.
Extension springs should be contained by a secure cable that runs through the center of the
springs.

~ 225 ~
Wall Push Button
Locate the push button on the wall. Measure the vertical distance between the button and
the floor. The button should be at least 5 feet above the standing surface and high enough
to be out of reach of small children. Press the push button to see if it successfully operates
the door.
Photo-Electric Eyes
Federal law states that residential garage door openers manufactured after 1992 must be
equipped with photo-electric eyes or some other safety-reverse feature. If the garage door
has an opener, check to see if photo-electric eyes are installed. They should be near the
floor, mounted to the left and right sides of the bottom door panel. The beam of the photo-
electric eyes should not be higher than 6 inches above the floor.
Non-Contact Reversal Test
This check applies to door systems that are equipped with photo-electric eyes. Standing
inside the garage and safely away from the path of the door, use the remote control or wall
button to close the door. As the door is closing, wave an object in the path of the photo-
electric eye beam. The door should immediately reverse and return to the fully-open
position.
Contact Reversal Test
In rare instances, a contact reversal test could damage the door system when the opener’s
force setting has been improperly set, or when the opener reinforcement bracket is not
securely or appropriately attached to the top section. If you are concerned that a contact
reversal test may cause damage, don’t conduct the test. This test applies to doors with
openers.
Begin this test with the door fully open. Under the center of the door, place a 2x4 piece of
wood flat on the floor in the path of the door. Standing inside the garage, but safely away
from the path of the door, use the wall push button to close the door. When the door
contacts the wood, the door should automatically reverse direction and return to the fully-
open position.

~ 226 ~
QUIZ 17
1. T/F: Openings from a garage directly into a room used for sleeping purposes are not permitted.
True
False
2. T/F: In many jurisdictions, a self-closing device on the garage door may be required.
True
False
3. T/F: The garage door is the largest moving object in a house.
True
False
4. Federal law in the U.S. requires that residential garage door openers manufactured after _____ must be equipped with photo-electric eyes or some other auto-reverse safety feature.
1972
1982
1992
2002
Answer Key to Quiz 17
1. T/F: Openings from a garage directly into a room used for sleeping purposes are not permitted. Answer: True
2. T/F: In many jurisdictions, a self-closing device on the garage door may be required. Answer: True
3. T/F: The garage door is the largest moving object in a house. Answer: True
4. Federal law in the U.S. requires that residential garage door openers manufactured after 1992 must be equipped with photo-electric eyes or some other auto-reverse safety feature.
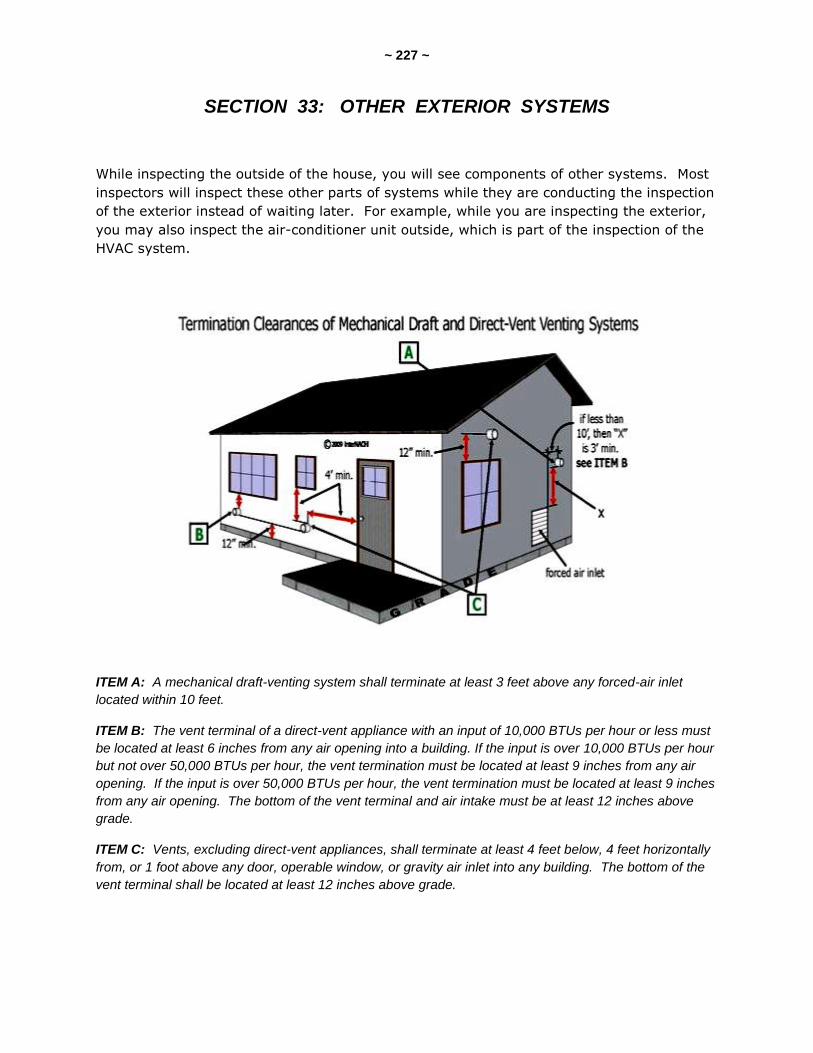
~ 227 ~
SECTION 33: OTHER EXTERIOR SYSTEMS
While inspecting the outside of the house, you will see components of other systems. Most
inspectors will inspect these other parts of systems while they are conducting the inspection
of the exterior instead of waiting later. For example, while you are inspecting the exterior,
you may also inspect the air-conditioner unit outside, which is part of the inspection of the
HVAC system.
ITEM A: A mechanical draft-venting system shall terminate at least 3 feet above any forced-air inlet
located within 10 feet.
ITEM B: The vent terminal of a direct-vent appliance with an input of 10,000 BTUs per hour or less must
be located at least 6 inches from any air opening into a building. If the input is over 10,000 BTUs per hour
but not over 50,000 BTUs per hour, the vent termination must be located at least 9 inches from any air
opening. If the input is over 50,000 BTUs per hour, the vent termination must be located at least 9 inches
from any air opening. The bottom of the vent terminal and air intake must be at least 12 inches above
grade.
ITEM C: Vents, excluding direct-vent appliances, shall terminate at least 4 feet below, 4 feet horizontally
from, or 1 foot above any door, operable window, or gravity air inlet into any building. The bottom of the
vent terminal shall be located at least 12 inches above grade.

~ 228 ~
Examples of components of systems (other than the exterior) that you may inspect while
conducting the inspection of the exterior may include, but are not limited to:
exterior hose bibbs;
main water service meter and shutoff valve;
lawn sprinkler system;
sewer vent pipes;
septic system components;
sump pump discharge;
electrical service lines, service entrance, conductors, meters and disconnect;
electrical service to detached outbuildings and detached garages;
exterior lights and receptacles;
fresh-air vents for fireplace chimneys;
exhausts from heating systems or ventilation systems;
oil fill and vent pipes from an oil storage tank;
overflow drainpipes;
exterior condenser units for an air-conditioning unit or heat-pump system;
refrigerant line;
condensate discharge;
evaporative swamp cooler;
ventilation for the roof system, including the soffit and gable;
crawlspace access and ventilation;
exhaust vents from the kitchen and bathroom;
exhaust vent from the clothes dryer;
cracks at the structure and foundation;
indications of settlement and movement of
the structure and foundation; and
movement of walls.
You may inspect these things (and more) while you
are outside, collect the information, and combine
that information with that of your inspection of the
other systems that you encounter at a later time.

~ 229 ~
SECTION 34: CHIMNEYS
If there is a chimney at the property, look at it
while performing the exterior inspection. Chimneys
have greater exposure to the weather than most
building components, and they have no lateral
support from the point where they emerge from
the roof. Problems can develop at any point in
time as the house ages. A chimney sweep can
monitor the chimney structure for your client.
Chimney Cap
You'll often find that the inspection of various systems overlaps. You may inspect the
chimney stack during the inspection of the roof system. You may decide to check the top of
the stack during the time that you inspect the roof surface.
The top of the chimney stack can deteriorate due to a
deteriorated cap that allows water into the masonry
below and exposes it to freeze-thaw cycles. This cap
is typically made of a tapered layer of mortar, called a
cement wash, which cracks and breaks after several
years. If the cap is mortar and the chimney has a
hood, the mortar will need to be repaired. If the cap
is mortar and the chimney does not have a hood, the
mortar should be replaced with a stone or concrete
cap. If the cap is stone or concrete, it will need to be
repaired or replaced.
Settlement or Leaning
An inadequate foundation can cause differential settlement of the chimney, but the
foundation is underground and not readily visible. If the chimney is part of an exterior wall,
it will tend to lean away from the wall and crack where it is joined to other masonry. In
some cases, the chimney can be tied to the building.
The chimney could lean where it projects above the roof due to deteriorated mortar joints
caused either by wind-induced swaying of the chimney, or by sulfate attack from flue gases
and particulates within the chimney when the chimney is not protected by a tight flue liner.

~ 230 ~
You could recommend that deteriorated mortar joints be re-pointed, and unstable
chimneys and those with a noticeable lean be further evaluated by a chimney expert for
repairs, which may include dismantling and rebuilding.
Cleanout Door
The cleanout door of the chimney flue may be found outside.
Oftentimes, the cleanout door will be found at the base of the
chimney flue on the exterior-side of the stack. The door may
be metal, steel or cast iron. Check this cleanout door for
proper operation. It should not be missing, damaged or
corroded.

~ 231 ~
SECTION 35: DEFENSIBLE SPACE
Defensible space refers to the area surrounding a building that is mitigated to protect it
from wildfires. Along with the quality of a building’s roofing material, adequate defensible
space is one of the most important factors in determining a building’s ability to survive a
wildfire. Inspectors should know enough about defensible space to educate their clients,
particularly in fire-prone regions.
Defensible space performs the following functions:
1. Ideally, a carefully maintained defensible space does not contain enough fuel to allow
a wildfire to reach a house. Even if the space is breached, the fire will be slowed and
weakened, helping firefighters to defend the house.
2. A defensible space provides an accessible area for fire trucks to park and firefighters
to work during a structure fire.
3. If there is a pond near a burning house, it can be used to replenish a fire truck’s
water supply. The perimeter of the pond should be thinned of trees and brush
sufficiently so that firefighters can access it.
The size requirements for defensible space vary by jurisdiction because the potential for
wildfires varies by region. Buildings in forested areas of the Southwest need a much larger
protective space than in New Jersey, for instance. As of 2006, California state law mandates
a minimum of 100 feet of defensible space for houses in rural locations. Trees and shrubs
surrounding a house should be trimmed and spaced apart a safe distance from one another.
Chainsaws can be used to remove trees and branches, pruning shears can be used to trim
plants, and rakes can be used to remove pine needles and other ground-level combustibles.
Trees that are very close to the house should be removed because this is where fire
prevention is most critical. Vegetation can be plentiful toward the perimeter of the space if it
is green and pruned.
Colorado State University divides defensible space into three categories in the following
manner:
Zone 1 is the first 15 feet from a home and should be devoid of all flammable
vegetation. Firewood and other flammable materials should not be stored in this
area.
Zone 2 is the area of fuel reduction that extends from Zone 1 outward to between 75
to 125 feet from the structure. Trees and large shrubs should be no less than 10 feet
apart, especially in steep terrain. Trees must also be pruned to a height of 10 feet
from the ground, and any ―ladder fuels‖ (vegetation with vertical continuity) should
be removed from the base of the trees. Grass, trees and shrubs in this area should
be green and adequately spaced. Pine needles, dead leaves, branches, dead and
dying vegetation, and other flammable debris on the ground should be removed
whenever they appear.
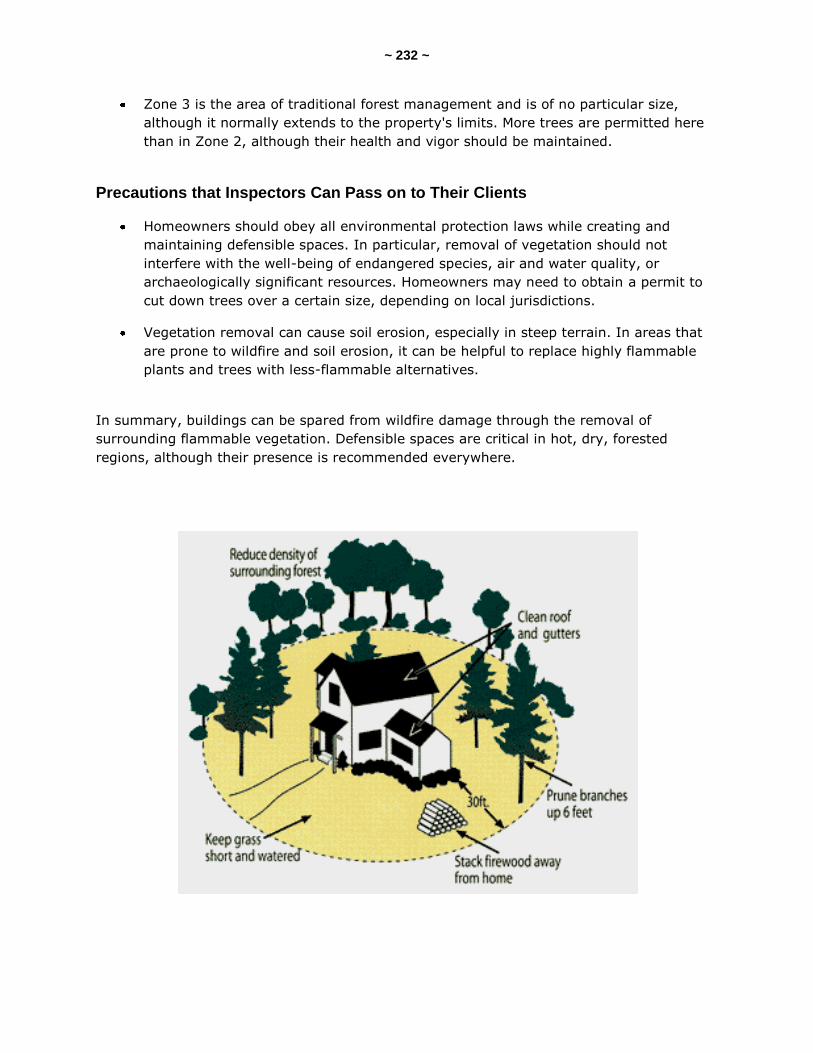
~ 232 ~
Zone 3 is the area of traditional forest management and is of no particular size,
although it normally extends to the property's limits. More trees are permitted here
than in Zone 2, although their health and vigor should be maintained.
Precautions that Inspectors Can Pass on to Their Clients
Homeowners should obey all environmental protection laws while creating and
maintaining defensible spaces. In particular, removal of vegetation should not
interfere with the well-being of endangered species, air and water quality, or
archaeologically significant resources. Homeowners may need to obtain a permit to
cut down trees over a certain size, depending on local jurisdictions.
Vegetation removal can cause soil erosion, especially in steep terrain. In areas that
are prone to wildfire and soil erosion, it can be helpful to replace highly flammable
plants and trees with less-flammable alternatives.
In summary, buildings can be spared from wildfire damage through the removal of
surrounding flammable vegetation. Defensible spaces are critical in hot, dry, forested
regions, although their presence is recommended everywhere.

~ 233 ~
SECTION 36: RETAINING WALLS
This section deals with the details of retaining walls that may be observed during an
inspection of the exterior.
At the end of this section, you should be able to:
list different types of retaining walls;
describe the function of a retaining wall; and
list some concerns related to retaining walls.
Retaining walls are a common feature at many residential properties. They can be made
from a variety of materials, including stone, brick, concrete, block and wood. The most
common problem with a retaining wall is poor drainage.
There are building standards and best practices that provide some criteria related to the
required design features of a retaining wall. Where wood is installed in retaining walls, the
wood should be pressure preservative-treated or of a wood species that has natural
protective properties.

~ 234 ~
Retaining walls that are more than 24 inches tall and not laterally supported at the top
should be designed to ensure stability against overturning, sliding, excessive foundation
pressure, and water uplift.
Look for Movement
Bowing (vertical bulges), sweeping (horizontal bulges), and cracking in retaining walls can
be caused by water or hydrostatic pressure. Bulging can also be a result of inadequate
strength of the earth behind the wall to resist the load. Bowing and sweeping failures may
be correctable if found early enough and if the cause is poor drainage.

~ 235 ~
There are other types of failures of retaining walls. Failure by overturning (leaning from the
top) or sliding may be caused by inadequate wall strength. In addition, water behind a wall
can create moist bearing, especially in clay soils, and contribute to sliding. Retaining walls
also fail due to settlement and heaving.
Settlement occurs whenever filled earth below the wall compacts soon after the wall is built,
or when wet earth caused by poor drainage dries out and soil consolidates. Poor drainage
contributes to failure in cold climates by creating heaving from frozen ground.

~ 236 ~
Both overturning and sliding may be stabilized and sometimes corrected if the amount of
movement is not extreme. Settling may be corrected on small, low walls of concrete and
masonry, and heaving may be controlled by proper drainage.

~ 237 ~
Significant failure of any kind usually requires rebuilding or replacing all or part of a wall.
Recommend the consultation of a qualified professional when major repairs or corrections
are needed.

~ 238 ~

~ 239 ~
SECTION 37: DRIVEWAYS, WALKWAYS and PAVEMENT
Cracks and Settlement
Check the paved areas. Asphalt and concrete are commonly used for driveways and
walkways. You may encounter brick, gravel and packed soils.
Where there is a difference in elevation in a walk or drive that creates a tripping hazard, the
higher portion of concrete may be ground down to the level of the lower portion, although
the grinding will change the appearance of the concrete. Walkways and driveways may
crack, crumble or settle over time. Safety hazards may develop, and those hazards should
be checked and noted in the inspection report.
Paved areas immediately adjacent to a building should slope away from the perimeter of the
building (or foundation) walls. Paving that is not sloped to drain water away from a building
should be repaired.
Look for any paving that has large cracks, broken sections, high areas, low areas that trap
water, and tripping hazards. Repairing concrete often requires total replacement.
Resurfacing with a thin layer of more concrete cannot repair concrete.
Concrete should be no less than 3 inches thick. Cracks in concrete can be cut open and
sealed with a flexible sealant compound, which will extend its service life. For sidewalks
that have settled downward, it may be possible to lift up sections.
Asphalt Surfaces
Sealing asphalt paving extends its life. Homeowners should seal-coat their asphalt
driveways every three to five years. Examine the paving to determine when sealing is
needed. Check asphalt driveways for sunken areas that hold water. Low areas in asphalt
paving can be brought to level with an asphalt repair.
Paving
Paving does not last forever. Brick and stone patio paving could be set on a concrete slab,
in a mortar bed with mortar joints, or in a sand bed that is laid on earth. Mortar joints can
be tuck-pointed. Loose bricks and stones can be reset in a new mortar bed. Pavers set in
sand can be taken up easily, sand can be added or removed, and the pavers replaced.
Responsibility
The maintenance and repair of sidewalks, drive aprons, and curbs at the street may be the
property owner’s responsibility or that of the local jurisdiction. Many inspectors check those
areas for their clients and report the condition of those items that may be the clients’
responsibility to maintain.

~ 240 ~
SECTION 38: BURIED OIL TANKS
A buried oil tank is beyond the scope of a home inspection. Inspectors who come across
the indications of a buried oil tank could inform their client of their findings.
Buried ferrous-metal oil tanks are common on older properties whose home or domestic
water is heated by oil. The evidence of a buried oil tank can be covered up by landscaping.
The presence of a buried oil tank can usually be determined by finding the fill and vent
pipes that extend above ground. Abandoned and very old buried ferrous-metal oil tanks are
an environmental hazard.
If there is a buried tank on the property, the soil around it should be tested for the presence
of oil seepage by a qualified environmental professional. If leaking has occurred, the tank
and all contaminated soil around it must be removed. If leaking has not occurred, it may
still be a potential problem. Even if a tank is empty, it still may have residual oil in the
bottom that is a pollutant.
As with all underground items, a buried oil tank is not within the scope of a visual home
inspection.

~ 241 ~
SECTION 39: OTHER EXTERIOR CONSIDERATIONS
Additional Exterior Structures
Additional structures, storage sheds, and other outbuildings should be kept in good
condition in the same manner that the home is maintained. Your client should monitor each
outbuilding’s water-shedding capability and the adequacy of its foundations. Advise your
client to look for roof leaks from inside the buildings. Wood-frame structures should be
checked for rot and insect infestation.
The doors and windows of outbuildings should be checked to assure that they provide
adequate weather protection and security.
Small outbuildings should have sufficient structural strength to sustain wind loads or seismic
forces, and this may be more than just a simple judgment call. If the site is in a hurricane
or high-wind region, you might check all outbuildings for their ability to resist a storm
without coming apart and becoming windborne debris. Consider recommending to your
client a consultation with a qualified professional experienced in high-wind or seismic issues.
Yards and Courts
In urban areas, two or more housing units may share a yard or court to provide light and
ventilation to interior rooms. The adequacy of the light provided to the interior rooms of the
home may be a function of the dimensions of the yard or court. Check these characteristics,
as well as zoning, building and housing code requirements pertaining to light, ventilation
and privacy screening for yards and courts. Such requirements may affect the reuse of the
property, and their implications should be understood before the property is altered.
Flood Zones
Check with local authorities to determine if your client’s home is in a flood-risk zone. If it is,
check with local building officials. Many communities have adopted higher standards than
those set by national agencies.
The Federal Emergency Management Agency (FEMA) and the National Flood Insurance
Program have established and defined five major flood-risk zones and created special flood-
resistance requirements for each. For a flood map, visit the FEMA Map Service Center at
www.msc.fema.gov. Improperly designed grading and drainage may aggravate flood
hazards to buildings and cause runoff, soil erosion and sedimentation. Local agencies may
regulate building elevations that are above street or sewer level.

~ 242 ~
Exterior Water
Exterior hose spigots should be frost-proof. You can't
see the frost-proof feature from outside. Unlike a
traditional hose bibb whose valve stem is 1 or 2
inches in length, the valve stem for a frost-proof
hose bibb (or sillcock) could be 6 to 30 inches long.
Thus, the valve is well within the exterior wall and
protected from cold and freezing.

~ 243 ~
GFCI Protection for the Exterior
All exterior electrical receptacles should have GFCI protection.

~ 244 ~
Clothes Dryer Exhaust
The appropriate length of a clothes dryer exhaust ensures that the dryer exhaust blower will
be able to push sufficient air volume to take away the damp air and lint. The length can be
increased only when the make and model of the dryer are known, or when an approved
blower-fan calculation is provided.
The maximum length of a clothes dryer exhaust duct should not be greater than 25 feet
from the dryer's location to the wall or roof termination. For each 45°-bend, the maximum
length of the duct should be reduced by 2½ feet. For each 90°-bend, the maximum should
be reduced by 5 feet.
The maximum length of the exhaust duct does
not include the transition duct.
Screens are not permitted on the clothes
dryer exhaust vent, as these can trap lint and
debris and pose a fire hazard. The exhaust
vent should have a damper installed at its
termination to prevent debris, rodents, birds
and other pests from enter the exhaust.
Check this damper (if accessible) to make
sure it’s not stuck open or closed.

~ 245 ~
Private Wells
A homeowner should know the location of any well on the property. Ideally, wells that
supply drinking water are located uphill from the building and from any storm and sanitary
sewer-system piping. Standards usually require that the well be a minimum of 50 feet from
a septic tank, and 100 feet from any part of the absorption field. Local codes may have
different separation distances based on the percolation rates of the local soils.
You could remind your client that water quality of a private well can change every year, and
that s/he should consider having the water quality tested on a regular basis.
SEPTIC SYSTEMS
Location and Layout
A homeowner should know the layout of the existing septic system.
The absorption field should not be disturbed by new construction or vehicular traffic, or
covered by fill, trees or dense vegetation.
No storm water should be directed into the septic system.
Under proper use, a typical septic system has an average life expectancy of 15 to 20 years.
Septic Tank
If properly maintained, it should be pumped every two to three years. Records related to
the pumping should be kept. The lack of periodic pumping will cause solids to be carried
into the absorption field, clogging the leaching beds and shortening their useful life.

~ 246 ~
Signs of a clogged absorption field include the presence of dark green vegetation over the
leaching beds throughout the growing season (which is caused by nutrient-laden wastes
being pushed up through the soil), wet or soggy areas in the field, and/or distinct sewage
odors.
OTHER EXTERIOR FACTORS
The following are several factors about a home and its property that are often overlooked.
Slope
Look at the property around the house and the slope of the ground. In all seismic regions,
including regions of low seismic activity, if the house is on a ground slope of 20° or more, a
structural engineer should be consulted to further examine the house in relation to the
slope.
Wind
If the property is located in a hurricane or high-wind region, look for loose fences, tree
limbs, landscaping materials (such as gravel and small rocks), and other objects that could
become windborne debris in a storm.
Floods
Check with local authorities. Major flood-risk zones have been established to define where
floods occur, and special flood-resistance requirements have been created for each zone.
Lead
Your client may consider checking for the presence of lead in the soil, which can be a hazard
to children playing outdoors and can be tracked indoors on shoes. Lead in soil can come
from different sources, such as discarded lead-based paint, lead-based paint chips at the
perimeter of stone foundations where the paint is flaking, and old trash sites where items
containing lead have been discarded. The soil and home could be tested for lead by a
qualified professional inspector. For more information, visit the U.S. EPA's website to read
"Lead in Paint, Dust and Soil" at www.epa.gov/lead.
Wildfires
In locations where wildfires can occur, some jurisdictions have requirements for hydrant
locations, and restrictions on the use of certain building materials, as well as restrictions on
plantings close to a building. In the context of fire control, defensible space (covered in
Section 35) is the area around a structure that has been landscaped to reduce fire danger.

~ 247 ~
Check with the local building official and fire marshal for information on such requirements
before reporting any deficiencies or making recommendations.
Construction Expansion and Site Restrictions
If a future construction project on the house includes expansion, an assessment of the site
for such future work is critical. The use of the land around the existing house is likely
restricted by coverage and setback requirements, which define the areas of the property
that can be used for future construction projects.
Homeowner association bylaws and deed covenants sometimes include requirements that
can affect changes or additions to a building or outbuilding.
Accessibility
When universal design is a need, consult a code-certified professional inspector for detailed
information about parking, walkways, patios and egress.

~ 248 ~
QUIZ 18
1. The chimney __________ is often made of a tapered layer of mortar, called a cement wash, which cracks and breaks after several years.
bottom
flue
top
stack
cap
2. The chimney could lean where it projects above the roof due to deteriorated mortar joints caused either by wind-induced swaying of the chimney, or by sulfate attack from ________.
the terracotta liner
the concrete chimney cap
flue gases
rainwater
outdoor air
3. ___________ space refers to the area surrounding a building that is mitigated to protect it from wildfires.
Fencible
Protective
Indefensible
Defensible
Firewall
4. Retaining walls that are taller than ______ inches and not laterally supported at the top should be designed to ensure stability against overturning, sliding, excessive foundation pressure, and water uplift.
12
24
48
72
(Continued on next page.)
~ 249 ~
5. T/F: At a driveway or walkway, the concrete should be no less than 3 inches thick.
True
False
6. T/F: A buried oil tank is within the scope of a home inspection.
True
False
7. T/F: With a few exceptions, all exterior electrical receptacles should have GFCI protection.
True
False
8. T/F: A screen is permitted on a clothes dryer's exhaust vent.
True
False
Answer Key to Quiz 18
1. The chimney cap is often made of a tapered layer of mortar, called a cement wash, which cracks and breaks after several years.
2. The chimney could lean where it projects above the roof due to deteriorated mortar joints caused either by wind-induced swaying of the chimney, or by sulfate attack from flue gases.
3. Defensible space refers to the area surrounding a building that is mitigated to protect it from wildfires.
4. Retaining walls that are taller than 24 inches and not laterally supported at the top should be designed to ensure stability against overturning, sliding, excessive foundation pressure, and water uplift.
5. T/F: At a driveway or walkway, the concrete should be no less than 3 inches thick. Answer: True
6. T/F: A buried oil tank is within the scope of a home inspection. Answer: False
7. T/F: With a few exceptions, all exterior electrical receptacles should have GFCI protection. Answer: True
8. T/F: A screen is permitted on a clothes dryer's exhaust vent. Answer: False

~ 250 ~
SECTION 40: A GUIDE for HOMEOWNERS:
WATER MANAGEMENT and PREVENTION
This section provides inspectors with basic information that they can convey to
homeowners for making appropriate decisions and taking the appropriate actions to keep
their homes dry and comfortable. Use the information in this section to effectively
communicate with your clients about water management and moisture-damage prevention.
Designing, building and maintaining homes that manage moisture effectively is a process of
making good decisions. While builders and designers provide most of the up-front decisions
— such as designing the roof system, and specifying the foundation drainage details — over
the long term, the homeowner must understand basic moisture issues and make good
decisions at the right times.
There is already plenty of useful guidance for homeowners on what to do (and not do)
regarding moisture. This section does not ―reinvent the wheel‖ but will instead provide basic
guidance for homeowners.
This section includes inspection tips that may help an inspector to spot common types of
moisture problems during an inspection. Most (if not all) moisture-related problems could
become serious and expensive if not taken care of quickly and completely. Therefore, it is
important for an inspector to call out or recommend further evaluation and/or repair by
qualified professionals when any moisture intrusion is observed.
Houses and Water
Water, in its many forms, is an ever-present fact of life for a homeowner. Households can
use hundreds of gallons of tap water on a daily basis. Lots of rainwater must be successfully
shed by the roof and siding during rainstorms. Groundwater moves through the soil beneath
the foundation. Indoor humidity levels are controlled for comfort. Moisture, in the forms of
condensation and water vapor, is absorbed and released by the house itself.
When a well-built home is properly maintained, water is a benefit and a pleasure. On the
other hand, uncontrolled water in a home can cause damage. It can lead to mold growth,
rotten wood and structural damage.
A House Repels Excess Water
The exterior surfaces of a house, from roof to foundation, make up its envelope or "skin."
The skin is designed to shed or repel excess water. If it doesn’t, expect trouble. When roof
flashings, windows, foundation walls, and other building components are not properly
maintained, rainwater will find its way in through vulnerable parts of the house.

~ 251 ~
A House Absorbs and Releases Excess Moisture
All houses must absorb and release moisture constantly in order to maintain a healthy
balance. If the house has "breathing" problems, many types of moisture problems can
develop. Trapped moisture — dampness that cannot be released, for one reason or another
— is one of the primary causes of fungus and mold growth in a house. Fungi can literally eat
wood, causing decay, rot and, ultimately, structural damage. Trapped moisture in the walls
can destroy the value of the insulation and raise heating and cooling costs. Wood that stays
damp attracts carpenter ants and other insects that can accelerate structural problems.
A House Transports Piped Water
Directly beneath the skin of the house is a complex maze of pipes carrying fresh water, as
well as drain lines that dispose of water after its use. There are dozens of pipe joints and
specialized fittings throughout the house, any one of which can develop a leak and cause
moisture damage.
A House Needs a Firm, Dry Foundation
The best foundation is a dry foundation. A water-damaged foundation is extremely
expensive to repair and can lead to damage in the rest of the house. Groundwater,
floodwater or even rainwater from a misdirected downspout can undermine the foundation
and cause settling cracks, wet floors and walls, and other undesirable conditions.
Common Sources of Moisture Damage
Unwanted water can intrude through cracks in the protective skin of the house. It can also
accumulate from interior moisture sources.
The following describe the most common sources of moisture problems at the exterior of a
house.
Roof and Flashing
Roofing materials can wear out, break, rust, blow off, or otherwise fail and expose the roof
deck and structural components beneath to moisture intrusion and damage.

~ 252 ~
Most leaks occur around penetrations through the roof, such as at a chimney, plumbing
vent, exhaust fan and skylight. Flashings and sealant joints around these penetrations can
crack, fail and leak. Intersections of roof surfaces with walls are also common leakage
points.
Old or defective shingles can curl and crack, allowing moisture intrusion. If old shingles
aren’t removed before new roof shingles are applied, they can reduce the life of the new
roof. Chimney caps can crack, allowing water into interior areas of the chimney.
Shingle edges can fail, forcing rainwater to accumulate between the roof and gutter.
Flat and low-pitched roofs have unique maintenance needs and are susceptible to water
problems because they may not drain as quickly as roofs with a steeper pitch.
Flat-roof drains or scuppers can clog and hold water on the roof, increasing the risk not only
of a leak, but also of a possible collapse of the entire roof under the weight of the water.
Gutters and Downspouts
Clogged gutters can force rainwater to travel up onto the roof under shingles, or to overflow
and travel down the inside of the wall, or to overflow and collect at the home’s foundation.
First-floor gutters can overflow if second-floor gutters have been mistakenly directed to
drain into them.
An insufficient number of or undersized downspouts can cause gutters to overflow.

~ 253 ~
Downspouts that don’t empty far enough away from foundation walls can lead to foundation
wall damage and a wet basement.
Ice Dams
Inadequate attic insulation allows heat to escape from the house into the attic, which can
turn rooftop snow into an ice dam along the eaves. Ice dams frequently force moisture to
back up under the roof shingles where it can drip into the attic and walls.
Clogged and frozen gutters can act like ice dams, pushing moisture up under the shingles
and into the house.
Soffits and Fascia
Damaged soffits (horizontal surfaces under the eaves) can allow snow and rain to be blown
into the attic, damaging the insulation, ceilings and walls.
Fascia boards (vertical roof-trim sections) can then become damaged, allowing the moisture
from rain and snow into the attic and atop interior walls.
Weep Holes
Weep holes, which are designed to allow moisture to escape from behind walls, can become
blocked. Weep holes can freeze, forcing moisture to back up inside the wall cavity. Weep
holes can become clogged with landscape mulch, soil and other material.
Landscape and Grading
Landscape modifications may result in water drainage back toward the foundation, rather
than away from it.
A newly built home's lot may have been graded improperly, or the original foundation
backfill may have settled over time, causing drainage problems.
Automatic sprinklers may be spraying water onto or too close to the foundation walls.
Window and Door Flashing and Seals
Cracked, torn and damaged seals, weatherstripping, and flashing around windows and doors
can allow wind-blown moisture to penetrate the house. Worn and failed weatherstripping
can allow wind-driven rain to penetrate a closed window or door.
Improperly installed windows and doors can allow moisture into the wall.

~ 254 ~
Groundwater and Rainwater
Groundwater and misdirected rainwater can collect during wet seasons along the foundation
wall and beneath the floor or slab. Unless it is directed away from the structure by a sump
pump or corrected drainage, this moisture can lead to mold growth, wall failure, and other
destructive moisture problems.
Condensation
Condensation on windows can, at a minimum, damage windowsills and finishes. At worst, it
can damage walls and floors.
Condensation on un-insulated pipes can collect nearby or travel along a pipe to accumulate
far from the original source.
Condensation can form inside improperly built walls and lead to serious water damage and
biological growth that are hidden from sight.
HVAC
Lapses in regular maintenance can lead to moisture and comfort problems, ranging from
clogged drain pans to iced-up cooling coils and mold growth within the system.
Failure to clean and service air conditioners regularly can lead to diminishing performance,
higher operating costs, and potential moisture problems.
Humidifiers can add too much moisture to a house, leading to dampness and mold.
Sump Pump
Neglecting to test a sump pump routinely — especially if it is rarely used — can lead to
severe water damage, especially when a heavy storm, snow melt or flooding sends water
against the home.
Overload of the sump pump due to poor drainage elsewhere on the property can lead to
pump failure. Frequent sump operation can be a sign of excessive water buildup under the
basement floor due to poorly sloped landscaping, poor rain runoff, gutter backflows, and
other problems.
Lack of a backup sump pump, which can be quickly installed in the event that the first pump
fails, can lead to serious water damage and property loss. This is especially important if the
sump pump is relied upon to maintain a dry basement, or if the house is located in an area
of seasonally high groundwater. Sump failure can cause extensive water damage and the
loss of valuable personal belongings.
*****************************

~ 255 ~
Own InterNACHI’s Education Library!
Plumbing Moisture Intrusion
Electrical Wood-Destroying
HVAC Organisms
Exterior Radon
Mold Structural Issues
Roofing Pools and Spas
25 Standards Safety Practices
International Standards of Practice
for Inspecting Commercial Properties
and many more!
Order online now at InspectorOutlet.com!

~ 256 ~
InspectorOutlet.com is your source for
all things inspection-related!
We are the official source for InterNACHI, the International
Association of Certified Home Inspectors (www.NACHI.org).
We strive to provide the lowest prices on the highest-quality tools,
products, supplies, safety apparel and equipment, as well as educational
books, articles and other materials to help home and commercial property
inspectors stay on the cutting edge of the inspection industry.
"Inspector Outlet is officially endorsed by InterNACHI for the
best prices in the business for our members."
-- Nick Gromicko, Founder of InterNACHI
At InspectorOutlet.com, we are constantly expanding and adding new products, so check
our site often. If there is something you would like to see in our store, please feel free to
email us with your suggestions.
We appreciate your business,
and we’re here to help you find what you need!