Embed Size (px)
Citation preview
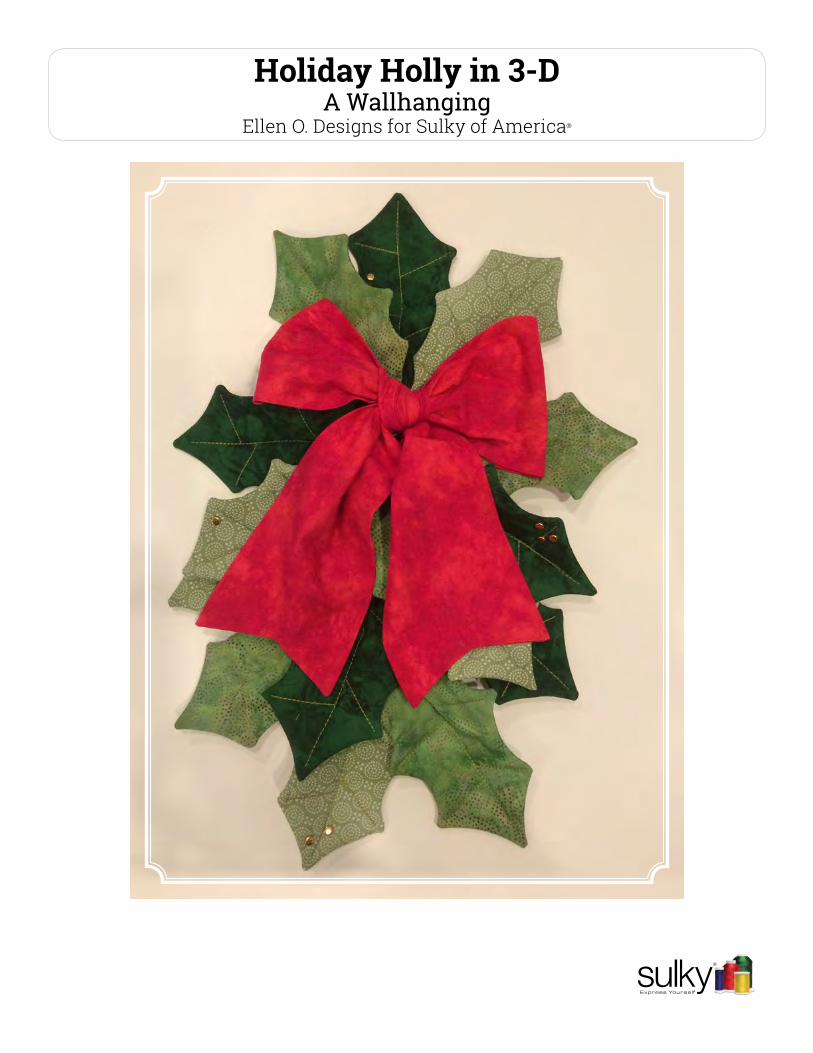
Holiday Holly in 3-DA Wallhanging
Ellen O. Designs for Sulky of America®
Holiday Holly in 3-D
What We Used
Your FabricsHere is a spot for you to put a swatch of your fabric choices.
A. B. C. D.
–2–
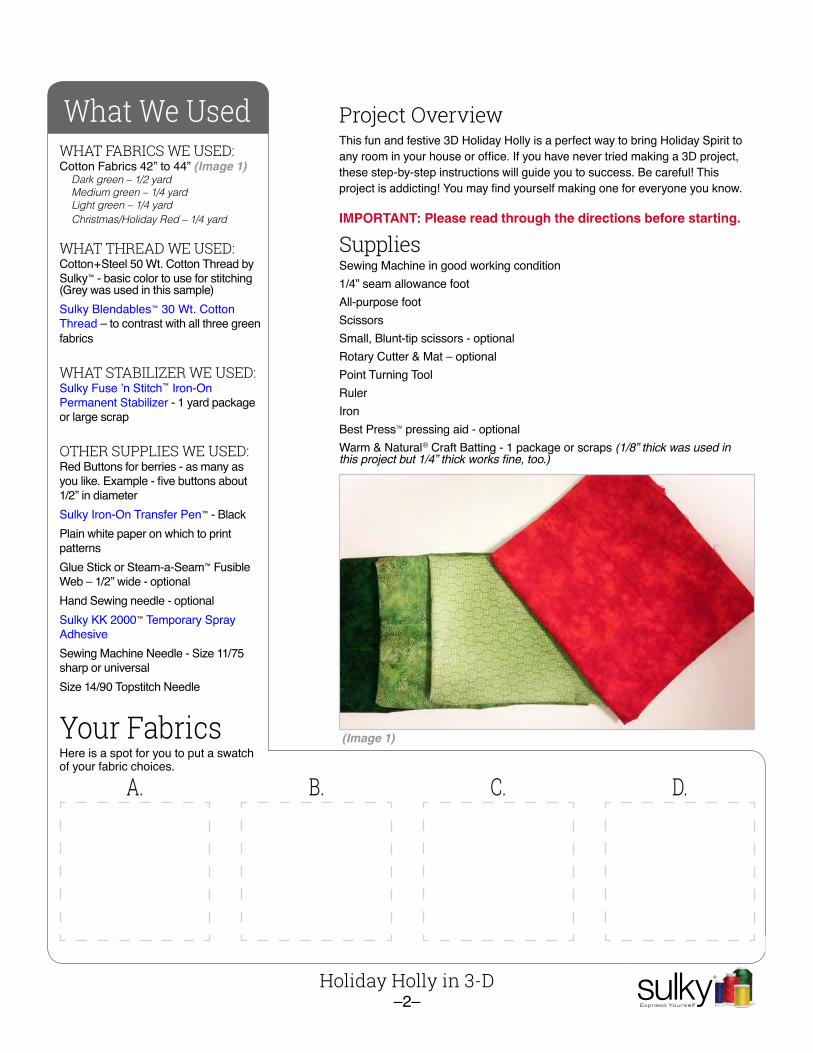
WHAT FABRICS WE USED: Cotton Fabrics 42” to 44” (Image 1)
Dark green – 1/2 yardMedium green – 1/4 yardLight green – 1/4 yardChristmas/Holiday Red – 1/4 yard
WHAT THREAD WE USED: Cotton+Steel 50 Wt. Cotton Thread by Sulky™ - basic color to use for stitching (Grey was used in this sample)Sulky Blendables™ 30 Wt. Cotton Thread – to contrast with all three green fabrics
WHAT STABILIZER WE USED:Sulky Fuse ’n Stitch™ Iron-On Permanent Stabilizer - 1 yard package or large scrap
OTHER SUPPLIES WE USED:Red Buttons for berries - as many as you like. Example - five buttons about 1/2” in diameterSulky Iron-On Transfer Pen™ - BlackPlain white paper on which to print patternsGlue Stick or Steam-a-Seam™ Fusible Web – 1/2” wide - optionalHand Sewing needle - optionalSulky KK 2000™ Temporary Spray AdhesiveSewing Machine Needle - Size 11/75 sharp or universal Size 14/90 Topstitch Needle
Project OverviewThis fun and festive 3D Holiday Holly is a perfect way to bring Holiday Spirit to any room in your house or office. If you have never tried making a 3D project, these step-by-step instructions will guide you to success. Be careful! This project is addicting! You may find yourself making one for everyone you know.
IMPORTANT: Please read through the directions before starting.
SuppliesSewing Machine in good working condition1/4” seam allowance footAll-purpose footScissorsSmall, Blunt-tip scissors - optionalRotary Cutter & Mat – optionalPoint Turning ToolRulerIronBest Press™ pressing aid - optionalWarm & Natural® Craft Batting - 1 package or scraps (1/8” thick was used in this project but 1/4” thick works fine, too.)
(Image 1)

Holiday Holly in 3-D–3–
Bottom
LPL
LPL
1/8” SeamAllowance
Overlap
LPLLPL
Leav
e O
pen
Holiday Holly in 3-D Wallhanging© 2016 Ellen O Designs for Sulky of America, Inc.
When printing from this PDF file, set Page Scaling to “None”. Print patterns at 100% or “Actual Size”. Do not select “Shrink to Fit” or “Fit to Printable Area” options. Once printed, this square should measure exactly 1” x 1”
Base
BaseEllen O Designs
2 of 2
Holiday Holly in 3-D Wallhanging© 2016 Ellen O Designs for Sulky of America, Inc.
When printing from this PDF file, set Page Scaling to
“None”. Print patterns at 100% or “Actual Size”. Do not select “Shrink to Fit” or
“Fit to Printable Area” options. Once printed, this square should measure
exactly 1” x 1”
Overlap
SuggestedLeaf Placement Lines
(LPL)for Outer Edge
LPLLPL
LPL
1/8” SeamAllowance
Leav
e O
pen
Top
Base
BaseEllen O Designs
1 of 2
Holly Leaf
(Cut 2 Cotton Fabrics for Each Leaf)
Sel
vage
Ed
ges
Vein Topstitch
1/8” Seam
Allowance
Leave Open
9”
Bows End
(Fancy Cut Template)
Cut
Cut
Cut
Cut
Holiday Holly in 3-D Wallhanging
© 2016 Ellen O Designs for Sulky of America, Inc.
When printing from this PDF
file, set Page Scaling to
“None”. Print patterns at
100% or “Actual Size”. Do
not select “Shrink to Fit” or
“Fit to Printable Area”
options. Once printed, this
square should measure
exactly 1” x 1”
1 of 1
With your printer set to print actual size, print the leaf pattern, base pattern and the bow template (see pgs. 11-13). Trace over the leaf pattern with a Black Sulky Iron-On Transfer Pen.
Cut the dark green fabric in half, selvage to selvage. One of these 1/4-yard pieces will be placed on the bottom of the stack. (If needed, use the remainder to make extra leaves.) Fold the fabrics, wrong sides out.
Stack the three greens (dark green on the bottom, medium green in the middle, light green on top) together with all the selvage edges lined up and even.
Trace the leaf onto regular copy paper following the directions on the Sulky Iron-On Transfer Pen.
Starting at the selvage edge, place the traced leaf pattern, with the transfer ink side down, on the light green fabric.Following the directions on the Transfer Pen, use a hot, dry iron to press down on the leaf pattern to transfer it onto the light green fabric. Move the leaf pattern to a close-by open space and repeat transferring it. (You can make 4 - 8 transfers with one inking depending on how long you hold the iron down each time.) If you can no longer see a leaf image, use the transfer pen to trace over it again and continue transferring it until you get to the fabric fold or have no more space to fit the leaf pattern.
Instructions

Holiday Holly in 3-D–4–
Pin through all the layers of leaf sets - three leaf sets will be pinned together. Use sharp scissors to cut out each leaf set along the transfer line. Unpin. Separate each pair of leaves. All pairs should be right sides
Thread the top and bobbin with Cotton+Steel 50 wt. Cotton Thread by Sulky; use a normal, balanced tension; and insert a new size 11/75 Sharp or Universal
Instructions - continued
together. You can use the extra dark green fabric to make more leaves, if needed.Cut 12 to 15 – 6” x 8” batting rectangles. For the Base, cut one 9” x 15” piece each of batting and Fuse ’n Stitch.
Position each leaf set on a batting rectangle. Pin in place or lightly spray with KK 2000 to hold temporarily in position.
HINT: A leaf set consists of one pair each of light, medium and dark green. You should have 12 to 15 pairs of leaves.
Needle. Set the stitch length at 2.0; attach a 1/4” seam allowance foot; then stitch each leaf set together with a 1/8” seam allowance. Leave the widest part (bottom)
of each leaf set open and unstitched. By using a short stitch length there is no need to back stitch.

Holiday Holly in 3-D–5–
Instructions - continued
Stitch all the leaves. Use blunt-tip scissors to trim the batting close to the seam without cutting the stitches or the fabric. (Blunt-tip scissors won’t get caught in the batting as you trim it away.)Turn each leaf right side out, through the bottom opening. Use a
point-turner to help push all the points out. Tuck open-end edges inside, about 1/8” or 1/4”. Use a glue stick, fusible web or hand stitching to close the opening. Press the whole leaf, being careful not to crush the batting, which will make the leaf limp.
Press to fuse Fuse ’n Stitch onto one side of the 9” x 15” base batting. Overlap Base pattern 1 & 2. Tape together. Trace the Base onto the WS of the dark green fabric. Cut out. Position the dark green fabric base, right sides together, on top of batting.
HINT: Closeup view of the base top showing 1/8” seam stitching.

Holiday Holly in 3-D–6–
Instructions - continued
Use the same thread and settings that you used for each leaf, along with a 1/8” seam allowance, to sew all around from start DOT to end DOT. Trim away the batting from the seam stitches
as close as possible. Clip curves if needed. Turn right side out. Use a point turner to push out the points. Sew the opening closed or fuse or glue. Set aside.

Holiday Holly in 3-D–7–
Make leaf veins on the front side, which is the side that feels cushy. Thread the top and bobbin with a contrasting color of Sulky 30 wt. Cotton Blendables; insert a size 14/90 Topstitch Needle; and set the stitch length at 3 to 3.5. Follow the stitch
Instructions - continued
guide on the leaf pattern and start stitching at the base. Stitch to the leaf top. Pivot the leaf and stitch back along the same stitches. Stitch to each leaf point, back to the center, and repeat until you end back at the leaf base.
To add shape and dimension, fold each leaf in half lengthwise. At each leaf base, sew a scant 1/4” tuck for 3/4 of an inch.
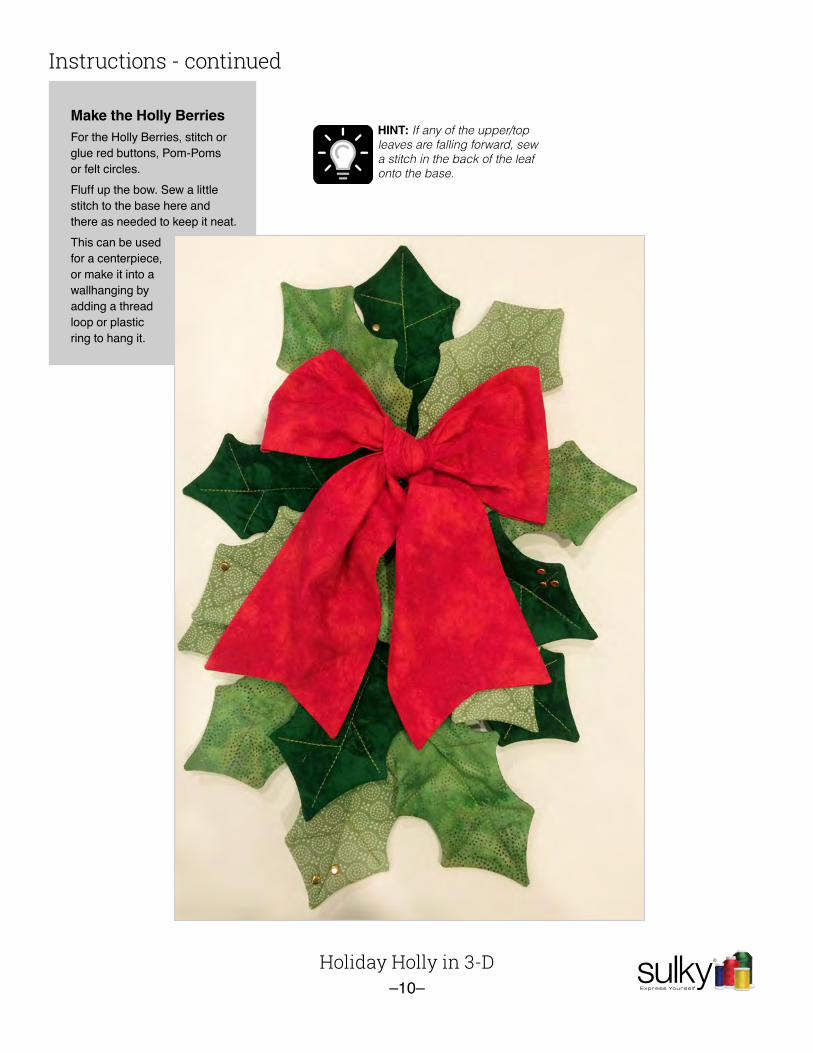
On the base front, start laying out the leaves. Work from the back to the front. The final top leaf ends will be covered up by the pretty red bow. (See the adjacent Hint)
Pin each leaf individually to the base, and then, starting with the under leaf, stitch the leaf bottom to the base while lifting the top leaf out of the way. This is a little tricky, but worth it. Or, if you prefer, you can hand stitch them in place.
Backstitch a couple of stitches. Trim threads as needed.
HINT: The Base pattern includes suggested placement lines to aid
you with the Holly leaf layout.

Holiday Holly in 3-D–8–
Instructions - continued
Make the Pretty Red BowSet up for all-purpose sewing like you did for the leaf and base.
Stitch length 2.0
Size 11/75 Universal Needle
1/2” seam allowance
Cotton+Steel 50 wt. Cotton Thread by Sulky on the top and in the bobbin
Balanced thread tension
Fold the 1/4 yard of red fabric in half with the selvages together. On the odd-looking paper pattern that says BOW END, place the 9” side of
the pattern even with the 9” wide straight selvage edge. Cut along the uneven pattern edge. In total you are cutting off the selvages and a little bit of the red fabric. Any more than that, OOPS.
Open the red bow fabric and fold in half lengthwise. Leave the weird cut ends alone, and don’t sew them (it’ll make sense later). With the right sides together, stitch
a 1/2” seam on the long side. Stop about halfway and leave a three-inch opening. Resume stitching the long side.
Set the seam by pressing flat, and then press the seam open.

Holiday Holly in 3-D–9–
Lay out the long strip so that the seam you just sewed is lying in the center. You’ll notice how the ends look similar to when you cut the ribbon ends, like a V. Sew the ends with a 1/2” seam allowance.
Instructions - continued
Clip off the corners and clip the center.
Turn right side out through the 3” opening in the seam.
Stitch opening closed. Press. Tie into a bow. Attach the bow so it covers the leaf ends where they all meet. Hand stitch the bow in place.
Holiday Holly in 3-D–10–
Instructions - continued
Make the Holly BerriesFor the Holly Berries, stitch or glue red buttons, Pom-Poms or felt circles.Fluff up the bow. Sew a little stitch to the base here and there as needed to keep it neat.This can be used for a centerpiece, or make it into a wallhanging by adding a thread loop or plastic ring to hang it.
HINT: If any of the upper/top leaves are falling forward, sew a stitch in the back of the leaf onto the base.

HOLLY LEAF(Cut 2 Cotton Fabrics for Each Leaf)
Sel
vage
Ed
ges
Vein Topstitch
1/8” SeamAllowance
Leave Open
9”
BOWS END(Fancy Cut Template)
Cut
Cut
Cut
Cut
Holiday Holly in 3-D Wallhanging© 2016 Ellen O Designs for Sulky of America, Inc.
When printing from this PDF file, set Page Scaling to
“None”. Print patterns at 100% or “Actual Size”. Do not select “Shrink to Fit” or
“Fit to Printable Area” options. Once printed, this square should measure
exactly 1” x 1”
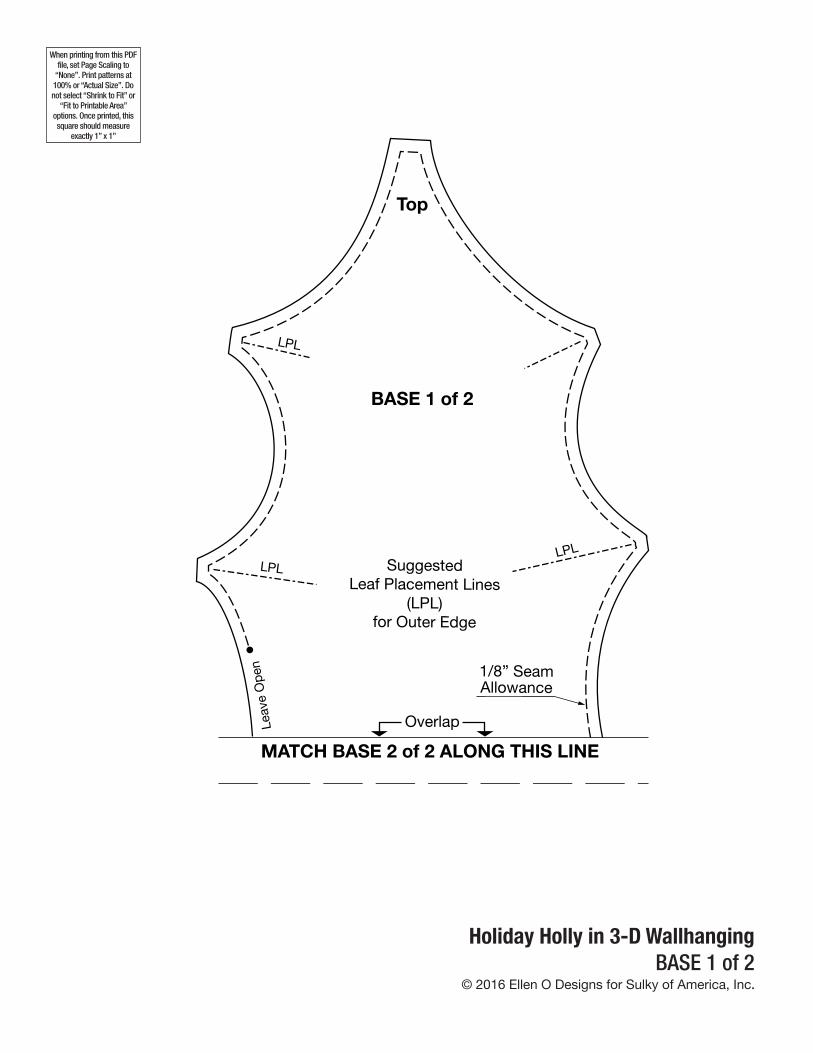
Holiday Holly in 3-D WallhangingBASE 1 of 2
© 2016 Ellen O Designs for Sulky of America, Inc.
When printing from this PDF file, set Page Scaling to
“None”. Print patterns at 100% or “Actual Size”. Do not select “Shrink to Fit” or
“Fit to Printable Area” options. Once printed, this square should measure
exactly 1” x 1”
Overlap
SuggestedLeaf Placement Lines
(LPL)for Outer Edge
LPLLPL
LPL
1/8” SeamAllowance
Leav
e O
pen
Top
MATCH BASE 2 of 2 ALONG THIS LINE
BASE 1 of 2

Bottom
LPL
LPL
1/8” SeamAllowance
Overlap
LPL
LPL
Leav
e O
pen
Holiday Holly in 3-D WallhangingBASE 2 of 2
© 2016 Ellen O Designs for Sulky of America, Inc.
When printing from this PDF file, set Page Scaling to
“None”. Print patterns at 100% or “Actual Size”. Do not select “Shrink to Fit” or
“Fit to Printable Area” options. Once printed, this square should measure
exactly 1” x 1”
BASE 2 of 2
MATCH BASE 1 of 2 ALONG THIS LINE