Embed Size (px)
Citation preview

1
High Temperature and High Hydrostatic Pressure Cultivation, Transfer,
and Filtration Systems for Investigating Deep Marine Microorganisms
Gina C. Oliver1,2¥, Anaïs Cario1,3¥*, Karyn L. Rogers1,4*
1Department of Earth and Environmental Sciences, Rensselaer Polytechnic Institute, Troy, NY, USA
2Current address: Department of Geology, San Bernardino Valley Community College, San Bernardino,
CA, USA
3Current address: CNRS, Univ. Bordeaux, Bordeaux INP, ICMCB, F-33600, Pessac, France
4Rensselaer Astrobiology Research and Education Center, Rensselaer Polytechnic Institute, Troy, NY,
USA
¥These authors contributed equally to this work
*Correspondence:
Corresponding Authors
Keywords: high-pressure microbiology, deep biosphere, cultivation devices, decompression
Abstract High temperatures (HT) and high hydrostatic pressures (HHP) are characteristic of deep-
sea hydrothermal vents and other deep crustal settings. These environments host vast and diverse
microbial populations, yet only a small fraction of those populations have been successfully
cultured. This is due, in part, to the difficulty of sampling while maintaining these in situ conditions
and also replicating those high-temperature and high-pressure conditions in the laboratory. In an
effort to facilitate more HT-HHP cultivation, we present two HT-HHP batch culture incubation
systems for cultivating deep-sea vent and subsurface (hyper)thermophilic microorganisms. One
HT-HHP system can be used for batch cultivation up to 110 MPa and 121°C, and requires sample
decompression during subsampling. The second HT-HHP system can be used to culture
microorganisms up to 100 MPa and 160°C with variable-volume, pressure-retaining vessels that
negate whole-sample decompression during subsampling. Here, we describe how to build cost
effective heating systems for these two types of high-pressure vessels, as well as the protocols for
Preprints (www.preprints.org) | NOT PEER-REVIEWED | Posted: 17 April 2021 doi:10.20944/preprints202104.0453.v1
© 2021 by the author(s). Distributed under a Creative Commons CC BY license.

2
HT-HHP microbial batch cultivation in both systems. Additionally, we demonstrate HHP transfer
between the variable-volume vessels, which has utility in sampling and enrichment without
decompression, laboratory isolation experiments, as well as HHP filtration.
1. Introduction Deep-sea hydrothermal vents and subseafloor environments are highly productive
ecosystems in the deep biosphere. With the average deep-sea vent depth at ~2.1 km (i.e. ~21 MPa;
Von Damm, 1990), high-pressure conditions are inherent in these systems (Fry et al., 2008; Jebbar
et al., 2015). The microbial communities in these environments are metabolically diverse and often
display unique adaptive strategies that operate under elevated-pressure conditions. Currently only
~0.1% of the microbial populations sampled from the subsurface are successfully cultured
(D’Hondt et al., 2004, Parkes et al., 2014). In most cases, the isolates obtained from these
environments are cultivated at in situ temperatures and 0.1 MPa, and their growth under elevated
pressure conditions is rarely characterized. Therefore, our view of deep-sea vent and subseafloor
microbial diversity is biased toward those microbes that are able to withstand drastic pressure
changes compared to in situ conditions, and our understanding of microbial physiology and
metabolism is largely based on growth at surface pressures (e.g. 0.1 MPa). This is primarily
because high temperature (HT) and high hydrostatic pressure (HHP) microbial cultivation is not a
widely adopted laboratory technique. HT-HHP microbial cultivation usually requires expensive
equipment, specialized laboratory training, and it is more labor-intensive compared to ambient
pressure experiments (Cario et al., 2019). However, HT-HHP cultivation is necessary if deep-sea
and subsurface isolates are to be better-represented among the characterized isolated species.
Furthermore, such laboratory techniques are critical to our understanding of pressure adaptation
and potential unknown metabolic and physiological strategies relevant to biotechnology, geo-
engineering, medical sciences, and biogeochemical sciences. Therefore, we offer some practical
HT-HHP batch culture experimental options to encourage more laboratories to adopt these long-
standing techniques and expand the collective knowledge of how life thrives in deep-sea vents and
in the subsurface.
High-pressure microbial batch cultivation is not a new idea and variations of vessels and
culturing containers have been implemented over the last ~70 years (Schwarz et al.; 1976; Jannash
et al., 1980; Deming and Colwell, 1981; Yayanos, 1986; Zobell and Oppenheimer, 1950; Jannasch
et al., 1966; McNichol et al., 2016 & 2018). The same initial HHP batch cultivation techniques
described in Zobell and Oppenheimer (1950) are still in use today (e.g. Orcutt et al., 2008; this
study), and are also easily modified to accommodate other vessel configurations or experimental
requirements. For example, vessels used for batch cultivation with sample decompression
described in Yayanos (1982; 2001) can be fabricated at a lower cost when purchased in bulk.
Microorganisms in fluid medium or sediment can be grown in these types of vessels at HT-HHP
using a variety of cultivation techniques in syringes (Baross & Deming, 1983; Marteinsson et al.,
1999; Takai et al., 2008), glass tubes with rubber stoppers (Bowles et al., 2011; Tasumi et al.,
2015), heat sealed plastic bags (Berger et al., 1970), and sealed plastic pipette bulbs (Delong and
Yayanos, 1986; Marietou et al., 2015). For HT-HHP systems that negate whole sample
decompression, custom modifications can be made to vessels, like the PUSH vessels described
below, to also cultivate sediment samples. Currently the PUSH vessels are designed for microbial
batch cultivation in a fluid medium
Here we present two effective systems for routine HT-HHP batch cultivations. The first
HT-HHP batch-culturing system was designed and built to accommodate four static pressure
Preprints (www.preprints.org) | NOT PEER-REVIEWED | Posted: 17 April 2021 doi:10.20944/preprints202104.0453.v1

3
vessels, where sample decompression and repressurization is required for subsampling. Even
though decompression-repressurization cycles can be detrimental to microbial growth (Oliver et
al., 2020), the effects of decompression can be experimentally measured and the experimental
design can be modified to minimize the decompression-repressurization cycles (e.g. Yayanos
1995; Yayanos, 2001). For example, additional HHP vessels can be used so that samples are only
exposed to a single decompression-repressurization cycle, or samples can be fixed prior to
decompression (i.e. Marietou et al., 2015). The second system we describe was built for variable-
volume, floating-piston vessels that allow for subsampling without decompression. These
pressurized underwater sample handler (PUSH) vessels, based on previous designs (Bianchi et al.,
1999, Tamburini et al., 2003), were purchased through TOP Industrie© and designed with a
polyether ether ketone (PEEK) internal reservoir with a floating piston that maintains system
pressure during subsampling via a connection to a HHP pump. Furthermore, the PUSH vessel HT-
HHP system was built for mobility to allow for anaerobic preparations in an anaerobic chamber
without heat loss so that stable pressures could be achieved quickly. In general, batch cultivation
is a common and effective microbiological technique used to explore microbial growth,
metabolism, and physiology (e.g. Kell, 1987; Maier, 2000). In the HT-HHP systems presented
here, such investigations can be extended to a range of temperature, pressure, and geochemical
conditions that better replicate a variety of deep-sea vent and subsurface environments. These
systems have been applied to the cultivation of two extremophiles, Archaeoglobus fulgidus and
Desulfovibrio salexigens (Oliver et al., 2020), and similar systems have been used in other deep-
ocean settings (Garel et al., 2019).
2. HT-HHP system in static pressure vessels Different pressure retaining vessels for microbial sample collection from the deep sea and
HT-HHP cultivation have been designed over the last fifty years (reviewed in Tamburini, 2006),
and a few of those designs were specifically made to cultivate hyperthermophilic piezophiles (Kyo
et al., 1991; Cangenella et al., 1997; Kato, 2006; Parkes et al., 2009). Here we present a
configuration for using several common static high-pressure vessels in parallel with a heating
system that allows for batch cultivation of (hyper)thermophilic microorganisms at elevated
pressures.
2.1 Design objectives and schematics
The objective for this HT-HHP cultivation system was to build an installation where
several (4) pressure vessels could be secured in place, heated, insulated, and pressurized by a single
HHP pump. Each vessel required a temperature-controlled system, a pressure line to the pump,
and an easily attachable and mobile pressure gauge (Fig. 1). Four vessels were included in the
setup to facilitate triplicate experiments with a single negative control. Finally, the length, width,
and height of this system design considered table space availability and usability by researchers.
Preprints (www.preprints.org) | NOT PEER-REVIEWED | Posted: 17 April 2021 doi:10.20944/preprints202104.0453.v1

4
Figure 1. A design schematic of the HT-HHP system installation for static pressure vessels. The side view
shows an insulated vessel and a cross section of an insulated vessel to show the heating element and syringe
sample loading. The back view highlights the adjustable gauge and vessel security.
2.2 Vessels and Thermal Control
Four 125 mL static volume pressure vessels from High Pressure Equipment Co.© (HiP©,
OC-1 O-Ring series) were adapted for HT/HHP batch cultivation. Temperature was controlled via
a silicone rubber heating jacket together with CNi16D33 temperature controllers (OMEGA) and a
type J thermocouple. Thermocouples, heating jackets, and power cord wires were attached to the
temperature controllers by terminal connections according to the OMEGA™ instructions manual
for the CNi16D33 temperature controllers. Thermocouples were first calibrated in a 0°C ice bath
and the controllers were then set to the desired temperature for each experiment (e.g. 83°C for the
experiments described below) and auto-tuned. After auto-tuning, fine calibration was done
following the OMEGA™ manual and the set temperature was maintained within ± 0.5°C.
Temperature and pressure limits were based on the maximum working capacities of the HiP©
vessels and OMEGA™ heating jackets (see below).
2.3 Materials
The installation frame was constructed from 80/20® Inc. T-slotted aluminum framing and
accessories. T-slotted framing profiles, the 31-inch long by 9-inch wide aluminum base plate, nuts,
bolts, fasteners, mounts, and brackets were purchased from 80/20® Inc. Clamping hangers, rigid
galvanized standard duct, insulation (fiberglass and high temperature calcium silicate blocks),
screws, fuses, power cords, and clear Nema boxes were purchased from McMaster Carr.
Temperature controllers (CNi16D33), silicone rubber heating jackets, thermocouples (type J) were
purchased from OMEGA™. High pressure gauges, gauge hex nut reducer, ¼ inch medium
pressure tubing, valves and connections were purchased from Swagelok®, all rated to 137.89 MPa.
2.4 Construction
Preprints (www.preprints.org) | NOT PEER-REVIEWED | Posted: 17 April 2021 doi:10.20944/preprints202104.0453.v1

5
The vessel installation frame was constructed first (Fig. 1). Because the bottom of each
vessel was slotted to fit into a vice (for torque during lid closure or removal) a custom-mahcined
aluminum baseplate was needed to fit the base shape of each vessel. This allowed for vessel
stability when additional torque was needed to open the vessels. Rigid calcium silicate insulation
was placed under each baseplate cutout to insulate the bottom of each vessel and additional
insulation was placed underneath the entire baseplate. Despite these measures, small areas of the
stainless steel vessels were in contact with the aluminum base plate resulting in minor heat loss.
This issue is addressed in section 2.5.
The installation frame was assembled and bolted to the lab bench (Fig. 2). Each pressure
vessel was placed into a cutout on the baseplate. Temperature was monitored by thermocouples (J
type) attached on the outside of each vessel and the thermocouples were connected to a temperature
controller (OMEGA™) that was calibrated and programmed. Each vessel was then wrapped in a
7-inch x10-inch silicone rubber heating jacket (OMEGA™) and insulated (Fig. 1). Heating jackets
and insulation were wrapped around each vessel with hook and loop fasteners. To further stabilize
each static pressure vessel, five-foot rigid standard duct was cut into one-foot lengths and placed
over the vessel heating jacket and insulation. The vessels were then secured to the aluminum frame
by wrapping two threaded rod-clamping hangers around the rigid duct (Fig. 1).
Each vessel was equipped with a pressure gauge that was secured on an arm attached to
the main installation frame. The extension arms can be adjusted vertically so that the gauges can
be connected and disconnected from each vessel during lid removal. The high-pressure gauge was
fitted to the extended arm by a hex nut connection. The hex nuts were machined to fit into the
80/20® Inc. mounts and were then fastened to the t-slotted extension arm off the main t-slotted
frame. The four extension arms for each pressure gauge were connected to the main frame with
single mount Unibearing™ assemblies. The pressure gauges were connected to a three-way valve:
one way to the vessel, one way to the pressure gauge, and one way to the high-pressure line. Four
high pressure lines were built for each vessel from ¼ inch high-pressure stainless steel tubing
(Swagelok®) that was measured, cut, bent, coned, and threaded so that each vessel could be
connected to the high pressure screw pump rated to 206 MPa (HiP©, Fig. 2).
Preprints (www.preprints.org) | NOT PEER-REVIEWED | Posted: 17 April 2021 doi:10.20944/preprints202104.0453.v1

6
Figure 2: Picture of the HT-HHP system for static pressure vessels with temperature-controlled, insulated
vessels.
2.5 Equipment testing
Following initial assembly, and prior to every experiment, the complete experimental setup
was pressure-tested, O-rings were inspected and lubricated as necessary, and the temperature
control system calibration was verified. The high-pressure lines were regularly checked for leaks
before and during HHP experiments. Internal vessel temperatures were monitored by thermometer
and the controllers were set to the desired internal vessel temperature. Since there were small areas
of the vessel in direct contact with the aluminum base, heat was lost at the bottom of the vessels,
resulting in a small temperature gradient that left the bottom two inches of the vessel ~4-6°C cooler
than the set temperature that was obtained in the main body of the vessel. Therefore, samples were
always placed above this thermal decline. Mitigation of this thermal gradient requires extension of
the heating jacket and/or additional insulation around the base of the vessel.
2.6 Batch cultivation in syringes
Various methods of HHP cultivation in static pressure vessels have been reviewed by
Yayanos (2001), and many focus on the growth of heterotrophs in stoppered-syringes, usually
custom made. Methods described in Takai et al., (2008) and Tasumi et al., (2015) were developed
for autotrophic HHP batch cultivation of anaerobes in gas-tight, glass syringes, which could also
be applied to anaerobic heterotrophs. In general, plastic syringes can be used for HHP
heterotrophic growth of facultative anaerobes or anaerobic sulfate reducing microorganisms
(Yayanos, 2001). The advantages of plastic syringes for HHP growth is that they are cost effective
and several will fit in most pressure vessels to facilitate experimental replication. However,
because plastic syringes are not gas tight, small amounts of oxygen can penetrate the culture
medium. In strains grown in a medium containing Na2S to maintain anoxif and/or strains that
produce sulfide, oxygen stress can be mitigated. For species particularly sensitive to oxygen, glass,
gas-tight syringes will prevent oxygen contamination. Cell densities and cell morphology can be
indicative of oxidative stress, and should be compared between syringe types to check for oxidative
stress.
2.7 Experimental Design and Protocol Design of a HT-HHP growth experiment in static pressure vessels using syringes as
microbial growth reactors has to balance the growth rate, the sampling interval, and the number of
syringes that can fit into each static pressure vessel, while minimizing the decompression and
repressurization cycles. In general, to conduct an experiment in triplicate with a single negative
control, each of the four vessels will contain one syringe from each triplicate and a negative control
syringe. Subsampling required to construct a robust growth curve will cycle through all four
vessels so that each vessel and the syringes contained therein are only decompressed and
repressurized at every fourth sampling interval. The protocol below follows this design, but can
be easily modified depending on alternative experimental requirements, which might require
additional vessels, syringes, or alternative reaction volumes
2.7.1 Preparation of growth media and pre-cultures
In general, cultivation in syringes begins with preparation and inoculation of the growth
medium in serum bottles followed by transfer into syringes. The methods described here are
Preprints (www.preprints.org) | NOT PEER-REVIEWED | Posted: 17 April 2021 doi:10.20944/preprints202104.0453.v1

7
designed specifically for the growth of anaerobes and include several steps to prevent oxygen
contamination while maintaining sterility. These protocols could be simplified if anoxia is not
required. A sterile growth medium appropriate for the microbial species of interest should be
prepared in sterile serum bottles, and the number of serum bottles should be equivalent to the
number of syringes needed for the entire experiment. In the case described here, thirteen serum
bottles containing sterile anoxic growth media were required for triplicate growth experiments in
four vessels with one negative control (Fig. 3A), in addition to the vials required to obtain an
actively growing culture from frozen stock, as well as the growth of pre-cultures. The volume of
media in each bottle should be twice the target syringe volume, so that the remaining inoculated
volume can be incubated at ambient pressures as a positive growth control. Finally, pre-cultures
are prepared from frozen stocks so that logarithmic phase is achieved just prior to inoculation of
the experiment.
1. Prepare sterile media appropriate for the target species. If anoxia is required, boil the medium
under N2 and adjust pH as required.
2. Distribute 10 mL anoxically into serum bottles under N2; cap and crimp, then autoclave for 15
minutes at 121°C for sterilization (Balch et al., 1979).
3. Following sterilization, anoxic conditions can be maintained by adding 0.1 mL sulfide from a
2.5 % (w/v) anaerobic solution (Na2S*9H2O) for every 10 mL of medium, or otherwise as
required for the target species.
4. Inoculate sterile growth medium with frozen stock of the target species. In general 1%
inoculation volume will allow for a robust logarithmic phase of growth.
5. Use logarithmic phase aliquots of this culture as inoculum for three pre-cultures, one for each
of the triplicate HT-HHP batch growth experiments. Incubate at the desired temperature.
Monitor growth and measure cell density prior to inoculation of experimental serum bottles.
2.7.2 Syringe preparation, inoculation and transfer
Pre-cultures prepared as described in section 2.7.1 are used to inoculate the sterile growth
medium in serum bottles, which is immediately transferred to sterile and anoxic syringes. These
are then moved into pre-heated pressure vessels and pressurized. Again, additional steps are
included here to maintain anoxia in the growth medium and these steps could be excluded for the
growth of aerobes. Details below are for a triplicate growth experiment conducted in 5 mL syringes
alongside a negative control conducted in 3 mL syringes. Each triplicate of the positive growth
experiment and the negative control are distributed in 4 syringes that are incubated in separate
pressure vessels to minimize decompression/repressurization cycles. To complete a triplicate batch
cultivation experiment 16 syringes were prepared. Twelve 5 mL syringes were used as positive
growth experiments and four 3 mL syringes were used for negative controls (Figs. 3A and 3B).
1. Preheat the pressure vessels filled with ultrapure water (18.2 MΩ) to the desired experimental
temperature. Be sure to open at least one valve so that the temperature increase does not
increase the pressure during pre-heating.
2. While maintaining sterility, fit twelve 5-mL and four 3-mL Becton-Dickinson (BD) plastic
syringes with 23-gauge BD needles.
3. Flush each syringe with N2 3-4 times. This can be done by inserting each syringe into a sterile,
N2-filled stoppered flask, retracting the plunger to fill the syringe with N2, removing the
syringe from the flask and pushing out the gas while maintaining sterility.
4. With the syringe full of N2, immediately embed the needle partway in the middle of a sterile
butyl rubber stopper or silicone stopper.
Preprints (www.preprints.org) | NOT PEER-REVIEWED | Posted: 17 April 2021 doi:10.20944/preprints202104.0453.v1

8
5. Inoculate 3 sets of 4 serum bottles each with one of the three pre-cultures to the desired cell
density. Depending on growth rate and measurement technique either a 1% (v/v) inoculum
volume or a target cell density of ~ 106 cells/ml is ideal.
6. Shake each serum bottle to evenly distribute the cells.
7. Immediately transfer 5mL of inoculated growth medium from each serum bottle into each
syringe using sterile techniques. Ideally, transfers are conducted in an anaerobic chamber. To
maintain anoxia, remove the stopper from the needle, expel the last of N2 from the syringe
while inserting the needle into the serum bottle stopper. Fill the syringe to slightly over 5 mL,
and reduce to 5 mL before re-inserting the needle into the silicone stopper. This should produce
12 total inoculated 5-mL syringes, 4 of each of the three pre-cultures.
8. For the negative controls, using the same anoxic and sterile techniques transfer the sterile
growth medium from the serum bottle into four, 3-mL syringes.
9. Distribute the syringes into the four pre-heated vessels as described above (Fig. 3).
10. Pressurize each vessel to the desired experimental pressure.
11. Incubate the remaining inoculated fluid in each of the serum bottles at the experimental
temperature as a control of cell viability. Note that this is only appropriate for cells able to
grow at ambient pressures.
Preprints (www.preprints.org) | NOT PEER-REVIEWED | Posted: 17 April 2021 doi:10.20944/preprints202104.0453.v1

9
Figure 3: (A) A picture of serum bottles filled with reduced sterile medium for inoculation from three
separate pre-cultures and flushed plastic syringes prepared for anaerobic transfer of inoculated medium. (B)
A schematic of the four heated pressure vessels with syringe samples. This illustrates an example of a HT-
HHP growth curve experiment done in triplicate with syringe distribution into each vessel.
2.7.3 Sampling with decompression
In order to quantify cell density as a function of time each growth experiment was
subsampled at regular intervals. A subsampling interval that produces 8-12 data points distributed
across the lag-, logarithmic, and stationary-growth phases is optimal. However, the time between
decompression and repressurization must also be maximized. Each vessel contained one
representative from each triplicate and the negative control, and only one vessel was used per
sampling interval. Therefore, each set of experimental syringes (one from each pre-culture and the
negative control) was only decompressed and repressurized every fourth sampling interval. Here
we describe subsample preparation for subsequent quantification of cell density via
epifluorescence microscopy.
1. At each sampling interval, decompress one vessel at an average rate of 19 MPa/minute or slower. Some microorganisms are more sensitive to decompression that others and a slower
decompression rate may be required.
2. Remove the syringes and fix a 0.5 mL subsamples in 2.5% gludaraldehyde and store at 4°C
until analysis.
3. Return the syringes to the heated vessels and repressurize.
3. Pressurized Underwater Sample Handler (PUSH) vessel HT-HHP system The use of the PUSH system for laboratory cultivation of extremophiles leverages the
variable-volume, floating-piston design of these vessels to achieve HT-HHP batch culture
experiments that have no decompression/repressurization cycles during subsampling. While the
initial motivation for developing these vessels was to retrieve water column samples at in situ
pressures (Bianchi et al., 1999, Tamburini et al., 2003), coupling these vessels to other isobaric
samplers and to each other enables fully isobaric sample processing, including sample transfer,
enrichment, and filtration. Here we describe a mobile HT-HHP system built for eight pressure-
retaining vessels with reservoir sizes of 50 mL for batch culture to facilitate post-sampling HT-
HHP enrichment and transfer experiments.
3.1 Design objectives and schematics
The objectives for the second HT-HHP cultivation system design were to build portable
heating systems that could be taken on and off of the PUSH vessels, create a portable power source
for the heating systems to heat the vessels in an anaerobic chamber, and build an installation frame
for eight vessels so that each vessel could be pressurized from one or two hydraulic pump(s).
Overall, this heating system needed to be portable, removable, and suitable for continually heating
the vessels in the anaerobic chamber. Again, the length, width, and height of this system design
considered table space availability and usability by researchers.
3.2 Vessels
The pressurized underwater sample handler (PUSH) vessels were made by TOP Industrie©
and have a maximum pressure and temperature range of 0.1-100 MPa and 25-160°C, respectively.
Each vessel includes a stainless steel vessel body, a polyether ether ketone (PEEK) reservoir with
Preprints (www.preprints.org) | NOT PEER-REVIEWED | Posted: 17 April 2021 doi:10.20944/preprints202104.0453.v1

10
a floating piston and lid, two screw caps (one screw cap for the PEEK piston side and one screw
cap to the PEEK reservoir side), two valve connections and two valves (Figs. 4A-C). To preserve
the lifetime of the PEEK reservoir, the working pressure range is suggested for use up to 80 MPa
(TOP Industrie©). Performance is optimized, and screw cap seizing is prevented, when an anti-
seizing agent is used on the screw caps during routine batch laboratory culturing.
Figure 4: Picture of a disassembled Pressurized Underwater Sampler Handler (PUSH) vessel and individual
parts (A), a side view of the PUSH showing the floating piston in the PEEK reservoir (B), and a schematic
of the PUSH vessel (C).
3.3 Materials
The PUSH installation frame was also constructed from 80/20® Inc. T-slotted aluminum
framing (Fig. 5). Clamping hangers, L-brackets, hinges, latches, clear Nema boxes (Fig. 5), rigid
galvanized standard duct, insulation (flexible foam sheets and bubble insulation), 12-volt
rechargeable large cell battery, battery charger, electrical wires, screws, fuses, and power cords
were purchased from McMaster Carr. Eight additional temperature-controlled OMEGA® systems
previously described in section 2.2 and 2.3 were purchased and assembled for up to eight PUSH
vessels. The only differences in the heating system were the heating jacket size (7x7 in. silicone
rubber heaters) and the insulation (see section 2.4). Flexible 1/16-inch tubing and 1/16 to 1/8 inch
Preprints (www.preprints.org) | NOT PEER-REVIEWED | Posted: 17 April 2021 doi:10.20944/preprints202104.0453.v1

11
adapters were purchased from HiP© to make a high-pressure line that could connect the pump to
each vessel. Also, 1/8 inch high-pressure tubing, one needle valve (HiP), and one micrometering
valve (TOP Industrie©) were purchased to construct a decompression line.
Figure 5: Picture of the HT-HHP installation system parts showing the T-slotted frame, connections, and
brackets from 80/20® and modified materials from McMaster Carr.
3.4 Construction
Modifications were made to most of the materials to fit the installation design (Fig. 5). To
make supports and enclosures for each vessel, the following modifications were made: 8x8 inch
L-brackets used to support the vessels were cut down to 4.5 inches on one side to fit the frame;
hinges and latches were screwed into the clamping hangers; and eight 7-inch cylinders cut from a
10-foot stainless steel standard duct were cut in half lengthwise and deburred. Each half of the
stainless steel duct cylinder was screwed onto each side of the clamping hanger, and the clamping
hanger was bolted to the L-bracket. Each vessel enclosure was made from two clamping hangers
bolted to a set of L-brackets (Fig. 6). The Nema electrical boxes were cut to fit the temperature
controllers and holes were drilled through the boxes to enclose the heating and power element
wires. Mounts for the Nema electrical boxes were constructed by attaching 4x4 inch L-brackets to
the main T-slotted frame, then attaching 2x2 inch L-brackets to the 4x4 inch L-brackets. Finally,
the installation was made up of two vertically stacked sections of four vessels (Fig. 6).
For the vessel heating system, the thermocouple was placed onto the middle of a PUSH
vessel, then the heating jacket and insulation was wrapped around the vessel and thermocouple
and was secured with two hook and loop fasteners. Each vessel had a double insulation wrap made
from a flexible foam insulation sheet sealed to a less flexible bubble insulation sheet (Fig. 6). These
heating wraps were made to be taken on and off of vessels. To power the heaters in the anaerobic
chamber, a DC to AC power converter was purchased and connected to a 12-volt rechargeable
lead-acid battery with a fuse attached to the positive cable (Fig. 7).
Finally, the high-pressure line and decompression line were assembled. The decompression
line was made to minimize shear stress caused by a pressure differential during subsampling. This
was made from using 1/8-inch high-pressure tubing and connecting it to a needle valve (HiP©) and
to a micrometering valve (TOP Industrie©). The high-pressure line was made with flexible 1/16-
Preprints (www.preprints.org) | NOT PEER-REVIEWED | Posted: 17 April 2021 doi:10.20944/preprints202104.0453.v1

12
inch high-pressure stainless steel tubing and was connected to a 1/16-inch to 1/8-inch adapter on
both ends of the tubing, to accommodate the 1/8-inch connections on the PUSH vessels and pump.
A plastic Luer-lok valve was placed at the end of the decompression line to connect any slip tip or
Luer-lok syringes for sampling cell cultures.
Figure 6: The main assembly of the HT-HHP installation frame with cut-to-fit stainless steel vessel holders,
and for reference a hydraulic screw pump is shown in the bottom left and a PUSH vessel wrapped in a
heating jacket and insulation is shown bottom center.
Preprints (www.preprints.org) | NOT PEER-REVIEWED | Posted: 17 April 2021 doi:10.20944/preprints202104.0453.v1

13
Figure 7: A heated and insulated PUSH vessel in the anaerobic chamber. The PUSH vessel and temperature
controller system is plugged into the DC to AC power converter ran by a 12-volt battery.
3.5 Equipment testing
As with all HHP experiments, the entire system was pressure-tested prior to each
experiment, and connections and lines were leak-checked every time a new connection was made.
At the start of each experiments, all O-rings were inspected and lubricant was added as needed,
and anti-seizing agents were applied to stainless-steel threading. Finally, the temperature control
system was calibrated. The internal PUSH vessel temperatures were monitored by directly
measuring the ultrapure water (18.2 MΩ) fluid temperature inside the heated vessels with a Type
J thermocouple. Only minimal temperature fluctuations were observed during cycling of the
temperature controller. The controllers were then set to the desired internal vessel temperature for
the experiment. When experiments require elevated temperatures (e.g. thermophile growth) the
PUSH vessel and sterile medium need to be pre-heated prior to inoculation and pressurization. If
enrichments or batch culture experiments for (hyper)thermophiles are started at room temperature
and then pressurized and heated to a set temperature, the subsequent pressure increase that
accompanies the temperature increase will need to be mitigated via a back-pressure valve or via
continuous adjustment with the HHP pump. For the case of pre-heating the growth medium and
vessels, we monitored temperature in the medium during the transfer from the anaerobic chamber
and re-heating on the frame. A maximum temperature loss of 15°C was observed and the set
temperature (83°C) was reestablished within five minutes.
3.6 Batch cultivation in PUSH vessels
Preprints (www.preprints.org) | NOT PEER-REVIEWED | Posted: 17 April 2021 doi:10.20944/preprints202104.0453.v1
14
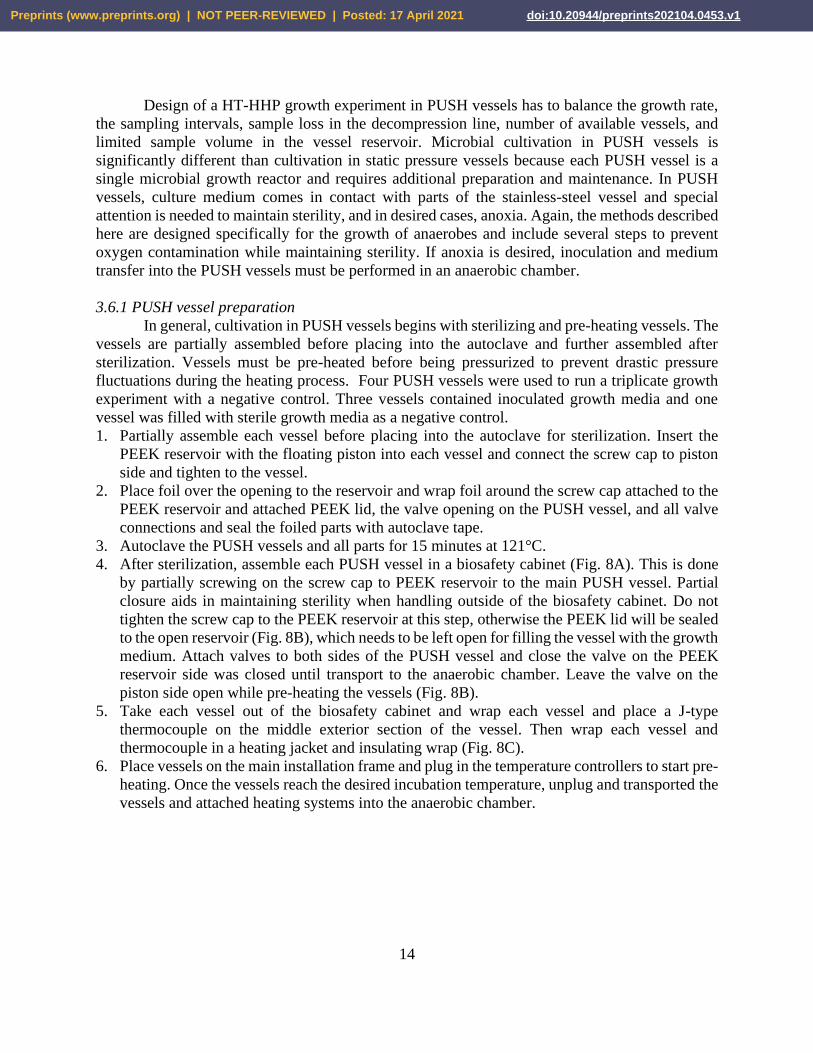
Design of a HT-HHP growth experiment in PUSH vessels has to balance the growth rate,
the sampling intervals, sample loss in the decompression line, number of available vessels, and
limited sample volume in the vessel reservoir. Microbial cultivation in PUSH vessels is
significantly different than cultivation in static pressure vessels because each PUSH vessel is a
single microbial growth reactor and requires additional preparation and maintenance. In PUSH
vessels, culture medium comes in contact with parts of the stainless-steel vessel and special
attention is needed to maintain sterility, and in desired cases, anoxia. Again, the methods described
here are designed specifically for the growth of anaerobes and include several steps to prevent
oxygen contamination while maintaining sterility. If anoxia is desired, inoculation and medium
transfer into the PUSH vessels must be performed in an anaerobic chamber.
3.6.1 PUSH vessel preparation
In general, cultivation in PUSH vessels begins with sterilizing and pre-heating vessels. The
vessels are partially assembled before placing into the autoclave and further assembled after
sterilization. Vessels must be pre-heated before being pressurized to prevent drastic pressure
fluctuations during the heating process. Four PUSH vessels were used to run a triplicate growth
experiment with a negative control. Three vessels contained inoculated growth media and one
vessel was filled with sterile growth media as a negative control.
1. Partially assemble each vessel before placing into the autoclave for sterilization. Insert the
PEEK reservoir with the floating piston into each vessel and connect the screw cap to piston
side and tighten to the vessel.
2. Place foil over the opening to the reservoir and wrap foil around the screw cap attached to the
PEEK reservoir and attached PEEK lid, the valve opening on the PUSH vessel, and all valve
connections and seal the foiled parts with autoclave tape.
3. Autoclave the PUSH vessels and all parts for 15 minutes at 121°C.
4. After sterilization, assemble each PUSH vessel in a biosafety cabinet (Fig. 8A). This is done
by partially screwing on the screw cap to PEEK reservoir to the main PUSH vessel. Partial
closure aids in maintaining sterility when handling outside of the biosafety cabinet. Do not
tighten the screw cap to the PEEK reservoir at this step, otherwise the PEEK lid will be sealed
to the open reservoir (Fig. 8B), which needs to be left open for filling the vessel with the growth
medium. Attach valves to both sides of the PUSH vessel and close the valve on the PEEK
reservoir side was closed until transport to the anaerobic chamber. Leave the valve on the
piston side open while pre-heating the vessels (Fig. 8B).
5. Take each vessel out of the biosafety cabinet and wrap each vessel and place a J-type
thermocouple on the middle exterior section of the vessel. Then wrap each vessel and
thermocouple in a heating jacket and insulating wrap (Fig. 8C).
6. Place vessels on the main installation frame and plug in the temperature controllers to start pre-
heating. Once the vessels reach the desired incubation temperature, unplug and transported the
vessels and attached heating systems into the anaerobic chamber.
Preprints (www.preprints.org) | NOT PEER-REVIEWED | Posted: 17 April 2021 doi:10.20944/preprints202104.0453.v1

15
Figure 8: Picture of a sterile PUSH vessel and individual parts in a biosafety cabinet (A) for vessel assembly
under sterile conditions. (B) An assembled PUSH vessel with the screw cap to the PEEK reservoir left
partially unthreaded to later open for sample loading. (C) A schematic of a heated and insulated PUSH
vessel with the temperature controlled system.
3.6.2 Media preparation and pre-cultures
Media and preculture preparation followed the same protocol as growth in static HHP
vessels described in section 2.7.1. The only modification was using four serum bottles each filled
with 50 mL of sterile reduced medium for triplicate experiments with one negative control.
Preprints (www.preprints.org) | NOT PEER-REVIEWED | Posted: 17 April 2021 doi:10.20944/preprints202104.0453.v1

16
1. Decrimp the sterile reduced medium filled serum bottles before placing them into the anaerobic
chamber.
2. Place the pre-cultures and sterile reduced medium in the anaerobic chamber.
3.6.3 Powering the PUSH vessels inside the anaerobic chamber
To maintain pre-heated temperatures during inoculation, each vessel heating system must
be powered inside the anaerobic chamber. The power source here is a 12-volt rechargeable lead-
acid battery connected to a 1000W DC to AC power converter with four AC power outlets.
1. Place the he fully charged 12-volt battery and DC to AC power converter into the anaerobic
chamber before inoculation.
2. Place heat-resistant gloves and the pre-heated PUSH vessels and heating systems into the
anaerobic chamber.
3. Plug in the heating systems to the DC to AC power converter to continuously heat the vessels
throughout the inoculation process (Figs. 7 and 9A).
3.6.4 Inoculation and transfer in the anaerobic chamber
Prior to starting the inoculation, all of the vessels, mobile heating systems, heat-resistant
gloves, sterile reduced medium, and pre-cultures were transferred to the anaerobic chamber.
1. Inoculate 3 sets of 4 serum bottles each with one of the three pre-cultures to the desired cell
density. Depending on growth rate and measurement technique either a 1% (v/v) inoculum
volume or a target cell density of ~ 106 cells/ml is ideal.
2. Shake each serum bottle to evenly distribute the cells. 3. Unscrew the cap on the PEEK reservoir side while maintaining sterility. 4. Remove the butyl rubber stoppers from the serum bottles and pour the medium (~50 mL) into
each of the PUSH vessels (Figs 9A&B).
5. Screw the cap on the PEEK reservoir side to close the vessel and close the respective valve.
6. After inoculating and transferring medium into the PUSH vessels, unplug their heating systems
and remove them from the anaerobic chamber.
Preprints (www.preprints.org) | NOT PEER-REVIEWED | Posted: 17 April 2021 doi:10.20944/preprints202104.0453.v1

17
Figure 9: Picture of inoculated medium poured into a heated PUSH vessel in the anaerobic chamber (A).
Three vessels were filled with inoculated medium and one vessel was filled with the sterile medium as a
triplicate experiments and a negative control (A). (B) A schematic is shown on the right to reference (A).
3.6.5 Sample pressurization
All four vessels secured into a designated holder (Fig. 10) on the main installation frame.
There, each vessel was pressurized using a HHP pump (TOP Industrie©) connected to a flexible
high-pressure line made from HiP© parts (Fig. 10).
1. Fill the HHP pump reservoir (reservoir size, 50 mL) with water by closing the pressure valve
and opening the reservoir valve. Rotate the HHP pump counterclockwise using the handles
until the pump is completely filled.
2. Connect one end of high-pressure line to the HHP pump and the other end to the valve
connected to the piston side on the PUSH vessel (Fig. 10).
3. Open both the pressure valve and valve to the piston on the PUSH vessel. Check to make sure
the valve to the PEEK reservoir side is closed.
4. Pressurize the PUSH vessel to the target growth pressure.
5. Close the valve to the piston.
6. Repeat this procedure for all four vessels.
7. Check pressure stability regularly within the first 2-3 hours after inoculation. This is done by
connecting the HHP pump to a vessel with all valves closed. Pressurize the HHP pump to the
vessel pressure and only open the valve to the piston side. The pressure is stable when the
pressure on the HHP pump gauge does not move when the valve to the piston side is opened.
Figure 10: Picture of four heated and insulated PUSH vessels in the installation system secured in place
with the manual screw pump (bottom left), high-pressure line, decompression line (bottom center),
decompression line stand (right), and waste container (bottom right).
3.6.6 Subsampling without decompressing the whole culture
Subsampling from the PUSH vessels is done using a decompression line similar to
techniques described by Foustoukos and Pérez-Rodríguez (2015). Use of the decompression line
Preprints (www.preprints.org) | NOT PEER-REVIEWED | Posted: 17 April 2021 doi:10.20944/preprints202104.0453.v1
18
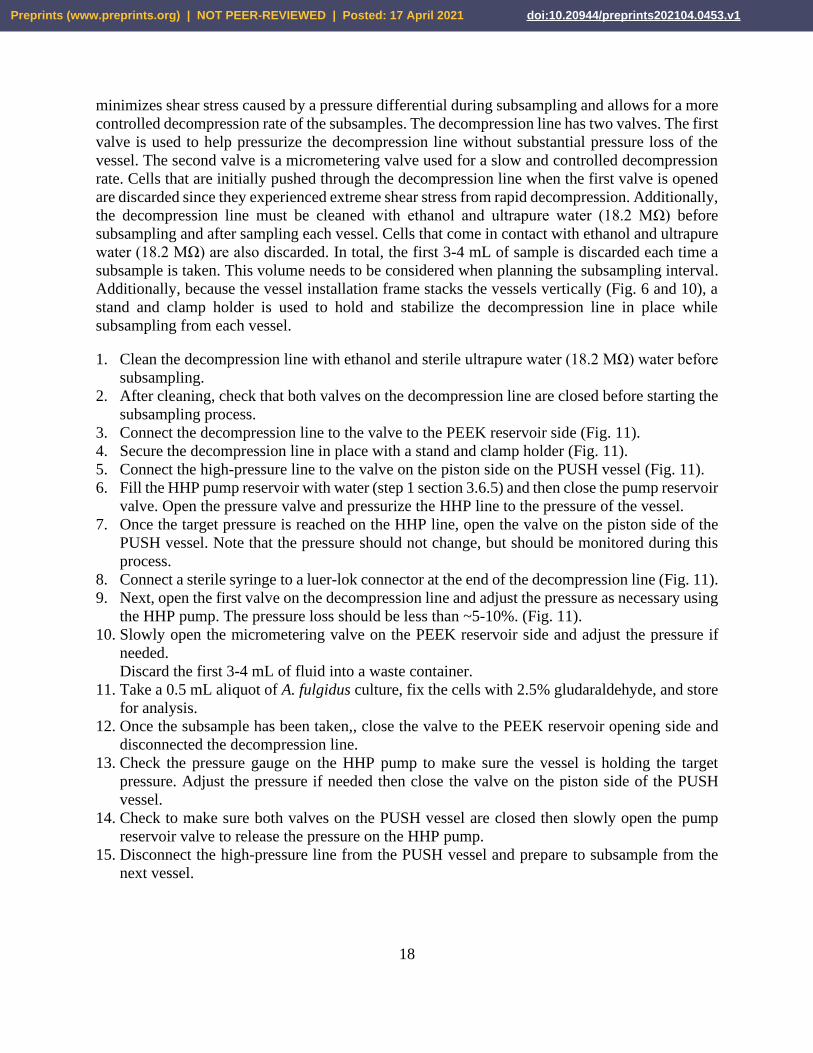
minimizes shear stress caused by a pressure differential during subsampling and allows for a more
controlled decompression rate of the subsamples. The decompression line has two valves. The first
valve is used to help pressurize the decompression line without substantial pressure loss of the
vessel. The second valve is a micrometering valve used for a slow and controlled decompression
rate. Cells that are initially pushed through the decompression line when the first valve is opened
are discarded since they experienced extreme shear stress from rapid decompression. Additionally,
the decompression line must be cleaned with ethanol and ultrapure water (18.2 MΩ) before
subsampling and after sampling each vessel. Cells that come in contact with ethanol and ultrapure
water (18.2 MΩ) are also discarded. In total, the first 3-4 mL of sample is discarded each time a
subsample is taken. This volume needs to be considered when planning the subsampling interval.
Additionally, because the vessel installation frame stacks the vessels vertically (Fig. 6 and 10), a
stand and clamp holder is used to hold and stabilize the decompression line in place while
subsampling from each vessel.
1. Clean the decompression line with ethanol and sterile ultrapure water (18.2 MΩ) water before
subsampling. 2. After cleaning, check that both valves on the decompression line are closed before starting the
subsampling process. 3. Connect the decompression line to the valve to the PEEK reservoir side (Fig. 11). 4. Secure the decompression line in place with a stand and clamp holder (Fig. 11).
5. Connect the high-pressure line to the valve on the piston side on the PUSH vessel (Fig. 11). 6. Fill the HHP pump reservoir with water (step 1 section 3.6.5) and then close the pump reservoir
valve. Open the pressure valve and pressurize the HHP line to the pressure of the vessel. 7. Once the target pressure is reached on the HHP line, open the valve on the piston side of the
PUSH vessel. Note that the pressure should not change, but should be monitored during this
process. 8. Connect a sterile syringe to a luer-lok connector at the end of the decompression line (Fig. 11). 9. Next, open the first valve on the decompression line and adjust the pressure as necessary using
the HHP pump. The pressure loss should be less than ~5-10%. (Fig. 11). 10. Slowly open the micrometering valve on the PEEK reservoir side and adjust the pressure if
needed. Discard the first 3-4 mL of fluid into a waste container.
11. Take a 0.5 mL aliquot of A. fulgidus culture, fix the cells with 2.5% gludaraldehyde, and store
for analysis. 12. Once the subsample has been taken,, close the valve to the PEEK reservoir opening side and
disconnected the decompression line. 13. Check the pressure gauge on the HHP pump to make sure the vessel is holding the target
pressure. Adjust the pressure if needed then close the valve on the piston side of the PUSH
vessel. 14. Check to make sure both valves on the PUSH vessel are closed then slowly open the pump
reservoir valve to release the pressure on the HHP pump. 15. Disconnect the high-pressure line from the PUSH vessel and prepare to subsample from the
next vessel.
Preprints (www.preprints.org) | NOT PEER-REVIEWED | Posted: 17 April 2021 doi:10.20944/preprints202104.0453.v1

19
Figure 11: Picture of a heated and insulated PUSH vessel connected to a manual screw pump (left) and the
decompression line (right) with a sampling syringe.
3.7 HHP PUSH-to-PUSH transfer without decompression
Investigating HHP microbial diversity and physiology will inevitably require transferring
samples or enrichment cultures while maintaining HHP conditions. One example of such an
experiment would be strain isolation from an enrichment culture, and another might be exploring
the adaptation of a strain to alternate growth (e.g. pressure) conditions. Below we describe the
protocol to transfer fluid from one PUSH vessel to another PUSH vessel while maintaining HHP. Choice of strain, media type, and target pressure are all customizable. Follow the protocols above
to prepare and grow the culture to be transferred as well as the sterile medium in the target PUSH
vessel. Modifications are described below.
1. During preparation of the PUSH vessels insert a magnetic stir bar inside each PEEK reservoir
before sterilization to be used for mixing after inoculation.
2. Cut a ~5-inch long 1/8” ID high-pressure tube and fit with valve connections on both ends,
including a micrometering valve on the outlet to the PUSH that will serve as the inoculum
source.
3. Calibrate the fluid volume transferred in this connector (here ~0.6 mL of fluid transferred per
HHP screw pump rotation).
4. Sterilize the connector prior to installation between the two PUSH vessels and fill with sterile
growth medium prior to connecting to the vessels.
5. Install the connector so that the reservoir side of the source vessel points toward the reservoir
side of the target vessel (Fig. 12).
6. Connect a second HHP screw pump and gauge on the piston side of the target PUSH vessel.
7. The first step is to pressurize the fluid in the connector tube with the pump connected to the
source PUSH vessel. First open the valve on the piston-side of the source PUSH vessel. While
turning the pump slowly open the valve between the source PUSH vessel and the connector
until the target pressure is reached.
8. Prior to inoculation pressurize the sterile growth medium in the target PUSH vessel using the
second pump on the piston-side of that vessel.
Preprints (www.preprints.org) | NOT PEER-REVIEWED | Posted: 17 April 2021 doi:10.20944/preprints202104.0453.v1

20
9. To transfer cells from the source PUSH to the target PUSH open the remaining valve on the
connector. Turn the HHP screw pump on the source PUSH while also decreasing the pressure
with the HHP screw pump on the target PUSH to slowly transfer fluid. Quantify the fluid
transferred by monitoring the turns on the screw pump.
10. Following transfer, close both vessels were closed and detach from their respective HHP screw
pumps.
11. Place the target PUSH on a stir plate to mix the distribute the inoculum.
12. Return the target PUSH to the frame and return to incubation temperature. Sample as needed
according to the protocol above.
A.
B.
C.
Preprints (www.preprints.org) | NOT PEER-REVIEWED | Posted: 17 April 2021 doi:10.20944/preprints202104.0453.v1

21
Figure 12: Schematic of the PUSH-to-PUSH transfer assembly. (A). Picture of the PUSH-to-PUSH transfer
set up (B) with a zoom in on the transfer line (C).
4. High-pressure whole-cell filtration without decompression
The growth, survival and structural integrity of pressure-adapted microbes can be
negatively impacted by decompression. The most deleterious effect is rupture of the cell envelope
caused by shear stress during rapid decompression (Taylor & Jannasch, 1976, Hemmingsen &
Hemmingsen, 1980, Park & Clark, 2002). The extent of cell lysis is a function of the
decompression rate (Taylor & Jannasch, 1976, Park & Clark, 2002), the presence of intracellular
vacuoles (Hemmingsen & Hemmingsen, 1980), and the style of pressurization (hydrostatic vs.
hyperbaric (Park & Clark, 2002)). For phylogenetic analyses that rely on genomic DNA extracted
from whole cells, sample decompression prior to whole cell filtration and nucleic acid extraction
would result in loss of nucleic acids from ruptured cells and analyses would be biased against
decompression-intolerant strains. Here we present a new high-pressure filtration system developed
during an oceanographic research expedition in January 2020 (Mid-Cayman Rise) to filter
genomic DNA under in situ pressure conditions. The protocol outlined below assumes the fluid to
be filtered is in PUSH vessel under in situ HHP. The PUSH containing the fluid to be filtered is
connected to a high-pressure filter holder, followed by a back-pressure valve (BPV) (Fig. 13). For
RNA-seq experiments, an alternative procedure for fixation under pressure is proposed, in order
to keep the transcripts under in situ pressure conditions.
1. Using a HHP screw pump connected to the inlet of the BPV set the pressure on the BPV to just
slightly above the pressure of the sample to be filtered.
2. Sterilize both sides of the filter holder with the valves attached and assemble the filter holder
with a 0.2 μm filter.
3. Connect the outlet of the filter holder to the BPV and the inlet to a PUSH containing sterile
ultrapure (18.2 MΩ) water.
4. With a HHP screw pump attached to the piston-side of the sterile-water PUSH, fill the filter
holder with sterile water and pressurize to the sample pressure. Close the valves on the filter
holder and remove the PUSH containing sterile ultrapure (18.2 MΩ) water from the assembly.
5. Connect the PUSH containing the sample to be filtered between the HHP pump and the inlet
of the filter housing. Pressurize the line between the pump and the vessel containing the HHP
sample.
6. While maintaining pressure in the line with the screw pump, open the valves starting at the
piston-side of the PUSH and moving forward through the assembly. Be sure to maintain
pressure in the line during this process (Fig. 14).
7. Once all valves are open continue turning the HHP pump to transfer the sample fluid through
the line. To monitor the volume filtered collect the filtered fluid on the outlet of the BPV.
8. Once all fluid is transferred, close the valves to the filter holder and remove from the
assembly.* Decompress and collect the filter in a sterile falcon tube and freeze in desired
fixative until analysis.
The alternative protocol below can be used to fix the filter while still under pressure.
A3. Dedicate a specific PUSH vessel to the fixative only.
A4. Once the valves of the filter holder are closed, connect a pressure vessel (previously filled
with a fixative, which volume corresponds to half of the filtrated volume) between the HHP
pump and the inlet of the filter housing.
Preprints (www.preprints.org) | NOT PEER-REVIEWED | Posted: 17 April 2021 doi:10.20944/preprints202104.0453.v1

22
A5. Pressurize the fixative vessel at the corresponding pressure. Then follow the procedure starting
at step 6.
Figure 13: Schematic of the high-pressure filtration assembly connected to a floating-variable piston (e.g.
PUSH for whole-cell filtration without decompression.
A
A.
B.
Preprints (www.preprints.org) | NOT PEER-REVIEWED | Posted: 17 April 2021 doi:10.20944/preprints202104.0453.v1

23
Figure 14: Schematic of the PUSH connected to the pressure holder and the backpressure valve (A). Picture
of the pressure holder and the backpressure valve (BPV) (B).
7. Concluding remarks
Here, we present two high temperature (HT) and high hydrostatic pressure (HHP) batch
cultivation systems and example protocols for growing anaerobic thermophiles under batch
conditions. This was done to ease the adoption of HT-HHP techniques to more laboratories and
expand our understanding of extremophiles from deep-sea vents and hot subseafloor environments
under natural conditions. Previous HT-HHP microbial cultivation has highlighted the fact that
relatively little is known about the physiology and metabolism of deep-sea and subseafloor
microorganisms. Fluctuating temperature, pressure, and geochemical conditions of growth all have
an impact on microbial functionality. To better understand the range of growth and adaptive
strategies deep-sea and subseafloor microorganisms have under in situ conditions, a large effort is
needed to continue to grow these extremophiles under various HT-HHP and geochemical
conditions.
Conflict of interest The authors declare that the research was conducted in the absence of any commercial or
financial relationships that could be construed as a potential conflict of interest.
Author Contribution GCO, AC, and KLR designed this research project. GCO wrote the original draft; All
authors contributed to revisions of the manuscript, figures and approved the submitted version.
Funding
Preprints (www.preprints.org) | NOT PEER-REVIEWED | Posted: 17 April 2021 doi:10.20944/preprints202104.0453.v1
24
Funding for this work was provided by the NASA (Exobiology Program: NNX13AP2G9
and PSTAR: 80NSSC17K0252 to KLR), the Deep Carbon Observatory (Subawards: 10371-07,
10561-01, and 10311-11 to KLR), an NSF Graduate Fellowship (FAIN 1247271 and 1744655 to
GCO) and a GSA Research Grant to GCO. Additional support was provided by startup funds from
Rensselaer Polytechnic Institute to KLR.
Acknowledgements We would like to give our many thanks Dr. E. Bruce Watson for gifting the Habitability
and Extreme Life Laboratory (HELL) four high-pressure vessels that were used for HT-HHP
cultivation with sample decompression. We would like to thank Christopher Hoff for his help with
the thermal control system.
References
Baross, J. a, & Deming, J. W. (1983). Growth of `black smoker’ bacteria at temperatures of at least 250 °C.
Nature, 303(5916), 423–426.
Bowles, M. W., Samarkin, V. a., & Joye, S. B. (2011). Improved measurement of microbial activity in
deep-sea sediments at in situ pressure and methane concentration. Limnology and Oceanography:
Methods, 9, 499–506.
Canganella, F., Jones, W. J., Gambacorta, A., & Antranikian, G. (1997). Biochemical and phylogenetic
characterization of two novel deep-sea Thermococcus isolates with potentially biotechnological
applications. Archives of Microbiology, 167(4), 233–238.
Cario, A., Oliver, G. C., & Rogers, K. L. (2019). Exploring the deep marine biosphere: challenges,
innovations, and opportunities. Frontiers in Earth Science, 7, 225.
Deming, J. W., & Colwell, R. R. (1981). Barophilic bacteria associated with deep-sea animals. Bioscience,
31(7), 507-511.
D’Hondt, S. (2004). Distributions of Microbial Activities in Deep Subseafloor Sediments. Science,
306(5705), 2216–2221.
Foustoukos, Dionysis I., and Ileana Pérez-Rodríguez (2015). A Continuous Culture System for Assessing
Microbial Activities in the Piezosphere. Applied and Environmental Microbiology 81, no. 19: 6850–
56.
Garel, M., Bonin, P., Martini, S., Guasco, S., Roumagnac, M., Bhairy, N., & Tamburini, C. (2019).
Pressure-retaining sampler and high-pressure systems to study deep-sea microbes under in situ
conditions. Frontiers in microbiology, 10, 453.
Hemmingsen, B. B., & Hemmingsen, E. A. (1980). Rupture of the cell envelope by induced intracellular
gas phase expansion in gas vacuolate bacteria. Journal of bacteriology, 143(2), 841-846.
Jannasch, H. W., Cuhel, R. L., Wirsen, C. O., & Taylor, C. D. (1980). An approach for in situ studies of
deep-sea amphipods and their microbial gut flora. Deep Sea Research Part A. Oceanographic
Research Papers, 27(10), 867-872.
Jannasch, H. W., Wirsen, C. O., & Doherty, K. W. (1996). A pressurized chemostat for the study of marine
barophilic and oligotrophic bacteria. Applied and environmental microbiology, 62(5), 1593-1596.
Kato, C. (2006). Handling of Piezophilic Microorganisms, 35(5).
Maier, R. M. (2009). Bacterial Growth. Environmental Microbiology, 37–54.
Marietou, A., Nguyen, A. T. T., Allen, E. E., & Bartlett, D. H. (2014). Adaptive laboratory evolution of
Escherichia coli K-12 MG1655 for growth at high hydrostatic pressure. Frontiers in Microbiology,
5(DEC), 1–8.
Marteinsson, V. T., Birrien, J. L., Raguenes, G., da Costa, M. S., & Prieur, D. (1999). Isolation and
characterization of Thermus thermophilus Gy1211 from a deep-sea hydrothermal vent.
Extremophiles, 3(4), 247–251.
McNichol, J., Sylva, S. P., Thomas, F., Taylor, C. D., Sievert, S. M., & Seewald, J. S. (2016). Assessing
Preprints (www.preprints.org) | NOT PEER-REVIEWED | Posted: 17 April 2021 doi:10.20944/preprints202104.0453.v1

25
microbial processes in deep-sea hydrothermal systems by incubation at in situ temperature and
pressure. Deep Sea Research Part I: Oceanographic Research Papers, 115, 221-232.
McNichol, J., Stryhanyuk, H., Sylva, S. P., Thomas, F., Musat, N., Seewald, J. S., & Sievert, S. M. (2018).
Primary productivity below the seafloor at deep-sea hot springs. Proceedings of the National Academy
of Sciences, 115(26), 6756-6761
Oliver, G. C., Cario, A., & Rogers, K. L. (2020). Rate and Extent of Growth of a Model Extremophile,
Archaeoglobus fulgidus, Under High Hydrostatic Pressures. Frontiers in microbiology, 11, 1023.
Park, C. B., & Clark, D. S. (2002). Rupture of the cell envelope by decompression of the deep-sea
methanogen Methanococcus jannaschii. Applied and environmental microbiology, 68(3), 1458-1463.
Parkes, R. J., Sellek, G., Webster, G., Martin, D., Anders, E., Weightman, A. J., & Sass. (2009). Culturable
prokaryotic diversity of deep, gas hydrate sediments: first use of a continuous high-pressure,
anaerobic, enrichment and isolation system for subseafloor sediments (DeepIsoBUG). Environmental
Microbiology, 11(12), 3140–3153.
Parkes, R. J., Cragg, B., Roussel, E., Webster, G., Weightman, A., & Sass, H. (2014). A review of
prokaryotic populations and processes in sub-seafloor sediments, including biosphere: Geosphere
interactions. Marine Geology, 352, 409–425.
Schwarz, J. R., Yayanos, A. A., & Colwell, R. R. (1976). Metabolic activities of the intestinal microflora
of a deep-sea invertebrate. Applied and Environmental Microbiology, 31(1), 46-48.
Takai, K., Nakamura, K., Toki, T., Tsunogai, U., Miyazaki, M., Miyazaki, J., et al. (2008). Cell proliferation
at 122 C and isotopically heavy CH4 production by a hyperthermophilic methanogen under high-
pressure cultivation. Proceedings of the National Academy of Sciences, 105(31), 10949–10954.
Tamburini, C., Garcin, J., and Bianchi, A. (2003). Role of deep-sea bacteria in organic matter mineralization
and adaptation to hydrostatic pressure conditions in the NW Mediterranean Sea, 32, 209–218.
Tamburini, C. (2006). Life under pressure. Deep-sea microbial ecology. Life as we know it. Series:
Cellular Origin and Life in Extreme Habitats and Astrobiology. Springer, Dordrecht, The
Netherlands pp. 125-143
Tasumi, E., Yanagawa, K., Miyazaki, J., & Takai, K. (2015). In Vitro High-Pressure Incubation and
Activity Measurement of Deep-Sea Methanogenic Archaea, (June), 51–64.
Taylor, C. D., & Jannasch, H. W. (1976). Subsampling technique for measuring growth of bacterial cultures
under high hydrostatic pressure. Applied and environmental microbiology, 32(3), 355-359.
Yayanos, A. A. (1995). Microbiology to 10,500 meters in the deep sea. Annual review of microbiology, 49,
777–805.
Yayanos, A. A. (1986). Evolutional and ecological implications of the properties of deep-sea barophilic
bacteria. Proceedings of the National Academy of Sciences, 83(24), 9542-9546.
Yayanos, A. A. (2001). 30 Deep-sea Piezophilic Bacteria. Methods in Microbiology, 30, 615–637.
Yayanos, A. A., Dietz, A. S., & Boxtel, R. V. A. N. (1982). of Deep-Sea Bacteria, 44(6), 1356–1361.
Zobell, C. E., & Oppenheimer, C. H. (1950). Some effects of hydrostatic pressure on the multiplication
and morphology of marine bacteria. Journal of Bacteriology, 60(0), 771–781.
Preprints (www.preprints.org) | NOT PEER-REVIEWED | Posted: 17 April 2021 doi:10.20944/preprints202104.0453.v1