Embed Size (px)
Citation preview

Hands On Nuendo 6

Cristina Bachmann, Heiko Bischoff, Marion Bröer, Christina Kaboth, Insa Mingers, Sabine Pfeifer, Benjamin Schütte
The PDF provides improved access for vision-impaired users. Please note that due to the complexity and number of images in this document, it is not possible to include text descriptions of images.
The information in this document is subject to change without notice and does not represent a commitment on the part of Steinberg Media Technologies GmbH. The software described by this document is subject to a License Agreement and may not be copied to other media except as specifically allowed in the License Agreement. No part of this publication may be copied, reproduced, or otherwise transmitted or recorded, for any purpose, without prior written permission by Steinberg Media Technologies GmbH. Registered licensees of the product described herein may print one copy of this document for their personal use.
All product and company names are ™ or ® trademarks of their respective holders. For more information, please visit www.steinberg.net/trademarks.
Release Date: February 7, 2013
© Steinberg Media Technologies GmbH, 2013.
All rights reserved.

Table of Contents
4 Setting up your System4 About this Chapter4 Setting up your Audio Hardware4 Setting up Busses5 Setting up the Control Room6 Setting up MIDI and Remote Controllers7 Configuring Synchronization Settings8 Integrating Sound Libraries in the
MediaBay
9 Setting up Projects9 About this Chapter9 About Project Files and Media Files9 General Project Settings11 Adding Tracks13 Routing in the MixConsole14 Saving a Project Template
15 Working with Imported Media15 About this Chapter15 Importing Video16 Defining Scenes with Markers17 Importing Delivered Data
18 Recording Audio18 About this Chapter18 Setting up Record and Monitoring Modes18 Recording Audio on the Fly18 Recording with automatic Punch In/Out19 Recording Audio with Markers19 Creating a Headphone Mix19 Using Direct Monitoring
20 Editing Audio20 About this Chapter20 Cutting Audio Events20 Creating Fades and Crossfades21 Moving Audio Events to Picture21 Offline Processing
22 Mixing, Effects, and Automation22 About this Chapter22 Mixing24 Using Effects25 Writing Automation
26 Delivering26 About this Chapter26 Exporting Stems as Audio Files27 Recording Stems27 Backing up
3
Setting up your System
About this Chapter
In this chapter you learn:
- How to set up your audio hardware and the connections in Nuendo.- How to work with MIDI and remote controllers.- How to synchronize your system.- How to integrate your own sound archives in the MediaBay.
Setting up your Audio Hardware
Before you start working with sound, you must connect Nuendo to your ASIO device.
1. Select “Devices > Device Setup…” to open the Device Setup dialog.
2. In the Devices list to the left, click “VST Audio System”.
3. Open the ASIO Driver pop-up menu, and select your audio hardware driver.The sample rate of your hardware is indicated below.
For easy identification, you can specify names for the driver ports by selecting the driver in the Devices list and using the driver settings page to the right.
The “Control Panel” button opens a dialog where you can adjust output and input ports, buffer size and offset settings. For details, click the Help button.
We strongly recommend that you use an ASIO driver written specifically for your audio hardware. If no specific ASIO driver is available, use the Generic Low Latency ASIO driver. A DirectX driver is the next best option. To take full advantage of this driver, the audio hardware must support WDM (Windows Driver Model).
Setting up Busses
Once you have set up your audio hardware, connect its ASIO ports to the input and output busses in Nuendo to transfer the audio between Nuendo and your audio hardware. Normally, you need one bus per input and one master bus. The bus configuration is saved with each project.
To add an input or output bus, and map them to input and output sources, proceed as follows:
1. Select “Devices > VST Connections” to open the VST Connections window.
2. Click the Inputs or Outputs tab depending on the type of bus that you want to add, and click the “Add Bus” button.
3. Open the Configuration pop-up menu, select a channel configuration for your bus, and click “Add Bus”.
4. Open the Inputs tab and click in the Device Port column to map your input sources to the input busses. The busses pass the input signal on to the audio tracks in your project.
4

Setting up the Control Room
• Open the Outputs tab and click in the Device Port column to set up your output busses to the ASIO ports of your audio hardware. The output busses are master channels for your audio tracks.
This is only necessary if you want to send the master out to another destination, for example, a DAT recorder or another computer. Otherwise, use the Control Room, and leave the output bus unconnected.
Setting up the Control Room
The Control Room features the functionalities of the mixing console’s monitoring section in a virtual, VST-based audio environment where flexibility and instant recall are expected.
To set up the Control Room, proceed as follows:
1. Select “Devices > VST Connections” to open the VST Connections window.
2. Click the Studio tab, and activate the Control Room button.
3. Click the “Add Channel” button, and select “Add Monitor” from the pop-up menu.
4. Open the Configuration pop-up menu, and select a channel configuration for your monitor speakers.
5. Click OK.
Now, click in the Device Port column to connect your monitor boxes and headphones to the Control Room by routing them to the correct ports.
The “Main Mix” output is automatically routed to the Control Room.
The Control Room allows you to adjust the volume of monitors independently from the mix bus level, to work with different monitor speakers and switch between them, and to route various cue mixes and other sources.
Input sources (microphones, keyboards, etc.) Input busses Audio tracks
Output busses or Control Room ASIO portsAudio tracks
Monitor speakers
Audio tracks Output busses
Control Room
5Setting up your System

Setting up MIDI and Remote Controllers
Setting up MIDI and Remote Controllers
If you want to connect MIDI interfaces to your system, make sure that their latest drivers are installed.
To check your MIDI Setup, proceed as follows:
1. Select “Devices > Device Setup…” to open the Device Setup dialog.
2. Click “MIDI Port Setup” in the Devices list to open a page where you can show, hide, and activate MIDI ports.
3. Click the Add Device (+) button at the top left of the Device Setup dialog. A pop-up menu with all remote devices supported by Nuendo opens.
4. Select a remote device.
5. Use the parameters and controls on the right to configure your remote device.
If your remote device has its own driver, please refer to the documentation of the device.
6Setting up your System

Configuring Synchronization Settings
Configuring Synchronization Settings
Nuendo’s Project Synchronization dialog allows you to configure complex synchronized systems. It contains settings for timecode source and machine control, project setup parameters, and basic transport controls.
1. Select “Transport > Project Synchronization Setup” to open the Project Synchronization dialog.
2. Synchronize Nuendo with other workstations or hardware devices by using the following timecode sources:
• MIDI TimecodeNuendo acts as a timecode slave to any incoming MIDI timecode (MTC) on the ports that are selected in the MIDI Timecode Settings section.
• 9-PinYou can use timecode polling over Sony’s 9-Pin RS422 protocol as a timecode source. In this case, we recommend that you use Steinberg’s SyncStation hardware.
• VST System Link This allows you to synchronize multiple workstations via digital audio connections. System Link uses the sample clock for position and speed references, which ensures sample-accurate synchronization. System Link can only be used with Steinberg products.
• SyncStationThe SyncStation is a full-featured hardware synchronizer with extensive machine control capabilities that allows for sample-accurate synchronization with a variety of external devices.
• ASIO SyncIf your audio card supports the ASIO Positioning Protocol and has an on-board synchronizer, you can use it as a timecode source.
• SMPTEGenerator Load your SMPTEGenerator as an insert effect for an output bus to generate longitudinal timecode (LTC) in realtime.
7Setting up your System

Integrating Sound Libraries in the MediaBay
Integrating Sound Libraries in the MediaBay
The MediaBay is an efficient database that allows you to handle and manage media files easily from within Nuendo. If your sound archives are stored on a local drive, you can skip this step. If your sound archives are located on an external drive, you must integrate them in the MediaBay.
To integrate external sound archives, proceed as follows:
1. Select “Media > MediaBay”.
2. Locate the folder in the Define Locations section.
3. Right-click the folder, and select “Create Volume Database” in the context menu.This way your external sound archives are automatically mounted when Nuendo is launched.
4. Activate the checkbox for your folder to scan it for sounds.
5. Select the folder, and click the Add button to define the folder as a scan location.
In the Results section, you can now browse your files and search for file names, file attributes, or meta data. You can also preview your files and drag them directly to the project window.
8Setting up your System

Setting up Projects
About this Chapter
In this chapter you learn:
- How projects are structured. - How to add tracks.- Where to perform basic project settings in Nuendo.
About Project Files and Media Files
The project file (extension .npr) is the central document in Nuendo. Project files contain audio clips or video clips that refer to files on the hard disk. All editing in the Project window affects only those clips, while the referenced files remain untouched.
The Project Folder
Every time you create a new project, you must specify a folder, to which the project file is saved. To avoid confusion, create a new folder for every project that you work on. Inside the project folder, Nuendo automatically creates an Audio folder, to which all audio data that you record for this particular project is saved.
Files that are referenced by the project can, but do not have to reside in the project folder. You can reference media files in any location to which you have access.
The Pool Window
The Pool window lets you view all audio and video clips that belong to your project, together with relevant information, such as the creation date, and the path to the referenced file. Furthermore, the Pool window allows for operations, such as importing, converting file formats, deleting, and sorting. To open the Pool window, click “Media > Open Pool Window”.
General Project Settings
The Project Setup dialog allows you to make general settings for your project. You have access to all settings that affect time issues within Nuendo, such as the sample rate at which audio is played back, and the frame rate for the timecode. Select “Project > Project Setup” to open the Project Setup dialog.
Before setting up your project, you should consider the following:
- The timecode format and positions of the involved video file.- The timecode positions of media files to be imported.
We recommend not to change any of these settings, as this would change the playback speed.
9

General Project Settings
Start and Length
Set the Start value in relation to the timecode start position of the video file. If the video timeline starts at 10:00:00:00, for example, a start time of 09:58:00:00 is appropriate.
Especially when working with imported media, for example AAF, it is important to set a useful project start and length. During import, the imported media files are placed at the timecode positions specified within the AAF file. So your project start time should reflect the times used in the imported media.
Frame Rate
This setting determines the timecode standard and the frame rate for the project.
Think about which timecode format is appropriate for your project. In order to ensure that video and audio can be in sync, the project frame rate and the video frame rate must match. Set up all parts of your setup, including Nuendo and any synchronizer connected, to the frame rate of the video file.
It is advisable not to change the frame rate during the project. In particular, avoid switching between a whole number frame rate and a decimal frame rate. This can create synchronization problems that are difficult to correct at a later stage.
Sample Rate
This is the sample rate at which Nuendo records and plays back audio. This setting must match the sample rate of your hardware.
If your audio hardware is clocked externally, enter the external sample rate, select “Devices > Device Setup…”, click the name of your audio driver, and activate the “Externally Clocked” option.
10Setting up Projects
Adding Tracks
Adding Tracks
Your project can contain various tracks for different types of data, such as audio, MIDI, or video. You can also organize your project by combining several tracks in a folder track, and by creating group tracks, for example, for setting up stems.
To add a track, proceed as follows:
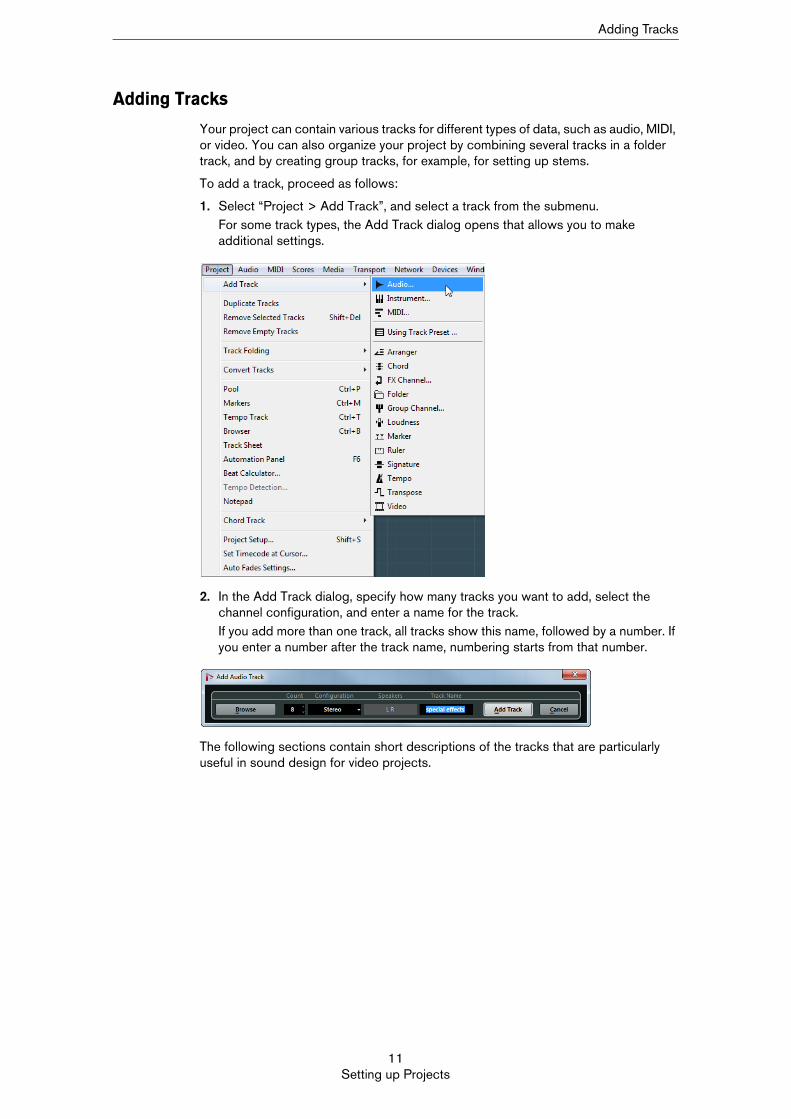
1. Select “Project > Add Track”, and select a track from the submenu.For some track types, the Add Track dialog opens that allows you to make additional settings.
2. In the Add Track dialog, specify how many tracks you want to add, select the channel configuration, and enter a name for the track.If you add more than one track, all tracks show this name, followed by a number. If you enter a number after the track name, numbering starts from that number.
The following sections contain short descriptions of the tracks that are particularly useful in sound design for video projects.
11Setting up Projects

Adding Tracks
Audio Tracks
Audio tracks can be configured as mono, stereo, or surround tracks. You can record multi-channel files and play them back on a surround track, or you can split the file and put the channels on several mono tracks. It is not possible to change the configuration at a later stage.
Audio Track Routing
You can route an audio track to one or several output busses for playback, or to a group channel to be able to mix several audio tracks as one entity. Use the track’s send slots to route it to one or several FX channels for applying effects.
Folder Tracks
Folder tracks offer a way of structuring your project. You can have one folder track for dialog takes, one for special effects, one for music, and one for foley, for example. Editing a folder track means to apply all edits to all tracks contained in this folder track. For example, you can mute/solo all tracks in a folder simultaneously. Folder tracks can contain any type of track, including other folder tracks. In the MixConsole, folder tracks are not displayed as channels.
You can configure the MixConsole to view only the tracks inside a folder track. This helps you to get a much better overview of your tracks, and it makes mixing more convenient.
Marker Tracks
You can insert markers at particular positions in your project. The markers allow you to locate to these positions quickly. You can also set up cycle markers for marking whole sections. This is very useful for voice-overs, for example.
You can add more than one marker track to your project, for example, one marker track for marking the different scenes in the video, and a second marker track for marking characters in dialog takes.
The Marker Window
Select “Project > Markers” to open the Marker window, and add, view, or edit markers. The markers are displayed in a list in the order in which they occur in the project, together with the exact timecode positions and various definable attributes, for example, “Actor’s Name”.
FX Channels
If your project requires that you frequently apply certain effects, for example, a delay and a reverb, you can set up FX channels for each of these effects.
You apply the effect by routing audio from an audio channel to the corresponding FX channel, by means of the Sends section in the MixConsole. To control the effect’s return level, use the FX channel in the MixConsole. Technically, FX channels are like audio channels, that is, you can route them like audio channels and apply insert effects, for example.
Group Channels
Use group channels for stems, for example.
You can route the outputs of multiple audio channels to a group channel. This enables you to control the channel levels using one fader, apply the same effects and equalization to the sum of all the channels, etc. You can route group channels like all other channels.
12Setting up Projects
Routing in the MixConsole
Routing in the MixConsole
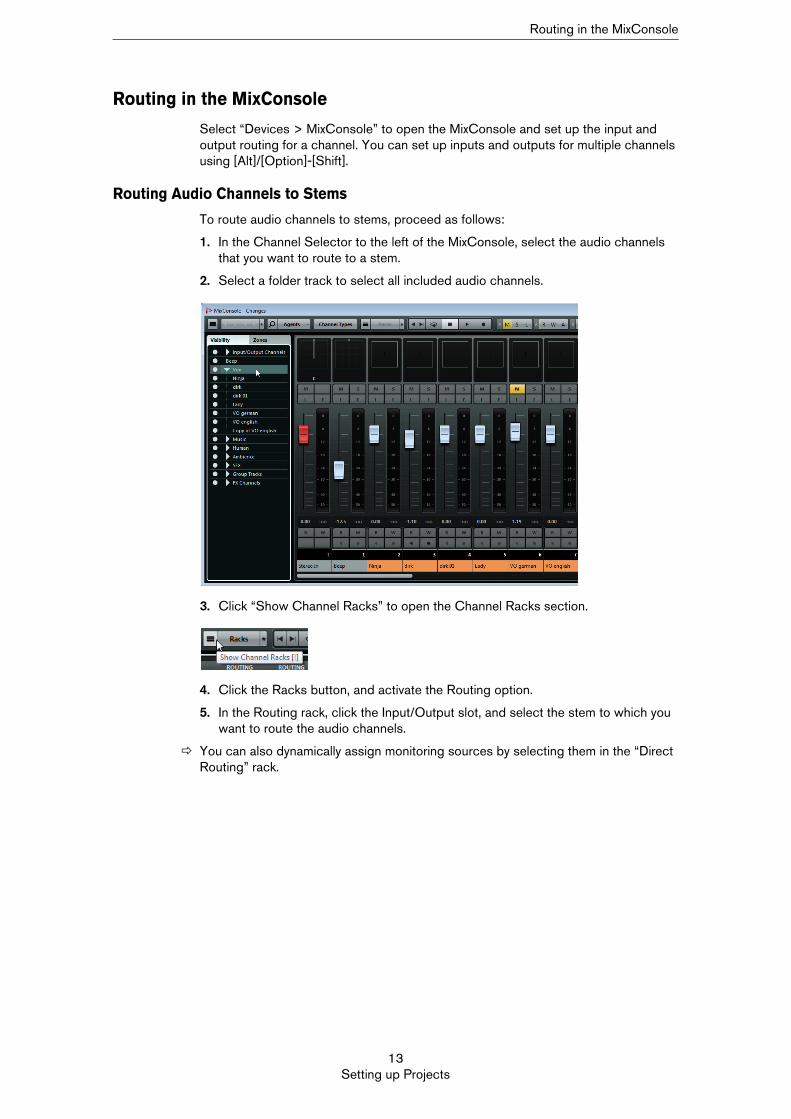
Select “Devices > MixConsole” to open the MixConsole and set up the input and output routing for a channel. You can set up inputs and outputs for multiple channels using [Alt]/[Option]-[Shift].
Routing Audio Channels to Stems
To route audio channels to stems, proceed as follows:
1. In the Channel Selector to the left of the MixConsole, select the audio channels that you want to route to a stem.
2. Select a folder track to select all included audio channels.
3. Click “Show Channel Racks” to open the Channel Racks section.
4. Click the Racks button, and activate the Routing option.
5. In the Routing rack, click the Input/Output slot, and select the stem to which you want to route the audio channels.
You can also dynamically assign monitoring sources by selecting them in the “Direct Routing” rack.
13Setting up Projects
Saving a Project Template
Configuring Stems as Monitoring Sources for the Control Room
Setting up different monitoring sources for each stem allows you to listen to important stems individually, as well as to different masters. This allows for high flexibility in monitoring. You can constantly switch monitoring sources, for example, only listen to the dialog stem at a specific point in time, and add ambience sounds in the next.
To configure stems as monitoring sources, proceed as follows:
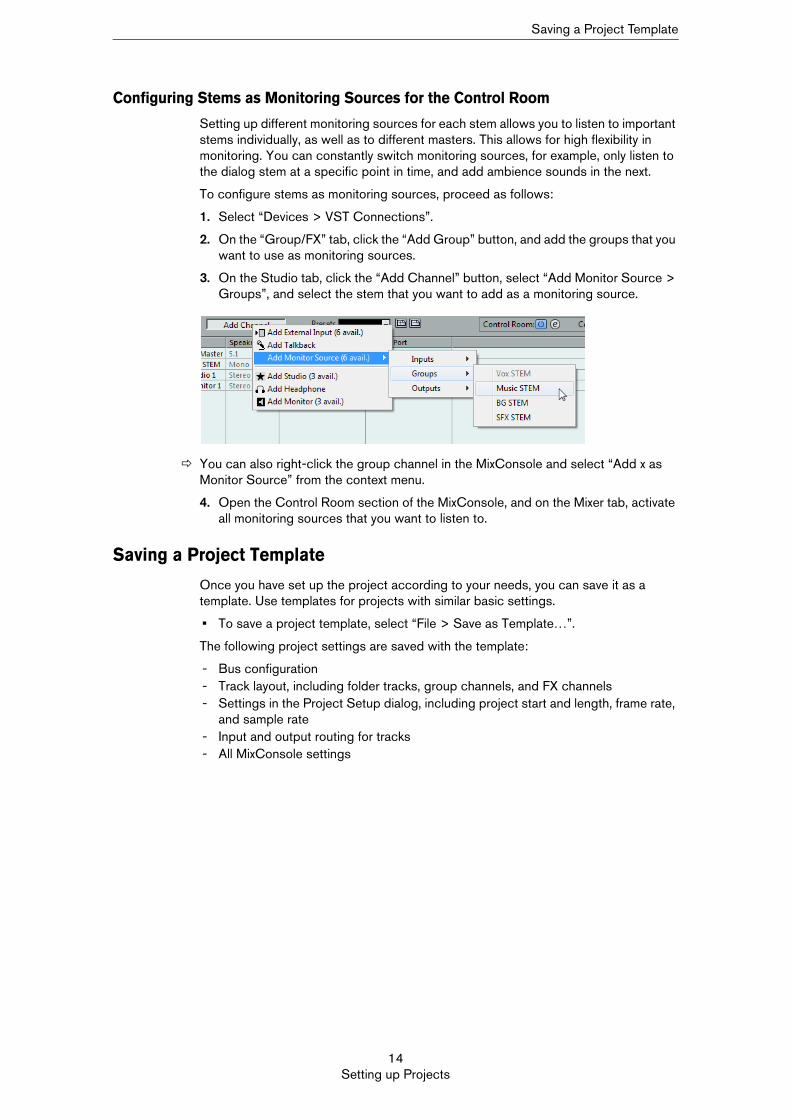
1. Select “Devices > VST Connections”.
2. On the “Group/FX” tab, click the “Add Group” button, and add the groups that you want to use as monitoring sources.
3. On the Studio tab, click the “Add Channel” button, select “Add Monitor Source > Groups”, and select the stem that you want to add as a monitoring source.
You can also right-click the group channel in the MixConsole and select “Add x as Monitor Source” from the context menu.
4. Open the Control Room section of the MixConsole, and on the Mixer tab, activate all monitoring sources that you want to listen to.
Saving a Project Template
Once you have set up the project according to your needs, you can save it as a template. Use templates for projects with similar basic settings.
• To save a project template, select “File > Save as Template…”.
The following project settings are saved with the template:
- Bus configuration- Track layout, including folder tracks, group channels, and FX channels- Settings in the Project Setup dialog, including project start and length, frame rate,
and sample rate- Input and output routing for tracks- All MixConsole settings
14Setting up Projects

Working with Imported Media
About this Chapter
In this chapter you learn:
- How to import a video file together with its audio.- How to mark different scenes with markers.- How to import session data.
Importing Video
Supported Video Formats
Nuendo uses QuickTime for playing back video files. Therefore, make sure you have QuickTime 7.7 installed, and open the video file with QuickTime to verify that its format is supported.
Importing Video and Extracting Audio
To import a video file in Nuendo and extract its audio, proceed as follows:
1. Set the project cursor to the timecode position in the project where you want your imported files to start.
2. Select “File > Import > Video File…”.
3. In the dialog that opens, select the video file and activate the “Extract Audio From Video” option.The audio data is extracted and saved as a separate file in the Audio folder of your project. A video event referencing the video file is placed on a video track, starting at the cursor position. An audio event referencing the new audio file is placed on an audio track, also starting at the cursor position.
Importing EDL Files
A video file can be accompanied by Edit Decision Lists (EDL). EDL files contain information about transitions that can be used for creating markers. Nuendo supports the EDL CMX3600 file format.
To import an EDL CMX3600 file, proceed as follows:
1. Select “File > Import > EDL CMX3600…”.
2. In the file dialog that opens, select the file that you want to import, and click Open. The Import Options dialog opens.
3. In the Import column on the left, activate the marker tracks that you want to import or click the Select All Tracks button.
4. In the “Marker Options - Video” and “Marker Options - Audio” sections, select whether you want to import position markers or cycle markers.
5. Click OK.
Every track in the EDL results in a new marker track in Nuendo.
15

Defining Scenes with Markers
Defining Scenes with Markers
In Nuendo you can add multiple marker tracks. These can be used for adding and editing position markers and cycle markers.
Creating Markers in Nuendo
Markers are very useful for navigating through a project. To create markers, proceed as follows:
1. Select “Project > Add Track > Marker”.This adds a marker track to your project.
2. Play back your video file, search for the first scene change or transition, and position the left locator at the beginning, and the right locator at the end of the scene.
3. Click the “Add Cycle Marker” button in the track list for your marker track.This adds a cycle marker that encompasses your first scene.
Editing Markers in the Marker Window
In the Marker window you can locate, view, and edit all markers. The markers on the active marker track are displayed in the marker list in the order in which they occur in the project. To edit markers, proceed as follows:
1. Press [Ctrl]/[Command]-[M] to open the Marker window.
2. Open the Track pop-up menu in the upper left corner of the Marker window, and select the marker track that you want to use.
3. In the far left column of the markers list, click the marker of the scene to which you want to navigate.The project cursor jumps to the corresponding marker in the Project window.
The Markers window also holds the ADR functions. These are described in the chapter “Using markers” in the Operation Manual.
Marker track
Add Marker Add Cycle Marker
Track pop-up menu Marker list
16Working with Imported Media
Importing Delivered Data
Importing Delivered Data
Nuendo supports various audio formats, including AAF.
Importing AAF Files
The Advanced Authoring Format (AAF) is a digital media exchange format.
To import tracks from an AAF file, proceed as follows:
1. Select “File > Import > AAF…”.
2. Select the tracks that you wish to import by clicking in the Import column next to each track.You can also click the Select All button.
3. Choose the “Import all Media Files” option to import all media files to your project directory. This copies all files to your project folder. Otherwise they are only referenced.
4. Click OK.The import process begins.
The timecode and track positions to which your data are imported are determined by the AAF file. Therefore, make sure that your project settings (timecode start and length) correspond to the settings in the AAF file.
17Working with Imported Media
Recording Audio
About this Chapter
In this chapter you learn:
- How to record and monitor audio.- How to create a headphone mix.
Make sure that you have your audio hardware set up before proceeding.
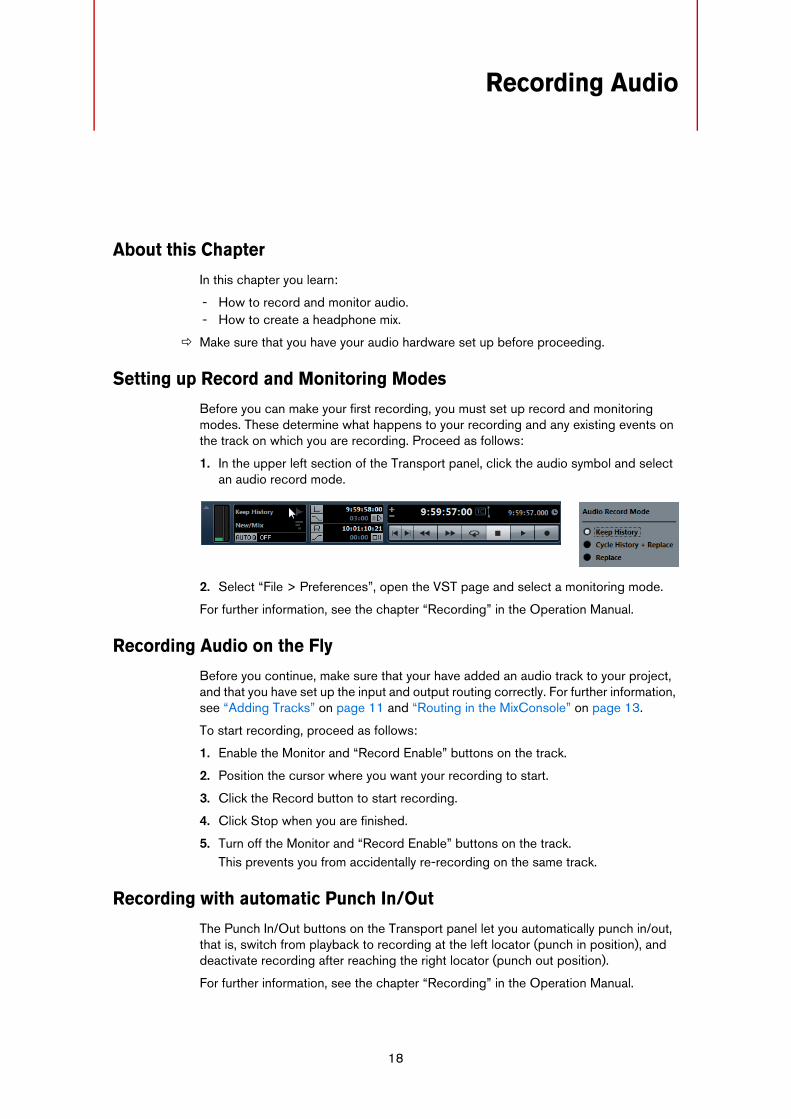
Setting up Record and Monitoring Modes
Before you can make your first recording, you must set up record and monitoring modes. These determine what happens to your recording and any existing events on the track on which you are recording. Proceed as follows:
1. In the upper left section of the Transport panel, click the audio symbol and select an audio record mode.
2. Select “File > Preferences”, open the VST page and select a monitoring mode.
For further information, see the chapter “Recording” in the Operation Manual.
Recording Audio on the Fly
Before you continue, make sure that your have added an audio track to your project, and that you have set up the input and output routing correctly. For further information, see “Adding Tracks” on page 11 and “Routing in the MixConsole” on page 13.
To start recording, proceed as follows:
1. Enable the Monitor and “Record Enable” buttons on the track.
2. Position the cursor where you want your recording to start.
3. Click the Record button to start recording.
4. Click Stop when you are finished.
5. Turn off the Monitor and “Record Enable” buttons on the track. This prevents you from accidentally re-recording on the same track.
Recording with automatic Punch In/Out
The Punch In/Out buttons on the Transport panel let you automatically punch in/out, that is, switch from playback to recording at the left locator (punch in position), and deactivate recording after reaching the right locator (punch out position).
For further information, see the chapter “Recording” in the Operation Manual.
18
Recording Audio with Markers
Recording Audio with Markers
If you have already defined the scenes that you want to record, you can use the Markers window to navigate to these scenes. Proceed as follows:
1. Select “Project > Markers”.
2. In the far left column of the markers list, click the marker of the scene that you want to record.
3. Enable the Monitor and “Record Enable” buttons on the track.
4. Click the Record button to start recording.
5. Click Stop when you are finished.
Creating a Headphone Mix
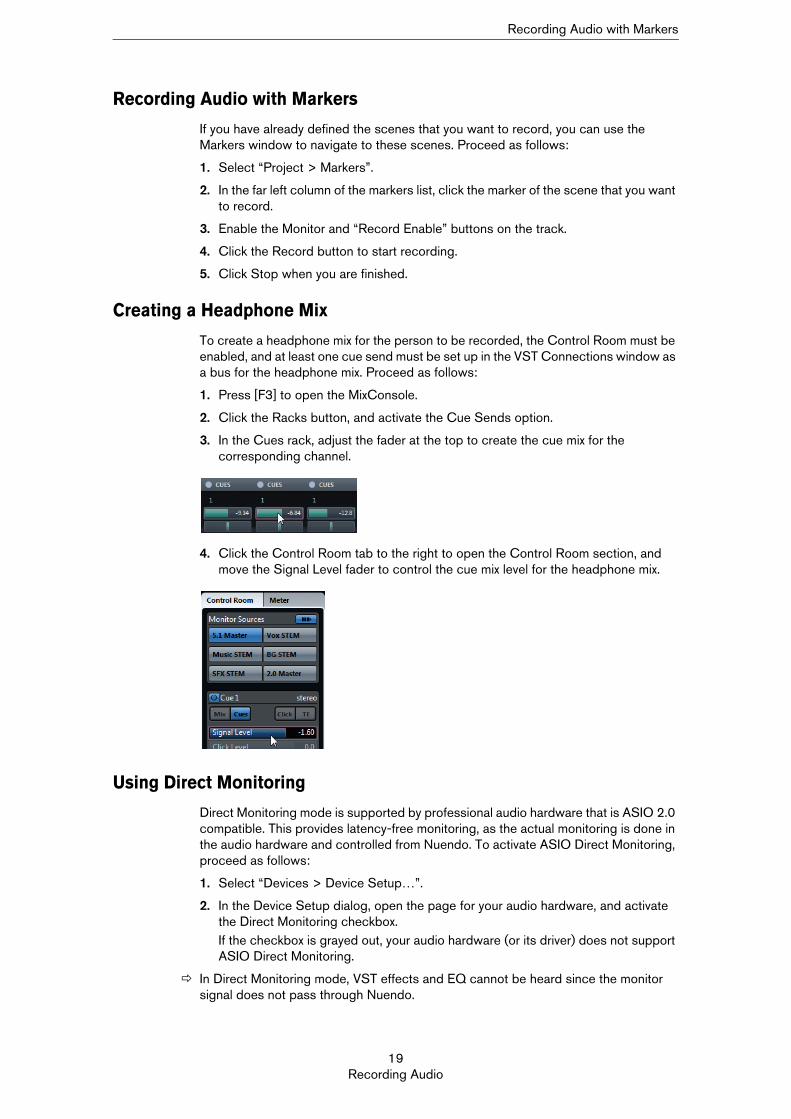
To create a headphone mix for the person to be recorded, the Control Room must be enabled, and at least one cue send must be set up in the VST Connections window as a bus for the headphone mix. Proceed as follows:
1. Press [F3] to open the MixConsole.
2. Click the Racks button, and activate the Cue Sends option.
3. In the Cues rack, adjust the fader at the top to create the cue mix for the corresponding channel.
4. Click the Control Room tab to the right to open the Control Room section, and move the Signal Level fader to control the cue mix level for the headphone mix.
Using Direct Monitoring
Direct Monitoring mode is supported by professional audio hardware that is ASIO 2.0 compatible. This provides latency-free monitoring, as the actual monitoring is done in the audio hardware and controlled from Nuendo. To activate ASIO Direct Monitoring, proceed as follows:
1. Select “Devices > Device Setup…”.
2. In the Device Setup dialog, open the page for your audio hardware, and activate the Direct Monitoring checkbox. If the checkbox is grayed out, your audio hardware (or its driver) does not support ASIO Direct Monitoring.
In Direct Monitoring mode, VST effects and EQ cannot be heard since the monitor signal does not pass through Nuendo.
19Recording Audio

Editing Audio
About this Chapter
In this chapter you learn:
- How to edit audio events.- How to create fades and crossfades.- How to move events to picture.- How to add offline processing to render effects.
Cutting Audio Events
You can cut audio events at a particular position or using selection ranges, even across multiple tracks. Proceed as follows:
• To cut your audio event at a particular position, press [Alt]/[Option] or select the Cut tool, and click at the position where you want to cut your audio event.
• To define a selection range, drag with the Range Selection tool.
- To cut everything outside a selected range, select “Edit > Range > Crop”.- To cut everything to the left of the selection, select “Edit > Range > Cut Head”.- To cut everything to the right of the selection, select “Edit > Range > Cut Tail”.
Creating Fades and Crossfades
Audio events have fade handles. Dragging these handles lets you create a fade in or fade out.
• To create a fade in, drag the upper left handle to the right, or set the project cursor to the position where you want the fade to end, and select “Audio > Fade In to Cursor”.
• To create a fade in and fade out, make a range selection, and press [A].This creates a fade in from the event start to the beginning of the range, and a fade out from the end of the range to the end of the audio event.
20

Moving Audio Events to Picture
• To create a crossfade between two overlapping events, select both events and press [X].You can press [X] twice to open the Crossfade Editor.
Moving Audio Events to Picture
If you recorded audio on the fly, you may need to adjust the takes to the exact start position of the corresponding scenes. Proceed as follows:
1. Click [F8] to open the Video Player window, and start playback.
2. Press Stop when the cursor reaches the position where you want to place the audio event, and press [Ctrl]/[Command]-[L].This moves the start of the selected audio event to the cursor.
You can also use the shuttle and scrub tools or the nudge buttons to adjust the position of your audio event. To access these tools, right-click the Transport panel and select the corresponding option from the context menu.
Offline Processing
When you have arranged all audio events, you can use Nuendo’s offline process features to print sound effects. Offline processing lets you apply effects to clips so that you can move or deliver the clips together with the sound effects at a later stage. This is non-destructive and you can always undo your changes or revert to the original using the Offline Process History.
1. Select “Audio > Plug-ins”, and select one of the effects, a filter effect, for example.
2. Adjust the parameters, and click the Preview button to hear the result.
3. When you are done, click the Process button to apply the effect to your audio event.
• To remove or modify processing from a clip, select the clip, and from the Audio menu, select “Offline Process History…”. This opens a dialog where you can remove or modify all processing and any applied plug-in effects.
21Editing Audio

Mixing, Effects, and Automation
About this Chapter
In this chapter you learn:
- How to mix your project.- How to add effects.- How to use automation.
Mixing
After recording and editing all sound elements (dialogue, music, and effects) for your project, you are ready for mixing, that is, equalizing all sound elements, balancing their volumes, and refining them with effects.
The MixConsole Sections
You can open the MixConsole by pressing [F3], and show or hide different sections by clicking the “Set up Window Layout” button on the toolbar and activating one of the following options:
• Channel SelectorThe Channel Selector lets you set up the visibility and position of channels in the fader section.
• Channel RacksThe Channel Racks section allows you to configure specific MixConsole functions in racks, such as routing, insert handling or send handling.
• Control Room/MeterThe Control Room/Meter section features a master meter and a loudness meter. The loudness meter complies to the loudness recommendation R 128 of the European Broadcasting Union (EBU).
22

Mixing
The Signal Path in the MixConsole
The signal path of the channels in the MixConsole is represented vertically.
Mute, Solo, and Listen
These buttons determine which channels you hear during playback.
• MuteThis mutes the channel.
• SoloThis function is also known as solo-in-place.
• ListenThis function corresponds to PFL (pre fader listen).
23Mixing, Effects, and Automation

Using Effects
Using Effects
You can use VST 2 and VST 3 plug-ins. Nuendo provides a large number of highly professional effect plug-ins.
Using Insert Effects
You can apply up to eight insert effects to a single channel.
To add an insert effect, proceed as follows:
1. On the MixConsole toolbar, click the Racks button, and activate the Inserts option.
2. Click one of the inserts slots, and select an effect from the insert selector.The insert effect is loaded and automatically activated and its plug-in panel opens.
Using Sends
If you want to apply a certain effect, for example a reverb or an echo, to several channels at once, create an FX channel and insert the plug-in. You can now route the signals of the channels to this FX channel using the send slots of each channel. Proceed as follows:
1. In the Add FX Channel Track window, select the effect and configuration, and click the “Add Track” button.The FX channel track is added in the Project window.
2. On the MixConsole toolbar, click the Racks button, and activate the Sends option.
3. Click the Sends label to open the Sends rack.
4. Right-click one of the send slots, and select the send destination FX channel.
5. Use the send fader to adjust the effect level.
External FX Busses
If you want to use your hardware effect units, you can set up an external FX bus. External plug-ins are treated like regular plug-ins. Latency compensation is also possible.
You can create FX busses on the External FX tab of the VST Connections window as a combination of outputs (sends) and inputs (returns) on your audio hardware.
If you now open an effect pop-up menu and select an external effect as an insert effect for an audio track, the audio is sent to the corresponding audio output, processed in your hardware effect, and returned via the specified audio input.
24Mixing, Effects, and Automation

Writing Automation
Writing Automation
You can write automation for MixConsole parameters and later reproduce your fader, EQ, pan, or mute operations by reading the written automation values. This way, you do not have to adjust parameter controls manually when you play back or export your project, for example.
Writing Dynamic Automation
To write automation on the fly, proceed as follows:
1. Open the MixConsole window, and click the global Write button (“Activate Write for all tracks”) to enable global write mode.
2. Start playback, and adjust the parameters and faders in the MixConsole.
3. When you are done, stop playback, and return to the position where you started playback.
4. Start playback, listen, and watch the MixConsole.All your actions performed during the previous playback are reproduced exactly.
Writing Scene-Based Automation
You can also find specific settings for a specific scene. In this section, we assume that you have already set up markers for your scene, see “Defining Scenes with Markers” on page 16. Proceed as follows:
1. In the Markers window, select the cycle marker for the scene that you want to preview and start playback.
2. From the Project menu, open the Automation Panel, and click the Preview and Loop buttons.
3. Touch a parameter control in the MixConsole, for example the level fader, and listen to the scene to find the correct value.Use the Suspend function if you want to compare the value that was found during preview with previously automated values.
4. Once you have found your values, click the Punch button to make them permanent.
25Mixing, Effects, and Automation

Delivering
About this Chapter
In this chapter you learn:
- How to export your files.- How to back up your project.
Exporting Stems as Audio Files
To export stems as audio files, proceed as follows:
1. Set up the left and right locators to encompass the section that you want to export.
2. Select “File > Export > Audio Mixdown…”.
3. Open the “Path Options” pop-up menu to the right of the Path field, and select “Choose…” to specify an export folder. Use the option “Use Project Audio Folder” if you want to store the exported file in your project’s audio folder.
4. In the File Format section, select a file format, for example, “Wave File”. Activate the “Insert Broadcast Wave Chunk” option, and click the Edit button to enter meta data for the file header.
5. In the “Audio Engine Output” section, select the sample rate and bit depth for your export.48 kHz and 24 bit are common for film projects.
6. Activate the “Split Channels” option if you want to export surround audio and need a separate mono audio file for each surround channel.
7. Click the Export button.Your audio is exported to the specified location.
Selecting an Export Channel
In the Channel Selection section to the left of the Export Audio Mixdown dialog, you can select the output bus or audio-related channel that you want to export:
• Select the main output or master to generate the export file using the main output signal.
• If you created multiple mixes by using different busses, activate the “Channel Batch Export” option to export them in one go.
Exporting Scene by Scene
In the Cycle Marker Selection section you can activate the “Export Cycle Markers” option and select the corresponding markers to export your project scene by scene. On export, you get one audio file for each cycle marker range.
Only the cycle markers of the active markers track can be selected.
26
Recording Stems
Naming your Files
In the File Location section, you can enter a file name in the Name field or specify a naming scheme by clicking the “Naming Scheme…” button. Depending on the settings in the Channel Selection and Marker Selection sections, different elements are available, for example, name (of the exported channel, of the project, of the cycle marker), counter, or channel type. You can always combine these elements. The generated name is shown to the right of the “Naming Scheme…” button.
Exporting to AAF
The Advanced Authoring Format (AAF) is a multimedia file format that allows you to include valuable meta data in your export, such as fades, automation, and processing.
To export an AAF file, proceed as follows:
1. Select “File > Export > AAF…”.
2. For each track name, click in the export column to select the tracks that you want to export.To export the portion between the left and right locators, activate the “From Left to Right Locator” checkbox.
3. Activate the required options in the Options section, and click OK.You can, for example, export all data to one file or create media references to files from within the AAF file.
Recording Stems
You can record your audio internally by using the output of a certain bus or group as an input for a track and record on that track. You can also record externally by playing back your project and making a multi-track recording on an external master, a DAT recorder, another Nuendo instance, or a different DAW, for example.
Backing up
If you are asked to deliver an entire Nuendo project, you can use the backup function.
Preparing Archives
The “Prepare Archive” function verifies that every clip referenced in the project is located in the project folder. This is useful, if your project references sounds from an external hard drive, for example, and you want to back up an independent project.
To prepare an archive, proceed as follows:
1. Select “Media > Prepare Archive…”.If your project references external files, you are asked whether you want to copy them to your working directory. If any processing has been applied, you must decide whether you want to freeze edits.
2. Click Proceed.
Video clips are always referenced and are not stored in the project folder.
27Delivering
Backing up
Backing up Projects
Use this function to create a backup copy of a project or to prepare self-contained projects for delivery. All media files (except those coming from VST Sound archives) can be included as a copy.
Proceed as follows:
1. Select “File > Back up Project…” and choose an empty folder, or create a new folder to save the project.
2. Click OK.
3. To reduce the size of your project, activate the options in the Back Up Projects Options dialog.
- “Minimize Audio Files” includes only the audio file portions that are actually used.- “Freeze Edits” makes all processing and applied effects permanent.- “Remove Unused Files” saves only files that are actually used.- “Do Not Back up Video” excludes any video clips from your backup project.
4. Click OK. A copy of the project is saved in the new folder. The original project is not affected.
28Delivering


![[Manuales] Guia de Utilizacion Nuendo Spanish](https://img.dokumen.tips/doc/110x75/55cf9954550346d0339cd28b/manuales-guia-de-utilizacion-nuendo-spanish-569f6c1f46b8c.jpg)


