Embed Size (px)
DESCRIPTION
Manual em inglês da Camera Profissional Samsung GX-10
Citation preview


1
For Safe Use of Your CameraThank you for buying a Samsung Digital Camera.
Prior to using this camera, please read this user manual thoroughly.When you require After Sales service, please bring the camera and the cause of the cameramalfunction (such as battery, Memory card etc.) to the After Sales centre.To avoid disappointment please ensure that your camera is operating properly well before you intendto use it (e.g. for a trip or an important event). Samsung Cameras take no responsibility for any lossor damages that may result from camera malfunction.Keep the manual in a safe place.Microsoft, Windows and Windows logo are registered trademarks of Microsoft Corporationincorporated in the United States and/or other countries.All brand and product names appearing in this manual are registered trademarks of their respectivecompanies.Specifications are subject to change without prior notice.
DANGERDANGER indicates an imminently hazardous situation which, if not avoided, will result
in death or serious injury.
WARNINGWARNING indicates a potentially hazardous situation, which, if not avoided, could
result in death or serious injury.
CAUTIONCAUTION indicates a potentially hazardous situation, which, if not avoided, may result
in a minor or moderate injury.
This manual contains instructions that will help you to use this camera safely and correctly.
This will help prevent danger and injury to others.
2
Danger
Warning
Do not use the flash in close proximity to people or animals. Positioning the flash too close to yoursubject’s eyes, may cause eyesight damage.When taking photographs, never point the lens of the camera directly into very strong light. This mayresult in permanent damage to your eyesight.For safety reasons keep this product and accessories out of reach of children or animals to preventaccidents e.g.:
Swallowing batteries or small camera accessories. If an accident should occur, please consult adoctor immediately.There is the possibility of injury from the camera’s moving parts.
Batteries and camera may become hot during prolonged use which may result in camera malfunction.Should this be the case, allow the camera to sit idle for a few minutes to allow it time to cool.Do not leave this camera in places subject to extremely high temperatures, such as a sealed vehicle,direct sunlight or other places of extreme variations in temperature. Exposure to extreme temperatures may adversely affect the camera s internal components and couldcause a fire.When in use, do not cover the camera or AC Power Adapter. This may cause heat to build up anddistort the camera body or cause a fire. Always use the camera and its accessories in a well-ventilatedarea.
Do not attempt to modify this camera in any way. This may result in fire, injury, electric shock orsevere damage to you or your camera. Internal inspection, maintenance and repairs should becarried out by your dealer or Samsung Camera Service centre.Please do not use this product in close proximity to flammable or explosive gases, as this couldincrease the risk of explosion.Should any form of liquid or a foreign object enter the camera, do not use it. Switch off the camera,and then disconnect the power source (batteries or AC Power Adapter).You must contact your dealer or Samsung Camera Service centre. Do not continue to use thecamera as this may cause a fire or electric shock.Do not insert or drop metallic or inflammable foreign objects into the camera through access pointse.g. the memory card slot and battery chamber. This may cause a fire or electric shock.Do not operate this camera with wet hands. This could pose a risk of electric shock.

3
Caution
Only use specified batteries (SLB-1674) with this camera. Use of other batteries can causeoverheating or explosion.Do not allow metallic or inflammable foreign objects to come into contact with the battery.Remove the battery when not planning to use the camera for a long period of time. Otherwise thebattery may leak corrosive electrolyte and permanently damage the camera’s components.Cover the battery with the battery cap to prevent the short circuit. Do not disassemble the battery. It may cause leakage or breakage. If liquid from the battery enters the eyes, wash it away immediately with fresh water and consult adoctor. It may cause loss of eyesight.If any of the battery leakage should come in contact with skin or clothes,wash the affected areasthoroughly with water.If there is overheating in, or smoke from, the battery chamber, remove the battery from the camera assoon as possible. When doing so, take care to avoid burns. And then contact your dealer orSamsung Camera Service Centre.The battery is expendable and its life is shortened through use. If the battery capacity is reduced byhalf, purchase new one.After removing the batteries for about 110 hour (4-5 days), the camera may be reset.
Precautions for Battery Usage
Leaking, overheating, or burst batteries could result in fire or injury.Use batteries with the correct specification for the camera.Do not short circuit, heat or dispose of battery in fire.Do not insert the batteries with polarities reversed.
Do not fire the flash while it is in contact with hands or objects. Do not touch the flash after using itcontinuously. It may cause burns.If you are using the AC power adaptor be careful when moving the camera.After use, always switch off the camera before unplugging the adapter from the wall socket. Thenmake sure that any connector cords or cables to other devices are disconnected before moving thecamera. Failure to do so may damage the cords or cables and cause a fire or electric shock.Only D-XENON lenses can be used with this camera.

4
Caution
Only use specified charger (SBC-L6) with this camera. Other chargers can cause fire or electric shock. Observe the power specification (100-240V only) andonly charge the specified rechargeable batter (SLB-1674). Do not disassemble the charger. It may cause fire, electric shock or malfunction.If the charger smokes or overheats, stop using it immediately and contact your dealer or SamsungCamera Service Centre as soon as possible.If water gets inside the camera, stop using the camera and contact your dealer or Samsung CameraService Centre. It may cause fire or electric shock. If the lightning flashes or thunder fills the air, disconnect the power plug. It may cause breakage, fireor electric shock. If there is dirt on the plug, clear the dirt or it may cause fire.
Precautions for Charger Usage

5
ContentsFor Safe Use of Your Camera 1Danger 2Warning 2Caution 3Precautions for Battery Usage 3Precautions for Charger Usage 4Contents 5Contents of the Operating Manual 10
Before Using Your Camera
GX-10 Camera Characteristics 12Checking the Contents of the Package 14Names of Working Parts 15Front 15Back 15Top 16Side 16Bottom 17Using the Button Functions 18Capture Mode 18Playback mode 21LCD Monitor Indications 23While Power is On or Operating Mode Dial 23Capture Mode 24Playback Mode 25Histogram Display 26Viewfinder Indications 27LCD Panel Indications 29
Getting Started
Attaching the Strap 32Connecting to a Power Source 33Inserting the Battery 33How to charge the exclusive rechargeable battery 34Battery Level Indicator / Approximate Playback Time (new batteries) 36Using the Optional AC Adapter 37Using the memory card 38Inserting / Removing the Memory Card 38Precautions When Using the Memory Card 39

6
ContentsRecorded Pixels and Quality Level 40Turning the Camera On and Off 41Initial Settings 42Setting the Display Language 42Setting the Date and Time 44Attaching the Lens 46Adjusting the Viewfinder Dioptre 48
Basic Operations
Basic Shooting Operation 50Holding the Camera 50Letting the Camera Choose the Optimal Settings 51Operating the shutter release button 53Hard-to-Autofocus Subjects 54OPS (Optical Picture Stabilisation) 55Optical Picture Stabilisation 55Shake Reduction Function and Lens Focal Length / Turning On the OPS Function 56Setting the OPS Function 57Using the RAW button 59Other Shooting Modes 60Continuous Shooting 60Self-Timer Shooting 62Remote Control Shooting (Remote Control F : Sold Separately) 65Using Mirror Lock Up Function to Prevent Camera Shake 68Using the Zoom Lens 69Using the Built-in Flash 70Selecting Flash Mode 71Using Auto Discharge , 72Using Fill-in Flash , 73Using Red-eye Reduction Flash / Daylight-Sync Shooting 74Compensating Flash Output 75Using the White Balance 76Setting the White Balance 76Adjusting the White Balance Manually 78Fine-Tuning the White Balance 80Using the ISO sensitivity 82Setting the Sensitivity 82Setting the Range of Automatic Correction in AUTO 83Playing Back Still Pictures 84Playing Back Images 84

7
ContentsRotating Images 85Enlarging Playback Images 86Displaying Multiple Images 88 Selecting the Number of Images to Display / Displaying a Folder 89Slideshow 90Connecting the Camera to AV Equipment 92Digital Filters 93Editing RAW Images 96Deleting Images 98Deleting a Single Image 98Deleting All Images 99Deleting Selected Images (from Nine-Image Display) 100Deleting images taken with the RAW button 102 Protecting Images 103Protecting Images from Deletion (Protect) 103Protecting All Images 104Setting the Printing Service (DPOF) 105Printing Single Images 105Settings for All Images 107Printing Using PictBridge 108Setting USB 109Connecting the Camera to the Printer 110Printing Single Images 111Printing All Images 113Printing Images Using the DPOF Settings / Disconnecting the Cable from the Printer 115
Button, Menu, Mode dial Reference
Using the Menu 118How to Operate the Menu 118Select a menu item and set 119[CAPTURE MENU] Menu Settings 120Setting the Image Tone 121Setting the File Format / Setting the JPEG Recorded Pixels 122Setting the JPEG Quality Level 123Setting the Saturation / Sharpness / Contrast 124Storing User Settings 125Setting the Colour Space 126Shooting in Extended Bracket Mode / Shooting in Multi-exposure Mode 127Memory setting 128Optical Picture stabilisation (OPS) / Exposure mode 129

8
Contents[CUSTOM1 MENU] Menu Setting Items 130Linking AF Point and AE / Superimpose 131AF in remote control / AF Button Function 132AF by Press Halfway / EV Steps 133Meter Operating Time / AE-L with AF locked 134Program Line / Auto EV Compensation 135Fine tune when AWB / WB when using flash 136Adjusting the White Balance with Color Temperature / Noise Reduction 137ISO Warning 138ISO sensitivity step / Reset Custom Function1 139[CUSTOM2 MENU] Menu Setting Items 140Auto Bracketing order / Green Button in Manual mode 141Aperture Ring Use 142e-dial functions on the P / Sv / Tv / Av mode 142One-touch RAW + / Recordable Image No. 144Allowing Shooting while Charging Flash / Selecting the Preview Method 145Initial zoom display / Auto Image Rotation 146Saving rotation information / Illuminating LCD panel 147Reset Custom Function2 148[SETUP MENU] Menu Setting Items 149Formatting the Memory Card 150Turning the Beep On and Off 151Changing the Date and Time and the Display Style 152Setting the World Time 153List of World Time Cities 155Setting the Display Language / Guide Display Time 156Adjusting the Brightness of the LCD Monitor 157Selecting the Video Output Format 158USB (Selecting an external device) / Setting Auto Power Off 159Selecting the Folder Name 160Cleaning the CCD 161Removing the dust 163Reset 164[PLAYBACK MENU] Menu Setting Items / Exposure warning 165Instant View 166Digital Preview / Digital Filter 167Slide show 168Using the Fn Menu 169Capture Mode 169Playback Mode 170

9
ContentsUsing the Mode Dial 171Using the (AUTO) mode 173Using the P (Program) mode 174Using the Hyper-program Mode ( ) 175Using the Sv (Sensitivity Priority) Mode 176 Using the Tv (Shutter Priority) Mode 177Using the Av (Aperture Priority) Mode 179Using the TAv (Shutter & Aperture Priority) Mode 181Using M (Hyper-manual) Mode 182EV Bar 184Using the B (Bulb) Mode 186Using the X (Flash X-Sync Speed) Mode 187Using the USER Mode 187
Basic FunctionChecking the Composition, Exposure and Focus Before Shooting 190Focusing 192Setting the Exposure 199Using the Built-in Flash 208Using an External Flash (Optional) 212
Software informationSoftware Notes 218About the software 219Setting up the application software 220Removable Disk 223Removing the removable disk 225Digimax Master 227Digimax RAW Converter 232
AppendixDefault Settings 234Optional Accessories 239Error Messages 241Troubleshooting 243Main Specifications 248Glossary 250Index 254

10
Contents of the Operating ManualThis operating manual contains the following chapters.
1. Before Using Your CameraExplains camera characteristics, accessories and the names of various parts.
2. Getting StartedExplains your first steps from purchasing the camera to taking pictures. Be sure to read it and followthe instructions.
3. Basic OperationsExplains the basic procedures for taking, playing back, and printing still pictures.
4. Menu ReferenceUnderstand how to use and access the buttons and menus of the GX-10.
5. Function ReferenceIntroduces functions to further enhance your GX-10 experience.
6. Software informationExplains software installation and how to use the program.
7. AppendixExplains troubleshooting, introduces optional accessories and provides various resources.

11
Check the package contents and names of working parts before use.
GX-10 Camera Characteristics 12
Checking the Contents of the Package 14
Names of Working Parts 15
Using the Button Functions 18
LCD Monitor Indications 23
Viewfinder Indications 27
LCD panel Indications 29
1 Before Using Your Camera
12
Features a 23.5x15.7 mm CCD with 10.14 million effective pixels for superior definition and a widedynamic range.Coupled CCD shift type OPS (Optical Picture Stabilization) function. This feature will minimisecamera shake. Features an Auto-Focus sensor with 11 focusing points. The central 9 are wide cross area sensors.Improved manual focusing using a viewfinder similar to a conventional 35 mm SLR camera, with0.95x magnification. Also features a superimpose function in which the focus points on the viewfinderilluminate red.Features a Digital Preview function for checking the image to ensure that the desired result isachieved.Features a large 2.5-inch LCD monitor with 210,000 pixels and a brightness adjusting function forhigh-precision viewing performance.The large, high-resolution LCD monitor and clear menus make the camera easy to operate.The SP coated CCD minimises dust. Any remaining dust can be removed with CCD clear function.You can select JPEG or RAW image format. Or you can select JPEG and PAW at the same time. This is a dustproof and damp proof camera for safe outdoor shooting.
GX-10 Camera Characteristics

13
GX-10 Camera Characteristics
The captured area (view angle) will differ between the GX-10 and 35 mm SLR cameras even if thesame lens is used because the format size for 35 mm film and the CCD are different.Sizes for 35 mm film and CCD
35 mm film : 36x24 mmGX-10 CCD : 23.5x15.7 mm
Angles of view being equal, the focal length of a lens used with a 35 mm camera must beapproximately 1.5 times longer than that of GX-10. To obtain a focal length framing the same area,divide the focal length of the 35 mm lens by 1.5.
Example) To capture the same image as a 150 mm lens attached to a 35 mm camera150÷1.5=100Use a 100 mm lens with the GX-10.
Conversely, multiply the focal length of the lens used with GX-10 by 1.5 to determine the focallength for 35 mm cameras.
Example) If 300 mm lens is used with GX-10300x1.5=450Focal length is equivalent to 450 mm lens on a 35 mm camera.

14
Please check that you have the correct contents before using this product. The contents can varydepending on the sales region. To buy the optional equipment, contact your nearest Samsung dealer orSamsung service centre.
Hot shoe cover (Installed on camera)
Eyecup (Installed on camera)
Viewfinder cap
Body mount cover (Installed on camera)
USB cable Video cable
Software (CD-ROM) Strap
Charger (SBC-L6) AC cord
Rechargeable battery(SLB-1674)
Operating Manual (this manual)
Checking the Contents of the Package

15
Names of Working Parts
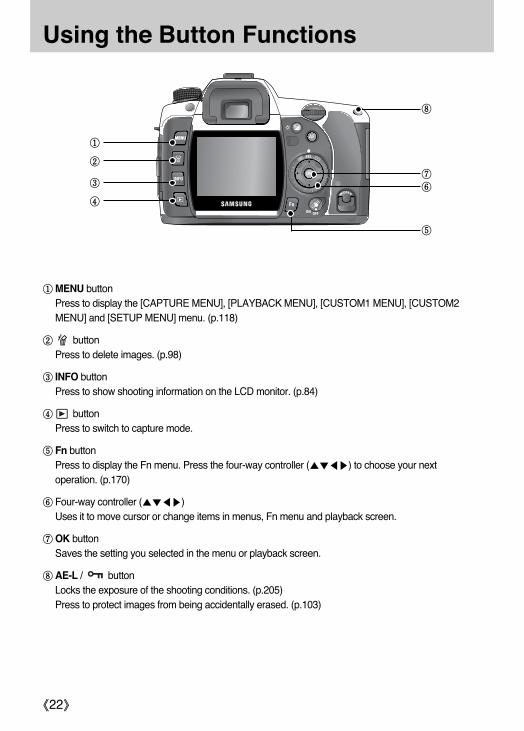
MENU button
Playback ( ) button
Delete ( ) button
INFO button
Mirror
Focus modelever
AF coupler
Lens information contactsLens unlock button
Self-Timer lamp /Remote control receiver
LCD monitorFn button
AE-L / button
Four-way controller
OK button
Rear e-dial
Focus (AF) button
Lens mount index
Front e-dial
Flash ( )pop-up button
Strap
ExposureBracket button
Viewfinder
Self-Timer lamp / Remote control receiver
Card access lamp
(Optical PictureStabilization) lever
Focus point selection dial
Front
Back
RAW button
Exposure Compensation ( ) / LCD panel lamp button

16
Names of Working Parts
Built-in Flash
Hot shoe
Mode dial
DC input terminal
Side
Top
Cable switch port
USB / Videoterminal
Terminal Cover Card cover
Memory CardSlot
LCD panel
Strap
Front e-dial
Main Switch
Strap
Dioptre adjustmentlever
Shutter Button
Green button
Rear e-dial
Metering Lever
Card cover lock
Connection ports Memory Card Slot

17
Names of Working Parts
Bottom
Tripod socketBattery cover &
Lock lever
Battery Chamber cover
Battery Chamber
Battery Holder
Battery Chamber

18
Using the Button Functions
Functions of buttons used during shooting.
Shutter release buttonPress to capture images. (p.53)
Main switchMove to turn the power on/off (p.41) and confirm the depth of field (Preview) (p.190).
Lens unlock buttonPress to detach lens. (p.47)
Focus mode leverSwitches between Autofocus mode (p.192) and Manual focus mode (p.197).
RAW buttonPress to capture a JPEG and RAW file at the same time. (p.59)
Flash pop-up button ( )Press to pop up the built-in flash. (p.72)
Capture Mode

19
Using the Button Functions
Exposure bracket button Sets the Exposure bracket. (p.206)MENU buttonDisplays the [CAPTURE MENU], [CUSTOM1 MENU], [CUSTOM2 MENU], [SETUP MENU] and[PLAYBACK MENU] menu. (p.118)INFO buttonPress to show shooting information on the LCD monitor. (p.24)
buttonSwitches to the Playback mode. (p.84)Fn buttonPress to display the Fn menu. Press the four-way controller ( ) to choose the next operation.(p.169)Optical Picture Stabiliser ( ) buttonSwitches on or off the OPS function. (p.55)Four-way controller ( )Uses it to move cursor or change items in menus and Fn menu.OK buttonSaves the setting you selected in the menu.Focus position dialPress to select a focus position. (p.194)AF buttonFocuses on the subject and get the proper metering. (p.132)AE-L buttonLocks the exposure before shooting. (p.205)EV ( ) / LCD panel lamp buttonHolding this button, rotate the front e-dial to compensate the exposure. (p.204) Press this button to turn on the LCD panel lamp.

20
Using the Button Functions
Metering mode leverChanges the metering modes. (p.202)
Mode dialChanges the camera modes. (p.171)
Rear e-dialSets aperture ISO sensitivity values.
Green buttonResets exposure settings and automatically adjusts the appropriate exposure in a M (Manual) mode.
Front e-dialSets shutter speed and EV compensation values.
21
Using the Button Functions
Functions of buttons used during playback.
Playback mode
Front e-dialUse it to display the previous or next image in magnified playback (p.86) or adjust the digital filter.(p.93)
Main switchMove to turn the camera on and off. (p.41)
Shutter release buttonPress to switch to capture mode.
Rear e-dialSets the Exposure values. Use it to enlarge an image or display multiple images at the same time. (p.86)Use to select a digital filter. (p.93)
22
Using the Button Functions
MENU buttonPress to display the [CAPTURE MENU], [PLAYBACK MENU], [CUSTOM1 MENU], [CUSTOM2MENU] and [SETUP MENU] menu. (p.118)
buttonPress to delete images. (p.98)
INFO buttonPress to show shooting information on the LCD monitor. (p.84)
buttonPress to switch to capture mode.
Fn buttonPress to display the Fn menu. Press the four-way controller ( ) to choose your nextoperation. (p.170)
Four-way controller ( )Uses it to move cursor or change items in menus, Fn menu and playback screen.
OK buttonSaves the setting you selected in the menu or playback screen.
AE-L / buttonLocks the exposure of the shooting conditions. (p.205)Press to protect images from being accidentally erased. (p.103)
23
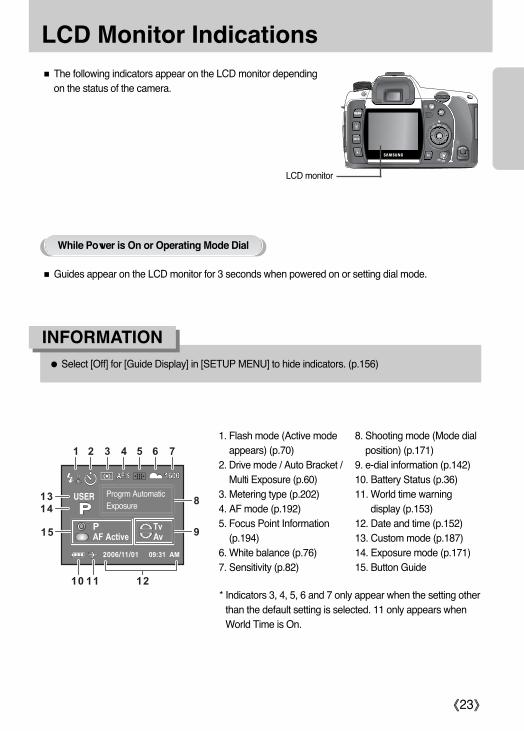
LCD Monitor IndicationsThe following indicators appear on the LCD monitor dependingon the status of the camera.
Guides appear on the LCD monitor for 3 seconds when powered on or setting dial mode.
LCD monitor
While Power is On or Operating Mode Dial
* Indicators 3, 4, 5, 6 and 7 only appear when the setting otherthan the default setting is selected. 11 only appears whenWorld Time is On.
1. Flash mode (Active modeappears) (p.70)
2. Drive mode / Auto Bracket /Multi Exposure (p.60)
3. Metering type (p.202)4. AF mode (p.192)5. Focus Point Information
(p.194)6. White balance (p.76)7. Sensitivity (p.82)
8. Shooting mode (Mode dialposition) (p.171)
9. e-dial information (p.142)10. Battery Status (p.36)11. World time warning
display (p.153)12. Date and time (p.152)13. Custom mode (p.187)14. Exposure mode (p.171)15. Button Guide
Progrm AutomaticExposure
Select [Off] for [Guide Display] in [SETUP MENU] to hide indicators. (p.156)
INFORMATION

24
LCD Monitor Indications
Press the INFO button in capture mode to display the capture function settings on the LCD monitorfor 15 seconds.
1. Shooting mode (p.171)2. Custom mode (p.187) 3. Metering mode (p.202)4. Flash mode (p.70)5. Drive mode (p.60)6. Shutter Speed (p.199)7. Aperture Value (p.200)8. Exposure Compensation Value (p.204)9. Flash Exposure Value (p.75)10. Exposure Bracket / Multi Exposure
(p.206, 127)11. Extended Bracket (p.127)12. Image tone (p.121)13. ISO sensitivity (p.82)14. ISO range (Auto) (p.83)15. White balance (p.76)16. GM compensation value (p.80)
17. BA compensation value (p.80)18. Colour space (p.126)19. File type (p.122)20. Recorded pixels (p.122)21. Quality level (p.123)22. Optical Picture Stabilization (OPS)
(p.55)23. AF mode (p.192)24. Focus point location (p.194)25. Lens focal length (p.57)26. Saturation (p.124)27. Sharpness (p.124)28. Contrast (p.124)29. Battery Status (p.36)30. World tiem (p.153)31. Date and time (p.152)
Capture Mode
Detailed Information

25
LCD Monitor Indications
Press the INFO button in playback mode to display the image information on the LCD monitor.Whenever pressing the INFO button, Basic information, Histogram, Detail information and noinformation will display in that order.
1. Rotate icon (p.85)2. Captured images3. Metering mode4. Flash mode5. Drive mode6. Exposure Bracket /
Multi Exposure7. Exposure mode8. Shutter Speed9. Aperture Value10. Exposure Compensation
Value
11. Flash Compensation Value12. Folder name and Stored
image number (p.126, 160)13. DPOF settings (p.105)14. Protect icon (p.103)15. AF mode16. Focus point information17. Lens focal length 18. Image tone19. Sensitivity20. White Balance / Colour
Temperature
21. WB compensation (GM)22. WB compensation (BA)23. File type24. Image size25. Quality26. Colour Space27. Date & Time28. Saturation29. Sharpness30. Contrast31. Extended Bracket
You can change the information initially displayed by pressing the PB button. (p.84)
INFORMATION
Playback Mode
* Indicators 4 (Flash mode) and 11 (Flash compensation Value) only appear when the image wastaken with flash.
Detailed Information

26
LCD Monitor Indications
1. Capture quality (Image file type)2. Image folder number and file number3. Protect icon (p.103)4. Histogram (Brightness)5. DPOF settings (p.105)
6. Indicator for Brightness Histogram andRGB Histogram
7. Histogram (R)8. Histogram (G)9. Histogram (B)
DPOF icon ( ) will display only when an DPOF set image is played back.Areas where blooming occurred blink if [Exposure Warning] warning is on. (p.165)Histogram shows you the distribution of brightness in recordedimages. If the bars in the histogram are higher towards the right, the image may be too bright.If the bars are higher on the left, the image may be too dark. If the lighting conditions are too bright to check the subject by usingthe LCD, checking the histogram will enable more precise exposurecontrol for the shots.
INFORMATION
Brightness Histogram that distributes brightness of the image and RGB Histogram that distributescolour of the image are selectable by using the Up and Down ( , ) button.
Histogram Display
[Playback] [Y Histogram] [RGB Histogram]
Pix
el
Dark Bright
Distribution of brightness

27
Viewfinder Indications
1. Autofocus frame2. Spot metering frame3. Focus point (p.194)4. indicator
: Blinks when OPS is operating (p.55)5. Flash status
: Appears when flash is available and blinks when flash is recommended but not set. (p.70)6. Shutter speed
: Shutter speed when capturing or adjusting (underlined when shutter speed can be adjusted withfront e-dial). (p.199)
7. Aperture : Aperture when capturing or adjusting (underlined when aperture can be adjusted with rear e-dial).(p.200)
8. Focus indicator : Appears when image is focused.
9. Manual Focus: Appears when the Manual Focus is selected.
10. Exposure Bar : Displays the Exposure Compensation Value. (p.184)The differences between Current Exposure Value and Proper Exposure Value in the M mode.

28
Viewfinder Indications11. EV compensation
: Appears when EV compensation is available or in use.12. Flash Exposure Compensation
: Appears when Flash Exposure is compensated. 13. AE Lock indicator
: Appears when AE is locked. 14. ISO sensitivity warning
: Appears when warning value is exceeded.15. Number of recordable images / EV compensation
: Show the number of recordable images with current quality and recorded pixel setting. (p.122, 123)Show the number of continuous shooting recordable images. (p.144)The differences between the compensated Exposure and proper exposure will display. In the M mode, the exposure value can be different. In the Sensitivity priority mode / Shutter & Aperture Priority mode, ISO sensitivity will display.
The red indication of the focus point used for autofocus lights up and is superimposed on the viewwhen the shutter release button is pressed halfway.When [AF Button Function] of the [CUSTOM1 MENU] menu is set to [Cancel AF], MF icon willdisplay while AF button is pressed. (p.132)In any mode with the exception of Sensitivity priority mode and Shutter & Aperture priority mode,ISO sensitivity will display on No. 14 position while the OK button is pressed.
INFORMATION

29
LCD Panel Indications
1. Shutter speed (p.199)2. Aperture (p.200)3. Flash mode (p.70)
: Built-in flash is ready(when blinking, flash should beused; or incorrect lens ismounted)
: Red-eye reduction flash on: Flash off: Auto discharge
SLOW : First curtain synchro4. Drive mode (p.60)
: Single frame: Continuous Shot: Self-timer: Remote control mode
5. Exposure Bar (p.184)6. Auto Bracket (p.206)7. Flash Exposure Compensation indicator
(p.75)8. Exposure compensation (p.204)9. Battery status (p.36)10. White Balance (If Auto WB is selected, no
icon will display) (p.76)± : White Balance Compensation
11. ISO sensitivity warning (p.138)12. RAW + button : RAW + (p.144)13. Number of recordable images / EV
compensation value / PC (Pb)(PC=Personal Computer (mass storage))(Pb=PictBridge)
14. Multi exposure (p.127)
The following information appears in the LCD panel on top of the camera.

30
MEMO

31
This chapter explains your first steps from purchasing the camera to taking pictures. Be sure toread it and follow the instructions.
Attaching the Strap 32
Connecting to a Power Source 33
Using the memory card 38
Turning the Camera On and Off 41
Initial Settings 42
Attaching the Lens 46
Adjusting the Viewfinder Dioptre 48
2 Getting Started

32
Attaching the Strap1. Pass the end of the strap through the strap lug, then secure on the
inside of the clasp.
2. Pass the other end of the strap through the other strap lug on thecamera, then secure on the inside of the clasp.

33
Connecting to a Power Source
Use the supplied rechargeable battery (SLB-1674). When the battery is used for the first time or is notused for a long time, a [Low Battery] message will display.
1. Rotate the Battery cover unlock lever as shown in theillustration ( ) and open the cover ( ).
Use the specified battery. Problems caused by using the other battery are not covered by theSamsung warranty.Do not open the battery cover or remove the batteries while the power is on.Remove the batteries when you will not use the camera for a long while. The batteries may leak.If the date and time settings have been reset when you insert new batteries after a long while,follow the procedure for “Setting the Date and Time”.Insert batteries correctly. Batteries inserted incorrectly may cause a camera breakdown. Wipe theelectrodes of the batteries before inserting.When the battery is removed, turn off the camera first or the stored data may be deleted.
INFORMATION
Inserting the Battery
Model Name SLB-1674
Battery Type Lithium-ion
Capacity 1620mAh
Voltagy 7.4V
Charging time
(When the camera power is off)About 150-180 Min.

34
1. Insert the supplied AC cord to the power outlet and DC input port of the charger.
Connecting to a Power Source
3. Close the Battery cover and rotate the battery cover lock leveras shown ( ).
2. Insert the batteries according to the + / - indicators in thebattery cover. Have the mark on the battery facing towardthe LCD monitor and insert the battery by pressing the batterylock lever as shown ( ). Insert the battery until the battery lockis locked. To remove the battery press the battery lock lever asshown ( ). When the battery pops up slightly, remove thebattery.
We recommend using AC adapter when the camera is used for a long time or is connected to acomputer.
INFORMATION
How to charge the exclusive rechargeable battery
Battery lock lever

35
Connecting to a Power Source
If the charging LED of the AC Charger does not turn on orblink after inserting the rechargeable battery, please checkwhether the battery is inserted correctly.
You must check the battery charging status with the ChargingLED.
Charging LED Status
Being Charged Red LED is on
Charging is complete The LED is off
Charging error Red LED is blinking
Charging LED
2. Put the battery on the charger as shown.
Proper operating temperatures of the Charger are 0°C ~ 40°C. The battery may not be chargedunder or over the operating temperature (Red LED is blinking). This is not the cameramalfunction. The period of quality guarantee of charger is 1 year and Lithium ion rechargeable battery is 6months.
A Lithium ion battery is expendable. If the working duration of a fully charged battery decreasessharply, purchase a new one.
INFORMATION
Rated input AC100-240V (50Hz-60Hz)
Rated output DC 8.4 V/700 mA
Dimensions 60 90 30.2 mm
Weight 86 g
Charger (SBC-L6)

36
You can confirm remaining battery level by checking the displayed on the LCD panel.
lit : Battery is full.
lit : Battery is running low.
lit : Battery is almost empty.
blink : The camera turns off after displaying a message.
The still picture storage capacity is based on measuring conditions in accordance with CIPAstandards and the playback time is based on SAMSUNG measuring conditions. Some deviation fromthe above figures may occur in actual use depending on shooting mode and shooting conditions.
23 Approx. 510 Min. Approx. 440 Min. Approx. 320 Min. Approx. 300 Min.
Normalrecording
BatteryOperating
Temperature
Rechargeable battery(SLB-1674)
Playback timeFlash photography
50% use 100% use
Battery performance temporarily decreases while being used in cold conditions. When using thecamera in cold climates, have extra batteries on hand and keep them warm in your pocket.Battery performance will return to normal when returned to room temperature.Have extra batteries ready when travelling overseas, taking pictures in cold climates, or when youwill be taking a lot of pictures.
INFORMATION
Battery Level Indicator
Approximate Playback Time (new batteries)
Connecting to a Power Source

37
1. Make sure the camera is turned off before opening the terminal cover.2. Connect the DC terminal on the AC adapter to the DC input terminal on the camera.3. Connect the AC plug cord to the AC adapter.4. Plug the AC cord into the power outlet.
Make sure the camera is turned off before connecting or disconnecting the AC adapter.Make sure connections are secure between the camera, AC adapter, AC plug cord terminal andthe power outlet. Memory Card and data will be corrupted if disconnected while camera isrecording or reading data.Be sure to read the AC adapter SAC-82 operating manual when using the AC adapter.The rechargeable batteries in your camera will not charge when connected to the AC adapter.
INFORMATION
1
2
3
4
AC adapter (SAC-82, optional) for PENTAX DSLR cameras can be used with SAMSUNG DSLRcameras.
Using the Optional AC Adapter
Connecting to a Power Source

38
Using the memory card
SD / SDHC memory card and Multi Media Card can be used with this camera.
Captured images are recorded on the Memory Card. Make sure the camera is turned off beforeinserting or removing the Memory Card.
1. Lift up the Card Cover Lock as shown ( ) and rotate it to theOPEN direction ( ) (Card cover opens ).
2. Have the front of the memory card facing toward the LCDmonitor and insert the memory card.To remove the card, push it as shown.
3. Close the Card cover.Close the Card cover firmly or the camera will not turn on.
Do not remove the Memory Card while card access lamp is lit.Always format new Memory Cards before use. Also format Memory Cards used with othercameras. Refer to “Formatting the Memory Card” (p.150) for details on formatting.
INFORMATION
Inserting / Removing the Memory Card

39
Using the memory card
The Memory Card is equipped with a write-protect switch. Setting theswitch to LOCK protects the existing data by preventing the recordingof new data, deletion of existing data or formatting of the card.Care should be taken when removing the Memory Card immediatelyafter using the camera because the card may be hot.Do not remove the Memory Card or turn the camera off while data isbeing saved to the card, images are being played back, or thecamera is connected to a computer with the USB cable. This may cause the data to be lost or thecard to be damaged.Do not bend the Memory Card or subject it to violent impact. Keep it away from water and store awayfrom high temperatures.Do not remove the Memory Card during formatting. The card may be damaged beyond use.Data on the Memory Card may be deleted in the following circumstances.Samsung Camera does not accept any liability for data that is deleted if(1) the Memory Card is mishandled by the user.(2) the Memory Card is exposed to static electricity or electrical interference.(3) the card has not been used for a long time.(4) the card is ejected or the battery is removed while the data on the card is being recorded or
accessed.The Memory Card has a limited service life. If it is not used for a long time, the data on the card maybecome unreadable. Be sure to regularly make a backup of important data on a computer.Avoid using or storing the card where it may be exposed to static electricity or electrical interference.Avoid using or storing the card in direct sunlight or where it may be exposed to rapid changes intemperature or to condensation.For information on compatible Memory Cards, visit the Samsung Camera website or contact yournearest Samsung Camera customer service centre.Always format new Memory Cards. Also format Memory Cards used with other cameras.
Formatting the Memory Card (p.150)
Write-protectswitch
Precautions When Using the Memory Card

40
Using the memory card
Choose the number of pixels (size) and quality level (data compression rate) of pictures according tohow you intend to use the pictures you have taken.Pictures with larger recorded size or the more are clearer when printed.The number of pictures that can be taken (the number of pictures that can be recorded on anMemory Card) becomes less with larger file sizes.The quality of the captured photo or printed picture depends on the quality level, exposure control,resolution of the printer and a variety of other factors so you do not need to select more than therequired number of pixels. For example, to print in postcard size, 2M (1824X1216) is adequate. Set the appropriate recorded size and quality level depending on purpose.
Choose the appropriate number of recorded pixels and quality level for images on the [CAPTUREMENU] menu.
Setting the Recorded Pixels (p.122)Setting the Quality Level (p.123)
- The above table shows the approximate image storage capacity and recording time when using a512 MB SD Memory Card.
- The above figures may vary depending on the subject, shooting conditions, shooting mode, MemoryCard and other factors.
Recorded Pixels, Quality Level and Approximate Image Storage Capacity
30 - - -
- 104 178 306
- 174 297 512
- 474 802 1360
(3872x2592)
(3008x2000)
(1824x1216)
Recorded Pixels
Quality LevelRAW
Best Better Good
Recorded Pixels and Quality Level
Any images in excess of 500 on a single card will be saved in a new folder. But, in the AutoBracket mode, folders are not made though the numbers of images are over 500 until the AutoBracket shots are finished.
INFORMATION
10M
6M
2M

41
Move the main switch to the [ON] position.The camera will turn on. Move the main switch to the [OFF]position to turn off the camera.
Always turn the camera off when not in use.The power will automatically turn off when you do not perform any operations within a set periodof time. (Default setting is 1 minute) You can change the setting on the [Auto Power Off] menu ofthe [SETUP MENU] menu. To turn on the camera again, rotate the main switch or refer to the followings. - Press the shutter button halfway down- Press the Playback mode button- Press the INFO button
INFORMATION
Turning the Camera On and Off

INITIAL SETTING
: Set : Cancel
Language/
DeutschEspañol
PortuguêsItaliano
Svenska
42
Initial SettingsThe first time the camera is turned on after purchasing, the “Initial Settings” screen appears on theLCD monitor. Follow the procedure below to set the language displayed on the LCD monitor and thecurrent date and time. Once setting is done, these will not need to be set again when turning yourcamera on.
You can choose the language in which the menus, error messages, etc. are displayed from thefollowing : English, Korean, Chinese (traditional / simplified), French, German, Spanish, Portuguese, Italian,Swedish, Dutch, Danish, and Russian.
1. Language selection menu displays.
2. Select a menu by using the four way controller ( ). The default setting is English.
3. Press the OK button.
Setting the Display Language
4. Press the button. The menu cursor will shift to menu.
5. Press the button to select a city.
English
Français
INITIAL SETTING
: Set : Cancel
Language/ English
Seoul
DST
INITIAL SETTING
: Set : Cancel
Language/
DeutschEspañol
PortuguêsItaliano
Svenska
English
Français
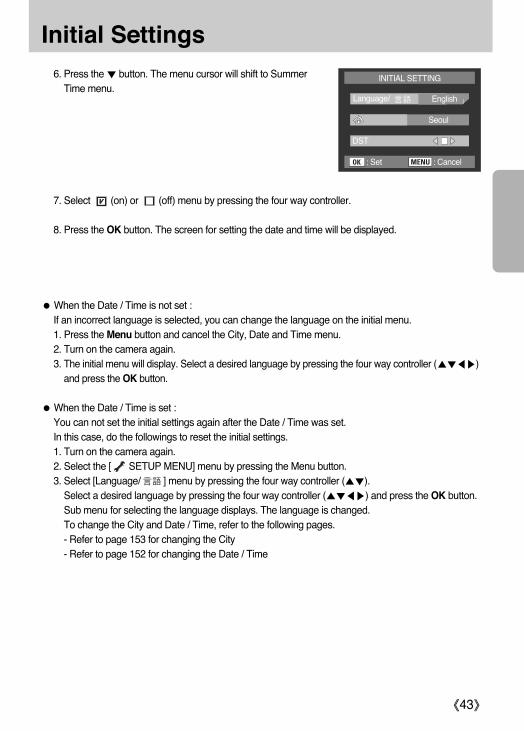
43
Initial Settings6. Press the button. The menu cursor will shift to Summer
Time menu.
When the Date / Time is not set :If an incorrect language is selected, you can change the language on the initial menu. 1. Press the Menu button and cancel the City, Date and Time menu. 2. Turn on the camera again. 3. The initial menu will display. Select a desired language by pressing the four way controller ( )
and press the OK button.
When the Date / Time is set :You can not set the initial settings again after the Date / Time was set.In this case, do the followings to reset the initial settings. 1. Turn on the camera again.2. Select the [ SETUP MENU] menu by pressing the Menu button.3. Select [Language/ ] menu by pressing the four way controller ( ).
Select a desired language by pressing the four way controller ( ) and press the OK button. Sub menu for selecting the language displays. The language is changed.To change the City and Date / Time, refer to the following pages.- Refer to page 153 for changing the City- Refer to page 152 for changing the Date / Time
INITIAL SETTING
: Set : Cancel
Language/ English
Seoul
DST
7. Select (on) or (off) menu by pressing the four way controller.
8. Press the OK button. The screen for setting the date and time will be displayed.

44
1. Press the four-way controller ( ).The frame moves to [yy/mm/dd].
2. Use the four-way controller ( ) to choose the date style.
3. Press the four-way controller ( ).The frame moves to [24h].
4. Use the four-way controller ( ) to select 24h (24 hourdisplay) or 12h (12-hour display).
5. Press the four-way controller ( ).The frame returns to [Date Style].
6. Press the four-way controller ( ).The frame moves to [Date].
Set the current date and time and the display style.
Initial Settings
Setting the Date and Time
7. Press the four-way controller ( ). The frame moves to the year.
If you press the Menu button during the initial settings, the menu set at the moment is cancelled.In this case, the [Language/ ] menu will display when the camera is turned on.
INFORMATION
INITIAL SETTING
Date & Time
: Set : Cancel
Date Style yy/mm/dd
Date 2006
Time 00 00
01 01
24h
INITIAL SETTING
Date & Time
: Set : Cancel
Date Style yy/mm/dd
Date 2006
Time 00 00
01 01
24h
INITIAL SETTING
Date & Time
: Set : Cancel
Date Style yy/mm/dd
Date 2006
Time 00 00
01 01
24h

45
Initial Settings8. Use the four-way controller ( ) to set the year. Set the month and year in the same manner.
9. Press the button. The frame returns to the [Date] menu.
10. Press the button. The frame returns to the [Time] menu.
11. Press the button. Use the buttons to set the time.
12. Press the OK button. The camera is ready to take pictures. If you set the date and time with themenu operations, the screen will return to the [SETUP MENU] menu. Press the OK button again.
You can cancel the setting operation and switch to Capture mode during initial settings bypressing the MENU button. In this case, the Initial Settings screen will appear again the next timeyou turn the camera on.When you finish the settings and press the OK button, the camera clock is reset to 00 seconds. To set the exact time, press the OK button when the time signal (on the TV, radio, etc.) reaches00 seconds.You can change the language and date and time settings with the menu operations. (p.152, 156)
INFORMATION
INITIAL SETTING
Date & Time
: Set : Cancel
Date Style yy/mm/dd
Date 2006
Time 00 00
01 01
24h
INITIAL SETTING
Date & Time
: Set : Cancel
Date Style yy/mm/dd
Date 2006
Time 00 00
01 01
24h

46
Attaching the LensOnly D-XENON, D-XENOGON lenses can be used with this camera.Some functions are restricted when lenses are not set to Aperture A (Auto). Also see “Notes on[Using Aperture Ring]”. Other lenses and accessories will not be available with factory defaultsettings. To allow shutter release, set [Use Aperture Ring] in [CUSTOM2 MENU] menu.
1. Check that the camera is off.2. Remove the body mount cover ( ) and lens mount cover ( ).
Be sure to put the lens down with the lens mount side facingupward to avoid damage.
3. Align the red dots on the camera and the lens, and secure byturning the lens clockwise until it clicks.After attaching, check that the lens is secure. Also check thatthe red dots of the lens are on top and the attached portiondoes not move sideways.
Turn the camera off before attaching or removing the lens to prevent unexpected lens problems.
INFORMATION

47
Attaching the Lens4. Remove the front lens cap by pushing the indicated portions
inward.
To detach the lens, hold down the lens unlock button ( ) andturn the lens counterclockwise.
The body mount cover ( ) is a cover to prevent damage during shipping. We assume no responsibility nor liability for accidents, damages and malfunctions resulting fromthe use of lenses made by other manufacturers.The camera body and lens mount incorporate lens information contacts and an AF coupler.Dirt, dust, or corrosion may damage the electrical system.Clean the contacts with a soft dry cloth.
INFORMATION

48
Adjusting the Viewfinder DioptreAdjust the viewfinder to suit your eyesight.If it is difficult to see the viewfinder image clearly, slide the diopter adjustment lever sideways.You can slide the diopter from -2.5 m-1 to +1.5 m-1.
1. Look through the viewfinder and point the camera at a well-litscene. Slide the diopter adjustment lever left or right.Adjust the lever until the AF frame in the viewfinder is focused.
AF Frame
Eyecup is attached to the viewfinder portion when cameraleaves the factory. Diopter adjustment is available with theeyecup attached. However, adjustment is easier with theeyecup removed as shown above. To remove the eyecup,pull upward and remove as shown on the right.If it is difficult to see the viewfinder image clearly even if youset the diopter adjustment lever, use the diopter correctionlens adapter (optional). However, the eyecup must beremoved.
INFORMATION

This chapter explains basic operations. For information about advanced functions and settingsfor taking pictures, refer to chapter 4 and onward.
Basic Shooting Operation 50
OPS (Optical Picture Stabilisation) 55
Using the RAW button 59
Other Shooting Modes 60
Using the Zoom Lens 69
Using the Built-in Flash 70
Using the White Balance 76
Using the ISO sensitivity 82
Playing Back Still Pictures 84
Deleting Images 98
Protecting Images 103
Setting the Printing Service (DPOF) 105
Printing Using PictBridge 108
3 Basic Operations

50
Basic Shooting Operation
How you hold the camera is important when taking pictures.- Hold the camera firmly with both hands.- Press the shutter release button gently when taking a picture.
[Horizontal position] [Vertical position]
To reduce camera shake, support your body or the camera on a solid object such as a table, tree,or wall. Although there are individual differences among photographers, the slowest recommendedshutter speed for a handheld camera is generally 1/(focal lengthx1.5). For example, it is 1/75 of a second for a focal length of 50 mm and 1/150 of a second for 100 mm. A tripod or OPS function should be used for shutter speeds slower than this. When using a telephoto lens, a tripod that is heavier than the total weight of the camera and lensis recommended to avoid camera shake.When using the tripod, do not use the OPS function as the image may be blurred due to theoscillation of the OPS sensor.
INFORMATION
Holding the Camera

51
How to set the camera so it will choose the optimum settings based on the subject lighting, distanceand motion.
1. Set the mode dial to .- The camera will select the optimal capturing mode for the subject.
2. Set the focus mode lever to SAF. In this mode, the shutter canbe released when the image is focused.
Basic Shooting Operation
Letting the Camera Choose the Optimal Settings
52
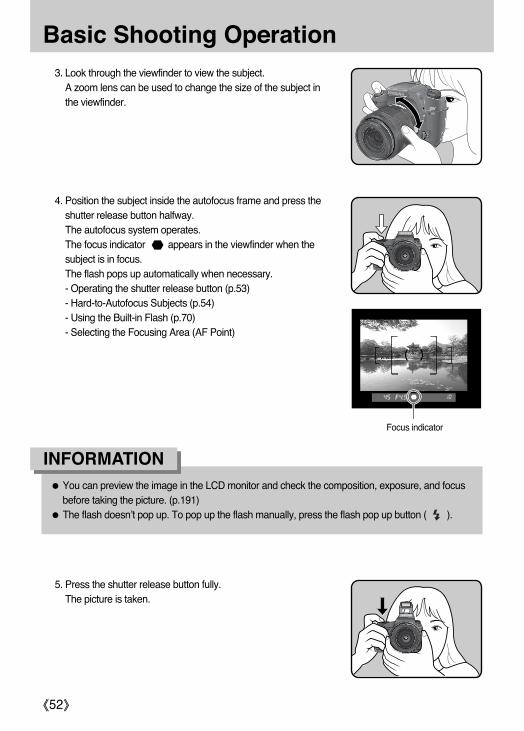
Basic Shooting Operation3. Look through the viewfinder to view the subject.
A zoom lens can be used to change the size of the subject inthe viewfinder.
5. Press the shutter release button fully. The picture is taken.
4. Position the subject inside the autofocus frame and press theshutter release button halfway.The autofocus system operates.The focus indicator appears in the viewfinder when thesubject is in focus.The flash pops up automatically when necessary. - Operating the shutter release button (p.53)- Hard-to-Autofocus Subjects (p.54)- Using the Built-in Flash (p.70)- Selecting the Focusing Area (AF Point)
You can preview the image in the LCD monitor and check the composition, exposure, and focusbefore taking the picture. (p.191)The flash doesn’t pop up. To pop up the flash manually, press the flash pop up button ( ).
INFORMATION
Focus indicator

53
6. Review captured images on the LCD monitor.Image displays for 1 second on the LCD monitor aftercapturing (Instant Review.) You can delete the image during Instant Review by pressingthe button.- Setting the Display Time (p.166)- Deleting Images (p.98)- Displaying Bright Portion Warning (p.165)
The shutter release button has two positions.
Pressing the shutter release button down halfway (first position) turns on the viewfinder and LCDpanel indicators and the autofocus system operates. Pressing it down fully (second position) takesthe picture.
Not pressed Pressed halfway(first position)
Pressed fully(second position)
Squeeze the shutter release button gently when taking a picture to prevent camera shake.Practice pressing the shutter release button halfway to learn where the first position is.The viewfinder indicators stay on while shutter release button is pressed. The indications stay onfor about 10 seconds (default setting) after the button is released.
INFORMATION
Basic Shooting Operation
Operating the shutter release button
Delete

54
Basic Shooting Operation
The autofocus mechanism is not always precisely accurate. Focusing may be difficult when takingpictures under the following conditions ((a) to (f) below). These also apply to manual focusing using thefocus indicator in the viewfinder. If the subject cannot be focused automatically, set the focusmode lever to MF and use the manual focus mode to focus on the subject with the aid of the mattefield in the viewfinder.
(a) Extremely low-contrast subjects such as a white wall in the focus points range.(b) Subjects which do not reflect much light within the focus points range.(c) Fast moving objects.(d) Strongly reflected light or strong backlighting (bright background).(e) If vertical or horizontal line patterns appear within the focus points range.(f) Multiple subjects in the foreground and background within the focus points range.
Subject may not be focused even when (focus indicator) is displayed when (f) above applies.
INFORMATION
Hard-to-Autofocus Subjects

55
OPS (Optical Picture Stabilisation) You can easily take sharp pictures using the Optical PictureStabilisation by simply turning on the OPS switch.
Optical Picture Stabilisation
The OPS function reduces camera shake that occurs when the shutter release button is pressed.This is useful for taking pictures in situations where camera shake is likely to occur. The OPS functionallows you to take pictures at approximately 2 to 3.5 steps slower shutter speed without the risk of thecamera shake.The OPS function is ideal when taking pictures in the following situations.- When taking pictures in dimly lit locations, such as indoors, at night, on cloudy days and in the shade- When taking telephoto pictures
[Blurred picture] [Picture taken with the OPS function]
The OPS function does not compensate for blurring caused by movement of the subject. To takepictures of a moving subject, increase the shutter speed.The OPS function may not fully reduce camera shake when taking close-up shots. In this case, itis recommended that the OPS function be turned off and the camera be used with a tripod.The OPS function will not fully work when shooting with a slower shutter speed, for example whenshooting a moving subject or night scenes. In this case, it is recommended that the OPS functionbe turned off and the camera be used with a tripod.
INFORMATION

56
Turning On the OPS Function
Turn on the OPS switch. When the shutter release button is pressed halfway, appears in theviewfinder and the OPS function turns on.
Turn the Shake Reduction switch off if you will not use the Shake Reduction function. (OFF)The Shake Reduction function will not fully work (for about 2 seconds) right after turning on thecamera or restoring from Auto Power Off. Wait for the Shake Reduction function to become stablebefore gently pressing the shutter release button to take a picture. Press the shutter releasebutton halfway. The camera is ready to take pictures when icon appears in the viewfinder.Be sure to turn off the OPS switch when using the camera with a tripod.The Shake Reduction function automatically turns off in the following situations.When using self-timer, remote control shooting, bulb shooting, or wireless mode with an externalflash.
INFORMATION
OPS (Optical Picture Stabilisation)
Shake Reduction Function and Lens Focal Length
The OPS function operates by acquiring the lens information such as focal length. If a lens thatinformation is automatically acquired is used, the [ OPS] setting menu appears but can't beselected. If another type of lens is used, the lens information cannot be automatically acquired. In this case, setthe focal length by using the [ OPS] menu.

57
OPS (Optical Picture Stabilisation)
Setting the OPS Function
The [ OPS] setting menu appears when the camera is turned on with the Shake Reductionswitch on and a type of lens that does not support automatic acquisition of lens information such asfocal length is mounted. Use the [ OPS] setting menu to set the Focal Length.
The [ OPS] setting menu may appear but is not selected when using a lens that supportsautomatic acquisition of lens information such as focal length because the Focal Length is setautomatically.When using a lens without the A (Auto) position on the aperture or with the aperture set to aposition other than the s position, set [Use Aperture Ring] on the [CUSTOM2 MENU] menu to[On].
INFORMATION
1. Use the four-way controller ( ) to set the Focal Length.Select from the following focal length values. (The default setting is 35.)
8 10 12 15 18 20 24 28 30 35
40 43 50 55 65 70 77 85 100 120
135 150 180 200 250 300 350 400 450 500
550 600 700 800 - - - - - -
FocalLength
To change the Focal Length and OPS settings, use [ OPS]on the [CAPTURE MENU] menu.
CAPTURE MENU
: Set : Back
Optical Picture Stabilization
Focal Length
CAPTURE MENU
: Move : Exit
User RegistrationColor SpaceExtended BracketMulti ExposureMemory of Settings
OPS
OffOff
Manual

58
OPS (Optical Picture Stabilisation)
If the focal length for your lens is not listed above, select the value closest to the actual focallength.When using a zoom lens, select the actual focal length at the zoom setting in the same manner.
INFORMATION

59
Using the RAW button When you press the RAW button, the images are taken as RAWand JPEG file type. You can set the type of shooting with the RAWbutton. (p.144)
When you press the RAW button, RAW + will display on the LCDpanel. Press the Shutter button to take a picture.
When rotating the Mode dial and pressing the RAW button again, the RAW function will becancelled.When using the RAW+ function, it may take a time to save the image as the images are saved asRAW and JPEG file type.When the Image taken with the RAW+ function is displayed on the LCD monitor, only a JPEGimage is displayed. To view the RAW image, use the supplied Software.
INFORMATION

60
Other Shooting Modes
Pictures can be taken continuously while the shutter release button is held down.When you select [RAW] menu in the [File Format] menu, the maximum number of continuous shotsare 9.
1. Press the Fn button.
The Fn menu appears.
Continuous Shooting
2. Press the four-way controller ( ).
The Drive Mode options screen appears. The Default is [Single Frame Shooting].
Single Frame Shooting
DRIVE
: Set: Move
: Move : Exit

61
Other Shooting Modes
6. Press the shutter release button fully.Pictures are taken continuously while the shutter release button is fully pressed. Take your fingeroff the shutter release button to stop.Continuous shooting settings are retained when the power is turned off.Display the Fn menu again and set to (Single frame shooting) to stop Continuous shooting.
Set [Continuous] in [Remaining Count] of the [CUSTOM2 MENU] menu. The number of continuouslyrecordable images (buffer space) appears when shutter is pressed halfway. (p.144)
3. Use the four-way controller ( ) to select .
4. Press the OK button twice. The camera is ready to take pictures.
5. Press the shutter release button halfway. The autofocus system operates. The focus indicatorappears in the viewfinder when the subject is in focus.
Continuous Shooting
DRIVE
: Set: Move

62
Other Shooting Modes
This camera has two types of self-timers : and .
Shutter will be released after about 12 seconds. Use this mode to include the
photographer in the picture.
After pressing the shutter button Mirror will pop up directly.
Shutter is released after about 2 seconds. Use this mode to avoid camera shake
when the shutter release button is pressed.
1. Mount the camera to a tripod.
The focus is adjusted each time the shutter is released while exposure metering timer is set(shutter release button is pressed halfway) if the focus mode is set to SAF (Single mode). (p.192)Focusing is continuously active when the focus mode is set to CAF (Continuous mode). Note that in CAF, the shutter will release when the shutter release button is pressed fully even iffocusing is not complete.The shutter cannot be released until charging is complete when using the built-in flash. Use acustom function to enable shutter release before the built-in flash is ready.
INFORMATION
Self-Timer Shooting

63
Other Shooting Modes
The Drive Mode options screen appears.
2. Press the Fn button.
The Fn menu appears.
3. Press the four-way controller ( ).
: Move : Exit
Continuous Shooting
DRIVE
: Set: Move

64
Other Shooting Modes4. Use the four-way controller ( ) to select or .
5. Press the OK button twice. The camera is ready to take pictures.
6. Confirm in the viewfinder that the subject you wish to shoot is inthe display and press the shutter release button halfway.The focus indicator appears when the subject is in focus.
7. Press the shutter release button fully., the self-timer lamp starts blinking slowly at first and then
blinks rapidly for 2 seconds before the shutter is released.The beep is heard and the rate increases.The shutter will be released about 12 seconds after the shutterrelease button is pressed fully.
, the shutter will be released about 2 seconds after theshutter release button is pressed fully.
8. Turn the camera off after shooting.
You can cancel the self-timer. Press the MENU, Fn, Playbackbutton or rotate the Mode dial Whlie the self-timer is operating.
Self-Timer (12 secs)
DRIVE
: Set: Move

65
Other Shooting Modes
3. Press the four-way controller ( ).The Drive Mode options screen appears.
The shutter can be released with the optional remote control unit. You can select from (remotecontrol) and (three-second delay) for remote control shooting.
The shutter will be released immediately the shutter release button on the remote
control unit is pressed.
The shutter will be released 3 seconds after the shutter release button on the
remote control unit is pressed.
1. Mount the camera on to a tripod.
The Fn menu appears.
Remote Control for PENTAX DSLR (Remote Controller F) can be used with SAMSUNG DSLR.
Remote Control Shooting (Remote Control F : Sold Separately)
2. Press the Fn button.
: Move : Exit

66
Other Shooting Modes4. Use the four-way controller ( ) to select or .
The self-timer lamp will blink to let you know that the camera isin remote control wait status.
5. Press the OK button twice. The camera is ready to take pictures.
6. Press the shutter release button halfway.The autofocus system operates. The focus indicator appears in the viewfinder when thesubject is in focus.
You cannot focus with the remote control unit in default settings. Focus on the subject first beforeoperating with the remote control. You can set [AF in Remote Control] to [On] in the customfunction. (p.132)
INFORMATION
7. Point the remote control unit towards the front of the cameraand press the shutter release button on the remote control.The maximum operating distance of the remote control unit isabout 5 m from the front of the camera.- , the shutter will be released immediately after theshutter release button is pressed.
- , the shutter will be released approximately 3 secondsafter the shutter release button is pressed.When the picture is taken, the self-timer lamp lights and willthen resume blinking.
Remote Control
DRIVE
: Set: Move

67
Other Shooting Modes
The beep can be turned off (p.151).Exposure may be affected if light enters the viewfinder. Attach the provided viewfinder cap or usethe AE lock function (p.205). (Ignore the light entering the viewfinder when the exposure mode isset to the Manual mode (p.182).)Remove the Eyecup by pulling one side out and toward you when using accessories such as theviewfinder cap.
Turn the power off to stop the remote control operation after it has been activated.The remote control may not operate in backlit conditions.The remote control does not work while the flash is being charged.When using the built-in flash, raise the flash into position first.The remote control unit battery can send a remote control signal about 30,000 times.
INFORMATION
[Removing the Eyecup] [Attaching the Viewfinder cap]

68
Other Shooting Modes
Use the Mirror Lock Up function if camera shake is evident even when Cable Switch (optional) orRemote Control Unit (optional) is used.When the shutter release button is pressed, the mirror pops up and the shutter is fired 2 seconds laterif the 2 second Self-Timer setting is selected. Avoid camera shake when mirror pops up by using thismethod. Follow the procedure below to take a picture with the mirror lock up.
1. Mount the camera to a tripod.
2. Use the Fn button and the four-way controller ( ) to select (2 sec. Self-Timer). (p.62)
3. Focus on the subject.
4. Press the shutter release button fully.The mirror pops up and the picture is taken 2 seconds later. AE lock is enabled with the exposurevalue set immediately before the mirror goes up.
Using Mirror Lock Up Function to Prevent Camera Shake

69
Using the Zoom LensEnlarge the subject (telephoto) or capture a wider area (wide angle) with a zoom lens. Adjust it to thedesired size and take the picture.
1. Turn the zoom ring to the right or left.Turn the zoom ring clockwise for telephoto andcounterclockwise for wide angle.
Wide Angle Telephoto
Look through the viewfinder to compose your picture at the focal length that looks right for yourpurpose. Turn the zoom ring right or left until you see the composition you want.
INFORMATION
70
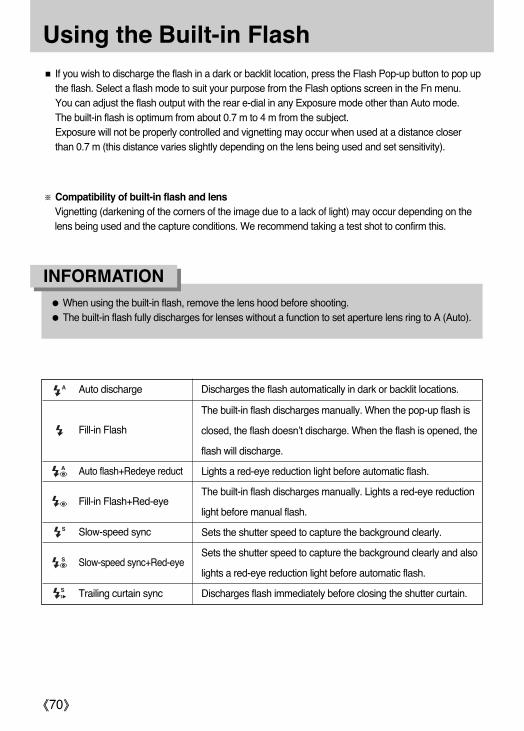
Using the Built-in FlashIf you wish to discharge the flash in a dark or backlit location, press the Flash Pop-up button to pop upthe flash. Select a flash mode to suit your purpose from the Flash options screen in the Fn menu. You can adjust the flash output with the rear e-dial in any Exposure mode other than Auto mode. The built-in flash is optimum from about 0.7 m to 4 m from the subject.Exposure will not be properly controlled and vignetting may occur when used at a distance closerthan 0.7 m (this distance varies slightly depending on the lens being used and set sensitivity).
Compatibility of built-in flash and lensVignetting (darkening of the corners of the image due to a lack of light) may occur depending on thelens being used and the capture conditions. We recommend taking a test shot to confirm this.
Discharges the flash automatically in dark or backlit locations.
The built-in flash discharges manually. When the pop-up flash is
closed, the flash doesn’t discharge. When the flash is opened, the
flash will discharge.
Lights a red-eye reduction light before automatic flash.
The built-in flash discharges manually. Lights a red-eye reduction
light before manual flash.
Sets the shutter speed to capture the background clearly.
Sets the shutter speed to capture the background clearly and also
lights a red-eye reduction light before automatic flash.
Discharges flash immediately before closing the shutter curtain.
Auto discharge
Fill-in Flash
Fill-in Flash+Red-eye
Slow-speed sync
Auto flash+Redeye reduct
Slow-speed sync+Red-eye
When using the built-in flash, remove the lens hood before shooting.The built-in flash fully discharges for lenses without a function to set aperture lens ring to A (Auto).
INFORMATION
Trailing curtain sync

71
Using the Built-in Flash
1. Press the Fn button. The Fn menu appears.
2. Press the four-way controller ( ). The flash options screen appears.
3. Use the four-way controller ( ) to choose a flash mode.When not in Auto mode, turn the rear e-dial to perform Flash Compensation. The compensationrange is -2.0 to +1.0. (p.75)
4. Press the OK button twice. The camera returns to a capture mode.
Selecting Flash Mode
Available flash mode, by recording mode (O : Selectable, X : Not selectable)
Auto discharge
Fill-in Flash
Auto flash+Redeye reduct
Fill-in Flash+Red-eye
Slow-speed sync
Slow-speed sync+Red-eye
Trailing curtain sync
A P Sv Tv Av TAv M B X USER
O X X X X X X X X O
X O O O O O O O O O
O X X X X X X X X O
X O O O O O O O O O
X O O X O X X X X O
X O O X O X X X X O
X O O O O O O O X O
: Move : Exit
FLASH
Fill-In
: Set
* In the USER mode, the available flash may be changed by the exposure mode.
72
Using the Built-in Flash
3. Press the shutter release button halfway. The focus indicator appears in the viewfinder whenfocused.
4. Press the shutter release button fully. The picture is taken.
5. Push down on the portion indicated in the illustration to retract the flash.
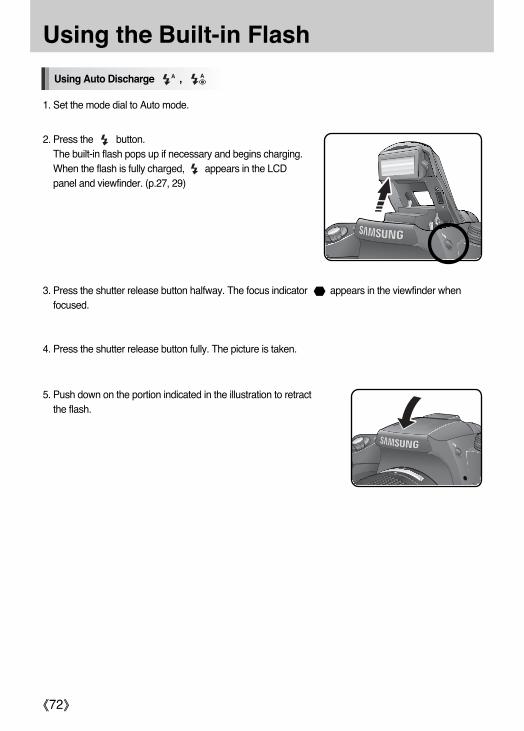
1. Set the mode dial to Auto mode.
2. Press the button.The built-in flash pops up if necessary and begins charging.When the flash is fully charged, appears in the LCDpanel and viewfinder. (p.27, 29)
Using Auto Discharge ,

73
Using the Built-in Flash
3. Press the shutter release button halfway.The focus indicator appears in the viewfinder when focused.
4. Press the shutter release button fully. The picture is taken.
5. Push down on the portion indicated in the illustration to retract the flash.
2. Press the button.The built-in flash pops up if necessary and begins charging.Regardless of the Flash mode, the Fill-in flash will beselected. When the flash is fully charged, appears in the LCDpanel and viewfinder.
1. Set the mode dial to any recording mode except for the Auto mode.
Using Fill-in Flash ,

74
Using the Built-in Flash
“Red-eye” is the phenomenon where eyes look reddish in photographs taken in dark environmentswith a flash. This is caused by the reflection of the electronic flash from the retina of the eye.Red-eye occurs because pupils are dilated in dark environments.This phenomenon cannot be averted but the following measures can be used to combat it.
Brighten the surroundings when shooting.If using a zoom lens, set it to wide-angle and move in closer to your subject.Use a flash that supports red-eye reduction. Position the flash as far away from the camera as possible when using an external flash.
The red-eye reduction function on this camera reduces red-eye by discharging the flash twice.With the red-eye reduction function, the pre-flash is discharged just before the shutter is released.This reduces pupil dilation. The main flash is then discharged while the pupils are smaller, reducingthe red-eye effect. To use the red-eye reduction function, set (Auto+Red-eye reduction) in Auto mode and
(Fill-in Flash+Red-eye reduction) or (Slow speed sync+Red-eye reduction in other modes.
In daylight conditions, the flash will eliminate shadows when a portrait picture is taken with a person’sface cast in shadow. Use of the flash in this way is called Daylight-Sync Shooting. Flash is dischargedmanually when shooting with Daylight-Sync Shooting.
Taking pictures (Hyper program)1. Confirm that the flash has popped up and the flash mode is set to Fill-in Flash. (p.70)2. Confirm that the flash is fully charged.3. Take the picture.
The picture may be over-exposed if the background is too bright.
[Without Daylight-Sync] [With Daylight-Sync]
Using Red-eye Reduction Flash
Daylight-Sync Shooting

75
Using the Built-in Flash
You can change the flash output in a range of -2.0 to +1.0. The Flash Compensation values are asfollows for 1/2 EV and 1/3 EV.
Set interval of steps in [EV Steps] in the [CUSTOM1 MENU] menu. (p.133)
Set in Flash item of Fn menu by using the Rear e-dial.
Step interval Flash Compensation
1/2 EV -2.0, -1.5, -1.0, -0.5, 0.0, +0.5, +1.0
1/3 EV -2.0, -1.7, -1.3, -1.0, -0.7, -0.3, 0.0, +0.3, +0.7, +1.0
blinks in the viewfinder when the flash pops up during Flash Compensation. (p.27)If the maximum flash output is exceeded when corrected to the plus (+) side, no compensationwill be effective.Compensating to the minus (-) side may not effect the image if the subject is too close, aperture islow or sensitivity is high.
INFORMATION
Compensating Flash Output
FLASH
Fill-In
: Set

76
Using the White Balance
The colour of the subject changes with the light source. For example, the same white object will be adifferent shade of white in daylight than under a light bulb. In cameras using film, this is adjusted bychanging the film or using filters. In digital cameras, the whiteness is adjusted using white balance.The default setting is (Auto).
Auto Automatically adjusts the white balance. (About 4000 to 8000K)
Daylight For use when taking pictures in sunlight. (About 5200K)
For use when taking pictures in the shade. It reduces the bluish color tones
in a picture. (About 8000K)
Cloudy For use when taking pictures on cloudy days. (About 6000K)
For use when taking pictures under fluorescent lighting. Select the type of
fluorescent light, from W (white) (About 4200K), N (neutral white) (About
5000K), and D (daylight) (About 6500K).
For use when taking pictures under light bulb or other tungsten light.
It reduces the reddish colour tones in a picture. (About 2850K)
Flash For use when taking pictures using the built-in flash. (About 5400K)
Use this to manually adjust the white balance according to the lighting so
that white objects appear as a natural white.
Use this to set the colour temperature in figures.
You can save three settings.
The colour temperature (K) is an estimate. This does not indicate precise colours.
The colour temperature step can be set in the [Color Temp. Unit] of the [CUSTOM1 MENU]. (p.137)
Setting the White Balance
Manual
Color Temperature
1, 2, 3
Tungsten Light
Fluorescent
Light
Shade

77
1. Press the Fn button. - The Fn menu appears.
2. Press the four-way controller ( ). - The White Balance screen appears.
3. Use the four-way controller ( ) to select a desiredwhite balance.
WHITE BALANCE
Auto
: Check : Set
Using the White Balance
: Move : Exit
Red tint Blue tint
Candle
flame
Oillam
p
Tungstenlight
Halogen
lightbulb
White
(Fluorescentlight)
Daylight
FlashN
eutralwhite
(Fluorescentlight)
Cloudy
Daylight(Fluorescentlight)
Shade
Clearsky
Colour Temperature
The colour of light shifts towards blue as the colour temperature rises, and towards red as thecolour temperature falls. Colour temperature describes this change in light colour in terms ofabsolute temperature (K: Kelvin).This camera is capable of setting the white balance to enable taking pictures with natural colouringunder a variety of lighting conditions.
After selecting a desired White Balance rotate the main switch to ( ). You can check theprevious White Balance.

78
Using the White Balance
1. Press the Fn button. - The Fn menu appears.
2. Use the four-way controller ( ). - The white balance menu appears.
You can adjust the white balance depending on the light source when taking pictures. With ManualWhite Balance, the camera can store delicate shades that cannot be precisely adjusted with the whitebalance preset values provided in the camera. This provides the optimum white balance for yoursurroundings.
Adjusting the White Balance Manually
3. Use the four-way controller ( ) to select (Manual).
4. Press the four-way controller ( ). - The message screen appears.
5. Fully display a white or gray sheet of paper in the viewfinder under the light to adjust white balance.
6. Press the shutter release button fully.- Slide the focus mode lever to MF if the shutter cannot be released.
WHITE BALANCE
Auto
: Check : Set
AWB
WHITE BALANCE
Manual: Check : Set
MANUAL WHITE BALANCE
: Exit : Set

79
Using the White Balance7. The menu as shown will display.
8. Press the OK button and the White Balance adjustment menu will display. Press the OK buttonagain to save the setting.
The position of Custom white balance can be changed by thereal e-dial. You can select a desired white balance by using thefour way controller ( ).
No image is recorded when the shutter release button is pressed to adjust the white balance.Press the Fn button when adjustment is unsuccessful to set again.If picture is extremely overexposed or underexposed, white balance may not be adjusted. In thiscase, set an appropriate exposure and re-adjust the white balance.
INFORMATION
: Set
: Set

80
Using the White Balance
Fine-Tuning the White Balance
You can fine tune the White Balance setting.
1. Press the Fn button. - The Fn menu appears.
2. Use the four-way controller ( ). - The white balance menu appears.
3. Use the four-way controller ( ) to select a desired whitebalance.
WHITE BALANCE
Auto
: Check : Set
AWB
WHITE BALANCE
Daylight
: Check : Set
4. Press the four-way controller ( ). - The White Balance fine tune screen appears.
[Selecting Daylight WB]
DAYLIGHT
: Exit : Set
After selecting a desired White Balance rotate the main switchto ( ). You can check the previous White Balance.
AWB
WHITE BALANCE
Daylight
: Check : Set

81
Using the White Balance5. Use the four-way controller ( ) to fine tune the White
Balance. Seven levels and 196 patterns are available on theG-M and B-A axes. - G : Green- M : Magenta- B : Blue- A : Amber
G2 A3
WBDAYLIGHT
: Exit : Set
GM compensation Adjusts the tone of the colours between green and magenta.
BA compensation Adjusts the tone of the colours between blue and amber.
WHITE BALANCE
Auto
: Check : Set
7. Press the OK button twice.The camera is ready to take a picture with the set White Balance.
If the Green button is pressed during the White Balance setting,the White Balance value is set to default ( 0). When the colour temperature is change after selecting thecolour temperature, the following menu will display. Change the menu with the Front and Rear e-dial. Set [Fine tune when AWB] in [CUSTOM1 MENU] to [On] whenfine-tuning in AWB. (p.136)
INFORMATION
COLOR TEMP. UNIT
: Exit : Set
6. Press the OK button. The camera returns to the White Balance screen.

82
Using the ISO sensitivity
You can set the sensitivity to suit the brightness of the surroundings. The sensitivity can be set to[Auto] or within a sensitivity range equivalent to ISO 100 to 1600.
Captured images can show more noise if higher Sensitivity is set.Set this menu in [CUSTOM1 MENU] > [ISO Steps]. (p.139)
INFORMATION
Setting the Sensitivity
ISO SENSITIVITY
AUTO 100-1600
: Move : Set
1. Press the Fn button. - The Fn menu appears.
2. Use the four-way controller ( ). - The ISO sensitivity menu appears.
3. Use the four-way controller ( ) to select a desired sensitivity.
: Move : Exit
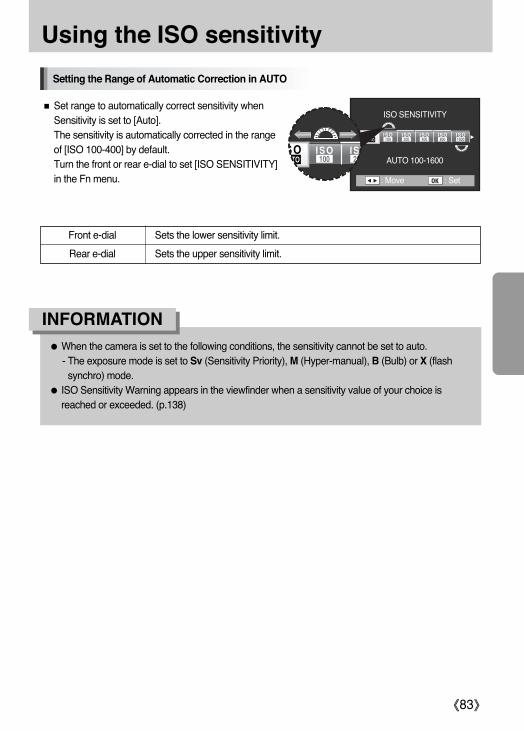
83
Using the ISO sensitivity
When the camera is set to the following conditions, the sensitivity cannot be set to auto.- The exposure mode is set to Sv (Sensitivity Priority), M (Hyper-manual), B (Bulb) or X (flashsynchro) mode.
ISO Sensitivity Warning appears in the viewfinder when a sensitivity value of your choice isreached or exceeded. (p.138)
INFORMATION
Set range to automatically correct sensitivity whenSensitivity is set to [Auto]. The sensitivity is automatically corrected in the rangeof [ISO 100-400] by default.Turn the front or rear e-dial to set [ISO SENSITIVITY]in the Fn menu.
Front e-dial Sets the lower sensitivity limit.
Rear e-dial Sets the upper sensitivity limit.
Setting the Range of Automatic Correction in AUTO
ISO SENSITIVITY
AUTO 100-1600
: Move : Set

84
Playing Back Still Pictures
You can play back captured still pictures with the camera.
1. Press the button after taking a picture.The most recently captured image (image with the largestfile number) is displayed on the LCD monitor.
INFO button
When an image is played back, press the INFO button. The recording information will be changed as followings.
Use the included “Digimax Master” software to play back using a PC. Refer to the software instructions for details. (p.218)
INFORMATION
Playing Back Images
INFO button
INFO button
INFO button INFO button

85
2. Press the four-way controller ( ).: The previous image appears.: The next image appears.
To make images shot vertically easier to view you can rotate images 90° counterclockwise.
1. Press the button after taking a picture.The most recently captured image (image with the largest filenumber) is displayed on the LCD monitor.
2. Press the four-way controller ( ).The image is rotated 90° counterclockwise each time the buttonis pressed.
Playing Back Still Pictures
Rotating Images
: Set : Set : Set

86
Playing Back Still Pictures3. Press the OK button.
Image rotation information is saved.
You can magnify images up to 20 times when displaying them on the LCD monitor.
1. Press the button and use the four-way controller ( ) to select an image.The most recently captured image (image with the largest filenumber) is displayed first on the LCD monitor.
Enlarging Playback Images

87
Playing Back Still Pictures2. Turn the e-dial to the right (toward ).
Image enlarges at each calibration and can be enlarged to 20times the original.
The following buttons act as : - Four way controller ( ) : change the enlargement
position. - Rear e-dial (Right) : enlarges the image (Max. 20 times)- Rear e-dial (Left) : reduce the image (Max. 1.2 times)- OK button : displays the original size image- INFO button : display the information of image- Front e-dial : holding the image enlargement scale, the previous or the next image is displayed
The first calibration on the Rear e-dial is 1.2 times. You can change this in [CUSTOM2 MENU] >[Initial Zoom] menu.
You can enlarge the image by following the same procedure during Instant Review (p.166) orDigital Preview (p.167).
INFORMATION

88
Playing Back Still Pictures
1. Press the button. The most recently captured image(image with the largest file number) is displayed on the LCDmonitor.
2. Turn the rear e-dial to the left (toward ). The multi-imagedisplay screen appears. Up to 16 thumbnail images will bedisplayed at once. Use the four-way controller ( ) toselect an image. A scroll bar appears at the right of the screen.[?] appears for an image that cannot be displayed.
Frame
Scroll bar
You can display 4, 9 or 16 images on the LCD monitor at the same time.
Displaying Multiple Images
: Delete

89
Playing Back Still Pictures
Selecting the Number of Images to Display
1. In the multi-image display screen, press the Fn button. The multi-image options screen appears.
2. Use the four-way controller ( ) to select the number of imagesto display at once. - 4, 9, 16 images
3. The selected number of images display at once.
Displaying a Folder
You can display the contents of folders in the multi-image displayscreen.
1. Turn the rear e-dial to the left in the multi-image display screen.
2. Select the folder you want to display and press the OK button.The images in the folder are displayed.
3. Turn the rear e-dial to the right (towards ) or press the OKbutton. A full screen display of the selected image appears.
: Set
: Back
Folder name

90
Playing Back Still Pictures
You can play back all images recorded on your Memory Card successively. To start continuousplayback, use the menu screen displayed on the LCD monitor.
1. Press the button and use the four-way controller ( ) toselect an image to be displayed first.The most recently captured image (image with the largest filenumber) is displayed first on the LCD monitor.
2. Press the Fn button. The Fn menu appears.
Slideshow
: Move : Exit

91
Playing Back Still Pictures3. Press the four-way controller ( ).
Start screen is displayed and slideshow begins.
Operations available during a slideshow- OK button : Pause- Four-way controller ( ) : Shows previous image- Four-way controller ( ) : Shows next image- Four-way controller ( ) : Stop
Set the display time for slideshow in the [ PLAYBACK MENU] menu. Alternatively, start theslideshow from the [ PLAYBACK MENU] menu. (p.168)Slideshow ends when one of the following is performed during playback or when paused.
Four-way controller ( ) is pressed Shutter release button is pressed halfway or fully AF button is pressed Playback button is pressed Main switch is turned to the position Mode dial is turnedMenu button is pressed
After slideshow ends, the camera switches to Playback mode., , , , After slideshow ends, the camera switches to Capture mode.After slideshow ends, the Playback menu appears.
INFORMATION
: Exit: Move
Start

92
Playing Back Still Pictures
By using the video cable, you can play back images using a TV or other device with a video IN jackas your monitor. Make sure that both the TV and the camera are turned off before connecting thecable.
- Selecting the Video Output Format (p.158)
1. Open the terminal cover and connect the video cable to the USB / Video terminal on your camera.
2. Connect the other end of the video cable to the video IN jack on the AV device.
3. Turn on the AV device and the camera.
If you intend to use the camera continuously for a long period, use of the AC adapter (SAC-82,optional) is recommended. (p.37)For AV equipment with multiple video IN jacks (such as TVs), check the operating manual of theAV device, and select the video IN jack to which the camera is connected.Ensure that the video output format setting is the correct one for your country or region. (p.158)The camera LCD monitor turns off while the camera is connected to the AV device.
INFORMATION
Connecting the Camera to AV Equipment

93
Playing Back Still Pictures
You can edit shot images using digital filters. Processed images are saved under a different name.
Digital Filters
1. Press the Fn button in Playback mode. The Fn menu appears.
2. Press the four-way controller ( ). The screen for selecting the filter appears.
B&W
: Set: Back
: Move : Exit

94
7. Use the four-way controller ( ) to select [Save as].
6. Press the OK button. The save confirmation screen appears.
8. Press the OK button.The filtered image is saved under a different name.
5. Set a desired filter by using the front and rear e-dial.
SOFT
SLIM
[Slim Filter][Colour Filter]
SOFT
SLIM
COLOR SLIM
: Set : Back : Set: Back
: Set: Back
Save image as a new file
Save asCancel
Playing Back Still Pictures3. Use the four-way controller ( ) to select an image.
4. Use the four-way controller ( ) to select a filter.Select a filter and preview the effects on the image.

95
Playing Back Still Pictures
RAW images cannot be processed using the digital filter.Additionally, set digital filters from the [ PLAYBACK MENU] menu.
INFORMATION
Digital Filters
Filter name Function Front e-dial Rear e-dial
Converts to a black and white image.
Changes the contrast to appear as if a B&W colour
filter was used.
Adds a vintage touch to photos by converting them
to sepia color.
Adds a colour filter to the image. Selects from 18
filters (6 colors x 3 tones).
Creates a soft image by lightly fading the entire
image.
Changes the horizontal and vertical ratio of images.
Adjusts height or width up to two times the original
size.
Changes the brightness of images. Adjusts in a
range of ±8 levels.
When another image is selected with the four-way controller ( ), the image appears in the set filter.
B&W - B&W/R/G/B
- Density (3 levels)
Red/Green/Blue/
Yellow/Magenta/
Cyan
Density of each
color (3 levels)
-
Softness
(3 levels)-
Left : Wide
Right : Slim
-Left : Dark
Right : Light
Sepia
Color
Soft
Slim
Brightness

96
: Back : Set
Playing Back Still Pictures
You can convert captured RAW files into JPEG files.
1. Select a RAW file in Play mode.
Editing RAW Images
2. Press the Fn button. The Fn menu appears.
3. Press the four-way controller ( ).
4. Press the OK button. The parameters recorded in the image file appear.
If you do not want to change the current parameters, press theOK button again.
: Move : Exit
: Back : Set
Develop this image
: Change
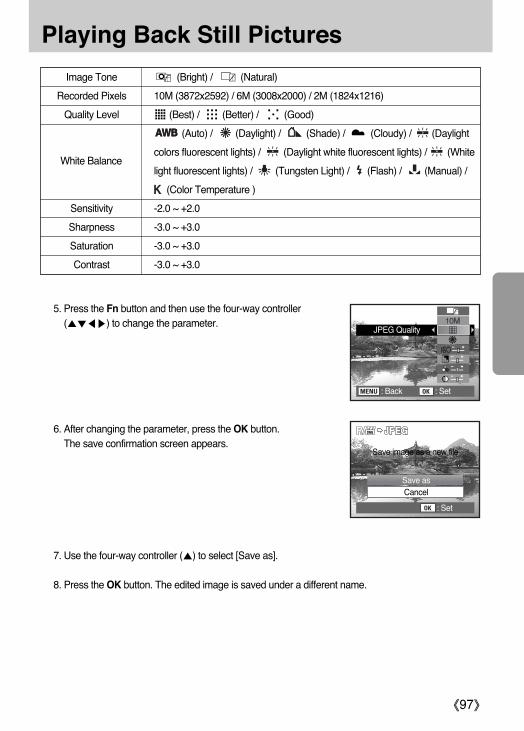
97
Playing Back Still Pictures
Image Tone (Bright) / (Natural)
Recorded Pixels 10M (3872x2592) / 6M (3008x2000) / 2M (1824x1216)
Quality Level (Best) / (Better) / (Good)
(Auto) / (Daylight) / (Shade) / (Cloudy) / (Daylight
colors fluorescent lights) / (Daylight white fluorescent lights) / (White
light fluorescent lights) / (Tungsten Light) / (Flash) / (Manual) /
(Color Temperature )
Sensitivity -2.0 ~ +2.0
Sharpness -3.0 ~ +3.0
Saturation -3.0 ~ +3.0
Contrast -3.0 ~ +3.0
White Balance
5. Press the Fn button and then use the four-way controller ( ) to change the parameter.
6. After changing the parameter, press the OK button. The save confirmation screen appears.
7. Use the four-way controller ( ) to select [Save as].
8. Press the OK button. The edited image is saved under a different name.
: Back : Set
: Set
Save image as a new file
Save asCancel
JPEG Quality

98
Deleting Images
You can delete one image at a time.
1. Press the button and use the four-way controller ( ) to select an image to delete.
2. Press the button.The Delete screen appears.
3. Use the four-way controller ( ) to select [Delete].
4. Press the OK button.The image is deleted.
Deleted images cannot be restored.Protected images cannot be deleted.
INFORMATION
Deleting a Single Image
: Set: All images
DeleteCancel

99
Deleting Images
You can delete all saved images at once.
2. Press the button twice.The Delete All screen appears.
1. Press the button.
4. Press the OK button. All images are deleted.
3. Use the four-way controller ( ) to select [Delete All].
Deleted images cannot be restored.Protected images cannot be deleted.
INFORMATION
Deleting All Images
: Set: Back
Delete all imageson memory card?
Delete AllCancel
No image

100
Deleting Images
You can delete multiple images from the nine-image display at once.
1. Press the button.The most recently captured image (image with the largest filenumber) is displayed first on the LCD monitor.
2. Turn the e-dial to the left (toward ).
Nine thumbnail images appear.
Deleted images cannot be restored.Protected images cannot be deleted.Only files in the same folder can be selected at once.
INFORMATION
Deleting Selected Images (from Nine-Image Display)
: Delete

101
Deleting Images3. Press the button.
appears above the images.
4. Use the four-way controller ( ) to move to the imagesto delete and press the OK button.Image is selected and appears.Press Fn button to select all images (the selection of imagesmay take time to complete depending on the number ofimages).
5. Press the button.The Delete confirmation screen appears.
7. Press the OK button.The selected images are deleted.
6. Use the four-way controller ( ) to select [Select&Delete].
: Set: Back
All selectedimages are deleted
Select&DeleteCancel
: Delete :
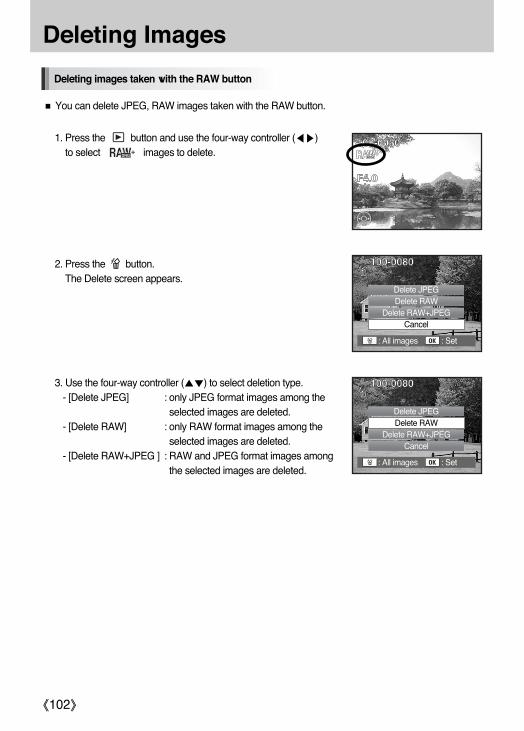
You can delete JPEG, RAW images taken with the RAW button.
1. Press the button and use the four-way controller ( ) to select images to delete.
Deleting images taken with the RAW button
102
Deleting Images
DNG�
2. Press the button. The Delete screen appears.
3. Use the four-way controller ( ) to select deletion type.- [Delete JPEG] : only JPEG format images among the
selected images are deleted.- [Delete RAW] : only RAW format images among the
selected images are deleted.- [Delete RAW+JPEG ] : RAW and JPEG format images among
the selected images are deleted.
: Set: All images
Delete JPEGDelete RAW
Delete RAW+JPEG Cancel
100-0080
: Set: All images
Delete JPEGDelete RAW
Delete RAW+JPEG Cancel

103
You can protect images from being accidentally deleted.
Even protected images are deleted if the Memory Card is formatted.
1. Press the button and use the four-way controller ( ) to select an image.The most recently captured images (image with the largest filenumber) are displayed first on the LCD monitor.
2. Press the button.The Protect screen appears.
3. Use the four-way controller ( ) to select [Protect].
4. Press the OK button.The selected image is protected.
Select [Unprotect] in Step 3 to cancel the Protect setting.The symbol is displayed when playing back protected images. (p.25, 26)
INFORMATION
Protecting Images from Deletion (Protect)
: Set: All images
ProtectUnprotect
Protecting Images

104
Protecting Images
1. Press the button.
2. Press the button twice.The Protect all images screen appears.
3. Press the four-way controller ( ) to select [Protect] and press the OK button.All images saved in the Memory Card are protected.
Select [Unprotect] in Step 3 to cancel the Protect setting on all of the images.
Protecting All Images
: Set: Back
Protect all images
ProtectUnprotect

105
Setting the Printing Service (DPOF)You can order conventional photograph prints by taking the Memory Card with recorded images toany store offering this printing service.DPOF (Digital Print Order Format) settings allow you to specify the number of copies or to imprint thedate.
Set the following items for each image.
1. Press the button and use the four-way controller ( ) to select an image.
Copies Selects the number of copies. You can print up to 99 copies.
Date Specifies whether you want the date inserted on the print or not.
2. Press the Fn button.The Fn menu appears.
3. Press the four-way controller ( ).The DPOF screen appears.If DPOF settings have already been made for an image, theprevious number of prints and date setting ( (on) or (off))will be displayed.
DPOF settings cannot be applied to RAW images.
Printing Single Images
: Set: All images
CopiesDate
: Move : Exit

106
Setting the Printing Service (DPOF)4. Use the four-way controller ( ) to choose the number of copies and press the four-way
controller ( ). The frame moves to [Date].
6. Press the OK button.The DPOF settings are saved and the camera returns to playback status.
5. Use the four-way controller ( ) to choose whether to insertthe date ( ) or not ( ).- ( ) : The date will be imprinted.- ( ) : The date will not be imprinted.
Depending on the printer or printing equipment at the photo processing lab, the date may not beimprinted on the pictures even if the DPOF setting was made.To cancel DPOF settings, set the number of copies to [00] in Step 4 and press the OK button.
INFORMATION
: Set: All images
CopiesDate

107
5. Press the OK button.The DPOF settings for all the images are saved and the camera returns to playback status.
The number of copies specified in settings for all images applies to all the images. Before printing, check that the number is correct.Settings for single images are cancelled when settings are made for all images.
INFORMATION
Setting the Printing Service (DPOF)
1. Press the Fn button in Playback mode.The Fn menu appears.
2. Press the four-way controller ( ).The DPOF screen appears.
3. Press the Fn button.The screen for making DPOF settings for all images appears.
4. Use the four-way controller ( ) to choose the number of copies and whether to insert the date ( ) or not ( ).Refer to Steps 4 and 5 in Printing Single Images” (p.105) for details of how to make the settings.
Settings for All Images
: Set: All images
CopiesDate
: Set: Back
CopiesDate
DPOF setting for allimages
: Move : Exit

108
Printing Using PictBridgeThis function lets you print images directly from the camera without using a PC (direct printing).Connect the camera and PictBridge compatible printer with the included USB cable to print directly.After connecting the camera to the printer, select the images you want to print, the number of copiesand whether to insert the date or not.Direct printing is performed in the following steps.
Set [USB] on camera to [Printer]
Connect the camera to the printer (p.110)
Set the printing optionsPrint single images (p.111)Print all images (p.113)Print with DPOF settings (p.115)
Use of the AC adapter (SAC-82, optional) is recommended when connecting the camera to aprinter. If the AC adapter is not used, the printer may not work properly or the image data may belost if the batteries run out of power while the camera is connected to the printer.Do not disconnect the USB cable during data transfer.Depending on the type of printer, not all the settings made on the camera (such as print settingsand DPOF settings) may be valid.A printing error may occur if the selected number of copies exceeds 500.You cannot use the camera to select multiple images for printing on a single sheet. Make the settings on the printer. For details, refer to the operating manual for your printer.RAW images cannot be printed directly. Use a PC to print RAW images.See the software instructions when connecting to a PC. (p.222)
INFORMATION
SETUP MENU
: Set : Cancel
Video OutUSBAuto Power OffFolder NameSensor CleaningDust RemovalReset
ComputerPrinter

109
Printing Using PictBridge
1. Press the MENU button.The [CAPTURE MENU] menu appears.
2. Use the four-way controller ( ) to select the [SETUP MENU]menu. Press the four-way controller ( ).
3. Use the four-way controller ( ) to select [USB].
4. Press the four-way controller ( ).A pop-up menu appears.
Setting USB
SETUP MENU
: Move : Exit
FormatBeepDate/TimeWorld TimeLanguage/Guide DisplayLCD Brightness
English3sec
0

110
Printing Using PictBridge5. Use the four-way controller ( ) to select [Printer].
6. Press the OK button.The setting is changed.
7. Press the MENU button.
1. Turn the camera off.
2. Connect the camera and a PictBridge compatible printer using the USB cable supplied with the camera.
Connecting the Camera to the Printer
SETUP MENU
: Set : Cancel
Video OutUSBAuto Power OffFolder NameSensor CleaningDust RemovalReset
ComputerPrinter

111
Printing Using PictBridge
4. After printer start-up is complete, turn the camera on.The PictBridge menu appears.
3. Turn the printer on.
1. Use the four-way controller ( ) to select [Print One] on thePictBridge menu.
2. Press the OK button.The Print one screen appears.
PictBridge menu is not displayed if [USB] is set to [Computer].
INFORMATION
Printing Single Images
: Set: Move
Select Printing Mode
Print OnePrint All
DPOF Auto Print
: Set: Move
Select Printing Mode
Print OnePrint All
DPOF Auto Print

112
Printing Using PictBridge3. Use the four-way controller ( ) to choose an image to print.
4. Use the four-way controller ( ) to choose the number of copies. You can print up to 999 copies.
5. Use the Fn button to choose whether to insert the date ( ) or not ( ).( ) : The date will be printed.( ) : The date will not be printed.
6. Press the OK button.The print settings confirmation screen appears.Proceed to Step 12 to print the images by default.To change the print settings, go to Step 7.
7. Press the Fn button.The screen for changing print settings appears.
8. Select [Paper Size] and press the four-way controller ( ).The Paper Size screen appears.
: Set: Cancel
PictBridge
Paper SizePaper TypeQualityBorder Status
StandardStandardStandardStandard
: Back: Date
Print this image
Copies Date
: Print: Back: Change
Print accordingto settings?
Paper SizePaper TypeQualityBorder Status
StandardStandardStandardStandard

113
Printing Using PictBridge9. Use the four-way controller ( ) to choose the paper size.
You can only choose a size that is supported by your printer.When the Paper Size is set to [Standard], images are printedaccording to the printer settings.
10. Press the OK button.
11. Repeat Steps 8 to 10 to set [Paper Type], [Quality] and [Border Status].The print settings change screen appears after each item has been set.When the Paper Size is set to [Standard], images are printed according to the printer settings.- [Paper Type] : Standard, (Best), (Better), (Good)- [Quality] : Standard, (Super fine), (Fine), (Normal)
12. Press the OK button twice.The image is printed according to the settings.Press the MENU button to cancel printing.
1. Use the four-way controller ( ) to select [Print All] on thePictBridge menu.
2. Press the OK button.The Print all images screen appears.
Printing All Images
: Set: Cancel
Paper Size
StandardCardL100X150Postcard4 X6
2L8 X10A4Letter11 X17A3
: Set: Move
Select Printing Mode
Print OnePrint All
DPOF Auto Print

114
3. Choose the number of copies and whether to imprint the date ornot. The number of copies and the date setting that you chooseapply to all of the images.Refer to Steps 4 and 5 of Printing Single Images” (p.112) fordetails on how to change the settings.
4. Press the OK button.The print settings confirmation screen appears.Refer to Steps 7 and 11 of Printing Single Images” (p.112 and 113) for details on how to change thesettings.
5. Press the OK button on the print settings confirmation screen.All the images are printed according to the settings.Press the MENU button to cancel printing.
Printing Using PictBridge
: Back : Print: Date Total
Print all images
Copies Date
: Print aborted
Printing

115
Printing Using PictBridge
1. Use the four-way controller ( ) to select [DPOF Auto Print] on the PictBridge menu.
2. Press the OK button.The Print w/ DPOF settings screen appears. Use the four-way controller ( ) to check the number of copiesfor each image, whether the date is imprinted or not, and totalnumber of copies. Print settings are set with the Print Service. (p.105)
3. Press the OK button.The print settings confirmation screen appears.Refer to Steps 7 and 11 of Printing Single Images (p.112 and 113) for details on how to change thesettings.
4. Press the OK button on the print settings confirmation screen.The images are printed according to the settings.Press the MENU button to cancel printing.
When you have finished printing, turn off the camera.
1. Turn off the camera.
2. Disconnect the USB cable from the camera and printer.
Disconnecting the Cable from the Printer
Printing Images Using the DPOF Settings
: Back : Print
Print with DPOFsettings
CopiesTotal
Date

116
MEMO

Explains the functions of the GX-10 buttons and menus.
Using the Menu 118
Using the Fn Menu 169
Using the Mode Dial 171
4 Button, Menu, Mode dial Reference
When using menus and Fn menu, items which cannot be changed due to camera settingsappear gray and cannot be selected.

118
Using the Menu
This section explains operation methods for [CAPTURE MENU], [CUSTOM1 MENU], [CUSTOM2MENU], [SETUP MENU], and [PLAYBACK MENU] menu.
Displaying the Menu screen
1. Press the MENU button in Capture mode.- The [CAPTURE MENU] menu appears on the LCD monitor.
2. Press the four-way controller ( ).- [CUSTOM1 MENU], [CUSTOM2 MENU], [SETUP MENU]and [PLAYBACK MENU] menu appear in order each timethe four-way controller ( ) is pressed.
CAPTURE MENU
: Move : Exit
Image ToneFile FormatJPEG SizeJPEG QualitySaturationSharpnessContrast
CUSTOM1 MENU
: Move : Exit
Link AF Point & AESuperimpose AF AreaAF in Remote ControlAF Button FunctionAF by Press HalfwayEV StepsMetering Time
OffOnOffOffOn
1/2 EV10sec
How to Operate the Menu

119
Procedure to set the [JPEG Quality] on the [CAPTURE MENU] menu is explained as an example.
1. Use the four-way controller ( ) to choose an item.- Press the front e-dial to move the menu page by page.
2. Press the four-way controller ( ).- Available [JPEG Quality] options appear.Press the four-way controller ( ) to move to the pop-upmenu if there is one.
3. Use the four-way controller ( ) to select a setting.
4. Press the OK button.- The camera returns to the menu screen. Next, set other items.- Press the MENU button to return to Capture or Playback mode.
Even after you press the MENU button and close the menu screen, your settings will not besaved if the camera is turned off improperly (such as by removing the batteries while the camerais on).You can use the front e-dial to move the menu page and the rear e-dila to switch between the[CUSTOM1, 2 MENU], [SETUP MENU] and [PLAYBACK MENU] menu when no pop-up menu isdisplayed.
INFORMATION
Using the Menu
CAPTURE MENU
: Move : Exit
Image ToneFile FormatJPEG SizeJPEG QualitySaturationSharpnessContrast
Remaining Count :
: Set : Cancel
Image ToneFile FormatJPEG SizeJPEG QualitySaturationSharpnessContrast
Select a menu item and set

120
Using the Menu
Perform settings related to capturing in the [CAPTURE MENU] menu.
Item Function Page
Image Tone Sets the colour tone of pictures. p.121
File type Sets the image file type. p.122
Recorded Pixels Sets the recording size of images. p.122
Quality Level Sets the image quality. p.123
Saturation Sets the colour saturation. p.124
Sharpness Makes the image outlines sharp or soft. p.124
Contrast Sets the image contrast. p.124
User set Registers current camera settings on the User mode. p.125
Colour space Sets the colour space. p.126
Extended Bracket Sets Extended Bracket shooting. p.127
Multi-exposure Sets Multi-exposure shooting. p.127
Memory Sets the settings to save when the power is turned off. p.128
Exposure mode Registers current exposure mode on the User mode. p.129
p.129Shake Reduction (OPS)Sets the [Focal Length] and [Sensitivity] when using a lens for
which focal length information cannot be acquired.
[CAPTURE MENU] Menu Settings

121
Using the Menu
Different saturation, sharpness and contrast values can be set for (Bright) and (Natural).
INFORMATION
Set the basic colour tone of pictures. The default setting is Bright.
Natural Images are finished naturally and suitable for retouching.
Bright Images are finished brightly, with high contrast and sharp focus.
Setting the Image Tone
CAPTURE MENU
: Set : Cancel
Image ToneFile FormatJPEG SizeJPEG QualitySaturationSharpnessContrast

122
Using the Menu
You can select the number of recorded pixels from 10M, 6M and 2M. The more pixels there are, thelarger the picture and the bigger the file size. The file size will also differ according to the [JPEGQuality] setting. The default setting is 10M (3872x2592).
(RAW)
(JPEG)
3008x2000 For A4 paper
1824x1216 For A5 paper
For A3 paper
You can set the format of image files.The default setting is JPEG.
When the file format is changed, the number of recordableimages appears at the top right of the screen.
Setting the File Format
Setting the JPEG Recorded Pixels
3872x2592
Captures images in JPEG format. You can change the number of recorded pixels
from [JPEG Size] in the [CAPTURE MENU] menu, and the image quality level from
[JPEG Quality] in the [CAPTURE MENU] menu. The file size varies according to the
settings.
RAW data is CCD output data saved without processing.
Effects such as White Balance, Contrast, Saturation and Sharpness are not applied
to the image but such information is saved. Use Raw Display or transfer to a PC,
apply effects with the enclosed software and create JPEG and TIFF images.
Images are captured in both RAW and JPEG formats.
RAW
RAW +
JPEG
Remaining Count :
: Set : Cancel
Image ToneFile FormatJPEG SizeJPEG QualitySaturationSharpnessContrast
10M
6M
2M

123
Using the MenuYou can set the JPEG recorded pixels in [JPEG Size] in the[CAPTURE MENU] menu. When the number of recorded pixelsis changed, the number of recordable images appears at the topright of the screen.
You can set the image quality level. The file size will also differ according to the [JPEG Quality]setting. The default setting is (Best).
Lowest compression rate, suited for printing large pictures such as A4 size.
Image is saved in JPEG format.
Standard compression rate, suited for viewing as photographs or on your
computer screen. Image is saved in JPEG format.
Highest compression rate, suitable for attaching to e-mail or posting on
websites. Image is saved in JPEG format.
Best
Better
Good
When the quality level is changed, the number of recordableimages at that quality level appears at the top right of the screen.
Setting the JPEG Quality Level
Remaining Count :
: Set : Cancel
Image ToneFile FormatJPEG SizeJPEG QualitySaturationSharpnessContrast
Remaining Count :
: Set : Cancel
Image ToneFile FormatJPEG SizeJPEG QualitySaturationSharpnessContrast

124
Using the Menu
Select from six levels of Saturation, Sharpness and Contrast. The default setting is [0 (Standard)] for all.
Saturation
Sharpness
Saturation Sets the colour saturation.
Sharpness Makes the image outlines sharp or soft.
Contrast Sets the image contrast.
Towards + : Higher saturationTowards - : Lower saturation
Towards + : Highersharpness
Towards - : Lowersharpness
Setting the Saturation / Sharpness / Contrast
CAPTURE MENU
: Move : Exit
Image ToneFile FormatJPEG SizeJPEG QualitySaturationSharpnessContrast
CAPTURE MENU
: Set : Cancel
Image ToneFile FormatJPEG SizeJPEG QualitySaturationSharpnessContrast
CAPTURE MENU
: Move : Exit
Image ToneFile FormatJPEG SizeJPEG QualitySaturationSharpnessContrast
CAPTURE MENU
: Set : Cancel
Image ToneFile FormatJPEG SizeJPEG QualitySaturationSharpnessContrast
Contrast
Towards + : Higher contrastTowards - : Lower contrast
CAPTURE MENU
: Set : Cancel
Image ToneFile FormatJPEG SizeJPEG QualitySaturationSharpnessContrast
CAPTURE MENU
: Move : Exit
Image ToneFile FormatJPEG SizeJPEG QualitySaturationSharpnessContrast

125
Using the Menu
You can store the current camera settings and easily retrievethem simply by setting the mode dial to USER.
- Press the four way controller ( ) and the current camerainformation will display. Press the OK button and theinformation is saved on the User mode.
The following settings can be stored.
Storing User Settings
CAPTURE MENU
: Move : Exit
User Registration Color SpaceExtended BracketMulti ExposureMemory of Settings
OPS
Saves current settingsto USER Registration mode
: Set : Back
OffOff
Auto
Exposure mode Sharpness
EV Compensation White Balance
Flash mode Saturation
Drive mode File Format
Extended Bracketing Steps & Type JPEG Size
Flash Exposure Compensation JPEG Quality
Exposure Bracketing Steps & No. of Frames Image Tone
Sensitivity Contrast
Auto Sensitivity Adjustment Range

126
Using the Menu
You can set the colour space to use. The default setting is [sRGB].
1 sRGB Sets to sRGB colour space.
2 AdobeRGB Sets to AdobeRGB colour space.
File names differ depending on the colour space setting as shown below.- For sRGB : SG10XXXX.JPG- For AdobeRGB : _G10XXXX.JPG [XXXX] is the file number and numbering continues from the last stored file number.
INFORMATION
Setting the Colour Space
CAPTURE MENU
: Set : Cancel
User Registration Color SpaceExtended BracketMulti ExposureMemory of Settings
OPS
Colour Space
Colour ranges for various input/output devices, such as digital cameras, monitors, and printers,differ. This colour range is called the colour Space.To recreate different colour spaces in different devices, standard colour spaces have beenproposed. This camera supports sRGB and AdobeRGB.sRGB is mainly used for devices such as a PC.AdobeRGB covers a wider area than sRGB and is used for occupational uses such as industrialprinting. An image created in AdobeRGB may appear lighter than an image created in sRGB whenoutput from a sRGB compatible device.

127
Using the Menu
Shooting in Extended Bracket Mode
Shooting in Multi-exposure Mode
CAPTURE MENU
: Move : Exit
User Registration Color SpaceExtended BracketMulti ExposureMemory of Settings
OPS
OffOff
Auto
You can save pictures with three different white balance, saturation, sharpness and contrast levels.Three pictures are saved with each shot.
You can take multiple frames while creating a single picture.
White Balance MG 3, MG 2, MG 1, AB 3, AB 2, AB 1
Saturation 3, 2, 1
Sharpness 3, 2, 1
Contrast 3, 2, 1
Available Number of images 2 - 9 images
the exposure is adjusted automatically according to the number of
shots.
CAPTURE MENU
: Move : Exit
User Registration Color SpaceExtended BracketMulti ExposureMemory of Settings
OPS
OffOff
Auto
: Set : Back : Set : Back
CAPTURE MENUExtended Bracket
CAPTURE MENUExtended Bracket
Extended Bracket Extended Bracket
White BalanceSaturationSharpnessContrast
: Set : Back
CAPTURE MENUMulti Exposure
Number of ShotsAuto EV Adjust
: Set : Back
CAPTURE MENUMulti Exposure
Number of ShotsAuto EV Adjust
2 times
: Set : Cancel
CAPTURE MENUMulti Exposure
Number of ShotsAuto EV Adjust
Off2 times3 times4 times5 times
Off
Auto Exposure Adjustment
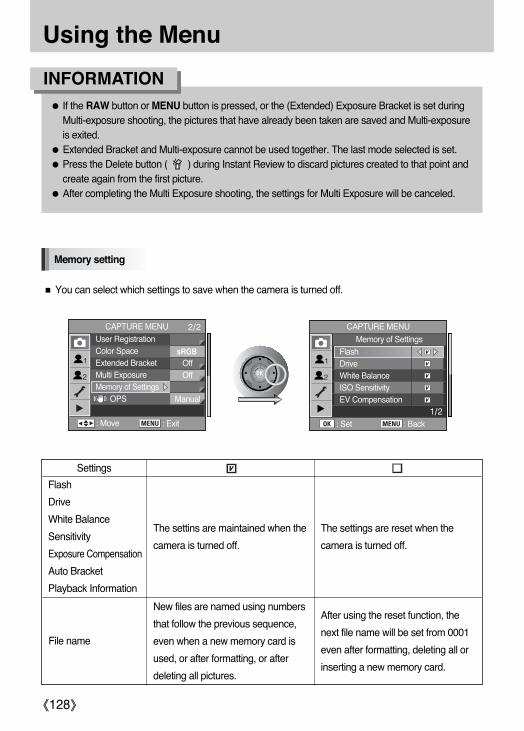
128
Using the Menu
Memory setting
CAPTURE MENU
: Move : Exit
User Registration Color SpaceExtended BracketMulti ExposureMemory of Settings
OPS
OffOff
Manual
CAPTURE MENU
: Set : Back
Memory of Settings
If the RAW button or MENU button is pressed, or the (Extended) Exposure Bracket is set duringMulti-exposure shooting, the pictures that have already been taken are saved and Multi-exposureis exited.Extended Bracket and Multi-exposure cannot be used together. The last mode selected is set.Press the Delete button ( ) during Instant Review to discard pictures created to that point andcreate again from the first picture.After completing the Multi Exposure shooting, the settings for Multi Exposure will be canceled.
INFORMATION
You can select which settings to save when the camera is turned off.
FlashDriveWhite BalanceISO SensitivityEV Compensation
Settings
Flash
Drive
White Balance
Sensitivity
Exposure Compensation
Auto Bracket
Playback Information
New files are named using numbers
that follow the previous sequence,
even when a new memory card is
used, or after formatting, or after
deleting all pictures.
After using the reset function, the
next file name will be set from 0001
even after formatting, deleting all or
inserting a new memory card.
The settins are maintained when the
camera is turned off.
The settings are reset when the
camera is turned off.
File name

129
Using the Menu
Optical Picture stabilisation (OPS)
CAPTURE MENU
: Move : Exit
User RegistrationColor SpaceExtended BracketMulti ExposureMemory of Settings
OPS
OffOff
Manual
If a lens is used that does not support automatic acquisition oflens information, such as focal length, the [ OPS] menuappears. Set [Focal Length] manually on the [ OPS] menu.For more information, see “Setting the Shake ReductionFunction (p.55)”.
Exposure mode
CAPTURE MENU
: Set : Cancel
Exposure ModeUser RegistrationColor SpaceExtended BracketMulti ExposureMemory of Settings
OPS
You can store the current camera settings and easily retrievethem simply by setting the mode dial to USER. Exposure mode only can be selected in the User mode.

130
Using the Menu
Set custom functions to fully use the functions of a SLR camera with the Custom Function Menu.
Item Function Page
Sets whether to use Autofocus when shooting with remote control. p.132
EV Steps Sets the adjustment steps for exposure. p.133
Meter Operating Time Sets the exposure metering time. p.134
AE-L with AF locked Sets whether to lock exposure value when focus is locked. p.134
Program line Set the type of Program line. p.135
WB when using flash Sets whether to fix white balance when flash is discharged. p.136
Color temp. Unit Sets the adjustment steps for colour temperature. p.137
Noise Reduction Sets whether to use Noise Reduction in slow speed shooting. p.137
Sensitivity Steps Sets the adjustment steps for ISO sensitivity. p.139
p.131
p.131
p.132
p.133
p.135
p.136
p.138
p.139
AF in remote control
AF Button Function
AF by Press Halfway
Fine tune when AWB
Auto EV Compensation
ISO warning
Reset Custom Function
Superimpose AF Area
Link AF Point and AE
[CUSTOM1 MENU] Menu Setting Items
Sets whether to adjust AE and Focusing Area in multi-segment
metering based on AF point.
Sets whether to display the selected AF point (focus position)
in the viewfinder.
Sets whether to perform AF while the AF button is pressed or
not perform AF while the AF button is pressed.
Sets whether to perform AF when the shutter release button is
pressed halfway.
Sets whether to compensate automatically when proper
exposure cannot be determined.
Sets whether fine tune is available when white balance is set to
Auto.
Sets the maximum sensitivity level. ISO warning appears
when exceeded.
Resets all the settings in the Custom Function menu to the
defaults.
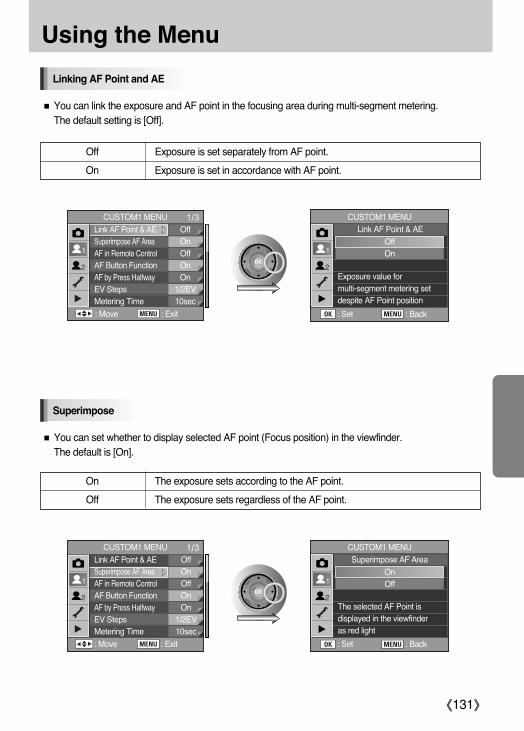
131
Using the Menu
You can link the exposure and AF point in the focusing area during multi-segment metering. The default setting is [Off].
Linking AF Point and AE
You can set whether to display selected AF point (Focus position) in the viewfinder.The default is [On].
Superimpose
CUSTOM1 MENU
: Move : Exit
Link AF Point & AESuperimpose AF AreaAF in Remote ControlAF Button FunctionAF by Press HalfwayEV StepsMetering Time
OffOnOffOnOn
1/2EV10sec
Off Exposure is set separately from AF point.
On Exposure is set in accordance with AF point.
On The exposure sets according to the AF point.
Off The exposure sets regardless of the AF point.
CUSTOM1 MENU
: Set : Back
Link AF Point & AEOffOn
Exposure value formulti-segment metering setdespite AF Point position
CUSTOM1 MENU
: Move : Exit
Link AF Point & AESuperimpose AF AreaAF in Remote ControlAF Button FunctionAF by Press HalfwayEV StepsMetering Time
OffOnOffOnOn
1/2EV10sec
CUSTOM1 MENU
: Set : Back
Superimpose AF AreaOnOff
The selected AF Point isdisplayed in the viewfinder as red light

132
Using the Menu
Sets whether to use Autofocus when shooting with remote control. The default is [Off].
AF in remote control
CUSTOM1 MENU
: Move : Exit
Link AF Point & AESuperimpose AF AreaAF in Remote ControlAF Button FunctionAF by Press HalfwayEV StepsMetering Time
OffOnOffOnOn
1/2EV10sec
Off AF does not activate at shutter release from remote control when [Off].
On AF activates if shutter is released from remote control when [On].
CUSTOM1 MENU
: Set : Back
AF in Remote ControlOffOn
AF is not operated whenreleased with theremote control unit
Set whether to perform AF while the AF button is pressed or not perform AF while the AF button ispressed. The default is [Enable AF].
AF Button Function
CUSTOM1 MENU
: Move : Exit
Link AF Point & AESuperimpose AF AreaAF in Remote ControlAF Button FunctionAF by Press HalfwayEV StepsMetering Time
OffOnOffOnOn
1/2EV10sec
Enable AF Performs Autofocus when pressing the AF button.
Cancel AF Does not perform Autofocus when pressing the AF button.
CUSTOM1 MENU
: Set : Back
AF Button FunctionEnable AF Cancel AF
AF operates when theAF button is pressed

133
Using the Menu
Sets whether to perform AF when the shutter release button is pressed halfway. The default is [On].
AF by Press Halfway
CUSTOM1 MENU
: Move : Exit
Link AF Point & AESuperimpose AF AreaAF in Remote ControlAF Button FunctionAF by Press HalfwayEV StepsMetering Time
OffOnOffOnOn
1/2EV10sec
On Performs AF when the shutter release button is pressed halfway.
Off Does not perform AF when the shutter release button is pressed halfway.
CUSTOM1 MENU
: Set : Back
AF by Press Halfway
OnOff
AF operates when shutter release button is pressed halfway
Sets the adjustment steps for exposure. The default setting is [1/2 EV step].
EV Steps
CUSTOM1 MENU
: Move : Exit
Link AF Point & AESuperimpose AF AreaAF in Remote ControlAF Button FunctionAF by Press HalfwayEV StepsMetering Time
OffOnOffOnOn
1/2EV10sec
1/2 EV Sets the EV step to 1/2 EV.
1/3 EV Sets the EV step to 1/3 EV.
CUSTOM1 MENU
: Set : Back
EV Steps
1/2 EV 1/3 EV
Exposure setting stepsare set to 1/2 EV

134
Using the Menu
Sets the exposure metering time. The default setting is [10 sec].
Meter Operating Time
CUSTOM1 MENU
: Move : Exit
Link AF Point & AESuperimpose AF AreaAF in Remote ControlAF Button FunctionAF by Press HalfwayEV StepsMetering Time
OffOnOffOnOn
1/2EV10sec
10 sec Sets the exposure metering time to 10 seconds.
3 sec Sets the exposure metering time to 3 seconds.
30 sec Sets the exposure metering time to 30 seconds.
CUSTOM1 MENU
: Set : Back
Metering Time10sec3sec30sec
Sets exposure meteringtimer to 10 seconds
Locks the exposure value when the focus is locked. The default setting is [Off].
AE-L with AF locked
CUSTOM1 MENU
: Move : Exit
AEL with AF LockedProgram LineAuto EVCFine tune when AWBWB when using flashColor Temp. UnitNoise Reduction
OffNormal
OffOff---
Kelvin On
Off Does not lock the exposure when focus is locked.
On Locks the exposure when the focus is locked.
CUSTOM1 MENU
: Set : Back
AEL with AF LockedOffOn
AE is not locked when the focus is locked

135
Using the Menu
In Auto mode and Program mode, exposure is regulated according to the set Program line. Choose normal Program line or one of the following. The default is [Normal].
Program Line
Normal Normal program is the basic Automatic Exposure Program.
Hi-speed priority program is an Automatic Exposure Program that selects
higher shutter speeds.
Depth-of-field priority program is an Automatic Exposure Program that selects
smaller aperture settings to maximise depth-of-field.
MTF priority program is an Automatic Exposure Program that selects the
best aperture settings for the attached lens.
Sets whether to compensate automatically when proper exposure cannot be determined. The default is [Off].
Auto EV Compensation
CUSTOM1 MENU
: Move : Exit
AEL with AF LockedProgram LineAuto EVCFine tune when AWBWB when using flashColor Temp. UnitNoise Reduction
OffNormal
OffOff---
KelvinOn
The exposure does not compensate when the exposure cannot be accurately
calculated automatically.
The exposure compensates automatically when the automatic exposure
function is unable to set the exposure accurately.
CUSTOM1 MENU
: Set : Back
Auto EVC OffOn
Does not use auto EV compensation when properexposure is not obtained
Off
On
CUSTOM1 MENU
: Move : Exit
AEL with AF LockedProgram LineAuto EVCFine tune when AWBWB when using flashColor Temp. UnitNoise Reduction
OffNormal
OffOff ---
Kelvin On
CUSTOM1 MENU
: Set : Back
Program Line
NormalH.Speed
DepthMTF
Sets Program line toNormal program
H.Speed
Depth
MTF

136
Using the Menu
Sets whether fine tune is available when white balance is set to Auto. The default is [Off].
Fine tune when AWB
CUSTOM1 MENU
: Move : Exit
AEL with AF LockedProgram LineAuto EVCFine tune when AWBWB when using flashColor Temp. UnitNoise Reduction
OffNormal
OffOff---
KelvinOn
Off AWB fine tuning is not available.
On The AWB fine tuning is available.
CUSTOM1 MENU
: Set : Back
Fine tune when AWBOffOn
Fine tune is disabled when White Balance is set to AWB
Sets whether to fix white balance when flash is discharged. The default is [Unchanged].
WB when using flash
CUSTOM1 MENU
: Move : Exit
AEL with AF LockedProgram LineAuto EVCFine tune when AWBWB when using flashColor Temp. UnitNoise Reduction
OffNormal
OffOff---
Kelvin On
Unchanged The WB is not changed when flash is discharged.
Flash The WB is changed when flash is discharged.
CUSTOM1 MENU
: Set : Back
WB when using flashUnchanged
Flash
White Balance setting is not changed by flash use

137
Using the Menu
Use figures to set the colour temperature. The default is [Kelvin].
Adjusting the White Balance with Colour Temperature
CUSTOM1 MENU
: Move : Exit
AEL with AF LockedProgram LineAuto EVCFine tune when AWBWB when using flashColor Temp. UnitNoise Reduction
OffNormal
OffOff---
Kelvin On
Kelvin Sets the colour temperature by 100K.
Sets the Colour temperature by 20 Mired.
The figures are converted to Kelvin and displayed.
CUSTOM1 MENU
: Set : Back
Color Temp. Unit
Kelvin Mired
Color temperature can be set in steps of 100K
Mired
Sets whether to use Noise Reduction in slow speed shooting. The default is [On].
Noise Reduction
CUSTOM1 MENU
: Move : Exit
AEL with AF LockedProgram LineAuto EVCFine tune when AWBWB when using flashColor Temp. UnitNoise Reduction
OffNormal
OffOff---
Kelvin On
On Uses Noise Reduction in slow speed shooting.
Off Does not use Noise Reduction in slow speed shooting.
CUSTOM1 MENU
: Set : Back
Noise Reduction
OnOff
Noise Reduction will activatein slow speed shooting

138
Using the Menu
ISO warning appears in the viewfinder when a sensitivity value of your choice is reached orexceeded. Set a sensitivity that is not regularly used to avoid forgetting to reset when sensitivity israised. ISO warning is not displayed by default.
ISO (ISO warning) appears in the viewfinder when the setsensitivity is set or exceeded.
ISO Warning
CUSTOM1 MENU
: Move : Exit
ISO WarningISO StepsReset Custom1
Off1 EV
Off ISO warning is not displayed.
ISO 400 ISO warning is displayed when ISO 400 is set or exceeded.
ISO 800 ISO warning is displayed when ISO 800 is set or exceeded.
ISO 1600 ISO warning is displayed when ISO 1600 is set.
CUSTOM1 MENU
: Set : Back
ISO Warning
Off400
8001600
ISO sensitivity warning notdisplayed in veiwfinder

139
Using the Menu
Set the sensitivity step. The default is [1 EV Step].
ISO sensitivity step
CUSTOM1 MENU
: Move : Exit
ISO WarningISO StepsReset Custom1
Off1 EV
1 EV Step Set the sensitivity step to 1 EV.
As EV Steps Set the sensitivity according to the EV setting.
CUSTOM1 MENU
: Set : Back
ISO Steps1 EV Step
As EV Steps
ISO sensitivity steps are set to 1 EV
Resets all the settings in the Custom Function 1 menu to the defaults. The default is [Cancel].
Reset Custom Function 1
CUSTOM1 MENU
: Move : Exit
ISO WarningISO StepsReset Custom1
Off1 EV
Reset Resets the settings.
Cancel Does not reset the settings.
CUSTOM1 MENU
: Set : Back
Reset Custom1ResetCancel

140
Using the Menu
Item Function Page
Bracketing Order Sets the order for bracket shooting.
Selects the exposure adjustment method when the Green mode
button is pressed in an M mode.
Sets to enable shutter release when lens aperture ring is set at
other than A (Auto).
E-Dial in Program Sets the Front and Rear e-dials in P (Program) mode.
E-Dial in Sv Sets the Front and Rear e-dials in Sv (Sensitivity Priority) mode.
E-Dial in Tv Sets the e-dials in Tv (Shutter Priority) mode.
E-Dial in Av Sets the e-dials in Av (Aperture Priority) mode.
Sets whether to capture RAW+JPEG once or retain settings
when the RAW button is pressed.
Sets to switch number of recordable images in the LCD panel
and viewfinder to number of continuous shooting recordable
images when shutter release button is pressed halfway.
Release in Charging Sets to release shutter while the built-in flash is charging.
Initial Zoom Sets the initial magnification of the zoom playback.
Auto Rotation Sets to automatically rotate images when playing back.
Saving Rotation Info. Sets whether to save rotation information when shooting.
Light of Top LCD Sets whether to illuminate the LCD panel.
Resets all the settings in the Custom Function menu to the
defaults.
Green Button in M
Set RAW Button
Remaining Count
Preview Method
Reset Custom2
Use Aperture Ring
p.141
p.141
p.142
p.142 ~ 143
p.142 ~ 143
p.142 ~ 143
p.142 ~ 143
p.144
p.144
p.145
p.145
p.146
p.146
p.147
p.147
p.148
Sets to use Digital Preview or Optical Preview when the main
switch is turned to the preview position ( ). Digital Preview
lets you check the composition, exposure and focus on the
LCD monitor before taking the picture. Optical Preview lets you
check the depth of field with the viewfinder.
[CUSTOM2 MENU] Menu Setting Items

141
Using the Menu
Sets the order for bracket shooting. The default is [0, - , +].
Auto Bracketing order
Selects the exposure adjustment method when the Green mode button is pressed in M (Manual)mode. The default is [Program Line].
Green Button in Manual mode
Order 0 - +, - 0 +, + 0 -, 0 + -
Program Line The aperture and shutter speed are adjusted automatically.
Tv Shift The aperture is locked and the shutter speed is adjusted automatically.
Av Shift The shutter speed is locked and the aperture is adjusted automatically.
CUSTOM2 MENU
: Move : Exit
Bracketing OrderGreen Button in MUse Aperture RingE-Dial in ProgramE-Dial in SvE-Dial in TvE-Dial in Av
0 - +<-P->Off
Tv, Av---, ISOTv, --- ---, Av
CUSTOM2 MENU
: Move : Exit
Bracketing OrderGreen Button in MUse Aperture RingE-Dial in ProgramE-Dial in SvE-Dial in TvE-Dial in Av
0 - +<-P->Off
Tv, Av---, ISOTv, --- ---, Av
CUSTOM2 MENU
: Set : Back
Green Button in MProgram Line
Tv ShiftAv Shift
Sets the aperture and shutter speed to the Program Line exposure
CUSTOM2 MENU
: Set : Back
Bracketing Order
0 - +- 0 +
+ 0 - 0 + -
Shooting order3 frames:0,-1,+15 frames:0,-1,+1,-2,+2

142
Using the Menu
Sets the shutter so it can be released even if the aperture ring is not set to the A (Auto) position.The default is [Off].
Aperture Ring Use
You can set the functions of the front and rear e-dials on the P / Sv / Tv and Av modes.
e-dial functions on the P / Sv / Tv / Av mode
Off The aperture is locked and the shutter speed is adjusted automatically.
The shutter can be released even if the aperture ring is not set to the A (Auto)
position.
CUSTOM2 MENU
: Move : Exit
Bracketing OrderGreen Button in MUse Aperture RingE-Dial in ProgramE-Dial in SvE-Dial in TvE-Dial in Av
0 - +<-P->Off
Tv, Av---, ISOTv, --- ---, Av
CUSTOM2 MENU
: Set : Back
Use Aperture RingOffOn
Pictures cannot be takenwhen the aperture ringposition is other than A
CUSTOM2 MENU
: Move : Exit
Bracketing OrderGreen Button in MUse Aperture RingE-Dial in ProgramE-Dial in SvE-Dial in TvE-Dial in Av
0 - +<-P->Off
Tv, Av---, ISOTv, --- ---, Av
: Ps
CUSTOM2 MENU
: Set : Back
E-Dial in Program
Front:Shutter Speed (Hyper)Rear:Aperture (Hyper)
[e-dial menu of the P mode]
On

143
Using the MenuCUSTOM2 MENU
: Move : Exit
Bracketing OrderGreen Button in MUse Aperture RingE-Dial in ProgramE-Dial in SvE-Dial in TvE-Dial in Av
0 - +<-P->Off
Tv, Av---, ISOTv, --- ---, Av
CUSTOM2 MENU
: Set : Back
E-Dial in Sv
Front:Not AvailableRear:ISO Sensitivity
CUSTOM2 MENU
: Move : Exit
Bracketing OrderGreen Button in MUse Aperture RingE-Dial in ProgramE-Dial in SvE-Dial in TvE-Dial in Av
0 - +<-P->Off
Tv, Av---, ISOTv, --- ---, Av
CUSTOM2 MENU
: Set : Back
E-Dial in Tv
Front:Shutter SpeedRear:Not Available
CUSTOM2 MENU
: Move : Exit
Bracketing OrderGreen Button in MUse Aperture RingE-Dial in ProgramE-Dial in SvE-Dial in TvE-Dial in Av
0 - +<-P->Off
Tv, Av---, ISOTv, --- ---, Av
CUSTOM2 MENU
: Set : Back
E-Dial in Av
Front:Not AvailableRear:Aperture
[e-dial menu of the Sv mode]
[e-dial menu of the Tv mode]
[e-dial menu of the Av mode]

144
Using the Menu
Sets whether to capture RAW+JPEG images once, or retain same settings whenever the RAWbutton is pressed. The default is [1time].
One-touch RAW +
Sets to switch number of recordable images in the LCD panel and viewfinder. The default is [Normal].
Recordable Image No.
Displays the number of recordable images in the LCD panel and viewfinder.
The number of continuous recordable images is displayed when the shutter
release button is pressed halfway.Continuous
Normal
1time The setting is reset after taking a picture.
Continue The setting is retained when the RAW button is pressed again.
CUSTOM2 MENU
: Move : Exit
Set RAW ButtonRemaining CountRelease in ChargingPreview MethodInitial Zoom Auto RotationSaving Rotation Info.
1time
Off
1.2XOn On
CUSTOM2 MENU
: Set : Back
Set RAW Button1time
Continue
Returns to the previoussetting after one shooting
CUSTOM2 MENU
: Move : Exit
Set RAW ButtonRemaining CountRelease in ChargingPreview MethodInitial Zoom Auto RotationSaving Rotation Info.
1time
Off
1.2XOn On
CUSTOM2 MENU
: Set : Back
Remaining CountNormal
Continuous
Always displays the no.of recordable imagesfor current memory card

145
Using the Menu
You can set to allow shooting while the flash is re-charging. The default is [Off].
Allowing Shooting while Charging Flash
Off Pictures cannot be taken while the flash is re-charging.
On Pictures can be taken while the flash is re-charging.
Choose the preview method to use when the main switch is turned to the preview position ( ).
Selecting the Preview Method
Optical You can check the depth of field in the viewfinder.
Digital You can check the composition, exposure and focus on the LCD.
CUSTOM2 MENU
: Move : Exit
Set RAW ButtonRemaining CountRelease in ChargingPreview MethodInitial Zoom Auto RotationSaving Rotation Info.
1time
Off
1.2XOn On
CUSTOM2 MENU
: Set : Back
Release in ChargingOffOn
Disables shutter releasewhile the built-in flash is charging
CUSTOM2 MENU
: Move : Exit
Set RAW ButtonRemaining CountRelease in ChargingPreview MethodInitial Zoom Auto RotationSaving Rotation Info.
1time
Off
1.2XOn On
CUSTOM2 MENU
: Set : Back
Preview MethodOpticalDigital
For checking depth offield with viewfinder

146
Using the Menu
Sets the initial magnification of the zoom playback. The default is [1.2 times].
Initial zoom display
[1.2 times], [2 times], [4 times], [8 times] and [16 times].
Sets to automatically rotate images taken vertically when playing back. The default is [On]. If the [Saving Rotation Info.] is not set to [On], the image will not be rotated automatically.
Auto Image Rotation
On The images taken vertically rotate automatically.
Off The images taken vertically do not rotate automatically.
Initial magnification of
the zoom playback
CUSTOM2 MENU
: Move : Exit
Set RAW ButtonRemaining CountRelease in ChargingPreview MethodInitial Zoom Auto RotationSaving Rotation Info.
1time
Off
1.2XOn On
CUSTOM2 MENU
: Set : Back
Initial Zoom 1.2 times2 times4 times
8 times16 times
Magnification for startingzoom playback set to 1.2x
CUSTOM2 MENU
: Move : Exit
Set RAW ButtonRemaining CountRelease in ChargingPreview MethodInitial Zoom Auto RotationSaving Rotation Info.
1time
Off
1.2XOn On
CUSTOM2 MENU
: Set : Back
Auto RotationOnOff
Performs auto imagerotation during playback

147
Using the Menu
Sets whether to save rotation information when shooting. The default is [On].
Saving rotation information
On Saves the rotation information when shooting.
Off Does not save the rotation information when shooting.
Sets whether to illuminate the LCD panel. The default is [On].
Illuminating LCD panel
On The LCD panel will illuminate when pressing the LCD panel lamp button.
Off The LCD panel will not illuminate when pressing the LCD panel lamp button.
CUSTOM2 MENU
: Move : Exit
Set RAW ButtonRemaining CountRelease in ChargingPreview MethodInitial Zoom Auto RotationSaving Rotation Info.
1time
Off
1.2XOnOn
CUSTOM2 MENU
: Set : Back
Saving Rotation Info.OnOff
Saves rotation informationwhen shooting
CUSTOM2 MENU
: Move : Exit
Light of Top LCDReset Custom2
OnCUSTOM2 MENU
: Set : Back
Light of Top LCDOnOff
Press the Exposure compensation button to illuminate LCD panel

148
Using the Menu
Resets all the settings in the Custom Function 2 menu to the defaults. The default is [Cancel].
Reset Custom Function2
Reset The settings will reset.
Cancel The settings will not reset.
CUSTOM2 MENU
: Move : Exit
Light of Top LCDReset Custom2
On
CUSTOM2 MENU
: Set : Back
Reset Custom2ResetCancel

149
Item Function Page
Format Formats the Memory Card. p.150
Beep Switches the beep tone on/off. p.151
Date/Time Sets the date format and time. p.152
World Time Allows the display of local time when traveling abroad. p.153 ~ 155
Language/ Changes the language in which menus and messages appear. p.156
Guide display Sets to display indicators in LCD monitor. p.156
LCD Brightness Changes the brightness of the LCD monitor. p.157
Video Out Sets the output format to the TV monitor. p.158
USB* Sets the USB cable connection (PC or printer). p.159
Auto Power Off Sets the time to turn off automatically. p.159
Folder Name Sets the method used to add file numbers. p.160
Sensor Cleaning Locks the mirror in the up position for cleaning the CCD. p.161 ~ 162
Dust Removal Remove the dust of the CCD sensor. p.163
Reset p.164
* Refer to the software instructions for details on connecting the camera to a PC. (p.218)
Using the Menu
Perform various settings related to the camera in the [SETUP MENU] menu.
Resets all settings other than Date Adjust, Language, Video
Out and World Time.
[SETUP MENU] Menu Setting Items

150
Using the Menu
Be sure to format new Memory Card with the camera before using the card. Formatting will delete allthe data on the Memory Card.
Formatting the Memory Card
Format A [Formatting] message appears and the memory will be formatted.
Cancel The memory will not be formatted.
SETUP MENU
: Move : Exit
FormatBeepDate/TimeWorld TimeLanguage/Guide DisplayLCD Brightness
English3sec
0
SETUP MENU
: Set : Back
FormatFormatCancel
All data deleted
When formatting is completed, camera mode is changed to the Capture or Playing back mode.
Do not open the card cover while formatting Memory Card. The card may be damaged beyonduse.Formatting will delete protected data. Be aware.
INFORMATION
Formatting

151
SETUP MENU
: Set : Back
Beep
Using the Menu
You can turn the camera operation beep on or off. The default setting is [On].
Turning the Beep On and Off
There are five items that you can set :
- AF sound, AE Lock, RAW button, Self-timer and Remote Control.
No beep sound
Beep is not activated
SETUP MENU
: Move : Exit
FormatBeepDate/TimeWorld TimeLanguage/Guide DisplayLCD Brightness
English3sec
0
SETUP MENU
: Set : Back
BeepBeep
AF SoundAE LockRAW+Self-TimerRemote Control
SETUP MENU
: Set : Back
BeepBeep
AF SoundAE LockRAW+Self-TimerRemote Control
Beep
[Beep On]
[Beep Off]

152
Using the Menu
You can change the initial date and time settings.You can also set the display style.
Changing the Date and Time and the Display Style
Date Display Style [mm/dd/yy], [dd/mm/yy], [yy/mm/dd]
Time Display Style [12h (12 hour)], [24h (24 hour)]
SETUP MENU
: Set : Back
Date/Time
Type yy/mm/dd 24h
Date 2006 10
Time 13 00
01
SETUP MENU
: Set : Cancel
Date/Time
Type yy/mm/dd 24h
Date 2006 10
Time 13 00
01
SETUP MENU
: Set : Cancel
Date/Time
Type yy/mm/dd 24h
Date 2006 10
Time 13 00
01
Setting the Date / Time
SETUP MENU
: Set : Back
Date/Time
Type yy/mm/dd 24h
Date 2006 10
Time 13 00
01
SETUP MENU
: Set : Cancel
Date/Time
Type yy/mm/dd 24h
Date 2006 10
Time 13 00
01
SETUP MENU
: Set : Cancel
Date/Time
Type yy/mm/dd 24h
Date 2006 10
Time 13 00
01
SETUP MENU
: Set : Cancel
Date/Time
Type yy/mm/dd 24h
Date 2006 10
Time 13 00
01
Date Setting
SETUP MENU
: Set : Back
Date/Time
Type yy/mm/dd 24h
Date 2006 10
Time 13 00
01
SETUP MENU
: Set : Cancel
Date/Time
Type yy/mm/dd 24h
Date 2006 10
Time 13 00
01
SETUP MENU
: Set : Cancel
Date/Time
Type yy/mm/dd 24h
Date 2006 10
Time 13 00
01
Time Setting
SETUP MENU
: Move : Exit
FormatBeepDate/TimeWorld TimeLanguage/Guide DisplayLCD Brightness
English3sec
0

153
Using the Menu
The date and time selected in “Initial Settings” (p.42) serve as the date and time of your presentlocation. Setting [World Time] enables you to display the local date and time on the LCD monitorwhen travelling overseas.
1. Select [World Time] on the [SETUP MENU] menu.
2. Press the four-way controller ( ).The World Time screen appears.
3. Use the four-way controller ( ) to select (On) or (Off).
4. Press the four-way controller ( ).The selection frame moves to . The city with blinks.
5. Press the four-way controller ( ).The screen for magnifying the Destination region appears.Use the four-way controller ( ) to magnify the region.
6. Press the four-way controller ( ).The frame moves to city.
Applies time of city set in (Destination)
Applies time of city set in (Hometown)
Setting the World Time
: Back
World Time
SeoulSeoul
SETUP MENU
: Move : Exit
FormatBeepDate/TimeWorld TimeLanguage/Guide DisplayLCD Brightness
English3sec
0

154
Using the Menu7. Use the four-way controller ( ) to select the Destination city.
The current time, location and time difference of the selectedcity appears.
8. Use the four-way controller ( ) to select [DST].
9. Use the four-way controller ( ) to select (On) or (Off).Select (On) if the Destination city uses daylight saving time (DST).
11. Press the MENU button twice.The camera is ready to take pictures.
10. Press the OK button.The World Time setting is saved.
See List of World Time Cities” (p.155) for cities that can be specified as a destination.Select in Step 4 to set the city and DST setting.
appears on the guide display screen if World Time is On ( ). (p.23, 24)
INFORMATION
: Set : Back
Destination
LondonDST
: Back
World Time
LondonSeoul

155
Using the Menu
Region CityNorth HonoluluAmerica Anchorage
VancouverSan Francisco Dubai
Los AngelesCalgary
DenverChicago
MiamiToronto
New YorkHalifax
Central and Mexico City
South Lima
America SantiagoCaracas
Buenos AiresSao PauloRio de Janeiro
Europe LisbonMadridLondon
Paris
AmsterdamCopenhagenRomeBerlinStockholm
Athens
Helsinki
Moscow
Africa/ Dakar
West Asia Algiers
Johannesburg
Istanbul
Cairo
Jerusalem
Region City
Africa/ Nairobi
West Asia Jeddah
Tehran
Dubai
Karachi
Kabul
Male
Delhi
Colombo
Katmandu
Dacca
East Asia Yangon
Bangkok
Kuala Lumpur
Vientiane
Singapore
Phnom Penh
Ho chi Minh
Jakarta
Hong Kong
Beijing
Shanghai
Manila
Taipei
Seoul
Tokyo
Guam
Oceania Perth
Adelaide
Sydney
Noumea
Wellington
Auckland
Pago Pago
List of World Time Cities

156
Using the Menu
You can change the language in which the menus, error messages, etc. are displayed.
Setting the Display Language
You can choose from eleven languages: English, Korean, Chinese
(Traditional/ Simplified), French, German, Spanish, Portuguese, Italian,
Swedish, Dutch, Danish and Russian.
Language /
SETUP MENU
: Move : Exit
FormatBeepDate/TimeWorld TimeLanguage/Guide DisplayLCD Brightness
English3sec
0
SETUP MENU
: Set : Back
Language/
DeutschEspañol
PortuguêsItaliano
Svenska
English
Français
Set to display time of guides on the LCD monitor when main switch is on or Exposure mode ischanged. The default is [3Sec].
Guide Display Time
Off, 3Sec. 10Sec. 30Sec. Guide Display Time
SETUP MENU
: Move : Exit
FormatBeepDate/TimeWorld TimeLanguage/Guide DisplayLCD Brightness
English3sec
0
SETUP MENU
: Set : Cancel
FormatBeepDate/TimeWorld TimeLanguage/Guide DisplayLCD Brightness
Off3sec10sec30sec

157
Using the Menu
You can adjust the brightness of the LCD monitor. Adjust settings when the LCD monitor is hard to see.
You can select -7 ~ 0 ~ +7 steps of LCD brightness.
Adjusting the Brightness of the LCD Monitor
SETUP MENU
: Move : Exit
FormatBeepDate/TimeWorld TimeLanguage/Guide DisplayLCD Brightness
English3sec
0
SETUP MENU
: Set : Cancel
FormatBeepDate/TimeWorld TimeLanguage/Guide DisplayLCD Brightness

158
Using the Menu
When you connect the camera to AV equipment such as a TV, choose the appropriate video outputformat (NTSC or PAL) for playing back images.
Selecting the Video Output Format
SETUP MENU
: Move : Exit
Video OutUSBAuto Power OffFolder NameSensor CleaningDust RemovalReset
NTSCComputer
1minStandard
SETUP MENU
: Set : Cancel
Video OutUSBAuto Power OffFolder NameSensor CleaningDust RemovalReset
NTSCPAL
NTSC : U.S.A, Canada, Japan, South Korea, Taiwan, Mexico.PAL : Australia, Austria, Belgium, China, Denmark, Finland, Germany, U.K., Holland, Italy,
Kuwait, Malaysia, New Zealand, Singapore, Spain, Sweden, Switzerland, Thailand,Norway.
When using a TV as an external monitor, you will need to select the external or AV channel of theTV.There will be a digital noise on the external monitor, but it is not a malfunction.If the image is not in the centre of the screen, use the TV controls to centre it.When the camera is connected to an external monitor, the menu will be visible on the externalmonitor and the menu functions are the same as those indicated on the LCD monitor.
INFORMATION

159
Using the Menu
This menu sets the USB cable connection (PC or printer).
USB (Selecting an external device)
SETUP MENU
: Move : Exit
Video OutUSBAuto Power OffFolder NameSensor CleaningDust RemovalReset
NTSCComputer
1minStandard
SETUP MENU
: Set : Cancel
Video OutUSBAuto Power OffFolder NameSensor CleaningDust RemovalReset
ComputerPrinter
Computer Select this menu when connecting to a computer.
Printer Select this menu when connecting to a printer.
You can set the camera to turn off automatically if unused after a certain length of time. The default is [1Min].
Setting Auto Power Off
SETUP MENU
: Move : Exit
Video OutUSBAuto Power OffFolder NameSensor CleaningDust RemovalReset
NTSCComputer
1minStandard
SETUP MENU
: Set : Cancel
Video OutUSBAuto Power OffFolder NameSensor CleaningDust RemovalReset
1min3min5min10min30min
Off
Length of time 1Min, 3Min, 5Min, 10Min, 30Min, Off
Auto Power Off will not work during slideshow playback, a USB connection, Remote controlshooting or while displaying menu or Fn menu.
INFORMATION

160
Using the Menu
You can select the method for assigning the folder names for storing images. The default setting is [Std.].
Selecting the Folder Name
SETUP MENU
: Move : Exit
Video OutUSBAuto Power OffFolder NameSensor CleaningDust RemovalReset
NTSCComputer
1minStandard
SETUP MENU
: Set : Cancel
Video OutUSBAuto Power OffFolder NameSensor CleaningDust RemovalReset
StandardDate
The folder name is assigned in the form of [XXXSSCAM].
[XXX] is a sequential number from 100 to 999.
The two digits of the [month] and [day] on which the picture was taken are
assigned as the folder name in the form of [XXX_MMDD].
(Example) 101_0101 : for folders with pictures taken on January 1st
Standard
Date

161
Using the Menu
Shadows may appear in the image for white backgrounds and other shooting conditions if the CCDbecomes dirty or dusty. This indicates that the CCD must be cleaned. Please contact SamsungCamera service center for professional cleaning because the CCD is a precision part.
Cleaning the CCD
Do not use a spray type blower.Do not clean the CCD when the exposure mode is set to B (Bulb) mode.Always cap the lens mount area to prevent dirt and dust from accumulating on the CCD when nolens is on the camera.It is recommended to use the AC adapter (SAC-82, optional) when cleaning the CCD.When the battery level is low, a warning message [Not enough battery remaining to clean sensor]is displayed on the LCD monitor.If you are not using the AC adapter, please use batteries with ample capacity remaining. A warning beep will sound if the battery capacity becomes low during cleaning. Please stopcleaning immediately.Do not put the tip of the blower inside the lens mount area. If the power is turned off, this couldcause damage to the shutter or the CCD sensor.The self-timer lamp blinks and [Cln] appears on the LCD panel while cleaning the CCD.
INFORMATION
1. Turn the camera off and remove the lens.
2. Turn the camera on.
3. Select [Sensor Cleaning] on the [SETUP MENU] menu.
4. Press the four-way controller ( ).- The Sensor Cleaning screen appears.
SETUP MENU
: Move : Exit
Video OutUSBAuto Power OffFolder NameSensor CleaningDust RemovalReset
NTSCComputer
1minStandard

162
Using the Menu5. Use the four-way controller ( ) to select [Mirror Up].
6. Press the OK button.- The mirror is locked in the up position.
7. Clean the CCD.- Use a brush-less blower to remove dirt and dust from theCCD. Using a blower with a brush may scratch the CCD. Do not wipe the CCD with a cloth.
8. Turn the camera off.
9. Attach the lens after the mirror returns to its original position.
SETUP MENU
: Set : Back
Sensor CleaningMirror UpCancel
Mirror up to clean CCDTurn the power off to end

163
Using the Menu
The dust can be removed by shaking the CCD.
Removing the dust
SETUP MENU
: Move : Exit
Video OutUSBAuto Power OffFolder NameSensor CleaningDust RemovalReset
NTSCComputer
1minStandard
SETUP MENU
: Set : Back
Dust RemovalDust Removal
Dust Removal Removes the dust by shaking the CCD.
Start-up Action Shakes the CCD to remove the dust.
Removing Dust
SETUP MENU
: Set : Back
Dust RemovalDust Removal
Removing the dust when turning on the camera : select by using the four-way controller ( ).
Press the OK button to remove the dust.
Start-up Action
Start-up Action

164
Using the Menu
Resets all settings other than Date Adjust, Language, Video Out, User set1 and User set2.
Reset
Reset Resets all settings.
Cancel Does not reset camera settings.
SETUP MENU
: Move : Exit
Video OutUSBAuto Power OffFolder NameSensor CleaningDust RemovalReset
NTSCComputer
1minStandard
SETUP MENU
: Set : Back
ResetResetCancel

165
Using the Menu
Item Function Page
Sets to display over exposed area warning during Instant
Review or Playback.
Sets how long to display Instant Review and whether to display
Bright/Dark area warning and histogram.
Sets whether to display Bright/Dark area warning and histogram
during Digital Preview.
Changes the color tone of captured images, adds softening
and slimming effects, or adjusts the brightness.
Slide Show Plays back recorded images one after another. p.168
Perform settings related to playback and editing images in the [PLAYBACK MENU] menu.
p.165
p.166
p.167
p.167
Exposure Warning
Quick View
Digital Preview
Digital filter
Exposure warning
Sets to display over exposed area warning during Instant Review or Playback. The default is [Off].
PLAYBACK MENU
: Move : Exit
Exposure Warning Quick View Digital PreviewDigital FilterSlide Show
Off1sec
3sec
PLAYBACK MENU
: Set : Cancel
Exposure Warning Quick View Digital PreviewDigital FilterSlide Show
OffOn
[PLAYBACK MENU] Menu Setting Items
Off Exposed area does not blink.
On Over exposed area during Instant Review or Playback blinks.

166
Using the Menu
Instant View
Sets Display time, Exposure warning and Histogram.
1, 3, 5 Sec, Off (The default is 1 Sec.)Display time
Histogram
Exposure Warning
Use the four-way controller ( ) to select On (on) or Off (off).
The default is Off (Off).
PLAYBACK MENU
: Set : Cancel
Display TimeHistogramExposure Warning
1sec3sec5secOff
PLAYBACK MENU
Quick View
: Set : Back
Display TimeHistogramExposure Warning
1sec
PLAYBACK MENU
Quick View
: Set : Back
Display TimeHistogramExposure Warning
1sec
PLAYBACK MENU
Quick View
: Set : Back
Display TimeHistogramExposure Warning
1sec
PLAYBACK MENU
: Move : Exit
Exposure WarningQuick View Digital PreviewDigital FilterSlide Show
Off1sec
3sec
Quick View

167
Using the Menu
Digital Preview
You can set whether or not to display the histogram and Bright/Dark area warning during DigitalPreview. The default setting is [Off].
Digital Filter
You can edit shot images using digital filters. Refer to page 93 for more information about the menus.
Histogram
Exposure Warning
Use the four-way controller ( ) to select On (on) or Off (off).
The default is Off (Off).
PLAYBACK MENU
: Move : Exit
Exposure Warning Quick View Digital PreviewDigital FilterSlide Show
Off1sec
3sec
PLAYBACK MENUDigital Preview
: Set : Back
HistogramExposure Warning
PLAYBACK MENUDigital Preview
: Set : Back
HistogramExposure Warning
PLAYBACK MENU
: Move : Exit
Exposure WarningQuick View Digital PreviewDigital FilterSlide Show
Off1sec
3sec

168
Using the Menu
Slide show
You can play back all images recorded on your Memory Card successively. To start continuousplayback, use the menu screen displayed on the LCD monitor. Refer to page 90 for more informationabout the menus.
Interval Set image display interval to [3sec], [5sec], [10sec] or [30sec].
Repeat Set whether or not to play back repeatedly.
PLAYBACK MENU
: Set : Cancel
IntervalRepeat
3sec5sec10sec30sec
PLAYBACK MENU
Slide Show
: Set : Back
IntervalRepeat
3sec
PLAYBACK MENU
Slide Show
: Set : Back
IntervalRepeat
3sec
PLAYBACK MENU
: Move : Exit
Exposure Warning Quick View Digital PreviewDigital FilterSlide Show
Off
1sec
3sec
Slide Show

169
Using the Fn Menu
Press the four-way controller ( ) to set the operation.
Four-way controller Item Function Page
Flash Mode Adjusts the method of flash discharge. p.70 ~ 75
Sensitivity Sets the sensitivity. p.82 ~ 83
Press the Fn button while taking a picture. The Fn menu appears.
Drive Mode
White Balance
Capture Mode
Selects Continuous shooting, Self-Timer or Remote
control.
Adjusts the colour for the colour of the light source
illuminating the subject.
: Move : Exit
p.60 ~ 68
p.76 ~ 81

170
Press the Fn button during playback. The Fn menu appears.
Press the four-way controller ( ) to set the operation.
Four-way controller Item Function Page
DPOF Settings Sets the DPOF settings. p.105
Slideshow Plays back recorded images one after another. p.90 ~ 91
Converts the RAW file to the JPEG file. p.96 ~ 97
p.93 ~ 95
RAW converting
Using the Fn Menu
Playback Mode
When a JPEG file is played back, [Converting RAW file] menu can not be set.
When a RAW file is played back, [DPOF] and [Digital Filter] menu can not be selected.
[Playing back a JPEG file]
:: Move : Exit
[Playing back a RAW file]
: Move : Exit
Edits captured images to black and white or sepia tint,
or adds softening and slimming effects.Digital Filter

171
Using the Mode Dial
You can change the Shooting mode by setting the icons on the mode dial to the dial.
Dial indicator
Item Function Page
(Program)
(Auto Scene)
(Sensitivity Priority)
p.173
p.174
p.176
p.177
p.179
(Shutter Priority)
(Aperture Priority)
Automatically sets shutter speed and aperture to the proper
exposure according to Program line when taking pictures.
Automatically sets the shutter speed and aperture to the proper
exposure according to the set sensitivity.
Lets you set the desired aperture for controlling the depth of
field. Use it to obtain a blurred or sharp background.
Lets you set the desired shutter speed for expressing moving
subjects. Take pictures of fast moving subjects that look still or
subjects that give a sense of movement.
Automatically sets shutter speed and aperture to the proper
exposure according to Program line when taking pictures.
Use the front e-dial and rear e-dial to change the shutter speed
and aperture while maintaining the proper exposure.

172
Using the Mode Dial
Item Function Page
(Manual)
(Shutter & Aperture Priority)
(Bulb)
p.181
p.182
p.186
p.187
p.187
(Flash X-sync speed)
(USER)
Automatically sets the sensitivity so that shutter speed and
aperture give the proper exposure according to the brightness
of the subject.
Lets you set shutter speed and aperture to capture the picture
with creative intent.
Lets you capture images that require slow shutter speeds such
as fireworks and night scenes.
Locks shutter speed at 1/180 second. Use this when using an
External flash that does not automatically change the shutter
speed.
Lets you capture images with settings that you set.

173
Using the Mode Dial
Automatically sets shutter speed and aperture to the proper exposure according to Program linewhen taking pictures.
1. Rotate the Mode dial to .
2. Check the Shutter speed and Aperture value on the viewfinder and LCD panel.
Shutter speed, Aperture value, AE Lock, Exposure value, Auto bracket, Multi-exposure and Flashcompensation are not set in the (Auto) mode. Set the aperture to the A position while holding down the auto-lock button when using a lens with an aperture ring.
INFORMATION
Using the (AUTO) mode

174
Using the Mode Dial
Using the P (Program) mode
Automatically sets shutter speed and aperture to the proper exposure according to Program linewhen taking pictures.
1. Rotate the Mode dial to P.
2. Check the Shutter speed and Aperture value on the viewfinder and LCD panel.
You can change the program line. Set the [Program Line] in the [CUSTOM1 MENU] menu.(p.135)You can automatically correct the sensitivity if appropriate exposure cannot be set with the setcriteria. Set [ISO Sensitivity] to [Auto] in the Fn menu. (p.82)Set the aperture to the A position while holding down the auto-lock button when using a lens with an aperture ring.
INFORMATION

175
Using the Mode Dial
Using the Hyper-program Mode ( )
To change the shutter speedYou can switch to Shutter Priority automatic exposure by turning the front e-dial in P (Hyper-program) mode.
- You can only set the shutter speed to a value that is inrelation to aperture.
- If the brightness changes and the aperture value is outsidethe relative range, the aperture will blink in the viewfinderand on the LCD panel.
- Press the Green button to return to Hyper-programautomatic exposure.
To change the apertureYou can switch to Aperture Priority automatic exposure by turning the rear e-dial in P (Hyper-program) mode.
- You can only set the aperture to a value that is in relation toshutter speed.
- If the brightness changes and the shutter speed is outsidethe relative range, the shutter speed will blink in theviewfinder and on the LCD panel.
- Press the Green button to return to Hyper-programautomatic exposure.

176
Using the Mode Dial
Using the Sv (Sensitivity Priority) Mode
You can set the sensitivity to suit the brightness of the subject.The shutter speed and aperture are automatically set according to the selected sensitivity to obtainthe appropriate exposure.
1. Set the mode dial to Sv.
2. Turn the rear e-dial and adjust the sensitivity.The shutter speed, aperture value and sensitivity are displayedin the viewfinder and on the LCD panel.
Turn the front e-dial while pressing the button and change the EV Compensation value.Set the sensitivity in increments of 1/2 EV or 1/3 EV. Set in [ISO Steps] in the [CUSTOM1 MENU]menu. (p.139)You cannot set the sensitivity in [ISO Sensitivity] in the Fn menu.Set the aperture to the A position while holding down the auto-lock button when using a lens with an aperture ring.
INFORMATION
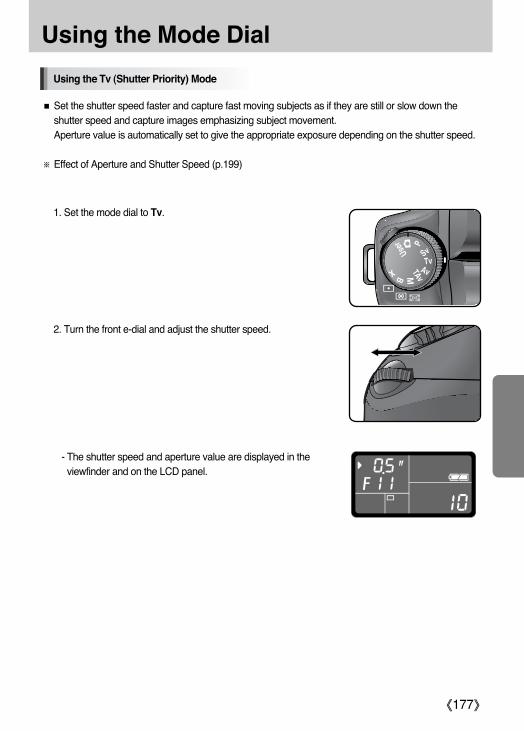
177
Using the Mode Dial
Set the shutter speed faster and capture fast moving subjects as if they are still or slow down theshutter speed and capture images emphasizing subject movement.Aperture value is automatically set to give the appropriate exposure depending on the shutter speed.
Effect of Aperture and Shutter Speed (p.199)
1. Set the mode dial to Tv.
2. Turn the front e-dial and adjust the shutter speed.
- The shutter speed and aperture value are displayed in theviewfinder and on the LCD panel.
Using the Tv (Shutter Priority) Mode

178
Using the Mode Dial
Turn the front e-dial while pressing the button to change the EV Compensation value. Set the shutter speed in increments of 1/2 EV or 1/3 EV. Set in [EV Steps] in the [CUSTOM1MENU] menu. (p.133)You can automatically correct the sensitivity if appropriate exposure cannot be set with the setcriteria. Set [ISO Sensitivity] to [Auto] in the Fn menu. (p.82)Set the aperture to the A position while holding down the auto-lock button when using a lens with an aperture ring.
INFORMATION
Exposure Warning
If the subject is too bright or too dark, the aperture value willblink in the viewfinder and on the LCD panel. If the subject istoo bright, choose a faster shutter speed. If it is too dark,choose a slower shutter speed. When the aperture value indication stops blinking, you can takethe picture with proper exposure. Use an ND (Neutral Density) filter if the subject is too bright. Use a flash if it is too dark.
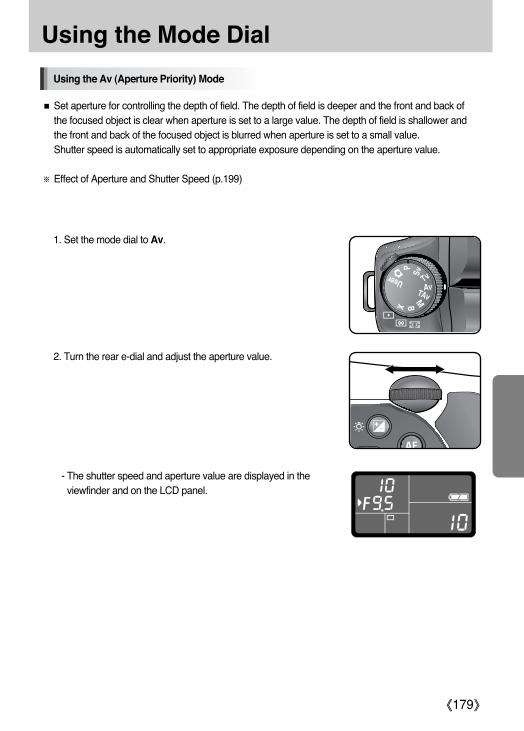
179
Using the Mode Dial
Using the Av (Aperture Priority) Mode
Set aperture for controlling the depth of field. The depth of field is deeper and the front and back ofthe focused object is clear when aperture is set to a large value. The depth of field is shallower andthe front and back of the focused object is blurred when aperture is set to a small value.Shutter speed is automatically set to appropriate exposure depending on the aperture value.
Effect of Aperture and Shutter Speed (p.199)
1. Set the mode dial to Av.
2. Turn the rear e-dial and adjust the aperture value.
- The shutter speed and aperture value are displayed in theviewfinder and on the LCD panel.

180
Turn the front e-dial while pressing the button to change the EV Compensation value.Set the aperture value in increments of 1/2 EV or 1/3 EV. Set in [EV Steps] in the [CUSTOM1MENU] menu. (p.133)You can automatically correct the sensitivity if appropriate exposure cannot be set with the setcriteria. Set [ISO Sensitivity] to [Auto] in the Fn menu. (p.82)Set the aperture to the A position while holding down the auto-lock button when using a lens with an aperture ring.
Using the Mode Dial
INFORMATION
Exposure Warning
If the subject is too bright or too dark, the shutter speed willblink in the viewfinder and on the LCD panel. If the subject istoo bright, set the aperture smaller (larger number), and whentoo dark, open the aperture further (smaller number). Once blinking stops, you can take the picture.Use an ND (Neutral Density) filter if the subject is too bright. Use a flash if it is too dark.

181
Using the Mode Dial
Using the TAv (Shutter & Aperture Priority) Mode
You can set both the desired shutter speed and aperture to take the picture.Automatically sets the sensitivity so that shutter speed and aperture will give the proper exposureaccording to the brightness of the subject.
1. Set the mode dial to TAv.
2. Turn the front e-dial and adjust the shutter speed.
- The shutter speed, aperture value and sensitivity aredisplayed in the viewfinder and on the LCD panel.
3. Turn the rear e-dial and adjust the aperture value.

This mode is convenient for taking pictures using the same shutter speed and aperture settingcombination or taking intentionally underexposed (darker) or over-exposed (brighter) photographs.
Effect of Aperture and Shutter Speed (p.199)
1. Set the mode dial to M.
Using M (Hyper-manual) Mode
182
Using the Mode Dial
Turn the front e-dial while pressing the button to change the EV Compensation value.Set the shutter speed and aperture values in increments of 1/2 EV or 1/3 EV. Set in [EV Steps] inthe [CUSTOM1 MENU] menu. (p.133)Settings other than [Auto] are not available in [ISO Sensitivity] in the Fn menu.Set the aperture to the A position while holding down the auto-lock button when using a lens with an aperture ring.
INFORMATION
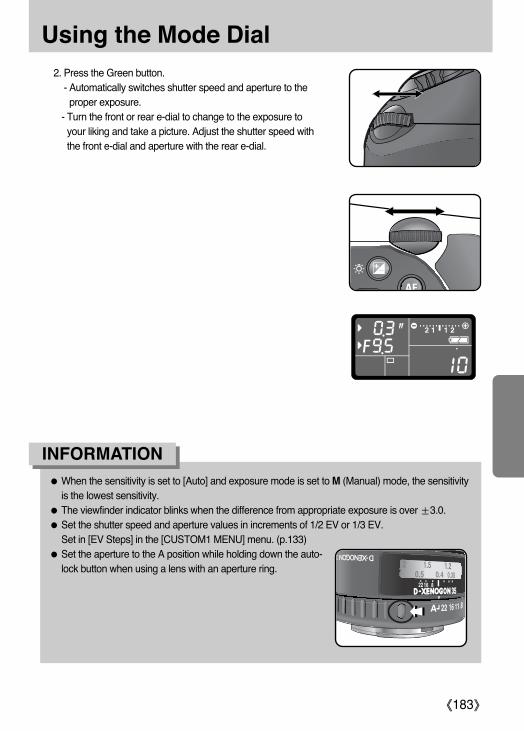
183
Using the Mode Dial2. Press the Green button.
- Automatically switches shutter speed and aperture to theproper exposure.
- Turn the front or rear e-dial to change to the exposure toyour liking and take a picture. Adjust the shutter speed withthe front e-dial and aperture with the rear e-dial.
When the sensitivity is set to [Auto] and exposure mode is set to M (Manual) mode, the sensitivityis the lowest sensitivity.The viewfinder indicator blinks when the difference from appropriate exposure is over 3.0.Set the shutter speed and aperture values in increments of 1/2 EV or 1/3 EV.Set in [EV Steps] in the [CUSTOM1 MENU] menu. (p.133)Set the aperture to the A position while holding down the auto-lock button when using a lens with an aperture ring.
INFORMATION
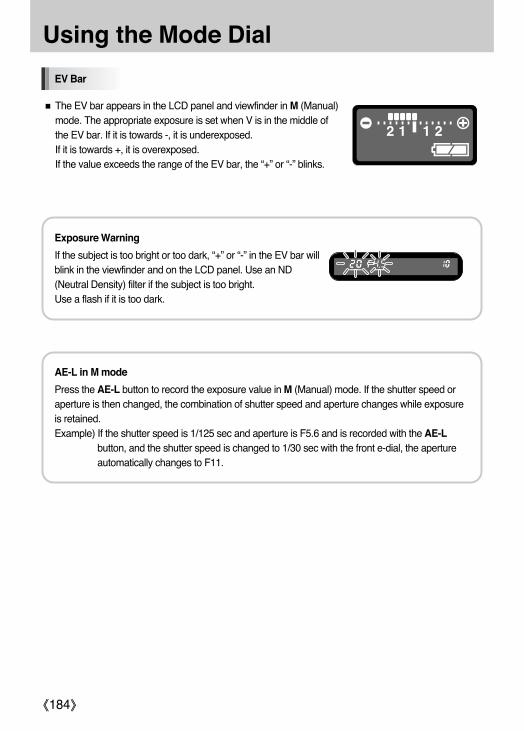
184
Using the Mode Dial
Exposure Warning
If the subject is too bright or too dark, “+” or “-” in the EV bar willblink in the viewfinder and on the LCD panel. Use an ND(Neutral Density) filter if the subject is too bright. Use a flash if it is too dark.
AE-L in M mode
Press the AE-L button to record the exposure value in M (Manual) mode. If the shutter speed oraperture is then changed, the combination of shutter speed and aperture changes while exposureis retained.Example) If the shutter speed is 1/125 sec and aperture is F5.6 and is recorded with the AE-L
button, and the shutter speed is changed to 1/30 sec with the front e-dial, the apertureautomatically changes to F11.
The EV bar appears in the LCD panel and viewfinder in M (Manual)mode. The appropriate exposure is set when V is in the middle ofthe EV bar. If it is towards -, it is underexposed. If it is towards +, it is overexposed.If the value exceeds the range of the EV bar, the “+” or “-” blinks.
EV Bar

185
Using the Mode Dial
About the Green Button
The aperture and shutter speed are automatically adjusted tothe appropriate exposure at that moment if the Green button ispressed in M (Manual) mode. You can choose from thefollowing three adjustment methods in [Green Button in M] inthe [CUSTOM2 MENU] menu.
1 Program Line The aperture and shutter speed are adjusted automatically.
2 Tv Shift The aperture is locked and the shutter speed is adjusted automatically.
3 Av Shift The shutter speed is locked and the aperture is adjusted automatically.

186
Using the Mode Dial
This mode is useful for the long exposures required for shooting night scenes and fireworks. The shutter remains open as long as the shutter release button is kept pressed.
1. Set the mode dial to B.
Turn the rear e-dial to adjust the aperture value.Set the aperture value in increments of 1/2 EV or 1/3 EV. Set in [EV Steps] in the [CUSTOM1MENU] menu (p.133).Use a sturdy tripod and the cable switch (optional) to prevent camera shake when using B (Bulb)mode. Connect the cable switch to the cable switch terminal.Bulb shooting is available when using the remote control shooting mode (p.65). The shutterremains open as long as the shutter release button of the optional remote control is held down.Noise reduction is a process to reduce noise (image roughness or unevenness) caused by lowshutter speed. Set [Noise Reduction] in the [CUSTOM1 MENU] menu (p.137).When the sensitivity is set to [Auto] and exposure mode is set to B (Bulb) mode, the sensitivity isset to the minimum value set on the "Setting the Range of Automatic Correction in AUTO (p.83)".
INFORMATION
Using the B (Bulb) Mode

187
Using the X (Flash X-Sync Speed) Mode
Using the Mode Dial
The shutter speed is locked at 1/180 second. Use this when using an External flash that does notautomatically change the shutter speed.
1. Set the mode dial to X.
Turn the rear e-dial to adjust the aperture value.Press the Green button to retain the shutter speed at 1/180 sec and automatically adjust theaperture. When the sensitivity is set to [Auto] and exposure mode is set to X (Flash X-Sync Speed) mode,the sensitivity is set to the minimum value set on the "Setting the Range of Automatic Correctionin AUTO (p.83)".
INFORMATION
Using the USER Mode
You can store the current camera settings and easily retrieve them simply by setting the mode dial toUSER.
1. Set the mode dial to USER.

188
MEMO

Introduces functions to further enhance your GX-10 experience.
Checking the Composition, Exposure and Focus Before Shooting 190
Focusing 192
Setting the Exposure 199
Using the Built-in Flash 208
Using an External Flash (Optional) 212
5 Basic Function

190
No shooting information is displayed in the viewfinder, and the shutter cannot be released whilethe main switch is in the preview position ( ).You can check the depth of field in all exposure modes.
INFORMATION
1. Position the subject inside the AF frame.
2. Turn the main switch to while looking through the viewfinder.- You can check the depth of field in the viewfinder while the mainswitch is on .
Displaying the Optical Preview
Checking the Composition, Exposure and Focus Before ShootingYou can use the preview function to check the depth of field, composition, exposure and focus beforetaking a picture. There are 2 preview methods.
Set in [Preview Method] in the [CUSTOM2 MENU] menu. (p.145) The default setting is Digital Preview.
Displaying the PreviewDisplay the Optical Preview or Digital Preview.
Optical Preview For checking the depth of field with the viewfinder.
Digital Preview For checking the composition, exposure, focus with the LCD monitor.

191
Checking the Composition, Exposure and Focus Before Shooting
Focus on the subject, then compose the picture in the viewfinderand move the main switch to .
The icon ( ) appears in the LCD monitor during preview andyou can check the composition, exposure and focus. Press the shutter release button halfway to end Digital Previewand start focusing. The image displayed in Digital Preview is notsaved.
In the digital preview mode, the image can be enlarged by usingthe rear e-dial. You can check the composition, exposure andfocus with the four-way button ( ) on the LCD monitor.
You can display the Bright/Dark area warning or histogram in Digital Preview.Set in [Digital Preview] (p.167) in the [PLAYBACK MENU] menu.
INFORMATION
Displaying the Digital Preview

192
FocusingYou can focus with the following methods.
1. Set the focus mode lever to SAF or CAF.
The camera is focused when the shutter release button is pressed
halfway.
Manual focus Manually adjust the focus.
You can choose the autofocus mode from SAF (Single mode) where the shutter release button ispressed halfway to focus on the subject and the focus is locked at that position, and CAF(Continuous mode) where the subject is kept in focus by continuous adjustment while the shutterrelease button is pressed halfway.
Using Autofocus
When the shutter release button is pressed halfway to focus on the subject,
the focus is locked at that position.
The subject is kept in focus by continuous adjustment while the shutter
release button is pressed halfway.
SAF (Single mode)
CAF (Continuous mode)
Autofocus

193
Focusing2. Look through the viewfinder and press the shutter release button
halfway.
- The focus indicator ( ) appears in the viewfinder whenfocused (if it is blinking, the subject is not in focus).
Subjects that are Difficult to Focus on (p.54)
The camera can be focused by pressing the AF buttonIn SAF (Single mode), the focus is locked (focus lock) while is lit. To focus on another subject,take your finger off the shutter release button first.In CAF (Continuous mode), focus is adjusted continuously, tracking the moving object as long asthe shutter release button is kept pressed halfway.The shutter cannot be released until the subject is in focus in SAF (Single mode). If the subject istoo close to the camera, move back and take the picture. Adjust the focus manually if the subjectis difficult to focus (p.54, 197).In SAF (Single mode), press the shutter release button halfway. The built-in flash will dischargeautomatically several times, enabling the autofocus to focus on the subject easier if the subject isin a dark area and the built-in flash is available.
INFORMATION
Focus indicator

194
Focusing
Choose the part of the viewfinder to set focus to. The factory default setting is (Auto). The selected AF point lights red in the viewfinder. (Superimpose AF Area).
The camera selects the optimum AF point even if the subject is not
centered.
Sets the focusing area to one of the eleven points in the AF area.
Sets the focusing area to the center of the viewfinder.
Select
Auto
Center
Set with the AF point switching dial.
AF point is not displayed in the viewfinder when [Off] is selected for [Superimpose AF Area] in the[CUSTOM1 MENU] menu.
INFORMATION
Selecting the Focusing Area (AF Point)

195
Focusing
1. Select SEL (Select) with the AF point switching dial.
2. Look through the viewfinder and check the position of the subject.
3. Use the four-way controller ( ) to select the desired AF point.- The AF point lights red in the viewfinder (Superimpose AF Area) and you can check where you setthe AF point.
Setting the Focus Position in the Viewfinder

196
Focusing
If the subject is outside the range of the focusing area, the camera cannot automatically focus on thesubject. In this situation, you can aim the focusing area toward the subject, use focus lock andrecompose the picture.
1. Frame the desired composition for your picture in the viewfinder.- Use focus lock function when the subject you wish to focus onis not inside the focusing area.
(Example) The person is out offocus and the background is
focused instead.
2. Center the subject to focus in the viewfinder and press theshutter release button halfway. The focus indicator ( )appears and you will hear a beep when the subject comes intofocus (if it is blinking, the subject is not in focus).
3. Lock the focus.- Keep the shutter release button pressed halfway. The focus will remain locked.
Fixing the Focus (Focus Lock)
4. Re-compose the picture while keeping the shutter releasebutton pressed halfway.
The focus is locked while the focus indicator ( ) is lit.Turning the zooming ring in focus lock mode may cause the subject to be out of focus.The beep can be turned off. (p.151)When the focus is fixed, you can fix the exposure. (p.205)
INFORMATION

197
Focusing
When you adjust the focus manually, you can either check with the focus indicator in the viewfinder oruse the viewfinder matte field to adjust focus.
You can manually adjust the focus using the focus indicator ( ).
1. Set the focus mode lever to MF.
2. Look through the viewfinder, press the shutter release buttonhalfway and turn the focusing ring.
- The focus indicator ( ) appears and you will hear a beepwhen the subject comes into focus.
Focus indicator
Adjusting the Focus Manually (Manual Focus)
Using the Focus Indicator

198
Focusing
1. Set the focus mode lever to MF.
2. Look through the viewfinder and turn the focusing ring until the subject looks sharp on the screen.
You can manually adjust the focus using the viewfinder matte field.
Use the matte field in the viewfinder when the subject is difficult to focus (p.54, 197) and the focusindicator will not stay lit.The beep can be turned off. (p.151)
INFORMATION
Using the Viewfinder Matte Field

199
Setting the Exposure
Correct exposure of the subject is determined by the combination of shutter speed and aperturesetting. There are many correct combinations of shutter speed and aperture for a particular subject.Different combinations produce different effects.
The shutter speed determines the length of time that light is allowed to strike the CCD. Adjusting theshutter speed alters the amount of light striking the CCD.
Using slower shutter speed
If the subject is moving, the image will be blurred because theshutter is open longer. It is possible to enhance the effect of motion (rivers, waterfalls,waves, etc.) by intentionally using a slower shutter speed.
Using faster shutter speed
Choosing a faster shutter speed will allow freezing the action of amoving subject.A faster shutter speed also helps preventing camera shake.
Effect of Aperture and Shutter Speed
Effect of Shutter Speed

200
Setting the Exposure
Adjust the amount of light hitting the CCD by changing the aperture.
Opening the aperture (reduce the aperture value)
Objects closer and farther than the focused subject will be out offocus. For instance, if you take a picture of flower against alandscape with the aperture open, the landscape in front andbehind the flower will be blurred, emphasizing only the flower.
Closing the aperture (increase the aperture value)
The range in focus expands forward and backward. For instance, if you take a picture of flower against a landscapewith a smaller aperture, the landscape in front and behind theflower will be in focus.
Depth of Field
When you focus on a specific subject, there is a range in which objects closer and farther away willalso be in focus. This focused range is called the depth of field.
The depth of field for the GX-10 differs depending on the lens but compared to a 35 mmcamera, the value is roughly one aperture setting lower (the focused range becomes shallower).The wider the wide-angle lens, and the farther away the subject, the greater the depth of field(some zoom lenses do not have a scale for depth of field because of their structure).
Effect of Aperture
Depth of field Shallow Deep
Area of focus Narrow Wide
Open Close
(Smaller value) (Larger value)
Longer Shorter
(Telephoto) (Wider)
Distance to the subject Near Far
Aperture
Lens focal length

201
Setting the Exposure
No shooting information is displayed in the viewfinder, and the shutter cannot be released whilethe main switch is in the preview position ( ).You can check the depth of field in all exposure modes.
INFORMATION
When you focus on a portion of the subject, there is a range in which object closer and farther willalso be in focus. This focused range is called the depth of field. If you use Depth of Field confirmation,you can check the depth of field in the viewfinder before taking a picture.
1. Focus on the subject.
2. Turn the main switch to while looking through the viewfinder.- You can check the depth of field in the viewfinder while holdingthe main switch.
How to Check Depth of Field

202
Setting the Exposure
Choose the part of the screen to use for measuring brightness and determining exposure.(Multi-segment metering), (Center-weighted metering) or (Spot metering) mode can
be selected. The default setting is (Multi-segment metering).
The center-weighted metering mode is automatically set even if you select the multi-segmentmetering mode when using a lens other than the D-XENON, D-XENOGON lens (can only beused if permission is set in [Use Aperture Ring] in the [CUSTOM2 MENU] menu). (p.142)You can link the exposure and AF point in the focusing area during multi segment metering.(p.131)
INFORMATION
Set with the metering mode lever.
The scene in the viewfinder is metered in 16 different zones asshown in the illustration when using the multi-segment metering.This mode automatically determines what level of brightness is inwhich portion.
Multi-segment
metering
Center-weighted
metering
Spot metering
Selecting the Metering Method
Using the Multi-Segment Metering
Segment the screen in 16 parts, meter each portion and determine
the appropriate exposure.
Measure the entire screen with an emphasis on the center and
determine the exposure.
Measure only the center of the screen and determine exposure.

203
Setting the Exposure
Metering is weighted at the center of the screen. Use this metering when you want to compensate the exposureby experience, instead of leaving it to the camera. The illustration shows that sensitivity increases as the patternheight increases (center). This mode does not automaticallycompensate for backlit scenes.
With spot metering, brightness is measured only within a limitedarea at the center of the screen as shown in the illustration. You can use this in combination with the AE lock (p.205)when the subject is extremely small and proper exposure isdifficult to obtain.
Using the Center-Weighted Metering
Using the Spot Metering

204
Setting the Exposure
This allows you to deliberately overexpose (brighten) or under-expose (darken) your picture. You canadjust the EV Compensation from -2 to +2 (EV) in increments of 1/2 EV or 1/3 EV.Select 1/2 EV or 1/3 EV in [EV Steps] in the [CUSTOM1 MENU] menu. (p.133)
1. Set the compensation with the front e-dial while the buttonis pressed.
button
2. Confirm the compensation value in the viewfinder.- is displayed during compensation.- blinks when the flash is popped up if the flash
compensation is set.
Exposure compensation is not available when the exposure mode is set to (Auto), M (Manual), B (Bulb) and X (Flash synchro) mode.The exposure compensation cannot be cancelled by turning the camera off or by setting anyother exposure mode.The is set to 0 when EV button and Green button are pressed at the same time.
INFORMATION
Exposure Compensation
Compensation value

205
AE Lock is a function that memorizes the exposure prior to taking the picture. Use this when thesubject is too small or backlit and a proper exposure setting cannot be obtained.
1. Press the AE-L button.- The camera memorizes the exposure (brightness) at thatinstant. Press it again to unlock.
is displayed in the viewfinder while the AE lock is engaged. (p.27)The exposure remains in memory for twice as much time as the metering timer after releasing theAE-L button. The exposure remains locked as long as the AE-L button is kept pressed or theshutter release button is kept pressed halfway.You will hear a beep when the AE-L button is pressed. The beep can be turned off. (p.151)AE lock is not available when the exposure mode is (Auto), B (Bulb) or X (Flash synchro)mode. The combination of shutter speed and aperture value changes depending on the zoomingposition even while the AE lock is engaged when using a zoom lens for which maximum aperturevaries depending on the focal length. However, the exposure value does not change and thepicture is taken at the brightness level set by the AE lock.If the exposure mode is M (Manual), the aperture and/or shutter speed are automatically adjustedto set the appropriate exposure when the Green button is pressed.Exposure can be fixed when focus is locked. Set in [AEL with AF Locked] in the [CUSTOM1MENU] menu. (p.134)
INFORMATION
Recording the Exposure Before Shooting (AE Lock)
Setting the Exposure
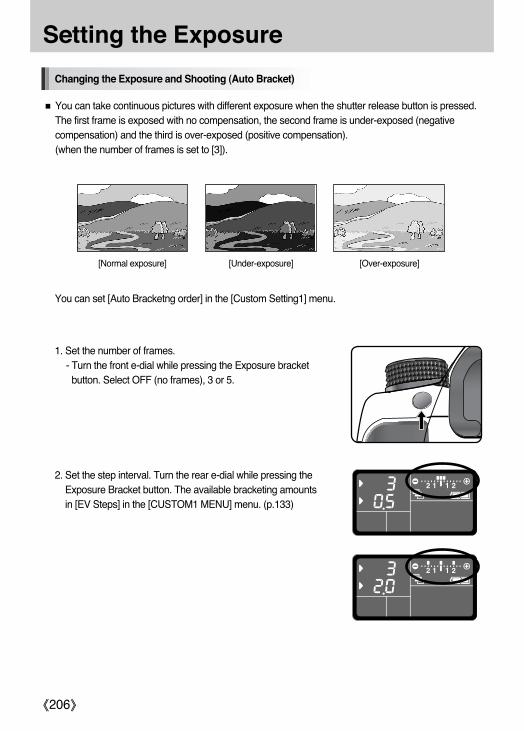
206
Setting the Exposure
You can take continuous pictures with different exposure when the shutter release button is pressed.The first frame is exposed with no compensation, the second frame is under-exposed (negativecompensation) and the third is over-exposed (positive compensation).(when the number of frames is set to [3]).
[Normal exposure] [Under-exposure] [Over-exposure]
1. Set the number of frames.- Turn the front e-dial while pressing the Exposure bracketbutton. Select OFF (no frames), 3 or 5.
2. Set the step interval. Turn the rear e-dial while pressing theExposure Bracket button. The available bracketing amounts in [EV Steps] in the [CUSTOM1 MENU] menu. (p.133)
Changing the Exposure and Shooting (Auto Bracket)
You can set [Auto Bracketng order] in the [Custom Setting1] menu.

207
Setting the Exposure3. Press the shutter release button halfway.
- Focus indicator ( ) appears in the viewfinder when focused.
4. Press the shutter release button fully.- Three consecutive pictures will be taken, the first with no compensation, the second with negativecompensation, and the third with positive compensation. (when the number of frames is set to [3]).
When the focus mode is set to SAF (Single mode), the focus is locked in the first frame positionand used for subsequent consecutive frames.The auto bracketing exposure setting will remain effective for twice as long as the exposuremetering timer (default setting is 20 seconds) when you release your finger from the shutterrelease button during auto bracketing, and you can take the next picture at the next compensationvalue. In this case, auto focusing works for each frame. After about twice as much time as theexposure metering timer (default setting is 20 seconds), the camera returns to settings for takingthe first picture. You can combine Auto Bracket with the built-in flash or external flash (P-TTL auto only) to changeonly the flash output continuously. However, when using an external flash, holding the shutterrelease button down to take three continuous frames may cause the second and third frame to betaken before the flash is fully recharged. Always take one frame at a time after confirming thatcharging is complete. Auto Bracket is not available when the exposure mode is set to B (Bulb) mode.Auto Bracket and Multi exposure are not used at the same time.
INFORMATION
Taking Only Overexposed or Underexposed Pictures
You can use Auto Bracket mode for only underexposure or overexposure shots by combining theoperation with EV compensation (p.204). Auto Bracket is performed in both cases on the basis ofthe specified EV compensation value.

208
Using the Built-in Flash
Using the Flash in Tv (Shutter Priority) Mode
- When taking a moving subject, you can use the flash to change the blur effect.- Any desired shutter speed 1/180 sec. or slower can be set for taking a flash photograph.- The aperture value automatically changes according to the ambient brightness.
Using the Flash in Av (Aperture Priority) Mode
- You can set the desired aperture to take a flash photograph when you want to change the depth offield or shoot a subject farther away.
- The shutter speed automatically changes with the ambient brightness.- The shutter speed shifts automatically anywhere from 1/180 sec. to a slow shutter speed thatreduces camera shake. The slowest shutter speed depends on the focal length of the lens in use.
Flash Characteristics in Each Exposure Mode
209
Using the Built-in Flash
Using Tv (Shutter Priority) Mode
1. Set the mode dial to Tv.Tv (Shutter Priority) mode is set.
2. Use the e-dial to set the desired shutter speed.The background is not properly corrected if aperture value is flashing when shutter speed is set. Set the shutter speed so that aperture does not flash.
3. Press the button.The flash pops up.
4. Take the picture.
Slow-speed-sync slows the shutter speed. Use a tripod or OPS to avoid camera shake. The picture will also blur if the subject moves.Slow-speed-sync shooting can also be performed with an external flash.
INFORMATION
You can use slow-speed-sync when shooting portraits with the sunset in the background.
Using M (Manual) Mode
1. Set the mode dial to M.M (Manual) mode is set.
2. Set the shutter speed (under 1/180 sec.) and aperture value to obtain correct exposure.3. Press the button.
The flash pops up.In M (Manual) mode, pop up the flash at any time.
4. Take the picture.
Using Slow-Speed-Sync

210
Using the Built-in Flash
A set criteria is necessary between the guide number, aperture and distance when shooting with theflash. Calculate and adjust the shooting conditions if flash is not sufficient.
Built-in flash guide number
Sensitivity Built-in flash guide number
ISO 100 11
ISO 200 15.6
ISO 400 22
ISO 800 31
ISO 1600 44
The following equation calculates the distance of the flash for aperture values.Maximum flash distance L1 = Guide number ÷ Selected apertureMinimum flash distance L2 = Maximum flash distance L1 ÷ 5*
* The value 5 used in the formula above is a fixed value which applies only when using the
built-in flash alone.
Example)When sensitivity is [ISO 200] and aperture value is F4L1 = 15.6 ÷ 4 = approx. 3.9 (m)L2 = 3.9 ÷ 5 = approx. 0.8 (m)Therefore, the flash can be used in a range of about 0.8 m to 3.9 m.The flash cannot be used when the distance is less than 0.7 m. When the flash is used at closer than0.7 m, it causes vignetting in the picture corners, light is distributed unevenly and the picture may beover-exposed.
Distance and Aperture when Using the Built-in Flash
Calculating Shooting Distance from Aperture Value
211
Using the Built-in Flash
The following equation calculates the aperture value for shooting distances.
Aperture Value Used F = Guide number ÷ Shooting distance
When sensitivity is [ISO 200] and shooting distance is 5.2 m, aperture value is:F = 15.6 ÷ 5.2 = 3If the resulting number (3, in the above example) is not available as a lens aperture, the smallernumber that is closest (2.8, in the above example) is generally used.
Calculating Aperture Value from Shooting Distance

212
Using an External Flash (Optional)
*1 : Shutter speed of 1/90 sec. or slower.*2 : Can be combined with SEF-36PZF for rear curtain sync flash.*3 : When combined with the SEF-36PZF, 1/3 of the flash discharge can be output by the built-in flash
and 2/3 can be output by the external flash.*4 : Two or more SEF-54PZF, SEF-36PZF units are required.
Using the optional external flash SEF-54PZF, SEF-36PZF enables a variety of flash modes, such asP-TTL auto flash mode, high-speed flash sync mode, and wireless mode. See the chart below fordetails. (O: Available, : Restricted, X: Not available)
See the SEF-54PZF, SEF-36PZF operating manual for details.
When using an external flash, it is recommended to use the high-precision SEF-54PZF, SEF-36PZF,as it is capable of P-TTL auto flash mode.
Red-eye reduction flash O O
Automatic flash discharge O O
Auto viewfinder check X X
P-TTL auto flash (appropriate sensitivity: 200 to 3200) O O
Slow-speed sync O O
Flash exposure compensation O O
AF illuminator O O
Rear curtain sync flash*1 *2 O
Contrast-control-sync flash mode *3 O
Slave flash X O
Multi Flash X X
High-speed flash sync X O
Wireless flash*4 X O
After the flash is charged, the camera automatically switches to
the flash sync speed.
Aperture is automatically set in P (Program) mode and Tv
(Shutter Priority) mode.
OO
OO
Camera Function
FlashBuilt-in Flash SEF-36PZF

213
Using an External Flash (Optional)
The SEF-36PZF will automatically convert the field angle differential between 35 mm format and theGX-10 depending on the focal length of the lens you are using (when using D-XENON lenses). The conversion indicator appears and the format size indicator disappears when the exposuremetering timer of the GX-10 is on (it returns to 35 mm format display when the exposure meteringtimer is turned off).
Use this flash mode with the SEF-36PZF flash unit. When flash mode is set to “P-TTL auto”, the flashpre-fires right before taking pictures using 16-segment metering and allows more precise control. P-TTL auto is available in wireless flash mode when two or more SEF-36PZF / SEF-54PZF units areused.
1. Remove the cover of the hot shoe and attach the SEF-36PZF / SEF-54PZF.2. Turn on the SEF-36PZF / SEF-54PZF.3. Set the SEF-36PZF / SEF-54PZF flash mode to P-TTL auto.4. Confirm that the SEF-36PZF / SEF-54PZF is fully charged and then take the picture.
85mm 77mm 50mm 35mm 28mm 24mm 20mm 18mm
70mm 50mm 28mm 24mm*
48mm 34mm 19mm 16mm*58mm
85mm
24mm
35mm
Lens focal length
SEF-36PZF
LCD panel
Exposuremetering timer
Off
Exposuremetering timer
On
P-TTL auto is only available with the SEF-36PZF / SEF-54PZF flash unit.The will light in the viewfinder when the flash is ready (fully charged).For details such as operation method and effective distance, please read the external flashmanual.The flash does not discharge when the subject is bright enough when Flash Mode is or .Therefore, it may not suitable for daylight-sync shooting.Never press the flash pop up button when any external flash unit is attached to the camera. The built-in flash will hit the external flash.See the SEF-36PZF / SEF-54PZF operating manual for details.
INFORMATION
* Using wide adaptor
About the LCD Panel Display for SEF-36PZF
Using P-TTL Auto Mode

214
Using an External Flash (Optional)
Shoot using the flash without connecting the camera and flash with a cord by using two SEF-36PZF /SEF-54PZF units. The High-speed sync mode is also available in wireless mode.
With the SEF-36PZF / SEF-54PZF, you can discharge the flash to take a picture at a shutter speedfaster than 1/180 second. High-speed flash sync can be used with the flash attached to the camera,or wireless.
Attaching and Using the SEF-36PZF / SEF-54PZF on the Camera
1. Remove the hot shoe cover and attach the SEF-36PZF / SEF-54PZF.2. Turn the mode dial and set the exposure mode to Tv or M.3. Turn on the SEF-36PZF / SEF-54PZF.4. Set the SEF-36PZF / SEF-54PZF sync mode to HS (high-speed flash sync.).5. Confirm that the SEF-36PZF / SEF-54PZF is fully charged and then take the picture.
The will light in the viewfinder when the flash is ready (fully charged).High-speed flash sync is only available when the shutter speed is faster than 1/180 sec.High-speed flash sync is not available when the exposure mode is set to B (Bulb).See the SEF-36PZF / SEF-54PZF operating manual for details.
INFORMATION
Be sure to set the two SEF-36PZF / SEF-54PZF units to the same channel. See the SEF-36PZF /SEF-54PZF operating manual for details.
INFORMATION
Using High-Speed Flash Sync Mode
Using in Wireless Mode

215
Using an External Flash (Optional)In Wireless Mode
1. Place the SEF-36PZF / SEF-54PZF at the desired location.2. Set the SEF-36PZF / SEF-54PZF power switch to [WIRELESS].3. Set the SEF-36PZF / SEF-54PZF wireless mode to S (Slave).4. Turn the camera mode dial and set the exposure mode to P, Tv, Av or M mode.5. Set the SEF-36PZF / SEF-54PZF power switch on the camera to [WIRELESS].6. Set the SEF-36PZF / SEF-54PZF wireless mode on the camera to M (Master) or C (Control).
Wireless mode is not available for the built-in flash.Set the SEF-36PZF / SEF-54PZF wireless slave mode to SLAVE1.
INFORMATION
Wireless Flash Control (P-TTL Flash Mode)
The following information is exchanged between the two SEF-36PZF / SEF-54PZF flash unitsbefore the flash is discharged when the SEF-36PZF / SEF-54PZF is used for wireless flash.
Press the shutter release button fully.
1. The camera s flash discharges a pre-flash (the camera s flash mode is transmitted).2. The external flash unit discharges a pre-flash (the subject s lighting condition is checked).3. The camera s flash unit discharges a pre-flash (the required flash output is transmitted to the
external flash).The camera s flash will discharge another pre-flash to transmit the flash duration in HS(High-speed sync).
4. The external flash discharges the main flash.Set the SEF-36PZF / SEF-54PZF wireless slave mode to SLAVE1.
216
Using an External Flash (Optional)
The red-eye reduction feature works even when only an external flash is used. (p.70)If red-eye reduction is used when the SEF-36PZF / SEF-54PZF is set as the slave unit or with thewireless function, the preflash for red-eye reduction will trigger the external flash. Do not use red-eye reduction when using a slave unit.See the SEF-36PZF / SEF-54PZF operating manual for details.
INFORMATION
As with the built-in flash, red-eye reduction is available with an external flash.
Red-Eye Reduction

Software Notes 218
About the software 219
Setting up the application software 220
Removable Disk 223
Removing the removable disk 225
Digimax Master 227
Digimax RAW Converter 232
6 Software information
Explains software installation and how to use the program.

218
Software NotesPlease ensure that you read this section of the instruction manual carefully before use.
The included software is a camera driver and image editing software tool for Windows.Under no circumstances should all or part of either the software or the user manual be reproduced.Copyrights for software are licensed only for use with a camera.In the unlikely event of a manufacturing fault, we will repair or exchange your camera.We cannot, however, be held responsible in any way for damage caused by inappropriate use.Using a Hand-made PC or a PC and OS that has not been guaranteed by the manufactureris not covered by the Samsung warranty.Before reading this manual, you should have a basic knowledge of computers and O/S (OperatingSystems).
For Windows For Macintosh
Windows 2000/ME/XP Mac OS 10.2 or later
Minimum 256MB RAM (XP : 512MB) Minimum 256MB RAM
250MB of available hard disk space 250MB of available hard-disk space
(1GB recommended)
USB port USB port
CD-ROM drive CD-ROM drive
PC with processor better than Pentium III 450Mz
(Pentium 700MHz recommended)
1024x768 pixels, 16-bit colour display compatible
monitor (24-bit colour display recommended)
Power Mac G4 or later
System Requirements

219
About the softwareDigimax Master : This is the all-in-one multi media software solutionYou can download, view, edit and save your digital images (RAW, JPEG) with this software. This software is only compatible with Windows.
Digimax RAW ConverterYou can convert a RAW (*.dng) file into a JPEG or TIFF file format.
You should allow 5~10 seconds for running the automatic setup program according to thecapability of your computer. If the frame does not show, run the [Windows Explorer] and select[setup.exe] in the CD-ROM Drive root directory.PDF documents of user manual are included in the Software CD-ROM supplied with this camera. Search the PDF files with Window s explorer. Before opening the PDF files, you must install theAdobe Reader included in the Software CD-ROM.To install the Adobe Reader 6.0.1, the Internet Explorer 5.01 must be installed. To upgrade theInsternet Explorer, visit www.microsoft.com.
INFORMATION

220
To use this camera with a PC, install the application software first.After this has been done, the stored images in the camera can be moved to the PC and can beedited by an image editing program.
You can visit the Samsung web-site through the internet.
http://www.samsungcamera.com : Englishhttp://www.samsungcamera.co.kr : Korean
1. Install the Digimax Master by following the instructions shown on your PC monitor.
Setting up the application software
[Click!]
[Click!]
[Click!]
[Click!]
[Click!]
[Click!]
[Click!]
[Click!]

221
Setting up the application software
2. After restarting the computer, connect the PC to the camera with the USB cable.
3. Turn the camera power on.The [Found New Hardware Wizard] will open and the computer will recognize the camera.
If your OS is Windows XP, an image viewerprogram will open.If the download window of Digmax Master opensafter starting Digimax Master, the camera driverwas setup successfully.
[Click!]
[Click!]

222
In this mode, you can download stored images to your PC through the USB cable.The LCD monitor is always turned off in PC mode.
Connecting the camera to a PC
1. Press the MENU button and select the [SETUP MENU] menu.2. Set [USB] on camera to [Computer]. 3. Connect the PC to the camera with the USB cable.
SETUP MENU
: Set : Cancel
Video OutUSBAuto Power OffFolder NameSensor CleaningDust RemovalReset
ComputerPrinter
Starting PC mode
Setting up the application software

223
Removable DiskDownloading stored imagesYou can download the still images stored on the camera to your PC's hard disk and print them or usea photo editing software to edit them.
1. Connect the camera to your PC with the USB cable.
2. On your computer's desktop display, select [MyComputer] and double click [Removable Disk DCIM
100SSCAM].The image files will then be displayed.
3. Select an image and press the right mouse button.
4. A pop-up menu will open.Click the [Cut] or [Copy] menu.- [Cut] : cuts a selected file.- [Copy] : copies files.
5. Click a folder where you want to paste the file.

224
7. An image file is transferred from the camera to yourPC.
6. Press the right mouse button and a pop-up menu willopen. Click [Paste].
- By using [Digimax Master], you can see the images stored in the memory directly on the PCmonitor and you can copy or move the image files.
We recommend that you should copy the images to the PC to view them. Opening imagesdirectly from the removable disk may be subject to unexpected disconnection.When you upload a file that is not taken by this camera to the Removable Disk, the [Cameracannot display this image] message will be displayed on the LCD monitor in the PLAY mode, and[?] message is displayed in THUMBNAIL mode.
CAUTION
Removable Disk

225
Removing the removable diskWindows 2000/ME/XP(The illustrations may be different from the real display depending on the Windows O/S.)
1. Check whether the camera and PC is transferring a file. If the Card in use lamp blinks, you have towait until the lamp is turned off.
3. The [Unplug or Eject Hardware] window will open.Select the [USB Mass Storage Device] and click the[Stop] button.
4. The [Stop a Hardware device] window will open. Select the [USB Mass Storage Device] and click the[OK] button.
2. Double-click the [Unplug or Eject Hardware] icon on thetask bar.
5. A [Safe to Remove Hardware] window will open. Click the [OK] button.
[Click!]
[Click!]
[Click!]
[Double-click!]

226
6. A [Unplug or Eject Hardware] window will open. Click the [Close] button and the removable disk maythen be removed safely.
7. Unplug the USB cable.
1. A USB Driver for MAC is not included with the software CD as MAC OS supports the cameradriver.
2. Check the MAC OS. This camera is compatible with MAC OS 10.2 or later.3. Connect the camera to the Macintosh and turn the camera power on.4. A new icon will be displayed on the desktop after connecting the camera to the MAC.
1. Double click a new icon on the desktop and the folder in the memory will be displayed.
2. Select an image file and copy or move it to MAC.
For Mac OS 10.0 or later : First complete uploading from computer to camera and then removethe removable disk with the Extract command.
INFORMATION
Removing the removable disk
[Click!]
Setting up the USB Driver for MAC
Using the USB Driver for MAC

227
Digimax MasterYou can download, view, edit and save your digital images and movies with this software. This software is only compatible with Windows except for the Windows 98.
To start the program, click [Start Programs Samsung Digimax Master Digimax Master].
Downloading images
1. Connect the camera to your PC.
2. A window for downloading images will display afterconnecting the camera and your PC.- To download the captured images, select the [SelectAll] button.
- Select desired folder in the window and click the[Select All] button. You can save captured images andselected folder.
- If you click the [Cancel] button, downloading will becancelled.
3. Click [Next >] button.
[Click!]
[Click!]

228
4. Select a destination and make a new folder in which tosave downloaded images and folders.- Folders will be made in order of date and images willbe downloaded.
- Folder names can be made as you want and imageswill be downloaded.
- After selecting a folder that was made before,images will be downloaded.
5. Click [Next >] button.
6. A window will open as shown alongside.The destination of the selected folder will be displayedon the upper side of the window.Click the [Start] button to download the images.
7. Downloaded images will be displayed.
Digimax Master
[Click!]
[Click!]

229
Digimax MasterImage viewer : You can view the stored images.
- Image viewer functions are listed below.Menu bar : You can select menus.
File, Edit, View, Tools, Change functions, Auto download, help, etc.Image selection window : You can select the desired images in this window.Media type selection menu : You can select image viewer, image edit, movie edit functions in this
menu.Preview window : You can preview a image or a movie clip and check the multi media information.Zoom bar : You can change preview size.Folder display window : You can see the folder location of the selected image.Image display window : Images of the selected folder are displayed.
Refer to the [Help] menu in Digimax Master for further information.

230
Digimax Master
- Image edit functions are listed below.Edit menu : You can select the following menus.[Tools] : You can resize or crop the selected image. See the [Help] menu.[Adjust] : You can modify image quality. See the [Help] menu.[Retouch] : You can change image or insert effects on the image. See the [Help] menu.Drawing tools : Tools for editing an image.Image display window : a selected image displays in this window.Preview window : You can preview the changed image.
A still image edited with Digimax Master can’t be played back on the camera.Refer to the [Help] menu in Digimax Master for further information.
Image edit : You can edit the still image.

231
Digimax Master
- Movie clip edit functions are listed below.Edit menu : You can select the following menus.[Add Media] : You can add other media elements to a movie.[Edit Clip] : You can change the brightness, contrast, colour and saturation.[Effects] : You can insert an effect.[Set Text] : You can insert texts.[Narrate] : You can insert a narration.[Produce] : You can save the edited multi media as a new file name.
You can select AVI, Windows media (wmv), Windows media (asf) and movie clipfor this camera (avi, MPEG-4) file types.
Frame display window : You can insert multi media in this window.
Some movie clips that were compressed with a codec that is not compatible with the Digimax Mastercan’t play back in the Digimax Master.Refer to the [Help] menu in Digimax Master for further information.
Movie edit : You can have still images, movies, narration and music all in one movie file.

232
Digimax RAW ConverterDigimax RAW Converter : You can convert a RAW (*.dng) file into a JPEG or TIFF file format.
- RAW Converter functions are listed below.Histogram display : Histogram of displayed image will be displayed.Tools : You can edit the RAW (*.dng) files as you want[White Balance]: You can edit the colour temperature and saturation of the image.[Exposure] : You can edit the Exposure value, Contrast and gamma value.[Sharpness] : You can edit the Sharpness of the image.[Aberration] : You can change the chromatic aberration.[Vignetting] : You can add the Vignetting on the captured image. [Curve] : You can change the color and contrast of an image. Image display window : a selected image displays in this window.Image tray : the selected image is diplayed. You can edit several images at a time.
Refer to the [Help] menu in Digimax RAW Converter for further information.You can convert a RAW (*.pef, *.dng) file into a JPEG or TIFF file format with the Digimax Master.

Default Settings 234
Optional Accessories 239
Error Messages 241
Troubleshooting 243
Main Specifications 248
Glossary 250
Index 254
7 Appendix
Explains troubleshooting, introduces optional accessories and provides various resources.

234
Default SettingsThe table below lists the factory default settings.Table notations are as follows.The current setting (last memory) is saved when the camera is turned off.
Reset SettingO : The setting returns to the default setting with the reset function. (p.164)X : The setting is saved even after reset.
Default Setting Reset Setting Page
Image Tone O p.121
File type JPEG O p.122
Recorded Pixels 10M (3872x2592) O p.122
Quality Level O p.123
Saturation O p.124
Sharpness O p.124
Contrast O p.124
User setting - - p.125
Color space sRGB O p.126
Off O p.127
AB 1 O p.127
Off O p.127
Memory setting O p.128
Optical Picture Stablisation (OPS) * 35 (Focus range) O p.55
Exposure mode* P O p.129
Recording mode menu
Extended
bracket
Multi exposure
Saturation /
Sharpness / Contrast
Type
White Balance
Number of shots
Auto exposure
compensation
1
(Off)
O
O
p.127
p.127
Item
*1 : When a lens that does not display the focal length automatically is attached, this icon will display. *2 : When the Mode dial is set to USER, * menu will be displayed.
1
2

235
Default Settings
Default Setting Reset Setting Page
Link AF Point and AE Off O p.131
Superimpose AF Area On O p.131
AF in remote control Off O p.132
AF Button Function On O p.132
AF by Press Halfway On O p.133
EV Steps 1/2 EV O p.133
Meter Operating Time 10 Sec O p.134
AE-L with AF locked Off O p.134
Program Line Normal O p.135
Auto EV Compensation Off O p.135
Fine tune when AWB Off O p.136
WB when using flash No O p.136
Color temp. steps Kelvin O p.137
Noise Reduction On O p.137
ISO Warning Off O p.138
Sensitivity Steps 1 EV O p.139
Reset Custom Function1* - - p.139
User setting1 menu
Item
* Reset settings in [CUSTOM1 MENU] menu.

236
Default Settings
Default Setting Reset Setting Page
Auto Bracketng order 0 - + O p.141
Green Btn in Manual <-P-> O p.141
Using aperture ring Prohibited O p.142
e-dial in Program O p.142 ~ 143
e-dial in Sv mode O p.142 ~ 143
e-dial in Tv mode O p.142 ~ 143
e-dial in Av mode O p.142 ~ 143
One-touch RAW + 1 time O p.144
Recordable Image No. Recordable Image No. O p.144
Release when Chrging Off O p.145
Preview Method Optical Preview O p.145
Initial zoom display 1.2X O p.146
Auto Image Rotation On O p.146
Saving rotation info On O p.147
Illuminate LCD panel On O p.147
Reset Custom Function2* - - p.148
User setting2 menu
Item
* Reset settings in [CUSTOM2 MENU] menu.

237
Default Setting Reset Setting Page
Format - - p.150
Beep All O (On) O p.151
According to default setting X p.152 ~ 155
(Off) O p.152 ~ 155
According to default setting X p.152 ~ 155
Same as Hometown X p.152 ~ 155
Same as Hometown X p.152 ~ 155
Language / According to default setting X p.156
Guide display 3 sec O p.156
Brightness Level 0 O p.157
Video Out NTSC X p.158
USB PC O p.159
Auto Power Off 1min O p.159
Folder Name Std. O p.160
Sensor Cleaning - X p.161
- X p.163
(Off) O p.163
Reset Custom Function2 - - p.164
Set up menu
Date Adjust
Dust Removal
World Time
Hometown (City)
Hometown (DST)
Destination (City)
Destination (DST)
Dust Removal
Cleaning whenturning on
Item
Default Settings

238
Default Settings
Default Setting Reset Setting Page
Bright/Dark area Off O p.165
1 sec O p.166
(Off) O p.166
(Off) O p.166
(Off) O p.167
(Off) O p.167
Digital Filter* B&W O p.167
3 sec O p.168
(Off) O p.168
Playback menu
Instant Review
Slideshow
Digital Preview
Display Time
Histogram
Bright/Dark area
Histogram
Bright/Dark area
Interval
Repeat Playback
Item
* The slimness setting for the slim filter, the softness setting for the soft filter, the brightness setting for thebrightness filter, and the color setting for the color filter can be saved/reset.
Default Setting Reset Setting Page
Drive Mode Single frame shooting O p.60
Flash Mode Fill-in flash* O p.70
White Balance Auto O p.76
Sensitivity Auto O p.82
DPOF - O p.105
Digital Filter* B&W O p.93
Slideshow 3 sec O p.90
Fn menu
RAW DisplayRecorded Pixels : 10M
Quality Level : Super fineO
Item
*1 : Automatically discharged in Green Mode ( ).*2 : The slimness setting for the slim filter, the softness setting for the soft filter, the brightness setting for
the brightness filter, and the color setting for the color filter are saved/reset.
2
1
p.96

239
Optional AccessoriesDedicated accessories are available for this camera. Please contact a service center for detailsregarding accessories. Accessories for PENTAX DSLR can be used with SAMSUNG DSLR.
Auto Flash SEF-36PZF / SEF-54PZFThis is an auto flash unit with a maximum guide number of 54 (ISO 100/m) / 36 (ISO 100/m). Its features include slave-sync flash, contrast-control-sync flash, AF spot beam, high-speed sync,wireless flash and front/rear curtain-sync.
Flash Accessories

240
Optional Accessories
Camera Case SCP-D2
The accessories below are the same as the accessories that are packaged with the camera.
- Viewfinder cap
- Eyecup
- Strap
Camera Case
Others

241
Error Messages
Memory card full
The Memory Card is full and no more images
can be saved. Insert a new Memory Card or delete unwanted
images. (p.38, 98)
You may be able to save new images by changing the quality
level or recorded pixels. (p.122, 123)
There are no images for playback on the Memory Card.
You are trying to play back an image in a format not
supported by this camera. You may be able to play it back on
another brand of camera or your computer.
The Memory Card is not inserted in the camera. (p.38)
The Memory Card has a problem, and image capture and
playback are impossible. It may be viewable on a PC but not
the camera.
The Memory Card you have inserted is unformatted or has
been formatted on a computer or other device and is not
compatible with this camera. Use after formatting with the
camera.
A locked Memory Card is inserted in the camera. Unlock the
Memory Card. (p.39)
The selected rotated image is protected.
Remove protection from the image.
The inserted card cannot be used on a camera.
Insert a usable card.
The batteries are exhausted. Install new batteries in the
camera. (p.36)
No image
Camera cannot display this image
No card in camera
Memory card error
Card not formatted
Card locked
Card is locked
Rotation information cannot be saved
This image is protectedRotation information cannot be saved
Cannot use this card
Battery depleted
Not enough battery remaining
to clean sensor
Appears during CCD cleaning if battery set level is insufficient.
Replace the battery set with a new one or use an AC adaptor.
(p.37)
Error Message Description
242
Error Messages
Image folder could not be created
The maximum folder number (999) and file number (9999)
are being used, and no more images can be saved.
Insert a new Memory Card or format the card. (p.150)
The image could not be saved because of an Memory Card
error.
The DPOF settings file could not be saved because Memory
Card is full. Delete unwanted images and set DPOF again.
(p.98)
DPOF cannot be applied to the RAW images.
RAW images cannot be processed using the digital filter.
When digital filter is started from [ PLAYBACK MENU]
menu, this message appears if all saved images are RAW
files or images captured with other cameras.
Appears when digital filter is started from Fn menu for images
captured with other cameras.
No file set with DPOF. Set DPOF and print. (p.105)
There is an error with the printer and the file cannot be
printed. Fix error and print.
Printer has run out of paper. Put paper in printer and print.
The image is not stored
Settings not stored
RAW images cannot be set
RAW images are not supported
No image to be filtered
This image cannot be filtered
No DPOF files
Printer error
No paper in a printer
No ink in a printer
Paper stuck in a printer
Data error
Printer has run out of ink. Replace ink and print.
Paper is jammed in printer. Remove paper and print.
A data error has occurred during printing.
Error Message Description

243
TroubleshootingWe recommend checking the following items before contacting a service center.
Replace with a charged battery set or use the AC adapter
(SAC-82, optional). (p.26)
Set the Aperture Ring to the A position or set the [Use
Aperture Ring] on the [CUSTOM2 MENU] to [On].
Wait until charging is finished.
Insert Memory Card with available space or delete
unwanted images. (p.38, 98)
Wait until recording is finished.
Autofocus cannot focus well on subjects that have low
contrast (the sky, white walls), dark colours, intricate
designs, are moving quickly or scenery shot through a
window or a net-like pattern.
Lock focus on another object located at same distance
(press shutter release button halfway), then aim at target
and press shutter release button fully. Alternatively, use
manual focus. (p.197)
Position subject in focus frame in middle of viewfinder.
If the subject is outside the focusing area aim the camera
at the subject and lock the focus (press shutter release
button halfway), then compose picture and press the
shutter release button fully.
Move away from the subject and take a picture.
Problem Cause Remedy
Camera does not
turn on
The shutter does
not release
The Autofocus
does not work
Batteries are not
installedCheck if batteries are installed. If not, install batteries.
Set the focus mode lever to AF. (p.192)
Set the focus mode to SAF (Single mode). (p.192)
Battery power is low
The Aperture Ring is
not on the A position
Flash is charging
No available space
on Memory Card
Recording
Subject is difficult to
focus on
Subject is not in
focusing area
Subject is too close
The focus mode is
set to MF
The focus mode is
set to CAF
(Continuous mode)

244
Troubleshooting
Problem Cause Remedy
Built-in Flashdoes notdischarge
USB connectionwith computerdoes not workproperly*
USB connectionwith printer doesnot work properly
ShakeReductiondoes not work
When flash mode isset to [Autodischarge] or [Autoflash+Redeyereduct], the flash willnot discharge if thesubject is bright
The transfer mode isset to [Printer]
An error occurredwhile sending USBdata
The transfer mode isset to [Computer]
Shake Reductionfunction is off
Set flash mode to [Manual discharge] or [Manualflash+Redeye reduct]. (p.70)
Set transfer mode to [Computer].
Change the transfer mode to [Printer].
Set transfer mode to [Printer]. (p.159)
Turn on the Shake Reduction switch.
Shake Reductionfunction is not setProperly
If a lens for which focal length information cannot beacquired is used, set the [Focal Length] on the [ OPS]menu.
Shutter speed is toolow for ShakeReduction functionto be effectivewhen panning orshooting nightscenes, etc.
Turn off the Shake Reduction function and use a tripod.
AE lock functiondoes not operate
Use AE lock with any setting other than (Auto),(Bulb) mode or (Flash X-synchro) mode.
AE lock is notavailable when set to
(Auto), (Bulb)mode or (FlashX-synchro) mode.

245
Troubleshooting
* In rare cases, the camera may not operate correctly due to static electricity. This can be remedied bytaking the batteries out and putting them back in again. When the mirror remains in the up position,take the batteries out and put them back in again. Then, turn the power on. The mirror will retract.After the procedure is done, if the camera operates correctly, it does not require any repairs.
* Refer to the software instructions for details on connecting the camera to a PC. (p.218)
Problem Cause Remedy
ShakeReductiondoes not work
Move away from the subject, or turn off the ShakeReduction function and use a tripod.
Subject is too close

246
TroubleshootingPlease check the following if the USB connection malfunctions.
[Case 1] The USB cable is not connected or you are using a cable with an incorrect specification.
Use a USB cable with the correct specification.
[Case 2] The camera is not recognized by your PC. Sometimes, the camera may appear under
[Unknown Devices] in Device Manager.
Turn off the camera, remove the USB cable, plug in the USB cable again, and then
turn on the camera.
[Case 3] There is an unexpected error during file transfer
Turn the camera power off and on again. Transfer the file again.
[Case 4] When using the USB hub.
There may be a problem in connecting the camera to the PC through the USB hub if
the PC and the hub are not compatible. Wherever possible, connect the camera to
the PC directly.
[Case 5] Are other USB cables connected to the PC?
The camera may malfunction when it is connected to the PC at the same time as
another USB cable. In this case, disconnect the other USB cable, and connect only
one USB cable to the PC.
[Case 6] When I open the Device Manager (by clicking Start (Settings) Control Panel
(Performance and Maintenance) System (Hardware) Device Manager), there
are Unknown Devices or Other Devices entries with a yellow question mark (?)
beside them or devices with an exclamation mark (!) beside them.
Right-click on the entry with the question (?) or exclamation (!) mark and select
"Remove". Restart the PC and connect the camera the again. For Windows 98 PC,
remove the camera driver also, restart the PC, and then reinstall the camera driver.

247
Troubleshooting[Case 7] In some security programs (Norton Anti Virus, V3, etc.), the computer may not
recognise the camera as a removable disk.
Stop the security programs and connect the camera to the computer. Refer to the
security program instructions about how to stop the program.
[Case 8] If a PC connected with the camera stops responding while Windows is starting.
In this case, disconnect the PC and the camera and Windows will start.
If the problem happens continuously, set the Legacy USB Support to disable and re-
start the PC. The Legacy USB Support is in the BIOS setup menu (The BIOS setup
menu differs from the PC manufacturers and some BIOS menus don’t have Legacy
USB Support). If you can’t change the menu by yourself, contact the PC
manufacturer or BIOS manufacturer.
[Case 9] The camera is connected to the USB port located on the front of the computer.
When the camera is connected to the USB port located on the front of the computer,
the computer may not recognise the camera.
Connect the camera to the USB port located on the back of the computer.

248
Main Specifications
Type 23.5mm x 15.7mm CCD
Effective Pixel Approx. 10.20 Mega-pixel
Total Pixel Approx. 10.75 Mega-pixel
Mount PENTAX KAF2 bayonet mount
Schneider D-XENON, D-XENOGON Lens
* All PENTAX DSLR lenses are available.
* KAF2 mount lenses, KAF mount lenses,
KA mount lenses
Type Pentaprism, Natural-Bright-Matte Focusing Screen
Field of View 95%
Magnification 0.95X (50mm F1.4 Lens )
Diopter Adjustment -2.5m-1 ~ 1.5m-1
Low-temperature polysilicon TFT colour LCD monitor
2.5" (approximately 210,000 dots)
Type TTL phase-matching 11 points wide AF
Modes AF Single (with focus lock), Manual focus, Continuous AF
Type Electronically controlled vertical-run focal plane shutter
Auto : 1/4000sec ~ 30sec (No step), Manual : 1/4000sec ~
30sec (1/3EV step or 1/2EV step) with Bulb
TTL open-aperture 16-segment
Metering : Multi, Center-weighted, Spot
Compensation 3 (1/3EV or 1/2EV steps)
ISO Equivalent Auto, 100, 200, 400, 800, 1600
Type Built-in retractable P-TTL Manual pop-up flash
Auto, Fill-in, Auto+Red eye, Fill-in+Red eye, Front curtain
synchro, Front curtain synchro+Red eye, Rear curtain synchro
Guide Number 11 (at ISO 100)
28mm wide-angle (equivalent to 35mm)
Sync. Speed 1/180 sec.
Recharging Time Approx. 3 sec.
External Flash SEF-36PZF, SEF-54PZF (optional)
Auto, Daylight, Shade, Cloudy, Tungsten, Fluorescent (W, D,
N), Flash, Manual, Colour Temperature 1, 2, 3
Auto, Program, Sensitivity Priority, Shutter Priority, Aperture
Priority, Shutter&Aperture Priority, Manual, Bulb, Flash X-sync,
User mode
Image Sensor
Lens
Viewfinder
Focusing
Shutter
Exposure Control
Flash
White Balance
Shooting
LCD Monitor
Usable Lens
Speed
Metering System
Modes
Angle of ViewCoverage
Modes

249
Main Specifications
Drive Modes Single, Continuous, Auto Bracket
3 fps up to 9 frames (RAW), Depending on the memory
capacity (JPEG)
OPS CCD shift type
Dust Removal by removing the CCD and SP coating
2 sec., 12 sec., Remote control, Remote control 3 sec
(Compatible with PENTAX remote control, Optional)
SD/MMC (up to 2GB guaranteed), SDHC (up to 4GB
guaranteed)
File Format RAW (DNG), JPEG (DCF), EXIF 2.21, DPOF 1.1, PictBridge 1.0
10M : 3872X2592, 6M : 3008X2000, 2M : 1824X1216 (JPEG)
10M : 3872X2592 (RAW)
10M : RAW 30
10M : Super Fine 104 Fine 178 Normal 306
6M : Super Fine 174 Fine 297 Normal 512
2M : Super Fine 474 Fine 802 Normal 1360
These figures are measured under Samsung s standard
conditions and may vary depending on shooting conditions
and camera settings.
Type Single image, Thumbnails, Slide show
Editing Rotate, Digital Filter
Digital Filter B&W, Sepia, Soft, Slim, Brightness
Digital Output Connector : USB 2.0 (HI-SPEED)
Video Output : NTSC, PAL (user selectable)
DC Power Input Connector : DC 8.3V, 2A (100~240V)
Lithium Ion Battery : SLB-1674, Charger : SBC-L6
AC adapter : SAC-82 (optional)
Dimensions (WxHxD) 142x101x71.5mm (excluding the projecting parts of the camera)
Weight 710g (without batteries and card)
Operating Temperature 0 ~ 40 C
Operating Humidity 5 ~ 85%
Camera Driver Storage Driver (Windows 2000/ME/XP, Mac OS 10.2 or later)
Application Digimax Master, Digimax RAW Converter, Adobe Reader
Storage
Shooting
Self-timer
Image Play
Interface
Power Source
Software
Media
Image Size
Capacity (512MB)
Continuous
* Specifications are subject to change without prior notice.* All trademarks are the property of their respective owners.* Accessories for PENTAX DSLR can be used with SAMSUNG DSLR.

250
AdobeRGB
Colour space recommended by Adobe Systems, Inc. for commercial printing. Wider range of colourreproduction than sRGB. Covers most of the colour range so colours only available when printed are notlost when editing images from a computer. When image is opened by non-compatible software, thecolours look lighter.
AE Metering
Brightness of subject is measured to determine exposure. In this camera, select from [Multi-segmentMetering], [Center-weighted Metering] and [Spot Metering].
Aperture
The aperture increases or reduces the light beam (the amount of light) that passes through the lens.
Auto BracketFor automatically changing the shooting conditions. When the shutter button is pressed, three imagesare shot. The first one has no compensation, the second is under-exposed and the third is over-exposed.
Bright Portion
Over exposed area in the image loses contrast and appears white.
Camera Shake (Blur)
When the camera moves while the shutter is open, the entire image appears blurred. This occurs moreoften when shutter speed is low.Prevent camera shake by raising the sensitivity, using the flash, or by using a faster shutter speed.Alternatively, use a tripod to stabilize the camera. Because camera motion causes camera shake, usethe self-timer, the remote control unit, and the cable switch to prevent.
CCD (Charge Coupled Devices)
Photography element which converts the light entering through the lens into electric signals.
Colour space
A defined range of colours from the spectrum which are used. In digital cameras, [sRGB] is defined asthe standard Colour Space by Exif. In this camera, [AdobeRGB] is also used because of its richer colourexpression over sRGB.
Glossary

251
GlossaryColour Temperature
This numerically expresses the colour of the light source illuminating the subject. This is indicated inabsolute temperature, using Kelvin (K) units.The colour of light shifts to a bluish colour as the colour temperature rises, and to a reddish colour as thecolour temperature falls.
DCF (Design Rule for Camera File System)
A digital camera file system standard established by the Japan Electronics and Information TechnologyIndustries Association (JEITA).
Depth of Field
Area of focus. This depends on the aperture, lens focal length, and distance to the subject. For example,select a smaller aperture to increase the depth of field or use a larger aperture to decrease the depth offield.
DNG RAW file
DNG (Digital Negative) is a general-purpose RAW file format designed by Adobe Systems. Whenimages captured in proprietary RAW formats are converted to DNG format, support and compatibility forthe images increases significantly.
DPOF (Digital Print Order Format)
Rules for writing information onto a card with recorded images regarding the specific images andnumber of copies to be printed. Prints can easily be made by taking images to a DPOF photo printingstore.
EV (Exposure Value)
Exposure Value is determined by the combination of the aperture value and the shutter speed.
EV Compensation
Process of adjusting the image brightness by changing the shutter speed and aperture value.
Exif (Exchangeable image file format for digital still camera)
A standard digital camera file format established by the Japan Electronics and Information TechnologyIndustries Association (JEITA).
252
GlossaryFocus point
Position in the viewfinder that determines focus.
Histogram
A graph that shows the darkest and brightest points in an image. The horizontal axis represents thebrightness and the vertical axis represents the number of pixels. This is useful when you wish to refer tothe exposure status of an image.
JPEG
An image compression method. The image is recorded in JPEG format when the quality level is set to (Best), (Better), or (Good). Images recorded in JPEG format are suited for viewing on your PC
or for attaching to e-mail.
ND (Neutral Density) Filter
A filter which reduces the amount of light entering the camera lens by a measured amount, withoutaffecting the picture itself.
Noise Reduction
Process to reduce noise (image roughness or unevenness) caused by slow shutter speed.
NTSC/ PAL
These are video output formats. NTSC is mainly used in Japan, North America, and South Korea. PALis mainly used in Europe and in China.
Quality Level
This refers to the image compression ratio. The lower the compression, the more detailed the image.The image becomes rougher as the compression rate rises.
RAW data
Unedited image data output from the CCD. RAW data is data before being internally processed by thecamera. Settings like White balance, contrast, saturation and sharpness can be manipulated individuallyon each file. In addition, RAW data is 12-bit data that contains 16 times the information of 8-bit JPEGand TIFF data. Rich gradations are possible. Transfer RAW data to your computer and use the providedsoftware to create image data with different settings, such as JPEG or TIFF.

253
GlossaryRecorded Pixels
Indicates the size of the image by the number of pixels. The more pixels that compose a picture, thelarger the image size.
Sensitivity
The sensitivity of the camera to light; the equivalent of film speed in a camera using film. With a highsensitivity, images can be shot with a high shutter speed even in dimly lit places, reducing camerashake. However, images with high sensitivity are more susceptible to noise.
Shutter Speed
The length of time that the shutter is open and light strikes the CCD. The amount of light that strikes theCCD can be changed by altering the shutter speed.
sRGB (standard RGB)
International standard of colour space established by the IEC (International ElectrotechnicalCommission). This is defined from colour space for PC monitors and is also used as the standard colourspace for Exif.
Vignetting
Vignetting occurs when corners of pictures are darkened because the subject was blocked by the hoodor filter or the flash was blocked.
White Balance
While shooting, colour temperature is adjusted to match the light source so that the subject appears tohave correct colour.

254
IndexSymbols
Auto 171, 173
Program 171, 174
Sensitivity Priority 171, 176
Shutter Priority 171, 177
Aperture Priority 172, 179
Shutter&Aperture Priority 172, 181
Manual 172, 182
Bulb 172, 186
X-flash Synchro 172, 187
User 172, 187
OPS 19, 55
button 18, 70
button 206
button 98
button 84
button 84
button 10, 132
EVC button + LCD lamp button 204
button 103
A
AC Adapter 37
AdobeRGB 126
AE lock 205
AE-L button 205
AF Mode 192
Aperture 199
Aperture Priority Mode Av 172, 179
Auto Bracket 206
Auto Power Off 159
AF (Autofocus) 192
Autofocus AF 192
Automatic Sensitivity Correction 83
Av (Aperture Priority) mode 172, 179
B
B&W (Digital Filter) 93, 95
Batteries 33
Beep 151
Bright 165
Bright Portion 165
Built-in flash 70
B (Bulb) Mode 172, 186
Bulb Mode B 172, 186
C
Cable Switch 68, 186
Capture Information 23, 24
Card access lamp 15
CCD Cleaning 161
Center-weighted 202
Cloudy (White Balance) 76
Colour space 126
Colour Temperature 76
Continuous Autofocus 192
Continuous mode (CAF) 192
Continuous Shooting 60, 169
Contrast 124
Contrast-Control-Sync Flash 212
Custom Function 125
[CUSTOM MENU] Menu 130, 140
D
Date Adjust 152
Date change 152
Daylight (White Balance) 76
Daylight-Sync Shooting 74
Default Setting 234
Delete 98
Delete All Images 99
Depth of Field 200
Digital Filter 93
Diopter Adjus 48
Direct Printing 108
Display Language 156

255
IndexDrive Mode 60
E
e-dial 20
Error Message 241
EV Compensation 204
Exposure 199
Exposure Mode 129
Exposure Warning 165
External flash 212
F
File Name 126, 128
Filter 178
Fix Exposure 205
Fix Focus 196
Flash 70
Flash (White Balance) 76
Flash Compensation 75
Fluorescent Light (White Balance) 76
Fn button 169
Fn Menu 169
Focus Indicator 27
Focus Lock 196
Focus mode lever 192
Format 150
Four-way controller 19
G
Guide display 23, 156
H
High-Speed Flash Sync Mode 214
Histogram 26
I
Image Tone 121
INFO button 84
Instant Review 166
ISO Sensitivity 82
ISO Sensitivity Warning Display 138
L
Language 156
Last Memory 128
Lens 46
Lens unlock button 18, 47
M
Main switch 41
MF (Manual focus) 192
Manual focus 192
Manual White Balance 78
Matte Field 198
Menu Operation 118
Meter Operating Time 134
Mirror Lock Up 68
Mode dial 171
N
Nine-Image Display 89
Noise Reduction 137
NTSC 158
O
OK button 15, 19, 22
Optional Accessories 239
P
P (Program) Mode 171, 174
PAL 158
PictBridge 108
Playback 84
Power 33

256
IndexPress fully 53
Press halfway 53
Preview 190
Printer connection 110
Program Mode 171, 174
Protect 103
P-TTL (Auto) 213
P-TTL (Flash) 212
R
RAW 122
RAW + 59, 122
RAW + JPEG 102, 122
Rear Curtain Sync Flash 212
Red-eye reduction 74
Remaining image storage capacity 40
Remote Control 65
Reset 139, 148, 164
Rotate 85
S
Saturation 124
SEF-36PZF / SEF-54PZF 212, 239
Select&Delete 100
Selecting the Focusing Area 194
Self-Timer 62
Sensitivity 82
Sepia (Digital Filter) 95
Shade (White Balance) 76
Sharpness 124
Shutter Priority Mode Tv 171, 177
Shutter release button 53
Shutter speed 199
Single mode (SAF) 192
Slideshow 90
Slim (Digital Filter) 95
Spot Metering 202
sRGB 126
T
Transfer Mode 159
Tungsten Light (White Balance) 76
TV 158
Tv (Shutter Priority) mode 171, 177
U
Using aperture ring 142
V
Video cable 92
Video Output Format 158
Viewfinder 27, 48
Vignetting 70
W
White Balance 76
Z
Zoom Lens 69

257
Correct Disposal of This ProductCorrect Disposal of This Product (Waste Electrical & Electronic Equipment)(Applicable in the European Union and other European countries with separate collectionsystems) This marking shown on the product or its literature, indicates that it should not bedisposed with other household wastes at the end of its working life. To prevent possible harm to the environment or human health from uncontrolled waste
disposal, please separate this from other types of wastes and recycle it responsibly to promote thesustainable reuse of material resources. Household users should contact either the retailer where theypurchased this product, or their local government office, for details of where and how they can take thisitem for environmentally safe recycling. Business users should contact their supplier and check the termsand conditions of the purchase contract. This product should not be mixed with other commercial wastes for disposal.
Samsung Techwin cares for the environment at all product manufacturing stages topreserve the environment, and is taking a number of steps to provide customerswith more environment-friendly products. The Eco mark represents SamsungTechwin's will to create environment-friendly products, and indicates that theproduct satisfies the EU RoHS Directive.
258
FCC notice
NOTE : This equipment has been tested and found to comply with the limits for a Class B digital device,pursuant to part 15 of the FCC Rules. These limits are designed to provide reasonable protectionagainst harmful interference in a residential installation.This equipment generates, uses and can radiate radio frequency energy and, if not installed andused in accordance with the instructions, may cause harmful interference to radiocommunications. However, there is no guarantee that interference will not occur in a particularinstallation. If this equipment does cause harmful interference to radio or television reception,which can be determined by turning the equipment off and on, the user is encouraged to try tocorrect the interference by one or more of the following measures:- Reorientate, or relocate, the receiving antenna.- Increase the separation between the equipment and receiver.- Connect the equipment into an outlet on a circuit different from that to which the receiver isconnected.
- Consult the dealer or an experienced radio / TV technician for help.CAUTION : Changes or modifications not expressly approved by the manufacturer responsible for compliancecould void the user’s authority to operate the equipment.
Declaration of ConformityTrade Name : SAMSUNG TECHWINModel No. : Samsung GX-10Responsible Party : Samsung Opto-Electronics America, INC.Address : 40 Seaview Dr. Secaucus,NJ 07094Telephone No. : 201-902-0347
This device complies with Part 15 of the FCC Rules. Operation is subject to the following twoconditions: (1) This device may not cause harmful interference, and (2) this device must acceptany interference received, including interference that may cause undesired operation.

259
MEMO

260
MEMO

6806-3495
Internet address - http : //www.samsungcamera.com/
The CE Mark is a Directive conformitymark of the European Community (EC)
SAMSUNG TECHWIN CO., LTD.
OPTICS & DIGITAL IMAGING DIVISION145-3, SANGDAEWON 1-DONG, JUNGWONGU,SUNGNAM-CITY, KYUNGKI-DO, KOREA462-121TEL : (82) 31-740-8222, 8488, 8490FAX : (82) 31-740-8398www.samsungcamera.com
SAMSUNG OPTO-ELECTRONICS AMERICA, INC.
1-800-SAMSUNG (726-7864)www.samsungcamerausa.com
If you have any questions or comments relating toSamsung cameras, Please contactthe SAMSUNG customer care center
SAMSUNG FRANCE S.A.S.
HOTLINE PHOTO NUMÉRIQUE :00 800 22 26 37 27 (Numéro Vert-Appel Gratuit)www.samsungphoto.fr
SAMSUNG OPTO-ELECTRONICS GmbHZENTRALE, KEINE REPARATURAM KRONBERGER HANG 6D-65824 SCHWALBACH/TS, GERMANYTEL : 49 (0) 6196 66 5303FAX : 49 (0) 6196 66 5366TECHNISCHE SERVICE HOTLINE :00800 4526 3727 (nur kostenfrei fur Anrufe aus Deutschland)
Die Adressen Ihrer Kundendienste sowie dieGarantiebestimmungen entnehmen Sie bitte aus dembeiliegenden Faltblatt (SAMSUNG INTERNATIONALWARRANTY CERTIFICATE) INTERNET : www.samsungcameras.de
TIANJIN SAMSUNG OPTO-ELECTRONICS CO., LTD
NO.9 ZHANGHENG STREET. MICRO-ELECTRONICINDUSTRIAL PARK JINGANG ROAD TIANJIN CHINA.POST CODE : 300385TEL : 800-810-5858www.samsungcamera.com.cn
SAMSUNG OPTO-ELECTRONICS UK LIMITEDSAMSUNG HOUSE 1000 HILLSWOOD DRIVEHILLSWOOD BUSINESS PARKCHERTSEY KT16 OPS U.K.TEL : 00800 12263727(free for calls from UK only)UK Service Hotline : 01932455320www.samsungcamera.co.uk
RUSSIA INFORMATION CENTER SAMSUNG ELECTRONICS
117545 ST. DOROZHNAYA BUILDING 3,KORPUS 6, ENTRANCE 2, MOSCOW, RUSSIATEL : (7) 495-363-1700CALL FREE : (8) 800 555 55 55 (from Russia only)www.samsungcamera.ru