Embed Size (px)
Citation preview

Guide to Email Setup using Microsoft Outlook Express
Document Date: December 20, 2005
Document Version: Version: 1.0
Disclaimer:
Please note that this document is provided on an “as is where is” basis and we accept no
responsibilities whatsoever for the use of information contained in this document, its accuracy and / or
the results achieved by the same. The document is provided only for the benefit of customers but is
UNSUPPORTED; No support telephonic or otherwise is available for the same.
-: Prepared by :-

1
INTRODUCTION Email Setup Instructions for Microsoft Outlook Express
These instructions will assist you in getting Cybersites India’s email service configured under
Microsoft Outlook 2000. Before you begin please make sure that you have your new email
address, password, and server details ready with you. These details can be found in the
welcome mail sent to you at the time of order processing and are required to complete the
process.
If you encounter problems or have additional questions, you may please contact our support
team at [email protected].
Configuring Outlook Express
Open Outlook Express by following any of the below mentioned methods:
• Double-click the Outlook Express icon on the
Windows desktop.
OR
• Single-click the Outlook Express button on the Quick Launch bar in the
lower left corner of the Windows desktop.
OR
• Click the Start button in the lower left corner of the screen
• Select Programs. >> Microsoft Office Outlook Express

2
Configuring Microsoft Outlook Express
Step 1
When you open Microsoft Outlook 2000 a screen similar to the one shown below
should appear (your screen settings may differ depending on your settings).
On the menu bar click on the "Tools" menu and then click on "Accounts...”
Accounts

3
Configuring Microsoft Outlook Express
Step 2
In the “Internet Accounts” window click on the Add button and then click on Mail.
Add Mail

4
Configuring Microsoft Outlook Express
Step 3
The next window which opens up is the “Internet Connection Wizard” window. Click
on the Display name text box and type your name here, then click on the Next
Button. (This name is displayed in the “from email address” when you send an email)
Type your Name

5
Configuring Microsoft Outlook Express
Step 4
In the E-mail Servers Names window select “POP3” as the incoming server type from
the Server List.
Select incoming server type

6
Configuring Microsoft Outlook Express
Step 5
Type your web site domain name or IP address into the “Incoming mail server” &
“Outgoing mail server” textboxes and then click on Next button.
(You have all this information available in the welcome email sent to you during order
processing)
Type PO3 Server Name OR IP
Type SMTP Server Name OR IP

7
Configuring Microsoft Outlook Express
Step 6
Type your complete email address into Account name text box
([email protected]) and enter your email account password into the
Password text box. Click the Next button to proceed.
Type Account Name
Type Password
8
Configuring Microsoft Outlook Express
Step 7
Click finish on the Congratulations window, to save your settings.
NOTE: We are not yet finished setting up the account, a small configuration still
needs to be done.
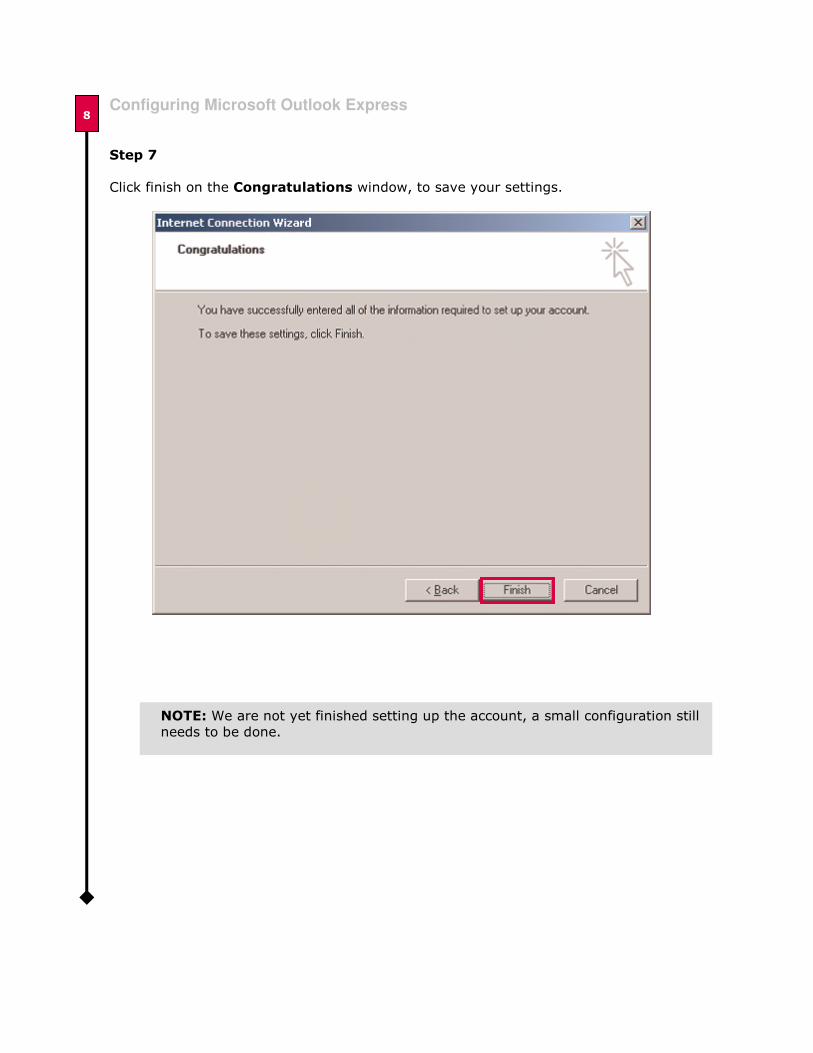
9
Configuring Microsoft Outlook Express
Step 8
Click on the “Tools” menu and then click on “Accounts…”
Accounts

10
Configuring Microsoft Outlook Express
Step 9
Click on the Mail tab, you should be able to see your email account listed. Click the
entry corresponding to your email account and then click the properties button.
Properties
11
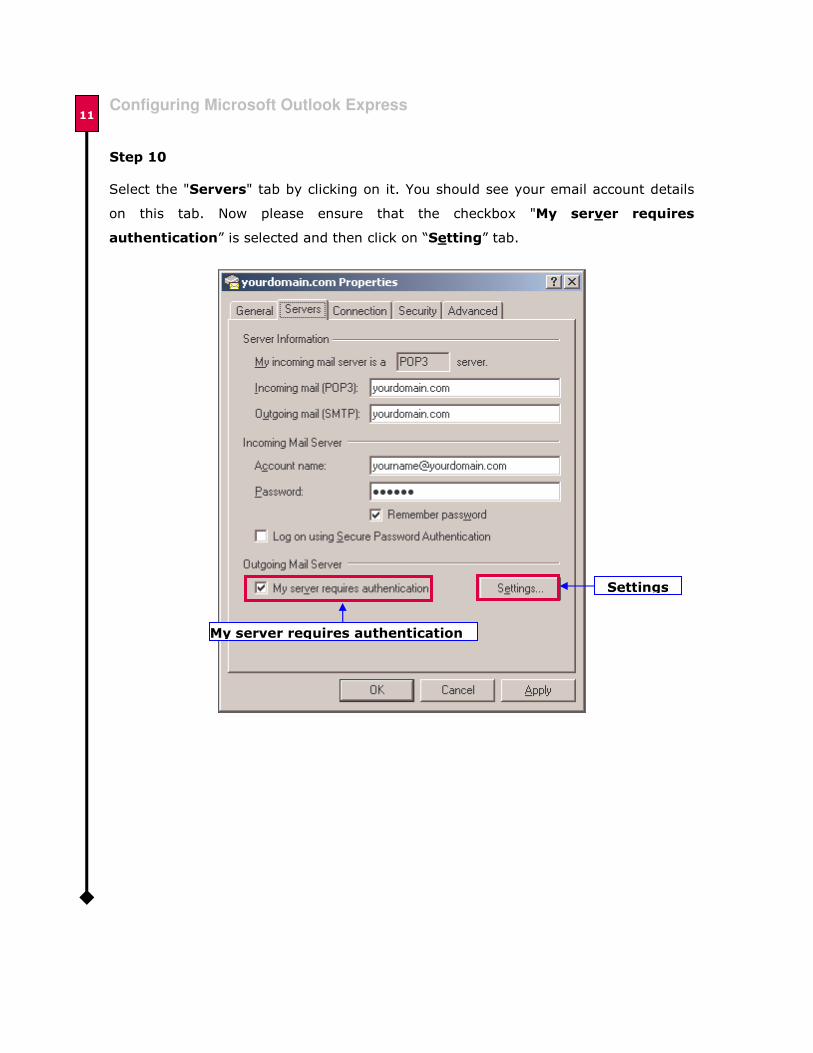
Configuring Microsoft Outlook Express
Step 10
Select the "Servers" tab by clicking on it. You should see your email account details
on this tab. Now please ensure that the checkbox "My server requires
authentication” is selected and then click on “Setting” tab.
Settings
My server requires authentication
12
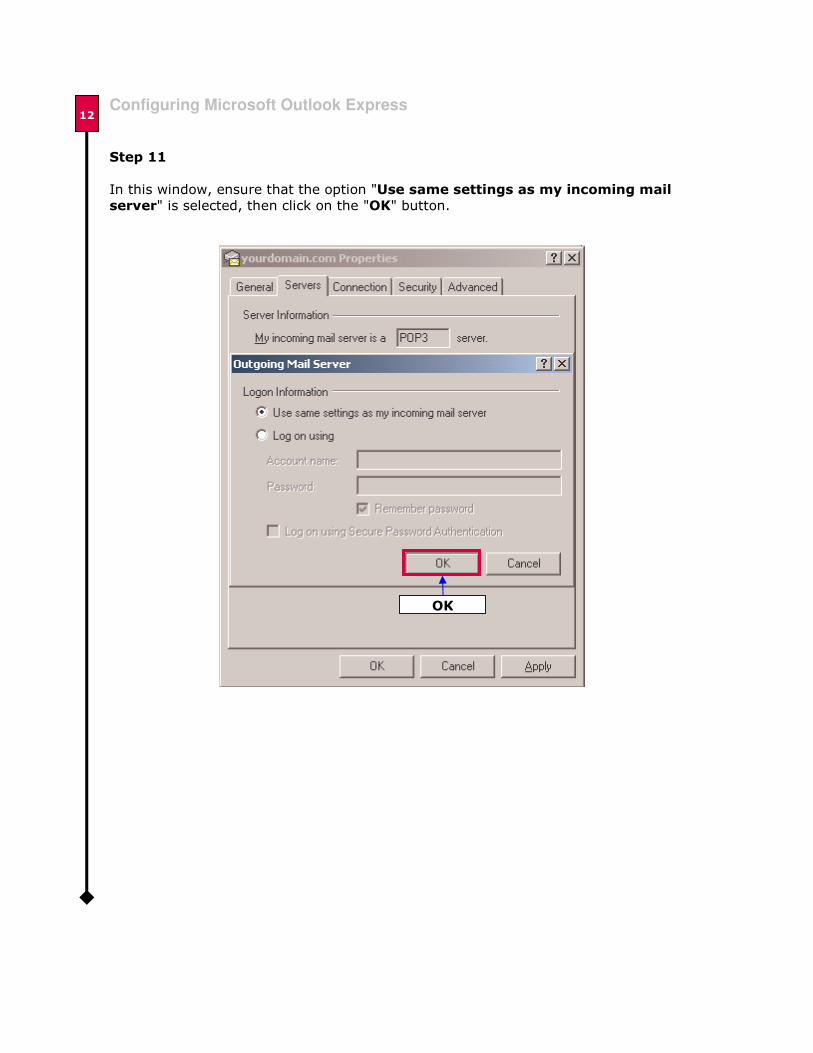
Configuring Microsoft Outlook Express
Step 11
In this window, ensure that the option "Use same settings as my incoming mail
server" is selected, then click on the "OK" button.
OK

13
Configuring Microsoft Outlook Express
Step 12
Click on the “Apply” button and then click on “OK” to save these settings.
OK Apply
Congratulations! Your email account with Cybersites India is now configured under Microsoft Outlook Express.

14
Send/Receive Button
Configuring Microsoft Outlook Express
Outlook Express is now configured to access and download email onto your pc, your should now
make sure you are connected to the internet and then click the send/Receive button or press
the “F9” key on the keyboard to check your e-mail
Send/Receive Status
Message Headers
Folder List
Message Preview