Embed Size (px)
Citation preview

GroupWise Collaboration Integration Suite Setup and Configuration Guide
Revised: October 30, 2008 © 2002-2007 Omni Technology Solutions Inc. Page 1 of 22
This GuideThis GuideThis GuideThis Guide
Welcome to Riva, Omni's Collaboration Integration Platform for GroupWise. Riva is a powerful set of policy-based, automated Modules, Applications and Reports that allow administrators to manage GroupWise accounts and content like never before.
This guide provides information necessary to:
• Install the Riva application on a management Windows workstation
• Run the setup wizards to configure connection settings
• Modify existing connection settings
There are other Riva guides that you can refer to:
• Riva Setup and Configuration GuideRiva Setup and Configuration GuideRiva Setup and Configuration GuideRiva Setup and Configuration Guide –––– describes how to install and configure the various connection settings for Riva.
• Riva Managed Policies & Reports Guide Riva Managed Policies & Reports Guide Riva Managed Policies & Reports Guide Riva Managed Policies & Reports Guide – describes how to create. modify and execute Riva managed policies and managed report policies.
• Riva Managed Application Guides Riva Managed Application Guides Riva Managed Application Guides Riva Managed Application Guides – describes how to create, modify and execute managed applications:
o Managed Signature GuideManaged Signature GuideManaged Signature GuideManaged Signature Guide
o Dynamic Distribution List GuideDynamic Distribution List GuideDynamic Distribution List GuideDynamic Distribution List Guide
o Secure Distribution List GuideSecure Distribution List GuideSecure Distribution List GuideSecure Distribution List Guide
• Riva CRM Enterprise Guide Riva CRM Enterprise Guide Riva CRM Enterprise Guide Riva CRM Enterprise Guide – describes how to integrate Riva CRM Enterprise with common CRM solutions including SugarCRM, info@hand, Salesforce.com, Microsoft Dynamics, etc.
• Riva CRM Desktop Edition GuideRiva CRM Desktop Edition GuideRiva CRM Desktop Edition GuideRiva CRM Desktop Edition Guide - describes how to integrate Riva CRM Desktop Edition with common CRM solutions including SugarCRM, info@hand, Salesforce.com, Microsoft Dynamics, etc.

Riva Setup and Configuration Guide
www.omni-ts.com
Revised: October 30, 2008 © 2002-2007 Omni Technology Solutions Inc. Page 2 of 22
Table of ContentsTable of ContentsTable of ContentsTable of Contents
How Riva Works .................................................................................................................. 3
Installing Riva ..................................................................................................................... 3
System Requirements .................................................................................................. 3
How to Install Riva ...................................................................................................... 3
How to Start Riva ........................................................................................................ 4
How to Update Riva ..................................................................................................... 4
Riva Support Files ............................................................................................................... 7
How to Establish System Connections ................................................................................. 7
eDirectory and GroupWise Connections .......................................................................... 7
Add .csv File Support ................................................................................................. 16
How to Modify Existing System Connections ..................................................................... 18
Modify Host IP Address or Port Value or Use SSL ........................................................... 18
Add a SOAP Connection .............................................................................................. 19
Support for Riva ................................................................................................................. 21
Reporting a Technical Issue ........................................................................................ 21
Upgrade and Maintenance Support Agreements ............................................................. 21
Free Support ............................................................................................................. 21
Contacting Support .................................................................................................... 22
Online Resources ....................................................................................................... 22

Riva Setup and Configuration Guide
www.omni-ts.com
Revised: October 30, 2008 © 2002-2007 Omni Technology Solutions Inc. Page 3 of 22
How Riva WorksHow Riva WorksHow Riva WorksHow Riva Works
Riva is a combination of three key components that work together:
1. Riva FrameworkRiva FrameworkRiva FrameworkRiva Framework The Riva framework is the “engine” that permits centralized management of GroupWise account information using policies that are created using the Riva application. Riva is able to execute policies using a GroupWise Trusted Application Key and the Riva eDirectory connectors. The GroupWise Trusted Application allows an administrator to update content in all mailboxes in a GroupWise system.
2. Riva Riva Riva Riva InterfaceInterfaceInterfaceInterface The Riva interface is used by the administrator to connect to one or more eDirectory and GroupWise systems to create, manage and execute policies. Policies are created by running policy wizards that are associated to Riva modules.
3. Riva ModulesRiva ModulesRiva ModulesRiva Modules Riva uses a set of modules to provide managed policies, reports, applications and CRM integration. Each Module can be licensed individually. Riva’s flexible licensing system allows customers to license different modules for different parts of the eDirectory and GroupWise systems.
There are five steps to install and configure Riva:
• Step 1 – Install Riva
• Step 2 – Configure the connection settings
• Step 3 – License Riva (required for Trial of Full mode)
• Step 4 – Create the desired policies
• Step 5 – Execute policies
Installing RivaInstalling RivaInstalling RivaInstalling Riva
System RequirementsSystem RequirementsSystem RequirementsSystem Requirements::::
• Windows 2000 or XP workstation, or Windows 2003 server with latest service packs
• Microsoft .NET 2.0 Framework http://www.microsoft.com/downloads/details.aspx?familyid=0856EACB-4362-4B0D-8EDD-AAB15C5E04F5&displaylang=en
• GroupWise 6.5 SP2 or higher client (and server)
• LDAP context of an eDirectory username and password to connect to the eDirectory tree
• LDAP context of the LDAP Server Group of the server that Riva will connect to
• GroupWise administrator account to generate the GroupWise Trusted Application Key
• *.lic*.lic*.lic*.licenceenceenceence file for licensed modules. Riva modules will run in demonstration mode without a license file.
• SOAP SOAP SOAP SOAP must be enabled against the GroupWise PO’s for the Managed Signatures application module.
How to Install RivaHow to Install RivaHow to Install RivaHow to Install Riva
To install Riva, create a c:c:c:c:\\\\Program FilesProgram FilesProgram FilesProgram Files\\\\OmniOmniOmniOmni\\\\RivaRivaRivaRiva folder. Extract the riva-latest.zip file and copy the contents of the \\\\rivarivarivariva----latestlatestlatestlatest folder to the c:c:c:c:\\\\ProgramProgramProgramProgram Files Files Files Files\\\\OmniOmniOmniOmni\\\\RivaRivaRivaRiva folder. You can also make a shortcut of the Riva.exe file to your desktop and label it as "Launch Riva".

Riva Setup and Configuration Guide
www.omni-ts.com
Revised: October 30, 2008 © 2002-2007 Omni Technology Solutions Inc. Page 4 of 22
How to Start Riva How to Start Riva How to Start Riva How to Start Riva
Double-click the Launch RivaLaunch RivaLaunch RivaLaunch Riva desktop icon, or double-click the Riva.exe Riva.exe Riva.exe Riva.exe file in the Riva installation directory.
How to How to How to How to Update RivaUpdate RivaUpdate RivaUpdate Riva
Riva comes with a “Check for UpdateCheck for UpdateCheck for UpdateCheck for Update” feature which should be run immediately after installing Riva. You can confirm the installed version of Riva by double-clicking on the Riva icon in the top left corner of the Riva application.
Click on an installed module to view the version information.

Riva Setup and Configuration Guide
www.omni-ts.com
Revised: October 30, 2008 © 2002-2007 Omni Technology Solutions Inc. Page 5 of 22
To update Riva:
1. Click the Check for Updates Check for Updates Check for Updates Check for Updates link at the far right side of the menu bar.
2. In the “Internet Connection” window, click YesYesYesYes.
A Riva Updater Status Riva Updater Status Riva Updater Status Riva Updater Status window will open.
3. If no update is available click OK OK OK OK to close the window.
4. If available an “Update Available” window will open.
Click YesYesYesYes to update Riva. This will return to the “Riva Updater Status” window where the download progress can be monitored.

Riva Setup and Configuration Guide
www.omni-ts.com
Revised: October 30, 2008 © 2002-2007 Omni Technology Solutions Inc. Page 6 of 22
At the “Download Successful” window, click OKOKOKOK.
5. Once an update has completed, you will need to close Riva and restart it. You can then verify that the update has completed by double-clicking the Riva icon (top left) to open the “About Riva” window.
You can also verify the success of the update by checking the update log, found in the \\\\LogsLogsLogsLogs\\\\SelfUpdaterSelfUpdaterSelfUpdaterSelfUpdater folder.

Riva Setup and Configuration Guide
www.omni-ts.com
Revised: October 30, 2008 © 2002-2007 Omni Technology Solutions Inc. Page 7 of 22
Riva Support FilesRiva Support FilesRiva Support FilesRiva Support Files
Additional tools and sample files are available in RivaRivaRivaRiva----SupportSupportSupportSupport----Files.zip Files.zip Files.zip Files.zip which can be downloaded from http://www.omni-ts.com/download/riva.html. Included are CCUAdmin CCUAdmin CCUAdmin CCUAdmin which is a utility to create .CSV input data files for Common Calendar Update (CCU) policies, and IACIACIACIAC----TestTestTestTest.NAB.NAB.NAB.NAB which is a GroupWise Address Book import file that can be used to test the GWIA Internet Address Cleaner (IAC) policies. Please refer to the “Readme-Riva-Support-Files.txt” file for additional information.
How to How to How to How to Establish System ConnectionsEstablish System ConnectionsEstablish System ConnectionsEstablish System Connections
eDirectory and GroupWise ConnectionseDirectory and GroupWise ConnectionseDirectory and GroupWise ConnectionseDirectory and GroupWise Connections
When you run Riva for the first time, eDirectory and GroupWise system connections must be established. Establishing these connections will generate the required trusted GroupWise application key. To establish system connections:
1. Connect to eDirectory:Connect to eDirectory:Connect to eDirectory:Connect to eDirectory:
a. Click SetupSetupSetupSetup and click Novell eDirectoryNovell eDirectoryNovell eDirectoryNovell eDirectory under Connection WizardsConnection WizardsConnection WizardsConnection Wizards.
b. This will start the eDirectory Connection Wizard. Click NextNextNextNext.
c. In the “Target Information” window, specify the IP address or the DNS name of the eDirectory LDAP host server and specify the port value. If EnaEnaEnaEnable SSLble SSLble SSLble SSL is selected, the port value will change to 636 636 636 636 as the default SSL port for eDirectory. Modify this value as required. Click NextNextNextNext.

Riva Setup and Configuration Guide
www.omni-ts.com
Revised: October 30, 2008 © 2002-2007 Omni Technology Solutions Inc. Page 8 of 22
d. Enter the LDAP context and password for the eDirectory user account that will be used to connect Riva to the eDirectory system. The LDAP naming convention does not use a leading period and uses a comma (,) to separate the container objects rather than a period. e.g. cn=admin,ou=users,o=omnicn=admin,ou=users,o=omnicn=admin,ou=users,o=omnicn=admin,ou=users,o=omni
Click Next >> Next >> Next >> Next >> to continue.
e. Click the select>> select>> select>> select>> button to open the eDirectory Tree Browser window.

Riva Setup and Configuration Guide
www.omni-ts.com
Revised: October 30, 2008 © 2002-2007 Omni Technology Solutions Inc. Page 9 of 22
f. Navigate and select the LDAP Group object for the server you specified in the previous “Target Information” window.
Click OK >> OK >> OK >> OK >> to close the eDirectory Tree Browse window and return to the LDAP Group Distinguished Name window.
Click the Next > Next > Next > Next > button

Riva Setup and Configuration Guide
www.omni-ts.com
Revised: October 30, 2008 © 2002-2007 Omni Technology Solutions Inc. Page 10 of 22
g. At the “Results for matched/Not Matched Attribute List and map” window, the number of mapped attribute objects will be displayed. If there are unmapped attribute objects, when you click NextNextNextNext > > > >.
h. At the “Results for matched/Not Matched Class List and map” window, the number of mapped class objects will be displayed. If there are unmapped class objects, when you click NextNextNextNext > > > >.
i. At the “eDirectory connection successful” window, you will see a summary screen.
Click FinishFinishFinishFinish which will automatically start the New GroupWise Connection WizardNew GroupWise Connection WizardNew GroupWise Connection WizardNew GroupWise Connection Wizard.
2. Connect to GroupWise (Part One) Connect to GroupWise (Part One) Connect to GroupWise (Part One) Connect to GroupWise (Part One) – the GroupWise Connection Wizard will start and lead into the Trusted Application Key WizardTrusted Application Key WizardTrusted Application Key WizardTrusted Application Key Wizard. This wizard requires windows explorer access to the wpdomain.db file for the GroupWise domain.
a. At the introduction window, click NextNextNextNext > > > >.
b. At the “Trusted Application Key” window, select Create a new trusted Application KeyCreate a new trusted Application KeyCreate a new trusted Application KeyCreate a new trusted Application Key to generate a new key and click Next >Next >Next >Next >.

Riva Setup and Configuration Guide
www.omni-ts.com
Revised: October 30, 2008 © 2002-2007 Omni Technology Solutions Inc. Page 11 of 22
This will automatically start the “Trusted Application Wizard”.
3. Create the Trusted Application KeyCreate the Trusted Application KeyCreate the Trusted Application KeyCreate the Trusted Application Key
a. At the “Welcome to the Trusted Application Wizard” window, click NextNextNextNext > > > >....
b. At the “Collect Trusted Application Parameters” window, enter the:
• Domain Path: Domain Path: Domain Path: Domain Path: specify the UNC path or mapped drive path to the wpdomain.db file of the primary GroupWise Domain that Riva will connect to. You can manually type in the UNC path or use the BrowseBrowseBrowseBrowse button to navigate and select the target folder through a mapped drive.
• Application NameApplication NameApplication NameApplication Name: provide an Application Key Name. This should be unique if multiple trusted application keys will be used for different installations of Riva connecting to the same GroupWise system.
• Application DescriptionApplication DescriptionApplication DescriptionApplication Description: (Optional) this is an optional description field.
• IP AddressIP AddressIP AddressIP Address: (Optional) this security setting should be used if you want to limit Riva to only be able to run from this specific workstation IP address. This prevents Riva from being able to run on a different workstation.

Riva Setup and Configuration Guide
www.omni-ts.com
Revised: October 30, 2008 © 2002-2007 Omni Technology Solutions Inc. Page 12 of 22
Click NextNextNextNext to continue.
c. At the “Collect Trusted Application Options” window, select Yes Yes Yes Yes for Overwrite a Trusted Overwrite a Trusted Overwrite a Trusted Overwrite a Trusted Application Key with the same name as this oneApplication Key with the same name as this oneApplication Key with the same name as this oneApplication Key with the same name as this one (choose this option if you are recreating a new trusted application key). Click NextNextNextNext > > > >.
d. (Optional) To view the registration of the trusted application, 0pen a server remote console session to a post office console screen of one of the post offices in the domain that is being configured with the trusted application. Set logging to Verbose. When the trusted application is registered in the step “e”, you will see the following message in the post office screen: “Server Time: 31F ADM: Completed: Update object in post office – Trusted Application on (Domain: Name of domain)”. Set the log level back to normal on your post office.
e. At the “Generation Successful” screen, it is recommended that you save the trusted application key information to a file. This will allow you to re-use this key if you want to re-install Riva at a later date or install Riva to run the same policies from another workstation. Click Save to Save to Save to Save to ddddiskiskiskisk . . . . . . . . . . . . and save the file to the desired location. Note that any person with this key can run any application that is configured to use this trusted application key. This key should be stored in a secure location.

Riva Setup and Configuration Guide
www.omni-ts.com
Revised: October 30, 2008 © 2002-2007 Omni Technology Solutions Inc. Page 13 of 22
Depending on how busy your GroupWise system is, it might take up to five minutes for the Trusted Application Key to be registered on your system. If you have followed the Optional Step e above, you will have seen the successful registration of the key.
f. Click FinishFinishFinishFinish to complete the process. If you see the following error message when you select FinishFinishFinishFinish, the Trusted Application Key has not had time to be registered on your system:
Click OK OK OK OK and click FinishFinishFinishFinish again.
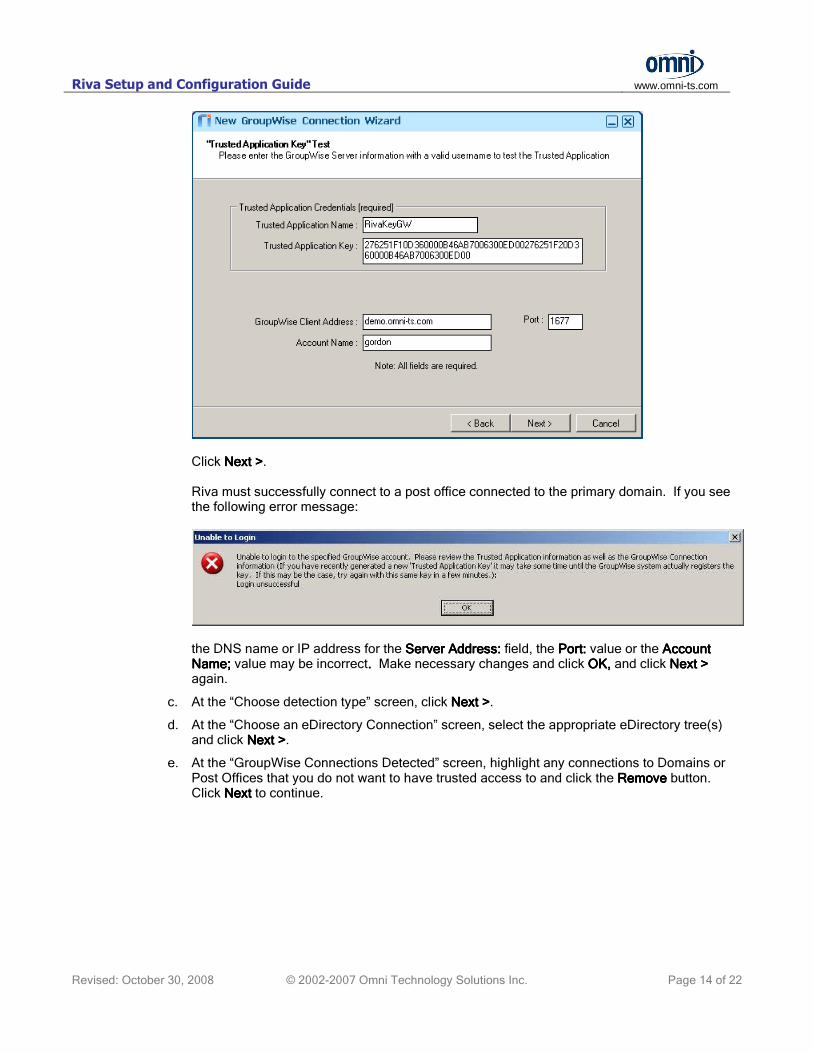
4. GroupWise Connection Wizard (Part 2) GroupWise Connection Wizard (Part 2) GroupWise Connection Wizard (Part 2) GroupWise Connection Wizard (Part 2) – after the trusted application key has been created and registered in the GroupWise system, the next steps are to configure and confirm the operation of the Trusted Application Key.
a. At the “Trusted Application Key” test screen, the “Trusted Application Credentials” will be displayed. Specify the:
• Server AddressServer AddressServer AddressServer Address:::: DNS name or IP address of the server hosting the Post Office of the GroupWise account that will be using Riva
• Port:Port:Port:Port: 1677 is displayed by default. Modify this value to match the port value of the Post Office
b. AccAccAccAccount Name:ount Name:ount Name:ount Name: specify the GroupWise login name of the account that will be used by the key. This can be the name of any user. The account does not require supervisor rights.
Riva Setup and Configuration Guide
www.omni-ts.com
Revised: October 30, 2008 © 2002-2007 Omni Technology Solutions Inc. Page 14 of 22
Click NextNextNextNext > > > >. Riva must successfully connect to a post office connected to the primary domain. If you see the following error message:
the DNS name or IP address for the Server Address: Server Address: Server Address: Server Address: field, the Port: Port: Port: Port: value or the Account Account Account Account Name; Name; Name; Name; value may be incorrect. . . . Make necessary changes and click OK, OK, OK, OK, and click NextNextNextNext > > > > again.
c. At the “Choose detection type” screen, click Next Next Next Next > > > >.
d. At the “Choose an eDirectory Connection” screen, select the appropriate eDirectory tree(s) and click NextNextNextNext > > > >.
e. At the “GroupWise Connections Detected” screen, highlight any connections to Domains or Post Offices that you do not want to have trusted access to and click the RemoveRemoveRemoveRemove button. Click NextNextNextNext to continue.

Riva Setup and Configuration Guide
www.omni-ts.com
Revised: October 30, 2008 © 2002-2007 Omni Technology Solutions Inc. Page 15 of 22
f. (Optional) At the “Automatic Configuration Results” window, click Manually add a GroupWise Manually add a GroupWise Manually add a GroupWise Manually add a GroupWise External DomainExternal DomainExternal DomainExternal Domain button to add an external GroupWise domain (which must be configured in the existing detected GroupWise system (check ConsoleOne if necessary).
Click Add > Add > Add > Add > to add the external domain.
Riva Setup and Configuration Guide
www.omni-ts.com
Revised: October 30, 2008 © 2002-2007 Omni Technology Solutions Inc. Page 16 of 22
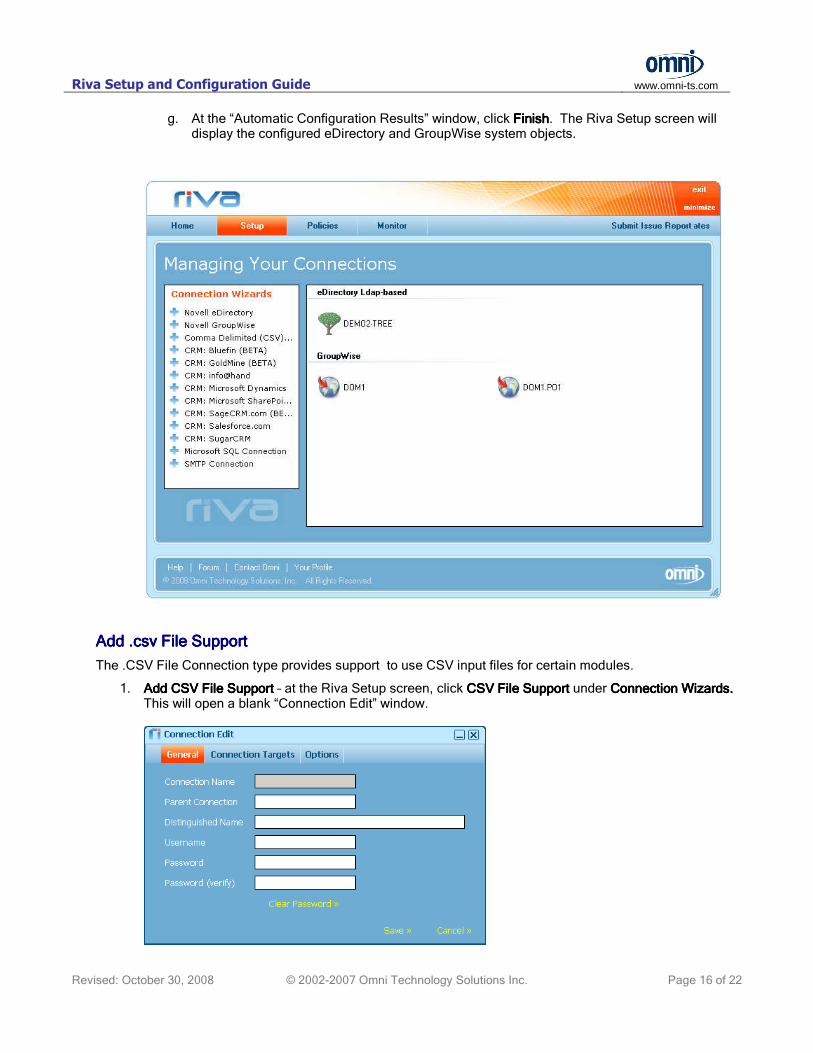
g. At the “Automatic Configuration Results” window, click FinishFinishFinishFinish. The Riva Setup screen will display the configured eDirectory and GroupWise system objects.
Add .csv File SupportAdd .csv File SupportAdd .csv File SupportAdd .csv File Support
The .CSV File Connection type provides support to use CSV input files for certain modules.
1. Add CSV File SupportAdd CSV File SupportAdd CSV File SupportAdd CSV File Support – at the Riva Setup screen, click CSVCSVCSVCSV File Support File Support File Support File Support under Connection WizardsConnection WizardsConnection WizardsConnection Wizards. . . . This will open a blank “Connection Edit” window.

Riva Setup and Configuration Guide
www.omni-ts.com
Revised: October 30, 2008 © 2002-2007 Omni Technology Solutions Inc. Page 17 of 22
2. Click Save >>Save >>Save >>Save >> to add a CSV FilesCSV FilesCSV FilesCSV Files connector.
Riva Setup and Configuration Guide
www.omni-ts.com
Revised: October 30, 2008 © 2002-2007 Omni Technology Solutions Inc. Page 18 of 22
How to ModifyHow to ModifyHow to ModifyHow to Modify System Connections System Connections System Connections System Connections
ModifyModifyModifyModify Host IP Address Host IP Address Host IP Address Host IP Address or Port Value or Port Value or Port Value or Port Value or Use SSL or Use SSL or Use SSL or Use SSL
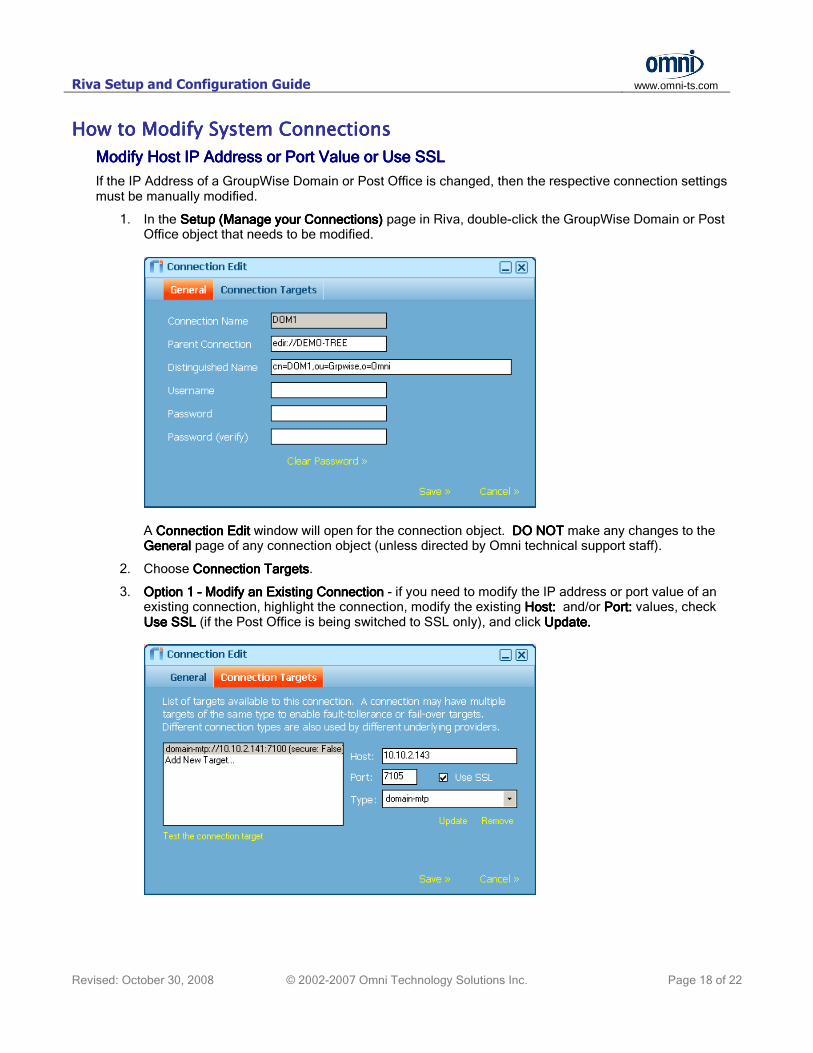
If the IP Address of a GroupWise Domain or Post Office is changed, then the respective connection settings must be manually modified.
1. In the Setup (Manage your Connections) Setup (Manage your Connections) Setup (Manage your Connections) Setup (Manage your Connections) page in Riva, double-click the GroupWise Domain or Post Office object that needs to be modified.
A Connection Edit Connection Edit Connection Edit Connection Edit window will open for the connection object. DO NOT DO NOT DO NOT DO NOT make any changes to the General General General General page of any connection object (unless directed by Omni technical support staff).
2. Choose Connection TargetsConnection TargetsConnection TargetsConnection Targets.
3. Option 1 Option 1 Option 1 Option 1 –––– Modify an Existing Connection Modify an Existing Connection Modify an Existing Connection Modify an Existing Connection - if you need to modify the IP address or port value of an existing connection, highlight the connection, modify the existing Host: Host: Host: Host: and/or Port: Port: Port: Port: values, check Use SSL Use SSL Use SSL Use SSL (if the Post Office is being switched to SSL only), and click Update.Update.Update.Update.

Riva Setup and Configuration Guide
www.omni-ts.com
Revised: October 30, 2008 © 2002-2007 Omni Technology Solutions Inc. Page 19 of 22
4. Option 2 Option 2 Option 2 Option 2 –––– Add an Additional Connection Add an Additional Connection Add an Additional Connection Add an Additional Connection – if you need to add a connection to an existing object to support non-SSL and SSL connections, highlight Add New TargetAdd New TargetAdd New TargetAdd New Target, add in the values for Host:Host:Host:Host: and Port:Port:Port:Port:, check Use SSLUse SSLUse SSLUse SSL, select domaindomaindomaindomain----mtp mtp mtp mtp (for a Domain) or client client client client (for a Post Office), and click UpdateUpdateUpdateUpdate.
5. Click Save >> Save >> Save >> Save >> to save the connection settings and close the Connection Edit Connection Edit Connection Edit Connection Edit window.
6. Close and restart the Riva application to use the modified connection settings.
Add Add Add Add a a a a SOAP ConnectionSOAP ConnectionSOAP ConnectionSOAP Connection
Riva now supports SOAP connections to Post Offices for use with Riva modules and reports that use SOAP (limited to GroupWise 7.x or higher systems). When the Connection wizard is run, the GroupWise System wizard detects which version each Post Office is, and it will add SOAP connections to all Post Office connection objects that are running version 7 databases.
If Riva has been upgraded from an earlier version that did not include SOAP support, or the GroupWise system has been upgraded from 6.x to 7.x after Riva was installed and configured, SOAP connections will need to be added to the Riva Post Office connection objects.
1. Ensure that SOAP had been enabled and configured in ConsoleOne for the applicable Post Office objects. Record the IP address and Port values for SOAP support.
2. In the Setup (Manage your Connections) Setup (Manage your Connections) Setup (Manage your Connections) Setup (Manage your Connections) page in Riva, double-click the GroupWise Post Office object that needs to be modified.
3. Select Connection TargetsConnection TargetsConnection TargetsConnection Targets.
4. Select Add New Target . . . Add New Target . . . Add New Target . . . Add New Target . . . and add the values for Host: Host: Host: Host: and Port:, Port:, Port:, Port:, check Use SSL Use SSL Use SSL Use SSL (if applicable), choose

Riva Setup and Configuration Guide
www.omni-ts.com
Revised: October 30, 2008 © 2002-2007 Omni Technology Solutions Inc. Page 20 of 22
5. Click Update Update Update Update and Save >> Save >> Save >> Save >> to save the new connection and close the Connection Edit Connection Edit Connection Edit Connection Edit window....
6. Close and restart the Riva application to use the modified connection settings.

Riva Setup and Configuration Guide
www.omni-ts.com
Revised: October 30, 2008 © 2002-2007 Omni Technology Solutions Inc. Page 21 of 22
Support for RivaSupport for RivaSupport for RivaSupport for Riva
Reporting a Technical IssueReporting a Technical IssueReporting a Technical IssueReporting a Technical Issue
Riva CRM Enterprise Edition includes a “Submit Issue Report” feature in the program. If you experience a problem with the application, click the Submit Issue ReportSubmit Issue ReportSubmit Issue ReportSubmit Issue Report link and complete the form. Please ensure that you include the correct contact information. Once the OK OK OK OK button is clicked, Riva CRM Enterprise Edition will send this issue and a copy of the application logs to our technical support team.
.
Upgrade and Upgrade and Upgrade and Upgrade and Maintenance Maintenance Maintenance Maintenance Support Support Support Support AgreementsAgreementsAgreementsAgreements
Customers who have current upgrade and maintenance support contracts are eligible to receive full email and telephone support Monday to Friday between 9:00 a.m. and 5:00 p.m. Mountain Time. Limited email support may be available during extended hours. Email and telephone support is also available to customers who are evaluating Riva. 365x7x24 support is available for optional purchase.
Free SupFree SupFree SupFree Supportportportport
Free support is limited to information available from our support forum, our web site and information contained in the user manual. Telephone and email support for customers who do not have a current support contract can be provided on a fee per incident or fee per hour basis, whichever is greater.
Riva Setup and Configuration Guide
www.omni-ts.com
Revised: October 30, 2008 © 2002-2007 Omni Technology Solutions Inc. Page 22 of 22
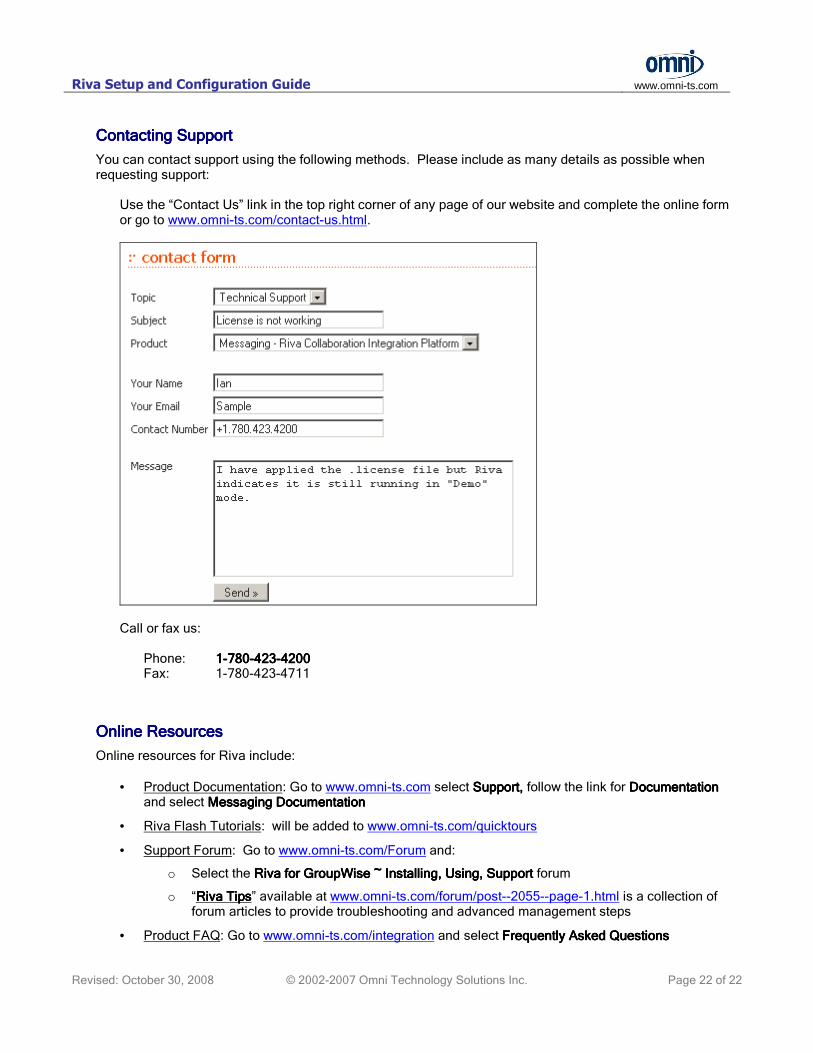
Contacting SupportContacting SupportContacting SupportContacting Support
You can contact support using the following methods. Please include as many details as possible when requesting support:
Use the “Contact Us” link in the top right corner of any page of our website and complete the online form or go to www.omni-ts.com/contact-us.html.
Call or fax us: Phone: 1111----780780780780----423423423423----4200420042004200 Fax: 1-780-423-4711
Online ResourcesOnline ResourcesOnline ResourcesOnline Resources
Online resources for Riva include:
• Product Documentation: Go to www.omni-ts.com select Support, Support, Support, Support, follow the link for DocumentationDocumentationDocumentationDocumentation and select Messaging DocumentationMessaging DocumentationMessaging DocumentationMessaging Documentation
• Riva Flash Tutorials: will be added to www.omni-ts.com/quicktours
• Support Forum: Go to www.omni-ts.com/Forum and:
o Select the Riva for GroupWise ~ Installing, Using, SupportRiva for GroupWise ~ Installing, Using, SupportRiva for GroupWise ~ Installing, Using, SupportRiva for GroupWise ~ Installing, Using, Support forum
o “RivaRivaRivaRiva Tips Tips Tips Tips” available at www.omni-ts.com/forum/post--2055--page-1.html is a collection of forum articles to provide troubleshooting and advanced management steps
• Product FAQ: Go to www.omni-ts.com/integration and select Frequently Asked QuestionsFrequently Asked QuestionsFrequently Asked QuestionsFrequently Asked Questions


![Novell Groupwise Windermere[1]](https://img.dokumen.tips/doc/110x75/55cf9714550346d0338fa633/novell-groupwise-windermere1.jpg)