Embed Size (px)
Citation preview
2
Contents
GB MANUAL GEWA CONTROL TOOL ............................................................. 12
INTRODUCTION.............................................................................................................. 12 COMPATIBLE PRODUCTS................................................................................................ 12 INSTALLING GEWA CONTROL PROG.............................................................................. 13 CONNECTING AN IR TRANSMITTER TO A COMPUTER...................................................... 14 DESCRIPTION................................................................................................................. 15 EDITING IR TRANSMITTER............................................................................................. 16
Copying IR code from one key to another key.......................................................... 16 Copying IR code from a backup file to another IR transmitter................................ 17 Saving key information ............................................................................................. 18 Adding keyboard commands..................................................................................... 19

3
12
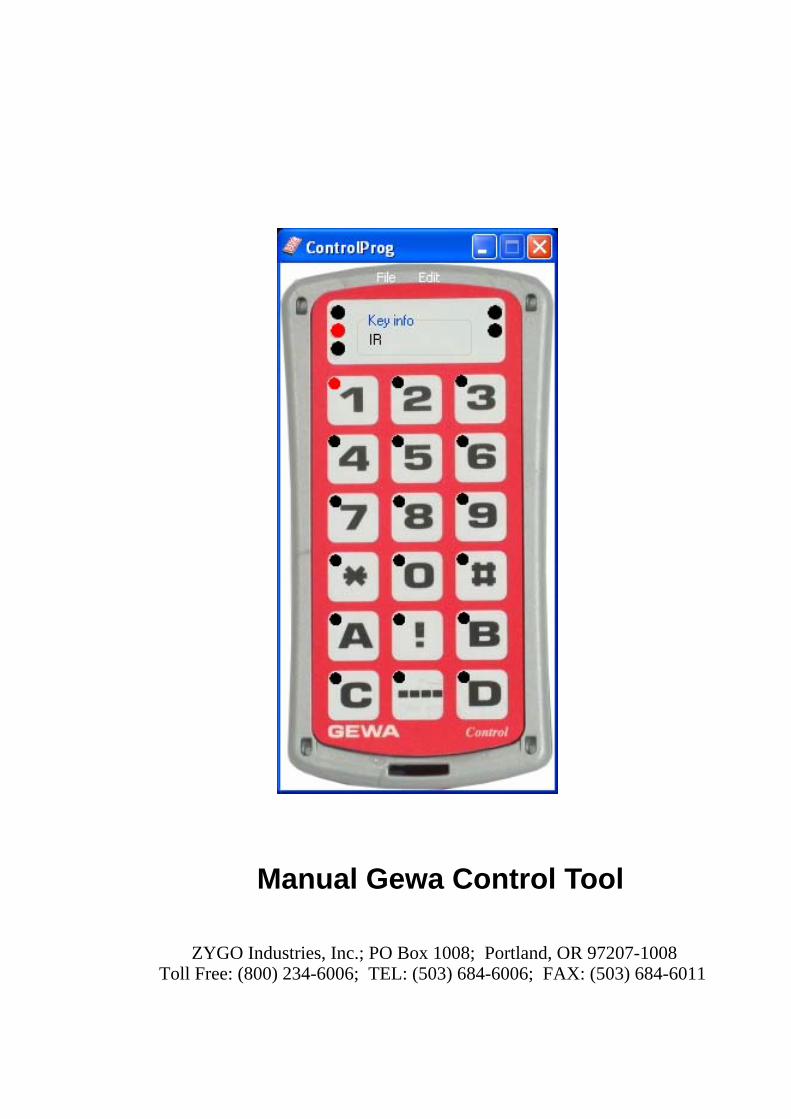
GB Manual Gewa Control Tool
Introduction Gewa Control Tool is a tool used to make backup and edit IR channels on programmable IR transmitters.
Compatible products The following IR transmitters are compatible with Gewa Control Tool: 425700 Control Prog 425718 Control 18 425710 Control 10 4256 Gewa Prog III (backup-file from GP-III ver. 2.x and 3.x can be converted to Control Prog, GP-III Mod) 422900 IR-17SP (backup-file fom IR-17SP ver. 2.x, and 3.x can be converted to Control 18) 422400 IR-9SP (backup-file from IR-9SP ver. 2.x and 3.x can be converted to Control 10) 4069 IR-5SP 425613 GP-III Module 6610 Access Medi Scan 6600 Access Maxi 425615 Control Star USB 425638 Control Micro USB 425315 Progress Star USB 425346 Progress Micro USB
13
Installing Gewa Control Prog To avoid problems when starting up software and hardware, it is important to follow the installation guide. Note! Start by installing the software before connecting any IR transmitter. Gewa Control Tool is compatible with Win98 second edition, Win 2000 and Win XP. Install software and hardware by the following procedure:
1. Insert the CD Gewa Control Tool in the CD unit on the computer. Wait until an installation quide is shown on the screen. It might take a few seconds. If the installation guide is not shown: Go to Start-menu, Select Drive and write D:\setup (exchange D if the CD unit has another designation). Click on OK. Follow the installation guide.
2. Connect an IR-transmitter to the USB-port on the computer or the Serial port when an instruction is given (see "Connecting IR transmitter to the computer"). Begin by installing the Driver for the USB Serial Converter and then the driver for the USB Serial Port. Select automatic installation. When installing in Win98 it must be specified that you must pick up drivers from the CD, path D:\Drivers\w98_w2k_wxp. If drivers are already installed this section will be neglected.
3. Remove the CD from the CD-unit.
14
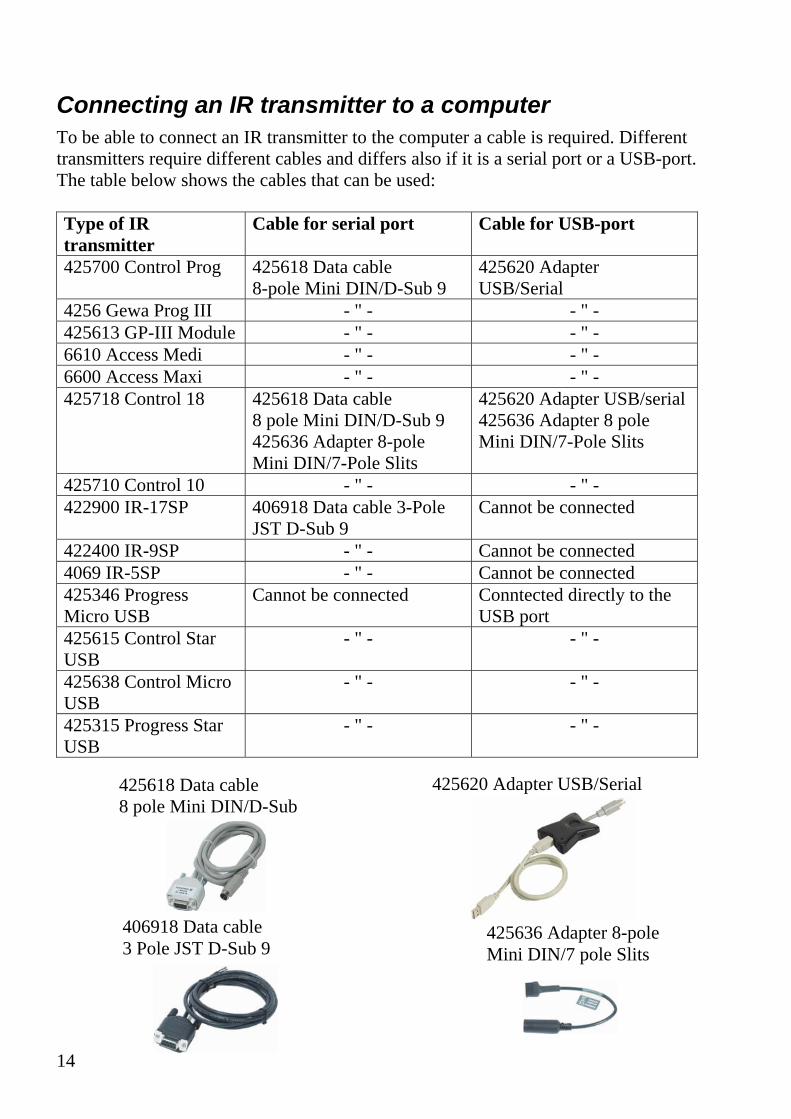
Connecting an IR transmitter to a computer To be able to connect an IR transmitter to the computer a cable is required. Different transmitters require different cables and differs also if it is a serial port or a USB-port. The table below shows the cables that can be used: Type of IR transmitter
Cable for serial port Cable for USB-port
425700 Control Prog
425618 Data cable 8-pole Mini DIN/D-Sub 9
425620 Adapter USB/Serial
4256 Gewa Prog III - " - - " - 425613 GP-III Module - " - - " - 6610 Access Medi - " - - " - 6600 Access Maxi - " - - " - 425718 Control 18 425618 Data cable
8 pole Mini DIN/D-Sub 9 425636 Adapter 8-pole Mini DIN/7-Pole Slits
425620 Adapter USB/serial 425636 Adapter 8 pole Mini DIN/7-Pole Slits
425710 Control 10 - " - - " - 422900 IR-17SP 406918 Data cable 3-Pole
JST D-Sub 9 Cannot be connected
422400 IR-9SP - " - Cannot be connected 4069 IR-5SP - " - Cannot be connected 425346 Progress Micro USB
Cannot be connected Conntected directly to the USB port
425615 Control Star USB
- " - - " -
425638 Control Micro USB
- " - - " -
425315 Progress Star USB
- " - - " -
425618 Data cable 8 pole Mini DIN/D-Sub
406918 Data cable 3 Pole JST D-Sub 9
425620 Adapter USB/Serial
425636 Adapter 8-pole Mini DIN/7 pole Slits
15
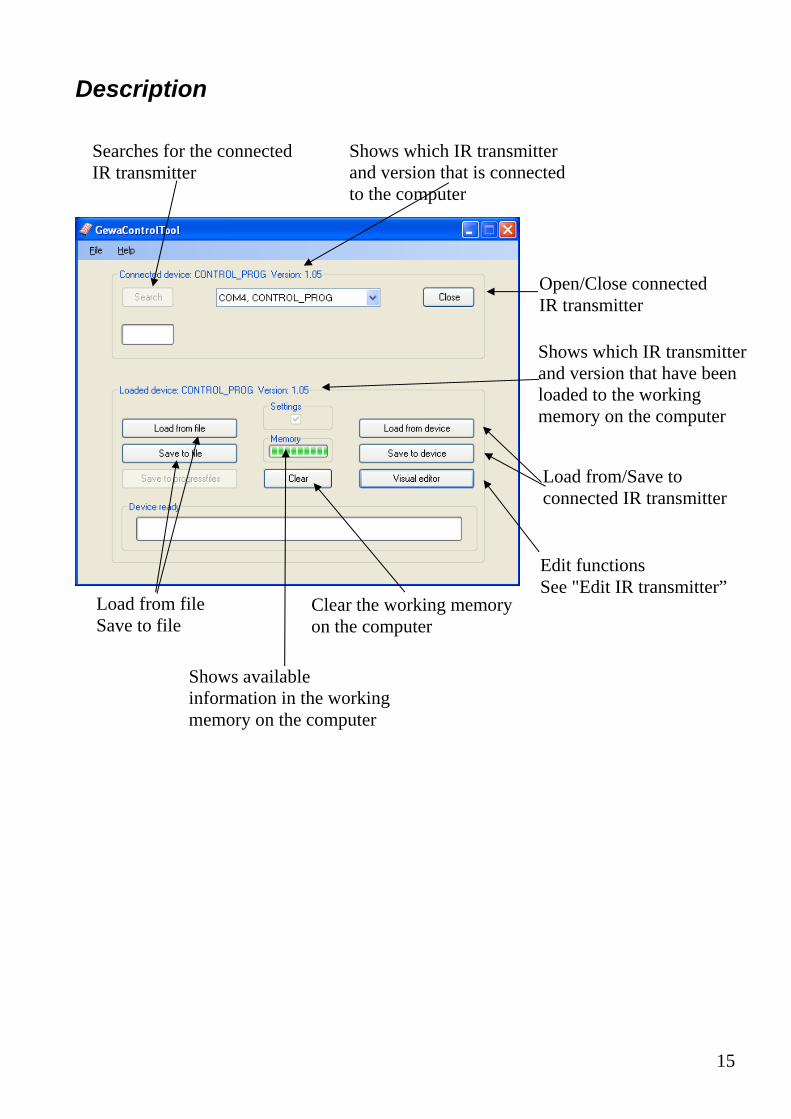
Description
Shows which IR transmitter and version that have been loaded to the working memory on the computer
Edit functions See "Edit IR transmitter”
Searches for the connected IR transmitter
Open/Close connected IR transmitter
Load from/Save to connected IR transmitter
Shows which IR transmitter and version that is connected to the computer
Load from file Save to file
Clear the working memory on the computer
Shows available information in the working memory on the computer
16
Editing IR transmitter If you click on the button "Visual editor" you enter a new window where you can see:
• copy IR code from one key to another key irrespective of level • copy IR code from the backup file to another key on another IR transmitter • name every key • add keyboard commands
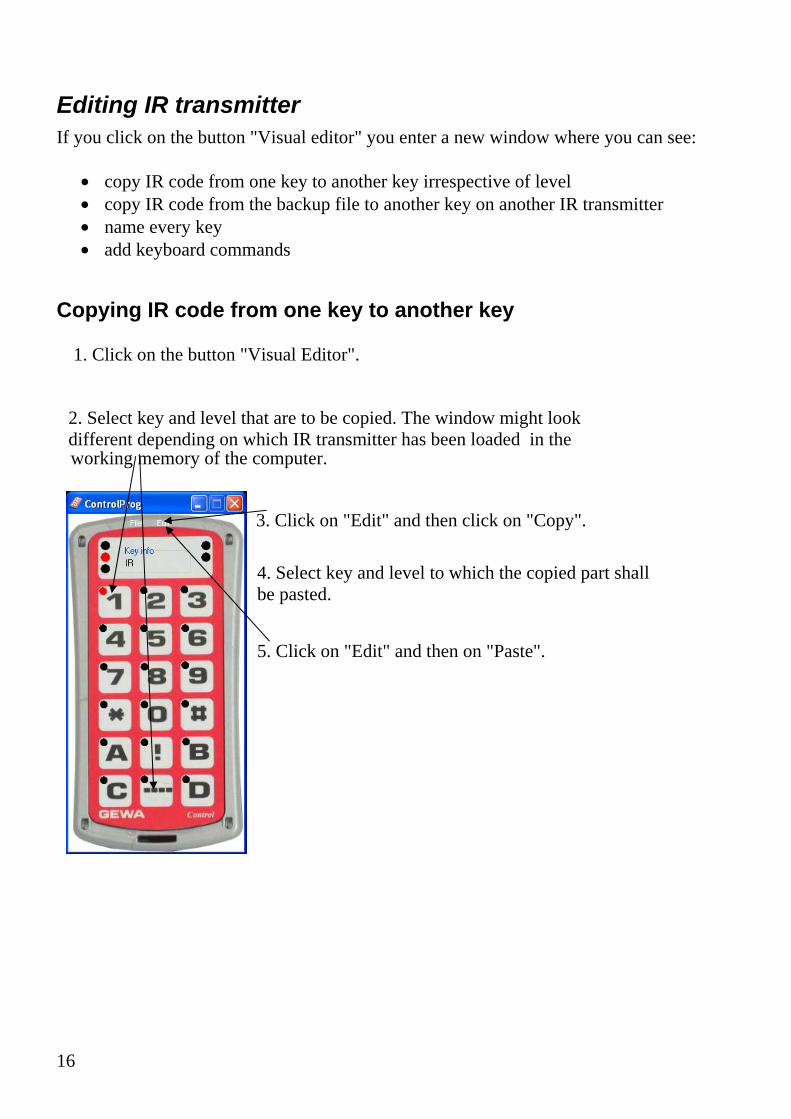
Copying IR code from one key to another key
1. Click on the button "Visual Editor".
2. Select key and level that are to be copied. The window might look different depending on which IR transmitter has been loaded in the
working memory of the computer.
3. Click on "Edit" and then click on "Copy".
4. Select key and level to which the copied part shall be pasted.
5. Click on "Edit" and then on "Paste".
17
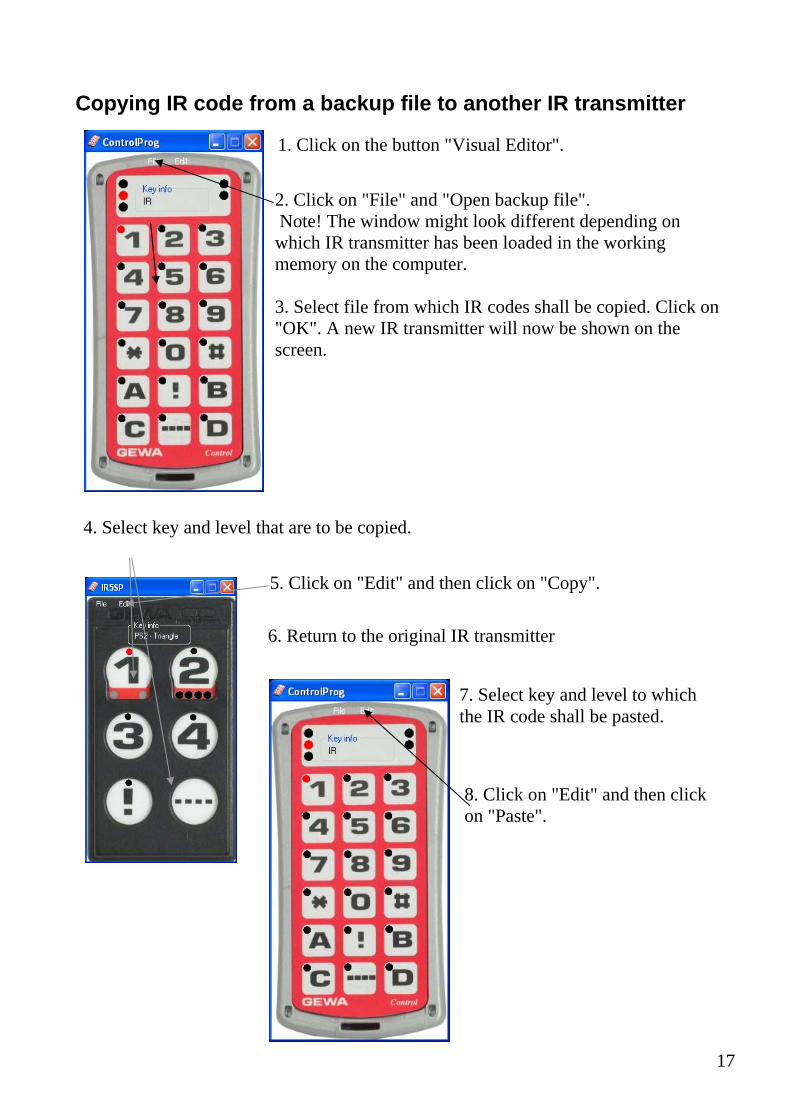
Copying IR code from a backup file to another IR transmitter
2. Click on "File" and "Open backup file". Note! The window might look different depending on which IR transmitter has been loaded in the working memory on the computer. 3. Select file from which IR codes shall be copied. Click on "OK". A new IR transmitter will now be shown on the screen.
6. Return to the original IR transmitter
5. Click on "Edit" and then click on "Copy".
1. Click on the button "Visual Editor".
4. Select key and level that are to be copied.
7. Select key and level to which the IR code shall be pasted.
8. Click on "Edit" and then click on "Paste".
18
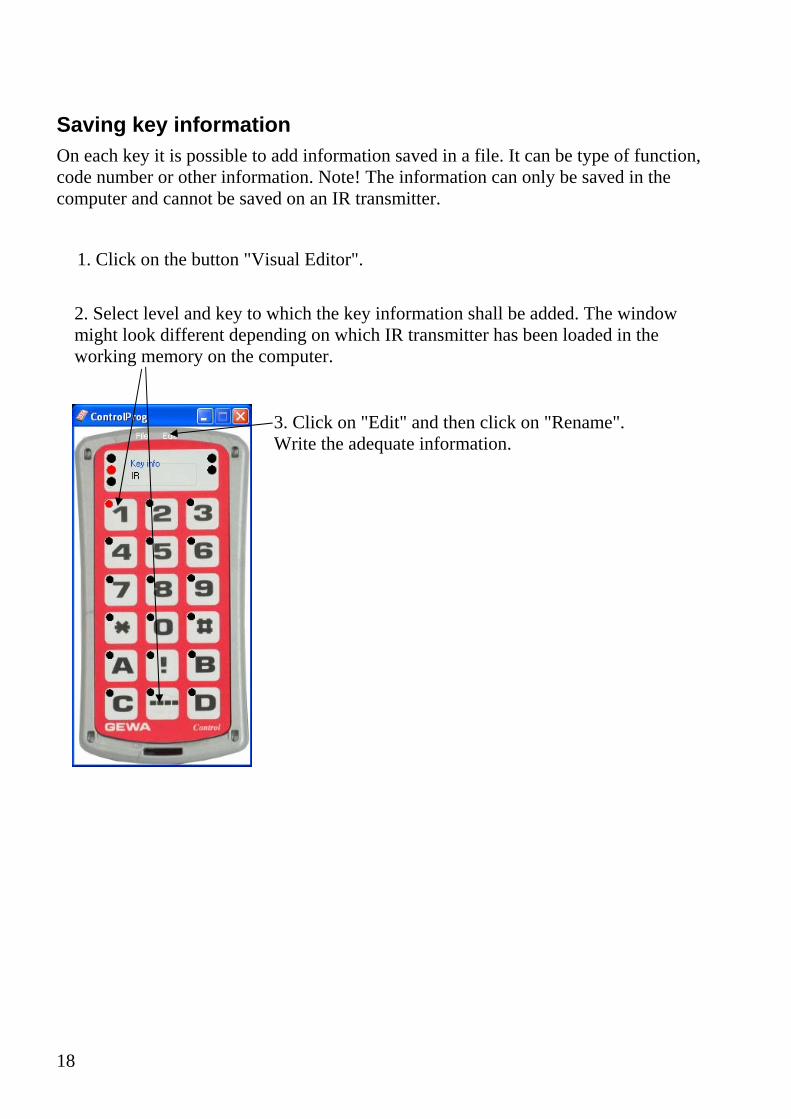
Saving key information On each key it is possible to add information saved in a file. It can be type of function, code number or other information. Note! The information can only be saved in the computer and cannot be saved on an IR transmitter.
1. Click on the button "Visual Editor".
2. Select level and key to which the key information shall be added. The window might look different depending on which IR transmitter has been loaded in the working memory on the computer.
3. Click on "Edit" and then click on "Rename". Write the adequate information.
19
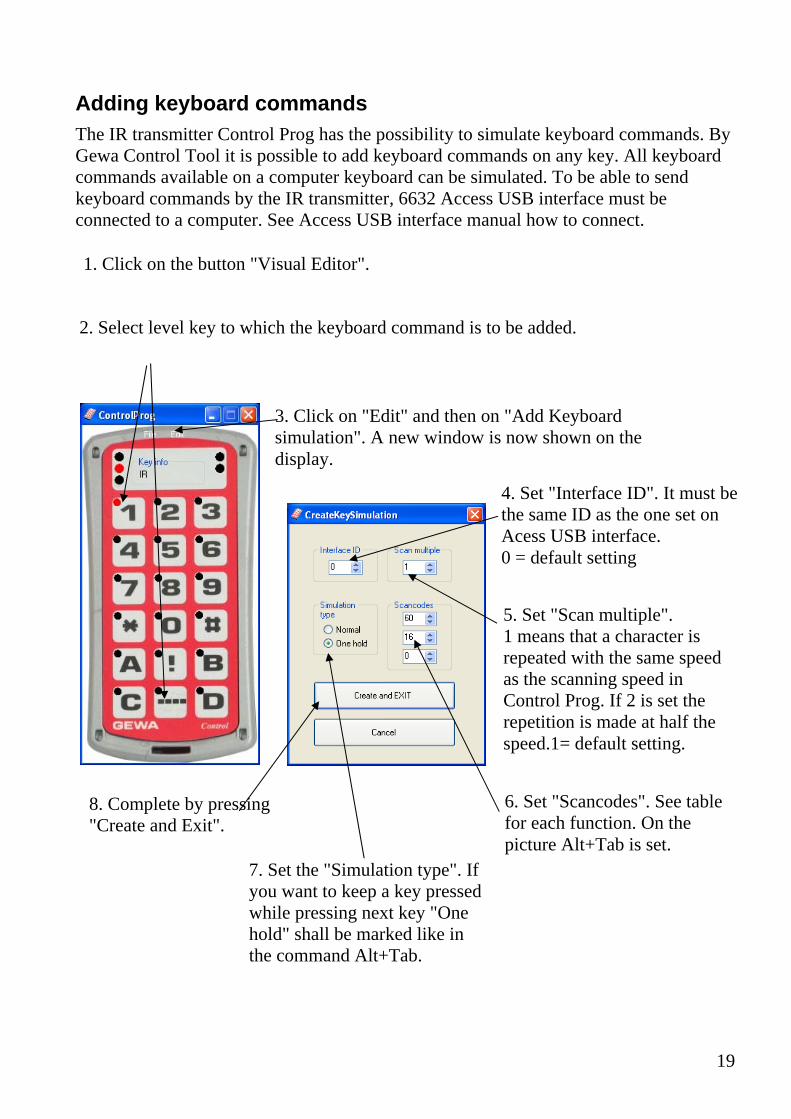
Adding keyboard commands The IR transmitter Control Prog has the possibility to simulate keyboard commands. By Gewa Control Tool it is possible to add keyboard commands on any key. All keyboard commands available on a computer keyboard can be simulated. To be able to send keyboard commands by the IR transmitter, 6632 Access USB interface must be connected to a computer. See Access USB interface manual how to connect.
1. Click on the button "Visual Editor".
2. Select level key to which the keyboard command is to be added.
3. Click on "Edit" and then on "Add Keyboard simulation". A new window is now shown on the display.
4. Set "Interface ID". It must be the same ID as the one set on Acess USB interface. 0 = default setting
5. Set "Scan multiple". 1 means that a character is repeated with the same speed as the scanning speed in Control Prog. If 2 is set the repetition is made at half the speed.1= default setting.
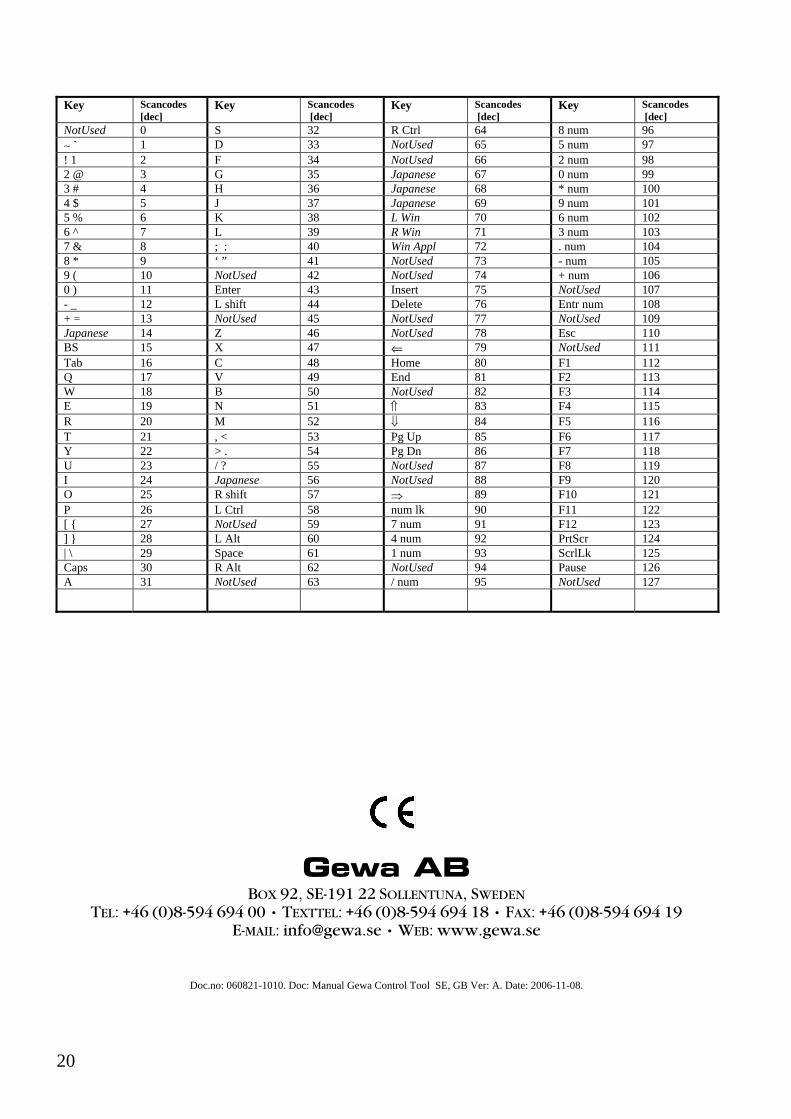
6. Set "Scancodes". See table for each function. On the picture Alt+Tab is set.
7. Set the "Simulation type". If you want to keep a key pressed while pressing next key "One hold" shall be marked like in the command Alt+Tab.
8. Complete by pressing "Create and Exit".
20
Key Scancodes
[dec] Key Scancodes
[dec] Key Scancodes
[dec] Key Scancodes
[dec] NotUsed 0 S 32 R Ctrl 64 8 num 96 ∼ ` 1 D 33 NotUsed 65 5 num 97 ! 1 2 F 34 NotUsed 66 2 num 98 2 @ 3 G 35 Japanese 67 0 num 99 3 # 4 H 36 Japanese 68 * num 100 4 $ 5 J 37 Japanese 69 9 num 101 5 % 6 K 38 L Win 70 6 num 102 6 ^ 7 L 39 R Win 71 3 num 103 7 & 8 ; : 40 Win Appl 72 . num 104 8 * 9 ‘ ” 41 NotUsed 73 - num 105 9 ( 10 NotUsed 42 NotUsed 74 + num 106 0 ) 11 Enter 43 Insert 75 NotUsed 107 - _ 12 L shift 44 Delete 76 Entr num 108 + = 13 NotUsed 45 NotUsed 77 NotUsed 109 Japanese 14 Z 46 NotUsed 78 Esc 110 BS 15 X 47 ⇐ 79 NotUsed 111 Tab 16 C 48 Home 80 F1 112 Q 17 V 49 End 81 F2 113 W 18 B 50 NotUsed 82 F3 114 E 19 N 51 ⇑ 83 F4 115 R 20 M 52 ⇓ 84 F5 116 T 21 , < 53 Pg Up 85 F6 117 Y 22 > . 54 Pg Dn 86 F7 118 U 23 / ? 55 NotUsed 87 F8 119 I 24 Japanese 56 NotUsed 88 F9 120 O 25 R shift 57 ⇒ 89 F10 121 P 26 L Ctrl 58 num lk 90 F11 122 [ { 27 NotUsed 59 7 num 91 F12 123 ] } 28 L Alt 60 4 num 92 PrtScr 124 | \ 29 Space 61 1 num 93 ScrlLk 125 Caps 30 R Alt 62 NotUsed 94 Pause 126 A 31 NotUsed 63 / num 95 NotUsed 127
Gewa AB BOX 92, SE-191 22 SOLLENTUNA, SWEDEN
TEL: +46 (0)8-594 694 00 • TEXTTEL: +46 (0)8-594 694 18 • FAX: +46 (0)8-594 694 19 E-MAIL: [email protected] • WEB: www.gewa.se
Doc.no: 060821-1010. Doc: Manual Gewa Control Tool SE, GB Ver: A. Date: 2006-11-08.