Embed Size (px)
Citation preview

DIABETES MANAGEMENT SOFTWARE
• Display meter readings
• View a variety of reports
• Personalize meter settings
• Easy-to-use database
1600 Sherwin Ave.Des Plaines, IL 60018T 847.296.6000
July 13, 2009Bayer Health CareGlucofacts Deluxe UG - 510(K) 473610A0481697362 Rev. 02/09N/A11.0" (H) x 8.5" (W)N/A
New Layout - Glucofacts Deluse QRGAlt#1 - 6/09/2009 - Copy ChangesAlt#2 - 6/16/2009 - Image ChangeAlt#3 - 7/13/2009 - Copy Changes
DATE:
CLIENT:
DESCRIPTION:
SCHAWK JOB#:
BAN#:
SKU#:
BAYER SPEC:
UPC CODE:
V-3 ENGLISH
PROCESS CYANPROCESS MAGENTAPROCESS YELLOWPROCESS BLACK
COLORSHelvetica, Times, Trade Gothic
FONTS
USER GUIDE
For use with Bayer’s CONTOUR® (including DIDGET™ where available) and BREEZE® meter families

Introduction
GLUCOFACTS® DELUXE software is intended for use by Health Care Professionals and patients with diabetes for viewing and printing reports that display blood sugar readings from Bayer’s CONTOUR® and BREEZE® meter families and Bayer’s DIDGET™ meter (*where available). When the software is installed on a personal computer, a database is available to store multiple users’ profiles and their meter readings. The GLUCOFACTS DELUXE reports can be customized to display meter readings by specific dates and includes trends and summaries. There are also options for customizing the report ranges for Above Target, Target, and Below Target blood sugar readings, and setting the daily time periods. Your reports will display the unit of measure from your meter - either mmol/L or mg/dL. Any screen images in this document are merely examples. GLUCOFACTS DELUXE makes meter setting changes easy for all supported meters. You can set time format (24 or 12 hour), date format and sound Off or On. If your Contour meter allows you to set target ranges and change alarms settings or optional levels, these changes can be make from GLUCOFACTS DELUXE. In addition, on those CONTOUR meters that allow setting Target ranges, changing alarm settings, or optional levels, these changes can be easily made from your GLUCOFACTS DELUXE screen.
Additional Materials Needed:
Bayer’s CONTOUR® and Bayer’s BREEZE® meter families and Bayer’s DIDGET* meters (where available) are compatible with the GLUCOFACTS DELUXE application.
An appropriate cable from Bayer to connect your meter with your computer. This can be Bayer’s serial cable – connected to a serial/pin port on your computer, or Bayer’s USB cable – connected to a USB port on your computer.
NOTES: Bayer’s CONTOUR® USB meter includes an extension cable in your meter kit for added convenience, and Bayer’s DIDGET meter includes a cable in the meter kit.
A computer with the following:
o Microsoft® Windows XP SP3, or Vista® SP2 operating system Java®1.6.0_07 or higher Hardware requirements ---
PC with a USB or Serial port, and a CD drive (if using CD installation), or internet connection (if using internet download installation).
o Mac® OS 10.5.7 or later and an intel-based 64 bit processor Mac is only an option for the Contour USB meter.
Java® SE 6 or higher (by Sun Microsystems Inc.) Hardware requirements ---
Mac with a USB port, and a CD drive (if using CD installation), or internet connection (if using internet download installation).
* Bayer’s DIDGET™ meter is available in limited countries pending regulatory clearance.
Bayer’s GLUCOFACTS® DELUXE Software User Guide

Installing GLUCOFACTS® DELUXE 1 Welcome to GLUCOFACTS® DELUXE 2 Connecting a Meter 3
Connect a Meter to a Computer 3 Order a Cable from Bayer 4 Designate COM Ports 4
Downloading a Meter 5 Automatic Meter Detection 5 Add a New Person 6 Associate a Meter to a Person 6 View or Print Reports Without Setting up a Person in the Database 7
GLUCOFACTS® DELUXE Reports 8 View Reports 8 Report Definitions 9 Change the Date Range Used for GLUCOFACTS® DELUXE Reports 10 View Details About Readings on a Report 10 View Same Day or Same Week Readings in a Report 10 Manually Add a Blood Sugar Reading or HbA1c to a Person’s Record 11 Add a Note to a Blood Sugar Reading in the Logbook 11 Edit or Delete an Entry in a Person’s Logbook 11 Print a Report 12 Change Settings for Automatically Printed Reports 12 Save or Export a Report as a PDF (Adobe Acrobat®) File 12 View Blood Sugar Reading Details in a Report 12
Personal Settings 13 Find a Person in GLUCOFACTS® DELUXE 13 Change the Sorting Order of the People List 13 Set Personal Blood Sugar Ranges 14 Customize a Person’s Daily Time Periods 14 Change a Meter’s Blood Sugar Ranges to Match GLUCOFACTS® DELUXE 15 Change Meter Settings 15 Change Software to Match Individual Meter Settings 15
System Settings 16 GLUCOFACTS® DELUXE product updates 16 View and Change System Settings 16 Setup Automatic Downloading and Report Printing 16 Change the Blood Sugar Ranges Used for All GLUCOFACTS® DELUXE reports 17 Change the Daily Time Period Settings Used for GLUCOFACTS® DELUXE Reports 18 Associate Meter Data with a Temporary Person 18 Change the language used in GLUCOFACTS® DELUXE 18
Bayer’s GLUCOFACTS® DELUXE Software User Guide

CONTOUR® USB Settings in GLUCOFACTS® DELUXE 19 Personalize Meter Profile 19 Change Personal Daily Time Periods 19 Change Overall Blood Sugar Target Settings Currently in the Meter 20 Change Blood Sugar Targets on your Meter 20 Printing a Report 21 Printing Reports Automatically 21 Change Meter Formats and Settings 21 Change Meter Trend Settings 22 Change Hyper / Hypo Limits in the Meter 22
System / Utilities 23 GLUCOFACTS® DELUXE Product Updates 23 Remove the GLUCOFACTS® DELUXE Application 23 Remove a Person From the Application 23 Copy / Import a Person from Bayer’s WinGlucofacts™ software into GLUCOFACTS® DELUXE 24 Create a New Database (if running from a computer – not a Contour USB meter) 25 Create or Use a Different Database of People 25 Location of Database File for GLUCOFACTS® DELUXE 26
Troubleshooting 27 GLUCOFACTS® DELUXE Glossary 34
Glossary 34 Report Definitions 36
Bayer’s GLUCOFACTS® DELUXE Software User Guide

Installing GLUCOFACTS® DELUXE If you have a previous version of WinGlucofacts™ or GLUCOFACTS® EXPRESS installed, GLUCOFACTS DELUXE will not replace that software. You can import the files from your WinGlucofacts software.
To download and install from the internet site, go to www.bayerglucofacts.com and follow the directions on the screens.
Installing from a CD (for PC or Mac) 1. Turn on your computer and insert the Glucofacts Deluxe CD into your computer’s CD drive.
If the installation does not begin automatically, locate the Glucofacts Deluxe 2.01.exe (Glucofacts Deluxe 2.01.mpkg for Mac®) file on the CD and double-click the file to start the installation. Glucofacts Deluxe works with Java® software, and will verify your version of Java. If needed, you will be directed to update your Java version at the Java website. • If you do not have an internet connection, please go to the Java folder on the CD and
double-click the file in that folder to install the Java update. • After the Java update has completed, you must re-start the installation of Glucofacts
Deluxe by finding the Glucofacts Deluxe 2.01.exe file (Glucofacts Deluxe 2.01. mpkg for Mac) on the CD. Double-click the file to re-start the installation.
2. You will be directed through a few screens to set up the location for the database for Glucofacts DELUXE, language choice and other preferences, and the installation will complete.
3. Read the End User License Agreement displayed on your screen, and if you agree, click the “I agree” button.
A shortcut icon will be setup on your desktop for easy access to the application after installation.
Connecting a Meter (Please see the Connecting a Meter section of this User Guide.)
1. If you have Bayer’s USB cable simply follow the installation instructions that came with the USB Cable.
2. If you have Bayer’s CONTOUR® USB meter, simply plug it in using the connector built into the meter.
3. For Bayer’s DIDGET™ meter* (where available), use the cable included with your meter kit. 4. If you have Bayer’s serial or “Y” cable with two different ends, insert the 9-pin connector into
the computer port and the prong end into your BREEZE® or CONTOUR® meter. * Bayer’s DIDGET™ meter is available in limited countries pending regulatory clearance.
Bayer’s GLUCOFACTS® DELUXE Software User Guide Page 1

Welcome to GLUCOFACTS® DELUXE
The Welcome or Home screen of GLUCOFACTS® DELUXE has links to all of the options available.
Bayer’s GLUCOFACTS® DELUXE Software User Guide Page 2

Connecting a Meter Connect a Meter to a Computer GLUCOFACTS® DELUXE supports the CONTOUR® and BREEZE® meter families and Bayer’s DIDGET™ meter (where available).
If you have Bayer’s CONTOUR USB meter, simply plug it into the USB port or use the additional USB cable provided in your meter kit. If you have Bayer’s DIDGET meter (where available), use the cable included in your meter kit.
None of the connection steps listed below are needed for these two meter types.
Locate the appropriate cable for your meter-computer connection. If you do not have a cable, visit the U.S. website www.bayerdiabetesstore.com or call 1-877-716-1733 in the U.S. For all other countries, please refer to the Customer Support contact displayed on your meter’s back label.
Your PC will have a serial port that has 9-pin holes for a serial cable, or a USB port , or both. The cable you use must fit one of the ports available on your PC.
If you are using Bayer’s serial/pin cable:
Serial Cable
With the meter turned OFF, firmly plug the cable into the meter and insert the other end into the computer’s serial/pin port. Your computer should recognize the serial cable without any installation steps. Please verify that your meter plug is inserted completely.
Note: If you are using Bayer’s serial cable (a ‘Y’ cable), only the round metal end fits into the meter.
If you are using Bayer’s USB cable: USB Cable Please follow the instructions received with your USB Cable for first time installation:
Plug the USB connector into the PC’s USB port. This will start the Found New Hardware Wizard.
Insert the CD that is included with your USB cable from Bayer into the computer’s CD drive. The Wizard will guide you through the setup of USB drivers and then you must repeat the steps for the serial drivers. Be sure to follow the instructions from the Wizard and install both sets of drivers.
With the meter turned OFF, completely insert the round metal end of the USB cable into the meter. Please verify that your meter plug is inserted completely.
Note: For your convenience, you can leave your cable from Bayer connected to the computer at all times. Do not leave your meter connected while testing.
Bayer’s GLUCOFACTS® DELUXE Software User Guide Page 3
Order a Cable from Bayer
1. Identify the type of cable you need (serial or USB) for your computer. 2. In the US, you can order a cable directly from www.bayerdiabetesstore.com or call 1-877-
716-1733. 3. Outside the US, please visit www.bayerglucofacts.com , select your country and follow the
corresponding instructions. Note: If an Internet connection is not available, please call the Bayer Diabetes Care Customer Service phone number on the back of your meter.
Designate COM Ports If you are using Bayer’s USB cable or Bayer’s CONTOUR® USB or DIDGET™ meter (where available), you do not have to manually configure the meter-computer connection.
1. Click the Settings button on the top toolbar.
2. Click the tab, and then Click to view all available ports for the computer’s operating system.
3. If you know the COM Ports you want GLUCOFACTS® DELUXE to use, check the “Use” box next to each COM Port.
4. To see which port the meter is connected to: 5. Connect the meter, and turn it on. 6. Click “Scan for Meter”. When GLUCOFACTS® DELUXE detects the meter on a port, it places a
check in the port’s Use column. 7. Select one of the communication options:
• Use only the currently detected meter’s port. (This option is only available if a meter is connected and the application has detected the meter on a port.)
• Scan ALL ports. (This may interfere with other devices connected to your computer.) • Scan only SELECTED ports. (This option is only available if one or more COM Ports
have been checked in the Use column.)
8. Click or click . Note: You can change auto setup at any time.
Bayer’s GLUCOFACTS® DELUXE Software User Guide Page 4

Downloading a Meter Automatic Meter Detection GLUCOFACTS® DELUXE is set to automatically detect a meter whenever it is connected to your
computer. If you would like to change these settings, click the Settings button and you can
change these settings on the tab. NOTE: If you have a CONTOUR® USB meter and run GLUCOFACTS® DELUXE from your meter, your screen will appear differently than shown here. Your buttons will appear a bit differently and you will not have a “View Records” button. Please see the separate section in this User Guide for features specific to the CONTOUR USB meter.
To download your meter’s readings, simply plug it in, and turn the meter on.
NOTES: Your reports will display the unit of measure from your meter - either mmol/L or mg/dL. Any screen images in this document are merely examples. Please do not share your meter with others. Your reports will not be accurate if they contain readings from more than one person.
Bayer’s GLUCOFACTS® DELUXE Software User Guide Page 5

When initially downloading a meter that is not associated with a person, you have four options:
Add a New Person
1. Click the “Add New Person” button. 2. Complete First and Last name fields. These are the only required fields. You can use your
tab key to move from field to field. 3. If you want to add Date of Birth, click the beside each Date of Birth field to open the list of
choices for each. Move the blue scroll bar to browse through the options, or click to move one option at a time. Click on the desired Day, Month, and Year.
4. Complete other fields as desired.
5. Click or click . Note: If a ‘Duplicate Person’ window pops up, the person you saved has the same First Name, Last Name, and Date of Birth of someone already in GLUCOFACTS® DELUXE. To save the new person, you may: Click “Edit Profile”, change one of the identical fields, and save again or Click “Save As Duplicate”, and a number will be added to the end of the Last Name, for example ‘Jane Doe [2]’.
Associate a Meter to a Person
1. From the New Meter Detected dialog box, click Note that this option will not be available if there are no people in database.
2. Follow the instructions on the pop-up box. As you type, all people that may be a match appear on the list.
3. Click on the name in the list to select the person you want, and the name will be copied into the text box.
4. If the name in the text box is correct, click . The meter is now assigned to the person you selected, and your screen will display the person’s reports.
Bayer’s GLUCOFACTS® DELUXE Software User Guide Page 6

View or Print Reports Without Setting up a Person in the Database
If you want to view or print reports for a meter without adding the person to the database, you can. This will create a temporary person in the database for this meter. You can view and print all reports for the temporary person, as well as select the temporary person
from the People list until the next meter is downloaded or you close the application. If you use the “View Reports Only” or “Print Reports Only” again, it will create a new temporary person for that meter. Meter reports will be saved for this temporary person until the next time you choose to View Reports Only or Print Reports only. You can have one temporary person in the database at a time. Until you download another “temporary report”, you can choose to associate this record to a person or set up a new person. To do this, see the links near the top of your screen. Click either the “new profile” or “associate this meter. . .” link if desired.
Please see the System Utilities section of this User Guide for more information about finding a person, editing and adding people, and managing the list of people in your GLUCOFACTS® DELUXE software’s database.
Bayer’s GLUCOFACTS® DELUXE Software User Guide Page 7

GLUCOFACTS® DELUXE Reports View Reports
This is a Logbook Report. Other views are available by selecting one of these links.
NOTE: Your reports will display the unit of measure from your meter - either mmol/L or mg/dL. Any screen images in this document are merely examples. After a successful meter download, you will be automatically directed to the Logbook Report. The features of the report will be similar to the above image. The meter readings will be color coded to show any readings as Above Target (yellow), Target (green), or Below Target (orange).
A legend appears on the right side of the screen explaining the symbols used in the reports. You can view the details about each blood sugar reading by pointing your mouse to the logbook
entry. All readings will appear in the “No Mark” column unless the meter is set up to mark Before Meal
and After Meal. The “No Mark” column indicates that meal markers were not used. There may be other marks in this column such as control test, deleted readings or logbook markers. The
Before and After Meal readings will appear in the column under their symbols. Entries marked in the meter with the Logbook symbol will have a marker or note within the
reading Any control tests will have a marker within the reading. Readings that have been marked as
deleted in the meter (All BREEZE and some CONTOUR meters) will be marked with a in GLUCOFACTS® DELUXE. Please review your meter’s User Guide to confirm whether this applies to your meter.
Bayer’s GLUCOFACTS® DELUXE Software User Guide Page 8

The above image is an example of a Standard Week Report displaying readings from multiple weeks designated by day of the week.
Report Definitions
Trend Report A graph of blood sugar readings by day for a specified date range. Readings marked deleted or control are not included in the report.
Logbook Report A record of meter and manual blood sugar readings by day and time for a specified date range.
Standard Day Report A graph that displays blood sugar readings by time of day as if all readings occurred in one day. Readings marked deleted or control are not included in the report.
Standard Week Report A graph that displays blood sugar readings by day of the week as if all readings in the date range occurred in one week. Readings marked deleted or control are not included in the report.
Summary Report An overview of all meter readings in a specified date range that includes information such as the number of readings; the minimum and maximum blood sugar reading (units); the number of control and deleted readings; and the average blood sugar reading. This can be displayed as a pie chart or a bar chart.
Units of Measure: mmol/L or mg/dL
Your reports will display the unit of measure from your meter - either mmol/L or mg/dL. Any screen images in this document are merely examples.
Bayer’s GLUCOFACTS® DELUXE Software User Guide Page 9

Change the Date Range Used for GLUCOFACTS® DELUXE Reports
1. Click in the upper right corner of the report.
The Change Date Range window shows the ‘From’ and ‘To’ dates that will be used for each option, based on the date of the most recent reading in the meter (not the current date.)
2. Click the desired date range, or click to enter your own date range. Note: The ‘From’ date you enter CANNOT BE EARLIER than the earliest ‘From’ date in the Date Range list. If you enter an unacceptable date, the box will turn red until you enter a valid date.
3. To use the same (non-custom) date range for all GLUCOFACTS® DELUXE reports the next time you download meter readings, check . Note: By default, Glucofacts DELUXE uses ‘Last Month’ as the standard date range for reports. You can change this default by checking ‘Use these settings next time’ before applying your date range.
4. Click to change the date range, or click . Note: The date range you choose for online reports does not change the date range for automatically printed reports. For more information see Change Settings for Automatically Printed Reports.
View Details About Readings on a Report Move your cursor over any data point on a graph or over an entry in the Logbook. A ‘tool tip’ will open and display the date, time, Before Meal or After Meal marker (if applicable), blood sugar value, HbA1c reading (if manually entered), and any other icons associated with this reading, such as:
View Same Day or Same Week Readings in a Report Click a data point on the Standard Day or Standard Week report graph. GLUCOFACTS® DELUXE will connect this reading with all readings that occurred the same day or week, within the selected date range. To disconnect the line, click anywhere in the graph outside a data point.
Bayer’s GLUCOFACTS® DELUXE Software User Guide Page 10

Manually Add a Blood Sugar Reading or HbA1c to a Person’s Record 1. Click the Logbook report tab.
2. Click the icon below the Legend. GLUCOFACTS® DELUXE fills in the date, the time (the start time of the Time Period) and the meal marker based on the cell you selected. You can change these fields if desired.
3. Enter a date or click the calendar icon to select a date from the calendar. If you use the calendar tool, click the desired date and you will be returned to the pop-up window.
4. Enter the time, or click the time tool icon to select the time. 5. Click “OK” to set the time. 6. Enter the blood sugar value. If applicable, select Before Meal or After Meal Marker or No
Mark 7. If desired, enter an HbA1c percent measurement (as one decimal point: example 5.4). 8. Enter any notes or comments in the Comments text box.
9. Click , or click .
Add a Note to a Blood Sugar Reading in the Logbook You can add a note or comment to any entry in the Logbook. 1. Click the Logbook report tab. 2. Click the entry/reading.
3. Click the button on the right side of your screen, below the Legend. 4. Enter your note or comment in the comment box.
5. Click , or click .
Edit or Delete an Entry in a Person’s Logbook Note: Only entries that have been manually added can be deleted.
1. Select the person from the People list.
2. Click the person’s tab to open the most recently viewed report. 3. Click the Logbook tab. 4. Find the entry in the cell and click it to highlight.
5. Click the button below the Legend. 6. Change field values as needed.
7. Click , or click .
Bayer’s GLUCOFACTS® DELUXE Software User Guide Page 11

Print a Report To print a report while you are viewing it follow these steps. This will not affect your automatic printing options. You can print on 8 ½ X 11 inch or A4 paper.
1. Select the person from the list.
2. Click the person’s tab. GLUCOFACTS® DELUXE opens the most recently viewed report.
3. Click the button in the upper right corner of the screen. The report you are viewing is already selected.
4. Click in the box beside each report you wish to print. To de-select a report for printing, click again in the check box.
5. Select one date range for this report. The current date range is already selected but can be changed.
6. Click , or click .
Change Settings for Automatically Printed Reports This will change how your reports will print if you have automatic printing selected in your preferences.
1. Click on the top toolbar.
2. Click the tab. 3. Check the box beside each report you want to print. 4. Click the number of days you would like to print for all selected reports. You may only select
one date range: Last Week, Last 2 Weeks, Last Month, Last 2 Months, or Last 3 Months.
5. Click .To cancel your changes, click .
Save or Export a Report as a PDF (Adobe Acrobat®) File You can save the report as an Adobe Acrobat or PDF file. This will make it easier to send the report via email.
1. Select the person from the list. For detailed instructions, see Find a Person in the
software help or in this User Guide.
2. Click the person’s tab to access the most recently viewed report.
3. Click in the upper right corner of the screen.
4. Select the report and date range, then click . 5. When the Save window displays, change the ‘Save in’ file location if needed. 6. Click Save.
Note: A PDF file can only be viewed or printed with Adobe® Reader®. However, you can print from the software without saving as a PDF.
View Blood Sugar Reading Details in a Report If you move your mouse cursor over any data point on a graph or in the Logbook report, a ‘tool tip’ will appear displaying detailed information for this reading.
Bayer’s GLUCOFACTS® DELUXE Software User Guide Page 12

Personal Settings GLUCOFACTS® DELUXE allows you to change settings for an individual person, keeping the system settings for all others. If you are running GLUCOFACTS® DELUXE from your Contour USB meter, your settings will be different. For Contour USB meters, please see the separate section in this User Guide. Find a Person in GLUCOFACTS® DELUXE
1. Click on the top toolbar. GLUCOFACTS® DELUXE lists all people currently stored in the system. You can move through the list by using the scroll bar on the right or you can search for the person.
2. Type the ID, First Name, Last Name, or Date of Birth in the text box. As you type, Glucofacts® DELUXE lists all the people that are a match.
3. Click on the row to select the person you want. GLUCOFACTS® DELUXE copies the whole row
into the text box.
4. If the name in the text box is correct, click , and the person’s row will be highlighted.
5. Click once on the highlighted row to go to the person’s logbook page. You will see the previously downloaded readings.
NOTE: Any changes made to the settings or meter information for this person will not affect the system settings for other people in the system.
Change the Sorting Order of the People List By default, the People list is sorted in descending order A to Z by Last Name, but you can sort the list in ascending or descending order by any column.
1. Click the People button on the top toolbar. 2. Click on the column header, for example, ‘Date of Birth’.
3. When the small arrow displays in the column header, it will be pointing down or up , 4. To reverse the sort order of the column, click on the heading again.
Bayer’s GLUCOFACTS® DELUXE Software User Guide Page 13

Set Personal Blood Sugar Ranges
1. Select the person from the list.
2. Click the person’s tab.
3. Click the link on the upper left side of your screen.
4. Click in the upper left area of the screen. (It will turn green when selected.)
5. To change the blood sugar ranges, click and drag the slider ‘handles’ , or click the plus (+) and minus (-) signs, or type the target numbers in the white boxes.
In this image, 181 mg/dL is in the Above Target range and 180 mg/dL is in the Target (green) range.
6. Click , or click . The application will use your saved settings instead of the default (standard) settings.
IMPORTANT NOTE: Changes to personal or application settings in GLUCOFACTS® DELUXE do not affect the settings in a person’s meter. They will change how your reports will appear.
Customize a Person’s Daily Time Periods
1. Select the person from the list. (For detailed instructions, see Find a Person.)
2. Click the person’s tab. 3. Click the link.
4. Click in the upper left area of the screen. The text will turn green when selected.
5. If desired, change the number of time periods, and type in new Time Period descriptions (for example, ‘Early Morning’). Be sure that the descriptions in the text boxes are not the same and that all text boxes contain time periods.
6. To change the start times, click and drag the column slider ‘handles’ .
7. Click , or click to cancel your changes. IMPORTANT NOTE: Changes to personal or application settings in GLUCOFACTS® DELUXE do not affect the settings in a person’s meter.
Bayer’s GLUCOFACTS® DELUXE Software User Guide Page 14

Change a Meter’s Blood Sugar Ranges to Match GLUCOFACTS® DELUXE If the connected meter from Bayer supports above target and below target (some meters call them “high” and “low”) blood sugar settings, GLUCOFACTS® DELUXE warns you if the ranges in the connected meter are not the same as the application’s blood sugar ranges. After a download while the meter is still connected:
1. Click the tab.
2. Click the button on the left side of the screen.
3. Select the tab, and click the button.
Change Meter Settings Make sure your meter is connected to GLUCOFACTS® DELUXE and turned on.
1. Click on the top toolbar.
2. Click the tab. 3. Under the Meter Settings heading, each setting currently selected will be marked. 4. To change a setting, click the button beside the desired setting.
5. Click , or click .
To change the blood sugar settings on Contour models that allow changes, make sure your meter is connected and turned on. To change your settings on your meter to match the software:
1. Click .
2. Click the tab, and click the button.
Change Software to Match Individual Meter Settings If you unintentionally change the software settings for yourself or an individual, you can restore GLUCOFACTS® DELUXE settings to match the individual meter.
1. After changing your blood sugar or time period settings in , you will see a popup message alerting you.
2. Click the button to change the software to match your meter.
Bayer’s GLUCOFACTS® DELUXE Software User Guide Page 15

System Settings These options are available if you are running GLUCOFACTS DELUXE from your computer. If you have a Contour USB meter and run GLUCOFACTS DELUXE from your meter, you will not have all of the options in this section.
GLUCOFACTS® DELUXE product updates Go to www.BayerGlucofacts.com to check for and download updates for your software. If you do not have access to the internet, in the United States contact Customer Support at 1-800-348-8100 to inquire about product updates. In the UK, contact Bayer Diabetes Support at 0845 600 6030 or 1 890 920 111 in the Republic of Ireland. For all other countries, please refer to the Customer Support contact displayed on your meter’s back label.
View and Change System Settings
You can view and change the standard application settings when you click on the top toolbar. There are four types of application settings:
General (meter, communication ports and language settings) Blood Sugar Ranges for your Reports Time Period (daily time period settings) Print Reports (report types and date ranges for automatic printing)
Application (system) settings apply to everyone in GLUCOFACTS® DELUXE unless a person has personal Blood Sugar or Time Period settings. GLUCOFACTS® DELUXE allows you to ‘personalize’ these
settings for anyone in the People list through using the “Setting Preferences” tab. Changes to a person’s Blood Sugar and/or Time Period settings are used by GLUCOFACTS® DELUXE for that person instead of the application settings.
Setup Automatic Downloading and Report Printing
1. Click the Settings button on the top toolbar.
2. Click the tab if it is not already showing. 3. In the center area of the screen, review the options for automatic downloading and printing. 4. Select the options you want when a meter is recognized after connecting, and your options
when a meter is not recognized.
Bayer’s GLUCOFACTS® DELUXE Software User Guide Page 16

Change the Blood Sugar Ranges Used for All GLUCOFACTS® DELUXE reports
1. Click the Settings button on the top toolbar.
2. Click the tab. 3. To change the blood sugar ranges (High or Above Target, Low or Below Target), click and
drag the slider ‘handles’ , or Click the plus (+) and minus (-) signs or type the target numbers in the white boxes.
In this image, 181 mg/dL is in the Above Target range and 180 mg/dL is in the Target (green) range.
4. Click , or click .
NOTES: Changes to the application’s standard blood sugar ranges or time periods, will remain in effect for all meter downloads unless other ranges have been specified individually for a person. Changes to personal or application settings do not change the settings in a person’s meter.
Bayer’s GLUCOFACTS® DELUXE Software User Guide Page 17

Change the Daily Time Period Settings Used for GLUCOFACTS® DELUXE Reports
1. Click the Settings button on the top toolbar.
2. Click the tab. 3. Change the Number of Time Periods, if desired by clicking the drop down arrow
. 4. If desired, type in new Time Period names, or use the pre-set names provided. Be sure that
the time period names are different for each time period, and none are left blank. 5. To change the start times of the time periods, click and drag the column slider
‘handles’ .
6. Click , or click to cancel your changes.
Note: Changes to the application’s standard daily time periods will apply to all reports unless other time periods have been specified for a person.
Associate Meter Data with a Temporary Person 1. If you do not associate a newly downloaded meter to an existing person, or add a new
person for this meter, GLUCOFACTS® DELUXE automatically assigns a ‘temporary person’ to this meter.
2. You can view and print all reports for the temporary person, as well as select the temporary
person from the People list until the next meter is downloaded or you close the application. You can only have one temporary person in the database.
Change the language used in GLUCOFACTS® DELUXE
1. Click the Settings button on the top toolbar.
2. Click the tab.
3. Click down-arrow in the Language box to select the desired language.
4. Click , or click .
Bayer’s GLUCOFACTS® DELUXE Software User Guide Page 18

CONTOUR® USB Settings in GLUCOFACTS® DELUXE This section is intended for CONTOUR USB meters. Many of the screens will differ if you are running GLUCOFACTS DELUXE from your Contour USB meter or using the GLUCOFACTS DELUXE version installed on your computer. Most of the button images in this section display GLUCOFACTS DELUXE running from your meter, not your PC. For details about your CONTOUR USB meter, see your meter’s User Guide. A few notes about Contour USB meter’s Autolog feature, making changes to your meter settings, and initial launch of GLUCOFACTS DELUXE from your meter:
The first time you launch GLUCOFACTS DELUXE from your CONTOUR USB meter, please allow a few minutes. After the initial launch, you will see your GLUCOFACTS DELUXE screens more quickly.
If AutoLog is off, the Meter Information screen in the GLUCOFACTS DELUXE application will only display the high (hyperglycemic) and low (hypoglycemic) settings. You cannot change overall blood sugar target settings from that screen.
You can change targets or ranges in GLUCOFACTS DELUXE and then match the meter to the application. See “Change Overall Blood Sugar Target Settings Currently in the Meter” in this section of the User Guide.
If Autolog is on – you will see overall targets, but will not able to change the targets in GLUCOFACTS DELUXE or on the meter. Before meal and after meal targets may be changed when AutoLog is on.
Personalize Meter Profile To personalize your CONTOUR® USB meter profile with your name and date of birth:
1. Click on the top toolbar. If you are viewing Trends, this icon will appear as .
2. Click the tab. 3. Enter a first and last name.
4. Use the drop-down arrow to enter Date of Birth, if desired.
5. Click or .
Change Personal Daily Time Periods To change your personal time periods on your CONTOUR® USB meter:
1. Click on the top toolbar. If you are viewing Trends, this icon will appear as .
2. Click the tab. 3. Click the link near the top of the screen. 4. Change Number of Time Periods, if desired. 5. If desired, type in new time period labels (for example, ‘Early Morning’). Be sure that no
labels are the same and that no labels are left blank. 6. Click and drag the column sliders to move the start times up or down as
needed.
7. Click or . The application will use your saved settings instead of the default (standard) settings.
Bayer’s GLUCOFACTS® DELUXE Software User Guide Page 19

Change Overall Blood Sugar Target Settings Currently in the Meter These values can be changed to the range you and/ or your health care professional decide are your personal targets. Note: If AutoLog is turned OFF in the meter, only the overall Blood Sugar Target range will be editable in the meter. Overall Target can be changed through GLUCOFACTS ® DELUXE as follows:
1. Make sure your meter is connected and ON.
2. Click on the top toolbar.
3. Click the tab.
4. Click the tab/link. 5. Change the Blood Sugar Target Low and Target High as needed. For detailed instructions,
see Help>How Do I> Change Personal Blood Sugar Settings in GLUCOFACTS® Deluxe Help.
6. Click
7. Now click the tab. A warning message displays.
8. Click to update the meter with the new overall target range.
Change Blood Sugar Targets on your Meter You may adjust the high and low settings on your meter, and they can be different than the targets set for the reports in the software.
1. Your CONTOUR USB meter must be connected. Click on the top toolbar. If you are
viewing Trends, this icon will appear as .
2. Click the tab. If View All is selected under Blood Sugar Settings, the meter’s current target settings are shown, plus High (hyper) and Low (hypo) limits. Note: If AutoLog is OFF on the meter, only “High (hyper) / Low (hypo)” will appear. Each blood sugar range is color-coded.
3. Under View All, select the item you want to change. Only one type of setting can be changed at a time.
For example, to change the meter’s Before Meal blood sugar limits: • Click (or press and hold) the plus and minus buttons OR click and drag the Target
slider ‘handles’ OR type the Above Target / Below Target numbers in the white boxes.
• Click or .
Bayer’s GLUCOFACTS® DELUXE Software User Guide Page 20

Printing a Report To print a report you are viewing:
1. Click on the top toolbar. If you are viewing Trends, this icon will appear as .
2. Click the tab. GLUCOFACTS® DELUXE opens the Reports section.
3. Click the button in the upper right corner of the screen. 4. Click in the checkbox beside each report you wish to print. To de-select, click again. 5. Select the number of days to appear in the report. The current date range is already
selected but can be changed. 6. If you wish to keep these print settings for your reports, check
7. Click . Reports can be printed on standard 8 ½ by 11 inch or A4 paper.
Printing Reports Automatically To print reports automatically when running the application from your CONTOUR® USB meter:
1. Click on the top toolbar. If you are viewing Settings, this icon will appear as .
2. Under “When the CONTOUR® USB meter is plugged in” click the button for “Automatically Download Readings and Print Reports”.
3. Click or . Reports will print to your default printer.
Change Meter Formats and Settings
1. Make sure your CONTOUR USB meter is connected , and click on the top toolbar. If
you are viewing Trends, this icon will appear as .
2. Click the tab. 3. Under the Meter Settings heading, each setting currently selected will be marked.
Example of Meter Settings
4. To change a setting, click in the button beside the setting.
5. Click or
Bayer’s GLUCOFACTS® DELUXE Software User Guide Page 21

For more about the advanced features of your Contour USB meter, see your meter’s user guide.
Change Meter Trend Settings 1. Make sure your CONTOUR USB meter is connected.
2. Click on the top toolbar.
3. Click the tab. 4. Under the Meter Settings heading (lower left side of screen), click the Trends button that
you wish to set (either 7, 14 or 30 day):
Click or
For a definition of Trends, please see the Glossary.
Change Hyper / Hypo Limits in the Meter This is only available on your Contour USB meter. If you have “AutoLog” turned on, you will see more options on your screen. You may adjust the high (hyperglycemic) and low (hypoglycemic) settings on your meter, and they can be different than the targets set within the software. See page 28 of your meter’s User Guide for more information about AutoLog.
1. Make sure your meter is connected.
2. Click on the top toolbar. If you are viewing Trends, this icon will appear as .
3. Click the tab. 4. On the right side of your screen, click (if needed) and your screen
will show an image similar to this:
5. Click the plus or minus to change your settings.
6. Click Note: The meter’s High (hyper) and Low (hypo) settings can only be changed through GLUCOFACTS DELUXE. Hypo and Hyper limits must be within the limits set by the meter AND must not extend into any other target ranges in the meter.
Bayer’s GLUCOFACTS® DELUXE Software User Guide Page 22

System / Utilities GLUCOFACTS® DELUXE Product Updates Please go to www.BayerGlucofacts.com to check for product updates. If you do not have an internet connection, in the United States contact Customer Support at 1-800-348-8100 for product updates available as a CD. In the UK, contact Bayer Diabetes Support at 0845 600 6030 or 1 890 920 111 in the Republic of Ireland for product updates available as a CD. For all other countries, please refer to the Customer Support contact displayed on your meter’s back label.
Remove the GLUCOFACTS® DELUXE Application 1. Open the Control Panel window. 2. Double-click Add or Remove Programs. 3. Review the list of currently installed programs and click the Glucofacts® DELUXE application
name to highlight it. 4. Click Remove.
NOTE: The Control Panel and Add or Remove Programs windows may vary slightly across operating systems. If you remove the application, all data within the application will be deleted.
Remove a Person From the Application
1. Click on the top toolbar. 2. Select the person from the list.
3. When the person’s page displays, click in the upper right corner of the screen.
4. When you are prompted to confirm the delete, click . NOTE: Once a person is removed, you can only restore the records by re-entering the person and their data.
Bayer’s GLUCOFACTS® DELUXE Software User Guide Page 23

Copy / Import a Person from Bayer’s WinGlucofacts™ software into GLUCOFACTS® DELUXE You may import one person or a group of people from Bayer’s WinGlucofacts into GLUCOFACTS DELUXE one time. This feature is not available for Mac computers or computers with 64 bit Operating Systems.
1. Click on the top toolbar.
2. Click the button in the upper right corner of the screen and click Continue to proceed.
3. In the Import Data Tool window, enter the folder name that contains the Bayer’s WinGlucofacts person or group you wish to import, or Click the Browse button to navigate to the correct file. Highlight the file or folder and click Open to select the file (file type must be ‘.dex’).
4. When the file/folder is displayed in the Locate Data box, click . 5. If GLUCOFACTS DELUXE finds a Bayer’s WinGlucofacts person with the same name and birth
date as someone in the application, for example, ‘John Smith’ below:
• Check the Import as Duplicate box to create a second entry for this person (for example, ‘Smith [2], John’) OR leave the box blank to stop the import of this person.
6. Click Continue to complete the import, or click at any time to stop the import process. GLUCOFACTS DELUXE tells you when the import finishes successfully.
7. Click to close the pop-up window.
Bayer’s GLUCOFACTS® DELUXE Software User Guide Page 24

Create a New Database (if running from a computer – not a Contour USB meter)
1. Click the button on the top toolbar. 2. Click Database Setup to the right of Database Information. 3. Check Create a New Database and Choose the Location. GLUCOFACTS DELUXE provides a
default location. 4. To change the location of the new database, click the Browse button, select the desired
directory and folder, then click Open. 5. When the correct database location (path) displays in the Create a New Database box, click
Create.
6. GLUCOFACTS DELUXE updates the application and returns you to the screen.
NOTE: Every new database is created using the standard settings for Blood Sugar and Time Periods. GLUCOFACTS DELUXE can be used with or without a people database provided it is running from a computer (and not from a CONTOUR® USB meter). To run the application without a database, simply create a temporary person by using the View Reports or View and Print Reports when downloading a meter.
Use a Different Database of People
1. Click on the top toolbar. 2. Click the Database Setup button to the right of Database Information. 3. On the Database Setup screen check Select an Existing Database, then click the Browse
button. 4. Select the folder that contains the desired database (file type must be ‘.db’) and click Open. 5. When the correct database file displays in the Existing Database box, click Select.
6. GLUCOFACTS DELUXE updates the application and returns you to the screen.
NOTE: The database you change to may have different Blood Sugar and Time Period settings than the original database. Please review your database settings to confirm.
Bayer’s GLUCOFACTS® DELUXE Software User Guide Page 25

Location of Database File for GLUCOFACTS® DELUXE
Click on the top toolbar. The current location (path) of the database is displayed to the right of Database Information.
NOTE: GLUCOFACTS DELUXE can be used with or without a people database. To use without a database, you can download meter data to a temporary person. See “Downloading a Meter” section of this User Guide.
Bayer’s GLUCOFACTS® DELUXE Software User Guide Page 26

Troubleshooting
Item Response
Meter Timed Out
If the Home screen displays a disconnected meter picture or the Current Status on a person’s Meter Information screen is ‘Meter is not detected’, your meter has probably timed out/turned off. Simply turn your meter back on. GLUCOFACTS DELUXE will detect your meter and resume activities. NOTE: To view the Meter Information screen, select the meter owner
from the list, then click the tab.
Meter Cable Purchase
To order a serial or USB cable, in the US contact www.bayerdiabetesstore.com or call 1-877-716-1733. In the UK contact Bayer Diabetes Support at 0845 600 6030. For all other countries, please refer to the Customer Support contact displayed on your meter’s back label.
Connection Problems
Disconnect the meter.
Click on the top toolbar. Follow the instructions for connecting your meter. For details about connecting your meter to the cable see “Connecting a Meter” section of this User Guide.
Meter Not Found I connected my meter and turned it on, but the Home screen still shows no meter connected. Make sure the cable is firmly plugged into the meter and that proper cable drivers are installed. Your meter screen displays three dashes when the meter is properly connected to the computer. If you have used your meter with GLUCOFACTS DELUXE in the past, there may be a problem with the COM port(s) you set up. See the COM ports section in this User Guide. If you are using GLUCOFACTS DELUXE for the first time, follow the steps in the “Automatic Meter Detection” section of this User Guide. If the problem persists, contact Customer Support.
Download Interrupted
GLUCOFACTS DELUXE returned a meter communication error (an error code with the prefix ‘ME’) and the download was interrupted. Verify all cables are securely connected from your meter to the computer. If using a meter that does not have rechargeable batteries, make sure the meter’s batteries are not low: unplug the meter, turn it on, and see whether the low battery icon displays. Try to download your readings again.
Unsupported Meter GLUCOFACTS DELUXE supports the CONTOUR® and BREEZE® meter families and Bayer’s DIDGET meter (where available). Please connect a supported meter from Bayer and try again.
Bayer’s GLUCOFACTS® DELUXE Software User Guide Page 27

Item Response
Blood Sugar Range Error
The application displayed the following error message when a hypo or hyper limit was being changed:
The hyper or hypo limit has been set to a value that is not valid for the meter or extends into a current target range.
Click and revise the hypo/hyper setting or adjust the overall Target or Before Meal /After Meal Targets in the meter.
Target Range Error The application displayed the following error message during an update of the meter:
The application’s Blood Sugar Personal Target High or Target Low has been set to a value that is not valid for the meter or extends into a hyper or hypo range.
Click and revise the personal blood sugar settings.
Blood Sugar Setting Warning
The application displayed the following warning when I changed the Personal Blood Sugar settings:
GLUCOFACTS tries to keep the application’s Target settings in sync with the meter and displays a warning when they do not match.
Click to leave the settings as they are or click
Bayer’s GLUCOFACTS® DELUXE Software User Guide Page 28

Item Response
Port Problems GLUCOFACTS DELUXE displayed a message that another application may be using this COM Port. This message indicates that Bayer’s GLUCOFACTS DELUXE cannot communicate with your meter using this port. Solution #1: Change your communication port (COM Port) settings:
Click on the top toolbar. Under the Meter Detection heading,
click . If you know the COM Port(s) you want GLUCOFACTS DELUXE to use, check the Use box to the right of each COM Port in the Detected Ports column. The port you check should have a status of ‘Available’. Select “Scan selected ports only”. Click Save. Solution #2: Check to see whether another application is using this port and wait until that application is finished before running Bayer’s GLUCOFACTS DELUXE. NOTE: Some programs may open a communication port and keep it open all the time, preventing other applications from using this COM port. A COM port may only be opened by one program at a time. Exiting the application or rebooting your computer will most likely make the Com port available for your meter.
Long Meter Download Time
The download seems to be taking too long. GLUCOFACTS DELUXE will notify you if there is a communication problem. Note that the download time increases as the number of readings in the meter increases.
Unsupported Meter GLUCOFACTS DELUXE supports the CONTOUR® and BREEZE® meter families and Bayer’s DIDGET meter (where available). Please connect a supported meter from Bayer and try again.
Personal Settings Are Grayed Out
The Blood Sugar and/or Time Periods Personal Settings are grayed out (inactive). If you selected “Use GLUCOFACTS Settings” in the upper left corner of a person’s Blood Sugar or Time Periods screen, these personal settings will be inactive.
Click to edit and use personal settings. “Use Personal Settings” will appear in green when it is available.
Logbook Printout Too Long
The Logbook Report printout is longer than expected. Is this normal? Yes. Every day in a specified date range is displayed as a row in the Logbook report, regardless of whether there were blood sugar results on that day. The Logbook row will be blank for days without tests. Try selecting a shorter date range for the Logbook report so fewer blank rows will print. For details on changing the date range, see Reports >
Bayer’s GLUCOFACTS® DELUXE Software User Guide Page 29

Item Response Change Date Range in this User Guide.
Logbook Reading ‘High’/’Low’
Some readings in the Logbook are displayed as text - ‘high’ or ‘low’ instead of as a number. A ‘High’(‘HI’) or ‘Low’ (‘LO’) meter reading displays in GLUCOFACTS DELUXE reports as ‘High’ or ‘Low’ instead of as a number result. For a definition of High and Low readings, see the Glossary in this User Guide or Help in the software. Your meter’s User Guide will also give you more details about High/HI and Low/LO.
Need to Choose a Reference Method for Reports
The application displayed a message asking me to select a Reference Method to use for GLUCOFACTS DELUXE reports. Why? Although most meters report blood sugar values derived from the ‘Plasma’ Reference Method, some meters use other Reference Methods such as ‘Whole Blood’. In some cases, a person may download readings from meters that use different Reference Methods. Since GLUCOFACTS DELUXE cannot display readings from different Reference Methods in the same report view, it asks you to choose the method you wish to use. A drop-down menu at the top of the report allows you switch Reference Methods as you view the reports, as follows: Click the down arrow in the Reference Method box at the top of the report. Click on the desired Reference Method.
Error During Import The application displayed the following error message during an Import:
Only files with a ‘.dex’ extension can be imported from Bayer’s WinGlucofacts™ into GLUCOFACTS DELUXE. The folder you selected contained files with other extensions.
Click and select a different folder.
Logbook Printout Too Long
The Logbook Report printout is longer than expected. Is this normal? Yes. Every day in a specified date range is displayed as a row in the Logbook report, regardless of whether there were blood sugar results on that day. The Logbook row will be blank for days without tests. Try selecting a shorter date range for the Logbook report so fewer blank rows will print. For details on changing the date range, see Reports > Change Date Range in this User Guide.
Bayer’s GLUCOFACTS® DELUXE Software User Guide Page 30
Bayer’s GLUCOFACTS® DELUXE Software User Guide Page 31
Item Response
Non-Meter Devices Not Working
Since I started using GLUCOFACTS DELUXE with my meter, one of my other devices (for example, my PDA) is not working when I connect it to my computer. GLUCOFACTS DELUXE and your non-meter device may be trying to use the same COM port. Here are some things you can do to fix this problem: You can close down GLUCOFACTS DELUXE while you are using a non-meter device to prevent a conflict over a port OR You can turn automatic meter detection ON each time you run GLUCOFACTS DELUXE and avoid connecting any other device to the computer while the application is running. You can then turn detection OFF when you are finished using GLUCOFACTS DELUXE. NOTE: Even if your meter is not connected to GLUCOFACTS DELUXE, the application will continue to search for a port(s) while it is running as long as automatic meter detection is turned ON. (For directions on setting meter detection, see the section on Turn On/Off Meter Detection) OR If you know the COM port(s) that your non-meter device always uses, you can manually change the port settings in GLUCOFACTS® DELUXE to avoid these ports. For more information, see Setup Automatic Downloading and Report Printing in this User Guide. NOTE: A conflict between GLUCOFACTS DELUXE and other software will not damage any non-meter device or its software.
E-14 Meter Error The meter download was successful but my meter is displaying an ‘E-14’ error message. This is not a problem with Bayer’s GLUCOFACTS DELUXE. After each successful download, some meters display an ‘E-14’ and automatically disconnect from the application. Your data is not affected, and you can press the M button on the meter to turn it off. If you want the meter to stay connected to GLUCOFACTS DELUXE: Turn off your meter and turn it on again. The meter error message no longer displays and you can continue working with this meter.
Error During Update GLUCOFACTS DELUXE displayed an error message during a product update from the Internet. Check to see that you are still connected to the Internet. Re-start GLUCOFACTS DELUXE: The application will again try to download product updates from the website. If the error message displays again, in the US call Customer Support for assistance at 1-800-348-8100. In the UK contact Bayer Diabetes Support at 0845 600 6030 or in the Republic of Ireland call 1 890 920 111. For all other countries, please refer to the Customer Support contact displayed on your meter’s back label.
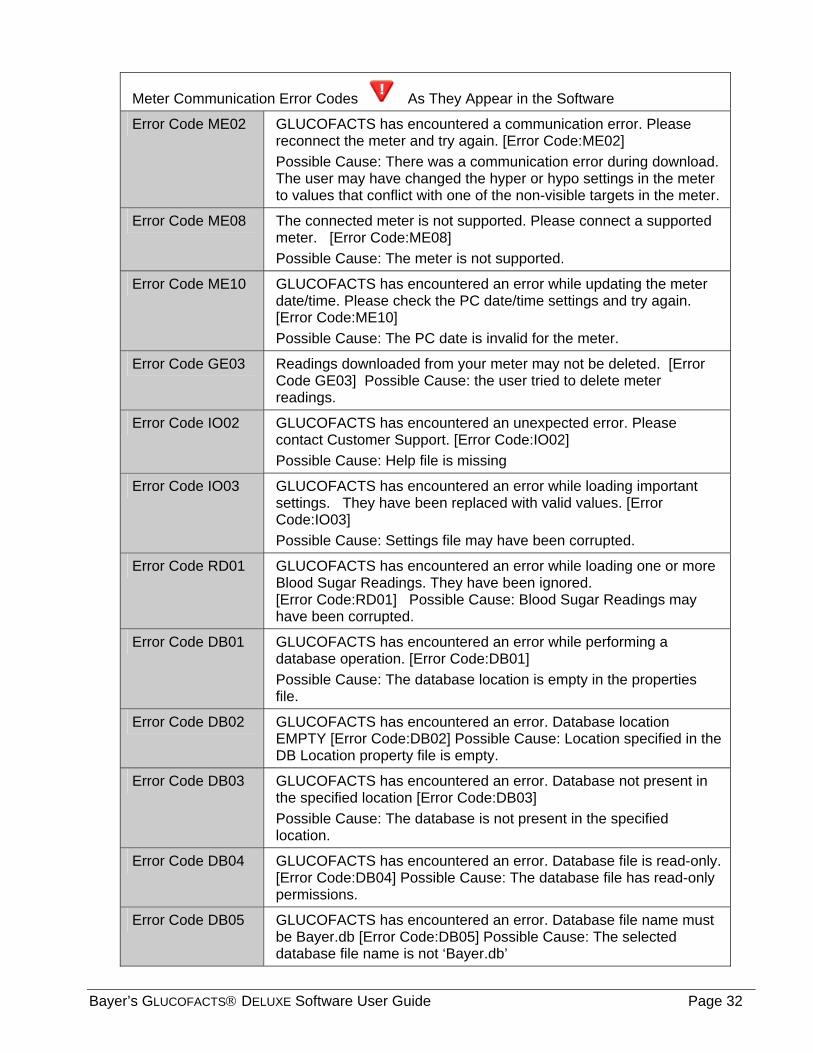
Meter Communication Error Codes As They Appear in the Software
Error Code ME02 GLUCOFACTS has encountered a communication error. Please reconnect the meter and try again. [Error Code:ME02] Possible Cause: There was a communication error during download. The user may have changed the hyper or hypo settings in the meter to values that conflict with one of the non-visible targets in the meter.
Error Code ME08 The connected meter is not supported. Please connect a supported meter. [Error Code:ME08] Possible Cause: The meter is not supported.
Error Code ME10 GLUCOFACTS has encountered an error while updating the meter date/time. Please check the PC date/time settings and try again. [Error Code:ME10] Possible Cause: The PC date is invalid for the meter.
Error Code GE03 Readings downloaded from your meter may not be deleted. [Error Code GE03] Possible Cause: the user tried to delete meter readings.
Error Code IO02 GLUCOFACTS has encountered an unexpected error. Please contact Customer Support. [Error Code:IO02] Possible Cause: Help file is missing
Error Code IO03 GLUCOFACTS has encountered an error while loading important settings. They have been replaced with valid values. [Error Code:IO03] Possible Cause: Settings file may have been corrupted.
Error Code RD01 GLUCOFACTS has encountered an error while loading one or more Blood Sugar Readings. They have been ignored. [Error Code:RD01] Possible Cause: Blood Sugar Readings may have been corrupted.
Error Code DB01 GLUCOFACTS has encountered an error while performing a database operation. [Error Code:DB01] Possible Cause: The database location is empty in the properties file.
Error Code DB02 GLUCOFACTS has encountered an error. Database location EMPTY [Error Code:DB02] Possible Cause: Location specified in the DB Location property file is empty.
Error Code DB03 GLUCOFACTS has encountered an error. Database not present in the specified location [Error Code:DB03] Possible Cause: The database is not present in the specified location.
Error Code DB04 GLUCOFACTS has encountered an error. Database file is read-only. [Error Code:DB04] Possible Cause: The database file has read-only permissions.
Error Code DB05 GLUCOFACTS has encountered an error. Database file name must be Bayer.db [Error Code:DB05] Possible Cause: The selected database file name is not ‘Bayer.db’
Bayer’s GLUCOFACTS® DELUXE Software User Guide Page 32

Bayer’s GLUCOFACTS® DELUXE Software User Guide Page 33
Meter Communication Error Codes As They Appear in the Software
Error Code DB06 GLUCOFACTS has encountered an error. Invalid database file. [Error Code:DB06] Possible Cause: Selected database file is invalid.
Error Code DB07 GLUCOFACTS has encountered an error. Invalid selection. Please select a valid folder and try again. [Error Code:DB07] Possible Cause: Selected DB location is invalid in the create DB scenario.
Error Code DB10 Selected database is same as current database. Please select a different database file and proceed. [Error Code:DB10] Possible Cause: The selected DB file is the same as the old DB file.
Error Code DB11 GLUCOFACTS has encountered an error. Database already present at this location. Do you want to overwrite? [Error Code:DB11] Possible Cause: Selected location already has a DB file in existence.
Error Code DB13 GLUCOFACTS has encountered an error. Read-only folder. Please select a valid folder and try again. [Error Code:DB13] Possible Cause: Trying to create a new database at the same location of an existing database.
Error Code PR01 GLUCOFACTS has encountered an error. File containing the configuration settings is missing so all settings will revert to the defaults [Error Code:PR01] Possible Cause: If the property file is deleted
Error Code WGF01
GLUCOFACTS has encountered an error. Corrupted data in .dex files. [Error Code:WGF01] Possible Cause: The data is corrupted.
Error Code WGF02
GLUCOFACTS has encountered an error. Corrupted .dex file in the selected path. [Error Code:WGF02] Possible Cause: The file is corrupted.

Bayer’s GLUCOFACTS® DELUXE Software User Guide Page 34
GLUCOFACTS® DELUXE Glossary
Glossary Abbreviations & Terms
Definition
% Percent. A portion of the total, where the total is represented by 100. If the percent of readings in the Target range is 50%, then 50 out of 100 readings are in the Target range.
Above Target Blood sugar readings that are above the ‘Target’ blood sugar range. Example: If the Target range is 80 – 180 mg/dL (4.4 – 10.0 mmol/L), a reading of 181 mg/dL (10.1 mmol/L) or higher will be considered ‘Above Target’.
After Meal Reading
Post-meal reading. A blood sugar meter reading marked on the meter by the user to indicate the reading was taken after food, where food is generally thought of as breakfast, lunch, dinner or a substantial snack. Note that some CONTOUR® meters and all BREEZE® meters do not provide meal and logbook markers.
Avg Average. The average blood sugar reading for the specified date range. Calculated by dividing the sum of all blood sugar readings by the number of individual readings. In GLUCOFACTS DELUXE, a minimum of three readings is required to calculate average.
Avg. Tests Per Day
Calculated for the Summary report as the total number of blood sugar tests taken in the specified date range, divided by the Days Covered.
Bar Chart A chart where the height of each bar (column) represents the percent of blood sugar readings in each blood sugar range, compared to the total number of readings. Also called a Bar Graph.
Before Meal Reading
Pre-meal reading. A blood sugar meter reading marked on the meter by the user to indicate the reading was taken before food, where food is generally thought of as breakfast, lunch or dinner or a substantial snack. Some CONTOUR® meters and all BREEZE® meters do not provide meal and logbook markers.
Below Target Blood sugar readings that are below the ‘Target’ blood sugar range. Example: If the Target range is 80 – 180 mg/dL (4.4 mmol/L), a reading of 79 mg/dL (4.4 mmol/L) or lower will be considered ‘Below Target’.
Blood Glucose Sugar in the form of glucose in the blood. The concentration of glucose in the blood, measured in milligrams of glucose per 100 milliliters of blood (mg/dL) or millimoles of glucose per Liters of blood (mmol/L). This application uses the term ‘blood sugar’ for all references to blood glucose.
Blood Sugar Ranges
The three levels that blood sugar readings can belong in: Low or Below Target, Target and High or Above Target. Blood sugar ranges can be changed by the user in the Settings function of GLUCOFACTS DELUXE.
Cable Driver A set of computer files that enable your computer to connect your meter to GLUCOFACTS DELUXE.

Bayer’s GLUCOFACTS® DELUXE Software User Guide Page 35
Glossary Abbreviations & Terms
Definition
COM Port Communication port. The port (connector) on the computer that is used to attach a device, such as a meter or printer, to the computer using a cable.
Control Reading A meter reading obtained by testing a control solution, used to ensure a meter is functioning properly. Control readings are not included in calculations of average or standard deviation.
Daily Time Period A time range within a day, for example, a ‘Morning’ time period may range from 5:30 a.m. (inclusive) to 10:00 a.m, (exclusive).
Daily Time Period Label
The name associated with a Daily Time Period, for example ‘Morning’, ‘Evening’, editable by the user.
Days Covered The number of days in the specified date range. Displayed in the Summary report.
Default The standard or preset value in Glucofacts® DELUXE. Users can change default settings for blood sugar ranges, daily time periods, and date ranges for reports.
Deleted Reading A blood sugar reading marked on the meter as ‘deleted’ by the user. Deleted readings are not included in calculations of average or standard deviation. Note that only certain meters allow the user to delete readings.
GLUCOFACTS Settings
The application's settings for blood sugar ranges and time periods that are pre-set (have default values) in GLUCOFACTS DELUXE. Users can customize these settings for an individual by selecting the Use Personal Settings option. This option tells the application to use the customized blood sugar and time period settings instead of the GLUCOFACTS settings for this individual.
HbA1c A measurement of a person’s three month average blood sugar, displayed as a decimal percent, for example, 6.8. Also known as ‘A1c’, ‘Glycohemoglobin’, and ‘glycosylated hemoglobin’.
High/HI Reading A meter reading with a value greater than the highest allowable value for the meter. For example: if the meter range is 10 - 600 mg/dL (0.6 – 33.3 mmol/L), a ‘High’ or “HI” reading is 600 + 1 (33.3 +1 mmol/L) or 601 mg/dL (33.4 mmol/L) or greater. Displayed as ‘High’ in GLUCOFACTS DELUXE reports.
Hyperglycemic Limit
Any random blood glucose measurement above 11.1 mmol/L, according to 2009 ADA recommendations. The hyperglycemic limit is set in some meters from Bayer and can be modified in GLUCOFACTS DELUXE.
Hypoglycemic Limit
Any random blood glucose measurement below 3.9 mmol/L, according to 2009 ADA recommendations. The hypoglycemic limit is set in some meters from Bayer and can be modified in GLUCOFACTS DELUXE
Logbook Marker A marker for a reading that can be used as a reminder to check the Logbook for more information about the reading. Some CONTOUR® meters and all BREEZE® meters do not provide meal and logbook markers. The CONTOUR USB meter also refers to these as “Notes”.

Bayer’s GLUCOFACTS® DELUXE Software User Guide Page 36
Glossary Abbreviations & Terms
Definition
Low/LO Reading A meter reading with a value less than the lowest allowable value for the meter. For example: if the meter range is 10 - 600 mg/dL (0.6 – 33.3 mmol/L), a ‘Low’ or “LO” reading is under 10 mg/dL (0.6 mmol/L). Displayed as ‘Low’ in Glucofacts® DELUXE reports.
Max Maximum. The highest blood sugar reading in a specific set of readings.
Min Minimum. The lowest blood sugar reading in a specific set of readings.
No Mark The column header in the Logbook report that indicates the readings in this column are not marked as ‘before meal’ or ‘after meal’. Unmarked readings, control test readings and readings marked ‘logbook’ are included in this column.
Personal Settings The blood sugar ranges and time period settings that can be customized for an individual in GLUCOFACTS® Deluxe. Users can modify these settings in the person's Settings Preferences > Blood Sugar and Time Periods tabs.
Pie Chart A chart that resembles a pie, where each slice is a percent of blood sugar readings in each blood sugar range, compared to the total number of readings.
Std. Deviation Standard Deviation. A measure of how much the blood sugar results vary. A low standard deviation means the blood sugar readings are similar; a high standard deviation means the blood sugar results vary widely. In GLUCOFACTS DELUXE, a minimum of three readings is required to calculate standard deviation.
Standard Day / Standard Week
A graphical ‘time of day’ or ‘day of the week’ analysis of blood sugar levels for a selected date range, where readings are displayed as if they occurred in a single day or a single week.
Report Definitions - Trend Report A graph of blood sugar readings by day for a specified date range.
Logbook Report A record of meter and manual blood sugar readings by day and time for a specified date range.
Standard Day Report
A graph displaying blood sugar readings by time of day as if all readings occurred in one day.
Standard Week Report
A graph displaying blood sugar readings by day of the week as if all readings in the date range occurred in one week.
Summary Report An overview of all meter readings in a specified date range including the number of readings; the minimum and maximum blood sugar reading (units); the number of control and deleted readings; and the average blood sugar reading. This can be displayed as a pie chart or a bar chart.
Units of Measure: mmol/L or mg/dL
Your reports will display the unit of measure from your meter - either mmol/L or mg/dL. Any screen images in this document are merely examples.
Readings marked deleted or control are not included in reports.

82636073 Rev. 1/10
Distributed by Bayer HealthCare, LLCMishawaka, IN 46544 USA
© 2009 Bayer HealthCare LLC. All rights reserved.
Bayer, the Bayer Cross, GLUCOFACTS, CONTOUR, and BREEZE are registered trademarks of Bayer.All other trademarks are the property of their respective owners.
Bayer Consumer Care AGPostfach4002 Basel, Switzerland