Embed Size (px)
Citation preview

Experion
Getting Started with Experion Software
Guide EP-DCSX24
R300.1 05/06
Release 300.1 Honeywell
Copyright Honeywell International September 2005 All Rights Reserved

ii Experion Getting Started with Experion Software Guide R300.1 Honeywell 05/06
Notices and Trademarks
Copyright 2005 by Honeywell International Inc. Release 300.1 May 12, 2006
While this information is presented in good faith and believed to be accurate, Honeywell disclaims the implied warranties of merchantability and fitness for a particular purpose and makes no express warranties except as may be stated in its written agreement with and for its customers.
In no event is Honeywell liable to anyone for any indirect, special or consequential damages. The information and specifications in this document are subject to change without notice.
Experion and TotalPlant are registered trademarks of Honeywell International Inc.
Other brand or product names are trademarks of their respective owners.
Honeywell International
Process Solutions
2500 West Union Hills
Phoenix, AZ 85027
1-800 343-0228

R300.1 Experion Getting Started with Experion Software Guide iii 05/06 Honeywell
About This Document This document gives the installation user an overview of the tasks that will be performed while installing an Experion ® Process Knowledge System (PKS). Each node type is explained along with associated documentation that might be required while performing an installation of that node type
Release Information
Document Name Document ID Release Number
Publication Date
Getting Started with Experion Software Guide - EX54
EP-DCSX24 300.1 05/06
References The following list identifies all documents that may be sources of reference for material discussed in this publication.
Document Title
Experion Software Installation and Upgrade Guide
Experion Supplementary Installation Tasks Guide
Experion Control Hardware and I/O Module Firmware Upgrade Guide
Contacts
World Wide Web The following Honeywell web sites may be of interest to Process Solutions customers.
Honeywell Organization WWW Address (URL)
Corporate http://www.honeywell.com
Honeywell Process Solutions http://hpsweb.honeywell.com

Contacts
iv Experion Getting Started with Experion Software Guide R300.1 Honeywell 05/06
Telephone Contact us by telephone at the numbers listed below.
Location Organization Phone
United States and Canada
Honeywell IAC Solution Support Center
1-800-822-7673
Europe Honeywell TAC-EMEA +32-2-728-2704
Pacific Honeywell Global TAC - Pacific
1300-300-4822 (toll free within Australia) +61-8-9362-9559 (outside Australia)
India Honeywell Global TAC - India
+91-20-2682-2458
Korea Honeywell Global TAC - Korea
+82-2-799-6317
People’s Republic of China
Honeywell Global TAC - China
+86-10-8458-3280 ext. 361
Singapore Honeywell Global TAC - South East Asia
+65-6580-3500
Taiwan Honeywell Global TAC - Taiwan
+886-7-323-5900
Japan Honeywell Global TAC - Japan
+81-3-5440-1303
Elsewhere Call your nearest Honeywell office.

Symbol Definitions
R300.1 Experion Getting Started with Experion Software Guide v 05/06 Honeywell
Symbol Definitions The following table lists those symbols used in this document to denote certain conditions.
Symbol Definition
ATTENTION: Identifies information that requires special consideration.
TIP: Identifies advice or hints for the user, often in terms of performing a task.


R300.1 Experion Getting Started with Experion Software Guide vii 05/06 Honeywell
Contents
1. ABOUT THIS GUIDE......................................................................9 1.1 Introduction ..................................................................................................... 9
Scope of this guide.................................................................................................................9 Supporting documentation .....................................................................................................9 Audience skill set ...................................................................................................................9 Overview of installation activity ............................................................................................10
2. BEFORE YOU START .................................................................11 2.1 Understanding installation tasks................................................................. 11
Experion Networks ...............................................................................................................11 Rules....................................................................................................................................11 Domain Controllers and High Security Policy.......................................................................12
2.2 Before starting an installation ..................................................................... 13 Solution Support On-line (SSOL) .........................................................................................13
2.3 Overview of Experion media ........................................................................ 15 Experion CDs and DVDs......................................................................................................15
2.4 Overview of Experion nodes........................................................................ 17 Experion server ....................................................................................................................17 eServer.................................................................................................................................17 Experion Flex Station (ES-F) or Console Extension Station (ES-CE) ..................................17 Experion Console Station (ES-C).........................................................................................18 Experion Hiway Gateway (EHG) ..........................................................................................18 Experion Application Control Environment (ACE) ................................................................18 Experion Simulation Environment (SimC200) ......................................................................18
3. GETTING STARTED SCENARIOS..............................................19
4. INSTALLING ON A CLEAN COMPUTER....................................21 4.1 Overview ........................................................................................................ 21 4.2 Install missing hardware .............................................................................. 21 4.3 Choose an installation method.................................................................... 22

Contents Symbol Definitions
viii Experion Getting Started with Experion Software Guide R300.1 Honeywell 05/06
5. INSTALLING ON A NON-HONEYWELL COMPUTER ............... 23 5.1 Overview.........................................................................................................23 5.2 Manual Experion operating system installation.........................................23
Assumptions........................................................................................................................ 23 Manual operating system installation .................................................................................. 25
6. PREPARING FOR AN INSTALLATION...................................... 29 6.1 Completing the specification forms ............................................................29
7. PREPARING HARDWARE FOR AN INSTALLATION................ 35 7.1 Introduction....................................................................................................35 7.2 Installing a network interface card ..............................................................35
Installing the Microsoft loopback adapter ............................................................................ 36 7.3 Installing a Control Net PCIC card ...............................................................37
Prerequisites ....................................................................................................................... 37 Accessing the expansion slots and installing the card......................................................... 37
7.4 Installing the PCIC drivers............................................................................39

R300.1 Experion Getting Started with Experion Software Guide 9 05/06 Honeywell
1. About this guide
1.1 Introduction Scope of this guide
This document gives you an overview of the tasks that you will perform while installing an Experion system. Each Experion node type is explained along with associated documentation that might be required while performing an installation of that node type.
Each node has its own checklist that should be followed during installation. The installation checklists are in the Experion Software Installation and Upgrade Guide (SIUG).
Supporting documentation
Following is a list of documentation that you should have during an Experion installation.
• Experion Software Installation User’s Guide (SIUG). This document guides the user through the standard Experion software installation. The SIUG is not part of Knowledge Builder but can be found in the Experion PDF Collection CD.
• Experion Supplementary Installation Tasks Guide (SITG). This document describes additional mandatory and optional setup tasks that are performed after the software installation is completed. This document is on the Knowledge Builder CD.
• Software Change Notices (SCN)
Audience skill set The person installing the Experion software should have an understanding of Windows folder and file structures, experience installing software programs using standard installation screens, and an understanding of the plant topology where this software will be used.
The installer must also have access to software installation license keys as they will be required during the Experion installation.

1. About this guide 1.1. Introduction
10 Experion Getting Started with Experion Software Guide R300.1 Honeywell 05/06
Overview of installation activity Figure 1 illustrates the activities you will be performing in this guide during a software installation.
Figure 1 Software Activities
R300.1 Experion Getting Started with Experion Software Guide 11 05/06 Honeywell
2. Before you start
2.1 Understanding installation tasks Experion software is installed onto a Computer that contains either a Windows Server 2003 Standard Edition or an XP Professional operating system. For nodes purchased from Honeywell, all required software, including the operating system, is provided for a standard installation.
In addition to the packages installed during the initial installation, the DVD contains several supporting or optional packages that are to be installed.
ATTENTION
The R300.0 release of Experion PKS does not support migration/upgrades from earlier versions of Experion. If you have an Experion R210 release or an Experion R300 Off Process Beta release, you must perform a clean install of the R300.0 software.
Experion Networks
Experion Process Networks (EPNs) are the networks used between systems that can communicate directly with C200/C300 Controllers. This choice affects the way services are configured on products, ie the communication channel and peer-to-peer communications. The following products have this capability:
• Experion Server with C200/C300 support.
• Experion Console Stations with C200/C300 support.
• ACE Server
• SIM-C200
Rules Only one EPN type can be defined per Experion System. You can not combine different EPN types on a single system.
Valid EPN types are:
• ControlNet
• ControlNet over Ethernet (not available for ACE or C200 Simulation environments.)
• Fault Tolerant Ethernet (FTE)

2. Before you start 2.1. Understanding installation tasks
12 Experion Getting Started with Experion Software Guide R300.1 Honeywell 05/06
Domain Controllers and High Security Policy It is up to you whether or not to use a Domain Controller in your system. If you do decide to use a Domain Controller, you should install the Domain Controller before you start installing any Experion nodes.
After all of your Experion nodes have been installed, you should then install the High Security Policy on the Domain Controller. More information about installing the High Security Policy on the Domain Controller can be found in the Server and Client Configuration Guide under Configuring security and access, Using High Security Policy.

2. Before you start 2.2. Before starting an installation
R300.1 Experion Getting Started with Experion Software Guide 13 05/06 Honeywell
2.2 Before starting an installation Solution Support On-line (SSOL)
In our efforts to provide the most up-to-date information, updates to this Software Installation and Upgrade Guide are available on the Solution Support Online site at www.honeywell.com\ps
Before installing Experion, please check the Solution Support Online site for updates. If you are a new user, you can register for access to the Solution Support Online site at this URL.
Perform the steps in the following table to check the Solution Support Online site.
Step Action
1 Type the following URL into your web browser navigation window and hit Enter.
www.honeywell.com\ps
2 Click Login to My Account.
3 Type your user name and password, and then click Login.
4 Choose "Legacy SSOL" from the Quick Links Section.
5 Select Solution Support Online.
6 In the Your Entitled Products section, choose Experion .
Software Installation and Upgrade Guide updates are listed in the Experion home page. You should look specifically for any required R300 patches that need to be downloaded before you begin installation or upgrade.

2. Before you start 2.2. Before starting an installation
14 Experion Getting Started with Experion Software Guide R300.1 Honeywell 05/06
Important tips when using Windows Server 2003 Service Pack 1
If you are using Windows Server 2003, please read the following information. It is very important the Windows firewall is properly enabled before stating your Experion software installation.
TIP
The following WARNING only applies if you do NOT plan to use the Client/Server Initialization CD to install your operating system. If you did use the Client/Server Initialization CD to install your operating system, you can ignore the following WARNING.
WARNING
Windows Server 2003 Service Pack 1 introduces the Windows Firewall to the Windows Server platform. This firewall, if enabled, has a significant impact on the operation of Experion PKS software.
Experion PKS software installation packages register with the firewall to allow proper operation, but only if the firewall is present and enabled at the time the Experion software is installed.
Honeywell recommends and supports running Windows Server 2003 with the firewall enabled. However, for Experion PKS to operate correctly with the added security of the Windows Firewall, the following steps must be followed:
1. Service Pack 1 (or later) must be installed.
2. The firewall must be enabled (by default, it is not enabled by Microsoft).
Any Experion PKS software that was installed prior to the previous steps must be uninstalled and reinstalled.
2. Before you start 2.3. Overview of Experion media
R300.1 Experion Getting Started with Experion Software Guide 15 05/06 Honeywell
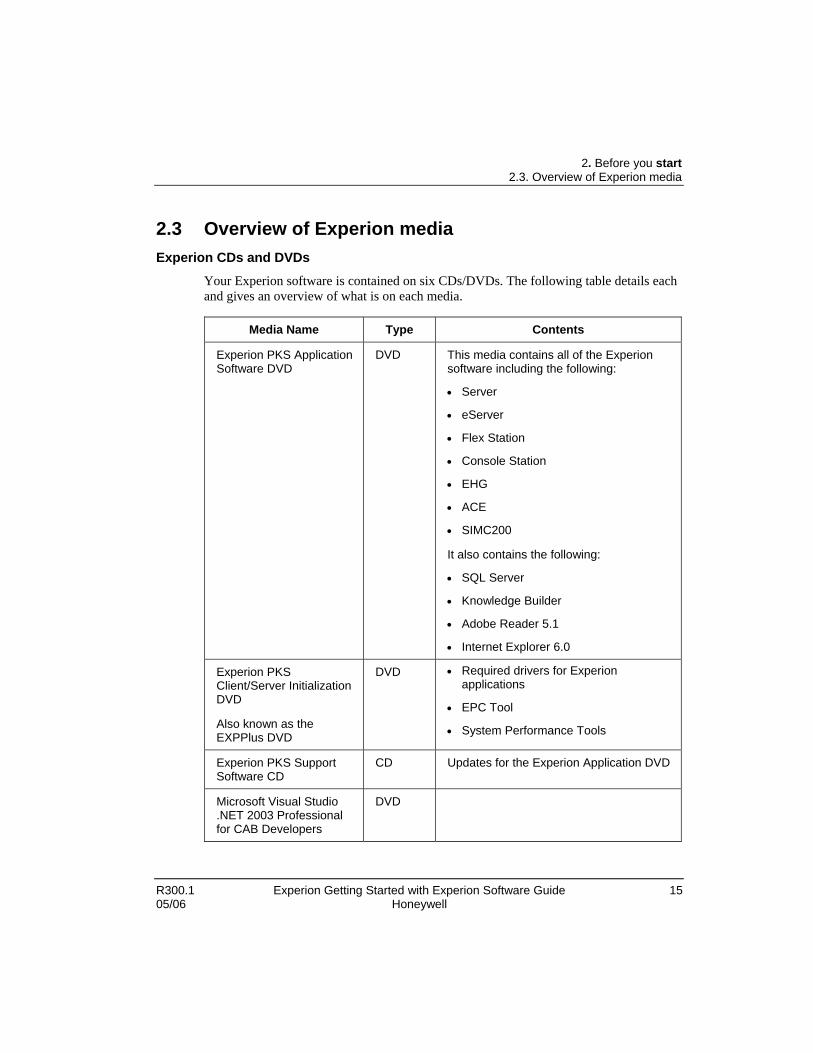
2.3 Overview of Experion media Experion CDs and DVDs
Your Experion software is contained on six CDs/DVDs. The following table details each and gives an overview of what is on each media.
Media Name Type Contents
Experion PKS Application Software DVD
DVD This media contains all of the Experion software including the following:
• Server
• eServer
• Flex Station
• Console Station
• EHG
• ACE
• SIMC200
It also contains the following:
• SQL Server
• Knowledge Builder
• Adobe Reader 5.1
• Internet Explorer 6.0
Experion PKS Client/Server Initialization DVD
Also known as the EXPPlus DVD
DVD • Required drivers for Experion applications
• EPC Tool
• System Performance Tools
Experion PKS Support Software CD
CD Updates for the Experion Application DVD
Microsoft Visual Studio .NET 2003 Professional for CAB Developers
DVD

2. Before you start 2.3. Overview of Experion media
16 Experion Getting Started with Experion Software Guide R300.1 Honeywell 05/06
Media Name Type Contents
Microsoft Visual Studio .NET 2003 Professional MSDN Library
DVD
Experion PKS LIOM Software CD
CD LIOM software
Experion Knowledge Builder CD
CD Experion book set.
NOTE: Knowledge Builder is installed by the Application DVD but is also on its own media.
Experion PDF Collection CD
CD Experion book set in PDF format
Experion PKS LIOM Knowledge Builder CD
CD LIOM book set

2. Before you start 2.4. Overview of Experion nodes
R300.1 Experion Getting Started with Experion Software Guide 17 05/06 Honeywell
2.4 Overview of Experion nodes Experion server
The Experion server is the core component of the Experion Process Control System. The Experion server is the central point for communication, management, and distribution of data.
The Experion server provides:
• Inter-site coordination via DSA (Distributed Server Architecture)
• Host control system configuration data
• Host environment for Flex Station access (up to 40)
• Configuration for Console Stations (up to 10)
• Alarm and Event Management
• Reporting and Trend Analysis
eServer eServer provides casual users the ability to gain access to displays and report data from the Control System with no special client side software install. It provides this by communicating to the Experion Servers via DSA.
Experion Flex Station (ES-F) or Console Extension Station (ES-CE) Experion Flex Station and Console Extension Station:
• provide the main user interface software and tool set for Experion
• allow control data to be read, manipulated, and displayed.
Typically situated on Level2, they require a link with a node that has direct access to Level1.
The Flex Stations (ES-F) communicate with Experion Servers for data access.
The Console Extension Station (ES-CE) communicates with Console Stations for data access.

2. Before you start 2.4. Overview of Experion nodes
18 Experion Getting Started with Experion Software Guide R300.1 Honeywell 05/06
Experion Console Station (ES-C) A high availability operator station option for critical processes, it provides direct access to Level-1 while hosting an environment for up to four Console Extension Stations. It maintains control system accessibility in the event the server is unavailable. It does not provide centralized Alarm and Event Management, Reporting and Trend Analysis, or the ability to configure DSA connections.
Experion Hiway Gateway (EHG) An optional system that allows Experion to access data from the TDC 2000 Data Hi-Way. EHG provides a redundant interface between Experion’s FTE Control Network and the DHEB (Data Highway Ethernet Bridge).
Experion Application Control Environment (ACE) A Windows Server based control execution environment that supports Level2 control and allows integration to third party components via standard interfaces like OPC (OLE for Process Control).
Experion Simulation Environment (SimC200) A software based simulation of a C200 controller. When combined with other software, for example, Shadow Plant, it allows control strategies to be tested in a simulated environment before running in production.

R300.1 Experion Getting Started with Experion Software Guide 19 05/06 Honeywell
3. Getting started scenarios The following table describes the possible scenarios that you may encounter and are covered in this and other Experion documents.
If… then go to ….
You have purchased your computer from Honeywell with operating system and Experion software installed
Factory Installations - Experion Nodes Purchased from Honeywell under “Experion PKS installation modes options” in the SIUG.
You have purchased your computer from Honeywell with no operating system nor Experion software installed
“Installing on a clean computer” in this guide.
You have purchased your computer from a vendor other than Honeywell.
“Installing on a non-Honeywell computer” in this guide.


R300.1 Experion Getting Started with Experion Software Guide 21 05/06 Honeywell
4. Installing on a clean computer
4.1 Overview This section describes the tasks that will be required after you receive your clean computer. A clean computer contains no operating system or Experion software.
There are two ways that you can install your software on a clean computer. They are:
• Clean Installation using Unattended Workstation Deployment (UWD)
• Manual Clean Installation for OEM Users.
UWD installation is an automated process designed for use with Honeywell qualified machines. UWD is the preferred installation method.
The Manual Clean Installation method is required when the operating system needs to be manually installed. This may be necessary if you have purchased your computer from a vendor other than Honeywell. User interaction will be required throughout this method of installation.
4.2 Install missing hardware In the following procedure, you will complete tasks that are necessary before you start any clean installation.
Step Action
1 If the NIC and PCIC cards have not been installed in your computer, see “Preparing hardware for an installation” in this guide
3 Before starting the clean computer installation, see “Completing the specification forms” in this guide.

4. Installing on a clean computer 4.3. Choose an installation method
22 Experion Getting Started with Experion Software Guide R300.1 Honeywell 05/06
4.3 Choose an installation method The following table lists two different methods for installing your software on a clean computer. The UWD method is the preferred method.
ATTENTION
Before installing your operating system, the hard drive will be re-formatted. Make sure that you have disconnected any external drives so that those drives will not be inadvertently re-formatted instead of the internal hard drive.
If …. then go to ….
You will be using the UWD installation method,
“Unattended Workstation Deployment (UWD) checklists” in the SIUG.
You will be using the manual Clean Installation method
“Manual Clean Installation checklists” in the SIUG.

R300.1 Experion Getting Started with Experion Software Guide 23 05/06 Honeywell
5. Installing on a non-Honeywell computer
5.1 Overview This section addresses some of the tasks that you will have to perform if you have purchased a computer from a vendor other than Honeywell. The purpose of this section is not to give you a step-by-step process for setting up your system, rather its purpose is to define, at a high level, some of the tasks that you need to be aware of when you are setting up a PC from scratch.
The assumption is that you are not using the Experion PKS Client/Server Initialization DVD since this DVD is designed to work on Honeywell-supplied platforms.
ATTENTION
Even if you have purchased the same model PC from Dell, for example, as Honeywell uses, it may not have the same configuration as that PC would have if you purchased it from Honeywell.
Such things as hard drive type can affect your ability to use the Experion PKS Client/Server Initialization DVD during an installation.
Also, due to the wide variation in personal computers available on the market, to obtain an acceptable level of performance and operation, you may need to add additional processor or memory resources beyond that specified in the Technical Specifications. It is also possible that other issues relating to non-Honeywell computer resources (Video Adapters, Network adapters, etc.) will adversely affect system operation and/or performance.
Special attention should be given to computers that will be used for LCN Connected Nodes and FTE since these computers require approved LCNP and NIC cards that may only function properly on Honeywell supplied computers.
5.2 Manual Experion operating system installation Assumptions
• You did not purchase your PC from Honeywell.
• You are not using the Experion PKS Client/Server Initialization DVD.

5. Installing on a non-Honeywell computer 5.2. Manual Experion operating system installation
24 Experion Getting Started with Experion Software Guide R300.1 Honeywell 05/06
• You have a platform that conforms to the minimum Honeywell hardware requirements.
• Some of the following tasks apply to Dell platforms only.

5. Installing on a non-Honeywell computer 5.2. Manual Experion operating system installation
R300.1 Experion Getting Started with Experion Software Guide 25 05/06 Honeywell
Manual operating system installation The following defines the tasks you will need to perform and the software that you will need before starting a manual operating system installation on your Experion system.
OS Media requirements and installation You will need:
− Dell Reinstallation media (Dell platforms Only) or,
− Microsoft Retail/Off-the-shelf media or,
− OS media supplied by your platform vendor
Experion Applications release R300 requires:
− Windows XP Professional Service Pack 2
ATTENTION
Your media may or may not have Service Pack 2 integrated. Please consult your supplier or proceed to Microsoft’s site to download if necessary.
− Windows Server 2003 Service Pack 1 – Standard Edition
ATTENTION
Your media may or may not have Service Pack 1 integrated. Please consult your supplier or proceed to Microsoft’s site to download if necessary.
Install the Windows Operating System per your specific requirements (i.e. Partition size, other specific OS options you prefer). Consult your Microsoft documentation for installation guidelines, or refer to your platform vendor’s specific guidelines/documentation.
Install .Net Framework
Clients and servers require .Net Framework 1.1 Service Pack 1
− Client/XP .Net F/W Service Pack 1 (see KB867460)
Servers should have .Net Framework 1.1 already installed by default during Windows Server 2003 SP1 installation. .Net Framework 1.1 Service Pack 1 will need to be installed on top of .Net Framework 1.1.

5. Installing on a non-Honeywell computer 5.2. Manual Experion operating system installation
26 Experion Getting Started with Experion Software Guide R300.1 Honeywell 05/06
− Windows Server 2003 .Net F/W Service Pack 1 (see KB867460)
(Dell Servers Only) Install Dell OpenManage Server Administrator (OMSA) 4.4
TIP
Dell OMSA breaks down into various sub-components depending on what is supported in a specific platform. Please consult your Dell documentation or your hardware vendor for specific versions.
(Dell Workstations Only) Install Dell OpenManage Client Instrumentation v7.0 and v7.1 (update)
Consult your Dell documentation for the correct version for the platform
(Server Only) Install the following WMI (Windows Management Instrumentation) components
• Simple Network Management Protocol
• WMI SNMP Provider
• WMI Windows Installer Provider
Install the Honeywell_IKB_Service.msi file, if using the Honeywell Integrated Keyboard or OEP IKB keyboard
Install Patch for Windows Server 2003 SP1 event log file corruption
See KB899416
Install the Microsoft Windows Installer software and update
Consult Microsoft and Honeywell documentation for the current supported version.
• Client Only: Windows Installer update for Windows XP service pack 2 (KB893803-v2)
• Server Only: Windows Installer update for Windows Server 2003 service pack 1 (KB898715)
Disable the Screen Saver
To prevent blank screens and/or screen lockout, the Screen Saver and Power Save Options must be disabled.

5. Installing on a non-Honeywell computer 5.2. Manual Experion operating system installation
R300.1 Experion Getting Started with Experion Software Guide 27 05/06 Honeywell
Install MDAC Components (MS04-003)
Install the DirectX 9.0c driver
Disable simple file sharing (Clients/Windows XP Only)
Disable media sensing on NIC adapter
TIP
Refer to vendor documentation if needed.
Adjust video settings per your requirements
You will need to adjust the video settings on your PC per your system requirements (1024x768, 1280x1024, or 1600x1200; 16bit Color; monitor/FPD frequency)
Adjust Operating System Performance Tuning Options
Based on your platform, either server or workstation client, adjust your Operating System Performance Tuning Options, Application or Performance
Operating System (XP) Changes to Improve System Performance
Station performance can be improved by changing the Visual Effects option when using the XP operating system.
The steps to change this option are:
1. Right click on “My Computer” and select Properties.
2. Select the “Advanced” tab.
3. On the “Visual Effects” tab select “Adjust for Best Performance”.
4. Click Ok.
5. Click OK.

5. Installing on a non-Honeywell computer 5.2. Manual Experion operating system installation
28 Experion Getting Started with Experion Software Guide R300.1 Honeywell 05/06
Enable/Turn ON the Windows Firewall
ATTENTION
Ensure the Windows Internet Connection Service (ICS)/Firewall Service has been started PRIOR to Experion Application installation.
In Windows XP, the default is Enabled/On.
Setting up NIC cards for FTE See the Fault Tolerant Ethernet Installation and Service Guide section ……. for details.
Additional resources
Refer to the following sites for assistance with Microsoft products or issues:
• http://support.microsoft.com/search/?adv=0 [Knowledge Base Search] • http://www.microsoft.com/downloads/search.aspx?displaylang=en [Downloads]
Refer to the following site for assistance with Dell products or issues:
• http://www1.us.dell.com/content/default.aspx?c=us&cs=555&l=en&s=biz
At this point, go to the “Experion PKS installation modes options” in the SIUG.

R300.1 Experion Getting Started with Experion Software Guide 29 05/06 Honeywell
6. Preparing for an installation
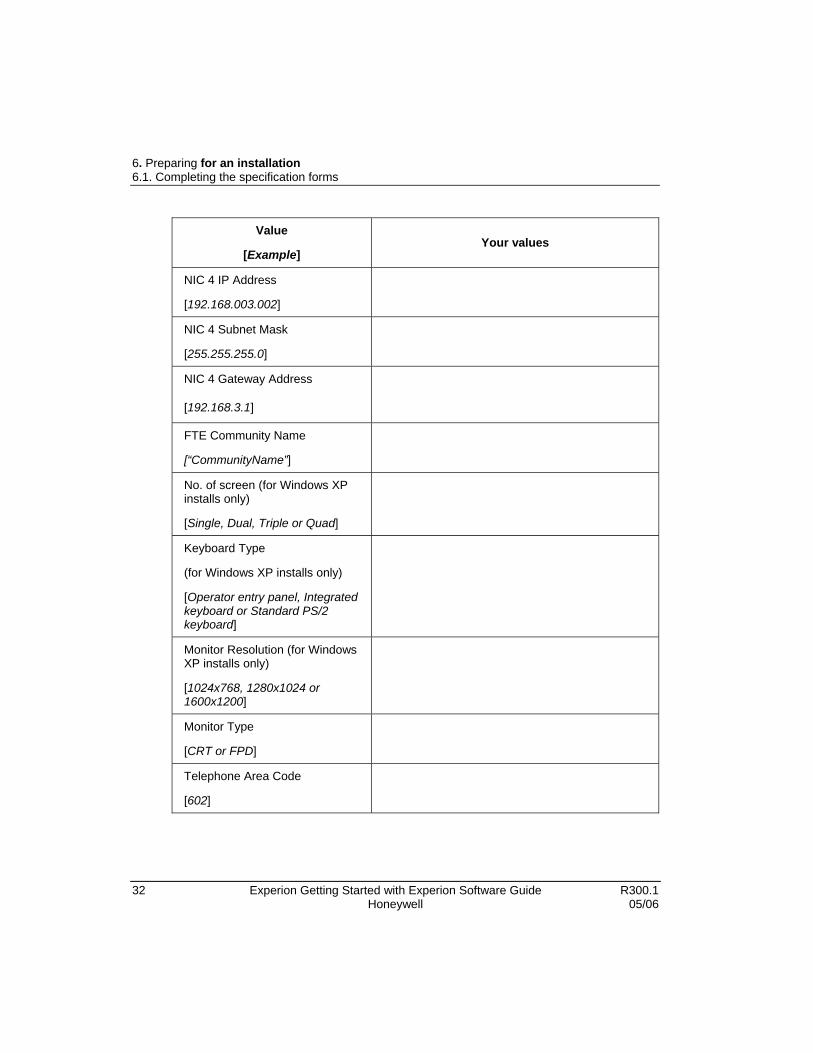
6.1 Completing the specification forms During the installation of the operating system using EXPPlus, you will be asked to enter system information. This system information will be used during the install and will be saved for future node installations.
You will also need this information when completing a factory install.
Use the following table to gather information required to enter into the Experion PKS Configuration Tool (EPCTool). It may be necessary to consult with your IT department for information required for setting up your system.
TIP
In many cases, the examples are for reference only. For example, you will need to determine your own NIC IP Addresses.
Also, when the EPCTool is executed on the machine being configured as an Experion system, the EPCTool auto-detects the # values.

6. Preparing for an installation 6.1. Completing the specification forms
30 Experion Getting Started with Experion Software Guide R300.1 Honeywell 05/06
Value
[Example] Your values
computer Platform Model #
[1. P340 , P360 , P370 or P470 for Experion PKS client systems
2. PE1600Sc, PE2600, PE1800, PE2850 for Experion PKS server systems]
Installation Type
[1. Windows XP Professional with/without Experion PKS software installation.
2. Windows Server 2003 with/without Experion PKS software installation.]
EXPPlus Media version #
[WPE_UT1.0]
EXPPlus Media part number #
[51123456]
Dell Service Tag #
[Number similar to "C8QZ00B"]
Number of Network Interface Cards #
[ 1-4]
NIC 1 MAC Address #
[123456789012]
NIC 1 IP Address
[192.168.000.002]

6. Preparing for an installation 6.1. Completing the specification forms
R300.1 Experion Getting Started with Experion Software Guide 31 05/06 Honeywell
Value
[Example] Your values
NIC 1 Subnet Mask
[255.255.255.0]
NIC 1 Gateway Address
[192.168.0.1]
NIC 2 MAC Address #
[123456789012]
NIC 2 IP Address
[192.168.001.002]
NIC 2 Subnet Mask
[255.255.255.0]
NIC 2 Gateway Address
[192.168.1.1]
NIC 3 MAC Address #
[123456789012]
NIC 3 IP Address
[192.168.002.002]
NIC 3 Subnet Mask
[255.255.255.0]
NIC 3 Gateway Address
[192.168.2.1]
NIC 4 MAC Address #
[123456789012]
6. Preparing for an installation 6.1. Completing the specification forms
32 Experion Getting Started with Experion Software Guide R300.1 Honeywell 05/06
Value
[Example] Your values
NIC 4 IP Address
[192.168.003.002]
NIC 4 Subnet Mask
[255.255.255.0]
NIC 4 Gateway Address
[192.168.3.1]
FTE Community Name
[“CommunityName”]
No. of screen (for Windows XP installs only)
[Single, Dual, Triple or Quad]
Keyboard Type
(for Windows XP installs only)
[Operator entry panel, Integrated keyboard or Standard PS/2 keyboard]
Monitor Resolution (for Windows XP installs only)
[1024x768, 1280x1024 or 1600x1200]
Monitor Type
[CRT or FPD]
Telephone Area Code
[602]

6. Preparing for an installation 6.1. Completing the specification forms
R300.1 Experion Getting Started with Experion Software Guide 33 05/06 Honeywell
Value
[Example] Your values
Tuning Options (for XP and Windows Server 2003 installs)
[Applications]
Server Optimization
(Windows Server 2003 only)
[Maximize throughput for Network Application]
Server services for Windows Server 2003
[Internet Information Services or Terminal Services]
License details for Windows Server 2003
[Per Seat or Per Server]
Windows Product ID
[{25 digit code}]
Computer Name
[EXP_STATION]
Company Name
[Honeywell, Inc.]
Customer Name
[XXXXXX]
Workgroup Name
[WORKGROUP]

6. Preparing for an installation 6.1. Completing the specification forms
34 Experion Getting Started with Experion Software Guide R300.1 Honeywell 05/06
You have completed this task. Return to the checklist that brought you to this point.

R300.1 Experion Getting Started with Experion Software Guide 35 05/06 Honeywell
7. Preparing hardware for an installation
7.1 Introduction The following hardware items may need to be installed before starting an Experion installation.
• Network interface card (NIC).
• Control Net PCIC card.
7.2 Installing a network interface card This section describes how to install a network interface card (NIC) and driver.
If you do not install a NIC, you must install the Microsoft loopback adapter driver (see ”Installing the Microsoft loopback adapter”), regardless of the connection status.
Install the NIC in accordance with the manufacturer’s instructions, and then install the appropriate driver as described here.
ESD HAZARD
Ensure that you are properly grounded when installing any hardware in a computer. It is recommended that you use an antistatic wrist strap. Alternatively, frequently touch metal parts on the computer to prevent the buildup of static electricity.
It is recommended that you use the network interface card supplied with the computer (if it is a DELL computer). If you receive a computer pre-configured from the factory, the qualified NIC is already installed.
If you order FTE after your system has been installed, you will only receive that hardware which is qualified and you should install FTE according to the FTE instructions.
For a list of qualified switches and other network equipment, refer to the most recent Experion Platform Fault Tolerant Ethernet (FTE) Specification and Technical Data.
ATTENTION
The Etherlink III NIC, which was recommended in earlier versions of Experion, is not supported in this release of Experion.

7. Preparing hardware for an installation 7.2. Installing a network interface card
36 Experion Getting Started with Experion Software Guide R300.1 Honeywell 05/06
Prerequisites
• NIC is qualified for use with Experion R300.
• Disk or CD supplied with the NIC.
Considerations
• If you have a Windows 2000, Windows XP Professional, or Windows Server 2003, recommended NIC, it will be detected and automatically configured during the operating system installation.
Configuring the network adapter settings
To change the configuration:
Step Action
1 Choose Start > Settings > Network and Dial-up Connections.
2 Right-click on the connection and choose Properties.
3 Make the required changes.
You have completed this task.
Installing the Microsoft loopback adapter
ATTENTION
If you have a Network Interface Card (NIC) installed, you do not need to install the Microsoft Loopback adapter driver. You have completed the task and can return to the checklist that led to this task.
If you have no NIC installed, you must install the Microsoft Loopback adapter driver.
To install the Microsoft Loopback Adapter, perform the steps in the following table.
Step Action
1 Choose Start > Settings > Control Panel.

7. Preparing hardware for an installation 7.3. Installing a Control Net PCIC card
R300.1 Experion Getting Started with Experion Software Guide 37 05/06 Honeywell
Step Action
2 Double-click Add/Remove Hardware.
3 Click Next to continue.
4 Click Add/Troubleshoot a device and click Next.
The wizard will locate and list all the plug and play hardware devices.
5 From the list of devices, click Add a new device and click Next.
6 Click No, I want to select the hardware from a list and click Next.
7 In the Hardware Types list, click Network Adapters and click Next.
8 In the Manufacturers list, click Microsoft, and in the Network Adapter list, click Microsoft Loopback Adapter and click Next.
9 Click Next to start the hardware installation.
10 Click Finish.
You have completed this task. Return to the checklist that led to this task.
7.3 Installing a Control Net PCIC card Prerequisites
• Computer documentation is available for reference.
• Be sure you know how to install hardware in your computer
• Be sure you have installed the operating system for your computer and configured your options.
• Be sure you are wearing a grounding wrist strap before you handle the card.
• Be sure you have a Phillips-head and flat-head screwdriver on hand.
Accessing the expansion slots and installing the card Use the following procedure to access the PCI local bus expansion slots in your computer. Refer to the computer manufacturer’s documentation for details, if required.

7. Preparing hardware for an installation 7.3. Installing a Control Net PCIC card
38 Experion Getting Started with Experion Software Guide R300.1 Honeywell 05/06
Step Action
1 Turn off the power switch to remove power from the computer
2 Remove the computer’s cover
3 • Select a vacant PCI local bus expansion slot.
• Remove the slot’s expansion cover on the back (rear bracket) of the computer.
4 Insert the PCIC card into the edge connector for the selected slot.
5 Install the expansion slot screw to secure the card in its slot.
6 Turn on the power switch and wait for the computer to power up.
• If the computer powers up correctly, go to Step 4.
• If the computer hang ups, you probably have a memory or I/O conflict. Remove all other cards and try again. If the computer still hangs up, call our Technical Assistance Center.
7 Replace the computer’s cover.
8 Connect the ControlNet network to the PCIC card connectors.

7. Preparing hardware for an installation 7.4. Installing the PCIC drivers
R300.1 Experion Getting Started with Experion Software Guide 39 05/06 Honeywell
7.4 Installing the PCIC drivers
Step Action
1 Insert the Experion R300 Application DVD into the appropriate drive.
2 In the Computer Management dialog box, right-click in the pane displaying the devices, and then click Scan for Hardware Changes.
3 Click Other Device and then click Reinstall Driver.
4 Click Next to start installing the driver.
5 Click Display a list of the known drivers for this device so that I can choose a specific driver and then click Next.
6 Click Other Device.
7 Click Have Disk to display the Install from Disk dialog box.
8 Click Browse and then browse to the following folder on the drive:
\RSLinx\RSLinx\pnp_Drivers\Win2k\1784-PCIC(S)
9 Click OK.
10 Click A-B 1784-PCIC(S).
11 Click Next.
12 Click Yes in the update driver warning message dialog box.
13 Click Next.
14 If a confirm file replace message dialog box appears, click Yes to continue the installation.
15 Click Finish to complete the installation.
16 Click Close to close the Properties dialog box.