Embed Size (px)
Citation preview

Created 2016-07 CPR Electronic Records Committee
Electronic Records Modules Electronic Records Committee Congressional Papers Roundtable Society of American Archivists Generating File Format Identification and Checksums with DROID
Brandon Hirsch Center for Legislative Studies [email protected]
____________________________________________________ Date Published: July 2016 Module#: ERCM001

2
File Format Identification & Checksum Generation with DROID
May 2016 For Congressional Papers Roundtable Electronic Records Committee
Table of Contents Table of Contents Overview and Rationale Procedural Assumptions Hardware and Software Requirements Workflow
Configuring DROID Configuring DROID in Mac OS X Configuring DROID in Windows
Starting DROID Starting DROID in Mac OS X Starting DROID in Windows
What Do These Results Mean? Checksums Further Evaluation
Exporting Results Filtering Reports
Overview and Rationale File format identification is a critical component of digital preservation activities because it provides a reliable method for determining exactly what types of files are stored in your institution’s holdings. Understanding the contents of one’s holdings provides a foundation upon which additional preservation decisions are made. Additionally, generating checksums provides a reliable method for evaluating the identity and integrity of the specific files and objects in an institution’s digital holdings throughout the preservation lifecycle. The National Archives UK’s Digital Record Object IDentifier is one tool that can meet both of these needs. DROID’s primary function is to generate file format identification in compliance with the PRONOM registry, and to provide reports and/or exported results that can be used to
3
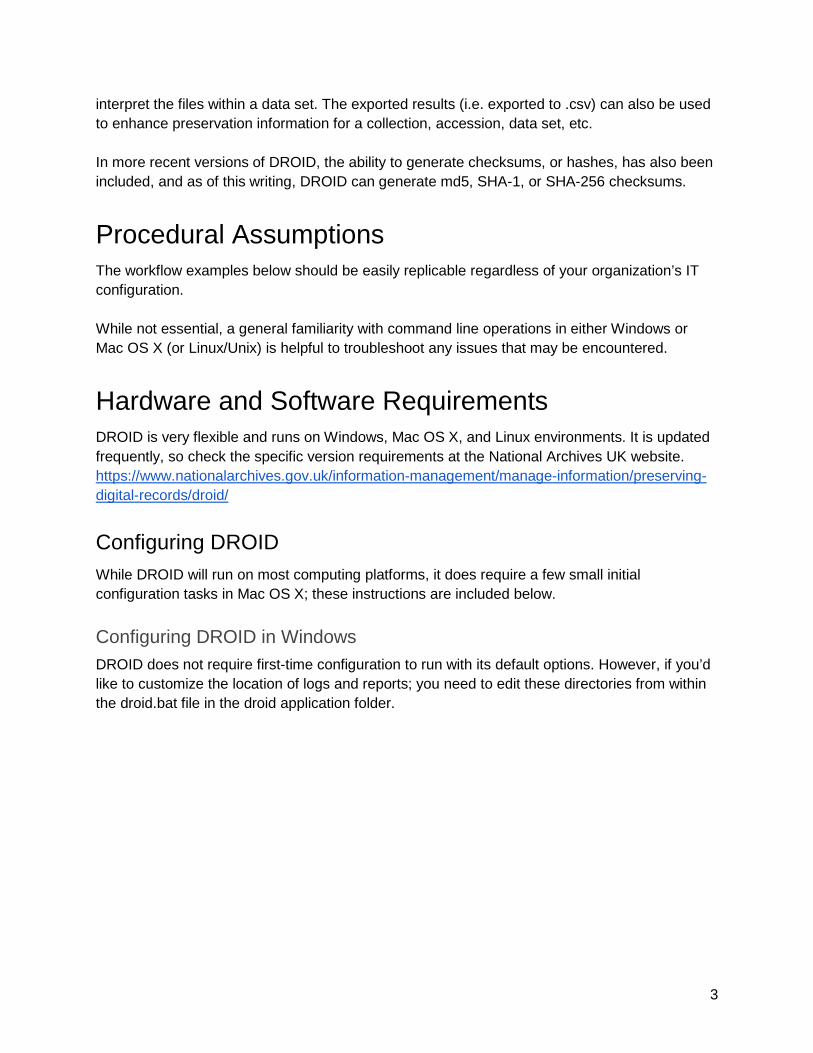
interpret the files within a data set. The exported results (i.e. exported to .csv) can also be used to enhance preservation information for a collection, accession, data set, etc. In more recent versions of DROID, the ability to generate checksums, or hashes, has also been included, and as of this writing, DROID can generate md5, SHA-1, or SHA-256 checksums.
Procedural Assumptions The workflow examples below should be easily replicable regardless of your organization’s IT configuration. While not essential, a general familiarity with command line operations in either Windows or Mac OS X (or Linux/Unix) is helpful to troubleshoot any issues that may be encountered.
Hardware and Software Requirements DROID is very flexible and runs on Windows, Mac OS X, and Linux environments. It is updated frequently, so check the specific version requirements at the National Archives UK website. https://www.nationalarchives.gov.uk/information-management/manage-information/preserving-digital-records/droid/
Configuring DROID While DROID will run on most computing platforms, it does require a few small initial configuration tasks in Mac OS X; these instructions are included below.
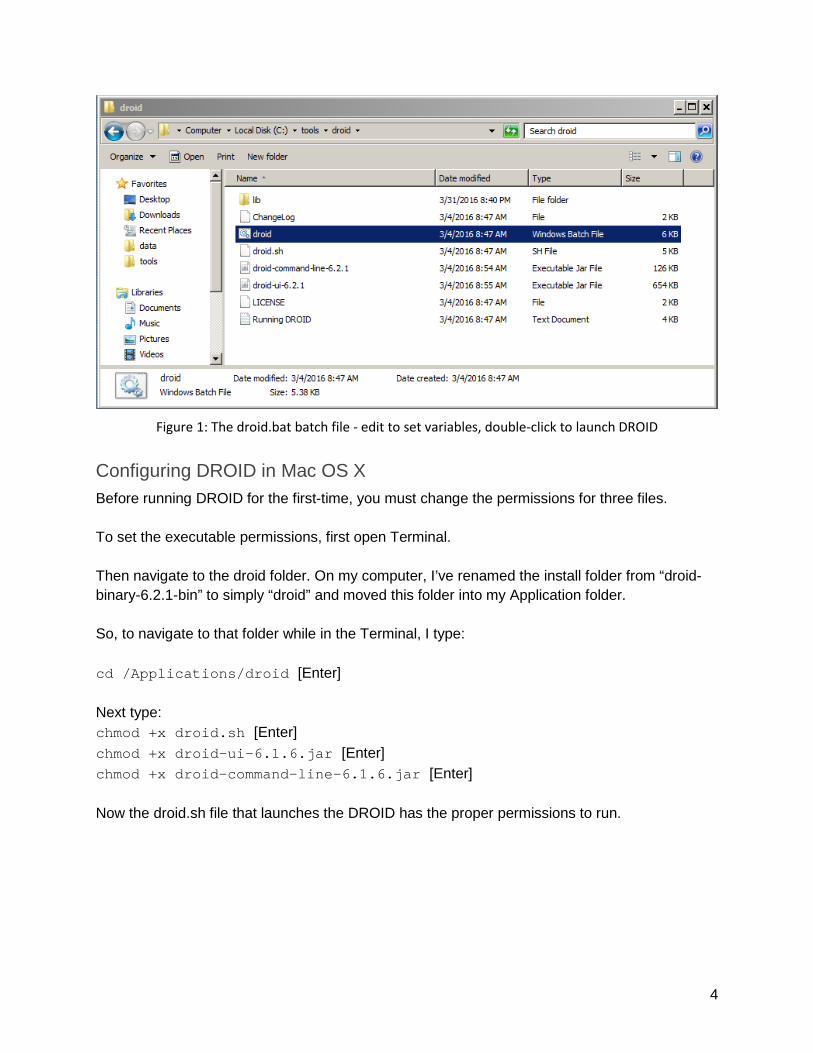
Configuring DROID in Windows DROID does not require first-time configuration to run with its default options. However, if you’d like to customize the location of logs and reports; you need to edit these directories from within the droid.bat file in the droid application folder.
4
Figure 1: The droid.bat batch file - edit to set variables, double-click to launch DROID
Configuring DROID in Mac OS X Before running DROID for the first-time, you must change the permissions for three files. To set the executable permissions, first open Terminal. Then navigate to the droid folder. On my computer, I’ve renamed the install folder from “droid-binary-6.2.1-bin” to simply “droid” and moved this folder into my Application folder. So, to navigate to that folder while in the Terminal, I type: cd /Applications/droid [Enter] Next type: chmod +x droid.sh [Enter] chmod +x droid-ui-6.1.6.jar [Enter] chmod +x droid-command-line-6.1.6.jar [Enter] Now the droid.sh file that launches the DROID has the proper permissions to run.
5
Workflow and Examples
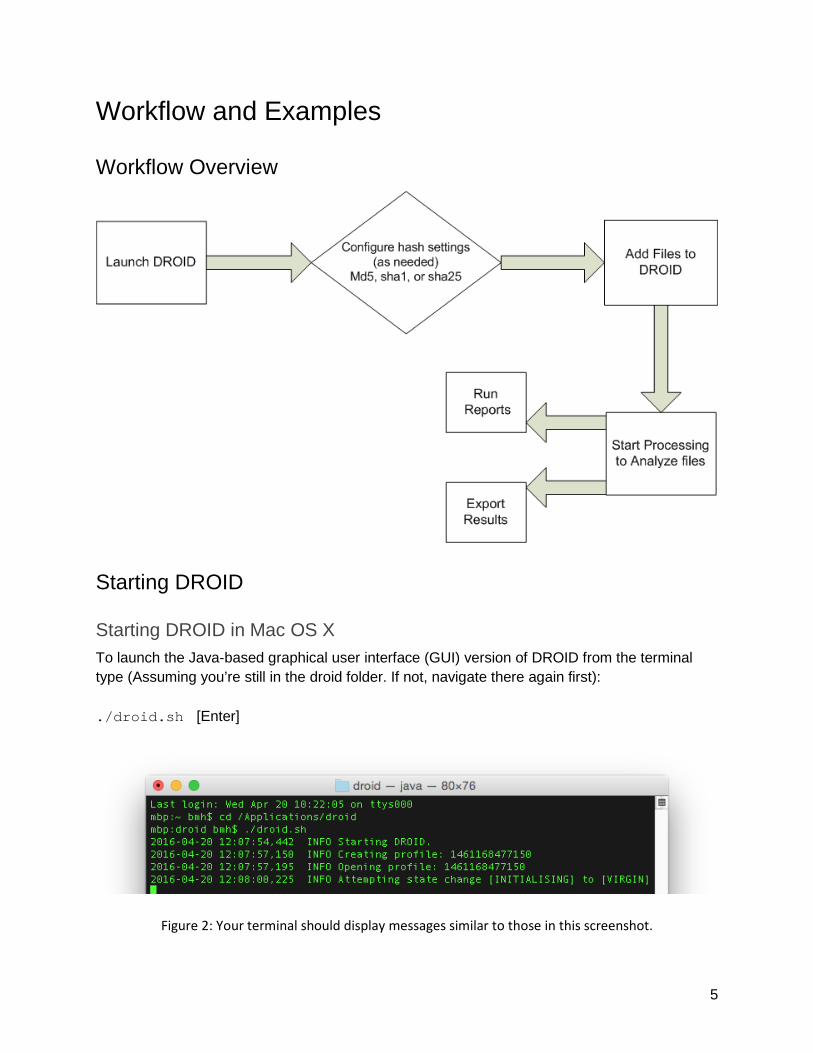
Workflow Overview
Starting DROID
Starting DROID in Mac OS X To launch the Java-based graphical user interface (GUI) version of DROID from the terminal type (Assuming you’re still in the droid folder. If not, navigate there again first): ./droid.sh [Enter]
Figure 2: Your terminal should display messages similar to those in this screenshot.
6
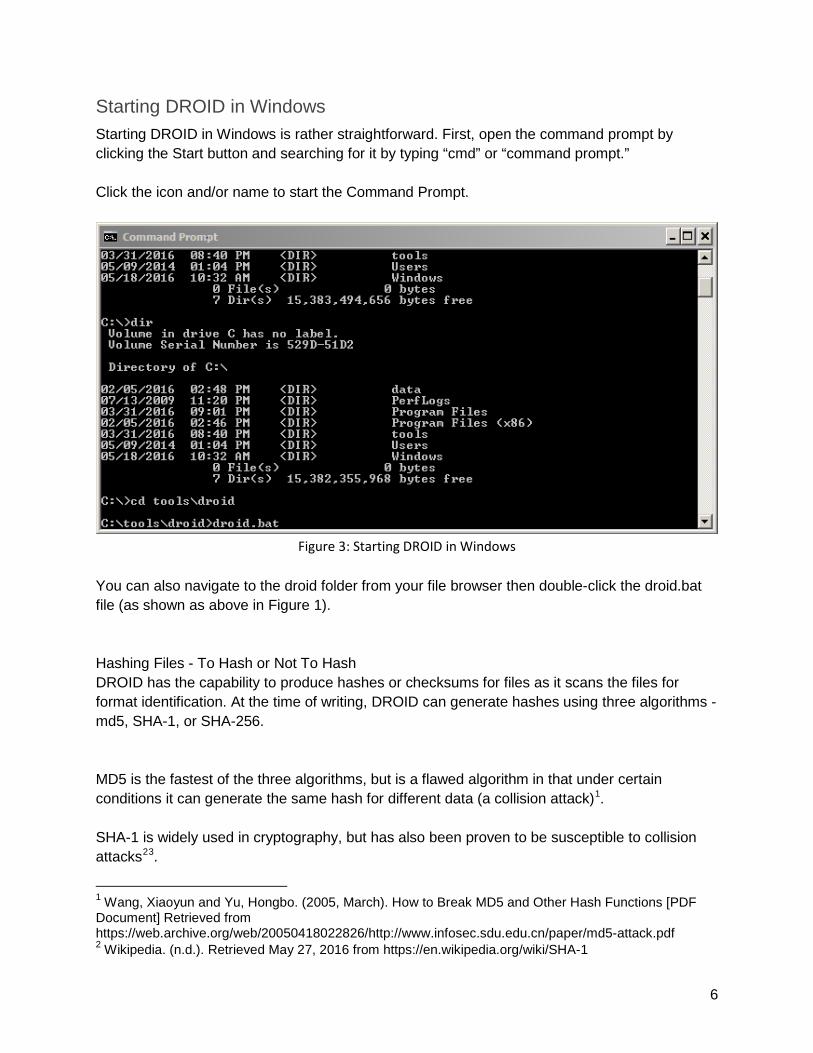
Starting DROID in Windows Starting DROID in Windows is rather straightforward. First, open the command prompt by clicking the Start button and searching for it by typing “cmd” or “command prompt.” Click the icon and/or name to start the Command Prompt.
Figure 3: Starting DROID in Windows
You can also navigate to the droid folder from your file browser then double-click the droid.bat file (as shown as above in Figure 1). Hashing Files - To Hash or Not To Hash DROID has the capability to produce hashes or checksums for files as it scans the files for format identification. At the time of writing, DROID can generate hashes using three algorithms - md5, SHA-1, or SHA-256. MD5 is the fastest of the three algorithms, but is a flawed algorithm in that under certain conditions it can generate the same hash for different data (a collision attack)1. SHA-1 is widely used in cryptography, but has also been proven to be susceptible to collision attacks23.
1 Wang, Xiaoyun and Yu, Hongbo. (2005, March). How to Break MD5 and Other Hash Functions [PDF Document] Retrieved from https://web.archive.org/web/20050418022826/http://www.infosec.sdu.edu.cn/paper/md5-attack.pdf 2 Wikipedia. (n.d.). Retrieved May 27, 2016 from https://en.wikipedia.org/wiki/SHA-1
7
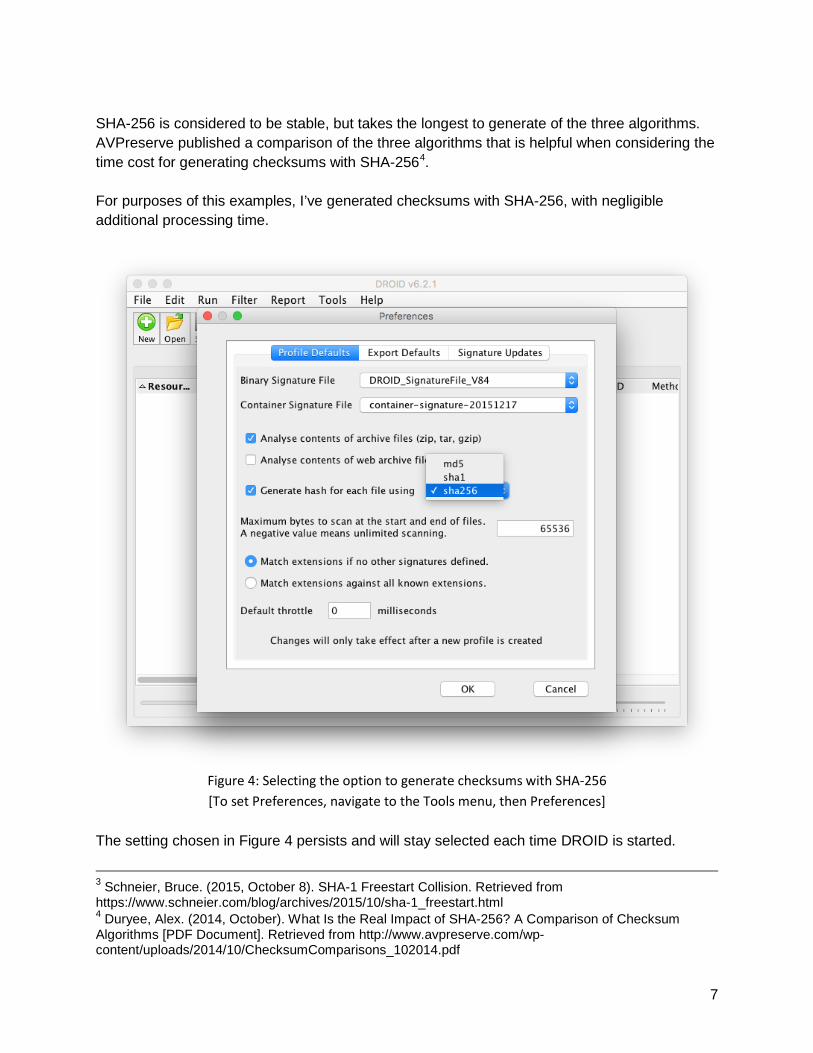
SHA-256 is considered to be stable, but takes the longest to generate of the three algorithms. AVPreserve published a comparison of the three algorithms that is helpful when considering the time cost for generating checksums with SHA-2564. For purposes of this examples, I’ve generated checksums with SHA-256, with negligible additional processing time.
Figure 4: Selecting the option to generate checksums with SHA-256 [To set Preferences, navigate to the Tools menu, then Preferences]
The setting chosen in Figure 4 persists and will stay selected each time DROID is started.
3 Schneier, Bruce. (2015, October 8). SHA-1 Freestart Collision. Retrieved from https://www.schneier.com/blog/archives/2015/10/sha-1_freestart.html 4 Duryee, Alex. (2014, October). What Is the Real Impact of SHA-256? A Comparison of Checksum Algorithms [PDF Document]. Retrieved from http://www.avpreserve.com/wp-content/uploads/2014/10/ChecksumComparisons_102014.pdf
8
Choosing to generate checksums, regardless of the algorithm selected, will increase the time required to complete a DROID processing operation. When generating checksums, each byte of every file must be scanned in order to produce the hash. If simply performing file format identification, only a small portion of the file must be scanned in order to identify the file format identification, which is typically in the file’s header.
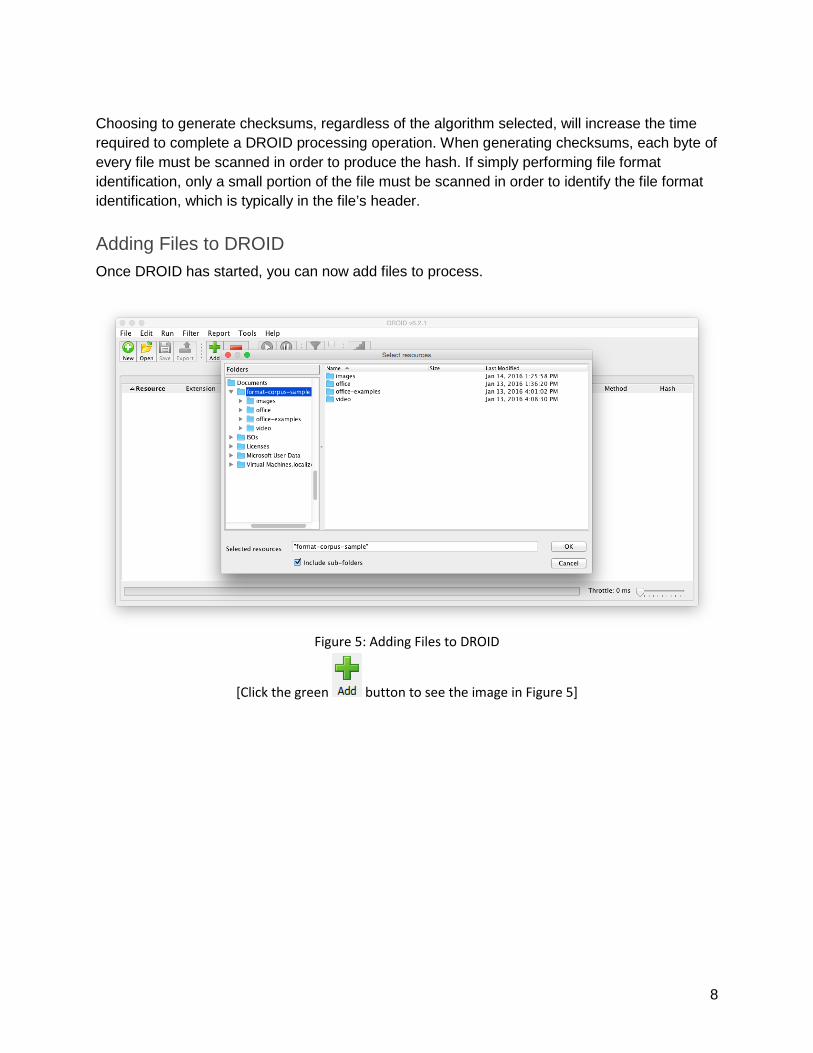
Adding Files to DROID Once DROID has started, you can now add files to process.
Figure 5: Adding Files to DROID
[Click the green button to see the image in Figure 5]
9
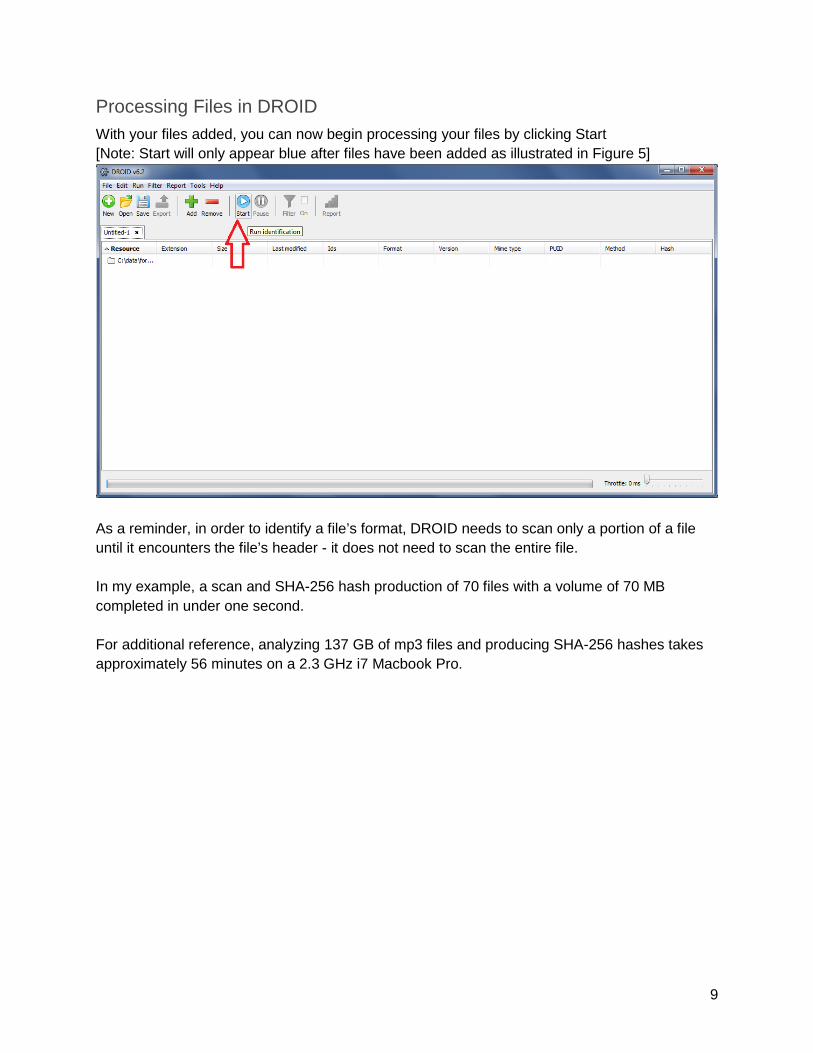
Processing Files in DROID With your files added, you can now begin processing your files by clicking Start [Note: Start will only appear blue after files have been added as illustrated in Figure 5]
As a reminder, in order to identify a file’s format, DROID needs to scan only a portion of a file until it encounters the file’s header - it does not need to scan the entire file. In my example, a scan and SHA-256 hash production of 70 files with a volume of 70 MB completed in under one second. For additional reference, analyzing 137 GB of mp3 files and producing SHA-256 hashes takes approximately 56 minutes on a 2.3 GHz i7 Macbook Pro.

10
Figure 6: DROID Results
When DROID has finished scanning your files, the results will appear similar to the above screenshot (although I’ve expanded the subfolders to show detail information for files). Resultant information includes: Resource (or filename) Extension Size Last modified date Ids (how many format identification methods were used) Format Version (of the format) Mime type PUID (Pronom Unique IDentifier) Method (of identification) Hash (optional process to run, a unique value for every file - more on this later) And there you have it. You’ve now identified the file formats for your chosen directory.
11
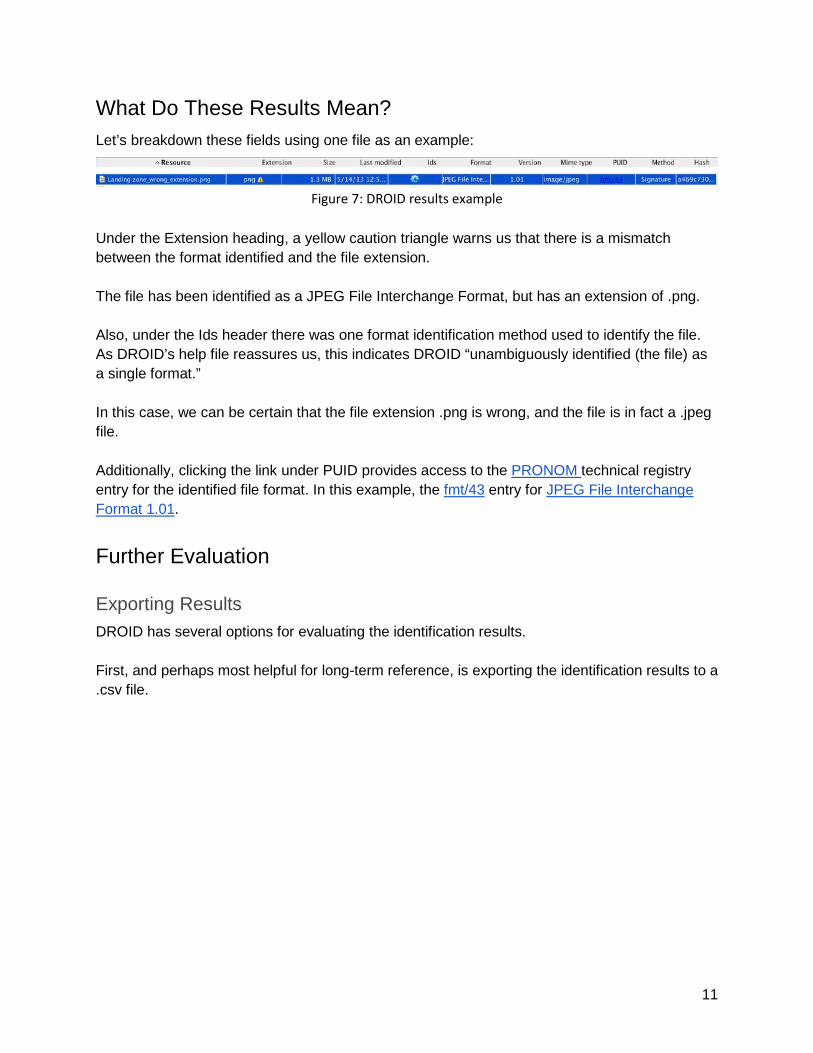
What Do These Results Mean? Let’s breakdown these fields using one file as an example:
Figure 7: DROID results example Under the Extension heading, a yellow caution triangle warns us that there is a mismatch between the format identified and the file extension. The file has been identified as a JPEG File Interchange Format, but has an extension of .png. Also, under the Ids header there was one format identification method used to identify the file. As DROID’s help file reassures us, this indicates DROID “unambiguously identified (the file) as a single format.” In this case, we can be certain that the file extension .png is wrong, and the file is in fact a .jpeg file. Additionally, clicking the link under PUID provides access to the PRONOM technical registry entry for the identified file format. In this example, the fmt/43 entry for JPEG File Interchange Format 1.01.
Further Evaluation
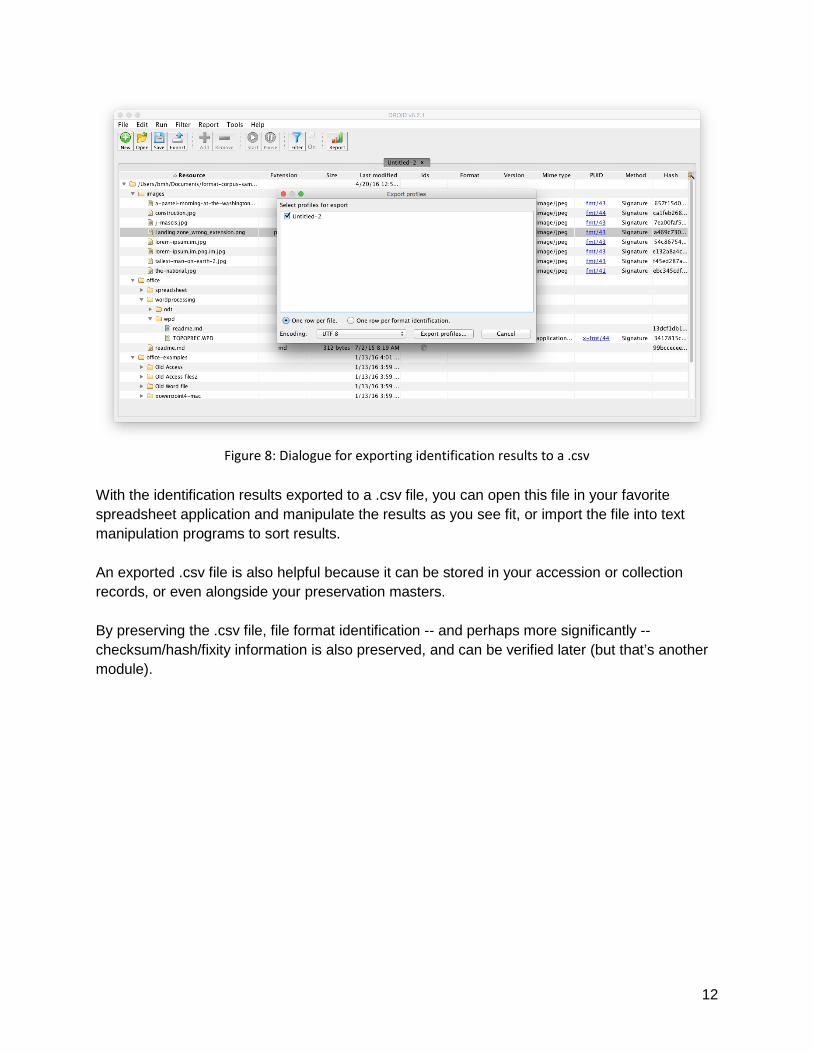
Exporting Results DROID has several options for evaluating the identification results. First, and perhaps most helpful for long-term reference, is exporting the identification results to a .csv file.
12
Figure 8: Dialogue for exporting identification results to a .csv
With the identification results exported to a .csv file, you can open this file in your favorite spreadsheet application and manipulate the results as you see fit, or import the file into text manipulation programs to sort results. An exported .csv file is also helpful because it can be stored in your accession or collection records, or even alongside your preservation masters. By preserving the .csv file, file format identification -- and perhaps more significantly -- checksum/hash/fixity information is also preserved, and can be verified later (but that’s another module).
13
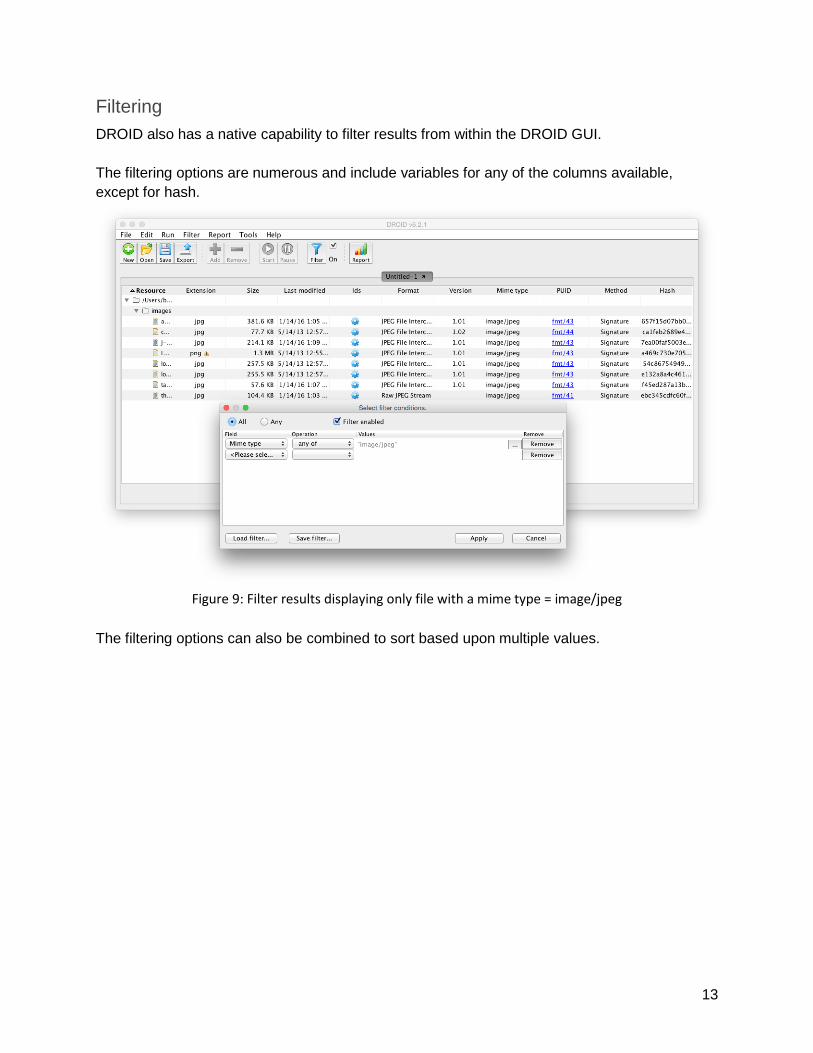
Filtering DROID also has a native capability to filter results from within the DROID GUI. The filtering options are numerous and include variables for any of the columns available, except for hash.
Figure 9: Filter results displaying only file with a mime type = image/jpeg
The filtering options can also be combined to sort based upon multiple values.
14
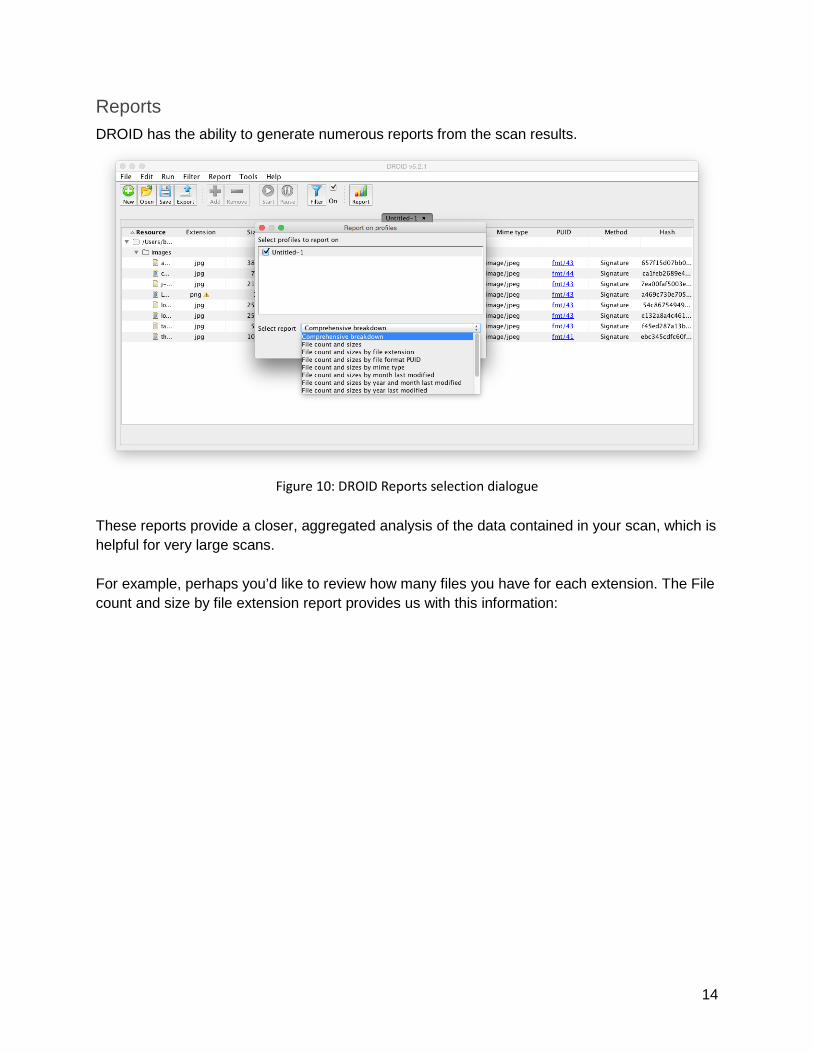
Reports DROID has the ability to generate numerous reports from the scan results.
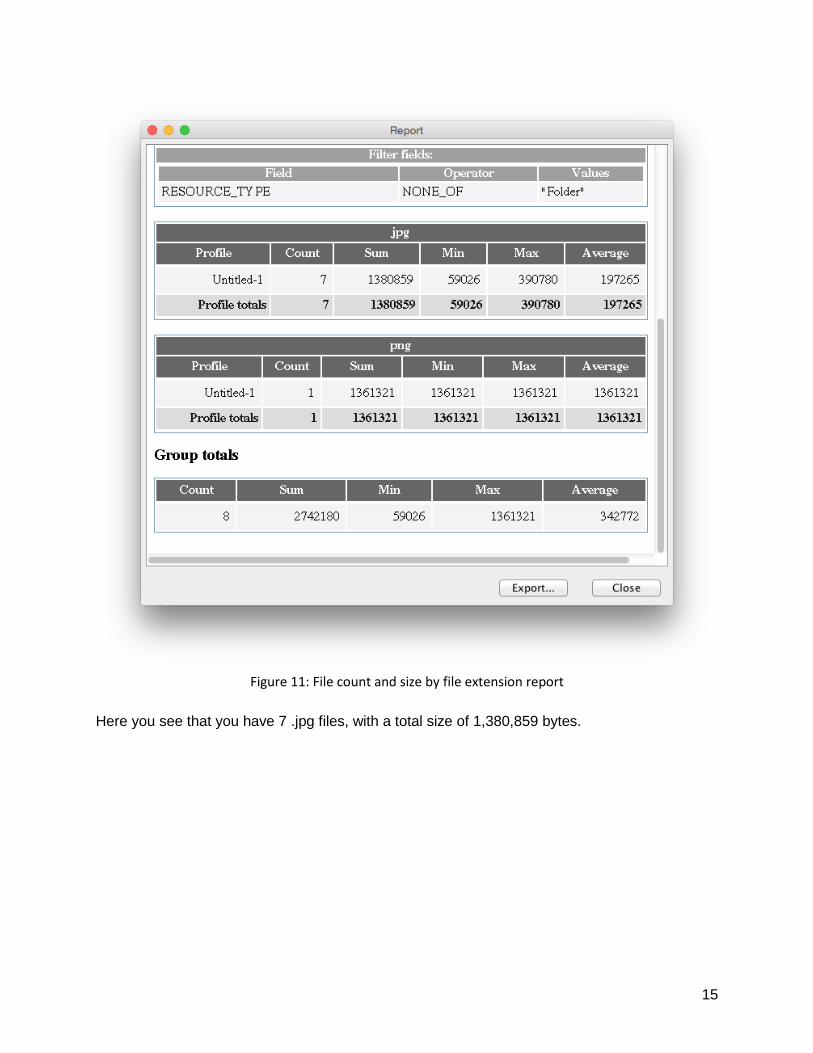
Figure 10: DROID Reports selection dialogue
These reports provide a closer, aggregated analysis of the data contained in your scan, which is helpful for very large scans. For example, perhaps you’d like to review how many files you have for each extension. The File count and size by file extension report provides us with this information:
15
Figure 11: File count and size by file extension report
Here you see that you have 7 .jpg files, with a total size of 1,380,859 bytes.
16
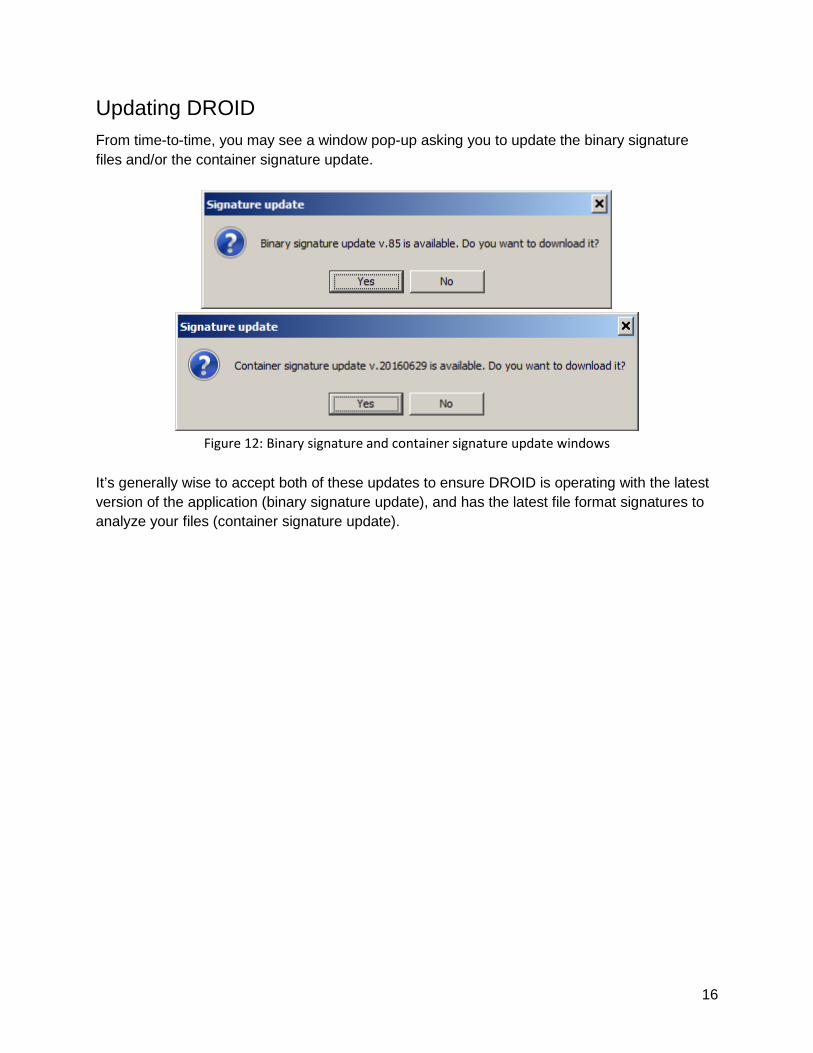
Updating DROID From time-to-time, you may see a window pop-up asking you to update the binary signature files and/or the container signature update.
Figure 12: Binary signature and container signature update windows
It’s generally wise to accept both of these updates to ensure DROID is operating with the latest version of the application (binary signature update), and has the latest file format signatures to analyze your files (container signature update).
17
Appendix A: Processing Step Walkthrough
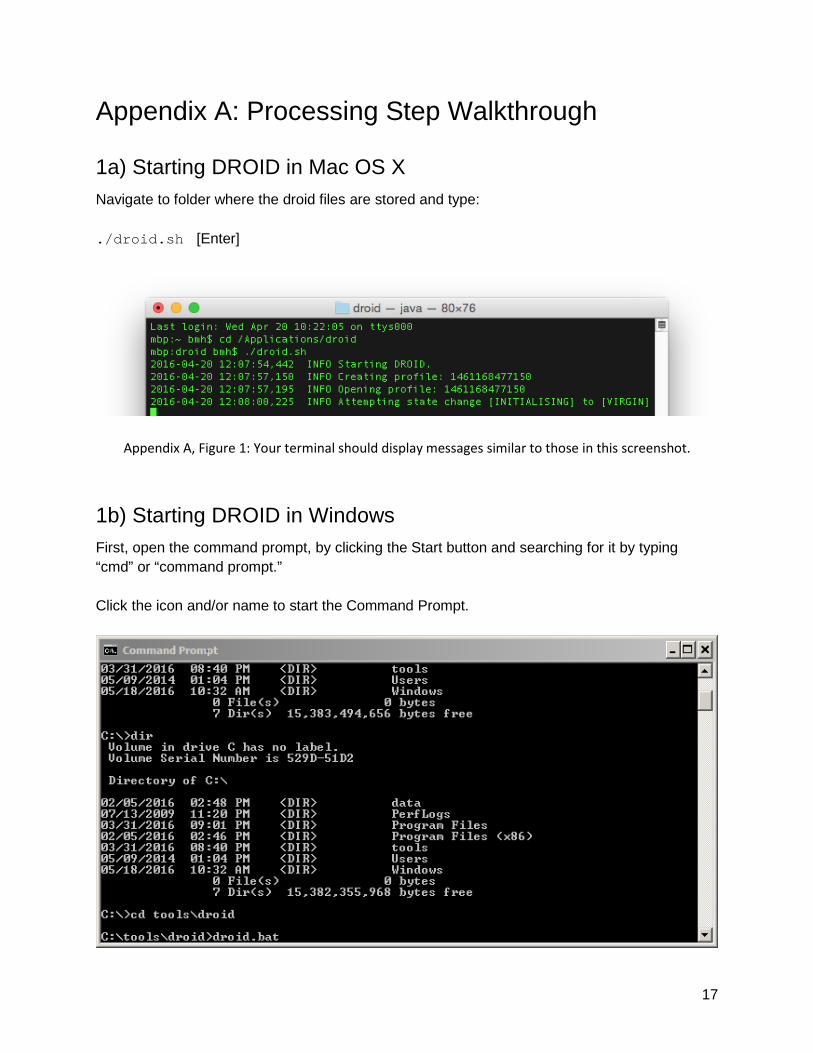
1a) Starting DROID in Mac OS X Navigate to folder where the droid files are stored and type: ./droid.sh [Enter]
Appendix A, Figure 1: Your terminal should display messages similar to those in this screenshot.
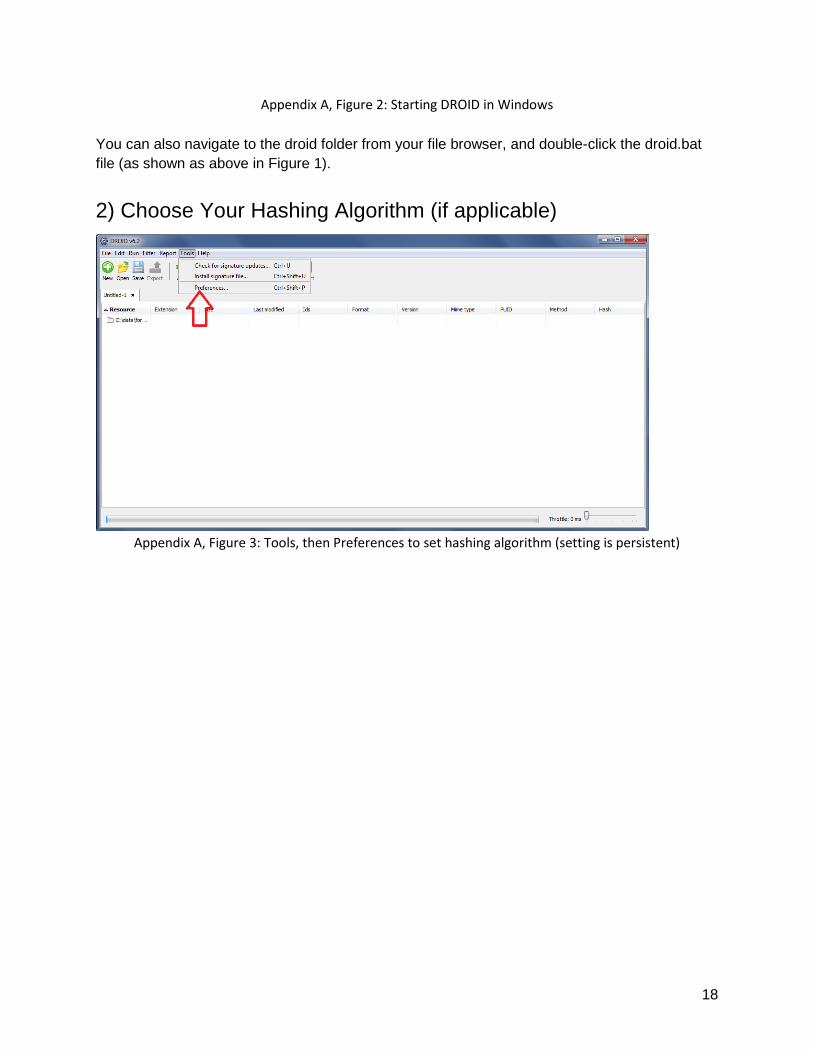
1b) Starting DROID in Windows First, open the command prompt, by clicking the Start button and searching for it by typing “cmd” or “command prompt.” Click the icon and/or name to start the Command Prompt.
18
Appendix A, Figure 2: Starting DROID in Windows You can also navigate to the droid folder from your file browser, and double-click the droid.bat file (as shown as above in Figure 1).
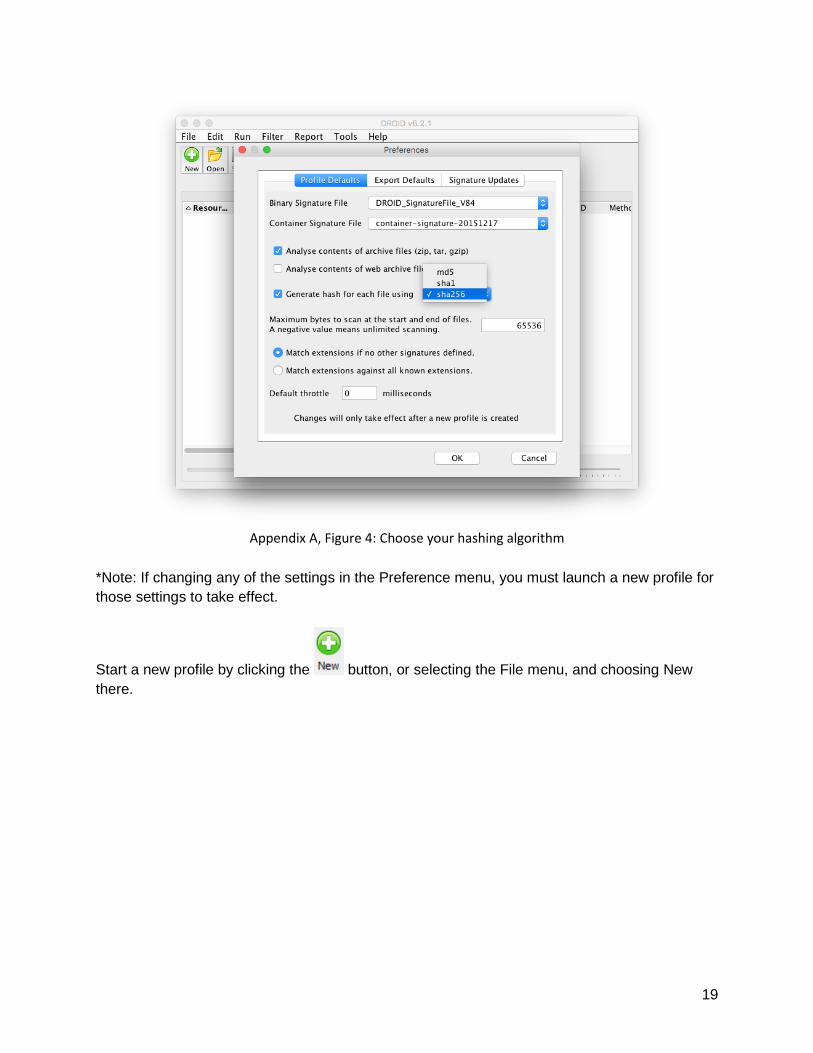
2) Choose Your Hashing Algorithm (if applicable)
Appendix A, Figure 3: Tools, then Preferences to set hashing algorithm (setting is persistent)
19
Appendix A, Figure 4: Choose your hashing algorithm
*Note: If changing any of the settings in the Preference menu, you must launch a new profile for those settings to take effect.
Start a new profile by clicking the button, or selecting the File menu, and choosing New there.
20
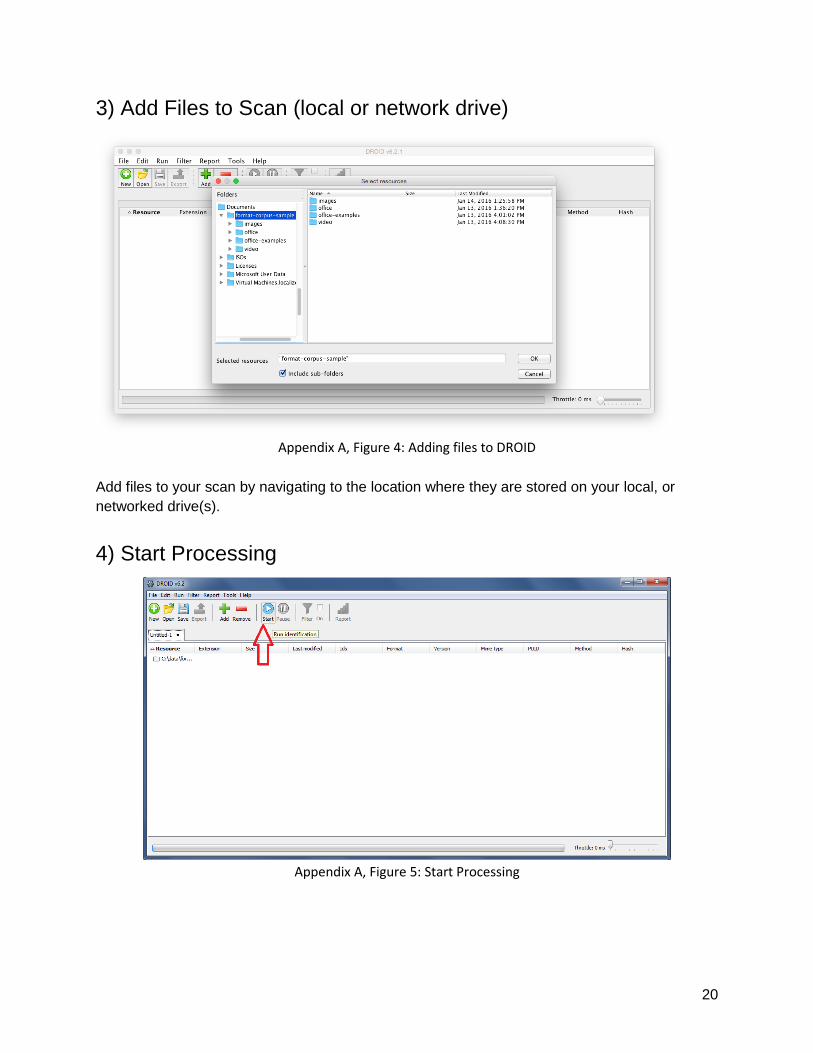
3) Add Files to Scan (local or network drive)
Appendix A, Figure 4: Adding files to DROID
Add files to your scan by navigating to the location where they are stored on your local, or networked drive(s).
4) Start Processing
Appendix A, Figure 5: Start Processing
21
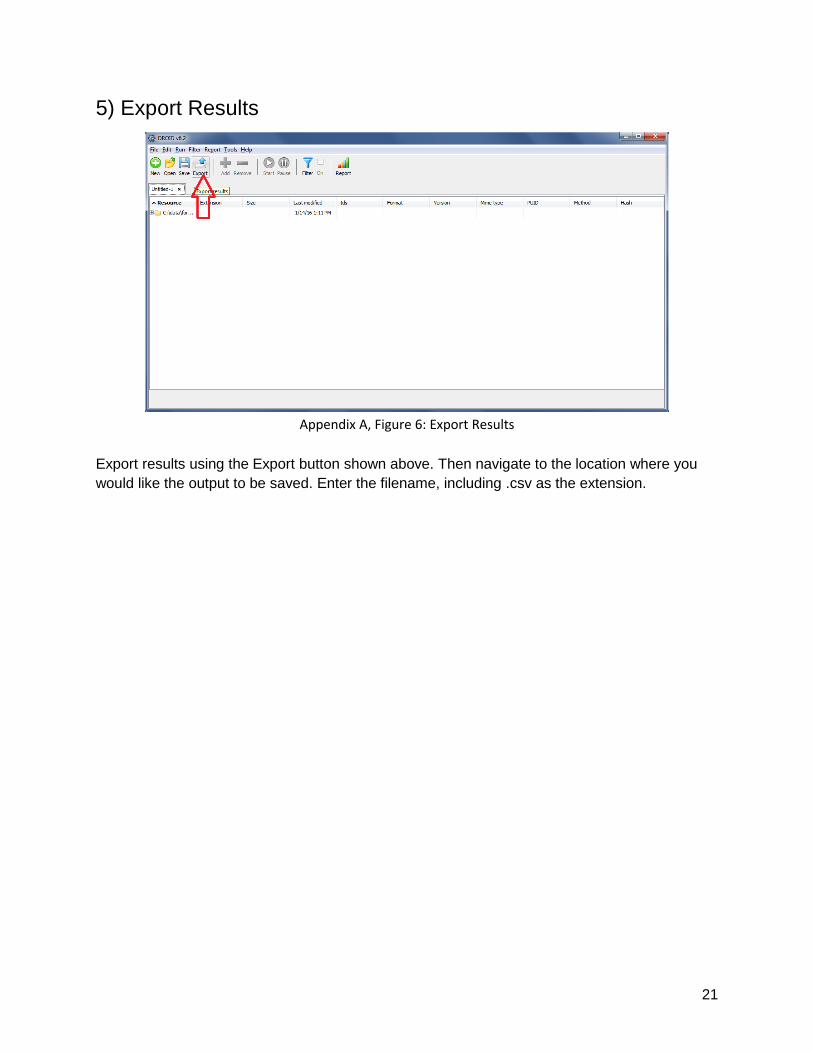
5) Export Results
Appendix A, Figure 6: Export Results
Export results using the Export button shown above. Then navigate to the location where you would like the output to be saved. Enter the filename, including .csv as the extension.
22
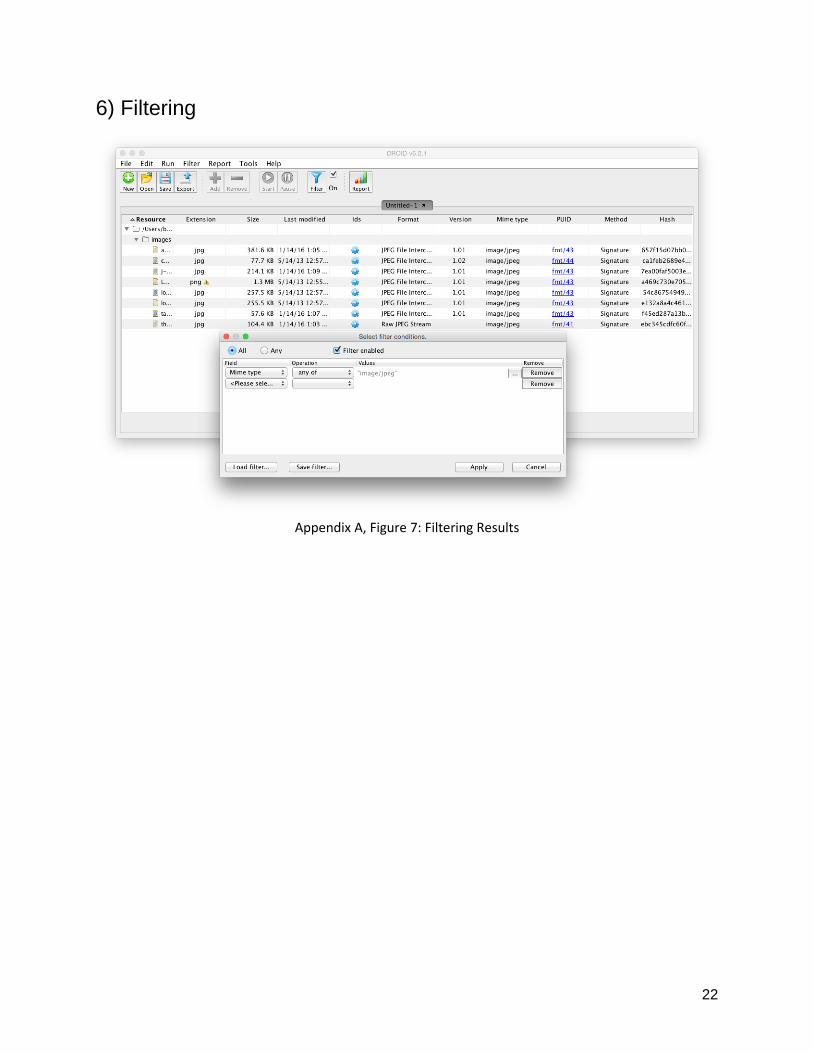
6) Filtering
Appendix A, Figure 7: Filtering Results


![Prospective Identification of Glioblastoma Cells Generating … · 2020-06-13 · spontaneously switch to become fast-growing, angiogenic tumors [23,30]. Next, we sought to identify](https://img.dokumen.tips/doc/110x75/5fa8964c476d335fcf76e43d/prospective-identification-of-glioblastoma-cells-generating-2020-06-13-spontaneously.jpg)