Embed Size (px)
Citation preview

This Guide provides an overview of the main features for all users in the NCLHDA Dashboard. A separate Guide has been created for tasks specific to the Organizational Administrative users.
Contents
Introduction .......................................................................................................................................................... 3
2020 Updates ......................................................................................................................................................... 3
The Dashboard Cycle Process ............................................................................................................................ 3
User Types and Permissions .............................................................................................................................. 3
Logging in to the Dashboard .............................................................................................................................. 4
Change Password............................................................................................................................................. 6
Notes about Using the Dashboard .................................................................................................................... 7
Copy and Paste ................................................................................................................................................. 7
Traffic Lights – Monitoring Progress ............................................................................................................ 7
Dashboard Overview .......................................................................................................................................... 7
Quick Access Menu ......................................................................................................................................... 7
Activities Selection & Management Page ..................................................................................................... 8
Navigating the Dashboard – Normal User, Manager, Org Admin and Partner .................................... 9
Navigating the Dashboard – Quick Update Only User ............................................................................... 13
HDSAI Narrative ............................................................................................................................................... 13
Document Management .................................................................................................................................... 14
Uploading Documents .............................................................................................................................. 14
Document Linking ..................................................................................................................................... 16
View/Export Documents ........................................................................................................................... 18
General User Quick Start Guide for the NCLHD Accreditation Dashboard 2020

2
Update or Edit Document Information .................................................................................................. 19
Delete a Document ..................................................................................................................................... 19
Searching for a Document ........................................................................................................................ 19
Operational Plan Report ................................................................................................................................... 20
Site Visit Review Process .................................................................................................................................. 22
Review Process Overview ............................................................................................................................ 22
Lighting System for Evidence Review ........................................................................................................ 24
Prior the Site Visit ...................................................................................................................................... 24
During the Site Visit .................................................................................................................................. 25
After the Site Visit ...................................................................................................................................... 25
Site Visitor Review ......................................................................................................................................... 25
Personnel Records ...................................................................................................................................... 25
Health Department Review Response ........................................................................................................ 27
Site Visit Review ............................................................................................................................................. 28
Monitoring Progress – Dashboard and Reports ........................................................................................ 28
Dashboard ................................................................................................................................................... 28
Reports ......................................................................................................................................................... 31
Print Reports ................................................................................................................................................... 37

3
Introduction
This Guide provides an overview of the NCLHDA Dashboard for most users. Each type of user in the NCLHDA Dashboard has different levels of access that affects what information they can see in the dashboard. This Guide was created using the screen of an Organizational Administrative User. If you are a different type of user, your main screen will not have options for Users, Document Management, Categories and Settings. However, all the features outlined in this guide will work the same in your dashboard.
2020 Updates
• Description of the how new Groups are assigned each cycle added, page 3. • Descriptions of the different user types and permissions added, page 3. • Steps for how a Quick Update Only User can update their password, page 6. • Section for Quick Update Only Users to navigate the dashboard, page 13. • Description of the feature that alerts users when they are about to delete a document that is
linked to other Activities, page 19. • Updated photos of the Review screen throughout. • When new evidence is added during a Site Visit, add NEW EVIDENCE in front of the
documentation, page 28. • Steps to filter a Review Report by Best Practice, page 35.
The Dashboard Cycle Process
At the conclusion of a site visit, the current Group (e.g., NCLHDA – 2019) will be archived with the assigned users given view-only access the dashboard. From this point forward all assigned users will be able to view but not edit that Group in the dashboard. After the NCLHDA Board meeting where the health departments are adjudicated, each health department will receive access to a new Group to use for the next four-year cycle. New Groups will be named according to their cycles, for example, NCLHDA _Fall 2019-Fall 2023.
User Types and Permissions
In the NCLHD Accreditation Dashboard there are several different user types. Each of these users is assigned a different type of permission. Listed below are users for the NCLHDA Dashboard, please note if you are working on a plan that is not for the NCLHDA program, the user permissions will work differently:

4
The Quick Update Only User has access to change traffic lights, change the percent complete, add and edit notes/comments and add and edit documents for the activities they have been assigned. They will not be able to make updates to any other activities in the dashboard. When they login, they will be taken directly to the activities they have been assigned.
The normal User has access to change traffic lights, change the percent complete, add and edit notes and comments, add and edit documents for any activities. In non-NCLHD Accreditation plans, these users can delete Objectives and Activities.
The Manager User has the same access as the normal user, the only difference is that they have the options to hide and to view hidden services in the dashboard. The only services in the NCLHDA plan that can be hidden are the archived dashboards. In non-NCLHD Accreditation plan, these users can delete Services and Initiatives, Objectives and Activities.
The Org Admin User has the highest level of access. The have all the access of the Manager User. In addition, they can change user permissions, assign tasks to team members, set up email notifications. In non-NCLHDA plans to the Org Admin users can delete Groups, Services and Initiatives, Objectives and Activities.
Partner Users are users outside of the agency that have been given access to the dashboard. These users can change traffic lights, change the percent complete, add and edit notes/comments and add and edit documents.
Logging in to the Dashboard
Use one of the following web browsers in this order of preference: Google Chrome – latest version Firefox – latest version
Please DO NOT USE Microsoft Internet Explorer or Edge browsers — many known issues exist.
Follow these steps the first time you log in:
1. Go to: http://login.VMSGDashboard.com
5
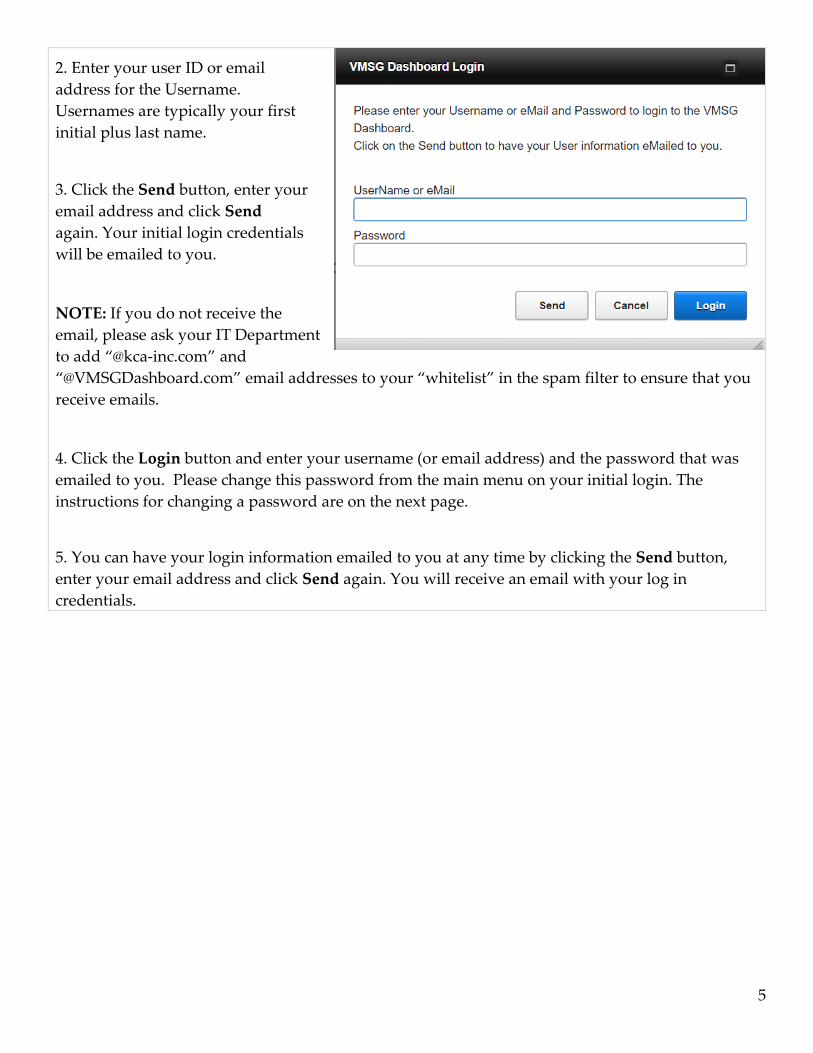
2. Enter your user ID or email address for the Username. Usernames are typically your first initial plus last name.
3. Click the Send button, enter your email address and click Send again. Your initial login credentials will be emailed to you.
NOTE: If you do not receive the email, please ask your IT Department to add “@kca-inc.com” and “@VMSGDashboard.com” email addresses to your “whitelist” in the spam filter to ensure that you receive emails.
4. Click the Login button and enter your username (or email address) and the password that was emailed to you. Please change this password from the main menu on your initial login. The instructions for changing a password are on the next page.
5. You can have your login information emailed to you at any time by clicking the Send button, enter your email address and click Send again. You will receive an email with your log in credentials.

6
Change Password Normal users will log in to the dashboard and select Password from the Main Menu and follow the prompts.
Quick Update Only users will log in, and click on the Keys at the upper right-hand side of the of the screen and follow the prompts.

7
Notes about Using the Dashboard
Copy and Paste
To copy and paste in the dashboard, select the text that you would like to copy and click Ctrl + C on your keyboard. Then click where you would like to paste the text and click Ctrl + V to paste the text. Do not use the copy and paste commands with the mouse, you must use the shortcut keys as just explained.
Traffic Lights – Monitoring Progress
When a health department receives access to a new plan at the beginning of a four-year cycle, all the lights are red. There are several options of traffic lights that you may choose to monitor progress on submitting evidence through the dashboard: red light , yellow light , green light
and a gold bar .
Health departments are welcome to use these lights to track their status as it is helpful to them. The NCLHDA program only has requirement for how the lights are used for the site review process, explained in the Site Review Process section of this Guide.
Dashboard Overview
Quick Access Menu
A Quick Access Menu is always available at the upper right-hand corner of the screen.
= Dashboard
= Reports
= Main Menu
= VMSG Tutorials
= Log Out

8
Activities Selection & Management Page
The Health Department Self-Assessment Instrument (HDSAI) narrative and the evidence are added from the Activity Selection & Management page. The steps to navigate to this page are outlined in the next section.
The blue folder is the Document Management page where the documents are uploaded. The number of documents that have been uploaded to an Activity are shown on the folder. This blue folder shows that two documents have been uploaded to this Activity.
The Performance Metric/Target box lists the required documentation for the Activity.
The Notes/Comments box is where you will place the HDSAI narrative for each piece of evidence submitted.
The Activity description.
Activity Leader & Team Members can also be viewed from this page.
Start Dates and End Dates can be set, however, is it not a requirement of the NCLHDAccreditation Program that these be
used. These dates need to be set if email notifications are going to be set for lagging or overdue Activities. More information on this is avaliable in the Organizational Administrators User Guide.

9
Navigating the Dashboard – Normal User, Manager, Org Admin and Partner
There are a couple of ways to navigate through the dashboard to get to the Activities Selection & Management page.
Keep the following in mind when navigating the dashboard for the NCLHD Accreditation Program:
= Your health department
= North Carolina Local Health Department Accreditation – 20XX
(each cycle a health department will receive an updated group)
= Complete the North Carolina Local Health Department Accreditation
(NCLHDA) Process
= NCLHD Accreditation Standards
= NCLHD Accreditation Benchmarks
= NCLHD Accreditation Activities
Click on the Orgs tab and select your health department. Your health department should be
the only one listed. Once your health department is selected, click the Groups tab at the top of the page or click the blue arrow at the right of your health department name.

10
Select the Group North Carolina Local Health Department Accreditation – 20XX by clicking it so that it is highlighted in blue. Then click the Services & Initiatives tab at the top or the blue arrow to the right of North Carolina Health Department Accreditation – 20XX.
Select Complete the North Carolina Local Health Department Accreditation Process by
clicking on it so that it is highlighted in blue. Click the Goals tab at the top of the page or the blue arrow to the right of Complete the North Carolina Local Health Department Accreditation Process to bring up the Standards.

11
Remember, = Standards. The Benchmarks that are listed under each Standard are noted. For example, the Assessment Standard comprises Benchmarks 1-8.
Select the Standard that contains the Benchmark with the Activities that you would like to
add evidence to by clicking on the Standard so that it is highlighted in blue. In the picture below, the Assessment Standard, Benchmarks 1-8 is selected. Once the Standard is selected, click on the Objectives tab at the top or click the blue arrow to the right of the Standard.
The Benchmarks are listed under the Objectives tab. In the example above, the Assessment
Standard with Benchmarks 1-8 was selected. By selecting this Standard, Benchmarks 1-8 will
be listed. (Remember, = Benchmarks.) To view the Activities for a Benchmark, select the Benchmark by clicking on it so that it is
highlighted in blue. Once the Benchmark is selected, click on the Activities tab at the top or the blue arrow to the right of the Benchmark to see the associated Activities.

12
In the picture above, Benchmark 1 has been selected, once it is clicked, Activities 1.1., 1.2 and 1.3 will show as illustrated in the picture below.
You are now at the Activity Selection & Management page and can add the HDSAI narrative and upload documents.
13
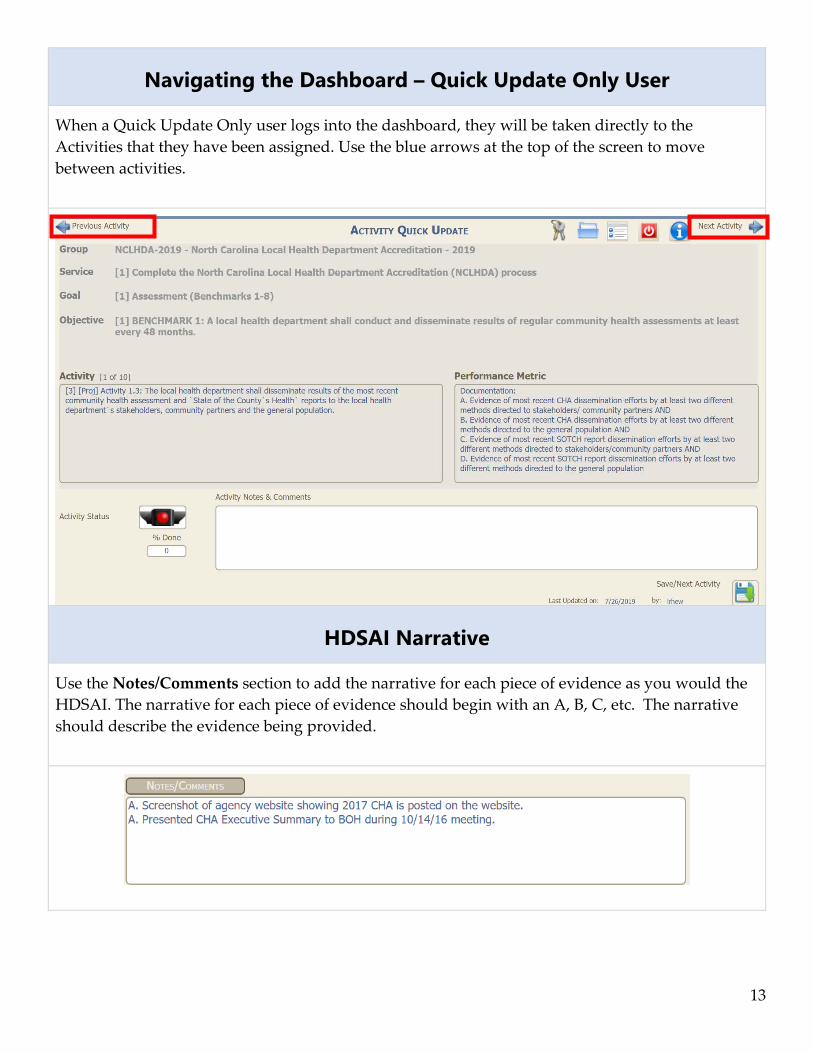
Navigating the Dashboard – Quick Update Only User
When a Quick Update Only user logs into the dashboard, they will be taken directly to the Activities that they have been assigned. Use the blue arrows at the top of the screen to move between activities.
HDSAI Narrative
Use the Notes/Comments section to add the narrative for each piece of evidence as you would the HDSAI. The narrative for each piece of evidence should begin with an A, B, C, etc. The narrative should describe the evidence being provided.

14
Document Management
Uploading Documents
From the Activity Selection & Management page or the Activity Quick Update page, click on the Activity that the document will be uploaded to and then click on the Blue Folder .

15
It will bring you to the Document Management page below. Click in the box or on the to add a document.
Follow the prompts to upload the document.
On the Document Management page, the description of the document should be entered in the Description box. This description will also be used to locate the document in the dashboard. Use the Document Notes section to indicate which section of the document is being used as evidence for that Activity. In the example below, the Document Notes let the Site Visitors know that they need to review page 5, lines 55-60 of the document for the evidence.

16
When you have added all the information for the document, click the Save button at the bottom right of the page.
NOTE: If a document with the same exact filename is added, a new version will be created. The latest version number is in green font.
To show all versions of a document attached to the current Activity, click the checkbox labeled Show All Versions at the top of the screen. The latest version number of the document is in green font. Click the checkbox again to hide all but the most recent version.
NOTE: If none of the documents that you have previously uploaded to an Activity are showing, check the Show All Versions box and the documents should show.
All documents that are uploaded to the Document Management Page are automatically alphabetized.
Document Linking
You can link to a document already uploaded under a different Activity. To link to a document, go
to the Activity Selection & Management page and click on the Blue Folder . This will take you to the Document Management page.

17
To link to an existing document in the system instead of adding a new document,
click the Link button on the bottom-right toolbar.
Once you click the Link button , the main Document Management screen will open, allowing you to choose any existing document to link. Select the document you would like to link by clicking on it.
Then click on the Save button at the bottom right of the page.
The selected document will now appear as a row on the Document Management screen with a Link icon on the right side.
NOTE: To cancel the selection of the document to be linked, click the Blue Back Arrow in the top left corner to return to the original Document Management page.

18
View/Export Documents
You can view/export a document by clicking on the document type button (e.g., pdf icon ) or the Link button in the row or at the bottom of the page, next to the Description field. This will take you to the original document.
If the document is uploaded to one Activity and was not linked to any other Activities, it will bring up this screen.
Click the gray bar in the middle to download the document.
If the document is a linked document, it will bring up this screen.
Click Ok and then click on the document type icon to download the document.
You can also select the document that you would like to download, then click the printer icon in the bottom right of the page.

19
Update or Edit Document Information
To update or make edits to the information added for the document, select the document by
clicking on it. Edit the information at the bottom of the screen and click the Save button at the bottom right of the page.
Delete a Document
To remove or delete a document from an Activity select the document to delete.
Click the red X at the bottom of the screen.
If you try to delete a document that has been linked to other documents, you will receive this message:
If you click OK, it will delete the original document and all links.
Searching for a Document
On the Document Management page, from the Main Menu or from the Document Management page for an Activity, you can use the search function to find documents by searching the “Description,” “Notes” and “File Name” fields. If you access the page from the Main Menu it will show you all the documents that have been uploaded in the dashboard. If you access the page from the Activity Selection & Management page, it will show you the Activities that have been uploaded for that Activity.
To search for a document, enter any part of the filename, description or notes in the Search box then click the Magnifying Glass or touch the Tab key on your keyboard.

20
In the example below, the word “Minutes” was placed in search box.
If are using the status lights, you can filter by the color of lights. In this example below, the documents were searched by “yellow” lights, so all the documents with yellow lights are listed.
Points to Consider about Documents
• Documents can only be uploaded one document at a time. • Save the document every time you make changes. • The document management page automatically alphabetizes the list of the documents that
have been uploaded.
Operational Plan Report The Operational Plan report will show you all Activities, Notes/Comments, Team members and Leads for each Activity and can show documents that have been uploaded.
Select the Reports Menu from the top Quick-Access Menu or the Main Menu.
Select View or Print the Operational Plan Report .

21
To see the information that has been added at the Activity Level, select Activity next to Level at the top right-hand corner of the screen.

22
Site Visit Review Process
Review Process Overview
The dashboard will be locked to the health department at a designated date and time for the Site Visit Team to review the evidence. The health department will have access to the dashboard to review and respond to the Site Visitors’ questions two days prior to their Site Visit. In addition, all of the personnel records selected for review will be listed in the Site Visitor Questions/Comments box for Activity nine in Supplemental Materials.
All of these dates will be outlined in the 90-day notification letter.
The review is conducted on Activity Selection & Management page. Once the dashboard is locked
to the health department, a Review button becomes available for Site Visitors on the Activity Selection & Management page of each Activity.

23
Once the Review button is clicked, it brings up the Review Pane below.
In this review pane, the Site Visitors can add Questions/Comments, explanations for Not Met Activities, Suggestions for Quality Improvement and any Best Practices Identified.

24
Health Departments will have the opportunity to respond to questions in the Health Dept. Section of the Review Pane once the dashboard is unlocked to them.
Lighting System for Evidence Review There is a defined lighting system for the review process.
The Site Visitors will use the following lighting system:
Red light: Activity not met Yellow light: More information needed Green light: Activity met
Prior to the Site Visit
Once the dashboard is locked to the health department, all lights in the dashboard will be turned to red. In the review conducted prior to the site visit, all lights will be changed to yellow or green by the Site Visitors:
Yellow light: Need more information: if there is a question about the evidence submitted for an Activity, a question will be placed in the Site Visitor Questions/Comments box. If the Activity requires on-site observation there will be a comment that the Activity will be reviewed on site. The light will be changed to yellow.
Green light: Activity met: If the evidence demonstrates the Activity was met, the review light will be green and the text “met” will be in the Site Visitor Questions/Comments box.

25
During the Site Visit
During the site visit, the questions that were posted prior to the visit will have responses from the health department, and the visual observation and any on-site reviews will be conducted. During this phase of the review, the lights will be yellow or green using the same criteria as noted above.
NOTE: The color of the lights are not final until you receive your Site Visit Team report.
After the Site Visit
When the health department receives their Site Visit Team Report, the lights in the dashboard will be changed to green and red.
Green light: Activity met
Red light: Activity not met
In Summary:
When the dashboard is locked, all lights will be red.
After the site visitors conduct their initial review, ALL lights will be green or yellow.
If a light is green, the word “met” will be typed in the Site Visitor Questions/Comments box.
If a light is yellow, there will be a question listed in the Site Visitor Questions/Comments box.
At the conclusion of the site visit, all lights should be green or yellow. Review at this time is not final and a yellow light may or may not indicate whether that Activity is ultimately “not met.” Final review is considered the distribution of the Site Visit Report.
Site Visitor Review Personnel Records
The health department must upload their most current staff roster in the supplemental materials by the designated date that the dashboard will lock. This is the roster that personnel records will be sampled from. The list of selected staff and corresponding year will be listed in the Site Visitor Question/Comments box for Activity nine “Submit a roster of the agency’s entire staff…” Departments should compile all required personnel record elements for each staff member (e.g., certifications/ authorizations, qualifications, orientation, trainings, performance evaluation, job description) and upload one pdf document per staff member. Or you can provide hard copies at the site visit.

26
When the Site Visitors conduct their initial review, they will change lights to yellow or green using this system:
More information needed – Site Visitor question or on-site review needed
Activity met
An Activity will not be marked as Not Met without a question being asked. If the Site Visitor has a question about the Activity or if on-site obeservation is required, the light will be turned to yellow and there will be a question or comment in the Site Vistor Questions/Comments box.
If an Activity is met, the review pane will also include the word “Met.”

27
Health Department Review Response At a designated date and time, the Site Visitors will have all of their questions/comments added and the health department will regain access to the dashboard.
Once the dashboard is unlocked, the health department has access to: • View all Site Visitor questions/comments and status flags. • Add department notes and upload documents. • View/Print various reports of the complete review.
During this phase of the review, the health department will not change any lights in the dashboard. The lights will only be changed by the Site Visitors.
The health department can click on the Review button from the Activity Selection & Management page and respond to the Site Visitor Questions/Comments in the Health Department Response box for all of the Activity that have a yellow light.

28
Click the Save button after entering a response. If a new document is uploaded please note this in the Health Dept. Response box. And when the document is uploaded add “NEW EVIDENCE” in front of the document name.
Site Visit Review
During the site visit both the health department and the Site Visitors will be working in the dashboard. The Site Visitors will review the responses to the questions and will conduct the on-site observations. They will respond in the dashboard and change lights as needed.
Once the health department receives their final report any Activities not met will be changed to red in the dashboard.
The dashboard will be locked to the health department once the site visit is complete and they will have view-only access to the Group. The health department will receive access to a new Group to begin the new four-year cycle and will continue to have view-only access to their previous Groups.
Monitoring Progress – Dashboard and Reports
There are a couple of ways to monitor progress through the site visit process. You can use the Dashboard or run a Review Report. Each of these are described below.
Dashboard
To view a summary of the color of the lights for the Activities, go to the Dashboard . You can get to the Dashboard from the Quick Access Menu or the Main Menu.

29
You can select to view by Group or Leader. The Group is NCLHDA-20XX, North Carolina Local Health Department Accreditation – 20XX.
The lights can be viewed at the Goals (Standards), Objectives (Benchmarks) or Activities (Activities) level.
(Note that supplemental materials are included in the Standards, Benchmarks and Activities).
To see a list of Activities associated with each light, click on the number in the box under the light with the Activities that you want to view.

30
For example, by clicking on the green “4” under the green light, the screen below will show.
Please note that the Activities on this page are listed in numerical order by the Act# column. So, all Activities with .1 will be listed first followed by .2, etc. You can reorder that Act# list from ascending to descending by clicking on the Act# box.
Earlier in the guide, Activity 1.3 was reviewed and assigned a yellow light because more information was needed. To see this Activity, click on the yellow number 157, under the yellow light.

31
Because the Activity reviewed was 1.3, scroll down until you reach the list of Act#3.
Please note, you cannot add or review any of the Site Visitor comments from the dashboard. However, if you select an Activity by clicking on it so that it is blue, and click the Activities tab, it will take you to the Activity Selection & Management page for that Activity and the review comments can be read and edited.
Reports
Reports can be created for the entire plan or for selected sections of the plan. To run a report, click
on the Report icon from the Quick Access Menu or the Main Menu. Select Accreditation Review Report: Accreditation Review Status Report from the Report Menu.

32
There are several options to view the review report.
Reviewed Report
This report will show only those Activities that have been reviewed. To view the Reviewed Report, in the Select Report box, use the drop-down menu to select “Reviewed.”

33
All the Activities that have site visitor comments will show.
All Report
This report will show all the Activities regardless of whether a comment has been added or not. To view the All Report, in the Select Report box, use the drop-down menu to select “All.”

34
Not Met Report
This report shows all Activities with notes/comments in the Not Met Activity box.
Suggestions for Quality Improvement (SQI) Report
This report shows all Activities with notes in the Suggestions for Quality Improvement box.

35
Best Practices Report
This report shows all Activities with notes in the Best Practices box.
Filtering Reports
The information in the reports can also be filtered by status (red, yellow or green light). Use the drop-down box next to Review Status to filter the reports.

36
To view the documents that have been uploaded to each Activity check the box next to Documents.

37
The documents that have been uploaded will be listed in green text.
Print Reports
To print a report, click the printer icon in the bottom right-hand side of the screen.

38
Click the VMSG_Report.htm button and a HTML report will be generated. Once the report is created, save the report to your computer or print it. The report can be put in a Word doc by highlighting the report contents (Ctrl-A) and copying (Ctrl-C) and pasting (Ctrl-V).
Sections of this Guide were adapted from Knowledge Capital Alliance, Inc. User Guides (www.kca-inc.com).