Embed Size (px)
Citation preview

Gatineau Gliding Club 30/03/18
Field Operations Training Guide, Rev. 4 i
Gatineau Gliding Club (GGC)
Field Operations Training Guide March 2018
Guide Owner: Chief Field Manager
Approved by [Name]
Revision 4
Gatineau Gliding Club 30/03/18
Field Operations Training Guide, Rev. 4 ii
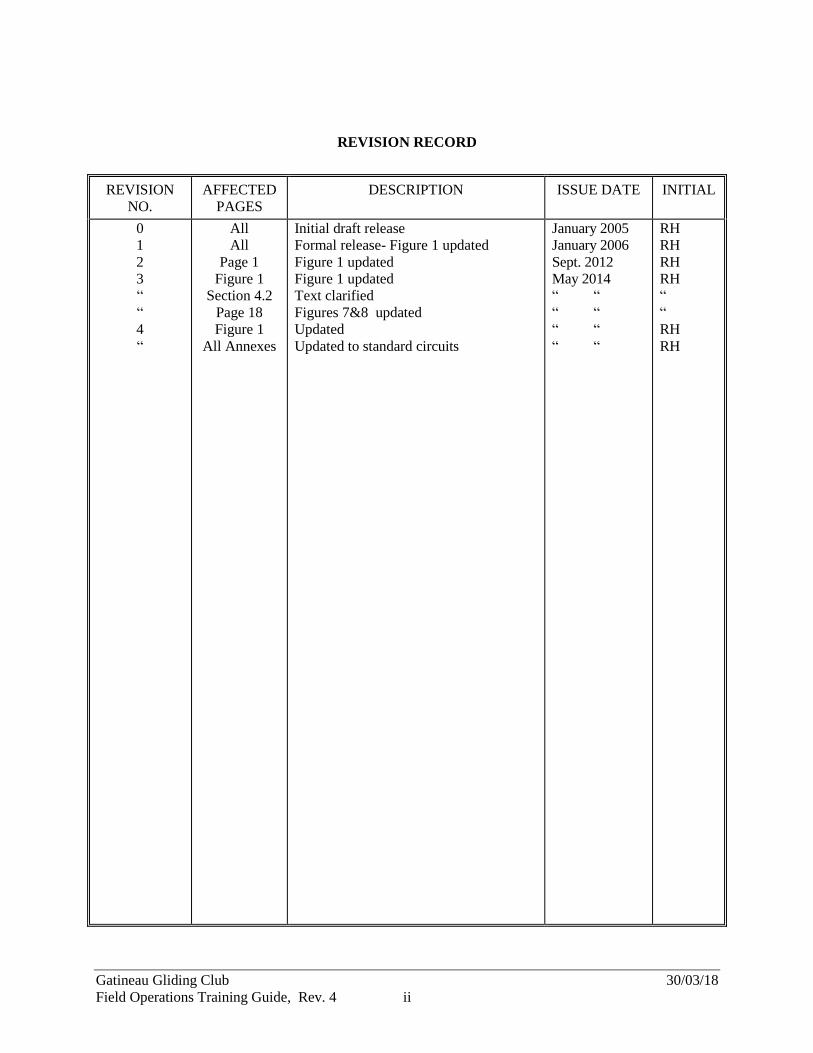
REVISION RECORD
REVISION
NO.
AFFECTED
PAGES
DESCRIPTION ISSUE DATE INITIAL
0
1
2
3
“
“
4
“
All
All
Page 1
Figure 1
Section 4.2
Page 18
Figure 1
All Annexes
Initial draft release
Formal release- Figure 1 updated
Figure 1 updated
Figure 1 updated
Text clarified
Figures 7&8 updated
Updated
Updated to standard circuits
January 2005
January 2006
Sept. 2012
May 2014
“ “
“ “
“ “
“ “
RH
RH
RH
RH
“
“
RH
RH

Gatineau Gliding Club 30/03/18
Field Operations Training Guide, Rev. 4 iii
TABLE OF CONTENTS
Paragraph Title Page
1. Overview ............................................................................................................................................... 1
2. Daily Flight Preparations .................................................................................................................... 2 2.1 Introduction .......................................................................................................................................... 2 2.2 Where Pre-Flight Preparations Should be Carried Out ........................................................................ 2 2.3 Assembling the Glider ......................................................................................................................... 2 2.4 Critical Assembly Check ..................................................................................................................... 2 2.5 Critical Items ........................................................................................................................................ 3 2.6 Positive Control Check ........................................................................................................................ 3 2.7 The Daily Inspection (DI) .................................................................................................................... 3 2.8 Other Assistance .................................................................................................................................. 5 2.8.1 Glider Tow Hitch .............................................................................................................................. 5 2.8.2 Canopy .............................................................................................................................................. 5 2.8.3 Tow Out Equipment .......................................................................................................................... 5 2.9 Summary .............................................................................................................................................. 5
3. Ground Handling ................................................................................................................................. 7 3.1 Introduction .......................................................................................................................................... 7 3.2 Glider Familiarity ................................................................................................................................. 7 3.3 Preparation and planning before moving ............................................................................................. 7 3.4 Moving the glider ................................................................................................................................. 8 3.4.1 Positioning the Helpers ..................................................................................................................... 8 3.4.2 Strong and Gusty Winds ................................................................................................................... 8 3.4.3 Turning the Glider ............................................................................................................................. 8 3.4.4 Things to Watch on the Way............................................................................................................. 8 3.4.5 Problems During Glider Repositioning ............................................................................................. 9 3.5 Parking and Securing the Glider .......................................................................................................... 9 3.5.1 Location ............................................................................................................................................ 9 3.5.2 Orienting the Glider and Keeping it Safe on the Airport .................................................................. 9 3.5.3 Methods of Securing the Glider ...................................................................................................... 10 3.6 Summary ............................................................................................................................................ 10
4. Positioning the Glider for Take-Off ................................................................................................. 11 4.1 Introduction ........................................................................................................................................ 11 4.2 Preparing to Position the Glider ......................................................................................................... 11 4.3 Positioning Glider on Runway ........................................................................................................... 11 4.4 Removing External Equipment .......................................................................................................... 11 4.5 Summary ............................................................................................................................................ 12
5. Pre-Takeoff Checklist ........................................................................................................................ 13 5.1 Introduction ........................................................................................................................................ 13 5.2 General ............................................................................................................................................... 13 5.3 Parachutes .......................................................................................................................................... 13 5.4 Preparation for Entering the Glider .................................................................................................... 13 5.5 Entering the Glider ............................................................................................................................. 14 5.6 In the Glider ....................................................................................................................................... 14 5.7 Pre-Takeoff Checklist ........................................................................................................................ 14 5.8 Controls .............................................................................................................................................. 14

Gatineau Gliding Club 30/03/18
Field Operations Training Guide, Rev. 4 iv
5.9 Canopy ............................................................................................................................................... 15 5.10 Checking the Towline ...................................................................................................................... 15 5.11 Summary .......................................................................................................................................... 15
6. Connecting the Towline ..................................................................................................................... 16 6.1 Introduction ........................................................................................................................................ 16 6.2 Preparation ......................................................................................................................................... 16 6.3 Safety ................................................................................................................................................. 16 6.4 Glider Tow Hitches ............................................................................................................................ 16 6.5 Glider Tow Hitch Location ................................................................................................................ 17 6.6 Tow Plane Towline Attachment ........................................................................................................ 18 6.7 Glider Towline Attachment ............................................................................................................... 19 6.8 Tow Release Checks .......................................................................................................................... 20 6.9 Summary ............................................................................................................................................ 20
7. Launching the Glider ......................................................................................................................... 21 7.1 Introduction ........................................................................................................................................ 21 7.2 Safety ................................................................................................................................................. 21 7.3 Sequence of Events ............................................................................................................................ 21 7.3.1 Clear Area of People ....................................................................................................................... 22 7.3.2 Check Glider Configuration ............................................................................................................ 22 7.3.3 Check Traffic Pattern ...................................................................................................................... 22 7.4 Launch Signals ................................................................................................................................... 23 7.4.1 Take Up Slack Signal ...................................................................................................................... 24 7.4.2 Hold Signal ..................................................................................................................................... 24 7.4.3 All Out Signal ................................................................................................................................. 25 7.4.4 Emergency Stop Signal ................................................................................................................... 25 7.5 Running the Wing .............................................................................................................................. 25 7.6 Clearing the Launch Area .................................................................................................................. 26 7.7 Summary ............................................................................................................................................ 26
Annexes
A Runway 31 Operations
B Runway 26 Operations
C Runway 13 Operations
D Runway 08 Operations

Gatineau Gliding Club 30/03/18
Field Operations Training Guide, Rev. 4 v
LIST OF FIGURES
Figure Title Page
Figure 1 – GGC Operational Procedures ...................................................................................................... 1 Figure 2 – Typical DI Walk Around Path ..................................................................................................... 4 Figure 3 – Glider Handling Areas ................................................................................................................. 7 Figure 4 – Glider Orientation for Securing ................................................................................................. 10 Figure 5 – Types of Tow Rings .................................................................................................................. 17 Figure 6 – ASK-13 Release Location & Detail .......................................................................................... 17 Figure 7 – Blanik L23 Release Location & Detail ...................................................................................... 18 Figure 8 – L33/Puchacz/ASW-24/27 Release Location & Detail .............................................................. 18 Figure 9 – Tow Plane Hitch Mechanism .................................................................................................... 19 Figure 10 – Tow Rope Connection Signals ................................................................................................ 20 Figure 11 – Launch Danger Zones .............................................................................................................. 21 Figure 12 – Launch Signals ........................................................................................................................ 24

Gatineau Gliding Club 30/03/18
Field Operations Training Guide, Rev. 4 1
1. OVERVIEW
This guide has been generated to be used as the written reference text for the Field Manager Training
Course that is held early each season at GGC. This document (and attendance at the associated training
course) should be reviewed by all club members, specifically those assigned duties of Field Manager,
Assistant Field Manager and Wing Runners. A set of Annexes describe specific ground operations for
each runway at the GGC aerodrome.
This Field Manager Training Guide forms part of the overall GGC Operational Procedures as shown in
Figure 1.
Figure 1 – GGC Operational Procedures

Gatineau Gliding Club 30/03/18
Field Operations Training Guide, Rev. 4 2
2. DAILY FLIGHT PREPARATIONS
2.1 Introduction
Before the pilot is ready to climb into the glider for takeoff, a number of preparations and safety checks
must be completed to ensure that the glider is in an airworthy condition. The pilot may require assistance
to accomplish some of these checks and the ground crewmember may be asked to assist in completing
them. The following sections review typical pre-flight tasks in which the ground crewmember may be
asked to assist.
2.2 Where Pre-Flight Preparations Should be Carried Out
The glider is not safe to fly until all necessary pre-flight preparations and a Daily Inspection (DI) check
has been completed. Consequently, the glider should not to taken out to the flight line until all pre-flight
preparations, including a DI, have been accomplished. This allows the pilot to perform the required
checks with less chance of disruption from the hustle and bustle of the flight line.
2.3 Assembling the Glider
Club gliders that are not used on a daily basis or stored for the winter may often be disassembled and
stored in specially designed trailers. Enclosed trailers protect the airframe from exposure to the natural
elements when not being used. These trailers also allow the pilot to relocate the glider easily. The
assembly of a glider typically requires the pilot and at least one helper. To ensure the glider is assembled
correctly, pilots and other persons assisting in the assembly should adhere to the manufacturer's assembly
checklist.
2.4 Critical Assembly Check
If a glider has just been assembled, it needs to be carefully checked before flight. This should involve the
pilot ensuring that all critical assembly items are checked for correct assembly, security, and proper
operation.
Four causal factors have been identified to be prevalent in assembly related accidents:
1. Distractions during the assembly process,
2. Failure to follow manufacturer's recommended assembly procedure,
3. Failure to conduct a positive control check,
4. Rushing the procedure to get into the air.
TO ENHANCE SAFETY IN THE ASSEMBLY PROCEDURE, A CRITICAL ASSEMBLY CHECK
MUST BE CONDUCTED AFTER THE GLIDER HAS BEEN ASSEMBLED. THE PILOT-IN-
COMMAND SHOULD ENLIST ANOTHER PERSON TO ASSIST IN EXAMINING CRITICAL
ASSEMBLY COMPONENTS TO ENSURE PROPER INSTALLATION. THIS PERSON DOES NOT
NECESSARILY NEED TO BE FAMILIAR WITH A SPECIFIC AIRCRAFT OR
MANUFACTURER, BUT SHOULD HAVE A BASIC UNDERSTANDING OF THE FACTORS
INVOLVED IN A PROPERLY ASSEMBLED GLIDER. THIS CAN BE ACHIEVED BY THE
PILOT-IN-COMMAND EXPLAINING TO HIS/HER HELPERS HOW EACH PART IS
INSTALLED AND ATTACHED SECURELY. THE GROUND CREWMEMBER MAY BE ASKED
TO SERVE IN THIS CAPACITY.

Gatineau Gliding Club 30/03/18
Field Operations Training Guide, Rev. 4 3
2.5 Critical Items
THE FOLLOWING LIST, THOUGH NOT TOTALLY INCLUSIVE, OFFERS ITEMS THAT
SHOULD BE CHECKED PRIOR TO FLIGHT. FAILURE TO HAVE THESE ITEMS CORRECTLY
ASSEMBLED MAY RESULT IN DIFFICULT OR IMPOSSIBLE FLIGHT CHARACTERISTICS.
THE CHECK BY THE PILOT-IN-COMMAND AND AN ASSISTANT CAN NORMALLY BE
PERFORMED BY SIMPLY WALKING AROUND THE AIRCRAFT, STARTING AND ENDING AT
THE COCKPIT AREA.
With the help of an assistant, check each of the following items for proper installation and security.
After check of these items is complete, a Positive Control Check should be performed.
Main wing pin(s) installed
Drag spar pin(s) installed
Control rods attached
Hotellier connectors attached
Spring-loaded connectors engaged
Locking collars engaged
Safety pins installed
Safety collars installed
Outer wing panels installed
Control rods attached and properly secured
Horizontal stabilizer properly installed
Elevator control rod attached
Rudder cables attached
2.6 Positive Control Check
In the assembly process, not only do the wings and horizontal tail surfaces (and any other parts which
have been attached) require to be properly attached to the glider but the flight control surfaces on these
components (the ailerons, flaps and airbrakes on the wings, the elevator on the horizontal tail surfaces)
need to be properly connected to the controls in the cockpit. Pilots have been injured and killed as a result
of failure to properly connect flight controls.
A positive control check is conducted with one person manipulating the flight control in the cockpit and
another person holding the flight control surface to be checked. The person in the cockpit moves the
control to be checked (control stick, airbrake lever, flap handle, etc.) while the other person firmly resists
the movement of the surface being checked. Normally the pilot will place the control to each end of its
travel in turn then, while the other person resists the movement of the flight control surface, attempt to
move the control away from that position. To prevent damage to the control surface, excessive pressure
should not be applied. If the pilot is able to move the cockpit control while the surface is being held, then
the flight control is not properly connected. The ground crewmember may be asked to assist with a
positive control check.
2.7 The Daily Inspection (DI)
Regardless of whether the glider has just been assembled or stored in the hangar, all gliders must undergo
a DI before they are flown. A DI book is located in the side cockpit pouch of each glider. The DI pilot

Gatineau Gliding Club 30/03/18
Field Operations Training Guide, Rev. 4 4
should review the book for any existing “snags” and follow the checklist given in the book. Students may
perform a DI but it must be verified/signed by a licenced glider pilot. If the DI pilot is unsure of what to
look for he/she should ask a pilot/instructor that is familiar with that type of glider. An inspecting pilot
should not allow him/herself to be distracted when performing an inspection. Pleasant conversation and
verifying that a glider is airworthy do not mix.
Figure 2 – Typical DI Walk Around Path
A typical DI procedure should follow the walk around path shown in Figure 2 verifying the following:
Cockpit
o Controls connected and move properly through full range
o Instruments secure and operational
o Cockpit secure. Seat and attachments secure. Seat belts anchored and functional
o Canopy attached, free of defects and clean
Starboard and Fuselage Forward
o Free of tears and no signs of internal damage
Starboard Wing
o All points of attachment secured properly
o No signs of significant damage
o Properly attached to fuselage
o Control surfaces move properly and hinges are free to move
Starboard Fuselage Aft
o Free of tears and no signs of internal damage
Tail Section
o Horizontal and vertical stabilizers secure
o Elevator and rudder move properly and attachments have correct safeties
o Tail wheel or skid in good condition and attached properly
Port Fuselage Aft
o Free of tears and no signs of internal damage
Port Wing
o All points of attachment secured properly
o No signs of significant damage
o Properly attached to fuselage
Gatineau Gliding Club 30/03/18
Field Operations Training Guide, Rev. 4 5
o Control surfaces move properly and hinges are free to move
Port Fuselage Forward
o Free of tears and no signs of internal damage
Undercarriage
o Attached properly and wheel and tire inflated properly and in good condition
Skid
o Attached and in good condition
Pitot & Static Ports
o Attached properly and clear
2.8 Other Assistance
It is not possible here to include all the areas in which the pilot may require help with pre-flight
preparation. The ground crewmember should inquire what assistance the pilot may need. These areas
include:
2.8.1 Glider Tow Hitch
It is essential that the tow hitch on the glider functions correctly, and neither causes the towline to hang
up, nor release prematurely. While inspection of the tow hitch is part of the glider pilot's Pre-Flight
Check, a functional check of its operation also needs to be carried out. The wing runner may be asked to
assist in this check by attaching the towline to the tow hitch and pulling on it to keep it under tension
while the glider pilot operates the release handle in the cockpit. (See Connecting the Towline for details
of how the towline should be attached.)
2.8.2 Canopy
The pilot often requires help in fitting and/or closing the canopy, particularly if the canopy is designed to
detach completely from the cockpit (no hinge). If the pilot requires assistance, the wing runner should be
familiar with proper operation of attaching the canopy before the glider is moved on to the flight line.
This will prevent operations from being delayed when the canopy is secured immediately prior to launch.
2.8.3 Tow Out Equipment
To assist in moving the glider around the field, glider pilots often attach special towing out equipment to
the glider. This may include a tail dolly, a wingtip wheel, and other special purpose items. The glider pilot
may require help in attaching or removing such equipment. If asked to assist, the wing runner must know
how such equipment is attached and removed. In particular, the tail (which is usually heavy) must be
raised to permit the attachment of the tail dolly. The wing runner needs to know where it is safe to lift the
tail or rear fuselage for this purpose, and whether it is safe to press down on the nose of the glider to assist
in the process.
2.9 Summary
While pre-flight preparations are being made, make sure the glider is parked safely in a location
that does not obstruct the launch area.
If helping with the rigging, the wing runner should know ahead of time what is required, and
where to hold glider components to prevent damage to the airframe.
The wing runner should know how to assist in a Critical Assembly Check and the Positive
Control Check.

Gatineau Gliding Club 30/03/18
Field Operations Training Guide, Rev. 4 6
The wing runner should know where the glider can be safely lifted before helping to attach or
remove a tail dolly.
When checking the towline, it must be laid out so that any imperfections affecting its integrity
can be readily identified.

Gatineau Gliding Club 30/03/18
Field Operations Training Guide, Rev. 4 7
3. GROUND HANDLING
3.1 Introduction
While safe ground handling is primarily the responsibility of the pilot-in-command of the glider, all
members of the ground crew also need to be knowledgeable of these procedures. Safe movement of a
glider requires special procedures, especially during conditions of high or gusty winds. This chapter will
describe the sequence of moving a glider from a hangar or tie-down to the flight line and provide the
knowledge necessary to accomplish this operation safely.
3.2 Glider Familiarity
The glider is typically repositioned on the ground by pushing or pulling on specific areas of the airframe.
The glider may also be moved with the assistance of a surface vehicle. Some parts of a glider are fragile
and may be damaged by careless contact. Examples include pushing on the trailing edge (rear surface) of
a wing or applying excessive pressure on both wingtips simultaneously to move a glider. Pushing or
pulling on critical areas of the airframe can damage control surfaces or wing attachment fittings.
Figure 3 – Glider Handling Areas
Accordingly it is important to learn which parts of the glider can be used for handling before the glider is
moved. If the ground crew member is not familiar with a specific model of glider, it is important to first
determine the proper method to use in repositioning it. Ground crew members should seek advice from
the pilot-in-command or operator before attempting to reposition an unfamiliar glider. Glider cockpit
canopies are very susceptible to damage. Normally the canopy should be kept closed and locked anytime
the glider is moved or remains unattended. However, this may be impractical during certain operations. In
this case, the canopy frame should be held firmly so the canopy is not jerked open or slammed shut as the
glider is moved.
3.3 Preparation and planning before moving
Before a glider is untied or first moved out of the hangar, it is necessary to first ensure there are people
available to assist in moving it safely. The number of helpers required will depend on the size of the
glider, the wind (if strong or gusty, more help will be required), and the conditions in the areas through
which it is to be moved. For example, significantly sloping terrain will require additional help to maintain
control of the glider while being moved; a restricted space will require helpers to be positioned close to
the parts of the glider nearest the obstructions. If a glider is to be towed by a surface vehicle, a minimum
of one helper at the wingtip to assist in steering the glider and a second assistant walking at the nose of

Gatineau Gliding Club 30/03/18
Field Operations Training Guide, Rev. 4 8
the glider would be required. If there is any doubt whether there are sufficient helpers, the decision to
move the glider must be made by the pilot-in-command, or the operator.
3.4 Moving the glider
WHETHER A GLIDER IS PUSHED, PULLED OR TOWED, IT SHOULD NOT BE MOVED
FASTER THAN A SLOW WALK.
3.4.1 Positioning the Helpers
One helper should always hold a wingtip, and be responsible for steering the glider. To steer the glider,
moving the left tip forward towards the nose will make the glider turn to the right. Moving the wingtip to
the left will have the opposite effect. On level ground, it is not necessary for both wingtips to be held.
When a glider is being moved up or down a gentle slope, a helper needs to be at each wingtip to restrain
it; for a steeper slope a helper, or helpers, should also be placed down the slope from the glider to assist in
restraining the glider as needed. When a glider is being towed forward by a vehicle, another helper should
walk ahead of the wing, close to the cockpit, in a position to hold the glider back if the glider begins to
over-run the tow vehicle. This individual would also be positioned to release the towrope in the event this
became necessary.
3.4.2 Strong and Gusty Winds
When the wind is strong or gusty, more helpers are required to keep the glider from being damaged
during ground movement. The flight controls should be locked or otherwise restrained to prevent the
control surfaces being blown against their stops. In particular, the 2 seat Blanik must have the stick tied
back using the shoulder straps to stop the elevator from pounding against it’s lower stop as the glider is
moved. The airbrakes should be opened if possible. Depending on glider design, this may not be possible
without operating the wheel brake.
3.4.3 Turning the Glider
When a glider is turned on the spot or with a short radius, ground crewmembers should be aware of the
need to prevent damage to glider nose-skids, tail-wheels and other components. This can typically be
accomplished by ensuring that the component in question is well clear of the ground. For example,
pressing down on the rear fuselage of the glider will help to keep the nose-skid clear of the ground.
However, care must be taken to avoid lifting on or pressing down on parts that could be damaged. In
strong or gusty winds, particular care is necessary. The upwind wing should always be held low to
prevent the wind picking it up and flipping the glider on its back. As the glider is turned around through
the wind, helpers must "change wings" so that a helper is always holding the upwind wing and keeping it
low. In addition to keeping someone in the cockpit, it may also be necessary to have a helper lift the tail
as the nose of the glider is turned into the wind, thus reducing the lifting force generated by the wings.
3.4.4 Things to Watch on the Way
The glider should be moved along a planned route to its destination so as to avoid potential obstructions
such as bad ground, tight spaces, and moving hazards like taxiing aircraft. Also be aware of the prop or jet
blast moving rearwards from powered aircraft. When the glider arrives at the launch point (unless lined
up for the pilot to enter and take an immediate tow) it needs to be parked safely clear of all aircraft and
vehicles that are expected to be moving. (See section on 'Parking and Tie Down') In either case, the glider
Gatineau Gliding Club 30/03/18
Field Operations Training Guide, Rev. 4 9
should not be left unattended unless it is properly configured and it is safe to do so. If the glider cannot be
tied down or otherwise restrained, at least one ground crewmember should remain in position.
These principles, of course, apply similarly to a glider being returned to the hangar.
3.4.5 Problems During Glider Repositioning
Although a number of problems can occur during the repositioning of a glider, the most typical relate to
the ground crew not being able to adequately control the glider's path. For example, the surface vehicle
may over-speed the glider during ground movement. The solution is almost always to release from the
tow vehicle and stop the glider. It may be necessary to turn the glider around to prevent it from colliding
with the tow vehicle or other obstruction. It is important to take appropriate action to prevent a recurrence
of the problem. Remember most ground movement incidents are caused by excessive towing speed. The
glider should not be towed faster than a slow walk.
3.5 Parking and Securing the Glider
3.5.1 Location
Except in light wind conditions and in locations where the glider is unlikely to be affected by prop blast, a
glider should not be left unattended unless it has been tied down or otherwise safely restrained. In any
case, it should be parked safely clear of other aircraft and vehicles. If there are fixed tie-downs (ropes or
chains) at the location, these are normally attached to the tie-down points on the glider. Different models
of glider have different restraint mechanisms. If unfamiliar with a particular glider, obtain specific
instructions from the pilot-in-command or operator.
3.5.2 Orienting the Glider and Keeping it Safe on the Airport
While on the field, the glider must always be properly safeguarded. Helpers should remain beside the
glider to keep it secure if wind conditions require it. Only in very light winds should a glider be left
unsecured and unattended.
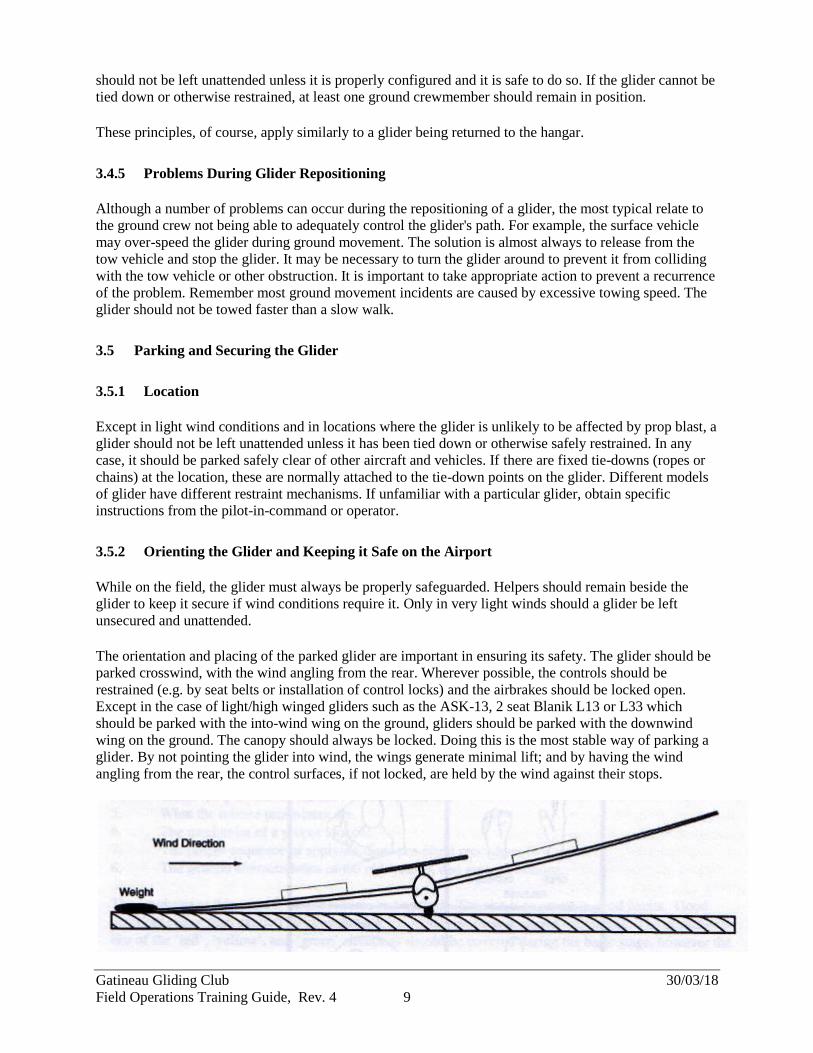
The orientation and placing of the parked glider are important in ensuring its safety. The glider should be
parked crosswind, with the wind angling from the rear. Wherever possible, the controls should be
restrained (e.g. by seat belts or installation of control locks) and the airbrakes should be locked open.
Except in the case of light/high winged gliders such as the ASK-13, 2 seat Blanik L13 or L33 which
should be parked with the into-wind wing on the ground, gliders should be parked with the downwind
wing on the ground. The canopy should always be locked. Doing this is the most stable way of parking a
glider. By not pointing the glider into wind, the wings generate minimal lift; and by having the wind
angling from the rear, the control surfaces, if not locked, are held by the wind against their stops.
Gatineau Gliding Club 30/03/18
Field Operations Training Guide, Rev. 4 10
Figure 4 – Glider Orientation for Securing
3.5.3 Methods of Securing the Glider
Gliders may be secured using old tires placed on the wingtip and restricting the nose and/or tail from
moving. Parachutes should not be used as damage to the parachute may result. In any case, if the ground
crewmember is not familiar with the specific glider, or the method of restraint to be used, the proper
procedure can be obtained from the aircraft flight manual or from the owner or operator. The glider can
be damaged if incorrect procedures are used.
3.6 Summary
Before moving the glider, plan a route and ensure that there are enough helpers to move the glider
safely.
Know where to push or pull on the glider to avoid damaging the airframe.
Do not move the glider faster than a slow walk.
Take special care and precautions (including extra helpers) in strong or gusty winds.
Be ready to stop in case of emergency.
Do not leave the glider unattended unless the glider is secured and it is safe to do so.
Park and secure the glider in a safe manner considering the surface wind and other aircraft and
vehicles.
If in doubt, ask!

Gatineau Gliding Club 30/03/18
Field Operations Training Guide, Rev. 4 11
4. POSITIONING THE GLIDER FOR TAKE-OFF
4.1 Introduction
Once the pilot has completed all required pre-flight checks and is ready for launch, the glider can be
positioned on the departure runway. This operation must be performed efficiently to minimize the amount
of time that other aircraft are prevented from using the runway. The following sections describe the
procedure for positioning the glider on the runway and preparing for the pilot's pre-takeoff checklist. The
field manager will assign the glider to a pilot and determine the launch order. Once the field manager has
assigned the aircraft to a pilot, that pilot is responsible for ensuring that the aircraft is properly secure
while awaiting launch through to securing the glider at the end of the flight.
4.2 Preparing to Position the Glider
It is important to complete all possible external pre-flight actions before moving the glider onto the
runway. Required items such as ballast, maps, clothing, etc. should be in place and secure. Passenger
briefings should also be accomplished prior to positioning the glider onto the runway.
The wing runner should ensure that all necessary pre-flight preparation has been completed before
moving the glider onto the runway. The pilot of the tow plane should be made aware that a glider launch
is imminent to ensure that the tow aircraft will be ready as well. It is extremely important to survey the
traffic pattern to determine if an appropriate interval is available to position and launch the glider.
4.3 Positioning Glider on Runway
When an appropriate interval is available, the glider should be moved to the departure point. The
departure points for the various runways used at Pendleton are given later in this document. It is very
important to point the glider straight down the runway as the glider pilot may not have full directional
control during the initial phase of the takeoff roll.
Always confirm proper positioning of the glider with the pilot-in-command.
Once the glider is positioned, the wing runner may assist the pilot and passengers with entering the glider.
This assistance may include helping with seatbelts, the canopy, or other items. Ensure that loose objects
in the cockpit are secured. Once the glider pilot begins the pre-takeoff checklist, avoid any unnecessary
conversation or distractions.
4.4 Removing External Equipment
Some gliders (particularly high-performance sailplanes) use a tail dolly to assist ground handling and
reduce wear on the tailskid/tail wheel. Sometimes other equipment such as wing wheels and tow bars are
also used. These items must be removed before launch. The wing runner should show the removed items
to the pilot for final verification.
This is also a good time to confirm that control locks, pitot tube covers, and any other remove-before-
flight items have in fact been removed. Do not hesitate to stop the launch process if you suspect that any
remove-before-flight item is still attached to the glider or anything else appears wrong.

Gatineau Gliding Club 30/03/18
Field Operations Training Guide, Rev. 4 12
4.5 Summary
Perform as many preparatory items as possible before moving the glider onto the runway.
Ensure that the runway and traffic pattern are clear of conflicting aircraft.
Position the glider at the end of the departure runway, and--most importantly--pointing straight
down the runway.
Assist the pilot and passengers with entering the glider.
Remove and show the pilot all remove-before-flight items such as tail dollies, wingtip wheels,
etc.

Gatineau Gliding Club 30/03/18
Field Operations Training Guide, Rev. 4 13
5. PRE-TAKEOFF CHECKLIST
5.1 Introduction
Once the glider has had a DI to ensure that it is airworthy (see Daily Flight Preparations) and has been
positioned for takeoff (see Positioning the Glider for Takeoff), the pilot must perform a final walk-around
of the aircraft to check for any obvious items that render the aircraft unairworthy. Items that have
typically been caught during a walkaround are:
Tail dolly still attached
Open inspection panels
Low tire pressure
The wing runner may be required to assist the pilot in some or all of these tasks. The following sections
discuss typical tasks that may require help from the wing runner.
5.2 General
The wing runner should ask the pilot what assistance he or she requires. If unfamiliar with the task, ask
the pilot and get whatever information is required before assisting.
5.3 Parachutes
If a parachute is to be used, the pilot normally puts it on before getting in the glider. This substantially
reduces the risk of getting the parachute straps tangled with the seat belts. The pilot will usually stand
well clear of the glider when donning the parachute to prevent the parachute strap buckles from
inadvertently hitting the glider. The wing runner may be asked to assist the pilot in donning the parachute.
The parachute container (with canopy inside) is normally put on much like a sleeveless coat with the arms
going through the harness armholes. The top of the harness goes over the pilot's shoulders. The wing
runner may be required to help the pilot 'get into' the harness, usually by holding it up so that the pilot's
arms can be placed through the armholes.
Once the pilot has put on the harness, the parachute straps will need to be secured and adjusted. Different
models of parachutes may have multiple straps that are required to be attached. Almost without exception,
these include two straps attached to the lower back of the harness, which require to be passed through
between the pilot's legs and attached around the thighs or elsewhere to the front of the harness. The wing
runner may be required to locate these straps, pass them to the pilot, or attach them for the pilot. It may
also be necessary to assist in adjusting the straps so the harness fits snugly.
5.4 Preparation for Entering the Glider
To enable the pilot to be properly seated in the glider, the seating area needs to be free of objects (e.g.,
maps) that the pilot would sit on if not removed. In particular, the seat belts should be moved clear of the
seat pan. The pilot should verify that ballast is in position (or removed as required) prior to entering the
cockpit. The wing runner can assist the pilot in these tasks and, if necessary, hold the seat belts clear
while the pilot enters the cockpit.

Gatineau Gliding Club 30/03/18
Field Operations Training Guide, Rev. 4 14
5.5 Entering the Glider
Some models of glider (usually those which have a nose wheel or skid resting on the ground when the
pilot is aboard but rest with the tail on the ground when unoccupied) may tip forward as the pilot enters
the cockpit. In these cases it is customary to lower the nose until it rests on the ground before the pilot
gets in, thus preventing the nose from striking the ground and possibly damaging the airframe. The wing
runner may be asked to assist by holding down on the nose of the glider or at some other point on the
airframe (if safe to do so) until the pilot has entered the cockpit. If unfamiliar with the specific model of
glider, it is important to determine the proper places to push on the airframe. The pilot-in-command will
be able to provide this information.
5.6 In the Glider
Once the pilot is seated in the glider, the wing runner can assist by positioning seat belts and shoulder
harness. Assistance may also be provided in helping the pilot get organized in the cockpit - positioning
and securing maps, water bottles, oxygen masks and other items. Once the pilot and passengers have their
seat belts attached and adjusted and the cockpit is properly organized, the pre-takeoff checklist will be
initiated.
5.7 Pre-Takeoff Checklist
It is important that the pilot is not distracted or interrupted while conducting the pre-takeoff checklist
(Controls, Instruments, Straps, Trim & Ballast, Release, Spoilers, Canopy, Options). The wing runner
should not talk, nor be talking to the pilot while the checklist is being conducted. However, the pilot may
require assistance to conduct these checks properly. The wing runner may be asked to assist in checking
the following items:
5.8 Controls
The pilot will check the glider's controls for proper operation (i.e. ensuring that the control surfaces move
in the correct direction in response to control movements in the cockpit). If the pilot cannot see the
control surface being checked from his or her position in the cockpit, the wing runner may be asked to
report to the pilot the position of the control surface. For example, if the pilot cannot see the ailerons at
the wingtips, he or she will move the control stick to one side and state the proper positions of the control
surfaces. The wing runner should look at the control surface and verify its position. This will be repeated
for each control surface: the ailerons, rudder, and elevator. Additional checks may be required for the
secondary controls surfaces including the trim, spoilers, and flaps if installed.
The pilot is relying on the wing runner to observe and report any abnormalities. Should the control
surface not move, or if it moves in an unusual or improper way, the wing runner should immediately
report this observation this to the pilot.
When checking the flaps, it is important to check that the surfaces on each side move together and with
the same amount of travel. Airbrakes/spoilers should also move in a uniform manner. In the case of
spoilers (which are hinged at and pivot around their front edge) the wing runner may need to look from
the side, along the wing, to see that the surfaces remain in line. Once the airbrake/spoiler check has been
completed (unless the pilot indicates differently) they should also be checked to ensure they are closed
and flush with the wing surface. Every year, glider incidents and accidents occur because the pilot has
failed to lock the airbrakes closed prior to flight. You can help prevent this by making this check.

Gatineau Gliding Club 30/03/18
Field Operations Training Guide, Rev. 4 15
5.9 Canopy
Some gliders have locking handles/levers that are visible from outside the canopy. It is important to be
familiar with these to be able to make a visual check to ensure the canopy is locked once it has been
closed. Gliders have been destroyed and the occupants fatally injured as a result of the pilot failing to
properly secure the canopy before flight. The wing runner can be instrumental in helping to prevent
accidents by making this visual check and advising the pilot if the canopy is not locked.
5.10 Checking the Towline
The towline should not be attached, nor offered to the pilot for attachment, until the pre-takeoff checks
have been completed.
It is also a responsibility of the ground crewmember to monitor the condition of the towline during launch
operations. To check the integrity of the towline, it first must be laid out on the ground - a proper
inspection cannot be made if the towline is coiled up.
The towline needs to be checked to ensure that it is undamaged. A thorough check must include the
following -
The steel rings at either end must be securely attached to the rope, and not be distorted.
The rope should show no signs of distress or fraying at any point, particularly where there are
splices, and where it goes around the rings.
There must be no knots in the rope itself.
No strands of the rope should be broken.
The rope condition should be generally good without frays, kinks, oil stains or other
discontinuities.
Particular care should be taken with the inspection of the weak link(s) and any part that has been
'protected' from wear by attachment of tape, thimbles, tennis balls, or other items. If there is any doubt as
to the serviceability of any part of the towline, a final determination should be made by the glider pilot or
tow operator.
5.11 Summary
Ask the pilot what assistance is required.
If unfamiliar with a particular glider or procedure, always ask the pilot in command before
assisting.
Be able to identify each of the glider's control surfaces and know its correct movement/position.
Handle the canopy with care using the frame, not the Plexiglas®.
Allow the pilot to control the pace of the operation, particularly by waiting for the pre-takeoff
checks to be completed before attaching the towline.
When checking the towline, it must be laid out so that any imperfections affecting its integrity
can be readily identified.

Gatineau Gliding Club 30/03/18
Field Operations Training Guide, Rev. 4 16
6. CONNECTING THE TOWLINE
6.1 Introduction
Connecting the towline is one of the most important tasks that the wing runner will be required to
accomplish. If this task is completed in a careless or incorrect manner, it could cause the glider to
experience a premature release from the tow plane or prevent a release of the towline. Either of these
abnormal occurrences will result in a potential emergency for the pilots of the glider and the tow aircraft.
The following sections review the requirements for, and potential problems associated, with attaching the
towline.
6.2 Preparation
The wing runner is required to check the towline before aero tow operations begin. Has been discussed
previously.
6.3 Safety
A typical sequence of events involves the following steps: The tow pilot will taxi the tow plane into
position in front of the glider. The towline will be positioned close to the glider but with enough slack to
permit it to be attached. Once the tow plane has stopped and when requested by the glider pilot, the tow
ring can be attached to the glider tow hitch.
This sequence of events occurs during a period of time in which a number of potential hazards exist. For
example, the tow plane is being taxied in close proximity to the glider as the wing runner approaches the
tow plane to pick up the towline. It is vital for the wing runner to be aware of these potential hazards and
to maintain a safe distance from moving aircraft, especially the area around the propeller. Stay behind the
wing of the tow plane.
As the tow plane approaches with engine running, the nose of the tow plane partially obscures the forward
view of the tow pilot. It is vitally important to keep well clear of the tow plane while it is moving. Only
approach it from behind the wings. If it is necessary to go to the cockpit, wait for the tow plane to stop.
Picking up the towline while it is moving risks rope burn if the rope slides through the hands.
Additionally, entanglement is always a possibility with a moving towline. Stand well clear of the towline
as the tow plane taxies forward to prevent legs and arms from being caught in a tangled towline. Do not
let the towline run through the hands or around the body. Always hold the towline in a manner in which it
can be easily released if the rope snatches.
6.4 Glider Tow Hitches
At the glider end of the towline are the attachment ring(s). The type of tow hitch fitted to the glider
determines the proper type of ring(s). The wing runner needs to be familiar with the requirements of the
glider to ensure that the correct ring(s) are used. Using the wrong type of ring(s) may result in the towline
hanging up and failing to release from the glider.
There are two different types of tow hitch and tow ring(s) in use at GGC. The Schweizer tow ring (used
on the two seat Blanik) uses a single round tow ring. Nearly all other gliders are fitted with a Tost tow
hitch. The Tost hitch is a hook mounted inside a round metal ring. Tost tow hitches use tow rings that are

Gatineau Gliding Club 30/03/18
Field Operations Training Guide, Rev. 4 17
specially designed for the Tost hitch. The Tost unit is comprised of an oblong ring and a round ring
looped through each other. The round ring is attached to the tow hitch.
Figure 5 – Types of Tow Rings
The Schweizer ring is too large to fit the Tost hitch, but Tost rings can be fitted to the Schweizer hitch.
Because the Tost ring is not compatible with the Schweizer hitch, the tow hitch may jam. Consequently
Tost rings are not be attached to the Schweizer hook. If unsure of the correct tow ring(s), ask the glider
pilot.
GGC tow ropes have a Schweizer ring on one end for the tow plane and Tost ring set on the glider end. The Tost ring set (small ring) is used for all club gliders. The wing runner will need to be familiar with
this system and to know how to identify the rings.
6.5 Glider Tow Hitch Location
As previously stated, different gliders have different tow hitches that require different tow rings.
Additionally, the tow hitches on different gliders may be fitted in different locations. The wing runner
must know where the tow hitch is located. If any doubt exists as to which tow hitch should be used, be
sure to ask the pilot of the glider.
Figure 6 – ASK-13 Release Location & Detail
Gatineau Gliding Club 30/03/18
Field Operations Training Guide, Rev. 4 18
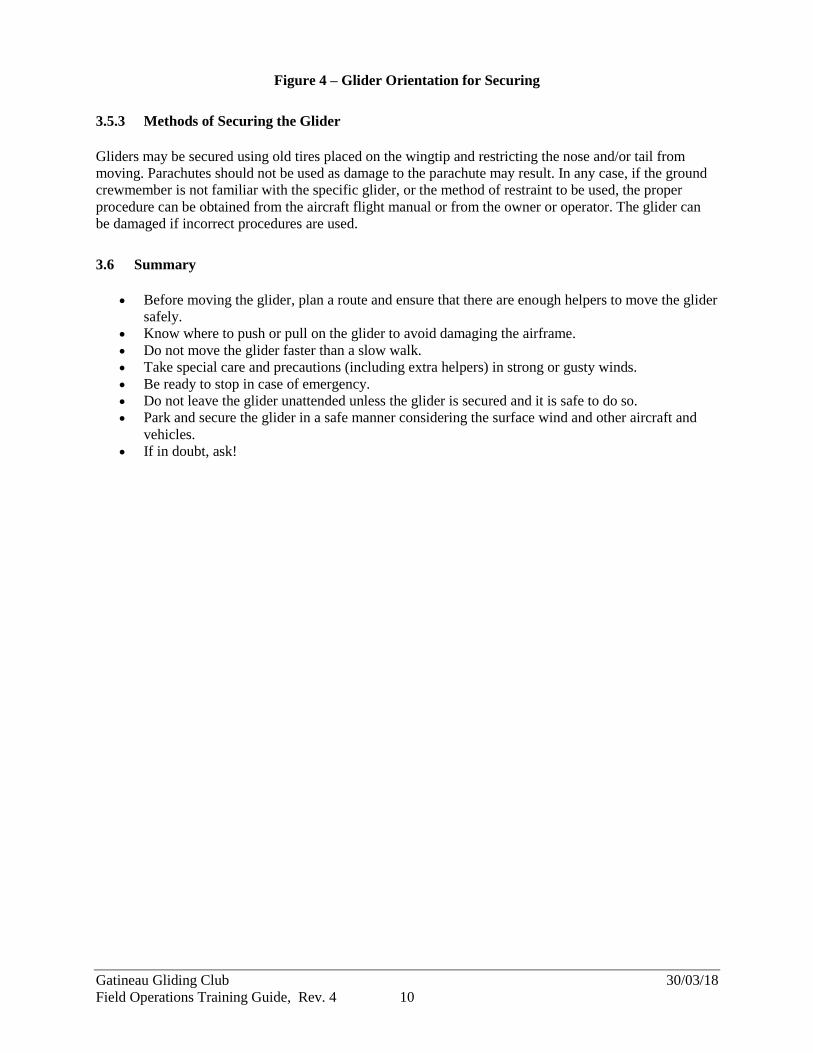
Figure 7 – Blanik L23 Release Location & Detail
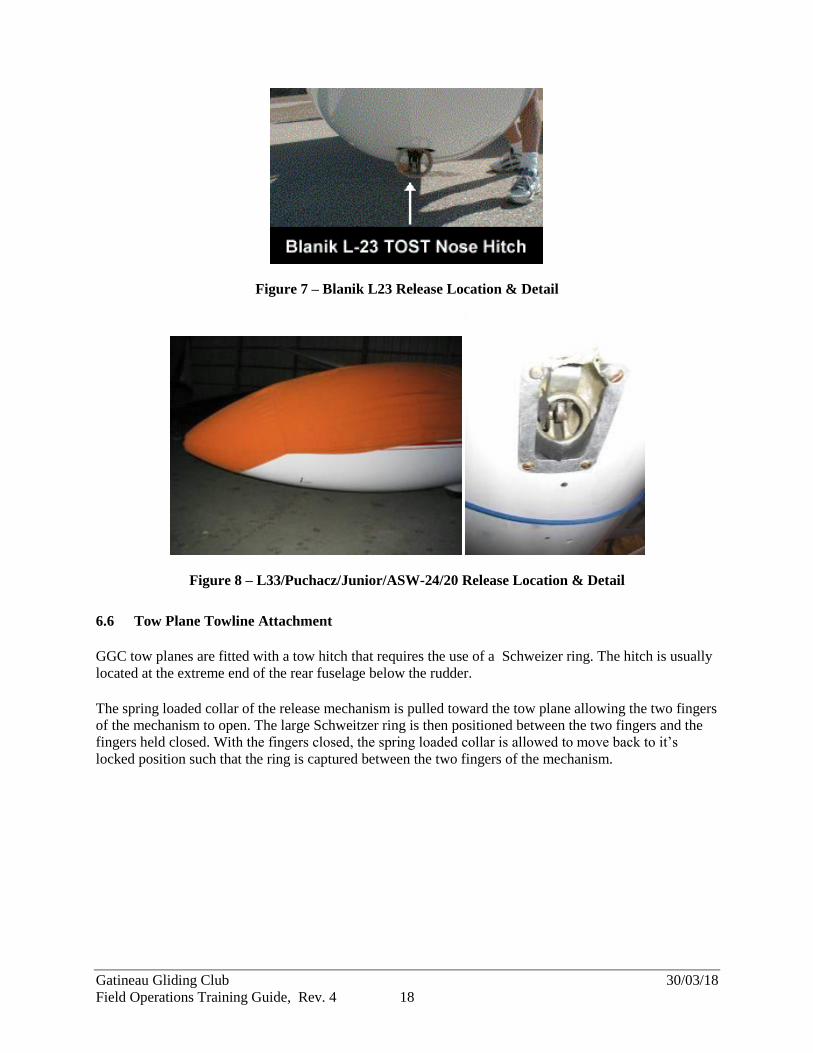
Figure 8 – L33/Puchacz/Junior/ASW-24/20 Release Location & Detail
6.6 Tow Plane Towline Attachment
GGC tow planes are fitted with a tow hitch that requires the use of a Schweizer ring. The hitch is usually
located at the extreme end of the rear fuselage below the rudder.
The spring loaded collar of the release mechanism is pulled toward the tow plane allowing the two fingers
of the mechanism to open. The large Schweitzer ring is then positioned between the two fingers and the
fingers held closed. With the fingers closed, the spring loaded collar is allowed to move back to it’s
locked position such that the ring is captured between the two fingers of the mechanism.

Gatineau Gliding Club 30/03/18
Field Operations Training Guide, Rev. 4 19
Figure 9 – Tow Plane Hitch Mechanism
The wing runner must be familiar with the correct method of attachment. As always, if in doubt, ask. It is
vital that prior to each tow, the tow ring is checked to ensure that it is in the correct position, and the
release not jammed. The safety of the tow pilot may depend on being able to release the towline in an
emergency.
6.7 Glider Towline Attachment
When the tow plane taxies up, or is otherwise ready to start a tow, the wing runner must connect the
towline. If it is not already attached, it should be attached to the tow plane; if already attached and the tow
plane has the Schweizer tow hitch, the attachment should be checked in accordance with the preceding
section.
In the process of picking up the towline and taking it to the glider, it is important to ensure that it is
undamaged.
Tow ring(s) should be securely attached to the rope and not distorted.
Ensure that there are no signs of distress or fraying of the rope - particularly where there are
splices and where it goes around the rings.
Confirm that there are no knots in the towline.
Check for broken strands in the towline.
Verify that there is no obvious damage to the towline-frays, kinks, oil stains or other
abnormalities.
Pay particular attention to areas protected by tape, thimbles, tennis balls or other protective
devices.
If any doubt exists regarding the integrity of the towline, show the affected area to the glider pilot.
REMEMBER TO EXERCISE CARE!
DO NOT HOLD ON TO A MOVING TOWLINE - AVOID ROPE BURN!
DO NOT STAND NEAR A MOVING TOWLINE - AVOID ENTANGLEMENT AND DRAGGING!

Gatineau Gliding Club 30/03/18
Field Operations Training Guide, Rev. 4 20
Take the glider tow ring end of the towline and show the ring(s) and the weak link to the glider pilot for
his inspection and approval.
Do not attempt to connect the tow ring before the glider pilot requests that it be attached. Wait for the
glider pilot to do this! After receiving a request to "Connect Tow Rope" the "Open Tow Hitch" hand
signal should be given. If necessary, this signal may be supplemented by a verbal request. Present the tow
ring to the tow hitch and, once properly located, give the glider pilot the "Close Tow Hitch" hand signal.
Again, the signal may be supplemented by a verbal request.
Figure 10 – Tow Rope Connection Signals
Once the towline has been attached, it is essential to check that the towline is secure on the tow hitch.
This is accomplished by pulling the rope firmly forward to ensure that it does not release under tension. In
the case of a Tost tow hitch, this must be supplemented by shaking the towline close to the tow hitch - if
the rings rattle in the hitch, they are properly attached; if they are not free to rattle, the connecting ring has
not been correctly located and the rings need to be released and the attachment sequence started over
again.
6.8 Tow Release Checks
As part of the towline attachment procedure, the glider pilot may request a tow hitch release check. This
is a functional check to ensure the tow hitch is operating correctly and is mandatory prior to the first flight
of the day of any glider. Once the towline has been attached, the wing runner may pull the rope firmly
forward. The glider pilot will release the rope while it remains under tension. The pilot may also check for
'free drop', when the hitch is operated while the rope is not under tension.
6.9 Summary
Only approach the tow plane from behind the wings
Don't handle a moving rope
Don't let the towrope run around the body
Know how to distinguish Schweizer tow hitches and tow rings from Tost tow hitches and tow
rings
Know how to attach the “shortie” link
Know the location of the correct tow hitch
Don't attach the towline until the glider pilot requests it
Always check to ensure the towline is undamaged before attaching it

Gatineau Gliding Club 30/03/18
Field Operations Training Guide, Rev. 4 21
7. LAUNCHING THE GLIDER
7.1 Introduction
By now it should be obvious that the responsibility of serving in the capacity of ground crew or wing
runner is much more complex than simply running alongside the departing glider's wing. The process of
launching a glider is one of the most safety-critical aspects of the entire wing running operation and of the
entire glider flight. Consequently, the wing runner must be familiar with all aspects of the launch
sequence.
Once the towline has been checked for proper attachment to the glider and the wing runner has moved to
a position at the wingtip of the glider, the pilot of the tow aircraft can begin to remove the slack from the
towline once the proper signal has been given. The following sections describe the procedures to be used
to safely remove slack from the towline in preparation for a glider launch.
7.2 Safety
The wing runner must recognize the hazard that exists once the towline is connected to the glider. If the
pilot of the tow aircraft initiates the takeoff before the area around the glider is cleared of all ground
crewmembers and spectators, serious injury can occur. To prevent this type of occurrence, ensure that no
one is allowed to walk or stand between a taxiing tow aircraft and the glider.
The most effective way to prevent this from hazarding the wing runner is to move out beyond the wingtip
of the glider immediately after the towline is connected. By doing so, the wing runner will not be struck
in the event of the glider being inadvertently moved forward. The wing runner should always consider the
region in front of glider that has been connected to a towline, to be a DANGER ZONE (FIGURE 11).
Figure 11 – Launch Danger Zones
It is also important to realize that the tow pilot and the pilot of the glider have very limited rearward
visibility and restricted forward visibility from the cockpit. They rely heavily on the wing runner to
monitor the operation for potential hazards during the launch of the glider.
7.3 Sequence of Events
The sequence of events in this segment are:

Gatineau Gliding Club 30/03/18
Field Operations Training Guide, Rev. 4 22
The wing runner clears the area around the glider of people and movable obstructions.
The wing runner checks the glider canopy for security and that all external devices such as wing
and tail dollies are removed. The wing runner should also confirm that the glider's spoilers /
divebrakes / canopy are closed.
The wing runner checks the traffic pattern for conflicting traffic and ensures that the area ahead
and to the sides is clear of obstructions. These include parked gliders, vehicles, spectators, and
anything else that could constitute a collision hazard if the tow were to be aborted. [See the Note
immediately below.]
The wing runner should announce that the "all clear above and behind" or point our conflicting
traffic.
Once the glider pilot has signalled with a “thumbs up”, the wing runner lifts the wing level and
gives the signal to the tow pilot to remove slack
If necessary, the wing runner signals "hold" to indicate to the tow pilot to hold position.
Note: It must be kept in mind that in the event of a tow abort when the glider has not yet achieved full
lateral or directional control, a dropped wing or uncommanded change in direction could result in the
glider performing a "ground loop" – the out-of-control glider following a circular path (which could be
several hundred feet in diameter, depending on the glider speed) off to one side or the other. The safe
course is to ensure that there is an area clear of all obstructions ahead and to the side of the glider about to
be towed. The size of this area depends on the circumstances, including the type of glider being towed,
and the strength and direction of the wind. If in doubt, the wing runner should seek the advice of the
glider pilot – he/she has the final decision.
7.3.1 Clear Area of People
Once the glider is connected to the tow aircraft, no persons other than the wing runner should be allowed
near the glider, especially not within the DANGER ZONE (FIGURE 11). This is particularly true for
personnel unfamiliar with the launch operations (i.e. friends or spectators taking photographs, etc.), as
they may become distracted and not recognize the potential hazard.
7.3.2 Check Glider Configuration
Before proceeding with the launch operation, the wing runner should conduct a brief visual check of the
glider to ensure that the canopy is secure, all external devices such as wing and tail dollies are removed,
and the spoilers / divebrakes /canopy are securely stowed. Note: In some high performance sailplanes the
takeoff is initiated with the spoilers extended for increased controllability. This procedure should be
discussed with the pilot of the glider prior to takeoff if the wing runner and tow pilot are unfamiliar with
the procedure. Any discrepancy noted should be immediately communicated to the pilot of the glider.
7.3.3 Check Traffic Pattern
Prior to giving the signal to Take Up Slack, the wing runner should visually scan the traffic pattern to
ensure that the glider launch will not conflict with other aircraft on the runway or established in the
pattern. The scan should include the traffic pattern to all existing runways at the facility being used as
airborne traffic might not always use recommended traffic pattern procedures.
If an aircraft is observed in the traffic pattern and the glider is ready to launch, a decision must be made as
whether the launch can be continued without causing a conflict with the landing aircraft. Under normal

Gatineau Gliding Club 30/03/18
Field Operations Training Guide, Rev. 4 23
circumstances, it is usually better to discontinue the launch and clear the aircraft from the runway. If the
launch was to proceed and a subsequent emergency causes the takeoff to be aborted, the pilot of the glider
might have to make a landing in conflict with the other traffic. The preferable approach is to avoid the
situation of conflicting traffic by maintaining a high level of awareness of potential conflicting traffic
when conducting launch operations.
When it has been determined that the glider is ready to launch and the traffic pattern is clear, the wing
runner should make visual contact with the pilot of the glider and announce,
"ALL CLEAR ABOVE AND BEHIND."
The wing runner should then verify with the pilot,
“SPOILERS AND CANOPY LOCKED?”
The wing runner should receive acknowledgement from the pilot before proceeding further with the
launch. When the pilot of the glider is ready for the slack to be removed from the towline, a "Thumbs-up"
signal is given by the pilot to indicate "Pilot Ready-Level Wings." The wing runner should then level the
wings of the glider.
EVEN IF THE "THUMBS-UP" SIGNAL HAS BEEN GIVEN, THE WINGS SHOULD NOT BE
LEVELLED UNLESS IT IS CLEAR THAT THERE IS NO POTENTIAL CONFLICTING
TRAFFIC.
Note: This may involve a judgment call – if it is likely to be quicker to launch the glider than get it and
the tow plane clear of the runway, launching the glider could be the better course if there is insufficient
time to otherwise get the runway clear before another glider needs to land on the runway.
7.4 Launch Signals
After receiving a "Thumbs-up" signal from the pilot of the glider indicating "Pilot Ready-Level Wings,"
the wing runner should level the wings of the glider to the takeoff position.
THE WINGS OF THE GLIDER SHOULD NEVER BE RAISED BEFORE THE "PILOT READY-
LEVEL WINGS" SIGNAL IS RECEIVED FROM THE PILOT OF THE GLIDER, AND ONLY
THEN WHEN THE WING RUNNER HAS CHECKED THAT IT IS SAFE FOR THE LAUNCH TO
PROCEED.
Three hand signals are used during normal operations to communicate with the pilot of the tow aircraft.
These signals are very important, as the tow pilot may have limited visibility of the area directly behind
the tow aircraft. In this case, the tow pilot will rely on the wing runner to assist in the positioning of the
tow aircraft to remove slack from the towline. The wing runner should always give the signals promptly
and correctly to prevent the glider being lurched forward as the towline becomes taut.

Gatineau Gliding Club 30/03/18
Field Operations Training Guide, Rev. 4 24
Figure 12 – Launch Signals
7.4.1 Take Up Slack Signal
The "Take Up Slack" signal is given to instruct the tow pilot to begin a slow taxi forward to remove slack
from the towline. The wing runner signals the tow pilot to begin removing slack from the towline by
moving one arm from side to side through an arc below the shoulder. Note: Throughout the process, the
wing runner should be monitoring the rope for proper takeout of the slack, the glider for further signals,
and the pattern for conflicting traffic – watching the tow plane provides no useful information!
7.4.2 Hold Signal
If necessary, the wing runner should signal the tow pilot to "Hold" position by lowering the wing of the
glider and holding both arms outstretched above his/her head. The wing runner may initiate the hold
signal when necessary without request from the pilot of the glider.
A number of hand and aircraft signals are used to communicate various conditions and intentions between
the wing runner, glider pilot, and tow pilot.

Gatineau Gliding Club 30/03/18
Field Operations Training Guide, Rev. 4 25
The sequence and significance of these signals can vary between different glider operations, so you
should receive a thorough briefing at any new operation before performing the wing running role there.
Be particularly observant of the transfer of launch control between the wing runner and glider pilot. In
some operations, once the glider pilot gives the "thumbs up" signal, the wing runner controls the rest of
the launch. At other operations, the glider pilot retains control of the launch procedure and the wing
runner is simply there to hold the wing and signal the glider pilot's intentions to the tow pilot.
7.4.3 All Out Signal
When the glider pilot is ready for the takeoff roll, the wing runner (having made a final check to ensure
that the pattern remains clear) signals with a circular motion of the arm.
It is imperative not to give the "Begin Takeoff" signal unless the glider pilot is ready. Note: Throughout
the process, the wing runner has the continuing responsibility of ensuring that there is no conflicting
traffic. Neither the tow pilot nor the glider pilot has a clear view of the pattern – they depend on the wing
runner’s assistance to do this. If a potential conflict is identified, the launch should be stopped and, if
appropriate, the glider and tow plane moved clear of the launch area. Sometimes this calls for exercise of
judgment – in some circumstances it may be safer for the tow to proceed and clear the area. An example
of this might be where there is only one landing area, blocked by the glider and tow plane waiting to
launch, with a glider in the latter stages of its approach, leaving insufficient time to push the glider and
move the tow plane off the runway. If in doubt, don’t launch.
7.4.4 Emergency Stop Signal
The signal to stop operation is made by waving the arms back and forth above the head in a swift manner.
The pilot of the glider may stop the launch operation at any time by releasing the towline. Before giving
the signal, it is necessary to replace the glider's wing on the ground. This should direct the tow pilot's
attention to the signal being given by the wing runner.
This signal is distinct from the "hold" signal that is associated with normal operations. If the "stop
operation" or "emergency" signal is given, the wing runner should anticipate rapid action by the tow plane
including the tow pilot releasing the towline and taxiing clear of the active runway.
7.5 Running the Wing
When the ground roll begins, the wing runner should run alongside the glider and keep the wings level
(i.e. parallel with the ground) until the glider pilot gains control authority. It is important when running
the wing to hold it lightly to allow the glider pilot to have full control authority as soon as possible. Care
should be taken not to push or pull on the wingtip, as this may have a negative effect on the pilot's
directional control of the glider.
Release the wing as soon as the glider is capable of maintaining wings level. In a strong headwind, this
may occur in a few short steps. The opposite is true when launching with a tailwind. The wing runner
must be prepared to run fast for a longer distance. The same will be true when the glider is operating at an
increased weight due to the addition of water ballast in its wings. In this case, the pilot will not have
sufficient aileron control to maintain a wings level attitude until the glider achieves a slightly higher
speed.
Often the glider pilot will inadvertently hold some non-neutral aileron position during the initial ground
roll. If the wing runner continues to hold the wing level against the resulting wingtip pressure, the glider
will tend to drop a wing as soon as it is released. Instead, yield to the wingtip pressure and permit the
Gatineau Gliding Club 30/03/18
Field Operations Training Guide, Rev. 4 26
wing to rise or fall slightly in accordance with the pressure. The glider pilot will then instinctively remove
the inadvertent aileron control input.
When launching in a crosswind, it is important to keep the wing level or slightly down on the into-wind
side. If the wing is permitted to rise, it may be impossible for the glider pilot to restore a wing-level
condition and the launch must be aborted.
The wing runner should be aware of the difference in glider behaviour when using nose and CG tow
hitches. Nose-mounted tow hitches permit some restoring force if the glider begins to point away from the
tow plane but this force is negligible when using CG-mounted tow hitches. The wing runner must be
particularly diligent when launching a glider with a CG tow hitch in a crosswind. For the first several feet
of the ground roll, the glider pilot has minimal directional control authority and any swing of the glider
will require an immediate launch abort by the pilot.
7.6 Clearing the Launch Area
After the glider has been launched, the wing runner should survey the area for tail dollies, ballast, tow
ring adapters, rope hooks or any other equipment that may pose a hazard for subsequent launches. These
items should be removed from the launch area. Be particularly aware of landing aircraft when clearing the
launch area and returning equipment to the operations base.
7.7 Summary
Be aware of the hazards that exist when the glider is connected to the towline and remain clear of
the DANGER ZONE (Figure 11) in front of the glider's wing.
Perform a final visual check of the glider canopy, spoilers / divebrakes, and external attachments.
Do not allow the launch to continue if any discrepancies are noted.
Visually check the area ahead for obstructions and the traffic pattern to all runways for
conflicting traffic and be prepared to discontinue the launch if required.
Always give the appropriate signals in an accurate and timely manner.
Maintain high situational awareness and communicate any significant information to the pilot of
the glider.
Be prepared to abort the launch at any time if it is determined that continuing it would pose a
hazard.
Give the appropriate signals to the glider pilot and tow pilot. Remember that the pilot of the glider
is the final authority in controlling the launch operation.
When running the wing, hold it lightly near the trailing edge to permit the glider pilot to feel the
forces acting upon the glider.
Be particularly sensitive to a rising or falling wing due to inadvertent control deflections by the
glider pilot.
When launching a glider in a crosswind, hold the upwind wing level or slightly low. Be
particularly vigilant when launching CG-hook equipped gliders in a crosswind.
Clear the launch area of any items left behind.

Gatineau Gliding Club 30/03/18
Field Operations Training Guide, Rev. 4 i
Annex A - Runway 31 Operations
Launch
Pre-Launch - Runway 31
The grass runway to the left of the asphalt is used for launching and landing operations on
Runway 31.
Gliders are secured to the left and/or right of the flight shack, well back from the launch line.
Tow planes are secured to the right of the flight shack.
Golf cart should wait on the flight shack side of the asphalt.
Ground crew should avoid driving the golf cart onto the active runway
Gliders should be moved to the flight line from the hangars by staying on the flight shack side of
the asphalt
The flight shack should be positioned approximately 15m from the edge of the asphalt of runway
31
Tow planes and other powered aircraft should be parked to the north of the flight shack.
Launching – Runway 31
Glider should be positioned on the launch line only after the field manager has assigned the
aircraft to a pilot.
Forward launch line limit defined by intersection of grass and the 31 / 26 taxiway
Rear launch line limit defined by the approach path to Runway 26
Gliders should be in line with dashed white line on the right side of grass Runway 31
Once a glider has been positioned on the launch line, the pilot should remain with the glider and
is responsible for ensuring the safety of that glider
Wing down on active side of runway (in this case the left wing)
Spoilers should be deployed while awaiting launch
26
31
Parking

Gatineau Gliding Club 30/03/18
Field Operations Training Guide, Rev. 4 ii
Annex A – Runway 31 Operations
Landing Operations – Typical
Landing – Runway 31 (Typical)
Aiming point identified by the red star, always ahead of the first glider in the launch line and just
past the Runway 31 /26 taxiway
Pilot should land/roll straight ahead or gently roll to the right side the active runway, stopping
short of the asphalt
The glider should then be moved across the active runway and asphalt to clear the active runway
ASAP
Glider can now be pulled back to the flight line along the flight shack side of the asphalt using the
golf cart if desired.
If the tow plane is ready to launch, glider should be moved across the asphalt onto the grass and
positioned perpendicular to the active runway until the tow plane/glider have taken off.

Gatineau Gliding Club 30/03/18
Field Operations Training Guide, Rev. 4 iii
Annex A – Runway 31 Operations
Landing Operations – Runway 31 Occupied
Landing – Runway 31 Busy
Aiming point for Runway 31 identified by the red star
If the active Runway 31 is not cleared by the time a following aircraft is on final, the following
glider should turn left slightly to line up and land on the grass of Runway 26.

Gatineau Gliding Club 30/03/18
Field Operations Training Guide, Rev. 4 iv
Annex B – Runway 26 Operations
Launch
Pre-Launch
The asphalt is used for launching and the grass for landing operations on Runway 26.
Gliders are secured to the left of the flight shack, well back from the launch line.
Tow planes are secured to the right of the flight shack.
Golf cart should wait on the flight shack side of the asphalt.
Ground crew should avoid driving the golf cart onto the active runway
Gliders should be moved to the flight line from the hangars by staying on the visitor parking
shack side of asphalt Runway 31
The flight shack should be positioned approximately 15m from the edge of the asphalt of runway
26
Tow planes and other powered aircraft should be parked to the north of the flight shack.
Launching - Runway 26
Glider should be positioned on the launch line only after the field manager has assigned the
aircraft to a pilot.
Forward launch line limit defined by intersection of grass and the 26 / 31 taxiway
Rear launch line limit defined by the approach path to 31
Gliders should be in line with the centre of the asphalt of Runway 26
Once a glider has been positioned on the launch line, the pilot should remain with the glider and
is responsible for ensuring the safety of that glider
Wing down on active side of runway (in this case the left wing)
Spoilers should be deployed while awaiting launch
Visitor Parking
Mem
ber
Parking
26
31
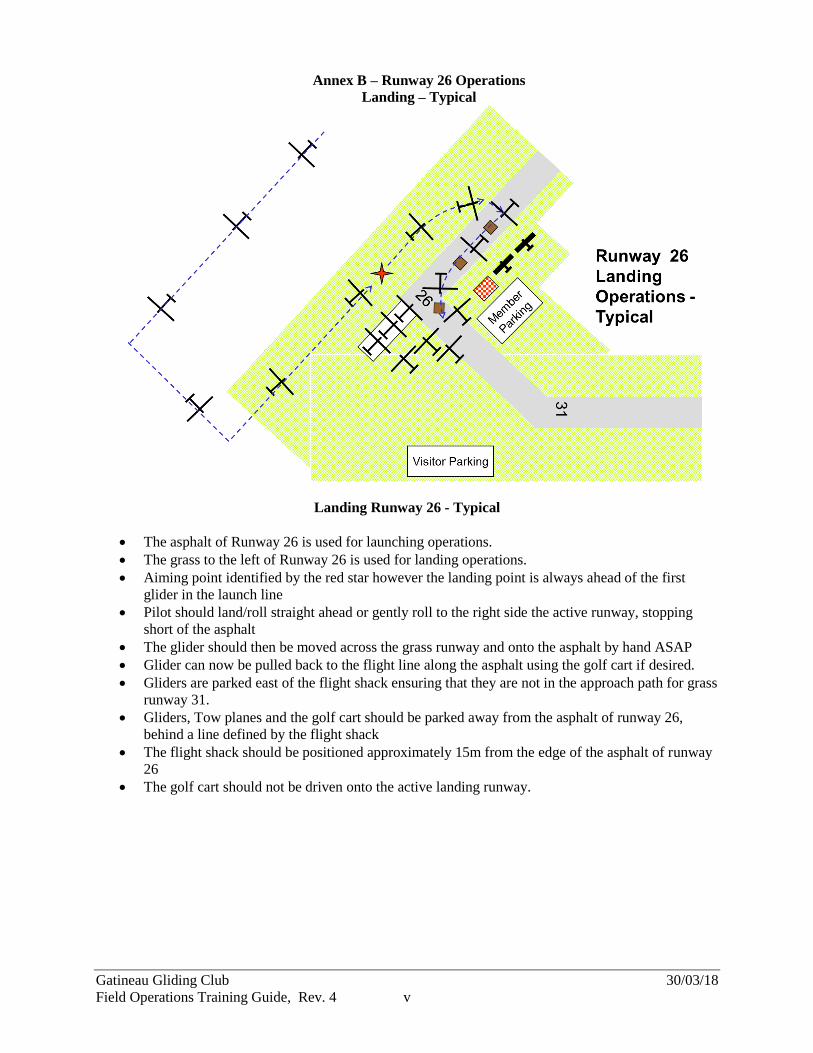
Gatineau Gliding Club 30/03/18
Field Operations Training Guide, Rev. 4 v
Annex B – Runway 26 Operations
Landing – Typical
Landing Runway 26 - Typical
The asphalt of Runway 26 is used for launching operations.
The grass to the left of Runway 26 is used for landing operations.
Aiming point identified by the red star however the landing point is always ahead of the first
glider in the launch line
Pilot should land/roll straight ahead or gently roll to the right side the active runway, stopping
short of the asphalt
The glider should then be moved across the grass runway and onto the asphalt by hand ASAP
Glider can now be pulled back to the flight line along the asphalt using the golf cart if desired.
Gliders are parked east of the flight shack ensuring that they are not in the approach path for grass
runway 31.
Gliders, Tow planes and the golf cart should be parked away from the asphalt of runway 26,
behind a line defined by the flight shack
The flight shack should be positioned approximately 15m from the edge of the asphalt of runway
26
The golf cart should not be driven onto the active landing runway.
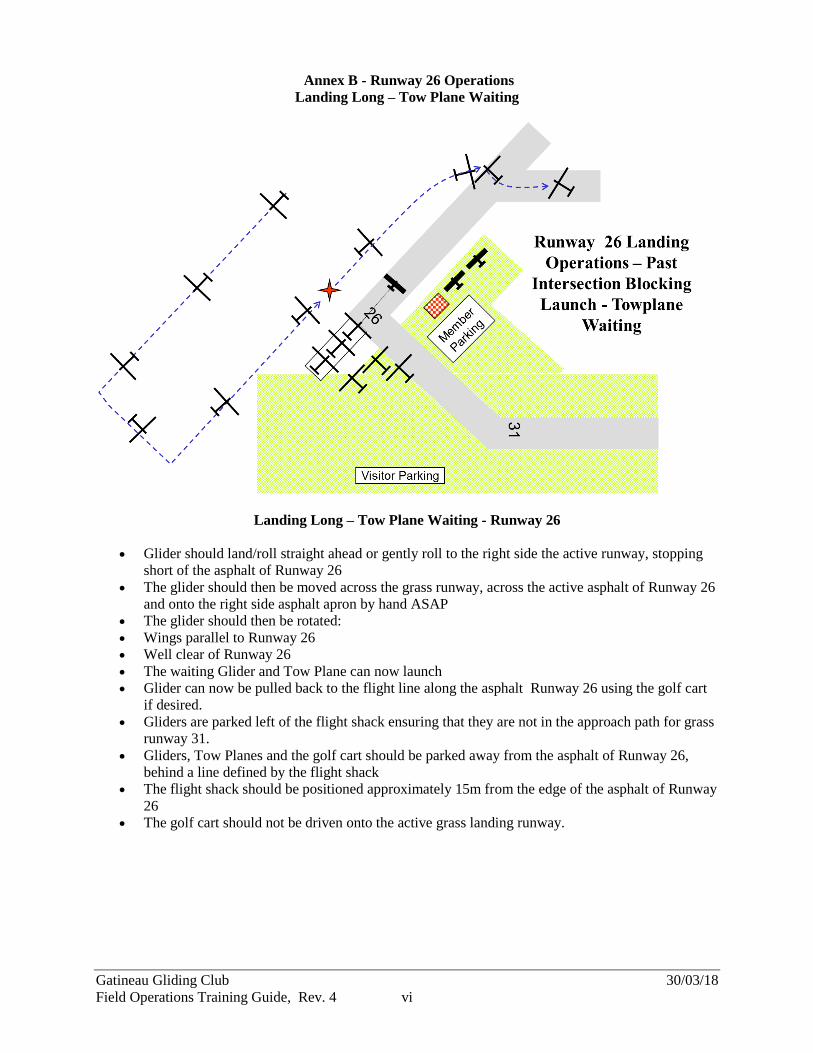
Gatineau Gliding Club 30/03/18
Field Operations Training Guide, Rev. 4 vi
Annex B - Runway 26 Operations
Landing Long – Tow Plane Waiting
Landing Long – Tow Plane Waiting - Runway 26
Glider should land/roll straight ahead or gently roll to the right side the active runway, stopping
short of the asphalt of Runway 26
The glider should then be moved across the grass runway, across the active asphalt of Runway 26
and onto the right side asphalt apron by hand ASAP
The glider should then be rotated:
Wings parallel to Runway 26
Well clear of Runway 26
The waiting Glider and Tow Plane can now launch
Glider can now be pulled back to the flight line along the asphalt Runway 26 using the golf cart
if desired.
Gliders are parked left of the flight shack ensuring that they are not in the approach path for grass
runway 31.
Gliders, Tow Planes and the golf cart should be parked away from the asphalt of Runway 26,
behind a line defined by the flight shack
The flight shack should be positioned approximately 15m from the edge of the asphalt of Runway
26
The golf cart should not be driven onto the active grass landing runway.

Gatineau Gliding Club 30/03/18
Field Operations Training Guide, Rev. 4 vii
Annex B – Runway 26 Operations
Landing - Runway 26 Occupied
Landing - Runway 26 Occupied
Aiming point for Runway 26 is identified by the red star
If the active Runway 26 is not cleared by the time a following aircraft is on final, the following
glider should turn right slightly to line up and land on the grass of Runway 31.

Gatineau Gliding Club 30/03/18
Field Operations Training Guide, Rev. 4 viii
Annex C – Runway 13 Operations
Launching
Pre-Launch
The grass runway to the right of the asphalt is used for launching and landing operations on
Runway 13.
Gliders are secured to the right and/or left of the flight shack, well back from the launch line.
Tow planes are secured to the left of the flight shack.
Golf cart should wait on the flight shack side of the asphalt.
Ground crew should avoid driving the golf cart onto the active runway
Gliders should be moved to the flight line from the hangars by staying on the flight shack side of
the asphalt
The flight shack should be positioned approximately 15m from the edge of the asphalt of runway
13
Tow Planes and other powered aircraft should be parked to the left of the flight shack.
Launching – Runway 13
Glider should be positioned on the launch line only after the field manager has assigned the
aircraft to a pilot.
Forward launch limit defined by intersection of grass and the Runway 13 / 17 taxiway
Rear launch limit defined by the approach path to Runway 17
Gliders should be in line with dashed white line on the left side of Runway 13
Once a glider has been positioned on the launch line, the pilot should remain with the glider and
is responsible for ensuring the safety of that glider
Wing down on active side of runway (in this case the right wing)
Spoilers should be deployed while awaiting launch
Parking
17
13

Gatineau Gliding Club 30/03/18
Field Operations Training Guide, Rev. 4 ix
Annex C – Runway 13 Operations
Landing – Typical
Landing - Runway 13
Aiming point identified by the red star, always ahead of the first glider in the launch line
Pilot should land/roll straight ahead or gently roll to the left side the active runway, stopping short
of the asphalt
The glider should then be moved across the active runway and asphalt to clear the active runway
ASAP
Glider can now be pulled back to the flight line along the flight shack side of the asphalt using the
golf cart if desired.
If the Tow Plane is ready to launch, glider should be moved across the asphalt onto the grass and
positioned perpendicular to the active runway until the Tow Plane/glider have taken off.

Gatineau Gliding Club 30/03/18
Field Operations Training Guide, Rev. 4 x
Annex C - Runway 13 Operations
Landing - Runway 13 Occupied
Landing – Runway 13 Occupied
Aiming point for Runway 13 identified by the red star
If the active Runway 13 is not cleared by the time a following aircraft is on final, the following
glider should turn right slightly to line up and land on the grass of Runway 17.

Gatineau Gliding Club 30/03/18
Field Operations Training Guide, Rev. 4 xi
Annex D – Runway 08 Operations
Launching
Pre-Launch
The asphalt is used for launching and the grass for landing operations on Runway 08.
Gliders are secured to the right of the flight shack, across Runway 17/35, well back from the
launch line.
Tow planes are secured to the left of the flight shack.
Golf cart should wait by the flight shack.
Ground crew should avoid driving the golf cart onto the active runway
Gliders should be moved to the flight line from the hangars by following staying on the flight
shack side of the asphalt
The flight shack should be positioned approximately 15m from the edge of the asphalt of runway
08
Tow planes and other powered aircraft should be parked to the north of the flight shack.
Launching - Runway 08
Glider should be positioned on the launch line only after the field manager has assigned the
aircraft to a pilot.
Forward launch limit defined by the asphalt of Runway 08
Gliders should be in line with the centre of the asphalt of Runway 08
Once the glider has been positioned on the launch line, the pilot should remain with the glider and
is responsible for ensuring the safety of that glider
Wing down on active side of runway (in this case the right wing)
Spoilers should be deployed while awaiting launch
Par
king
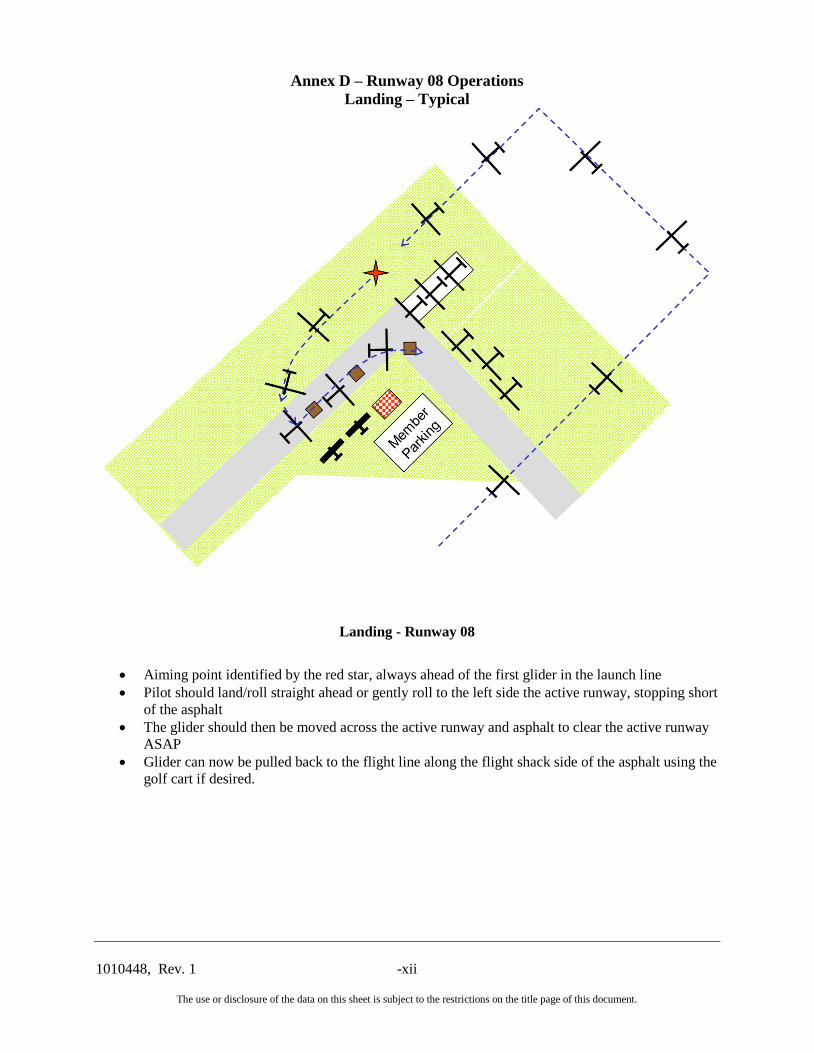
1010448, Rev. 1 -xii
The use or disclosure of the data on this sheet is subject to the restrictions on the title page of this document.
Annex D – Runway 08 Operations
Landing – Typical
Landing - Runway 08
Aiming point identified by the red star, always ahead of the first glider in the launch line
Pilot should land/roll straight ahead or gently roll to the left side the active runway, stopping short
of the asphalt
The glider should then be moved across the active runway and asphalt to clear the active runway
ASAP
Glider can now be pulled back to the flight line along the flight shack side of the asphalt using the
golf cart if desired.