Embed Size (px)
Citation preview
1
The 17th Century: Not an Easy Time for Farming
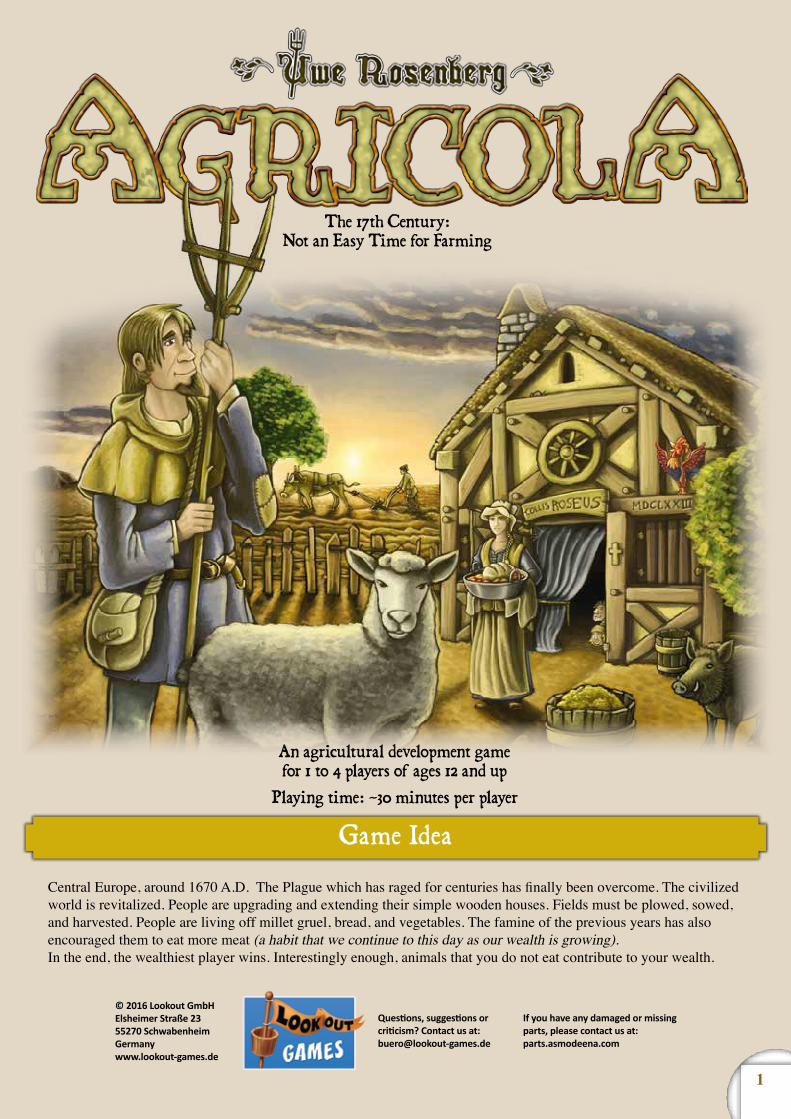
Game IdeaCentral Europe, around 1670 A.D. The Plague which has raged for centuries has finally been overcome. The civilized world is revitalized. People are upgrading and extending their simple wooden houses. Fields must be plowed, sowed, and harvested. People are living off millet gruel, bread, and vegetables. The famine of the previous years has also encouraged them to eat more meat (a habit that we continue to this day as our wealth is growing).In the end, the wealthiest player wins. Interestingly enough, animals that you do not eat contribute to your wealth.
An agricultural development game for 1 to 4 players of ages 12 and up
Playing time: ~30 minutes per player
© 2016 Lookout GmbHElsheimer Straße 2355270 SchwabenheimGermany www.lookout-games.de
Questions, suggestions or criticism? Contact us at: [email protected]
If you have any damaged or missing parts, please contact us at:parts.asmodeena.com

2
SetupWe will explain the rules for 2-4 players first, followed by the solo game rules on the last page.
Your Personal Display
Choose a player color and take the five people, four stables, and 15 fences in that color.
Take a farmyard board. Place one person in each of your two wood rooms. Your remaining three people as well as your fences and stables constitute your supply. (Put the components of unused colors as well as the remaining
farmyard boards back into the game box—you will not need them.)
ComponentsWooden components
18 white sheep15 black wild boar13 brown cattle30 brown “wood” building resource tokens24 auburn “clay” building resource tokens14 white “reed” building resource tokens16 black “stone” building resource tokens
Game boards
4 large farmyard boards (one for each player)1 large game board1 supply board for the major improvements2 game board extensions (with a scoring
overview and—in one case—action spaces for the multi-player game)
Tiles
23 wood room/field tiles16 clay/stone room tiles
2 variant tiles (one for the 2-player game, the other for the 3- and 4-player game)
1 “Side Job” action space tile for the game without hand cards (with an overview of action spaces on the back side)
120 cards
14 action space cards for stages 1 to 610 red “major improvement” cards48 yellow “occupation” cards48 orange “minor improvement” cards
As well as
1 scoring pad10 transparent bags to organize the componentsthis 12-page rule booka 12-page appendix
24 yellow “grain” crop tokens16 orange “vegetable” crop tokens
1 yellow starting player token
In different player colors:4x 15 fences4x 4 stables4x 5 people
Markers
36 “1 food” markers8 “5 food” markers3 yellow suggestion markers
(for the blitz intro)10 goods tiles
for various goods (with begging markers on the back sides)
A086*
When you play this card, you immediately get your
choice of 1 wood or 1 grain. Instead of just1 animal total, you can
keep any 1 animal in eachroom of your house.
Animal Tamer
A044*
Pond Hut
Place 1 food on each of the next 3 round spaces.
At the start of these rounds, you get the food.
Exactly2 Occu-pations
Field TilesPastures
GrainVegetables
SheepWild Boar
CattleUnused Farmyard Spaces
Fenced StablesClay Rooms
Stone RoomsPeople
Bonus Points
Total
Name
5x
4x
15x
9
Pottery
Harvest:
Scoring:
Eastern Quarry
Stage 4

3
This is the game board for the 3-player game.
Fireplaces cost 2 and 3 clay, respectively. Cooking Hearths cost 4 and 5 clay, respectively.
You start the game with seven orange and seven yellow cards in your hand.
This is how the game board looks for a 2-player game.
Suggestion TilesThe three yellow suggestion tiles are used in games with inexperienced players and small children (see page 1 of the appendix). Usually, you will not need them at all.
A092*
For 1 food, you can
take
an action with offsp
ring in
the same ro
und you get it
.
If you do,
the offspring
does not co
unt
as "newborn".
Adopt
ive Parents
A086*
When you play this card,
you immediately get your
choice of 1 wood or
1 grain. Instead of just
1 animal total, you can
keep any 1 animal in each
room of your house.
Animal Tamer
B102*
When you play this card in
a 1-/2-/3-/4-player game,
you immediately get
2 grain/3 clay/2 reed/2 sheep.
Consultant
A143*
Every improvement,
room, and renovation
costs you 1 stone less.
Stonecutter
B163*
Once you are the only player
to live in a house with only
2 rooms, you immediately
get 3 wood, 2 clay, 1 reed,
and 1 stone (only once).
Pastor
A143*
Every improvement, room, and renovation costs you 1 stone less.
StonecutterB098*
During scoring, you get 1 bonus point for each pasture containing at least 1 animal while having unused capacity
for at leastthree more animals.
Organic Farmer
B057*
Scullery
At the start of each round, if you live in a wooden house, you get 1 food.
B066*
Sack Cart2 Occu-pations
Place 1 grain each on the remaining spaces
for rounds 5, 8, 11, and 14. At the start of these rounds,
you get the grain.
B062*
Pitchfork
Each time you use the
"Grain Seeds" action space,
if the "Farmland" action
space is occupied, you also get 3 food.
A078*
Canoe
1 Occu-pation
Each time you use the
"Fishing" accumulation
space, you get an additional
1 food and 1 reed.
B061*
Three-Field Rotation
At the start of the field
phase of each harvest, if you
have at least 1 grain field,
1 vegetable field,
and 1 empty field,
you get 3 food.
3 Occu-pations
A067*
Corn Scoop
Each time you use the
"Grain Seeds" action space,
you get 1 additional grain.
A069*
Large Greenhouse
2 Occu-pations
Add 4, 7, and 9 to the
current round and place
1 vegetable on each
corresponding round space.
At the start of these rounds,
you get the vegetable.
1
Fireplace
At any time:
"Bake Bread" action:
2
Fireplace
At any time:
"Bake Bread" action:
4
Cooking Hearth
Return Fireplace
or
At any time:
"Bake Bread" action:
3
Cooking Hearth
Return Fireplace
or
At any time:
"Bake Bread" action:
Room and Field Tiles
Place the stack of clay/stone room tiles next to the game board. Divide the stack of wood room tiles in two, placing one half with the wood rooms facing up and the other with the field tiles facing up.
Game Board with Action Spaces
Place the game board in the middle of the play area. Depending on the number of players, take the appropriate game board extension and attach it to the game board with the proper side facing up
Randomly determine who gets the starting player token. This player gets 2 food; each other player gets 3 food. ( )
Improvements and Occupations
Major ImprovementsPlace the red (“major”) improvements on the designated spaces of the supply board. Please note that there are two Fireplaces and two Cooking Hearths.
Minor ImprovementsShuffle the orange improvements and deal each player a hand of seven cards.
OccupationsA square symbol on the left side of the yellow occupation cards indicates the number of players with which the card is used. [1+] stands for 1-4 players, [3+] stands for 3-4 players, and [4] stands for 4 players. Put the cards that you are not supposed to be using according to your number of players back into the game box. Shuffle the remaining cards and deal each player a hand of seven cards.
Action Space CardsShuffle the 14 action space cards and sort them by the numbers on their back sides. This should result in 6 stacks, which you must place on top of each other in descending order from bottom to top. Thus, the cards for stage 1 should be on top of those for stage 2 etc.
Place all the animals (sheep, wild boar, cattle), building resources (wood, clay, reed, stone), crops (grain, vegetables), and food markers ready at hand as the general supply.The goods tiles with begging markers on their backs will only be needed occasionally. Place them somewhere on the side of the table—in case you need them.
“Side Job” and Other Variant TilesPlease check pages 1 and 8 of the appendix on how to use the “Side Job” and the other two variant tiles. You will not need them in the base game.
4
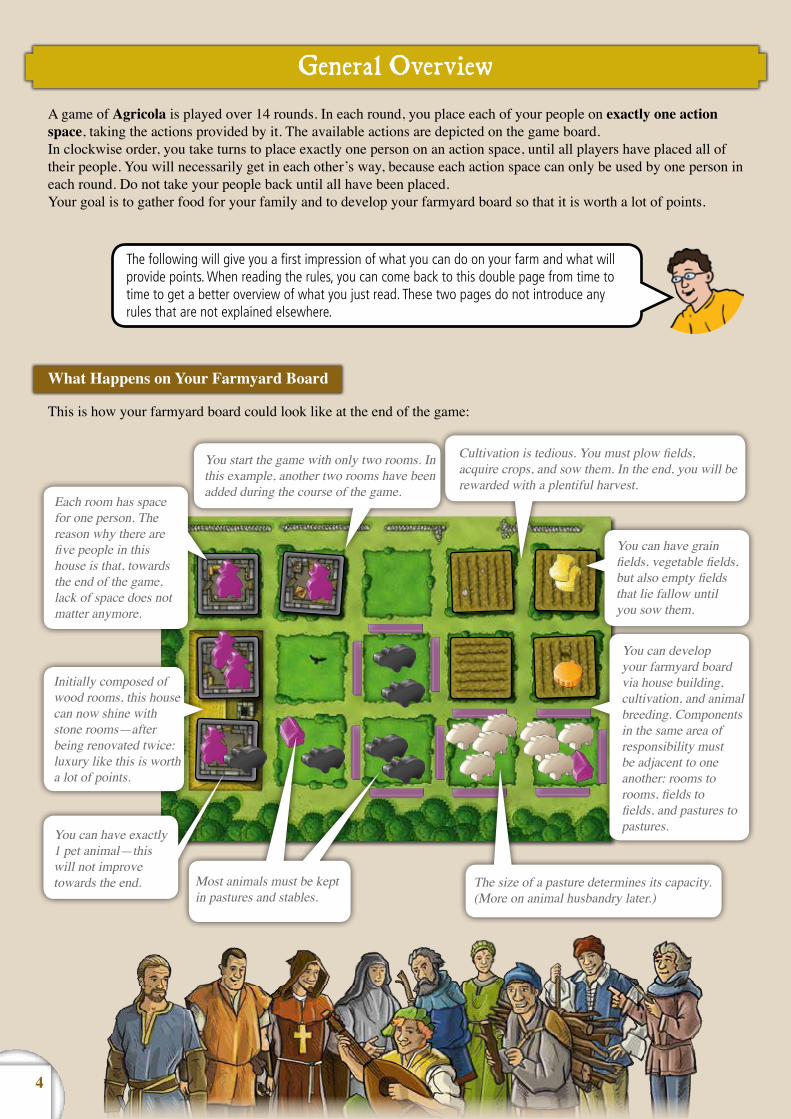
The following will give you a first impression of what you can do on your farm and what will provide points. When reading the rules, you can come back to this double page from time to time to get a better overview of what you just read. These two pages do not introduce any rules that are not explained elsewhere.
Cultivation is tedious. You must plow fields, acquire crops, and sow them. In the end, you will be rewarded with a plentiful harvest.
You start the game with only two rooms. In this example, another two rooms have been added during the course of the game.
Each room has space for one person. The reason why there are five people in this house is that, towards the end of the game, lack of space does not matter anymore.
Initially composed of wood rooms, this house can now shine with stone rooms—after being renovated twice: luxury like this is worth a lot of points.
You can have exactly 1 pet animal—this will not improve towards the end. Most animals must be kept
in pastures and stables.The size of a pasture determines its capacity. (More on animal husbandry later.)
You can develop your farmyard board via house building, cultivation, and animal breeding. Components in the same area of responsibility must be adjacent to one another: rooms to rooms, fields to fields, and pastures to pastures.
You can have grain fields, vegetable fields, but also empty fields that lie fallow until you sow them.
General OverviewA game of Agricola is played over 14 rounds. In each round, you place each of your people on exactly one action space, taking the actions provided by it. The available actions are depicted on the game board.In clockwise order, you take turns to place exactly one person on an action space, until all players have placed all of their people. You will necessarily get in each other’s way, because each action space can only be used by one person in each round. Do not take your people back until all have been placed.Your goal is to gather food for your family and to develop your farmyard board so that it is worth a lot of points.
What Happens on Your Farmyard Board
This is how your farmyard board could look like at the end of the game:

5
Some cards provide additional bonus points that are tied to certain conditions.The Loom provides bonus points for sheep. 8 sheep are worth 2 bonus points.The Joinery allows you to exchange leftover wood in your supply for bonus points: 5 wood are also worth 2 points. (4)
Occupations can also be worth points. The Braggart can provide up to 9 bonus points for the improvements you have in play. Unfortunately, having only the Loom and Joinery is not enough to be worth anything in this case. (0)
A final score of 42 in this example is intentional. It is a score that I would consider one of my better ones (if I did not just construct it).
B039*
Loom2 Occu-pations
In the field phase of each harvest, if you have
at least 1/4/7 sheep, you get 1/2/3 food. During scoring, you get 1 bonus point for
every 3 sheep.
A133*
During the scoring, you get 2/3/4/5/7/9 bonus points
for having at least 5/6/7/8/9/10 improvements
in front of you.
Braggart
8
Joinery
Harvest:
Scoring:
Each pasture is worth 1 point (regardless of size). (2)
Each stable in a pasture is worth 1 point. (1)
Each person is worth 3 points. (15)
You lose 1 point for each unused space in your farmyard. (-2)
You lose 1 point for each missing type of animal. (-1 for cattle)
6 wild boar are worth 3 points. (3)
4 fields are worth 3 points. (3)Each room in a stone house is worth 2 points. (8)
8 sheep are worth 4 points. (4)
You get points for the total amount of grain in your supply and farm. The same applies to vegetables. According to the table, 3 grain are worth 1 point, and 1 vegetable is worth 1 point. (2)
You get points according to the printed value on the minor and major improvements.The Loom is worth 1 point, the Joinery is worth 2 points. (3)
8
Tischlerei
Erntezeit:
Bei der Wertung:
Have a First Look at the Scoring Sheet
At the end of the game, the player whose farm is worth the most points wins.The following shall give you a rough idea of what you get points for. The number in parentheses is the total points in the respective category. (The scoring rules can be found on page 12 and in greater detail on pages 11 to 12 of the appendix.)
In total, this farmyard board is worth 35 points.
Improvements and Occupations
The cards are what makes each game of Agricola so different. There are 3 types of cards. Minor improvements are orange, major improvements are red. Occupations are yellow.
Here are three more examples, continuing the scoring example above:
A score of 30 points is considered respectable for someone who plays Agricola for the first time. Experienced players strive for scores of 40 and higher.
6
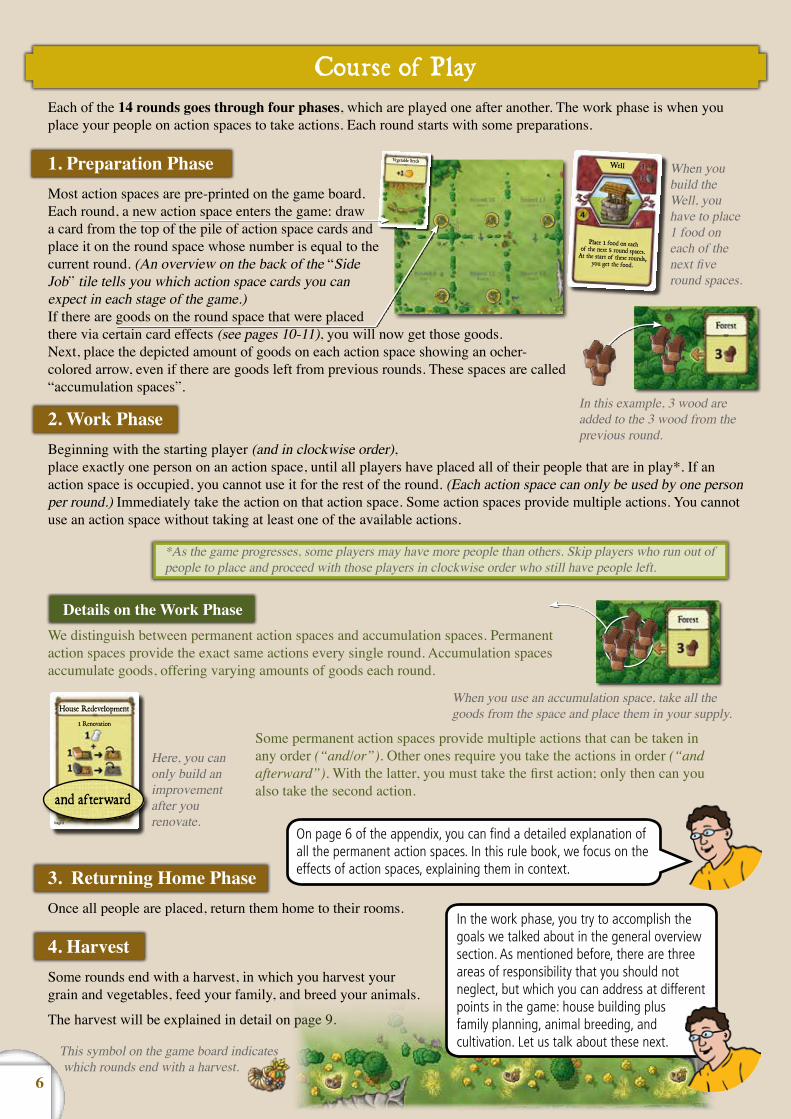
Course of PlayEach of the 14 rounds goes through four phases, which are played one after another. The work phase is when you place your people on action spaces to take actions. Each round starts with some preparations.
1. Preparation PhaseMost action spaces are pre-printed on the game board. Each round, a new action space enters the game: draw a card from the top of the pile of action space cards and place it on the round space whose number is equal to the current round. (An overview on the back of the “Side Job” tile tells you which action space cards you can expect in each stage of the game.)If there are goods on the round space that were placed there via certain card effects (see pages 10-11), you will now get those goods.Next, place the depicted amount of goods on each action space showing an ocher-colored arrow, even if there are goods left from previous rounds. These spaces are called “accumulation spaces”.
2. Work PhaseBeginning with the starting player (and in clockwise order), place exactly one person on an action space, until all players have placed all of their people that are in play*. If an action space is occupied, you cannot use it for the rest of the round. (Each action space can only be used by one person per round.) Immediately take the action on that action space. Some action spaces provide multiple actions. You cannot use an action space without taking at least one of the available actions.
Details on the Work PhaseWe distinguish between permanent action spaces and accumulation spaces. Permanent action spaces provide the exact same actions every single round. Accumulation spaces accumulate goods, offering varying amounts of goods each round.
Some permanent action spaces provide multiple actions that can be taken in any order (“and/or”). Other ones require you take the actions in order (“and afterward”). With the latter, you must take the first action; only then can you also take the second action.
3. Returning Home PhaseOnce all people are placed, return them home to their rooms.
4. HarvestSome rounds end with a harvest, in which you harvest your grain and vegetables, feed your family, and breed your animals.
The harvest will be explained in detail on page 9.
When you build the Well, you have to place 1 food on each of the next five round spaces.
When you use an accumulation space, take all the goods from the space and place them in your supply.
Here, you can only build an improvement after you renovate.
On page 6 of the appendix, you can find a detailed explanation of all the permanent action spaces. In this rule book, we focus on the effects of action spaces, explaining them in context.
This symbol on the game board indicates which rounds end with a harvest.
In this example, 3 wood are added to the 3 wood from the previous round.
*As the game progresses, some players may have more people than others. Skip players who run out of people to place and proceed with those players in clockwise order who still have people left.
5
Well
Place 1 food on each of the next 5 round spaces. At the start of these rounds, you get the food.
House Redevelopment1 Renovation
and afterward
Stage 2
In the work phase, you try to accomplish the goals we talked about in the general overview section. As mentioned before, there are three areas of responsibility that you should not neglect, but which you can address at different points in the game: house building plus family planning, animal breeding, and cultivation. Let us talk about these next.
House Redevelopment1 Renovation
and afterward
Stage 2
Vegetable Seeds
Stage 3

7
House Building and Family PlanningAt the start of the game, you have a wooden house with room for just two people. If you want to grow your family to increase the number of actions you can take each round, you must extend your house first. This requires building resources—at the start, wood and reed—which you can get on accumulation spaces like “Forest” and “Reed Bank”.
Adding RoomsUse the “Farm Expansion” action space and take the “Build Rooms” action, paying the required building resources: 5 wood and 2 reed. Take a wood room tile and place it adjacent to your existing ones.
Details on Building a Room
Now you have more rooms than people—the prerequisite for taking the “Family Growth with Room Only” action. When taking that action, place a person from your supply next to the person with which you take the action. At the end of the round, when your people return home, place the new person in its own room: each person occupies one room. From next round, you will have an additional turn. Family growth becomes available in round 5, 6, or 7 (depending on when the “Basic Wish for Children” action space card comes into play).
Renovation
In round 5, 6, or 7, the “House Redevelopment” action space comes into play. On that space, you can take the “Renovation” action to turn your wooden house into a valuable clay house, placing a clay room tile on each of the pre-printed wood rooms in your farmyard and exchanging any additional wood rooms for clay rooms. For this, you must pay 1 reed to overhaul the roof, as well as 1 clay per room.
Later, you can renovate your house again by paying 1 reed for the roof and 1 stone per room, turning it into a stone house. (For that, you must turn the room tiles to the other side.)
Once you live in a clay house, you can only add clay rooms to your house: when you use the “Farm Expansion” action space, you must pay 5 clay and 2 reed for every new room—later 5 stone and 2 reed once you live in a stone house.
The Action Space Cards of the Final RoundsTowards the end of the game, you gain a lot of momentum in growing your family. In round 12 or 13, the “Urgent Wish for Children” action space comes into play. It provides the “Family Growth Even without Room” action which allows you to grow your family without building a room first.
Detail on Family Growth
The “Farm Expansion” action space
These two people symbolize mother and child.
These stone rooms replace clay rooms.
If there is no legal space for a room on your farmyard board, you cannot add any more rooms.
In a single action, you can build as many rooms as you can afford, one after another.
If you build a new room after taking the “Family Growth Even without Room” action, one of your people immediately moves into that room. You could not take a “Family Growth with Room Only” action right afterward, because you would not have enough room.
Detail on Renovation When you renovate, you must renovate all the rooms in your house. You are not allowed to renovate only part of your house.
ABBILDUNG drei Räume, in denen vier
Personen leben
Farm Redevelopment
1 Renovation
and afterward
Build Fences
Stage 6
House Redevelopment1 Renovation
and afterward
Stage 2
The “Farm Redevelopment” action space also improves your animal husbandry capabilities (see next section).
Basic Wish for Children
and afterward
Stage 2
With Room Only
Urgent Wish for Children
Even without Room
Stage 5
In the final round of the game, a second renovation space comes into play.

8
The “Sheep Market” accumulation space comes into play between rounds 1 and 4, “Pig Market” in round 8 or 9, and “Cattle Market” in round 10 or 11.
Adjacent pastures share fences that are bordering them. When you take a “Build Fences” action, you may subdivide an existing pasture by adding fences inside the pasture
The edges of room tiles do not count as fences (even though that would make thematic sense). The same applies to field tiles.
Two stables in this 1x2 pasture doubles its capacity twice. Instead of just 4 animals, the pasture can now hold up to 16 animals of the same type*.
*Like factory farming in real life, this does not make much sense in regard to the scoring.
Once built, fences may not be demolished.
A stable outside of a pasture can hold exactly 1 animal. You can fence the stable later.
You can hold exactly 1 animal of any type in your house as your pet.
You can double the capacity of a pasture by building a stable in it. Each player has 4 stables in their supply.
The “Build Fences” action allows you to surround one or more farmyard spaces with fences, creating a pasture. Each player has 15 fences in their supply. Each pasture can only hold a single type of animal and up to 2 animals of that type for each farmyard space it covers.
CultivationPlow 1 Field
and/orSow
Stage 5
United in neighborhood: the “Cultivation” and “Grain Seeds” action spaces.
Sheep Market
Stage 1
Cattle Market
Stage 4
Pig Market
Stage 3
Animal BreedingAnimal breeding can play a major role in feeding your family. You can get animals on accumulation spaces. Take all the animals from the space when you use one.
Animal Husbandry Options
Unlike crops and building resources, you do not simply place your animals in your supply, but you must accommodate them on your farmyard board. Otherwise your animals will wander off. There are several options to counteract that.
To fence pastures, use the “Fencing” action space. Each fence that you build during the “Build Fences” action costs 1 wood. In a single action, you can fence as many pastures as you can afford. You can build your first pasture anywhere on your farmyard board—as long as the spaces are empty and contiguous. Any pasture you build after that must be adjacent to an existing one. Fences may only be built if they will create a fully enclosed pasture, with fences on all sides.
Details on Fencing
You can build stables for 2 wood per stable by taking the “Build Stables” action on the “Farm Expansion” action space. (This is the same action space that allows you to build rooms, see page 7.)
Details on Building Stables You can build at most one stable in each farmyard space. The space may not be covered by a tile. Rooms, fields, and pastures must be adjacent to other rooms, fields, and pastures, respectively. This rule does not apply to stables. You do not build stables all at once, but one after another. Certain cards can assign a special ability to a stable (see pages 10-11). Each stable may have at most one special ability.
If you have an improvement with the symbol (see Fireplace and Cooking Hearth on page 10), you can turn the animals that you take from an accumulation space into food directly. In this case, you do not have to accommodate them on your farm first.Anytime actions: Your animals are the only things on your farm that you can move around at any time (according to the animal husbandry rules). Everything else (rooms, fields, fences, and stables) is immovable. At any time, you can discard animals—as well as any other goods—to the general supply.
CultivationCultivation requires a little bit of preparation. First, you need to take the “Plow a Field” action to acquire a field tile. You can place your first field tile anywhere on your farmyard board—as long as the space is empty. Any field tile you place after that must be adjacent to an existing one. Second, you need a seed crop. The “Grain Seeds” action space is available from the start. It provides the “Get 1 Grain” action
during which you get 1 grain in your supply.

9
After you sow, each new grain field contains 3 grain and each new vegetable field contains 2 vegetables.
Harvest after harvest, you will slowly but surely empty all of
your fields: each harvest you must take 1 crop from each field and place it in your supply.
You must take exactly 1 crop from each of your fields and place it in your supply. You are not allowed to skip harvesting your fields—not even a single one of them.
Each person that is already in play requires 2 food*. Exception: if you grew your family that round, the “newborn” person (who has not taken an action yet) only requires 1 food.Grain and vegetables in your supply are worth 1 food each.
You can make millet gruel from grain …
The “Traveling Players” accumulation space is only available in the 4-player game.
*If you do not have enough food to feed your family, you must go begging for food, taking 1 begging marker for each missing food. As each begging marker will cost you -3 points during scoring and as there is no way to get rid of them, you should really make sure you can feed your people.
After you fed your family, your animals breed. If you have at least 2 animals of the same type, you get exactly one animal of that type from the general supply, but only if you can accommodate that new animal. (The parent animals are not required to live in the same space to breed.) You are explicitly forbidden to turn the parent animals or the newborn into food during the breeding phase. Each harvest, you can get at most 1 newborn animal of each type.
Vegetables become available in round 8 or 9 on the “Vegetable Seeds” action space.
At the start of each harvest, you will take 1 crop from each of your fields and place it in your supply (see below).
… and eat your vegetables uncooked.
Vegetable Seeds
Stage 3
Grain UtilizationSow
and/or
Bake Bread
Stage 1
Later in the game, vegetables become available as a second crop.If you have crops in your supply and unplanted fields on your farm, you can take the “Sow” action on the appropriate action space, which comes into play between rounds 1 and 4. When you sow, place 1 grain or 1 vegetable from your supply on an empty field and add another 2 grain and 1 vegetable from the general supply on top of that, respectively (see illustration). Those crops remain in their field until the harvest. In a single “Sow” action, you can plant any number of unplanted fields.
Details on Cultivation When you sow, you can choose from all the crops that are in your supply. Every seed crop that you get from a “Seeds” action space is already considered a fully-grown crop. You do not have to plant it. When you sow, you are not required to plant every empty field you have. Fields can lie idle. Once placed, you cannot remove a field tile from your farm (e.g. to make space for a room tile). You have no access to the crops on your fields until you harvest them, moving them to your supply (see next section). However, during the scoring at the end of the game, crops in your fields do count (see page 12).
HarvestThere is a harvest at the end of rounds 4, 7, 9, 11, 13, and 14, indicated by the symbol on the game board. Each harvest goes through three phases that are played in order.
Field Phase
Feeding Phase
Details on the Feeding Phase As you can see, additional people increase the number of actions you can take but also require food. You can get food on the “Fishing”, “Day Laborer”, and “Traveling Players” action spaces. Crops can provide a lot more food if you have and improvements, which will be addressed in the next section. Animals can only be turned into food via improvements. They do not provide food per se.
Breeding Phase

10
The “Major Improvement” action space is the designated space for building major improvements. On the “House Redevelopment” action space, building a major improvement is just a bonus action.
The main purpose of the major improvements is to turn goods into food: animals and vegetables get cooked, grain gets baked, building resources become craft products which are then exchanged for food.
Fireplaces are the cheapest among the major improvements: one costs 2 clay, the other 3 clay.
On the “Grain Utilization” action space, you can decide how to use the grain in your supply. You can sow it in a field (see page 9) or turn it into food using a improvement.
If you have both the Clay Oven and a Cooking Hearth and take a “Bake Bread” action, you can turn 1 grain into 5 food and each additional grain into 3 food.
You can find a more detailed explanation of the major improvements on page 2 of the appendix.
During scoring, the Joinery provides 1 bonus point for 3-4 wood left in your supply, 2 bonus points for 5-6 wood, and 3 bonus points for 7 or more wood.
2
Fireplace
At any time:
"Bake Bread" action:
1
Fireplace
At any time:
"Bake Bread" action:
8
Joinery
Harvest:
Scoring:
3
Cooking Hearth
Return Fireplace
or
At any time:
"Bake Bread" action:
3
Cooking Hearth
Return Fireplace
or
At any time:
"Bake Bread" action:
2
Fireplace
At any time:
"Bake Bread" action:
1
Fireplace
At any time:
"Bake Bread" action:
House Redevelopment1 Renovation
and afterward
Stage 2
Major Improvement1 Major
or Minor Improvement
Stage 1
Grain UtilizationSow
and/or
Bake Bread
Stage 1
3
Cooking Hearth
Return Fireplace
or
At any time:
"Bake Bread" action:
6
Clay Oven
"Bake Bread" action:
When you build this improvement, you can
immediately take a "Bake Bread" action.
8
Joinery
Harvest:
Scoring:
Major ImprovementsThere are 10 major improvements in the game. You have access to all of them. Once you own a major improvement, you can use it for the rest of the game. Major improvements are worth points, indicated by a number in a yellow circle.
In the top right corner of an improvement card, you can find its building cost. To play the card face up in front of you, you must pay the depicted amounts of building resources.
Fireplaces and Cooking HearthsThere are two Fireplaces and two Cooking Hearths, among which one costs less clay than the other. They are used to turn animals and vegetables into food at any time. How much food each good is worth is noted on the card. (Cooking Hearths are slightly more efficient than Fireplaces, but also more expensive.)
Details on Fireplaces and Cooking Hearths When taking a “Major Improvement” action, you can exchange a Fireplace for a Cooking Hearth, without paying any additional building resources. All cards that allow you to turn animals and vegetables into food have a symbol at the bottom left.
At any time, you can exchange grain—and vegetables—in your supply for 1 food each (see page 9), but you will get more food out of each grain if you take a “Bake Bread” action: each grain you bake turns into 2 food via a Fireplace and into 3 food via a Cooking Hearth.
OvensImprovements that allow you to bake bread have a symbol at the bottom right. Aside from the Fireplace and Cooking Hearth, the Clay and Stone Oven also have this symbol. When you build one of these ovens, you immediately get a “Bake Bread” action. (Preferably, you should only build an oven if you already have grain to bake.) The “Grain Utilization” action space also provides that action.
Craft BuildingsThe Joinery processes wood, the Pottery clay, and the Basketmaker’s Workshop reed. Once per harvest, these improvements allow you to turn 1 wood, clay, and reed into 2, 2, and 3 food, respectively. During scoring (see page 12), they allow you to exchange leftover building resources in your supply for bonus points.
WellThe tenth major improvement is the Well. For 5 rounds, it provides its owner with 1 food. When you build it, place 1 food on each of the next 5 round spaces of the game board that are not covered by an action space card yet (if possible). At the
start of these rounds, you get the food from the round space.

11
B008*
Market Stall
You immediately get 1 vegetable. (Effectively,
you are exchanging 1 grain for 1 vegetable.)
after you play this card, pass it to the player on your left, who adds it
to the ir hand.
B039*
Loom2 Occu-pations
In the field phase of each harvest, if you have
at least 1/4/7 sheep, you get 1/2/3 food. During scoring, you get 1 bonus point for
every 3 sheep.
Major improvements have a red background color; minor impro-vements have an orange one.
This prerequisite requires you have at least 2 occupations in front of you.
More details on the occupations and minor improvements can be found on pages 2-3 of the appendix.
The House Steward is sort of a special card. This card challenges the players to build the house with the most rooms. Whoever wins this challenge gets 3 bonus points (multiple players can win it, if tied).
Example: When you play this card, you immediately get 2 grain, 3 clay, 2 reed, or 2 sheep, depending on whether this is a 1-, 2-, 3-, or 4-player game, respectively.
B102*
When you play this card in a 1-/2-/3-/4-player game,
you immediately get 2 grain/3 clay/2 reed/2 sheep.
Consultant
2
Fireplace
At any time:
"Bake Bread" action:
B016*
Mining Hammer
When you play this card, you immediately get 1 food.
Each time you renovate, you can also build a stable
without paying wood.
B136*
If there are still 1/3/6/9 complete rounds left
to play, you immediately get 1/2/3/4 wood.
During scoring, each player with the most rooms
gets 3 bonus points.
House Steward
A024*
Threshing Board2 Occu-
pations
Each time you use the "Farmland" or
"Cultivation" action space, you get an additional "Bake Bread" action.
A024*
Threshing Board2 Occu-
pations
Each time you use the "Farmland" or
"Cultivation" action space, you get an additional "Bake Bread" action.
B008*
Market Stall
You immediately get 1 vegetable. (Effectively,
you are exchanging 1 grain for 1 vegetable.)
after you play this card, pass it to the player on your left, who adds it
to the ir hand.
Basically, the “Market Stand” lets you exchange 1 grain for 1 vegetable.
The bonus point symbol reminds you of potential bonus points. The Loom provides 1 bonus point for every 3 sheep.
The Loom itself is worth 1 point.
B039*
Loom2 Occu-pations
In the field phase of each harvest, if you have
at least 1/4/7 sheep, you get 1/2/3 food. During scoring, you get 1 bonus point for
every 3 sheep.
B039*
Loom2 Occu-pations
In the field phase of each harvest, if you have
at least 1/4/7 sheep, you get 1/2/3 food. During scoring, you get 1 bonus point for
every 3 sheep.
Hand CardsMajor improvements are face up on the supply board. Minor improvements and occupations are kept in hand, until you play them, which is when the text at the bottom of the card comes into effect. As long as a card is in hand, it does not affect the game in any way. Played cards can change the rules: the text on a card always takes precedence over this rule book.You will not draw any additional cards during the game, so you must make the best out of the 7 minor improvements and 7 occupations you got at the start.
Detail on Hand Cards If a card is phrased like “if some condition a/b/c is met, you get A/B/C” (see also „Craft Buildings“ on page 10), at most one of these conditions can be met at a time: a is assigned to A, b to B, and c to C. (For details on other frequently used phrases see pages 3 to 6 of the appendix.)
Minor ImprovementsWhen you take a “Major or Minor Improvement” action, you can choose whether you build a major improvement or play a minor one. You can also play a minor improvement when taking the starting player token on the “Meeting Place” action space (see page 12) or when growing your family on the “Basic Wish for Children” action space (see page 7).As with the major improvements, you can find the building cost in the top right corner. However, some minor improvements may show a prerequisite: only if this prerequisite is met can you play the respective card at all. Prerequisites only demand you have something, not pay something.
Most minor and all major improvements are worth points at the end of the game. The yellow symbol on a card tells you how many points it is worth. As with the craft buildings (see page 10), some minor improvements can provide a variable number of bonus points.
Some minor improvements are traveling cards: when you play one, you carry out its instructions and pass it to the player on your left who must take it into their hand. These cards are indicated by an arrow pointing left.
OccupationsThe “Lessons” action spaces allow you to play exactly one occupation card from your hand, placing it face up in front of you. On the “Lessons” action space above “Day Laborer”, the first occupation you play in the game is free. Each additional occupation you play after that costs you 1 food.In games with 3 and 4 players, there is an additional “Lessons” action space. In a 3-player game, each occupation played on that space costs you 2 food; in a 4-player game the first two occupations cost 1 food, each one after that costs 2 food. These costs are called “occupation
costs”. (There are a few occupations that require an additional cost, which is described in the text on the card.)

12
Starting Player
The starting player does not change automatically from round to round. To become the starting player, you must use the “Meeting Place” action space. (If no player uses it, the starting player token remains with its current holder.)
Game End and WinnerThe game ends at the end of the 14th round, after the final harvest.A table on the side of the game board shows what you get points for at the end of the game: basically anything but food.The first line shows that 0-1 field tiles are worth 1 negative point, 2 field tiles are worth 1 point, 3 field tiles 2 points, etc. In a similar fashion, you get points for pastures, grain, vegetables, and animals.
Details on Scoring Whether or not goods on cards provide points depends on the particular phrasing. See the exact rules on the last pages of the appendix. When scoring grain and vegetables, count all the grain in your supply, on your field tiles, and on any cards that identify themselves as fields. Animals and people on cards that provide “room” for them do count unless stated otherwise.
You can familiarize yourself with the exact values as you are playing the game. It is important you keep in mind that you lose 1 point for each unused space in your farmyard.
Furthermore, you get points for the renovation status of your house, for your people, for the improvements in front of you, as well as for fenced stables.A detailed description of all the scoring categories can be found on the last pages of the appendix. The player with the most points wins. In case of a tie, the player who has more building resources left in their supply breaks the tie. If still tied, the involved players share a rank.
Number of ComponentsThe only components that are intentionally limited in number are your five people, four stables, and 15 fences. If any other component that is available to all players runs out, use the goods tiles or improvise. There are goods tiles for 2 vegetables, 3 grain, 4 animals (one marker for each type), and 5 building resources (one marker for each type).
Solo GameAs the solo player, you start the game with 0 food. You play one turn after another, according to the 2-player game rules with the following exceptions: your adult people require 3 food in the feeding phases (newborns still only require 1 food). Only 2 wood instead of 3 are placed on the “Forest” accumulation space each round. After you play a traveling card that you would normally pass to the player on your left, remove it from play. (See also “Campaigns” on page 10 of the appendix.) If you like, you can choose your hand cards and even the order in which the action space cards enter play.
Designer and editor: Uwe RosenbergCard testing supervisor: Chris DeotteRealization, illustrations, and graphic design: Klemens Franz
When using the “Meeting Place” action space, you can also play a minor improvement.
Typesetting: Andrea KattnigEnglish translation of the rule book and cards: Grzegorz KobielaProofreading: Alex Yeager
Animals can be “quadrupled”. This double pasture contains 4 wild boar.
This goods tile represents 2 vegetables in that field.