Embed Size (px)
Citation preview

Furnace build report
Cheap and Free Rick is the president of the Metro Detroit Metalworking Club. A few weeks ago we spent the better part of a Sunday over at C&F Rick’s house while some aluminum casting was being performed. Rick was making a few practice pours for a demo he was going to do in Ann Arbor. There was also a brass pour made to practice for a cannon pour that may happen this summer. Watching all this go on it’s hard to do nothing so I grabbed a hot glue gun, some foam, and Don’s hot wire cutter and cut out a fictional engine block. With Ricks guidance the foam was coated in “popcorn ceiling/stucco” material with the foam balls sifted out. After the coating, the foam was sprinkled in common beach sand and dried with a heat gun to speed things up. The foam was then buried in a bucket of sand and molten aluminum was poured onto the foam and the block was cast. Seeing the results I knew that I would need to build a furnace of my own.
Right away I started to gather materials. By the end of the week I had gathered or made all of the things in this photo. The metal 5 gallon bucket, the sheet metal for the lid, my burner tube, the crucible, 2 stainless steel pressure heads, and 3 ingot molds
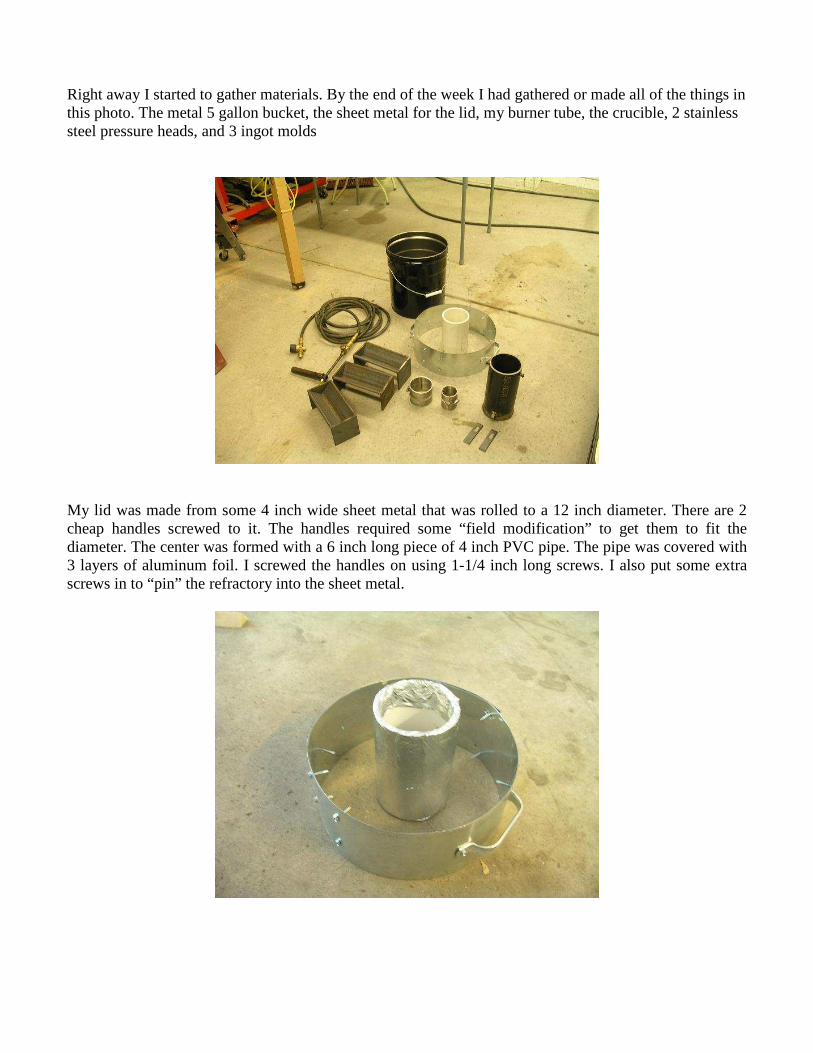
My lid was made from some 4 inch wide sheet metal that was rolled to a 12 inch diameter. There are 2 cheap handles screwed to it. The handles required some “field modification” to get them to fit the diameter. The center was formed with a 6 inch long piece of 4 inch PVC pipe. The pipe was covered with 3 layers of aluminum foil. I screwed the handles on using 1-1/4 inch long screws. I also put some extra screws in to “pin” the refractory into the sheet metal.

The center of the furnace was formed with a 2 foot long piece of 6 inch PVC pipe. This pipe also was wrapped with 3 layers of aluminum foil. I also drilled 2, ½ inch holes 10-1/2 inches from the bottom of the pipe, so a ½ inch rod could be slid thru the center of the pipe. This rod will hold the pipe 3 inches off the bottom of the bucket when set in. Sorry about no photo of the rod in action.
Next a 1-1/8 inch hole was drilled 4 inches from the bottom of the bucket to insert the burner tube. The hole was made on an angle so when the tube is inserted it would just touch the wall inside the 6 inch PVC.

The PVC is drilled at 1 inch from the bottom with the same angle. I just eyeballed the entire thing, nothing fancy about it.
With a piece of burner tube inserted, the walls of the pipe were touching and the 6 inch was centered in the bucket. The flame will swirl around the crucible instead of blasting right at it.

Next the refractory was mixed up. I was told to make a “dry mix” by the fellow who sold it. Don’t mix it wet like concrete because there is a chemical binder that will separate with to much water. It is hard to explain but the refractory when mixed was like shaved ice. If it was poked with a stick it would make a hole and stay that way. When I put it in the bucket it just plopped in but if I shook the bucket hard enough it almost went liquid and self leveled. After marking the inside of the bucket with a depth mark, I put a 3 inch layer of refractory in the bucket. Then the ½ inch rod was inserted thru the 6 inch pipe and the PVC was hung in the bucket. Then the bucket was filled and shaken slowly. As I shook the bucket the refractory wanted to creep up the center of the PVC pipe. Maybe I should have foiled the end of the pipe to keep the refractory down.
After the bucket was full a garbage bag was laid out and the lid was also poured. After about 15 minutes, the rod was slid out, and the 6 inch could support itself. Then it was possible to reach down thru the 6 inch pipe and clean out the refractory that worked it way up the center. Also the top will have a divot from the ½ inch rod. That divot needs to be smoothed out at this stage. At this point I pushed a 3/8 bolt into the lid to act as a pivot point for a lid. As it dried, the burner nipple was rotated every so often to keep it from becoming trapped. NOTE: This whole thing required 2-55# bags of refractory and almost used it all.

After 3 days cure time the PVC pipe was cut with a saw creating a slot from top to bottom. The width of the saw blade was enough to allow the pipe to collapse in and slip right out leaving an aluminum foil layer in the refractory.
The bucket was worked the same way. There were 4 slots cut but the bottom could not be reached with the saw due to the refractory back draft. With the 4 slots I was able to slip the PVC up about ½ inch allowing access to the bottom. One of the cuts was extended thru the bottom and the PVC slipped right out.

The furnace is now ready for first fire. I am going to wait a few more days and fire it up. The furnace will be lit with as low a flame possible and then slowly increased over hours until full temperature is achieved. I might even wire brush the lid and put some barbeque paint on it.
The burner was made using plans for a burner from http://www.backyardmetalcasting.com/oliverburner1.html The propane regulator and hose setup was recycled from an old torch from work that was no longer fit for service. There was a problem when the furnace was lit and the burner ran extremely rich. After trying 2 other designs, the right burner for my regulator ended up being a variation with (4) 5/16 holes instead of the (6) 3/8 holes, and in the cross tube, a #75 (.021) hole was used instead of the #57 (.043). I am not exactly sure why this combination works and the supplied design did not. I suspect the output pressure may be higher on the regulator that I had but I have no way to confirm that.
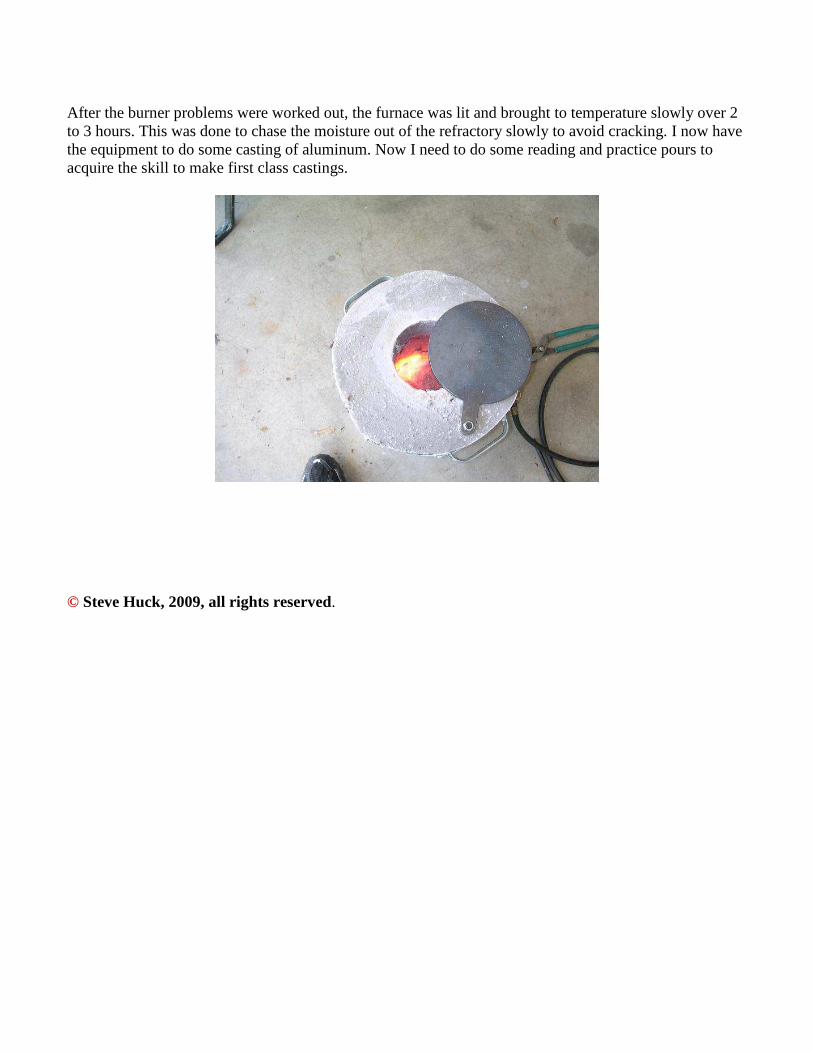
After the burner problems were worked out, the furnace was lit and brought to temperature slowly over 2 to 3 hours. This was done to chase the moisture out of the refractory slowly to avoid cracking. I now have the equipment to do some casting of aluminum. Now I need to do some reading and practice pours to acquire the skill to make first class castings.
© Steve Huck, 2009, all rights reserved.