Embed Size (px)
Citation preview
Any questions? Email us at [email protected] or call 888-912-7238.
www.3wishesfabric.com
Fo�ow us here to s� m�e excitingprojects and ideas!
page 1
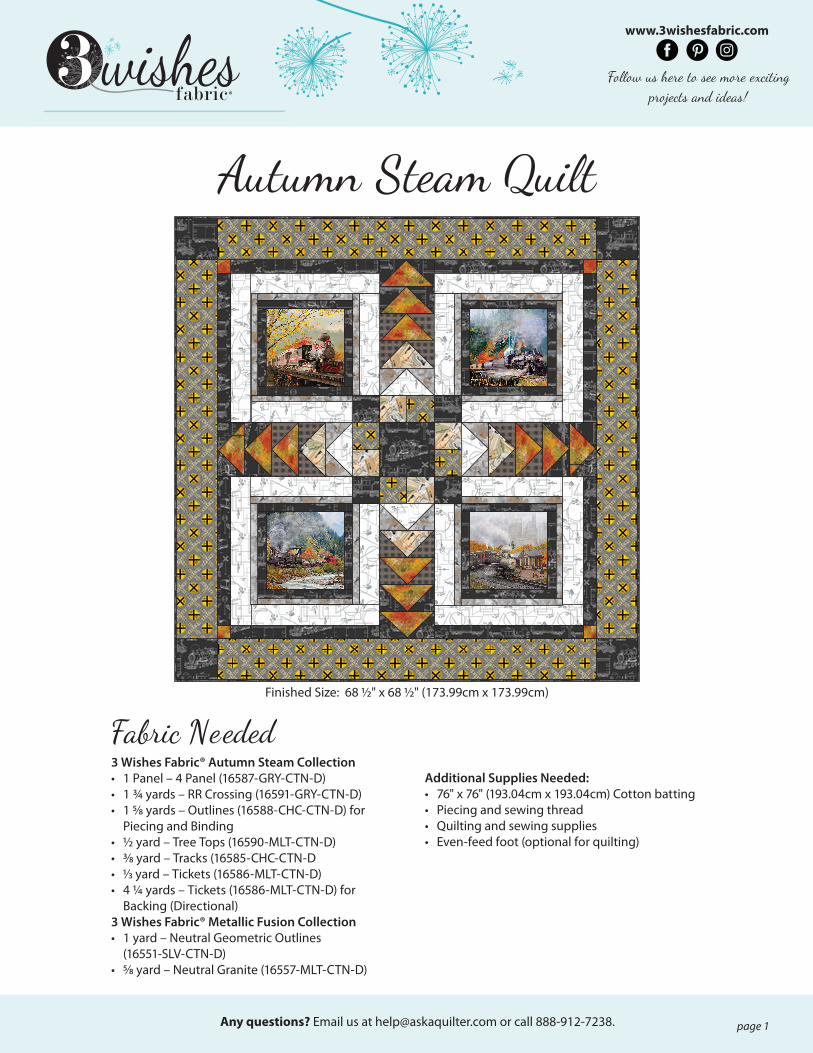
Finished Size: 68 ½" x 68 ½" (173.99cm x 173.99cm)
Autumn Steam Quilt
Fabric Needed3 Wishes Fabric® Autumn Steam Collection• 1 Panel – 4 Panel (16587-GRY-CTN-D)• 1 ¾ yards – RR Crossing (16591-GRY-CTN-D)• 1 5⁄8 yards – Outlines (16588-CHC-CTN-D) for
Piecing and Binding• ½ yard – Tree Tops (16590-MLT-CTN-D) • 3⁄8 yard – Tracks (16585-CHC-CTN-D• 1⁄3 yard – Tickets (16586-MLT-CTN-D)• 4 ¼ yards – Tickets (16586-MLT-CTN-D) for
Backing (Directional) 3 Wishes Fabric® Metallic Fusion Collection• 1 yard – Neutral Geometric Outlines
(16551-SLV-CTN-D)• 5⁄8 yard – Neutral Granite (16557-MLT-CTN-D)
Additional Supplies Needed:• 76" x 76" (193.04cm x 193.04cm) Cotton batting • Piecing and sewing thread• Quilting and sewing supplies• Even-feed foot (optional for quilting)

www.3wishesfabric.com page 2
CuttingUse a rotary cutter and acrylic ruler to cut the number of pieces from each fabric listed below.
Before You BeginRead all instructions before beginning project. Do not pre-wash fabrics. Press fabrics with a dry iron on cotton setting before cutting. Use a ¼" (6.35mm) seam allowance and sew fabrics with right sides together (RST) unless otherwise noted. Press seams in the direction of the arrows. wof = width of fabric
4 Panel (16587-GRY-CTN-D) 1 PanelFussy Cut 4 – 12" x 12" (30.48cm x 30.48cm)Label the Panels 1-4
RR Crossing (16591-GRY-CTN-D) 1 ¾ yardsCut 4 – 6 ½" x 56 ½" (16.51cm x 143.51cm)Cut 4 – 4 ½" x 4 ½" (11.43cm x 11.43cm)
Outlines (16588-CHC-CTN-D) 1 ¾ yardsCut 8 – 2 ½" (6.35cm) x wof (Binding)Cut 20 – 4 ½" x 4 ½" (11.43cm x 11.43cm)Cut 4 – 2 ½" x 22 ½" (6.35cm x 57.15cm) *horizontalCut 4 – 2 ½" x 22 ½" (6.35cm x 57.15cm) *veritcalCut 1 – 8 ½" x 8 ½" (21.59cm x 25.19cm) Cut 8 – 1 ¾" x 14 ½" (4.45cm x 36.83cm) *horizontalCut 8 – 1 ¾" x 12" (6.35cm x 30.48cm) *veritcalCut 4 – 6 ½" x 6 ½" (16.51cm x 16.51cm)
1
4
2
3
2 ½" x wof
2 ½" x 22 ½"
1 ¾" x 14 ½"
1 ¾
" x 1
2"
2 ½
" x 2
2 ½
"
6 ½
" x 5
6 ½
"
6 ½"x
6 ½"
4 ½"x
4 ½"
4 ½"x
4 ½"
8 ½" x 8 ½"

www.3wishesfabric.com page 3
Sewing1. Place an Outlines Border (1 ¾" x 12" / 4.45cm x 30.48cm) on each side of a fussy cut Panel square (12" x 12" / 30.48cm x 30.48cm) as
shown in Diagram A. Pin RST, sew and press. Place an Outlines Border (1 ¾" x 14 ½" / 4.45cm x 36.83cm) on the top and bottom and pin RST, sew and press. Finished Panel 1 size will be 14 ½" x 14 ½" (36.83cmx 36.83cm). Repeat to make Panels 2-4.
2. Place a Tickets and a RR Crossing square (4 ½" x 4 ½" / 11.43cm x 11.43cm) as shown in Diagram B. Pin RST, sew and press to make one Border Unit (4 ½" x 8 ½" / 11.43cm x 21.59cm). Make four.
Neutral Geometric Outlines (16551-SLV-CTN-D) 1 yard from the 3Wishes Metallic Fusion CollectionCut 4 – 3 ½" x 22 ½" (8.89cm x 57.15cm)Cut 4 – 3 ½" x 19 ½" (8.89cm x 49.53cm)Cut 8 – 3 ½" x 15 ½" (8.89cm x 39.37cm) Cut 4 – 4 ½" x 8 ½" (11.43cm x 21.59cm)
3 ½" x 22 ½" 3 ½" x 15 ½"
3 ½" x 19 ½" 3 ½" x 15 ½"
4 ½" x 8 ½"
2 ½" x 2 ½"
Neutral Granite(16557-MLT-CTN-D) 5⁄8 yard from the 3Wishes Metallic Fusion CollectionCut 8 – 4 ½" x 4 ½" (11.43cm x 11.43cm)Cut 12 – 1 ½" x 15 ½" (3.81cm x 39.37cm) Cut 4 – 1 ½" x 14 ½" (3.81cm x 36.83cm)
Tree Tops (16590-MLT-CTN-D) ½ yardCut 12 – 4 ½" x 8 ½" (11.43cm x 21.59cm)Cut 4 – 2 ½" x 2 ½" (6.35cm x 6.35cm)
Tracks (16585-CHC-CTN-D) 3⁄8 yardCut 16 – 4 ½" x 4 ½" (11.43cm x 11.43cm)
Tickets (16586-MLT-CTN-D) 1⁄3 yardCut 4 – 4 ½" x 8 ½" (11.43cm x 21.59cm)Cut 4 – 4 ½" x 4 ½" (11.43cm x 11.43cm)
1 ½" x 15 ½"
1 ½" x 14 ½"
4 ½"x
4 ½"
4 ½"x
4 ½"
4 ½"x
4 ½"
4 ½" x 8 ½"
4 ½" x 8 ½"
Dia. A
+
+
=
Panel 1
14 ½" x 14 ½"(36.83cm x 36.83cm)
Make Panels 1 - 4
+ +
Panel 2
14 ½" x 14 ½"(36.83cm x 36.83cm)
Panel 3
14 ½" x 14 ½"(36.83cm x 36.83cm)
Panel 4
14 ½" x 14 ½"(36.83cm x 36.83cm)
Dia. B
+ =
Border Unit
4 ½" x 8 ½"( 11.43cm x 21.59cm)
Make 4

www.3wishesfabric.com page 4
3. Refer to Diagram C to make Flying Geese Units. Draw a diagonal line on the wrong side of an Outlines square (4 ½" x 4 ½" / 11.43cm x 11.43cm). Place RST on the left side of a Tree Tops rectangle (4 ½" x 8 ½" / 11.43cm x 21.59cm). Sew on the diagonal line. Trim seam to ¼" (6.35mm); press open. Repeat with a second Outlines square on the right side of the rectangle to make Flying Geese Unit 1 (4 ½" x 8 ½" / 11.43cm x 21.59cm). Make 8.
4. Repeat Step 3 and refer to Diagram D using eight Tracks squares (4 ½" x 4 ½" / 11.43cm x 11.43cm) and four Trees rectangles (4 ½" x 8 ½" / 11.43cm x 21.59cm ) to make four Flying Geese Unit 2’s (4 ½" x 8 ½" / 11.43cm x 21.59cm).
5. Repeat Step 3 and refer to Diagram E using eight Tracks squares (4 ½" x 4 ½" / 11.43cm x 11.43cm) and four Tickets rectangles (4 ½" x 8 ½" / 11.43cm x 21.59cm) to make four Flying Geese Unit 3’s (4 ½" x 8 ½" / 11.43cm x 21.59cm).
6. Repeat Step 3 and refer to Diagram F using eight Neutral Granite squares (4 ½" x 4 ½" / 11.43cm x 11.43cm) and four Neutral Geometric Outlines rectangles (4 ½" x 8 ½" / 11.43cm x 21.59cm) to make four Flying Geese Unit 4’s (4 ½" x 8 ½" / 11.43cm x 21.59cm).
7. Place two Flying Geese Unit 1’s, one each of Flying Geese Units 2-4 and one Border Unit as shown in Diagram G. Pin RST, sew and press to make one Flying Geese Row (8 ½" x 24 ½" / 21.59cm x 62.23cm). Make 4.
Tip: To ensure precise points when sewing a Flying Geese Unit to other pieces, place on top, stitch just next to the center of the “X“, 1 or 2 threads above the intersection.
Dia. C
Flying GeeseUnit 1
4 ½" x 8 ½"(11.43cm x 21.59cm)
Make 8
¼" (6.35mm)
DrawWrong side
Sew
Sew
Cut Press
Press
Flying GeeseUnit 2
4 ½" x 8 ½"(11.43cm x 21.59cm)
Make 4
Dia. D
Flying GeeseUnit 3
4 ½" x 8 ½"(11.43cm x 21.59cm)
Make 4
Dia. E
Dia. F
Flying GeeseUnit 4
4 ½" x 8 ½"(11.43cm x 21.59cm)
Make 4
Unit 1 Unit 1 Unit 2 Unit 3 Unit 4 Border Unit Flying Geese Row
Dia. G
8 ½" x 24 ½"(21.59cm x 62.23cm)
Make 4
+ + + + + =
“X” tip ¼" (6.35mm)from un�nished edge

www.3wishesfabric.com page 5
8. Place a Neutral Granite rectangle (1 ½" x 15 ½" / 4.45cm x 39.37cm) with a Neutral Geometric Outlines rectangle (3 ½" x 15 ½" / 8.89cm x 39.37cm) as shown in Diagram H. Pin RST, sew and press to make a Quadrant Border A (4 ½" x 15 ½" / 11.43cm x 39.37cm). Make 8.
9. Place an Outlines square (4 ½" x 4 ½" / 11.43cm x 11.43cm) and a Quadrant Section Border A (4 ½" x 15 ½" / 11.43cm x 39.37cm) as shown in Diagram I. Pin, sew and press to make a Quadrant Border A-1 (4 ½" x 19 ½" / 11.43cm x 49.53cm). Make 2. Repeat to make two Quadrant Border A-2, noting the orientation of the pieces.
10. Place an Outlines rectangle (2 ½" x 22 ½" / 6.35cm x 57.15cm) and a Neutral Geometric Outlines rectangle (3 ½" x 22 ½" / 8.89cm x 57.15cm) as shown in Diagram J. Pin RST, sew and press to make a Quadrant Border B (5 ½" x 22 ½" / 13.97cm x 57.15cm). Make 4.
11. Place a Trees square (2 ½" x 2 ½" / 6.35cm x 6.35cm) and an Outlines rectangle (2 ½" x 22 ½" / 6.35cm x 57.15cm) as shown in Diagram K. Pin RST, sew and press to make a Quadrant Border C (2 ½" x 24 ½" / 6.35cm x 62.23cm). Make 4.
Dia. HQuadrantBorder A
4 ½" x 15 ½"(11.43cm x 39.37cm)
Make 8
+ =
QuadrantBorder A-1
QuadrantBorder A-2
4 ½" x 19 ½"(11.43cm x 49.53cm)
Make 2
4 ½" x 19 ½"(11.43cm x 49.53cm)
Make 2
+
=
Dia. I
Dia. JQuadrantBorder B
5 ½" x 22 ½"(13.97cm x 57.15cm)
Make 4
+ =
Dia. K Quadrant Border C
2 ½" x 24 ½" (6.35cm x 62.23cm)Make 4
+ =

www.3wishesfabric.com page 6
12. Construct Quadrant 1 using Fussy Cut Panel 1 square 1 (14 ½"x 14 ½" / 36.83cm x 36.83cm) in the center. Sew the pieces in the order shown in Diagrams L1-8. Pin pieces RST, sew and press toward the outside of the Quadrant. Check the measurements at each step to ensure the next border will fit.
L1 Neutral Granite rectangle (1 ½" x 14 ½" / 4.45cm x 36.83cm). Quadrant size 14 ½" x 15 ½" (36.83cm x 39.37cm).L2 Neutral Granite rectangle (1 ½" x 15 ½" / 4.45cm x 39.37cm). Quadrant size 15 ½" x 15 ½" (39.37cm x 39.37cm).L3 Quadrant Border A (4 ½" x 15 ½" / 11.43cm x 39.37cm). Quadrant size 15 ½" x 19 ½" (39.37cm x 49.53cm).L4 Quadrant Border A-1. Quadrant size 19 ½" x 19 ½" (49.53cm x 49.53cm).L5 Neutral Geometric Outlines rectangle (3 ½" x 19 ½" / 8.89cm x 49.53cm). Quadrant size 19 ½" x 22 ½" (49.53cm x 57.15cm).L6 Quadrant Border B (5 ½" x 22 ½" / 13.97cm x 57.15cm). Quadrant size 22 ½" x 24 ½" (57.15cm x 62.23cm).L7 Quadrant Border C (2 ½" x 24 ½" / 6.35cm x 62.23cm). Quadrant size 24 ½" x 24 ½" (62.23cm x 62.23cm).L8 Quadrant 1 (24 ½" x 24 ½" / 62.23cm x 62.23cm).
Dia. L1
Dia. L2
Panel 1
Quadrant 1
+
++
= = = =+ +
+14 ½" x 15 ½"
(36.83cm x 39.37cm)
15 ½" x 15 ½"(39.37cm x 39.37cm)
15 ½" x 19 ½" (39.37cm x 49.53cm)
19 ½" x 19 ½"(49.53cm x 49.53cm)
Dia. L3 Dia. L4
= = =+
19 ½" x 22 ½"(49.53cm x 57.15cm)
22 ½" x 24 ½"(57.15cm x 62.23cm) 24 ½" x 24 ½"
(62.23cm x 62.23cm)
Dia. L5
Dia. L6
Dia. L7
24 ½" x 24 ½" (62.23cm x 62.23cm)
Dia. L8
1
2
3
5
6
7

www.3wishesfabric.com page 7
13. Construct Quadrant 2 using Fussy Cut Panel 2 square (14 ½"x 14 ½" / 36.83cm x 36.83cm) in the center as shown in Diagram M. Use the piecing and pressing methods in Step 12 as a general guide but follow the numbers for the piecing order which are different for each Quadrant.
M1 Neutral Granite rectangle (1 ½" x 14 ½" / 4.45cm x 36.83cm). Quadrant size 14 ½" x 15 ½" (36.83cm x 39.37cm).
M2 Neutral Granite rectangle (1 ½" x 15 ½" / 4.45cm x 39.37cm). Quadrant size 15 ½" x 15 ½" (39.37cm x 39.37cm).
M3 Quadrant Border A (4 ½" x 15 ½" / 11.43cm x 39.37cm). Quadrant size 15 ½" x 19 ½" (39.37cm x 49.53cm).
M4 Quadrant Border A-1. Quadrant size 19 ½" x 19 ½" (49.53cm x 49.53cm).M5 Neutral Geometric Outlines rectangle (3 ½" x 19 ½" / 8.89cm x 49.53cm).
Quadrant size 19 ½" x 22 ½" (49.53cm x 57.15cm).M6 Quadrant Border B (5 ½" x 22 ½" / 13.97cm x 57.15cm).
Quadrant size 22 ½" x 24 ½" (57.15cm x 62.23cm).M7 Quadrant Border C (2 ½" x 24 ½" / 6.35cm x 62.23cm).
Quadrant size 24 ½" x 24 ½" (62.23cm x 62.23cm).M8 Quadrant 2 (24 ½" x 24 ½" / 62.23cm x 62.23cm).
14. Construct Quadrant 3 using Fussy Cut Panel 3 square (14 ½"x 14 ½" / 36.83cm x 36.83cm) in the center as shown in Diagram N. Use the piecing and pressing methods in Step 12 as a general guide but follow the numbers for the piecing order which are different for each Quadrant.
N1 Neutral Granite rectangle (1 ½" x 14 ½" / 4.45cm x 36.83cm). Quadrant size 14 ½" x 15 ½" (36.83cm x 39.37cm).
N2 Neutral Granite rectangle (1 ½" x 15 ½" / 4.45cm x 39.37cm). Quadrant size 15 ½" x 15 ½" (39.37cm x 39.37cm).
N3 Quadrant Border A (4 ½" x 15 ½" / 11.43cm x 39.37cm). Quadrant size 15 ½" x 19 ½" (39.37cm x 49.53cm).
N4 Quadrant Border A-2. Quadrant size 19 ½" x 19 ½" (49.53cm x 49.53cm).N5 Neutral Geometric Outlines rectangle (3 ½" x 19 ½" / 8.89cm x 49.53cm).
Quadrant size 19 ½" x 22 ½" (49.53cm x 57.15cm).N6 Quadrant Border B (5 ½" x 22 ½" / 13.97cm x 57.15cm).
Quadrant size 22 ½" x 24 ½" (57.15cm x 62.23cm).N7 Quadrant Border C (2 ½" x 24 ½" / 6.35cm x 62.23cm).
Quadrant size 24 ½" x 24 ½" (62.23cm x 62.23cm).N8 Quadrant3 (24 ½" x 24 ½" / 62.23cm x 62.23cm).
15. Construct Quadrant 4 using Fussy Cut Panel 4 square (14 ½"x 14 ½" / 36.83cm x 36.83cm) in the center as shown in Diagram O. Use the piecing and pressing methods in Step 12 as a general guide but follow the numbers for the piecing order which are different for each Quadrant.
O1 Neutral Granite rectangle (1 ½" x 14 ½" / 4.45cm x 36.83cm). Quadrant size 14 ½" x 15 ½" (36.83cm x 39.37cm).
O2 Neutral Granite rectangle (1 ½" x 15 ½" / 4.45cm x 39.37cm). Quadrant size 15 ½" x 15 ½" (39.37cm x 39.37cm).
O3 Quadrant Border A (4 ½" x 15 ½" / 11.43cm x 39.37cm). Quadrant size 15 ½" x 19 ½" (39.37cm x 49.53cm).
O4 Quadrant Border A-2. Quadrant size 19 ½" x 19 ½" (49.53cm x 49.53cm).O5 Neutral Geometric Outlines rectangle (3 ½" x 19 ½" / 8.89cm x 49.53cm).
Quadrant size 19 ½" x 22 ½" (49.53cm x 57.15cm).O6 Quadrant Border B (5 ½" x 22 ½" / 13.97cm x 57.15cm).
Quadrant size 22 ½" x 24 ½" (57.15cm x 62.23cm).O7 Quadrant Border C (2 ½" x 24 ½" / 6.35cm x 62.23cm).
Quadrant size 24 ½" x 24 ½" (62.23cm x 62.23cm).O8 Quadrant 4 (24 ½" x 24 ½" / 62.23cm x 62.23cm).
Dia. MQuadrant 2
24 ½" x 24 ½" (62.23cm x 62.23cm)
1
2
3
4
5
6
7
Dia. NQuadrant 3
24 ½" x 24 ½" (62.23cm x 62.23cm)
1
2
3
4
5
6
7
Dia. OQuadrant 4
24 ½" x 24 ½" (62.23cm x 62.23cm)
1
23
4
5
6
7

www.3wishesfabric.com page 8
16. Place Quadrants 1 and 2 (24 ½" x 24 ½" / 62.23cm x 62.23cm) with a Flying Geese Row (8 ½" x 24 ½" /21.59cm x 62.23cm) as shown in Diagram P. Pin RST, sew and press to make Row 1 (24 ½" x 56 ½" / 62.23cm x 143.51cm).
17. Place two Flying Geese Rows (8 ½" x 24 ½" / 21.59cm x 62.23cm) with the Outlines square (8 ½" x 8 ½" / 21.59cm x 21.59cm) as shown in Diagram Q. Pin RST, sew and press to make Row 2 (8 ½" x 56 ½" / 21.59cm x 143.51cm).
18. Place Quadrants 3 and 4 (24 ½" x 24 ½" / 62.23cm x 62.23cm) and one Flying Geese Row (8 ½" x 24 ½" / 21.59cm x 62.23cm) as shown in Diagram R. Pin RST, sew and press to make Row 3 (24 ½" x 56 ½" / 62.23cm x 143.51cm).
Flying GeeseRow
+ +
Quadrant 1Dia. P
Quadrant 2
24 ½" x 56 ½" (62.23cm x 143.51cm)
Flying Geese Row Flying Geese Row
+ +
Dia. Q
8 ½" x 56 ½" (21.59cm x 143.51cm)
Quadrant 3 Quadrant 4Flying Geese
Row
+ +
Dia. R
24 ½" x 56 ½" (62.23cm x 143.51cm)

www.3wishesfabric.com page 9
19. Place the three rows as shown in Diagram S. Pin RST matching ends, middles and seams; sew and press to make the Quilt Center (56 ½" x 56 ½" / 143.51cm x 143.51cm).
20. Place an Outlines square (6 ½" x 6 ½" / 16.51cm x 16.51cm) on each end of one RR Crossing rectangle (6 ½" x 56 ½" / 16.51cm x 143.51cm) as shown in Diagram T. Pin RST, sew and press to make the Top Border (6 ½" x 68 ½" / 16.51cm x 173.99cm). Repeat to make the Bottom Border.
Quilt Center
+
+
56 ½" x 56 ½" (145.31cm x 143.51cm)
Dia. S
Row 1
Row 2
Row 3
Top and Bottom Borders=
+ +
6 ½" x 68 ½" (16.51cm x 173.99cm)
Dia. T

www.3wishesfabric.com page 10
21. Refer to Diagram U to place the Borders around the Quilt Center (56 ½" x 56 ½" / 143.51cm x 143.51cm). Pin and sew the two RR Crossing rectangles (6 ½" x 56 ½" / 16.51cm x 143.51cm) to each side, then sew the top and bottom borders (6 ½" x 68 ½" / 16.51cm x 173.99cm) made in Step 20 to the top and bottom. Press seams as shown. The finished Quilt Top should measure 68 ½" x 68 ½" (173.99cm x 173.99cm).
+ +
+
+
68 ½" x 68 ½" (173.99cm x 173.99cm)
Dia. U

www.3wishesfabric.com page 11
22. To make the Tickets Backing, remove the selvages and cut two pieces 38 ¼" x 76" (97.16cm x 193.04cm) as shown in Diagram V. Pin RST and sew along the long edges. Press seams open or to one side. The Backing should measure 76" x 76" (193.04cm x 193.04cm).
23. Press finished Quilt Top and Backing. Tape the Backing wrong side up to a firm surface. Layer Batting and Quilt Top (right side up). Baste the layers together with safety pins. Quilt as desired.
24. Once quilting is complete, square up corners and edges, trimming excess Backing and Batting even with the Quilt Top.
25. To make the Outlines Binding, remove selvages and sew the short ends of the eight 2 ½" (6.35cm) x wof strips RST end to end at a 45° angle to make one continuous strip; press seams open. Press one short end ¼" (6.35mm) to the wrong side. Fold in half lengthwise with wrong sides together; press. Leaving a 2" (5.08cm) tail on the folded end, place cut edges of folded Binding even with the edge of the Quilt Top and sew, mitering the corners. Overlap ends, trim any excess and finish sewing the Binding. Fold Binding over to back and hand stitch.
Finished Care InstructionsMachine wash in cold water; gentle cycle. Do not bleach. Tip: Before drying, check for fabric dyes that may have run. If fabric dyes run, rewash and rinse using a color catcher to absorb loose dye. Lay flat to dry or tumble dry low.
Dia. V
Backing76" x 76" (193.04cm x 193.04cm)
38 ¼" x 76" (97.16cm x 193.04cm)
38 ¼" x 76" (97.16cm x 193.04cm)


![ÅBDÉ Æ Â ÉEÈÐ ÅÆ Æ - phariyadi's blogphariyadi.staff.ipb.ac.id/files/2016/01/2015...ro`w ^]^czoaw ^s[cro fo\u ps`ysas[^obo\ [s\s[^cv ^s\rwrwyo\ bw\uuw% ?vcaca\fo [s\us\ow](https://img.dokumen.tips/doc/110x75/5f83dbc4166c79050542cf42/bd-e-phariyadis-row-czoaw-scro-fou-psysasobo.jpg)