Embed Size (px)
Citation preview

Fog BoxCW4062
Instructions (V2.0 1119)IMPORTANT! Before taking this instrument in use we strongly advise you to read this manual carefully.
| 2
FOG BOX INSTALLATION
Models
100
Instructions
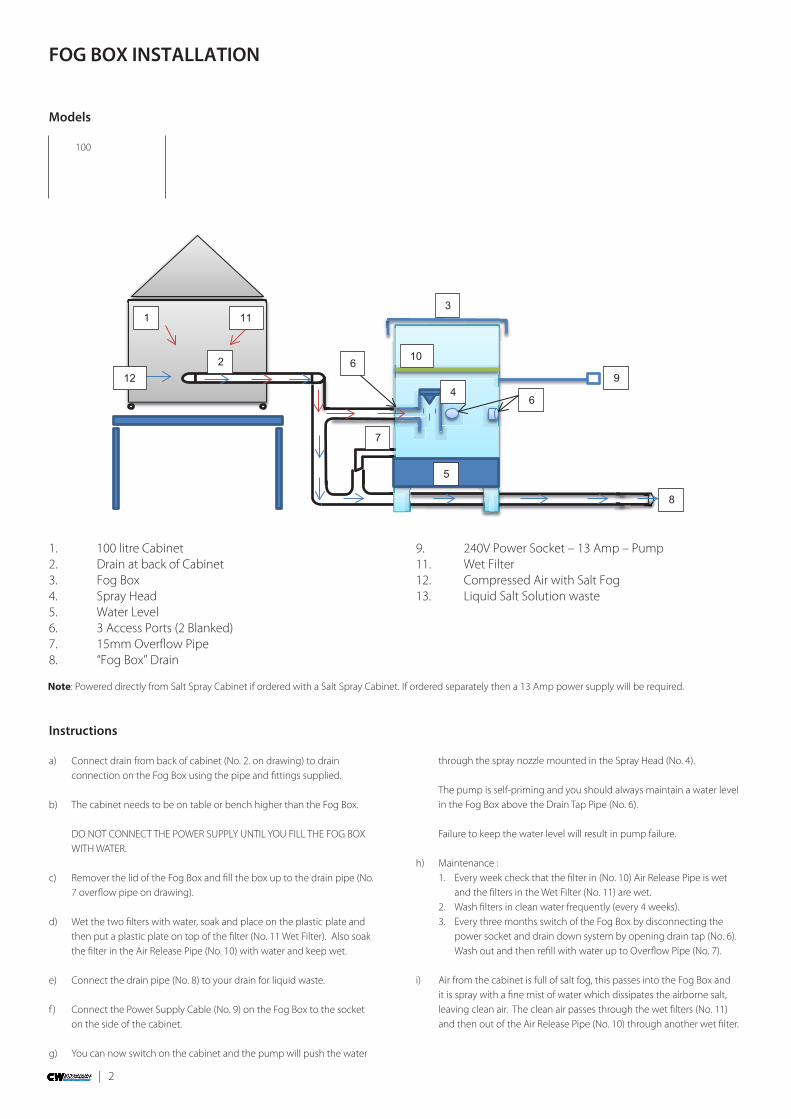
a) Connect drain from back of cabinet (No. 2. on drawing) to drain connection on the Fog Box using the pipe and fittings supplied.
b) The cabinet needs to be on table or bench higher than the Fog Box.
DO NOT CONNECT THE POWER SUPPLY UNTIL YOU FILL THE FOG BOX WITH WATER.
c) Remover the lid of the Fog Box and fill the box up to the drain pipe (No. 7 overflow pipe on drawing).
d) Wet the two filters with water, soak and place on the plastic plate and then put a plastic plate on top of the filter (No. 11 Wet Filter). Also soak the filter in the Air Release Pipe (No. 10) with water and keep wet.
e) Connect the drain pipe (No. 8) to your drain for liquid waste.
f ) Connect the Power Supply Cable (No. 9) on the Fog Box to the socket on the side of the cabinet.
g) You can now switch on the cabinet and the pump will push the water
through the spray nozzle mounted in the Spray Head (No. 4).
The pump is self-priming and you should always maintain a water level in the Fog Box above the Drain Tap Pipe (No. 6).
Failure to keep the water level will result in pump failure.
h) Maintenance : 1. Every week check that the filter in (No. 10) Air Release Pipe is wet and the filters in the Wet Filter (No. 11) are wet. 2. Wash filters in clean water frequently (every 4 weeks). 3. Every three months switch of the Fog Box by disconnecting the power socket and drain down system by opening drain tap (No. 6). Wash out and then refill with water up to Overflow Pipe (No. 7).
i) Air from the cabinet is full of salt fog, this passes into the Fog Box and it is spray with a fine mist of water which dissipates the airborne salt, leaving clean air. The clean air passes through the wet filters (No. 11) and then out of the Air Release Pipe (No. 10) through another wet filter.
Note: Powered directly from Salt Spray Cabinet if ordered with a Salt Spray Cabinet. If ordered separately then a 13 Amp power supply will be required.
3
4
5
6
7
8
9
10
“FOG BOX” INSTALLATION - ALL 200, 450, 1000 & 2000 LITRE MODELS
100 litre Cabinet
Drain at back of Cabinet
Fog Box
Spray Head
Water Level
3 Access Ports (2 Blanked)
15mm Over�ow Pipe
6
1
2
11
12
11
10
9
8
7
6
5
4
3
2
1
13
12
NOTE: Powered directly from Salt Spray Cabinet if ordered with a Salt Spray Cabinet.
If ordered separately then a 13 Amp power supply will be required.
“Fog Box” Drain
240V Power Socket -13 Amp - Pump
Filter/Air Release Pipe
Wet Filter
Compressed Air with Salt Fog
Liquid Salt Solution waste
1. 100 litre Cabinet2. Drain at back of Cabinet3. Fog Box4. Spray Head5. Water Level6. 3 Access Ports (2 Blanked)7. 15mm Overflow Pipe8. “Fog Box” Drain
9. 240V Power Socket – 13 Amp – Pump11. Wet Filter12. Compressed Air with Salt Fog13. Liquid Salt Solution waste
3 |
Models
200 450 750 1000 2000
Instructions
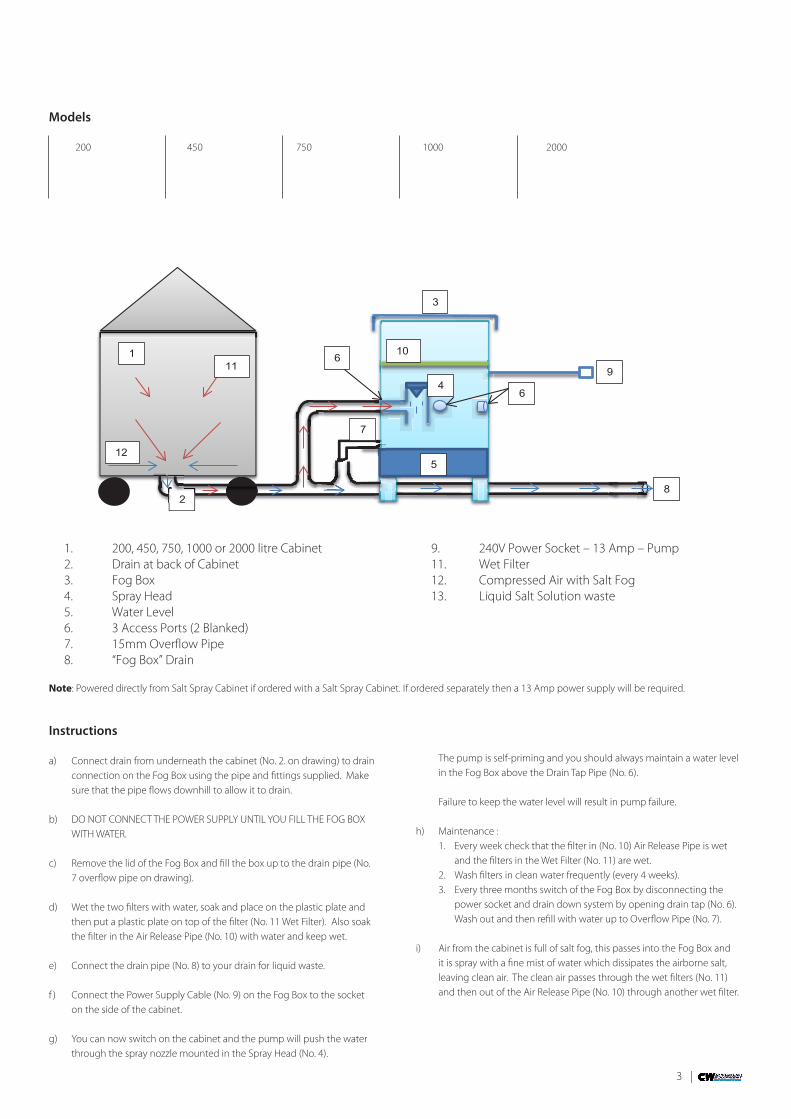
a) Connect drain from underneath the cabinet (No. 2. on drawing) to drain connection on the Fog Box using the pipe and fittings supplied. Make sure that the pipe flows downhill to allow it to drain.
b) DO NOT CONNECT THE POWER SUPPLY UNTIL YOU FILL THE FOG BOX WITH WATER.
c) Remove the lid of the Fog Box and fill the box up to the drain pipe (No. 7 overflow pipe on drawing).
d) Wet the two filters with water, soak and place on the plastic plate and then put a plastic plate on top of the filter (No. 11 Wet Filter). Also soak the filter in the Air Release Pipe (No. 10) with water and keep wet.
e) Connect the drain pipe (No. 8) to your drain for liquid waste.
f ) Connect the Power Supply Cable (No. 9) on the Fog Box to the socket on the side of the cabinet.
g) You can now switch on the cabinet and the pump will push the water through the spray nozzle mounted in the Spray Head (No. 4).
The pump is self-priming and you should always maintain a water level in the Fog Box above the Drain Tap Pipe (No. 6).
Failure to keep the water level will result in pump failure.
h) Maintenance : 1. Every week check that the filter in (No. 10) Air Release Pipe is wet and the filters in the Wet Filter (No. 11) are wet. 2. Wash filters in clean water frequently (every 4 weeks). 3. Every three months switch of the Fog Box by disconnecting the power socket and drain down system by opening drain tap (No. 6). Wash out and then refill with water up to Overflow Pipe (No. 7).
i) Air from the cabinet is full of salt fog, this passes into the Fog Box and it is spray with a fine mist of water which dissipates the airborne salt, leaving clean air. The clean air passes through the wet filters (No. 11) and then out of the Air Release Pipe (No. 10) through another wet filter.
Note: Powered directly from Salt Spray Cabinet if ordered with a Salt Spray Cabinet. If ordered separately then a 13 Amp power supply will be required.
1
2
3
4
5
6
7
8
9
10
“F OG BOX” INSTALLATION – all 200, 450, 750, 1000 & 2000 litre models
11
12
6
Note: Powered directly from Salt Spray Cabinet if ordered with a Salt Spray Cabinet. If ordered separately then a 13 Amp power supply will be required.
1. 200, 450, 750, 1000 or 2000 litre Cabinet2. Drain at back of Cabinet3. Fog Box4. Spray Head5. Water Level6. 3 Access Ports (2 Blanked)7. 15mm Overflow Pipe8. “Fog Box” Drain
9. 240V Power Socket – 13 Amp – Pump11. Wet Filter12. Compressed Air with Salt Fog13. Liquid Salt Solution waste
C&W Specialist EquipmentUnit 2, Burnside CourtBrunel RoadLeominsterHerefordshireHR6 0LX United Kingdom
Phone: +44 (0) 2039 3635 65E-mail: [email protected]
www.cw-spec.com
PRODUCT GUARANTEE
C&W Specialist Equipment guarantee the cabine! and components included in its manufacture for a period of one year from the date of despatch from its factory according to the shipping documents subject to the below mentioned conditions and excluding the items listed in condition 5 below. lf within the said period any component of the cabine! is found to be defective, C&W Specialist Equipment will (subject to the conditions of the guarantee and excluded items) exchange or repair such a component free of charge to the end customer. In the event of a local distributor or agent representing C&W Specialist Equipment, the agent or distributor will be responsible for the repair or replacement of the faulty component. All labour and travelling costs incurred during the replacement will be absorbed by the agent or distributor. C&W Specialist Equipment will supply the replacement components without charge on condition that the said faulty component is returned to C&W Specialist Equipment at the expense of the agent) within the period of the guarantee.
This guarantee is to be additional to and does not take away any of the purchaser's rights under the Sale of Goods Act 1979. Neither does this guarantee supersede any guarantee given by the manufacturers whose services will be employed where appropriate.
Conditions of Guarantee
1. The cabinet has not been tampered with or repaired by anyone other than an employee or agent of C&W Specialist Equipment, unless under direct instructions from C&W Specialist Equipment.
2. The cabinet has been installed correctly as per the instructions of C&W Specialist Equipment.
3. The cabinet has not been subject to misuse, or to willful or accidental damage (including damage caused by lire or lightning).
4. The cabinet has been used solely for the purpose for which il was manufactured and kept in and operated to the conditions specified by C&W Specialist Equipment.
5. The guarantee excludes components that have a limited life span and components that are non mechanical or electrical that fail due to third party damage.


![Vehicular Fog Computing: A Viewpoint of Vehicles as the ...cwc.ucsd.edu/sites/cwc.ucsd.edu/files/Vehicular Fog... · fog computing paradigm [10]–[14]. Specifically, in the fog](https://img.dokumen.tips/doc/110x75/5ece3cb4a160d21f083aea78/vehicular-fog-computing-a-viewpoint-of-vehicles-as-the-cwcucsdedusitescwcucsdedufilesvehicular.jpg)