Embed Size (px)
Citation preview
Financials:
nVision Financial
Reports
User’s Guide
Revised May 2009
SOLAR Financials nVision Financial Reports
SOLAR Financials; nVision Financial Reports 2/5/2014 2
TABLE OF CONTENTS
SOLAR Financials nVision Financial Reports User’s Guide ............................................ 3
Who Do I Call For Help? ................................................................................................. 3
SOLAR nVision Reporting Tools ..................................................................................... 4
Available Reports ........................................................................................................ 4
Accessing SOLAR Financials .......................................................................................... 6
Generating Financial Reports .......................................................................................... 6
Accessing PS/nVision ................................................................................................. 6
Report Request ........................................................................................................... 9
Report Scope ........................................................................................................ 12
Scope Naming Conventions ................................................................................. 13
Complete and Run the Report Request ................................................................ 16
Process Monitor ............................................................................................................ 19
Canceling A Report Process ..................................................................................... 20
Deleting a Report Process ........................................................................................ 22
Report Manager ............................................................................................................ 24
Retrieving Reports .................................................................................................... 24
Explorer Tab ......................................................................................................... 24
List Tab ................................................................................................................. 28
Report Administration ................................................................................................ 29
Administration Tab ................................................................................................ 29
Deleting Reports ................................................................................................... 29
Set View Rights ..................................................................................................... 30
Setting Report Expiration Dates ............................................................................ 33
View Link ................................................................................................................... 34
Archives Tab ......................................................................................................... 35
Clearing Cache Files ..................................................................................................... 36
nVision User’s Aid – Reports and Scopes Reference Guide ......................................... 40
47
SOLAR Financials nVision Financial Reports
SOLAR Financials; nVision Financial Reports 2/5/2014 3
SOLAR Financials nVision Financial Reports User’s Guide The SOLAR Financials system provides a financial reporting tool that includes various pre-formatted reports and is used to track and reconcile financial transactions posted to the general ledger. The SOLAR nVision Financial Reports User’s Guide provides information on:
Available Reports
Establishing a Report Request
Choosing a Scope
Retrieving Reports
Report Administration
Who Do I Call For Help? SOLAR Financials is available to answer your SOLAR questions such as “How do I download a report?” or “How do I choose a scope?” Contact SOLAR Financials at:
(818) 677-1000, press 2, press 1 You may also refer to the Financial Systems web site for additional SOLAR information and documentation:
SOLAR Financials nVision Financial Reports
SOLAR Financials; nVision Financial Reports 2/5/2014 4
SOLAR nVision Reporting Tools The SOLAR nVision Financial Reports User’s Guide is designed to help you select, define and run financial reports using the SOLAR nVision reporting tool.
Available Reports
The following is a list of the financial reports available:
BBA Mgmt Act Stmt – Budget Balance Available Management Activity Statement. This expense report provides month-end and cumulative year-to-date data.
BBA Month-End Act Stmt – Budget Balance Available Month-End Activity Statement. This expense report contains month-to-date and year-to-date activity for specific periods.
Budgetary Summary by Expense Category – This report provides a year-to-date summary line by department for division and college level areas. Department expenses are categorized as salaries, benefits, and operating expenses.
Budgetary Summary by Department – This report provides a year-to-date summary line by department for division and college level areas. Department expenses are categorized as pre-encumbrances, encumbrances, and actual expenses.
Management Fund Summary – This report provides all current year-to-date activity for the following funds; current year General Fund, Lottery, and Trust combined with IRA. This report should be used with caution; it combines information on the balances available instead of providing information for each specific chartfield string.
Trust and IRA funds are restrictive in use and are not included in the Total Balance Available column. The Total Trust Balance Available to Spend is presented separately from the other funds.
Month-to-Date Phone Detail – This is a detailed report of call detail history for phone charges posted in the accounting period (also available for the previous three accounting periods).
MTD-Payroll Account – Month-To-Date Payroll Transactions (by period or by quarter). This report is a non-cumulative list of payroll expenditures for the previous pay period (also available for the previous three pay periods).
SOLAR Financials nVision Financial Reports
SOLAR Financials; nVision Financial Reports 2/5/2014 5
PEAS – Payroll Expenditures Analysis Summary – This is a year-to-date cumulative report that summarizes employee’s payroll expenditures by account, reported by charge period (not calendar month), and by fiscal year.
Trust Bal Sum – Trust Balance Summary Report (also known as the Trust Balance Sheet). The Summary Report balances assets against liabilities, showing the items to be paid against the ability to pay them (the difference between the assets and liabilities is considered equity). This report is a balance sheet for specified Trust chartfield strings.
Trust Act Stmt – Trust Statement of Financial Activity (Trust Income Statement). This report provides a summary of net financial activity for specified Trust chartfield strings at a specific period of time. Net financial activity reported represents revenues minus expenses at the end of a period.
SOLAR Financials nVision Financial Reports
SOLAR Financials; nVision Financial Reports 2/5/2014 6
Accessing SOLAR Financials The following provides instructions on accessing SOLAR Financials from the Campus Portal. 1. Open Microsoft Internet Explorer. 2. Access the Campus Web Portal Login Authentication web page at:
https://www.csun.edu and log into the Campus Portal.
Generating Financial Reports
Individuals who have access to Financial Reports to reconcile department expenses now have the ability to run financial reports through SOLAR Financials nVision.
Accessing PS/nVision
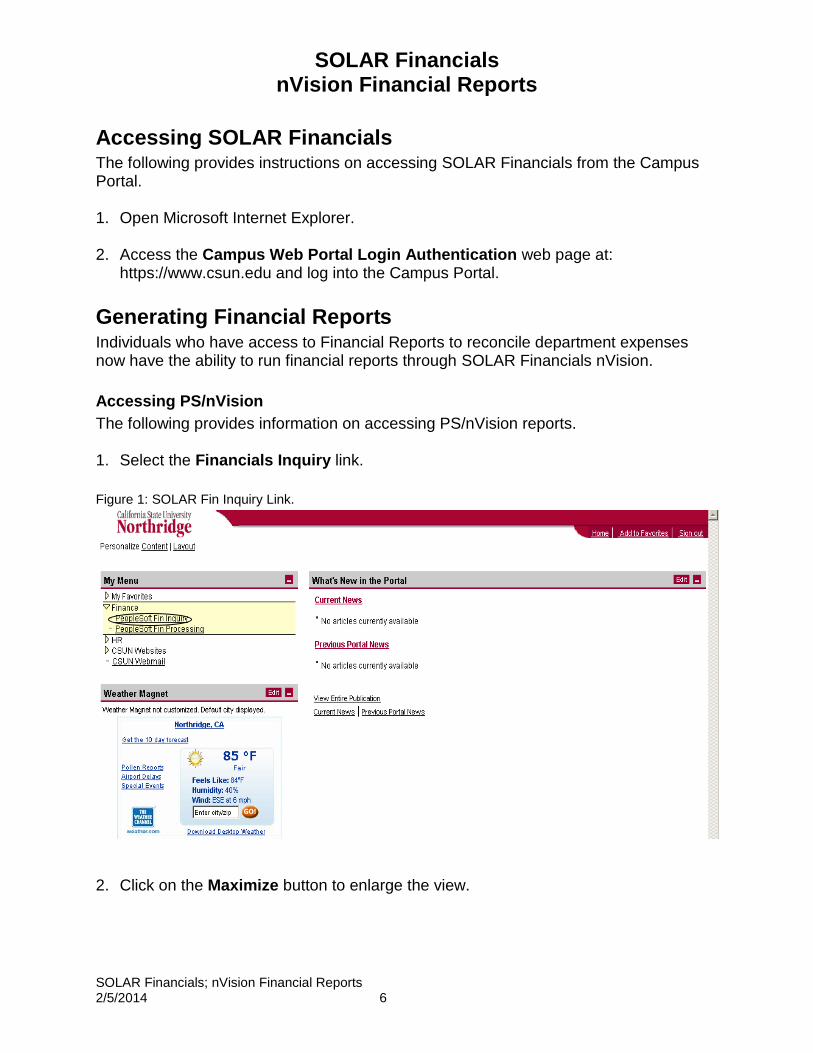
The following provides information on accessing PS/nVision reports. 1. Select the Financials Inquiry link.
Figure 1: SOLAR Fin Inquiry Link.
2. Click on the Maximize button to enlarge the view.

SOLAR Financials nVision Financial Reports
SOLAR Financials; nVision Financial Reports 2/5/2014 7
Figure 2: New Window
3. To access PS/nVision, select the following menu path:
SOLAR Financials > nVision > Define Report Request
Figure 3: Reporting Tools Menu Path
4. To begin a new report request, from the Report Request search page, click on the
yellow Search button.
If the report name is known, enter the first few letters of the name in the Report ID field and click on the yellow Search button.
SOLAR Financials nVision Financial Reports
SOLAR Financials; nVision Financial Reports 2/5/2014 8
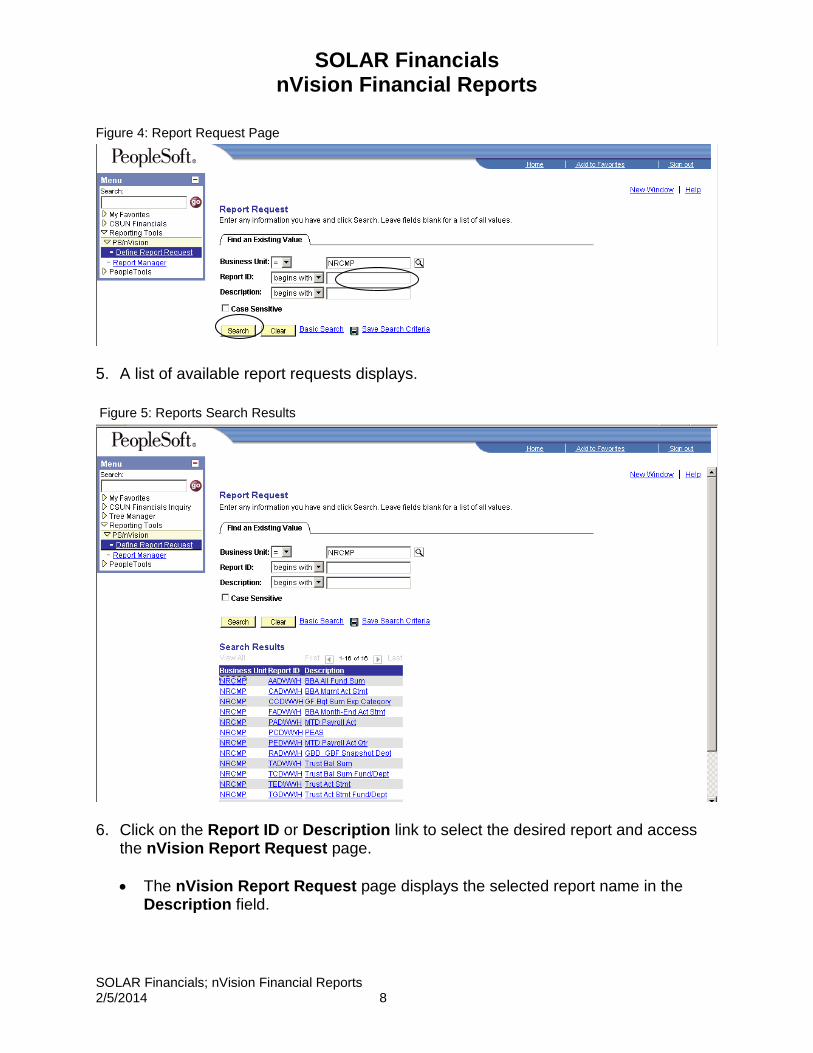
Figure 4: Report Request Page
5. A list of available report requests displays.
Figure 5: Reports Search Results
6. Click on the Report ID or Description link to select the desired report and access
the nVision Report Request page.
The nVision Report Request page displays the selected report name in the Description field.
SOLAR Financials nVision Financial Reports
SOLAR Financials; nVision Financial Reports 2/5/2014 9
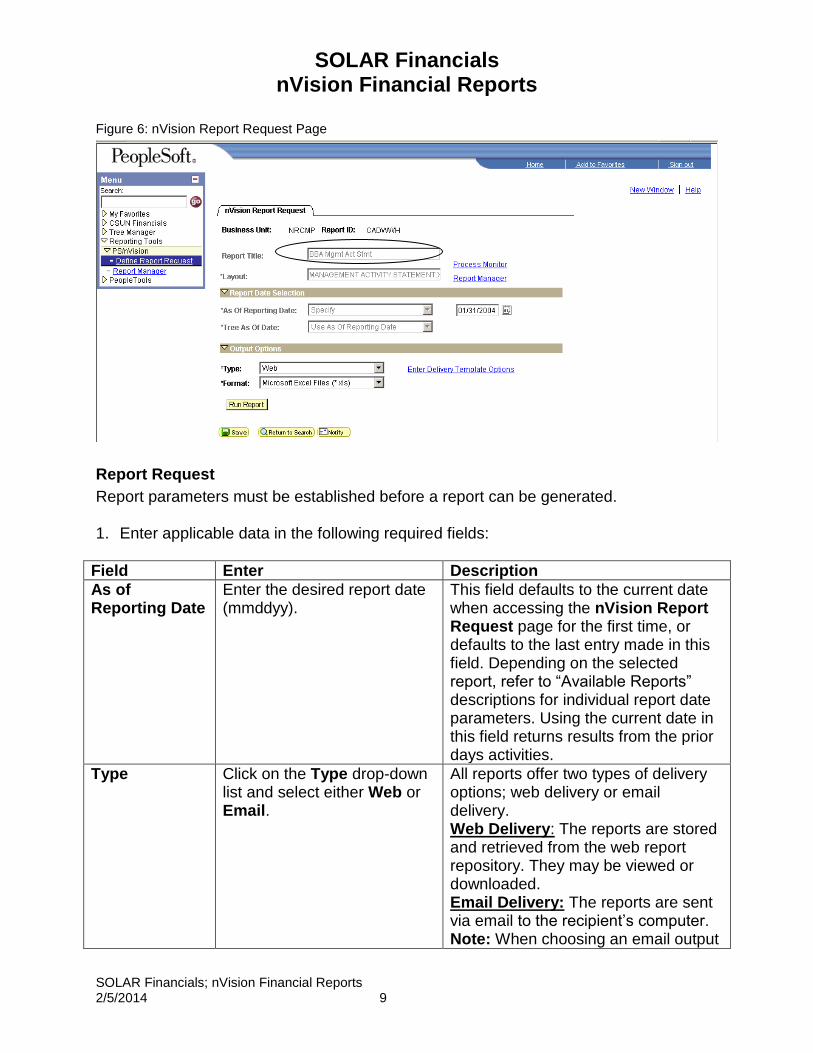
Figure 6: nVision Report Request Page
Report Request
Report parameters must be established before a report can be generated. 1. Enter applicable data in the following required fields:
Field Enter Description
As of Reporting Date
Enter the desired report date (mmddyy).
This field defaults to the current date when accessing the nVision Report Request page for the first time, or defaults to the last entry made in this field. Depending on the selected report, refer to “Available Reports” descriptions for individual report date parameters. Using the current date in this field returns results from the prior days activities.
Type Click on the Type drop-down list and select either Web or Email.
All reports offer two types of delivery options; web delivery or email delivery. Web Delivery: The reports are stored and retrieved from the web report repository. They may be viewed or downloaded. Email Delivery: The reports are sent via email to the recipient’s computer. Note: When choosing an email output
SOLAR Financials nVision Financial Reports
SOLAR Financials; nVision Financial Reports 2/5/2014 10
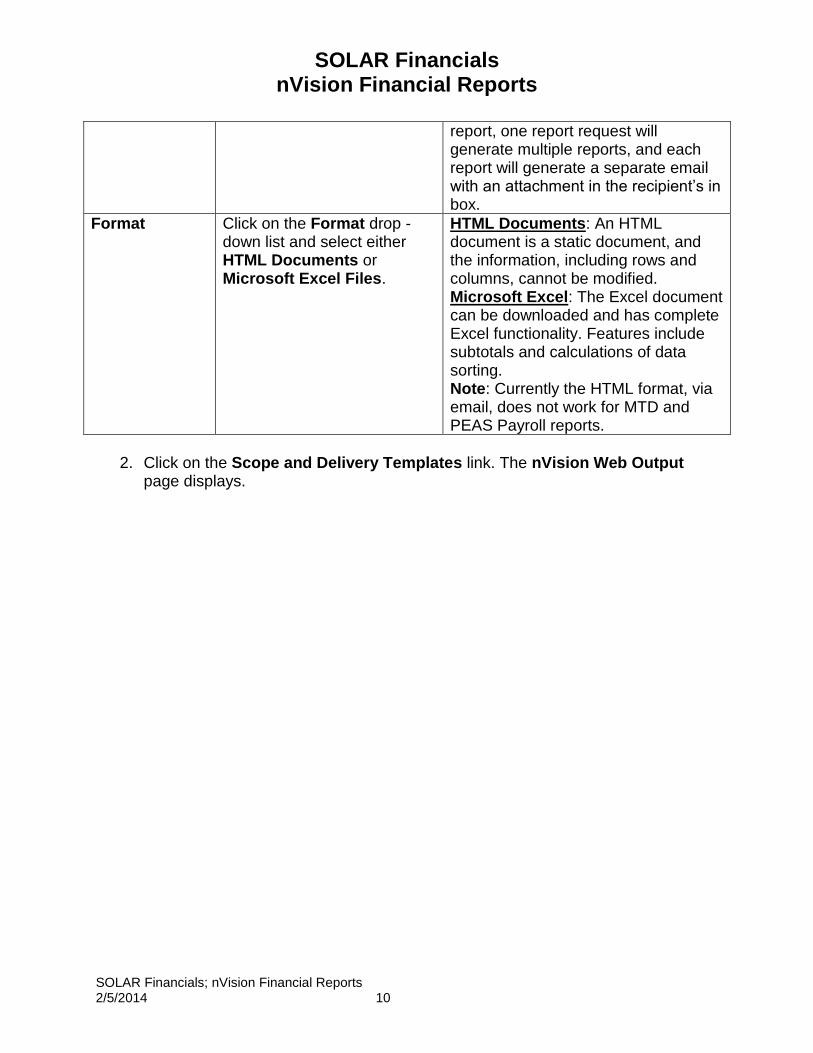
report, one report request will generate multiple reports, and each report will generate a separate email with an attachment in the recipient’s in box.
Format Click on the Format drop -down list and select either HTML Documents or Microsoft Excel Files.
HTML Documents: An HTML document is a static document, and the information, including rows and columns, cannot be modified. Microsoft Excel: The Excel document can be downloaded and has complete Excel functionality. Features include subtotals and calculations of data sorting. Note: Currently the HTML format, via email, does not work for MTD and PEAS Payroll reports.
2. Click on the Scope and Delivery Templates link. The nVision Web Output
page displays.
SOLAR Financials nVision Financial Reports
SOLAR Financials; nVision Financial Reports 2/5/2014 11
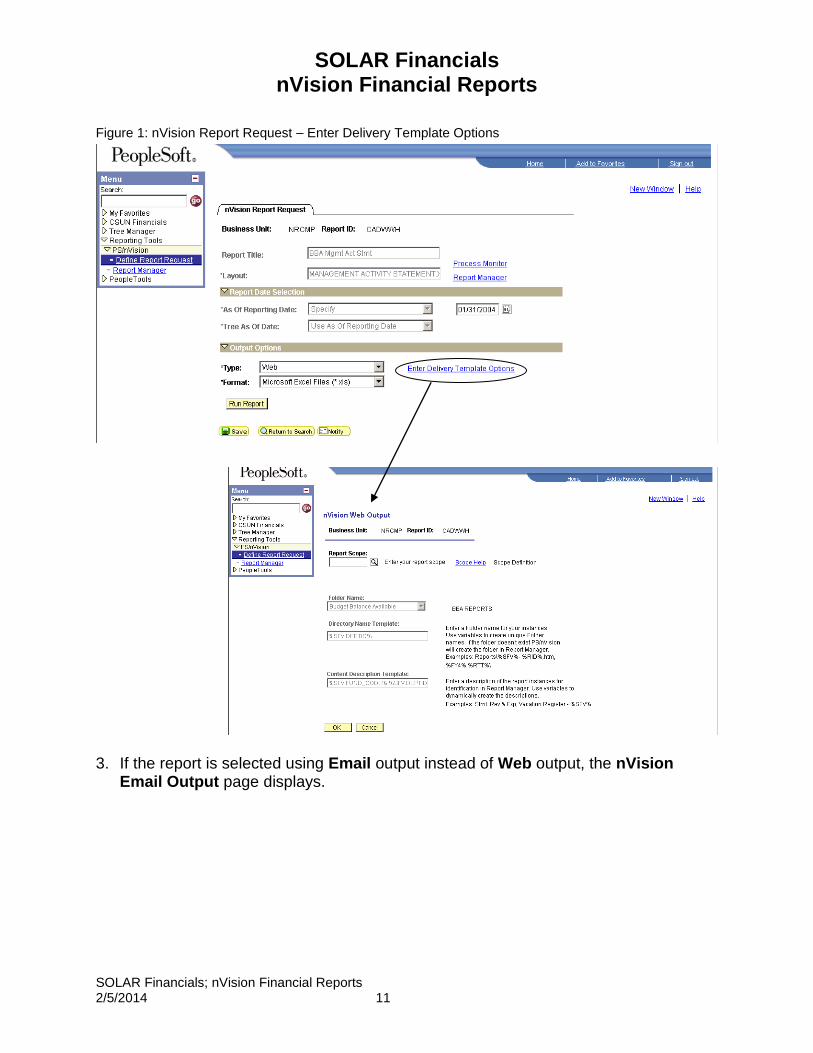
Figure 1: nVision Report Request – Enter Delivery Template Options
3. If the report is selected using Email output instead of Web output, the nVision
Email Output page displays.
SOLAR Financials nVision Financial Reports
SOLAR Financials; nVision Financial Reports 2/5/2014 12
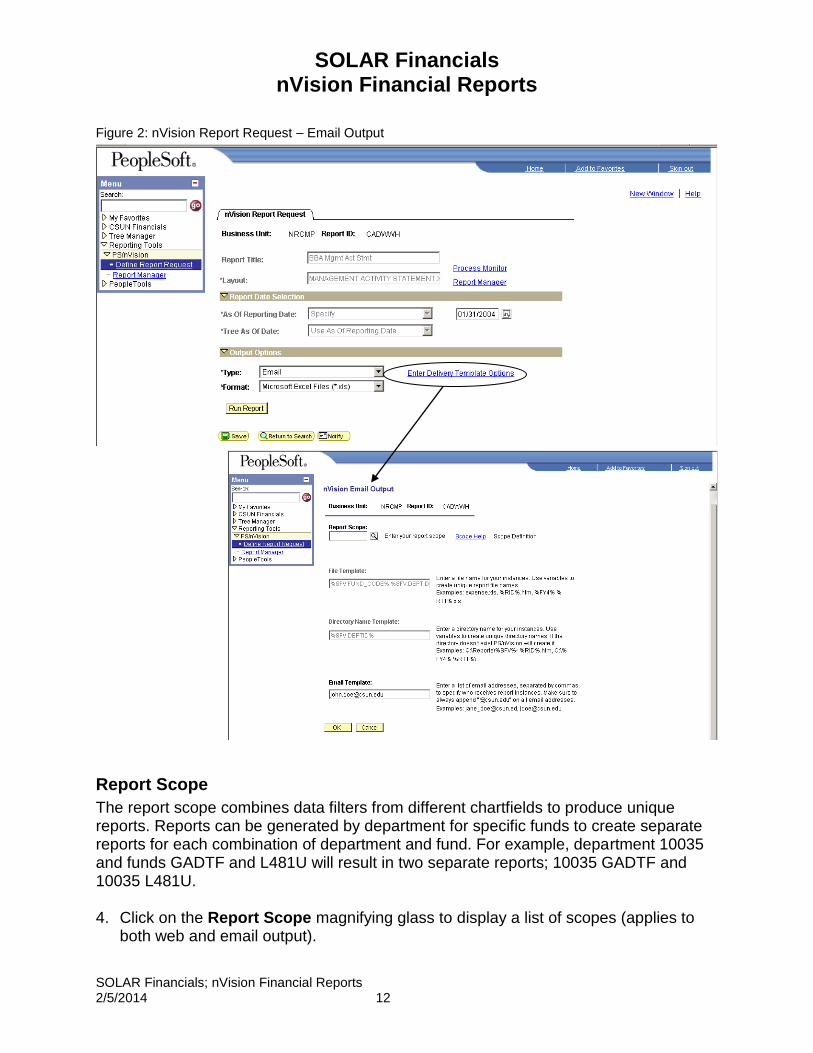
Figure 2: nVision Report Request – Email Output
Report Scope
The report scope combines data filters from different chartfields to produce unique reports. Reports can be generated by department for specific funds to create separate reports for each combination of department and fund. For example, department 10035 and funds GADTF and L481U will result in two separate reports; 10035 GADTF and 10035 L481U. 4. Click on the Report Scope magnifying glass to display a list of scopes (applies to
both web and email output).
SOLAR Financials nVision Financial Reports
SOLAR Financials; nVision Financial Reports 2/5/2014 13
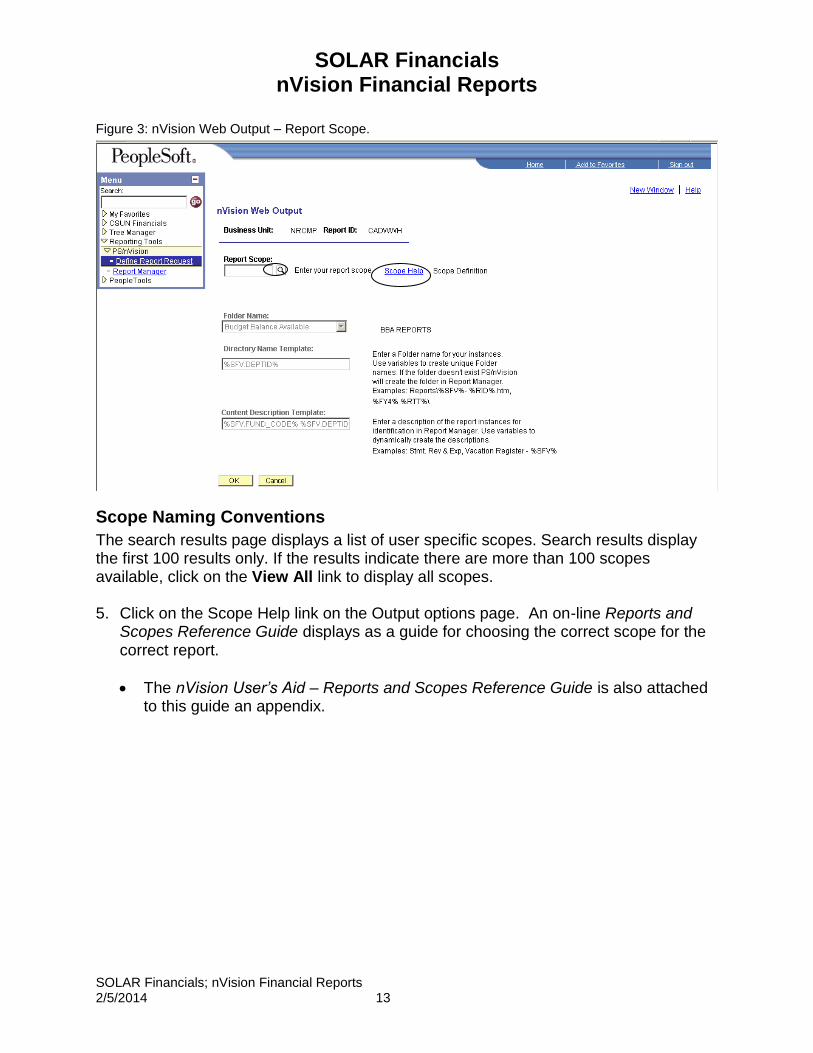
Figure 3: nVision Web Output – Report Scope.
Scope Naming Conventions
The search results page displays a list of user specific scopes. Search results display the first 100 results only. If the results indicate there are more than 100 scopes available, click on the View All link to display all scopes. 5. Click on the Scope Help link on the Output options page. An on-line Reports and
Scopes Reference Guide displays as a guide for choosing the correct scope for the correct report.
The nVision User’s Aid – Reports and Scopes Reference Guide is also attached to this guide an appendix.

SOLAR Financials nVision Financial Reports
SOLAR Financials; nVision Financial Reports 2/5/2014 14
Figure 4:PSnVision User’s Aid - Reports and Scopes Reference Guide
Scope naming conventions are as follows:
Payroll, Management Fund Summary, and Call Accounting Reports
The report scope name begins with an “AD”, followed by a department ID, and returns summarized data for all funds for selected department. The report scope name begins with an “AD”, followed by a tree node name, and returns summarized data for all funds for each department that rolls up to that node. Separate reports are generated for each department that rolls up to that node. The report scope name begins with an “AN”, followed by a tree node name, and returns summarized data for all funds for all the departments that roll up to that node.
BBA Reports
The report scope name begins with a “D”, followed by a department ID, and returns specific department and fund information. The report scope name begins with a “D”, followed by a tree node name, returns specific department and fund information for each department that rolls up to that node. Separate reports are generated for each department that rolls up to that node.
SOLAR Financials nVision Financial Reports
SOLAR Financials; nVision Financial Reports 2/5/2014 15
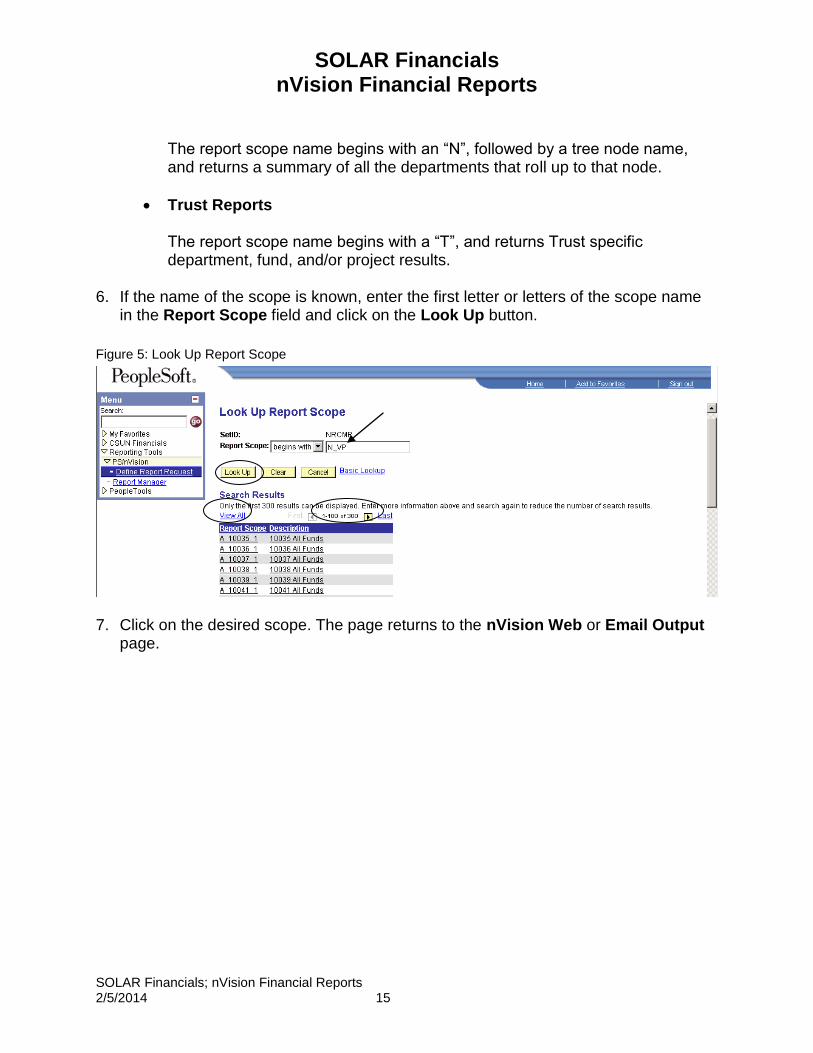
The report scope name begins with an “N”, followed by a tree node name, and returns a summary of all the departments that roll up to that node.
Trust Reports The report scope name begins with a “T”, and returns Trust specific department, fund, and/or project results.
6. If the name of the scope is known, enter the first letter or letters of the scope name
in the Report Scope field and click on the Look Up button.
Figure 5: Look Up Report Scope
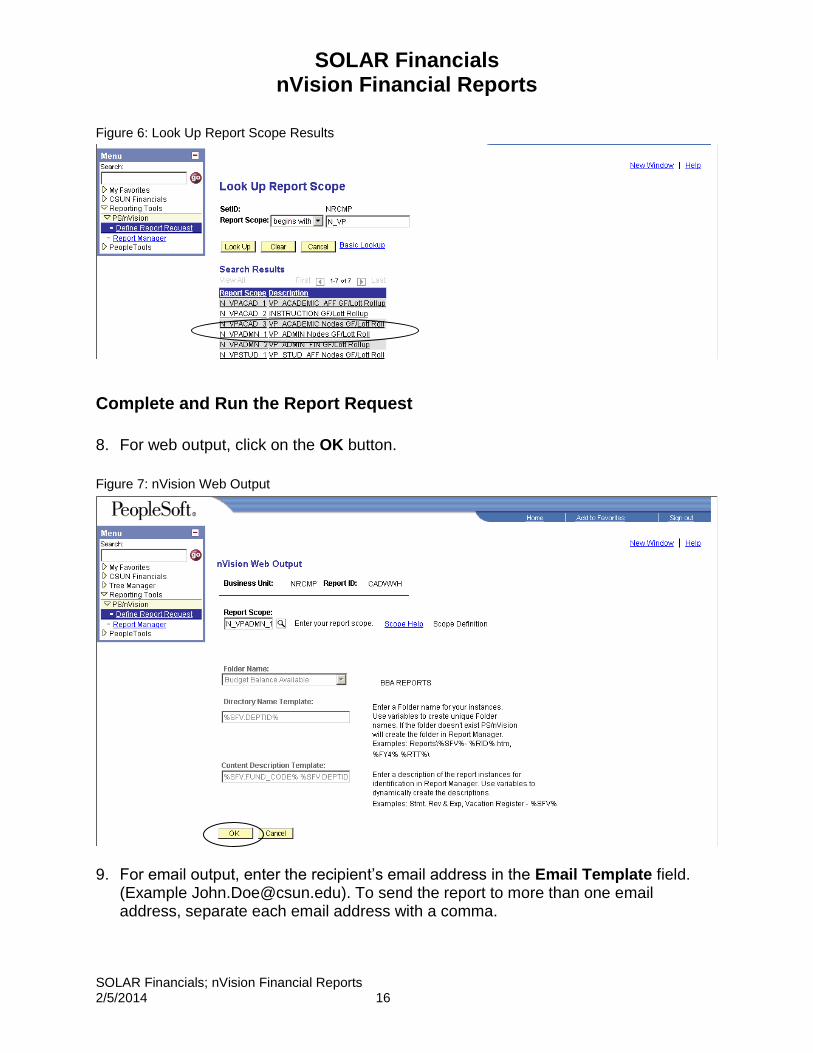
7. Click on the desired scope. The page returns to the nVision Web or Email Output
page.
SOLAR Financials nVision Financial Reports
SOLAR Financials; nVision Financial Reports 2/5/2014 16
Figure 6: Look Up Report Scope Results
Complete and Run the Report Request
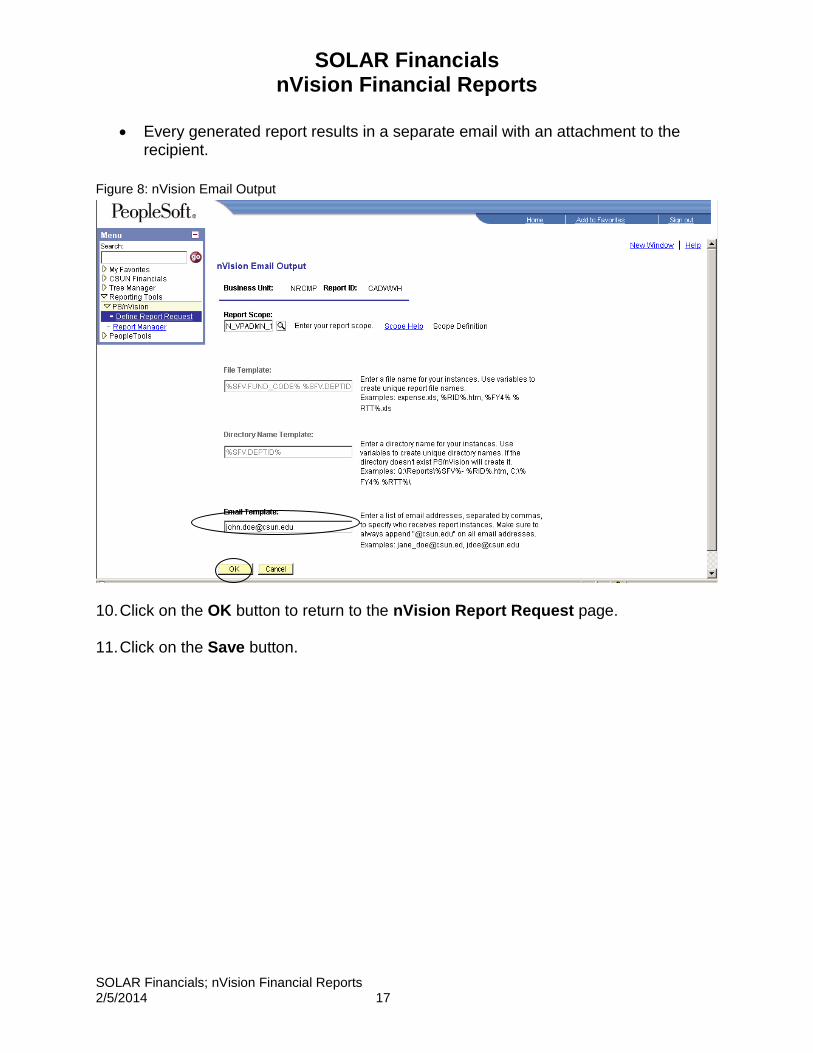
8. For web output, click on the OK button.
Figure 7: nVision Web Output
9. For email output, enter the recipient’s email address in the Email Template field.
(Example [email protected]). To send the report to more than one email address, separate each email address with a comma.
SOLAR Financials nVision Financial Reports
SOLAR Financials; nVision Financial Reports 2/5/2014 17
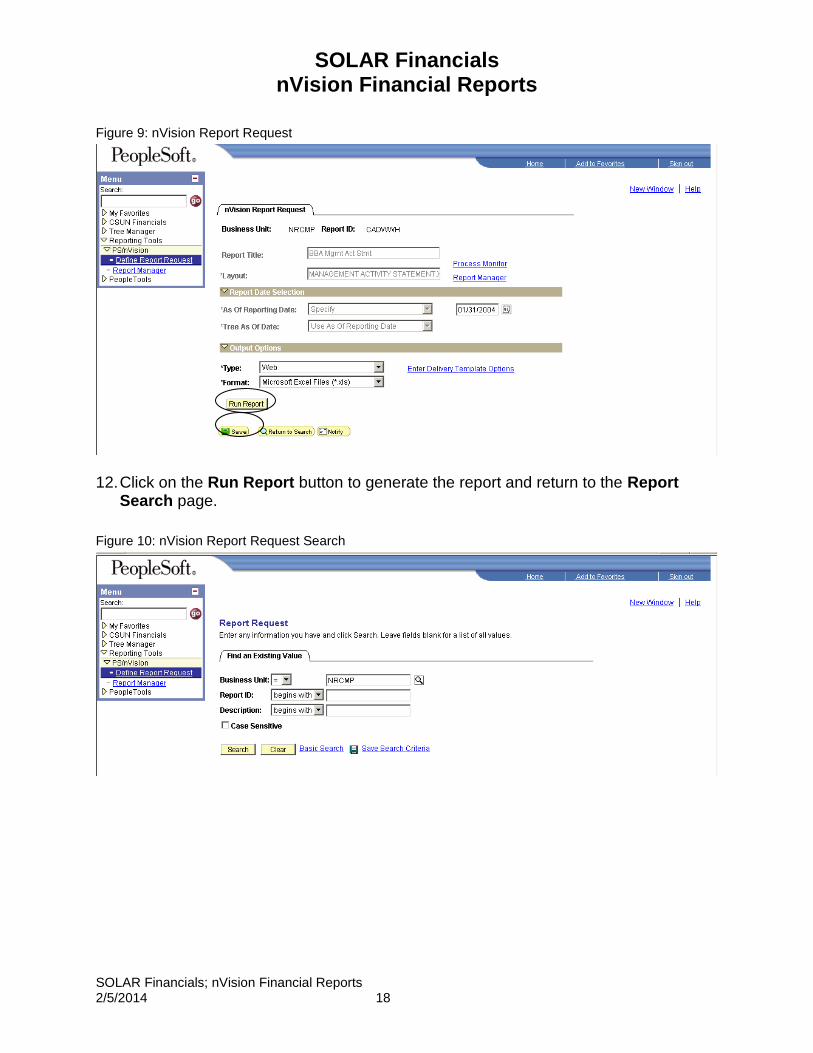
Every generated report results in a separate email with an attachment to the recipient.
Figure 8: nVision Email Output
10. Click on the OK button to return to the nVision Report Request page. 11. Click on the Save button.
SOLAR Financials nVision Financial Reports
SOLAR Financials; nVision Financial Reports 2/5/2014 18
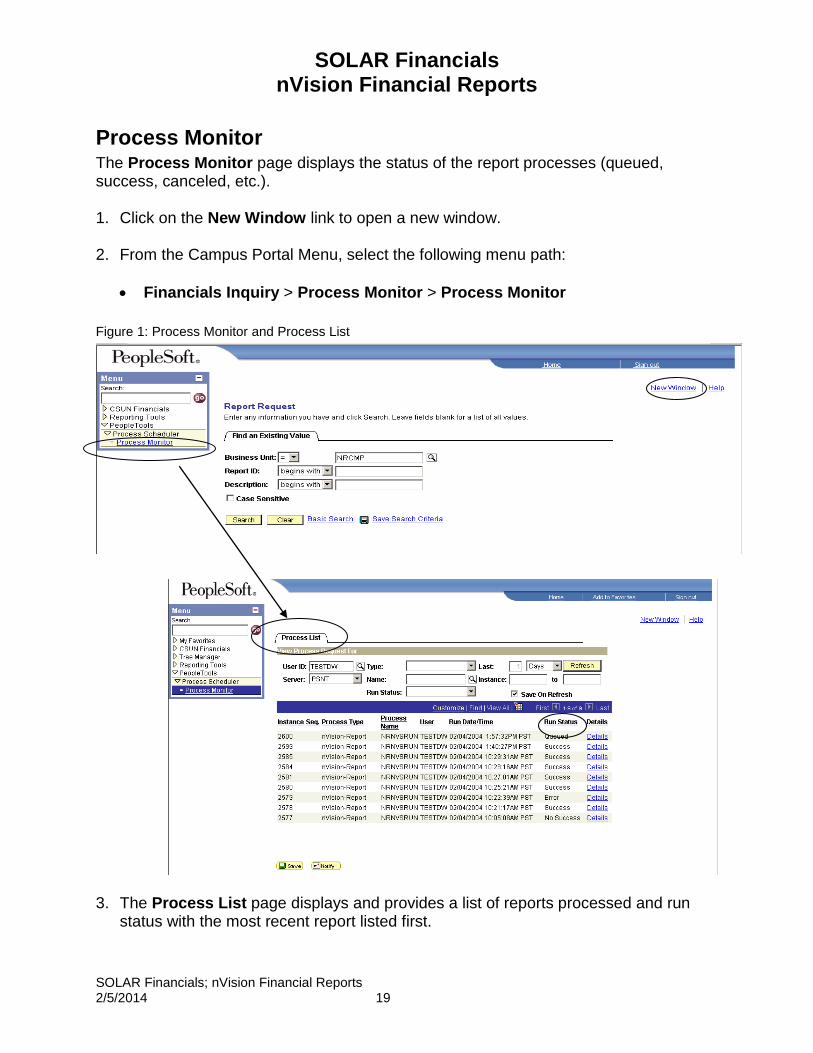
Figure 9: nVision Report Request
12. Click on the Run Report button to generate the report and return to the Report
Search page.
Figure 10: nVision Report Request Search
SOLAR Financials nVision Financial Reports
SOLAR Financials; nVision Financial Reports 2/5/2014 19
Process Monitor The Process Monitor page displays the status of the report processes (queued, success, canceled, etc.). 1. Click on the New Window link to open a new window. 2. From the Campus Portal Menu, select the following menu path:
Financials Inquiry > Process Monitor > Process Monitor
Figure 1: Process Monitor and Process List
3. The Process List page displays and provides a list of reports processed and run
status with the most recent report listed first.
SOLAR Financials nVision Financial Reports
SOLAR Financials; nVision Financial Reports 2/5/2014 20
If the Run Status indicates Queued or Processing, click on the Refresh button every few minutes until the Run Status indicates Success, No Success, or Error. The larger the scope request, the longer the process will take to run.
If the Run Status indicates Error or No Success, contact SOLAR Financials at: [email protected], or call (818) 677-6685 for assistance.
Do not enter data in any fields on the Process Monitor page. 4. To retrieve generated report(s) refer to the Retrieving Reports section in this Guide.
Canceling A Report Process
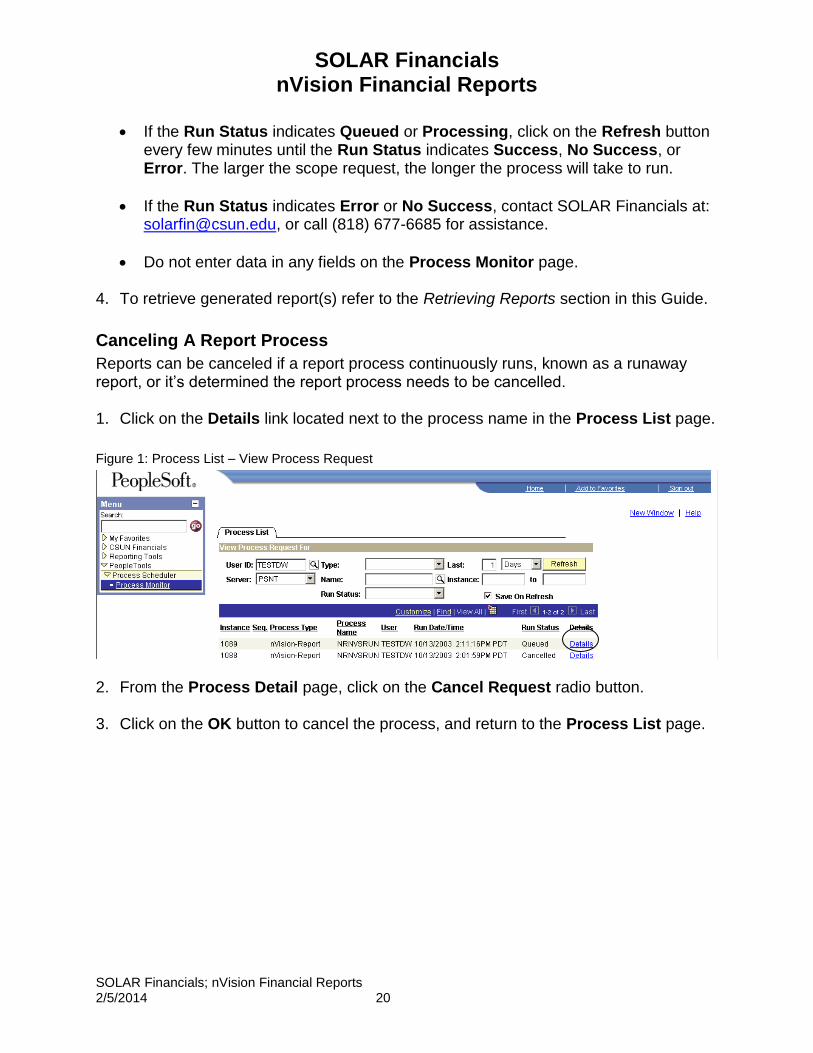
Reports can be canceled if a report process continuously runs, known as a runaway report, or it’s determined the report process needs to be cancelled. 1. Click on the Details link located next to the process name in the Process List page.
Figure 1: Process List – View Process Request
2. From the Process Detail page, click on the Cancel Request radio button. 3. Click on the OK button to cancel the process, and return to the Process List page.
SOLAR Financials nVision Financial Reports
SOLAR Financials; nVision Financial Reports 2/5/2014 21
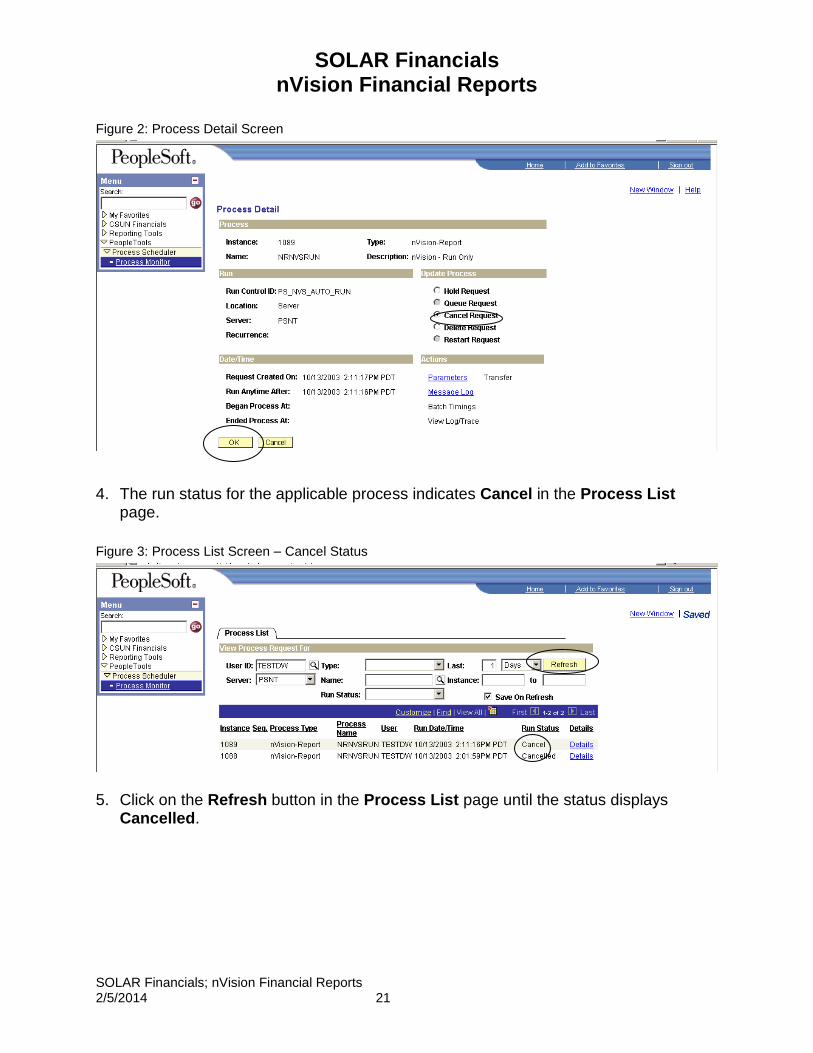
Figure 2: Process Detail Screen
4. The run status for the applicable process indicates Cancel in the Process List
page.
Figure 3: Process List Screen – Cancel Status
5. Click on the Refresh button in the Process List page until the status displays
Cancelled.
SOLAR Financials nVision Financial Reports
SOLAR Financials; nVision Financial Reports 2/5/2014 22
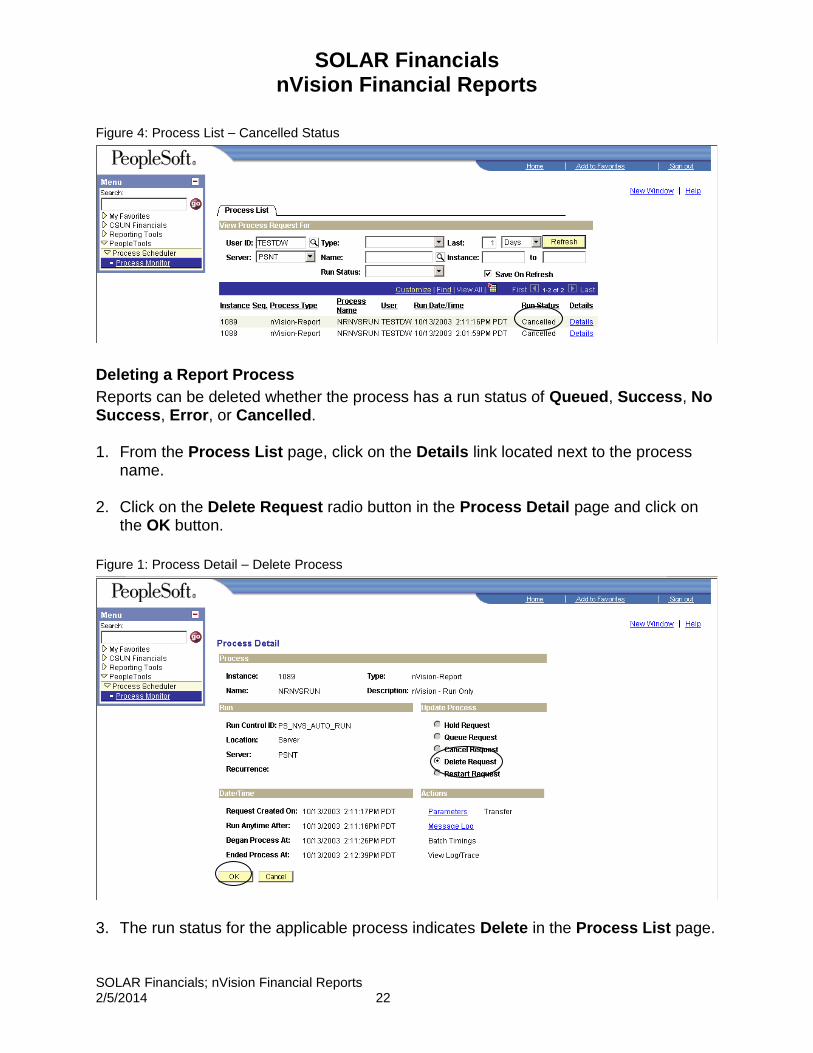
Figure 4: Process List – Cancelled Status
Deleting a Report Process
Reports can be deleted whether the process has a run status of Queued, Success, No Success, Error, or Cancelled. 1. From the Process List page, click on the Details link located next to the process
name.
2. Click on the Delete Request radio button in the Process Detail page and click on the OK button.
Figure 1: Process Detail – Delete Process
3. The run status for the applicable process indicates Delete in the Process List page.
SOLAR Financials nVision Financial Reports
SOLAR Financials; nVision Financial Reports 2/5/2014 23
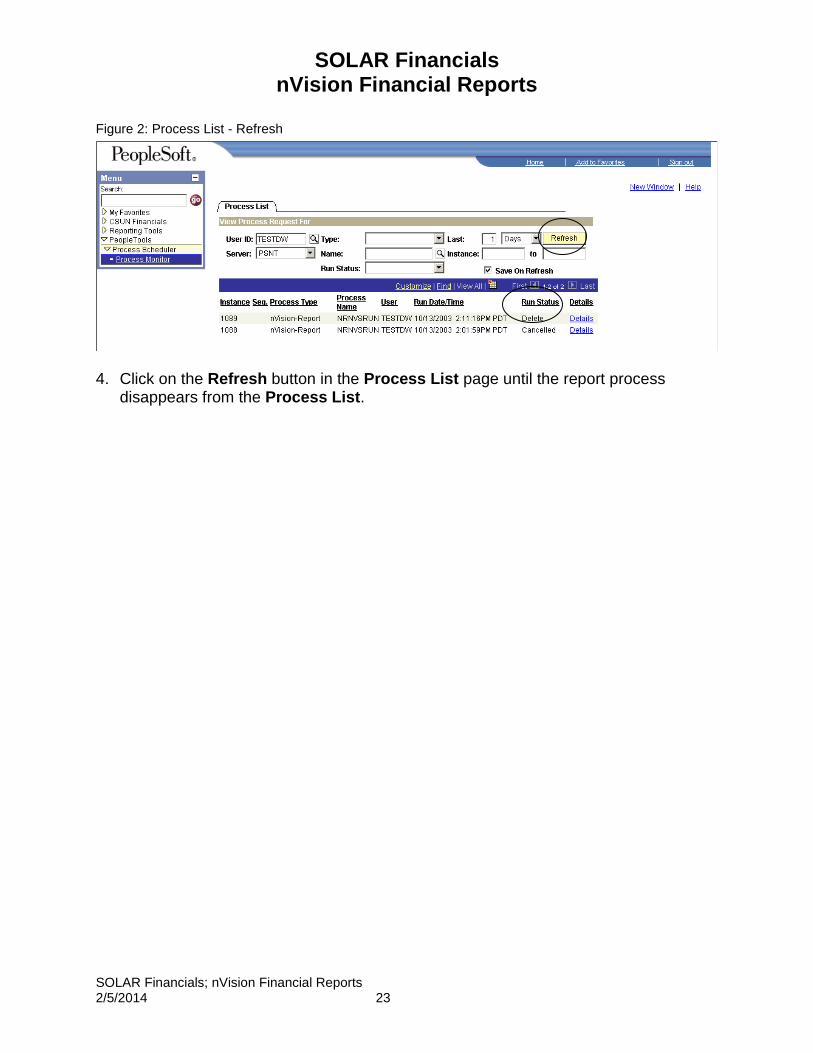
Figure 2: Process List - Refresh
4. Click on the Refresh button in the Process List page until the report process
disappears from the Process List.
SOLAR Financials nVision Financial Reports
SOLAR Financials; nVision Financial Reports 2/5/2014 24
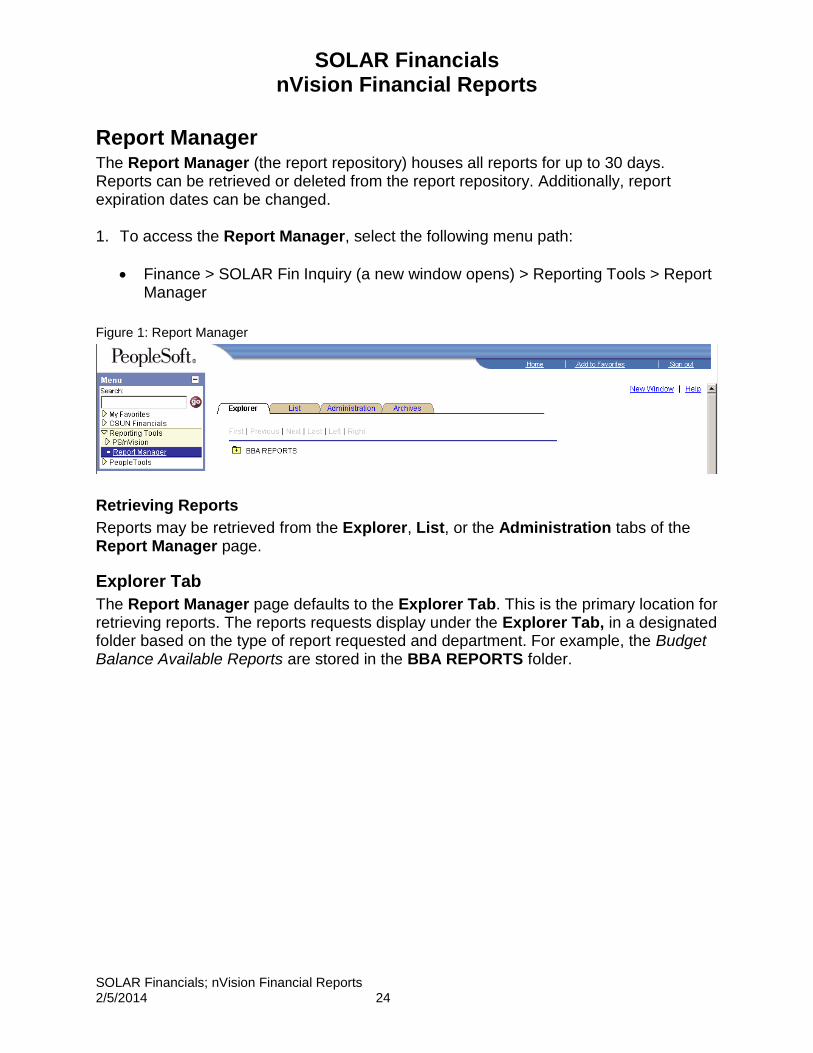
Report Manager The Report Manager (the report repository) houses all reports for up to 30 days. Reports can be retrieved or deleted from the report repository. Additionally, report expiration dates can be changed. 1. To access the Report Manager, select the following menu path:
Finance > SOLAR Fin Inquiry (a new window opens) > Reporting Tools > Report Manager
Figure 1: Report Manager
Retrieving Reports
Reports may be retrieved from the Explorer, List, or the Administration tabs of the Report Manager page.
Explorer Tab
The Report Manager page defaults to the Explorer Tab. This is the primary location for retrieving reports. The reports requests display under the Explorer Tab, in a designated folder based on the type of report requested and department. For example, the Budget Balance Available Reports are stored in the BBA REPORTS folder.
SOLAR Financials nVision Financial Reports
SOLAR Financials; nVision Financial Reports 2/5/2014 25
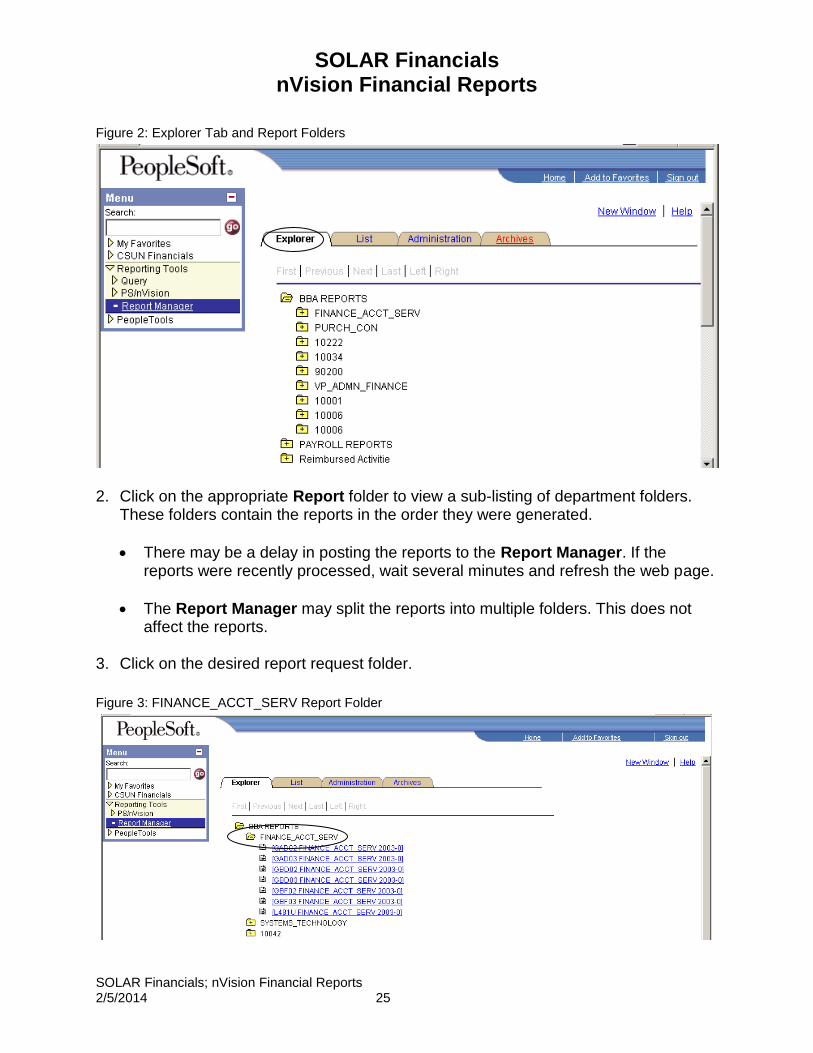
Figure 2: Explorer Tab and Report Folders
2. Click on the appropriate Report folder to view a sub-listing of department folders.
These folders contain the reports in the order they were generated.
There may be a delay in posting the reports to the Report Manager. If the reports were recently processed, wait several minutes and refresh the web page.
The Report Manager may split the reports into multiple folders. This does not affect the reports.
3. Click on the desired report request folder.
Figure 3: FINANCE_ACCT_SERV Report Folder
SOLAR Financials nVision Financial Reports
SOLAR Financials; nVision Financial Reports 2/5/2014 26
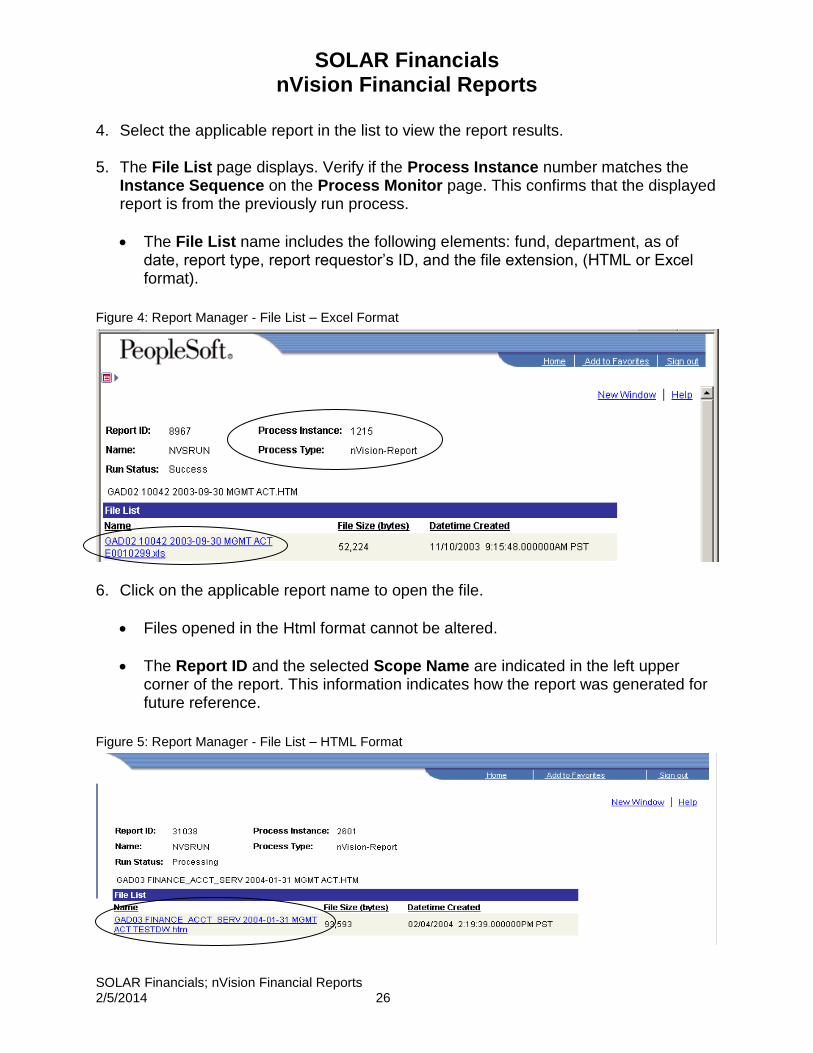
4. Select the applicable report in the list to view the report results. 5. The File List page displays. Verify if the Process Instance number matches the
Instance Sequence on the Process Monitor page. This confirms that the displayed report is from the previously run process.
The File List name includes the following elements: fund, department, as of date, report type, report requestor’s ID, and the file extension, (HTML or Excel format).
Figure 4: Report Manager - File List – Excel Format
6. Click on the applicable report name to open the file.
Files opened in the Html format cannot be altered.
The Report ID and the selected Scope Name are indicated in the left upper corner of the report. This information indicates how the report was generated for future reference.
Figure 5: Report Manager - File List – HTML Format
SOLAR Financials nVision Financial Reports
SOLAR Financials; nVision Financial Reports 2/5/2014 27
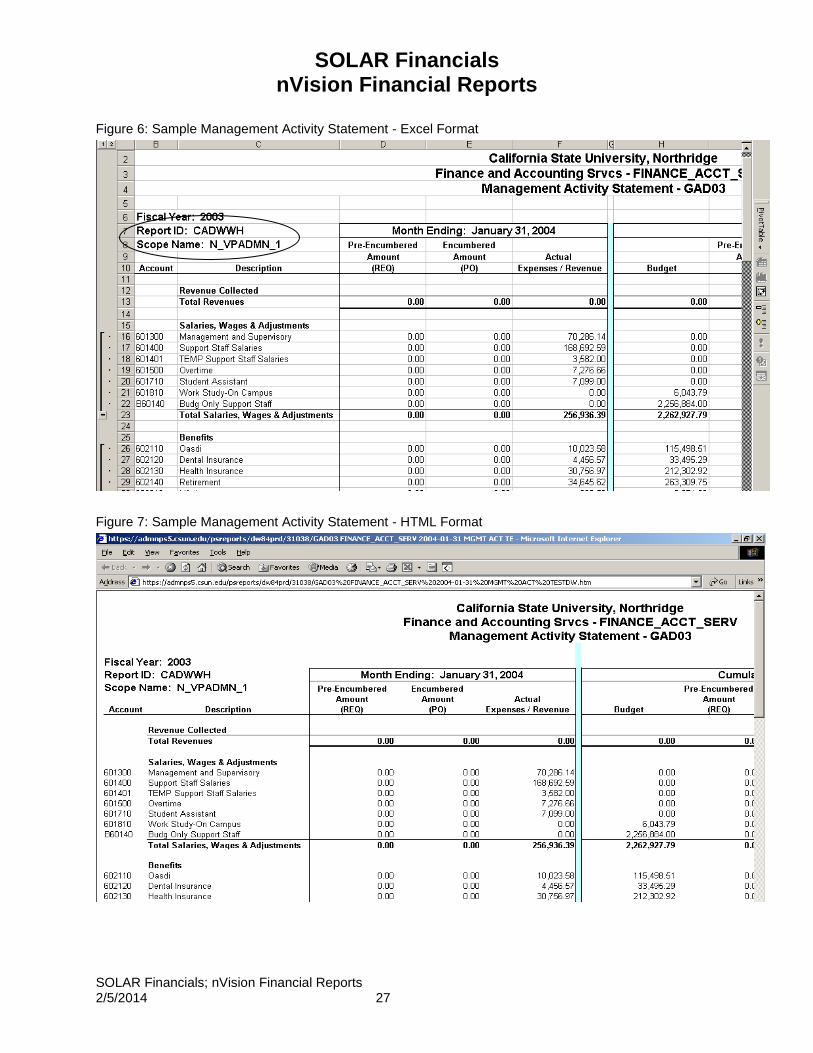
Figure 6: Sample Management Activity Statement - Excel Format
Figure 7: Sample Management Activity Statement - HTML Format
SOLAR Financials nVision Financial Reports
SOLAR Financials; nVision Financial Reports 2/5/2014 28
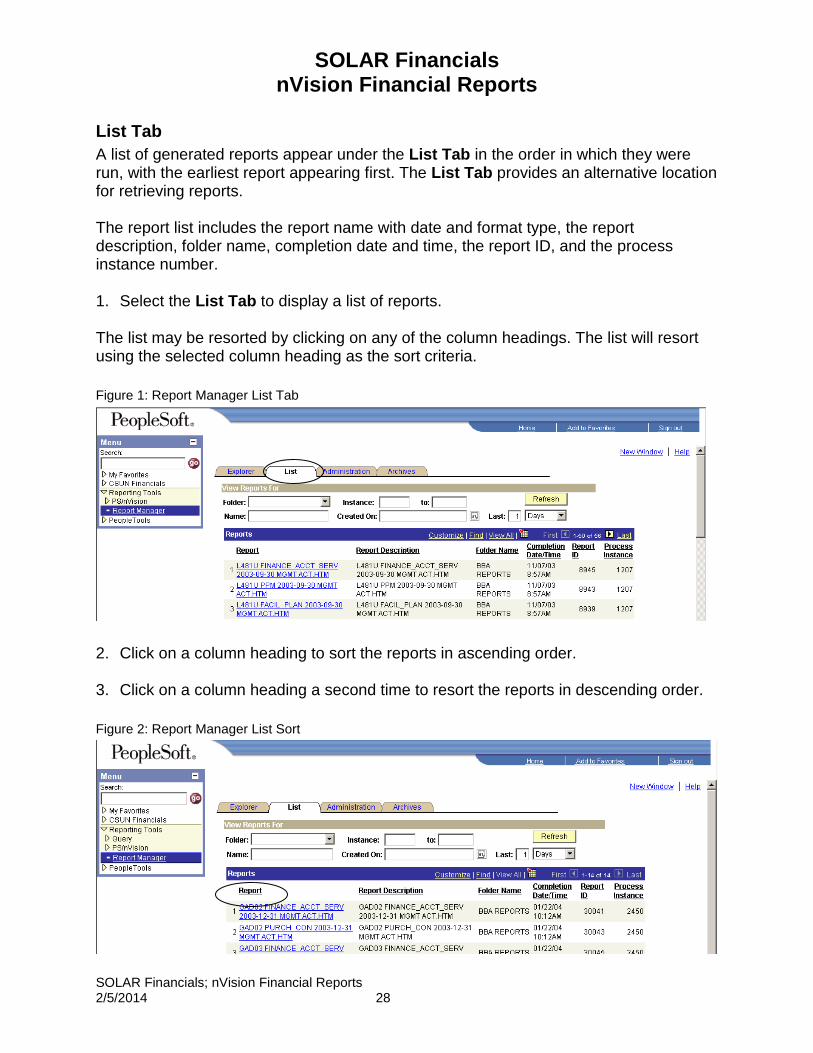
List Tab
A list of generated reports appear under the List Tab in the order in which they were run, with the earliest report appearing first. The List Tab provides an alternative location for retrieving reports. The report list includes the report name with date and format type, the report description, folder name, completion date and time, the report ID, and the process instance number. 1. Select the List Tab to display a list of reports. The list may be resorted by clicking on any of the column headings. The list will resort using the selected column heading as the sort criteria.
Figure 1: Report Manager List Tab
2. Click on a column heading to sort the reports in ascending order.
3. Click on a column heading a second time to resort the reports in descending order.
Figure 2: Report Manager List Sort
SOLAR Financials nVision Financial Reports
SOLAR Financials; nVision Financial Reports 2/5/2014 29
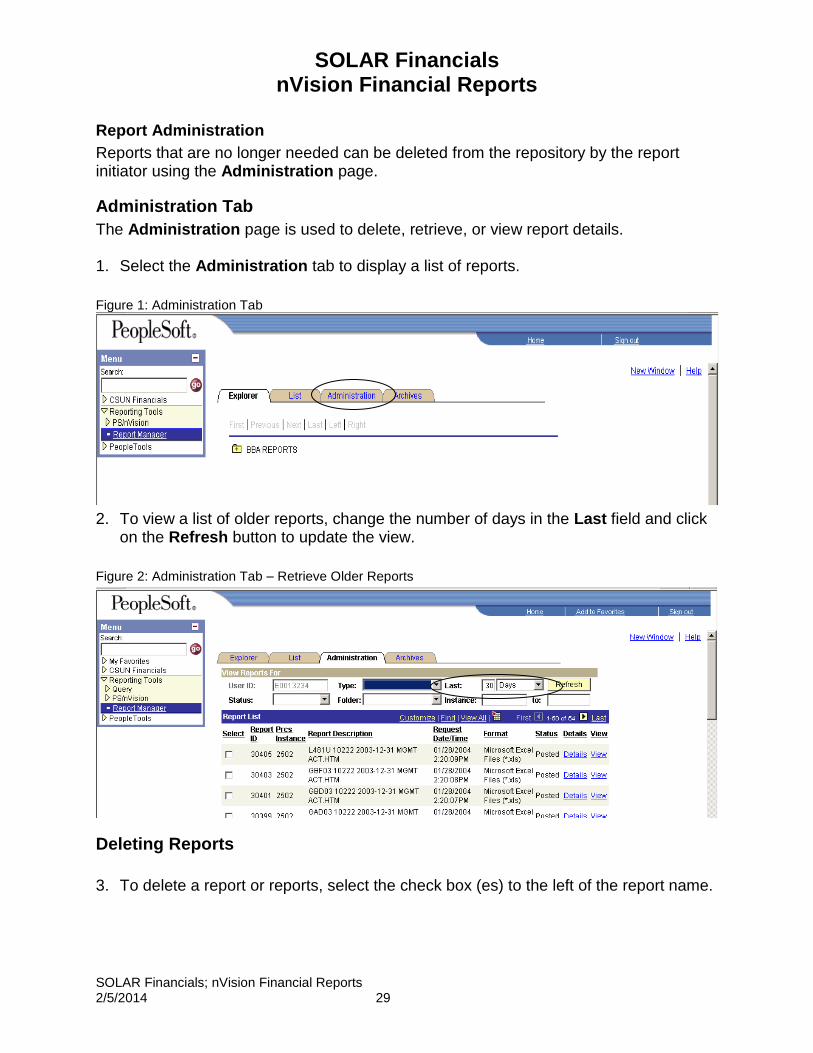
Report Administration
Reports that are no longer needed can be deleted from the repository by the report initiator using the Administration page.
Administration Tab
The Administration page is used to delete, retrieve, or view report details. 1. Select the Administration tab to display a list of reports.
Figure 1: Administration Tab
2. To view a list of older reports, change the number of days in the Last field and click on the Refresh button to update the view.
Figure 2: Administration Tab – Retrieve Older Reports
Deleting Reports
3. To delete a report or reports, select the check box (es) to the left of the report name.

SOLAR Financials nVision Financial Reports
SOLAR Financials; nVision Financial Reports 2/5/2014 30
Figure 3: Report List – Delete Reports
4. Click on the Delete button. 5. Click on the Yes button in the Confirmation page.
Figure 4: Delete Reports Confirmation Page
Set View Rights
The report initiator can authorize another individual(s) the rights to view report created by the initiator.
If the other user also has the ability to Run nVsion reports, they will also have the access to delete the report or change its expiration date.
1. From the Administration Tab, click on the Details link for the desired report to
distribute the report to another individual(s).
The Distribution ID Type defaults to User.
SOLAR Financials nVision Financial Reports
SOLAR Financials; nVision Financial Reports 2/5/2014 31
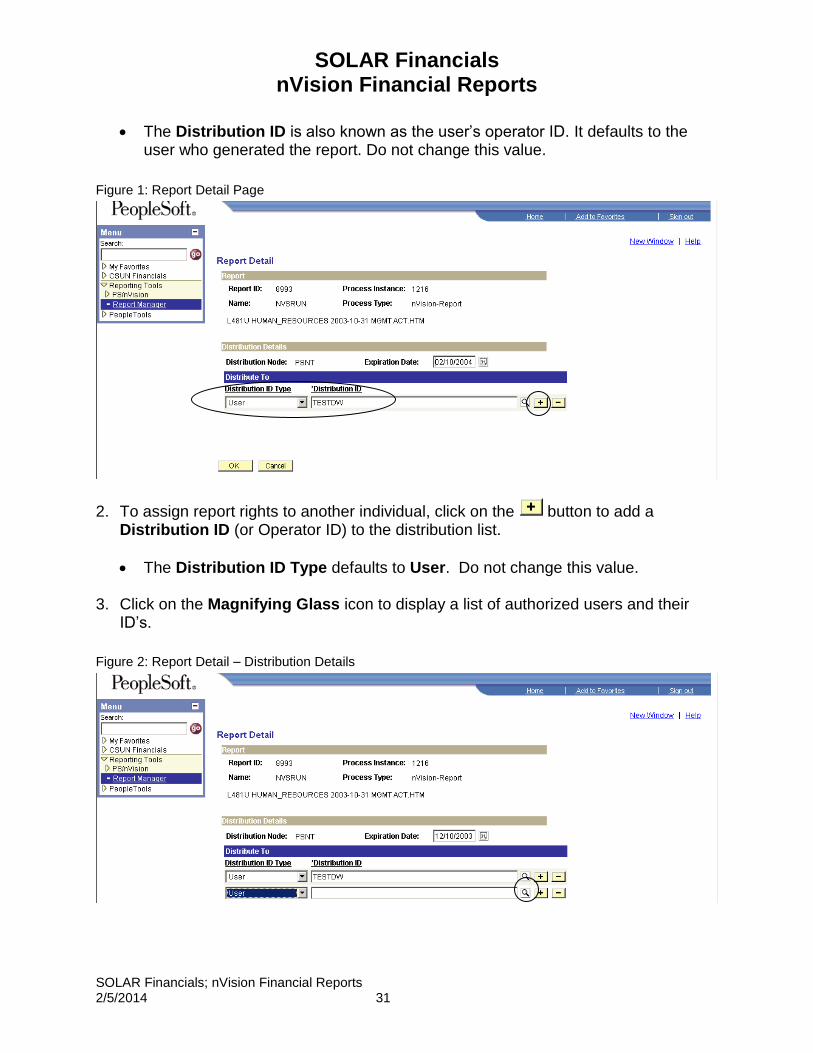
The Distribution ID is also known as the user’s operator ID. It defaults to the user who generated the report. Do not change this value.
Figure 1: Report Detail Page
2. To assign report rights to another individual, click on the button to add a Distribution ID (or Operator ID) to the distribution list.
The Distribution ID Type defaults to User. Do not change this value. 3. Click on the Magnifying Glass icon to display a list of authorized users and their
ID’s.
Figure 2: Report Detail – Distribution Details

SOLAR Financials nVision Financial Reports
SOLAR Financials; nVision Financial Reports 2/5/2014 32
4. To sort the list of users by last name or Operator ID, click on the Description or Distribution ID column heading respectively.
Figure 3: Search by Distribution ID or Description
5. To search by User Name, click on the Advanced Lookup link.
6. Enter the recipient’s last name in the Description field and click on the Lookup button.
Figure 4: Advanced Lookup Distribution ID Page
7. Click on the Distribution ID link or name to update the distribution list on the Report
Detail page.
SOLAR Financials nVision Financial Reports
SOLAR Financials; nVision Financial Reports 2/5/2014 33
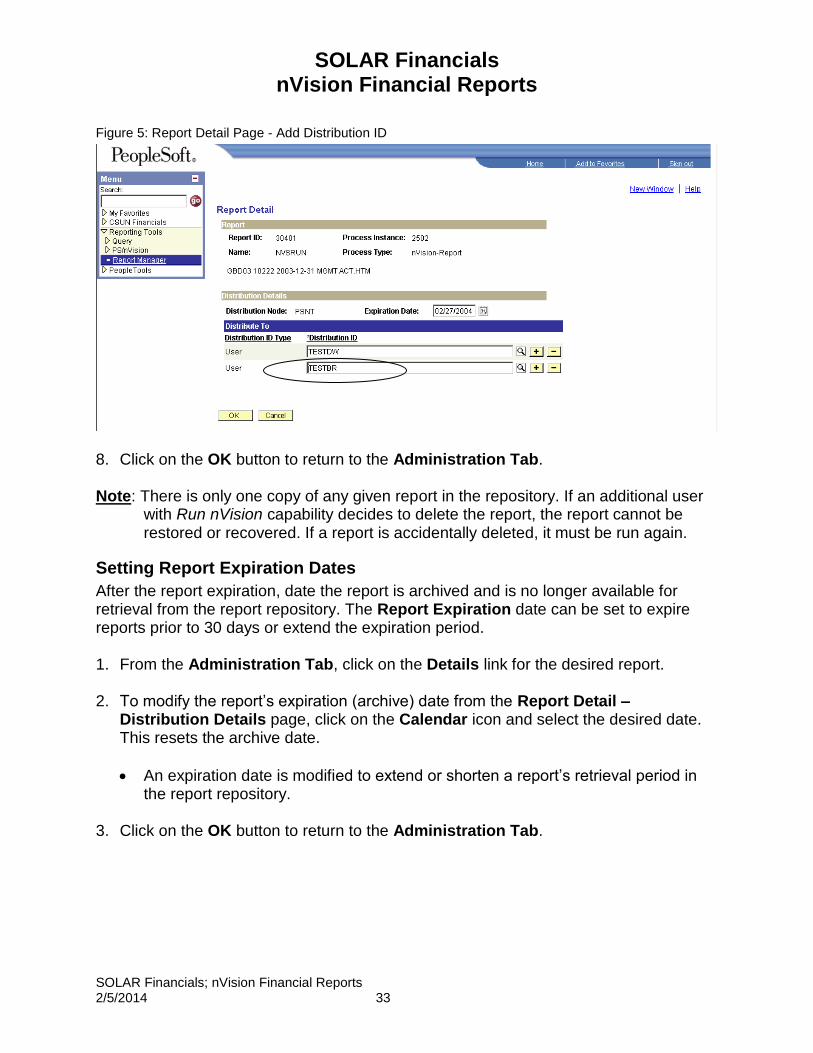
Figure 5: Report Detail Page - Add Distribution ID
8. Click on the OK button to return to the Administration Tab. Note: There is only one copy of any given report in the repository. If an additional user
with Run nVision capability decides to delete the report, the report cannot be restored or recovered. If a report is accidentally deleted, it must be run again.
Setting Report Expiration Dates
After the report expiration, date the report is archived and is no longer available for retrieval from the report repository. The Report Expiration date can be set to expire reports prior to 30 days or extend the expiration period.
1. From the Administration Tab, click on the Details link for the desired report.
2. To modify the report’s expiration (archive) date from the Report Detail –
Distribution Details page, click on the Calendar icon and select the desired date. This resets the archive date.
An expiration date is modified to extend or shorten a report’s retrieval period in the report repository.
3. Click on the OK button to return to the Administration Tab.
SOLAR Financials nVision Financial Reports
SOLAR Financials; nVision Financial Reports 2/5/2014 34
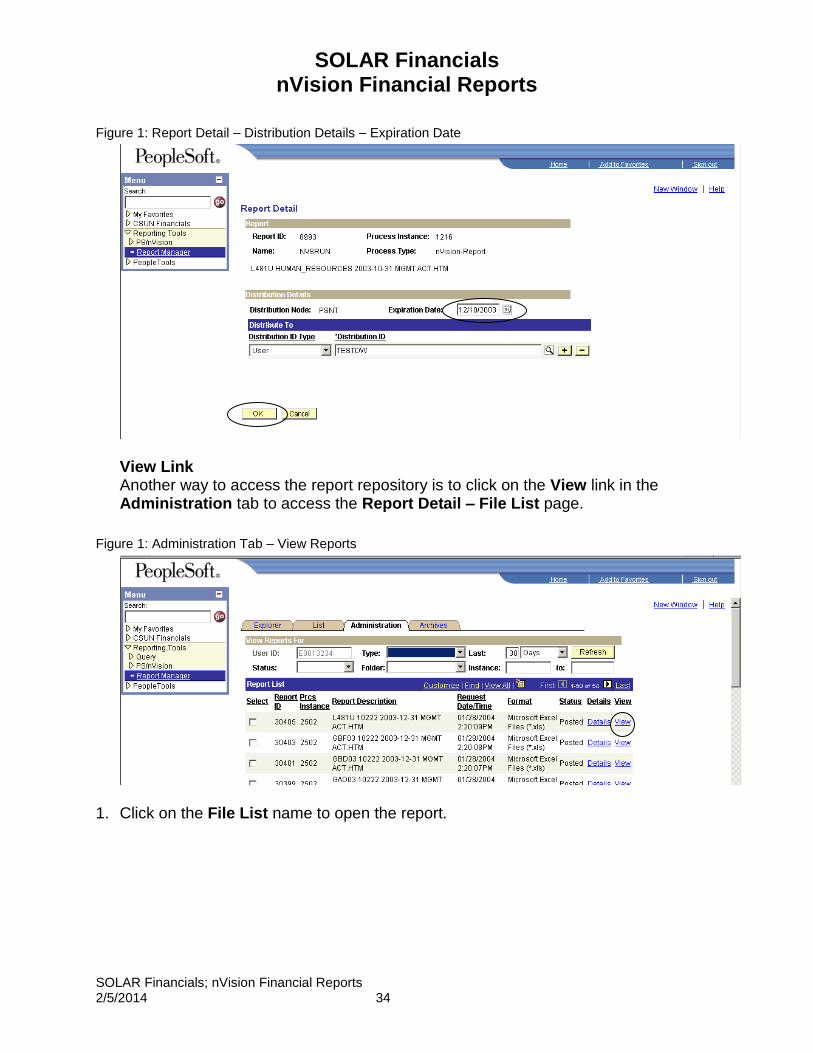
Figure 1: Report Detail – Distribution Details – Expiration Date
View Link Another way to access the report repository is to click on the View link in the Administration tab to access the Report Detail – File List page.
Figure 1: Administration Tab – View Reports
1. Click on the File List name to open the report.
SOLAR Financials nVision Financial Reports
SOLAR Financials; nVision Financial Reports 2/5/2014 35
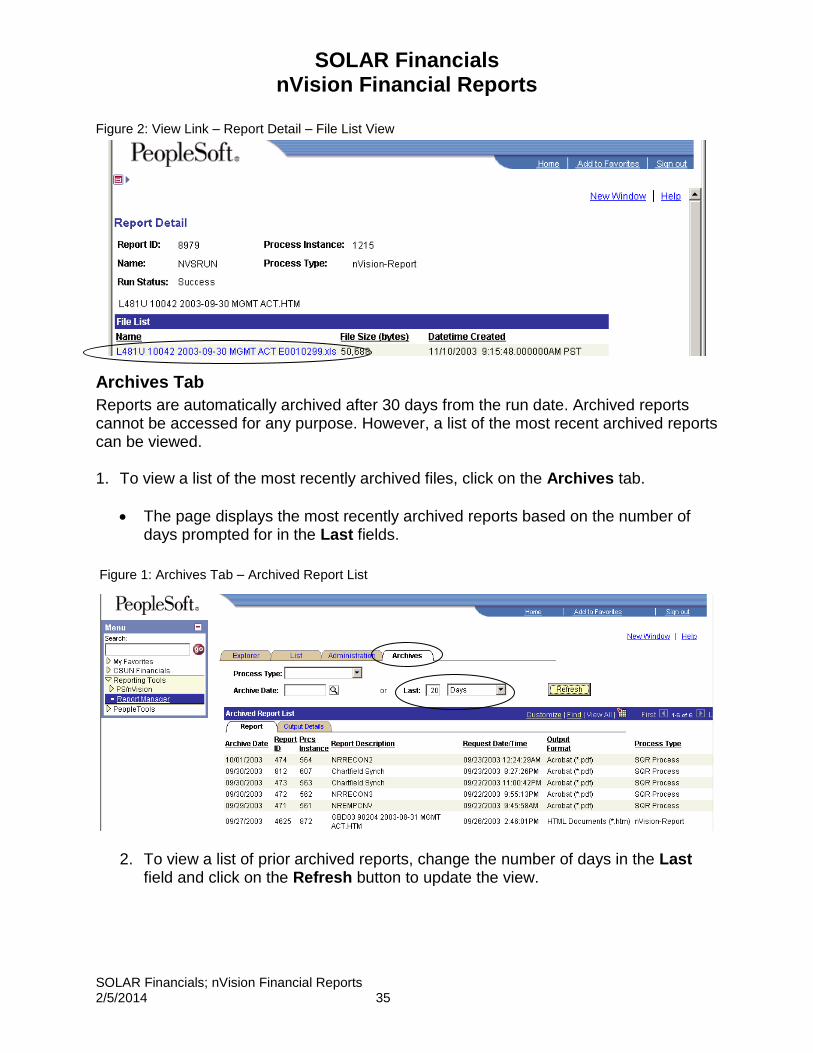
Figure 2: View Link – Report Detail – File List View
Archives Tab
Reports are automatically archived after 30 days from the run date. Archived reports cannot be accessed for any purpose. However, a list of the most recent archived reports can be viewed. 1. To view a list of the most recently archived files, click on the Archives tab.
The page displays the most recently archived reports based on the number of days prompted for in the Last fields.
Figure 1: Archives Tab – Archived Report List
2. To view a list of prior archived reports, change the number of days in the Last field and click on the Refresh button to update the view.
SOLAR Financials nVision Financial Reports
SOLAR Financials; nVision Financial Reports 2/5/2014 36
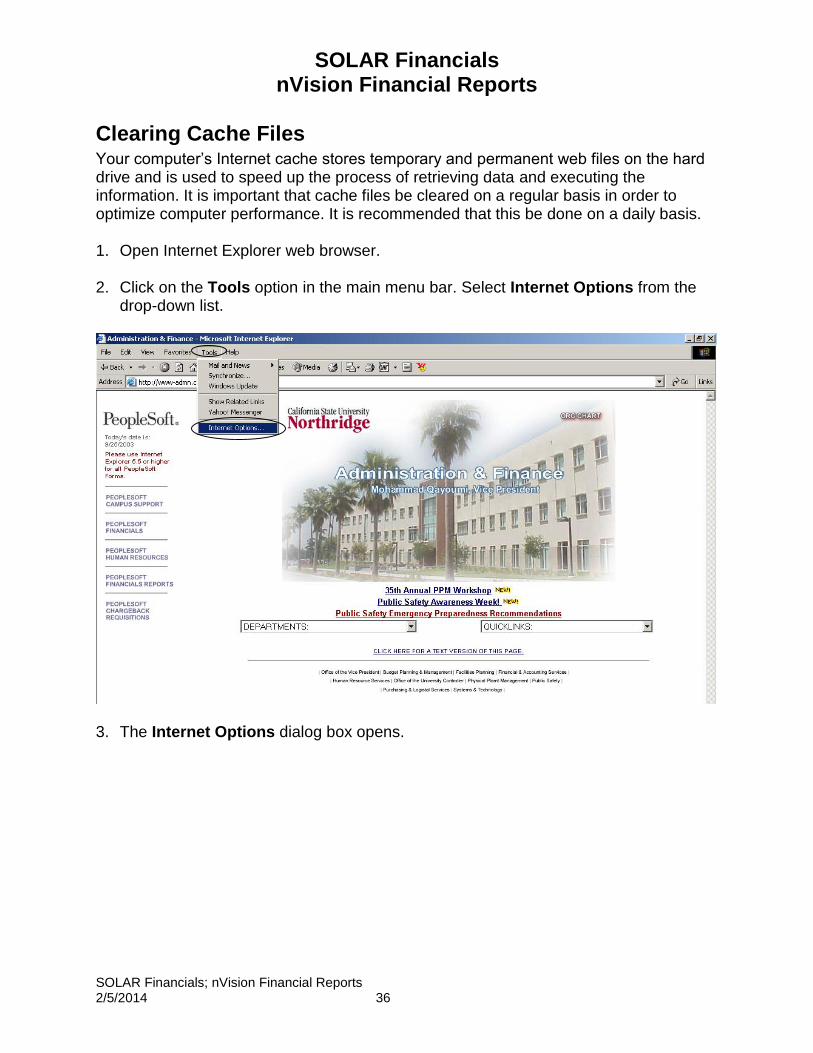
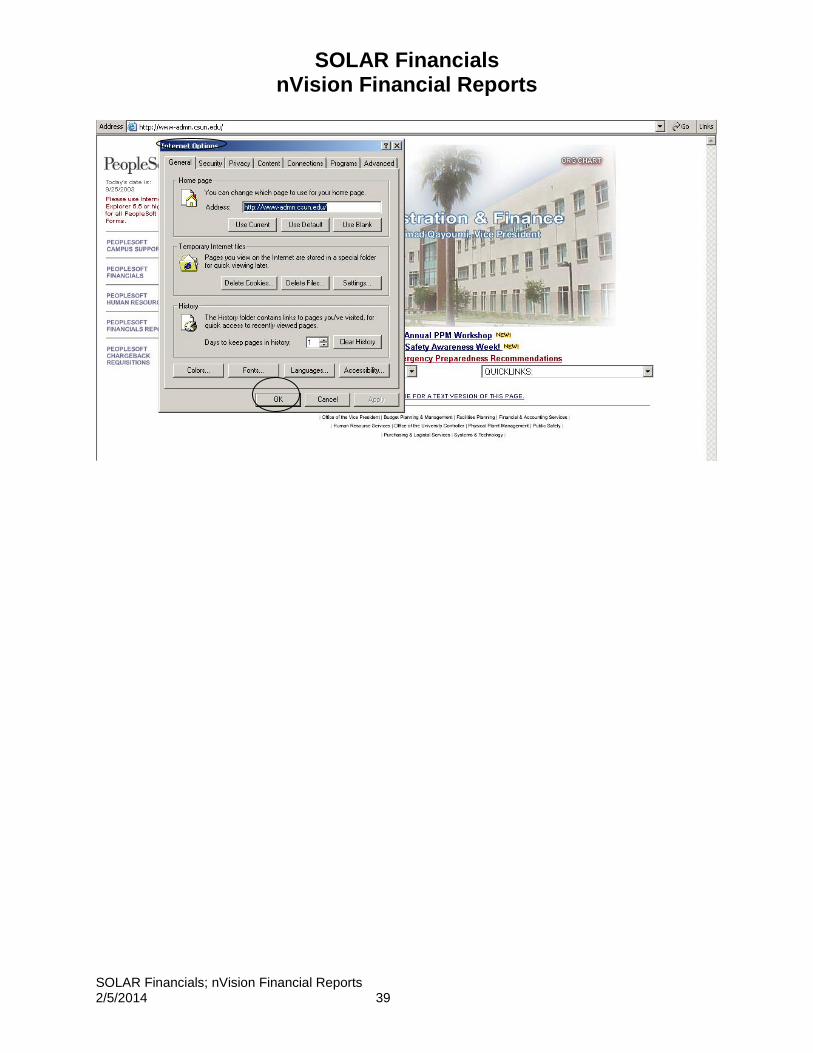
Clearing Cache Files Your computer’s Internet cache stores temporary and permanent web files on the hard drive and is used to speed up the process of retrieving data and executing the information. It is important that cache files be cleared on a regular basis in order to optimize computer performance. It is recommended that this be done on a daily basis. 1. Open Internet Explorer web browser.
2. Click on the Tools option in the main menu bar. Select Internet Options from the
drop-down list.
3. The Internet Options dialog box opens.
SOLAR Financials nVision Financial Reports
SOLAR Financials; nVision Financial Reports 2/5/2014 37
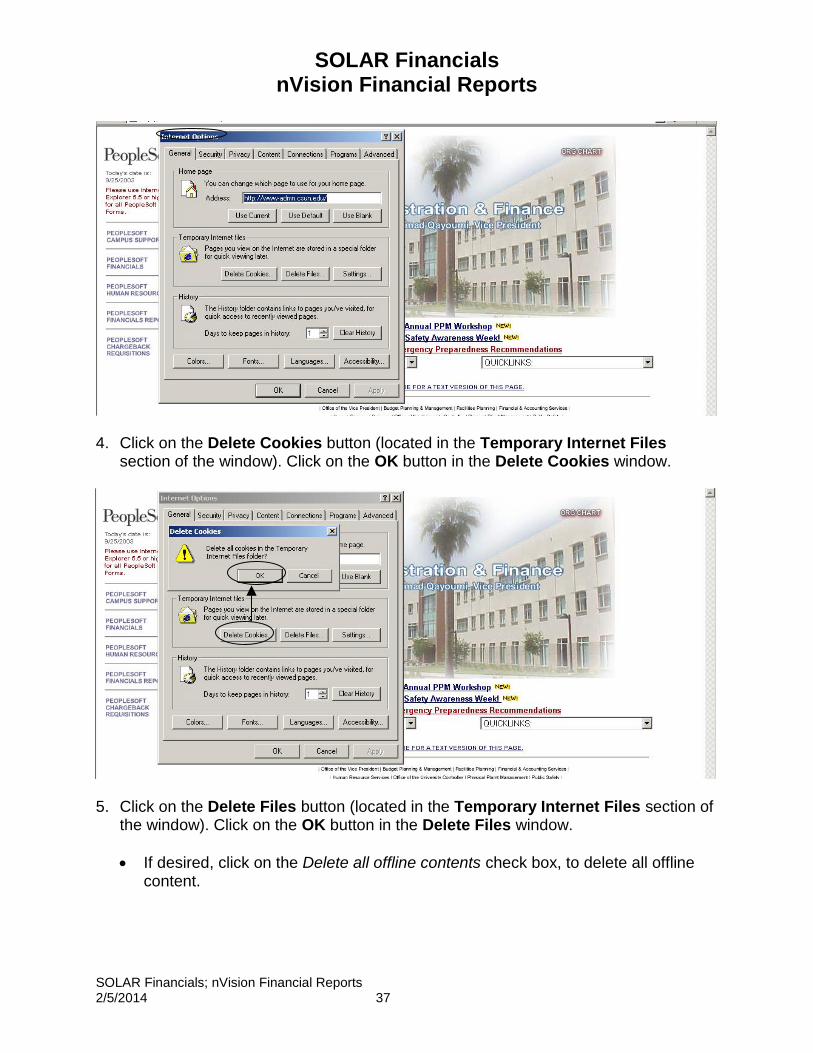
4. Click on the Delete Cookies button (located in the Temporary Internet Files
section of the window). Click on the OK button in the Delete Cookies window.
5. Click on the Delete Files button (located in the Temporary Internet Files section of
the window). Click on the OK button in the Delete Files window.
If desired, click on the Delete all offline contents check box, to delete all offline content.

SOLAR Financials nVision Financial Reports
SOLAR Financials; nVision Financial Reports 2/5/2014 38
6. If desired, retained history of previously visited web sites (whose addresses, or
URLs, were manually typed in the browser Address field) may also be deleted. Click on the Clear History button. Click on the Yes button in the Internet Options window asking if you are sure you want to delete history.
7. Click the OK button in the Internet Options dialog box when all desired files have
been deleted.
SOLAR Financials nVision Financial Reports
SOLAR Financials; nVision Financial Reports 2/5/2014 39
SOLAR Financials nVision Financial Reports
SOLAR Financials; nVision Financial Reports 2/5/2014 40
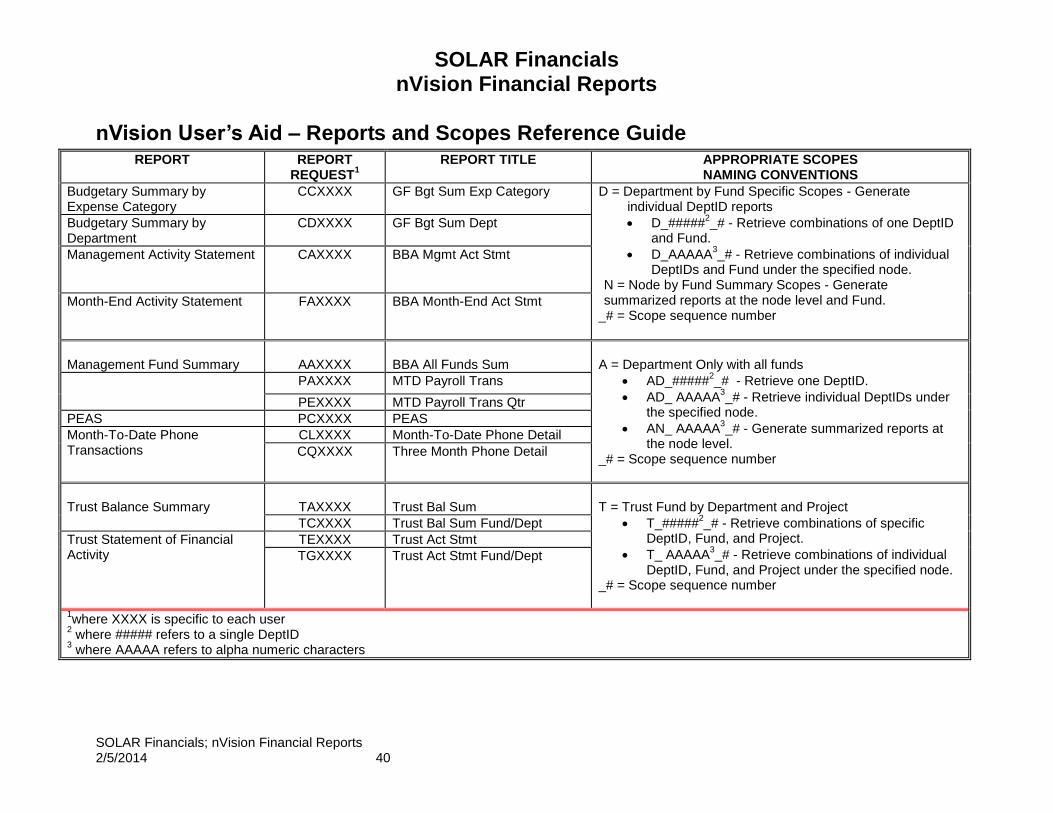
nVision User’s Aid – Reports and Scopes Reference Guide REPORT REPORT
REQUEST1
REPORT TITLE APPROPRIATE SCOPES NAMING CONVENTIONS
Budgetary Summary by Expense Category
CCXXXX GF Bgt Sum Exp Category D = Department by Fund Specific Scopes - Generate individual DeptID reports
D_#####2_# - Retrieve combinations of one DeptID
and Fund.
D_AAAAA3_# - Retrieve combinations of individual
DeptIDs and Fund under the specified node. N = Node by Fund Summary Scopes - Generate summarized reports at the node level and Fund.
_# = Scope sequence number
Budgetary Summary by Department
CDXXXX GF Bgt Sum Dept
Management Activity Statement CAXXXX BBA Mgmt Act Stmt
Month-End Activity Statement FAXXXX BBA Month-End Act Stmt
Management Fund Summary
AAXXXX
BBA All Funds Sum
A = Department Only with all funds
AD_#####2_# - Retrieve one DeptID.
AD_ AAAAA3_# - Retrieve individual DeptIDs under
the specified node.
AN_ AAAAA3_# - Generate summarized reports at
the node level. _# = Scope sequence number
PAXXXX MTD Payroll Trans
PEXXXX MTD Payroll Trans Qtr
PEAS PCXXXX PEAS
Month-To-Date Phone Transactions
CLXXXX Month-To-Date Phone Detail
CQXXXX Three Month Phone Detail
Trust Balance Summary
TAXXXX
Trust Bal Sum
T = Trust Fund by Department and Project
T_#####2_# - Retrieve combinations of specific
DeptID, Fund, and Project.
T_ AAAAA3_# - Retrieve combinations of individual
DeptID, Fund, and Project under the specified node. _# = Scope sequence number
TCXXXX Trust Bal Sum Fund/Dept
Trust Statement of Financial Activity
TEXXXX Trust Act Stmt
TGXXXX Trust Act Stmt Fund/Dept
1where XXXX is specific to each user
2 where ##### refers to a single DeptID
3 where AAAAA refers to alpha numeric characters