Embed Size (px)
Citation preview

Sample Practice Plan
For new Managers and coaches, the following is a practice plan with suggested drills that you will find throughout the Sudbury Little League system. This document combined with the A1/A2 Manual will give you plenty of information and ideas on what to cover during practices. Please let your commissioner(s) know if you have any questions.
PRACTICE GOALS
Be sure to emphasize these 7 topics as much as possible during practices:
1. Positive Coaching2. Catching, Catching, Catching3. Good throwing technique (Bird, Shoulder high, feed the giant) and four-seam grip (if hand can actually do it)4. Playing “first base” and proper foot technique5. Running through first base and avoiding the fielder6. Basic baseball concepts (position names, proper fielding position, when to tag a runner, force play)7. Properly grip a bat, keep eye on the ball
Positive CoachingThe Big Three (Have Fun, Work Hard, Be a Good Sport) There are three big things to work on this season — have fun, work hard, and be a good sport. If you can do all three, you’ll have a great season. Have Fun: When you enjoy what you are doing, you usually do it better. Work Hard: Have everyone agree to give his or her best effort at every practice and game. Be a Good Sport: You want to Honor the Game and treat your opponents and officials with respect even when things don’t go the way we’d like them to. Any one of these three things may seem pretty easy, but when you try to do all of them, it can be difficult. For example, it’s easy to have fun when you don’t work hard, but we can do both. We’ll learn that hard work can be fun.
Rebounding From Mistakes (Mistake Ritual) All athletes, even great ones, make mistakes, but great athletes know how to bounce back from mistakes. On your team it should be acceptable to make a mistake. If your players fear mistakes they won’t try their hardest. Tell them to remember to just keep hustling and working hard, no matter what! Use a Mistake Ritual to help your players focus on the most important play — the next play. When someone on your team makes a mistake, they can get past the error by making a throw-away motion with their hand. Also, tell that person, “That’s okay. Toss it! Get ready for the next play.”
Everyone Belongs Here (Emotional Tank) It is very important to have every one of your players feel like he/ she is an important part of the team — Help them understand that they each belong there and deserve the opportunity to play, have fun and learn. We all have unique strengths. We are all different in some ways. But we are all similar in some ways. Being a great team member involves encouraging each other and supporting each other. Being kind to each other and trying hard together. Encourage your athletes to make each other feel good about being on the team. This will not only make it fun for everybody, it will help everyone improve and play well.
Practice Plan - use this format for first two weeks of practice and adjust as you get more comfortable
5 Min Bring all of the players into a circle and introduce yourself and other coaches and have the players introduce themselves by giving name, school and favorite baseball team or player. Give the ball to one player and have him/her pass the ball to the next player by calling that person’s name. Explain the goals of practice. Then, go over the above Positive Coaching Tips
5 Min Max Stretching – this is more about introducing them to the concept
Have the team run along the outfield fence and gather in the opposite outfield from which you started.
Choose 4-5 exercises go through them at a fairly rapid pace so as not to take up too much time.
Arm Circles: Short circles forward/backward, big circles forward/backward. Arm above the head and try to grab the middle of your back. Use the opposite arm to push arm down as far as you can reach. Right arm across the body, grab the elbow to stretch. Wrist Pull Downs: Extend your Right Arm / Left Arm out with the palm up, grab the finger tips with opposite arm and pull fingers down/back creating the stretch.
Wrist Pull Ups: Extend your arm out with the palm down, grab the finger tips with opposite arm and pull fingers up/back creating the stretch. Touch your toes (sitting with both leg straight out, legs spread apart, grab toes with opposite hand, each leg once) Triangle seat: Seated pull feet together in to the body and use elbows to push the knees flat to the ground. Lateral shuffle and/or Crossover shuffle – 10 steps left 10 steps right.
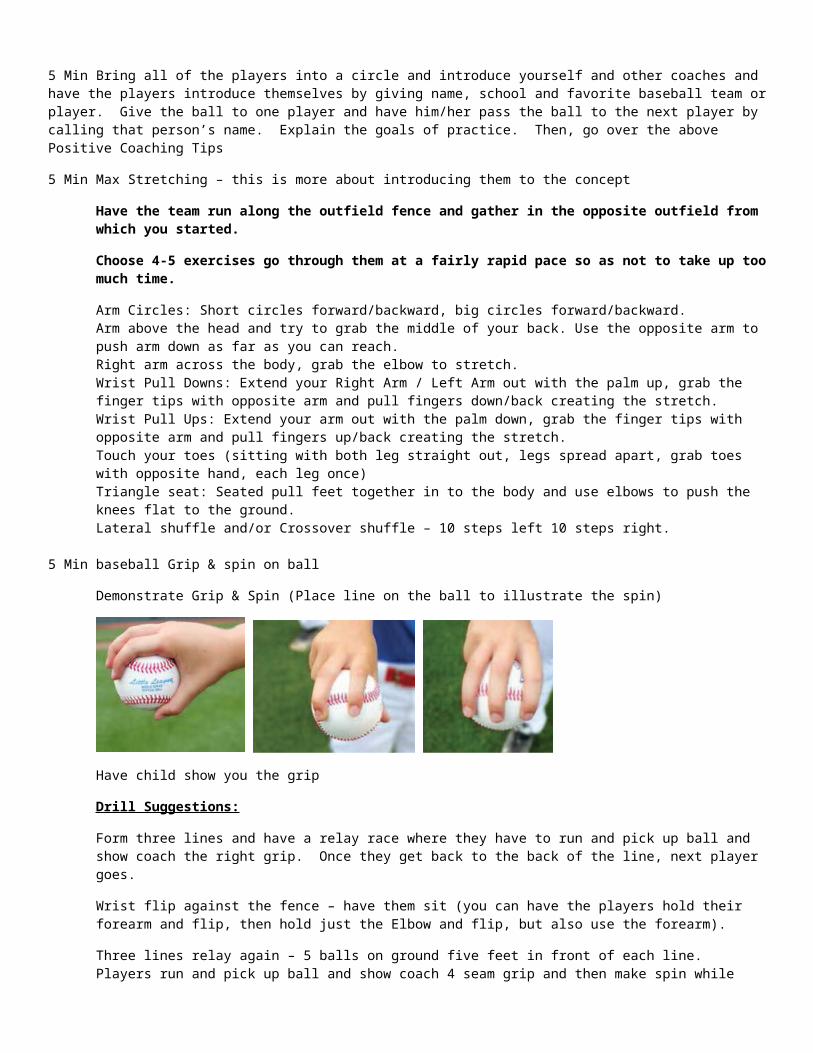
5 Min baseball Grip & spin on ball
Demonstrate Grip & Spin (Place line on the ball to illustrate the spin)
Have child show you the grip
Drill Suggestions:
Form three lines and have a relay race where they have to run and pick up ball and show coach the right grip. Once they get back to the back of the line, next player goes.
Wrist flip against the fence – have them sit (you can have the players hold their forearm and flip, then hold just the Elbow and flip, but also use the forearm).
Three lines relay again – 5 balls on ground five feet in front of each line. Players run and pick up ball and show coach 4 seam grip and then make spin while flipping into bucket. Each line gets five balls first line to get them in the bucket wins, but the spin must be right.
20 Min Throwing and Catching
Demonstrate
1 Start 2 Shoulder-to-Partner 3 Launch 4 Delivery 5 Finish
REINFORCE GOOD FORM……Bird, FRONT SHOULDER ALIGNED TO TARGET…ELBOW AT OR ABOVE SHOULDER…..Feed the Giant, STEP STRAIGHT TO TARGET……Eye on the TARGET AND FOLLOW THROUGH…
Drill Suggestions:
One Knee Drill – Throwing knee on the ground. Front knee off ground
Player should start at (Bird position) hand should be “feeding the giant” the baseball then throw to coach – focus on spin and throwing arm goes on other side of front knee for good follow through. Pretend there is a dollar on the outside of the front foot and “pick it up”
Standing – same as above but now in normal throwing position. Have player separate hands and get the Bird position - feed the giant - and then throw Small step toward the target, hips rotate, arm follows, good follow through.
Trash Can Drill; proper throwing technique and hit the can…..1 point for hitting target.

Demonstrate catching technique:
Fig 2.1 Fig 2.2 Fig 2.3 Fig 2.4
–– Two-Hand Target (2HT) When playing catch, the thrower should not deliver the ball until the receiver shows the thrower a two-hand target. The 2HT is when the player receiving the ball has both arms extended straight out from their body with a little flex in the elbow. Hands straight up, with thumbs towards each other, once the thrower sees this, they may deliver the ball. This is the 2HT. (See Fig. 2.1)–– Thumb-to-Thumb (T2T) When receiving the ball above the waist the receiver should show a 2HT and catch the ball thumb-to-thumb. This is important because it emphasizes using two hands to catch the ball. This will allow the receiver to quickly make the transition from their glove to their throwing hand, while using the four-seam grip. (see Fig. 2.2)–– Pinky-to-Pinky (P2P) When receiving the ball below the waist the receiver should show a 2HT and catch the ball pinky-to-pinky. Just like T2T this is equally important because it stresses using two hands and teaches the proper way to catch a ball below the waist. (See Fig. 2.3 & 2.4)
KEYS TO REINFORCE WHENEVER PLAYERS ARE PLAYING CATCH: HANDS UP AND READY TO RECEIVE THE BALL….PLAYER MOVES THEIR FEET TO ENSURE THEY ARE CATCHING THE BALL IN FRONT OF THEMSELVES AND NOT TO THE SIDE UNLESS IT IS A BAD THROW……..Move the GLOVE toward the ball first, not the bare hand (otherwise kids will learn the hard way…)
Drill Suggestions:
Coaches play catch with players…… Key words: “Thumb to Thumb” for above waste. “Pinky to Pinky” for throws below the waste, “glove to ball” to get them moving glove hand first.
Use tennis balls in the first few weeks of practice… the more reps trying to catch the better.
20 Min Hitting
Grip: Each player will take a bat. Place both hands out flat and lay the bat at the base of the fingers. Lightly wrap your fingers around the bat. This grip will align the players knuckles up. The knuckles can be in a straight line or slightly shifted either way.
Stance: Have the players get into an athletic position with knees bent slightly and shoulder width apart. There should be more weight on the back foot, with the weight distribution being even on the balls of the feet……When the pitcher’s hand goes back, the player should load weight by distributing weight about 40 percent on the front food and 60 on the back foot. Bat should be vertical (see picture). Avoid a horizontal bat (when barrel is pointing toward the home plate umpire as that can lead to a hitch.

Coverage: The bat needs to cover the entire plate. Have the player get in their stance; place the bat at the corner of the plate closest to the catcher. You want to make sure that your stance allows you to have complete plate coverage, so you can hit the outside pitch.
Drill Suggestions:
Split team into groups of 2-3 for the following stations
Stations:
Tee Work (soccer ball and baseball)Soft Toss (Side & Front)Live pitching
When learning to hit the “eye needs to always look at ball”, player should “load” , and hips should move first to ensure proper rotation. Some key words are “Hands back, eye on ball, hips first”; “load and explode”, “ready, fire”.
15 Min Fielding
Player will take two steps towards the hitter. First step is with the throwing hand, second step is with the glove hand. The glove foot will be slightly out front of the throwing foot.
As ball is on its way, the player will have knees bent and will have their body lowered down so that their glove is touching the ground in a “ready” position. Much quicker to work from ground up than down.

As ball arrives, the Player will be in ready position as shown above with their arms extended out in front of their body. The palm of the glove will be facing the hitter and low to the ground. The throwing hand should be above the glove forming the mouth of an alligator.
Players will field the ball out in front of their body with “alligator hands” and bring the ball into their mid-section. At this time the player will use the throwing hand of the alligator hands to grip the ball in a four seam grip. At the same time the player should move their body, throwing foot then glove foot towards the direction where the throw will be made. When finished with this step, the shoulder of the glove hand should be pointed at the target.
Throw the ball
Drills:
Two or three groups: Triangle drill: Have players stand with a wide base in ready position with glove out in front forming a triangle with feet and hands. Roll ground balls to players and have them field it and run to drop the ball in the bucket next to coach.
Two groups (one at third base and one at second base)…..roll or hit ground balls. (Note, at the beginning of season have coaches catch throw unless you are comfortable with a few players.
3rd base throws to second base
Second base throws to first base
Teach proper footwork at the base. Non glove side foot on side of bag to allow for simple step of glove side foot toward ball. Body not in front of runner/baseline. Napoli is over doing it in the picture but you get the idea. “Glove to ball”, “Thumb to Thumb” auditory catching tips are really important reminders to avoid injury. More balls bounce off the heel of the glove into noses when kids have natural tendency to try to catch “pinky to pinky” on balls waist high
Eventually, you will want to incorporate situational baseball as the kids get more skilled in throwing/catching. Start to encourage learning where to throw the ball with runner on first, or first and second. Etc….

5 Min Baserunning:
Running Through First Base (ground ball hit to infield); Run to first base, hit front of bag……look to right for overthrow.
Single- run to first, button curl, step on the base, find the ball
Double,
Triple,
Home Run
Teach stepping on the corner of the bag when running. This allows a good push off/angle to next base.
5 Minutes Wrap up
Kids put away helmets, bases, (coaches be responsible for bats).
Finish with 2 things that the kids did really well