Embed Size (px)
Citation preview
Catalyst 2950 and Catalyst 29578-11380-11
C H A P T E R 16
. It
mand
n,ANs,t. Anyandtse asIB
ain
Configuring VLANs
This chapter describes how to configure normal-range VLANs (VLAN IDs 1 to 1005) andextended-range VLANs (VLAN IDs 1006 to 4094) on your Catalyst 2950 or Catalyst 2955 switchincludes information about VLAN modes and the VLAN Membership Policy Server (VMPS).
Note For complete syntax and usage information for the commands used in this chapter, see the comreference for this release.
The chapter includes these sections:
• Understanding VLANs, page 16-1
• Configuring Normal-Range VLANs, page 16-4
• Configuring Extended-Range VLANs, page 16-11
• Displaying VLANs, page 16-14
• Configuring VLAN Trunks, page 16-14
• Configuring VMPS, page 16-24
Understanding VLANsA VLAN is a switched network that is logically segmented by function, project team, or applicatiowithout regard to the physical locations of the users. VLANs have the same attributes as physical Lbut you can group end stations even if they are not physically located on the same LAN segmenswitch port can belong to a VLAN, and unicast, broadcast, and multicast packets are forwarded flooded only to end stations in the VLAN. Each VLAN is considered a logical network, and packedestined for stations that do not belong to the VLAN must be forwarded through a router or bridgshown inFigure 16-1. Because a VLAN is considered a separate logical network, it contains its own Minformation and can support its own implementation of spanning tree. SeeChapter 13, “ConfiguringSTP” andChapter 14, “Configuring MSTP.”
Note Before you create VLANs, you must decide whether to use VLAN Trunking Protocol (VTP) to maintglobal VLAN configuration for your network. For more information on VTP, seeChapter 17,“Configuring VTP.”
16-15 Switch Software Configuration Guide

Chapter 16 Configuring VLANsUnderstanding VLANs
r IPy on, it is
0 andist of
1 toare
1
4094.
f 64
or
Figure 16-1 shows an example of VLANs segmented into logically defined networks.
Figure 16-1 VLANs as Logically Defined Networks
VLANs are often associated with IP subnetworks. For example, all the end stations in a particulasubnet belong to the same VLAN. Interface VLAN membership on the switch is assigned manuallan interface-by-interface basis. When you assign switch interfaces to VLANs by using this methodknown as interface-based, or static, VLAN membership.
Supported VLANsCatalyst 2950 switches that run the standard software image (SI) support 64 VLANs; Catalyst 295Catalyst 2955 switches that run the enhanced software image (EI) support 250 VLANs. For the lswitches that support each image, see the release notes. VLANs are identified with a number from4094 when the EI is installed and 1 to 1005 when the SI is installed. VLAN IDs 1002 through 1005reserved for Token Ring and FDDI VLANs. VTP only learns normal-range VLANs, with VLAN IDsto 1005; VLAN IDs greater than 1005 are extended-range VLANs and are not stored in the VLANdatabase. The switch must be in VTP transparent mode when you create VLAN IDs from 1006 to
The switch supports per-VLAN spanning-tree plus (PVST+) and rapid PVST+ with a maximum ospanning-tree instances. One spanning-tree instance is allowed per VLAN. See the“Normal-RangeVLAN Configuration Guidelines” section on page 16-5 for more information about the number ofspanning-tree instances and the number of VLANs. The switch supports IEEE 802.1Q trunking fsending VLAN traffic over Ethernet ports.
Floor 1
Floor 2
EngineeringVLAN
Cisco router
Fast Ethernet
Floor 3
MarketingVLAN
AccountingVLAN
1675
1
16-2Catalyst 2950 and Catalyst 2955 Switch Software Configuration Guide
78-11380-11

Chapter 16 Configuring VLANsUnderstanding VLANs
d of
e port
VLAN Port Membership ModesYou configure a port to belong to a VLAN by assigning a membership mode that determines the kintraffic the port carries and the number of VLANs to which it can belong.Table 16-1lists the membershipmodes and membership and VTP characteristics.
For more detailed definitions of the modes and their functions, seeTable 16-4 on page 16-16.
When a port belongs to a VLAN, the switch learns and manages the addresses associated with thon a per-VLAN basis. For more information, see the“Managing the MAC Address Table” section onpage 7-20.
Table 16-1 Port Membership Modes
Membership Mode VLAN Membership Characteristics VTP Characteristics
Static-access A static-access port can belong to one VLAN and ismanually assigned to that VLAN. For more information,see the“Assigning Static-Access Ports to a VLAN”section on page 16-11.
VTP is not required. If you do not wantVTP to globally propagate information, setthe VTP mode to transparent to disableVTP. To participate in VTP, there must beat least one trunk port on the switchconnected to a trunk port of a secondswitch.
802.1Q trunk A trunk port is a member of all VLANs by default,including extended-range VLANs, but membership can belimited by configuring the allowed-VLAN list. You canalso modify the pruning-eligible list to block floodedtraffic to VLANs on trunk ports that are included in thelist. For information about configuring trunk ports, see the“Configuring an Ethernet Interface as a Trunk Port”section on page 16-17.
VTP is recommended but not required.VTP maintains VLAN configurationconsistency by managing the addition,deletion, and renaming of VLANs on anetwork-wide basis. VTP exchangesVLAN configuration messages with otherswitches over trunk links.
Dynamic access A dynamic-access port can belong to one VLAN (VLANID 1 to 4094), and is dynamically assigned by a VMPS.The VMPS can be a Catalyst 5000 or Catalyst 6500 seriesswitch, for example, but never a Catalyst 2950 or 2955switch.
You can have dynamic-access ports and trunk ports on thesame switch, but you must connect the dynamic-accessport to an end station and not to another switch.
For configuration information, see the“ConfiguringDynamic Access Ports on VMPS Clients” section onpage 16-28.
VTP is required.
Configure the VMPS and the client with thesame VTP domain name.
You can change the reconfirmation intervaland retry count on the VMPS client switch.
Voice VLAN A voice VLAN port is an access port attached to a CiscoIP Phone, configured to use one VLAN for voice trafficand another VLAN for data traffic from a device attachedto the phone. For more information about voice VLANports, seeChapter 18, “Configuring Voice VLAN.”
VTP is not required; it has no affect onvoice VLAN.
16-3Catalyst 2950 and Catalyst 2955 Switch Software Configuration Guide
78-11380-11

Chapter 16 Configuring VLANsConfiguring Normal-Range VLANs
N
rangee.
the
moveyou
LAN
,
d
Configuring Normal-Range VLANsNormal-range VLANs are VLANs with VLAN IDs 1 to 1005. If the switch is in VTP server ortransparent mode, you can add, modify or remove configurations for VLANs 2 to 1001 in the VLAdatabase. (VLAN IDs 1 and 1002 to 1005 are automatically created and cannot be removed.)
Note When the switch is in VTP transparent mode and the EI is installed, you can also create extended-VLANs (VLANs with IDs from 1006 to 4094), but these VLANs are not saved in the VLAN databasSee the“Configuring Extended-Range VLANs” section on page 16-11.
Configurations for VLAN IDs 1 to 1005 are written to the filevlan.dat (VLAN database), and you candisplay them by entering theshow vlanprivileged EXEC command. Thevlan.datfile is stored in Flashmemory.
Caution You can cause inconsistency in the VLAN database if you attempt to manually delete thevlan.dat file.If you want to modify the VLAN configuration, use the commands described in these sections and incommand reference for this release. To change the VTP configuration, seeChapter 17, “ConfiguringVTP.”
You use the interface configuration mode to define the port membership mode and to add and reports from VLANs. The results of these commands are written to the running-configuration file, andcan display the file by entering theshow running-config privileged EXEC command.
You can set these parameters when you create a new normal-range VLAN or modify an existing Vin the VLAN database:
• VLAN ID
• VLAN name
• VLAN type (Ethernet, Fiber Distributed Data Interface [FDDI], FDDI network entity title [NET]TrBRF, or TrCRF, Token Ring, Token Ring-Net)
• VLAN state (active or suspended)
• Maximum transmission unit (MTU) for the VLAN
• Security Association Identifier (SAID)
• Bridge identification number for TrBRF VLANs
• Ring number for FDDI and TrCRF VLANs
• Parent VLAN number for TrCRF VLANs
• Spanning Tree Protocol (STP) type for TrCRF VLANs
• VLAN number to use when translating from one VLAN type to another
Note This section does not provide configuration details for most of these parameters. For completeinformation on the commands and parameters that control VLAN configuration, see the commanreference for this release.
16-4Catalyst 2950 and Catalyst 2955 Switch Software Configuration Guide
78-11380-11

Chapter 16 Configuring VLANsConfiguring Normal-Range VLANs
t 5000s.
s
2
defile.
led)ited.
ode.
P.
orted
,tich
This section includes information about these topics about normal-range VLANs:
• Token Ring VLANs, page 16-5
• Normal-Range VLAN Configuration Guidelines, page 16-5
• VLAN Configuration Mode Options, page 16-6
• Saving VLAN Configuration, page 16-7
• Default Ethernet VLAN Configuration, page 16-7
• Creating or Modifying an Ethernet VLAN, page 16-8
• Deleting a VLAN, page 16-10
• Assigning Static-Access Ports to a VLAN, page 16-11
Token Ring VLANsAlthough the switch does not support Token Ring connections, a remote device such as a Catalysseries switch with Token Ring connections could be managed from one of the supported switcheSwitches running VTP version 2 advertise information about these Token Ring VLANs:
• Token Ring TrBRF VLANs
• Token Ring TrCRF VLANs
For more information on configuring Token Ring VLANs, see theCatalyst 5000 Series SoftwareConfiguration Guide.
Normal-Range VLAN Configuration GuidelinesFollow these guidelines when creating and modifying normal-range VLANs in your network:
• SeeTable 16-1 for the maximum number of supported VLANs per switch model. On a switchsupporting 250 VLANs, if VTP reports that there are 250 active VLANs, four of the active VLAN(1002 to 1005) are reserved for Token Ring and FDDI.
• Normal-range VLANs are identified with a number between 1 and 1001. VLAN numbers 100through 1005 are reserved for Token Ring and FDDI VLANs.
• VLAN configuration for VLANs 1 to 1005 are always saved in the VLAN database. If VTP mois transparent, VTP and VLAN configuration are also saved in the switch running configuration
• The switch also supports VLAN IDs 1006 through 4094 in VTP transparent mode (VTP disabwhen the EI is installed. These are extended-range VLANs, and configuration options are limExtended-range VLANs are not saved in the VLAN database. See the“Configuring Extended-RangeVLANs” section on page 16-11.
• Before you can create a VLAN, the switch must be in VTP server mode or VTP transparent mIf the switch is a VTP server, you must define a VTP domain, or VTP will not function.
• The switch does not support Token Ring or FDDI media. The switch does not forward FDDI,FDDI-Net, TrCRF, or TrBRF traffic, but it does propagate the VLAN configuration through VT
• The switch supports 64 spanning-tree instances. If a switch has more active VLANs than suppspanning-tree instances, spanning tree can be enabled on 64 VLANs and is disabled on theremaining VLANs. If you have already used all available spanning-tree instances on a switchadding another VLAN anywhere in the VTP domain creates a VLAN on that switch that is norunning spanning tree. If you have the default allowed list on the trunk ports of that switch (wh
16-5Catalyst 2950 and Catalyst 2955 Switch Software Configuration Guide
78-11380-11

Chapter 16 Configuring VLANsConfiguring Normal-Range VLANs
oferent thistion
s, we
on
t
, you,
an
ished
o other
is to allow all VLANs), the new VLAN is carried on all trunk ports. Depending on the topologythe network, this could create a loop in the new VLAN that would not be broken, particularly if thare several adjacent switches that all have run out of spanning-tree instances. You can prevepossibility by setting allowed lists on the trunk ports of switches that have used up their allocaof spanning-tree instances.
If the number of VLANs on the switch exceeds the number of supported spanning tree instancerecommend that you configure the IEEE 802.1S Multiple STP (MSTP) on your switch to mapmultiple VLANs to a single STP instance. For more information about MSTP, seeChapter 14,“Configuring MSTP.”
VLAN Configuration Mode OptionsYou can configure normal-range VLANs (with VLAN IDs 1 to 1005) by using these two configuratimodes:
• VLAN Configuration in config-vlan Mode, page 16-6
You access config-vlan mode by entering thevlan vlan-id global configuration command.
• VLAN Configuration in VLAN Configuration Mode, page 16-6
You access VLAN database configuration mode by entering thevlan database privileged EXECcommand.
VLAN Configuration in config-vlan Mode
To access config-vlan mode, enter thevlan global configuration command with a VLAN ID. Enter a newVLAN ID to create a VLAN or with an existing VLAN ID to modify the VLAN. You can use the defaulVLAN configuration (Table 16-2) or enter multiple commands to configure the VLAN. For moreinformation about commands available in this mode, see thevlan global configuration commanddescription in the command reference for this release. When you have finished the configurationmust exit config-vlan mode for the configuration to take effect. To display the VLAN configurationenter theshow vlan privileged EXEC command.
You must use this config-vlan mode when creating extended-range VLANs (VLAN IDs greater th1005). See the“Configuring Extended-Range VLANs” section on page 16-11.
VLAN Configuration in VLAN Configuration Mode
To access VLAN configuration mode, enter thevlan databaseprivileged EXEC command. Then enterthevlan command with a new VLAN ID to create a VLAN or with an existing VLAN ID to modify theVLAN. You can use the default VLAN configuration (Table 16-2) or enter multiple commands toconfigure the VLAN. For more information about keywords available in this mode, see thevlan VLANconfiguration command description in the command reference for this release. When you have finthe configuration, you must enterapply or exit for the configuration to take effect. When you enter theexit command, it applies all commands and updates the VLAN database. VTP messages are sent tswitches in the VTP domain, and the privileged EXEC mode prompt appears.
16-6Catalyst 2950 and Catalyst 2955 Switch Software Configuration Guide
78-11380-11

Chapter 16 Configuring VLANsConfiguring Normal-Range VLANs
. Ifenter
VTPNtione.
ase,
se
onfile,
otP
Saving VLAN ConfigurationThe configurations of VLAN IDs 1 to 1005 are always saved in the VLAN database (vlan.dat file)VTP mode is transparent, they are also saved in the switch running configuration file and you canthecopy running-config startup-config privileged EXEC command to save the configuration in thestartup configuration file. You can use theshow running-config vlanprivileged EXEC command todisplay the switch running configuration file. To display the VLAN configuration, enter theshow vlanprivileged EXEC command.
When you save VLAN and VTP information (including extended-range VLAN configurationinformation) in the startup configuration file and reboot the switch, the switch configuration isdetermined as follows:
• If the VTP mode is transparent in the startup configuration, and the VLAN database and the domain name from the VLAN database matches that in the startup configuration file, the VLAdatabase is ignored (cleared), and the VTP and VLAN configurations in the startup configurafile are used. The VLAN database revision number remains unchanged in the VLAN databas
• If the VTP mode or domain name in the startup configuration does not match the VLAN databthe domain name and VTP mode and configuration for the first 1005 VLAN IDs use the VLANdatabase information.
• If VTP mode is server, the domain name and VLAN configuration for the first 1005 VLAN IDs uthe VLAN database information
• If the switch is running Cisco IOS Release 12.1(9)EA1 or later and you use an older startupconfiguration file to boot up the switch, the configuration file does not contain VTP or VLANinformation, and the switch uses the VLAN database configurations.
• If the switch is running a Cisco IOS release earlier than 12.1(9)EA1 and you use a startupconfiguration file from Cisco IOS Release 12.1(9)EA1 or later to boot up the switch, the imagethe switch does not recognize the VLAN and VTP configurations in the startup configuration so the switch uses the VLAN database configuration.
Caution If the VLAN database configuration is used at startup and the startup configuration file containsextended-range VLAN configuration, this information is lost when the system boots up.
Default Ethernet VLAN ConfigurationTable 16-2 shows the default configuration for Ethernet VLANs.
Note The switch supports Ethernet interfaces exclusively. Because FDDI and Token Ring VLANs are nlocally supported, you only configure FDDI and Token Ring media-specific characteristics for VTglobal advertisements to other switches.
16-7Catalyst 2950 and Catalyst 2955 Switch Software Configuration Guide
78-11380-11

Chapter 16 Configuring VLANsConfiguring Normal-Range VLANs
.
ater
y an
Creating or Modifying an Ethernet VLANEach Ethernet VLAN in the VLAN database has a unique, 4-digit ID that can be a number from 1to 1001. VLAN IDs 1002 to 1005 are reserved for Token Ring and FDDI VLANs. To create anormal-range VLAN to be added to the VLAN database, assign a number and name to the VLAN
Note When the switch is in VTP transparent mode and the EI is installed, you can assign VLAN IDs grethan 1006, but they are not added to the VLAN database. See the“Configuring Extended-RangeVLANs” section on page 16-11.
For the list of default parameters that are assigned when you add a VLAN, see the“ConfiguringNormal-Range VLANs” section on page 16-4.
Beginning in privileged EXEC mode, follow these steps to use config-vlan mode to create or modifEthernet VLAN:
Table 16-2 Ethernet VLAN Defaults and Ranges
Parameter Default Range
VLAN ID 1 1 to 4094when the EI is installed and 1 to1005 when the SI is installed.
Note Extended-range VLANs (VLANIDs 1006 to 4094) are not saved inthe VLAN database.
VLAN name VLANxxxx, wherexxxxrepresents four numeric digits(including leading zeros) equalto the VLAN ID number
No range
802.10 SAID 100001 (100000 plus theVLAN ID)
1 to 4294967294
MTU size 1500 1500–18190
Translational bridge 1 0 0–1005
Translational bridge 2 0 0–1005
VLAN state active active, suspend
Remote SPAN disabled enabled, disabled
Command Purpose
Step 1 configure terminal Enter global configuration mode.
Step 2 vlan vlan-id Enter a VLAN ID, and enter config-vlan mode. Enter a new VLAN IDto create a VLAN, or enter an existing VLAN ID to modify a VLAN.
Note The available VLAN ID range for this command is 1 to 1005when the SI is installed and 1 to 4094 when the EI isinstalled.For information about adding VLAN IDs greater than1005 (extended-range VLANs), see the“ConfiguringExtended-Range VLANs” section on page 16-11.
16-8Catalyst 2950 and Catalyst 2955 Switch Software Configuration Guide
78-11380-11

Chapter 16 Configuring VLANsConfiguring Normal-Range VLANs
e or
lt
e
To return the VLAN name to the default settings, use theno vlan name, no vlan mtu, or no remotespanconfig-vlan commands.
This example shows how to use config-vlan mode to create Ethernet VLAN 20, name ittest20,and addit to the VLAN database:
Switch# configure terminalSwitch(config)# vlan 20Switch(config-vlan)# name test20Switch(config-vlan)# end
Beginning in privileged EXEC mode, follow these steps to use VLAN configuration mode to creatmodify an Ethernet VLAN:
Step 3 namevlan-name (Optional) Enter a name for the VLAN. If no name is entered, the defauis to append thevlan-id with leading zeros to the word VLAN. Forexample, VLAN0004 is a default VLAN name for VLAN 4.
Step 4 mtu mtu-size (Optional) Change the MTU size (or other VLAN characteristic).
Step 5 remote-span (Optional) Configure the VLAN as the RSPAN VLAN for a remoteSPAN session. For more information on remote SPAN, seeChapter 24,“Configuring SPAN and RSPAN.”
Step 6 end Return to privileged EXEC mode.
Step 7 show vlan{ namevlan-name |id vlan-id} Verify your entries.
Step 8 copy running-config startup config (Optional) If the switch is in VTP transparent mode, the VLANconfiguration is saved in the running configuration file as well as in theVLAN database. This saves the configuration in the switch startupconfiguration file.
Command Purpose
Command Purpose
Step 1 vlan database Enter VLAN database configuration mode.
Step 2 vlan vlan-id namevlan-name Add an Ethernet VLAN by assigning a number to it. The range is 1 to1001; do not enter leading zeros.
If no name is entered, the default is to append thevlan-id with leadingzeros to the word VLAN. For example, VLAN0004 is a default VLANname for VLAN 4.
Step 3 vlan vlan-id mtu mtu-size (Optional) To modify a VLAN, identify the VLAN and change acharacteristic, such as the MTU size.
Step 4 exit Update the VLAN database, propagate it throughout the administrativdomain, and return to privileged EXEC mode.
Step 5 show vlan {namevlan-name |id vlan-id} Verify your entries.
Step 6 copy running-config startup config (Optional) If the switch is in VTP transparent mode, the VLANconfiguration is saved in the running configuration file as well as in theVLAN database. This saves the configuration in the switch startupconfiguration file.
16-9Catalyst 2950 and Catalyst 2955 Switch Software Configuration Guide
78-11380-11

Chapter 16 Configuring VLANsConfiguring Normal-Range VLANs
ame
ein
r
iated
bal
p
Note You cannot configure an RSPAN VLAN in VLAN database configuration mode.
To return the VLAN name to the default settings, use theno vlan vlan-id nameVLAN configurationcommand.
This example shows how to use VLAN database configuration mode to create Ethernet VLAN 20, nit test20, and add it to the VLAN database:
Switch# vlan databaseSwitch(vlan)# vlan 20 name test20Switch(vlan)# exitAPPLY completed.Exiting....Switch#
Deleting a VLANWhen you delete a VLAN from a switch that is in VTP server mode, the VLAN is removed from thVLAN database for all switches in the VTP domain. When you delete a VLAN from a switch that isVTP transparent mode, the VLAN is deleted only on that specific switch.
You cannot delete the default VLANs for the different media types: Ethernet VLAN 1 and FDDI oToken Ring VLANs 1002 to 1005.
Caution When you delete a VLAN, any ports assigned to that VLAN become inactive. They remain assocwith the VLAN (and thus inactive) until you assign them to a new VLAN.
Beginning in privileged EXEC mode, follow these steps to delete a VLAN on the switch by using gloconfiguration mode:
To delete a VLAN in VLAN database configuration mode, use thevlan database privileged EXECcommand to enter VLAN database configuration mode and theno vlan vlan-id VLAN configurationcommand.
Command Purpose
Step 1 configure terminal Enter global configuration mode.
Step 2 no vlan vlan-id Remove the VLAN by entering the VLAN ID.
Step 3 end Return to privileged EXEC mode.
Step 4 show vlan brief Verify the VLAN removal.
Step 5 copy running-config startup config (Optional) If the switch is in VTP transparent mode, the VLANconfiguration is saved in the running configuration file as well as inthe VLAN database. This saves the configuration in the switch startuconfiguration file.
16-10Catalyst 2950 and Catalyst 2955 Switch Software Configuration Guide
78-11380-11

Chapter 16 Configuring VLANsConfiguring Extended-Range VLANs
n a
tes).
Assigning Static-Access Ports to a VLANYou can assign a static-access port to a VLAN without having VTP globally propagate VLANconfiguration information by disabling VTP (VTP transparent mode). If you are assigning a port ocluster member switch to a VLAN, first use thercommand privileged EXEC command to log in to themember switch.
Note If you assign an interface to a VLAN that does not exist, the new VLAN is created. (See the“Creatingor Modifying an Ethernet VLAN” section on page 16-8.)
Beginning in privileged EXEC mode, follow these steps to assign a port to a VLAN in the VLANdatabase:
To return an interface to its default configuration, use thedefault interface interface-idinterfaceconfiguration command.
This example shows how to configure a port as an access port in VLAN 2:
Switch# configure terminalEnter configuration commands, one per line. End with CNTL/Z.Switch(config)# interface fastethernet0/1Switch(config-if)# switchport mode accessSwitch(config-if)# switchport access vlan 2Switch(config-if)# endSwitch#
Configuring Extended-Range VLANsWhen the switch is in VTP transparent mode (VTP disabled) and the EI is installed, you can creaextended-range VLANs (in the range 1006 to 4094 for any switch port commands that allow VLAN IDEnter thevlan vlan-id global configuration command to access config-vlan mode and to configureextended-range VLANs. The VLAN database configuration mode (that you access by entering thevlandatabase privileged EXEC command) does not support the extended range.
Command Purpose
Step 1 configure terminal Enter global configuration mode
Step 2 interface interface-id Enter the interface to be added to the VLAN.
Step 3 switchport mode access Define the VLAN membership mode for the port (Layer 2 accessport).
Step 4 switchport access vlanvlan-id Assign the port to a VLAN. Valid VLAN IDs are 1 to 4094.
Step 5 end Return to privileged EXEC mode.
Step 6 show running-config interfaceinterface-id Verify the VLAN membership mode of the interface.
Step 7 show interfacesinterface-id switchport Verify your entries in theAdministrative Modeand theAccess ModeVLAN fields of the display.
Step 8 copy running-config startup-config (Optional) Save your entries in the configuration file.
16-11Catalyst 2950 and Catalyst 2955 Switch Software Configuration Guide
78-11380-11

Chapter 16 Configuring VLANsConfiguring Extended-Range VLANs
isn in
e
tion
by
ode.
TPsets.
S.
edeitch
Extended-range VLAN configurations are not stored in the VLAN database. Because VTP mode transparent, they are stored in the switch running configuration file. You can save the configuratiothe startup configuration file by using thecopy running-config startup-config privileged EXECcommand.
Note Although the switch supports 4094 VLAN IDs when the EI is installed, see the“Supported VLANs”section on page 16-2 for the actual number of VLANs supported.
This section includes this information about extended-range VLANs:
• Default VLAN Configuration, page 16-12
• Extended-Range VLAN Configuration Guidelines, page 16-12
• Creating an Extended-Range VLAN, page 16-13
• Displaying VLANs, page 16-14
Default VLAN ConfigurationSeeTable 16-2 on page 16-8for the default configuration for Ethernet VLANs. You can change only thMTU size on extended-range VLANs; all other characteristics must remain at the default state.
Extended-Range VLAN Configuration GuidelinesFollow these guidelines when creating extended-range VLANs:
• To add an extended-range VLAN, you must use thevlan vlan-idglobal configuration command andaccess config-vlan mode. You cannot add extended-range VLANs in VLAN database configuramode (accessed by entering thevlan database privileged EXEC command).
• VLAN IDs in the extended range are not saved in the VLAN database and are not recognizedVTP.
• You cannot include extended-range VLANs in the pruning eligible range.
• The switch must be in VTP transparent mode when you create extended-range VLANs. If VTP mis server or client, an error message is generated, and the extended-range VLAN is rejected
• You can set the VTP mode to transparent in global configuration mode or in VLAN databaseconfiguration mode. See the“Disabling VTP (VTP Transparent Mode)” section on page 17-12. Youshould save this configuration to the startup configuration so that the switch will boot up in Vtransparent mode. Otherwise, you will lose extended-range VLAN configuration if the switch re
• VLANs in the extended range are not supported by VQP. They cannot be configured by VMP
• STP is enabled by default on extended-range VLANs, but you can disable it by using thenospanning-tree vlanvlan-idglobal configuration command. When the maximum number ofspanning-tree instances (64) are on the switch, spanning tree is disabled on any newly creatVLANs. If the number of VLANs on the switch exceeds the maximum number of spanning treinstances, we recommend that you configure the IEEE 802.1S Multiple STP (MSTP) on your swto map multiple VLANs to a single STP instance. For more information about MSTP, seeChapter 14, “Configuring MSTP.”
16-12Catalyst 2950 and Catalyst 2955 Switch Software Configuration Guide
78-11380-11

Chapter 16 Configuring VLANsConfiguring Extended-Range VLANs
lan
LANfrom
g
ll
e
Creating an Extended-Range VLANYou create an extended-range VLAN in global configuration mode by entering thevlan globalconfiguration command with a VLAN ID from 1006 to 4094. This command accesses the config-vmode. The extended-range VLAN has the default Ethernet VLAN characteristics (seeTable 16-2), andthe MTU size is the only parameter you can change. See the description of thevlan global configurationcommand in the command reference for defaults of all parameters. If you enter an extended-range VID when the switch is not in VTP transparent mode, an error message is generated when you exitconfig-vlan mode, and the extended-range VLAN is not created.
Extended-range VLANs are not saved in the VLAN database; they are saved in the switch runninconfiguration file. You can save the extended-range VLAN configuration in the switch startupconfiguration file by using thecopy running-config startup-config privileged EXEC command.
Beginning in privileged EXEC mode, follow these steps to create an extended-range VLAN:
To delete an extended-range VLAN, use theno vlan vlan-id global configuration command.
The procedure for assigning static-access ports to an extended-range VLAN is the same as fornormal-range VLANs. See the“Assigning Static-Access Ports to a VLAN” section on page 16-11.
This example shows how to create a new extended-range VLAN (when the EI is installed) with adefault characteristics, enter config-vlan mode, and save the new VLAN in the switch startupconfiguration file:
Switch(config)# vtp mode transparentSwitch(config)# vlan 2000Switch(config-vlan)# endSwitch# copy running-config startup config
Command Purpose
Step 1 configure terminal Enter global configuration mode.
Step 2 vtp mode transparent Configure the switch for VTP transparent mode, disabling VTP.
Step 3 vlan vlan-id Enter an extended-range VLAN ID and enter config-vlan mode. Therange is 1006 to 4094.
Step 4 mtu mtu-size (Optional) Modify the VLAN by changing the MTU size.
Note Although all commands appear in the CLI help in config-vlanmode, only themtu mtu-sizecommand is supported forextended-range VLANs.
Step 5 end Return to privileged EXEC mode.
Step 6 show vlan id vlan-id Verify that the VLAN has been created.
Step 7 copy running-config startup config Save your entries in the switch startup configuration file. To saveextended-range VLAN configurations, you need to save the VTPtransparent mode configuration and the extended-range VLANconfiguration in the switch startup configuration file. Otherwise, if theswitch resets, it will default to VTP server mode, and the extended-rangVLAN IDs will not be saved.
16-13Catalyst 2950 and Catalyst 2955 Switch Software Configuration Guide
78-11380-11

Chapter 16 Configuring VLANsDisplaying VLANs
g To
mand
evice
Displaying VLANsUse theshow vlan privileged EXEC command to display a list of all VLANs on the switch, includinextended-range VLANs. The display includes VLAN status, ports, and configuration information.view normal-range VLANs in the VLAN database (1 to 1005) use theshow VLAN configurationcommand (accessed by entering thevlan databaseprivileged EXEC command). For a list of the VLANIDs on the switch, use theshow running-config vlanprivileged EXEC command, optionally entering aVLAN ID range.
Table 16-3 lists the commands for monitoring VLANs.
For more details about the show command options and explanations of output fields, see the comreference for this release.
Configuring VLAN TrunksThese sections describe how VLAN trunks function on the switch:
• Trunking Overview, page 16-14
• 802.1Q Configuration Considerations, page 16-16
• Default Layer 2 Ethernet Interface VLAN Configuration, page 16-16
Trunking OverviewA trunk is a point-to-point link between one or more Ethernet switch interfaces and another networking dsuch as a router or a switch. FastEthernet and Gigabit Ethernet trunkscarry the traffic of multiple VLANsover a singlelink, and you can extend the VLANs across an entire network.
The switch supports 802.1Q, the industry-standard trunking encapsulation.
Table 16-3 VLAN Monitoring Commands
Command Command Mode Purpose
show VLAN configuration Display status of VLANs in the VLAN database.
show current [vlan-id] VLAN configuration Display status of all or the specified VLAN in theVLAN database.
show interfaces[vlanvlan-id]
Privileged EXEC Display characteristics for all interfaces or forthe specified VLAN configured on the switch.
show running-config vlan Privileged EXEC Display all or a range of VLANs on the switch.
show vlan [ id vlan-id] Privileged EXEC Display parameters for all VLANs or thespecified VLAN on the switch.
16-14Catalyst 2950 and Catalyst 2955 Switch Software Configuration Guide
78-11380-11

Chapter 16 Configuring VLANsConfiguring VLAN Trunks
tuld
ot
unk
by are
me
Figure 16-2 shows a network of switches that are connected by 802.1Q trunks.
Figure 16-2 Switches in an 802.1Q Trunking Environment
You can configure a trunk on a single Ethernet interface or on an EtherChannel bundle. For moreinformation about EtherChannel, seeChapter 30, “Configuring EtherChannels.”
Ethernet trunk interfaces support different trunking modes (seeTable 16-4). You can set an interface astrunking or nontrunking or to negotiate trunking with the neighboring interface. To autonegotiatetrunking, the interfaces must be in the same VTP domain.
Trunk negotiation is managed by the Dynamic Trunking Protocol (DTP), which is a Point-to-PoinProtocol. However, some internetworking devices might forward DTP frames improperly, which cocause misconfigurations.
To avoid this, you should configure interfaces connected to devices that do not support DTP to nforward DTP frames, that is, to turn off DTP.
• If you do not intend to trunk across those links, use theswitchport mode access interfaceconfiguration command to disable trunking.
• To enable trunking to a device that does not support DTP, use theswitchport mode trunk andswitchport nonegotiateinterface configuration commands to cause the interface to become a trbut to not generate DTP frames.
• With GigaStack GBICs, dynamic trunking is only supported when two switches are connectedsingle GigaStack GBIC link. If trunking is required when more than two switches in a stack aconnected by GigaStack GBIC links, you must manually configure trunking in this manner:
– Manually shut down the GigaStack port by using theshutdown interface configurationcommand.
– Manually configure trunk mode on the GigaStack port by using theswitchport mode trunkinterface configuration command on both GBIC interfaces to cause the interfaces to becotrunks.
– Use theno shutdown interface configuration command to bring up the GigaStack port.
Catalyst 6500 seriesswitch
Switch
Switch Switch
Switch
VLAN2
VLAN3VLAN1
VLAN1
VLAN2
VLAN3
Trunkport
Trunkport
Trunkport
Trunkport
1114
13
16-15Catalyst 2950 and Catalyst 2955 Switch Software Configuration Guide
78-11380-11

Chapter 16 Configuring VLANsConfiguring VLAN Trunks
tance
itche ofby
cloud
the
onou onee.
mes
nk
to a is
hen
802.1Q Configuration Considerations
802.1Q trunks impose these limitations on a network:
• In a network of Cisco switches connected through 802.1Q trunks, the switches maintain one insof spanning tree for each VLAN allowed on the trunks. Non-Cisco devices might support onespanning-tree instance for all VLANs.
When you connect a Cisco switch to a non-Cisco device through an 802.1Q trunk, the Cisco swcombines the spanning-tree instance of the VLAN of the trunk with the spanning-tree instancthe non-Cisco 802.1Q switch. However, spanning-tree information for each VLAN is maintainedCisco switches separated by a cloud of non-Cisco 802.1Q switches. The non-Cisco 802.1Q separating the Cisco switches is treated as a single trunk link between the switches.
• Make sure the native VLAN for an 802.1Q trunk is the same on both ends of the trunk link. Ifnative VLAN on one end of the trunk is different from the native VLAN on the other end,spanning-tree loops might result.
• Disabling spanning tree on the native VLAN of an 802.1Q trunk without disabling spanning treeevery VLAN in the network can potentially cause spanning-tree loops. We recommend that yleave spanning tree enabled on the native VLAN of an 802.1Q trunk or disable spanning treeevery VLAN in the network. Make sure your network is loop-free before disabling spanning tr
Default Layer 2 Ethernet Interface VLAN ConfigurationTable 16-5 shows the default Layer 2 Ethernet interface VLAN configuration.
Table 16-4 Layer 2 Interface Modes
Mode Function
switchport mode access Puts the interface (access port) into permanent nontrunking mode. The interface becoa nontrunk interface even if the neighboring interface is a trunk interface.
switchport mode dynamicdesirable
Makes the interface actively attempt to convert the link to a trunk link. The interfacebecomes a trunk interface if the neighboring interface is set totrunk, desirable, or automode. The default switch-port mode for all Ethernet interfaces isdynamic desirable.
switchport mode dynamic auto Makes the interface able to convert the link to a trunk link. The interface becomes a truinterface if the neighboring interface is set totrunk or desirable mode.
switchport mode trunk Puts the interface into permanent trunking mode and negotiates to convert the link intrunk link. The interface becomes a trunk interface even if the neighboring interfacenot a trunk interface.
switchport nonegotiate Prevents the interface from generating DTP frames. You can use this command only wthe interface switchport mode isaccess or trunk . You must manually configure theneighboring interface as a trunk interface to establish a trunk link.
Table 16-5 Default Layer 2 Ethernet Interface VLAN Configuration
Feature Default Setting
Interface mode switchport mode dynamic desirable
Allowed VLAN range VLANs 1 to 4094 when the EI is installed and 1 to1005 when the SI is installed
16-16Catalyst 2950 and Catalyst 2955 Switch Software Configuration Guide
78-11380-11

Chapter 16 Configuring VLANsConfiguring VLAN Trunks
ast onecond
witch:
e theportitch
.)
led. Ifd.
blehange
Configuring an Ethernet Interface as a Trunk PortBecause trunk ports send and receive VTP advertisements, to use VTP you must ensure that at letrunk port is configured on the switch and that this trunk port is connected to the trunk port of a seswitch. Otherwise, the switch cannot receive any VTP advertisements.
This section includes these procedures for configuring an Ethernet interface as a trunk port on the s
• Interaction with Other Features, page 16-17
• Defining the Allowed VLANs on a Trunk, page 16-18
• Changing the Pruning-Eligible List, page 16-20
• Configuring the Native VLAN for Untagged Traffic, page 16-20
Note The default mode for Layer 2 interfaces isswitchport mode dynamic desirable. If the neighboringinterface supports trunking and is configured to allow trunking, the link is a Layer 2 trunk.
Interaction with Other Features
Trunking interacts with other features in these ways:
• A trunk port cannot be a secure port.
• Trunk ports can be grouped into EtherChannel port groups, but all trunks in the group must havsame configuration. When a group is first created, all ports follow the parameters set for the firstto be added to the group. If you change the configuration of one of these parameters, the swpropagates the setting that you entered to all ports in the group:
– allowed-VLAN list
– STP port priority for each VLAN
– STP Port Fast setting
– trunk status (If one port in a port group ceases to be a trunk, all ports cease to be trunks
• If you try to enable 802.1X on a trunk port, an error message appears, and 802.1X is not enabyou try to change the mode of an 802.1X-enabled port to trunk, the port mode is not change
• A port in dynamic mode can negotiate with its neighbor to become a trunk port. If you try to ena802.1X on a dynamic port, an error message appears, and 802.1X is not enabled. If you try to cthe mode of an 802.1X-enabled port to dynamic, the port mode is not changed.
• Protected ports are supported on 802.1Q trunks.
VLAN range eligible for pruning VLANs 2 to 1001
Default VLAN (for access ports) VLAN 1
Native VLAN (for 802.1Q trunks) VLAN 1
Table 16-5 Default Layer 2 Ethernet Interface VLAN Configuration (continued)
Feature Default Setting
16-17Catalyst 2950 and Catalyst 2955 Switch Software Configuration Guide
78-11380-11

Chapter 16 Configuring VLANsConfiguring VLAN Trunks
rt:
, use
ighbor
4, youthe
or
e
e
Configuring a Trunk Port
Beginning in privileged EXEC mode, follow these steps to configure a port as an 802.1Q trunk po
To return an interface to its default configuration, use thedefault interface interface-id interfaceconfiguration command. To reset all trunking characteristics of a trunking interface to the defaultstheno switchport trunk interface configuration command. To disable trunking, use theswitchportmode access interface configuration command to configure the port as a static-access port.
This example shows how to configure a port as an 802.1Q trunk. The example assumes that the neinterface is configured to support 802.1Q trunking.
Switch# configure terminalEnter configuration commands, one per line. End with CNTL/Z.Switch(config)# interface fastethernet0/4Switch(config-if)# switchport mode dynamic desirableSwitch(config-if)# end
Defining the Allowed VLANs on a Trunk
By default, a trunk port sends traffic to and receives traffic from all VLANs. All VLAN IDs, 1 to 409when the EI is installed, and 1 to 1005 when the SI is installed, are allowed on each trunk. Howevercan remove VLANs from the allowed list, preventing traffic from those VLANs from passing over trunk. To restrict the traffic a trunk carries, use theswitchport trunk allowed vlan remove vlan-listinterface configuration command to remove specific VLANs from the allowed list.
Command Purpose
Step 1 configure terminal Enter global configuration mode.
Step 2 interface interface-id Enter the interface configuration mode and the port to be configured ftrunking.
Step 3 switchport mode { dynamic { auto |desirable} | trunk }
Configure the interface as a Layer 2 trunk (required only if the interfacis a Layer 2 access port or to specify the trunking mode).
• dynamic auto—Set the interface to a trunk link if the neighboringinterface is set to trunk or desirable mode.
• dynamic desirable—Set the interface to a trunk link if theneighboring interface is set to trunk, desirable, or auto mode.
• trunk —Set the interface in permanent trunking mode and negotiatto convert the link to a trunk link even if the neighboring interface isnot a trunk interface.
Step 4 switchport access vlanvlan-id (Optional) Specify the default VLAN, which is used if the interface stopstrunking.
Step 5 switchport trunk native vlan vlan-id Specify the native VLAN.
Step 6 end Return to privileged EXEC mode.
Step 7 show interfacesinterface-idswitchport Display the switchport configuration of the interface in theAdministrativeMode and theAdministrative Trunking Encapsulation fields of thedisplay.
Step 8 show interfacesinterface-id trunk Display the trunk configuration of the interface.
Step 9 copy running-config startup-config (Optional) Save your entries in the configuration file.
16-18Catalyst 2950 and Catalyst 2955 Switch Software Configuration Guide
78-11380-11

Chapter 16 Configuring VLANsConfiguring VLAN Trunks
AN
lived
ment
. If
,theek
unk:
e
To reduce the risk of spanning-tree loops or storms, you can disable VLAN 1 on any individual VLtrunk port by removing VLAN 1 from the allowed list. This is known as VLAN 1 minimization. VLAN 1minimization disables VLAN 1 (the default VLAN on all Cisco switch trunk ports) on an individuaVLAN trunk link. As a result, no user traffic, including spanning-tree advertisements, is sent or receon VLAN 1.
When you remove VLAN 1 from a trunk port, the interface continues to send and receive managetraffic, for example, Cisco Discovery Protocol (CDP), Port Aggregation Protocol (PAgP), LinkAggregation Control Protocol (LACP), Dynamic Trunking Protocol (DTP), and VLAN TrunkingProtocol (VTP) in VLAN 1.
If a trunk port with VLAN 1 disabled is converted to a nontrunk port, it is added to the access VLANthe access VLAN is set to 1, the port is added to VLAN 1, regardless of theswitchport trunk allowedsetting. The same is true for any VLAN that has been disabled on the port.
A trunk port can become a member of a VLAN if the VLAN is enabled, if VTP knows of the VLANand if the VLAN is in the allowed list for the port. When VTP detects a newly enabled VLAN and VLAN is in the allowed list for a trunk port, the trunk port automatically becomes a member of thenabled VLAN. When VTP detects a new VLAN and the VLAN is not in the allowed list for a trunport, the trunk port does not become a member of the new VLAN.
Beginning in privileged EXEC mode, follow these steps to modify the allowed list of an 802.1Q tr
To return to the default allowed VLAN list of all VLANs, use theno switchport trunk allowed vlaninterface configuration command.
This example shows how to remove VLAN 2 from the allowed VLAN list:
Switch(config)# interface fastethernet0/1Switch(config-if)# switchport trunk allowed vlan remove 2Switch(config-if)# endSwitch#
Command Purpose
Step 1 configure terminal Enter global configuration mode.
Step 2 interface interface-id Enter interface configuration mode and the port to be configured.
Step 3 switchport mode trunk Configure the interface as a VLAN trunk port.
Step 4 switchport trunk allowed vlan {add |all | except | remove} vlan-list
(Optional) Configure the list of VLANs allowed on the trunk.
For explanations about using theadd, all, except, andremovekeywords,see the command reference for this release.
Thevlan-list parameter is either a single VLAN number from 1 to 4094when the EI is installed, and 1 to 1005 when the SI is installed or a rangof VLANs described by two VLAN numbers, the lower one first,separated by a hyphen. Do not enter any spaces betweencomma-separated VLAN parameters or in hyphen-specified ranges.
All VLANs are allowed by default.
Step 5 end Return to privileged EXEC mode.
Step 6 show interfacesinterface-idswitchport Verify your entries in theTrunking VLANs Enabled field of the display.
Step 7 copy running-config startup-config (Optional) Save your entries in the configuration file.
16-19Catalyst 2950 and Catalyst 2955 Switch Software Configuration Guide
78-11380-11

Chapter 16 Configuring VLANsConfiguring VLAN Trunks
list
fault, is
e a
Changing the Pruning-Eligible List
The pruning-eligible list applies only to trunk ports. Each trunk port has its own eligibility list. VTPpruning must be enabled for this procedure to take effect. The“Enabling VTP Pruning” section onpage 17-14 describes how to enable VTP pruning.
Beginning in privileged EXEC mode, follow these steps to remove VLANs from the pruning-eligibleon a trunk port:
To return to the default pruning-eligible list of all VLANs, use theno switchport trunk pruning vlaninterface configuration command.
Configuring the Native VLAN for Untagged Traffic
A trunk port configured with 802.1Q tagging can receive both tagged and untagged traffic. By dethe switch forwards untagged traffic in the native VLAN configured for the port. The native VLANVLAN 1 by default.
Note The native VLAN can be assigned any VLAN ID; it is not dependent on the management VLAN.
For information about 802.1Q configuration issues, see the“802.1Q Configuration Considerations”section on page 16-16.
Command Purpose
Step 1 configure terminal Enter global configuration mode.
Step 2 interface interface-id Enter interface configuration mode, and select the trunk port for whichVLANs should be pruned.
Step 3 switchport trunk pruning vlan { add |except | none | remove} vlan-list[,vlan[,vlan[,,,]]
Configure the list of VLANs allowed to be pruned from the trunk. (See the“VTP Pruning” section on page 17-4).
For explanations about using theadd, except, none, andremovekeywords, see the command reference for this release.
Separate nonconsecutive VLAN IDs with a comma and no spaces; ushyphen to designate a range of IDs. Valid IDs are from 2 to 1001.Extended-range VLANs (VLAN IDs 1006 to 4094) cannot be pruned.
VLANs that are pruning-ineligible receive flooded traffic.
The default list of VLANs allowed to be pruned contains VLANs 2 to1001.
Step 4 end Return to privileged EXEC mode.
Step 5 show interfacesinterface-idswitchport Verify your entries in thePruning VLANs Enabled field of the display.
Step 6 copy running-config startup-config (Optional) Save your entries in the configuration file.
16-20Catalyst 2950 and Catalyst 2955 Switch Software Configuration Guide
78-11380-11

Chapter 16 Configuring VLANsConfiguring VLAN Trunks
Q
nt
ps,affic
dr load two
rt is thats)
ll
o
Beginning in privileged EXEC mode, follow these steps to configure the native VLAN on an 802.1trunk:
To return to the default native VLAN, VLAN 1, use theno switchport trunk native vlan interfaceconfiguration command.
If a packet has a VLAN ID that is the same as the outgoing port native VLAN ID, the packet is seuntagged; otherwise, the switch sends the packet with a tag.
Load Sharing Using STPLoad sharing divides the bandwidth supplied by parallel trunks connecting switches. To avoid looSTP normally blocks all but one parallel link between switches. Using load sharing, you divide the trbetween the links according to which VLAN the traffic belongs.
You configure load sharing on trunk ports by using STP port priorities or STP path costs. For loasharing using STP port priorities, both load-sharing links must be connected to the same switch. Fosharing using STP path costs, each load-sharing link can be connected to the same switch or todifferent switches. For more information about STP, seeChapter 13, “Configuring STP.”
Load Sharing Using STP Port Priorities
When two ports on the same switch form a loop, the STP port priority setting determines which poenabled and which port is in a blocking state. You can set the priorities on a parallel trunk port sothe port carries all the traffic for a given VLAN. The trunk port with the higher priority (lower valuefor a VLAN is forwarding traffic for that VLAN. The trunk port with the lower priority (higher values)for the same VLAN remains in a blocking state for that VLAN. One trunk port sends or receives atraffic for the VLAN.
Figure 16-3 shows two trunks connecting supported switches. In this example, the switches areconfigured as follows:
• VLANs 8 through 10 are assigned a port priority of 16 on Trunk 1.
• VLANs 3 through 6 retain the default port priority of 128 on Trunk 1.
• VLANs 3 through 6 are assigned a port priority of 16 on Trunk 2.
• VLANs 8 through 10 retain the default port priority of 128 on Trunk 2.
Command Purpose
Step 1 configure terminal Enter global configuration mode.
Step 2 interface interface-id Enter interface configuration mode, and define the interface that isconfigured as the 802.1Q trunk.
Step 3 switchport trunk native vlan vlan-id Configure the VLAN that is sending and receiving untagged traffic onthe trunk port.
For vlan-id, the range is 1 to 4094 when the EI is installed, and 1 t1005 when the SI is installed.
Step 4 end Return to privileged EXEC mode.
Step 5 show interfacesinterface-idswitchport Verify your entries in theTrunking Native Mode VLAN field.
Step 6 copy running-config startup-config (Optional) Save your entries in the configuration file.
16-21Catalyst 2950 and Catalyst 2955 Switch Software Configuration Guide
78-11380-11

Chapter 16 Configuring VLANsConfiguring VLAN Trunks
for
/1
n
e
In this way, Trunk 1 carries traffic for VLANs 8 through 10, and Trunk 2 carries traffic for VLANs 3through 6. If the active trunk fails, the trunk with the lower priority takes over and carries the trafficall of the VLANs. No duplication of traffic occurs over any trunk port.
Figure 16-3 Load Sharing by Using STP Port Priorities
Beginning in privileged EXEC mode, follow these steps to configure the network shown inFigure 16-3.
9337
0
Switch A
Switch B
Trunk 2VLANs 3 – 6 (priority 16)VLANs 8 – 10 (priority 128)
Trunk 1VLANs 8 – 10 (priority 16)VLANs 3 – 6 (priority 128)
Command Purpose
Step 1 configure terminal Enter global configuration mode on Switch 1.
Step 2 vtp domain domain-name Configure a VTP administrative domain.
The domain name can be from 1 to 32 characters.
Step 3 vtp mode server Configure Switch 1 as the VTP server.
Step 4 end Return to privileged EXEC mode.
Step 5 show vtp status Verify the VTP configuration on both Switch A and Switch B.
In the display, check theVTP Operating Mode and theVTP DomainName fields.
Step 6 show vlan Verify that the VLANs exist in the database on Switch A.
Step 7 configure terminal Enter global configuration mode.
Step 8 interface fastethernet 0/1 Enter interface configuration mode, and define Fast Ethernet port 0as the interface to be configured as a trunk.
Step 9 switchport mode trunk Configure the port as a trunk port.
Step 10 end Return to privilege EXEC mode.
Step 11 show interfaces fastethernet0/1switchport
Verify the VLAN configuration.
Step 12 Repeat Steps 7 through 11 on Switch A for Fast Ethernet port 0/2.
Step 13 Repeat Steps 7 through 11 on Switch B to configure the trunk ports oFast Ethernet ports 0/1 and 0/2.
Step 14 show vlan When the trunk links come up, VTP passes the VTP and VLANinformation to Switch B. Verify that Switch B has learned the VLANconfiguration.
Step 15 configure terminal Enter global configuration mode on Switch A.
Step 16 interface fastethernet0/1 Enter interface configuration mode, and define the interface to set thSTP port priority.
16-22Catalyst 2950 and Catalyst 2955 Switch Software Configuration Guide
78-11380-11

Chapter 16 Configuring VLANsConfiguring VLAN Trunks
ndauset link.
ned
e
as
Load Sharing Using STP Path Cost
You can configure parallel trunks to share VLAN traffic by setting different path costs on a trunk aassociating the path costs with different sets of VLANs. The VLANs keep the traffic separate. Becno loops exist, STP does not disable the ports, and redundancy is maintained in the event of a los
In Figure 16-4, Trunk ports 1 and 2 are 100BASE-T ports. The path costs for the VLANs are assigas follows:
• VLANs 2 through 4 are assigned a path cost of 30 on Trunk port 1.
• VLANs 8 through 10 retain the default 100BASE-T path cost on Trunk port 1 of 19.
• VLANs 8 through 10 are assigned a path cost of 30 on Trunk port 2.
• VLANs 2 through 4 retain the default 100BASE-T path cost on Trunk port 2 of 19.
Figure 16-4 Load-Sharing Trunks with Traffic Distributed by Path Cost
Beginning in privileged EXEC mode, follow these steps to configure the network shown inFigure 16-4:
Step 17 spanning-tree vlan 8-10 port-priority 16 Assign the port priority of 16 for VLANs 8 through 10.
Step 18 spanning-tree vlan 10 port-priority 16 Assign the port priority of 16 for VLAN 10.
Step 19 exit Return to global configuration mode.
Step 20 interface fastethernet0/2 Enter interface configuration mode, and define the interface to set thSTP port priority.
Step 21 spanning-tree vlan 3-6 port-priority 16 Assign the port priority of 16 for VLANs 3 through 6.
Step 22 end Return to privileged EXEC mode.
Step 23 show running-config Verify your entries.
Step 24 copy running-config startup-config (Optional) Save your entries in the configuration file.
Command Purpose
9057
3
Switch A
Switch B
Trunk port 1VLANs 2 – 4 (path cost 30)
VLANs 8 – 10 (path cost 19)
Trunk port 2VLANs 8 – 10 (path cost 30)VLANs 2 – 4 (path cost 19)
Command Purpose
Step 1 configure terminal Enter global configuration mode on Switch A.
Step 2 interface fastethernet 0/1 Enter interface configuration mode, and define Fast Ethernet port 0/1the interface to be configured as a trunk.
Step 3 switchport mode trunk Configure the port as a trunk port.
16-23Catalyst 2950 and Catalyst 2955 Switch Software Configuration Guide
78-11380-11

Chapter 16 Configuring VLANsConfiguring VMPS
it
as
nd
es
Configuring VMPSThe switch cannot be a VMPS server but can act as a client to the VMPS and communicate withthrough the VLAN Query Protocol (VQP). VMPS dynamically assigns dynamic access port VLANmembership.
This section includes this information about configuring VMPS:
• “Understanding VMPS” section on page 16-25
• “Default VMPS Client Configuration” section on page 16-26
• “VMPS Configuration Guidelines” section on page 16-26
• “Configuring the VMPS Client” section on page 16-27
• “Monitoring the VMPS” section on page 16-30
• “Troubleshooting Dynamic Port VLAN Membership” section on page 16-30
• “VMPS Configuration Example” section on page 16-31
Step 4 exit Return to global configuration mode.
Step 5 Repeat Steps 2 through 4 on Switch A interface Fast Ethernet 0/2.
Step 6 end Return to privileged EXEC mode.
Step 7 show running-config Verify your entries.
In the display, make sure that interfaces Fast Ethernet 0/1 and FastEthernet 0/2 are configured as trunk ports.
Step 8 show vlan When the trunk links come up, Switch A receives the VTP informationfrom the other switches. Verify that Switch A has learned the VLANconfiguration.
Step 9 configure terminal Enter global configuration mode.
Step 10 interface fastethernet 0/1 Enter interface configuration mode, and define Fast Ethernet port 0/1the interface to set the STP cost.
Step 11 spanning-tree vlan 2-4 cost 30 Set the spanning-tree path cost to 30 for VLANs 2 through 4.
Step 12 end Return to global configuration mode.
Step 13 Repeat Steps 9 through 11 on Switch A interface Fast Ethernet 0/2, aset the spanning-tree path cost to 30 for VLANs 8, 9, and 10.
Step 14 exit Return to privileged EXEC mode.
Step 15 show running-config Verify your entries.
In the display, verify that the path costs are set correctly for interfacFast Ethernet 0/1 and 0/2.
Step 16 copy running-config startup-config (Optional) Save your entries in the configuration file.
Command Purpose
16-24Catalyst 2950 and Catalyst 2955 Switch Software Configuration Guide
78-11380-11
Chapter 16 Configuring VLANsConfiguring VMPS
ot theVLAN
inst
se.
ds
s a
t one
ert and
CLI,
esses
oPS
t of aMPS
porterycketsignedthe
;
to aPS
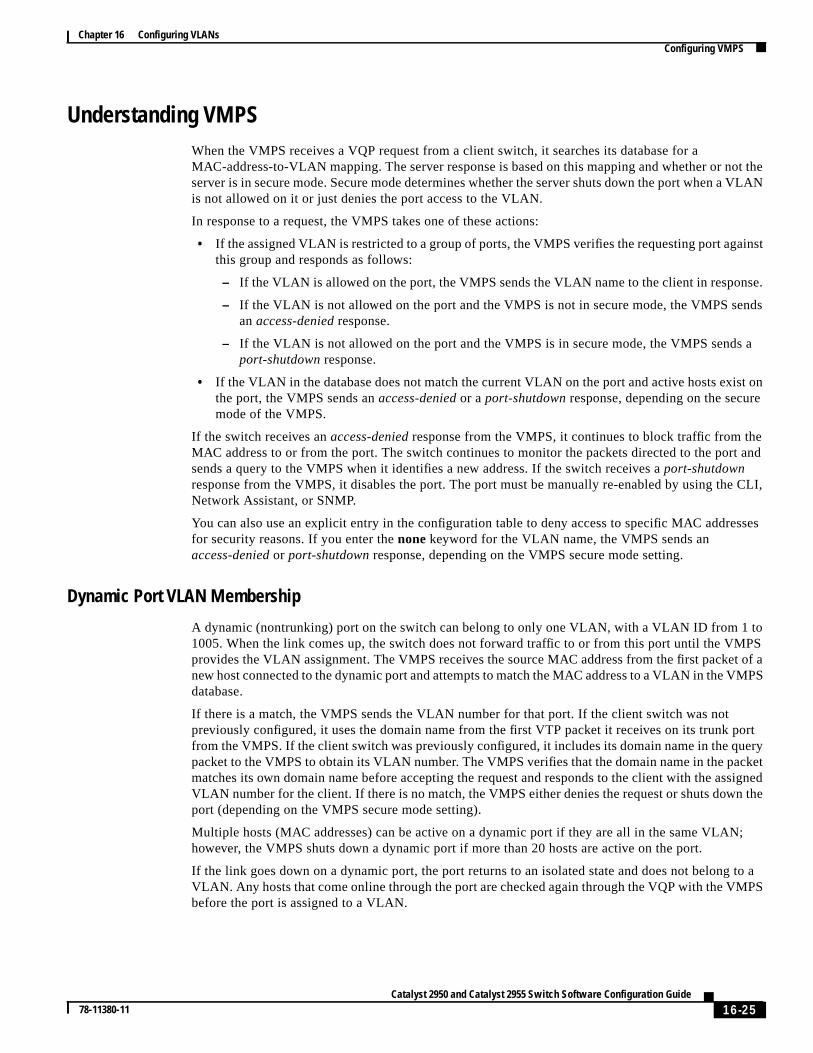
Understanding VMPSWhen the VMPS receives a VQP request from a client switch, it searches its database for aMAC-address-to-VLAN mapping. The server response is based on this mapping and whether or nserver is in secure mode. Secure mode determines whether the server shuts down the port when ais not allowed on it or just denies the port access to the VLAN.
In response to a request, the VMPS takes one of these actions:
• If the assigned VLAN is restricted to a group of ports, the VMPS verifies the requesting port agathis group and responds as follows:
– If the VLAN is allowed on the port, the VMPS sends the VLAN name to the client in respon
– If the VLAN is not allowed on the port and the VMPS is not in secure mode, the VMPS senanaccess-deniedresponse.
– If the VLAN is not allowed on the port and the VMPS is in secure mode, the VMPS sendport-shutdownresponse.
• If the VLAN in the database does not match the current VLAN on the port and active hosts existhe port, the VMPS sends anaccess-denied or a port-shutdown response, depending on the securmode of the VMPS.
If the switch receives anaccess-denied response from the VMPS, it continues to block traffic from thMAC address to or from the port. The switch continues to monitor the packets directed to the posends a query to the VMPS when it identifies a new address. If the switch receives aport-shutdownresponse from the VMPS, it disables the port. The port must be manually re-enabled by using theNetwork Assistant, or SNMP.
You can also use an explicit entry in the configuration table to deny access to specific MAC addrfor security reasons. If you enter thenonekeyword for the VLAN name, the VMPS sends anaccess-denied or port-shutdown response, depending on the VMPS secure mode setting.
Dynamic Port VLAN Membership
A dynamic (nontrunking) port on the switch can belong to only one VLAN, with a VLAN ID from 1 t1005. When the link comes up, the switch does not forward traffic to or from this port until the VMprovides the VLAN assignment. The VMPS receives the source MAC address from the first packenew host connected to the dynamic port and attempts to match the MAC address to a VLAN in the Vdatabase.
If there is a match, the VMPS sends the VLAN number for that port. If the client switch was notpreviously configured, it uses the domain name from the first VTP packet it receives on its trunk from the VMPS. If the client switch was previously configured, it includes its domain name in the qupacket to the VMPS to obtain its VLAN number. The VMPS verifies that the domain name in the pamatches its own domain name before accepting the request and responds to the client with the asVLAN number for the client. If there is no match, the VMPS either denies the request or shuts downport (depending on the VMPS secure mode setting).
Multiple hosts (MAC addresses) can be active on a dynamic port if they are all in the same VLANhowever, the VMPS shuts down a dynamic port if more than 20 hosts are active on the port.
If the link goes down on a dynamic port, the port returns to an isolated state and does not belongVLAN. Any hosts that come online through the port are checked again through the VQP with the VMbefore the port is assigned to a VLAN.
16-25Catalyst 2950 and Catalyst 2955 Switch Software Configuration Guide
78-11380-11

Chapter 16 Configuring VLANsConfiguring VMPS
a
series
theck
switchis a
thesed to
witch
e port
y tond the
VMPS Database Configuration File
The VMPS contains a database configuration file that you create. This ASCII text file is stored onswitch-accessible TFTP server that functions as a server for VMPS. The file contains VMPSinformation, such as the domain name, the fallback VLAN name, and the MAC-address-to-VLANmapping. The switch cannot act as the VMPS, but you can use a Catalyst 5000 or Catalyst 6000switch as the VMPS.
You can configure a fallback VLAN name. If you connect a device with a MAC address that is not indatabase, the VMPS sends the fallback VLAN name to the client. If you do not configure a fallbaVLAN and the MAC address does not exist in the database, the VMPS sends anaccess-deniedresponse.If the VMPS is in secure mode, it sends aport-shutdown response.
Whenever port names are used in the VMPS database configuration file, the server must use theconvention for naming ports. For example, Fa0/4 is fixed Fast Ethernet port number 4. If the switchcluster member, the command switch adds the name of the switch before the type. For example,es3%Fa0/4refers to fixed Fast Ethernet port 4 on member switch 3. When port names are required,naming conventions must be followed in the VMPS database configuration file when it is configuresupport a cluster.
Default VMPS Client ConfigurationTable 16-6 shows the default VMPS and dynamic port configuration on client switches.
VMPS Configuration GuidelinesThese guidelines and restrictions apply to dynamic access port VLAN membership:
• You should configure the VMPS before you configure ports as dynamic.
• The communication between a cluster of switches and VMPS is managed by the command sand includes port-naming conventions that are different from standard port names. For thecluster-based port-naming conventions, see the“VMPS Database Configuration File” section onpage 16-26.
• When you configure a port as a dynamic access port, the spanning-tree Port Fast feature isautomatically enabled for that port. The Port Fast mode accelerates the process of bringing thinto the forwarding state.
• 802.1X ports cannot be configured as dynamic access ports. If you try to enable 802.1X on adynamic-access (VQP) port, an error message appears, and 802.1X is not enabled. If you trchange an 802.1X-enabled port to dynamic VLAN assignment, an error message appears, aVLAN configuration is not changed.
Table 16-6 Default VMPS Client and Dynamic Port Configuration
Feature Default Setting
VMPS domain server None
VMPS reconfirm interval 60 minutes
VMPS server retry count 3
Dynamic ports None configured
16-26Catalyst 2950 and Catalyst 2955 Switch Software Configuration Guide
78-11380-11

Chapter 16 Configuring VLANsConfiguring VMPS
nd
re it
e
not
.
eithern
• Trunk ports cannot be dynamic access ports, but you can enter theswitchport access vlan dynamicinterface configuration command for a trunk port. In this case, the switch retains the setting aapplies it if the port is later configured as an access port.
You must turn off trunking on the port before the dynamic access setting takes effect.
• Dynamic access ports cannot be network ports or monitor ports.
• Secure ports cannot be dynamic access ports. You must disable port security on a port befobecomes dynamic.
• Dynamic access ports cannot be members of an EtherChannel group.
• Port channels cannot be configured as dynamic access ports.
• The VTP management domain of the VMPS client and the VMPS server must be the same.
• VQP does not support extended-range VLANs (VLAN IDs higher than 1006). Extended-rangVLANs cannot be configured by VMPS.
• The VLAN configured on the VMPS server should not be a voice VLAN.
Configuring the VMPS ClientYou configure dynamic VLANs by using the VMPS (server). The switch can be a VMPS client; it canbe a VMPS server.
Entering the IP Address of the VMPS
You must first enter the IP address of the server to configure the switch as a client.
Note If the VMPS is being defined for a cluster of switches, enter the address on the command switch
Beginning in privileged EXEC mode, follow these steps to enter the IP address of the VMPS:
Note The switch port that is connected to the VMPS server cannot be a dynamic access port. It can bea static access port or a trunk port. See the“Configuring an Ethernet Interface as a Trunk Port” sectioon page 16-17.
Command Purpose
Step 1 configure terminal Enter global configuration mode.
Step 2 vmps serveripaddress primary Enter the IP address of the switch acting as the primary VMPS server.
Step 3 vmps server ipaddress Enter the IP address of the switch acting as a secondary VMPS server.
You can enter up to three secondary server addresses.
Step 4 end Return to privileged EXEC mode.
Step 5 show vmps Verify your entries in theVMPS Domain Server field of the display.
Step 6 copy running-config startup-config (Optional) Save your entries in the configuration file.
16-27Catalyst 2950 and Catalyst 2955 Switch Software Configuration Guide
78-11380-11

Chapter 16 Configuring VLANsConfiguring VMPS
ng
PS
), uset
theis to
hip
Configuring Dynamic Access Ports on VMPS Clients
If you are configuring a port on a cluster member switch as a dynamic port, first use thercommandprivileged EXEC command to log into the member switch.
Caution Dynamic port VLAN membership is for end stations or hubs connected to end stations. Connectidynamic access ports to other switches can cause a loss of connectivity.
Beginning in privileged EXEC mode, follow these steps to configure a dynamic access port on a VMclient switch:
To return an interface to its default configuration, use thedefault interface interface-id interfaceconfiguration command. To return an interface to its default switchport mode (dynamic desirabletheno switchport modeinterface configuration command. To reset the access mode to the defaulVLAN for the switch, use theno switchport access interface configuration command.
Note When you configure a dynamic access port by using theswitchport access vlan dynamic interfaceconfiguration command, the port might allow unauthorized users to access network resources if interface changes from access mode to trunk mode through the DTP negotiation. The workaroundconfigure the port as a static access port.
Reconfirming VLAN Memberships
Beginning in privileged EXEC mode, follow these steps to confirm the dynamic port VLAN membersassignments that the switch has received from the VMPS:
Command Purpose
Step 1 configure terminal Enter global configuration mode.
Step 2 interface interface-id Enter interface configuration mode and the switch port that isconnected to the end station.
Step 3 switchport mode access Set the port to access mode.
Step 4 switchport access vlan dynamic Configure the port as eligible for dynamic VLAN membership.
The dynamic access port must be connected to an end station.
Step 5 end Return to privileged EXEC mode.
Step 6 show interfacesinterface-idswitchport Verify your entries in theOperational Mode field of the display.
Step 7 copy running-config startup-config (Optional) Save your entries in the configuration file.
Command Purpose
Step 1 vmps reconfirm Reconfirm dynamic port VLAN membership.
Step 2 show vmps Verify the dynamic VLAN reconfirmation status.
16-28Catalyst 2950 and Catalyst 2955 Switch Software Configuration Guide
78-11380-11
Chapter 16 Configuring VLANsConfiguring VMPS
ou
n the
witch
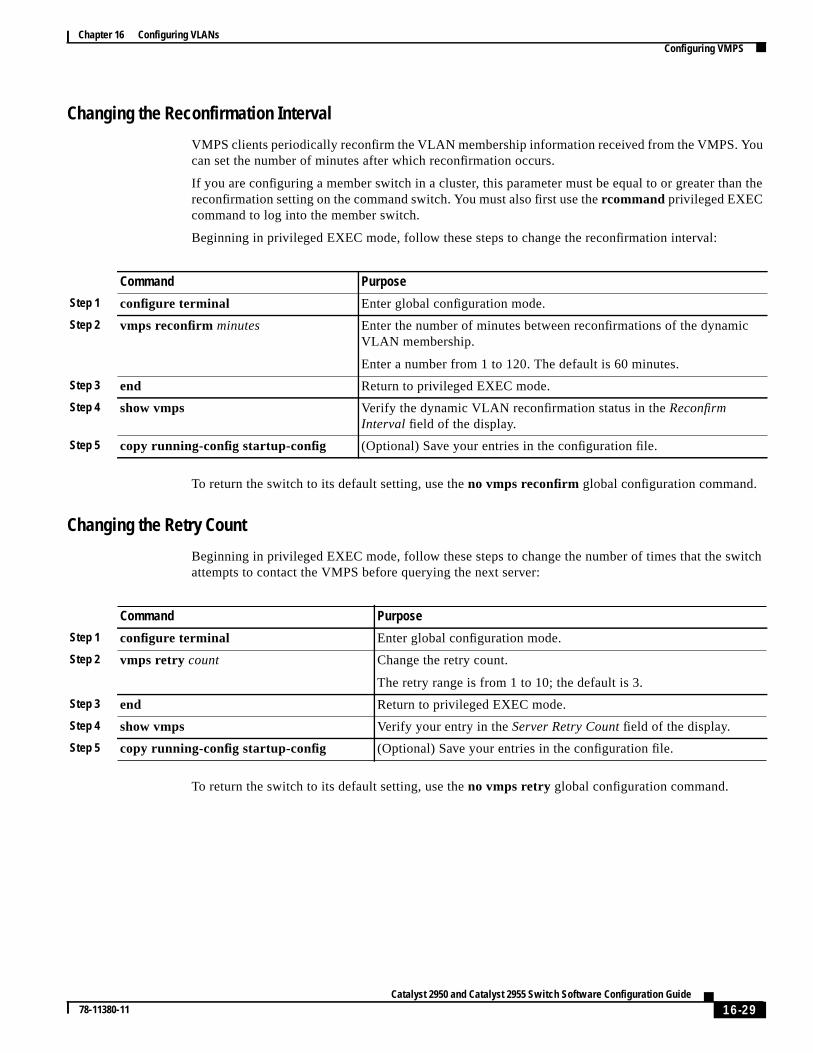
Changing the Reconfirmation Interval
VMPS clients periodically reconfirm the VLAN membership information received from the VMPS. Ycan set the number of minutes after which reconfirmation occurs.
If you are configuring a member switch in a cluster, this parameter must be equal to or greater thareconfirmation setting on the command switch. You must also first use thercommand privileged EXECcommand to log into the member switch.
Beginning in privileged EXEC mode, follow these steps to change the reconfirmation interval:
To return the switch to its default setting, use theno vmps reconfirm global configuration command.
Changing the Retry Count
Beginning in privileged EXEC mode, follow these steps to change the number of times that the sattempts to contact the VMPS before querying the next server:
To return the switch to its default setting, use theno vmps retry global configuration command.
Command Purpose
Step 1 configure terminal Enter global configuration mode.
Step 2 vmps reconfirm minutes Enter the number of minutes between reconfirmations of the dynamicVLAN membership.
Enter a number from 1 to 120. The default is 60 minutes.
Step 3 end Return to privileged EXEC mode.
Step 4 show vmps Verify the dynamic VLAN reconfirmation status in theReconfirmInterval field of the display.
Step 5 copy running-config startup-config (Optional) Save your entries in the configuration file.
Command Purpose
Step 1 configure terminal Enter global configuration mode.
Step 2 vmps retry count Change the retry count.
The retry range is from 1 to 10; the default is 3.
Step 3 end Return to privileged EXEC mode.
Step 4 show vmps Verify your entry in theServer Retry Count field of the display.
Step 5 copy running-config startup-config (Optional) Save your entries in the configuration file.
16-29Catalyst 2950 and Catalyst 2955 Switch Software Configuration Guide
78-11380-11

Chapter 16 Configuring VLANsConfiguring VMPS
huts
ies
S.
tch
ptn
Monitoring the VMPSYou can display information about the VMPS by using theshow vmpsprivileged EXEC command. Theswitch displays this information about the VMPS:
This is an example of output for theshow vmps privileged EXEC command:
Switch# show vmps
VQP Client Status:--------------------VMPS VQP Version: 1Reconfirm Interval: 60 minServer Retry Count: 3VMPS domain server: 172.20.128.86 (primary, current) 172.20.128.87
Reconfirmation status---------------------VMPS Action: No Dynamic Port
Troubleshooting Dynamic Port VLAN MembershipThe VMPS shuts down a dynamic port under these conditions:
• The VMPS is in secure mode, and it does not allow the host to connect to the port. The VMPS sdown the port to prevent the host from connecting to the network.
• More than 20 active hosts reside on a dynamic port.
To re-enable a disabled dynamic port, enter theno shutdown interface configuration command.
VMPS VQP Version The version of VQP used to communicate with the VMPS. The switch querthe VMPS that is using VQP version 1.
Reconfirm Interval The number of minutes the switch waits before reconfirming theVLAN-to-MAC-address assignments.
Server Retry Count The number of times VQP resends a query to the VMPS. If no response isreceived after this many tries, the switch starts to query the secondary VMP
VMPS domain server The IP address of the configured VLAN membership policy servers. The swisends queries to the one markedcurrent. The one markedprimary is the primaryserver.
VMPS Action The result of the most recent reconfirmation attempt. A reconfirmation attemcan occur automatically when the reconfirmation interval expired, or you caforce it by entering thevmps reconfirm privileged EXEC command or itsNetwork Assistant or SNMP equivalent.
16-30Catalyst 2950 and Catalyst 2955 Switch Software Configuration Guide
78-11380-11
Chapter 16 Configuring VLANsConfiguring VMPS
rts.
.
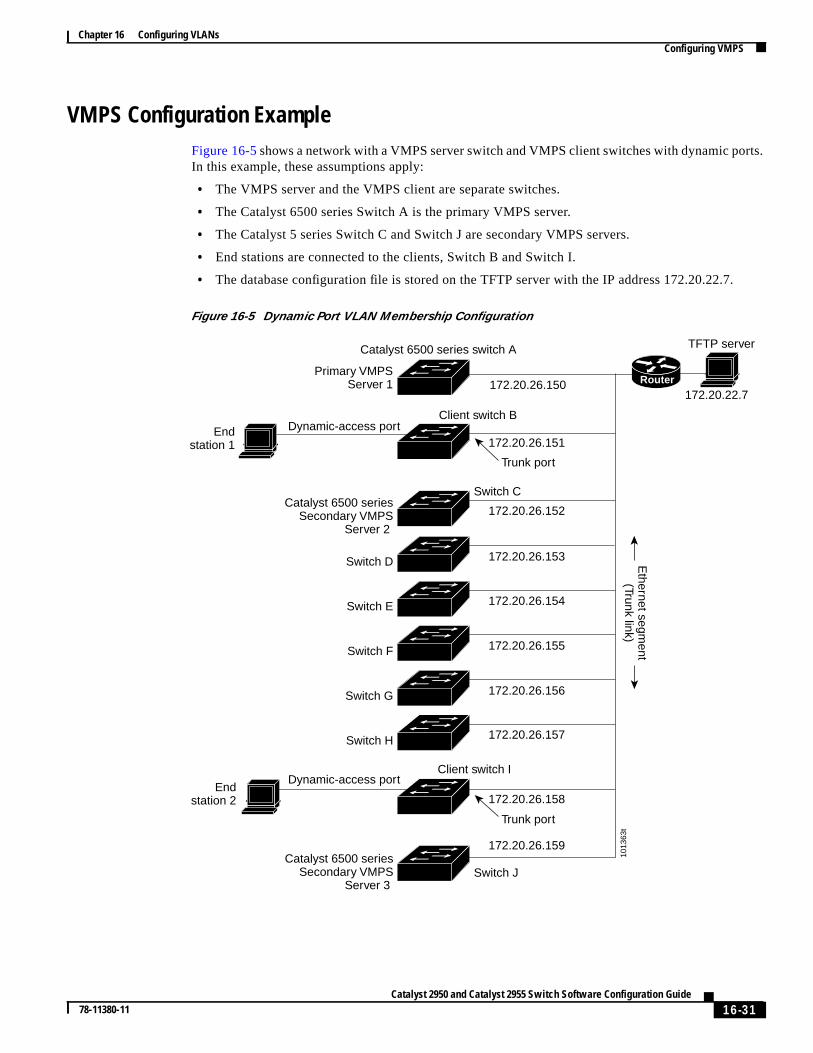
VMPS Configuration ExampleFigure 16-5shows a network with a VMPS server switch and VMPS client switches with dynamic poIn this example, these assumptions apply:
• The VMPS server and the VMPS client are separate switches.
• The Catalyst 6500 series Switch A is the primary VMPS server.
• The Catalyst 5 series Switch C and Switch J are secondary VMPS servers.
• End stations are connected to the clients, Switch B and Switch I.
• The database configuration file is stored on the TFTP server with the IP address 172.20.22.7
Figure 16-5 Dynamic Port VLAN Membership Configuration
Primary VMPSServer 1
Catalyst 6500 seriesSecondary VMPS
Server 2
Catalyst 6500 seriesSecondary VMPS
Server 3
172.20.26.150
172.20.26.151
Catalyst 6500 series switch A
172.20.26.152
Switch C
Ethernet segm
ent(Trunk link)
172.20.26.153
172.20.26.154
172.20.26.155
172.20.26.156
172.20.26.157
172.20.26.158
172.20.26.159
Client switch I
Client switch B
Endstation 2
Endstation 1
TFTP server
Dynamic-access port
Dynamic-access port
Switch J
Switch D
Switch E
Switch F
Switch G
Switch H
172.20.22.7
1013
63t
Trunk port
Trunk port
Router
16-31Catalyst 2950 and Catalyst 2955 Switch Software Configuration Guide
78-11380-11

Chapter 16 Configuring VLANsConfiguring VMPS
16-32Catalyst 2950 and Catalyst 2955 Switch Software Configuration Guide
78-11380-11