Embed Size (px)
Citation preview
NMKOMNN
`bob`=_äçÅë
kÉï=~ë=çÑW==
båÖäáëÜ
fåÇìëíêá~ääó=ã~åìÑ~ÅíìêÉÇ=ÑáåÉJëíêìÅíìêÉÇ=ÑÉäÇëé~íÜáÅ=ÅÉê~ãáÅ=ÄäçÅâëléÉê~íáåÖ=fåëíêìÅíáçåë
Industrially manufactured fine-structured feldspathic ceramic blocks\r\rOperating Instructions

Sirona Dental Systems GmbH Industrially manufactured fine-structured feldspathic ceramic blocks
Table of contents
1 Material..................................................................................................................... 4
2 Chemical composition .............................................................................................. 6
3 Technical Data ......................................................................................................... 7
4 Indications and preparation instructions................................................................... 10
4.1 Indication....................................................................................................... 10
4.2 Contraindications .......................................................................................... 10
4.3 General preparation instructions ................................................................... 11
4.4 Preparation of veneers.................................................................................. 11
4.5 Preparation of inlays and onlays ................................................................... 12
4.6 Preparation of anterior and posterior tooth crowns ....................................... 13
5 Producing a restoration ............................................................................................ 15
5.1 Use of the multilayer technique..................................................................... 165.1.1 Introduction ........................................................................................ 165.1.2 Processing steps................................................................................ 165.1.3 Advantages of the multilayer technique ............................................. 165.1.4 Indication of the multilayer technique................................................. 175.1.4.1General indication .............................................................................. 175.1.4.2Dentist indication................................................................................ 175.1.4.3Laboratory indication.......................................................................... 175.1.5 Contraindication of the multilayer technique ...................................... 185.1.5.1General contraindication .................................................................... 185.1.5.2Hyperfunction ..................................................................................... 185.1.6 Available block sizes and colors ........................................................ 185.1.7 Processing conditions for the multilayer technique............................ 195.1.8 Designing a restoration ...................................................................... 205.1.8.1General information............................................................................ 205.1.8.2Recommended parameter settings .................................................... 205.1.8.3Designing with the multilayer technique............................................. 205.1.9 Reworking the framework and veneer structure ................................ 225.1.10 Adhesive bonding of the veneer and framework structures ............... 255.1.11 Clinical bonding of the restoration...................................................... 28
5.2 Scanning, designing and milling.................................................................... 28
61 72 642 D 34872 D 3487.201.04.03.02 10.2011

Sirona Dental Systems GmbH
Industrially manufactured fine-structured feldspathic ceramic blocks
båÖäáëÜ
5.3 Reworking/Polishing..................................................................................... 29
5.4 Characterization/Individualization................................................................. 29
5.5 Bonding ........................................................................................................ 29
5.6 Removal of inserted restorations.................................................................. 30
5.7 Trephination ................................................................................................. 30
6 Certification.............................................................................................................. 31
7 References .............................................................................................................. 32
61 72 642 D 3487D 3487.201.04.03.02 10.2011 3

1 Material Sirona Dental Systems GmbH Industrially manufactured fine-structured feldspathic ceramic blocks
1 MaterialMaterial
CEREC Blocs are industrially manufactured, fine-structured feldspathic ceramic blocks used to produce inlays, onlays, crowns and veneers with CEREC or inLab.
The key advantage of CEREC Blocs is that restorations can be inserted immediately after the milling operation. Dentists also appreciate the good polishability and outstanding enamel-like abrasion properties of CEREC Blocs.
The select composition, the fine microstructure and the industrial sintering process used in producing the ceramic blocks are the chief reasons for the good polishability and outstanding enamel-like abrasion properties of restorations produced from CEREC Blocs.
The outstandingly millable CEREC Blocs PC enable dentists to reproduce the color gradients characteristic of natural teeth with respect to both translucence and intensity chairside, thus achieving improved integration of the restoration in the remaining dentition as well.
The milling tool saving, fine-structured feldspathic ceramics are characterized by antagonist-friendly abrasion properties corresponding to those of natural tooth substance, as well as optimal light conducting effects and white fluorescence.
A special production process has made it possible to integrate three different color saturation levels (chroma) in the CEREC Blocs PC, and thus three different levels of translucence in a single ceramic layer block.
Through these three layers in a single CEREC Blocks PC, it is now possible to attain a unique naturalness in the restoration: The upper layer of enamel is the least intensive and, at the same time, most translucent one; the middle dentin layer corresponds to the normal level of intensity, while the lower cervical layer has the strongest pigmentation and, like a natural tooth, the least translucence.
Restorations made from CEREC Blocs PC thus resemble natural teeth more strongly without requiring any subsequent surface individualization or characterization. The use of CEREC Blocks PC also enables enhanced integration of the restoration in the remaining dentition.
The material and processing advantages of CEREC Blocs/CEREC Blocs PC feldspathic ceramics have been verified by scientific studies and correlated to the more than 14 million restorations produced with the VITABLOCS fine-structured feldspathic ceramic blocks from VITA in Bad Säckingen to-date.
61 72 642 D 34874 D 3487.201.04.03.02 10.2011

Sirona Dental Systems GmbH 1 MaterialIndustrially manufactured fine-structured feldspathic ceramic blocks
båÖäáëÜ
The advantages of fine-structure feldspathic ceramics are:
● The material is ideally suited to the CEREC CAD/CAM system
● Many years of experience working with the material
● Maximum market acceptance
● Clinical acceptance
● Highly aesthetic appearance
● Very good translucence properties
● Chameleon effect
● Antagonist-friendly abrasion properties
61 72 642 D 3487D 3487.201.04.03.02 10.2011 5

61 72 642 D 34876 D 3487.201.04.03.02 10.2011
2 Chemical composition Sirona Dental Systems GmbH Industrially manufactured fine-structured feldspathic ceramic blocks
2 Chemical compositionChemical composition
The chemical composition values specified above are batch-dependent.
Oxides, contained in very low concentrations and used e.g. for coloring, are not specified here.
Oxide % of total weightSiO2 56 - 64
Al2O3 20 - 23
Na2O 6 - 9
K2O 6 - 8
CaO 0,3 - 0,6TiO2 0,0 - 0,1

Sirona Dental Systems GmbH 3 Technical DataIndustrially manufactured fine-structured feldspathic ceramic blocks
båÖäáëÜ
3 Technical DataTechnical Data
Physical properties1
CEREC Blocs are available in up to six brightness steps: three areas for the value of the color saturation or chroma (translucent, medium and opaque) and three as polychromatic CEREC Blocs PC layer blocks.
The designation of the CEREC Blocs indicates the manufacturer, Sirona (S), the brightness step (0 - 5) and the area of the color saturation value (T, M, O).
More information concerning available block sizes and colors can be obtained from the two tables below:
1. The technical and physical values specified here are typical measurement results obtained by the manufacturer using inter-nally available measuring equipment to measure internally produced samples. Different results can be expected when measuringsamples produced elsewhere with other measuring instruments.
61 72 642 D 3487D 3487.201.04.03.02 10.2011 7
3 Technical Data Sirona Dental Systems GmbH Industrially manufactured fine-structured feldspathic ceramic blocks
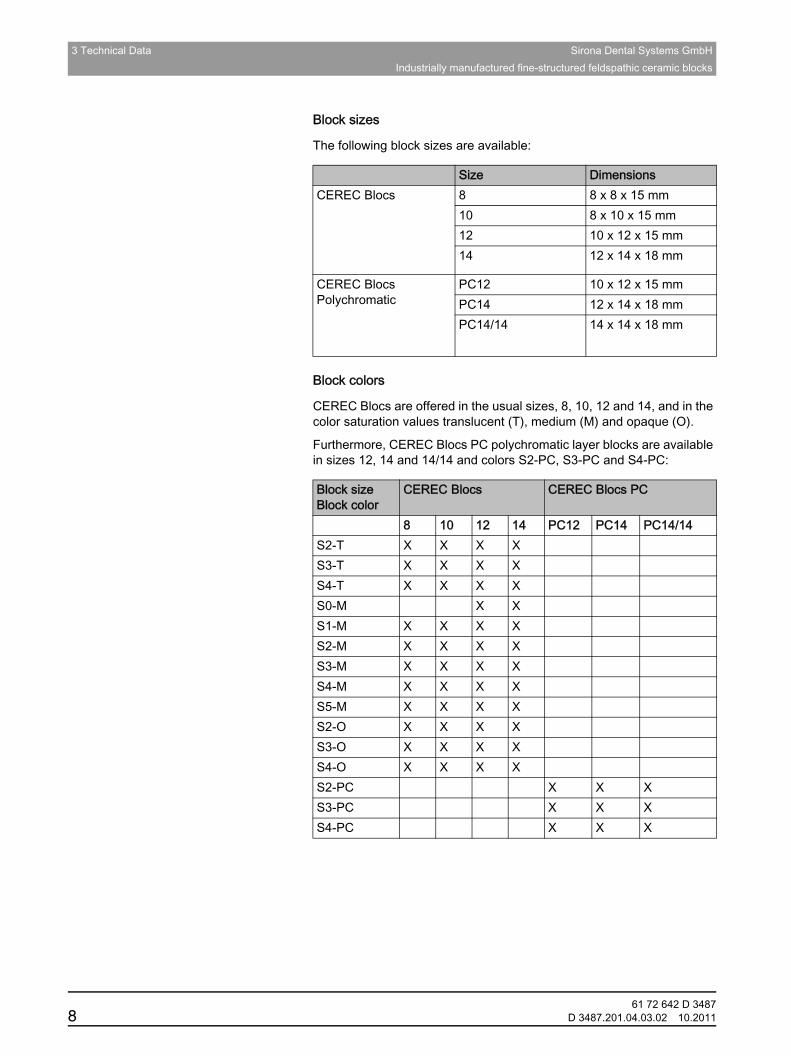
Block sizes
The following block sizes are available:
Block colors
CEREC Blocs are offered in the usual sizes, 8, 10, 12 and 14, and in the color saturation values translucent (T), medium (M) and opaque (O).
Furthermore, CEREC Blocs PC polychromatic layer blocks are available in sizes 12, 14 and 14/14 and colors S2-PC, S3-PC and S4-PC:
Size DimensionsCEREC Blocs 8 8 x 8 x 15 mm
10 8 x 10 x 15 mm12 10 x 12 x 15 mm14 12 x 14 x 18 mm
CEREC Blocs Polychromatic
PC12 10 x 12 x 15 mmPC14 12 x 14 x 18 mmPC14/14 14 x 14 x 18 mm
Block sizeBlock color
CEREC Blocs CEREC Blocs PC
8 10 12 14 PC12 PC14 PC14/14S2-T X X X XS3-T X X X XS4-T X X X XS0-M X XS1-M X X X XS2-M X X X XS3-M X X X XS4-M X X X XS5-M X X X XS2-O X X X XS3-O X X X XS4-O X X X XS2-PC X X XS3-PC X X XS4-PC X X X
61 72 642 D 34878 D 3487.201.04.03.02 10.2011

Sirona Dental Systems GmbH 3 Technical DataIndustrially manufactured fine-structured feldspathic ceramic blocks
båÖäáëÜ
The following chart (incl. the specification of the VITA reference colors) provides detailed information for color selection:
61 72 642 D 3487D 3487.201.04.03.02 10.2011 9

4 Indications and preparation instructions Sirona Dental Systems GmbH4.1 Indication Industrially manufactured fine-structured feldspathic ceramic blocks
4 Indications and preparation instructionsIndications and preparation instructions
4.1 IndicationIndication
CEREC Blocs are indicated for the CEREC/inLab CAD/CAM production of inlays, onlays, overlays, partial crowns, full crowns and endocrowns on molars as well as for the veneering structure in multilayer systems:
– possible
– recommended
4.2 ContraindicationsContraindications
● Insufficient oral hygiene
● Insufficient preparation results
● Insufficient tooth structure
● Insufficient space available
● Bruxism
Hyperfunction: Patients diagnosed with excessive mastication, especially "gnashers" and "pressers" are contraindicated for restorations from CEREC Blocs. An absolute contraindication applies to the treatment of devital teeth of hyperfunction patients with CEREC Blocs restorations.
Endocrown premolars: Endocrowns on premolars are contraindicated due to their small adhesive surfaces and delicate root cross sections.
Bridges: Since CEREC Blocs are ceramic blocks made of finely structured feldspathic ceramics, they cannot be used to produce bridge restorations of any kind prior to processing due to their limited strength of approx. 120 MPa.
Material
Indication
Finely structured feldspathic ceramics
CEREC Blocs CEREC Blocs Polychromatic
Inlays
Onlays
Veneers
Partial crowns
Anterior tooth crowns
Posterior tooth crowns
Multilayer veneering structure (frame structure from inCoris ZI)
61 72 642 D 348710 D 3487.201.04.03.02 10.2011

Sirona Dental Systems GmbH 4 Indications and preparation instructionsIndustrially manufactured fine-structured feldspathic ceramic blocks
båÖäáëÜ
Fully ceramic frameworks: CEREC Blocs and CEREC Blocs PC must not be used as framework ceramics. A suitable veneer (e.g. VITA VM9) made of this material therefore must not be used as a full veneer of a crown cap.
4.3 General preparation instructionsGeneral preparation instructions
The preparation can be optionally with a chamfer or a shoulder with rounded internal angle A circular depth of cut of one millimeter should be aimed for. The vertical preparation angle should be at least 3°. All transitions from the axial to the occlusal or incisal areas must be rounded off. Uniform and smooth surfaces are advantageous. A WaxUp and the production of silicone keys to check the preparation are advantageous for diagnosis as well as for clinical implementation (defect-oriented preparation):
4.4 Preparation of veneersPreparation of veneers
The ceramic layer thickness of CEREC Blocs veneers should be at least 0.5 mm to enable reliable adhesive bonding:
Labial
● Average labial reduction: 0.5 mm
● Progression of vestibular tooth contour maintained
Cervical
● Lightly rounded shoulder or chamfer running parallel to the gingival margin, supragingival
Shoulder preparation
Chamfer preparation
Over-contoured chamfer preparation
Tangential preparations are contraindicated.
61 72 642 D 3487D 3487.201.04.03.02 10.2011 11

4 Indications and preparation instructions Sirona Dental Systems GmbH4.5 Preparation of inlays and onlays Industrially manufactured fine-structured feldspathic ceramic blocks
Proximal
● Aim for proximal margins in the sense of a chamfer
● "Saddle-shaped" perimeter
● Natural contact points preserved where possible
Incisal
● Labial-incisal "chamfering" without extension (1)
● A slight reduction allows for a thicker ceramic layer for an individual characterization (2)
● For "extension", flatten incisal edge and round off edge (3)
4.5 Preparation of inlays and onlaysPreparation of inlays and onlays
The following guidelines apply to the production of inlays and onlays from CEREC Blocs finely structured feldspathic ceramics:
● Minimum depth at bottom of fissure: 1.5 mm
● Minimum depth at edge of cavity: 2 mm
● If the edge of the cavity comes to rest near the cusp tip: 2.5 mm
● The cervical step must be detached from the neighboring tooth.
● Minimum width of proximal step: 1.5 mm
● Angle between lateral wall of proximal box and proximal surface: ≥ 60°
61 72 642 D 348712 D 3487.201.04.03.02 10.2011

Sirona Dental Systems GmbH 4 Indications and preparation instructionsIndustrially manufactured fine-structured feldspathic ceramic blocks
båÖäáëÜ
Preparation of inlays
The minimum layer thickness of CEREC Blocs ceramics below the bottom location of the fissure should be 1.5 mm.
Preparation of onlays
For onlay restorations from CEREC Blocs, make sure that the minimum thickness of the ceramic material in the area of the cusp overcoupling is 1.5 - 2 mm.
4.6 Preparation of anterior and posterior tooth crownsPreparation of anterior and posterior tooth crowns
Occlusal ceramic layer thicknesses for crowns
In the main fissure: While the occlusal margins taper off thin, the minimum layer thickness of the ceramic material under the lowest point of the fissure is 1.5 mm.
Check the cavity for sufficient dimensions while making the preparation.
The establishment of functional dentin adhesion makes the laying of a subfilling unnecessary and prevents reduction of the ceramic material thickness at a specified preparation depth.
The layer thickness must be checked in the milling preview of the 3D software.
Reduction below the minimum layer thickness via manual reworking of the fissure following insertion must be avoided.
To ensure the clinical success of crowns made from CEREC Blocs, always observe the following minimum ceramic layer thicknesses:
61 72 642 D 3487D 3487.201.04.03.02 10.2011 13

4 Indications and preparation instructions Sirona Dental Systems GmbH4.6 Preparation of anterior and posterior tooth crowns Industrially manufactured fine-structured feldspathic ceramic blocks
Preparation of anterior teeth
The incisal wall thickness should be at least 1.5 mm, the circular wall thickness at least 1.0 mm.
The tapering crown edge should be 0.8 mm thick.
Preparation of posterior teeth (premolars and molars)
At the lowest point of the main fissure, the material thickness should be 1.5 mm.
For the cusp design, a material thickness of at least 2 mm should be ensured.
The circular wall thickness should be 1.0 - 1.5 mm.
The tapering crown edge should be 0.8 mm thick.
61 72 642 D 348714 D 3487.201.04.03.02 10.2011
Sirona Dental Systems GmbH 5 Producing a restorationIndustrially manufactured fine-structured feldspathic ceramic blocks
båÖäáëÜ
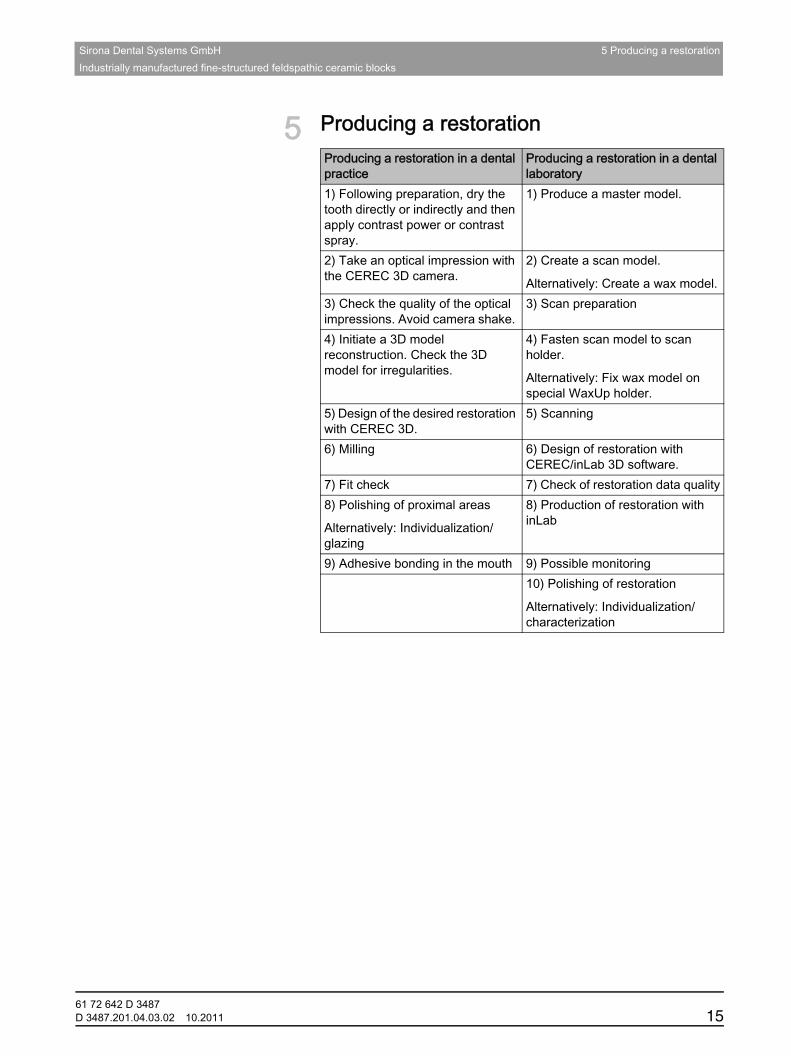
5 Producing a restorationProducing a restoration
Producing a restoration in a dental practice
Producing a restoration in a dental laboratory
1) Following preparation, dry the tooth directly or indirectly and then apply contrast power or contrast spray.
1) Produce a master model.
2) Take an optical impression with the CEREC 3D camera.
2) Create a scan model.
Alternatively: Create a wax model.3) Check the quality of the optical impressions. Avoid camera shake.
3) Scan preparation
4) Initiate a 3D model reconstruction. Check the 3D model for irregularities.
4) Fasten scan model to scan holder.
Alternatively: Fix wax model on special WaxUp holder.
5) Design of the desired restoration with CEREC 3D.
5) Scanning
6) Milling 6) Design of restoration with CEREC/inLab 3D software.
7) Fit check 7) Check of restoration data quality8) Polishing of proximal areas
Alternatively: Individualization/glazing
8) Production of restoration with inLab
9) Adhesive bonding in the mouth 9) Possible monitoring10) Polishing of restoration
Alternatively: Individualization/characterization
61 72 642 D 3487D 3487.201.04.03.02 10.2011 15

5 Producing a restoration Sirona Dental Systems GmbH5.1 Use of the multilayer technique Industrially manufactured fine-structured feldspathic ceramic blocks
5.1 Use of the multilayer techniqueUse of the multilayer technique
5.1.1 IntroductionIntroduction
The multilayer technique is an extremely rational method of manufacturing all-ceramic bridges and crowns. The fully anatomical suggestion is split into two parts in the software here.
The framework structure is manufactured from zirconia (inCoris ZI) and the veneer structure from feldspathic ceramics (CEREC Blocs). Starting with inLab 3D software 3.86, it is also possible to use this innovative approach for bridges with CEREC Blocs 40.
5.1.2 Processing stepsProcessing steps
The following processing steps must be followed when using the multilayer technique.
1. A fully anatomical bridge or crown can be produced following a single scan using patented biogenerics in conjunction with the inLab MC XL, inEos Blue or CEREC AC milling unit and inLab 3D software. The software automatically splits these fully anatomical
restorations into a defined optimal material layer thickness with an anatomically reduced, undercut-free geometry and in a veneer structure which also shows defined minimum layer thicknesses.
2. Then the framework (= primary structure) is first milled out of an inCoris ZI block and sintered in the inFire HTC high temperature sintering furnace.
3. The morphological veneer structure is then milled out of the CEREC Blocs. As a result, the two structures fit each other so that they can be
interconnected.
4. The veneer structure is then finalized (polished or painted).5. In the final processing step, the veneer structure made of silicate
ceramics is positively bonded to the zirconia framework structure using a commercially available bonding material.
The result is high-strength and esthetic bridges and crowns which can be perfectly integrated in the residual dentition from a functional perspective.
5.1.3 Advantages of the multilayer techniqueAdvantages of the multilayer technique
● Use of biogeneric design of occlusal surfaces for crowns and bridges, which is preferable to manual wax modeling regarding its speed and correct, patient-specific occlusal morphology, since it enables the reconstruction of completely destroyed occlusal surfaces as well. This enhances the integration in the individual remaining tooth substance and in the residual dentition.
● Consideration of patient-specific biomechanics and the the functioning of initially coherent occlusion/articulation, without time-consuming fitting at the treatment chair.
61 72 642 D 348716 D 3487.201.04.03.02 10.2011

Sirona Dental Systems GmbH 5 Producing a restorationIndustrially manufactured fine-structured feldspathic ceramic blocks
båÖäáëÜ
● Use of ceramics which have been clinically tried and tested over a million times for both the framework and the veneer structures.
● High clinical dependability of restorations through the use of industrially prefabricated, flawless and homogeneous blanks.
● Easy, positive and pore-free joining of the veneer structure onto the framework without using special equipment such as furnaces etc.
● Freedom of tension between zirconia framework and veneer structure due to composite buffer. The occurrence of damaging thermal inhomogeneities inside of the restoration and the risk of veneer chipping is thus avoided.
● Automatic compliance with the minimum ceramic layer thicknesses of the framework and of the veneer structure via software control.
● Consistent, highly efficient use of CAD/CAM technology for the veneer as well. Improved utilization of the inLab system is thus achieved.
● Manual operating time is thus replaced by machining time. A drastic reduction of production costs per unit is thus achieved.
5.1.4 Indication of the multilayer techniqueIndication of the multilayer technique
5.1.4.1 General indicationGeneral indication
Highly esthetic single-tooth crowns for the anterior and posterior tooth regions and bridge restorations for the posterior tooth region can be manufactured using the multilayer technique.
Indication overview
– recommended
5.1.4.2 Dentist indicationDentist indication
Single crowns and bridges comprising up to four units (limited by mounting area and block size).
5.1.4.3 Laboratory indicationLaboratory indication
Single crowns and bridges comprising up to four units (limited by block size).
Sirona multilayer techniqueAnterior tooth crowns
Posterior tooth crowns
Posterior tooth bridges
Dentist Laboratory
61 72 642 D 3487D 3487.201.04.03.02 10.2011 17

5 Producing a restoration Sirona Dental Systems GmbH5.1 Use of the multilayer technique Industrially manufactured fine-structured feldspathic ceramic blocks
5.1.5 Contraindication of the multilayer techniqueContraindication of the multilayer technique
5.1.5.1 General contraindicationGeneral contraindication
● Insufficient oral hygiene
● Insufficient preparation results
● Insufficient tooth structure
● Insufficient space available
5.1.5.2 HyperfunctionHyperfunction
Patients diagnosed with excessive mastication (especially "gnashers" and "pressers") are contraindicated for restorations with occlusal surfaces machined from finely structured feldspathic ceramic CEREC Blocs.
5.1.6 Available block sizes and colorsAvailable block sizes and colors
The block is available in 4 monochromatic colors and in three polychromatic colors.
IMPORTANT
For strength reasons, CEREC Blocs for the manufacture of veneer structures for bridges must not be used to manufacture bridges which are not supported by zirconia frameworks.
Designation REFCEREC Blocs 40 S2-T
Size: 40/19, color: S2-T, 2 pcs
6273895
CEREC Blocs 40 S2-M
Size: 40, color: S2-M, 2 pcs
6273887
CEREC Blocs 40 S3-M
Size: 40, color: S3-M, 2 pcs
6273879
CEREC Blocs 40 S4-M, size: 40, color: S4-M, 2 pcs
6273861
CEREC Blocs 40 S2-PC, size: 40, color: S2-PC, 2 pcs
6273929
CEREC Blocs 40 S3-PC, size: 40, color: S3-PC, 2 pcs
6273911
CEREC Blocs 40 S4-PC, size: 40, color: S4-PC, 2 pcs
6273903
61 72 642 D 348718 D 3487.201.04.03.02 10.2011

Sirona Dental Systems GmbH 5 Producing a restorationIndustrially manufactured fine-structured feldspathic ceramic blocks
båÖäáëÜ
5.1.7 Processing conditions for the multilayer techniqueProcessing conditions for the multilayer technique
Hardware requirements
Veneer structures can be machined from CEREC Blocs for the Sirona multilayer technique only with inLab MC XL and CEREC MC XL milling units.
A high-temperature sintering furnace such as e.g. inFire HTC speed is required for sintering zirconia frameworks.
Software requirements
inLab 3D software, Version 3.86 or higher, must be installed for processing with the multilayer technique.
Milling instruments
The following use of the milling instruments is recommended:
Preparation guidelines
The preparation guidelines usually applicable to full ceramic restorations apply (see "Preparation of anterior and posterior tooth crowns [ → 13]“).
IMPORTANT
If a high-temperature sintering furnace is not available in the practice or laboratory, the zirconia framework can be ordered from the Sirona infiniDent production center.
Required milling instrumentsleft right
Framework structure:
inCoris ZI
Veneer structure:
CEREC Blocs
Milling additive
DENTATEC
75 ml per tank filling
61 72 642 D 3487D 3487.201.04.03.02 10.2011 19

5 Producing a restoration Sirona Dental Systems GmbH5.1 Use of the multilayer technique Industrially manufactured fine-structured feldspathic ceramic blocks
Ceramic layer thickness
In order to ensure the lasting clinical success of restorations made with the Sirona multilayer technique, the correct minimum ceramic layer thicknesses of framework and veneer structures are stored in the inLab 3D software (Version 3.86 and higher).
5.1.8 Designing a restorationDesigning a restoration
5.1.8.1 General informationGeneral information
In order to design a restoration with CEREC Blocs 40, you will require inLab 3D software, Version 3.86 or higher.
Individual tooth restorations using e.g. CEREC Blocks 14 are also possible with inLab 3D software Version 3.80 and higher.
5.1.8.2 Recommended parameter settingsRecommended parameter settings
Spacer
Framework structure on the preparation: No change for conventional frameworks
Framework structure – veneer structure: + 60 μm
5.1.8.3 Designing with the multilayer techniqueDesigning with the multilayer technique
Designing a restoration
✔ You have selected a patient from the database or created a new patient.
1. In the New dialog, select e.g. "Bridge" as the restoration, and the "Multilayer" design technique.
2. Take exposures of the preparation and (if applicable) of the antagonist as usual as well as further images, depending on the selected bite registration technique.
3. After the model has been reconstructed, select Sirona inCoris ZI for the framework structure or CEREC Blocs-40 for the veneer structure in the material selection dialog.
4. Trim the model and the antagonist (if applicable).
5. Draw in the preparation lines and base lines. Draw in the base line so that the position and size correspond approximately to the pontic to be replaced.
IMPORTANT
The base line always must be drawn in larger for the multilayer technique than e.g. is usually the case for a fully anatomical bridge.
61 72 642 D 348720 D 3487.201.04.03.02 10.2011

Sirona Dental Systems GmbH 5 Producing a restorationIndustrially manufactured fine-structured feldspathic ceramic blocks
båÖäáëÜ
6. Using the parameter "Lingual opening angle", you can adapt the pontic on the lingual side to guarantee accessibility when cleaning. This parameter must be set prior to the calculation of the first suggestion.
7. Set the insertion axis and click the "Next" icon. A selection menu appears in which the type of tooth shape can
be selected.
8. Select "Individual" for biogeneric calculation based on the neighboring teeth. If no suitable neighboring teeth are available, select a preferential tooth shape: "adult", "youth", "lepto", "athlet", "pykno" or "asia".
9. Confirm your choice by clicking the "OK" button.10. This suggestion can be changed individually using the usual tools.
For bridges, ensure that you set a sufficiently large connector cross-section. The connector cross-sections for the current active tooth position are displayed in the status bar. If a connector cross-section that is too small has been selected,
the corresponding field in the status bar turns red. For precise checking of connectors, select the "Contact" button in the View window.
Ceramic layer thicknesses and connector cross-sections
IMPORTANT
Please observe the minimum ceramic layers and minimum connector cross-sections specified in the software in mm and mm2.
Minimum layer thicknesses Crown Posterior bridgeSirona inCoris ZI
Framework structure
occlusal 0,7 0,7circular 0,5 0,5
CEREC Blocs
Veneer structure
Bottom of fissure
1,0 1,0
circular 1,0 1,0
Minimum connector cross-sections
- 1 pontic 2 pontics9 12
61 72 642 D 3487D 3487.201.04.03.02 10.2011 21

5 Producing a restoration Sirona Dental Systems GmbH5.1 Use of the multilayer technique Industrially manufactured fine-structured feldspathic ceramic blocks
Milling preview and milling process
1. Change to the milling preview. The restoration is graphically divided into a framework and the
veneer structure located above it.
2. Start the milling process of the framework by clicking the "Mill" icon.3. To also mill the veneer structure, select the "Edit veneering
structure…" option in the "Design" menu in the milling preview. This opens the inLab 3D software again and loads the veneer structure in the milling preview.
5.1.9 Reworking the framework and veneer structureReworking the framework and veneer structure
Removing the neck part
➢ Carefully remove the neck part (between the restoration and the block) with a diamond bur. At the same time, make sure that the cervical step remains intact, that not too much material is removed and that the veneer structure thus remains hollow.
Tip: Measure the wall thickness of the adjacent area using a caliper and reduce/mill the wall thickness underneath the neck part to this dimension.
Contact between the veneer structure and the framework structure may exist only on the cervical margin.
Sintering the zirconia framework structure
➢ Sinter the framework made of Sirona inCoris ZI as specified in the inCoris ZI processing instructions.
inCoris ZI comes in four precolored versions.
IMPORTANT
The suggestion for the framework structure generated by the software should not be further edited, in order to ensure a perfect fit with the veneer structure.
61 72 642 D 348722 D 3487.201.04.03.02 10.2011

Sirona Dental Systems GmbH 5 Producing a restorationIndustrially manufactured fine-structured feldspathic ceramic blocks
båÖäáëÜ
Fitting and reworking the veneer structure
1. Carefully fit the veneer structure on the framework structure using lipstick, checking pastes or occlusion spray (e.g. Occlusspray from Hager & Werken) applying little pressure.
2. Check for a perfect fit.3. You might try making a fit sample using low-viscosity silicone (e.g. Fit
Checker from GC).
4. Use only a fine-grain diamond bur (40 µm) for subsequent contouring.5. The morphology of the veneer structure for the multilayer technique
is generated biogenerically. Less manual reworking is therefore usually required in the occlusal.
6. Note the following regarding manual reworking: Never perform reworking with hard metal instruments, but always use diamond burs to prevent damage to the ceramic material. It is advisable to use a laboratory turbine or highspeed handpiece for processing.
Color check
In order to check for an esthetic result ("fired restoration") prior to the adhesive bonding of the two structures, we recommend mounting the veneer structure on the framework using try-in paste (VITA-OXY-PREVENT). This can also be done in situ. You can then correct the color result if necessary.
Color characterization / Individualization of the veneer structure
CAUTIONMilling dust
The milling of sintered dental ceramic products results in dust which can damage one's health if inhaled frequently.
➢ Always wear a dust mask during milling operations.➢ Use wet milling.➢ Work behind safety glass and with suction.
IMPORTANT
Since the bonding of the veneer and framework structures is achieved using composite, any desired color characterization (painting technique) or individualization (layer technique) of the veneer structure must take place before it is bonded to the framework structure!
We recommend applying a thin layer of glaze before bonding the basal surfaces of the framework structure.
61 72 642 D 3487D 3487.201.04.03.02 10.2011 23

5 Producing a restoration Sirona Dental Systems GmbH5.1 Use of the multilayer technique Industrially manufactured fine-structured feldspathic ceramic blocks
1. Carry out the surface characterizations (painting technique) e.g. with VITA AKZENT paints or VITA SHADING PASTE.
2. Also perform an individualization with VITA VM 9 (layer technique) if required.
Tip: A harmonious cervical color transition from the veneer structure to the framework structure can be achieved by by mounting the veneer structure on the framework structure for painting and then simultaneously painting the cervical margin of the framework.
Overview of the firing programs recommended for characterization (painting technique)
Overview of the firing programs recommended for individualization (layer technique)
IMPORTANT
Remove the veneer structure again prior to firing and fire it separately from the framework structure.
Firing programs Vt. °C min.
min.
°C/min.
Approx. temp.°C
min.
VACmin.
Paint fix firing with SHADING PASTE / AKZENT
500 4.00 4.45 80 880 1.00 -
Glaze firing SHADING PASTE / SHADING PASTE Glaze / AKZENT / AKZENT Glaze / AKZENT Glaze Spray / AKZENT finishing agent
500 4.00 5.37 80 950 1.00 -
Firing programs Vt. °C min.
min.
°C/min.
Approx. temp.°C
min.
VACmin.
Paint fix firing with SHADING PASTE / AKZENT
500 4.00 4.45 80 880 1.00 -
1. Individualization firing VM9 500 6.00 7.49 55 930 1.00 7.492. Individualization firing VM9 500 6.00 7.38 55 920 1.00 7.38Glaze firing SHADING PASTE / SHADING PASTE Glaze / AKZENT / AKZENT Glaze / AKZENT Glaze Spray / AKZENT finishing agent
500 4.00 5.15 80 920 1.00 -
GLAZE LT powder glaze firing 500 4.00 3.30 80 780 1.00 -GLAZE LT paste glaze firing 500 6.00 3.30 80 780 1.00 -Correction firing with VM 9 COR 500 4.00 4.40 60 780 1.00 4.40
61 72 642 D 348724 D 3487.201.04.03.02 10.2011

Sirona Dental Systems GmbH 5 Producing a restorationIndustrially manufactured fine-structured feldspathic ceramic blocks
båÖäáëÜ
5.1.10 Adhesive bonding of the veneer and framework structuresAdhesive bonding of the veneer and framework structures
Important information
The framework and veneer structures must be bonded extraorally, i.e. before the restorations are inserted in situ.
Always wear a suitable pair of goggles or a face mask and gloves when working.
Observe the processing instructions provided by the manufacturers of the recommended luting composites.
Recommended composites
PANAVIA 21® is a registered trademark of KURARAY Medical Inc., Japan.
RelyX® Unicem Clicker® is a registered trademark of 3M ESPE Dental AG, D-Seefeld.
Adhesive bonding of the veneer and framework structures
1. Blast the outer surfaces of the framework structure with Al2O3, max. 50μm and a blasting pressure of max. 2.5 bar.
2. Clean the veneer structure thoroughly. Degrease it with alcohol and dry it with oil-free air if necessary.
3. Etch the veneer structure with VITA CERAMICS ETCH hydrofluoric acid gel (hydrofluoric acid gel. 5%) by applying it to the inner surfaces using a disposable brush. Etching time: 60 seconds.
4. NOTICE! Risk of contamination! Do not brush off. Remove the acid residues completely by rinsing the veneer structure off (60 seconds) or cleaning it in an ultrasonic bath. Then let the veneer structure dry for 20 seconds. The etched surfaces have a whitish opaque appearance after the
structure has dried.
Adhesivebonding
Phosphate-modifiedcomposite
Self-adhesive composite
Product name PANAVIA 21
PANAVIA F 2.0
RelyX Unicem Clicker
Color TC Translucent or A2 universal
Polymerization - Self-curing (anaerobic)
- Dual-curing (anaerobic)
- Self-curing
- Dual-curing
61 72 642 D 3487D 3487.201.04.03.02 10.2011 25

5 Producing a restoration Sirona Dental Systems GmbH5.1 Use of the multilayer technique Industrially manufactured fine-structured feldspathic ceramic blocks
5. Apply silane (e.g. VITASIL) to the etched surfaces and let it evaporate completely.
6. Apply a thin film of the composite to the veneer structure using a spatula or a microbrush.
7. Then insert the zirconia framework in the veneer structure by applying gentle and uniform pressure.
8. Remove coarse surpluses before they harden using a scaler, a disposable brush or a foam pellet. Leave small surpluses to prevent insufficient amounts after curing and reworking due to the oxygen inhibition layer on the surface of the composite.
or➢ Alternative procedure for RelyX Unicem 2: Cover the composite
with glycerine gel. No oxygen inhibition layer will then form on the surface.
IMPORTANTWorking with surplus
The composite must ooze out at the shoulder and/or at the base in a circular pattern between the veneer and framework structures in order to subsequently attain the homogeneous, bubble-free and positive connection between these structures that is essential for the lasting strength of the restoration.
61 72 642 D 348726 D 3487.201.04.03.02 10.2011

Sirona Dental Systems GmbH 5 Producing a restorationIndustrially manufactured fine-structured feldspathic ceramic blocks
båÖäáëÜ
Recommended procedure
1) The actual processing and setting times depend on the ambient and oral temperatures. The specified times are based on practice-relevant conditions. As with every composite cement, the setting time of RelyX Unicem is considerably slower at room temperature. The processing time can be reduced considerably if an operating light is used!
NOTICE! Keep the restoration pressed together during the curing phase!
Tip: Immobilize the restoration with a clothespin during the curing phase.
Final processing of the restoration
1. Carefully remove the surplus composite from the shoulders and base with a fine-grain diamond bur (max. 40 µm) and diamond rubber polishers. Check for smooth transitions to prevent irritations of the gums in situ.Fi
2. Use diamond finishing burs (8 µm) for prepolishing.3. Use polishing brushes and diamond polishing paste (e.g. VITA Karat
diamond polishing paste) for the final polishing step.
PANAVIA 21 PANAVIA F 2.0 RelyX Unicem ClickerType of curing Anaerobic self-curing
The application of Oxyguard II is mandatory
Anaerobic dual curing
The application of Oxguard II is mandatory without light curing
Self-curing
The application of glycerine gel is recommended
Mixing (at 25°C) 20 - 30 sec. 20 - 30 sec. 20 sec.Working time (at 25°C) max. 4 min. max. 3 min. 2 min.1)
Curing > 10 min. (without ED Primer)
> 10 min. (without ED Primer II)
Start of polymerization: 2 min. after start of mixing
Curing: > 10 min.1)
61 72 642 D 3487D 3487.201.04.03.02 10.2011 27

5 Producing a restoration Sirona Dental Systems GmbH5.2 Scanning, designing and milling Industrially manufactured fine-structured feldspathic ceramic blocks
4. Perfect high-gloss polishing of the zirconia basal surface of the bridge elements is clinically essential, since the latter are not covered by the veneer structure, unless a layer of glaze was already fired on prior to adhesive bonding!
5.1.11 Clinical bonding of the restorationClinical bonding of the restoration
The following bonding materials are recommended for the clinical bonding of restorations manufactured via the multilayer technique:
* Recommended for stumps with a length of < 4 mm.
We recommend blasting the adhesive surfaces with Al2O3, max. 50 μm and a blasting pressure of < 2.5 bar prior to adhesive bonding.
Observe the processing instructions provided by the manufacturers of the respective products.
5.2 Scanning, designing and millingScanning, designing and milling
Exact instructions can be found in the corresponding documents, "CEREC 3D Operator's Manual" and "inLab 3D Operator's Manual".
IMPORTANT
The restoration no longer may be fired (e.g. glazed) following adhesive bonding.
If the restoration must be ground in situ, polish it again carefully afterwards.
Type of bonding Conventional Adhesive*Materials Glass-ionomer cements Phosphate-modified
compositesSelf-adhesive composite
Product examples Ketac Cem (3M ESPE)Fuji I (GC)
PANAVIA 21
PANAVIA F 2.0 (Kuraray)
RelyX Unicem (3M ESPE)
Recommended colors of the bonding material
Standard color TC Translucent or A2 universal
61 72 642 D 348728 D 3487.201.04.03.02 10.2011

Sirona Dental Systems GmbH 5 Producing a restorationIndustrially manufactured fine-structured feldspathic ceramic blocks
båÖäáëÜ
5.3 Reworking/PolishingReworking/Polishing
CEREC Blocs restorations from finely structured feldspathic ceramics must not under any circumstances be reworked with hard metal instruments, as they could damage the ceramics and cause microcracks; the following therefore applies:
● Reworking of the material should be performed applying minimal force and with ample water cooling.
● Only fine-grain diamond burs (40µm) should be used for contouring and diamond finishing burs (8µm) should be used for prepolishing.
● The polishing is best performed with flexible disks coated with Al2O3, polishing brushes and diamond polishing paste.
5.4 Characterization/IndividualizationCharacterization/Individualization
Especially with restorations with large surface areas from Sirona CEREC Blocs, an additional finishing for color surface characterization should be performed with a final firing with the VITA Shading Paste paints (or VITA accent paints). In addition, these finely structured feldspathic ceramic blocks are optimally suited to individualization using VITA VM 9 veneer ceramics.
It is here essential that you observe the manufacturer's relevant processing instructions.
5.5 BondingBonding
The indications for ceramic restorations made from CEREC Blocs mentioned above apply solely to adhesive bonding using a recognized and correctly applied functional enamel-dentin adhesive system (total bonding).
Preparing ceramics
Finely structured feldspathic ceramics are inserted with luting composites. These adhesive materials create an adhesive bond between the hard tooth substance and the ceramic restoration which guarantees a positive bond. The bonding mechanism on the tooth and on the ceramic surface is decisive for clinical success.
Etching
One important prerequisite for bonding is enlargement of the adhesive area. The surface of finely structured feldspathic ceramics can be enlarged by partially dissolving the glass matrix with hydrofluoric acid (e.g. for 60 sec. with approx. 5 % HF) to create a microretentive pattern.
Silanizing
In addition to micromechanical anchoring between ceramics and luting composite, an additional bond can be created via silanization. The silane is applied to the ceramic surface following the etching process. It is important here that the solvent can evaporate completely.
61 72 642 D 3487D 3487.201.04.03.02 10.2011 29

5 Producing a restoration Sirona Dental Systems GmbH5.6 Removal of inserted restorations Industrially manufactured fine-structured feldspathic ceramic blocks
Bonding
In order to improve the moistening of the ceramic surface when using luting composites of higher viscosity, a thin layer of bonding material can be spread over the ceramic surface. This bonding layer is not cured. It polymerizes together with the luting composite.
5.6 Removal of inserted restorationsRemoval of inserted restorations
Diamond instruments must be used to remove full ceramic restorations. Hard metal instruments are not suitable.
Removal of adhesively bonded partial restorations
The problem with these restorations is that it is difficult to discern the borders between the restoration, the luting composite material and the tooth when performing the required wet milling. Since it is not desirable to penetrate further into the tooth substance than is absolutely necessary, it is helpful to intermittently stop milling and blow the tooth dry. The bond to the enamel is usually so good that the entire restoration must be milled out, while those parts that border the dentin automatically come loose.
Recommendation: standard-grain diamond bur (105 - 124 µm) with cylindrical shape.
5.7 TrephinationTrephination
To create a trephination opening, the coarse-grained diamond cylinder must be applied transversely. Once the opening has been milled, the conventional treatment can be resumed.
61 72 642 D 348730 D 3487.201.04.03.02 10.2011

61 72 642 D 3487D 3487.201.04.03.02 10.2011 31
Sirona Dental Systems GmbH 6 CertificationIndustrially manufactured fine-structured feldspathic ceramic blocks
båÖäáëÜ
6 CertificationCertification
Sirona CEREC Blocs/CEREC Blocs PC are manufactured under the responsibility of VITA Zahnfabrik.
VITA Zahnfabrik is certified according to the Medical Device Directive.
VITA ZahnfabrikSpitalgasse 379713 Bad SäckingenGermany
CE mark
The products CEREC Blocs and CEREC Blocs PC are certified and bear the identification mark
0124

61 72 642 D 348732 D 3487.201.04.03.02 10.2011
7 References Sirona Dental Systems GmbH Industrially manufactured fine-structured feldspathic ceramic blocks
7 ReferencesReferences
Bindl, A.; Mörmann, W.H.: Chairside - Computer - Kronen - Verfahrensszeit und klinische Qualität. Acta Med Dent Helv, 2: 293-300 (1997).
Bindl, A.; Mörmann, W.H.: Clinical Evaluation of Adhesively Placed CEREC End-Crowns after 2 Years-Preliminary Results. The Journal of Adhesive Dentistry, Vol. 1, No. 3, (1999).
Bindl, A.; Windisch, S.; Mörmann, W.H.: Full-Ceramic CAD/CIM Anterior Crowns and Copings. Acta Med Dent Helv, 4: 29-37 (1999).
Devigus, A.: Die CEREC 2 Frontzahnkrone. Dental Magazin, 3: 38-41 (1997).
Lampe, K.; Lüthy, H.; Mörmann, W.H.; Lutz, F.: Bruchlast vollkeramischer Computerkronen. Acta Med Dent Helv, 2: 76-83 (1997).
Mörmann, W.H.; Rathke, A.; Lüthy, H.: Der Einfluß von Präparation und Befestigungsmethode auf die Bruchlast vollkeramischer Computerkronen. Acta Med Dent Helv, 3: 29-35 (1998).
Schloderer, M.; Schloderer, M.: CEREC im Praxislabor. Dental Magazin, 3: 42-44 (1997).
N. Martin, N. M. Jedynakiewicz; Clinical performance of CEREC ceramic inlays: a systematic review; Dental Materials, Jan 1999; Vol. 15 (I): 54-61.
B. Reiss, W. Walther; Long-term clinical findings and 10-year Kaplan-Meier analysis of computer-aided ceramic inlays produced according to the CEREC method; Int J Comput Dent, 2000; 3: 9-23.
T. Otto, S. De-Nisco; Computer-aided Direct Ceramic Restorations: a 10 Year Prospective Clinical Study of CEREC CAD/CAM Inlays and Onlays; Int J Prosthodont, Mar-Apr 2002:15 (2): 122-128.
R. Hickel, J. Manhart; Longevity of Restorations in Posterior Teeth and Reasons for Failure; J-Adhens-Dent, Spring 2001; 3 (I) : 45-64.
A. Posselt, T. Kerschbaum; Longevity of 2328 chairside CEREC inlays and onlays; Int J Comput Dent, 2003; 6: 231-248.
Bindl, A.; Richter, B.; Mörmann, W.H.: Survival of ceramic computer-aided design/manufacturing crowns bonded to preparations with reduced macroretention geometry. Int J Prostodont, 2005; Vol. 18 (3): 219-224.
K. Wiedhahn, Th. Kerschbaum, D.F. Fasbinder; Clinical Long-Term Results with 617 CEREC Veneers: a Nine-Year Report; Int J Comput Dent, 2005; Vol. 8 (3): 233-246.
B. Reiss: Klinische Ergebnisse von Cerec Inlays aus der Praxis über einen Zeitraum von 18 Jahren. International Journal of Computerized Dentistry 2006, 9: 11-22.


tÉ=êÉëÉêîÉ=íÜÉ=êáÖÜí=íç=ã~âÉ=~åó=~äíÉê~íáçåë=ïÜáÅÜ=ã~ó=ÄÉ=êÉèìáêÉÇ=ÇìÉ=íç=íÉÅÜåáÅ~ä=áãéêçîÉãÉåíëK
«=páêçå~=aÉåí~ä=póëíÉãë=dãÄe=OMMSJOMNN péê~ÅÜÉW ÉåÖäáëÅÜ mêáåíÉÇ=áå=dÉêã~åóa=PQUTKOMNKMQKMPKMO NMKOMNN ûKJkêKW= NNQ=TOT
páêçå~=aÉåí~ä=póëíÉãë=dãÄeáå=íÜÉ=rp^W
c~Äêáâëíê~≈É=PNSQSOR=_ÉåëÜÉáãdÉêã~åóïïïKëáêçå~KÅçã
páêçå~=aÉåí~ä=póëíÉãë=ii`QUPR=páêçå~=aêáîÉI=pìáíÉ=NMM`Ü~êäçííÉI=k`=OUOTPrp^
lêÇÉê=kç SN=TO=SQO=a=PQUT