Embed Size (px)
Citation preview

1
ORACLE APPLICATIONS
WHITE PAPER
Security by Book
Author: Eileen Rox Wexler – Fixed Assets Development
Edited by: Kathryn J. White – Fixed Assets Support
Last Updated: 15-APR-2013
Version 2.0

2
Contributors
Date Author Version Change Reference
16-Nov-1999 Eileen R. Wexler 1.0 Initial Draft. No previous document.
15-Apr-2013 Kathryn J. White 2.0 Updated from original for R12 screenshots.

3
Contents
Introduction
Objective……………………………………………………………………………………………4
Scope…………………..…………..………………………………………..………………………4
Background…………………………………………………………………………………………4
Definitions…………………………………………………………………………………………..5
In Depth: A Look at Security by Book
The Security Model……………………………………………………………………………..6
Organizations and Heirarchies…………………………………………………………….6
Responsibilities……………………………………………………………………………………6
Security Profile…………………………………………………………………………………….6
Reports………………………………………………………………………………………………..6
Linking Books to Organization……………………………………………………………..7
Security Implementation……………………………………………………………………..8
Implementing Security by Book
Business Groups…………………………………………………………………………………..9
Setting up Organizations………………………………………………………………………9
Creating the Heirarchy………………………………………………………………………12
Security Profiles………………………………………………………………………………….14
Creating Responsibilities…………………………………………………………………….16
Attaching the Security Profiles…………………………………………………………….18
Assigning Responsibilities to Users………………………………………………………21
Troubleshooting…………………………………………………………………………………22

4

5
INTRODUCTION
Objective
THE PURPOSE OF THIS DOCUMENT IS TO PROVIDE AN OVERVIEW of the Security by
Book feature in Oracle Assets. Security by Book, available with Release 11i, enables users to
secure data access by book and responsibility. It implements the organizational hierarchy concept
that was introduced in Oracle Human Resources. This document will instruct users in the
method for creating a flexible hierarchy of asset security. It will absolutely eviscerate the topic of
security hierarchies in Oracle Assets: the subtleties, the tricks, the special cases, and of course,
the basics.
Scope
THIS PAPER DISCUSSES the Security by Book feature in Oracle Assets and the existing Oracle
Human Resources organization model. After a brief introduction to the fundamental components
of Security by Book in Oracle Assets, we will present a step-by-step approach to assist in your
implementation. We will then present technical information to elucidate the programs,
procedures, and tables of this feature. Possible pitfalls and cautionary remarks will be discussed
throughout the document. Finally, example business implementations and setups will illustrate
how to use the Security by Book feature to globalize your operations.
Background
Oracle Human Resources pioneered the organizational hierarchy architecture that forms the basis
for the Security by Book feature in Oracle. The organizational hierarchy concept in Oracle
Human Resources is used to represent a number of different relationships. One common type of
organizational hierarchy is the Position Hierarchy. Position Hierarchies represent the reporting
lines and other relationships among positions. If an enterprise has a matrix management
structure in which organizations have more than one reporting line, additional organizational
hierarchies can be set up to include these relationships. Establishment Hierarchies are another
type of organizational hierarchy. These hierarchies determine which organizations and
employees that Oracle Human Resources standard reports will include. Thus, Establishment
Hierarchies are necessary for producing reporting for government authorities in order to obtain
the correct coverage of employees. Additional hierarchies can also be created for analysis and
inquiry purposes. Finally, the Security Hierarchy can be constructed to control access to
information. It is the Security Hierarchy concept that is utilized in the Oracle Assets Security by
Book feature.

6
Definitions
Business Group The largest organizational unit you can set up in Oracle to represent your enterprise as an employer. May
correspond to a company or corporation, or in large enterprises, to a holding or parent company or
corporation.
Organization Organizations are departments, sections, divisions, companies, or other organizational units in your
business. In Security by Book, the Organizations are set up in a hierarchy to enable asset security.
However, in Oracle Human Resources, organizations can be internal or external, where internal
organizations are those to which you can assign people.
Organization Hierarchy Organization Hierarchies show relationships among the organizations in your enterprise. You can use
hierarchies to control access to information. For example, you might want to give each regional manager
access to the records of the employees in the organizations in his or her region.
Responsibility A responsibility determines if the user accesses certain Oracle Applications, which applications functions a
user can use, which reports and concurrent programs the user can run, and which data those reports and
concurrent programs have access to. Each application user is assigned at least one responsibility. Since
Responsibilities cannot be deleted, the Effective Date must be adjusted to enable/disable them.
Security Profiles In Human Resources, the security profile linked to the user’s responsibility and business group determines
which applicant and employee records are available to holders of that responsibility. A security profile
allows you to control access to Oracle Assets through responsibilities that you create and assign to users of
the system. Users can sign on to Oracle Assets only through the responsibilities that you give them. Their
responsibilities control what they can see and do in the system.
Book In this document, “Book” will refer to the accounting entity as defined in Fixed Assets. A Book is a
collection of assets, along with a record of the transactions performed on those assets, including addition,
depreciation and so forth. Journal entries must balance within the context of a book. Books must be
associated to a GL Ledger, thus inheriting a chart of accounts, currency, etc.
Ledger Defined in General Ledger, a Ledger consists of a functional currency, a chart of accounts (accounting
flexfield structure), an accounting calendar, and a set of default accounting and reporting options. The GL
product has Security by Set-of-Books, such that a given responsibility has access to data only under a given
Set of Book(s). Note: Prior to R12 this was commonly referred to as a Set of Books.
Security by Book This is the feature in which any form, report or process that in previous releases of Fixed Assets operated
on or otherwise accessed data belonging to several books at once now may operate on or access only on those
books that the current responsibility has privileges to access.

7
In Depth: A Look at Security by Book
The Security Model
Oracle Assets has long been a multiple-set-of-books product; however, prior to Security by Book,
it did not have any means by which users could query and update information pertaining only to
those users’ books or set-of-books via a given form. Users could access any book on the system.
Thus, the power and flexibility of having each department in a large organization have its own
books or set-of-books was mitigated because each departments’ staff could still query and update
possibly sensitive data in other departments.
The corporate book represents the ideal level of granularity for a security implementation in the
Oracle Assets product. Multiple (corporate / tax /budget) books can be set up for each ledger,
each belonging to departments wishing to store their data securely. Security by ledger
is not granular enough. Security by Book encompasses the needs of the majority of Oracle
Assets customers.
Organizations and Heirarchies
Organizations can be departments, divisions, sections, companies or any other entity within your
company that serve as an organizational unit. These organizations are arranged in a hierarchy.
The organization hierarchy serves to show the relationships that exist between each of the
organizations. Within Oracle Human Resources, there are a number of different relationships
that hierarchies can demonstrate. Reporting hierarchies, security hierarchies, hierarchies for
matrix management and establishment hierarchies are all available. However, the hierarchies
that are set up for the purposes of Security by Book in Oracle Assets are security hierarchies. A
security hierarchy is a hierarchy that controls access to information. For example, in a
decentralized enterprise, you might want to give each regional manager access to the records of
the employees in the organizations in his or her region. You can base security hierarchies on
geography, cost center, or any other method appropriate for your business.
Responsibilities
The responsibility determines which applications functions a user can perform, which reports
and concurrent programs the user can run, and which data those reports and concurrent
programs can access. You can create different responsibilities for the Oracle Assets module that
have different levels of data access depending on the responsibility. Then, you can decide which
responsibilities to assign to each user.
Security Profiles
The Security Profile is attached to a responsibility to determine which records are available to
holders of that responsibility. The Security Profile acts as the ‘glue’ between an organization
and a responsibility. To set up a security profile that permits access to employee records of
certain organizations only, you make use of organizational hierarchies.
Reports
Reporting capabilities are particularly impacted by Security by Book. When a user is logged in to
Oracle Assets by way of a particular responsibility, the LOV’s that are available in that
responsibility dictate whether or not the user will have access to reporting for that particular

8
book.
Linking Asset Books to Organization
Organization ID (org_id) has been added to the table FA_BOOK_CONTROLS. You will find the
organization ID from HR_ORGANIZATION_UNITS stored there. You may have multiple books
assigned to the same ORGANIZATION_ID, but each book can only be assigned one Org_ID n
the FA_BOOK_CONTROLS TABLE. For this reason a single book cannot be shared between
multiple organizations.
Security Implementation
The Implementation section will guide you through the setup of a multi-level, geographically
based security model. The parent organization, Oracle Headquarters, has six subordinates. Each
organization has access to the books associated with itself as well as those books associated with
its subordinates. However, an organization does not have access to the books associated with its
parent organization. For example, the Oracle USA asset manager cannot access the Oracle
Headquarters books. Oracle USA can only access the books associated with itself and those books
belonging to Oracle Los Angeles and Oracle New York City. Also, Oracle USA cannot access
the books that are associated with Oracle UK or any of the Oracle UK subordinates. However,
Oracle Headquarters can access all books belonging to Oracle USA and Oracle UK as well as
their subordinates.
Oracle
Headquarters
Oracle USA Oracle UK
Oracle
Los Angeles
Oracle
New York City
Oracle
London
Oracle
Manchester

9
Implementing Security by Book
Business Groups
The largest organizational unit that you can set up in Oracle Human Resources to represent
your enterprise is the Business Group. Within a Business Group, you can set up a body of
different organizations and other work structures, employees, and key flexfields. These
distinguishing features are shared by all of the structures that you set up as belonging to a
particular Business Group.
When you set up Security by Book, all of the organizations and hierarchies that you wish to
interact with one another must belong to a particular business group. Organizations that are
part of a single hierarchy must be assigned to the same business group in order for the
hierarchical relationships to work properly.
Setting Up Organizations
The first step in setting up Security by Book is to define your organizations. If you are
creating a fresh installation, you will need to define your organizations from the beginning.
However, if you are working on a migration to 11I or above, organizations may already exist.
Thus, the question is whether or not you want to use the existing organizations as your asset
organizations or create completely new and different organizational hierarchies. The
organization type that we define for Security by Book organizational hierarchies is the Asset
Organization. To set up these asset organizations (or modify existing organizations and
convert them into asset organizations), you will need to use the Organization form. The
organization form can be accessed via Oracle Assets or, if you are an Oracle Human
Resources customer as well, via the Oracle Human Resources responsibility. This section
will outline the procedure for setting up your Asset Organizations.
1. From the Oracle Assets Navigator, select the navigation path
Setup:Security:Organization:Description.
10
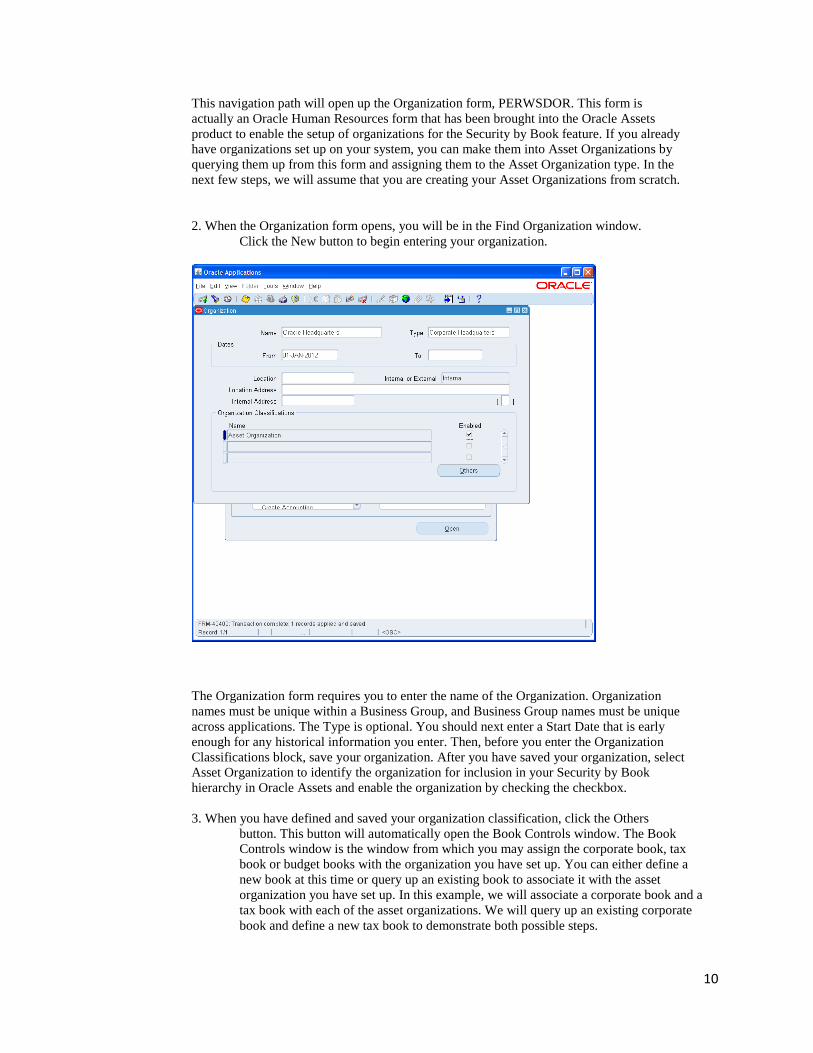
This navigation path will open up the Organization form, PERWSDOR. This form is
actually an Oracle Human Resources form that has been brought into the Oracle Assets
product to enable the setup of organizations for the Security by Book feature. If you already
have organizations set up on your system, you can make them into Asset Organizations by
querying them up from this form and assigning them to the Asset Organization type. In the
next few steps, we will assume that you are creating your Asset Organizations from scratch.
2. When the Organization form opens, you will be in the Find Organization window.
Click the New button to begin entering your organization.
The Organization form requires you to enter the name of the Organization. Organization
names must be unique within a Business Group, and Business Group names must be unique
across applications. The Type is optional. You should next enter a Start Date that is early
enough for any historical information you enter. Then, before you enter the Organization
Classifications block, save your organization. After you have saved your organization, select
Asset Organization to identify the organization for inclusion in your Security by Book
hierarchy in Oracle Assets and enable the organization by checking the checkbox.
3. When you have defined and saved your organization classification, click the Others
button. This button will automatically open the Book Controls window. The Book
Controls window is the window from which you may assign the corporate book, tax
book or budget books with the organization you have set up. You can either define a
new book at this time or query up an existing book to associate it with the asset
organization you have set up. In this example, we will associate a corporate book and a
tax book with each of the asset organizations. We will query up an existing corporate
book and define a new tax book to demonstrate both possible steps.

11
4. To query up an existing corporate book, navigate to the View menu and select View:
Query by Example: Enter. Then, enter the name of the corporate book that you wish to
associate with the Oracle Headquarters Organization. In the figure below, we have
queried up Oracle HQ Corp, an existing corporate book. In order to save this book to
the organization, the form trigger must recognize that a change has occurred to the book
information. To create a simple change that will enable the Save function to work, enter
the Description field and simply add a space at the end. Then, navigate to the File
menu and select File: Save. Although there is no visible alteration to the Oracle HQ
Corp book information, the form will now be able to save the book to the Oracle
Headquarters organization.
5. Now that you have saved the Oracle HQ Corp book to the Oracle Headquarters
organization, close the Organization form and requery the Oracle Headquarters
organization to verify that the book was saved properly. When you click the Others
button, the Book Controls screen should appear with Oracle HQ Corp’s information
available. You can now enter a new tax book. Navigate to the File menu and select File:
New. The Book Controls window will clear to enable you to enter a new book. When you
are finished entering the new book, navigate to File: Save.

12
6. Create each of your organizations in the same manner - Navigate to the Organization
form and define the organization, then click the Others button to add on the associated
books. In this paper, we will add the following Organizations and their associated books:
Oracle Headquarters. Books: Oracle HQ Corp and Oracle HQ Tax
Oracle USA. Books: Oracle USA Corp and Oracle USA Tax
Oracle Los Angeles. Books: Oracle LA Corp and Oracle LA Tax
Oracle New York City. Books: Oracle NYC Corp and Oracle NYC Tax
Oracle UK. Books: Oracle UK Corp and Oracle UK Tax
Oracle London. Books: Oracle London Corp and Oracle London Tax
Oracle Manchester. Books: Oracle Manchester Corp and Oracle Manchester Tax
Note: You cannot assign one book to two different organizations. If you assign an Oracle
Ace Tax book to Oracle Los Angeles organization, you cannot assign it to Oracle New York
City organization as well. When you attempt to assign the book to Oracle New York City,
the book will be saved as expected, but Oracle Los Angeles organization will no longer be
able to access that book!
Note: You can assign a corporate book and its associated tax book to two different organizations.
However, if you want to perform a Mass Copy, the user must access the organization that is assigned the
tax book.

13
Creating the Hierarchy
Now that the organizations have been created, you must specify the hierarchy. The
hierarchy specifies the relationships between each of the asset organizations. This section
outlines how to setup the hierarchy that ties the asset organizations together.
1. From the Oracle Assets Navigator, select the navigation path
Setup: Security: Organization: Hierarchy
This navigation path will open up the Hierarchy form, PERWSDOH.fmb, and enable
you to set up a security hierarchy to control access to your asset information.
2. From the Hierarchy form, you can create your organizational hierarchy. First, enter a
unique name for your hierarchy. We will call this hierarchy the Oracle Corporate
Hierarchy. The Primary checkbox is primarily used in Oracle Human Resources to
designate a particular hierarchy as the main reporting hierarchy. For our purposes in
Oracle Assets, this checkbox is not relevant. Then, enter a version number for the
hierarchy and a start date. The version number is used to keep track of organizational
changes that may occur in the future. For instance, if the Oracle USA fixed assets
manager is given access privileges over Oracle UK, a reorganization of the hierarchy
may be required, and a new version number could be assigned at that time. Save your
work at this point before continuing to the Organization block of the form.
3. Query the top organization, Oracle Headquarters, into the Name field. This designates
Oracle Headquarters as the top organization. In the Subordinates Block, select the
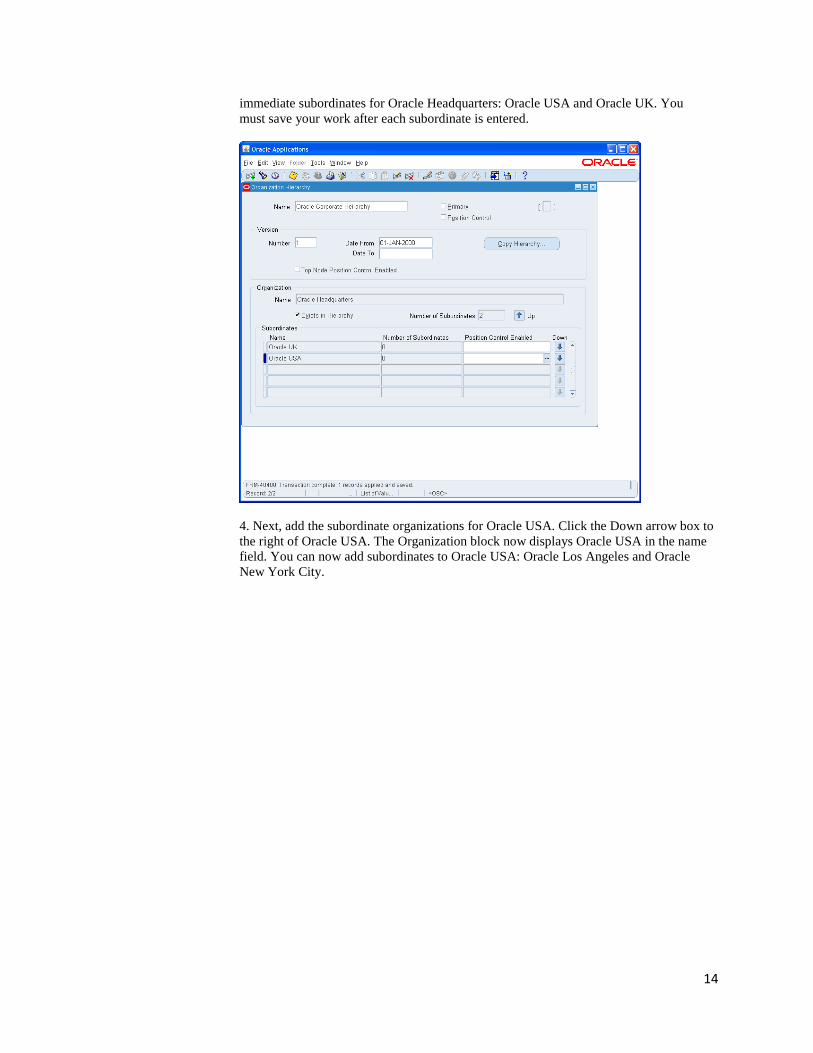
14
immediate subordinates for Oracle Headquarters: Oracle USA and Oracle UK. You
must save your work after each subordinate is entered.
4. Next, add the subordinate organizations for Oracle USA. Click the Down arrow box to
the right of Oracle USA. The Organization block now displays Oracle USA in the name
field. You can now add subordinates to Oracle USA: Oracle Los Angeles and Oracle
New York City.

15
5. After you have added the subordinates to Oracle USA, you can then add the
subordinates to Oracle UK. Since Oracle USA is currently designated in the
Organization block, click the Up arrow box. This will bring Oracle Headquarters back to
the Organization block and its subordinates, Oracle USA and Oracle UK, back to the
Subordinates block. You may now click the Down arrow box next to Oracle UK.
6. By clicking the Down arrow box next to Oracle UK, you have brought Oracle UK into
focus in the Organization block. Add the subordinate organizations for Oracle UK:
Oracle London and Oracle Manchester.
You have now completed the setup of the Oracle Corporate Hierarchy.
Security Profiles
Once the organizations have been created and assembled into a hierarchy, you are
prepared to set up the Security Profiles. The Security Profile is linked to the user’s
responsibility and business group and determines which applicant and employee records
are available to holders of the responsibility. If you do not set up the Security Profiles
correctly, Security by Book will not function. Why? Because a Security Profile holds
together the responsibilities and the organizations. Without the security profile, all
responsibilities can access all organizations.
At a technical level, the FA: Security Profile value restricts the predicate so that users can
only access certain tables, based upon their Business Group ID and Organization ID. It is
important to note this is not effective for Business Views, where a customization is
required to achieve the same level of security. This works within the main application
only.

16
This section will outline the procedure for setting up your Security Profiles:
1. From the Oracle Assets Navigator, select the navigation path
Setup:Security:Security.
The Security Profile form, PERWSSCP.fmb, will open and enable you to define
your security profiles. You will need to define one security profile for each
organization that you have. Later on, each Security Profile will be attached to a
Responsibility for viewing the associated organization and its hierarchy.
2. When the Security Profile form opens, enter the name of the first Security Profile.
There is no set naming convention that you must follow. One handy approach is to
name the Security Profiles with the name of the top organization followed by the
organization ID.
3. We will start by entering the name of the first Security Profile, Oracle Headquarters
Profile. Then, select the appropriate Business Group. All of the Security Profiles for a
particular organization should belong to the same Business Group. Then, move down to
the Security Type box. Choose the option to “Secure all organizations by organization
hierarchy and/or organization list”.
Since we are dealing with the Oracle Corporate Hierarchy, we should enter that
hierarchy name. Finally, we can name Oracle Headquarters as the top organization that is
viewable when using this Security Profile. Enable Include Top Organization.

17
Enter a Security Profile for each of the organizations that you have set up. Each
Security Profile can be named with the Org Name, the appropriate
Business Group and Hierarchy, and finally the topmost organization that can be viewed
from this Security Profile.
In our example, we created the following Security Profiles:
Oracle Headquarters Profile
Oracle UK Profile
Oracle USA Profile
Oracle London Profile
Oracle Manchester Profile
Oracle New York City Profile
Oracle Los Angeles Profile
5. Once you have defined all of the Security Profiles, you must run the Security List
Maintenance program. This program is not a report, so there should not be any output
expected. The Security List Maintenance program updates the LOV’s with the
appropriate books. This is a critical step, as it completes the organization and security
profile setup.
Creating Responsibilities
Once you have created your organizations, assembled them into hierarchies and created their
appropriate Security Profiles, you are prepared to create the Responsibilities. A responsibility
determines if the user accesses certain Oracle Applications, which applications functions a
user can use, which reports and concurrent programs the user can run, and which data those

18
reports and concurrent programs have access to. Each application user is assigned at least
one responsibility. Since Responsibilities cannot be deleted, the Effective Date must be
adjusted to enable/disable them. In this example, we will create a responsibility for each
Organization. The following section describes the process of creating a responsibility.
1. Navigate to File: Switch Responsibilities and choose the System Administrator
responsibility. Then, navigate to Setup: Responsibility: Define.
2. The Responsibilities form, FNDSCRSP.fmb, will open and you will be able to define the
responsibilities that you need for your users.
3. The first Responsibility that we will create is the Oracle Assets HQ Manager. In the
case of a user having multiple responsibilities, the Responsibility Name is the name that
will appear in the pop-up window after you sign on. Next, the Application Name of
Assets is entered. The Application Name and Responsibility name uniquely
identify a responsibility. Then, a Responsibility Key is created for use with loader
programs. The Responsibility Key must be unique throughout all applications. The
Oracle Assets HQ Manager responsibility should be made available from Oracle
Applications. The Data Group defines the pairing of application and ORACLE
username. The ORACLE username determines the database tables and table privileges
accessible by your responsibility. Finally, you can specify which, if any, menu
exclusions to assign to this responsibility. See the System Administrator User Guide for questions
regarding menu exclusions.

19
We want to set up a responsibility for each of the fixed asset managers in charge of each of
the organizations. That is, we want a separate responsibility for Headquarters, UK, USA,
and each of the four cities as well. We will set them all up as shown above with the
following Responsibility Names:
Oracle Assets USA Manager
Oracle Assets UK Manager
Oracle Assets London Manager
Oracle Assets Manchester Manager
Oracle Assets New York City Manager
Oracle Assets Los Angeles Manager
Attaching the Security Profiles
Once you have created your responsibilities, you may then attach the security profiles to
each responsibility. This effectively links the organization and responsibility via the security
profiles.
1. Navigate to the System Administrator responsibility if you are not already there. Then,
navigate to Profile: System.

20
2. The Profile Values form, FNDPOMPV.fmb, will open, and you may then assign the
responsibility to the appropriate Security Profile. The first screen that appears is the
Find System Profile Values window. Uncheck the Site checkbox and check the
Responsibility checkbox. Then, enter your Responsibility Name in the field. We will
enter “Oracle Assets HQ Manager” first. Then, select the Profile “FA: Security Profile”
from the LOV. Click the Find button.
3. The System Profile Values form will then appear with the “FA: Security Profile” under
the Profile column and “Oracle Assets HQ Manager” under the Responsibility column. In the
white field, you can select the Security Profile Value that you want to associate
with the Oracle Assets HQ Manager responsibility. From the previous section, we
named the “Oracle Corporate Profile” as the corresponding Security Profile. You
may select this value from the LOV and save it.

21
4. Navigate to the menu View: Find. Enter another responsibility, such as “Oracle Assets
UK Manager.” Click the Find button.
5. Again, select the Security Profile Value that you want to associate with the Oracle
Assets UK Manager responsiblity. From the previous section, we named the “Oracle
UK Profile” as the corresponding Security Profile. You may select this value from the
LOV and save it.
6. Repeat steps 4 and 5 for each of the responsibilities. You will have matched the
following Responsibility / Security Profile values:
Oracle Assets USA Manager / Oracle USA Profile
Oracle Assets Los Angeles Manager / Oracle Los Angeles Profile
Oracle Assets New York City / Oracle New York City Profile
Oracle Assets London Manager / Oracle London Profile
Oracle Assets Manchester / Oracle Manchester Profile

22
Assigning Responsibilities to Users
The final step in the Security by Book setup is to assign the various responsibilities to your
users. You can create a userid/pwd for each of your fixed assets managers and assign them
the appropriate responsibilities through the System Administrator responsibility. This
section details how to assign responsibilities to the various users:
1. In the System Administrator responsibility, navigate to Security: User: Define.
The Users form, FNDSCAUS.fmb, will appear and you can assign users the various
responsibilities that are appropriate for their level of security.
2. First, you must create the user name. We will call the fixed asset manager with access
to every organization the FADIRECTOR. After entering a description and password for
the FADIRECTOR, we can then assign every responsibility that we have to this person.
As soon as you choose the responsibility from the LOV, the Application and Security
Group will default. Then, you may either choose another responsibility for the user or
save your work as complete.

23
3. If there are users already existing on the system, navigate to the View menu : Query by
Example: Enter. Then, enter the User Name of the existing account and navigate to the
View menu: Query by Example: Run. You may then add to or delete any of the
responsibilities that user has been assigned.
This is the final step of the security by book setup. You may now navigate to the menu
File:Log on as a Different User and test the setup by adding assets to the books, mass
copying them into the tax books, and performing other transactions.
Troubleshooting
At last. You have set up the Security by Book feature, yet for some reason… your security
by book setup does not seem to be working. This section lists some possible avenues that
you may wish to investigate:
1. Functionality review. The Security by Book feature enables you to designate an
organizational hierarchy in which the assets of an organization can only be seen by (a)
the parent organization and (b) itself. If you are in Oracle Headquarters, you should be
able to see all assets and select all books in the organization.
2. An Orphan Organization. You may set up and define any number of organizations and
include as many of them as you wish in the hierarchy. If you set up the organizations
shown above but accidentally leave Oracle London out of the hierarchy, you will be able
to see Oracle London’s assets from everywhere in the hierarchy, including Oracle USA,
Oracle New York City and Oracle Los Angeles. Make sure that your hierarchy is set up
as you expect.
3. To extrapolate on #2, if you have unused books (for example, from before a reimplementation
or acquisition) and you don’t want them in any active profile, you will need to define an “unused
books” profile and secure them there. Anything not secured will appear in all profiles. If you

24
want someone to be able to inquire on those books, set up a special purpose responsibility with
inquiry only for that “unused books” profile.
4. Leaving out the Security List Maintenance program. This program populates the
LOV’s with the appropriate information. If you miss this important step, your LOV’s
will not show the correct books that are available for each organization to access.
5. Viewing additional books. If there is a book that already exists on the system and you
have not assigned that book to a particular organization, all organizations will be able to
see the book and its assets. If you are able to view Oracle USA’s corporate book from
Oracle Los Angeles, you may want to check the Organization form and query up Oracle
USA to ensure that the book was associated with the organization properly.
6. Please consider rerunning Security List Maintenance periodically. It will help ensure that any
new users, or responsibilities, are immediately captured into the existing hierarchies.
7. Note that Security By Book does not work for Business Views. If you wish to secure the data
in the Business Views for ad hoc reporting, you will need a custom solution.