Embed Size (px)
Citation preview

90
EXPERIMENT 45 – OBSERVING GERMINATION CSEC OBJECTIVE: Section B 8.3 Grade Level – 10
Stage 2 - Germination of the Seed You Need
x Small planting pot* x Potting soil* x Seeds* x Tap water
* Your teacher will provide these What to do
A Preparation The following preparation must be carried out at least two weeks before the observation stage of the investigation.
1. Place the potting soil in a small planting pot so that the pot is about half full. 2. Plant the seeds in the soil about 3 cm apart. 3. In your notebook, draw a table like the one below, leaving space for at least 14 days.
Observe and record the germination and growth of the young plant.
4. Sprinkle water on the seeds and the soil EVERY DAY for about 2 weeks. (Growth rate depends on temperature so the time is not exact.)
5. Leave the small planting pot in a sheltered area. B Observation
After about two weeks, carefully remove a seedling (young plant) from the soil and place it on damp newspaper.
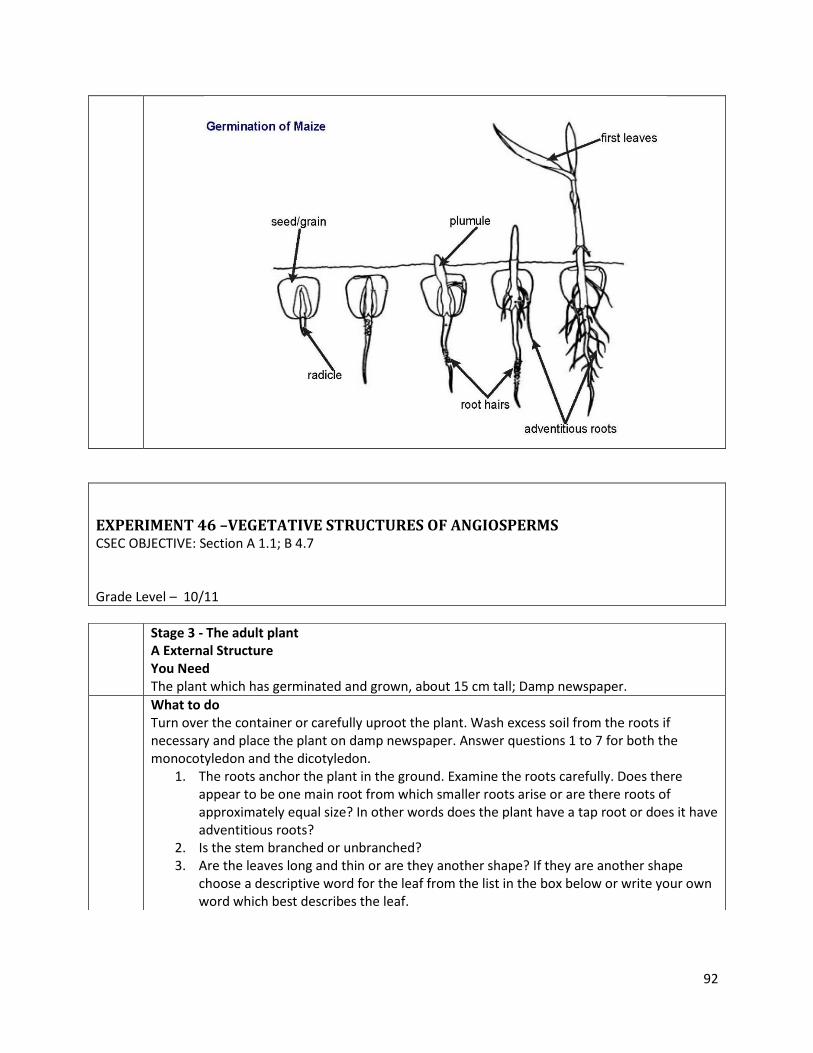
1. Use the diagrams below to identify the named structures on your seedling. Your seedling will probably be at an early stage of development.
2. Obtain a larger planting pot from your teacher and plant the seedling in the pot with fresh potting soil OR plant the seedling in the soil outside. Take care not to damage the roots.

91
Continue examining the seedling at regular intervals in order to identify additional structures as they develop.
3. Copy the diagrams below. Use coloured pencils to show each part of the embryo (radicle and plumule) at first. Use the same colour for each structure in the later stages.
4. Look after your seedling and the plant which it later becomes. You will need it to continue the following parts of this series of activities (to come).
92
EXPERIMENT 46 –VEGETATIVE STRUCTURES OF ANGIOSPERMS CSEC OBJECTIVE: Section A 1.1; B 4.7 Grade Level – 10/11
Stage 3 - The adult plant A External Structure You Need The plant which has germinated and grown, about 15 cm tall; Damp newspaper.
What to do Turn over the container or carefully uproot the plant. Wash excess soil from the roots if necessary and place the plant on damp newspaper. Answer questions 1 to 7 for both the monocotyledon and the dicotyledon.
1. The roots anchor the plant in the ground. Examine the roots carefully. Does there appear to be one main root from which smaller roots arise or are there roots of approximately equal size? In other words does the plant have a tap root or does it have adventitious roots?
2. Is the stem branched or unbranched? 3. Are the leaves long and thin or are they another shape? If they are another shape
choose a descriptive word for the leaf from the list in the box below or write your own word which best describes the leaf.

93
4. Are the leaves simple or compound? Use the figure below to help you decide.
5. Does the base of the leaf wrap around the stem or not? 6. Examine the margin (edge) of the leaf. Is the edge smooth or not? 7. Look at the veins of the leaf. Do the veins run parallel to each other or do they branch
out and form a network? Draw and label a leaf of your plant in your note book. Use the example below as a guide.
Remember to answer the questions on vegetative structure for both monocotyledons and dicotyledons.
B Internal Structure (Optional) The following section is to be used in conjunction with a light microscope. The microscopic structure of roots and stems The procedure for preparing the sections is identical in each case. Preparing a section of a leaf is very difficult, due to the nature of leaf tissue (very soft).
You Need Light microscope, Pieces of monocotyledon and dicotyledon root and stem, Glass slides, Coverslips, Safe blade or scalpel, Propette, Tap water.

94
What to do 1. Half-fill a shallow dish with tap water. 2. Rinse the safe blade with tap water. 3. Hold the material (e.g. dicotyledon stem) between thumb and forefinger. 4. Hold the safe blade at a slight angle and CAREFULLY cut thin sections of the material.
The sections need not be complete; i.e. they need not be whole circles.
5. Allow the sections to fall into the water. 6. Cut as many sections as possible, to practise your technique.
Note: Thin sections should look slightly transparent. 7. Select 3 to 4 of the thinnest sections and mount them in water on a glass slide. 8. If you have any difficulty covering the section with a coverslip, your sections are too
thick. Practise until you cut thinner sections. When you have mastered the technique of cutting thin sections, you can stain your sections with iodine solution. The stain will help you to see the tissues more clearly.
9. Draw (sketch) what you see. 10. Repeat the procedure for the different plant sections you wish to examine.
95
EXPERIMENT 47 – STRUCTURE OF ANGIOSPERM FLOWERS CSEC OBJECTIVE: Section B 9.8 Grade Level – 10
Stage 4 - Structure of the flower A External Structure (This section must be completed for both the monocotyledon and the dicotyledon.)
You Need x A selection of flowers; from the plant which you have grown as well as other flowers x Hand lens x Forceps x Needle* x Sharp knife*
* Your teacher will provide these What to do
1. Observe the plant and watch for the production of flowers. When several flowers are visible, pick a mature flower. Your teacher will also provide some flowers for comparison.
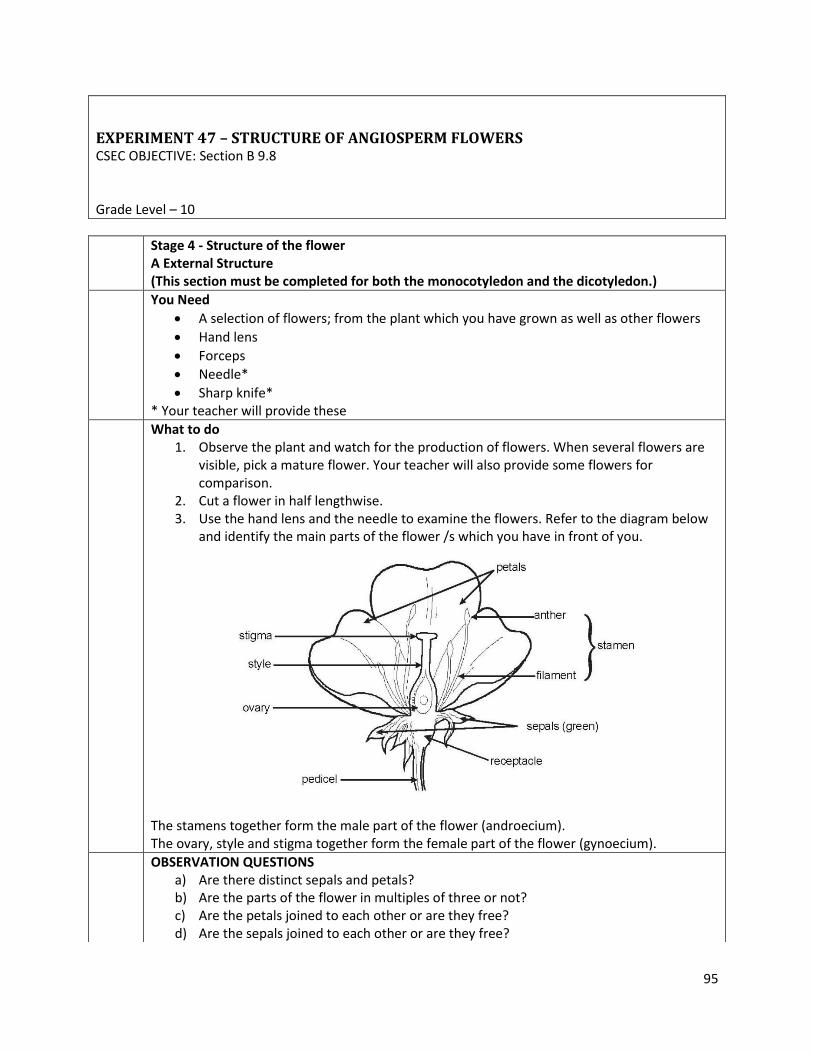
2. Cut a flower in half lengthwise. 3. Use the hand lens and the needle to examine the flowers. Refer to the diagram below
and identify the main parts of the flower /s which you have in front of you.
The stamens together form the male part of the flower (androecium). The ovary, style and stigma together form the female part of the flower (gynoecium).
OBSERVATION QUESTIONS a) Are there distinct sepals and petals? b) Are the parts of the flower in multiples of three or not? c) Are the petals joined to each other or are they free? d) Are the sepals joined to each other or are they free?

96
e) Does the flower have both male and female parts? 4. Carefully remove one stamen from the flower. View the stamen using the hand lens
and make a clear drawing of it in your notebook. See the example below.
Similarly, remove the gynoecium and make a clear drawing of it in your notebook. See the example below.
B Internal Structure (Optional)
The following section is to be used in conjunction with a light microscope. Examining the Reproductive Structures of Some Angiosperms
You Need Light microscope; Dissecting needle; Several anthers; preferably from different types of flowers; Some mature anthers with loose pollen and some young anthers; Several ovaries, also from different types of flowers; Glass slides; Coverslips; Safe blade or scalpel*; Propette; Tap water.

97
What to do The Androecium
1. Use the propette to add a few drops of water to the slide.
2. Shake pollen from one type of plant onto the slide. 3. Place the coverslip gently over the pollen. 4. Repeat the procedure with pollen from different types
of plants. 5. Draw what you see.
Examples of different pollen grains Pollen grains are very small and you will not see detail. You should, however, see shape, size and colour differences between pollens of different flowers.
The gynoecium 1. Use a blade to cut thin transverse sections of the ovary of a flower. Choose a flower
which is quite old and where the petals have fallen off. 2. Mount the sections in water on a slide. 3. Examine these using the light microscope. 4. Identify the ovary chambers with little ovules inside. Ovules ripen into seeds after
some time. 5. Repeat the procedure with several different flowers. 6. Draw what you see.

98
EXPERIMENT 48 – WHAT IS THE STRUCTURE OF A FREE-LIVING FLATWORM? CSEC OBJECTIVE: Section A 1.1 Grade Level – 10
INFORMATION You have already learned that planarians belong to a class of free-living (i.e. non parasitic) predators and scavengers that feed on a variety of other animals. Planarians are aquatic, living in fresh water where they hide under rocks.
You Need x Plastic lunch box if you maintain your own colony* x Forceps x Hand lens x Petri dish x Propette x Stones x Pond water (NOT tap water) x Planarians
* The teacher can decide whether to have a single colony or more than one colony. What to do
Follow the instructions below. When you are ready to begin the study, remove a planarian from the water. It may be attached to a rock or stone. If so, leave it attached and use the propette filled with pond water to keep it moist. Place the planarian and rock in a petri dish and use a hand lens to view it.
The water must be changed regularly. On the planarian you are studying, find the structures indicated in the figure below.
Observe the planarian with the hand lens and answer the following questions.
1. What is the length and the width of the planarian? 2. What colour is the planarian? 3. Does it have a definite front (anterior end) and rear (posterior end)? 4. Does the planarian move in a specific direction all the time? 5. How do you think the planarian receives information about its surroundings? 6. Locate the ventral (under) side of the planarian and identify the pharynx. This is a long
tube to which the mouth is attached. Collect some food from your teacher. Place the

99
food in the container with the planarian and observe it feeding. You must be patient - keep observing the planarian over a period of time. Once you have seen it feeding, describe what you see.
7. Consider the following report.
Where do you think the two planarians came from?
8. What do you think happened to the original planarian? 9. Devise an investigation which could test your ideas. Write down the steps of the
method for your investigation.

100
EXPERIMENT 49 – WHAT IS THE STRUCTURE OF AN EARTHWORM? CSEC OBJECTIVE: Section A 1.1 Grade Level – 10
INFORMATION You may have learned that earthworms live in moist areas. They burrow all the time and feed on decaying vegetation. They are segmented worms with a through gut and a closed circulatory system. In this series of activities, it will be your responsibility to ensure that their environment does not dry out.
You Need x Plastic lunch box x Propette x Forceps x Hand lens x Crushed chalk x Old leaves x Petri dish x Tap water x Earthworms*
* Your teacher will tell you whether or not to maintain your own earthworm colony. What to do
Stage 1 Setting up an earthworm environment 1. Place a layer of damp soil at the bottom of the lunch box. 2. Sprinkle a thin layer of chalk on top of this layer. 3. On top of this chalk layer, place another layer of damp soil and then another layer of
chalk of a different colour. 4. Finally place a layer of soil on the top. Use the diagram below to help you.
5. Place several dead (but not dried out) leaves on the top soil layer. 6. Place three or four earthworms on the top soil layer and leave them for a day.
Examine the environment of the earthworms every day and observe any changes in the soil and the chalk layers. DO NOT FORGET TO KEEP THE SOIL MOIST - NOT

101
WATERLOGGED. Stage 2 The structure of an earthworm
1. Take one earthworm from the lunch box and place it in a moistened petri dish with about a teaspoon of soil. Observe the earthworm’s structure and behaviour. Use the propette filled with water to keep the earthworm moist.
2. Is there a clear front (anterior) end and rear (posterior) end? 3. Are there visible sense organs? 4. Is the earthworm asymmetrical, radially symmetrical or bilaterally symmetrical? 5. Is the body flat or rounded? 6. Hold the worm in the palm of one hand. Feel the body along the dorsal, lateral and
ventral surfaces. What do you feel?
7. Does the body appear to be composed of a single unit or of several units? 8. Count the number of segments in the earthworm’s body. Compare your answer with
the answer of other groups. Is the number of segments always the same? 9. Now examine the earthworm with a hand lens and locate the bristles (setae, chaetae).
Where on the body are they situated? 10. How many bristles are on each segment? 11. The earthworm lives in soil. Of what value are the bristles to the earthworm when it
burrows? To help you answer this question, find out if the earthworm moves easily on glass or on a clean petri dish.
12. Observe the earthworms moving in their environment (i.e. moist soil in the lunch box). Describe their locomotion using the words in the box to help you.
13. Keep the earthworm moist and observe the dorsal blood vessel.
a. In which direction does the blood flow? b. Time the pulse rate per minute.
14. Observe the anterior end of the earthworm. Find the structures illustrated.
Use the hand lens to look carefully along the length of the earthworm. Find the little holes or pores on most segments. What do you suppose is their function? To help you answer this question, think about the characteristics of life - nutrition, movement . . . and so on. If the earthworms are mature, you will notice a swollen region between segments 32 to

102
37. This is the clitellum. It plays a major role in reproduction. 15. Replace the earthworms in the lunch box. Discuss how their behaviour is related to the
fertility of the soil OR discuss the reasons why gardeners like earthworms.
16. The drawing above shows a ventral view of the body of an earthworm. a. List the letters a to h in your notebook. Beside each of these, write the
appropriate label from the box below.
b. List the structures which can be seen only in dorsal view.
17. Read the following description of the body structure of an earthworm.

103
The sketches below are representations of possible transverse sections through a number of worm-like animals. Which of them do you think best represents the earthworm?

104
EXPERIMENT 50 –WHAT IS THE STRUCTURE OF AN INSECT (LOCUST)? CSEC OBJECTIVE: Section A 1.1 Grade Level – 10
INFORMATION Locusts are insects which undergo several moults before they reach adulthood. In other words, they undergo an incomplete metamorphosis. The juvenile stages of the locust are called hoppers or instars. The first hopper or instar hatches from the egg and when the fifth hopper or instar moults, the final, adult stage is reached. One or more colonies of locust hoppers (or grasshoppers, cockroaches or crickets) has been established in your classroom.
INTRODUCTION Examine the colony every day. Look out for the shed skins of the hoppers. Use the information below to help you identify the hopper stages. The 5th instar is easier to study than is the adult, because it cannot yet fly. The wings are not fully developed at this stage.
Replace the grass every day and remove any dead hoppers, old food and other waste. Introductory Questions
1. Locusts are usually found in dry areas. Examine the locusts in the colony and list all the ways you can see how these animals are adapted to dry conditions.
2. Why do you suppose the juveniles are called "hoppers"? 3. In history, we hear and read of "locust plagues". Why are swarms of locusts a plague,
do you think? 4. Consider a small swarm of ten million adult individuals. Each locust has a mass of three
grams. They feed for two days. What mass of green material is consumed in this time? When you observe a locust in detail:
You Need x Forceps x Hand lens x Petri dish x Paper towel x Locusts*

105
x Large vial x Fresh grass x Water x Twig
* To be obtained from your teacher What to do
Set up the vial with a single insect inside as shown below. Examine the insect in the vial to observe its structure.
To answer some of the questions on its behaviour, you will have to examine the locusts in the colony. Put the locust back in the colony when you have finished studying it. Observe one adult locust in detail. Answer the following questions.
1. Does the locust have an exoskeleton? 2. Find out from a suitable text the name of the substance of which it is composed? 3. Into how many parts is the body divided? 4. Is the body segmented? 5. How many appendages are there? 6. From which body part do they arise? 7. List the sense organs of the locust and note where they are located, how many there
are and their function. 8. Locusts can hear. How do you think they can do this? 9. Watch the locust feeding. Which structures do they use when they feed? 10. How is undigested food eliminated? 11. Along the sides of the body are several holes or pores. Watch them. What do you think
they are there for? 12. Watch a locust walking. Describe how they use their legs. Observe carefully and note
which legs on either side are used simultaneously (at the same time). 13. You will notice that the hind legs are different from the others. What do you think is
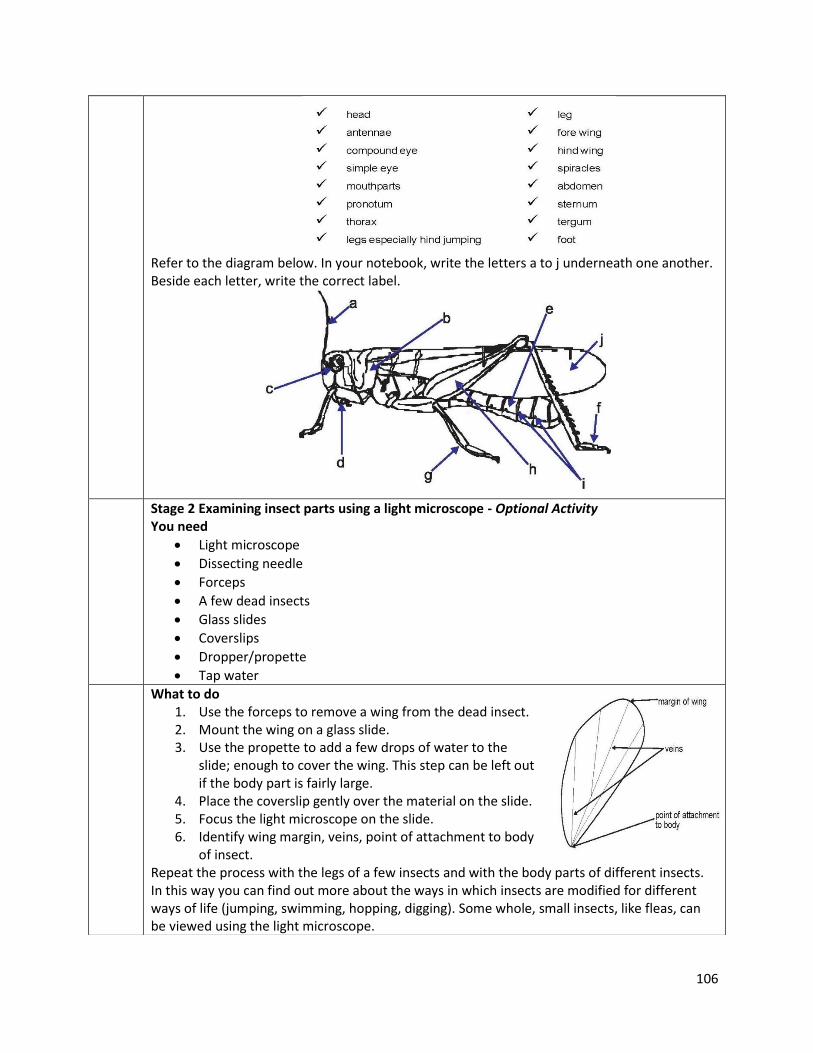
the function of the hind legs? 14. Identify the following structures on an adult locust. If you do not know the meanings of
the terms, refer to a biology dictionary or other text.
106
Refer to the diagram below. In your notebook, write the letters a to j underneath one another. Beside each letter, write the correct label.
Stage 2 Examining insect parts using a light microscope - Optional Activity
You need x Light microscope x Dissecting needle x Forceps x A few dead insects x Glass slides x Coverslips x Dropper/propette x Tap water
What to do 1. Use the forceps to remove a wing from the dead insect. 2. Mount the wing on a glass slide. 3. Use the propette to add a few drops of water to the
slide; enough to cover the wing. This step can be left out if the body part is fairly large.
4. Place the coverslip gently over the material on the slide. 5. Focus the light microscope on the slide. 6. Identify wing margin, veins, point of attachment to body
of insect. Repeat the process with the legs of a few insects and with the body parts of different insects. In this way you can find out more about the ways in which insects are modified for different ways of life (jumping, swimming, hopping, digging). Some whole, small insects, like fleas, can be viewed using the light microscope.

107