Embed Size (px)
Citation preview
EXOR
Exor General User Guide
February 2014
Version: 4.7
Submitted by:
Bentley Systems (UK) Ltd.,
9th Floor,
20 Gracechurch Street,
London
EC3V 0BG

EXOR
EXOR GENERAL USER GUIDE
DOCUMENT TRACKER
Version: 4.7 i
CONFIDENTIALITY STATEMENT
The contents of this document, including system ideas and concepts, are confidential and proprietary in nature and are not to be distributed in any form without the prior written consent of Bentley, Inc.
EXOR Exor General User Guide
Trademark
Bentley and the "B" Bentley logo are either registered or unregistered trademarks or service marks of
Bentley Systems, Incorporated, or one of its direct or indirect wholly-owned subsidiaries.
Other brands and product names are trademarks of their respective owners.
Copyright
Copyright © 2013 Bentley Systems, Incorporated.
All Rights Reserved.
Including software, file formats, and audiovisual displays; may only be used pursuant to applicable
software license agreement; contains confidential and proprietary information of Bentley Systems,
Incorporated and/or third parties which is protected by copyright and trade secret law and may not be
provided or otherwise made available without proper authorization.
Restricted Rights Legend
If this software is acquired for or on behalf of the United States of America, its agencies and/or
instrumentalities ("U.S. Government"), it is provided with restricted rights. This software and
accompanying documentation are "commercial computer software" and "commercial computer software
documentation", respectively, pursuant to 48 C.F.R. 12.212 and 227.7202, and "restricted computer
software" pursuant to 48 C.F.R. 52.227-19(a), as applicable. Use, modification, reproduction, release,
performance, display or disclosure of this software and accompanying documentation by the U.S.
Government are subject to restrictions as set forth in this Agreement and pursuant to 48 C.F.R. 12.212,
52.227-19, 227.7202, and 1852.227-86, as applicable.
Contractor/Manufacturer is Bentley Systems, Incorporated, 685 Stockton Drive, Exton, PA 19341-0678.
Unpublished - rights reserved under the Copyright Laws of the United States and International treaties.
EXOR
EXOR GENERAL USER GUIDE
DOCUMENT TRACKER
Version: 4.7 ii
CONFIDENTIALITY STATEMENT
The contents of this document, including system ideas and concepts, are confidential and proprietary in nature and are not to be distributed in any form without the prior written consent of Bentley, Inc.
Document Tracker
Document Details
File:
Exor General User Guide V4.7.docx
Prepared by:
T.C. Stewart
Manual Name:
Exor General User Guide
Reviewed by:
Version:
1.0
Approved for issue by:
Date of Issue:
Feb 2014
Product Manager:
T.C. Stewart
File Name:
Document Centre/Exor/Product Manuals/4.7 Product Manuals/4.7 completed documentation/Exor General User Guide v4.7.docx
Document Version Control
Revision Date By Chapter/Page Description
1 Nov 2010 IS All Reviewed for v4.3 release
2 May2011 IS None No changes for v4.4
3 Nov2011 IS None No changes for v4.5
4 Oct 2012 IS All Document reviewed and updated for 4.6 release
5 Feb 2014 BA/IS All Re-formatted into Bentley template for 4.7 release

EXOR
EXOR GENERAL USER GUIDE
TABLE OF CONTENTS
Version: 4.7 iii
CONFIDENTIALITY STATEMENT
The contents of this document, including system ideas and concepts, are confidential and proprietary in nature and are not to be distributed in any form without the prior written consent of Bentley, Inc.
Table of Contents
1 Introduction ........................................................................................................................................... 1
1.1 Exor – Company Overview........................................................................................................... 1
1.1.1 What is Exor? ........................................................................................................................ 2
1.1.2 Support Services ................................................................................................................... 3
1.1.3 Extended Support Programmes ............................................................................................. 3
1.1.4 Training ................................................................................................................................. 3
1.1.5 Who should use this guide .................................................................................................... 3
1.1.6 Notational Conventions ......................................................................................................... 4
1.1.7 Field Characteristics .............................................................................................................. 4
1.1.8 More Information .................................................................................................................. 4
1.2 Exor Launchpad ............................................................................................................................ 5
1.2.1 The Exor Launchpad ............................................................................................................. 5
1.2.2 Users ..................................................................................................................................... 6
1.2.3 Creating a New Folder in Favourites .................................................................................... 7
1.2.4 Adding a Module in Favourites via the ‘Add to Favourites’ option of the context menu .... 8
1.2.5 Adding a Module in Favourites using the Favourites Form.................................................. 8
1.2.6 Calling a Module from Favourites ........................................................................................ 9
1.2.7 Renaming a Folder or menu Item in Favourites .................................................................... 9
1.2.8 Deleting a Folder or Item from Favourites ........................................................................... 9
1.3 Using an Exor Form .................................................................................................................... 10
1.3.1 General Information ............................................................................................................ 10
1.3.2 Function Buttons ................................................................................................................. 12
1.3.3 Additional Useful Functions ............................................................................................... 14
1.3.4 Function Keys ..................................................................................................................... 14
1.3.5 Message Line ...................................................................................................................... 16
1.3.6 Status Line .......................................................................................................................... 16
1.3.7 Alert Box ............................................................................................................................. 16
1.3.8 Additional Module Information .......................................................................................... 17
1.3.9 Using Multiple Forms ......................................................................................................... 18
1.4 Querying Back Existing Data ..................................................................................................... 19
1.4.1 Searching for Information ................................................................................................... 19
1.4.2 How to Search for Information ........................................................................................... 20
1.4.3 List of Values ...................................................................................................................... 22
1.4.4 Major Features .................................................................................................................... 22
1.4.5 Using List of Values ........................................................................................................... 23
1.5 Fastpath ....................................................................................................................................... 25

EXOR
EXOR GENERAL USER GUIDE
TABLE OF CONTENTS
Version: 4.7 iv
CONFIDENTIALITY STATEMENT
The contents of this document, including system ideas and concepts, are confidential and proprietary in nature and are not to be distributed in any form without the prior written consent of Bentley, Inc.
1.5.1 Fastpath Screen ................................................................................................................... 25
1.6 Error Messages ............................................................................................................................ 26
1.7 Dates ........................................................................................................................................... 28
1.7.1 Date Formatting in Exor ..................................................................................................... 28
1.8 User Preferences – HIG1840 ...................................................................................................... 29
1.8.1 Effective Date ..................................................................................................................... 30
1.8.2 Setting the Effective Date ................................................................................................... 31
1.8.3 Select Date Calendar ........................................................................................................... 31
1.8.4 Unit Name ........................................................................................................................... 32
1.8.5 Preferred LRM .................................................................................................................... 32
1.8.6 Default Region of Interest ................................................................................................... 32
1.8.7 Default Inventory Attribute Set ........................................................................................... 33
1.8.8 User Options ....................................................................................................................... 33
1.9 Change Password – HIG1833 ..................................................................................................... 34
1.10 On-line Help ................................................................................................................................ 36
1.10.1 Accessing On-line Help ...................................................................................................... 36
1.10.2 Change the font size in a Help Topic .................................................................................. 37
1.10.3 Print a Help Topic ............................................................................................................... 37
1.10.4 Annotating on-line Help ...................................................................................................... 37

EXOR
EXOR GENERAL USER GUIDE
INTRODUCTION
Version: 4.7 1
CONFIDENTIALITY STATEMENT
The contents of this document, including system ideas and concepts, are confidential and proprietary in nature and are not to be distributed in any form without the prior written consent of Bentley, Inc.
1 Introduction
Welcome to Exor. This Guide provides you with comprehensive and practical information to help you understand the
genral principals of the Exor product set. It is organised for fast, easy access to detailed information on each of the
following topics:
Introduction to Exor
Exor launchpad, menus and forms
Searching for information
Using List of Values
Standard reporting interface
This Guide introduces you to Exor, and gives you an overview of the main features that are common across our broad
portfolio of applications.
We want you to get the most out of Exor.
1.1 Exor – Company Overview
Exor is part of the Assetwise group and is a division of Bentley systems. Exor supplies the world's leading Integrated
Infrastructure Asset Management Solution.
Based in the UK our software is used world-wide by state, local, national and commercial organisations, including leading
utility companies, for network-based asset, maintenance and contract management.
Exor delivers management systems based on advanced database technology from Oracle. These systems address both the
management and operational needs of modern transportation and utility organisations.
Exor products provide leading tools for network management and asset inventory coupled with unparalleled capabilities in
the field of maintenance, tendering and budgetary control.
Specialist applications for Linear Asset based Industies are incorporated as part of the product set. Spatial Manager by
Exor provides map-based access to information and interfaces to all leading GIS (Geographic Information Systems). Exor
also integrates with popular office systems to integrate word processing, graphs and spreadsheet facilities as well as to
specialised engineering packages, unlocking the full potential of an organisation's data through an integrated information
system.
Exor offers specialist consultancy services covering data transfer, system implementation and integration. In addition we
provide full training services and an international support infrastructure including locally based help desks.
For further information contact:
Bentley Systems (UK) Ltd.,
9th Floor,
20 Gracechurch Street,
London
EC3V 0BG
e-mail: [email protected]
http://www.bentley.com

EXOR
EXOR GENERAL USER GUIDE
INTRODUCTION
Version: 4.7 2
CONFIDENTIALITY STATEMENT
The contents of this document, including system ideas and concepts, are confidential and proprietary in nature and are not to be distributed in any form without the prior written consent of Bentley, Inc.
1.1.1 What is Exor?
Exor is a suite of computerised Infrastructure Asset Management database applications that are designed to meet your
specific Highways business needs.
It provides significant benefits to an organisation because it not only provides effective tools to run the operational
applications, but also provides an integrated solution in a single database. This approach ensures up-to-date and accurate
information is always available to both management and operational staff without the need for data duplication and the
complex management procedures required to control it. Senior management is then better able to take informed long-term
strategic decisions and policies can be more efficiently translated into operational programs.
The end result is efficient, economic and effective management of the highway network.
Exor is developed entirely within the Oracle Relational Database Management System (RDBMS). The use of Oracle
RDBMS allows Exor to provide systems that incorporate the benefits of the leading open database technology.
Exor products are modular and fully multi-user providing a single database that can be accessed across an organisation.
This means that Exor products are fully scaleable; customers may start small but can be confident in growth both in terms
of functionality, by purchasing new modules, and by increasing the number of users over time.
All our products are characterised by a fully data driven design. This means our users define and manage their own data
models and so can model their existing data requirements, as well as reflecting their own organisational structure, working
practices and legislative requirements.
This ensures Exor will prove to be a sound long term investment.
Exor consists of a core module, Network Manager, which manages all highway network information and its associated
data in a single shared database. Modular applications, working with this single database, are then available which satisfy
the operational requirements of a modern Organisation.
These include:
Spatial Manager
Document Manager
Enquiry Manager
Maintenance Manager
Street Works Manager
Street Lighting Manager
Inspections Manager
Structures Manager
Safety Manager
Schemes Manager
Pavement Manager
Traffic Manager
Information Manager
Alert Manager
Audit manager
Street Gazetteer Manager
You will have access to one or more of the above modules, other modules can be added at any time by purchasing
additional licenses.

EXOR
EXOR GENERAL USER GUIDE
INTRODUCTION
Version: 4.7 3
CONFIDENTIALITY STATEMENT
The contents of this document, including system ideas and concepts, are confidential and proprietary in nature and are not to be distributed in any form without the prior written consent of Bentley, Inc.
1.1.2 Support Services
Exor recognise that the purchase of comprehensive software products should represent a long-term investment. As a
result Exor provides a wide range of support services to ensure that clients can make best use of our software and obtain
the maximum return on their investment.
Exor provides comprehensive documentation to accompany our products as well as a telephone help desk for day to day
support, this is part of our bronze support and is supplied as part of the standard support and maintenance of the system.
1.1.3 Extended Support Programmes
A range of pro-active support packages is available to all users of Exor applications to enable each customer to get the
most effective assistance possible for running their day to day business.
The service is supplied by experienced consultants, who have a wealth of experience not only in the applications
themselves, but an in-depth knowledge of the business area and detailed experience of the underlying technical
architecture of the Oracle database upon which the applications are built. This offers the ability to readily access advice,
tips and guidance on use of the products from a wide range of specialists.
The programme is designed to provide differing levels of service, depending on the demands of your business.
The standard support provided with the licensed use of Exor products is known as Exor bronze. The enhanced support
packages are known as Exor silver, gold and platinum.
1.1.4 Training
Exor offer a comprehensive range of training courses covering all aspects of the system, these courses can be tailored to
suit your own operational requirements if required.
Training in the underlying Oracle database technology can also be provided and is tailored to form part of the overall
training package.
To discuss your training requirements further call your exor account manager
1.1.5 Who should use this guide
Both inexperienced and experienced users of Exor will find this Guide useful. This manual covers general principles of
Exor which are relevant to personnel working in Departments, such as:
Data Input Clerks
Technicians
Engineers
Inspectors
Project Managers
Maintenance Personnel or Contractors
This manual assumes that you have an understanding of the terms and functions associated with your organisation. It does
not assume you have used Exor before.
The purpose of this guide is to provide details of Exor conventions, menus, navigation and using forms to retrieve and
work with information.

EXOR
EXOR GENERAL USER GUIDE
INTRODUCTION
Version: 4.7 4
CONFIDENTIALITY STATEMENT
The contents of this document, including system ideas and concepts, are confidential and proprietary in nature and are not to be distributed in any form without the prior written consent of Bentley, Inc.
Using Exor
This chapter describes the features which are common to all Modules within Exor. A detailed description of the
conventions and functionality is provided.
1.1.6 Notational Conventions
Field Descriptions
Exor form descriptions include detailed explanations for each field. We present the name of each field as a separate
paragraph heading. At the same time, we present the Exor features that are available when you enter each field. We
display these field names and features as illustrated below.
Expand Select [Expand] to display further information for abbreviated fields in the selected window.
List Double click on the field, press [F9] or press the drop-down icon to display a window to view,
search and select valid input values for this field.
Edit Double click the field to display the full text within the field. This is available on most fields in
Exor. We indicate where you will find it most useful.
Gaz Use the Gazetteer to retrieve Group, Element or Network Extent details.
1.1.7 Field Characteristics
Exor form descriptions provide you with the characteristics that apply to each field, including any of the following:
Status Required, Default List
Required This is a mandatory field and Exor requires you to enter a valid value before you can proceed to
other windows.
Optional This is an optional field and you can choose not to enter a value.
Display Only You cannot enter information into this field. Exor uses it to display information for you.
Default Exor automatically enters a default value for this field. You can accept the default value or
override it by entering your own value.
1.1.8 More Information
Throughout Exor we alert you to additional or related information you may want to read. We refer you to the appropriate
Chapter and Page in this Guide or to other volumes within the documentation set. We highlight these cross-references
with an easy to notice graphic hand pointing the way to additional information.
EXOR
EXOR GENERAL USER GUIDE
INTRODUCTION
Version: 4.7 5
CONFIDENTIALITY STATEMENT
The contents of this document, including system ideas and concepts, are confidential and proprietary in nature and are not to be distributed in any form without the prior written consent of Bentley, Inc.
1.2 Exor Launchpad
Figure 1 - Launchpad
1.2.1 The Exor Launchpad
The Exor Launchpad is the means we use to access all the applications. When you first log into the system the above
window will be displayed.
The Launchpad will display a Folder for each of the Licenced Products within the System. Each Folder may contain a
number of sub folders and Application Modules. The application Modules displayed will depend on the User Roles
granted to the current User.
An Application module may be launched by double clicking the required module or by pressing the [Run] button on the
Launchpad toolbar.
Details of each of the Toolbar buttons are provided on page 6.

EXOR
EXOR GENERAL USER GUIDE
INTRODUCTION
Version: 4.7 6
CONFIDENTIALITY STATEMENT
The contents of this document, including system ideas and concepts, are confidential and proprietary in nature and are not to be distributed in any form without the prior written consent of Bentley, Inc.
1.2.2 Users
Regularly used Exor Forms can be easily accessed by adding them to the Favourites menu. Each User can personalise
their Favourites menu to suit their own requirements, making the most used Forms or Reports easy to access in the future.
Users personalise their Favourites Menu by amending the ‘User’ panel.
‘Corporate’ or System Favourites may be defined using the ‘System’ panel. This allows an Organistaion to define ‘Key’
modules or call ‘in-house’ reports written in Oracle Discoverer, for example.
Note: ONLY the Exor Owner may create or edit System Favourites.
The Favourites menu may be called from the File menu option in any of the Exor Application menus, or by clicking the
right mouse button and selecting the Favourites option from the context menu. An example of the Favourites menu is
shown in Figure 2.
Figure 2 - Favourites
Several toolbar buttons have been added for use with the Favourites menu.
Run: This will call the selected module and is only available when a Module Item is selected.
Select: This option is only available when adding a new module to the Favourites menu via the
‘Add to Favourites’ option from the context menu
Create New Folder: This will create a new Folder an is only available when an existing Folder
is selected.
EXOR
EXOR GENERAL USER GUIDE
INTRODUCTION
Version: 4.7 7
CONFIDENTIALITY STATEMENT
The contents of this document, including system ideas and concepts, are confidential and proprietary in nature and are not to be distributed in any form without the prior written consent of Bentley, Inc.
Rename Item: Renames Folders and Menu Items
Add: This will allow a new Module to be added to the currently ‘Open’ Folder.
Add Child: This will allow a new Module to be added to the currently selected Folder.
Delete Item: Deletes an entire Folder or menu Item
Refresh: Refreshes the menu and closes all folders
1.2.3 Creating a New Folder in Favourites
1. Call the Favourites form via the context menu or from the File menu option.
2. Select the ‘parent’ folder.
3. Press the [Create New Folder] button on the Favourites form.
4. This will call a Folder Name dialogue box as shown in Figure 3.
Figure 3 - Folder Name
5. Enter the required name for the folder.
6. Press the [Create Folder] button.
EXOR
EXOR GENERAL USER GUIDE
INTRODUCTION
Version: 4.7 8
CONFIDENTIALITY STATEMENT
The contents of this document, including system ideas and concepts, are confidential and proprietary in nature and are not to be distributed in any form without the prior written consent of Bentley, Inc.
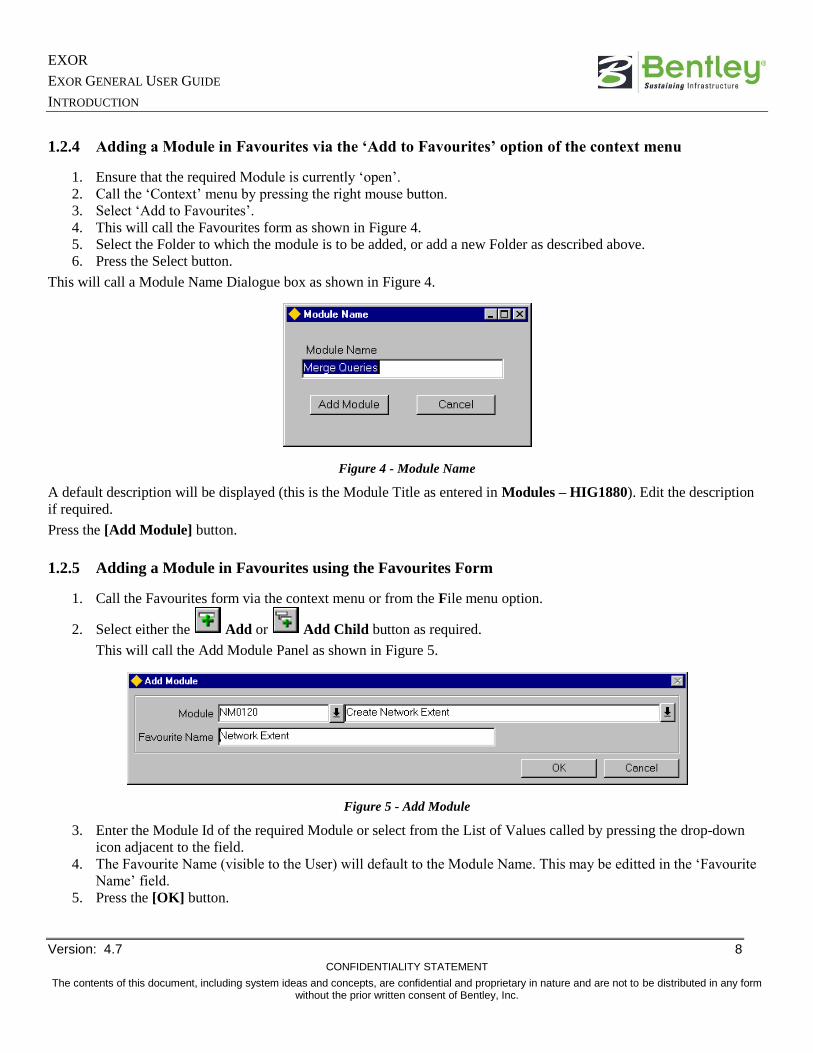
1.2.4 Adding a Module in Favourites via the ‘Add to Favourites’ option of the context menu
1. Ensure that the required Module is currently ‘open’.
2. Call the ‘Context’ menu by pressing the right mouse button.
3. Select ‘Add to Favourites’.
4. This will call the Favourites form as shown in Figure 4.
5. Select the Folder to which the module is to be added, or add a new Folder as described above.
6. Press the Select button.
This will call a Module Name Dialogue box as shown in Figure 4.
Figure 4 - Module Name
A default description will be displayed (this is the Module Title as entered in Modules – HIG1880). Edit the description
if required.
Press the [Add Module] button.
1.2.5 Adding a Module in Favourites using the Favourites Form
1. Call the Favourites form via the context menu or from the File menu option.
2. Select either the Add or Add Child button as required.
This will call the Add Module Panel as shown in Figure 5.
Figure 5 - Add Module
3. Enter the Module Id of the required Module or select from the List of Values called by pressing the drop-down
icon adjacent to the field.
4. The Favourite Name (visible to the User) will default to the Module Name. This may be editted in the ‘Favourite
Name’ field.
5. Press the [OK] button.

EXOR
EXOR GENERAL USER GUIDE
INTRODUCTION
Version: 4.7 9
CONFIDENTIALITY STATEMENT
The contents of this document, including system ideas and concepts, are confidential and proprietary in nature and are not to be distributed in any form without the prior written consent of Bentley, Inc.
1.2.6 Calling a Module from Favourites
1. Call the Favourites form via the context menu or from the File menu option.
2. Select the required Module. (To ‘expand’ a Folder press the [+] adjacent to the Folder Name.
3. Press the Run Button.
Figure 6 – Run Button
The appropriate module will be called.
1.2.7 Renaming a Folder or menu Item in Favourites
1. Call the Favourites form via the context menu or from the File menu option.
2. Select the Folder or Module Menu Item to rename.
3. Press the Rename button.
Figure 7 – Rename Button
4. This will call the Module Name dialogue box as in Figure 4.
5. Edit the Menu or Module Menu Item as required.
6. Press the [Rename] button.
7. To close the dialogue box press [Cancel].
1.2.8 Deleting a Folder or Item from Favourites
1. Call the Favourites form via the context menu or from the File menu option.
2. Select the Folder or Module Menu Item to be deleted.
3. Press the Delete button.
Figure 8 – Delete Button
4. A warning message will be displayed to the User.
5. To Delete the Item press the [OK] button.

EXOR
EXOR GENERAL USER GUIDE
INTRODUCTION
Version: 4.7 10
CONFIDENTIALITY STATEMENT
The contents of this document, including system ideas and concepts, are confidential and proprietary in nature and are not to be distributed in any form without the prior written consent of Bentley, Inc.
1.3 Using an Exor Form
Figure 9 - Exor Forms
1.3.1 General Information
All Exor applications consist of a series of forms that allow you to insert, modify or view Exor related data, depending on
the mode of access granted to a User. A typical form is displayed above.
All forms have a number of common characteristics.
Each form has a unique name, for example, NM0105. This name is used by the developers and support staff, if
problems are encountered this name should be quoted when contacting support.
Form name can be viewed once selected using
Menu | Help | About Current Form
All forms can be accessed using Fastpath
Some forms contain buttons that will lead to additional windows being displayed.
Mandatory fields are displayed in light yellow
In query Mode, queryable fields are displayed in Cyan
The Form title banner can display the following information when Product Option DBWINTITLE is set to ‘Y’. An
example is shown in
Figure 10.
Username
Database Alias

EXOR
EXOR GENERAL USER GUIDE
INTRODUCTION
Version: 4.7 11
CONFIDENTIALITY STATEMENT
The contents of this document, including system ideas and concepts, are confidential and proprietary in nature and are not to be distributed in any form without the prior written consent of Bentley, Inc.
Server Name
Current Highways Product (e.g., NET)
Version Number of the current Product
Figure 10 – Banner Information
The Module ID may also be displayed within the Form title Banner by setting Product Option IDWINTITLE to 'Y'. An
example is shown in Figure 11.
Note: DBWINTITLE is set to 'N' in this example.
Figure 11 – Module ID
Each form is comprised of a number of fields that can contain data. Fields:
are used to 'query' back existing data
can be 'display only' or 'updateable' (Display-only fields are ‘greyed’ out for easy identification.)
can have associated lists of values (Fields with an available List of Values can be identified by the ‘Drop Down
List’ icon adjacent to the field.)
may contain default values
can validate the format and content of data entered if required
help text and prompts will be displayed in the message line
Multiple forms can be displayed at any one time

EXOR
EXOR GENERAL USER GUIDE
INTRODUCTION
Version: 4.7 12
CONFIDENTIALITY STATEMENT
The contents of this document, including system ideas and concepts, are confidential and proprietary in nature and are not to be distributed in any form without the prior written consent of Bentley, Inc.
1.3.2 Function Buttons
Exor forms have a common look and feel. You should, therefore, be able to learn to use the system quickly. Common
functions are performed in the same way on each form and are driven by a series of function buttons.
Figure 12 - Buttons
When a form is selected the toolbar above will be displayed, this toolbar contains buttons that represent commonly used
functions when using a form. Additional less used functions can be found in the pull down menu above the toolbar.
The buttons are context sensitive and will be greyed out if they are unavailable for use at any time.
The following buttons become available when a form is selected.
Enter Query, changes the form's status so the user can enter some query criteria, Wildcards may
be used
Execute Query, executes the query based on the criteria entered.
Count Query Hits, displays the number of records that match the query criteria entered, you may
wish to enter additional criteria to reduce the records retrieved.
Cancel Query, this will return the form to insert mode. You must cancel a query before you will
be able to exit the form.
Expand, shows any additional information on the selected record.
Documents, call the document manager interface, displays all documents associated to the
selected record.
Create Record, add a new record into the database.
Delete Record, removes a record from the database. Records are generally end-dated and are not
completely removed from the system.
Clear Record, clears the record from the form.
First Record, move to the first record in the series retrieved.
Page Up, in a multi-record window page up 80% of the windows contents.
Up, move up one record at a time.
Down, move down one record at a time.
EXOR
EXOR GENERAL USER GUIDE
INTRODUCTION
Version: 4.7 13
CONFIDENTIALITY STATEMENT
The contents of this document, including system ideas and concepts, are confidential and proprietary in nature and are not to be distributed in any form without the prior written consent of Bentley, Inc.
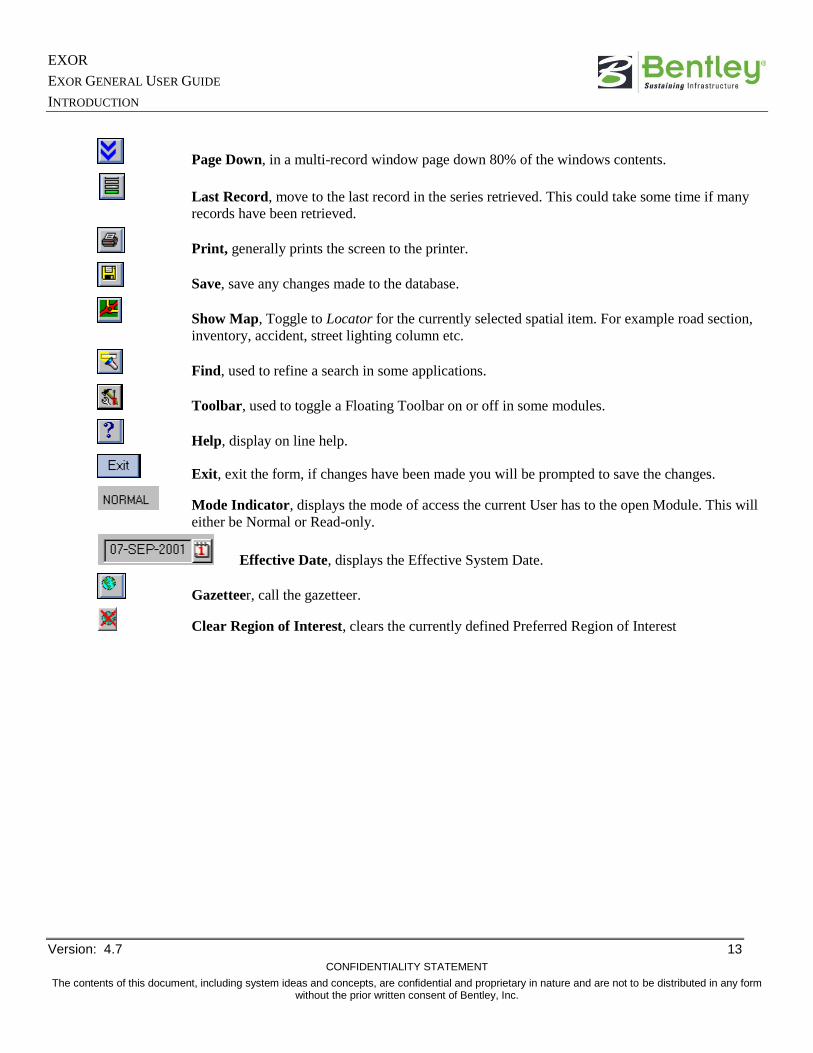
Page Down, in a multi-record window page down 80% of the windows contents.
Last Record, move to the last record in the series retrieved. This could take some time if many
records have been retrieved.
Print, generally prints the screen to the printer.
Save, save any changes made to the database.
Show Map, Toggle to Locator for the currently selected spatial item. For example road section,
inventory, accident, street lighting column etc.
Find, used to refine a search in some applications.
Toolbar, used to toggle a Floating Toolbar on or off in some modules.
Help, display on line help.
Exit, exit the form, if changes have been made you will be prompted to save the changes.
Mode Indicator, displays the mode of access the current User has to the open Module. This will
either be Normal or Read-only.
Effective Date, displays the Effective System Date.
Gazetteer, call the gazetteer.
Clear Region of Interest, clears the currently defined Preferred Region of Interest

EXOR
EXOR GENERAL USER GUIDE
INTRODUCTION
Version: 4.7 14
CONFIDENTIALITY STATEMENT
The contents of this document, including system ideas and concepts, are confidential and proprietary in nature and are not to be distributed in any form without the prior written consent of Bentley, Inc.
1.3.3 Additional Useful Functions
All the commonly used functions will have an associated button, however, when entering large amounts of similar data
the [Duplicate Record] function is useful.
To use this function follow this procedure:
1. Using the querying techniques detailed on page 33, retrieve the record you wish to copy.
2. Select [Insert Record] to create a new record.
3. From the menu, select Record then Duplicate. This will copy the contents of the record retrieved in step 1 into the
current record.
4. Make the changes to this copy, [Save] the changes made.
Other useful functions are detailed later in this chapter.
1.3.4 Function Keys
When entering data it is sometimes more convenient to use the function keys on your keyboard instead of selecting a
button with the mouse.
All the function buttons within Exor have a function key associated with them.
To view the function keys select Help then Keys from the menu, the following window will be displayed:

EXOR
EXOR GENERAL USER GUIDE
INTRODUCTION
Version: 4.7 15
CONFIDENTIALITY STATEMENT
The contents of this document, including system ideas and concepts, are confidential and proprietary in nature and are not to be distributed in any form without the prior written consent of Bentley, Inc.
Figure 13 - Function Keys
Like the buttons, the keys are context sensitive. The above list of keys will differ depending on where the list of keys was
requested.
When a form is selected a message and status line will be displayed at the bottom of the screen.

EXOR
EXOR GENERAL USER GUIDE
INTRODUCTION
Version: 4.7 16
CONFIDENTIALITY STATEMENT
The contents of this document, including system ideas and concepts, are confidential and proprietary in nature and are not to be distributed in any form without the prior written consent of Bentley, Inc.
1.3.5 Message Line
Figure 14 - Message and Status Lines
Figure 14 illustrates the Message Line at the bottom of the screen. You’ll get the following types of information:
Automatic help, guidance on what to enter in a field
Information, warning and error messages
1.3.6 Status Line
Figure 14Figure 14 illustrates the Status Line below the Message Line and displays system information such as:
Count Tells you the number of records you have viewed on the screen. As you scroll forward through
records the count increases. This information is always visible. An asterisk (*) next to the count
value indicates you are at the last record.
^ Tells you that there are records before or after the current record.
ENTER QUERY Tells you that you are in query mode. This allows you to enter your selection criteria.
Press [Execute Query] to retrieve data or [Cancel] to cancel the query. For more information see
Querying back Existing Data.
<List> The <List> option indicates there is a list of values available
1.3.7 Alert Box
Figure 15 - Alert Box
An Alert Box pops up when Exor finds an unfinished piece of work. Figure 15 illustrates a typical alert box. For example,
if you attempt to leave a form or enter a query without saving (committing) your latest changes, you are prompted to
select one of the following options:
(Yes) saves changes to the database

EXOR
EXOR GENERAL USER GUIDE
INTRODUCTION
Version: 4.7 17
CONFIDENTIALITY STATEMENT
The contents of this document, including system ideas and concepts, are confidential and proprietary in nature and are not to be distributed in any form without the prior written consent of Bentley, Inc.
(No) discards the changes to the database
(Cancel) allows you to continue the unfinished piece of work.
There are a number of alert boxes, the message should be read prior to making a selection.
1.3.8 Additional Module Information
Figure 16 - Additional information
If you require additional information regarding the selected module, for example, you need to obtain the unique module
id. From the strip menu above the buttons select Help then About Current Form; the window above will be displayed.
Select [OK] to remove the window.

EXOR
EXOR GENERAL USER GUIDE
INTRODUCTION
Version: 4.7 18
CONFIDENTIALITY STATEMENT
The contents of this document, including system ideas and concepts, are confidential and proprietary in nature and are not to be distributed in any form without the prior written consent of Bentley, Inc.
1.3.9 Using Multiple Forms
It is possible to use several forms at once. This will allow you to, for example, view data on one form whilst updating
related data on a separate form. These forms can all be from one application or from multiple applications.
To view multiple forms in the same application carry out the following procedure
1. Select the first form, query back the relevant data.
2. From the menu above the buttons, select Action | Switch to application, the menu will now change displaying the
menu for the current application.
3. Select another form. Query back the relevant data.
4. Repeat steps 2 and 3 to view additional forms.
5. To make one of the visible forms active select the form, then select one of the fields in the form. Forms can also
be selected by selecting window from the menu, the active forms will be displayed in a list, select the required
form.
To view multiple forms in a different application carry out the following procedure:
1. Select the first form, query back the relevant data.
2. From the menu above the buttons, select Action then Switch to Application, the menu will now change displaying
the menu for the current application, select Action then Return to Launchpad, this will display the launchpad.
3. Select the required application.
4. Select another form. Query back the relevant data.
5. Repeat steps 2 to 4 to view additional forms.
6. To make one of the visible forms active select the form, then select one of the fields in the form. Forms can also
be selected by selecting window from the menu, the active forms will be displayed in a list, select the required
form.
EXOR
EXOR GENERAL USER GUIDE
INTRODUCTION
Version: 4.7 19
CONFIDENTIALITY STATEMENT
The contents of this document, including system ideas and concepts, are confidential and proprietary in nature and are not to be distributed in any form without the prior written consent of Bentley, Inc.
1.4 Querying Back Existing Data
Within all Exor products you can use relational database search capabilities to retrieve information in your database.
You can retrieve information in your database. You can find this information quickly and easily.
You can search for a specific item of information or for related information based on search criteria without having to
review all the information in your database.
You can search for information based on any type and quantity of search criteria, including a single letter, a single word, a
group of characters or anything else you wish to enter.
You can find out how much information is available that satisfies your search criteria before running the search. This may
save you time should your search for a single piece of information yield 10,000 responses.
1.4.1 Searching for Information
Exor uses the term query to mean searching for information.
1.4.1.1 Entering and Executing a Query
To retrieve information from the database, you must enter a query and execute it. This means you must enter the condition
or values, criteria. Exor will use to search for information. When you select [Enter Query], you are in Enter Query
Mode and you are ready to enter query criteria. The message ENTER QUERY will be displayed in the status line
Once you are in Enter Query Mode, you have two options:
You can enter your query criteria and run (execute) the query by selecting [Execute Query].
or
You cancel Query Mode by selecting [Cancel], you will not be able to exit the form until the query has been
cancelled.
If you get the following message when you run your query:
Query cause no records to be retrieved. Re-enter.
Either enter different query criteria or cancel the query.
When a query retrieves information, Exor displays it on-screen. You don’t need to print out lengthy reports in
order to see it.
1.4.1.2 Count Query Hits
In Enter Query Mode, select [Count Query Hits] to see the number of rows a query will retrieve. With Count Query Hits
you can quickly determine how much information is in your database without actually displaying the data on your screen.
1.4.1.3 Reviewing Records
After Exor retrieves information, it displays the information on the screen. Some forms display one row at a time (single-
record windows) and others display several rows at a time (multi-record windows). To display records which have been
retrieved by your search but are not currently visible on the screen use [Up], [Down], [Page Up] and [Page Down]. We
call this scrolling through records.
To recap, the usual query sequence is as follows:
1. Select [Enter Query].
2. Type in your query criteria.

EXOR
EXOR GENERAL USER GUIDE
INTRODUCTION
Version: 4.7 20
CONFIDENTIALITY STATEMENT
The contents of this document, including system ideas and concepts, are confidential and proprietary in nature and are not to be distributed in any form without the prior written consent of Bentley, Inc.
3. Select [Execute Query].
1.4.2 How to Search for Information
There are a variety of search methods available to you whenever you want to retrieve information in your database. Some
forms go into query mode automatically when they are selected, Exor will tell you when [Enter Query] is available.
1.4.2.1 An Exact Match
You can retrieve just the information that matches your query criteria. For example, you may wish to review all Links
with a section class of All Purpose. Enter ‘AP’ in the appropriate field and Exor will retrieve and display the Links that
match this criteria. You can enter any search criteria you want to find just the information you need.
1.4.2.2 Using Comparative Searches
You can restrict by entering comparison using the following operators:
> Greater than
< Less than
>= Greater than or equal to
<= Less than or equal to
For example, to display all records where values in a particular field are more than 1000, you select [Enter Query], move
the cursor to the field and type >1000 followed by [Execute Query].
1.4.2.3 “Fuzzy Searches with Wildcards”
You can enter inexact (fuzzy) query criteria. To do this you use one or more wildcards. There are two wildcards that you
can use:
% percent takes the place of one or more characters or potentially no characters.
‘-’ underscore takes the place of a single character.
For example, you may wish to search for Links with a Linkcode of A1 or A10, enter ‘A1%’ followed by [Execute
Query]. Exor wildcards let you find this information quickly, without having to search each row individually.
To run a search for all descriptions containing the word “junction”, enter ‘%junction%’ in the appropriate field, some
fields are case sensitive, if your search results in no records being retrieved try the other case.
To search for all 100 series budget codes enter '_100%', this will retrieve all 'A100', 'B100', 'C100'….'n100' series budget
codes.
1.4.2.4 Initiating a Global Search
Initiating a global search is not recommended because the system will bring back all records, this could take some time on
larger databases. If you execute a query without entering any query criteria, you are not restricting the data that will be
retrieved. It is better to restrict your query using a combination of specific criteria and wildcards. If a global search is
carried out it is recommended that [Count QueryHits] is used to establish how many records will be retrieved.
If a large number of records are retrieved it is not recommended that the [Last Record] button be selected, this will take a
long time to retrieve the last record and may have the effect of 'hanging' your PC.

EXOR
EXOR GENERAL USER GUIDE
INTRODUCTION
Version: 4.7 21
CONFIDENTIALITY STATEMENT
The contents of this document, including system ideas and concepts, are confidential and proprietary in nature and are not to be distributed in any form without the prior written consent of Bentley, Inc.
1.4.2.5 Query Where Box
Figure 17 - Query Where
The Query Where Box allows you to enter complex search criteria, exploiting the full power of the Structured Query
Language (SQL). Figure 17 illustrates the use of Query Where to search for all sections with no adoption status and order
the results by the section description.
To use Query Where, follow the following steps:
1. Select [Enter Query].
2. Enter a variable in each field you want to reference; you can use more that one field in your query. The variable
should begin with a colon or an ampersand as illustrated in Figure 17.
3. Select [Execute Query] to display the Query Where Box.
4. Enter the query criteria in the Query Where Box.
5. Select [Save] to run the query.
The advantage of using Query Where is that you can fine tune your search criteria. If you simply enter criteria directly
into fields on screen, the information retrieved must satisfy all the criteria. Using Query Where you can vary the criteria.
You can have a query where expression for more than one field if required. When you do this you will need different
labels in each field, for example, ‘:A’ in the first field and ‘:B’ in the second etc.

EXOR
EXOR GENERAL USER GUIDE
INTRODUCTION
Version: 4.7 22
CONFIDENTIALITY STATEMENT
The contents of this document, including system ideas and concepts, are confidential and proprietary in nature and are not to be distributed in any form without the prior written consent of Bentley, Inc.
1.4.3 List of Values
List of Values provides you with an easy-to-use data entry and search method that increases your accuracy and
productivity:
You can enter data quickly and easily without having to memorise or look up valid data for each field.
You can choose from an on-line list of acceptable input choices whenever you want.
Exor will validate your input during data entry. If you enter incorrect data, you know right away so you can make
corrections.
The drop-down icon adjacent to the field easily identifies fields with an associated List of Values.
1.4.4 Major Features
1.4.4.1 List Option
Exor displays the List option when List of Values is available for a field. You will see the word <List> on the status line
at the bottom of the screen.
1.4.4.2 Dynamic Lists
When a list of values is displayed, entering a character from the keyboard will automatically reduce the contents of the list
to those values starting with the character entered.
1.4.4.3 Wildcard Search
The wildcard search facility simplifies and speeds your data entry. When you display the List of Values window, you have
the option of reducing the List of Values to just those containing the characters you want by entering a value in the Find
field, wildcards may be used in this field.

EXOR
EXOR GENERAL USER GUIDE
INTRODUCTION
Version: 4.7 23
CONFIDENTIALITY STATEMENT
The contents of this document, including system ideas and concepts, are confidential and proprietary in nature and are not to be distributed in any form without the prior written consent of Bentley, Inc.
1.4.5 Using List of Values
Figure 18 - List of Values
1.4.5.1 List of Values – The Basic Steps
A List of Values is available whenever the <List> options appears on the status line at the bottom of the screen.
In a field where the <List> option appears, double-click the field with the mouse or press the [F9] key. The List of Values
window appears with a descriptive heading, the list window can be resized if required by selecting on the edge or corner
of the window and dragging the window. A % will be displayed in the find field indicating all the values will be
displayed.
A count of the total number of entries in the list will be displayed on the message line.
To make a selection from the List, either, 'double click' the item required or select the item followed by [OK].
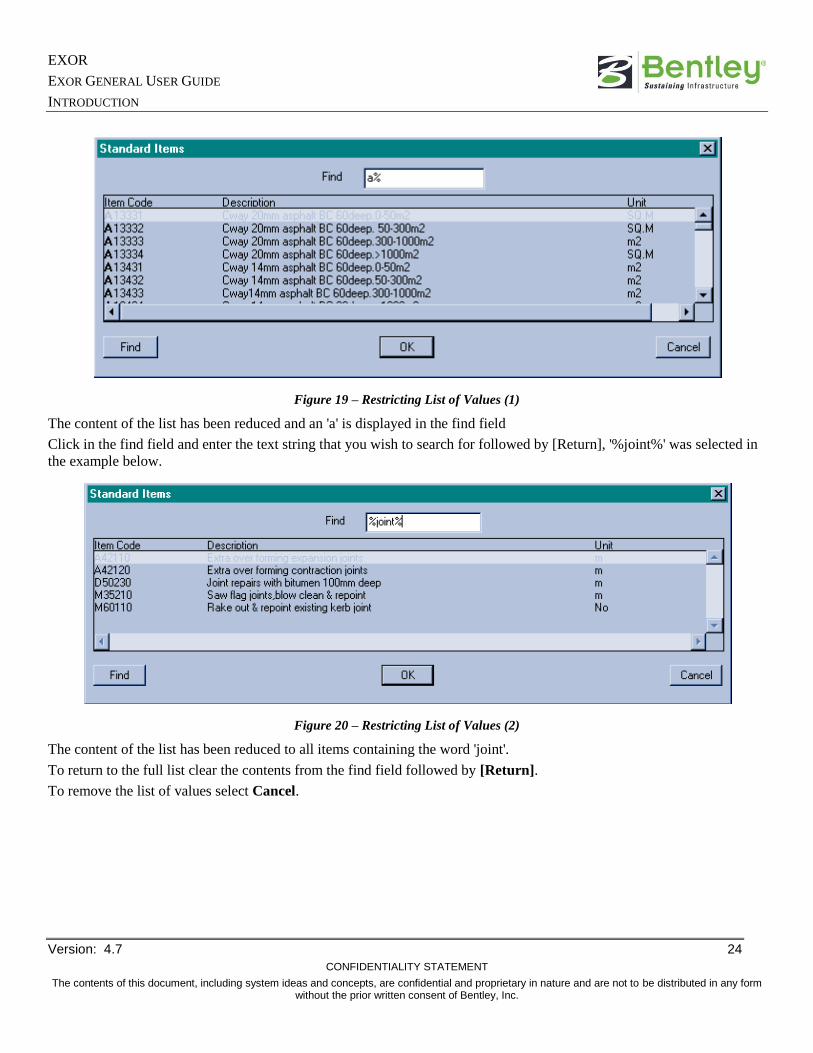
1.4.5.2 Restricting the content of the list
The contents of the list can be reduced in 1 of 2 ways.
Select a character using the keyboard, this will restrict the content of the list to all those values beginning with the
character selected, 'A' was selected in the example below.
EXOR
EXOR GENERAL USER GUIDE
INTRODUCTION
Version: 4.7 24
CONFIDENTIALITY STATEMENT
The contents of this document, including system ideas and concepts, are confidential and proprietary in nature and are not to be distributed in any form without the prior written consent of Bentley, Inc.
Figure 19 – Restricting List of Values (1)
The content of the list has been reduced and an 'a' is displayed in the find field
Click in the find field and enter the text string that you wish to search for followed by [Return], '%joint%' was selected in
the example below.
Figure 20 – Restricting List of Values (2)
The content of the list has been reduced to all items containing the word 'joint'.
To return to the full list clear the contents from the find field followed by [Return].
To remove the list of values select Cancel.

EXOR
EXOR GENERAL USER GUIDE
INTRODUCTION
Version: 4.7 25
CONFIDENTIALITY STATEMENT
The contents of this document, including system ideas and concepts, are confidential and proprietary in nature and are not to be distributed in any form without the prior written consent of Bentley, Inc.
1.5 Fastpath
Figure 21 - Fastpath menu
The Fastpath screen allows the user to move directly to a specified module by typing the module ID or Module Title
(wildcards may be used) into the appropriate fastpath field without moving through the menus to the required option.
1.5.1 Fastpath Screen
Figure 22 - Fastpath
This screen is used to move directly to a selected module.
Module (Optional) List
Enter the full ID of the module you wish to move directly to, for example, NM7050.
Title (Optional) List
Enter the Title of the module you wish to move directly to, for example, Groups of Groups.

EXOR
EXOR GENERAL USER GUIDE
INTRODUCTION
Version: 4.7 26
CONFIDENTIALITY STATEMENT
The contents of this document, including system ideas and concepts, are confidential and proprietary in nature and are not to be distributed in any form without the prior written consent of Bentley, Inc.
1.6 Error Messages
Figure 23 - Error Messages
Occasionally when working within Exor a database error may occur, a window similar to the one above will be displayed
informing you of the error.
Additional information about the error should be displayed by selecting Help | Display Error from the menu, a window
similar to the one below will be displayed:
Figure 24 - Error Messages
EXOR
EXOR GENERAL USER GUIDE
INTRODUCTION
Version: 4.7 27
CONFIDENTIALITY STATEMENT
The contents of this document, including system ideas and concepts, are confidential and proprietary in nature and are not to be distributed in any form without the prior written consent of Bentley, Inc.
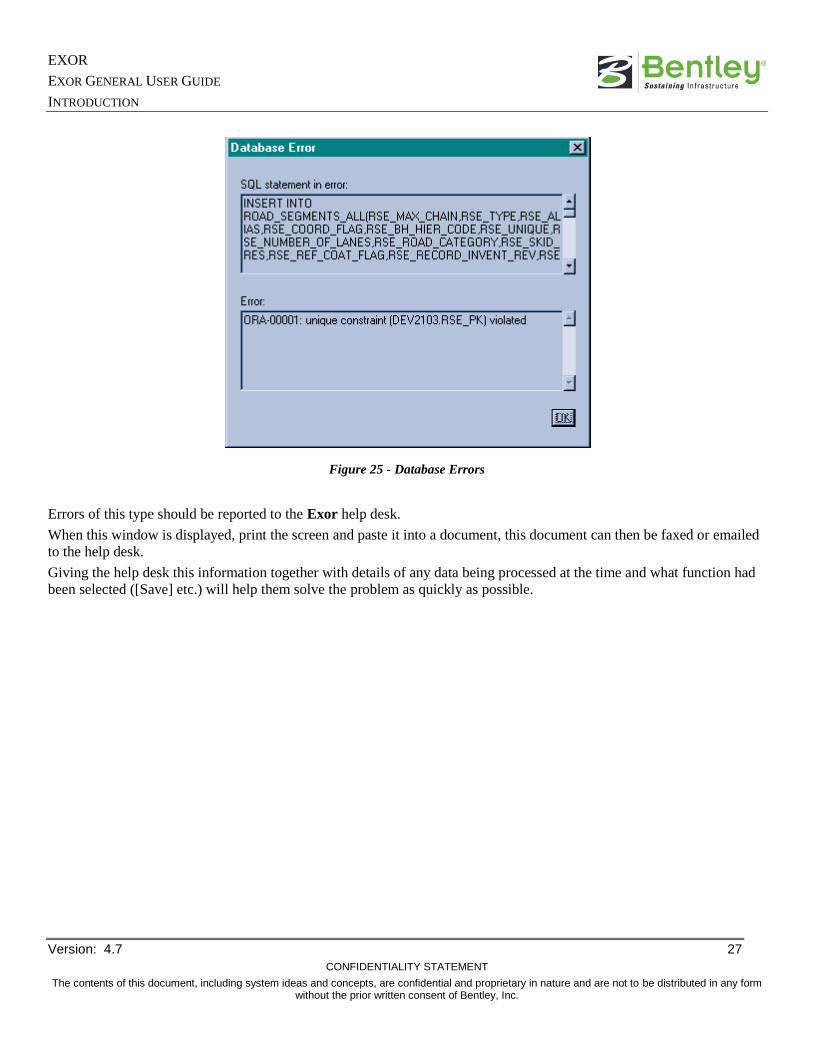
Figure 25 - Database Errors
Errors of this type should be reported to the Exor help desk.
When this window is displayed, print the screen and paste it into a document, this document can then be faxed or emailed
to the help desk.
Giving the help desk this information together with details of any data being processed at the time and what function had
been selected ([Save] etc.) will help them solve the problem as quickly as possible.

EXOR
EXOR GENERAL USER GUIDE
INTRODUCTION
Version: 4.7 28
CONFIDENTIALITY STATEMENT
The contents of this document, including system ideas and concepts, are confidential and proprietary in nature and are not to be distributed in any form without the prior written consent of Bentley, Inc.
1.7 Dates
Figure 26
1.7.1 Date Formatting in Exor
A date may be selected in any Date field by right clicking the Mouse button and selecting the ‘Today’ menu option from
the context menu or by selecting the required date from the ‘Calendar’ option as shown in
Figure 26 Figure 26.
The ‘Hot Key’ F3 will populate the selected date field with the current System Date when pressed.

EXOR
EXOR GENERAL USER GUIDE
INTRODUCTION
Version: 4.7 29
CONFIDENTIALITY STATEMENT
The contents of this document, including system ideas and concepts, are confidential and proprietary in nature and are not to be distributed in any form without the prior written consent of Bentley, Inc.

EXOR
EXOR GENERAL USER GUIDE
INTRODUCTION
Version: 4.7 30
CONFIDENTIALITY STATEMENT
The contents of this document, including system ideas and concepts, are confidential and proprietary in nature and are not to be distributed in any form without the prior written consent of Bentley, Inc.
1.8 User Preferences – HIG1840
Figure 27 – User Preferences
Figure 28 – Preferences Button
The User Preferences window is used to define certain default values for a User such as the 'Effective Date' (page 30)
and to manage a Users User Options. It may be called by selecting the 'User Preferences' option from the 'File' menu as
shown in Figure 27.
or by pressing the ‘Preferences’ button (Figure 28) on the menu toolbar when a form is active.
Both of the above options will display the User Preferences form as shown in Figure 29.

EXOR
EXOR GENERAL USER GUIDE
INTRODUCTION
Version: 4.7 31
CONFIDENTIALITY STATEMENT
The contents of this document, including system ideas and concepts, are confidential and proprietary in nature and are not to be distributed in any form without the prior written consent of Bentley, Inc.
Figure 29
1.8.1 Effective Date
Exor are commited to providing a fully accountable, auditable Network Management system. For this reason very few
‘Objects’, e.g., Network Elements, Network Groups, Inventory Items etc., are ever deleted from the system, they are
instead ‘End Dated’ which effectively hides them from the User.
A Network and any associated objects may be viewed as they were at previous temporal stages by setting the ‘Effective
Date’ to the required date. This will allow any Network Elements, Groups, Inventory Items etc., with a Start Date which is
equal to or greater than the selected ‘Effective Date’ to be displayed.
The Effective Date will be ‘Active’ for all Forms and will remain in affect until the current User session is ended or the
‘Effective Date’ is reset. When an Effective Date is selected no database updates or inserts will be allowed in any of the
Exor forms.
Note: Network Extents may be created when an Effective Date is set to a Date which is not today.
Figure 30 - Effective Date
The Effective Date selected will be displayed on the Exor menu toolbar as shown in Figure 30. If an Effective Date,
which is not the current system date, is selected it will be displayed in Red to indicate that no database updates or inserts
are allowed.

EXOR
EXOR GENERAL USER GUIDE
INTRODUCTION
Version: 4.7 32
CONFIDENTIALITY STATEMENT
The contents of this document, including system ideas and concepts, are confidential and proprietary in nature and are not to be distributed in any form without the prior written consent of Bentley, Inc.
1.8.2 Setting the Effective Date
To change the ‘Effective Date’ enter the required Date in the ‘Effective Date’ field. To select a date from the calendar,
click the right mouse button and select the ‘Calendar’ option from the context menu. This will call a ‘Select Date’
calendar window (Figure 31).
Figure 31 - Calendar
Note: Pressing the F3 key will populate the current System Date into the Effective Date.
1.8.3 Select Date Calendar
The Select Date Calendar allows the selection of a Date at any temporal stage.
The following buttons are available to navigate through the calendar to select the required date.
Move back one Month
Move back one Year
Move forward one Month
Move back one Year
When the required date has been selected press the [OK] button.
EXOR
EXOR GENERAL USER GUIDE
INTRODUCTION
Version: 4.7 33
CONFIDENTIALITY STATEMENT
The contents of this document, including system ideas and concepts, are confidential and proprietary in nature and are not to be distributed in any form without the prior written consent of Bentley, Inc.
1.8.4 Unit Name
The preferred Unit of Measurement used to display Element Lengths in the Elements – NM0105 may be selected in the
‘Unit Name’ field. The avalaible Units will have been defined in the Units and Conversions – HIG1820 form.
1.8.5 Preferred LRM
The User Preferred LRM or Linear Group Type may be defined by selecting the appropriate LRM from the List of
Values. The Preferred LRM is used throughout Exor. For example, if a Preferred LRM is currently set and the Gazetteer
is called, the Group Type and associated Network Type will be automatically populated in the appropraite fields. When
viewing Assets, their locations will only be displayed relative to the Preferred LRM unless the Asset is not located on a
Route of that Type, in which case the location will be displayed relative to ALL other LRMS on which the Asset is
located.
To set a Preferred LRM select the appropraite Linear Group Type from the LOV. If a Preferred LRM is not required the
User should select the ALL LRM'S value.
Note: If a User selects the ALL LRM'S value and Product Option PREFLRM has been set, the value entered for the
Product Option will take precidence. If this is not desirable no value should be entered for the Product Option.
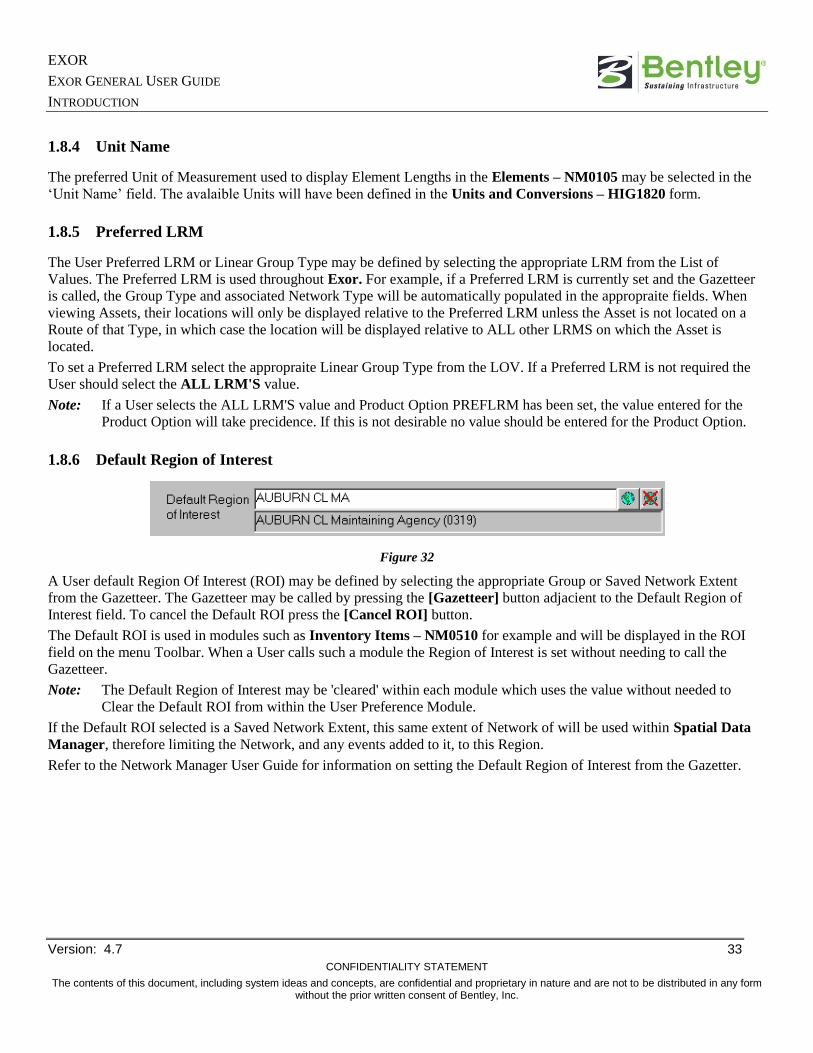
1.8.6 Default Region of Interest
Figure 32
A User default Region Of Interest (ROI) may be defined by selecting the appropriate Group or Saved Network Extent
from the Gazetteer. The Gazetteer may be called by pressing the [Gazetteer] button adjacient to the Default Region of
Interest field. To cancel the Default ROI press the [Cancel ROI] button.
The Default ROI is used in modules such as Inventory Items – NM0510 for example and will be displayed in the ROI
field on the menu Toolbar. When a User calls such a module the Region of Interest is set without needing to call the
Gazetteer.
Note: The Default Region of Interest may be 'cleared' within each module which uses the value without needed to
Clear the Default ROI from within the User Preference Module.
If the Default ROI selected is a Saved Network Extent, this same extent of Network of will be used within Spatial Data
Manager, therefore limiting the Network, and any events added to it, to this Region.
Refer to the Network Manager User Guide for information on setting the Default Region of Interest from the Gazetter.
EXOR
EXOR GENERAL USER GUIDE
INTRODUCTION
Version: 4.7 34
CONFIDENTIALITY STATEMENT
The contents of this document, including system ideas and concepts, are confidential and proprietary in nature and are not to be distributed in any form without the prior written consent of Bentley, Inc.
1.8.7 Default Inventory Attribute Set
Figure 33
A User default Inventory Asset Set may be defined by selecting the required Set from the LOV. Inventory Attribute Sets
are used to restrict the Attributes and Attribute values displayed for an Asset Item in modules such as Assets on a Route –
NM0560 (refer to Asset Manager User Guide) and some Asset Reports. Attribute sets are maintained using Inventory
Attribute Sets – NM0415 (refer to the Asset Manager System Admin Guide).
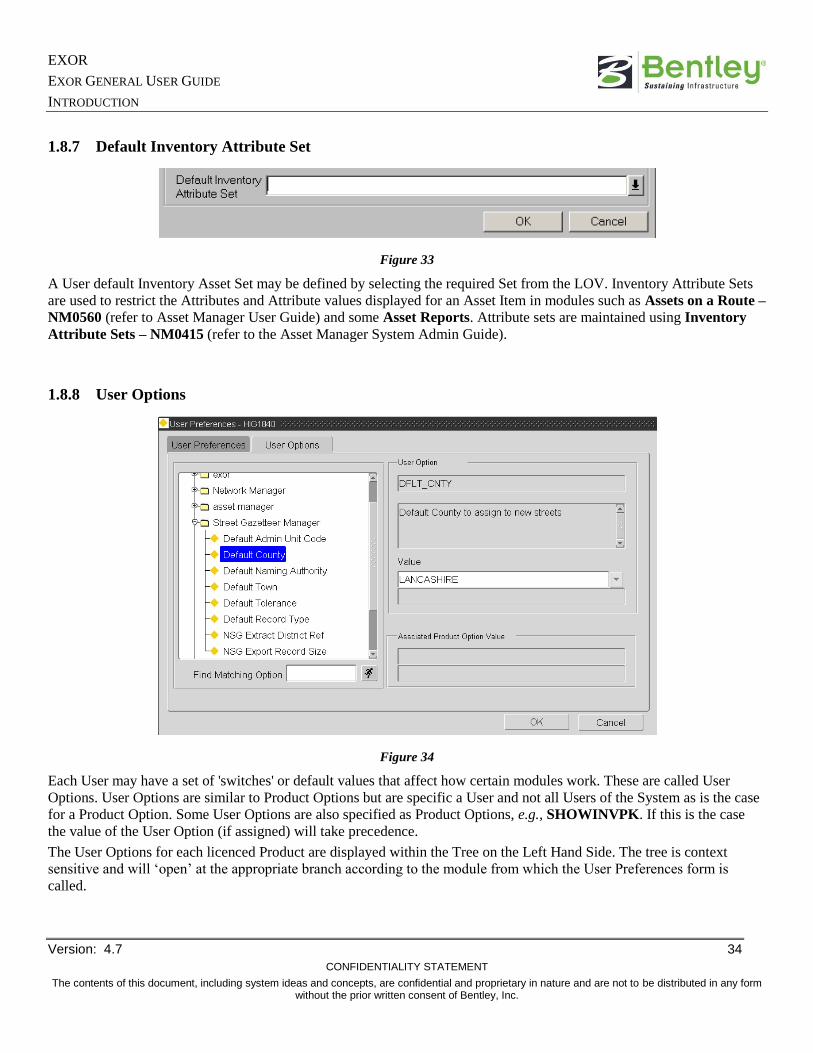
1.8.8 User Options
Figure 34
Each User may have a set of 'switches' or default values that affect how certain modules work. These are called User
Options. User Options are similar to Product Options but are specific a User and not all Users of the System as is the case
for a Product Option. Some User Options are also specified as Product Options, e.g., SHOWINVPK. If this is the case
the value of the User Option (if assigned) will take precedence.
The User Options for each licenced Product are displayed within the Tree on the Left Hand Side. The tree is context
sensitive and will ‘open’ at the appropriate branch according to the module from which the User Preferences form is
called.

EXOR
EXOR GENERAL USER GUIDE
INTRODUCTION
Version: 4.7 35
CONFIDENTIALITY STATEMENT
The contents of this document, including system ideas and concepts, are confidential and proprietary in nature and are not to be distributed in any form without the prior written consent of Bentley, Inc.
1.9 Change Password – HIG1833
Figure 35 - Change Password
The Change Password – HIG1833 option allows a User to change their Log on password. It may be accessed via the
Fastpath or by selecting ‘Change Password’ option from the File menu on the menu toolbar. When the Password has been
sucessfully changed and saved the User will be Logged out of Exor and must Log in again using the new Password.
Figure 36
Old Password (Required, Masked)
Enter the existing Password. If the Password is incorrectly entered a message will be displayed to the User as shown in
Figure 37.
Figure 37
New Password (Required, Masked)
Enter the required new password. A maximum of 30 characters is allowed.

EXOR
EXOR GENERAL USER GUIDE
INTRODUCTION
Version: 4.7 36
CONFIDENTIALITY STATEMENT
The contents of this document, including system ideas and concepts, are confidential and proprietary in nature and are not to be distributed in any form without the prior written consent of Bentley, Inc.
Repeat (Required, Masked)
Re-enter the new password.
If the passwords entered differ a message will be displayed warning the User as shown in Figure 38.
Figure 38
The required password should be corrected before pressing the [Change] button. Once the [Change] button is pressed a
message will be displayed warning the User that the current session will be terminated as shown in Figure 39. Press [OK]
to change the password and Log out or [Cancel].
Figure 39

EXOR
EXOR GENERAL USER GUIDE
INTRODUCTION
Version: 4.7 37
CONFIDENTIALITY STATEMENT
The contents of this document, including system ideas and concepts, are confidential and proprietary in nature and are not to be distributed in any form without the prior written consent of Bentley, Inc.
1.10 On-line Help
Exor provides full context sensitive On-line Help facilities to assist users in the use of Highways modules. This Online
Help provides detailed information about each form including general information and field characteristics.
Step by Step Guides are also available and can be viewed by clicking the [Step by Step] button where available.
Users can browse through the help books using the Contents tab, search for Topic titles using the Index tab or search for
specific words or phrases using the Find tab.
Specific Exor forms can be searched for by either typing in the forms Name e.g., Network Elements or by typing in the
fastpath for the form e.g., NM0105.
Figure 40 -On-line Help Topics
1.10.1 Accessing On-line Help
On-line help can be accessed by a number of different methods.

EXOR
EXOR GENERAL USER GUIDE
INTRODUCTION
Version: 4.7 38
CONFIDENTIALITY STATEMENT
The contents of this document, including system ideas and concepts, are confidential and proprietary in nature and are not to be distributed in any form without the prior written consent of Bentley, Inc.
1.10.1.1 Method 1
Figure 41
On the menu, press Help then On-line Help. This will display the Help for the currently selected Highways product.
1.10.1.2 Method 2
From within a Highways form press the button. This will automatically 'bring in' in currently selected Exor form name
in the 'Topic Index' box. To display the help information press the [Display] button.
1.10.2 Change the font size in a Help Topic
In the Help topic window, click Options
To change the font size, point to Font, then click Small, Normal or Large.
1.10.3 Print a Help Topic
In the Help topic window, click Options.
Click Print Topic.
1.10.4 Annotating on-line Help
Users can 'personalise' their help files by adding comments or notes to individual topics. These will be saved and can be
recalled later by clicking on the paper clip symbol that will appear against the topic header.
Figure 42
In the Help Topic window, click the Edit menu or the Options button.
You can also use the right mouse button to click inside the topic.
Click Annotate, and then type your comments or notes.
When you're done, you'll see a paper-clip icon at the top of the topic. You can click it to see or change your comment.