Embed Size (px)
Citation preview

A COMPUTE! Books Publication $4.95
Every Kid’s**™ First Book
of Robots and my uw
David D. Thornburg


Every Kid’s
First Book of Robots and. Computers
David D. Thornburg
Published by COMPUTE! Books. A Division of Small System Services, Inc., Greensboro, NC

Copyright © 1982, Small System Services, Inc. All rights reserved.
Reproduction or translation of any part of this work beyond that permitted by Sections 107 and 108 of the United States Copyright Act without the written permission of the copyright owner is unlawful. Turtle Tiles" are a trademark of David D. Thornburg and Innovision, Inc.
Atari is a trademark of Atari, Inc. Big Trak is a trademark of the Milton Bradley Company
Printed in the United States of America
ISBN 0-942386-05-1
10 987654321
il


Table Of Contents
Preface For Parents And Teachers.vii
1. Let’s Meet A Robot . 1
2. Introducing Some Turtles .9
Using The Big Trak . 12 Using The Turtle Tiles . 18
3. Moving In A Square —
Our First Turtle Pathway.23
SQUAREPATH For The Turtle . 27 SQUAREPATH For The Big Trak .31 SQUAREPATH For The Turtle Tiles .37
4. The Total Turtle Trip .43
Some Trips For The Turtle . 45 Some Trips For The Big Trak. 50 Some Trips For The Turtle Tiles .54
5. You Can’t Get There From Here —
Paths That Don’t Close .57
Strange Paths For The Turtle . 59 Strange Paths For The Big Trak .62 Strange Paths For The Turtle Tiles .65
6. From Big Trak To The Computer —
Your Next Step.69
7. Drawing Pictures And Other Things
To Do With The Big Trak .77
COMPUTE! Books is a division of Small System Services, Inc., Publishers of COMPUTE! Magazine Editorial Offices are located at: 625 Pulton Street, Greensboro, NC 27403 USA. (919) 275-9809.


Preface For Parents And Teachers This book allows children to develop skills in computer programming and geometry through the use of a commonly available toy - the Big Trak robot vehicle. Programming is introduced as the communication tool through which the child conveys instructions to the machine. Once the machine’s language limitations are understood, it can be made to follow any procedure which has been entered by the user. The mastery and control of a simple and inexpensive “computer” such as the Big Trak thus becomes the training experience that allows children to create their own programs on larger desk-top computer systems. There are many reasons for having children learn to program computers. The computer is one of the many tools which will be commonplace in our children’s lifetime. To deny children computer literacy is as nonsensical as denying them the opportunity to learn to read.
It is always exciting to find a plaything that, when viewed in a different light, is also a valuable educational tool. Simple geometric blocks, for example, take on additional educational value when combined with a mirror to allow the exploration of geometric symmetry. While most toys have recognizable educational content, many parents and teachers familiar with programmable robot vehicles (such as the Big Trak) have yet to discover the value of these toys in teaching geometry and computer programming. In the several years this product has been on the market, a few colleagues and I have used it in numerous classrooms and workshops. We have used it to teach programming to children from first to sixth grade, and have found the experience to be rewarding for both the children and their teachers.
vii

Vehicles such as the Big Trak belong to a class of robots known as “turtles.” A turtle responds to incremental commands (for example, GO 10 -units, or TURN 90 degrees). By issuing commands to move or turn by various amounts, the turtle can be instructed to trace out a path that defines any geometric shape. The process-based descriptions characteristic of turtle geometry are to be contrasted with the static descriptions of objects given by traditional coordinate geometry.
One of the turtle’s major advocates in this country is Seymour Papert. He and his colleagues at the Massachusetts Institute of Technology have spent many years implementing and using turtle geometry in a computer language called LOGO. Much of Papert’s philosophy regarding the use of computers by children was influenced by his association with the Swiss psychologist and educational philosopher Jean Piaget. In Papert’s book, Mindstorms: Children, Computers and Powerful Ideas (Basic Books, 1980), the computer is described as an adaptive tool to which the child can “teach” various concepts. In the course of conveying procedures to the computer, the child learns the concepts as well.
Our use of turtle commands as the programming language mirrors the process-based descriptions commonly used by children. For example, a child is likely to describe a nearby location, such as a friend’s house, by a procedure (Go two blocks, turn right, go another block, turn left,...). Because turtle geometry has been incorporated as the graphics environment in several computer languages available for the popular desk-top personal computers, these programming ideas can continue to be used as the child learns to operate other computers.
The material in this book has been tested with children of many ages and skill levels. Our use of
vlii

multiple levels of abstraction reinforces basic concepts and provides the bridge to other computer environments. As for the utility of such environments, all the illustrations for this book were prepared on an Atari 800 computer using turtle graphics in the language Atari PILOT. The resulting pictures were printed on an Epson MX- 100 printer using the Screen Printer Interface from Macrotronics.
Additional books on similar topics include Turtle Geometry: The Computer as a Medium for Exploring Mathematics, by Harold Abelson and Andrea diSessa (MIT Press, 1981), and Picture This! PILOT Turtle Geometry: An Introduction to Computer Graphics for Kids of all Ages, by David Thornburg (Addison Wesley, 1982).
Many of the basic approaches in this book, including the development of a unique programming tool, Turtle Tiles, benefited from numerous discussions with Liza Loop. As one of the people who pioneered the use of programmable toys in the classroom, her firsthand experiences reinforced my own and strengthened my determination to complete this project.
I have also been encouraged to work in this area by many teachers and by many people in the computer community. While a list of any reasonable size would be incomplete, I wish to acknowledge Portia Issacson, Ted and Robert Kahn, and Seymour Papert as just a few of the people who helped to guide my work.
My greatest encouragement has come from the children who have been introduced to computers through early drafts of this book. It is their excitement, playfulness, and love of learning which, more than anything else, convinced me of the value of the turtle in education.
ix


CHAPTER ONE
Let’s Meet A Robot!


CHAPTER ONE/3
Suppose you had a machine that could follow your instructions. How would you ask it to do something?
Maybe we need to decide just what kinds of things it is that this machine can do. If it knew about music, maybe it could play us a song. Or if it knew about cooking, maybe it could give us a snack. There are lots of things we could ask machines to do for us. That is why people build machines in the first place.
This book is about some special machines called robots. Do you know what a robot is? A robot is a special device that can move itself around in response to our instructions.
There are lots of reasons you might be interested in robots and computers. If you think robots are only found in the movies, you are in for a surprise. To start with, there are several interesting toys such as the Milton Bradley Big Trak that are real robots. By learning how to give instructions to machines like the Big Trak, you will be learning some things that will make it easier for you to use your own computer. Who knows — someday you might even be working in an area where your interest in robots and computers will be valuable!
Imagine what it would be like to have a robot around the house. Just think — you could say “Make the bed,” and the robot could make your bed up in the morning. You could say “Take out the garbage,” and the robot would do it without even saying “YUCHHH!”
Project 1. Make a list of at least ten chores that could be done by a robot.

%4/CHAPTER ONE
Next to each, chore, write the command you would want to give to the robot in order to make it do the chore for you.
If you take a good look at your list, you might notice that each chore probably seems pretty simple for you to do. The robot, of course, can’t make the bed or take out the garbage without being told how. Let’s look at the task of taking out the garbage. How do you do it? First you have to pick up the wastebasket, then you have to go out the door, turn right at the patio, go to the garbage can, lift the lid, throw in the garbage, replace the lid, and retrace your path back into the house.
Whew! If we are going to have a robot do this for
us, we need to find out exactly how to get each of these steps into the robot’s set of instructions.
Maybe we should start by looking at the basic instructions a robot needs to follow in order to do anything1 useful. Without thinking too hard you can probably come up with two important instructions right away.
For starters we will look at the instructions FORWARD and TURN. Let’s pretend that our robot is a mechanical turtle that can crawl along the floor as it follows our commands. We will show the turtle as a triangular arrowhead because this way it is easy to see in which direction it is pointing.
If we tell the turtle to go FORWARD it is

CHAPTER ONE/5 ,-—
almost ready to wander off in whatever direction it is headed, but it needs one more piece of information. What else do we need to tell the turtle? We need to let the turtle know how far to go forward. This amount will be a number. If we say FORWARD 5 the turtle will not travel as far as if we say FORWARD 25.
But what do 5 and 25 mean? Do we want the turtle to go 5 centimeters, 5 miles, 5 zillionths of a yard? Five what?
Well, since it is our robot, I guess we can make the number represent anything we want — a “turtle unit.” Let’s define 1 turtle unit to be the length of the turtle itself. This means that if we say FORWARD 1, the turtle will advance forward by one turtle unit.
FORWARD 1
If we say FORWARD 1 again, the turtle will take another step.
FORWARD 1 FORWARD 1
Now let’s get brave. We can say FORWARD 78.

c ,6/CHAPTER ONE
FORWARD 78
Whoops! Hey, turtle - come back here! Oh boy — that dumb turtle just wandered
out of sight and we don’t even know how to get it back.
We need another command so that we can have the turtle change direction. We need the command TURN. After all, it would be a pretty boring turtle if all it could do is wander off in one direction without being able to turn.
Clearly, if we want the turtle to TURN, it can’t do anything until we tell it how much. The most common numbers for measuring turns are in units called degrees. If you turn around in a complete circle, you will have turned exactly 360 degrees.
If we say TURN 90, the turtle will turn to the right like this:
TURN 90

CHAPTER ONE/7
If we say TURN 90 again, the turtle will now be pointing backwards:
TURN 90 TURN 90
If we give this command twice more (TURN 90, TURN 90), we get back exactly where we started.
TURN 90 TURN 90 TURN 90 TURN 90

,8/CHAPTER ONE
We have turned the turtle by 90 + 90 + 90 + 90 degrees, or 360 degrees overall.
Just as FORWARD always moves the turtle (starting from wherever it is at the time) TURN always turns the turtle from the position it was pointing at the start of the turn.
Now that we have both FORWARD and TURN, we can use combinations of these to make the turtle go anywhere we want. We go as far as we want in one direction, turn the turtle by some amount, and then have it go some distance in the new direction. By repeating this sequence of commands, we can make the turtle follow almost any path.
Project Z. You should spend some time thinking about the commands FORWARD and TURN. Can you describe how to get from your home to the store or school by using these two commands? Is there any path you can think of that can’t be described this way?
Next we will show how these commands are used with a real robot turtle.


CHAPTER TWO/1
There are lots of machines in the world that can accept commands of the type we have just described. Before going much farther, it is important that you get your hands on a robot turtle so that you can experiment with making it move in various ways instead of just reading how to do it.
We will concentrate on two turtles — the Big Trak robot car made by Milton Bradley, and Turtle Tiles — a set of cardboard turtle paths that allow you to try turtle instructions out any time or anywhere. A set of Turtle Tiles is included with this book.
We want this book to be useful to you whether you have a Big Trak or not. When we are covering general turtle information, we will use the triangular turtle symbol at the start of the section.
When we are covering Big Trak information, we will use this Big Trak symbol.
And, when we are covering Turtle Tile information, we will use the Turtle Tile symbol.

12/CHAPTER TWO
As each, new idea is tried out, we will illustrate the concept three times - once for each of our turtles. This way you don’t have to worry about missing anything if you don’t happen to have a Big Trak handy, or if you left your Turtle Tiles at a friend’s house.
Using The Big Trak ...
If you don’t already have one, you can buy a Big Trak from most toy stores for under $50. This robot car is a terrific turtle for you to use along with this book. The Big Trak also has some accessories, such as a dump cart. We will only use the Big Trak by itself, so if you have any accessories for this machine, you might leave them aside for a while.
a keyboard on its top that looks something like this:
y
CLR
l< HOLD ► FIRE
-v CLS
7 8 9 RPT
4 5 6 TEST
1 2 3 CK
IN 0 ; OUT GO

CHAPTER TWO/1 g^-—^
To make this turtle move around in a specific path, you first have to push the buttons in the correct sequence to store your instructions in the turtle’s memory bank.
Let’s look at how we can make the Big Trak do some of the things we have described. Let’s make it go FORWARD and TURN.
The very first thing you have to do is be sure that you have fresh batteries in your Big Trak. Check the instruction book that came with your unit to see how this is done. Next, turn on the Big Trak by sliding the grey switch located just above the keyboard.
A special note. Whenever the Big Trak is turned on (but not doing anything) it will “beep” at you every so often to remind you that it is ready for action. If you are not going to use your Big Trak for a while, be sure and turn it off to save the batteries.
Press the key marked CLR. The letters CLR stand for the . instruction clear. This key will clear ■— the Big Trak’s memory bank of any i— instructions it has stored. Next, look for the key that _ looks like an arrow pointing up. This ___ key is shown in the figure. _

^—-,14/CHAPTER TWO
This key corresponds to the FORWARD command. When you press this key (go ahead and do it!) you will hear a beep. If you don’t hear the beep, check to be sure the power is turned on and that the batteries are fresh. This beep sound lets you know that the Big Trak has received your instruction. If you press this button again, you won’t hear the beep because the unit already knows what it is supposed to do. It just doesn’t know how much to do it.
again to find the numerals 0 through 9. 1
7 8 9
4 5 6
1 2 3
0
Press the numeral 1. As soon as you do this you will hear another beep to let you know that this number has been accepted into the memory bank. By pressing these two keys, you have told the Big Trak to go FORWARD 1.
Next, press the key marked CK. The letters CK stand for the instruction check. After making a few beeps and whistles, your Big Trak will move forward by one turtle unit. The CK commmand lets you check instructions

CHAPTER TWO/15^—^
step-by-step as they are entered. Whenever CK is pressed, the Big Trak will do whatever you told it to with the most recently entered command.
FORWARD 1
If you enter FORWARD 1 again, and press the CK key, your turtle will move one more unit along the floor.
FORWARD 1 FORWARD 1
Next, let’s see the Big Trak move greater distances. Enter FORWARD 17 and press CK. Wow! There it goes — your Big Trak is heading off for a long trip, seventeen units long. Fortunately, this turtle moves slowly enough for you to chase after it.
Why don’t you do an experiment to see

ijr-\16/CHAPTER TWO
how far the Big Trak can go with a single FORWARD command?
Now that we can make the Big Trak go forward, we need to know how to make it turn. If you look at the keyboard you will see a key that looks like an arrow pointing to the right. This key is highlighted in the figure below:
1 ►
If you push this key, you will hear a beep that tells you that the Big Trak has accepted the command to TURN to the right. As with the FORWARD key, nothing will happen if you press this key again.
We must now let the Big Trak know how much we want it to turn. Let’s enter 90 and see what happens. If this number were a measure of the turning angle in degrees, then TURN 90 would turn the Big Trak until it was facing to the right. After entering 90, press the CK key to see what happens.

CHAPTER TWO/17
TURN 90
Wow! Instead of turning 90 degrees to the right, the Big Trak turned around one and a half times! Apparently this means that Big Trak’s turning angle is not measured in degrees.
Let’s do an experiment to see if we can figure this out. Set the Big Trak pointing straight out in front of you. Since TURN 90 turned the turtle one and a half times, what number should we have entered to make it turn in one complete circle? Let’s try turning 60 units and see how that works. Enter TURN 60 and press CK.
TURN 60

^-^,18/CHAPTER TWO
Depending on your Big Trak and the kind of floor surface you are running it on, this command should turn your turtle in one complete circle. You may have to experiment with different turning angles to find one that turns your Big Trak in an exact circle. Make note of this value. We will always assume that there are 60 Big Trak turning units in a circle, even though you might get a slightly different number.
Using The Turtle Tiles ...
In case you haven’t already done so, go to the back of this book and carefully remove the cardboard Turtle Tiles. Notice that each Turtle Tile is in the shape of an octagon and has a front and a back that look like this:
FRONT
Start by setting one Turtle Tile on the table in front of you like this:

CHAPTER TWO/19,.—^
This tile will always be left here as a marker to show where you started. To follow the command FORWARD 1, you just connect a second tile to the first so that the bottom edge of the new tile connects to the head of the first tile.
FORWARD 1
Next we will issue the command FORWARD 1 again. To follow this command, you should flip the front tile over to the turtle path side and then place a third tile at the end of this path. Be sure that the turtle’s head is pointing forward — we haven’t turned yet!
FORWARD 1 FORWARD 1

20/CHAPTER TWO o This path is two turtle units long. The
lines in the figure below show how the length of the turtle path is measured from the center of each tile.
FORWARD 1 FORWARD 1
Now that we know how to make our turtle go forward, we need to examine the TURN command. You may have noticed that each Turtle Tile has eight sides. Each tile is an octagon. As you turn a tile on the table you will find eight positions where its edges will line up with the original position. See if you can convince yourself that these are the only eight positions of this sort you can find.

CHAPTER TWO/21,-—^
Next place a single tile in front of you. If you give the command TURN 1, you turn the tile like this:
TURN 1
This corresponds to turning the tile by l/8th of a circle. If you are used to measuring angles in degrees you might notice that this amount of turning is 45 degrees.
Next, let’s start from our beginning position and give the command TURN 2. When you turn the tile two units, it will be pointing to the right. This means we have turned 90 degrees from our original position.
TURN 2

o 22/CHAPTER TWO
As you will see in the next chapter, even these limited turning angles can let us explore some interesting pathways for our robot turtle.

CHAPTER THREE
Moving In A Square Our First Turtle Pathway
i
rfl C-Hp-
tbc-up'
I
fo'Cip!


CHAPTER THREE/88|/-^[
The commands FORWARD and TURN are very powerful because they can be combined in ways that let us describe any path we want the robot to take. In this chapter we will explore how to combine these commands to produce a complete set of instructions for making the robot turtle trace out a square path. To do this we will make what is called a procedure. A procedure is a set of instructions that the robot can follow to go in paths more complex than those made with a single FORWARD or TURN command.
To get started, take a pencil or pen and draw a square on a sheet of paper. How did you do it? Did you draw four connected lines one after the other like this?
I
M
• • II'
FIRST LINE SECOND LINE
i
Il||lIIIIlllllMil11119111111IttillIlllll
THIRD LINE FOURTH LINE

/CHAPTER THREE
That is a perfectly good way to draw a square. There are lots of other ways of drawing squares also. For example, we could have drawn the vertical sides first, and then drawn the horizontal sides.
i
FIRST LINE SECOND LINE
..
M11
THIRD LINE FOURTH LINE
While this is a perfectly good way for you to draw a square, it is not very useful for our turtle, simply because each new line does not start from the ending point of the previous line. Even though you end up with a square, you have not drawn a square path.
Project 3. How many ways can you draw a square? Lines that are drawn top to bottom are different from lines drawn

CHAPTER THREE/27 ^
bottom to top, so don’t miss these ways when you count them up. Out of all the ways you have found to make a square, how many of these are useful paths for a robot to follow?
Once a path is finished, you often can’t tell how it was made. From the turtle’s point of view, the path is very important. It wouldn’t be useful, for example, to have robot move through a solid wall just because it might be the shortest path between two points of interest.
SQUAREPATH For The Turtle ...
Using the commands FORWARD and TURN let’s figure out how to move the turtle in a square. We can start by picking the length of our square’s side. For the size turtle we use in this book, let’s pick a length of 4. First we give the command FORWARD 4.
FORWARD 4
Next we have to turn the turtle to the right by 90 degrees with the command TURN 90.

^r-\ 88/CHAPTER THREE
TURN 90
Notice that the turtle didn’t move forward when this command was given, it only turned. Now we can finish the square by using these commands some more:
FORWARD 4 TURN 90 FORWARD 4 TURN 90 FORWARD 4
TURN 90
FORWARD 4 TURN 90

CHAPTER THREE/29,-~^
Now the turtle is hack at the starting point — or is it? Even though the square appears finished, look at the turtle. Is the turtle hack where it started? Remember that, when we started, the turtle was pointing straight up. It is now pointing to the left. To complete our square path we need one more TURN 90 command to get the turtle pointing straight up again.
This completes the procedure SQUAREPATH. The whole procedure is shown below for reference.
SQUAREPATH FORWARD 4 TURN 90 FORWARD 4 TURN 90

o 30/CHAPTER THREE
FORWARD 4 TURN 90 FORWARD 4 TURN 90
END
Project 4. Using pencil and paper, pretend that you are the robot and follow the instructions shown above. Instead of making the last 90 degree turn, keep pointing to the left. Now, follow the procedure again, starting from this new direction. Will your path be different from the original square? How many times will you have to repeat this process before you retrace the original square?
Now that we have worked out a procedure for having the turtle move in a square path, let’s do an experiment. Suppose we start with the turtle in its “home” position.
/
Next we give the command TURN 45.
TURN 45
At this point, let’s have the turtle use the procedure SQUAREPATH.
31/CHAPTER THREE
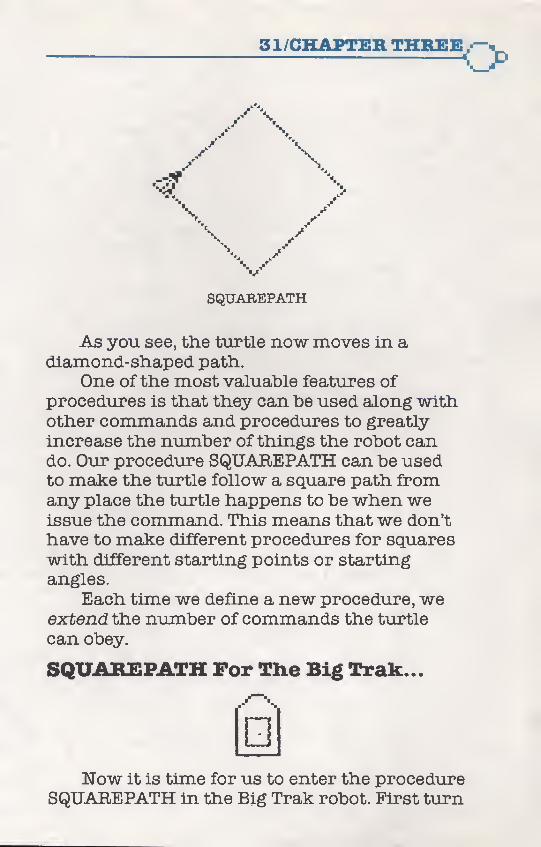
V SQUAREPATH
As you see, the turtle now moves in a diamond-shaped path.
One of the most valuable features of procedures is that they can be used along with other commands and procedures to greatly increase the number of things the robot can do. Our procedure SQUABEPATH can be used to make the turtle follow a square path from any place the turtle happens to be when we issue the command. This means that we don’t have to make different procedures for squares with different starting points or starting angles.
Each time we define a new procedure, we extend the number of commands the turtle can obey.
SQUABEPATH For The Big Trak...
Now it is time for us to enter the procedure SQUABEPATH in the Big Trak robot. First turn

c> , 32/CHAPTER THREE
on the Big Trak and press the key marked CLR. You are now ready to enter the procedure on the keyboard. While you can use any path length you want (depending on the size floor you are using), we will use paths whose length are two units in our example.
First enter FORWARD 2 and press CK. As soon as this key is pressed, your Big Trak will move forward two steps.
FORWARD 2
Next, enter TURN 15. (Remember that we want to turn 90 degrees to the right. If your Big Trak needs a different turning angle to do this, enter your number instead of 15.) When you press CK again, the Big Trak will turn to the right.
TURN 15

CHAPTER THREE/33 s-m
-
Now enter the rest of these commands, pressing CK after each command is entered.
FORWARD 2 TURN 15 FORWARD 2 TURN 15 FORWARD 2
TURN 15

34/CHAPTER THREE <o-
If everything went according to plan, your Big Trak robot is back home — except for one thing. We forgot to make the last turn! Enter TURN 15, press CK, and you should be right where you started.
If you are almost (but not quite ) back where you started, this means that you are either turning too much or too little at each TURN command. Don’t worry about being perfect, but go ahead and experiment with other turning angles until your square path looks pretty square to you. Be sure and press the CLR key before entering a new set of SQUAREPATH commands!
Now that we have made the Big Trak go in a square path, let’s do it again the easy way. Each time you pressed a key, the Big Trak automatically captured, this information and put these commands into a procedure. To use the procedure that is stored in the Big Trak, set it in front of you and press the key marked GO.

CHAPTER THREE/
GO
The Big Trak will now trace out the complete square path each time you press a single key — the GO key.
This procedure will stay in the Big Trak until you do one of two tilings. If you press the CLR key or turn the Big Trak off, you will erase any stored procedure from the turtle’s memory. For this reason, you should always keep a written record of any paths you create so that you can re-enter them as you need them.
Big Trak procedures can be up to 16 instructions long. If you try to enter longer procedures, the Big Trak just won’t accept them. You will no longer hear the “beep” when you press keys on the keyboard.
Now that SQUAREPATH is safely stored in the turtle’s memory, let’s make the Big Trak travel in a diamond path. Set the Big Trak in front of you.
Next enter TURN 7 and press CK.

o 36/CHAPTER THREE
TURN 7
This turned the Big Trak by about 45 degrees to the right, but it also added one more instruction to our procedure. To erase this step from the procedure, press the key marked CLS once. The letters CLS stand for the instruction clear step. Each time CLS is pressed, it erases one step from the procedure stored in the Big Trak. The CLS key is handy for fixing mistakes without having to press CLR and start over.
Next press GO and see what happens.
v GO
Our Big Trak has just traced out a diamond shaped path.
The steps we used to create procedures in the Big Trak are easy to summarize.
1. Turn on the Big Trak and press CLR to clear the turtle’s memory.

CHAPTER THREE/37^—^
2. Enter each step and press CK to make sure it works properly.
3. Fix any had steps hy pressing CLS and entering the correct command. (Be sure to move the Big Trak to the end of the previous step before pressing CK again).
4. When you are done, press GO to see the Big Trak carry out your whole procedure!
SQUARE PATH For The Turtle Tiles ...
To illustrate SQUAREPATH with the Turtle Tiles, we first have to pick a path length. We will use two units in our illustration, but you have enough tiles to make a square at least six units long on each side.
Start out with one tile face up on the table in front of you and follow the command FORWARD 2.
FORWARD 2

38/CHAPTER THREE -
Next, to turn 90 degrees to the right, use the command TURN 2. To follow this command, take the end tile and turn it to the right like this.
TURN 2
Now follow the rest of the commands. FORWARD 2 TURN 2 FORWARD 2 TURN 2 FORWARD 2 TURN 2 FORWARD 2
FORWARD 2

CHAPTER THKEE/39qd
/
L C> J
y
f g .y v
■. -■ . . -■ ■
r ) r *■.
/
C \
(6) to) TURN 2

o 40/CHAPTER THREE
FORWARD 2
The last tile should be laid over the very-
first tile in the path. As in our other examples
of SQUAREPATH, notice that the turtle is in
the correct place, but is pointing in a different
direction than the one from which it started
out. To fix this we just add the command TURN
2.
[ o in A
\_/ \_.
■ / ^ y )
fOlmmnfol TURN 2

CHAPTER THREE/41,.—^
This finishes our square path! One of the really neat things about Turtle
Tiles is that they let you see the path the turtle took as it moved around. This means that you can create any path you want with the Turtle Tiles, and can then “read” the procedure for making this path by just looking at the tiles.
Let’s try this out to see how it works. The figure below shows a complete turtle path, with the starting position marked.
STABT
What are the commands used in the procedure that generated this path?
First, notice that the starting position is turned 45 degrees from our home position. This means that the first command must be TURN 1. Next, the turtle went FORWARD 1 and TTJRNed 1 again. After this, the turtle went FORWARD 1 and then it turned to the left instead of to the right.
Hmmm - how do we turn to the left? There are several ways to do this. One way is to use negative numbers to turn to the left — for

o 42/CHAPTER THREE
example, TURN -2. Another way is to realize that since TURN 8 turns us in one complete circle, if we instead turned six units (8-2) we would be pointing to the left.
See if you can convince yourself that the complete procedure for the path shown above is this one:
TURN 1 FORWARD 1 TURN 1 FORWARD 1 TURN -2 FORWARD 1 TURN -2 FORWARD 3 TURN-1 FORWARD 1 TURN-1 FORWARD 1 TURN -2 FORWARD 2 TURN-1
As you can see from this example, you now have a new tool to help you write procedures for your robot. First, use your Turtle Tiles to map out the complete path you want to follow. Then write down the commands the turtle has to use at each step of the path.
In the next chapter we will learn something that all closed turtle paths have in common.

CHAPTER FOUR
The Total Turtle Trip


CHAPTER F0UR/45|^--^[
Procedures like SQUARE PATH are special turtle pathways "because they always end up where they started out. When the turtle goes on a trip of this sort it is called a closed path. If you think about it, closed paths are probably a very common part of your life. In the morning you leave for school and then you return home again in the afternoon. You make many trips like this - going to the store, visiting a friend, even going on a vacation trip. All these trips start and stop at the same place.
You already know that you can go to school by one path and come back by another. No matter which path you take, you still end up back home. In this chapter we are going to find out what makes closed paths so special.
Some Trips For The Turtle ...
Using the commands FORWARD and TURN, let’s examine several closed paths and see what they have in common. The first path we will make is a triangle. Let’s pick three units for the length of each side. A procedure to draw a triangle looks like this:
FORWARD 3 TURN 120 FORWARD 3 , TURN 120 FORWARD 3 TURN 120
FORWARD 3 TURN 120

^—% 46/CHAPTER FOUR
FORWARD 3 TURN 120
FORWARD 3 TURN 120
As you can see, this gives us a triangle with three equal sides. Now that we have the turtle hack at its home, let’s do two things. Let’s figure out how far the turtle moved and how much it turned on its trip. The turtle went forward three units on each side of the triangle, making the trip nine units long. The turtle also turned hy 120 degrees at each of the three corners. The total turning was 120 + 120 + 120, or 360 degrees. This is exactly the number of degrees it takes to turn in a complete circle.
Project 5. What would happen if the triangle had longer sides (say five units)? What would happen to the total trip length? How about the total turning angle? Experiment with this until you are convinced that the total turning for a triangle is 360 degrees no matter what the length of the sides is.
Now that we know about triangles, what

CHAPTER FOUR/47 ^
about squares? If we keep the side length at three units, the procedure for a square looks like this:
FORWARD 3 TURN 90 FORWARD 3 TURN 90 FORWARD 3 TURN 90 FORWARD 3 TURN 90
FORWARD 3 TURN 90
FORWARD 3 TURN 90

^—•, 48/CHAPTER FOUR
Now let’s do our calculations again and see wliat we get. Since the turtle moved three units on each of the four sides, the total path length is 12 units. The turtle also turned 90 degrees four times. Guess what! The total turning is 90 + 90 + 90 + 90, or 360 degrees — the same as for triangles.
Since we know that the total turning angle for a triangular path of any size is 360 degrees, and that the total turning angle for a square is 360 degrees, let’s try one more figure to see if this leads us to a rule. Let’s pick a path with five sides. A closed figure with five sides is called a pentagon. If we keep the side length the same (at 3 units), a procedure for drawing a pentagon looks like this:
FORWARD 3 TURN 72 FORWARD 3 TURN 72 FORWARD 3 TURN 72 FORWARD 3 TURN 72 FORWARD 3 TURN 72
FORWARD 3 TURN 72
FORWARD 3 TURN 72

CHAPTER FOUR/49,-—^
FORWARD 3 TURN 72
FORWARD 3 TURN 72
FORWARD 3 TURN 72
Once again we can do our calculations and see what we get. The turtle moved three units on each of the five sides, so the total path length is 15 units. The turtle also turned 72 degrees five times. The total turning is 72 + 72 + 72 + 72 + 72, or 360 degrees.

o 50/CHAPTER FOUR
It seems that no matter how many sides our path has, as long as we end up in exactly the same place that we started, we will have turned a total of 360 degrees.
This is pretty useful information since it gives us a way of showing how all simple closed figures are related to each other. The name for this rule is the Turtle Total Trip Theorem - just in case you are interested.
You probably noticed that there was no such rule for the total path length. No matter how long your trip is - say going from home to the library and back — you will have turned 360 degrees if you end up pointing in exactly the same direction in which you started.
Project 6. Can you write a procedure for making a triangle with the same total path length as a pentagon whose sides are three units long? How many units long would each side of the triangle be? Does this show you that you can’t tell the shape of a path from knowing its total path length and turning angle?
Some Trips For The Big Trak ...
Now that we know about total turtle trips, let’s try some out with the Big Trak. First enter the procedure for a square with a side length of 2 units. (Remember to press the clear button (CLR) before entering this procedure.)
FORWARD 2 TURN 15 FORWARD 2

CHAPTER FOTJR/51 o TURN 15 FORWARD 2 TURN 15 FORWARD 2 TURN 15
Next press the GO key and watch the Big Trak move in a square path.
[d
FORWARD 2
FORWARD 2 TURN 15

^—y?2/CHAPTER FOUR
If we add up the total trip length you will see that the Big Trak traveled eight units as it went in its square path. If you add up the turning angles, you will find that the Big Trak turned 60 units — the amount needed to turn in one complete circle.
For the Big Trak, the total trip theorem states that the total turning angle must he 60 units. Let’s try this out by having the Big Trak move in a triangular path. To draw a triangle we must turn three times. Since the total turning is 60 units, then each of the three turns should be 20 units. To try this out, clear the Big Trak (by pressing the CLR key) and enter the following procedure for a triangular path:
FORWARD 2
TURN 20
FORWARD 2 TURN 20
FORWARD 2 TURN 20
Press the GO key and watch the Big Trak move in a triangular path.

CHAPTER F0int/5S/--^
FORWABD 2 TURN 20
FORWARD 2 TURN 20
FORWARD 2
If everything went according to plan, your Big Trak should have moved in a triangular path and should be back where it started.
As you can see, the Turtle Total Trip Theorem is a handy tool for figuring the angles we need to turn for any number of sides in our path!

^—‘.54/CHAPTER FOUR
Some Trips For Tlie Turtle Tiles ...
Compared to our turtle or the Big Trak, Turtle Tiles have only a few limited turning angles, but we can still show the total trip theorem with them anyway.
First we can make a procedure for a small square, remembering that if we turn the Turtle Tile by two units it will turn by 90 degrees. Set a tile face up in front of you. Next, use your tiles to follow this procedure:
FORWARD 1 TURN 2 FORWARD 1 TURN 2 (\K)
Vl,-J FORWARD 1 TURN 2 1 FORWARD 1
l l [ J X_/
TURN 2 1 ( ^ '*1 “i 1 o J 1 1 [ u J \ / \_/
FORWARD 1 TURN 2
“ 11 ■-
C°3 fol I X_/
f C>) \ / ■
<KJ
\_/
frVl 1 1 Co j 1 X
FORWARD 1 TURN 2

CHAPTER FOUR/551
FORWARD 1
TURN 2
TURN 2
If we add everything up we see that the total trip length is four units and that the total turning is eight units. Since turning the Turtle Tile by eight units turns it in a circle, this is not surprising.
Suppose we now want to make a Turtle Tile procedure to create a path with eight sides. Since the total turning angle is eight units, then we need to turn one unit for each of the eight sides. Use your Turtle Tiles to follow this procedure:
FORWARD 1 TURN 1 FORWARD 1 TURN 1 FORWARD 1

-,56/CHAPTER FOUR
TURN 1 FORWARD 1 TURN 1 FORWARD 1 TURN 1 FORWARD 1 TURN 1 FORWARD 1 TURN 1 FORWARD 1 TURN 1
When you are all done you should have this pattern.
JOJQL
@r' ^ o') C&y-jH)
u i o ,n Now that you know all about closed paths,
let’s look at some paths that don’t close completely, no matter how hard we try!


CHAPTER FIVE/59
o> Suppose you want to send your robot on a trip where the ending point is different from the starting point. There are many paths you could choose. For example, you could have the turtle move around three sides of a square and then stop. If you wanted to, though, you could close this path by having the turtle travel along the fourth side of the square path.
Did you know that there are some paths that don’t close, no matter how hard we try? Impossible? Well, keep reading and you will learn about some very interesting paths.
If you find the material in this chapter to be a bit on the complicated side, you might want to save it for later and move on to the next chapter. ,
Strange Paths For The Turtle ...
Suppose you want to have the robot go in a triangular path which has two equal sides and has one turning angle of 90 degrees. We can start this path with sides four units long:
FORWARD 4 TURN 90 FORWARD 4
FORWARD 4 TURN 90 FORWARD 4

o 60/CHAPTER FIVE
Next, we need to figure out how much to turn. Since we already turned 90 degrees, and we need to turn hy 360 when we are done, we have 270 degrees left to go. For the triangle we are trying to make, we need to turn by two equal amounts, or by 135 degrees each time. Making the first turn is easy:
TURN 135
Now comes the tricky part. How far forward should we go? Let’s try moving 4 units and see where that leaves us:
FORWARD 4
FORWARD 4
Hmmm, that didn’t quite make it. We are clearly going in the right direction, but we didn’t go far enough. Let’s go forward by one

CHAPTER FIVE/61 o more unit:
FORWARD 1
FORWARD 1
We are closer, but we still haven’t gotten to our starting point. Let’s try going one more unit:
FORWARD 1
FORWARD 1
Hmmm. Now we have gone past our starting point. The length of this side is larger than five units and smaller than six units. How can this he?
We just sent the turtle on a trip it can’t complete! The reason for this is that the third side of our triangular path has a length that is not a whole number of units.

68/CHAPTER FIVE
If we could make the turtle take half steps, quarter steps, and so on, we would get very close to our starting point. But if we can only go in lengths made from one unit steps, we will never he able to close this path.
Project 7. If you know about something called a square root, you should be able to figure out how long this third side should be. Did you know that no matter how tiny your steps are, you could never get exactly to the starting point? For all practical purposes, though, you could get close enough.
Strange Paths For The Big Trak:...
Making the Big Trak move in paths which don’t close isn’t too hard - just because of small errors in the turning angle. But let’s repeat our triangle experiment with the Big Trak and see how well we do.
First turn on the Big Trak and clear the memory by pressing the CLR key. We will make the first two sides of the triangle two units long. The 90 degree turn is made by turning 15 turning units. Let’s enter these three steps and see how we are doing.
FORWARD 2 TURN 15 FORWARD 2
When you press the GO key the Big Trak should trace out the first two sides of the triangle.

CHAPTER FIVE/65,.—
FORWARD 2 TURN 15
Next we need to turn the Big Trak hy 135 degrees. Since 60 turning units is the same as 360 degrees, we should turn the Big Trak by about 23 units. (Actually, we should turn it by 22 1/2 units, but we can only turn by a whole number of units.) Enter the command:
TURN 23
and press CK so the Big Trak will follow this command.
TURN 23
Now our robot is heading back to the place where it started. How far should it go? Let’s try going two units. Enter:
FORWARD 2

^r—■,64/CHAPTER FIVE
and press CK again.
FORWARD 2
This didn’t take us far enough, hut if we enter:
FORWARD 1
and press CK once more, we see that we have gone too far!
FORWARD 1
Once again we see that we can’t close this path if the robot can only move by a whole number of units.

CHAPTER FIVE/65, -<_>
Strange Paths For The Turtle Tiles ...
You may not be convinced that this path can’t close. After all, just because the Big Trak was not able to complete this path, it doesn’t prove anything. As we said before, there are lots of little turning errors that can keep the Big Trak from completing a path exactly.
The Turtle Tiles are much more exact. We will try our strange triangle once more just to prove how strange it really is!
Lay a Turtle Tile on the table in front of you. First make the first two sides of the triangle by following these commands:
FORWARD 2 TURN 2 FORWARD 2
■ y / £$ \ ■
\ A I; 1 ■
( 1 1 / ■
r •- ■ ■ 1 1
■
rO J U
/ r >
J A
U x • / 1
FORWARD 2 TURN 2

r—■. 66/CHAPTER FIVE -
Next we need to turn by three units to head back to the starting position:
TURN 3
If you next move forward by following the command:
FORWARD 2
you will find that the leading edge of the end tile overlaps the starting tile just a little bit.

CHAPTER PIVE/67.—v. -O
This shows that the Turtle Tile version of this triangular path won’t close properly either!
There are many interesting pathways you can explore now that you know how to give instructions to the robot turtle. In the next two chapters we will show how the turtle fits into the world of computers, and how to make your Big Trak do some more neat things — such as draw pictures!


CHAPTER SIX
From The Big Trak To The Computer
Your Next Step


CHAPTER SIX/71^^,
The types of commands we have studied so far were designed to let us create pathways for robots. Suppose, instead, that you wanted to use a machine which drew pictures on your TV screen instead of moving in a pathway on the floor. If this special machine could use an imaginary turtle that carried a “pen” in its mouth, then by using commands like FORWARD and TURN we could tell this machine how to draw pictures.
Just think — you would have a machine which follows your commands to draw beautiful pictures on your TV set!
There are machines that do this. They are called computers. Many of the inexpensive computers available today even let you display color images. These computers look a bit like typewriters which are connected to the television set. The typewriter keyboard is used to accept commands from you. It is the input device - just like the keyboard on the Big Trak. The television screen is the place where the computer draws pictures or types words. It is the output device — just like the Big Trak which moves around the floor.
If you had a computer connected to your TV, how would you tell it what to do?
The first thing you would have to do is learn a computer language, just as we learned a set of commands for the Big Trak. The job of the computer language is to take your commands and turn them into instructions the computer can follow. There are many computer languages, each made with a special purpose in mind. Since we already know about turtle commands like FORWARD and TURN, it

|^-^7g/CHAPTER SIX
would be best if we could find a computer language which used commands like these.
Fortunately, there are several computer languages which work this way, and new ones seem to be coming all the time. If you can use an Apple computer, you could use languages like SuperPILOT or LOGO. If you use any of the Atari computers, PILOT is the language you want. The Texas Instrument’s computer uses the language LOGO for drawing pictures with commands very much like the ones we use with the Big Trak.
While all these languages use turtle commands for drawing pictures, they each have their own special way of doing this. To see how each language operates, let’s look at the procedure for drawing a square, ten units on a side, in each of four languages. We will begin with our standard turtle commands.
Turtle
FORWARD 10 TURN 90 FORWARD 10 TURN 90 FORWARD 10 TURN 90 FORWARD 10 TURN 90
Now let’s look at this same procedure written in Atari PILOT.
Atari PILOT
GR: DRAW 10 GR: TURN 90 GR: DRAW 10 GR: TURN 90 GR: DRAW 10

CHAPTER SEK/73^*—^
GR: TURN 90 GR: DRAW 10 GR: TURN 90
The GR: command at the beginning of each line tells PILOT that this is a graphics command. DRAW draws a line on the screen and TURN turns the turtle.
Apple SuperPILOT is very similar to Atari PILOT as shown below.
Apple SuperPlXOT
G: D 10 G: S 90 G.D 10 G: S 90 G:D 10 G: S 90 G:D 10 G: S 90
The letter D stands for the draw command, and the letter S is the SuperPILOT turn command (it stands for spin).
Next, let’s look at LOGO:
LOGO
FORWARD 10 RIGHT 90 FORWARD 10 RIGHT 90 FORWARD 10 RIGHT 90 FORWARD 10 RIGHT 90
As you can see, LOGO is most like the turtle commands we have been using.
Because it is tiring to keep typing the same commands over and over again, these languages have easy ways of doing repeated

tasks. The easy way to draw a square in Atari PILOT looks like this:
Atari PILOT
GR: 4(DRAW 10; TURN 90)
This one line command instructs the computer to “Four times draw 10 units and turn 90 degrees.” Apple SuperPILOT uses a similar type of command:
Apple SuperPILOT
G: 4(D 10; S 90)
The same commands in LOGO look like this:
LOGO REPEAT 4
FORWARD 10 RIGHT 90
Once you know a little about each language, it is pretty easy to see what is going on.
All of these computer languages let you create many procedures, each with a name of your choosing. The Big Trak can only hold one procedure at a time. If you are using one of the computer languages described above, you can create your own procedures for squares, stars, faces, or anything else you want to draw. All the pictures in this book were drawn by programs using the Atari PILOT turtle commands.
So, as you can see, your experiments with the Big Trak have done much more than teach you about robots. They taught you how to write programs for computers!
Even if you have a computer handy, you should continue to explore the things you can

CHAPTER SIX/75^-—^
do with, your Big Trak. In the next chapter we will show you how to fix up your Big Trak so it will draw pictures as it moves around.


CHAPTER SEVEN
Drawing Pictures And Other Things To Do
With The Big Trak


CHAPTER SEVEN/79
How would you like to get your Big Trak to draw pictures? It is easier than you might think. To change the Big Trak so it can draw we need to do two things. First we need a lot of paper (the Big Trak likes to draw BIG pictures). Second, we need to figure out how we can get the Big Trak to hold a pen. Since this is the trickiest part, let’s solve that problem first.
To make the Big Trak hold a pen, you will need three items:
1. A felt-tip watercolor pen. (I like the fat ones like those made by Magic Markers or Crayola, but any water color pen will work).
2. A metal U-shaped clamp that fits loosely around the pen. These are called conduit clamps and your hardware store sells them for just a few cents each.
3. Some double-sided sticky foam mounting tape to hold the clamp onto the Big Trak. You can get this tape at most hardware stores and at some drug stores.
CONDUIT CLAMP
FELT TIPPED PEN

..^,80/CHAPTER SEVEN
ROLL OF FOAM TAPE
Now that you have all these things, how do you hook them up to the Big Trak? Well, if you look around the sides of the Big Trak you see that it is all pretty humpy - all except the flat grooved panel at the back side. This is where we will mount our felt-tip pen.
LOCATION FOR THE PEN
The way we are going to mount the pen holder is very simple. We will cut some square pieces of sticky foam tape to put on the flat end pieces of the metal clamp. Before doing this, position the clamp near the center of the back panel and make sure that the felt-tip pen slides down smoothly so that when the Big Trak is set down, the pen tip can touch the floor.

CHAPTER SEVEN/81,-—^
Once you are convinced everything is going to work properly, cut two squares of foam tape, place one square on each flat end of the clamp, and press the clamp in place on the back of the Big Trak. You should now be able to stick the pen into this clamp so its tip will touch the floor. If the pen sticks in the clamp, remove it and add another layer of foam tape to make more room for the pen.
Next, you need paper. There are many ways to buy large amounts
of paper. Your best bet may be to check with your local newspaper to buy what are called “roll ends.” A roll end is the paper which is left over at the end of the roll. Usually there is a hundred feet or more of paper that the printer can’t use. Most newspapers are happy to sell these roll ends for a dollar or two. You should get the largest width paper you can handle. Paper that is 55” wide is perfect for Big Trak paths. If you can’t get newspaper roll ends, you might ask your butcher if he can help you get some wide paper. If all else fails, you can tape sheets of old newspapers together, although this may be more trouble than it is worth.

^—■, 82/CHAPTER SEVEN
Once you have fixed up your Big Trak and have your roll of paper, you are ready to let your robot draw some pictures for you. First you must find a nice flat floor with no carpeting on it. Be sure that the ink in the pen you are using can be washed off the floor, in case you have an accident. You must be careful to keep your pens away from carpets and furniture because some watercolor pens can leave permanent stains.
Before taking the cap off the pen, enter the procedure for the path you want to draw. A square with sides two units long fits nicely on 55” wide paper, so you should use short path lengths to make sure the Big Trak doesn’t wander off the paper.
After entering your program, set the Big Trak on the paper, take the cap off the pen and slide the pen in the holder so the point rests on the paper surface. As soon as you see the pen resting on the paper, press the GO key. If the pen stays in one place too long, it might make a splotch and soak through the paper. If everything goes according to plan, your Big Trak will draw a picture of its path as it moves along. If the path doesn’t quite close, you can make some really pretty pictures by pressing the GO key again and again. Experiment with different pictures. Maybe you can hang some of the prettier ones in your room!
For a different kind of challenge, you can create an obstacle course for the Big Trak to follow. There are lots of ways to make obstacle courses. One way that I like is to buy a piece of wall paneling and use masking tape to make the path I want the Big Trak to follow. You

CHAPTER SEVEN/83^—^
should he able to get a piece of paneling four feet wide by eight feet long from your local lumber yard for a few dollars. Sometimes lumber yards sell old styles or slightly damaged panels for under five dollars. Any panel will work perfectly. Lay the panel on the floor with the smooth back side facing up. Using masking tape, design a path for your Big Trak to follow. Next, see if you can create the procedure for following this path so that it works the first time. This is usually pretty tricky, but it is a lot of fun.
As you can see, there are lots of interesting things you can do with your Big Trak. As you continue to play with it, you will find many applications of your own.
Enj oy yourself!


If you've enjoyed the articles in this book, you'll find the same style and quality in every monthly issue of COMPUTE! Magazine. Use this form to order your subscription to COMPUTE!
For Fastest Service, Call Our Toll-Free US Order Line
800-334-0868 In NC call 919-275-9809
COMPUTE! P.O. Box 5406 Greensboro, NC 27403
My Computer Is: □ PET □ Apple □ Atari OOSI □ Other_□ Don't yet have one...
□ $20.00 One Year US Subscription □ $36.00 Two Year US Subscription □ $54.00 Three Year US Subscription
Subscription rates outside the US: □ $25.00 Canada f=2
□ $38.00 Europe/Air Delivery fi=3 □ $48.00 Middle East, North Africa, Central America/Air Mail fi=5 □ $88.00 South America, South Africa, Australasia/Air Mail fi=7
□ $25.00 International Surface Mail (lengthy, unreliable delivery) fi=4.6.8
Name
Address
City State Zip
Country
Payment must be in US Funds drawn on a US Bank; International Money Order, or charge card. □ Payment Enclosed □ MasterCard Acc't. No.
□ VISA □ American Express
Expires /
05-1

COMPUTE! Books P.O. Box 5406 Greensboro. NC 27403
Ask your retailer for these COMPUTE! Books. If he or she has sold out order directly from COMPUTE!
For Fastest Service Call Our TOLL FREE US Order Line
800-334-0868 In NC call 919-275-9809
Quantity Title Price Total
_The Beginner’s Guide To Buying A Personal Computer $ 3.95 _ (Add $1.00 shipping and handling. Outside US add $4.00 air mail; $2.00 surface mail.)
_ COMPUTED First Book of Atari $12.95 _ (Add $2.00 shipping and handling. Outside US add $4.00 air mail; $2.00 surface mail.)
_ Inside Atari DOS $19.95 _ (Add $2.00 shipping and handling. Outside US add $4.00 air mall; $2.00 surface mail.)
_ COMPUTERS First Book of PET/CBM $12.95 _ [Add $2.00 shipping and handling. Outside US add $4.00 air mail; $2.00 surface mall.)
_ Programming the PET/CBM $24.95 _ [Add $3.00 shipping and handling. Outside US add $9.00 air mail; $3.00 surface mail.)
_ Every Kid’s First Book of Robots and Computers $ 4.95 _ (Add $1.00 shipping and handling, Outside US add $4.00 air mail; $2.00 surface mail.)
_ COMPUTERS Second Book of Atari $12.95 _ [Add $2.00 shipping and handling. Outside US add $4.00 air mall; $2.00 surface mail.)
^_ COMPUTERS First Book of VIC $12.95 _ (Add $2.00 shipping and handling. Outside US add $4.00 air mail; $2.00 surface mail.)
All orders must be prepaid (money order, check, or charge). All payments must be in US funds. NC residents add 4% sales tax. □ Payment enclosed Please charge my: □VISA □ MasterCard □ American Express Acc't. No,_Expires /_
Name_
Address__
City_State_Zip_
Country_ Allow 4-5 weeks for delivery.
05-1