Embed Size (px)
Citation preview

Ben E. Keith
Entrée User Manual Version – 2018.2 Updated 04/26/2018
Entrée User Manual
1
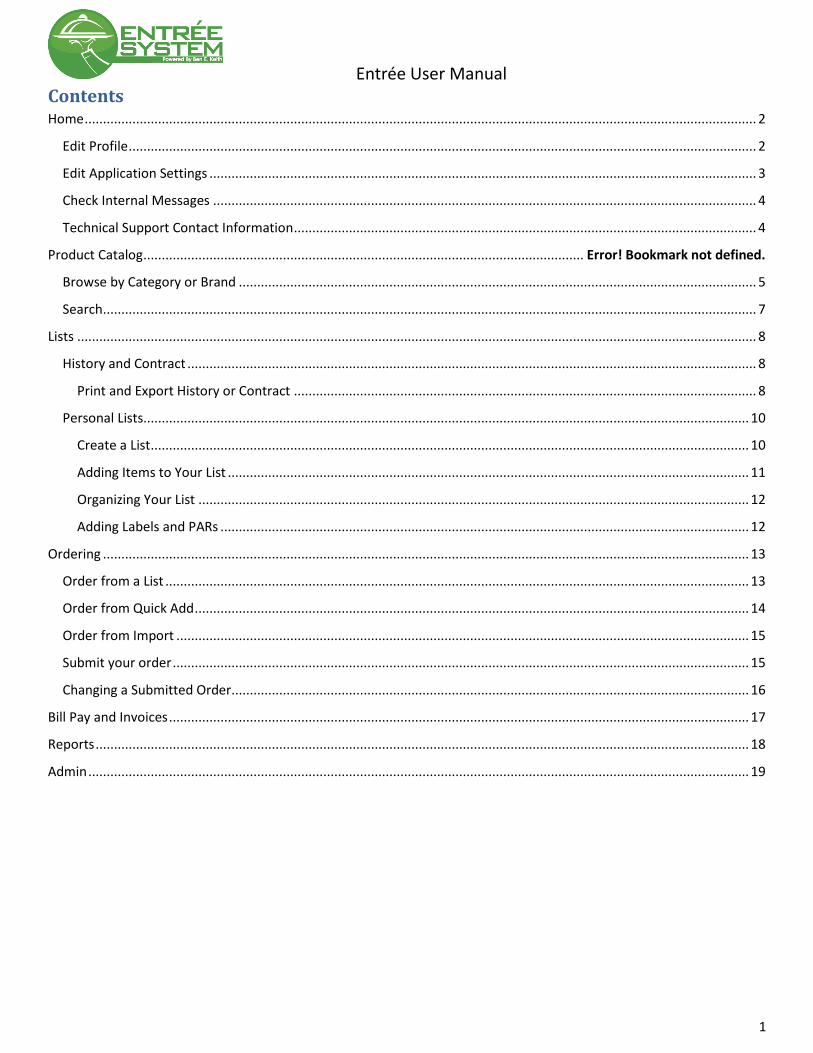
Contents Home ....................................................................................................................................................................................... 2
Edit Profile ........................................................................................................................................................................... 2
Edit Application Settings ..................................................................................................................................................... 3
Check Internal Messages .................................................................................................................................................... 4
Technical Support Contact Information .............................................................................................................................. 4
Product Catalog ........................................................................................................................ Error! Bookmark not defined.
Browse by Category or Brand ............................................................................................................................................. 5
Search .................................................................................................................................................................................. 7
Lists ......................................................................................................................................................................................... 8
History and Contract ........................................................................................................................................................... 8
Print and Export History or Contract .............................................................................................................................. 8
Personal Lists..................................................................................................................................................................... 10
Create a List ................................................................................................................................................................... 10
Adding Items to Your List .............................................................................................................................................. 11
Organizing Your List ...................................................................................................................................................... 12
Adding Labels and PARs ................................................................................................................................................ 12
Ordering ................................................................................................................................................................................ 13
Order from a List ............................................................................................................................................................... 13
Order from Quick Add ....................................................................................................................................................... 14
Order from Import ............................................................................................................................................................ 15
Submit your order ............................................................................................................................................................. 15
Changing a Submitted Order............................................................................................................................................. 16
Bill Pay and Invoices .............................................................................................................................................................. 17
Reports .................................................................................................................................................................................. 18
Admin .................................................................................................................................................................................... 19

Entrée User Manual
2
Home The home screen is your landing page each time you log into Entrée. This screen serves multiple purposes for the user,
one of which is an overview of current activity for the user concerning orders, invoice, and AR balances.
Edit Profile 1. In the top right corner hover your mouse over your user name, a box will popup, select Profile Settings
2. Under your user profile you can edit your name, phone number, change your password, and upload an avatar.
3. Set notifications for specific customer that are assigned to you.
• View messages
• View/Edit profile
settings
• View current AR details
• Access the latest
information from Ben E.
Keith
• Preview of Open and
Submitted Orders
• Start an order or view
your carts
Entrée User Manual
3
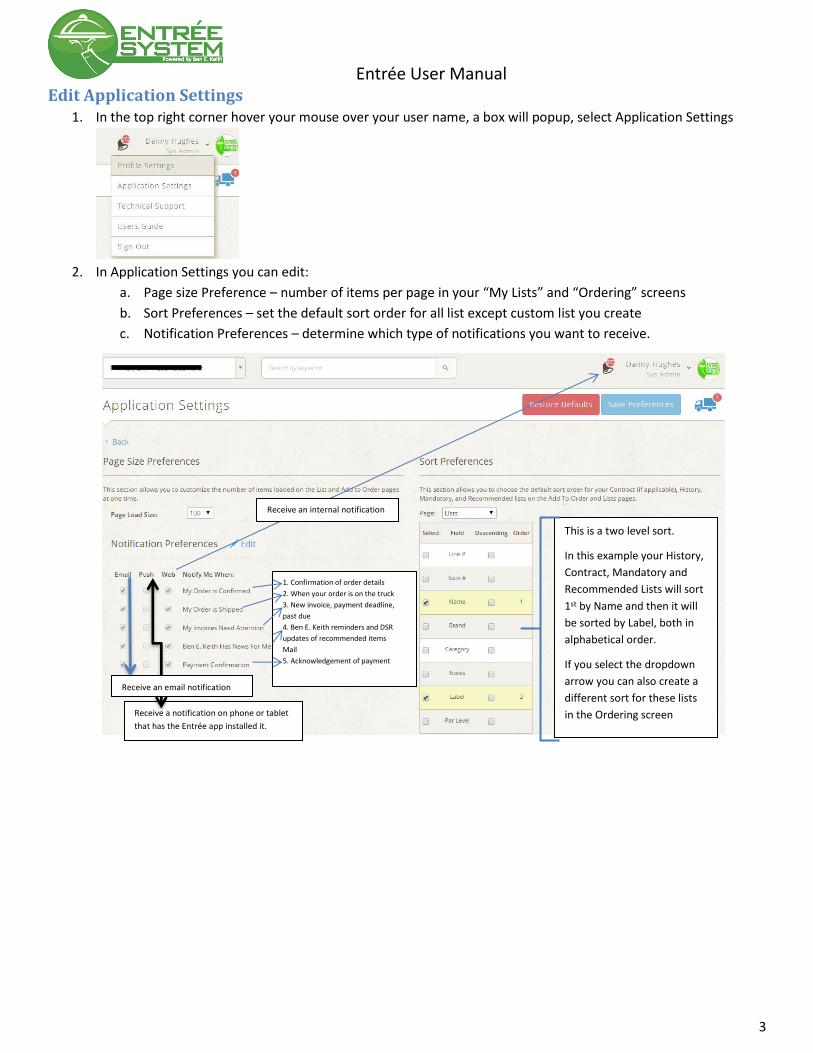
Edit Application Settings 1. In the top right corner hover your mouse over your user name, a box will popup, select Application Settings
2. In Application Settings you can edit:
a. Page size Preference – number of items per page in your “My Lists” and “Ordering” screens
b. Sort Preferences – set the default sort order for all list except custom list you create
c. Notification Preferences – determine which type of notifications you want to receive.
Receive a notification on phone or tablet
that has the Entrée app installed it.
Receive an internal notification
Receive an email notification
1. Confirmation of order details
2. When your order is on the truck
3. New invoice, payment deadline,
past due
4. Ben E. Keith reminders and DSR
updates of recommended items
5. Acknowledgement of payment
This is a two level sort.
In this example your History,
Contract, Mandatory and
Recommended Lists will sort
1st by Name and then it will
be sorted by Label, both in
alphabetical order.
If you select the dropdown
arrow you can also create a
different sort for these lists
in the Ordering screen

Entrée User Manual
4
Check Internal Messages At the top of the site you will notice a bell, this is where you receive notification that you have a message. When there is
a red circle next to the bell, this is an indicator of an unread message.
1. Click on the notification icon
2. Listed are all of the notifications you selected for “Web” notifications in the profile settings. Press the expand
button on the right side of the screen to view the message details
Technical Support Contact Information 1. In the top right corner hover your mouse over your user name, a box will popup, select Technical Support
2. In the new window you will see all contact information for your local Ben E. Keith division IT support.
Select the expand button to view message details

Entrée User Manual
5
Browse by Category or Brand 1. To browse the catalog by category or brand, select an image under the category or brand heading
2. Once a category/brand is selected there are a number of filtering options to help narrow your results. You can
also change your results layout to view pictures.
• Categorized Results
• Filter by: o Brand o Manufacturer o Dietary o Item specifications
• Sortable on column headers
• Add to Favorites list
• Quick add to an order or a list
• View item details
-Previously Ordered

Entrée User Manual
6
3. View item details by clicking on the item number.
• Item price and case information
• Quick add to a cart or a list
• Item specifics
• Order history for this item
• Item notes
o Select pencil to create/edit
Note
o Follows item throughout
Entrée
o Viewed by all users with
access to the same customer
Entrée User Manual
7
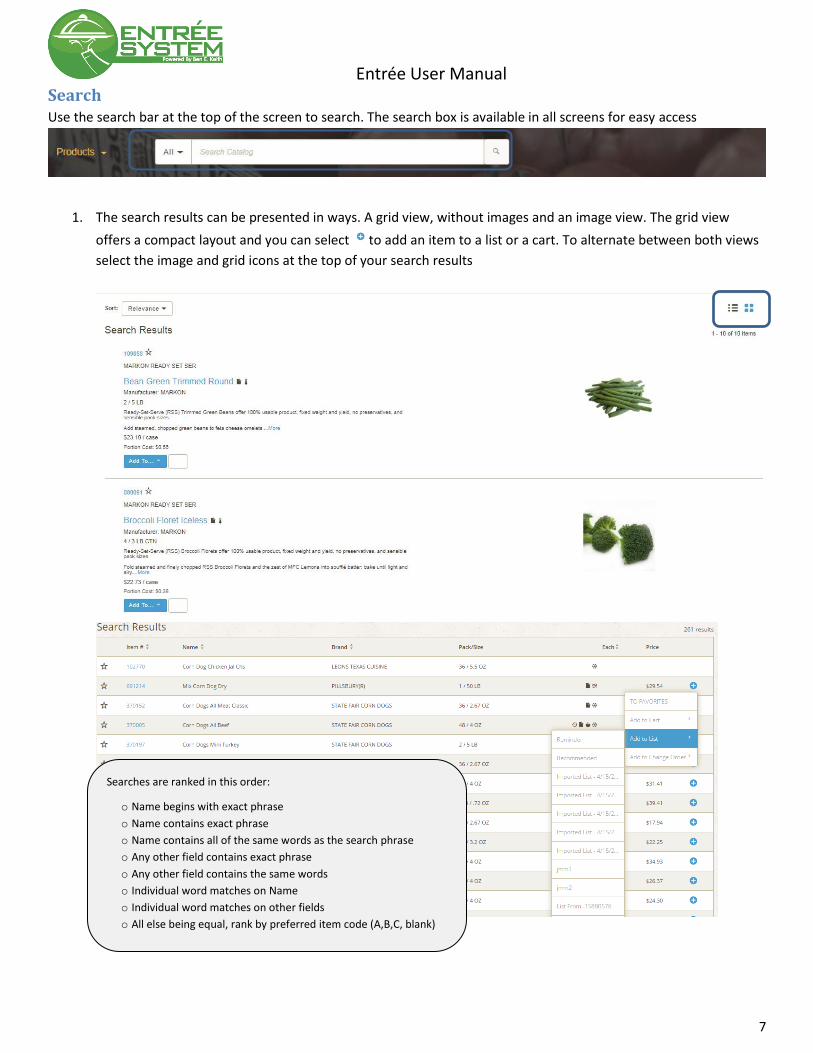
Search Use the search bar at the top of the screen to search. The search box is available in all screens for easy access
1. The search results can be presented in ways. A grid view, without images and an image view. The grid view
offers a compact layout and you can select to add an item to a list or a cart. To alternate between both views
select the image and grid icons at the top of your search results
Searches are ranked in this order:
o Name begins with exact phrase
o Name contains exact phrase
o Name contains all of the same words as the search phrase
o Any other field contains exact phrase
o Any other field contains the same words
o Individual word matches on Name
o Individual word matches on other fields
o All else being equal, rank by preferred item code (A,B,C, blank)

Entrée User Manual
8
Lists
History and Contract Contract and History, are items maintained via order history or managed by Ben E. Keith personnel. These lists cannot be
edited. However, they can be organized by the column headers, printed, and exported.
Print and Export History or Contract
Printing History or Contract
1. Select your History list and press list actions. Select Print.
2. When the print dialogue option opens select Print Page. Entrée sends your list to a .pdf file. You may be
prompted to save the file, depending on your browser settings.
• Sortable on column headers
• Print and export
• Search within list
Entrée User Manual
9
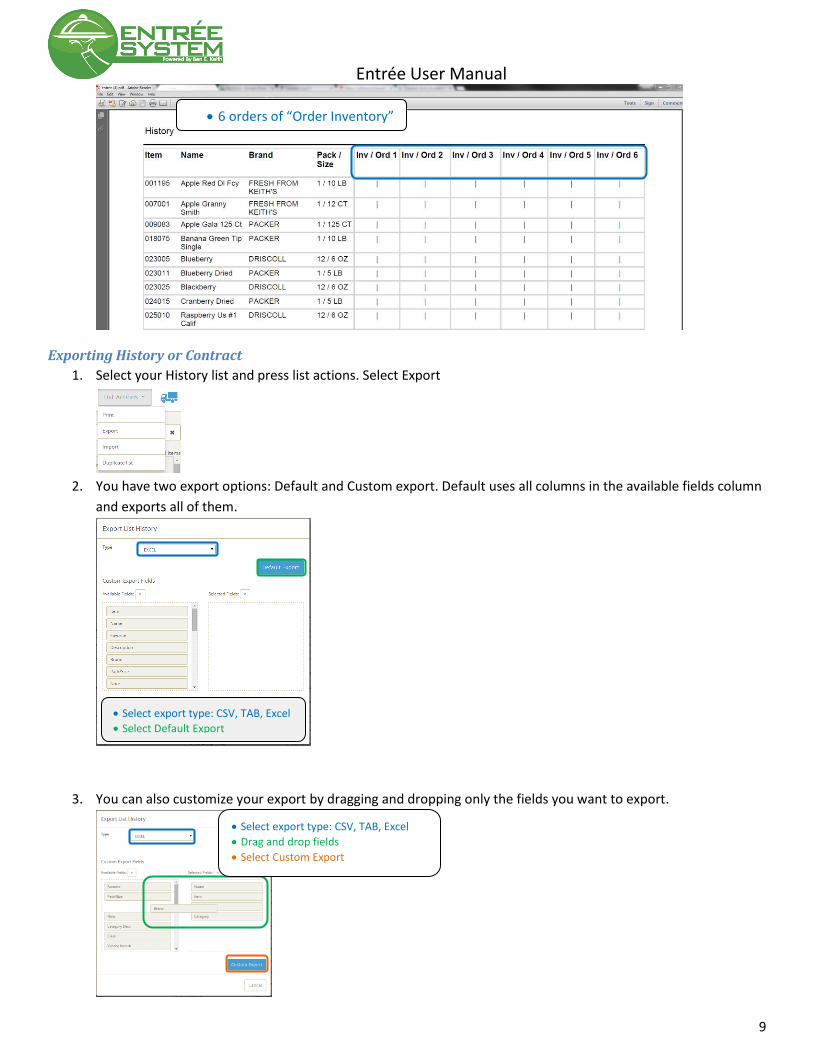
Exporting History or Contract
1. Select your History list and press list actions. Select Export
2. You have two export options: Default and Custom export. Default uses all columns in the available fields column
and exports all of them.
3. You can also customize your export by dragging and dropping only the fields you want to export.
• 6 orders of “Order Inventory”
• Select export type: CSV, TAB, Excel
• Select Default Export
• Select export type: CSV, TAB, Excel
• Drag and drop fields
• Select Custom Export

Entrée User Manual
10
Personal Lists These lists can be created, edited, shared, and deleted by the user.
Create a List
Create a blank list.
1. Select Create a New List, name the list and press the green check mark.
Create a list from the Orders screen.
1. Under Confirmed Orders select an invoice (one without the edit pencil), and then select . The new list will be
titled “List From – invoice #”.
Create a list from import
1. In My Lists screen, select list actions and Import
2. In the import list dialogue box, choose the file and define if it as CSV, TAB, or Excel (Ignore First Line if you want
to bypass column headers). Press import.
Entrée User Manual
11
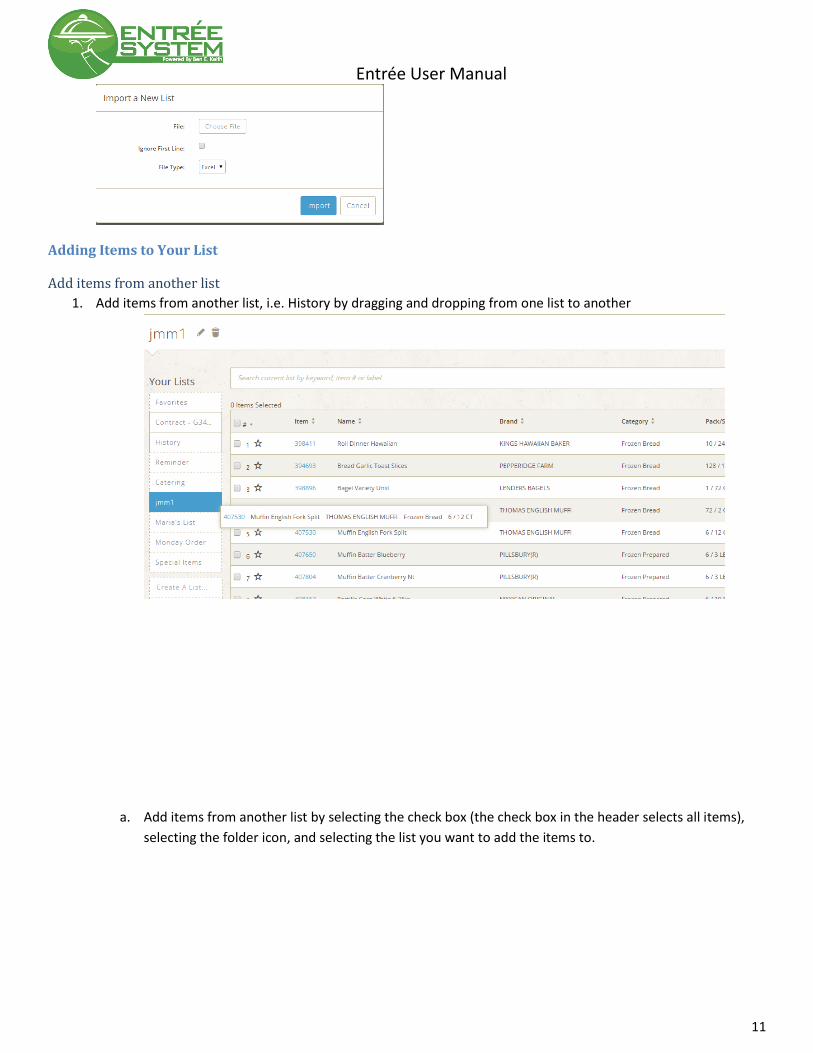
Adding Items to Your List
Add items from another list
1. Add items from another list, i.e. History by dragging and dropping from one list to another
a. Add items from another list by selecting the check box (the check box in the header selects all items),
selecting the folder icon, and selecting the list you want to add the items to.
Entrée User Manual
12
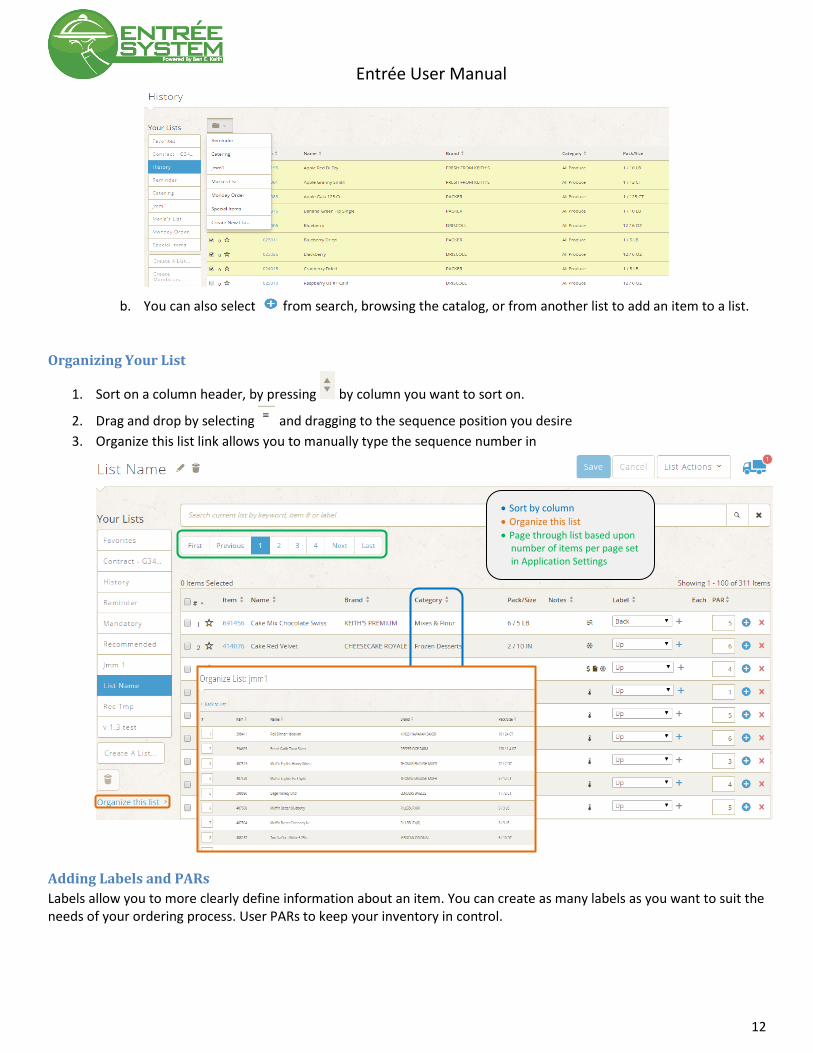
b. You can also select from search, browsing the catalog, or from another list to add an item to a list.
Organizing Your List
1. Sort on a column header, by pressing by column you want to sort on.
2. Drag and drop by selecting and dragging to the sequence position you desire
3. Organize this list link allows you to manually type the sequence number in
Adding Labels and PARs
Labels allow you to more clearly define information about an item. You can create as many labels as you want to suit the needs of your ordering process. User PARs to keep your inventory in control.
• Sort by column
• Organize this list
• Page through list based upon number of items per page set in Application Settings

Entrée User Manual
13
Ordering
Order from a List 1. From the Home or Orders screen you can begin an order
2. If you have multiple customers attached to your username, at the top of screen select the drop down menu and
select the customer you want to place an order for.
3. Select Create An Order and choose Ordering option “List”
**Default list is your History list, you can change between lists by selecting the dropdown arrow next to the list.
As well as set a default list for future orders
• Add labels one at a time
• Add a label to multiple items selecting check box and then label button
• Enter your PAR levels
Entrée User Manual
14
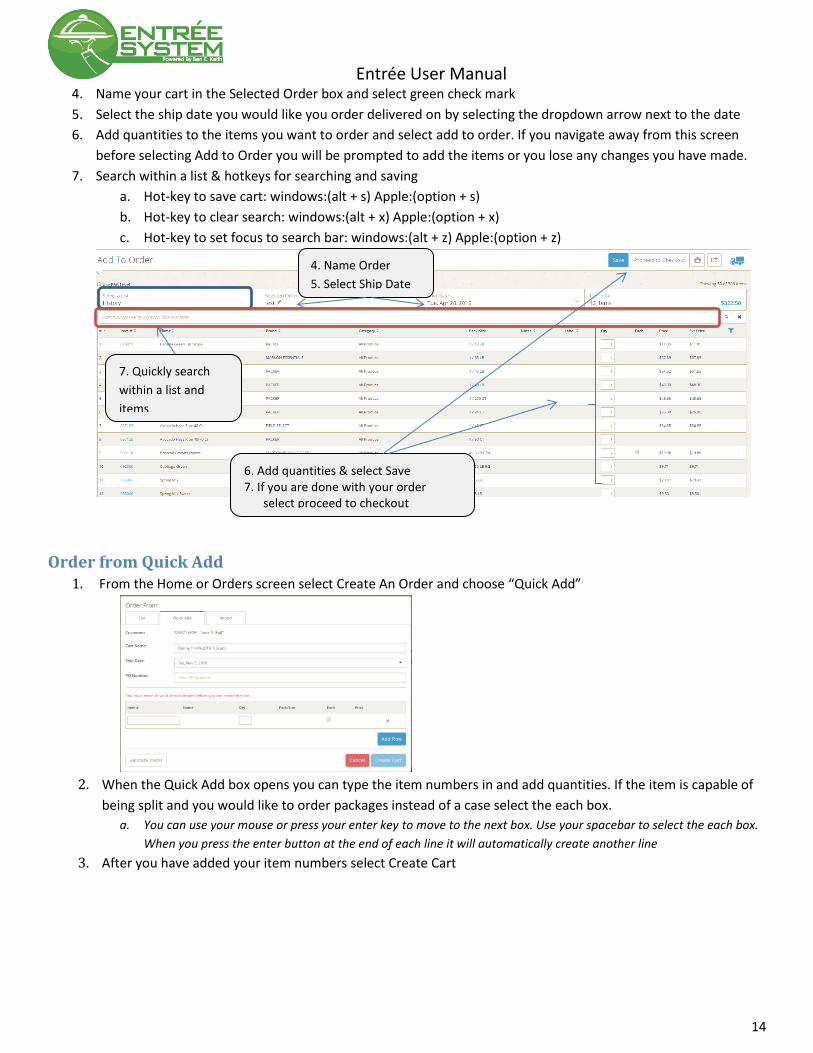
4. Name your cart in the Selected Order box and select green check mark
5. Select the ship date you would like you order delivered on by selecting the dropdown arrow next to the date
6. Add quantities to the items you want to order and select add to order. If you navigate away from this screen
before selecting Add to Order you will be prompted to add the items or you lose any changes you have made.
7. Search within a list & hotkeys for searching and saving
a. Hot-key to save cart: windows:(alt + s) Apple:(option + s)
b. Hot-key to clear search: windows:(alt + x) Apple:(option + x)
c. Hot-key to set focus to search bar: windows:(alt + z) Apple:(option + z)
Order from Quick Add 1. From the Home or Orders screen select Create An Order and choose “Quick Add”
2. When the Quick Add box opens you can type the item numbers in and add quantities. If the item is capable of
being split and you would like to order packages instead of a case select the each box.
a. You can use your mouse or press your enter key to move to the next box. Use your spacebar to select the each box.
When you press the enter button at the end of each line it will automatically create another line
3. After you have added your item numbers select Create Cart
4. Name Order
5. Select Ship Date
6. Add quantities & select Save 7. If you are done with your order
select proceed to checkout
7. Quickly search
within a list and
items

Entrée User Manual
15
Order from Import 1. From the Home or Orders screen select Create An Order and choose “Import”. In the Import a New Order box
you will choose your file and options for import
Submit your order 1. To submit order you can select the cart (blue truck) and select View Cart of the order you want. Or, if the order
you are currently in is the cart you would like to submit, select Proceed to Checkout
2. In the Cart screen you can delete items and adjust quantities.
2. Add item numbers,
quantities, and split cases
3. Select Create Cart
Item Number UPC Item Number or UPC
Item Only Item, Quantity Item, Quantity, Broken Case
CSV, TAB, Excel
Entrée User Manual
16
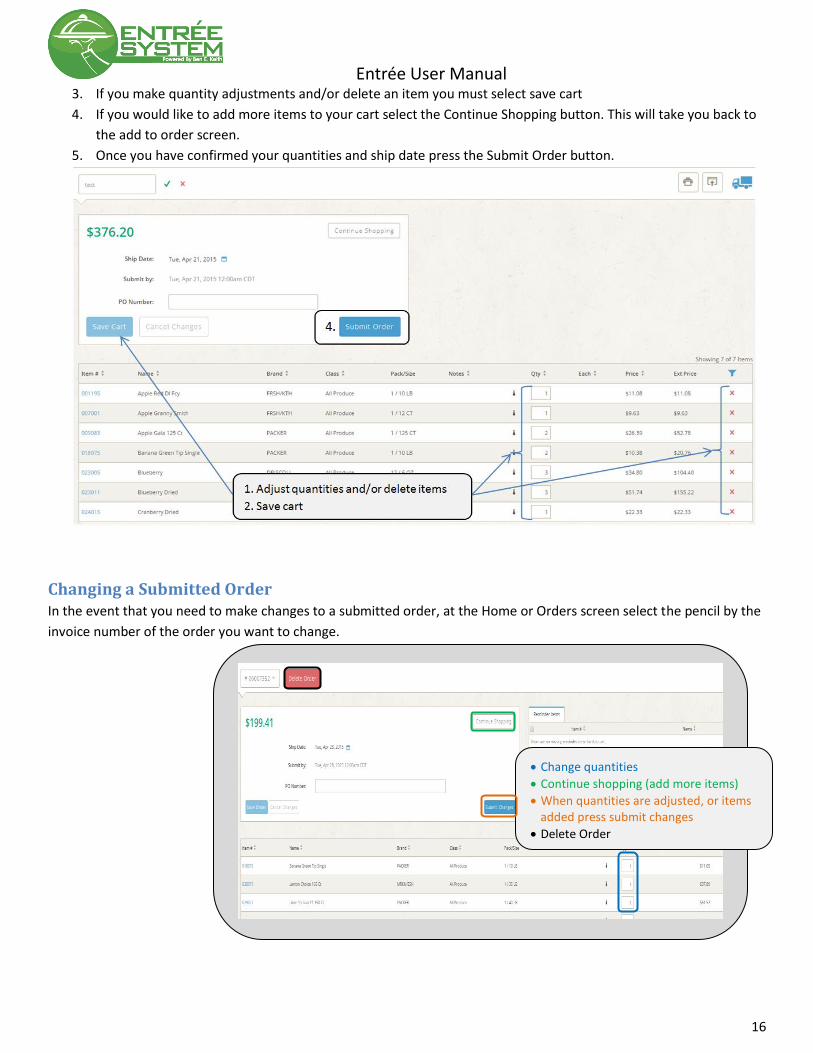
3. If you make quantity adjustments and/or delete an item you must select save cart
4. If you would like to add more items to your cart select the Continue Shopping button. This will take you back to
the add to order screen.
5. Once you have confirmed your quantities and ship date press the Submit Order button.
Changing a Submitted Order In the event that you need to make changes to a submitted order, at the Home or Orders screen select the pencil by the
invoice number of the order you want to change.
• Change quantities
• Continue shopping (add more items)
• When quantities are adjusted, or items added press submit changes
• Delete Order

Entrée User Manual
17
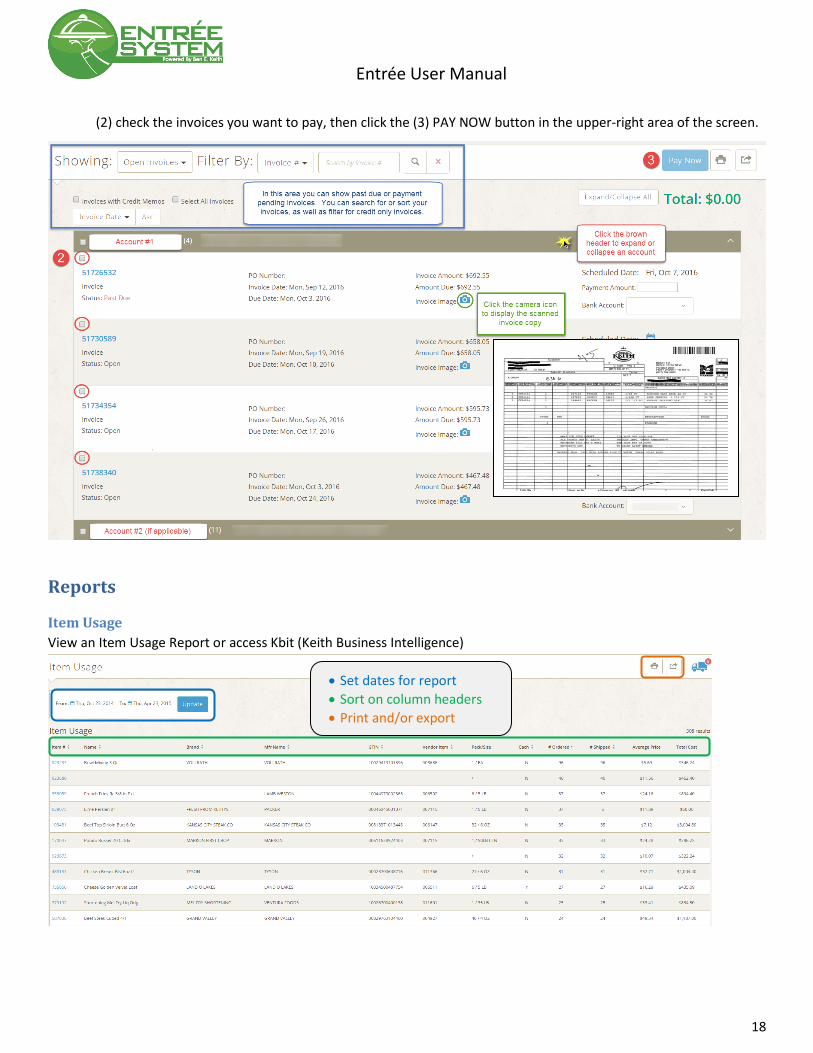
Bill Pay and Invoices You can view, print, and pay your invoices.
Entrée User Manual
18
(2) check the invoices you want to pay, then click the (3) PAY NOW button in the upper-right area of the screen.
Reports
Item Usage
View an Item Usage Report or access Kbit (Keith Business Intelligence)
• Set dates for report
• Sort on column headers
• Print and/or export

Entrée User Manual
19
Inventory Valuation
Admin In the Admin screen you can create users, assign roles, add customers to a user, and send broadcast messages.
• Create New user (add email address first)
• View current user, select user email to view profile
• View customers assigned to your customer group
• Send message to users or all users associated to a customer by selecting
Assign the customer you want the user to
see when they login. The customer will
show up in the assigned customer list.
Owner: Access to everything Accounting: Reports & Invoices Approver: Ordering Buyer: Build orders, cannot submit Guest: Access to Product Catalog
• Add items from existing list, or a single item #
• Sort on column headers
• Add inventory quantities to view dollar value
• Print and/or export