Embed Size (px)
Citation preview
EnterpriseOneWorkforce Management Self-Service 8.9 PeopleBook
September 2003


EnterpriseOne Workforce Management Self-Service 8.9 PeopleBook SKU REL9EWS0309 Copyright© 2003 PeopleSoft, Inc. All rights reserved. All material contained in this documentation is proprietary and confidential to PeopleSoft, Inc. ("PeopleSoft"), protected by copyright laws and subject to the nondisclosure provisions of the applicable PeopleSoft agreement. No part of this documentation may be reproduced, stored in a retrieval system, or transmitted in any form or by any means, including, but not limited to, electronic, graphic, mechanical, photocopying, recording, or otherwise without the prior written permission of PeopleSoft. This documentation is subject to change without notice, and PeopleSoft does not warrant that the material contained in this documentation is free of errors. Any errors found in this document should be reported to PeopleSoft in writing. The copyrighted software that accompanies this document is licensed for use only in strict accordance with the applicable license agreement which should be read carefully as it governs the terms of use of the software and this document, including the disclosure thereof. PeopleSoft, PeopleTools, PS/nVision, PeopleCode, PeopleBooks, PeopleTalk, and Vantive are registered trademarks, and Pure Internet Architecture, Intelligent Context Manager, and The Real-Time Enterprise are trademarks of PeopleSoft, Inc. All other company and product names may be trademarks of their respective owners. The information contained herein is subject to change without notice. Open Source Disclosure This product includes software developed by the Apache Software Foundation (http://www.apache.org/). Copyright (c) 1999-2000 The Apache Software Foundation. All rights reserved. THIS SOFTWARE IS PROVIDED “AS IS’’ AND ANY EXPRESSED OR IMPLIED WARRANTIES, INCLUDING, BUT NOT LIMITED TO, THE IMPLIED WARRANTIES OF MERCHANTABILITY AND FITNESS FOR A PARTICULAR PURPOSE ARE DISCLAIMED. IN NO EVENT SHALL THE APACHE SOFTWARE FOUNDATION OR ITS CONTRIBUTORS BE LIABLE FOR ANY DIRECT, INDIRECT, INCIDENTAL, SPECIAL, EXEMPLARY, OR CONSEQUENTIAL DAMAGES (INCLUDING, BUT NOT LIMITED TO, PROCUREMENT OF SUBSTITUTE GOODS OR SERVICES; LOSS OF USE, DATA, OR PROFITS; OR BUSINESS INTERRUPTION) HOWEVER CAUSED AND ON ANY THEORY OF LIABILITY, WHETHER IN CONTRACT, STRICT LIABILITY, OR TORT (INCLUDING NEGLIGENCE OR OTHERWISE) ARISING IN ANY WAY OUT OF THE USE OF THIS SOFTWARE, EVEN IF ADVISED OF THE POSSIBILITY OF SUCH DAMAGE. PeopleSoft takes no responsibility for its use or distribution of any open source or shareware software or documentation and disclaims any and all liability or damages resulting from use of said software or documentation.


Table of Contents
Self-Service Overview 1 Benefits Enrollment Self-Service.....................................................................2 Compensation Management Self-Service.......................................................2 Competency Management Self-Service..........................................................3 Global Leave Administration Self-Service .......................................................3 Employee Quick Hire.......................................................................................4 System Integration for Self-Service.................................................................4
Employee Self-Service 7 Working with Personal Information Using Self-Service ...................................7
Requesting a Verification-of-Employment Letter..................................................... 7 Reviewing Employee Personal Profile Information .........................................12 Reviewing Pay Stubs Using Employee Self-Service.......................................14 Entering Automatic Deposit Information Using Self-Service ...........................15 Working with Competency Information Using Self-Service .............................17
Entering Competency Information Using Self-Service ............................................ 17 Revising Competency Information Using Self-Service............................................ 21
Manager Self-Service 23 Manager's Workbench ....................................................................................24
Compensation Management Self-Service Considerations...................................... 26 Changing an Employee Status........................................................................27
Requesting an Employee Status Change ............................................................... 27 Reviewing a Status Change Request...................................................................... 33
Assigning Delegates........................................................................................37 Reviewing Upcoming Employee Reviews by Supervisor ................................39 Entering Data for Verification-of-Employment Letters .....................................41 Running Managers Reports ............................................................................46 Setting Up Information for New Employees ....................................................49
Adding an Employee Record Using Employee Setup............................................. 50 Initiating Employee Setup........................................................................................ 55 Completing Employee Setup Using Workflow......................................................... 58
Approving Information Using Manager Self-Service .......................................61 Approving Automatic Deposit Information ............................................................... 62 Approving Bank Information for Automatic Deposits............................................... 62 Approving Competency Information ........................................................................ 63
Creating Organizational Charts .......................................................................64
Self-Service Setup 70

Setting Up Common Settings for Workforce Management .............................70 Common Settings for Self-Service Applications...................................................... 70
Setting Up Employee Self-Service ..................................................................72 Setting Up Verification of Employment.................................................................... 72 Setting Up Name and Address Change .................................................................. 74 Setting Up Emergency Contacts and Phones ......................................................... 75 Setting Up Paid Time-Off Inquiry............................................................................. 76
Employee Self-Service Benefits Setup 77 Implementing Employee Benefits Setup .........................................................78 Setting Up Common Settings for Self-Service ................................................80 Changing Benefit Plans for Self-Service .........................................................82
Adding a New Benefit Plan...................................................................................... 82 Changing Plan Options ...................................................................................89
Setting Up Plan Options .......................................................................................... 90 Defining Benefit Category Rules for Self-Service............................................94
Linking Categories to Benefit Groups...................................................................... 96 Setting Up URLs for Self-Service Benefits ......................................................97
Setting Up URLs for Benefit Plan Options............................................................... 98 Setting Up URLs for Benefit Plans .......................................................................... 100 Setting Up URLs for Benefit Categories.................................................................. 101 Setting Up URLs for Benefit Groups........................................................................ 102
Setting Up Benefit Enrollment Events for Self-Service....................................102 Setting Up Benefit Enrollment Events ..................................................................... 103
Setting Up Benefit Categories by Enrollment Event........................................104 Setting Up Allowed Dependent Relationships by Plan....................................106 Setting Up Workfiles for Benefits Self-Service ................................................108
Setting Up Dependent Selection Automatically....................................................... 108 Building the Current Coverage Workfile for Self-Service ........................................ 109 Setting Up a Current Dependent and Beneficiary Workfile ..................................... 110 Building the Available Plans Workfile for Self-Service ............................................ 111 Building the Personal Information Workfile ............................................................. 113 Setting Up Steps and Rules for Director Process Flows......................................... 114
Setting Up Self-Service Benefit Plan Guidelines.............................................114 Setting Up Benefit Contribution Limits..................................................................... 114 Setting Up Maximum Coverage Increase Limits ..................................................... 116
Setting Up Self-Service Process Flows...........................................................119 Running the Populate Director Form Rules/Edits Report........................................ 119 Defining Process Flow Scripts................................................................................. 119 Setting Up Translated Director Text ........................................................................ 127
Setting Up Form Options.................................................................................128 Setting Up Benefit Confirmation Statement Options .......................................131 Setting Up Self-Service Benefits Workflow Approval ......................................133 Saving Self-Service Employee Information .....................................................135
Saving Self-Service Employee Personal Information.............................................. 135 Saving Self-Service Benefits Information ................................................................ 136
Reviewing Employee Self-Service History ......................................................137 Revising Workfiles for Benefits Self-Service ...................................................140
Revising the Current Coverage Workfile ................................................................. 140 Revising the Available Plans Workfile ..................................................................... 143 Reviewing Dependent and Beneficiary Current Coverage Revisions ..................... 147 Revising the Dependent and Beneficiary Updated Revisions Workfile................... 149 Revising the Personal Profile Workfile .................................................................... 152
Example: Employee Self-Service Demonstration............................................157 Setting Up New DBA Plan Rates ....................................................................174
Setting Up Manager Self-Service 176 Setting Up Upcoming Reviews by Supervisor.................................................176 Setting Up the Employee Setup Process ........................................................181 Setting Up Employee Status Change..............................................................185 Setting Up Manager Reports...........................................................................188
Self-Service Time Entry 190 Entering Timecards Using Self-Service...........................................................191
Managing Self-Service Timecards Using Daily Time Entry..................................... 191 Managing Self-Service Timecards Using Summary Time Entry ............................. 193
Reviewing and Approving Self-Service Timecards .........................................195 Setting Up Self-Service Time Entry.................................................................198
Managing the Time Entry Director Form ................................................................. 199 Creating the Employee Self-Service Time Entry Interface...................................... 212 Assigning Pay Types to Employee Groups ............................................................. 215 Setting Up Manager Delegates ............................................................................... 217

1
Self-Service Overview
J.D. Edwards Workforce Management Self-Service features enable employees and managers to conduct business, initiate transactions, and obtain needed information with rapid, cost-effective, online access to HR, Payroll and life management functions at any time. These robust features free HR personnel from administrative details so they can focus on strategic tasks.
Many companies have discovered the benefits of offering self-service features to employees by allowing them to complete tasks online through a company intranet site. Using self-service to streamline administrative processes such as benefits enrollment or time entry, HR departments can dramatically enhance service levels by virtually eliminating labor-intensive, error-prone tasks.
When employees enter changes to their personal information from a workstation or a remote location, they eliminate traditional document handling. Employees and the HR department share the resulting time savings. For example, when employees get married, they might need to change their name, address, tax withholding information, and benefit elections. To change personal information, many organizations currently require employees to fill out paper forms and then submit the forms to the HR department. An HR representative might then review the forms and enter the information into the system. Employees can save time and increase productivity when they use self-service features to enter changes through an intranet site. The HR department can eliminate redundant processes, lower expense, and reduce errors when staff members process the changes electronically. When employees enter new or updated information, the system records the changes in a temporary workfile. A company representative can then review the changes before posting them to the employee database.
Employees can use self-service features to enter and review the following types of information:
• Name and address
• Emergency contacts
• Dependents and beneficiaries
• Requests for verification-of-employment letters
• Benefits enrollment
• Timecards
• Paid time off
• Leave planning and requests
The system administrator can set up a self-service site on your organization's intranet that focuses only on information that is appropriate for your employees. Managers, supervisors, and administrators can use self-service features to review and update the following information online:
• Upcoming employee reviews
• Organization charts
• Employee compensation
• Employee competencies
• Requests for verification-of-employment letters

2
• Leave requests, leave accruals, and leave trends
• Employee setup process
Benefits Enrollment Self-Service
You can use self-service features to manage your benefit plans online. You can reduce data entry by implementing self-service benefits enrollment. With benefits enrollment self-service, employees can enroll in or change their own benefits through a web site on your company’s intranet during open enrollment, when a new employee is hired, or when an employee has a life change such as marriage.
Some tasks that you can complete using self-service benefits enrollment are:
• Enroll in plans during open enrollment.
• Change benefit plans due to a life event.
• Enroll dependents and enter beneficiary information.
• Print benefits statements.
Compensation Management Self-Service
The J.D. Edwards Compensation Management system provides salary-planning tools that empower supervisors to make salary decisions that are based on real-time information. Supervisors can use a flexible Web tool in Manager Self-Service to recommend adjustments to employee salaries using the budgets, rules, and approval requirements that are defined by Human Resources. Compensation management self-service features give HR personnel more control over the salary-planning process while freeing them from administrative tasks that are historically associated with salary planning.
Benefits for HR include the following:
• Rules engines allow HR to define the parameters under which supervisors can operate and remove HR from the process of manually looking for any activities that are outside the guidelines.
• Real-time information automatically updates supervisor rosters and budgets.
• Online forms prevent lost spreadsheets, therefore saving time and preventing security risks that are associated with mailing employee information.
Benefits for supervisors include the following:
• Web interface allows supervisors to plan salaries or approve recommendations from any location.
• Real-time information gives supervisors the most current data on which to base decisions.
• Online guidelines with visual indicators help supervisors make informed decisions and give them instant feedback on their recommendations.
• Summary information tells the supervisors immediately how they and their subordinate supervisors are doing against their budgets.
• Upper management can view the progress of the staff from a budget and salary review perspective.

3
The Compensation Management system can improve the salary review process for both Human Resources and management.
Competency Management Self-Service
Competency management is a method of categorizing and tracking the qualifications that employees have that make them competent to perform their job duties. You can use competency management to identify employee competencies (competencies that employees possess) and job competencies (competencies that the organization requires to perform a specific job within the organization). Employees can use competency-management self-service features to update their competency information, such as training class attended, through a Web site on their company’s intranet site. Managers can use self-service features of the Manager’s Workbench program (P08712) to review employee competencies.
Benefits for employees include the following:
• Direct access to periodically review competency requirements for a job
• Direct access to review and update personal information
• Accurate, current information in the system that can be used for performance reviews, salary adjustments or consideration for job changes
Benefits for managers include the following:
• Accurate information for employee performance appraisals, salary reviews, and job changes
• Reduced work requirements to review changes with each employee and input changes into the system
• Current information that can be shared with and used by J.D. Edwards Performance Management software
Benefits for HR include the following:
• Accurate, real-time information updates to employee records without labor-intensive input
• Elimination manual tracking of employee competency information
• Improves ability to accurately and impartially evaluate employee job changes
• Provides required data to track, categorize, and analyze workforce strengths and gaps
Global Leave Administration Self-Service
Global leave administration provides a convenient approach that employees can use to plan and review leave time. Employees can use self-service features to plan for vacations and other types of leave, create “what if” scenarios, and review used leave time.
Global leave administration also provides convenient leave management and tracking tools. Managers can use self-service features to track leave history, review requested leaves, and manage leave trends. Managers and HR can use the Medical Information Tracking program (P076210) to perform Family and Medical Leave Act (FMLA) tracking and administration (medical and maternity leaves in countries other than the United States). Managers and HR

4
can also use self-service features to authorize medical leave requests, track the progress of medical leaves, and capture information that is necessary to meet government requirements.
Employee Quick Hire
You can customize the New Hire Setup Workflow process to meet the needs of your organization. For example, you can set up Workflow to send a message to the appropriate manager for an approval when a manager enters an employee salary amount that exceeds a predetermined amount. To automate workplace setup tasks for a new employee, you might choose to require approval at the process level or at the task level. You might also choose to escalate certain tasks if the designated individuals so not complete the tasks in an appropriate time frame.
When adding an employee using the employee quick hire program, the system automatically sends an e-mail message to the appropriate supervisor, requesting the supervisor to identify the setup tasks necessary for the employee. The system determines which supervisor to e-mail based on predetermined position relationships.
To respond to the e-mail request, the supervisor identifies setup tasks and approves the employee setup request. The system then initiates the New Hire Setup Workflow process. Sample tasks can also be supplied automatically based on the job type. The New Hire Setup Workflow sends e-mail messages to the individuals in your organization who are responsible for completing the necessary tasks.
System Integration for Self-Service
Workflow is an integral part of many self-service features. Enterprise Workflow Management is a software approach that you can use to automate tasks, such as notifying a manager that a requisition is waiting for approval, using an e-mail-based process flow across a network. Workflow can send messages and approval forms to employees as a part of the process. Workflow can also e-mail one person or a group of people, or it can escalate a message that has not been answered within a certain time frame to another employee mailbox.
Your organization can set up self-service features to automatically initiate workflow processes. The employee setup process, for example, is a Workflow-based process that distributes a series of tasks, approvals, and work orders to accomplish many of the setup requirements for a new employee. Managers can use the self-service employee setup feature to authorize computer equipment, set up office space, and issue a parking permit for a new employee. After a manager initiates the employee setup process, workflow displays the progress status for each task and notifies the manager when tasks are not completed within scheduled time frames.
You can also take advantage of self-service and Workflow integration when an employee address change reflects a move to a different taxing locality. You can set up a Workflow process that automatically responds to the locality change and e-mails a notification message to the payroll department.
Some additional tasks that you can automate by using Workflow include the following:
• Discontinuing benefits and issue a final check when terminating an employee
• Approving a requisition
• Changing an employee salary

5
• Initiating new employee setup
• Reviewing upcoming employee reviews by supervisor
• Processing verification-of-employment letters
• Approving a W-4 form (for an employee in the United States)
You can use Workflow to automatically notify supervisors and human resource personnel about upcoming performance reviews, verification-of-employment letter, requisition approvals, and more.
The following changes are examples of advantages that you can enjoy with the integration of self-service features and Workflow:
• Eliminating redundant data entry
• Managing current and accurate information across all business operations
• Freeing personnel from administrative details
To prevent unauthorized access to confidential information, you can set up system security to allow users to view and change only their personal information, and information that they need for their jobs.
See Also
See the following topics in the Workforce Management Self-Service Guide:
Employee Self-Service for more information about tasks that employees can complete on an organization's website
Employee Self-Service Setup for information about how to set up employee self-service features
Employee Self-Service Benefits Setup for information about how to set up employee self-service benefits features
Manager Self-Service for more information about features that managers can use to change personal information and to manage employees
Setting Up Manager Self-Service for information about how to set up manager self-service features
Self-Service Time Entry for instructions about setting up self-service time entry and entering self-service timecards
See the following topics in the Human Resources Guide:
Compensation Management for complete information about setting up and using Employee Compensation Management features
Competency Management for complete information about setting up and using Competency Management features
See the following topics in the Time Accounting Guide:
Global Leave Administration for complete information about setting up and using Global Leave Administration features
Time Accounting for overview information about Time Accounting and related topics
Time Entry for complete information about setting up and using Time Accounting features
See the following topic in the Workforce Management Foundation Guide:

6
Adding Employee Records Using Employee Quick Hire for specific instructions about hiring new employees
See the following topic in the Foundation Guide:
Workflow Setup for complete information about setting up and using Workflow processes

7
Employee Self-Service
Self-service allows employees to complete tasks online through a company intranet site. Self-service reduces the handling of documents between employees and the human resources department by allowing employees to access information, forms, and services through desktop computers. For example, employees can use self-service to review and update personal data and enroll in benefits online. When employees update information through self-service, the changes made by the employee can be posted to a temporary workfile, where a company representative can review the changes before posting them to the employee database.
Employees can use self-service to perform the following functions online:
• Change name and address
• Change emergency contact information
• Request a verification-of-employment letter
• Request paid time off
• Review benefits information and enroll for new benefits
• Review and change dependents and beneficiaries information
• Review timecards
• Enter auto-deposit information
The type of information that is available on your self-service website is defined by your company. For example, your company might allow employees to make address changes but not benefits changes.
Working with Personal Information Using Self-Service
You can use Employee Self-Service to review and change personal information online. As personal circumstances change, use this approach to review or change the current status of personal information, obtain documentation regarding employment, or review your paid time off. To use Employee Self-Service, each employee must have password-protected access to the J.D. Edwards software.
Requesting a Verification-of-Employment Letter
J.D. Edwards Self-Service Review Requests for Verification of Employment (VOE) program (P05003) enables employees to submit requests online to verify salary and employment information. Concurrently, they can review the salary and employment information associated with their employee records.
Using processing options, the employer controls the user level. An employee can review information at the employee user level and make changes allowed for employees. An HR person can review information at the HR user level and perform functions that are allowed only at an administrative level.
After an employee has submitted a request for employment verification, a workflow process is started. The workflow process forwards the request to a designated HR person. The person then reviews the employment and salary information that the system has generated, makes

8
any necessary revisions, and then forwards the information directly to the party previously specified by the employee.
Employees can use self-service to request that a verification-of-employment letter be sent to a creditor or loan officer. After requesting the letter, employees can review the progress of the request. The human resources administrator can print or e-mail the completed letter.
► To request a verification-of-employment letter
From the Employee Self Service menu (G05BESS1), choose Verification of Employment.
1. On Work With Verification Of Employment Requests, complete the following field and click Add:
• Employee No.
2. On Verification Of Employment Data, complete the following field on the Request Information tab:
• Contact Name
3. Complete the following optional fields:
• Company
• Title
• Phone Area / Number
• Comment

9
4. Choose one or more of the following contact method options:
• Facsimile
5. Complete the following fields that apply to the contact method option you have chosen:
• E-Mail Address
• Fax Prefix / Phone No.
• Address Line 1
• Address Line 2
• State
• City
• Postal Code
• Country
6. Click the Employment Data tab.

10
7. Review the following pay information fields:
• Date Started
• Job Type/Step Description
• Continued Employment
• Pay Frequency
• Pay Class(H/S/P)
• Date Of Last Raise
• Amount Of Increase
• Date of Next Raise
• Pay Period Salary
• Comment
8. Review the following pay information fields for the current year, one year prior, and two years prior.
• Base
• Overtime
• Commission
• Bonus
• Other
9. Click OK.
The Work With Verification Of Employment Requests form appears. Your letter is pending review.
10. To review the status of your request, click Find.
11. Review the following field for the request:
• Revd Flag

11
Processing Options for Review Requests for Verification of Employment (P05003)
User Level Tab
Use this processing option to specify which user level the system uses.
1. User Level:
1 or blank Employee
2 HR Clerk
3 HR Administrator
(Option 3 will not send a request
through Workflow.)
Use this processing option to specify whether this program will be used by an employee, an HR clerk, or an HR administrator. Valid values are:
Blank Employee
1 Employee
2 HR clerk
3 HR Administrator (This option will not send a request through Workflow.)
Note: If this program is used by an employee or an HR clerk, the approval process will be routed through workflow, where the Workflow Setup tab must be set up.

12
Workflow Setup Tab
Use this processing option to specify which address number the system uses.
1. Address Number of VOE request processor (HRM): Use this processing option to specify the address number of the HR person (or a distribution list) who will process VOE requests.
Reviewing Employee Personal Profile Information
Use the Employee Profile program (P060116) to review information that currently exists in your company's records. The information that you can review is in the following categories:
• Personal
• Company (Self-Service)
• Job (Self-Service)
The information in this location is for review only; you cannot change any of the fields. If you find information that is not accurate, or if you want to add information, you can contact HR to request changes or additions.
Managers can review this information from the Manager's Workbench (P08712). The HR administrator can review this information by accessing Employee Profile from the Employee Management menu (G05BE1).
Before You Begin Ensure that the Human Resource field in the processing options for Employee Profile
(P060116) has been set to the HR administrator's address number. The Enrollment tab of the processing options is not functional for this application. Do not enter or change the value for this tab.
► To review employee personal profile information
From the Employee Self Service menu (G05BESS1), choose Employee Personal Profile.
1. On Employee Profile and Job Information, review the data on the Personal tab.
2. Click each of the subsequent tabs and review the information.
3. If you find information that requires correction or you desire to have new information added, click Contact HR.
4. On Send Internal Work Item, complete the following fields:
• Subject
• Phone Number
The system provides the default address number of the HR administrator in the Send To field, as specified by the processing option. The system provides your name as the default in the Call From field, which is not available for change.

13
5. Use the text area of the form to communicate detailed information that you want to provide to HR. When finished, click OK.
Workflow sends your message to the HR administrator for action on your request.
Processing Options for Employee Profile (P060116)
Enrollment Tab
This processing option specifies the default that is applied for an enrollment option that is used in another application. This processing option is not functional for this application and should not be changed.
Benefits Enrollment
E = Enroll with Eligibility
O = Enroll with Overrides (Default)
Use this processing option to specify whether to enroll an employee with eligibility for benefits or with overrides. Valid values are:
0 Enroll with overrides (default).
E Enroll with Eligibility.
Human Resource Tab
This processing option specifies the default that is applied for sending an email message to the appropriate Workforce Management representative.
Address Number
Use the processing option to specify the address book number that is used to retrieve the e-mail address that is stored in the Remark field on the Who's Who Address Book form.

14
Reviewing Pay Stubs Using Employee Self-Service
You can use Employee Self-Service to review the accuracy of your pay stubs and ensure that they are complete. If the portal component for the Stub Information History program (P07186) exists on your organization intranet portal, you can click the link to review your personal pay stub history. An HR administrator can access the same program from a menu and enter an employee identification number to review pay stub history for various employees.
► To review pay stubs using employee self-service
From the portal that is created by your organization, access Pay Stub History.
Alternatively, for HR access, from the U.S. History Inquiries menu (G07BUSP14), choose Pay Stub History.
1. On Work With Pay Stub History, to display entries for previous pay periods, complete the following fields and then click Find:
• Employee Identification
When you access this program from an organization portal, the system reads the employee login identification, disables this field, and displays pay stub records for the current user.
• From Check Date
• Through Check Date
2. Choose a pay stub record and click Select.

15
3. On Work With Pay Stub History, review the copy of your pay stub.
To review detail information for piecework, you can choose Piecework Stub from the Row menu.
4. To print the information, choose Print from the Form menu.
Entering Automatic Deposit Information Using Self-Service
Use the Auto Deposit Instructions program (P055011) to enter automatic deposit information when you want all or part of your payment each pay period to be deposited directly into your bank account. You can choose to receive part of your payment in check form and the rest in automatic deposit form. You also can divide your payment among multiple accounts. Typically, the automatic deposit information that you enter is reviewed and approved by a payroll representative before the information takes effect. You will receive a message from the payroll representative that indicates whether the information that you entered has been approved.
You can also revise any existing automatic deposit information that you or a payroll representative entered previously.
When you use self-service to enter or update automatic deposit information, the new deposit information is processed in the next payroll cycle, and the pre-note test is eliminated.

16
► To enter automatic deposit information using self-service
From the Employee Self Service menu (G05BESS1), choose Auto Deposit Instructions.
1. On Revise Automatic Deposit Instructions, click one of the following options:
• Dollar1
• Percent1
2. Complete the following fields:
• Amount or Percent
• Bank Trnst No.
• Bank Account
3. To indicate the type of account, click one of the following options:
• Checking1
• Savings1
4. Repeat steps 1-3 for as many accounts as you want to have a portion of your payment deposited.
5. If, after completing steps 1-4, any additional portion of your payment is unallocated, click one of the following options:

17
• Remainder Auto Deposit
• Remainder Check
6. Complete the Routing Number and the Account Number
7. Click one of the following options in the Remainder Amount group box:
• RemChecking
• RemSavings
8. Click OK.
The system displays a message that indicates that the information you entered has been submitted to a payroll representative for approval.
Working with Competency Information Using Self-Service
Competency management is a method of categorizing and tracking the qualifications that employees have that make them competent to perform their job duties. These qualifications, such as C programming skills, CPA license, or fluency in French, are called competencies.
Your organization uses competency management to track the competencies that you possess and to compare these competencies with those that are required for your job. Tracking competencies helps managers and human resources representatives determine the competencies that you need in order to satisfy the requirements of your current job, as well as a job that you hope to obtain in the future. Competency management also helps you and your manager create clear career goals and performance objectives for you.
To simplify the process of maintaining competency information for employees, you can use self-service to enter and revise your own competency information.
Entering Competency Information Using Self-Service
Because you typically know your professional background more thoroughly than anyone else in your organization, you can enter your own competency information, and the system submits it to someone else, such as your manager or a member of the human resources department, for approval. For example, others might not be aware that you are working on an advanced degree or a professional certification that is not directly related to your current job. Self-service allows you to update your competency information as you acquire each competency. You can also revise your existing competency information.
After you enter competency information, the appropriate person receives a Workflow message that indicates that competency information is waiting for approval. That person must then review the information and enter your level of proficiency in each competency.
► To enter a training competency
From the Employee Self Service menu (G05BESS1), choose Employee Competency Self Service.
1. On Competency Self Service, choose the following option and click Add:
• Training/Development

18
2. On Training/Development, complete the following fields:
• Competency Code
• Course Code
• Provider
• Training Reason
3. Complete the following optional fields and click OK:
• Start Date
• End Date
• Grade
• Deliver Type
• Units
• Location / Room
4. Repeat steps 2 and 3 for each training competency you want to enter.

19
► To enter a skill competency
From the Employee Self Service menu (G05BESS1), choose Employee Competency Self Service.
1. On Competency Self Service, choose the following option and click Add:
• Skills
2. On Skills, complete the following field:
• Competency Code
3. Complete the followings optional fields and click OK:
• Skill Description
• Date Acquired
• Status
4. Repeat steps 2 and 3 for each skill competency you want to enter.
► To enter an accomplishment competency
From the Employee Self Service menu (G05BESS1), choose Employee Competency Self Service.
1. On Competency Self Service, choose the following option and click Add:
• Accomplishments
2. On Accomplishments, complete the following required fields:
• Competency Code
• Accomplishment Type
3. Complete the following optional fields and click OK:
• Date Achieved
• Awarding Organization
• Date Awarded
• Status
4. Repeat steps 2 and 3 for each accomplishment competency you want to enter.
► To enter a certification competency
From the Employee Self Service menu (G05BESS1), choose Employee Competency Self Service.
1. On Competency Self Service, choose the following option and click Add:
• Certification

20
2. On Certifications, complete the following required fields:
• Competency Code
• Licensing Body
• Renewal Code
• Expiration Date
3. Complete the following optional fields and click OK:
• Licensing Number
• Score Rating
• Status
• Issue Date
4. Repeat step 2 and 3 for each certification competency you want to enter.
► To enter an education competency
From the Employee Self Service menu (G05BESS1), choose Employee Competency Self Service.
1. On Competency Self Service, choose the following option and click Add:
• Education
2. On Education, complete the following required fields:
• Competency Code
• Institution Code
3. Complete the following optional fields and click OK:
• Location
• Degree Date
• GPA Rating
• GradeBase
• Honorary
4. Repeat steps 2 and 3 for each education competency you want to enter.
21
► To enter a language competency
From the Employee Self Service menu (G05BESS1), choose Employee Competency Self Service.
1. On Competency Self Service, choose the following option and click Add:
• Language
2. On Language, complete the following required field:
• Competency Code
3. Complete the following optional fields and click OK:
• Status Date
• Status
4. Repeat steps 2 and 3 for each language competency you want to enter.
Revising Competency Information Using Self-Service
After you enter competency information for yourself, you can review it to verify that it is correct. If you find an error or omission, you can revise the information to correct it. After you revise competency information, the appropriate person, such as your manager or a member of the human resources department, receives a Workflow message that indicates that the information is waiting for approval.
The process that you use to revise competency information is similar to the process that you use to enter this information, except that you must first search for the competency that you need to revise.
► To revise competency information using self-service
From the Employee Self Service menu (G05BESS1), choose Employee Competency Self Service.
1. On Competency Self Service, choose one or more of the following options that correspond to the type of competency that you need to revise, and then click View:
• Training/Development
• Skills
• Accomplishments
• Certification
• Education
• Language

22
2. On Work With Training/Development, Work With Skills, Work With Accomplishments, Work With Certifications, Work With Education, or Work With Language, complete the following field:
• Competency Code
3. To narrow your search, complete any of the other fields and then click Find.
4. Choose a record in the detail area, and then click Select.
5. On Training/Development, Skills, Accomplishments, Certifications, Education, or Language, make the necessary changes and then click OK.
See Also Entering Competency Information Using Self-Service in the Workforce Management
Self-Service Guide for more specific instructions for entering competency information
Processing Options for Competency SelfService (P05130)
Display Tab
Use this processing option to specify whether the system displays manager information on the forms.
Display Manager Information
Use this processing option to specify whether the system will display the status, verification information, and competency level on the forms. Valid values are:
Blank Do not display the information.
1 Display the information.

23
Manager Self-Service
Managers can accomplish many tasks with less effort and time by using self-service procedures. These procedures might be available through a company intranet site or from OneWorld menus for employees and managers. This approach reduces document handling between employees and the human resources department by allowing employees to access information, forms, and services using desktop computers.
Managers can use self-service and Manager's Workbench (P08712) programs to perform a wide range of tasks for which they are responsible. These tasks include the following:
• Requesting employee status changes
• Running managerial reports
• Assigning delegates
• Generating a graphic organizational chart and reviewing the hierarchical structure of the jobs within an organization
• Reviewing jobs and job competencies in an organization
• Performing a gap analysis of employee and job competencies
• Entering employee competency information
• Reviewing employee profiles
• Reviewing employee information, such as name and address, time entry, emergency contacts, paid time off balances, and skill competencies
Additional self-service programs are available for managers use that are not included in the Manager's Workbench. These programs, accessible from the Employee and Manager Self Service menus, are:
• Upcoming Reviews by Supervisor (P052200)
• Employee Setup Workbench (P08710)
• Auto Deposit Instructions (P055011)
• Competency Self Service (P05130)
The type of information that is available on your self-service website is defined by your company. For example, your company might allow employees to make address changes but not benefits changes.
Many of the manager's self-service programs employ Enterprise Workflow Management. Workflow is an e-mail based system that automates tasks by using e-mail to reduce the processing time that it normally takes to complete a task. For example, managers can initiate an employee's promotion using Status Change from Manager's Workbench. When the process is initiated, a series of messages within Workflow are e-mailed to each manager who must be informed about the change and who must approve the change.
Only selected applications can be enabled on an intranet site. The preceding tasks are based on J.D. Edwards’ forms and data provided for self-service in a Windows environment. The navigations, forms, steps, and data shown in these tasks might not correspond to your customized, self-service intranet site. If you are using self-service from your self-service site, you must always log onto the site as the first step. When you log on, the system uses your employee number to retrieve your own information.

24
Manager's Workbench
You can perform many common supervisory tasks from a centralized location using Manager's Workbench (P08712). From this location, your employees' information is at your fingertips, enabling you to analyze job and employee information, initiate changes, and save time when you need reports that can be processed as a list or on an individual basis. Your own personal employee information is also available from within this application.
Using the Manager's Workbench, you have quick, easy access to information that you can review and use for budgeting, planning, decision-making, and approving. This application uses Workflow to save time communicating changes and obtaining required authorizations.
Note
The Manager's Workbench separates access to your personal information from access to your employees' information by the use of Form and Row menus. For example, when you choose options from the Form menu, you can access your own personal information and make a variety of changes. When you choose options from the Row menu, the system displays your employees' information. A manager can view an employee's information, but generally cannot make changes directly to an employee's record.
The following options are available in the Manager's Workbench:
Self-Service You can choose Self Service Apps. from the Row or Form menus, and then perform the following tasks:
• Review or change name and address information • Review time entry • Review paid time off • Review or update emergency contacts • Enter employee competency information
You can review employee data, analyze employee skills, and prepare for employee coaching sessions with these self-service options. See Assigning Competencies to Employees in the Human Resources Guide for more information about working with employee competencies.
Using My Self-Service, you can review and change your own, personal information. See Employee Self-Service in the Workforce Management Self-Service Guide for more information about making changes and the required procedures.
Status Change Status Change includes the following preset options for changing an employee's status:
• Requesting a promotion • Changing an employee's assigned location • Changing an employee's department or supervisor • Changing an employee's job status • Requesting a leave of absence
This centralized approach to managing employee changes allows you to review, initiate, and approve changes for your employees. The User Defined status

25
change category allows your Workforce Management Department to set up a new employee change category. For example, you might want to create a new category for Compensation Review. See Changing an Employee Status in the Workforce Management Self-Service Guide for more information and procedures.
Reports The following reports are available from the Manager's Workbench (P08712):
• Submit Managers Reports • Headcount • Organization Chart • Turnover Report • Supplemental Data • Phone List • Time Entry
Managers Reports (P08740) is a preset list of reports, defined by your Workforce Management Department, you can use to meet frequent reporting requirements. Your Workforce Management administrator can create multiple versions that include reports that you commonly use. Adding versions is an available option only in a windows environment. This feature cannot be used in a web environment.
The Organization Chart report prints a diagram of the organization, using your managerial position as the top level. This report requires Visio software to be resident on your computer.
Your Workforce Management department should define the Supplemental Data report to include any selection of data from the Employee Master table.
Use these reports to help meet your need for organizational reporting, planning, review, and management of your employees. You can generate reports for the employee group below your job level, or you can select a subordinate management level and generate reports with that level at the top of the hierarchy.
Jobs In An Organization
Use Jobs In An Organization to review how each job fits into the hierarchical levels of the organizational structure. You can use this information to plan for new jobs and to determine the competencies that are associated with each job. When you access this program from Managers Workbench, you can review information, but you cannot change it.
See Attaching Jobs to Organizational Levels in the Human Resources Guide for more information.
Compensation Review
Use this program to review compensation data for any of your employees. The program provides you with a workbench that provides exits for the following:
• Viewing and changing salary recommendations • Viewing the salary budget allocation, budget spent, and budget remaining
by increase types • Submitting salary recommendations up to the next level supervisor for
approval • Returning salary recommendations down to the previous level supervisor
for salary rework Providing access for a Workforce Management administrator to view or change

26
salary recommendations of a specified supervisor with the use of a processing option
Job Competencies In An Organization
Use Job Competencies In An Organization to see how job competencies are assigned to the hierarchical levels of the organizational structure. You can use this information to determine the competencies that apply to you and the employees who report to you. See Attaching Job Competencies to Organizational Levels in the Human Resources Guide for more information.
Gap Analysis Use Gap Analysis to help you compare the skill competencies required for a job and the current competencies of an employee. Often used in conjunction with Job Competencies In An Organization, these functions are useful for organizational planning and in preparation for employee performance reviews.
See Reviewing Gap Analysis Online in the Human Resources Guide for additional information and procedures.
Delegates Use Delegates to set up subordinates to use Manager's Workbench in your absence or to enable others to perform managerial functions. After the initial setup, the delegates that you select can access Manager's Workbench at your organizational level and then perform functions at an authority level that you specify to help you review, change, and approve employee information.
Employee Profile Use Employee Profile to review employee data obtained from the Employee Master table. You can also use this function to contact your Workforce Management Department about updates to an employee record.
See Reviewing Employee Personal Profile Information in the Workforce Management Self-Service Guide for additional information and procedures.
Attachments Attachments can be added as part of the setup function to provide information for all managers who use any of the Manager's Workbench applications. These can include instructions, reminders, or miscellaneous information.
You can also add attachments while using Manager's Workbench applications. For example, you might want to remind yourself about information that will help you plan for reviews or record action steps that you want to remember regarding specific employees. You can also attach graphic files. The attached files are linked to your address number and an employee address number so that if either position changes, another manager cannot view the notes that you attach.
Approvals Use Approvals to expedite the Workflow process for your employees. When an employee enters information that requires your approval, for example, you can use this Form menu option to review all requests and take appropriate action.
Compensation Management Self-Service Considerations
Your organization might have set up the Compensation Management system as a self-service application that allows you to manage the salary reviews of the employees who report to you. If you access the Compensation Management system from a self-service program, such as the Manager's Workbench (P08712), you can make salary recommendations within your own management hierarchy only. The supervisor field is disabled.

27
See Also Setting up Manager Self-Service in the Workforce Management Self-Service Guide to
specify processing options that automatically include a manager's address book number when you access Manager's Workbench (P08712) and the linked programs
Changing an Employee Status
Changing an Employee's Status, one of the applications within Manager's Workbench (P08712), provides a centralized approach to implementing common changes for employees who report to you or to one of your subordinate managers. Using this approach, you can manage some of the most common types of employee changes with a minimum of time and effort.
Using this approach, when you choose the type of change desired for a specified employee and implement a change, the system automatically notifies your HR department and any other managers who must approve the change. You will also be able to review the status of the approvals to stay current with the changes you have initiated.
You can perform any of the following, preset tasks:
• Promoting an employee
• Changing an employee's job status
• Relocating an employee
• Changing an employee department or supervisor
In addition to the five preset tasks listed above, two additional options exist that you can define in UDC 08/S4 to meet your specific requirements. For example, you might define this option to change an employee's salary. Working with your HR administrator, you can set up similar tasks or change any of the existing, pre-set tasks to use any combination of the data in the Employee Master Information table (F060116).
Requesting an Employee Status Change
To initiate an employee change, you can use the Employee Status Change program (P08720). You normally access this program through the Manager’s Workbench program (P08712). The system automatically displays tabs and fields on the change request form that are required to complete the change that you request.
► To request an employee status change
From the Manager Self Service menu (G05BMSS1), choose Managers Workbench.
1. On Work With Managers Employees, click one of the following options and click Find to display your subordinates.
• Active Employees
The Active option displays only employees with an active payroll status, including employees who are on a leave of absence.
• All Employees
The All Employees option displays all employees, including those with a terminated status.

28
2. Choose the desired subordinate's record from the detail area.
The first Employee's Name column displays the organizational structure that is subordinate to your position. You can click the plus sign to the left of a manager's name to display that manager's subordinates.
3. From the Row menu, choose Status Change Req and then Status Change.
4. On Select Employee Status Change Request, choose one of the following options:
• Promotion
• Location
• Dept/Supervisor Change
• Job Status
The system administrator can define values for the following fields to meet the needs of the organization:
• Flex
• User Defined
5. To display notes or instructions about the change process, click the icon next to the option.
6. Click Add.
7. On Create Employee Status Change Request, complete the following fields:
• Change Reason
• Effective On

29
8. Read the comments on the Instructions tab, and then click the next tab to enter appropriate changes to the active fields. Fields that are not applicable to the type of change selected are not available for changes.
9. Click each of the remaining tabs and enter changes as appropriate. Some change tasks might require more tabs than can fit on the form. If more tabs exist that you need to access on a subsequent form, the system activates the Next option in the menu bar.
10. After you review information for all tabs and complete the changes, perform one of the following:
• Click OK to save, but not submit, the request. This option allows you to review the request at a later date and then submit it for approval.
• Click Submit to save and submit the request for approval. After you submit a request, you cannot revise it except to enter a new Change Reason or to change the Effective On date.
If you need to change a request after you have submitted it, but before it has been approved, cancel the request and create a new one.
The system will automatically generate workflow messages in the Employee Work Center for the appropriate managers. The Employee Master Information table (F060116) is updated when the required approvals have been completed.
Processing Options for Employee Status Change (P08720)
Process Tab
These processing options specify the default settings for the program processes.
1. Mail Box Designator
Blank = 01 (Personal In Basket)
Use this processing option to specify the name of the mail box in the Employee Work Center where your workflow notifications and approval messages are sent.
To create a new mail box, add a new record to the 02/MB UDC.
2. Final Status
Use this processing option to specify the final status for the Employee Status Change records (F08720) when the process has been successfully completed.

30
3. Allow Delegates
0 = No
1 = Yes
Use this processing option to specify whether you want to allow the use of delegates. If a manager has defined a delegate, this employee can perform certain tasks in behalf of the manager. Valid values are:
0 No
1 Yes
4. Perform Employee Master Field Edits
0 = No
1 = Yes
Use this processing option to specify whether you want the system to write information that you change in the Managers Employee Status Change application to the Employee Master table. Valid values are:
0
No
1
Yes
User Level Tab
This processing option specifies the position of the person who will be using the program.
1. User Level 1 = Manager/Employee Level. 2 = HR Administrator Level

31
Use this processing option to specify whether the application will be used by a management employee or HR personnel. Valid values are: Blank Manager 1 Manager or a manager's delegate 2 HR Personnel
Defaults Tab
Use these processing options to specify default settings that the system uses and whether the system automatically includes job and business unit/ job cross reference information in the employee record when you change a job type for an existing employee.
1. Status Change Type 1
Use this processing option to specify a status change type that the system will use as one of the five default settings. The system will display the five default status change types on the Select Employee Status Change Request form.
2. Status Change Type 2
Use this processing option to specify a status change type that the system will use as one of the five default settings. The system will display the five default status change types on the Select Employee Status Change Request form.
3. Status Change Type 3
Use this processing option to specify a status change type that the system will use as one of the five default settings. The system will display the five default status change types on the Select Employee Status Change Request form.

32
4. Status Change Type 4
Use this processing option to specify a status change type that the system will use as one of the five default settings. The system will display the five default status change types on the Select Employee Status Change Request form.
5. Status Change Type 5
Use this processing option to specify a status change type that the system will use as one of the five default settings. The system will display the five default status change types on the Select Employee Status Change Request form.
6. Job Information Change
0 = Do not use default data
1 = Use default data
Use this processing option to specify whether the system will automatically supply job information in the employee record when you change a job type for an existing employee. The system will automatically include pay frequency,union code, pay class, pay grade, overtime exempt, pay grade step, and benefit group. Valid values are:
0 Do not use default data
1 Use default data
7. Business Unit/Job ID Information Change
0 = Do not use default data
1 = Use default data

33
Use this processing option to determine whether the system will automatically include the business unit/job cross reference information in the employee record when you change a job type for an existing employee. The system will automatically use the union code, workers compensation, and benefit group from the F08005 table. Valid values are:
0 Do not use default data
1 Use default data
Reviewing a Status Change Request
You can use the Status Change Review program (P087201) to examine a request that you have previously submitted, review notes that relate to a request, or follow up on a request that has not been approved within a reasonable amount of time.
If a request has not been approved, you can use the escalation monitor to determine possible reasons for the delay and restart the process. Use one of the following options, depending on the apparent cause of the delay:
• Escalation monitor. Provides a report of all halted workflow processes and moves the requests to the next stage.
• Escalate. Moves a specific request to the next stage if it has been halted due to payroll lockout, effective date, or approval inactivity.
• Restart. Restarts a specific status change process, deleting any associated workflow messages.
► To review a status change request
From the Manager Self Service menu (G05BMSS1), choose Managers Workbench.
1. On Work With Managers Employees, click one of the following options depending on whether you want to see only active employees who work for you or you want to include employees whose employment has been terminated.
• Active Employees
The Active Employees option includes employees who are on a leave of absence.
• All Employees
2. Choose the desired subordinate's record from the detail area.
3. From the Row menu, choose Status Change Request and then choose Status Change Review.
4. On Work With Status Change, choose the desired employee's record and click Select.

34
The system automatically displays the required tabs and fields on the form. Depending on the pending change, a different number of tabs might appear.
5. On Modify Employee Status Change Request, review the information on each of the tabs and enter required changes. Fields that are not applicable to the type of change selected will not be available for changes. If more tabs exist that you need to access on a subsequent form, the Next option in the menu bar will be available.
6. After you have reviewed the information for all tabs and completed the changes, perform one of the following actions:
• Click OK to save, but not submit, the request. This option allows you to review the request at a later date and then submit it for approval.
• Click Submit to save and submit the request for approval and then click OK on the Workflow Pending Review Notification.
After you submit a request it cannot be revised except to enter a new Change Reason or to change the Effective On date.
If you need to make additional changes to a request after you have submitted it, but before it has been approved, cancel the request and create a new one.
The system automatically generates workflow messages in the Employee Work Center (P012501) for the appropriate managers. The Employee Master Information table (F060116) is updated when the required approvals are complete.
7. On Work With Status Change, choose Escalation Monitor from the Form menu to generate a report of and move all halted processes to the next stage.
8. To move a specific request to the next stage, choose a record and then choose Escalate from the Row menu.
9. To restart a specific status change process and delete any pending workflow messages that are linked to the process, choose a record and then choose Restart from the Row menu.
Processing Options for Status Change Review (P087201)
Processing Tab
These processing options allow you to activate potential application activities that provide managers with a broader range of control over workflow and management options.
1. Allow Delegates
1 = Yes
0 = No
Use this processing option to specify whether you want to allow the use of delegates. If a manager has defined a delegate, this employee can perform certain tasks on his or her behalf.

35
Valid values are:
0 No
1 Yes
2. Allow Escalating Halted Activities
1 = Yes
0 = No
Use this processing option to specify whether you want to allow the user to escalate halted workflow activities. The Status Change workflow stops the process during a Payroll Lockout or to wait for a specified effective date. If the process is waiting for an effective date, escalating will cause the changes to be committed to the database immediately instead of waiting for the effective date. Escalating a Payroll Lockout will re-verify the lockout status before allowing the process to continue. Valid values are:
0 No
1 Yes
3. Allow Restarting Active Processes
1 = Yes
0 = No
Use this processing option to specify whether you want to allow the user to restart an active Status Change process. The Status Change workflow process might stop for any of the following reasons:
o Payroll Lockout

36
o Effective date
o Delay of management approval
When the workflow has stopped for any of these reasons, performing a restart will complete the active workflow activity and delete all approval messages,including messages that are waiting and those already approved, from the Employee Work Center and the Approval History table. The status of the Status Change record will change to pending. The workflow process will be completed but not deleted. Valid values are:
0 No
1 Yes
4. Allow Aborting Active Processes
1 = Yes
0 = No
Use this processing option to specify whether you want to allow the user to abort an active Status Change process. When the Status Change workflow process stops for a payroll lockout, an effective date, or a management approval,aborting will update the status of the Status Change record to 07-Cancelled by User and complete the active workflow. Valid values are:
0 No
1 Yes
5. Employee Status Change Version (P08720)
Blank = ZJDE0001

37
Use this processing option to specify which version of the Employee Status Change application (P08720) you want to use. The version will control the workflow process, retrieving the correct processing options for mail box and the final status.
If no value is entered, version ZJDE0001 will be used.
User Level Tab
This processing option specifies the type of user who will be accessing the application.
1. User Level
1 = Manager/Employee Level.
2 = HR Adminstrator Level.
Use this processing option to specify whether the application will be used by management, employees, or HR personnel.
Valid values are:
Blank Management
1 Employees and management
2 HR personnel
Assigning Delegates
You can use the Managers Delegates program (P08750) to designate other employees as delegates. You can also define the level of authority that is assigned to each delegate so that they can assist you with tasks and projects when you are away from your office or when you just need additional assistance. When work that you assign to others requires system access with an authority level comparable to a management level, you can assign delegate status to them up to your own level. When you designate an employee as a delegate for you, that employee can assist with routine tasks or projects from a predefined set of applications that

38
will allow the use of delegates. For example, you might want a delegate to run a list of weekly reports or conduct a job analysis project. You can also delegate an employee to perform your supervisory functions for periods of time that you will be absent from work.
Assigning delegates permits you to designate another employee to access your J.D. Edwards software with system authorization at a level that you assign. You can assign an authority level up to, and including, your own. For example, you can designate an employee to perform many of the same functions that you would ordinarily perform by assigning appropriate authorization types. The system includes five preset authorization types and allows you to add customized authorization types.
Before You Begin Set up additional authorization types, if needed, in UDC 08/AY. See Customizing
User Defined Codes in the Foundation Guide for more information.
► To assign a delegate
From the Manager Self Service menu (G05BMSS1), choose Managers Workbench.
1. On Work With Managers Employees, click Find to display your organizational hierarchy and your employees' records.
2. Choose My Delegates from the Form menu.
3. On Work With Delegates, complete the following fields:
• Delegate Number
• Authorization Type
• Effective On
39
• Ending Date
• Authorization Level
4. Repeat step 3 for the same employee as many times as needed, assigning an additional authorization type for each entry.
5. When you are finished assigning delegates, click OK.
Processing Options for Managers Delegates (P08750)
Defaults Tab
Use this processing option to specify the organizational level of the user who can view managers delegates.
1. User Level
1 = Manager/Employee Level
2 = HR Administrator Level
Use this processing option to specify whether to see delegates for different managers or to see the delegates for only one manager. Valid values are:
0 Only see one manager's delegates.
1 Can change managers to see everyone's delegates.
Reviewing Upcoming Employee Reviews by Supervisor
Managers can log onto the self-service intranet site to search for all upcoming employee reviews. This process can occur in one of the following ways:
• You can log onto the self-service intranet site and search for upcoming employee reviews using the Upcoming Reviews by Supervisor program (P052200). You can search for employees based on the following fields: Business Unit, Pay Class, Type of Review, and all review dates and payroll status fields. The system automatically displays employees that report directly to you by your supervisor number.
• You can log onto the self-service intranet site and access the Upcoming Reviews By Supervisor program after receiving an electronic message about your upcoming employee reviews. Instead of having to search for specific employees, the system automatically completes the grid with the employees that you are responsible for reviewing soon.

40
The electronic notification process occurs after the system administrator runs the Upcoming Reviews program (R052202). If the processing options for Upcoming Reviews are set up correctly, the program initiates Enterprise Workflow Management, which notifies all supervisors about their upcoming reviews with an e-mail. The system administrator can run the program automatically on a certain date by setting a processing option appropriately and setting up the program to run in the Scheduler Workbench. See Scheduling a Recurring job in the System Administration Guide.
Different versions of the report can be run to report overdue reviews and reviews for all employees. In these cases, you would not receive e-mails. However, the system would still supply the Work With Upcoming Reviews by Supervisor form that displays the employees you are responsible for reviewing.
After the system displays your employees with upcoming reviews, you can choose an employee record and choose an option from the Row menu to review profile, supplemental, employment, or organizational data for the employee. You can access this information if your OneWorld security system is set up to allow you access.
Before You Begin If the Upcoming Reviews program (R052202) has been run, you need to review only
the information on the report that appears when you log onto your self-service site. See Running the Upcoming Reviews Report in the Human Resources Guide to further understand the procedure.
► To review upcoming employee reviews by supervisor
From the Manager Self Service menu (G05BMSS1), choose Upcoming Reviews by Supervisor.
41
1. On Work With Upcoming Reviews By Supervisor, complete any of the following fields:
• Home Business Unit
• Pay Class(H/S/P)
• Type Review
2. Complete the following fields if you want to review employees who have upcoming reviews during a specific period of time:
• From Review Date
• Thru Review Date
If you complete the From Review Date field but leave the Thru Review Date field blank, the system displays all employees with reviews on or after the from review date.
If you complete only the Thru Review Date field, employees with no specific next review date and employees with a next review date equal to or prior to the through review date are displayed.
3. Choose one of the following options and then click Find to display your subordinates.
• Active Payroll Status
The Active Payroll Status option displays only employees with an active payroll status, including employees who are on a leave of absence.
• All
The All option displays all employees, including those with a terminated status.
The All option includes employees on a leave of absence.
4. Review the displayed information.
Entering Data for Verification-of-Employment Letters
The Review Requests for Verification of Employment program (P05003) allows only human resource administrators or system administrators to enter employment data for verification-of-employment letters.
Entering the employment data is the second part of a two-step process for processing a verification-of-employment letter. The employee must first request a letter by entering personal information on the Request Information tab of the Verification of Employment Data form. When an employee enters a request, the system copies the employee's job and compensation information from the Job Information table (F08001) to the Employment Data tab.
If Enterprise Workflow Management is enabled through your processing options, after receiving an e-mail that a verification-of-employment request is pending, you can inquire on the request, change the employee's employment data if necessary, and process the letter. You can also e-mail the completed letter to the contact person that the employee has requested.

42
See Also Requesting a Verification-of-Employment Letter in the Workforce Management Self-
Service Guide to better understand how an employee requests verification-of-employment letters
Setting Up Distribution Lists in the J.D. Edwards Workflow Tools Guide for more information about setting up Workflow recipients and distribution lists
Working with Recipient Rules in the J.D. Edwards Workflow Tools Guide for more information about setting up Workflow recipients and distribution lists
Before You Begin Have your workforce management system administrator set the processing option for
Verification of Employment to 3. This processing option allows you to change the job information fields on the Verification of Employment Data form, if necessary.
► To enter employment data for verification-of-employment letters
From the Employee Self Service menu (G05BESS1), choose Verification of Employment.
1. On Work With Verification Of Employment Requests, complete the following fields and click Find to locate an employee's request:
• Employee ID
• Request Date
2. If you need to delete a record, choose the record and click Delete.
3. Choose the employee's record and click Select.
4. On Verification Of Employment Data, click the Employment Data tab.

43
5. If your processing option is set to 3, choose one or more of the following options, depending on the contact method that the employee has checked:
• Print VOE Letter
• Delete Document
• E-Mail VOE Letter
If you clicked the Save Document option, the letter will be saved to the C:\TEMP\ directory.
6. Review and change the following fields if necessary:
• Date Started
• Job Type/Step Description
• Continued Employment
• Pay Frequency
• Pay Class(H/S/P)
• Date Of Last Raise
• Amount Of Increase
• Date of Next Raise
• Pay Period Salary
• Comment
7. Review and change the following compensation fields for the Current Year, One Year Prior, and Two Years Prior if necessary:
• Base
• Overtime
• Commission
• Bonus
• Other
8. Click OK.
The Verification-of-Employment letter appears.
9. Choose Print from the Form menu.

44
10. If you have clicked the option to e-mail the letter, click Send or Cancel on the E-Mail Confirmation form asking whether you want to e-mail the request.
Processing Options for Review Requests for Verification of Employment (P05003)
User Level Tab
Use this processing option to specify the organizational level of the user who will perform verification of employment functions.
1. User Level:
1 or blank Employee
2 HR Clerk
3 HR Administrator
(Option 3 will not send a request
through Workflow.)
Use this processing option to specify whether this program will be used by an employee, an HR clerk, or an HR administrator. Valid values are:
Blank Employee
1 Employee
2 HR clerk
3 HR Administrator (This option will not send a request through Workflow.)
Note: If this program is used by an employee or an HR clerk, the approval process will be routed through workflow, where the Workflow Setup tab must be set up.
Workflow Setup Tab
Use this processing option to specify the user or users who will process verification of employment requests.

45
1. Address Number of VOE request processor (HRM): Use this processing option to specify the address number of the HR person (or a distribution list) who will process VOE requests.

46
What You Should Know About Processing Options
The following list describes consequences and additional setup issues that you should be aware of when you choose one of the three processing options:
1-Used by Employee
Entering 1 instructs Workflow to notify the recipient of the pending request after the employee enters the request information. The recipient completes the verification-of-employment letter and can print the letter or e-mail it to the requested contact person. This value starts the process with the employee and finishes it with the Workflow recipient.
If you enter this value, you must set up your recipient in the processing option on the Workflow Setup tab.
2-Used by HRM clerk
Entering 2 instructs Workflow to notify the recipient of the completed letter after the human resource management clerk enters the request information. The recipient approves the letter and can print or e-mail the letter directly to the contact person that the employee requested. This value assumes that the process has already started with the employee. The HRM clerk does not receive a Workflow message but sends the completed letter through Workflow to a recipient for approval.
If you choose this value, you must set up your recipient in the processing option on the Workflow Setup tab.
3-Used by HRM administrator
Entering 3 deactivates Workflow in the Verification of Employment program. Because the human resources administrator starts and completes all requests, no need for Workflow exists. The HRM administrator can delete a request and also print the letter or e-mail it directly to the contact person that the employee requested.
Running Managers Reports
Managers and their delegates can use the Managers Reports program (P08740), to automate required reporting procedures and save time. Managers can select reports from a preset list to meet frequent reporting requirements. Two reporting approaches are available:
• Reports by category
• Individual reports
The Category option includes a customized list of reports that can save time. For example, if a manager needs to review a group of payroll reports at the end of each payroll cycle, the Payroll report category can be selected and the system prints all reports in the Payroll category. The reports that are included in each category are defined in the Managers Reports Setup program (P08741). Managers can also select reports within a list and specify the order in which they print to meet specific requirements. You can add to the list of categories by modifying UDC 08/RP. You can also use the Managers Reports Setup program to create Manager Reports versions that include pre-set lists of reports.
Managers can select and print any of the individual reports, such as Headcount or Phone List, by clicking the report name, reviewing the print destination on the Printer Selection form, and then clicking OK.

47
The Generate Graphic Org Chart program (P08713) prints a picture of the organization, starting at the requesting manager's level. This report requires Visio software installed on the manager's computer.
The supplemental data report produces information from the Supplemental Data table (F00092), linked to the Employee Master Information table (F060116). For example, you might want to print a report on skills or competencies for an employee. You can review the supplemental information that is available for this report in the Employee Master program (P0801).
When you create custom reports and want to add them to a report list in Managers Reports, you might need to alter one or more of the data items that you have included in the report's data structure to successfully run the report. To accomplish this mapping, use the Map Report Data Structure program (P08770), which is available by choosing the Map Data Structure row menu option in the Managers Report Setup program.
See Also
See the following topics in the Workforce Management Self-Service Guide:
Managers Workbench for information about implementing many tasks, including Managers Reports, from a single source
Setting Up Manager Reports for procedures to set up and modify report lists for the Managers Reports program

48
► To run manager reports
From the Manager Self Service Menu (G05BMSS1), choose Managers Reports.
1. On Managers Reports, complete the following field and then click Find:
• Category
2. To run the list of reports without modification, click Submit.
3. To run the list of reports in a particular order, choose Set Run Sequence from the Form menu.
4. On Manager Reports Sequence, click each row in the order in which you want the reports to run.
5. If you need to restart the sequence numbering, click Find and then click each row in the order in which you want the reports to run.
6. Click OK.
7. To run the reports in the new sequence, on Managers Reports, click Submit.
8. To run an individual report from the list, first remove the selected status from any report in the group that you do not want to run by double-clicking each report button in the first column.
You can also change the selection status by clicking the report and then choosing Toggle Selection from the Row menu.
9. To choose the report that you want to run, double-click the button in the first column for the desired report and then click Submit.

49
10. To run a report for one employee, remove the selected status from all reports and then double-click the button in the first column for the desired report.
11. Complete the following field:
• Employee
12. Click Submit.
13. To apply a name to your list of reports, enter a value in the following field and then choose Save from the Form menu.
• List Name
Setting Up Information for New Employees
When you hire an individual, many administrative tasks must be completed before the employee starts working. The process of setting up a new employee can involve many different people, paper forms, and approvals, and equipment must be set up for the new employee. Delays in the paperwork or approvals sometimes impede preparation for the employee and contribute to lost productivity.
Managers Employee Setup automates most communication associated with preparation for a new employee's arrival. Using this automated approach, tasks can be set up and distributed, and approvals can be routed efficiently. Each process can be tracked to spot potential problems and avoid delays. Setup processes are enhanced by the Enterprise Workflow Management process. Workflow routes approval and notification messages to required people about tasks that need to be completed by a specific date. This process tracks critical dates and notifies the originator when delays occur.
Using Workflow to help complete the setup process for new employees reduces the risk of misplacing paper forms, informs appropriate personnel of tasks that should be completed by a certain date, and decreases time spent preparing for a new employee.
You can avoid lost productivity by reviewing each setup process to resolve possible delays and ensure that all preparation will be completed on time. When you need to reduce the setup interval, you don't have to wait until all the hiring processes are complete to start preparing for the new employee. As soon as the address book number has been entered into the system, you can create setup tasks to ensure that the new employee can start work on the first day of employment.
Setting up new employees consists of the following steps:
1. Add an employee record to the database.
2. Create setup tasks to prepare for the new employee in Managers Employee Setup.
3. Initiate the employee setup process. When you initiate the process, Workflow sends a series of approvals according to the setup tasks that you entered. Each setup task can do one or more of the following activities: run a report, send an e-mail message, create a work order, or start a Workflow process.
When you add an employee record using the Employee Setup Workbench program (P08710), the system automatically adds an employee record to the Address Book Master table (F0101) and an employee setup record to the Employee Setup Master table (F08710).

50
Alternatively, you can add a new employee record using any of the following programs:
• Employee Master (P0801)
• Applicant Entry (P08401)
• Personic or any third-party software that updates the Unedited Quick Hire Transaction File table (F060116Z)
Note
When you use one of these programs, the system does not automatically add an employee setup record to the Employee Setup Master table. To add a setup record after you add an employee record, you must access the Employee Setup Workbench program and initiate the process for employee setup.
Adding an Employee Record Using Employee Setup
You must add an employee record to the database before you can initiate the employee setup process. If you have already added an employee record, proceed to the task to initiate employee setup.
If you are adding an employee record using any of the following programs, see the referenced information for adding an employee record, and then proceed to the task to initiate employee setup.
• Employee Master (P0801)
• Applicant Entry (P08401)
• Personic or any third-party software that updates the Unedited Quick Hire Transaction File table (F060116Z)
See Also Adding Employee Records One at a Time in the Workforce Management Foundation
Guide
Entering Applicant Information in the Human Resources Guide
Partner Processes - Personic Workflow in the Human Resources Guide
Before You Begin Set the processing options for Employee Setup Workbench (P08710).
Complete the setup tasks for the employee setup process. See Setting Up the Employee Setup Process in the Workforce Management Self-Service Guide.
Set the processing options for Employee Quick Hire (P060116Q) to activate the new hire process, which includes Employee Setup Workbench. You must also set these processing options to specify whether the system automatically updates the Employee Master table (F060116) or the Unedited Quick Hire Transaction File table (F060116Z) when you add a record. For more information about these processing options, see Adding Employee Records Using Employee Quick Hire in the Workforce Management Foundation Guide.

51
► To add an employee record using Employee Setup
Use one of the following navigations:
From the Manager Self Service menu (G05BMSS1), choose Managers Employee Setup.
From the Employee Management menu (G05BE1), choose HRM Employee Setup.
1. On Work With Employee Setup, choose Quick Hire from the Form menu.
2. On Employee Quick Hire, add a new employee record.
After you click OK on the Employee Quick Hire form, the system returns you to the Work With Employee Setup form and displays the employee with a Pending status.
See Also Adding Employee Records for Applicants, Rehires, and New Hires in the Workforce
Management Foundation Guide for more information about adding a new employee record
Processing Options for Employee Setup Workbench (P08710)
Processing Tab
These processing options specify the default values that the system will use to determine approval requirements and distribute workflow messages when managers or HR personnel perform employee setup functions.
1. Require Process Approval
1 = Yes
0 = No
Use this processing option to specify whether to require a manager's approval for the employee setup process before the system processes any of the setup tasks.
This approval is for the entire setup process. To create additional security,you can set up a requirement for the system to send an approval message for each setup task.
2. Allow Changing Process Approver
1 = Yes
0 = No

52
Use this processing option to specify whether to allow a manager the authority to change the individual who can approve the employee setup process. The default setting is the manager's supervisor. For cases in which the manager has no supervisor, and the first processing option is set to require process approval, the manager has the approval authority.
3. Work Center Mail Box
Blank = 01 (Personal In Basket)
Use this processing option to specify the mailbox number in the Employee Work Center of the individual to whom you want to send your notifications and approval messages.
To create a new mailbox number, you must add a record to UDC table 02/MB.
User Level Tab
This processing option specifies the organizational level of the user who will perform employee setup functions.
1. User Level 1 = Manager/Employee Level (Default ) 2 = HR Administrator Level Use this processing option to specify whether the application will be used by a manager (including a manager's delegate) or HR personnel. Valid values are: Blank Manager 1 Manager or manager's delegate 2 HR Personnel

53
Defaults Tab
This processing option specifies the end status of the employee setup process when you successfully complete it.
1. Ending Setup Status
Blank = 1 (Completed)
Use this processing option to specify the status to which you want the employee setup process changed when the process completes successfully. The status codes are listed in UDC table 08/S1. Valid values are:
1 Completed
7 Archive
8 Purge
Work Orders Tab
These processing options specify the statuses the system uses to identify pending, active, and cancelled work orders, the record type to use for writing instructions for a work order, and whether the system automatically supplies the description of the employee setup task when you create a new work order.
1. Pending W.O. Status Code (Required)
Use this processing option to specify the status that the system will use to identify pending work orders. The system places a work order in pending status when the setup task has been initiated but is waiting for the user to enter an effective date or location information.
2. Active W.O. Status Code (Required)
Use this processing option to specify the status that the system will use to identify active

54
work orders. The system places a work order in active status when the setup task has been initiated, the effective date has been reached,and the user has entered the location information.
3. Cancelled W.O. Status (Required)
Use this processing option to specify the status that the system will use to identify cancelled work orders. The system places a work order in cancelled status when the user ends the setup task.
4. Record Type used when creating Work Order instructions
Blank = A
Use this processing option to specify the record type that you want to use when you are writing instructions for a work order. The default value is A.
5. Copy Task Description to Work Order
1 = Yes
0 =No
Use this processing option to specify whether the system will copy the description of the employee setup task contained in the F087102 table into the description field of the work order when you create a new work order. Valid values are:
1 Copy the description from the setup task record.
0 Use the description from the work order template.

55
Initiating Employee Setup
After you add an employee record, you can assign setup tasks to the employee's setup record and then initiate the setup process.
Depending on how one of the processing options has been set, the entire employee setup process might require approval. Workflow will deliver an approval form for the process and wait for confirmation before it starts individual tasks that you have assigned to the employee record.
Most setup tasks are specific to the location where the employee will be working. You can choose tasks from a default task list that displays setup tasks for every employee by job type and job step. You can also choose tasks from a setup task list that includes all defined tasks. You can change tasks to customize the employee's setup. However, this could reinstate the process approval depending on the task specifications.
Each setup task can do one or more of the following activities, depending on how the tasks have been set up:
• Run a report
• Send an e-mail message
• Create a work order
• Start a Workflow process
Information that you enter in the tabbed area of the Employee Setup Entry form updates the Employee Setup Master table (F08710). Information that you enter in the detail area of the form updates the Employee Setup Tasks table (F08711).
Before You Begin Set the Employee Quick Hire processing options. See Processing Options for
Employee Quick Hire (P060116Q) in the Workforce Management Foundation Guide.
► To initiate employee setup
If you just added an employee record using the Employee Setup Workbench program (P08710), continue with the task.
If you added an employee record using a program other than the Employee Setup Workbench program, from the Manager Self Service menu (G05BMSS1), choose Managers Employee Setup.
Alternatively, from the Employee Management menu (G05BE1), choose HRM Employee Setup.
1. On Work With Employee Setup, if you used the Employee Setup Workbench program to add an employee record, go to step 3.
2. If you added an employee record with a program other than Employee Setup, complete any of the following fields and click Find:
• Supervisor
• Employee Number
• Process Status

56
3. Choose the employee record and click Add.
4. If you added an employee record with a program other than Employee Setup Workbench, on Employee Setup Entry, complete the following fields on the Employee tab:
• Address Number
• Setup Action
The system supplies the header fields.
5. To add default tasks, choose Add Default Tasks from the Form menu.
If default tasks are set up for the new employee's job type and step, the system supplies the default tasks on the Employee Setup Entry form.
6. To add or change the subclass for a task, review the following fields:
• Ranking
• Lock Code
If a value is in the Lock Code field, you can change the subclass only to a level that is equal to or less than the value in the Ranking field.
7. Complete the following field with a value that is equal to or less than the value in the Ranking field:
• Sub Class

57
8. Complete the following optional field:
• UM
9. If the task is an equipment-setup task and you need more than one unit, complete the following field:
• Units
10. Review the system-supplied information in the following fields:
• Order Number
• Task Recipient
• Approved By
• Req. Flds
You cannot change these fields.
11. Click the Location tab and review the following field to determine the number of Location Code fields that you need to complete for this task:
• Required Fields
12. Complete as many of the following Location Code fields as are required. For example, if four fields are required, then complete Location Code 001 through 004.
• Location Code 001
13. Complete the following optional field:
• Office Number
14. To assign an additional task, complete the following field and repeat steps 6-13:
• Task Type
If you complete the process approval task, you do not need to repeat steps 6-13.
15. To copy tasks from another employee, complete the following field on the Employee tab and choose Copy Employee from the Form menu.
• Address Number
The system supplies the detail area with tasks from the specified employee. You can copy tasks only from employees who have the same Setup Action value as the employee that you are setting up.
16. When you finish entering all tasks for the employee's setup, click OK.
Your new employee record displays on Work With Employee Setup and shows Pending in the Process Status field in the detail area.
The Activation Confirmation form appears asking whether you want to activate the employee setup process.

58
17. On Activation Confirmation, click Yes to begin the process. If you click No, the system leaves the status of the process as Pending. You will need to come back to this form to activate the process.
See Also Completing Employee Setup Using Workflow in the Workforce Management Self-
Service Guide
Completing Employee Setup Using Workflow
After you initiate employee setup, Workflow completes one or both of the following procedures depending on how the processing options are set:
• Obtains a process approval
• Obtains a task approval for each employee setup task that includes an approval requirement
If the system requires a process approval, Workflow will not begin each employee setup task until it obtains the process approval.
Workflow can complete any or all of the following processes for each setup task:
• Create a work order
• Create a report
• Send an e-mail
• Start an additional Workflow process
When specified in the processing option, the system will require a process approval for the entire setup process. Examples of this approval are an acknowledgment from a supervisor in the new employee's department, or a salary approval before an individual is hired. When the system requires a process approval, it sets the task status to Pending (as defined in Setup Task Status list 08/S1) until the designated manager approves the task. When the designated manager approves the task, the system resets the task status to Approved and starts each task within the process, except for tasks that include a future start date. The system starts tasks with a future Start Date on the appropriate date.
Individual tasks and changes to tasks might also require approval. For example, if the task for installing an employee telephone does not require an approval, Workflow will not send an e-mail approval form. However, you can set up this task to require an approval if a manager changes the task to install a phone with multiple features.
When a task requires approval, Workflow first verifies that the manager who entered the employee setup record also entered data in the required fields that identify the location of the new employee's workspace. If values are missing, Workflow delays the process and sends an e-mails message to the manager. When the manager enters the required data, Workflow sends an e-mail approval form to the approver who has been specified for the task. The system then sets the task status to Waiting (defined in Setup Task Status list 08/S2) until it is approved. When the designated manager approves the task, the system sets the task status to Approved and starts processing the task.
As part of each task, Workflow can send an e-mail message, run a customized report, create a work order, and start an additional Workflow process. An e-mail message can contain the employee's name and location information, the description of the task, a requested completion date, and an employee's comments about the task. You can send an e-mail

59
message to notify a recipient that the system ran a report. You can also link a work order to the setup task.
Most setup tasks require data entry to move the status to Completed. When task recipients complete their work and enter the completion in the system, the system sets the task status to Completed.
You can review and revise the task status for the entire setup process and for individual tasks. You can delete a task if it is in the Pending status. You can cancel a task if it is in the Waiting, Approved, or Active status. If you do not activate the employee setup process when you add an employee setup record, you can activate the process after your review.
Completing the employee setup process using Workflow consists of the following procedures:
• Approving the process or task for employee setup
• Reviewing and revising the status
Managers who are responsible for approving the process for new employee setup or the individual tasks within the process should complete these procedures.
Before You Begin Review the status codes from UDCs 08/S1 and 08/S2. See User Defined Codes for
Workforce Management Foundation in the Workforce Management Foundation Guide.
► To approve the process or task for employee setup
From the Workflow Management menu (G02), choose Work Item Manager
1. On Work Center, verify that the information in the following fields is correct and then click Find:
• Address Number / User / Role
• Associated Address Number
• Tickler Date
2. To view all Queues, click the following option:
• All Queues
3. Review your messages in the left-hand pane.
4. Click the (+) icon adjacent to the queue that receives Employee Setup messages.
All setup requests appear that are pending approval.
5. To view a message, click the checkbox that is adjacent to a pending approval entry and then click Drag.
The message appears in the right-hand pane.
6. On Media Object Viewer, if the message allows you to approve a task, click the icon in the left-hand pane.
A Workflow message might provide only change notification or change notification and approval. On Media Object Viewer, if an approval is requested, an icon exists in

60
the left-hand pane that you can click. The system then displays a form that you can use to approve or reject the request.
7. Click the icon in the left-hand queue.
8. On To Approve or Reject a Request, choose one of the following options in the Actions area and click OK.
• Approve
• Reject
9. On Work Center, click Close.
► To review and revise the status
From the Manager Self Service menu (G05BMSS1), choose Managers Employee Setup.
Alternatively, choose HRM Employee Setup from the Employment Management menu (G05BE1).
1. On Work With Employee Setup, complete the following fields and click Find:
• Supervisor
• Employee Number
• Process Status
2. he process, choose Cancel Process from the Row menu.
When you cancel a process, the task record remains in the system.
3. To delete the process, choose Delete.
You can delete a process or task record only while it is in the pending status, before you submit it. When you delete a process, the task record is removed from the system.
4. To activate the process, choose Process Tasks from the Row menu.
5. Click Select to review the status for individual setup tasks.
Tasks with a Y in the Pending Tasks column are pending. Although you previously submitted tasks with an N, you can also review them to track their progress.

61
6. On Employee Setup Entry, review the Task Status field for each task in the detail area.
The Task Status field displays the status for an individual setup task. You can delete the task if the status is Pending. A task is pending only if you have not submitted it for processing. You can abort the task if the status is Waiting, Approved, or Active.
7. To cancel a task, choose the task, choose Abort Task from the Row menu, and then click OK.
When you cancel a task, the system sets the task status to Cancelled by User.
8. To complete a task in the system after the task recipient finishes the work, choose the task, click Complete Task, and then click OK.
When you complete a task, the system sets the task status to the value that you specified in the Final Task Status field on the Work With Setup Task Details form.
Approving Information Using Manager Self-Service
Employees can use self-service to enter and update some of their personal information, such as name and address, emergency contact, and so on. Some types of information that employees enter, such as automatic deposit and competency, must be reviewed and approved by someone else before the database is updated.
If you are a representative of your organization's payroll department, you might be responsible for approving the automatic deposit information that employees add or change. In some cases, the routing number for an employee's bank might not exist in the user defined

62
code list for routing numbers (06/BC). You can use self-service to approve automatic deposit information and the addition of new routing numbers.
As a manager, you can use self-service to review competency information for your subordinates. You can also enter the level of proficiency that each employee demonstrates in these competencies.
Approving Automatic Deposit Information
If you are a representative of the payroll department, you might be responsible for approving the automatic deposit information that employees enter through self-service. If Enterprise Workflow Management is enabled, you receive a message in the Employee Work Center when automatic deposit information is awaiting your approval. You must verify that the employee correctly completed all of the necessary information, and then approve or disapprove the request. If necessary, you can enter a response to the employee. Workflow includes your response in the e-mail message that notifies the employee of the status of the request.
► To approve automatic deposit information
From the Workflow Management menu (G02), choose Work Item Manager.
1. On Work Item Manager, open a message queue that displays a message awaiting your review.
2. To review the message, click the checkbox next to the message that you want to review and then click Drag.
3. Review the message in the adjacent pane and, if you wish to submit an approval, click the magnifying glass icon.
4. Click Review/Validate Automatic Deposit Instructions.jde
5. Click the Review/Validate Automatic Deposit Instructions.jde link.
6. On Review/Validate Automatic Deposit Instructions, review all changes.
If the employee entered the incorrect routing number for the bank, you can correct it.
7. To approve or disapprove, click one of the following options and then click OK.
• Approve
• Disapprove
See Also Viewing Messages in the Foundation Guide
Approving Bank Information for Automatic Deposits
Occasionally, when an employee enters automatic deposit information using self-service, the employee might discover that the routing number for the bank where the account resides is not one of the valid values in the Routing Number field. In this case, the employee can submit a request to have the bank's routing number added to the list of values. If you are a representative of the payroll department, you might be responsible for approving the

63
employee's request before the system adds the new bank number to user defined code list 06/BC.
If Enterprise Workflow Management is enabled, you receive a message in the Employee Message Center when bank information is awaiting your approval. You must verify that the employee correctly completed all of the necessary information, and then approve or disapprove the request. If necessary, you can enter a response to the employee. Workflow includes your response in the e-mail message that notifies the employee of the status of the request.
When you approve the employee's request, the system updates user defined code list 06/BC.
► To approve bank information for automatic deposits
From the Workflow Management menu (G02), choose Work Item Manager.
1. On Work Item Manager, choose the message that you need to view.
2. Click the light bulb icon in the exit bar in the middle of the form.
3. Click the light bulb icon that appears on the right side of the form.
4. On Add Bank Transit Number, review the information in the following fields and correct it, if necessary:
• Bank Name
• Bank Routing Number
5. Add optional information to the Payroll Clerk's Response text area
6. Choose one of the following options and click OK:
• Bank Added
• Bank Not Added
See Also Viewing Messages in the Foundation Guide
Approving Competency Information
Competency management is a method of categorizing and tracking the qualifications that employees have that make them competent to perform their job duties. These qualifications, such as knowledge, skills, and training, are called competencies.
Your organization uses competency management to track the competencies that each employee possesses and to compare these competencies with those that are required for the employee's job. Tracking employee competencies helps you create clear career goals and performance objectives for the employees who work for you.
To simplify the process of maintaining competency information, employees can use self-service to enter and revise their own competency information. You might be responsible for approving the information that employees enter and entering the employee's level of proficiency in certain competencies. In this case, you receive a message in the Employee Message Center after an employee enters competency information. You must then review the information and enter a level of proficiency for each competency.

64
► To approve competency information
From the Workflow Management menu (G02), choose Work Item Manager.
1. On Work Item Manager, choose the message that you need to view.
2. Click the light bulb icon in the exit bar in the middle of the form.
3. Click the light bulb icon that appears on the right side of the form.
4. On Training/Development, Skills, Accomplishments, Certifications, Education, or Language, complete all of the following fields that apply, and then click OK:
• Competency Level
• Verified By
• Verification Method
See Also Viewing Messages in the Foundation Guide
Creating Organizational Charts
You can use the Generate Graphic Organization Chart program (P08713) to create graphical organization charts that illustrate and document your organizational structure. The Generate Graphic Organization Chart program combines uses features of the Microsoft Visio® 2002 software program to produce custom charts that can be displayed as a web page, published in documentation, or distributed for viewing in either electronic or printed format. Organizations can also download and use the Microsoft Visio® Viewer inside their Web browser to view drawings and diagrams that are created with Visio 5, 2000, or 2002. You can freely distribute drawings and diagrams to team members, partners, customers, or others, even if the recipients do not have Microsoft Visio® installed on their computers.
To create new Microsoft Visio® organization charts, you must have the Microsoft Visio® program installed on your computer. The Generate Graphic Organization Chart program can deliver the greatest flexibility in chart design when combined with Microsoft Visio® 2002. You can even use the Visio Wizard from within your J.D. Edwards software to prompt and guide you in preparing a chart.
Note
Because the Generate Graphic Organization Chart program is designed to link with and take advantage of Microsoft Visio® 2002 features, some options that are displayed in the J.D. Edwards program might not function when used with a previous version of Microsoft Visio® software.
See Also The Microsoft® website at http://www.office.Microsoft®.com for more
information about software requirements and hardware recommendations for running Microsoft Visio® 2002 or Microsoft Visio® Viewer

65
► To create organizational charts
From the Manager Self Service menu (G05BMSS1), choose Generate Graphic Organization Chart.
1. On Organization Chart Parameters, complete the following field:
• Employee Identification
2. Choose any of the following options:
• Use Previous Values
Each time you change one of the options with a check box, the value in the Command String field is update to reflect the change. The system passes the command string directly to the Microsoft Visio® wizard. The Command String provides parameters for creating the chart. If a user is familiar with how Microsoft Visio® uses the command line parameters, he or she can type directly into this field. Selecting or deselecting an option with a check box overwrites values in the Command String.
• Use Visio Wizard Prompts
• Show Terminated Employees
• Show Divider Line
• Hyperlink Across Pages

66
• Sync Across Pages
3. To specify the graphic shapes that you want to use in the chart, complete the following fields:
• Executive Shape
• Manager Shape
• Child Shape
• Terminated Shape
4. To specify required output, chart, and program command parameters, complete the following fields:
• Export File
• Chart Depth
• Command String
Edit only if necessary. The system automatically enters parameters as you choose each option on the form.
5. To specify data items that the system displays on each organization chart shape, set the value to Yes in the following field in the detail area for each item:
• Display Fields
Data item text that the system superimposes over a chart shape. Consider limiting the items that you choose and evaluate whether the resulting display is appropriate. The text for some data items might not fit within specific chart shapes.
Clicking in a Display or Custom Field field automatically toggles between Yes and No.
6. To specify data items that the system displays as a custom item, set the value to Yes in the following field in the detail area for each item:
• Custom Fields
You can view a custom item in Microsoft Visio® by right-clicking on a shape and choosing Properties. On a chart that is saved as a Web page, you can hover over a shape with your cursor, and the system displays the data item in a list on the left side of the screen.
Note When you choose from only the fields listed below, the system does not process any of the other field options and requires only minimal processing time.
• EmpID
• AlphaName
• Name
• Reports_To

67
• SupervisorName
When other display or custom options are chosen, the required processing time is considerably longer.
7. To create a new export file and chart, choose Generate New Chart.
You enter the file name and location in the Export File field. Microsoft Visio® automatically imports this file and creates the chart. If you prefer for the wizard to prompt you through the process, check the Use Visio Prompts option.
8. To recreate a chart without first creating an export file, click Org Chart Wizard.
Use this option when you want to regenerate a chart with entering changes to the display or custom fields. Changes can be made to the other options. You can still use the Microsoft Visio® wizard to prompt you through the process by checking the Use Visio Prompts option.
Processing Options for Generate Graphic Organizational Chart (P08713)
Default Tab
Use these processing options to specify file information that J.D. Edwards software uses to create and view a Microsoft Visio® organization chart.
1. Fully qualified path and file name of the Visio organization chart wizard.
Default if blank is "_Organization Chart Wizard.exe"
Use this processing option to specify the program used to generate the organization chart. If you leave this processing option blank, the system uses "_Organization Chart Wizard.exe," which is the default program supplied with Visio 2002. If the wizard does not start, make sure you have a path statement set up that references the directory where this file resides, or enter a fully qualified path and file name.
2. Export path.
Default if blank is OLEQUE
Use this processing option to specify the name of the file used to pass information to the Visio organization chart wizard. Enter a fully qualified path and file name. If you leave this processing option blank, the system uses OrgChart.txt; the path is the root of the drive where OneWorld is installed.

68
3. Name of the application to use to view the Visio export text file.
Default if blank is "Notepad.exe"
Use this processing option to select the program to use to view the exported text file. When you generate an organization chart, the system extracts the data from OneWorld and writes it to a text file, which is stored on your hard drive. You specify the location and name of this text file in processing option 2. A form exit on this application will use the program specified in this processing option to view the contents of this extracted file. If you leave this processing option blank, the system uses the default, Notepad.exe.
Shape Tab
Use these options to define values that the system uses to create chart shapes.
1. Viso Shape to use for the Executive shapes Default if blank = "Executive" Use this processing option to select the shape (UDC 08/GS) to use for executive or top level nodes. You can create your own shapes in Visio, but you must add the name of the shape to the UDC table. If you leave this processing option blank, the system uses the default, Executive.
2. Visio Shape to use for Manager shapes Default if blank = "Manager" Use this processing option to select the shape (UDC 08/GS) to use for manager nodes (nodes other than the executive that have subordinates). You can create your own shapes in Visio, but you must add the name of the shape to the UDC table. If you leave this processing option blank, the system uses the default, Manager.
3. Visio Shape to use for Child shapes Default if blank = "Position"
69
Use this processing option to select the shape (UDC 08/GS) to use for child nodes (nodes that do not have subordinates). You can create your own shapes in Visio, but you must add the name of the shape to the UDC table. If you leave this processing option blank, the system uses the default, Position.
4. Visio Shape to use for Terminated shapes Default if blank = "Vacancy" Use this processing option to select the shape (UDC 08/GS) to use for terminated employees. You can create your own shapes in Visio, but you must add the name of the shape to the UDC table. If you leave this processing option blank, the system uses the default, Vacancy.

70
Self-Service Setup
Setting up self-service is a task that should be performed by the system administrator.
Employees access self-service through a series of web pages on your company intranet site that allow them to complete such tasks as requesting a verification-of-employment letter or changing name, address, and emergency contact information. In addition to employee functions, managers can also use the Manager’s Workbench program (P08712) as a centralized location from which they can perform such tasks as changing employee status, personal self-service functions for manager, creation of delegates, and various reviews. These web pages correspond to self-service programs in J.D. Edwards’ software.
J.D. Edwards provides web pages for all self-service programs, as well as a logon page and a menu page. These pages are fully functional and you can use them without modification. You can also create customized self-service web pages. For example, if you want to put your own company's logo on the web pages, you need to create customized web pages.
Setting Up Common Settings for Workforce Management
You use the common settings for human resources to control specific features of several human resources processes, such as benefits enrollment, compensation management, and self-service programs.
Setting up the common settings updates the Common Settings for HR Employee Self Service Programs table (F05004).
Common Settings for Self-Service Applications
When you set up common settings for self-service applications, you specify whether to display employee numbers, employee tax identification numbers, and participant numbers of benefit plans in the upper left corner of all self-service web pages, except for the IRS Form W-4, Employee's Withholding Allowance Certificate program (P053030). You can also specify whether to limit the number of dependents that an employee can enroll, whether to display any benefits that are outside an employee's benefit group but in which the employee is enrolled, and whether to display the Personal tab for adding and viewing dependents and beneficiaries.
The following table describes the common settings for data items in Common Settings for HR Employee Self Service Programs program (P05004). You can also use the P05004 program to activate system level settings to activate the employee self-service software.
Display Employee Number on Self-service?
This common setting specifies whether to display the employee number on the top left corner of all employee self-service application, such as Name and Address Change.
Maximum Number of Dependents
This common setting denotes the maximum number of dependents that may be enrolled in a benefit plan.

71
Display Participant Number on Self-service?
This common setting specifies whether to display the participant number on the top left corner of all employee self-service programs, such as the Name and Address Change program (P01013).
Display Overrides Outside Benefit Group?
This common setting indicates whether to show current enrollment overrides outside the employee benefit group in the View Current Elections program (P08530).
Display Personal Tab on Self-service?
This common setting indicates whether to show the personal tab in benefit enrollment.
Display Tax ID on Self-service?
This common setting indicates whether to display the employee tax ID on the top left corner of all employee self-service applications, such as Name and Address Change program.
► To set up common settings for workforce management
Use one of the following navigations:
From the Self Service Setup menu (G05BESS4), choose Common Settings for EE Self Service Appl.
From the Compensation Mgmt System Setup menu (G08CM14), choose HRM Common Settings.
1. On Work With HRM Common Display Settings, choose the row containing the data item for which you want to change the current setting and click Select.
You cannot delete these data items from the system.

72
2. On J.D. Edwards System Control – Revisions, click the Yes or No option to specify the current setting and then click OK.
3. On Work With HRM Common Display Settings, click Add to add extra data items.
Any data item that you add must already exist in the system.
4. On J.D. Edwards System Control – Revisions, complete the following field:
• Data Item
5. Click the Yes or No option to specify the current setting and then click OK.
6. If you need to remove a data item that you have added, on Work With HRM Common Display Settings, choose the data item and click Delete.
When you click Delete, the system only removes the data item from this form. You cannot delete system-supplied data items from the system.
Setting Up Employee Self-Service
You can set up and customize employee self-service programs that you are running in an intranet environment so that employees can perform many functions without involving HR representatives and keep their own information current. In addition to setting up various programs so that employees can just click a link on your organization's web portal, You can also use the Employee Self Service Form Options program (P085550)You can specify many appearance options and offer employees self-service options that are tailored to meet organizational requirements.
Setting Up Verification of Employment
Employees can use the Review Requests for Verification of Employment program (P05003) to request that a verification of employment letter be sent to a specific individual or company, such as a creditor or a loan officer.
The Review Requests for Verification of Employment program uses a review form and an entry form. The review form is the entry point to Verification of Employment. The entry form has two tabs, Request Information and Employment Data. On the Employment Data tab, a Human Resources administrator or system administrator can enter information pertaining to the employee, such as the date that employment began. The system calculates and supplies the employee's earnings based on the Pay Type by Category table (F05002). Only the system administrator can change the employee earnings fields. The fields on the Employment Data tab are active only when an administrator is logged on to the self-service system.
When employees access the Review Requests for Verification of Employment program, information on the Employment Data tab is displayed. However, the employee cannot change the information.
Information entered on the Review Requests for Verification of Employment program updates the Verification of Employment Data table (F05003).
For the system to accurately report pay information on verification-of-employment letters, you must add certain pay types to the pay categories that you define in user defined code list 05/V1. For example, you might link a holiday bonus pay type and an annual bonus pay type to the bonus category.

73
When you set up verification of employment, you update the Pay Type By Category table.
Note
The task for requesting a verification of employment letter can include the Enterprise Workflow Management system. If your processing options are set up appropriately, Workflow notifies the individual responsible for processing the request after the request information is entered.
Before You Begin Verify that your verification-of-employment letter is complete. Select and review the
VOEREQUEST in the Maintain MailMerge Documents program (P980014). You must also hard code a company signature and phone number on the letter. See Changing Mail-Merge Documents in the Foundation Guide.
Review information about user defined codes. See Understanding User Defined Codes for Workforce Management Systems in the Workforce Management Foundation Guide.
Set up verification of employment categories for pay information in user defined code list 05/V1. See Changing a User Defined Code in the Foundation Guide.
Set up the common settings for self-service. See Setting Up Common Settings for Workforce Management in the Workforce Management Foundation Guide.
Set up the processing options for verification of employment. See Entering Data for Verification-of-Employment Letters in the Workforce Management Self-Service Guide.
► To set up verification of employment
From the Self Service Setup menu (G05BESS4), choose VOE Pay Types by Category.
1. On Work With Verification of Employment Categories, click Add.

74
2. On VOE Pay Types by Category, complete the following fields and click OK:
• VOE Category
• PDBA Code
• Eff From
Setting Up Name and Address Change
From the Employee Self Service Director Setup menu (G08BB411), choose Employee Self Service Process Flow Setup.
The Employee Name and Address Change program (P05101) displays the employee's current name and address and allows the employee to enter a new name and address. You can attach a personal photo of the employee as a media object to the Personal tab of the Name and Address Change form.
Information entered in Employee Name and Address Change program updates the Address Book Master table (F0101), which contains name and address information for all employees. This information has a search type of E (Employee).
When the employee enters a city, state, or postal code change, Workflow can notify a human resource administrator about the change so that payroll files can be updated manually. For example, a human resource administrator should update any employee's change of resident tax areas. Make sure you set your processing option with the address number of the employee who is to receive these notifications.

75
Employees access the Employee Name and Address Change program by clicking a link that you provide on your organization Web portal. To set up this access, you use the Self-Service Process Flow Setup program (P05400) to create a process flow script. You then link the Self-Service Director program (P05410) version that runs the script to the Web portal. You must set a processing option for the Self-Service Director program that specifies the correct process flow script.
See Also Setting Up Self-Service Process Flows in the Workforce Management Self-Service
Guide for instructions on providing access to employee self-service programs on a web portal
Portal Design in the Portal Guide for instructions on how to line self-service programs to a Web portal
Before You Begin To attach personal photos to the Personal tabs on Name and Address forms, see
Attaching Media Objects in the Foundation Guide.
Setting Up Emergency Contacts and Phones
From the portal on your company website, choose an option that links to Changing Emergency Contacts and Phone Numbers.
The Emergency Contacts and Phones program (P053010) lets employees enter the names and phone numbers of individuals that should be contacted in the event of an emergency. Information entered on the Emergency Contact and Phones form updates the Address Book - Contact Phone Numbers table (F0115).
Employees access the Emergency Contacts and Phones program by clicking a link that you provide on your organization Web portal. To set up this access, you use the Self-Service Process Flow Setup program (P05400) to create a process flow script. You then link the Self-Service Director program (P05410) version that runs the script to the Web portal. You must set a processing option for the Self-Service Director program that specifies the correct process flow script.
See Also Setting Up Self-Service Process Flows in the Workforce Management Self-Service
Guide for instructions on providing access to employee self-service programs on a web portal
Portal Design in the Developing Portal Components Guide for instructions on how to line self-service programs to a Web portal
Before You Begin Set up the common settings for self-service. See Setting Up Common Settings for
Workforce Management in the Workforce Management Foundation Guide.

76
Setting Up Paid Time-Off Inquiry
From the portal on your company intranet, choose an option that links to Paid Time Off Inquiries.
The Paid Time Off Inquiry program (P053020) shows an employee's paid time-off accruals, deductions, and balances. Employees access this program by clicking a link on the organization web portal that displays the Employee Self-Service Leave Planning And Request program (P07620). The system lists the number of hours available at the beginning of the year, the number of hours that have since been added to the available DBA code, the number of hours taken, and the number of hours that are currently available.
The program includes four versions that allow you to specify the history table from which the system retrieves paid time off information, either the Employee Transaction History Summary table (F06146) or the Fiscal and Anniversary Year History table (F06147). You specify the version that the system uses for Paid Time-Off Inquiry for employee self-service and the version that it uses for Paid Time-Off Inquiry for manager self-service.
See Also Entering Timecards Using Self-Service in the Workforce Management Self-Service
Guide for information about reviewing paid time off
Before You Begin Set up the common settings for self-service. See Setting Up Common Settings for
Workforce Management in the Workforce Management Foundation Guide.

77
Employee Self-Service Benefits Setup
Setting up self-service benefits is a task that should be performed by the system administrator. The administrator can set up the desired features for employee self-service benefit selections. The administrator can also enable security functions to limit employees from viewing or changing other employees' confidential records.
Employees access self-service benefits through a series of web pages on your company's intranet site that allow them to complete such tasks as changing benefit options or changing name, address, and emergency contact information.
J.D. Edwards software provides web pages for all self-service programs, as well as a logon page and a menu page. These pages are fully functional and you can use them without modification. You can also create customized self-service web pages. For example, if you want to put your own company's logo on the web pages, you need to create customized web pages. You can organize your web-based benefits enrollment program under a menu structure based on employment events such as new hire and rehire, and life events such as children or marriage. You might create a menu from which the employee selects the event or reason for changing enrollment. If the employee selects marriage, for example, the version of the web page that allows changes associated with marriage is used.
You can use processing options to set up different versions of the Self-Service Director program (P05410). For example, you might set up custom versions for enrollment event codes that are similar to the following versions that are included in your software:
New Hire Enrollment NHR (New Hire)
Rehire Enrollment RHR (Rehire)
Marriage MAR (Marriage)
Divorce DIV (Divorce)
Children CHD (Children)
Open Enrollment OPN (Open Enrollment)
Employee Self-Service Benefits Setup includes only those instructions that are required to set up employee self-service benefits. These instructions assume that the setup procedures for employee benefits are complete.

78
Implementing Employee Benefits Setup
You can use the ESS Setup Director program (P054100) to organize and implement the setup procedures for benefits self-service. This program introduces a director approach to the benefits setup task that simplifies and expedites setting up your software for a benefits enrollment offering. The program includes a list of links to the programs that you use, including program versions and processing options, to implement self-service offerings for your organization. After you complete this setup process, to activate employee access to self-service offerings, you must also implement a link to benefits enrollment on your organization intranet Web portal.
Consider the list of setup programs in the ESS Setup Director program as the starting point for your setup process. Implementing this list results in a sample benefits enrollment that might suit your organizational requirements. When you enter the ESS Setup Director program, the system displays setup overview information in the Extended Description window. When you click on any of the program links, the program automatically displays related documentation for the topic that is selected. Before you start building a list of program links to set up benefits enrollment, J.D. Edwards recommends that you click each program in the list and review the linked documentation. Some topics include additional links that can help you move to another area within the current topic. As you perform this review, you can note the options that apply to your organization requirements.
When you use the ESS Setup Director program to set up self-service benefits enrollment, you implement two processes: you specify setup program options and then you perform the setup tasks. This program includes two options, each of which displays a list of setup programs. ESS Versions/Processing Options displays a list of the setup programs for which you need to define processing option values and, where necessary, create program versions. ESS Setup Applications displays a list of programs that you subsequently use to perform each of the setup tasks.
To create a customized list, you can choose individual programs that appear in the Available Items pane and move them to the Selected Items pane. To choose the entire list, just click the right, double arrow. Many of the programs, such as Common Setting for HR ESS Programs, Self Service Process Flow Setup, and others, must be included in all benefit enrollments. Depending on your organization benefits offerings, some setup steps might not apply. Because some of the setup programs must be used in a specific order, the ESS Setup Director program maintains the correct order even if you move links out of order from one list to the other.
When you move one or more links to the Selected Items list and then choose Continue, the system displays a full screen of related documentation and links that you can use to start the setup program or move to the next item that is on your list of selected links.
See Also Setting Up Employee Self-Service in the Workforce Management Self-Service Guide
to set up other self-service features
Benefits Administration Setup in the Human Resource - Benefits Guide to set up employee benefits
Portal Design in the Developing Portal Components Guide for instructions on how to line self-service programs to a Web portal

79
► To implement employee benefits setup
From the Employee Self Service General Setup menu (G08BB413), choose Employee Self Service Setup Director.
1. On ESS Setup Director, click the following option and then review the resulting list of links in the Available Items pane:
• ESS Setup Applications
2. In the Available Items pane, click each link and review the documentation that the system automatically displays.
Note the programs that you want to include in your setup process.
Note the programs that require a new version or processing option settings.
3. To review the programs for which you need to create a new version or set processing options, click the following option and review the list of links:
• ESS Versions/Processing Options
4. To create a Selected Items list of links, click a version or processing option link on the Available Items list and then click the single, right-arrow between the Available and Selected Items lists.
5. Repeat the previous step for each version or processing option link that you want to move into the Selected Items list.
To move all items on the Available Items list to the Selected Items list, click the double, right arrow.

80
To move an item from the Selected Items list to the Available Items list, click the single, left arrow.
6. When the Selected Items list is complete, to begin the first task, click Continue.
The system displays the first program on the list of selected items.
7. On ESS Instructions, review data that might exist.
To refresh the screen, if necessary, choose Refresh from the Tools menu.
8. To access the program and add or change data, choose Edit Setup.
9. After you complete the task for the selected program, choose Cancel or Close.
10. On ESS Instructions, to move to the next selected item on your list, choose Next.
11. Repeat steps 7 through 10 until you complete all of the selected items on your list.
12. To review a previous program or documentation in the Selected Items list, click Previous.
13. When you complete the last selected item, click Next.
This completes the process of setting up program versions and specifying appropriate processing options.
The system automatically displays the ESS Setup Director form so that you can choose the setup programs that are required to complete the setup process.
14. On ESS Director, choose the following option:
• ESS Setup Applications
15. Repeat steps 4 through 11 until all of the tasks on your Selected Items list is complete.
Setting Up Common Settings for Self-Service
The setup process to provide employees with the opportunity to define and control their benefit selections begins with enabling your enhanced employee self-service software. By setting this control appropriately, you can access the necessary programs to define your self-service offerings. You can also define the primary care physician setting.

81
► To set up common settings for self-service benefits
From the Self Service Setup menu (G05BESS4), choose Common Settings for EE Self Service Appl.
1. On Work With HRM Common Display Settings, review the following data items:
PCPN Determines whether the system requires a primary care physician number for self-service health and welfare benefit plans or benefit plan options that are set up to track primary care physician information.
PCPV Determines whether the system tracks an employee visit with a primary care physician.
USEESS Determines whether enhanced employee self-service software is being used instead of standard employee self-service software in the Xe release of OneWorld.
2. To change the current setting for an item, choose the data item and then click Select.
3. On J.D. Edwards System Control - Revisions, choose either the Yes or No option, and then click OK.
4. On Work With HRM Common Display Settings, click Add to add data items.
5. On J.D. Edwards System Control - Revisions, complete the following field:
• Data Item
6. Choose either the Yes or No option and click OK.
7. On Work With HRM Common Display Settings, click Find to display the new data item and verify the setting.

82
See Also Common Settings for Benefits Enrollment in the Human Resources - Benefits Guide
Changing Benefit Plans for Self-Service
To set up benefit plans that employees can use in self-service, you need to define the following:
• The minimum and maximum number of persons that can be included in benefit plans that cover dependents
• Whether to track the primary care physician
• Non-participating benefit plans
Before You Begin Set up benefit groups and categories. See Setting up Group Information in the
Human Resources - Benefits Guide.
Set up benefit plans and enable each plan for self-service. See Setting Up Benefit Plans in the Human Resources - Benefits Guide.
Adding a New Benefit Plan
Before you can enroll employees in a benefit plan, you must set up the plan. You add a new benefit plan when you need to set up a unique plan or when you are setting up a plan for the first time. When you set up a plan, you define the following types of information:
• Effective dates
• Provider or trustee
• Enrollment rules
• Eligibility tables

83
► To add a new benefit plan
From the Benefits Administration Setup menu (G08BB4), choose Plan Master.
1. On Work With Plan Master, click Add.
2. On Plan Master, complete the following field:
• Plan ID
3. In the unlabeled field to the right of the Plan ID field, type the name of the plan.
4. On the General Info tab, complete the following field:
• Provider/Trustee
5. Complete the following optional fields or accept the default values:
• From Date
• Thru Date
• Policy/Reference Number
• Plan Type

84
Note You need to assign the same benefit plan type to every plan within a benefit category. For example, all medical plans should be assigned to the medical plan type.
• Status Code
6. Click any of the following options:
• Mandatory
• Enter Amount/Rate
• COBRA Plan
7. In the Enrollment Rules group box, choose an option for the Enrollment Start Date.
8. Click one or both of the following options:
• Allow Enrollment at Plan Level
• Flex Plan
9. Click one of the following options in the Dependent/Beneficiary group box:
• Requires Dependent
• Requires Beneficiary
• Does Not Require Dependent/Beneficiary
The Dependent/Beneficiary options define whether a plan is designated as a dependent plan or a beneficiary plan.
10. Click one of the following options in the Spending Account group box:
• Not a Spending Account
• Medical Spending Account
• Non-Medical Spending Account
You use the Spending Account options to associate the account with medical or other types of expenses.

85
11. Click the Calc./Eligibility tab and complete any of the following DBA fields:
• EE Payroll Deduction
• ER Paid Benefit
• EE Flex Cost
• ER Flex Credits
If the plan is a flex plan, you should complete either the EE Flex Cost or EE Flex Credits field.
12. To enter a date-sensitive override amount or rate for the employee contribution to one of the items, click one of the DBA fields and then choose Plan Rates from the Form menu.
13. On PDBA Detail choose a record and then click Select.
Note The plan rate or amount that you enter on this form is a date-sensitive override to the rate that exists in the DBA. You must complete the DBA field before you enter override amounts or rates. You cannot enter an amount or rate for a DBA field that is blank.
Entering new rates does not change existing benefit plan information for employees. To recalculate the new premium costs, the employee must re-enroll in the plan or a Workforce Management administrator must process batch enrollment.

86
14. On the Plan Master Rates Window, complete any of the following override fields, click OK, and then click Cancel:
• Type
• Beginning Date
• Ending Date
• Amount or Rate
15. On the Calc./Eligibility tab of Plan Master, complete the following fields:
• Init Elig Table
• Cont Elig Table
16. Complete the following optional field:
• Prerequisite Plan
17. To enter information about the plan, click the Addl. Info tab, and then enter the information.
18. To track additional data, click the Cat. Codes tab and complete the relevant information.

87
19. If you use Self-Service Benefits, click the Self-Service tab and complete the following fields:
• Description
If you do not enter a description, the plan description appears on self-service forms. This description field allows a longer representation of the benefit plan.
• Short Plan/Plan Option Description
This description field allows only a short description that is used when benefit plans appear as column titles on self-service forms.
• Plan Grouping Code
J.D. Edwards recommends that you use the Plan Master Options program (P083202) instead of Plan Grouping.
You can use plan grouping to associate benefit plans if you do not use benefit plan options. For example, if you create separate benefit plans for employee only, employee plus 1, employee plus family, and employee opt out, you can set up a plan grouping code in UDC 08/PG. You can then assign the plan grouping code to each plan master record.
J.D. Edwards recommends that you set up a non-participating plan for each benefit category so that employees can elect this plan to choose no coverage.
20. If you want to track the primary care physician number, click the following option:
• Track Primary Care Physician (PCP)

88
21. If the purpose of the benefit plan is to indicate that an employee is declining coverage, click the following option:
• Non-Participating Plan Flag
The system displays this option only if the plan is set up as a nonparticipating plan.
Note J.D. Edwards recommends that you set up a non-participating benefit plan for every benefit category.
22. If the plan is a dependent plan, specify the range of persons to be covered (including the employee) by completing the following fields:
• Minimum Dependents
• Maximum Dependent
If the benefit plan is a dependent plan, the system displays two fields on the bottom of the form to allow you to enter the number of dependents who can enroll in the plan.
23. Click the Premium/Coverage tab and complete either of the following fields to specify premium information:
• Premium Payment
• Age Rate Table

89
24. Complete the following optional fields:
• Per Coverage Dollars
• Maximum Premium Amount
25. To enter coverage information, complete either of the following fields:
• Amount - Coverage
• Salary Factor
26. Complete the following optional field:
• Rounding Amount
27. Click OK to save the record.
Processing Options for Plan Master (P08320)
Display Tab
This processing option specifies whether certain fields appear on the Plan Master form.
1. EE Flex Cost PDBA and the ER Flex Credits PDBA fields.
0 = Do not display these fields.
1 = Display these fields.
Use this processing option to specify whether the system should display the Employee Flex Costs field and the Employer Flex Credits DBAs field. Valid values are:
0 Do not display these fields.
1 Display these fields.
Changing Plan Options
After setting up the Plan Master (P08320), depending on your company setup, you might need to define the benefit plan options that employees can choose during each enrollment event. For employee self-service benefits, the benefit plan options might already be set up

90
appropriately. You also need to specify the minimum and maximum number of dependents that are allowable for each health and welfare benefit plan option. You can use this procedure to set up new plan options or change existing options.
If the available options for a plan category include non-participation, you need to set up a non-participating plan option. For example, a dental benefit plan might include the following plan options:
• Dental Coverage - Employee Only
• Dental Coverage - Employee and Family
• Dental Coverage - Employee and One Dependent
• Dental Coverage - No Coverage
Setting Up Plan Options
When the coverage for a plan can vary from employee to employee, you can either set up a separate plan for each variation or set up a plan with several options. For example, your organization might offer a dental plan to employees. The cost for this plan might vary depending on whether employees elect coverage for themselves only or for themselves plus their dependents. You can set up this dental plan in either of the following ways:
• Set up Employee Only, Employee Plus One, and Employee Plus Family as separate dental plans and link each of these plans to the dental category.
• Set up a dental plan, such as DEN-01, for an employee and include options such as DEN-01 Plus One and DEN-01 Plus Family. When you link DEN-01 to the dental category, the system also links the options.
When you set up benefit plan options, you can enter different coverage costs for each option. For example, the Employee Only option might cost 20.00 USD, the Employee Plus One option 40.00 USD, and the Employee Plus Family option 80.00 USD. You can indicate the cost of an option in either of the following ways:
• Assign to the option a separate DBA that has an associated amount or rate.
• Assign the DBA associated with the plan to the option. You can enter an override amount or rate for the option in the Plan Master Rates Window program (P083203).
• Use the benefit plan DBA and the benefit plan options DBA. The DBAs must be separate in this case.
When the employee enrolls in a benefit plan option, the system updates the employee's DBA instructions with the amount or rate that you entered for the option.
When you set up options for a single benefit plan, use the option rule to determine how the system calculates additional coverage costs. You can include one or more of the following in the calculation:
• DBA for the benefit plan
• DBA for the option
• Additional amount
When the employee enrolls in a benefit plan option, the system uses the option rule to either add the additional cost or replace the amount in the DBA that you identified in the Plan Master program (P08320). For example, the plan DBA identifies the amount that the employee pays for coverage when enrolled in DEN-01 only. If the employee enrolls in DEN-
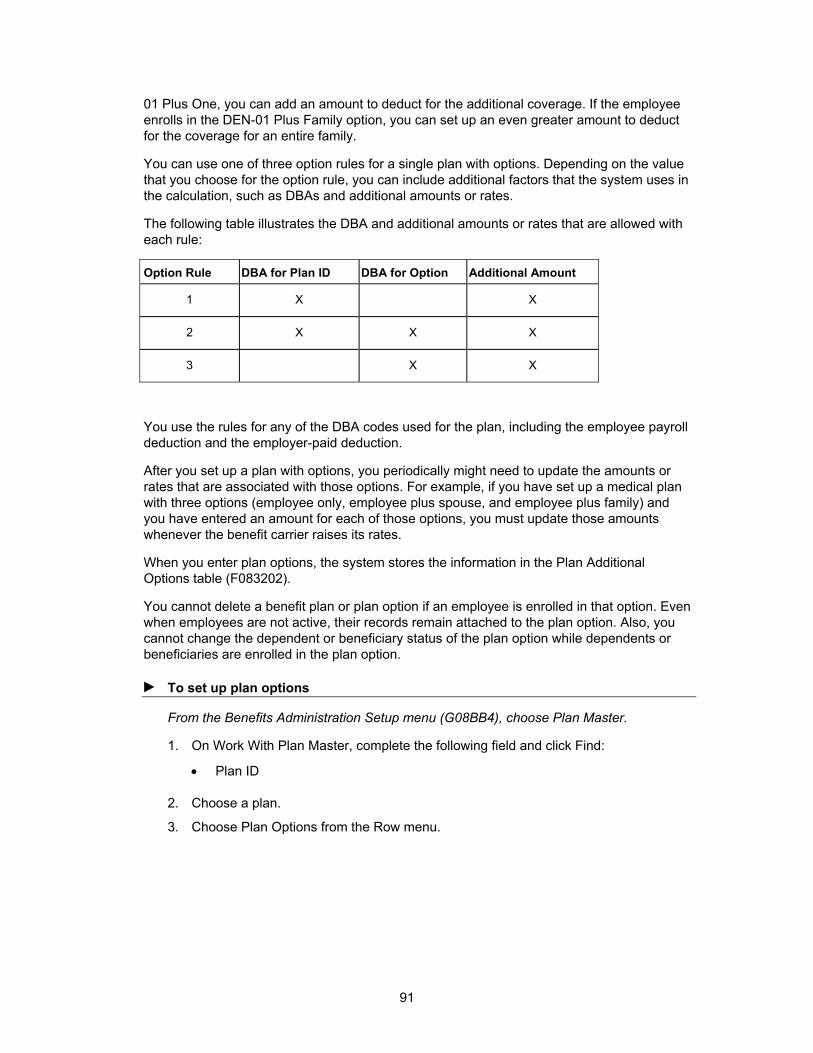
91
01 Plus One, you can add an amount to deduct for the additional coverage. If the employee enrolls in the DEN-01 Plus Family option, you can set up an even greater amount to deduct for the coverage for an entire family.
You can use one of three option rules for a single plan with options. Depending on the value that you choose for the option rule, you can include additional factors that the system uses in the calculation, such as DBAs and additional amounts or rates.
The following table illustrates the DBA and additional amounts or rates that are allowed with each rule:
Option Rule DBA for Plan ID DBA for Option Additional Amount
1 X X
2 X X X
3 X X
You use the rules for any of the DBA codes used for the plan, including the employee payroll deduction and the employer-paid deduction.
After you set up a plan with options, you periodically might need to update the amounts or rates that are associated with those options. For example, if you have set up a medical plan with three options (employee only, employee plus spouse, and employee plus family) and you have entered an amount for each of those options, you must update those amounts whenever the benefit carrier raises its rates.
When you enter plan options, the system stores the information in the Plan Additional Options table (F083202).
You cannot delete a benefit plan or plan option if an employee is enrolled in that option. Even when employees are not active, their records remain attached to the plan option. Also, you cannot change the dependent or beneficiary status of the plan option while dependents or beneficiaries are enrolled in the plan option.
► To set up plan options
From the Benefits Administration Setup menu (G08BB4), choose Plan Master.
1. On Work With Plan Master, complete the following field and click Find:
• Plan ID
2. Choose a plan.
3. Choose Plan Options from the Row menu.
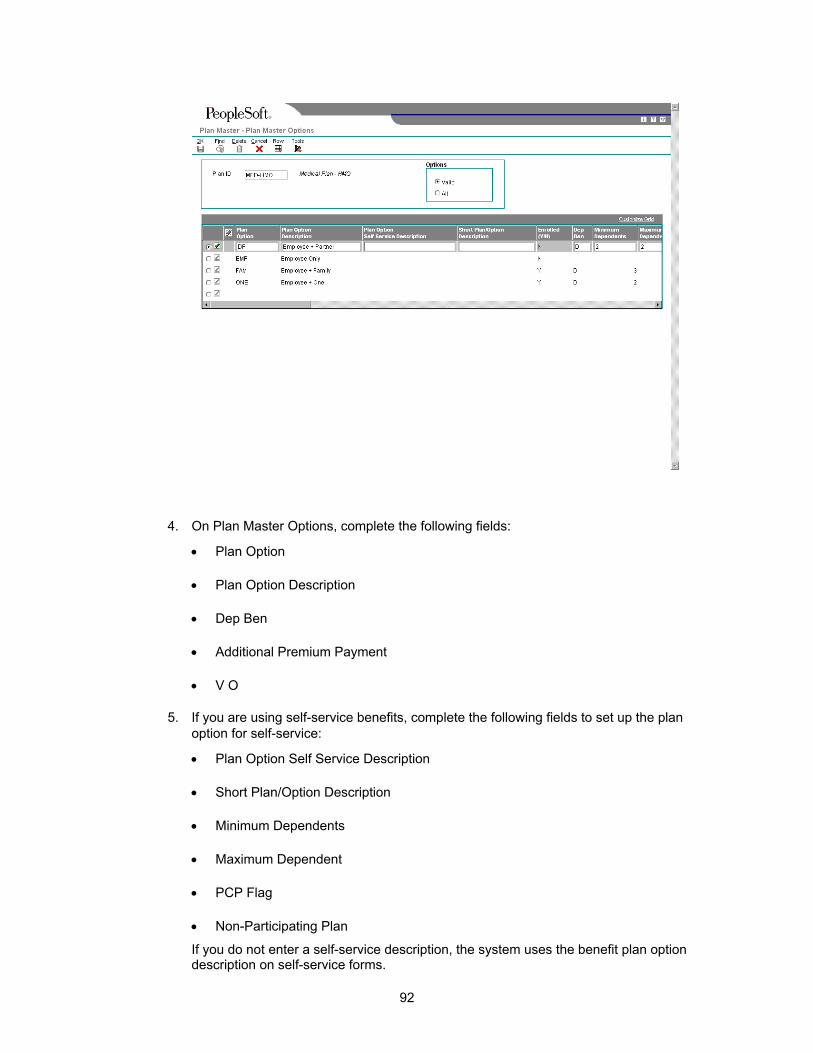
92
4. On Plan Master Options, complete the following fields:
• Plan Option
• Plan Option Description
• Dep Ben
• Additional Premium Payment
• V O
5. If you are using self-service benefits, complete the following fields to set up the plan option for self-service:
• Plan Option Self Service Description
• Short Plan/Option Description
• Minimum Dependents
• Maximum Dependent
• PCP Flag
• Non-Participating Plan
If you do not enter a self-service description, the system uses the benefit plan option description on self-service forms.
93
6. To set up the employee contribution information, complete the following fields:
• Payroll Ded -Option Rule
• Payroll Ded DBA
• Payroll Ded - Add'l or Override Rate
7. To set up the employer-paid information, complete the following fields:
• Paid Benefit -Option Rule
• Paid Benefit DBA
• Paid Benefit - Add'l or Override Rate
8. To set up the employee flex cost information, complete the following fields:
• Flex Cost -Option Rule
• Flex Cost DBA
• Flex Cost - Add'l or Override Rate
9. To set up the flex credits information, complete the following fields:
• Flex Credit -Option Rule
• Flex Credit DBA
• Flex Credit - Add'l or Override Rate
10. To enter a date-effective override amount or rate for the employee contribution to the DBA item, click one of the DBA fields and choose Plan Rates from the Row menu.
11. On PDBA Detail choose a record and then click Select.

94
12. On Plan Master Rates Window, complete the following fields:
• Beginning Date
• Ending Date
• Amount or Rate
13. Click OK to save the amount or rate record. Then click Cancel to return to Plan Master Options.
14. Click OK to save the plan record.
See Also Setting Up Benefit Plans in the Human Resources – Benefits Guide for information
that can help you decide whether to set up benefit plans with options
Defining Benefit Category Rules for Self-Service
Benefit category rules and specifications need to be set up before the new benefit self-service features are available to employees. To ensure that employees make benefit selections that are consistent with your organizational and provider policies, you use the Categories by Benefit Group program (P08350) to specify a classification for each benefit category and to specify that changes in employee elections must remain within a current group of benefit plans.

95
Benefit categories must be defined as belonging to one of the following classifications:
• Health and Welfare
• Indemnity
• Retirement Savings
• Other
For example, medical, dental, and vision categories are in the health and welfare classification. Life insurance and 401(k) categories are in the retirement savings classification. Employees might be allowed to decline inclusion in some categories, but not in others. For example, inclusion in a retirement savings plan might be optional. However, medical coverage might be required unless employees are included in spousal coverage with another employer. You can specify whether the Workforce Management administrator is notified when employees elect to decline coverage.
Note
When setting up a benefit category as a Health and Welfare category, you should include only benefit plans that do not require a beneficiary.
A benefit category should not allow more than one benefit plan election. A benefit category should also specify whether benefit plans within the category are optional. For example, valid values for the benefit category rule are as follows:
0 Optional
R Required
Most insurance providers allow employees to change their coverage when they experience a qualifying life event. For example, a married employee who gives birth to, or adopts, a child can usually change their medical insurance from employee plus spouse to employee plus family within 31 days of the birth of the child. The employee cannot ordinarily change from the current provider to an alternate provider until the commencement of an open enrollment period.
The Categories by Benefit Group program is normally used in the initial setup of benefits information. You use this program to link benefit categories to benefit groups when you set up the benefits administration software. The entire task is included as part of employee self-service benefits setup to ensure that the requirements to set up self-service are reviewed and completed.
Note
J.D. Edwards does not recommend setting up a benefit category to allow the selection of multiple plans in a health and welfare benefit category. If you allow the selection of multiple plans within a category, then your benefits self-service software cannot automatically select appropriate plans for an employee based on employee dependents and beneficiaries.

96
Linking Categories to Benefit Groups
After you set up benefit groups and benefit categories, you can link categories to each benefit group. For example, you can link the benefit categories for medical, dental, and life to the management benefit group. When you link a category to a benefit group, all of the employees in that group are eligible for all of the benefit plans in that category.
When you link categories to groups, you can also include the following information:
• Whether the benefit group has flex plans
• The sequence in which the benefit categories appear on the enrollment form
• The election criteria for a benefit category
• The benefit category type for special flex plans
• The benefit category classification
• An employee option to print a form for declining benefit coverage
• Whether employees must stay within the current benefit group options or within a current group of benefit plans
If a benefit group has flex plans, you must set up a benefit category for employee flex deductions (category type 2). This benefit category is the mechanism for deducting a negative flex balance from employee pay. If the employer awards members of the benefit group a lump sum of flex credits, you must set up a benefit category for those lump sum credits (category type 1).
► To link categories to benefit groups
From the Benefits Administration Setup menu (G08BB4), choose Categories by Benefit Group.
1. On Work With Benefit Groups, complete the following field and then click Find:
• Benefit Group
2. Choose the benefit group record and then click Select.

97
3. On Categories By Benefit Group, click one of the following options in the Benefit Group Rule group box to indicate whether the benefit group offers flex plans, and if so, how it treats positive remaining credits:
• Flex plans not offered
• Flex plans offered, positive remaining credits allowed
• Flex plans offered, positive remaining credits not allowed
4. Complete the following fields and click OK:
• Group Category
• Seq. Num.
• C R
• Category Type
Setting Up URLs for Self-Service Benefits
Within the employee self-service benefit programs, employees can click on a link to get more information about benefits. You define uniform resource locator addresses (URLs) that link users to resources about plan options, plans, categories and groups. Depending on the links that might be defined, employees can learn information about the enrollment process, organizational policy, provider options, a specific benefit plan, or details about a plan option.

98
These resources might also include direct access to the provider so that employees can implement changes. For example, an employee might use a link to access a provider website that lists primary care physicians.
To set up all URL specifications for benefit resources from one location, you can use the Plans Within Categories program (P08351). After choosing a benefit group, category, plan or plan option, you access the Benefits Enrollment Plan/Option URL Address program (P085540) from a Row menu option where you can record URL addresses. The URL might be a location on an organization's intranet or a provider Internet resource. The system stores the URL address information in the Benefits Enrollment Plan/Option URL Address table (F085540).
You can organize reference information as follows:
• Use a URL to access information for all benefit plan options that are linked to a benefit plan.
• Use URL to access information for all benefit plans that are linked to a benefit category.
• Use a URL to access information for all benefit categories that are linked to a benefit group.
• Use a URL to access information for all benefit groups.
When employees click on links in J.D. Edwards benefit self-service programs, the system searches for the most specific resource using a hierarchal approach. For example, if an employee clicks on a link for information about a benefit plan option, the system looks first at the benefit plan option level. If no information is found, the system looks sequentially at the benefit plan, category, and group levels.
J.D. Edwards recommends that you set up at least one URL for every benefit group. Because all benefit plans and benefit plan options appear as links, employee might click the link to get additional information. A URL is required for the function to work appropriately.
Before You Begin Set up benefit groups. See Setting Up Benefit Groups in the Human Resources -
Benefits Guide.
Set up benefit categories. See Setting Up Benefit Categories in the Human Resources - Benefits Guide.
Link each benefit category to an appropriate benefit group. See Linking Categories to Benefit Groups in the Human Resources - Benefits Guide.
Set up benefit plans. See Setting Up Benefit Plans in the Human Resources - Benefits Guide.
Link each benefit plan to an appropriate benefit category. See Linking Plans to Benefit Categories in the Human Resources - Benefits Guide.
Set up benefit plan options. See Setting Up Plan Options in the Human Resources - Benefits Guide.
Setting Up URLs for Benefit Plan Options
Within the employee self-service benefit programs, employees can click on a benefit plan option link to get information. Depending on the links that might be defined, employees might also have links to resources for benefit plans, benefit categories, and benefit groups. You can

99
provide separate links for employees to learn information about the enrollment process, organizational policy, provider options, a specific benefit plan, or details about a plan option.
See Also
See the following topics in the Workforce Management Self-Service Guide:
Setting Up URLs for Benefit Plans for the steps to add links to resource information on employee benefit plans
Setting Up URLs for Benefit Categories for the steps to add links to resource information on employee benefit categories
Setting Up URLs for Benefit Groups for the steps to add links to resource information on employee benefits or benefit groups
► To set up URLs for benefit plan options
From the Benefits Administration Setup menu (G08BB4), choose Plans Within Categories.
1. On Work with Categories within Groups, complete the following field and click Find to display the benefit categories that are linked to the benefit group:
• Benefit Group
2. Choose a benefit category and click Select to display the benefit plans that are linked to the benefit category.
3. On Plans Within Categories, choose a benefit plan and choose Associate URLs from the Row menu.

100
4. On Benefits Enrollment Plan/Option URL Address, complete the following fields:
• Plan Option
• Language
• URL Type
For example, the format of a sample URL might appear as follows: http://www.benefitsprovider.com.
Note Do not change the user defined code PCP, that is defined for the URL type. Employee self-service software recognizes only PCP and Blank as valid values.
• Portal URL Links
The system displays the Plan Option and Add Optional Description columns only when a plan option exists.
5. Click OK.
Setting Up URLs for Benefit Plans
Within the employee self-service benefit programs, employees can click on a benefit plan to get more information pertaining to the plan. Depending on the links that might be defined, employees might also have links to resources for benefit plan options, categories and groups. You can provide separate links for employees to learn information about the enrollment process, organizational policy, provider options, a specific benefit plan, or details about a plan option.
See Also
See the following topics in the Workforce Management Self-Service Guide:
Setting Up URLs for Benefit Plan Options for the steps to add links to resource information on employee benefit plan options
Setting Up URLs for Benefit Categories for the steps to add links to resource information on employee benefit categories
Setting Up URLs for Benefit Groups for the steps to add links to resource information on employee benefit groups
► To set up URLs for benefit plans
From the Benefits Administration Setup menu (G08BB4), choose Plans Within Categories.
1. On Work with Categories within Groups, complete the following field and click Find to display the benefit categories that are linked to the benefit group:
• Benefit Group
2. Choose a benefit category and click Select to display the benefit plans that are linked to the benefit category.

101
3. On Plans Within Categories, choose a benefit plan and choose Associate URLs from the Row menu.
4. On Benefits Enrollment Plan/Option URL Address, complete the following fields:
• Language
• URL Type
• Portal URL Links
For example, the format of a sample URL might appear as follows: http://www.benefitsprovider.com.
5. Click OK.
Setting Up URLs for Benefit Categories
Within the employee self-service benefit programs, employees can click on a benefit category to get additional information. Depending on the links that might be defined, employees might also have links to resources for benefit plan options, benefit plans, and benefit groups. You can provide separate links for employees to learn information about the enrollment process, organizational policy, provider options, a specific benefit plan, or details about a plan option.
See Also
See the following topics in the Workforce Management Self-Service Guide:
Setting Up URLs for Benefit Plan Options for the steps to add links to resource information on employee benefit plan options
Setting Up URLs for Benefit Plans for the steps to add links to resource information on employee benefit plans
Setting Up URLs for Benefit Groups for the steps to add links to resource information on employee benefit groups
► To set up URLs for benefit categories
From the Benefits Administration Setup menu (G08BB4), choose Categories by Benefit Group.
1. On Work With Benefit Groups, complete the following field and click Find:
• Benefit Group
2. Choose the benefit group and click Select to display the benefit categories that are linked to the benefit group.
3. On Categories By Benefit Group, choose a benefit category and choose Associate URLs from the Row menu.
4. On Benefits Enrollment Plan/Option URL Address, complete the following fields:
• Language
• URL Type
• Portal URL Links

102
5. Click OK.
Setting Up URLs for Benefit Groups
Within the employee self-service benefit programs, employees can click on a benefit group link to get information. Depending on the links that might be defined, employees might also have links to resources for benefit plan options, benefit plans, and benefit categories. You can provide separate links for employees to learn information about the enrollment process, organizational policy, provider options, a specific benefit plan, or details about a plan option.
See Also
See the following topics in the Workforce Management Self-Service Guide:
Setting Up URLs for Benefit Plan Options for the steps to add links to resource information on benefit plan options
Setting Up URLs for Benefit Plans for the steps to add links to resource information on benefit plans
Setting Up URLs for Benefit Categories for the steps to add links to resource information on employee benefit categories
► To set up URLs for benefit groups
From the Benefits Administration Setup menu (G08BB4), choose Categories by Benefit Group.
1. On Work With Benefit Groups, complete the following field and click Find:
• Benefit Group
2. Choose Associated URLs from the Row menu.
3. On Benefits Enrollment Plan/Option URL Address, complete the following fields:
• Language
• URL Type
• Portal URL Links
For example, the format of a sample URL might appear as follows: http://www.benefitsprovider.com.
4. Click OK.
Setting Up Benefit Enrollment Events for Self-Service
Although you normally set up benefit enrollment events when your benefits administration software is installed, you need to review these specifications when you add benefits self-service functionality to your system. When you set up benefit enrollment events, you can use the Benefits Enrollment Setup program (P08500) to define the time period during which an event is open for online changes or enrollments. If the enrollment event allows changes for a certain number of days following a specific or variable date, consider replacing Open From Date and Open Through Date values with the Open Based From Date value.
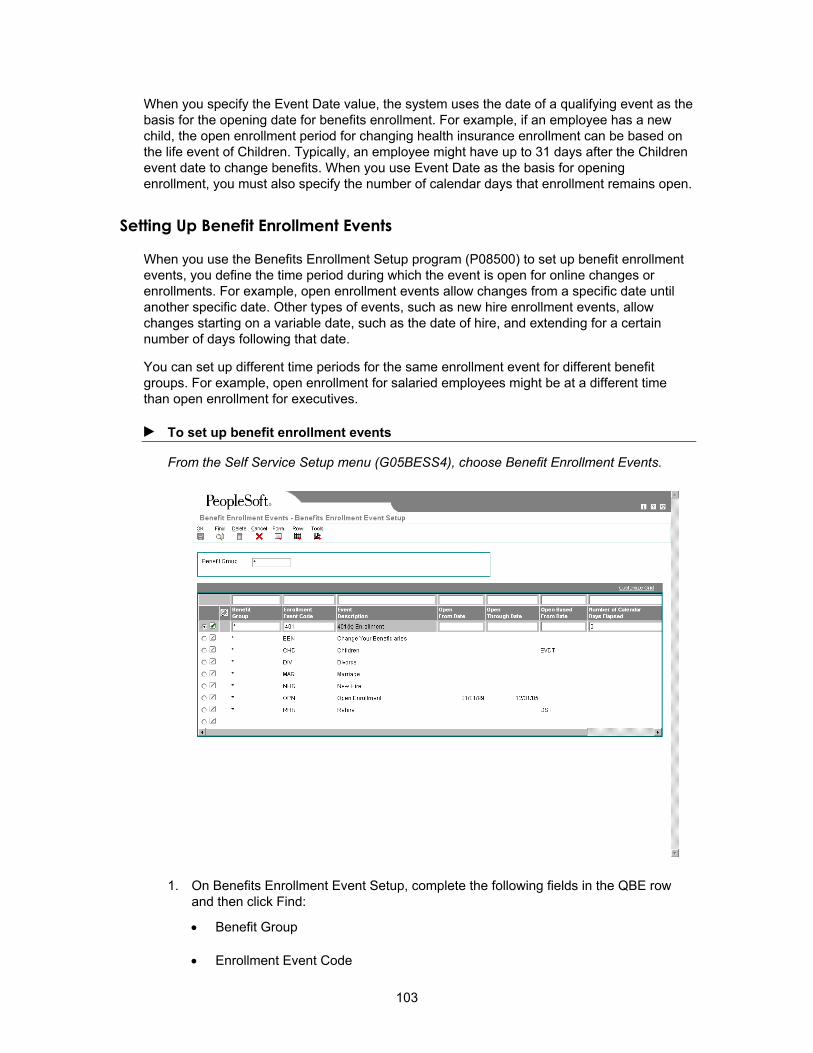
103
When you specify the Event Date value, the system uses the date of a qualifying event as the basis for the opening date for benefits enrollment. For example, if an employee has a new child, the open enrollment period for changing health insurance enrollment can be based on the life event of Children. Typically, an employee might have up to 31 days after the Children event date to change benefits. When you use Event Date as the basis for opening enrollment, you must also specify the number of calendar days that enrollment remains open.
Setting Up Benefit Enrollment Events
When you use the Benefits Enrollment Setup program (P08500) to set up benefit enrollment events, you define the time period during which the event is open for online changes or enrollments. For example, open enrollment events allow changes from a specific date until another specific date. Other types of events, such as new hire enrollment events, allow changes starting on a variable date, such as the date of hire, and extending for a certain number of days following that date.
You can set up different time periods for the same enrollment event for different benefit groups. For example, open enrollment for salaried employees might be at a different time than open enrollment for executives.
► To set up benefit enrollment events
From the Self Service Setup menu (G05BESS4), choose Benefit Enrollment Events.
1. On Benefits Enrollment Event Setup, complete the following fields in the QBE row and then click Find:
• Benefit Group
• Enrollment Event Code

104
The system first searches for an exact benefit group match and then for the generic * character. You can indicate that an event is open for all benefit groups by typing * in the Benefit Group field. For example, an employee in the EXEC benefit group is in open enrollment from 9/1/05 through 9/30/05. An employee in MGMT is in open enrollment from 11/1/05 through 11/30/05.
2. If the enrollment event will allow changes between specific dates, complete the following fields:
• Open From Date
• Open Through Date
3. If the enrollment event allows changes for a certain number of days following a specific or variable date, complete the following fields:
• Open Based From Date
• Number of Calendar Days Elapsed
You can enter a data item, such as the employee's start date or the event date, in the Open Based From Date field.
4. Complete the following field:
• Enrollment Effective Date
Note If you do not define a time period for an enrollment event, the system assumes that the event is open all year.
5. Repeat steps 1 through 4 for every available enrollment event, and then click OK to save your changes.
Setting Up Benefit Categories by Enrollment Event
After you have set up the enrollment event codes, you need to use the Benefit Categories by Enrollment Events program (P085510) to define which benefit categories can be changed or enrolled in during each enrollment event. For example, you might allow all benefit categories (medical, dental, disability, life, and so on) to be changed during open enrollment, but only selected categories (such as medical, dental, and vision) to be changed for an event such as marriage.
In addition to defining benefit categories, you can control whether employees can change beneficiary information only, or can also change their benefit plan enrollment.
If you do not set up categories for a specific enrollment event, the system assumes that no changes or enrollments are allowed for that event.

105
► To set up benefit categories by enrollment event
From the Self Service Setup menu (G05BESS4), choose Benefit Enrollment Events.
1. On Benefits Enrollment Event Setup, choose Categories By Event from the Form menu.
2. On Benefit Categories by Enrollment Events, complete the following fields in the detail area:
• Enrollment Event Code
• Group Category
• Category Description
• Only Allow Changes to Beneficiary
• Automatic Default of Current Enrollment
If the benefit plans are the same, and a processing option is set appropriately in the Current Enrollment Work File Build program (R085530), the system supplies the current enrollment as the default enrollment. However, if a current plan is no longer available (for example, if you are changing insurance carriers), you should not accept the default.
3. Repeat step 1 for every available benefit category for each enrollment event, and then click OK to save your changes.

106
Setting Up Allowed Dependent Relationships by Plan
You can use the Allowed Dependent Relationship by Plan program (P085500) to define dependent relationship information for employee beneficiaries and dependents that can be covered under a dependent benefit plan or benefit plan option. If you add only a single record, by entering a * in the Relation field for a benefit plan, then any beneficiary or dependent relationship is valid. If only a certain subset of relationships is valid, then you must define each of those valid relationships.
If all employee benefit plans are set up, and any beneficiary or dependent relationship is valid, then you can run the Automatically Setup SS Dependent Selection program (R085505) without defining allowed dependent relationships for each plan.
You might use this program to define allowed dependent relationships for benefit plans in an organization that covers domestic partners. Certain tax advantages that could apply to employee benefits do not apply to benefit plans that cover domestic partners. To track the DBAs for benefit plans that include a spouse and benefit plans that include a domestic partner, you might set up separate benefit plans that specify allowed dependent relationships by plan. For example, if an organization offers employee benefit plans that cover domestic partners, then the workforce management administrator might create a benefit plan with the following benefit plan options and allowed dependent relationships:
Benefit Plan Option Valid Dependent Relationship Employee Only (not a dependent plan) Not applicable
Employee + Spouse Spouse
Employee + Domestic Partner Domestic partner
Employee + Spouse + Family Spouse, child, step/foster child
Employee + Domestic Partner + Family Domestic partner, child, step/foster child
No Coverage (not a dependent plan) Not applicable
J.D. Edwards’ employee self-service software includes automatic selection of benefit plans that makes enrolling in benefits easier and faster for employees. The system automatically displays benefit plans and benefit plan options based on the number of dependents and their relationship to the employee.
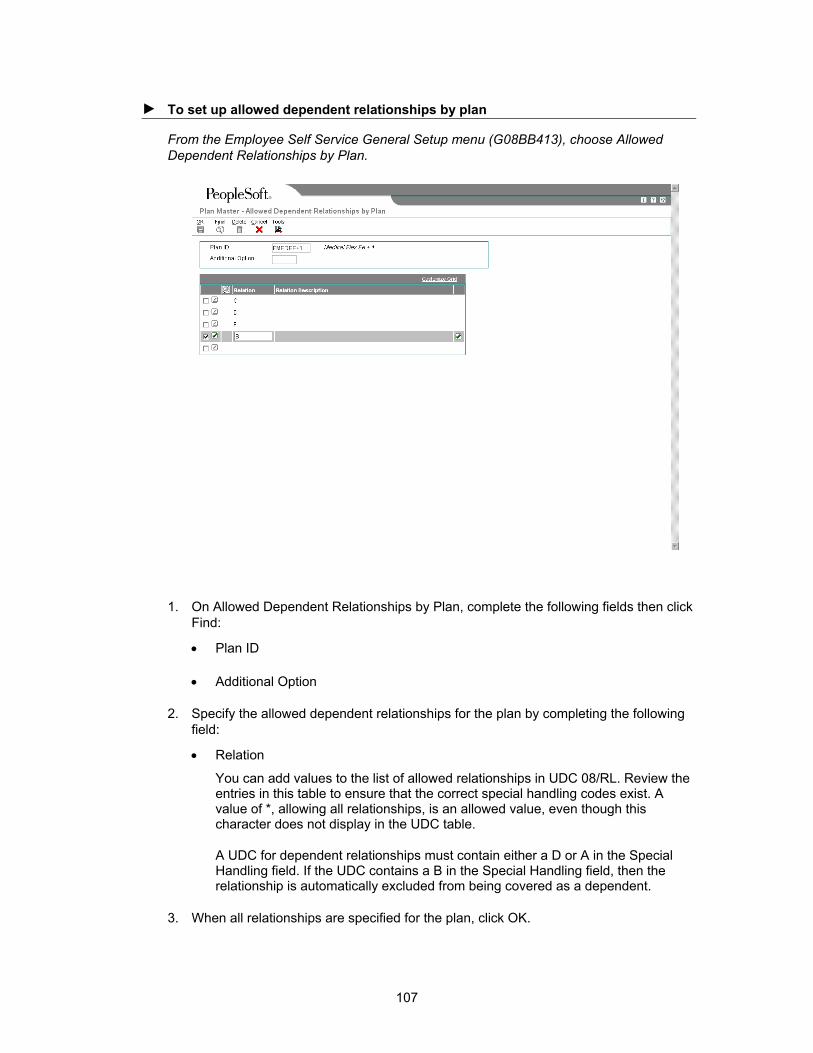
107
► To set up allowed dependent relationships by plan
From the Employee Self Service General Setup menu (G08BB413), choose Allowed Dependent Relationships by Plan.
1. On Allowed Dependent Relationships by Plan, complete the following fields then click Find:
• Plan ID
• Additional Option
2. Specify the allowed dependent relationships for the plan by completing the following field:
• Relation
You can add values to the list of allowed relationships in UDC 08/RL. Review the entries in this table to ensure that the correct special handling codes exist. A value of *, allowing all relationships, is an allowed value, even though this character does not display in the UDC table.
A UDC for dependent relationships must contain either a D or A in the Special Handling field. If the UDC contains a B in the Special Handling field, then the relationship is automatically excluded from being covered as a dependent.
3. When all relationships are specified for the plan, click OK.

108
See Also Setting Up Dependent Selection Automatically in the Workforce Management Self-
Service Guide to run a report that creates work files that the system uses to automatically select benefit plans and benefit plan options for employee benefit enrollment
User Defined Codes in the Foundation Guide to set up an additional UDC code for allowed relationships and include a special handling code for self-service
Setting Up Workfiles for Benefits Self-Service
J.D. Edwards software uses workfiles to process employee self-service enrollments. The workfiles contain values for current enrollments and available employee benefit plans. Each of the workfiles must be set up before employees can use the benefits self-service programs.
Setting Up Dependent Selection Automatically
From the Employee Self Service General Mgmt menu (G08BESS327), choose Automatically Set Up Dependent Min/Max.
The Automatically Setup SS Dependent Selection program (R085505) builds tables that the system uses to automatically determine the minimum number of dependents that are appropriate for each benefit plan or plan option. This report also adds a value for allowed relationships in the Allowed Dependent Relations Per Plan table (F085500). A * is added to each benefit plan or benefit plan option record that does not already contain a specified value. Self-service benefits programs use these tables to select benefit plans based on covered dependents. The system uses the following factors in determining the plans that are displayed as choices from which employees can choose:
• Minimum number of dependents
• Maximum number of dependents
• Valid relationships per plan or plan option
Before running this report, ensure that benefit plans options are defined for each benefit plan or that benefit plans are set up with plan grouping. Also review your benefit plan setup to ensure that a maximum number of dependents has been defined for all benefit plans and benefit plan options.
When the report is run, you define plans or plan options that you are including in the report. You normally run this report after adding a new set of benefit plans to the software and before building the benefit workfiles that use the new plans.
Include all benefit plan options within a benefit plan when you run the Automatically Setup SS Dependent Selection report. Do not include only one benefit plan option. If you are using benefit plan grouping, then include all benefit plans within a benefit plan group when you run the report.
The system determination of the minimum number of dependents for each benefit plan option is an estimate that is based on the maximum number of dependents listed in the prior plan option and the number of dependents that are defined for a certain plan. For example, the minimum number of dependents for the EE + 1 benefit plan in the list below is 2. The estimate of 2 is based on the maximum number of dependents defined for the previous EE Only benefit plan and the plan maximum of 2 dependents that are defined for the EE +1 benefit plan.

109
The system calculates the minimum number of dependents as follows:
Number of Dependents Before Running the Report
Number of Dependents After Running the Report
Medical Plan Options
Minimum Maximum Minimum Maximum
Optional - EE Only
0 0 0 0
EE + 1 0 2 2 2
EE + 3 0 4 3 4
EE + Family 0 99 5 99
You need to review the results of this report to ensure that the dependent numbers reflect the needs of the organization.
See Also Setting Up Allowed Dependent Relationships by Plan in the Workforce Management
Self-Service Guide to define dependent relationships that the Automatically Setup SS Dependent Selection program uses to automatically choose self-service benefit plans
Processing Options for the Automatically Setup SS Dependent Selection (R085505)
Defaults Default the number of dependants (1 = Yes default, 0 = No) Default the relationship if one is not found (1 = Yes default, 0 = No)
Building the Current Coverage Workfile for Self-Service
From the Current Coverage Work File Mgmt menu (G08BESS321), choose Current Coverage Work File Build.
The Current Enrollment Work File Build program (R085530) should be run prior to running the following reports:
• Available Plans Work File Build (R085520)
• Build Current Dependent/Beneficiary Work File (R085537)
• Personal Employee Information Workfile Build (R054101)
The Current Enrollment Work File Build program creates the Employee Current/Pending Elections Work Table (F085530W) that contains current employee enrollment information. The system uses this workfile to display the benefits in which an employee is currently enrolled. When you build the Employee Current/Pending Elections Work Table, the system uses information from the following tables:
• Employee Master Information (F060116)
• Employee Enrollment (F08330)

110
• Categories Within Benefit Groups (F08350)
• Plans Within Benefit Categories (F08351)
• Benefits Plan Master (F08320)
• Plan Additional Options (F083202)
This report should be run at the following times:
• Before employees use the benefits self-service programs to enter changes and new information
• Before each open enrollment
• Periodically, after employees enter benefit changes
When employees re-enter self-service after entering changes, they can view their updated information only after this report is run.
If the version number has been created for the Build Current Dependent/Beneficiary Work File program (R085537), and a processing option is set appropriately, the Current Enrollment Work File Build program automatically launches the Build Current Dependent/Beneficiary Work File program.
Processing Options for Current Enrollment Work File Build (R085530)
Versions 1. R085537 Version: Enter the version of the Build Current Dependent/Beneficiaries Work File UBE (R085537) to be run. If the field is left blank, the dependent/beneficiary enrollment information will not be generated. Verfy that the data selection for R085537 is set up for the selected version before running. XJDE0001 is the standard version used.
Setting Up a Current Dependent and Beneficiary Workfile
From the Dependent/Beneficiary Work File Mgmt menu (G08BESS323), choose Dependent/Beneficiary Work File Build.
When you build the Dependent and Beneficiary Work File table, the system searches the following tables:
• Employee Master Information (F060116)
• Employee Enrollment (F08330)
• Dep/Ben to Employee Plan X-Reference (F08336)
• Current Dep/Ben X-Reference Work Table (F085537W)
• Primary Care Physician Table (F08338)
• Dep/Ben X-Reference Tag Table (F08336B)

111
• Plan/Plan Option Tag Table (F08320B)
The system obtains employee dependent and beneficiary records that are associated with plans, and records that are not associated with plans. The system then saves this information in the Current Dep/Ben X-Reference Work Table. When employees use self-service to change their benefits or update information, the system uses information from this file to display their current dependents and beneficiaries. This report should be run before employees use benefit self-service features of OneWorld software.
You can build the workfile for open enrollment or for a current enrollment event type. The workfile stores the records for both types of events. The program maintains the dependent and beneficiary records separately for each event type.
Running this report checks for active and inactive dependents and beneficiaries and saves the information in the workfile. All dependent and beneficiary information is saved in the workfile even if the dependent or beneficiary is not currently covered by employee benefit plans or benefit plan options so that an employee can re-enroll an inactive dependent.
Before building the workfile, if the system finds unprocessed dependent or beneficiary records for an employee, the system prints the record on an exception report without processing the employee and proceeds to the next employee. The system does not include participants who are deceased.
Processing Options for Build Current Dependent/Beneficiary Work File (R085537)
Process 1. Enrollment Event Type: 1 - Open Enrollment 2 - Current Enrollment
Building the Available Plans Workfile for Self-Service
From the Available Plans Work File Mgmt menu (G08BESS322), choose Available Plans Work File Build.
When you use the Available Plans Work File Build program (R085520) to build the Available Plans and Plan Options by Employee Work Table (F085520W), the system searches each employee benefit group for all active benefit plans and benefit plan options that are offered. It also calculates the new cost, as of the effective date, for each plan and plan option. The system obtains age and salary from the Benefit Self Service Constant table (F08505) and uses this information as of the point-in-time date to determine the cost for applicable annuity benefit plans. If the plan requires the employee to enter an amount or rate, the system calculates the costs or credits dynamically after the employee enters the amount and requests the calculation.
If the workfile contains unprocessed records, these instances are printed to an exception report.
To determine whether the current employee enrollment elections can be reused for open enrollment, the Available Plans and Plan Options by Employee Table program (R085541) tracks whether the current elections are different than the available benefit plans and benefit

112
plan options. For the system to reuse current enrollment information, the following conditions must exist:
• All current benefit plans and benefit plan options must be valid for the upcoming enrollment year.
• All current benefit plans and benefit plan options must be set to allow reuse (defaulting).
If the benefit plans are the same, and a processing option is set appropriately in the Current Enrollment Work File Build report (R085530), the system supplies the current enrollment as the default enrollment. However, if a current plan is no longer available (for example, if you are changing insurance carriers), you should not accept the default.
You can build the Available Plans and Plan Options Work Table (F08320WF) for either open enrollment or current enrollment. In open enrollment, available plans and plan options, as well as their costs, might change. In current enrollment, which is typically associated with new hire, rehire, life event, or special enrollment, the available plans and plan options remain the same. The effective date processing option is used to obtain the active plans and plan options, with their associated costs and credits, for the event type. If you do not set up an effective date in the processing options, the system will not build the workfiles.
You can build the workfile twice; once for open enrollment and once for current enrollment. The workfile stores the records for both types of enrollment at the same time.
You can set processing options to specify the following:
• The effective date of the active benefit plans and benefit plan options
• The event type (open enrollment or current enrollment)
• Whether the system allows prior enrollment information to be automatically defaulted as the chosen benefit plans or benefit plan options
See Also Setting Up Benefit Categories by Enrollment Event in the Workforce Management
Self-Service Guide to review whether a benefit plan or a benefit plan option allows defaulting
Before You Begin Run the Current Coverage Work File Build report first so the report can determine
whether the previous year plans can be used without changes for the upcoming open enrollment. See Building the Current Coverage Workfile for Self-Service in the Workforce Management Self-Service Guide.
If your plan rates are changing during the open enrollment period, cross-reference the current year's DBAs to new rate DBAs. See Setting Up New DBA Plan Rates in the Workforce Management Self-Service Guide.
Processing Options for Available Plans Work File Build (R085520)
Date 1. Effective Date: Enter the effective date to determine the active plans and plan options with their associated costs and credits. Event Type

113
1. Event Type: 1 - Build available plans/plan options for Open Enrollment. 2 - Build available plans/plan options for Current Enrollment. 2. Process Defaulting: Blank - Do not process for defaulting 1 - Process for defaulting (Open enrollment only)
What You Should Know About Processing Options
Effective Date If the effective date is left blank, the system date is used.
Building the Personal Information Workfile
From the Personal Information Work File Mgmt menu (G08BESS324), choose Personal Information Work File Build.
You use the Personal Employee Information Workfile Build program (R054101) to create tables that contain employee, dependent, and beneficiary personal information. The report obtains information from the following tables:
• Employee Master Information (F060116)
• Address Book - Contact Phone Number (F0115)
• Address Book - Who's Who (F0111)
The benefits self-service programs use this information to display employee personal information. These tables provide a temporary location that the system uses to store data before writing it back to the originating tables.
The new tables that this program creates are:
• Employee Personal Profile Information Work Table (F054101W)
• Employee Phone Number Work Table (F054115W)
• Employee Emergency Contact Work Table (F054111W)
Processing Options for Personal Employee Information Workfile Build (R054101)
Process 1. Write Personal Information for Employee, Dependent/Beneficiary, or Both: 1 - Employee 2 - Dependent/Beneficiary (R085537 MUST be run first) 3 - Both (R085537 MUST be run first)
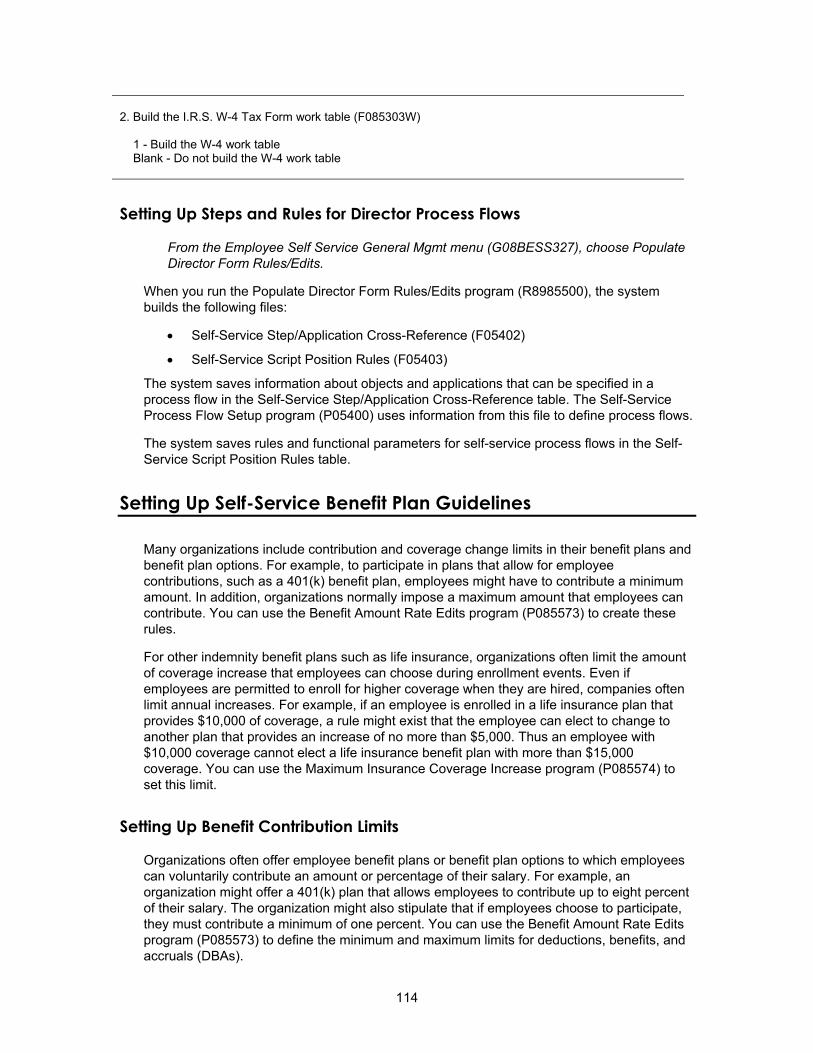
114
2. Build the I.R.S. W-4 Tax Form work table (F085303W) 1 - Build the W-4 work table Blank - Do not build the W-4 work table
Setting Up Steps and Rules for Director Process Flows
From the Employee Self Service General Mgmt menu (G08BESS327), choose Populate Director Form Rules/Edits.
When you run the Populate Director Form Rules/Edits program (R8985500), the system builds the following files:
• Self-Service Step/Application Cross-Reference (F05402)
• Self-Service Script Position Rules (F05403)
The system saves information about objects and applications that can be specified in a process flow in the Self-Service Step/Application Cross-Reference table. The Self-Service Process Flow Setup program (P05400) uses information from this file to define process flows.
The system saves rules and functional parameters for self-service process flows in the Self-Service Script Position Rules table.
Setting Up Self-Service Benefit Plan Guidelines
Many organizations include contribution and coverage change limits in their benefit plans and benefit plan options. For example, to participate in plans that allow for employee contributions, such as a 401(k) benefit plan, employees might have to contribute a minimum amount. In addition, organizations normally impose a maximum amount that employees can contribute. You can use the Benefit Amount Rate Edits program (P085573) to create these rules.
For other indemnity benefit plans such as life insurance, organizations often limit the amount of coverage increase that employees can choose during enrollment events. Even if employees are permitted to enroll for higher coverage when they are hired, companies often limit annual increases. For example, if an employee is enrolled in a life insurance plan that provides $10,000 of coverage, a rule might exist that the employee can elect to change to another plan that provides an increase of no more than $5,000. Thus an employee with $10,000 coverage cannot elect a life insurance benefit plan with more than $15,000 coverage. You can use the Maximum Insurance Coverage Increase program (P085574) to set this limit.
Setting Up Benefit Contribution Limits
Organizations often offer employee benefit plans or benefit plan options to which employees can voluntarily contribute an amount or percentage of their salary. For example, an organization might offer a 401(k) plan that allows employees to contribute up to eight percent of their salary. The organization might also stipulate that if employees choose to participate, they must contribute a minimum of one percent. You can use the Benefit Amount Rate Edits program (P085573) to define the minimum and maximum limits for deductions, benefits, and accruals (DBAs).

115
To set minimum and maximum limits for a DBA, you can use the Plan Master program (P08320) to choose a benefit plan. You need to review current DBAs that might be currently attached to the benefit plan and then use a Form menu option to choose the Benefit Rates. When you specify the minimum and maximum amounts that the organization allows for a specific DBA, you also need to specify the frequency type. The frequency type determines how the system distributes the amount deducted from salary over a period of one year.
The system stores information that you enter in the Benefit Amount Rate Edits program in the Entered Benefit Amount/Rate Edits table (F085573W).
► To set up benefit contribution limits
From the Benefits Administration Setup menu (G08BB4), choose Plan Master.
1. On Work With Plan Master, click Find to display existing benefit plans.
2. Choose a benefit plan, and then click Select.
3. On Plan Master, click the Calc./Eligibility tab and review the following fields:
• EE Payroll Deduction
• EE Flex Cost
The system uses EE Payroll Deduction or EE Flex Cost, but not both. If a value exists for EE Payroll Deduction and EE Flex Cost, the system uses EE Payroll Deduction and ignores EE Flex Cost.
4. Choose one of the following fields, and then choose Benefit Rates from the Form menu:
• EE Payroll Deduction
• EE Flex Cost
The Benefit Rates menu option is available only when you first perform one of the following:
• Choose EE Payroll Deduction
• Choose EE Flex Cost and EE Payroll Deduction is blank
5. On Work With Benefit Amount/Rate Edits, complete the following fields and then click Find to display existing records:
• Enrollment Event Type
• DBA Code
6. To add minimum and maximum limits to a DBA, click Add.

116
7. On Benefit Amount/Rate Edit Revisions, complete the following fields:
• DBA Code
• Minimum Amount
• Maximum Amount
• Frequency Type
8. Click OK.
You can enter minimum and maximum amounts for additional DBAs before canceling this form.
Setting Up Maximum Coverage Increase Limits
Many organizations offer life insurance benefit plans and benefit plan options to employees. Employees can normally choose to enroll in one or more of the plans or decline enrollment. Companies often allow employees to enroll in any available insurance benefit plan when they are hired, but limit annual increases after the initial enrollment. To qualify for an exception to the annual increase rule, an organization might require a physical examination.
You can use the Maximum Insurance Coverage Increase program (P085574) to create a coverage increase limit rule. You can create this rule for any of the following:
• Benefit plans
• Benefit categories

117
• Benefit plans within benefit categories
Before creating a new coverage increase limit rule, you need to review the premium and coverage information on the Premium/Coverage tab on the Plan Master form. After reviewing this information, you can choose a benefit plan and then use the Allowed Increment option on the Row menu of the Plan Master program (P08320) to access the Maximum Insurance Coverage Increase program. Alternatively, you can choose the Categories by Benefit Group program (P08350) and implement the same procedure.
If you create a coverage increase limit rule for a benefit plan, the rule then applies to everyone in the company who is covered by the benefit plan. If you create a rule for a benefit category, then only employees within the benefit category are affected by the rule. If you create a rule for a benefit plan within a benefit category, then only employees within the category who elect the benefit plan are affected by the rule.
The system stores information that you enter in the Maximum Insurance Coverage Increase Amounts table (F085574).
► To set up maximum coverage increase limits
From the Benefits Administration Setup menu (G08BB4), choose Plan Master.
1. On Work With Plan Master, click Find to display current benefit plans.
2. Choose an indemnity benefit plan and click Select.
3. On Plan Master, click the Premium/Coverage tab and review the following fields:
• Premium Payment
• Age Rate Table
• Per Coverage Dollars
• Maximum Premium Amount
• Amount - Coverage
• Salary Factor
• Rounding Amount
4. Click Cancel to return to Work With Plan Master.
5. Choose a benefit plan, and then choose Allowed Increment from the Row menu.

118
6. On Allowed Increment, complete the following field under Open Enrollment:
• Maximum Increase Amount
7. Complete the following field under Current Enrollment:
• Maximum Increase Amount
8. Click OK.
If you want to create limit rules only at the benefit plan level, this step ends the procedure. If you want to create limit rules at a more specific level, then continue with the following steps.
9. Exit to the menu and choose Categories by Benefit Group.
10. On Work With Benefit Groups, click Find to display existing employee benefit groups.
11. Choose a benefit group and click Select.
12. On Categories By Benefit Group, choose an indemnity benefit plan record such as Life Insurance Benefits, and then choose Assign Plans from the Row menu.
13. On Plans Within Categories, choose an employee benefit plan and choose Allowed Increment from the Row menu.
14. On Allowed Increment, complete the following field under Open Enrollment:
• Maximum Increase Amount
15. Complete the following field under Current Enrollment:
• Maximum Increase Amount

119
16. Click OK.
17. On Plans Within Categories, click OK.
Setting Up Self-Service Process Flows
Benefits self-service software includes the opportunity for Workforce Management administrators to extensively tailor the enrollment process to meet organizational requirements. Accessing this software through an Internet web portal, you can change the appearance of the interface and the processes that employees use to manage their benefits.
You need to run the Populate Director Form Rules/Edits program (R8985500) prior to creating or changing self-service process flows.
You can use the Self-Service Process Flow Setup program (P05400) to define the process flow for your self-service programs. The process flow includes the steps that are necessary to complete a full life event or open enrollment change. These steps might include a variety of interactive programs, reports, or director forms. You can create company or country-specific processes for each life or open enrollment event, including translated text to meet the needs of specific employee audiences.
Setting up process flows is required before employees, manager, or candidates can use self-service functions that require more than one program to complete.
Running the Populate Director Form Rules/Edits Report
From the Employee Self Service General Mgmt menu (G08BESS327), choose Populate Director Form Rules/Edits.
The Populate Director Form Rules/Edits program (R8985500) creates and stores information that is used by the Self-Service Process Flow Setup program (P05400) to create new process flow scripts. You need to run this report before creating or changing process flow scripts. You normally need to run this report only once unless you are setting up access to additional self-service programs after your initial setup. This report creates the following tables:
• Self-Service Step/Application Cross-Reference (F05402)
• Self-Service Script Position Rules (F05403)
The Self-Service Setup/Application Cross-Reference table saves a list of all the objects, programs, and reports that you might need when you create process flow scripts.
The Self-Service Script Position Rules table saves all of the rules that govern the setup of self-service process scripts.
Defining Process Flow Scripts
A Workforce Management administrator can use the Self-Service Process Flow Setup program (P05400) to define the action steps for new self-service process flows, copy and edit existing process flows, or delete process flows that are no longer applicable to organizational requirements. These process flows define the procedure that an employee uses to enroll in or change benefits or personal information.

120
For a new process flow, the user initially defines general information about the script, including the company and country to which the process flow applies. Next, the administrator defines each action step of the process flow. If the action step requires a program, the user specifies the program, including the version number. You can select only self-service programs. If the action step specifies a director form, the system uses the Self-Service Director Text program (P05401) to provide a form where the administrator defines the director text.
To plan a self-service process flow and implement the procedure with minimum effort, you need to be aware of the rules and program relationships that govern process flows. You generated these rules by running the Populate Director Form Rules/Edits program (R9895500). When you specify action steps in a process flow that violates any of the rules, the system produces an error and an explanation of the problem.
Self-Service Process Flow Rules and Program Relationships
Following are the rules that govern the creation of a self-service process flow:
• A director must be included between each application in the flow. Each script must follow this order: director, program, director, program, and so on.
• The first director in a script must be enabled.
• If an action step is required in a flow, then you must also enable that step in the flow. Although a setup option exists for disabling an action step, required action steps must always be enabled.
• If you specify Self-Service Action Step 70 Dependent List (P085551 - ZJDE001) in the process flow, then you must include Step 160 Preview Benefit Changes (P085568 - ZJDE0002). Step 70 must precede Step 160.
• If you specify Self-Service Action Step 80 Beneficiary List (P085551 - ZJDE0002) in the process flow, then you must place it after Step 70 (P085551 - ZJDE001).
• If you specify Self-Service Action Step 80 Beneficiary List (P085551 - ZJDE0002) in the process flow, then you must include Step 160 Preview Benefit Changes (P0855568 - ZJDE0002). Step 80 must precede Step 160.
• If you specify Self-Service Action Step 100 Number of Dependents to Cover (P085560) in the process flow, then you cannot include Step 120 ‘Health & Welfare’ Enrollment (P085570). If you specify Step120 ‘Health & Welfare’ Enrollment (P085570) in the process flow, then you cannot include Step 100 Number of Dependents to Cover (P085560). If you specify Step 100 or Step 120 in the process flow, then you must include Step 160 Preview Benefit Changes (P085568). Step 100 or 120 must precede Step 160.
• If you specify Self-Service Action Step 150 COBRA Notification (P085580) in the process flow, then this step must follow any of the following steps if they are in the process flow:
Self-Service Action Step
Program Number Program Version (if required)
70 P08551 ZJDE0001
80 P08551 ZJDE0002
100 P085560

121
120 P085570
160 P085568 ZJDE0002
170 P085564
180 P085568 ZJDE0003
190 P085563 ZJDE0001
200 P085563 ZJDE0002
210 P085563 ZJDE0003
220 P085563 ZJDE0004
• You must specify all or none of the following Self-Service Action Steps: 160 Preview Benefit Changes (P085568 - ZJDE0002), 170 Accept Benefit Changes (P085564), and 180 Final Benefit Confirmation Statement (P085568 - ZJDE0003). If you specify all three steps, you must define them in sequence after Steps 60 (P085562), 70 (P085551 - ZJDE0001), 100 (P085560) and 120 (P085570).
• When you specify the following Self-Service Action Steps, you must define them in the following sequence: 160 (P085568 - ZJDE0002), 170 (P085564) and 180 (P085568 - ZJDE0003).
• If you specify any of the following Self-Service Action Steps, then you must include Step 160 (P085568 - ZJDE0002): 190 'Indemnity' Plans to Change (P085563 - ZJDE0001), 200 'Retirement' Plans to Change (P085563 - ZJDE0002), 210 'Other' Plans to Change (P085563 - ZJDE0003), or 220 Change All Remaining Categories (P085563 - ZJDE0004). Step 160 must follow any of these steps in the process flow.
• If you specify Self-Service Action Steps 190 'Indemnity' Plans to Change (P085563 - ZJDE0001), 200 'Retirement' Plans to Change (P085562 - ZJDE0002), and 210 'Other' Plans to Change (P085563 - ZJDE0003) in the process flow, then do not include Step 220 Change All Remaining Categories (P085563 - ZJDE0004). Step 220 causes redundancies in the script because the first three steps include the benefit plans that are defined in Step 220.
► To define a process flow script
From the Employee Self Service Director Setup menu (G08BB411), choose Employee Self Service Process Flow Setup.
1. On Work With Self-Service Process Flow Scripts, click Add.

122
2. On Define Process Flow, complete the following fields:
• Enrollment Event Code
You enter this code in a processing option for the director when running a script.
• Company
3. Complete the following optional fields and then click OK.
• Country Code
• Address Number for E-Mail Recipient
You can define any of the Self-Service Category Codes, and use them for process identification and sorting at a later time. These user defined codes are not required for the self-service process script.
The process of creating a self-service process flow includes multiple forms that the system displays in sequence. After completing a form and choosing Next, the next form in the sequence appears without an option to return to the previous form.

123
4. On Define a Process Flow Step, review the following field and click Next:
• Sequence Number
Because all self-service process flows must begin with a director form, the system automatically selects the Display Director Form option and disables the Call An Application option.
On subsequent steps of the process flow, use the Version field only when you need to specify a specific program version.
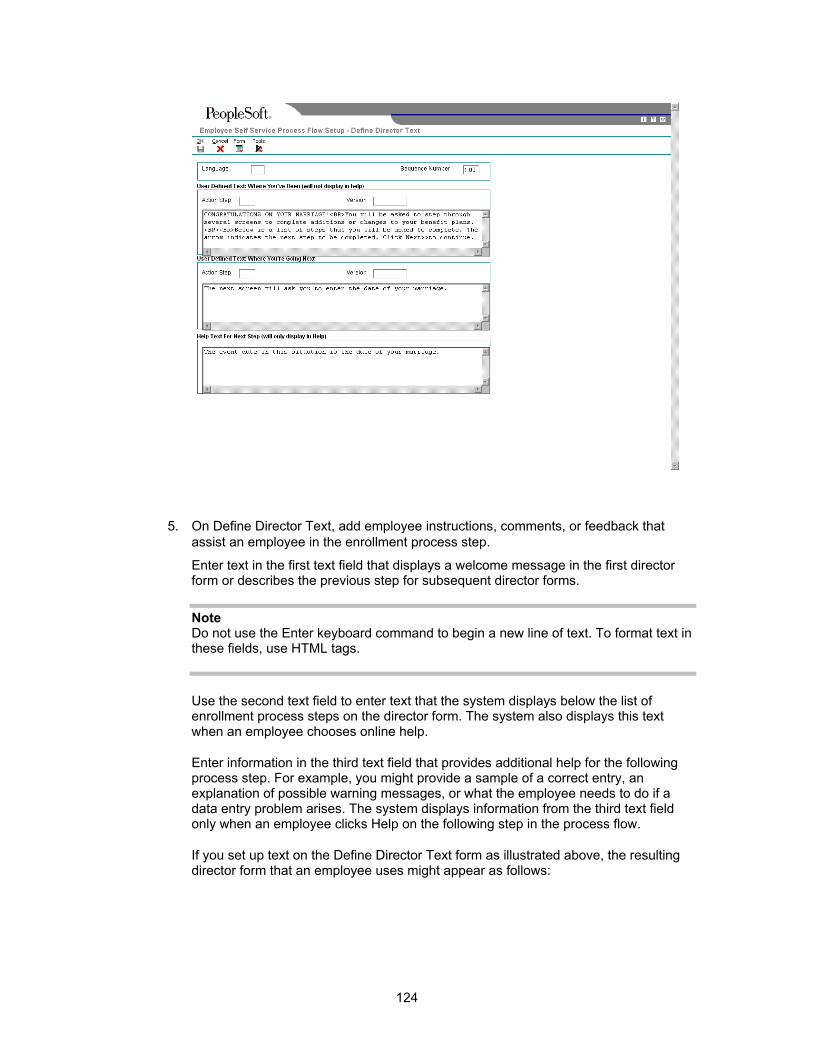
124
5. On Define Director Text, add employee instructions, comments, or feedback that assist an employee in the enrollment process step.
Enter text in the first text field that displays a welcome message in the first director form or describes the previous step for subsequent director forms.
Note Do not use the Enter keyboard command to begin a new line of text. To format text in these fields, use HTML tags.
Use the second text field to enter text that the system displays below the list of enrollment process steps on the director form. The system also displays this text when an employee chooses online help.
Enter information in the third text field that provides additional help for the following process step. For example, you might provide a sample of a correct entry, an explanation of possible warning messages, or what the employee needs to do if a data entry problem arises. The system displays information from the third text field only when an employee clicks Help on the following step in the process flow.
If you set up text on the Define Director Text form as illustrated above, the resulting director form that an employee uses might appear as follows:
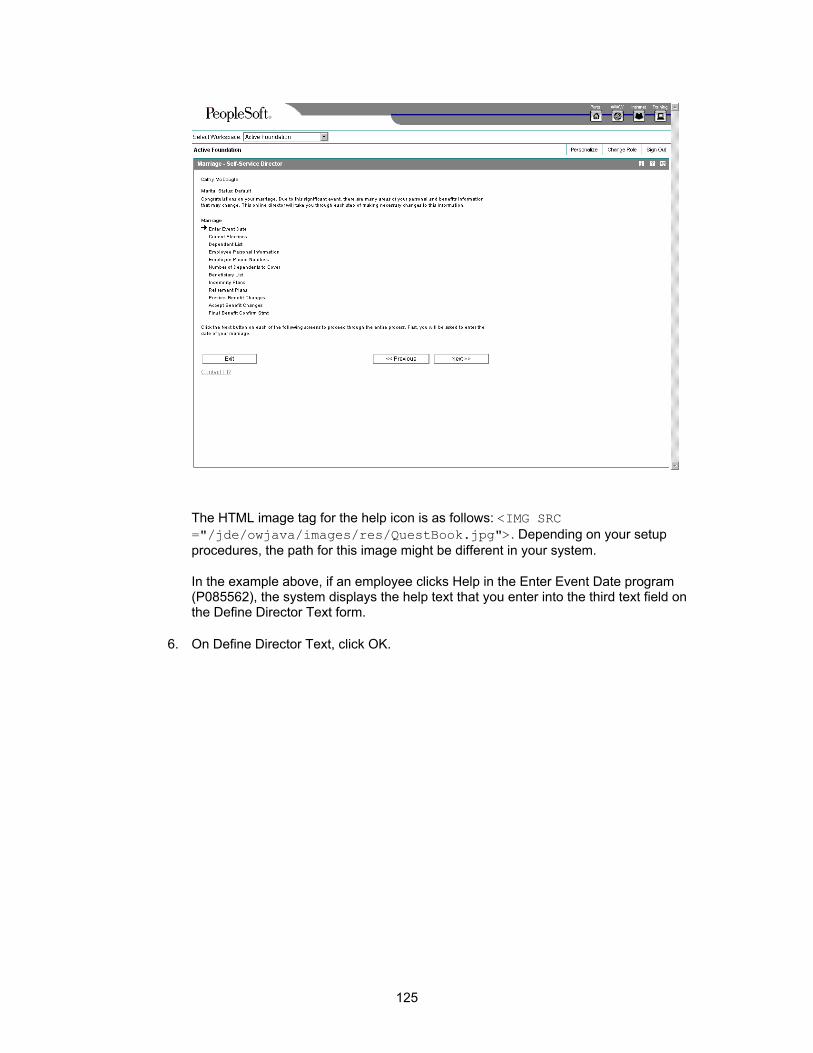
125
The HTML image tag for the help icon is as follows: <IMG SRC ="/jde/owjava/images/res/QuestBook.jpg">. Depending on your setup procedures, the path for this image might be different in your system.
In the example above, if an employee clicks Help in the Enter Event Date program (P085562), the system displays the help text that you enter into the third text field on the Define Director Text form.
6. On Define Director Text, click OK.

126
7. On Design a Process Flow Step, review the following options under the Action heading:
• Call An Application
• Display Director Form
The system automatically selects one of these options based on the process sequence. For example, after you define a director process step, the system automatically chooses the Call An Application option.
8. Complete the following fields under the Action Definition heading and click Next:
• Self-Service Step
• Sequence Number
The system automatically provides the next number in sequence. You can change this number to alter the order in which the forms are displayed to employees.
9. Repeat steps 2 - 7 until all steps of the process flow are complete.
10. When all process flow steps are defined, click Finish on the final appearance of the Design a Process Flow Step form.

127
11. On Process Flow Detail, review the process flow, make changes or additions, and then click OK.
Setting Up Translated Director Text
Each organization defines self-service process flows that employees use to enroll in benefits. Each of the director forms within a process flow contains user defined text in the domestic language that assists employees with the task. When self-service process flows are defined for additional companies and countries, the director form text entries might require translation.
To set up translated director text, you use the Self-Service Director Text program (P05401) to enter translated text.
► To set up translated director text
From the Employee Self Service Director Setup menu (G08BB411), choose Employee Self Service Director Setup.
1. On Work With Director Text, complete the following fields and then click Find:
• Enrollment Event Code
• Company
• Country Code
• Sequence Number

128
2. Choose a self-service process flow record and click Select.
The domestic text from the record appears in each of the windows.
3. On Define Director Text, choose Translate from the Form menu.
4. Complete the following field:
• Language
5. Enter translated text into each of the windows.
6. When finished entering translated text, click OK.
Setting Up Form Options
Although self-service forms are designed to display personal information that many organizations find appropriate and useful, in the context of self-service, some workforce management administrators might need to change these choices. You can use the Employee Self-Service Form Options program (P085550) to hide certain fields on a form or to disable certain fields so that the system displays information, but employees cannot enter changes.
The system default setting for the Employee Self-Service Form Options program is to show all fields and enable input. Only overrides to this default need to be specified. Only personal information can be set up as disabled for input. If no overrides are entered, employees have full access to each of the features. The Grouping Code field is connected to UDC 08/EG. This UDC contains a record for each program that has controls that can be hidden. The predefined Grouping Codes are as follows:
CON
Employee emergency contacts
DAB
Dependent and beneficiary personal information
PER
Employee personal information
You can also set up processing options for the following programs that specify display options on the following forms:
• Self-Service Director (P05410)
• Employee Information - Telephone Numbers (P054215)
• Enrollment Statement (P085568)
• Dependent Enrollment (P085570)
To set up these processing options, you use the Application Versions Interactive program (P983051) to find the processing options template and then choose Processing Options from the Row menu.

129
► To set up form options
From the Employee Self Service General Setup menu (G08BB413), choose Employee Self Service Form Options.
1. On Employee Self-Service Form Options, complete the following fields and click Find:
• Grouping Code
• Enrollment Event Code
• Data Item
2. To hide or disable the display of a data item, complete the following fields for each item:
• Grouping Code
• Enrollment Event Code
• Data Item
• Display Option
• Disable Input
3. Click OK.

130
Processing Options for Self-Service Director (P05410)
Process 1. Process Flow Event Display 1. Display Marital Status on the Director Form? 0 = No 1 = Yes 2. Display Salary on the Director Form? 0 = No 1 = Yes 3. Display Birthdate on the Director Form? 0 = No 1 = Yes 4. Display User Defined Text "Where You're Going Next", from P05400, on the Help Form. 0 = No 1 = Yes
Processing Options for Employee Information - Telephone Numbers (P054215)
Display 1) Display Phone Prefix 0 = No, do not display prefix 1 = Yes, display prefix
Processing Options for Enrollment Statement (P085568)
Options 1. Confirmation Statement Options C = Current Statement P = Pending Statement F = Final Statement 2. Employer Cost 0 = Hide 1 = Show 3. Final Statement 0 = Show Summary Of Benefits 1 = Show Transaction Number Only 4. Previous Employee Cost 0 = Hide 1 = Show

131
5. Categories To Display 0 = Show All Categories 1 = Only Categories in F085510 6. Categories In Final Statement 0 = Show All Categories 1 = Show Only Enrolled Categories Default Enter the mailing address for declined coverage statements 1. Enter The Company Name 2. Enter The Company Address 3. Enter The City 4. Enter The State 5. Enter The Postal Code 6. Enter The Persons Name For, Attention Of: Date 1. Current Enrollment Form Date to Display 0 = No Date Displayed 1 = Latest Plan Enrollment Date 2 = System Date 2. Current Enrollment Form Date to Display Enter a Valid Date to Override Above Options E-mail 1. From E-mail Address Valid E-mail Address Blank = Same as To Address
Processing Options for Dependent Enrollment (P085570)
Default Hide Benefit Calculations 0 = Do Not Hide 1 = Hide Calculation Button 2 = Hide Calculation Button and Totals
Setting Up Benefit Confirmation Statement Options
You can use the Benefit Confirmation Statement Options program (P085518) to define the text on certain buttons in benefit enrollment statements. You normally define these statement forms at various intervals of the process flows for benefits enrollment. Text on the buttons can be changed to suit individual events, versions, languages, countries, and organizations. The text on each button can be changed or the text can be hidden. If the text field is left blank, the system uses the default text that is currently displayed in the software.
On some forms, certain buttons are always hidden, regardless of the settings that you might input in this program. For example, the Next button is valid only on the Current Statement.

132
The Back button is valid only on the Current Statement and the Pending Statement. The Submit button exists on the Pending Statement and the Final Statement, but on the Final Statement, the default text is Final.
► To set up benefit confirmation statement options
From the Employee Self Service General Setup menu (G08BB413), choose Benefit Confirmation Statement Options.
1. On Benefit Statement Options, complete the following fields:
• Enrollment Event Code
• Confirmation Options
• Language
• Version Title
2. To customize the Next, Back, Print, Mail, and Submit buttons on the benefit confirmation form, complete the following fields for each event:
• Enrollment Event Code
• Version
• Language

133
• Print Button Text
• Mail Button Text
• Send E-Mail to HR Text
• Hide Mail
• Hide Print
• Statement Text
3. When all enrollment event changes are complete, click OK.
Setting Up Self-Service Benefits Workflow Approval
You can design and use workflow processes to notify specific employees when an employee enters self-service changes. The system allows workflow processes to be created for the following workfiles:
• Benefits Information
• Personal Information
• Emergency Contact Information
You can use the ESS Workfile Approval Setup program (P085515) to specify workflow processes that the system starts when changes are made to certain workfiles. You need to use this program to enable or disable self-service benefits workflow processes because you cannot make these changes in the workflow Process Master program (P98800). The workflow Process Master program allows only one active version. You can disable a workflow process by choosing the Disable Version option. When disabled, the version is inactive and the workflow process does not start when employees enter benefit changes. This function is different than the activate and deactivate features on the workflow Process Master program. When you define the workflow Enabled status as YES in the Benefits Workflow Approval program (P05420), the system runs the workflow process even if the Version Status in the workflow Process Master is not active.
Note
The system does not display the Process Master program in the HTML environment. The system administrator normally assigns this program a high level of security and might be accessible only to users with required system security.
Employee self-service benefits software includes the BENAPPRV default process. This process sends an email message and includes an acceptance form. Although the system uses only the BENAPPRV workflow process, you can create and use additional workflow process versions, modified to meet organizational requirements, with each enrollment event code and work file combination. The system requirement for each workflow process is that the data structures cannot be changed.
In an open enrollment event, employee benefit changes start the workflow process. If an employee enters additional changes through self-service, the system terminates any related, active workflow processes and removes pending approvals from the email system. If the

134
workflow process cannot start, possibly because the version number is unavailable, the system sends the process recipient a notification message regarding the process failure and then accepts the benefit changes. If workflow processes are enabled in your software, you cannot update employee changes to the live tables until all workflow processes are approved.
To create a new workflow process, copy the default BENAPPRV version and assign new identity information to the copy. Then modify the values in the new version to meet the needs of your organization. After you finish revising the new version, enable the new version with the Benefits Workflow Approval program. To validate a new workflow version, choose the new version and then choose Validate Workflow from the Row menu.
You can modify a workflow process until a new workflow process version is run the first time. When you run the workflow process version, the system creates an instance record and saves the record in the Process Instance table (F98860). You must delete all instance records created by running a workflow process version before you can enter changes to the version.
► To set up a self-service benefits workflow approval
From the Employee Self Service Workflow Setup menu (G08BB412), choose Self Service Benefits Workflow Approval.
1. On Benefits Workflow Approval Setup, complete one or both of the following fields and click Find:
• Enrollment Event Code
• Work File Object Name
2. To ensure that the workflow process includes appropriate specifications, review the following fields:
• Event Code
• Work File Object Name
• Process ID
• Workflow Process Version
• Workflow Process Version Status
The value in this field indicates whether the version of the workflow process is active.
• MB DS
The mailbox designation is the location to which the system sends notification and approval messages.
3. To activate a workflow process version, choose a workflow process record and choose Process Master from the Form menu.

135
Note The system does not provide access to the Process Master program (P98800) from the HTML environment. If access to this program is required, see the system administrator.
4. On Work With Processes, click Find to view the available workflow processes.
5. To activate a workflow process, choose a process record, and then choose Activate from the Row menu.
6. Click Close to return to Benefits Workflow Approval Setup.
7. Review the workflow process to verify that the status is changed.
8. When changes are complete, click OK.
Saving Self-Service Employee Information
When employees enter changes to their benefits, personal information, or dependent and beneficiary information, the system saves the changes in workfiles. This information needs to be periodically saved to system live files. After you set up benefits self-service, including the required workfiles, you need to schedule reports to run that periodically save this information.
Saving Self-Service Employee Personal Information
From the Update Work File Data to Live Tables menu (G08BESS325), choose Update Personal Info to Live Tables.
You can use the Update Employee Personal Information to Live Tables program (R054104) to save self-service changes to live system tables. Processing options specify the types of changes that are saved:
• Employee personal information
• Dependent and beneficiary information
• Employee personal information and dependent and beneficiary information
You should run this program after employees use self-service to change any of their personal information. Since you might not be aware of when changes are entered, you should schedule this program to run periodically so that the system saves new information to the live tables at least once each week. You should also run this program at the conclusion of each open enrollment period. After the system updates the live tables, employees can review the new changes on self-service forms.
The Employee Personal Information to Live Tables program includes a review of self-service workflow. This program verifies that required workflow approvals are complete before the system processes employee benefit changes. The final step of this programs process saves information to history tables so that employees can look up changes by transaction number.
The system references the following tables for this program:
• Employee Personal Profile Information Work Table (F054101W)
• Employee Phone Number Work Table (F054115W)

136
• Employee Emergency Contact Work Table (F054111W)
Note
If the GeoCoder for Human Resource Management applications is active, the Employee Personal Information to Live Tables program automatically updates employee tax area information if the changes that are made using self-service include a change to the employee's city, state, county, province, or postal code. If there are multiple valid GeoCodes for the employee's new address information, the system produces an exception report and does not update the employee's GeoCode. In these instances, you must select the correct GeoCode from the exception report and manually update the employee's tax area information. See Assigning Tax Area Information Using the GeoCoder in the Workforce Management Foundation Guide for additional information.
Processing Options for Update Employee Personal Information to Live Tables (R054104)
Process 1. Write Personal Information for Employee, Dependent/Beneficiary or Both: 1 - Employee (Proof mode only) 2 - Dependent/Beneficiary (Proof mode only) 3 - Both 2. Mode: 0 - Proof 1 - Final
Saving Self-Service Benefits Information
From the Update Work File Data to Live Tables menu (G08BESS325), choose Update Benefits Info to Live Tables.
You can use the Update Benefits Information to Live Tables program (R085524) to save self-service benefit changes. This program ensures that any eligibility rules are met and then saves changes from benefit workfiles to system live tables. If changes are made during open enrollment, you should run this program after the open enrollment period is closed. If changes are made because of life events, then you should run this program before each payroll is processed, so the system can save new DBA information to the appropriate files.
The Update Benefits Info to Live Tables program includes a review of self-service workflow. This program verifies that required workflow approvals are complete before the system processes employee benefit changes. The final step of this programs process saves information to history tables so that employees can look up changes by transaction number.
The system references the following tables for this program:
• Employee Master Information (F060116)
• Available Plans and Plan Options by Employee Work Table (F085520W)
• Dependent/Beneficiary X-Reference Work Table (F085536W)

137
Processing Options for Update Benefits Information to Live Tables (R085524)
Process 1. Enrollment Event Type: 1 - Open Enrollment 2 - Current Enrollment 2. Mode: 0 - Proof 1 - Final Defaults 1. End Enrollment Status: A valid code 2. End Enrollment Status based on Plan End Date(s): A valid code.
Reviewing Employee Self-Service History
Employees can use the Work With Employee Self Service History program (P085585) to review changes to their company benefits. When an employee enters changes to benefits, either as the result of a qualifying life event or during open enrollment, the system tracks all changes and saves them in history files. An employee might use this program to review current benefits to see if they need to be update or to check the records for errors.
The Work With Employee Self Service History program displays historical information in the following categories:
• Personal information
• Telephone information
• Emergency contact information
• Dependent and beneficiary information
• Benefit plan and benefit plan option information
The Work With Employee Self Service History program uses the following OneWorld tables:
• Employee Personal Profile Information History Table (F054101)
• Employee Emergency Contact History Table (F054111)
• Employee Phone Number History Table (F054115)
• Available Plans and Plan Options by Employee History Table (F085520)
• ESS History Table Cross Reference (F085528)

138
If changes to benefit information are required, and the open enrollment period is open, you can enter changes until open enrollment closes. If the open enrollment period is closed, you should contact the Workforce Management administrator.
If changes to benefit information are entered as the result of a qualifying life event, and the allowed period of time for entering benefit changes has not expired, you can enter changes. If the allowed period of time for entering benefit changes has expired, you should contact the Workforce Management administrator.
► To review employee self-service history
From your intranet portal, choose Employee Self-Service History Reference.
1. On Employee Self-Service History Reference, choose an underlined reference number.
The underlined reference number is a link to historical information. When you click a link, the system automatically displays a form with related, historical, benefit information. Depending on the link that you choose, one of the following history forms appears:
• Employee Personal Profile History
When you view the Personal Profile History form, a Next button appears only if changes exist.
• Emergency Contacts History
When you view the Emergency Contacts History form, a Next button appears only if changes exist.
• Dependent/Beneficiary History
• Plan/Plan Option History
When you view the Plan/Plan Option History form, a Next button appears only if changes exist.
2. To view the financial summary for benefit plan or benefit plan options, choose Next.

139
The plan/plan option history form displays the same data that appears on the final benefits enrollment confirmation form during the open enrollment process.
You can use the Back button to return to the previous form.
Depending on how the self-service benefits programs are set up, the following items might not appear:
• Flex cost column
• Employer cost column
• Cost per pay period row
• Send email to HR button
The system displays two financial summary rows; one at the top of the form and one at the bottom. Because information displayed between these two rows might exceed the information that you can see on a video display, summary information is provided in both locations for user convenience.
Processing Options for Work With Employee Self Service History (P085585)
Default 1. Address Number of HR E-Mail Recipient Display 1. Display Employer Cost column on Plan and Plan Option History Form. 0 = No 1 = Yes

140
2. Display text and buttons to resemble the Enrollment Statement. C = Current Enrollment Statement (Default) P = Pending Enrollment Statement F = Final Enrollment Statement
Revising Workfiles for Benefits Self-Service
A system administrator can use workfile maintenance programs to enter changes to the benefits self-service workfiles. Although entering changes directly to a workfile should be an unusual event, you can directly change the data in the workfiles to correct errors or enter changes that occur outside of normal parameters. You might use this approach for any of the following tasks:
• Review files for data errors
• Correct errors
• Enter changes to data outside of open enrollment
Caution
Access to this program should have the highest possible level of system security because when you revise self-service benefits information manually, the following occurs:
• The system does not validate data entry.
• Changes entered in this program can create unintentional detrimental effects in other programs.
• Data can be removed or changed that negatively affects payroll processing and employee benefits.
Only an expert J.D. Edwards software user should enter changes to benefits self-service workfiles. The user should be aware of all of the benefits self-service tables and understand the interactions of the enhanced self-service software. No data integrity checking is performed by any of the maintenance programs. For example, if a system administrator changes an employee enrollment from family coverage to employee only, errors result unless associated dependent records for the family enrollment are also changed.
A system administrator can remove data from the workfiles without replacing the data with valid values. For example, if an administrator mistakenly removed a benefit plan option, all employees enrolled in the benefit plan option are affected. The self-service workfiles might require rebuilding as the result of potential errors.
If you find it necessary to enter manual changes to self-service benefits history tables, back up your history workfiles and contact J.D. Edwards for technical support.
Revising the Current Coverage Workfile
An expert system administrator can use the Employee Enrollment Work File Revisions program (P085530W) to enter changes to data in the Employee Current/Pending Elections Work Table (F085530W) before the system saves the temporary information from this table in
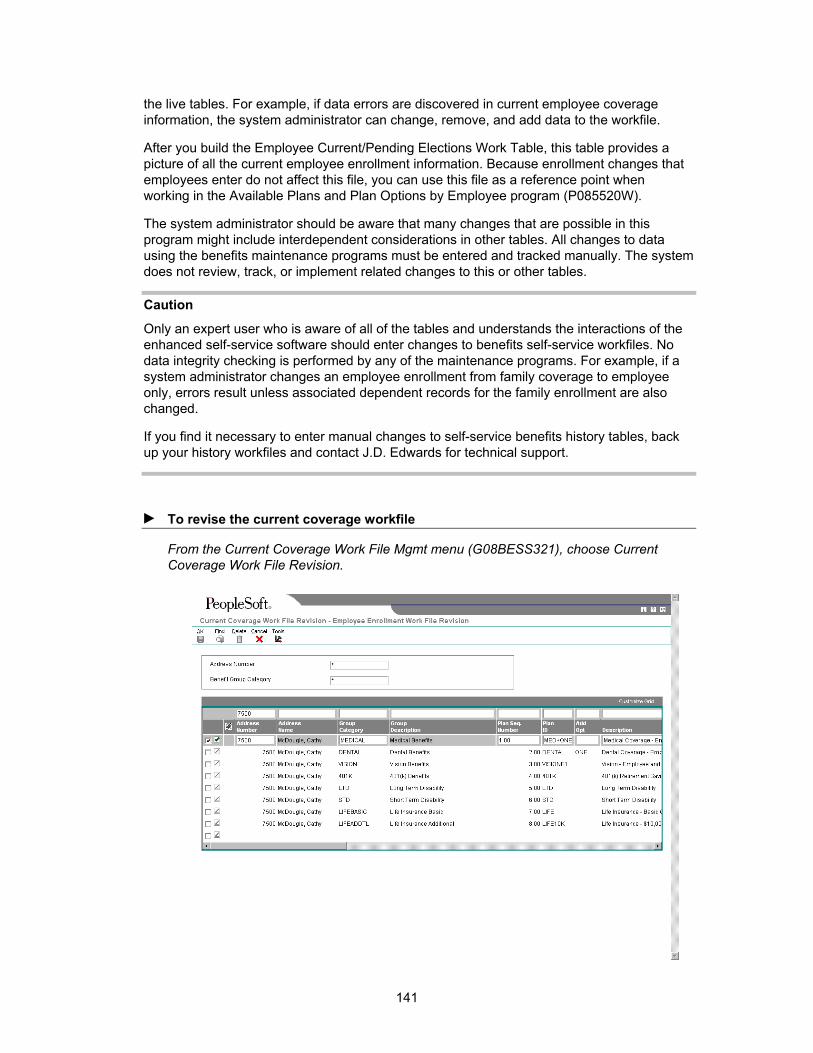
141
the live tables. For example, if data errors are discovered in current employee coverage information, the system administrator can change, remove, and add data to the workfile.
After you build the Employee Current/Pending Elections Work Table, this table provides a picture of all the current employee enrollment information. Because enrollment changes that employees enter do not affect this file, you can use this file as a reference point when working in the Available Plans and Plan Options by Employee program (P085520W).
The system administrator should be aware that many changes that are possible in this program might include interdependent considerations in other tables. All changes to data using the benefits maintenance programs must be entered and tracked manually. The system does not review, track, or implement related changes to this or other tables.
Caution
Only an expert user who is aware of all of the tables and understands the interactions of the enhanced self-service software should enter changes to benefits self-service workfiles. No data integrity checking is performed by any of the maintenance programs. For example, if a system administrator changes an employee enrollment from family coverage to employee only, errors result unless associated dependent records for the family enrollment are also changed.
If you find it necessary to enter manual changes to self-service benefits history tables, back up your history workfiles and contact J.D. Edwards for technical support.
► To revise the current coverage workfile
From the Current Coverage Work File Mgmt menu (G08BESS321), choose Current Coverage Work File Revision.

142
1. On Employee Enrollment Work File Revision, complete one or both of the following fields, and then click Find:
• Address Number
• Benefit Group Category
2. Review the values in the following fields making changes, if appropriate:
• Address Number
• Group Category
• Plan Seq. Number
• Plan ID
• Add Opt
• Effective Date
• Benefit Category Classification
• Plan Grouping
• Plan Cost
• Plan Credit
• Flex Cost
• D B
• Additional Amount
• Amount or Rate
• Amount or Rate
• PCP Flg
• PCP Visited
• PCP Number
• Category Seq. Number
• Category Type
• Ending Date
• Stay In Group

143
• Non-Participating Plan
3. Review the values in the following fields:
• User ID
• Program ID
• Work Stn ID
• Date Updated
• Time Updated
These values cannot be changed. They are for history tracking purposes and display information about the last change to the employee benefit record.
4. Click OK to save the changes in the workfile.
See Also Saving Self-Service Employee Information in the Workforce Management Self-
Service Guide for the procedure to save the temporary information in the workfile to the live tables
Revising the Available Plans Workfile
An expert system administrator can use the Available Plans and Plan Options by Employee program (P085520W) to enter changes to the data in the Available Plans and Plan Options by Employee Work Table (F085520W) before the system stores the temporary information from this table in the live tables.
After you build the Available Plans and Plan Options by Employee Work Table, this table provides a current picture of all the available benefit plans and benefit plan options from which an employee can choose. As employees enter changes, this file records the changes that are active for the upcoming benefit plan year.
A system administrator might enter changes to this table to correct data errors or to change information that is not accessible to an employee. For example, an employee is unable to update benefits choices during open enrollment and open enrollment is now closed. During open enrollment, the system automatically assigned the current benefit choices as the choices for the upcoming benefit year. The records in the Available Plans Work File show that the employee is enrolled in a Preferred Provider Option benefit plan (PPO) for the upcoming benefit year. The employee wants to change medical coverage from a PPO plan to an HMO plan. The system administrator can use the Available Plans Work File Revision program to remove the employee enrollment in the PPO plan and record an enrollment in an HMO plan. The system administrator must be aware that if dependents are affected by the benefit plan change, all issues that might be related to the change must be manually addressed. The system does not review, track, or implement related changes to this or other tables.
Caution
Only an expert user who is aware of all of the tables and understands the interactions of the enhanced self-service software should enter changes to benefits self-service workfiles. No data integrity checking is performed by any of the benefits maintenance programs. For

144
example, if a system administrator changes an employee enrollment from family coverage to employee only, data integrity errors result unless associated dependent records for the family enrollment are also changed.
If you find it necessary to enter manual changes to self-service benefits history tables, back up your history workfiles and contact J.D. Edwards for technical support.
► To revise the available plans workfile
From the Available Plans Work File Mgmt menu (G08BESS322), choose Available Plans Work File Revision.
1. On Available Plans and Plan Options, complete the following field:
• Employee Number
2. In the Display Enrollment Event Type area, choose eithe the Current Enrollment or the Open Enrollment option.
3. In the Display Plans/Plan area, choose either the All or the Selected Plan/Plans option, and then click Find.
4. Review the values in the following fields and make changes, if appropriate:
• Ev Ty
• Address Number

145
• Group Category
• Sequence Number
• Plan ID
• Add Opt
• D B
• PCP Flg
• PCP Visited
• PCP Number
• Amt Rte
• Employee DBA ID
• Employer DBA ID
• Additional Amount
• Non-Participating Plan
• Stay In Group
• Ded Pnts
• Cred Pnts
• Plan Cost
• Plan Credit
• Amount or Rate
• Amount or Rate
• Effective Date
• M P
• Dft Pln
• Ending Date
• Enrollment Event Code
• Selc 01

146
• Flex Cost
• Category Type
• Benefit Category Classification
• Decline Coverage Notification
• Defaulting Allowed
• Max DP
• Minimum Dependents
• Number Partic
• Plan Grouping
• Sequence Number
• Short Category Description
• Short Plan/Option Description
5. Review the values in the following fields:
• Electronic Signature ID
Electronic Signature ID and the next four data items, Date Updated, Time Updated, Updated By, and Program ID, track the last time that the employee made a change to the benefit record.
• Date Updated
• Time Updated
• Updated By
• Program ID
• Date Updated
Date Updated and the three following data items, Update Time, and User ID, and Work Stn ID, track the last time anyone made a change to the benefit record, whether that person was the employee or another person.
• Update Time
• User ID
• Work Stn ID
These values cannot be changed. They are for history tracking purposes and display information about the last change to the employee benefit record.

147
6. Click OK to save the changes in the workfile.
See Also Saving Self-Service Employee Information in the Workforce Management Self-
Service Guide for the procedure to save the temporary information in the workfile to the live tables
Reviewing Dependent and Beneficiary Current Coverage Revisions
A Workforce Management administrator can use the Current Dep/Ben X-Reference Work Table program (P085537W) to review current dependent and beneficiary information that is contained in the Current Dep/Ben X-Reference Work Table (F085537W). This table provides a picture of current dependent and beneficiary enrollment information that is updated each time that you build a new Employee Current/Pending Elections Work Table (F085530W).
If information in this table is incorrect, you should not enter corrections to this table. Because the system does not save information from this table in the live tables, any changes that you enter in this table are lost. An expert system administrator can use the Dependent/Beneficiary Coverage Revisions program (P085536W) to enter changes to the Dependent/Beneficiary X-Reference Work Table (F085536W). After you save changes to the workfile and then build new workfiles, your changes are included in the new Current Dep/Ben X-Reference Work Table.
Caution
The Dependent/Beneficiary Coverage Revisions program should not be used to enter changes to the Current Dep/Ben X-Reference Work File. No changes should be made to this file. Changes to this table replace information that you might need for reference or troubleshooting procedures. Only an expert user who is aware of all of the tables and understands the interactions of the enhanced self-service software should enter changes to benefits self-service workfiles. No data integrity checking is performed by any of the maintenance programs.
If you find it necessary to enter manual changes to self-service benefits history tables, back up your history workfiles and contact J.D. Edwards for technical support.
See Also Building the Current Coverage Workfile for Self-Service in the Workforce
Management Self-Service Guide for the steps to build a new workfile
► To review dependent and beneficiary current coverage revisions
From the Dependent/Beneficiary Work File Mgmt menu (G08BESS323), choose Dependent/Beneficiary Work File Revision.

148
1. On Current Dep/Ben Coverage Revisions, complete the following field and then click Find:
• Employee ID
2. Review the values in the following fields, but do not enter changes:
• Address Number
• Plan ID
• Add Opt
• Participant Address
• Mailing Name
• D B
• R L
• A/I
• Ben %
• Secondary Ben %
• New Ben %

149
• New Second Ben %
• Effective Date
• Ending Date
• PCP Number
• PCP Visited
• User ID
• Program ID
• Work Stn ID
• Date Updated
• Time Updated
Revising the Dependent and Beneficiary Updated Revisions Workfile
An expert Work Force Management administrator can use the Dependent/Beneficiary Coverage Revisions program (P085536W) to review updated dependent and beneficiary information that is contained in the Dependent/Beneficiary X-Reference Work Table (F085536W). This table displays updated dependent and beneficiary enrollment information that employees enter using self-service. The system periodically saves this information to live tables.
A system administrator might enter changes to this table to correct data errors or to change information that is not accessible to an employee. For example, an employee is unable to update benefits choices during open enrollment and open enrollment is now closed. During open enrollment, an employee enters dependent or beneficiary information that contains errors. When the open enrollment period is now over, errors might exist in the Dependent/Beneficiary X-Reference Work Table, but the workfile records have not been saved in the live tables. The system administrator can use the Dependent/Beneficiary Coverage Revisions program to correct the errors. The system administrator must be aware that if the new information contains errors, all issues that might be related to the change must be manually addressed. The system does not review, track, or implement related changes to this or other tables.
Caution
Only an expert user who is aware of all of the tables and understands the interactions of the enhanced self-service software should enter changes to benefits self-service workfiles. No data integrity checking is performed by any of the maintenance programs. For example, if a system administrator changes an employee enrollment from family coverage to employee only, errors result unless associated dependent records for the family enrollment are also changed.
If you find it necessary to enter manual changes to self-service benefits history tables, back up your history workfiles and contact J.D. Edwards for technical support.

150
► To revise the dependent and beneficiary updated coverage revisions workfile
From the Dependent/Beneficiary Work File Mgmt menu (G08BESS323), choose Dep/Ben Current Work File Revision.
1. On Dependent/Beneficiary Coverage Revisions, complete the following field:
• Employee ID
2. In the Enrollment Event Type area, choose one of the following options:
• Current Enrollment
• Open Enrollment
3. Click Find.
4. Review the values in the following fields and make changes, if appropriate:
• Ev Ty
• Action Flag
• Address Number
• Plan ID
• Add Opt

151
• Participant Address
• Mailing Name
• D B
• R L
• Ben %
• Secondary Ben %
• New Ben %
• New Second Ben %
• Effective Date
• Ending Date
• Enrollment Event Code
• Event Date
• PCP Number
• PCP Visited
• A/I
5. Review the values in the following fields:
• Electronic Signature ID
Electronic Signature ID and the next five data items, Date Updated, Update Time, Updated By, User ID, and Program ID, track the last time that the employee made a change to the benefit record.
• Date Updated
• Update Time
• Updated By
• User ID
• Program ID
• Work Stn ID
Work Stn ID and the two following data items track the last time anyone made a change to the benefit record, whether that person was the employee or another person.

152
• Date Updated
• Time Updated
These values cannot be changed. They are for history tracking purposes and display information about the last change to the employee benefit record.
6. Click OK to save the changes in the workfile.
See Also Saving Self-Service Employee Information in the Workforce Management Self-
Service Guide for the procedure to save the temporary information in the workfile to the live tables
Revising the Personal Profile Workfile
An expert Work Force Management administrator can use the Employee Personal Profile Information Table Revision program (P054101W) to review updated dependent and beneficiary information that is contained in the Employee Personal Profile Information Work Table (F054101W). This table displays current employee, dependent, and beneficiary personal profile information that employees enter using self-service. The system periodically saves this information to live tables.
A system administrator can enter changes to this table to correct data errors or to change information that is not accessible to an employee. For example, during open enrollment, an employee might enter personal profile information that contains errors. When open enrollment closes, a system administrator might need to enter corrections to the temporary workfile records before saving the new data in the live tables. The system administrator can use the Employee Personal Profile Information Table Revision program to correct the errors.
The system administrator must be aware that if the new information contains errors, all issues that might be related to the change must be manually addressed. This program allows changes to all data in the table except the fields that track the individuals entering changes and when changes are entered. The program even allows changes to data that is not entered by an employee. The system does not review, track, or implement related changes that might be required in other tables.
Caution
Only an expert user who is aware of all of the tables and understands the interactions of the enhanced self-service software should enter changes to benefits self-service workfiles. No data integrity checking is performed by any of the maintenance programs. For example, if a system administrator changes employee personal information, errors might result unless associated dependent records for the family enrollment are also changed.
If you find it necessary to enter manual changes to self-service benefits history tables, back up your history workfiles and contact J.D. Edwards for technical support.

153
► To revise the personal profile workfile
From the Personal Information Work File Mgmt menu (G08BESS324), choose Personal Profile Work File Revision.
1. On Work With Employee Personal Profile Information Table, complete one of the following fields and click Find:
• Address Number
• Participant Address
2. Review the values in each field to determine whether inaccurate information exists.
3. To enter personal profile changes, choose a record and then choose Profile Revisions from the Row menu.
4. On Employee Personal Profile Information Table Revisions, review the following fields making changes, if appropriate:
• Preferred Name
• Middle Name
• Participant Address
• Mailing Name
• Given Name
• M I
• Surname
• Home Business Unit
• Job Desc
• Supervisor Name
• Business Card Title
• Tax ID
• Address Line 1
• Address Line 2
• Address Line 3
• Address Line 4
• City

154
• ST
• Postal Code
• Ctry
• County
• Co
• R L
• Birth Date
• Gender
• Dep/Ben Tax ID
• H.S. Grad
• Emp
• F.T. Student
• School Attending
• D F
• Disb. Date
• Death Date
• Medicare Date
• Electronic Address
• Action Flag
5. Review the following fields that the system provides only to track changes to this table:
• Electronic Signature ID
• Date Updated
• Time Update
• Updated By
• Program ID
• User ID

155
• Work Stn ID
• Date Updated
• Time Updated
6. When you are finished making changes, click OK to save the new data.
7. To change telephone number information, choose a record and then choose Phone Number from the Row menu.
8. On Employee Phone Number Table Revisions, review the following fields and make changes, if appropriate:
• Prefix
• Phone Number
• Phone Type
• Action Flag
• Line Number
9. Review the following fields that the system provides to track changes to this table:
• Electronic Signature ID
• Updated Date
• Update Time
• Updated By
• User ID
• Program ID
• Work Stn ID
• Date Updated
• Time Updated
10. When changes are complete, click OK.
11. To change emergency contact information, choose a record and then choose Emergency Contact from the Row menu.
12. On Employee Emergency Contact Table Revisions, review the following fields and make changes, if appropriate:
• Salutation Name
• Mailing Name
156
• Given Name
• M I
• Surname
• Address
• City
• ST
• Postal Code
• Ctry
• Type Code
• Professional Title
• Line ID
• Display Sequence
• Remark
• Action Flag
13. Review the following fields that the system provides to track changes to this table:
• Electronic Signature ID
• Updated Date
• Update Time
• Updated By
• User ID
• Program ID
• Work Stn ID
• Date Updated
• Time Updated
14. When changes are complete, click OK.
The system saves your changes in the workfile immediately. The system saves your changes in the live tables only when the next workfile build is run.

157
See Also Building the Personal Information Workfile in the Workforce Management Self-
Service Guide for the procedures to build a new Personal Information workfile and save information to the live tables
Example: Employee Self-Service Demonstration
Employees use benefits self-service to change benefit options during open enrollment and after a life event such as marriage or the birth of a child. To begin the self-service process, employees start a web browser and choose a self-service option from their intranet web portal. The first form that an employee sees is a self-service director. This form, the text on the form, and all other director forms that follow it, are defined when the software is set up. A system administrator uses the following programs to create process scripts and define information that the system displays on forms:
• Self-Service Process Flow Setup (P05400) - Work With Self-Service Process Flow Scripts
You can use this program to create process flow scripts.
• Self-Service Director Text (P05401) - Work With Director Text
You can use this program to create up to three blocks of text on each director form.
• Employee Self Service Form Options (P085550)
You can use this program to hide fields that you do not want employees to see. You can also set up fields so that employees can view information but not change it.
• ESS Workfile approval setup (P085515)
You can use this program to set up Workflow that automatically routes messages for approval by a supervisor or an HR representative.
The self-service program that you link to the web portal is the Self-Service Director (P05410). Because the web portal and all of the self-service forms are defined by each organization to meet diverse requirements, the forms that are presented in this demonstration are a sample of only one possible design. This demonstration provides a view of a sample process flow and potential form that might be included in your script. The process demonstrates the process that an employee might use to change benefits and personal information following a marriage event.
When an employee starts a web browser, a portal appears. You can link a benefits enrollment option to the portal.
The first object that you define in all scripts is the self-service director form (P05410).

158
You can use the Self-Service Director Text program (P05401) to set up three blocks of text. The welcome and congratulations text are included in the first text field. You can define the information that displays immediately above the list of enrollment events in the first text field of the setup form. You can define the information that follows the list of enrollment events in the second field of the setup form. The system uses the second and third blocks of text on each director form as online help. On enrollment forms after the first director form, when an employee clicks on the book icon to display help, the system displays the help text that is located on the previous director form.
The process flow rules for creating scripts require that you specify a director form to start each script and then subsequent director forms after each interactive program. You can hide subsequent director forms for an employee audience that does not require frequent process directions. Even when hidden, when an employee clicks the help icon, the system displays the help text that you create in the second and third text blocks on each of the previous director forms.
On the first director form of each process flow script, an arrow indicates the enrollment event that the system starts first. Text in the third text block needs to instruct employees about which button to click to advance the process and the action that they perform on the following form.
For all benefit and personal information changes that are based on a qualifying life event, employees must enter an event date (P085562).

159
After entering the event date, the system can display a summary of an employee's current benefits and current costs per pay period (P085568, Version ZJDE0001).

160
On Current Elections, you can scroll down to view remaining information and use one or more of the features, such as printing a copy of the elections.
To update an employee name and address, the system displays a personal information form (P054201). The personal information form displays current employee information. Employees can make changes to this information.

161
To enter new address information, the employee clicks the Employee Address Information tab. The system displays current address information:
Employees can enter changes to the existing personal address information.

162
For new telephone information, the system displays the Telephone Numbers form with the current telephone information. Employees can view and change this information.
To add or revise emergency contact information, the system displays current information on the Contacts form of the Employee Contacts program (P054111).

163
If an employee clicks Add A Contact, the system displays the Emergency Contact Information form:
After completing emergency contact information, the system provides a Cover Dependents form of the View Dependents/Beneficiaries program (P085551). Adding or changing dependent information includes a group of forms. The Cover Dependents form lists current information about employee dependents. You can use the Personal Information form of the Personal/Dependent/Beneficiary Information program (P054201), with three tabs, to add or change dependent information. The third form is an updated version of the Cover Dependents form, showing new beneficiary additions and changes. When the system displays the third form, the beneficiary name is underlined and is linked to the data entry forms. When an employee clicks a name, the system redisplays the Personal Information form.

164
On the Cover Dependents form, employees can change current dependent information or add new dependents. To add a new dependent or beneficiary, an employee clicks Add New Dependent, and the system displays the Update Dependent Information form (P054201):
The personal information form for dependents and beneficiaries includes three tabs:

165
• Dependent Information
• Dependent Address
• Dependent Additional Information
On the Dependent Information tab, employees enter basic information for a new dependent or beneficiary. The following form shows the Dependent Address tab on the Update Dependent Information form (P054201):
To enter additional information about a new dependent or beneficiary, an employee chooses the Dependent Additional Information tab:

166
When data entry is complete, the employee clicks Next and the system displays summary information on the dependent list form:
After an employee adds new dependent information, the system displays a Health and Welfare form (P085570) that includes benefit plan options that are based on the new

167
dependent information and current enrollments. The form lists dependents and the health and welfare benefit categories that the employee can elect.
Based on your setup and the dependents that an employee chooses to cover, the system attempts to elect the best plan option. If more than one plan is available for the dependents that an employee wants to cover, the system then displays a form that can be used to elect coverage. The employee can choose from the list of available benefit plans.

168
On the elect coverage form, clicking an option enrolls an employee in a benefit plan. The benefit plan options are underlined, indicating that a link exists to additional information. When set up appropriately, clicking a benefit plan might link an employee to a web site that provides additional details about the plan.
When an employee chooses a benefit plan that requires a primary care physician number, the system displays the Primary Care Physician form:
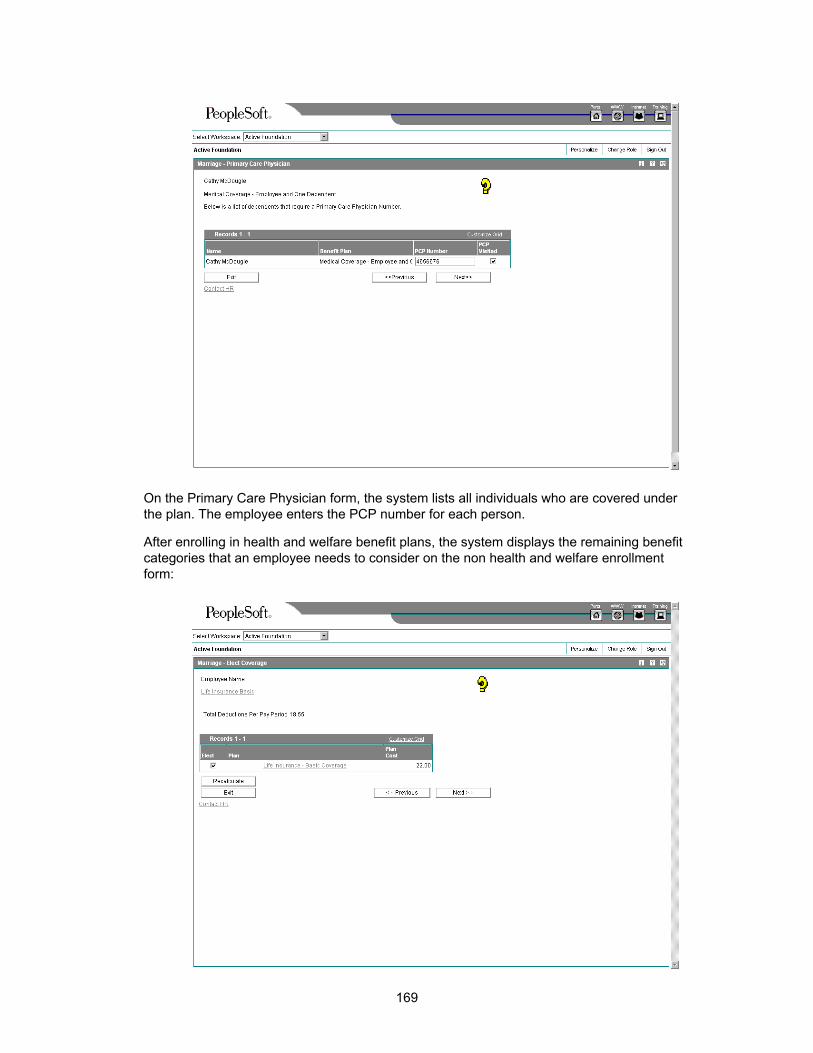
169
On the Primary Care Physician form, the system lists all individuals who are covered under the plan. The employee enters the PCP number for each person.
After enrolling in health and welfare benefit plans, the system displays the remaining benefit categories that an employee needs to consider on the non health and welfare enrollment form:

170
On the non health and welfare enrollment form, an employee can choose a benefit category and then choose Next to view a form that lists available benefit plans. The employee elects benefit coverage and then clicks Next.
When an employee elects a benefit plan that requires a beneficiary designation, the system displays a beneficiary enrollment form:
On the beneficiary enrollment form, the system lists current beneficiary information. The employee specifies a primary and secondary percentage for each beneficiary on this form.
Based on the demonstration script, the employee benefit choices are complete. The system displays a benefits confirmation form (P085568, Version ZJDE0002):

171
You can scroll to the bottom of the benefits confirmation form to view the remaining information:
On the benefits confirmation form, the system displays all of the benefit choices and the cost to the employee. After reviewing the pending benefit changes and cost information, the employee can click Back to enter additional changes or Next to display an acceptance form.
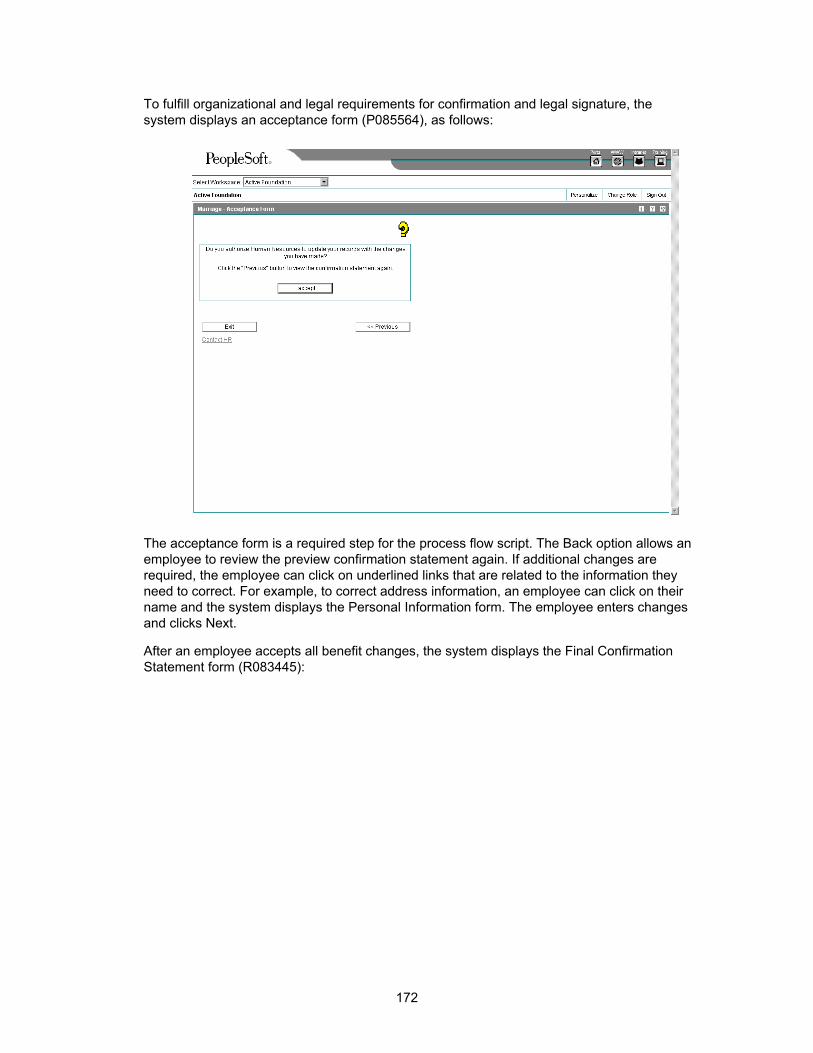
172
To fulfill organizational and legal requirements for confirmation and legal signature, the system displays an acceptance form (P085564), as follows:
The acceptance form is a required step for the process flow script. The Back option allows an employee to review the preview confirmation statement again. If additional changes are required, the employee can click on underlined links that are related to the information they need to correct. For example, to correct address information, an employee can click on their name and the system displays the Personal Information form. The employee enters changes and clicks Next.
After an employee accepts all benefit changes, the system displays the Final Confirmation Statement form (R083445):
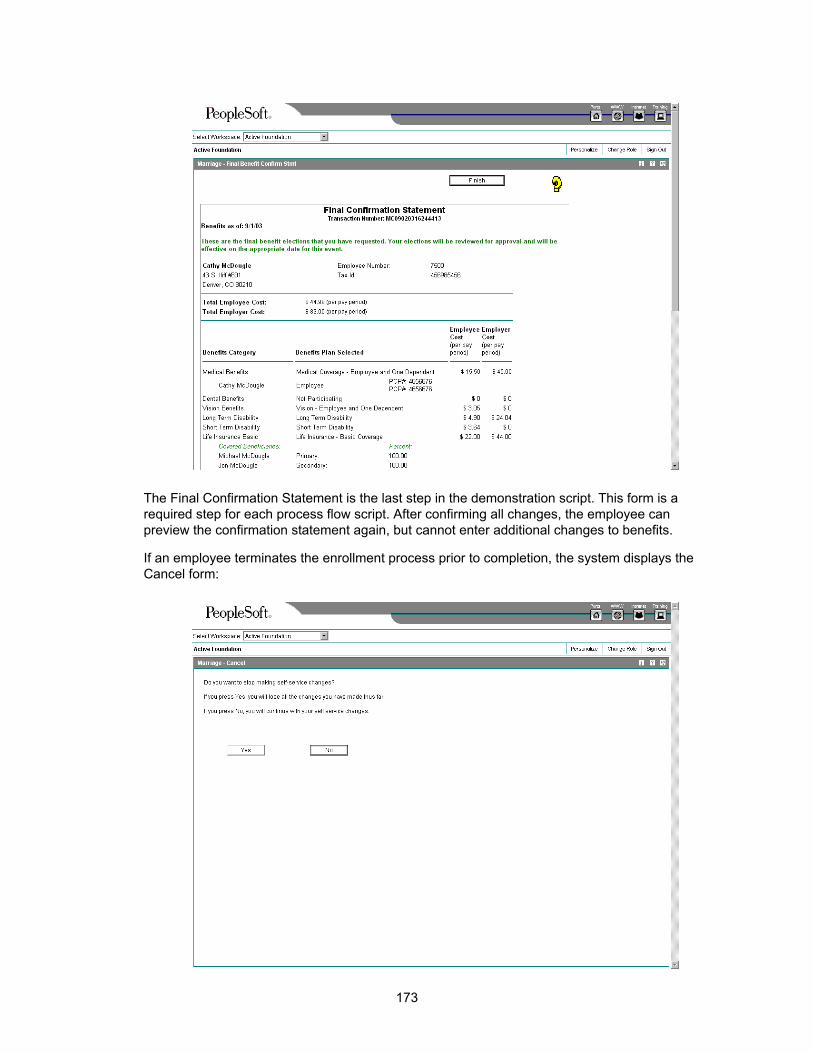
173
The Final Confirmation Statement is the last step in the demonstration script. This form is a required step for each process flow script. After confirming all changes, the employee can preview the confirmation statement again, but cannot enter additional changes to benefits.
If an employee terminates the enrollment process prior to completion, the system displays the Cancel form:

174
The system does not save any of the changes or new information that the employee enters up to this point. An employee must start a new enrollment process to elect benefits or change benefit information if he or she stops the enrollment process before completing the last step.
The following form might appear if an employee is removed from benefit coverage:
Setting Up New DBA Plan Rates
If any of your benefit plans are changing rates during the open enrollment period, you can cross-reference the current year's DBAs (deductions, benefits, and accruals) with the current rates to the DBAs that reference the new rates. This cross-reference lets you effectively change the rates that appear for the enrollment period without changing the rates for the current DBAs.
You need to cross-reference DBAs only for benefit calculations that are table based or if the DBA is changing radically (for example, from a flat dollar amount to a percentage). If you do not set up a cross-reference, the system retrieves new rates from the Plan Master Rates table (F083203). If you set up both the Plan Master Rates table and the DBA cross-reference, the system uses the DBA cross-reference.
You need to set up the DBA cross-reference before you build the workfiles for open enrollment.
Before You Begin Set up the DBAs for the new rates. See Setting Up Deductions, Benefits, and
Accruals in the Workforce Management Foundation Guide.

175
► To set up new DBA plan rates
From the Self Service Setup menu (G05BESS4), choose Current to Future DBA X-Ref.
1. On Plan DBA/Enrollment DBA Cross Reference, enter the current year's DBA in the following field:
• Plan / Option PDBA Code
2. Enter the corresponding DBA for the new rate in the following field:
• Enrollment PDBA Code
3. Repeat steps 1 and 2 for all the rates that are changing, and then click OK to save your changes.
You still need to change your enrollment plan's DBA amounts to the new rates prior to the period in which they will be effective.

176
Setting Up Manager Self-Service
You can set up self-service programs that assist supervisors in managing the hiring and reviews of employees.
Setting Up Upcoming Reviews by Supervisor
From the Manager Self Service menu (G05BMSS1), choose Upcoming Reviews by Supervisor.
Employees in a managerial or supervisory position can use the Upcoming Reviews by Supervisor program (P052200). Supervisors can log onto the self-service site to see all employees whom they are responsible to review soon.
The Upcoming Reviews By Supervisor program can be run to report employees with upcoming reviews by supervisor and to add Enterprise Workflow Management functionality to the process. If the processing options for this report are set up correctly, the system automatically reports employees with upcoming reviews, reminds each supervisor of upcoming reviews by sending an e-mail, and automatically updates the Upcoming Reviews By Supervisor program.
When a supervisor logs into the program, the system recognizes the employee number and displays the records for employees who have upcoming reviews. You can set processing options so that supervisors can choose options from the row menu to view employee information on the following forms: Work With Organizational Assignments, Personal, and Work With Basic Compensation (Employee Master program P0801), and Supplemental Data Inquiry (Supplemental DB Inquiry program (P050200). You can choose whether you want to set up security to permit access to these forms by certain individuals only.
This program updates supervisors and eliminates the time that they would spend researching upcoming reviews for their employees.
You can also set a processing option to have the report run automatically on a certain date.
Processing options are also available to run versions that report past due reviews and reviews for all employees without specified dates. Neither of these versions include Workflow.
Upcoming Reviews By Supervisor (P052200) is an inquiry-only program. The information presented by the program is from the Employee Master Information table (F060116).
See Also Running the Upcoming Employee Reviews by Supervisor Report in the Workforce
Management Foundation Guide, after you set the specifications, for information about running the report
Working With Security Workbench in the System Administration Guide to review procedures for authorizing access to functions and programs within the Managers Workbench
Scheduling a Recurring Job in the System Administration Guide for the procedure to set up a report to run automatically

177
Before You Begin Set up the common settings for self-service. See Setting Up Common Settings for
Workforce Management in the Workforce Management Foundation Guide.
Processing Options for Upcoming Reviews by Supervisor (P052200)
Process Tab
Use these processing options to define the defaults that will determine the options available when using this program.
1. Enable Select Button To Basic Compensation
1 = Yes
0 = No
Use this processing option to enable the row exit to Basic Compensation. Valid values are:
Blank Disable row exit.
1 Enable row exit.
2. Enable Organizational Assignment Row Exit
1 = Yes
0 = No
Use this processing option to enable the row exit to Organizational Assignment. Valid values are:
Blank Disable row exit.
1 Enable row exit.

178
3. Enable Employment Information Row Exit
1 = Yes
0 = No
Use this processing option to enable the row exit to Employee Information.
Valid values are:
Blank Disable row exit.
1 Enable row exit.
4. Enable Employee Profile Row Exit
1 = Yes
0 = No
Use this processing option to enable the row exit to Employee Profile. Valid values are:
Blank Disable row exit.
1 Enable row exit.
5. Enable Supplemental Data Row Exit

179
1 = Yes
0 = No
Use this processing option to enable the row exit to Supplemental Data. Valid values are:
Blank Disable row exit.
1 Enable row exit.
6. Enable Create Performance Appraisal
1 = Yes
0 = No
Use this processing option to enable the row exit to Create Performance Appraisal. Valid values are:
0 or Blank
Disable Row Exit
1
Enable Row Exit
Defaults Tab
Use this processing option to define whether the program will provide the opportunity to enter a supervisor data item.
1. Enable Supervisor Number Entry

180
1 = Yes
0 = No
Use this processing option to enable a supervisor data item to be entered.
Valid values are:
1 Enable supervisor data item to be entered.
0 Disable data item. The supervisor data item will be either passed to the application or supplied from the user address book number.
Version Tab
Use these processing options to define the defaults that will determine the options available when using this program.
1. Employee Compensation
Enter a specific version
Blank = Default version
Use this processing option to specify the version for Employee Compensation.
The default version is ZJDE0001.
2. Employee Organizational Assignment
Enter a specific version
Blank = Default version

181
Use this processing option to specify the version for Organizational Assignment. The default version is ZJDE0001.
3. Create Performance Appraisal
Enter a specific version
Blank = ZJDE0001
Use this processing option to specify which version of the Create Performance Appraisal program to run. If this option is left Blank, the system uses the default version, ZJDE0001.
Setting Up the Employee Setup Process
After hiring an employee, a manager can use self-service to add an employee record and initiate an employee setup process. Workflow then sends task approval messages and reminders about equipment setup to certain people.
You can define default setup tasks that can be automatically implemented each time a new employee is hired. Default tasks can be tasks that every new employee needs. For example, if your company provides a phone and a computer for most employees, you might want to set up default tasks for installing a phone, computer, and a network connection. Managers can add to or change these tasks unless you enter a lock code for tasks when you set them up. When you set up a default task, always associate it with a job type and step. Information entered as a default task updates the Default Setup Tasks table (F087101).
You also set up a task list by location. You enter every possible setup task for every location. For every task in the task list, you can specify an approver, a task recipient, and other task details. Managers can choose tasks from the task list and assign them to a new employee's setup record.
You can set up each task to do one or more of the following activities: run a report, send an e-mail message, create a work order, or start a Workflow process. You must first customize a report, set up a work order, or set up an additional Workflow process if you are planning to attach these activities to a task.
You can also require an approval for each task that you set up. If you require an approval, Workflow sends an e-mail approval form to the address book number of the person that you designated in the Approver field. You must also set your processing options to determine whether Workflow should obtain a process approval for the entire employee setup process for every new employee record.

182
The system determines the date to begin the approval process from the values that you enter in the following three fields on the Work With Setup Tasks Details form:
• Based On Date
• Duration
• Offset Days
To determine the date to begin each task, the system performs the following sequence of actions:
4. Retrieves the date from the Based On Date field (for instance, the arrival date of the employee)
5. Adds the number of days from the Duration field (the number of days needed to complete the task)
6. Adds the number of days from the Offset Days field (the number of days, when added to the Duration values, that determine the day by which the task must be completed)
The information that you enter in the header area of the setup forms updates the Setup Task List table (F087102). The information that you enter in the detail area of the setup forms updates the Setup Task Details table (F087103).
Before You Begin You must set up numerous user defined codes for the employee setup process,
including location codes 08/L1 through 08/L0. See Adding a User Defined Code in the Foundation Guide.
Set up the common settings for self-service. See Setting Up Common Settings for Workforce Management in the Workforce Management Foundation Guide.
Set up your processing options to require a process approval and to specify an ending status for the process approval.
Verify that the following Workflow processes are activated in the Process Master program (P98800):
EESETUP01-Employee Setup Approval
The Workflow process that e-mails an approval form for the entire employee setup process to the address book number of the approver. After Workflow obtains an approval, it e-mails approval forms for each setup task that requires an approval. If you want your system to obtain an approval for this process, you must set a processing option. You must also set up this task on any task setup form.
EESUTSK03-Get Task Approval
The Workflow process that e-mails an approval form to the address book number of the approver for an individual employee setup task that requires an approval. After Workflow obtains an approval, it begins the task.
EESUTSK01-Employee Task Setup
The Workflow process that begins the employee setup task after obtaining approval. Depending on how this task is set up, this task might include running a report, sending an additional e-mail, creating a work order, or starting an additional Workflow process.

183
► To set up default tasks
From the Manager's Employee Setup Options menu (G05BMSS4), choose Default Setup Tasks.
1. On Work With Default Setup Tasks, click Add.
2. On Edit Default Setup Tasks, complete the following fields:
• Job Type
• Job Step
• Task Type
3. Complete the following optional fields and click OK:
• Sub Class
• Lock Code
► To set up tasks by location
From the Manager's Employee Setup Options menu (G05BMSS4), choose Setup Task List.
1. On Work With Setup Tasks, click Add.

184
2. On Work With Setup Tasks Details, complete the following fields in the header area:
• Task Type
• Sub Class
• Description
• Required Location Fields
• Ranking
• Final Task Status
3. Choose the following option in the header area, if applicable:
• Approval Required
4. Enter your address book number or the address book number of the person responsible for monitoring this task in the following field:
• Task Owner
5. Complete the following optional field if you have an additional form set up to enter additional task information:
• App. Form Name
6. Complete the following field in the detail area:
• Task Recipient
The task recipient receives any e-mail, work order, or report that you attach to this task.
7. To identify the employee workspace, complete as many of the following type of fields that are required.
• Location Code 1
8. To define the number of required fields, you can set the required value in the following field:
• Required Location Fields
The system displays an error if fewer than the required number of fields are completed.
9. If you chose the Approval Required option, complete the following field:
• Approver
10. If you set up a customized report for this task, complete the following fields:
• Report Name
• Version
11. If you set up an additional workflow process for this task, complete the following field:

185
• Process ID
If you set up the process approval task, enter EESETUP01 in the Process ID field.
12. To send an e-mail message to the task recipient, complete the following field:
• Send E-Mail
If your organizational procedures are set up for work orders, you might want to create a work order for this task.
13. If you create a work order, complete the following field:
• Order Number
14. Complete the following fields so that the system can determine the start date of the task:
• Offset Days
• Duration
• Based on Date
If you are setting up the process approval task, you must enter the creation date as the value in the Based on Date field. The Completion Offset Days and Duration fields must be set to 0.
15. Repeat these steps to enter different locations for the task.
16. When you are finished, click OK.
See Also Creating Work Orders in the Work Orders Guide
Setting Up Employee Status Change
Employee Status Change Setup (P08730) is one of the suite of programs that a manager can use from Manager's Workbench (P08712). Managers can use Employee Status Change Setup to perform any of the following changes:
• Promotion
• Job status
• Location
• Leave of absence
• Department or supervisor
Managers can save time and effort by using the five default tasks above to perform the most frequent types of employee changes. For example, when an employee changes jobs, the supervisor can initiate the change using the Manager's Workbench. Workflow can route the status change to human resources for the appropriate approvals. Once the change request has been approved, the change will automatically be updated in the system.
Your software has been supplied with a default version that contains options, approval requirements, and data items that are common to a large cross-section of organizations. As a

186
result, little or no change might be required for this application to meet your needs. If you want to add data items to any of the existing change forms, you will find that the majority of the fields from the Employee Master Information table (F060116) are currently available.
If you want to change the default settings, the best approach is to make a copy of the existing version, rename the new version appropriately, and make changes only to the new version. Because any new version must maintain the same data structure (input parameters), this approach will result in less effort and fewer errors. You use the Employee Status Change Setup program to customize the setup of the Employee Status Change program (P08720).
An additional setup option exists, within the Employee Status Change Setup program, to define a sixth change type that can be either a combination of existing change types or a selection of any of the fields in the Employee Master Information table. You can accomplish this addition in Employee Status Change Setup. To add additional change types, you need to add each item to UDC 08/S4.
Normally, you will use the existing processing option settings for Employee Status Change Setup. These settings are:
• Report Name
• Report Version
The default report name and version include the options, approval requirements, and data items mentioned above. You should alter these settings only when you have created a new version and want managers to use your customized change options.
Before You Begin Verify that Workflow process EESTSCHG-Employee Status Change is activated in
the Process Master program (P98800). See Activating a Workflow Process in the J.D. Edwards Workflow Tools Guide.
► To set up employee status change
From the Self Service Setup menu (G05BESS4), choose Status Change Setup.
1. On Employee Status Change Setup, complete the following field and click Find:
• Change Type
The system automatically displays the data items that are currently selected. A check mark in the row header indicates that the data item is selected and appears as an available choice in the Employee Status Change program (P08720). If a lightening bolt symbol appears in the row header, the field is a required field and is marked with an asterisk in Employee Status Change.
2. To change the status of a selected field to a required field, double-click the row-header (the field with the check mark) so that the lightening bolt symbol appears.
3. To completely deselect a field, double-click the row-header again so that no symbol appears.
4. To add a new field, click the following display option:
• All
This option displays all of the enabled data items from the Employee Master Information table (F060116) from which you can select.
5. Double-click the row-header of the data item that you want to add and click OK.

187
Processing Options for Employee Status Change Setup (P08730)
Defaults Tab
These processing options specify the defaults that the system will apply when you initiate the status change process.
1. Business Function Name
Default Business Function used to initiate the status change process.
Use this processing option to specify the business function you want to use to initiate the status change workflow process. This business function must also handle the other workflow processes such as aborting, escalating, restarting,and approving.
The default function is Initiate Status Change. The source module is N0800206.
2. Hide Status Change Initialization Businsess Function
1 = Yes
0 = No
Use this processing option to specify whether you want to allow the user to see the Status Change business function driver used to initiate the Status Change process. It is recommended that you set this value to 1. Valid values are:
0 No
1 Yes

188
Setting Up Manager Reports
Managers and their delegates can use the Managers Reports program (P08740), to automate required reporting procedures and save time. System administrators use the Managers Reports Setup program (P08741) to set up the reports that are run in the Managers Reports program. Two setup approaches are available:
• Preset lists of reports
• Program versions
The Managers Reports Setup program includes a list of categories that are defined in UDC 08/RP. You can modify this list to meet organizational needs and then attach reports to each category as desired. To automatically run a category of reports from the Managers Reports program, managers can just choose an appropriate category and then click Submit. Managers retain the option of changing the sequence in which the system runs a list of reports and can also run individual reports instead of an entire list.
You can also set up program versions in the Managers Reports Setup program and then specify the version number in a processing option for the Managers Reports program. Creating program options allow you to set up lists of reports to meet a wide range of needs. You could create a version for the Payroll Department, for example, that included several lists of reports that need to be run biweekly and another version that could be run monthly.
When you create custom reports and want to add them to a report list, you might need to alter one or more of the data items that you have included in the report's data structure to successfully run the report. To accomplish this mapping, use the Map Report Data Structure program (P08770), which is available by choosing the Map Data Structure row menu option in the Managers Report Setup program.
Before You Begin To set up new category codes to which you can assign a new selection of reports,
before starting the following process, see Understanding User Defined Codes for Workforce Management Systems in the Workforce Management Foundation Guide.
To create a user defined code, see Adding a User Defined Code in the Foundation Guide. To create a new category for human resources reports, use 08 in the Product Code field and RP in the User Defined Codes field.
► To set up manager reports
From the Self Service Setup menu (G05BESS4), choose Managers Reports Setup.
1. On Manager's Report Setup, complete the following field and click Find to display the report names that are currently assigned:
• Category
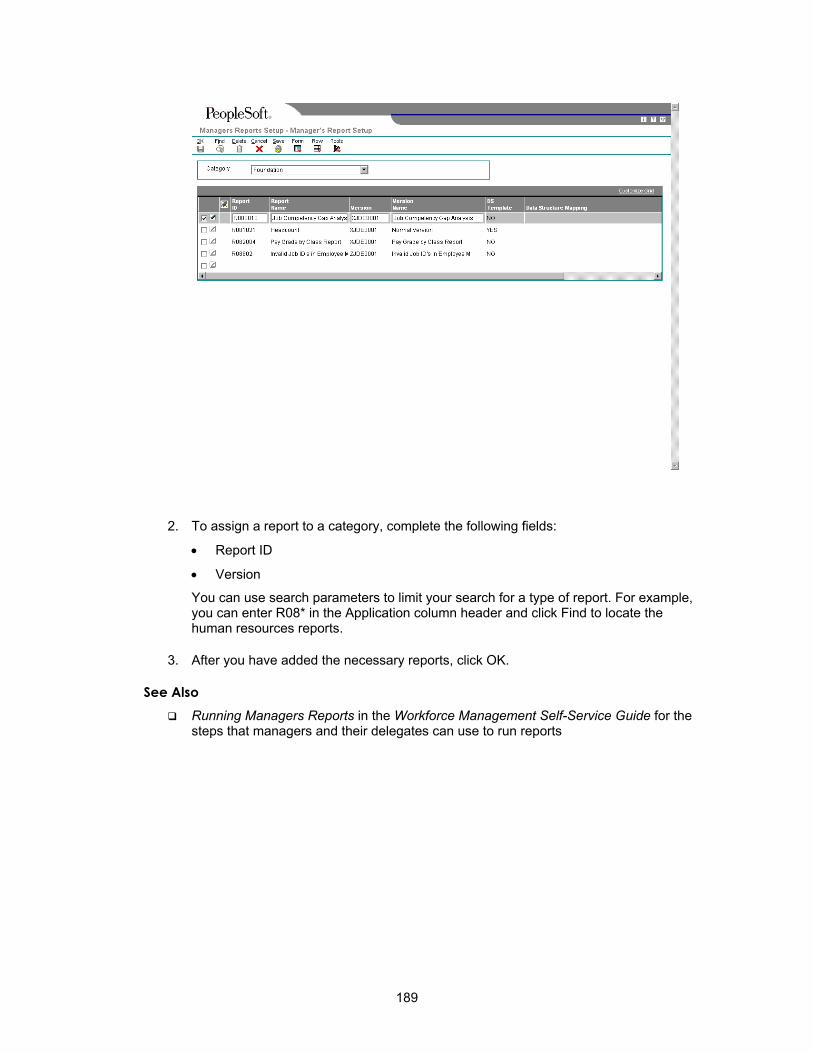
189
2. To assign a report to a category, complete the following fields:
• Report ID
• Version
You can use search parameters to limit your search for a type of report. For example, you can enter R08* in the Application column header and click Find to locate the human resources reports.
3. After you have added the necessary reports, click OK.
See Also Running Managers Reports in the Workforce Management Self-Service Guide for the
steps that managers and their delegates can use to run reports

190
Self-Service Time Entry
You can streamline and simplify the process of entering and reviewing employee timecard information by using J.D. Edwards self-service features. You can use the self-service approach for time entry to eliminate, or greatly reduce, the need for paper time sheets. You can also increase the accuracy and efficiency of your data entry by eliminating the need for a time entry clerk to manually transfer data from paper timesheets into the system.
Self-service time entry applications allow you to customize the user interfaces that employees use to enter timecards. You can create multiple interfaces to accommodate the different business requirements of employee groups within your organization.
When employees use self-service time entry, the system displays a welcome form called a director. You can customize this form to include user instructions for the time entry process, or to include information that employees need to complete their timecards for the specified pay period. The director form also includes links to Employee Daily Time Entry (P051127) and Employee Summary Time Entry (P051128), and a link to Manager Review and Approval (P051129) that managers or delegates can use to review and approve employee timecards.
When an employee chooses the appropriate link from the director form, the system automatically displays a time entry form where they can enter their timecard information. You can customize this form to include only the fields that you want employees to complete. Using the ESS Time Entry Setup program (P051123), you can choose from over 50 predefined fields to appear on the employee time entry form. This program allows you to quickly and easily create custom time entry forms to meet your business requirements. You can also define the pay types that each employee can use to enter timecards, which helps to ensure the accuracy of the timecard data.
Note
Employees can enter timecards only for themselves using self-service time entry programs. Similarly, employees who are not managers are able to review only their own timecards. Managers can review their own timecards and those of their employees. If it is necessary for an employee to enter timecards for another employee, these timecards must be entered using standard time entry programs. See Entering Timecards for Employees in the Time Accounting Guide for instructions for entering timecards using the standard time entry programs.
After an employee enters timecards into the system, those timecards can be reviewed and then approved, changed, deleted, or rejected by the employee's manager. You can also set up manager delegates to perform the review and approval process in the event that an employee's manager is unavailable. Manager delegates are employees that are assigned permission to review and approve timecards on behalf of a manager. In addition, you can generate e-mail messages directly from the Manager Review and Approval program, which allow managers to automatically notify employees about the status of their timecards during the approval process.
When employees enter timecards using self-service applications, the system stores the timecards in the Employee Transactions - Batch File table (F06116Z1), which is a temporary workfile. After the timecards have been reviewed and approved, you can run the Time Entry Batch Processor program (R05116Z1I) to transfer the timecards from the workfile into the Employee Transaction Detail File table (F06116). When the timecards are in the Employee Transaction Detail File table, they can be included in payroll cycle processing.

191
Note
Because the timecards that are entered using self-service time entry applications are stored in the Employee Transactions - Batch File table (F06116Z1), employees can enter timecards while the payroll cycle is being processed without affecting that payroll cycle. Only timecards that have been moved into the Employee Transaction Detail File table (F06116) are included in the payroll cycle.
Entering Timecards Using Self-Service
The Time Entry Self Service Director program (P051125) serves as the entry point for employees and managers to access self-service time entry applications. You can customize the text that appears on this form and automatically complete the Pay Period Ending Date field so that employees can easily enter timecard information using self-service features.
Employees access the time entry applications by clicking links that appear on Time Entry Self Service Director. Employees can click the Summary Time Entry link or the Daily Time Entry link. In addition to the time entry application links, a link to the timecard review and approval application is provided for managers who must review and approve timecards.
Note
The Summary Time Entry, Daily Time Entry, and Manager Review/Approval links always appear on Time Entry Self Service Director. The Summary Time Entry and Daily Time Entry links are always active for all employees; however, the Manager Review and Approval link is active only for managers and their active delegates who can review employee timecards.
Before You Begin Set up the self-service time entry features. See Setting Up Self-Service Time Entry in
the Workforce Management Self-Service Guide for instructions.
Managing Self-Service Timecards Using Daily Time Entry
When you click the Daily Time Entry link from Time Entry Self Service Director (P051125), the system displays Employee Daily Time Entry (P051127). The fields that employees must complete are determined during the setup process. The format of the form is determined by the pay frequency of the employee who accesses the program. For example, when an employee who is paid weekly accesses Employee Daily Time Entry, the system displays summarized information for the seven days for which the employee can enter timecards. Similarly, when an employee who is paid biweekly accesses the form, the system displays summarized information for the 14 days for which the employee can enter timecards.
To enter timecard information, employees use a time entry grid that contains a column for each day in the pay period. Employees can enter all timecards for the same pay type on one line in the grid for the entire pay period. A separate line in the grid must be used for each pay type used during the pay period. For example, if an employee works eight hours of regular time each day and also works two hours of overtime each day, two lines of time entry are required to accurately track the time for the pay period. The employee must enter one line and designate the pay type as regular pay. The employee then enters normal hours worked

192
for each day of the pay period on the same line. The employee must also enter a second line and designate the pay type as overtime pay. The employee then enters overtime hours worked for each day of the pay period on the same line.
Note
Only employees who are paid weekly, biweekly, or semimonthly can enter self-service timecards using Employee Daily Time Entry. Employees who are paid monthly must use Employee Summary Time Entry (P051128) to enter self-service timecards.
When an employee enters or updates timecards and clicks Save, the system stores the timecards in a temporary workfile called the Employee Transactions - Batch File table (F06116Z1). The system automatically assigns a status of 0 - Waiting for Approval to the timecard records that allows managers to easily identify timecards that must be reviewed and approved. Users can enter or update their own timecard records using this form. When a manager approves a timecard, users can no longer update the information.
After the timecards are approved, the Time Entry Batch Processor program (R05116Z1I) is used to move timecards from the Employee Transactions - Batch File table into the Employee Transaction Detail File table (F06116). After timecards from the workfile are stored in the Employee Transaction Detail File table, they can be processed in a payroll cycle.
► To enter self-service timecards using daily time entry
From the portal that is created by your organization, access Time Entry Self Service Director.
1. On Time Entry Self Service Director, verify that the date in the following field is correct, and then click the Daily Time Entry link.
• Pay Period Ending Date
2. On Employee Daily Time Entry, click a blank line in the time entry grid at the bottom of the form.
3. Enter a value in the following field:
• Pay Type
4. Enter the number of hours that are associated with the pay type that you entered in step 3 for each day of the pay period.
5. Complete any additional fields in the grid line.
Note The fields that the system displays in the grid are determined during self-service time entry setup. To review instructions for completing any of the fields that appear in the grid, see Entering Daily Timecards for Employees in the Time Accounting Guide.
6. Click Save to save the record and to display a new line in the time entry grid.
193
Note When you click Save, the system updates the totals in the review sections of the form.
7. Complete steps 2 through 6 until you have entered all timecard information. You must enter a separate line for each pay type.
8. Click Back to return to Time Entry Self Service Director.
► To delete or modify self-service timecards using daily time entry
From the portal that is created by your organization, access Time Entry Self Service Director.
1. On Time Entry Self Service Director, click the Daily Time Entry link.
2. On Employee Daily Time Entry, to delete timecards, click the Select option next to the records that you want to delete, and then click Delete.
3. To modify timecards, change any of the fields in the detail area of the form and then click Save.
Note When a manager approves a timecard, you can no longer delete or modify the information.
4. Click Back to return to Time Entry Self Service Director.
Managing Self-Service Timecards Using Summary Time Entry
When you click the Summary Time Entry link from Time Entry Self Service Director (P051125), the system displays two sections on Employee Summary Time Entry (P051128) where employees can enter timecard information. In the Quick Entry section of the form, employees can enter lump sum amounts for regular, sick, vacation, and holiday hours that they worked during the pay period.
For example, if an employee uses 40 hours of vacation time during the pay period, they can enter the total vacation time in the Quick Entry section of the form. The pay types that are included in the Quick Entry section are specified in a processing option for the Time Entry Self Service Director program.
Additionally, employees can enter timecard records in the time entry grid at the bottom of the form. The fields that appear in the time entry grid are determined during the self-service time entry setup process.
Note
Employees whose pay frequency is monthly must use Employee Summary Time Entry to enter self-service timecards. Only employees whose pay frequency is weekly, biweekly, or semimonthly can enter self-service timecards using either Employee Daily Time Entry or Employee Summary Time Entry.

194
When an employee enters or updates timecards, the system stores them in a temporary workfile called the Employee Transaction - Batch File table (F06116Z1). These timecard records are assigned a status of 0 - Waiting for Approval, which allows managers to easily identify timecards that must be reviewed and approved. Users can enter or update their own timecard records using this form. However, if a manager has already approved a timecard, the user cannot update the timecard.
After the timecards are approved, the Time Entry Batch Processor program (R05116Z1I) is used to move the timecards into the Employee Transaction Detail File table (F06116). After the system moves the timecards from the workfile into the Employee Transaction Detail File table, they can be processed in a payroll cycle.
► To enter self-service timecards using summary time entry
From the portal that is created by your organization, access Time Entry Self Service Director.
1. On Time Entry Self Service Director, verify that the date entered in the following field is correct, and then click the Summary Time Entry link.
• Pay Period Ending Date
2. On Summary Time Entry, complete the following fields in the Quick Entry (Totals Only) section of the form to enter lump sum amounts:
• Reg.
• Vac
• Sick
• Holiday
3. To enter timecards in the detail section of the form, click a grid line and enter a pay type in the following field:
• Pay Type
4. Complete any additional fields in the grid line.
Note The fields that appear in the grid are determined during self-service time entry setup. For instructions for completing any of the fields that appear in the grid, see Entering Timecards for Employees in the Time Accounting Guide.
5. Click Save to save the record and display a new line in the time entry grid.
Note If you click Close without first saving the timecard, the system displays a Save Any Unsaved Records? dialog so you can choose to save any unsaved changes or cancel the Close request.
6. Complete steps 2 through 5 until you have entered all timecard information.

195
7. Click Back to return to Time Entry Self Service Director.
► To delete or modify self-service timecards using summary time entry
From the portal that is created by your organization, access Time Entry Self Service Director.
1. On Time Entry Self Service Director, click the Summary Time Entry link.
2. On Employee Summary Time Entry, to delete timecards, click the Select option next to the records that you want to delete, and then click Delete.
Note To select or remove a selected status for all of the timecard records that are displayed, you can use the Select All or Clear All options.
Note The system displays a Delete Records? dialog that you must use to confirm the delete action. The dialog indicates the number of records that are selected and provides Yes and No options so you can proceed with the delete action or stop the delete action and return to Employee Summary Time Entry.
3. To modify timecards, change any of the fields in the detail area of the form and then click Save.
Note You cannot delete or modify a timecard if a manager has already approved it.
4. Click Back to return to Time Entry Self Service Director.
Reviewing and Approving Self-Service Timecards
After employees enter self-service timecards into the system, managers must review those timecards. Using the Manager Review and Approval program (P051129), managers can review, change, reject, and approve employee timecards. Along with reviewing and approving timecards, managers can use this program to view a list of employees who are missing timecards for the pay period. You can also set up the review and approval process to be completed by manager delegates.
Managers or their delegates can review the timecards for a group of employees and approve or reject all of the timecards at once, or timecards can be approved, changed, or rejected individually. Managers can also select multiple timecards or employees to approve or reject at one time.
In addition to approving and rejecting timecards, managers also can assign the Paid - Not Approved status to timecards. This status is used for informational purposes, and the timecards that are assigned this status are processed in the same way approved timecards are processed. Managers might use this status if a timecard is incorrect but the approval deadline does not allow for the timecard to be changed and re-entered by the employee. Assigning the Paid - Not Approved status allows the system to pay the employee for the

196
timecard. The manager would then need to follow up with the employee to ensure that the timecard information is corrected during a future pay period.
Managers also can send e-mail messages to employees using the Send E-Mail to Employee link on Self Service Manager Review and Approval. Managers might use this function to notify employees of the reason a timecard was changed or rejected, or to remind employees who have not entered timecards for the period to enter their timecards before the deadline.
The system stores timecards that employees enter into the system in a temporary workfile called the Employee Transactions - Batch File table (F06116Z1). After the timecards are reviewed and approved or rejected, the Time Entry Batch Processor program (R05116Z1I) moves all of the timecards with an Approved or Paid Not Approved status into the Employee Transaction Detail File table (F06116). When timecards are in the Employee Transaction Detail File table, they can be processed in a payroll cycle.
Note
To use the missing timecards option during the review and approval process, you must set the processing options for the Time Entry Self Service Director program (P051125) to turn on that feature. To display a list of employees who have not entered timecards for the pay period, the system must search through the entire employee database to find all of the employees that report to the specified manager; therefore, this process might take a significant amount of processing time.
See Also Working with Time Entry Batch Processing in the Time Accounting Guide for more
information about processing self-service timecards
► To review and approve self-service timecards
From the portal that is created by your organization, access Time Entry Self Service Director.
1. On Time Entry Self Service Director, verify that the date in the following field is correct, and then click the Manager Review/Approval link.
• Pay Period Ending Date
2. On Self Service Manager Review and Approval, verify the values in the following fields:
• Manager Number
Note If you are a delegate who is reviewing and approving timecards for a manager, enter the approving manager address book number and then click Refresh to display subordinate employees.
• Pay Period Ending Date

197
3. To specify which timecards to review, click one of the following options and then click Find Timecards:
• Waiting Approval
• Approved
• Rejected
• Paid Not Approved
• Missing Timecard
4. To approve all of the timecards for multiple employees, click the Select option next to each employee for whom you want to approve timecards, and then click Approve.
5. To reject all of the timecards for multiple employees, click the Select option next to each employee for whom you want to reject timecards, and then click Reject.
6. To reject all of the timecards for multiple employees, but allow them to be processed in a payroll cycle, click the Select option next to each employee for whom you want to assign the Paid - Not Approved status, and then click Paid Not Approved.
7. To review the timecard detail for an individual employee, click the Select option next to the employee's record in the detail area of the form, and then click Detail.
Note If the employee entered timecards using daily time entry, the system displays Employee Daily Time Entry when you review timecard detail. Similarly, if the employee used summary time entry, the system displays Employee Summary Time Entry. If the employee entered timecards using both applications during the same pay period, the system displays all of the employee’s timecards on Employee Summary Time Entry.
If necessary, you can change any of the information for each timecard that is displayed on the time entry form.
8. To approve selected timecards for the employee, click the Select option next to each timecard that you want to approve, and then click Approve.
9. To reject selected timecards for the employee, click the Select option next to each timecard that you want to reject, and then click Reject.
10. To assign the Paid - Not Approved status to selected timecards for the employee, click the Select option next to each timecard for which you want to assign this status, and then click Paid Not Approved.
11. When you have finished reviewing all of the employee's timecards, click the OK button to return to Self Service Manager Review and Approval.
12. To send an e-mail message to an employee, click the Select option next to the employee, and then click the Send E-Mail to Employee link.

198
Note You can send e-mail messages to only one employee at a time. Do not choose multiple employees when sending e-mail messages from Self Service Manager Review and Approval.
13. On Self-Service E-Mail Message, complete the following field:
• Subject:
14. Type your message in the text box and then click Send.
15. On Manager Self-Service Review and Approval, click Previous to return to Time Entry Self Service Director.
Setting Up Self-Service Time Entry
Before employees can enter timecard information using the self-service time entry applications, you must create the text that appears on the time entry forms, set up user interfaces, assign manager delegates for managers who review and approve timecards, and specify the available pay types that can be used for each employee group.
First, you must set up the director form. The director form is the first form that employees see when they access the self-service time entry system. You can enter text that will appear on this form. This text is called director text. You use director text to provide user instructions for employees or to provide pay-period specific information that might be needed for employees to enter timecards correctly.
In addition to director text, the director form also contains links to the actual time entry interfaces. You can activate the links to the Employee Summary Time Entry program (P051128), the Employee Daily Time Entry program (P051127), or to both programs. Though the system displays all of the links on the form, links are active are determined by the processing option settings for the Time Entry Self Service Director program (P051125).
After you set up the director, you must set up user interfaces for the time entry applications. You can create multiple interfaces to accommodate the business requirements of different companies or business units within your organization. To set up a user interface for self-service time entry, you choose which fields you want to display on the time entry forms. The following fields are set as default fields that the system automatically displays on Employee Daily Time Entry and Employee Summary Time Entry:
• Pay Type
• Hours
• Work Date
• Subledger
• Subledger Type
• Charge To
• Shift Code
• Equipment Worked
• Equipment Hours

199
J.D. Edwards also provides you with over 50 additional predefined fields to choose from. This allows you to quickly and easily customize your user interfaces to meet the business needs of your organization.
You can specify which pay types are available to employees within different employee groups. For example, employees in business unit 100 might need to use different pay types than employees in business unit 200, or employees with Job Type A-200 might use different pay types than employees with Job Type B-55. You can use the Classification/Pay Cross Reference program (P05932) to specify the available pay types for each employee group. When you set up this information, employees can enter timecards for only the pay types that are assigned to their employee group. If you do not set up this information, employees will receive a hard error on this field and will not be able to complete time entry.
You can define employee groups according to the following criteria:
• Job Type only
• Job Type and Job Step only
• Business Unit only
• Union Code only
• Shift Code only
• Job Type, Job Step, Business Unit, Union Code, and Shift Code
You can select the fields that you use to define employee groups for pay type assignment in the processing options for the Time Entry Self Service Director program.
To set up delegates who can assist managers with timecard approvals, you can use the Manager Delegates Setup program (P051126) to designate one or more subordinate employees as delegates for each manager. You also assign an authority level for each delegate. Manager delegates are employees who are given permission to perform duties on behalf of a manager. For example, if a manager is not available to review and approve timecards before the timecard approval deadline, a manager delegate could review and approve the timecards for that manager.
Managing the Time Entry Director Form
The Time Entry Self Service Director program (P01125) displays the first form that employees see when they access the self-service time entry system. You define the text that appears on this form. This text is called director text. You use director text to provide user instructions for employees or to provide pay-period specific information that employees might need to enter timecards correctly. If you choose to include pay-period specific information in director text, you must revise the text for each pay period.
The following examples illustrate the types of information that you might want to include in director text:
Example 1 July 1–15 time entry reports are due by noon July 16 — 80 total hours.
United Sates employees, code July 4 holiday pay to pay code 882. Canadian employees, code July 2 holiday pay to pay code 882.
Overtime reminder: All employees who are eligible for overtime are responsible for coding all overtime hours worked to pay code 300. If you have any questions about

200
overtime eligibility, please speak with your manager or a human resources representative.
Example 2 To enter timecards using this self-service form, verify that the date in the Pay Period Ending Date field is correct and then click the Summary Time Entry link to access the time entry screen. On the time entry screen, complete all of the fields and then click the Save button. Your manager will review your timecards and you will receive an e-mail response regarding the approval status of your timecards. If you have questions regarding the time entry process or the review and approval process, please speak with your manager or a human resources representative.
In addition to director text, the director form also contains the following links to employee or manager programs (interfaces):
• Daily Time Entry
• Summary Time Entry
• Manager Review and Approval
You use the processing options for the Time Entry Self Service Director program to specify which of these links are active.
The director form also automatically displays the last day of the pay period, based on information that you enter in the processing options.
► To set up director text for self-service time entry
From the Time Entry Self service Setup menu (G05BESS41), choose Director Text Setup.
1. On Work With Director Text, click Add.
2. On Define Director Text, complete the following fields:
• Company
• Business Unit
3. In the text pane, enter the text that you want to appear on the employee self-service time entry form.
Note You can enter text only in the text pane. Do not enter rich text, OLE objects, or images in the text pane. Also, when you enter text into the text pane, you must enter the HTML code <BR> when you want a line break. Using the Enter key will not simulate a line break when the text appears on the director form.
4. Click OK.
5. To enter different director text for different groups within your organization, complete steps 1 through 4 for each company and business unit combination for which you want to create director text.

201
6. To use the same director text for all employees in your organization, complete these steps once and enter 0 in the Company field and leave the Business Unit field blank.
► To revise director text for self-service time entry
From the Time Entry Self service Setup menu (G05BESS41), choose Director Text Setup.
1. On Work With Director Text, click Find.
2. Choose the record in the detail area that you want to revise and click Select.
3. On Define Director Text, revise the text that appears in the text pane.
Note You can only enter text in the text pane. Do not enter any other type of text, OLE objects, or images into the text pane. Also, when you enter text into the text pane, you must enter the HTML code <BR> when you want a line break. Using the Enter key will not simulate a line break when the text appears on the director form.
4. Click OK.
Processing Options for Time Entry Self Service Director (P051125)
Date/Pay Cycle Code Tab
These processing options specify the pay period ending dates that are displayed on the Time Entry Self Service Director form. The system displays the date that is linked to the employee pay cycle code. To ensure that the correct date is displayed on time entry forms, these processing options must be updated each pay period.
1. Pay Period Ending Date - Weekly
Use this processing option to specify the last day of the workweek for weekly processing periods.
Weekly Pay Cycle Code
Use this processing option to specify the master pay cycle that the system uses to determine pay period dates.

202
2. Pay Period Ending Date - Bi-Weekly
Use this processing option to specify the last day of biweekly processing periods.
Bi-Weekly Pay Cycle Code
Use this processing option to specify the master pay cycle that the system uses to determine pay period dates.
3. Pay Period Ending Date - Semi-Monthly
Use this processing option to specify the last day of semimonthly processing periods.
Semi-Monthly Pay Cycle Code
Use this processing option to specify the master pay cycle that the system uses to determine pay period dates.
4. Pay Period Ending Date - Monthly
Use this processing option to specify the last day of monthly processing periods.

203
Monthly Pay Cycle Code
Use this processing option to specify the master pay cycle that the system uses to determine pay period dates.
Pay Type Tab
These processing options specify the pay types that the system uses to create timecards for lump sum entries in the Quick Entry section of the summary time entry forms.
1. Pay Type - Regular
Use this processing option to specify the pay type that the system assigns to timecard information that is entered for regular pay in the self-service time entry program.
2. Pay Type - Sick Leave
Use this processing option to specify the pay type that the system assigns to timecard information that is entered for sick pay in the self-service time entry programs.
3. Pay Type - Vacation
Use this processing option to specify the pay type that the system assigns to timecard information that is entered for vacation pay in the self-service time entry programs.
4. Pay Type - Holiday
Use this processing option to specify the pay type that the system assigns to timecard

204
information that is entered for holiday pay in the self-service time entry programs.
5. Pay Type - Overtime
Use this processing option to specify the pay type that the system assigns to timecard information that is entered for overtime pay in the self-service time entry programs.
6. Cross Reference Search
1 = Job Type
2 = Job type and Job Step
3 = Business Unit
4 = Union Code
5 = Shift Code
0 = By all fields blank(default)
Use this processing option to specify the criteria that is used to set up a pay type cross-reference table for employee self-service time entry. You use the pay type cross-reference table to define pay types that various employee groups can use for time entry.
For example, if you want to assign pay types to employees by job type and job step, enter 2. If you enter 2, you should define pay types for all employee groups that use job type and job step.
To assign pay types to employee groups by business unit, enter 3.
To assign pay type cross-references that use different criteria for each employee group, enter 0. Entering 0 allows pay types to be assigned to specific employee groups and allows for a default set of pay types to be set up by leaving all of the options blank. This also allows any or none of the options to be used to define pay type cross-references.

205
Valid values are:
1
Job type
2
Job type and job step
3
Business unit
4
Union code
5
Shift code
0 or Blank (default)
Any or all cross reference options
Leave Entry Tab
These processing options specify how the system verifies employee available leave balances and which table the system uses to retrieve employee leave balances.
1. Leave Time Available 0= Do not Perform Editing 1= Perform Editing, Hard Error if Insufficient Balances Exist 2= Perform Editing, Warning Message if Insufficient Balances Exist 3= Perform Editing, Use Available Plus Accured Balances, Hard error if Insufficient Balances Exist 4= Perform Editing, Use Available Plus Accured Balances, Warning Message

206
if Insufficient Balances Exist Use this processing option to specify the method that the system uses to respond to leave requests or for leave taken by an employee. If you enter any value other than 0, an employee can take only available leave. This value is in effect for all pay types that are set up to use leave tracking. Valid values are: 0 Do not validate available leave time. 1 Display a hard error if an insufficient available balance exists. 2 Display a warning if an insufficient available balance exists. 3 Display a hard error if the combined available and accrued balances are insufficient. 4 Display a warning if the combined available and accrued balances are insufficient.
2. Leave History Source 0= Employee Transaction History Summary(F06146) 1= Fiscal And Anniversary Year History (F06147) Use this processing option to specify the table from which the system retrieves history information. Valid values are: 0 or Blank Calendar Month DBA Summary History table (F06145) or Employee Transaction History Summary table (F06146) 1 Fiscal and Anniversary Year History table (F06147)

207
Account Number Tab
These processing options specify how the system validates account numbers that are included on employee timecards.
1. Validate # sign 0= Allow # Sign(Default) 1= Do Not allow Use this processing option to specify whether the system allows employees to enter a pound sign (#) in place of a valid account number. If this is not allowed, the system verifies the validity of the account numbers associated with each timecard. Valid values are: 0 Allow a pound sign (#) entry 1 Do not allow a pound sign (#) entry
2. Posting Account Only 0= Allow All Accounts(Default) 1= Allow Only Postable Accounts Use this processing option to specify whether the system verifies that the account number entered for timecards can be posted. Valid values are: 0 Allow all account numbers (default) 1 Allow only account numbers that can be posted
3. Dynamic Account Creation
0= Dynamic Account Creation Turned Off
1= Dynamic Account Creation Turned On
Use this processing option to specify whether the system activates the feature for dynamic account creation. Dynamic account creation allows users to enter account numbers that do not exist in time entry and then creates them through a batch process in journal entries.

208
Valid values are:
0
Dynamic account creation is inactive
1
Dynamic account creation is active
4. Validate Account
0 = Do not validate account
1 = Validate Account
Use this processing option to activate account validation for Employee Self Service Time Entry. The account number is validated using the data on the timecard first, and then using data from the employee master if no account number is entered on the timecard. Valid values are:
0
Do not Validate Account
1
Validate Account
Multicurrency Tab
Use these processing options to enable the multicurrency feature for Employee Self-Service Time Entry and to specify the currency that the system uses. To use multicurrency, this feature must also be activated in the Time Entry MBF Processing Options (P050002A), Recharge tab, Enable Multi-Currency Functionality. Also on the Recharge tab, you should enter appropriate values for the remaining processing options.
1. Multicurrency
1= Enable Multicurrency

209
0= Do not enable multicurrency Functionality
Use this processing option to enable multicurrency for Employee Self Service Time Entry. If activated, the currency code is retrieved and written to the F06116Z1 table after the timecard is saved. Valid values are:
1
Enable Multicurrency
0
Do not enable Multicurrency Functionality
2. Currency Mode
D= Domestic Currency
F= Foreign Currency
Use this processing option to specify the curency that you are using for the transaction. If you choose domestic currency, the system uses the currency of the employee's home company. If you choose foreign currency, the system uses the currency of the company to which you are charging the timecard. Valid values are:
D
Domestic Currency
F
Foreign Currency

210
Manager Tab
This processing option specifies whether the missing timecard feature can be used.
1. Multicurrency 1= Enable Multicurrency 0= Do not enable multicurrency Functionality Use this processing option to specify whether managers can view records for employees who have not entered timecards for the specified period. Valid values are: 0 Enable the missing timecard option 1 Disable the missing timecard option
Administrator Tab
Use these processing options to specify whether the system displays each of the available time entry links on the self-service time entry forms. You can also specify the text that the system displays for each link.
1. Show Daily Time Entry Link
0 = Show Daily
1= Don't show Daily Link
Use this processing option to specify whether the link to the Daily Time Entry application is displayed for users. If you do not show the Daily Time Entry link, the employee will not be able to see the link to Daily Time Entry, and will not be able to access the program. Valid values are:
0
Show Daily Time Entry Link
1
Don't show Dialy Time Entry Link

211
Daily Time Entry Override Name
Use this processing option to override the text for the link to the Daily Time Entry program. You must display the Daily Time Entry link in order for the system to display the text that you enter in this processing option.
2. Show Summary Time Entry Link
0 = Show Summary Link
1 = Don't show Summary Link
Use this processing option to specify whether the link to the Summary Time Entry application is displayed for users. If you do not show the Summary Time Entry link, the employee will not be able to see the link to Summary Time Entry, and will not be able to access the program. Valid values are:
0
Show Summary Time Entry Link
1
Don't show Summary Time Entry Link
Summary Time Entry Override Name
Use this processing option to override the text for the link to the Summary Time Entry program. You must display the Summary Time Entry link in order for the system to display the text that you enter in this processing option.

212
3. Show Manager Approval Time Entry Link
0 = Show Manager Approval Link
1 = Don't show Manager Approval Link
Use this processing option to allow Employee Self Service Time Entry users to approve timecards using the Manager Approval program. If you do not show the Manager Approval link, employees cannot access Manager Approval. Valid values are:
0
Show Manager Approval Link
1
Don't show Manager Approval Link
Manager Approval Time Entry Override Name
Use this processing option to override the text for the Manager Approval link. You must choose to show the Manager Approval link in order for the system to display the text that you enter in this processing option.
Creating the Employee Self-Service Time Entry Interface
Before employees can enter timecard information into the system, you must define the information that appears on the interface that employees use. J.D. Edwards has set up the following default fields to appear on all self-service time entry forms; however, you can choose to display additional fields:
• Pay Type
• Hours
• Work Date
• Subledger
• Subledger Type
• Charge To

213
• Shift Code
• Equipment Worked
• Equipment Hours
You can the ESS Time Entry Setup program (P051123) to choose from over 50 additional predefined fields to appear on the employee time entry interface. This allows you to quickly and easily create time entry forms that meet the requirements of your organization. Depending on your business needs, you can create different time entry interfaces for each home company and home business unit combination within your organization.
For example, if you want employees in Company A to enter simple time entry records that do not require a large amount of data entry, you can choose to display only the default fields for Company A employees.
Conversely, you might want employees in Company B to enter detailed time entry information. In this case, you might select a large number of additional fields to appear on the employee time entry interface for Company B. Examples of additional fields that you might want to display are:
• Company - Home
• Object Account
• Subsidiary
• Item Number
• Unites - Pieces
• Amount - Sales
• Union Code
• Work State
• Billing Rate
► To create the employee self-service time entry interface
From the Time Entry Self service Setup menu (G05BESS41), choose Self Service Screen Setup.
1. On Work With ESS Time Entry Setup, click Add.
2. On ESS Time Entry Setup Revisions, complete the following fields:
• Company
• Business Unit
3. To specify which time entry programs you want employees to use, click one of the following options:
• Summary Time Entry
• Daily Time Entry
• Both

214
4. On the Fields 1-22 tab, click any of the following options that you want to appear on the time entry interface:
• Account Number
• Job Type
• Job Step
• LS Amnt
• Opt Sequence
• Equip Worked On
• Union
• Batch
• Uprate Amount
• Shift Differential
• Amount or Percent
• Billing Rate
• Home Company
• Cost Code
5. Click the Fields 23-42 tab and then click any of the following options that you want to appear on the time entry interface:
• Home Business Unit
• Tax Area
• Item
• Piece Rate
• Pieces
• Phase
• Record Type
• WCI Code
• SC/WC
• Check Route

215
• Cat 001
• Cat 002
• Cat 003
• Cat 004
• Bill RtCd
• Equipment Object
• Equipment Blrt
6. Click the Fields 43-52 tab and then click any of the following options that you want to appear on the time entry interface:
• Cost Type 1
• Cost Object 1
• Cost Type 2
• Cost Object 2
• Cost Type 3
• Cost Object 3
• Cost Type 4
• Cost Object 4
• Activity Code
• Leave Type
• Leave ID Number
7. Click OK.
8. Complete steps 2 through 7 for each company and business unit combination for which you want to create a separate user interface. If you want to use the same user interface for all of the employees in your organization, you can create one interface by entering 0 in the Company field and leaving the Business Unit field blank.
Assigning Pay Types to Employee Groups
To simplify the time entry process and to ensure that employees enter timecards using the correct pay types, you can use the Classification/Pay Cross Reference program (P05932) to specify the available pay types for specified employee groups within your organization. Linking pay types with employee groups is also necessary for the self-service time entry programs to function properly. You can define groups based on job types, job steps, business units, shift codes, union codes, or any combination of these fields. You can use the

216
processing options for the Time Entry Self Service Director program (P051125) to specify which of these fields you want to use to create employee groups for pay type classification purposes.
When you assign pay types to specific employee groups, employees can use only the pay types that have search criteria that match the information in the Employee Master Information table (F060116). For example, if you assign a pay type to business unit 100 and job type A-50, only employees who are listed in the Employee Master Information table with business unit 100 and job type A-50 can enter timecards using that pay type. Additionally, only the pay types associated with an employee group are displayed with the search function for the pay type field during the time entry process.
You can also set up a set of default pay types for employees who are listed in the Employee Master Information table with business unit and job type values that do not meet specified search criteria. You might want to do this in order to identify employee groups for which you have not set up pay type information. For example, if you set up pay type information for each employee group within your organization, you can set up default information and include only one pay type in the default set. If an employee does not meet the search criteria for any of the other employee groups, that employee can enter time using only the pay type that you have set up in the default set. You can then review time entry records to find employees who have entered timecards using that pay type. By identifying those employees, you can identify employee groups for which you need to set up pay type information.
You might also want to use a default set of pay types if you have a large number of employees in different employee groups who can use the same pay types. For example, if only three of the business units within your organization require unique pay types, you might set up pay types for each of the three business units. However, if the rest of the employees within your organization use the same pay types, you can set up a default set of pay types for those employees rather than setting up the same pay type information for each business unit.
Note
Assigning pay types to employee groups is required in order for self-service time entry programs to function properly. You must set up pay type information so that employees in your organization can use the pay types you set up. If no pay types are set up, then employees will receive a hard error on the pay type field and will not be able to enter a self-service timecard.
► To assign pay types to business units
From the Rate Derivation Setup menu (G05BRD4), choose Classification Pay/X-Ref.
1. On Work With Classification Pay/Cross Reference, click Add.
2. On Classification/Pay Cross Reference Revisions, complete any of the following fields to define the employee group to which you want to assign pay types:
• Job Type
• Job Step
• Union Code
• Business Unit

217
• Shift Code
Note To create a default set of pay types, leave all of these fields blank.
3. In the detail area of the form, enter the beginning pay type code in a range of pay types in the following field:
• From Trans
4. Enter the ending pay type code in a range of pay types in the following field:
• Thru Trans
Note When you are entering a range of pay types to assign to an employee group, both the pay type in the From Trans field and the pay type in the Thru Trans field are included in the range and assigned to the specified group. If you do not want to enter a pay type range, you can enter the same pay type code in the From Trans and Thru Trans fields.
5. Choose a blank row in the detail area and complete steps 3 and 4 until you have assigned all of the pay types for the specified business unit.
6. Click OK.
Setting Up Manager Delegates
After employees enter timecards in the system, managers can review and approve, change, or reject those timecards. Occasionally, managers are not available to review and approve timecards. In these circumstances, you can use the Manager Delegates Setup program (P051126) to set up delegates to perform certain review and approval functions on behalf of the manager.
When you set up manager delegates, you can assign an authorization level to each delegate. The authorization level specifies how much authority the delegate has during the timecard review and approval process. Delegates with an authorization level of 2 are only able to approve or reject timecards, and delegates with an authorization level of 1 are able to approve, change, delete, and reject timecards on behalf of the manager.
You can also assign effective dates to delegate records. For example, if a manager is on vacation for two weeks, you might set up a delegate that has review and approval authority during the time that the manager is unavailable. After the ending date that is assigned to the delegate record is reached, the delegate no longer has authorization to review and approve employee timecards. A manager can have no more than two active delegates at any given time.

218
► To set up manager delegates
From the Time Entry Self Service Setup menu (G05BESS41), choose Manager Delegate Setup.
1. On Work With Manager Delegates Setup, review and verify the information in the following field:
• Manager
2. Complete the following fields for each delegate, and then click OK:
• Delegate Number
• Effective Date
• Ending Date
• Authorization Type
Processing Options for Manager Delegates Setup (P051126)
Defaults Tab
This processing option specifies whether the Manager field is accessible and the address book value can be changed. When the value is set to the default (0), the system automatically detects the address book number of the manager who is currently signed onto the system, disables the field, and displays only delegates who are subordinate to the displayed manager. When the value is set to (1), the system activates the Manager field, does not automatically detect an address book number, and displays the subordinate delegates for any manager whose address book number is entered.
1. User Level
0 = Manager/Employee Level (Default)
1 = System Administrator Level
Use this processing option to specify whether to display delegates for different managers or to display the delegates for only one manager. Valid values are:
0
Only see one manager's delegates. (defualt)
1
Can change managers to see everyone's delegates.