Embed Size (px)
Citation preview

Enterprise Resource Planning (ERP)
Automation Manual 2018
Sacred Heart Autonomous Resource
Management System
(SHARMS)
Sacred Heart College, (Autonomous),
Thevara, Kochi

SHARMS
PAGE 1
Table of Contents Sl. No. Item Page No.
1. ADMINISTRATION MODULES OF THE SOFTWARE
A. ADMINISTRATOR 6-12
B. PRINCIPAL 12-19
C. OFFICE ADMINISTRATION 20-23
D. INTERNAL QUALITY ASSURANCE CELL (IQAC) 23-39
2. FACULTY 39-46
3. STUDENT 46-58
4. ADMISSION COMMITTEE 59-65
5. ONLINE ADMISSION 65-90
6. CURRICULUM SETTING 90-97
7. EXAM 97-111

SHARMS
PAGE 2
INDEX
1.A ADMINISTRATOR a. Course Setting b. Course Definition c. Subject Master d. Detailed Distribution of Course e. Teacher Subject Allocation f. Teacher Time Table g. Batch Creation h. Batch to Class Allocation i. Batch to Student Allocation j. Rule Setting k. Attendance Evaluation Setting l. Grade Setting m. Evaluation and Mark Normalisation
1.B PRINCIPAL
a. Student details b. Number of students statistics c. Profile of student d. Faculty e. Event reporting f. Marks details. g. Attendance Details h. Fee payment status i. Internal marks report j. Faculty evaluation report k. TC approval l. OBE report m. Faculty permission approval
1.C OFFICE ADMINISTRATION
a. Admission Register b. Academic Fee setting c. Second language setting d. Condonation Fee Setting Screen e. Document Verification f. TC Approval g. TC Printing
1.D INTERNAL QUALITY ASSURANCE CELL (IQAC)
a. Student details b. Students’ ratio
1.E ADMISSION COMMITTEE
E.1 Admission Process and Screens

SHARMS
PAGE 3
a. Admission of Students b. Configuration c. Quota Seat Allocation Screen d. Seat Distribution e. Course fee setting f. Subject-wise weightage mark setting g. Extra-curricular weightage mark setting
E.2 Configuring Application Fee a. Add Application Fee b. Application Number Configuration
E.3 Admission Application: User Manual a. Window for parent details b. Details of Qualifying examination c. Weightage and reservation d. Programme preferences e. Final submission f. Payment of fees
E.4 Management Quota Application
E.5 Rank list Preparation
E.6 Interview screen
a. Allotment Screen b. Document verification screen c. Principal’s screen d. Class allocation e. Second language Allocation
E.7 Fee Payments a. Challan generation b. Payment verification screen
E.8 ID Card Printing
2. Exam a. Exam Creation b. Exam Fee Category c. Student Condonation Approval d. Update Status: Student Condonation e. Student bypass condonation f. Update Challan Status g. Hall Ticket Configuration h. Hall Ticket i. Exam Fee Creation j. Condonation Approval Screen k. Mark entry l. Marks card Printing
3. Faculty a. Timetable Setting b. Daily attendance marking c. Incident reporting d. Internal mark entry

SHARMS
PAGE 4
e. Student details f. Consolidated internal mark report g. Attendance report h. OBE setting i. OBE report j. Individual Faculty evaluation report
4. Student a. Login b. Home Page c. Attendance View d. Apply Exam Screen e. Exam Application Screen f. View Receipt g. Applied Exam Report h. Condonation Apply Screen i. Internal Mark Report j. Faculty Evaluation by Students k. Hall ticket printing

SHARMS
PAGE 5
Administration Modules of the Software
The Enterprise Resource Planning (ERP) of Sacred Heart College (Autonomous) was started to assist the students, faculty, staff, and other members of the college. Different software solutions have been developed and maintained through this center to realize the dream of a paperless campus. The ERP comprises different portals developed and managed by the college itself. ERP of Sacred heart College, is named after SHARMS – (Sacred Heart College Autonomous Resource Management System). SHARMS solution comprises Administrator, Principal, Exam, Office administration, IQAC, Faculty and Student portals that enable the smooth functioning of all the academic and administrative activities of the College.
1.A. ADMINISTRATOR’S PORTAL
The Administrator Portal is accessed by a limited number of specially designated administrative members of the Management i.e., System admin, Principal, officers in charge of IQAC, Office administration, Library management, Account management and Examination cell with their specified functions.
The Administrator’s Portal provides access to the following: Admission details, applicants profile, student profile, allotment list, rank list, category wise admission details, class setting details, subject allocation details, Class details, subject details, internal and external Mark details, rules setting portal, update process, certificate publishing and printing details, grace mark settings, department details, staff details, timetable, attendance details of classes taken, extracurricular hours engaged, staff and student Activities, exam registration details, exam payment details etc. The administrator can view and access all the information transacted through the software.

SHARMS
PAGE 6

SHARMS
PAGE 7
a. Course Definition
b. Subject Master

SHARMS
PAGE 8
c. Detailed Distribution of course
d. Teacher subject allocation

SHARMS
PAGE 9
e. Teacher Time table
f. Batch Creation

SHARMS
PAGE 10
g. Batch to class allocation
h. Batch to student allocation

SHARMS
PAGE 11
i. Rule setting
j. Attendance evaluation setting

SHARMS
PAGE 12
k. Grade setting
l. Evaluation and mark normalization
1. B. PRINCIPAL’S PORTAL
The Principal’s Portal displays the user management portal that provides access to details of admission, students profile, academic details of the students, achievements and mischievous

SHARMS
PAGE 13
activities if any, attendance of Students, timetable of individual staff and class, semester wise mark details, Department details, faculty evaluation report. The User Management Page of the Principal leads to diverse sub-sections such as Student, Admission, Programmes and Faculty.
The Homepage of the portal displays current statistics of the student’s ratio and a search option. Principal can search for any information pertaining to the department, faculty, and students. Principal can easily evaluate the performance of a student with the help of different kinds of charts and be able to take printouts.

SHARMS
PAGE 14
Principal can view the staff details and the Department details through the report and accept/ reject different applications. Principal can view the Faculty evaluation report and student’s feedback. Principal can view all the reports pertaining to the ERP solution. This section provides the detailed timetable of the individual staff members of all the Departments. Faculty, students, and principal can access and view class timetables. This page gives information on the various courses offered by the Department in each semester, duration, and year of introduction of each course. It also gives options for the addition or deletion of courses. Subject Entry option provides information about the name of the course, course code, semester, index order, part type, credits, and short form of the subject. Software admin and controller of examination have the facility to add the course.
a. Student details
b. Number of student statistics

SHARMS
PAGE 15
c. Profile of student
d. Faculty

SHARMS
PAGE 16
e. Event reporting
f. Marks details

SHARMS
PAGE 17
g. Fee payment status
h. Internal mark report

SHARMS
PAGE 18
i. Faculty evaluation report
j. TC approval

SHARMS
PAGE 19
k. OBE report
l. Faculty permission approval

SHARMS
PAGE 20
1.C. COLLEGE OFFICE ADMINISTRATION
a. Admission register
b. Academic fee setting

SHARMS
PAGE 21
c. Second language setting
d. Condonation fee setting

SHARMS
PAGE 22
e. Document verification
f. TC Approval

SHARMS
PAGE 23
g. TC Printing
1.D. INTERNAL QUALITY ASSURANCE CELL(IQAC)
This page gives access to information and notifications from the Controller of Examinations Office of the College. Controller of Examination sets rules for all exam related activities, course code, course name, course type, course order, internal external mark ratio, rules of conversion and exam dates, question paper setting, question bank setting question paper scrutiny, question paper selection and printing, hall ticket publishing, conducting exam, pseudo-code generation, valuation, mark entry, pass board meeting, revaluation/scrutiny/improvement/supplementary exam valuation, printing, result publishing, grace mark setting, moderation setting, printing of tabulation report, consolidated marks card and semester marks card are done by the examination cell through the system.
a. Student details with photo

SHARMS
PAGE 24
b. Students ratio
c. Attendance report

SHARMS
PAGE 25
d. Mark report
e. Statistics report

SHARMS
PAGE 26
Admission of students to the various courses offered by the different Departments is displayed on this page.
IQAC portal is a centralized aggregation point for all information related to the college. Through the homepage of the cell, the committee members can access vital information about the college such as, the number of students studying in the institution, the male female ratio etc. They can also view any student’s information and their academic and non-academic details. The facility to view the comprehensive academic and non-academic details has been implemented so that the IQAC can take necessary steps to improve the quality and level of

SHARMS
PAGE 27
instruction as required by individual students. IQAC can also access the Department details and the details of the staff.
IQAC can monitor the admission procedures and can use the index mark calculation to evaluate whether the admission is done with respect to the Government norms. The IQAC is able to oversee all the reports pertaining to staff and students such as, admission, qualifying examination details, class-wise student list, promotion list, exam applicant list, revaluation applicant list, scrutiny application list, students attendance shortage list, TC applicant list, class wise internal mark report, subject wise internal and external mark details, condonation applicant list etc. All faculty details, faculty training applicant list, faculty remuneration collected details, incident report and students mentoring list can also be accessed by IQAC.
f. Home Page of the IQAC

SHARMS
PAGE 28
g. Student details view
h. Department Views

SHARMS
PAGE 29
i. Incident mark setting

SHARMS
PAGE 30
j. Online application statistics

SHARMS
PAGE 31
k. Challan generation
l. Payment and ID card printing

SHARMS
PAGE 32
m. Second language allocation
n. Class allocation
SHARMS
PAGE 33
o. Admission allotment desk
p. Final rank list

SHARMS
PAGE 34
q. Provisional rank list
r. Admission payment details

SHARMS
PAGE 35
s. Class wise student list
t. Student mentoring sheet

SHARMS
PAGE 36
u. Department wise faculty evaluation list
v. Faculty training programme

SHARMS
PAGE 37
w. Faculty training remuneration
x. Student promotion list

SHARMS
PAGE 38
y. Student condonation approval
z. Gender report

SHARMS
PAGE 39
aa. Gender wise count
2. Faculty Portal
a. Daily attendance
The Faculty login allows access for all the faculty of various Departments of the College through individual user ids and passwords. The Dashboard displays search options to obtain the details of students on an individual basis. Faculty can generate reports on their individual timetable, overall class attendance, attendance shortage list, attendance pending and present-day attendance, subject wise attendance report, student’s data analytics graph etc. Faculty can mark incidents that can be records of either achievements or disciplinary measures initiated against any student. That will reflect on the student's portal as well as the principal’s portal.

SHARMS
PAGE 40
Teachers also can view co-curricular attendance received to each student and its percentage. Teachers can enter the internal mark as per criteria given by the exam office and take reports and view consolidated internal mark details.
The page presents the profile of the faculty of the various departments of the College. The College website provides a detailed faculty profile.
b. Timetable
This section provides the Heads of the Departments with the detailed timetable of the individual staff members.
c. Course
This page gives information on the various courses offered by the Department, duration, and year of introduction of each course and the sanctioned strength for all the courses. It also gives options for the addition or deletion of courses.

SHARMS
PAGE 41
d. Subject Entry
The Subject Entry option provides information on the name of the course, subject code, semester, index Order, part type, credits, and short form of the subject. The Head of the Department can make new entries with the introduction of new courses.
e. Student profile
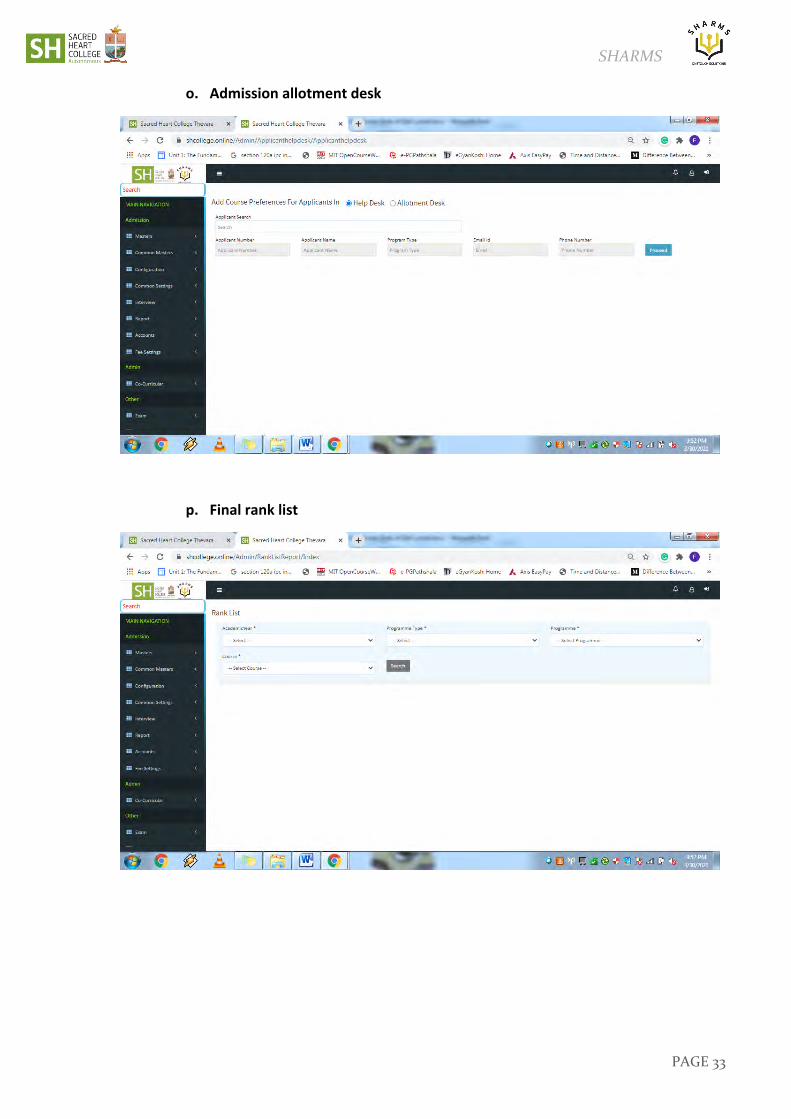
Data on diverse aspects of the students’ personal and academic profile are displayed on this page. The data includes a list of students of the various classes of the various programmes of the Department such as UG, PG and M. Phil. The particulars of the students of the Aided and Self-Financing streams of the Department can be accessed through the portal. The details can either be accessed in ledger form or can be exported to an Excel form. The page also furnishes details of the students such as name and department number of the student, town/village,
SHARMS
PAGE 42
name of the parent or guardian, residential address and contact number, date of birth, nationality, religion, caste, community, and email address.
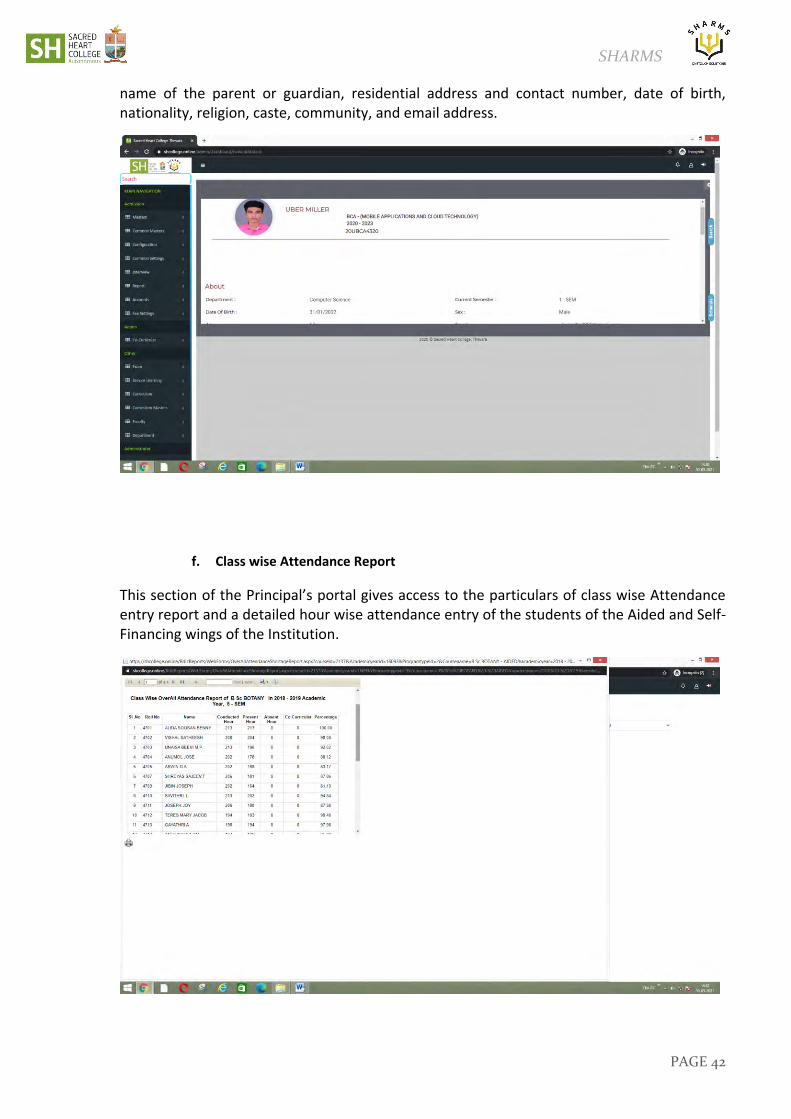
f. Class wise Attendance Report
This section of the Principal’s portal gives access to the particulars of class wise Attendance entry report and a detailed hour wise attendance entry of the students of the Aided and Self-Financing wings of the Institution.

SHARMS
PAGE 43
g. Attendance
Hour wise Attendance of students is provided on the page. And overall attendance percentage, attendance not marked reports, attendance shortage list, co-curricular attendance report and session wise attendance report is available for students.
h. Achievements/ Incident reports

SHARMS
PAGE 44
The page provides details of the academic and extracurricular achievements of the individual students. The mentors of each class can enter all the details about a student, including details of any disciplinary actions initiated against the student. This module is linked with the Conduct certificate and TC module. So that principal can easily identify a student and assess his character.
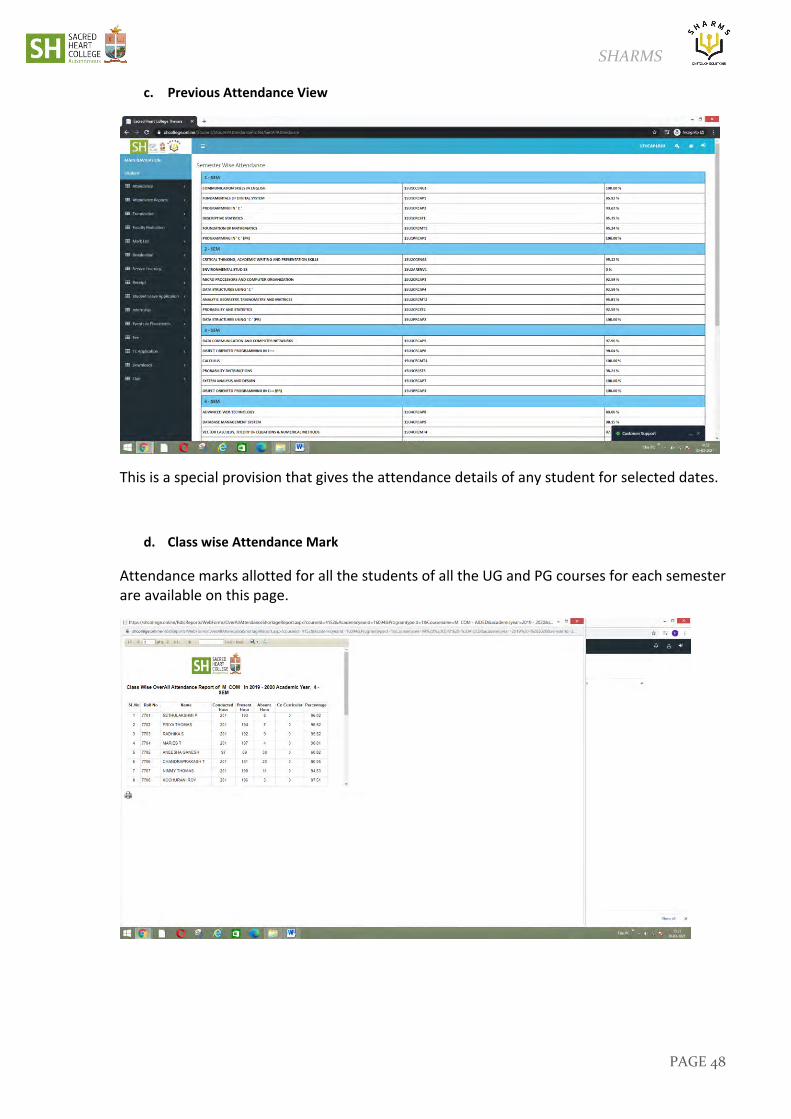
i. Previous Attendance View
This is a special provision that gives the attendance details of a student for selected dates and the previous semester attendance can also be accessed to the students.

SHARMS
PAGE 45
j. Class wise Attendance Mark
Marks awarded for the attendance for all the students of all the UG and PG courses for each semester are displayed on this page. Students can also register complaints or grievances if any within fifteen days of the publication of the results.
k. Programmes
This page gives information on the programmes offered by various Departments of College. Detailed syllabus is also attached on this page.

SHARMS
PAGE 46
3. Student portal
Data on diverse aspects of the students’ personal and academic profile are displayed on this page. The data includes a name list of students of the various classes of the various programmes of the Department such as UG, PG and M. Phil. The particulars of the students of the Aided and Self-Financing streams of the Department can be accessed through the portal. The details can either be accessed in ledger form or can be exported to an Excel form. The page also furnishes details of the students such as name and department number of the student, town/village, name of the parent or guardian, residential address and contact number, date of birth, nationality, religion, caste, community, and email address.
Individual Profile

SHARMS
PAGE 47
Individual Profile of the student gives access to the following particulars of the student: Profile, Fee Details, Library, Attendance and Achievements.
The profile page of the students offers details of the students such as name, date of birth, gender, religion, nationality, father’s name, blood group, first language, address for communication, email address and mobile number of the Student and the Parent.
a. Attendance
Hour-wise Attendance of students is provided on the page.
b. Achievements/incident report
The page provides details of the academic and extracurricular achievements of the students.
SHARMS
PAGE 48
c. Previous Attendance View
This is a special provision that gives the attendance details of any student for selected dates.
d. Class wise Attendance Mark
Attendance marks allotted for all the students of all the UG and PG courses for each semester are available on this page.

SHARMS
PAGE 49
e. Hour wise/ Subject wise attendance report
Students can view subject wise attendance reports and the hour wise attendance report through this facility.
f. Profile
The student profile page provides links to sections such as Profile with photo, Academic performance details, attendance details, absentee reports, CIA reports and ESE reports and marks card. The page contains the personal information of the student including name, date of birth, gender, religion, nationality, email id, father’s name, blood group, first language, community, and address for communication.

SHARMS
PAGE 50
g. Academics
The Academics section includes details of hour wise attendance, mark statements and exam results of the previous semesters from the Controller’s Office and the Book transaction and the library visits made by the student. Facility to send automatic messages to the students regarding attendance on a day-to-day basis is also available.
h. Syllabus
The College website provides access to all UG, PG and M.Phil. syllabi of programmes on offer at the institution.

SHARMS
PAGE 51
i. Exam Registration
This portal gives students the option to apply for examination, scrutiny, revaluation, supplementary examination registration and to make online payments of all kinds of fees. Students can print their exam Hall ticket from this portal. The Exam Result is also published through the student’s portal. Moreover, students can evaluate the faculty and provide feedback on their learning experience.
SHARMS
PAGE 52
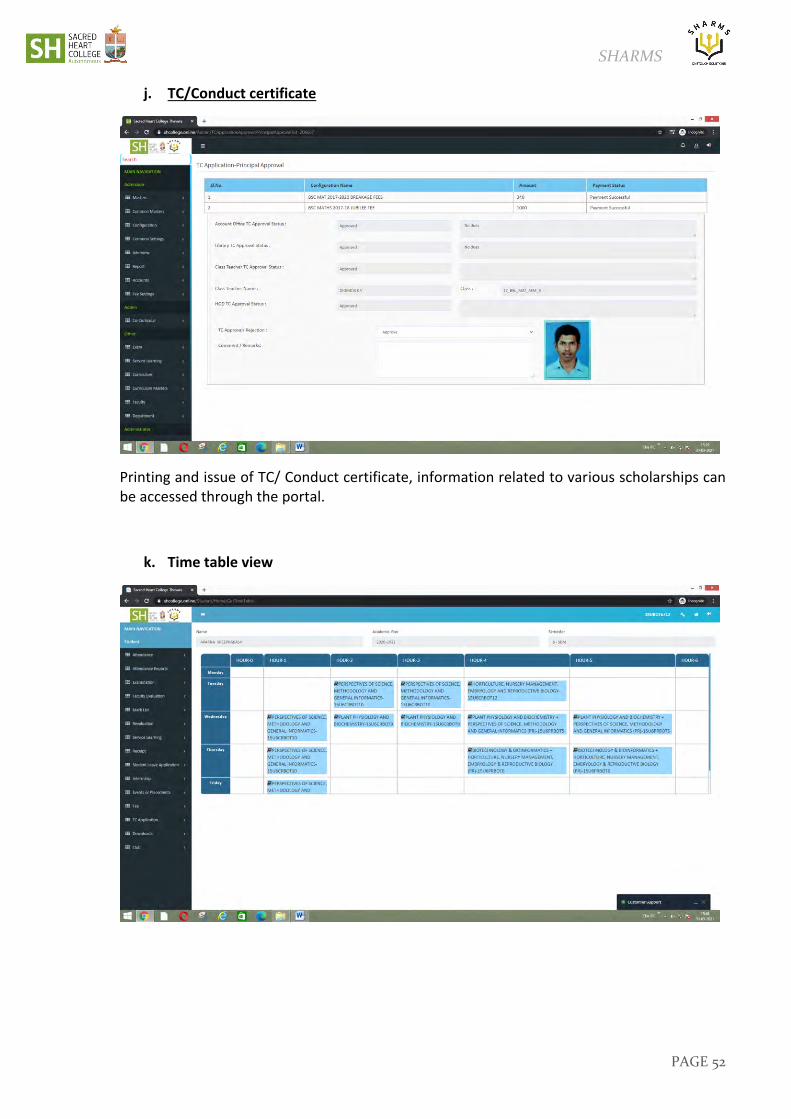
j. TC/Conduct certificate
Printing and issue of TC/ Conduct certificate, information related to various scholarships can be accessed through the portal.
k. Time table view

SHARMS
PAGE 53
l. semester wise Internal mark view report
m. Semester wise External exam marks cards

SHARMS
PAGE 54
n. Application for revaluation/Scrutiny/ Challenge valuation
o. Exam application and online payment

SHARMS
PAGE 55
p. Exam applied status
q. Application for condonation

SHARMS
PAGE 56
r. Co-curricular Leave report
s. Faculty Evaluation portal

SHARMS
PAGE 57
t. Incident view report
u. Hall ticket

SHARMS
PAGE 58
v. Receipt
w. Fee

SHARMS
PAGE 59
x. Leave Application
4. Online Admission portal
Student Admission and Support portal
The ERP comprises different portals developed and managed by the college itself. Data on diverse aspects of the students’ personal and academic profile are displayed on this page. The data includes a list of students of the various classes of the various programmes of the Department such as UG, PG and M. Phil. The particulars of the students of the Aided and Self-Financing streams of the Department can be accessed through the portal. The details can either be accessed in ledger form or can be exported to an Excel form. The page also furnishes details of the students such as name and department number of the student, town/village, name of the parent or guardian, residential address and contact number, date of birth, nationality, religion, caste, community, and email address.

SHARMS
PAGE 60
Students’ Admission Portal
a. Admission Login Page

SHARMS
PAGE 61
b. Admission Login Page
c. Personal Details

SHARMS
PAGE 62
d. Parent Details
e. Parent Details
SHARMS
PAGE 63
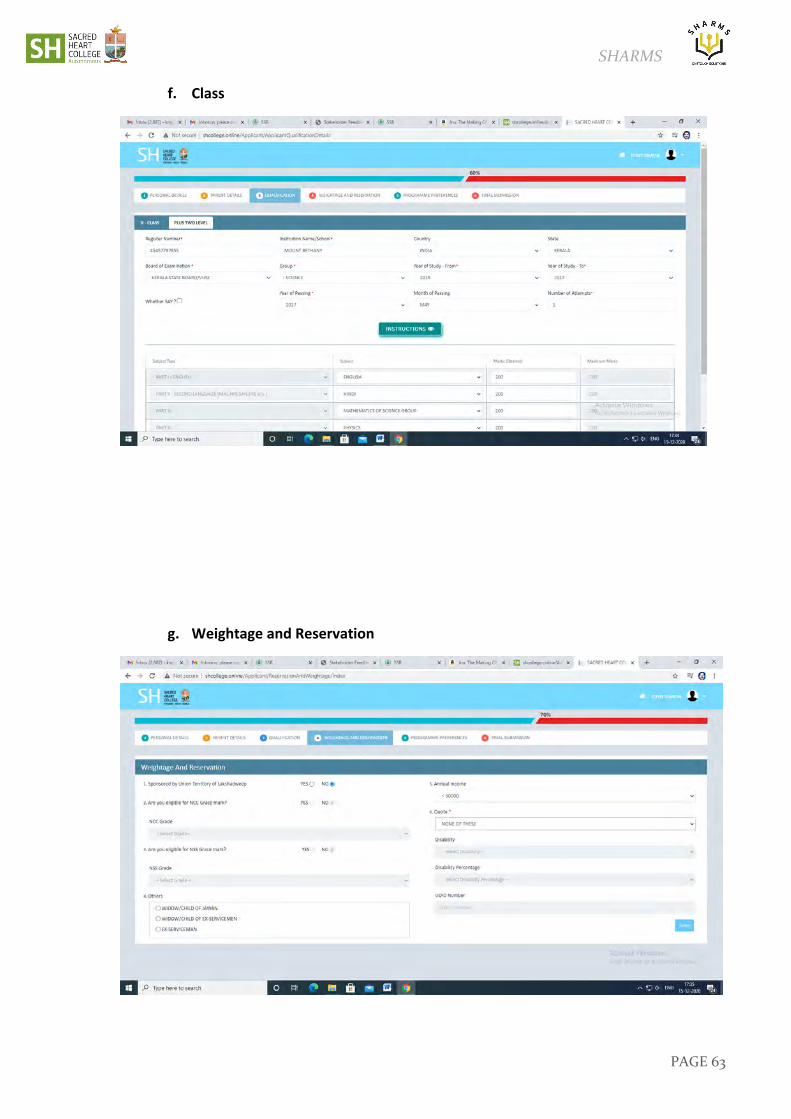
f. Class
g. Weightage and Reservation

SHARMS
PAGE 64
h. Second Language
i. Submission

SHARMS
PAGE 65
5. Admission Process administration Screens
Admission of Students
1. This module is used to configure the admission of students to various programmes. The opening window shows the login and password fields. Once logged in, the Admission configuration screen appears as below:
2. Configuration
From the menu Main Navigation select “Configuration: The following screen appears.Admission configuration Screens

SHARMS
PAGE 66
Steps: 1. Select Creation
2. Select “+” at the bottom of the page.
3. Code appears in the field
4. Enter Name
5. Academic Year
6. Programme Type
7. Admission Type
3. Quota Seat Allocation Screen
Steps: Select Programme and the quota
Seat Distribution screen. Steps: Allocate seats under each quota using the drop down menu.

SHARMS
PAGE 67
Course Fee Setting
Steps: 1 Select Configuration Name
3. Programme 4. Course 5. Semester/Year 6. Category 7. Enter the fee for each category.
Subject-wise Weightage Mark Setting Screen (For Rank list)
Steps: Add the weightage for the subject
4. Extra-curricular Weightage Mark Setting Screen (For Rank list)

SHARMS
PAGE 68
Steps: Add the weightage for extracurricular. CONFIGURING APPLICATION FEE
This module is intended to set the application fee for various courses to be paid by the student along with the application for admission.
Steps: 1. Go to the Configuration on the Main Menu. 2. Select Application fee. 3. Add Application Fee appears.
1. Add Application Fee
Steps: 1. Select the configuration name 2. Select category 3. Fee amount

SHARMS
PAGE 69
Application Number Configuration
Steps: 1. Enter the starting number of the application 2. Select the academic year 3. Select the programme type 4. Admission application
User Manual for Applicant Registration
Application for various programmes in the college is made through the Online Application Process. The process starts with the registration of the candidate for application, followed by access to the online application, submission of relevant documents and payment of fees.
Steps:
1. Open browser (Chrome/IE) and paste the below URL and Enter.
www.shcollege.online
2. A Login window is displayed (From which user can either do a “New Registration” or can login if an existing Candidate with their Credentials)
Pic 1.0-Login page
3. After clicking the New Registration takes user to a Registration page , which will ask for some necessary input from the Candidate

SHARMS
PAGE 70
Details mentioned in the checklist should be ready for further registration - (See checklist shown at the right)
Pic 1.1-UG Registration page
Pic 1.2-PG Registration page

SHARMS
PAGE 71
Pic 1.3-MPHIL Registration page
Before filling the application, please refer UG/PG/MPHIL Admission 2019 prospectus on the college website (http://www.shcollege.ac.in/Admission-For UG & http://www.shcollege.ac.in/PGAdmissions- For PG). This link will allow you to access the college website regarding the admission details of the program type.
In the registration form all Fields are mandatory. The Description of the fields is as below.
1. Programme type:- Choices are a. UNDGER GRADUATION b. POST-GRADUATION c. M. PHIL.
2. Full Name(Name as in the SSLC Certificate):- Write your Full Name 3. Category:-Select your Category(General, SC,ST & OEC) 4. Sex:-Select your Sex 5. Date Of birth:-Enter your date of birth. 6. Applicant’s mobile number:-Write your mobile number 7. Email for communication:-Write your email ID.
(*All fields are kept mandatory)
4. Click on Register button takes user to the page as shown below 5. Click Proceed to login button for Applicant login. 6. The user will get the login credential on his/her registered email id and mobile number.
(Registered in steps 6 & 7 above)

SHARMS
PAGE 72
Pic 1.4-Registration submission
7. After filling the Email Id and password, click on Login button takes user to Application registration page.
8. Navigate to Dash board which will be as seen in Image below
Pic 1.5- Applicant Dash board
9. If the Email ID and/or password supplied are wrong, then a message is displayed “Invalid Credentials” as shown below.

SHARMS
PAGE 73
Pic 1.6-Invalid Login
10. “Forget Password” link will send password to your email id which you had supplied at Registration.
11. After successful login, lands up in dash board (See the Pic 1.5). User can see the Menu icons-
a. Applicant profile b. Payment c. Admission Status d. Management quota e. Download application.
12. Click on Applicant profile Link to continue filling up application which will have the following tabs as shown below
1. Personal detail 2. Parent Details 3. Qualification 4. Weightage and Reservation 5. Programme Preferences 6. Payment 7. Final Submission.
13. Start with personal details. In this page your Name, DOB, Sex, Mobile and email ID will be populated automatically being given in the registration page. User can input your other Personal details such as (religion, Caste, Nationality, State and Blood group), Address details and Miscellaneous Details.
See the pic 1.7 Personal Details.

SHARMS
PAGE 74
Pic 1.7 Personal Details
For Indian citizens, enter your Aadhar number (Mandatory) and for Non-Indians your passport number.
14. Enter your Address details (Current Address and Permanent Address) in Address section of the personal information tab. See the pic 1.8 Address detail
Pic 1.8 Address detail
The Description of the fields is as below.
1. House /Flat Number:-Enter your house number or Flat Number here. 2. House/Flat Name:-You should enter your House Name or Flat Name here. 3. Post office:-Enter your post office. 4. Pin code:-Enter your pin code. 5. Street number:-Enter your Street number here. 6. Street name:- Enter your Street name here. 7. Taluk :- Enter your Taluk here 8. City :-Select your city 9. State :-Select your state.

SHARMS
PAGE 75
10. District:-Select your district.
15. If the current address and permanent address are same, then select the check box “Is permanent address same as current address?”
16. Enter the Miscellaneous Details in the Personal tab-Enter your Height, Weight, Birth place and Mother tongue here.
Pic 1.9 Miscellaneous Details.
17. Click on save button to continue with the application registration, takes user to the next tab –Parent details.
Window for parent details appears
a. Window for Parent Details

SHARMS
PAGE 76
Steps:
Enter the name; Phone Number, Occupation; Address Details; Guardian’s Address.

SHARMS
PAGE 77
b. Details of Qualifying Examination
Steps
1. Enter the qualifying exam 2. Enter the marks

SHARMS
PAGE 78
c. Weightage and Reservation
Steps: Enter details pertaining to eligibility for weightage.
d. Programme Preferences
Steps:
1. Select the course 2. Select the second Language from the drop down menu.

SHARMS
PAGE 79
e. Final Submission
Steps: 1. Upload Photo 2. Enter “Submit” to go the payment window.
f. Payment
Provision to pay the application Fee…two mode of payment here -Online payment and
Challan payment..
Steps:
1. Select the payment mode 2. Complete the payment by entering the payment gateway of the bank. 3. Final submission page opens. 4. Submit the application.
MANAGEMENT QUOTA APPLICATION FORM
Since the college belongs to the Minority Community the college enjoys the privilege of admitting students under the management quota allowed by the government. The following are the steps for applying for seats under the Management Quota.

SHARMS
PAGE 80
Steps:
1. Go to the applicant dashboard 2. Select the link for the management quota application 3. Enter the details.
The following window will appear including the name of the candidate and the photograph.
Download the application for the submission of the hard copy. RANK LIST PREPARATION
Rank list is prepared through backend process. The rank list can be viewed through the following Window:

SHARMS
PAGE 81
INTERVIEW SCREENS
Help Desk window will display the list of candidates in the rank list. Select the candidates present using the dropdown menu.
a. Allotment Screen

SHARMS
PAGE 82
Steps: 1. Allot students for various courses by clicking against the name of the candidate. 2. Select the Programme and other details

SHARMS
PAGE 83
b. Document Verification Screen(Listing)
Steps: 1. Select Edit
The following window will open Document Verification Screen (Checking)
Steps: 1. Verify the documents by checking the boxes. 2. Click verified.
c. Principal’s Screen

SHARMS
PAGE 84
Steps 1. Verify the details and Select admit from the drop down menu.
d. Class Allocation (Listing Screen)
The following screen lists the candidates and the courses click the button “Allocate” against the candidate’s name.
The Allocation window opens

SHARMS
PAGE 85
Class Allocation (Allocation Screen)
Steps: Details appear through auto-generate system. Verify the details and click on Allocate. e. Second Language allocation Screen(Listing Screen)
Steps: 1. Select the programme. 2. Select the second language by clicking on the Plus button against the name of the
student. The following window opens

SHARMS
PAGE 86
f. Second Language allocation Screen (Allocation Screen)
g. FEE PAYMENT The fee paid through challan. The challan is generated through clicking the challan button against the student.
h. Challan Generation(Listing Screen)

SHARMS
PAGE 87
i. Challan Generation (Generation or payment Screen)
j. Payment Verification Screen(Listing Screen)

SHARMS
PAGE 88
k. Payment Verification Screen (Verification Screen)
l. ID CARD PRINTING Once the payment verification is done. The ID Card printing screen appears. (Listing Screen below)

SHARMS
PAGE 89
ID Card Printing (Printing screen)

SHARMS
PAGE 90
6. CURRICULAM SETTING SCREENS
a. Course Definition: Course definition is prepared by selecting details from the appropriate drop down menu.
Once the course definition is over, the next window, Subject Master Appears. b. Subject Master

SHARMS
PAGE 91
Steps:
1. Select the Programme type 2. Subject Name 3. Subject code, type and mode 4. Select the subject stream and credits 5. Select the semester 6. Select the academic year and the department
The screen for detailed distribution of course appears.
c. Detailed Distribution of Course
Steps: 1. Select the type of course

SHARMS
PAGE 92
2. Name of the course 3. Semester 4. Academic batch and click on search.
The window for Teacher Subject Allocation appears
d. Teacher Subject Allocation
Steps:
1. Select the name of the faculty from the menu 2. Select the academic year 3. Enter the subjects taught by the faculty
The screen for Teacher Timetable appears.
e. Teacher Timetable
Steps:
1. Select the name of the staff 2. Select the day and hour 3. Select the class master 4. Select the subject and the academic year

SHARMS
PAGE 93
The window for batch creation appears
f. Batch Creation (For Open course and Second Language)
Steps:
1. Select the semester from the drop down menu 2. Select the subject stream 3. Select the subject 4. Enter the name.
The screen for Batch to Class Allocation appears
g. Batch to Class allocation (For Open course and Second Language)
Steps: Select the semester, second language and the class. The screen for Batch to student allocation appears

SHARMS
PAGE 94
h. Batch to Student Allocation (For Open course and Second Language)
Steps:
1. Select the second language batch 2. Check against the name of the student to select the batch.
i. Rule Setting
The following is the procedure for the rule setting for the Internal/ External marks.

SHARMS
PAGE 95
Steps: 1. Go to the Navigation menu 2. Select Rule setting 3. Select Common Rule setting 4. Enter the details of the UG/PG course 5. Set the Minimum and Maximum marks 6. Enter the Minimum and Maximum for the components for Continuous Internal
Evaluation 7. Save the data

SHARMS
PAGE 96
j. Attendance Evaluation Setting
This Screen is meant to set the criteria for attendance evaluation.
Steps:
1. Set the Percentage range and the corresponding mark 2. Set the minimum for eligibility for registering for exams 3. Set the minimum for condonation of absence 4. Set the attendance entry Freeze (No. of Days)
k. Grade Setting
This Screen is for setting the Grades and the corresponding percentage of marks. It is also the screen for setting the SGPA and its corresponding grade point. Steps:
1. Set the Mark percentage range and the corresponding grade. 2. Set the Pass/ Fail
SHARMS
PAGE 97
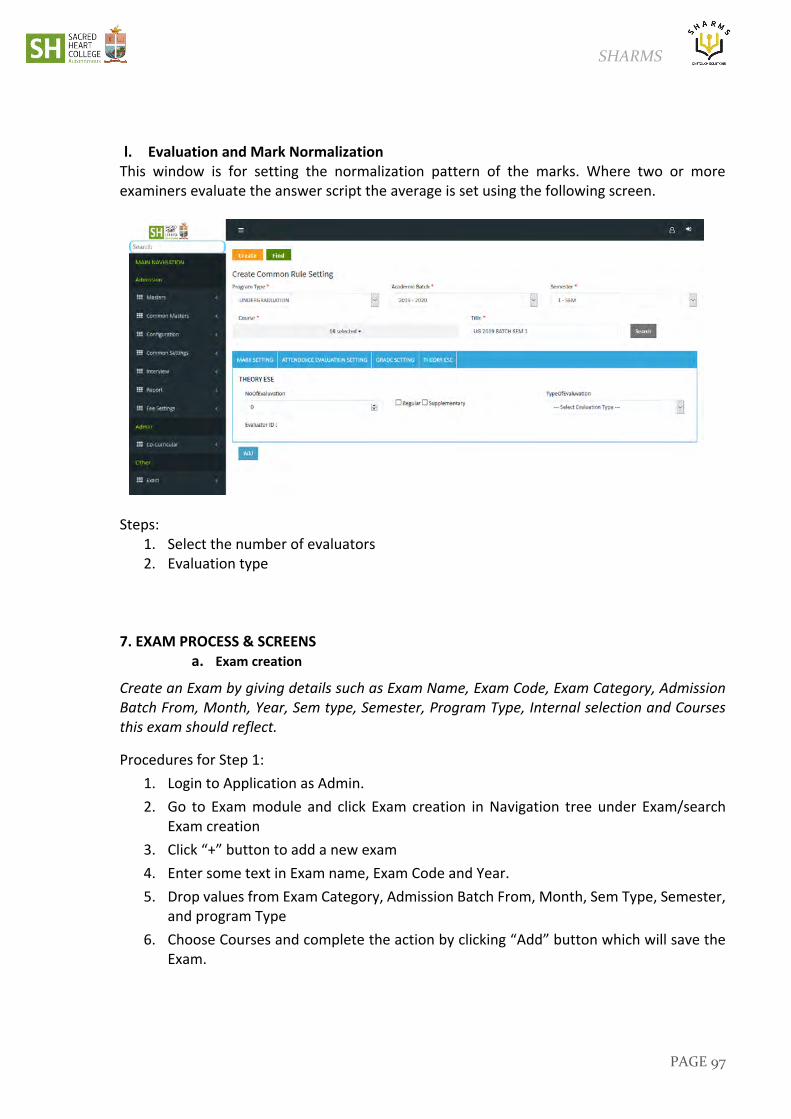
l. Evaluation and Mark Normalization
This window is for setting the normalization pattern of the marks. Where two or more examiners evaluate the answer script the average is set using the following screen.
Steps: 1. Select the number of evaluators 2. Evaluation type
7. EXAM PROCESS & SCREENS
a. Exam creation
Create an Exam by giving details such as Exam Name, Exam Code, Exam Category, Admission Batch From, Month, Year, Sem type, Semester, Program Type, Internal selection and Courses this exam should reflect.
Procedures for Step 1:
1. Login to Application as Admin.
2. Go to Exam module and click Exam creation in Navigation tree under Exam/search Exam creation
3. Click “+” button to add a new exam
4. Enter some text in Exam name, Exam Code and Year.
5. Drop values from Exam Category, Admission Batch From, Month, Sem Type, Semester, and program Type
6. Choose Courses and complete the action by clicking “Add” button which will save the Exam.

SHARMS
PAGE 98
Warning: Sem Type selection is important during the Exam creation as this is reflecting in many places. User can create a Sem Type as Odd/Even/Both based on the actions against that Exam
NOTE: Admission Batch From gives from which Batch this Exam should be visible, shouldn’t confuse with the Academic year.
b. Exam Fee Category
Exam Fee Category is created for an Academic Year by selecting the Year and the Fee category (adding the Quota).
Procedures for Step 2:
1. Select Exam Fee Category from Navigation tree under Exam/search Exam fee category
a) Choose an Academic year from drop down
b) Add Exam Fee Category
2. Complete an action using one of the following options:
Option 1
a) Click Save
b) Click Back to List (if you are not adding)
Option 2 -Edit
a) Click on an already Edited Fee Category
b) Do the changes
c) Click Edit

SHARMS
PAGE 99
c. Condonation Fee Setup
Student who has attendance less than 75% and on/above 65% go for Condonation. Condonation fees can be remitted only during a period as per the Notification announced.
Procedures for Step 3:
1. Select Condonation Fee Setup from Navigation tree under Exam/search Condonation Fee Setup
a) Add a Title
b) Select an Academic Year from drop down
c) Select Program Type from drop down
d) Add Course and Classes which are exempted by Condonation
e) Add Attendance% Frm, % To, Amount, Date From, Date To
2. Complete an action using one of the following options:
Option 1
a) Click Add
b) Click Back to List (if you are not adding)
Option 2 -Edit
a) Click on an already Edited Condonation
b) Do the changes
c) Click Edit

SHARMS
PAGE 100
E.
d. Student Condonation Approval
Prerequisite: - Student needs to login to Student portal and Apply Condonation
Procedures for Step 4:
1. Select Student Condonation Approval from Navigation tree under Exam/search Student Condonation Approval.
a) Search the Name of the Student
b) Click on Edit corresponding to that Student
c) Select Approve and Save
2. Complete an action using one of the following options:
Option 1
a) Click Save
b) Click Back to List (if you are not adding)
Option 2 -Edit
a) Click on an already Edited Fee Category
b) Do the changes

SHARMS
PAGE 101
c) Click Edit
e. Update Status Student Condonation
Once the condonation is paid, the status can be updated to Paid here
Procedures for Step 5:
1. Select Update Status Student Condonation from Navigation tree under Exam/search Update Status Student Condonation
a) Search the Student who underwent Condonation
b) Click Paid
f. Student Bypass Condonation
This is applicable to students if their attendance is very less and cannot apply for Condonation as well. This is the sole discretion of College to decide if he/she has to apply for the exam by by-passing Condonation

SHARMS
PAGE 102
Procedures for Step 6:
1. Select Student bypass condonation from Navigation tree under Exam/search Student by pass Condonation
a) Click on “+” button
b) Search Register Number who needs to bypass Condonation
c) Rest of the details are populated as per the register number
g. Faculty Evaluation Configuration
Admin can configure a course, semester and also under which dates the Faculty evaluation screen should be visible to Students at their portal
Procedures for Step 7:
1. Select Faculty Evaluation Config from Navigation tree/search Faculty evaluation config
a) Select Academic year from drop down
b) Select the Exam
c) Select Course and Semester
d) Select ‘Start and End dates’
e) Select Evaluation Type as “Faculty Evaluation”
f) Click on Get Data button to fetch the details
g) Complete the action by clicking Save.

SHARMS
PAGE 103
h. FACULTY EVALUATION
Feed Back Query can be added and a Max Credit Score also to be given. This is what gets reflected in Student portal once they evaluate a Faculty.
Max Credit score for Faculty evaluation given is 5.
Procedures for Step 8:
1. Select Faculty Evaluation from Navigation tree under Exam/search Faculty Evaluation
a) Add Feed Back Queries and Max Credit score for that Query.

SHARMS
PAGE 104
i. APPLY EXAM
Student can apply for Exam at Student portal. Fees can be remitted either online or as Challan
Procedures for Step 9:
1. Login to Student portal (who underwent Faculty evaluation/Condonation) to Apply Exam
2. Select Exam from drop down
3. Select Semester (which will display the subjects automatically upon the above selections)
4. Click Pay now option which will take Student to Online/Challan payment
(Student can note down the Challan # for further communications)
Upon ‘Challan payment’ a message window is shown as an acknowledgement

SHARMS
PAGE 105
F.
j. Update Challan Status
Once the Challan is paid by the Student this is the section where Admin can verify the Challan# and if it has been credited in college account.
Procedures for Step 10:
1. Login to Admin panel and under ‘Common Settings’ see ‘Update Challan Status’
2. Search the name of the student who remitted fees
3. Verify the Challan#, Select the checkbox and click Submit

SHARMS
PAGE 106
k. Hall Ticket Configuration
Hall ticket can be configured here which will allow student to download the hall ticket in specified dates .
Procedures for Step 11:
1. Login to Admin panel and under Exam-Click Hall Ticket Configuration
2. Select Academic year
3. Select Exam, Course and Semester
4. Select Start and End dates in which Hall Ticket should reflect at Student Portal
5. Click Get Data button
6. Verify the details populated and click Save
1. Student Hall Ticket Configuration
Hall ticket configured can be seen here
Procedures for Step 12: 1. Login to Admin panel and Exam –go to Student Hall Ticket Configuration 2. Select the Course, Class and Exam

SHARMS
PAGE 107
3. Click Search 4. Verify the search results and click Save
l. Hall Ticket
Student can login to his/her portal and under Navigation tree go to ‘Hall Ticket’
Procedures for Step 13: 1. Login to student portal and under Hall Ticket – Exam Hall Ticket List 2. Select the Hall ticket corresponding to the Exam applied 3. Click Download button

SHARMS
PAGE 108
m. EXAM CREATION

SHARMS
PAGE 109
n. Exam Fee Creation
o. Condonation Fee Setting Screen