Embed Size (px)
Citation preview

������������������������������������� ����� ���� ����� ������������� ���� �� ���� ��� �
�
������ ���������� ��� �������
�
�
����� � �� �� �!"����"�� �# � ��$� �!%�&�%'()�*++&���(++
�
End User Training Manual
for
SAP HCM – Human Capital Management
Process Name: Personnel Action - Joining
Process No: TRF/R2R/4.1
Control Copy No: TRF/R2R/4.1/
����� � �,-� ��,� ���$�
Doc Version Description Prepared by Date Reviewed by Approved by 00 Original Palani Dorai 24.12.2009 Amita Batra &
Ankita Paul

Project: MISSION SURE
�!"����"�� �# � ��$�TRF/R2R/4.1�*++&���(++
Page 2 of 45
Introduction
Recruitment to Retirement process in TRF has the following business processes. �$(� �( �!� ���������������� �( �������� �� �
�� ������� �������� ������������������������������ �!"���"�#��
�� �������������� ��� �!"���"�#��
$� �� ��%������� ��� �!"���"�#$#��
&� '������������� ��� (�������)�*�� �!"���"�#$#��
*� '������������� ��� (�������)�*�� �!"���"�#$#��
+� '������������� ��� (�������)�*�� �!"���"�#$#��
,� '������������� ��� (�������)�*�� �!"���"�#$#��
-� '������������� ��� (�������)�*�� �!"���"�#$#��
.� ������ ��������%%�)���/�����0�1���1��� 2 �#�3 ��1%������� �!"���"�#&�
�4� 5������� �!"���"&#��
��� ���)�� ����� �!"���"&#��
��� ��������2))�������%%� ������%�� �!"���"+#$�
�$� ��������2))�������%%� ������%�� �!"���"+#$�
�&� �����%%������������� �!"���",#4�
�*� ���������������%%� ��%��������� �!"���"-#��
�+� ���������������%%� ����� ���� �!"���"-#��
For each of the above processes, separate End User Training Manuals are available
This document covers sl. No. 10 of the above list, that is Joining
This End User Training manual on Joining consists of the following sequence
of sub-processes
1. Joining Process – Personal Actions - Transaction code PA40

Project: MISSION SURE
�!"����"�� �# � ��$�TRF/R2R/4.1�*++&���(++
Page 3 of 45
In order to HIRE (Joining Action) an employee the following activities are to be completed.
���$��� �.�� � ����-���� �� /
�
�$
� �
���������� �0�-�������� �����
12
��������������� ����
�� �������������� �%�)���5������� ��������� ������������ ������� ��� �������� � �����
�� ���6 ))���������%��%%��1���������������
��1�7����)�� �1���������������%�!�8�1�
9��7��� ������������ ������� ��� �������� � �����
$� �#� ��������������1�����%���� �1�����
�%#�
:#��)� �������������%�� �1�������)�����9��
;�����������;�1���<��������� �����������������
����;�%���������������������������������������������������������������������������������������������������������������������
�)��������������%� �1���������)������;����
�����<���1�)�� �<������������ ����#�
� �1�����
1���
������������ ������� ��� �������� � �����
&� ���9��7���� ����%%��%����5�������
)�� ������)����1�������� ������#�������������������������
9���%���%������������������%��)�
1��� ��%���������1���1�������;���
���<�������)�� �
9��7��� ������������ ������� ��� �������� � �����
*� ������������)���%�������5�������)�� �
��1�%�� �%����<�������)�� �������;���
���5��������������1������)�� %�"�
1��� ��%�)�������)�������
��������� ������������ ������� ��� �������� � �����
+� 9��7���� �������)��%���1������%����
)�� ���1����5���������������1�
��� ��%����%� ���������������
1���� ���
9��7��� ������������ ������� ��� �������� � �����
,� 9��7���� ���;�����������9������
�����������(���1������������2 ��
��1����1���� ������%� ����!�������
7���� ����
9��7��� ����� �������� ��������
-� 6 �������9������(����%%��%��� ����1����
���%�%� ����� �������5���%����
�� �����
9��7��� ������������ ������� ��� �������� � �����
.� 2 �������/�1�����%���1�������������#� 9�" ���
7���
������������ ������� ��� �������� � �����

Project: MISSION SURE
�!"����"�� �# � ��$�TRF/R2R/4.1�*++&���(++
Page 4 of 45
1. Joining Process - Personal Actions – Transaction Code – PA40
Procedural Steps
Menu Path
Access Personnel Action Screen, use the following menu path
• SAP Easy Access -> SAP menu ���� Human Resources ���� Personnel Management > Administration > HR Master Data > PA40 (Personnel Actions)
Transaction Code PA40
Procedure
a) SAP Easy Access -> SAP menu ���� Human Resources ���� Personnel Management > Administration > HR Master Data > PA40 (Personnel Actions)
OR
b) Enter the Transaction code PA40 in the command field (refer the following screen)

Project: MISSION SURE
�!"����"�� �# � ��$�TRF/R2R/4.1�*++&���(++
Page 5 of 45
Press <Enter> or key, the following screen will appear
On the above ‘Personnel Action Menu (transaction PA40)’, key-in the following information in the
fields as specified in the table below:
Field Name R/O/C Description
From Date R Enter the effective date of Personnel Action
Note: Be cautious, otherwise by default it will take the system date
Action Type R Select the row of the Personnel Action to be executed. For this particular
scenario (or document), The Action type “Joining” is selected. Once selected
the screen will look as shown below

Project: MISSION SURE
�!"����"�� �# � ��$�TRF/R2R/4.1�*++&���(++
Page 6 of 45
(Note: “R/O/C means > “R” = Required, “O” = Optional, “C” = Conditional)
Press the execute button, the following ‘Action Info type (IT 0000)’ screen appears.
1. Actions – Infotype 0000
Actions are stored in the Actions info type (IT 0000). For each action a reason has to be
keyed-in. In this info type the employee is automatically assigned with an employment
status, which plays an important role while processing (payroll run, report generation etc.,)
of an employee data.
On the above ‘Action Infotype (IT 0000)’, key-in the following information in the fields as specified in
the table below:
Field Name R/O/C User Action and Values
Personnel Number C Each employee will be assigned and identified with a unique key. d
This employee number will be allotted from a internal numbering
range (based on the configurations made)
From/To R Start and End date of action
a) The date entered in the previous screen will be defaulted
here as the start date.
b) In SAP by default, The end date is always defaulted as
31/12/9999 (Known also as High date)
Action Type C a) The Action Type will be defaulted based on the Action Type
selected in the previous screen.
OR
b) To select the Action to be executed ,
click on the drop down menu the to get a list of dropdown

Project: MISSION SURE
�!"����"�� �# � ��$�TRF/R2R/4.1�*++&���(++
Page 7 of 45
Field Name R/O/C User Action and Values
of all the personnel actions, double-click on the required action type,
to populate the same in the action type field
Field Name R/O/C User Action and Values
Reason for Action R Click on the field, the ‘drop down’ icon appears at the end of the
field as shown.
Click on this icon to get the drop down list, and
select a reason from that list to populate the value on to this field.
Note: this field is mandatory field
Reference
pers. No.
N/A N/A
Click on this ‘drop down’ icon

Project: MISSION SURE
�!"����"�� �# � ��$�TRF/R2R/4.1�*++&���(++
Page 8 of 45
Field Name R/O/C User Action and Values
Customer Specific N/A N/A
Employment C Employment status
The System defaults to 3, which means the active status. Active
means the employee is on company’s rolls
Special payment C Special payment status
System defaults to 1, which means standard wage type.
Position R a) Click on the position field, the ‘drop down’ icon appears at
the end of the field, and click on this icon , a search window
appears as shown below, click on ‘structure search’ to get a
window from which we can search and select the required
position.
.b) If Position no is known without the above procedure, it can be
keyed-in in the position field.
Personnel Area R Click on the ‘Personnel Area’ field, the ‘drop down’ icon appears at
the end of the field, and click on this icon, to get the drop down list,
from which select the required personnel area (where the employee
is to be hired), and click on the ‘check mark’ , the value
selected will get populated in this field..
Employee Group R Click on the ‘Employee Group’ field, the ‘drop down’ icon appears
at the end of the field, and click on this icon, to get the drop down
list, from which select the required personnel area (where the
employee is to be hired), and click on the ‘check mark’ , the
value selected will get populated in this field.
Employee
Subgroup
R Click on the ‘Employee Subgroup’ field, the ‘drop down’ icon
appears at the end of the field, and click on this icon, to get the drop
down list, from which select the required personnel area (where the

Project: MISSION SURE
�!"����"�� �# � ��$�TRF/R2R/4.1�*++&���(++
Page 9 of 45
Field Name R/O/C User Action and Values
employee is to be hired), and click on the ‘check mark’ , the
value selected will get populated in this field.
Additional Action
Information
At the bottom of the screen is a grayed-out area called ADDITIONAL
ACTIONS. This is for informational purposes only; each action
executed for an employee will show here as history.
Also if more than one actions are performed on an employee on the
same day, all previous actions of that day will be moved to this
additional action screen
(Note: “R/O/C means > “R” = Required, “O” = Optional, “C” = Conditional)
After keying-in the all the required details of info type 0000 (Action Infotype), click the check
mark at the top left corner of the screen. Check for message in the status line.
a) If any error message is displayed on the status line, the cursor will get positioned to the concerned error field and the colour of the field will be shown in yellow colour. Analyse the error message and correct the field accordingly
b) If ‘save your entries’ message appears in the status line, press the save icon to save the record. The system will assign personnel no to this employee and ‘Record Created’ message appears in the status line. And The system will show the ‘Organizational Assignment (IT 0001)’ screen as the next screen to be created.
Find below an example of an ‘Action info type (IT 0000)’, where all field s are keyed-in as per above instructions.

Project: MISSION SURE
�!"����"�� �# � ��$�TRF/R2R/4.1�*++&���(++
Page 10 of 45
Project: MISSION SURE
�!"����"�� �# � ��$�TRF/R2R/4.1�*++&���(++
Page 11 of 45
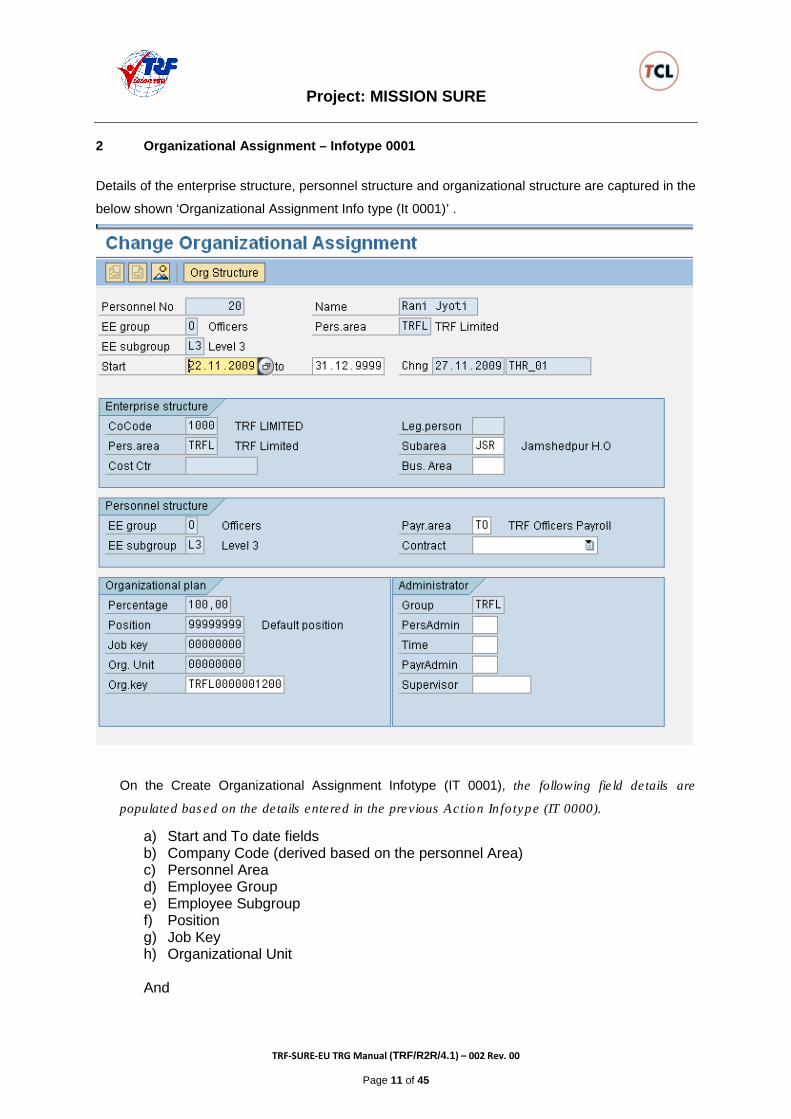
2 Organizational Assignment – Infotype 0001
Details of the enterprise structure, personnel structure and organizational structure are captured in the
below shown ‘Organizational Assignment Info type (It 0001)’ .
On the Create Organizational Assignment Infotype (IT 0001), the following field details are
populated based on the details entered in the previous Action Infotype (IT 0000).
a) Start and To date fields b) Company Code (derived based on the personnel Area) c) Personnel Area d) Employee Group e) Employee Subgroup f) Position g) Job Key h) Organizational Unit And

Project: MISSION SURE
�!"����"�� �# � ��$�TRF/R2R/4.1�*++&���(++
Page 12 of 45
i) Percentage is defaulted to 100% j) Organizational key will be defaulted as per the configuration. k) Cost Center – if already assigned to the position, the system will default it here l) Based on cost center the business area will be defaulted
On the above ‘Organizational Assignment Infotype (IT 0001)’, key-in the following information in
the fields as specified in the table below:
Field Name R/O/C User Action and Values
Personnel Subarea R Click on the ‘Personnel Subarea’ field, the ‘drop down’ icon
appears at the end of the field, and click on this icon, to get the
drop down list, from which select the required personnel
subarea, and click on the ‘check mark’ icon, the value
selected will get populated in to this field..
Payroll Area C a) The payroll area will be defaulted, if it is correct go to the
next field, otherwise to change the payroll area do as
suggested in ‘b)’ below.
c) Click on the ‘Payroll Area’ field, the ‘drop down’ icon
appears at the end of the field, and click on this icon, to
get the drop down list, from which select the required
payroll area, and click on the ‘check mark’ icon,
the value selected will get populated in to this field..
Contract O NA
Pers Admin O NA
Time O NA
Payroll O N/A
(Note: On above table, in column “R/O/C”; “R” = Required, “O” = Optional, “C” = Conditional)
After keying-in all the required details of info type 0001 (Organizational assignment Infotype),
click the check mark at the top left corner of the screen. Check for message in the status line.
a) If any error message is displayed on the status line, the cursor will get positioned to the concerned error field and the colour of the field will be shown in yellow colour., Analyse the error message and correct the field accordingly
b) If ‘save your entries’ message appears in the status line, press the save icon to save the record.
Project: MISSION SURE
�!"����"�� �# � ��$�TRF/R2R/4.1�*++&���(++
Page 13 of 45
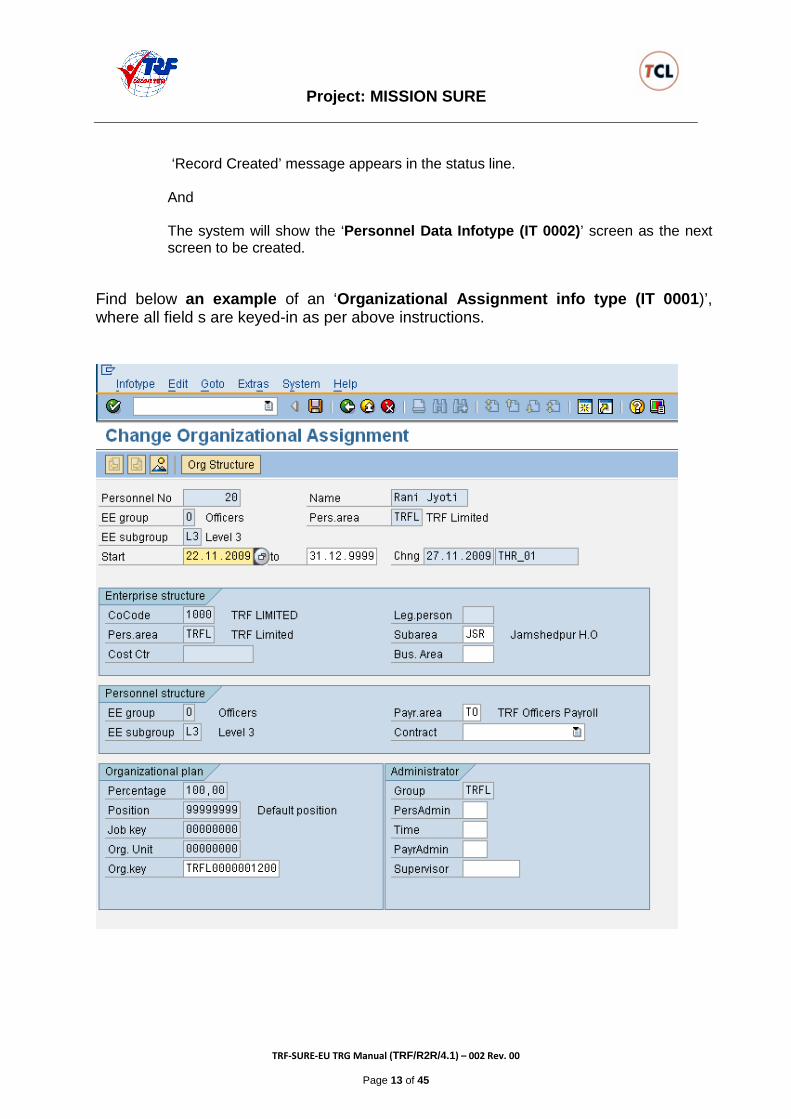
‘Record Created’ message appears in the status line. And The system will show the ‘Personnel Data Infotype (IT 0002)’ screen as the next screen to be created.
Find below an example of an ‘Organizational Assignment info type (IT 0001)’, where all field s are keyed-in as per above instructions.

Project: MISSION SURE
�!"����"�� �# � ��$�TRF/R2R/4.1�*++&���(++
Page 14 of 45
3. Personal data – info type 0002
This Infotype is used to capture employee’s personal information.
The system performs a combination validation based on the gender and the form of address field, and
displays an error message as “ the form of address and the assigned gender are incompatible’, for
example, if when a Women employee is addressed as Mr.
On the above ‘Personal Data (Infotype 0002)’, key-in the following information in the fields as
specified in the table below:
Field Name R/O/C User Action and Values
Start and To Dates C The system will take the Date of birth of the employee as the start
date. That is this is the effective date of employee’s personal

Project: MISSION SURE
�!"����"�� �# � ��$�TRF/R2R/4.1�*++&���(++
Page 15 of 45
information. .
The To date is the default high date, i.e. 31/12/9999..
Title R
To select the Title, click on the drop down menu icon to
get a drop down list of titles. According to the gender of the
employee select a title.
Name Format C The name format is used while printing an employee’s name.
System will default a value, and leave it unchanged. .
Last Name R Enter the employee’s last name. If employee uses a combined
last name, then separate them by using hyphens.
Birth Name O NA
First Name R Enter the employee’s first name
Initials R Enter employee’s initial if required
Name Prefix O NA
N Prefix 2 O NA
Title O NA
Second Title O NA
Other Title O NA
Nick Name NA
Gender R
To select the Gender, click on the drop down menu icon
to get a drop down list of Genders. According to the gender of the
employee select a Gender.
Language R To select the Language, click on the drop down menu icon
to get a drop down list of Languages, and select a
language from that list in which the employee wants to
communicate.
Birth Date R Enter the employee’s birth date in dd/mm/yyyy format.
Marital Status R Use the drop down menu to select the appropriate marital status.
Birth Place R Free text field, Enter the place of birth of the employee
Since R Enter the employee’s marriage date in dd/mm/yyyy format.
City of Birth R Enter the country of birth of the employee from the drop down list.
No. of Child C Free Numeric field, for entering a ‘number’ to represent the
number of children of the employee.
State R Select the State of employee, from the drop down list

Project: MISSION SURE
�!"����"�� �# � ��$�TRF/R2R/4.1�*++&���(++
Page 16 of 45
Religion R Select the Religion of the employee from the drop down list
Nationality R Use the drop down menu to select the appropriate nationality.
Occupational Code NA
2nd/3rd National NA
(Note: On above table, in column “R/O/C”; “R” = Required, “O” = Optional, “C” = Conditional)
After keying-in all the required details of info type 0002 (Personnel data Infotype), click the
check mark at the top left corner of the screen. Check for message in the status line.
a) If any error message is displayed on the status line, the cursor will get positioned to the concerned error field and the colour of the field will be shown in yellow colour., Analyse the error message and correct the field accordingly
b) If ‘save your entries’ message appears in the status line, press the save icon to save the record. ‘Record Created’ message appears in the status line. And The system will show the “Address Infotype (IT 0006)” to create next, the ‘subtypes 1 (permanent Residence) of Address Infotype’ will be displayed
Find below an example of ‘Personnel data info type (IT 0002)’, where all field s are keyed-in as per above instructions.

Project: MISSION SURE
�!"����"�� �# � ��$�TRF/R2R/4.1�*++&���(++
Page 17 of 45
4. Addresses – Info type 0006
This Infotype is used to store address information of an employee and all employees must have a
Permanent Address, which is stored in subtype 1. Other address subtypes like: Temporary
Residence, Home Address, Emergency Address, Mailing Address, or address of Accommodation
provided by employer, if required, can be created in the same way.
Project: MISSION SURE
�!"����"�� �# � ��$�TRF/R2R/4.1�*++&���(++
Page 18 of 45
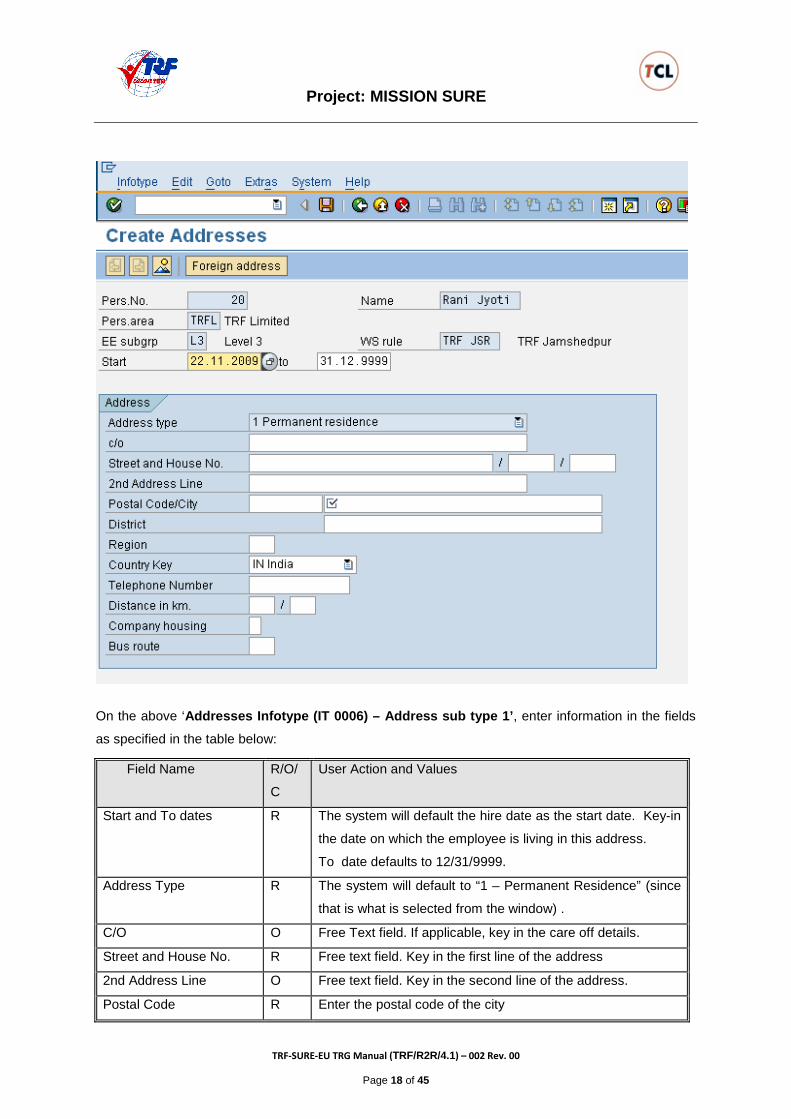
On the above ‘Addresses Infotype (IT 0006) – Address sub type 1’, enter information in the fields
as specified in the table below:
Field Name R/O/
C
User Action and Values
Start and To dates R The system will default the hire date as the start date. Key-in
the date on which the employee is living in this address.
To date defaults to 12/31/9999.
Address Type R The system will default to “1 – Permanent Residence” (since
that is what is selected from the window) .
C/O O Free Text field. If applicable, key in the care off details.
Street and House No. R Free text field. Key in the first line of the address
2nd Address Line O Free text field. Key in the second line of the address.
Postal Code R Enter the postal code of the city

Project: MISSION SURE
�!"����"�� �# � ��$�TRF/R2R/4.1�*++&���(++
Page 19 of 45
City R Enter name of city for address
District NA
Region O Enter a two-digit code for state name from the drop down
list..
Country N/A
Telephone Number O Enter the std code and phone number.
Distance in Km NA
Company Housing NA
Bus route NA
(Note: On above table, in column “R/O/C”; “R” = Required, “O” = Optional, “C” = Conditional)
After keying-in all the required details of info type 0006 (Address Infotype), click the check mark
at the top left corner of the screen. Check for message in the status line.
a) If any error message is displayed on the status line, the cursor will get positioned to the concerned error field and the colour of the field will be shown in yellow colour., Analyse the error message and correct the field accordingly
b) If ‘save your entries’ message appears in the status line, press the save icon to save the record. ‘Record Created’ message appears in the status line. And The system will show the ‘Planned Working Time Infotype (IT 0007)’ as the next screen to be created.
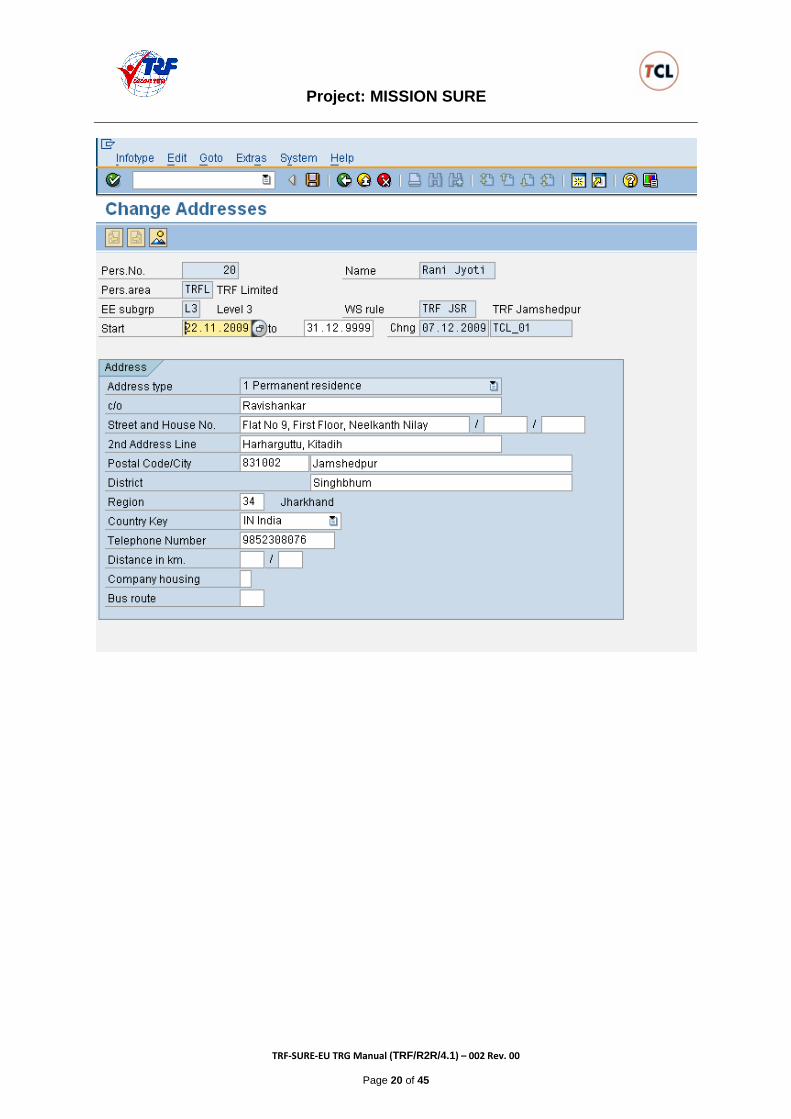
Find below an example of ‘Address info type (IT 0006), Subtype 1 (permanent residence’, where all field s are keyed-in as per above instructions.
Project: MISSION SURE
�!"����"�� �# � ��$�TRF/R2R/4.1�*++&���(++
Page 20 of 45

Project: MISSION SURE
�!"����"�� �# � ��$�TRF/R2R/4.1�*++&���(++
Page 21 of 45
5. PLANNED WORKING TIME – INFOTYPE 007
This Infotype is used for recording the working time schedule (shift details and working times) of the
employee.
On the above ‘Planned Working time Infotype (IT 0007)’, enter information in the fields as
specified in the table below:
Field Name R/O/
C
User Action and Values
Start and To dates R The system will default the hire date as the start date. Key-in
the date on which the employee is living in this address.
To date defaults to 12/31/9999.
Work schedule rule R Click on the ‘work schedule rule’ field, the ‘drop down’ icon
appears at the end of the field, and click on this icon,

Project: MISSION SURE
�!"����"�� �# � ��$�TRF/R2R/4.1�*++&���(++
Page 22 of 45
to get the drop down list, from which select the required work
schedule rule, and click on the ‘check mark’ icon, to get
the selected value to populated in to this field..
Employment percent R System will default 100.00. leave it unchanged
Daily Working hours R Key-in 8.00
Weekly working hours R System will default a value, leave it unchanged
Monthly working hours R System will default a value, leave it unchanged Enter the
postal code of the city
Annual working hours R System will default a value, leave it unchanged Enter the
postal code of the city
Weekly workdays R According to the no of weekly working days of this employee,
key-in the value either 5.00 or 5.500 or 6.00 in this field.
After keying-in all the required details of info type 0007 (Planned Working time Infotype), click
the check mark at the top left corner of the screen. Check for message in the status line.
a) If any error message is displayed on the status line, the cursor will get positioned to the concerned error field and the colour of the field will be shown in yellow colour., Analyse the error message and correct the field accordingly
b) If ‘save your entries’ message appears in the status line, press the save icon to save the record. ‘Record Created’ message appears in the status line. And The system will show the ‘Basic Pay Infotype (IT 0008)’ as the next screen to be created.
Find above an example of ‘Planned working time info type (IT 0007), showing all required fields with values..

Project: MISSION SURE
�!"����"�� �# � ��$�TRF/R2R/4.1�*++&���(++
Page 23 of 45
6. BASIC PAY – INFOTYPE 0008
This Infotype captures the information of basic salary payment details. For payroll
processing, details of this Infotype are one of the very basic information for running payroll
and for deriving or arriving at other allowances.
On above ‘Basic Pay (Infotype 0008)’ screen enter information in the fields as specified in the table below:
Field Name R/O/C User Action and Values Start and To dates R The system will default the hire date.as the start
date, and the end date is defaulted as 31/12/9999 (high date).

Project: MISSION SURE
�!"����"�� �# � ��$�TRF/R2R/4.1�*++&���(++
Page 24 of 45
Field Name R/O/C User Action and Values Reason R Use the drop down menu to select a reason for
changing this master data. For a new hire, enter “WO - appointment”
Pay Scale Type Note: The pay scale types are set up according to the collective agreement provisions that define the sector of industry for which the collective agreement is valid
R Use the drop down menu to select one of the following: T1 – TRF Officers T2 – TRF Workers.
Pay Scale Area Note: Pay scale areas are set up according to the collective agreement provisions for geographical/functional areas that defines the area in which the collective agreement is valid.
C Use the drop down menu to select one of the following: T1 – TRF Officers T2 – TRF Workers.
Pay Scale Group Note: A pay scale group is a criterion used for grading job evaluation, and is divided up into several pay scale levels.
R The system is configured for X different pay scale groups, use the drop down menu to select the right one.
Pay Scale Level Note: Subdivision of the pay scale group, which is also used as a criterion for job evaluation.
R Use the drop down menu to select the right one.
Capacity Utilization Level C Defaults to 100%. Do not change this percentage!
Work Hours/Period C Defaults from Planned Working Time (Infotype 0007). .
Next Increase O NA Annual Salary C Calculated by the system Wage types, Amount Number/unit Unit
R Will get defaulted automatically
Currency R Defaulted by the system
(Note: On above table, in column “R/O/C”; “R” = Required, “O” = Optional, “C” = Conditional) After keying-in all the required details of info type 0008 (Basic Pay Infotype), click the check
mark at the top left corner of the screen. Check for message in the status line.
a) If any error message is displayed on the status line, the cursor will get positioned to the concerned error field and the colour of the field will be shown in yellow colour., Analyse the error message and correct the field accordingly
b) If ‘save your entries’ message appears in the status line, press the save icon to save the record.

Project: MISSION SURE
�!"����"�� �# � ��$�TRF/R2R/4.1�*++&���(++
Page 25 of 45
‘Record Created’ message appears in the status line. And The system will show the ‘Bank Details Infotype (IT 0009)’ as the next screen to be created.
Thus we can find above the ‘Basic pay info type (IT 0008)’ in which all the required field are keyed in with values.
7 BANK DETAILS – INFOTYPE 0009
The Bank Details Infotype captures information related to the employee’s bank details so
that salary can be deposited to the employee’s account. If the employee opts for payment of
his salary by cash, in that case we need not capture his bank account details in this Infotype.
On the above ‘Bank Details (Infotype 0009)’ screen key-in information in the fields as specified in
the table below:
Field Name R/O/C User Action and Values
Start and To dates R The system will default the hire date.as the start date, and

Project: MISSION SURE
�!"����"�� �# � ��$�TRF/R2R/4.1�*++&���(++
Page 26 of 45
Field Name R/O/C User Action and Values
the end date is defaulted as 31/12/9999 (high date).
Bank Details Type R Use the pull down menu to select the Bank
Payee C Name of the payee. The system will default the employee to
be the payee.
Postal Code/City C The system will default the details of postal code and City
that were entered while capturing the Address Infotype
(Infotype 0006).
Bank Country C The system will default ‘IN India’ as the Bank country. It is
the country in which the Bank is located.
Bank Key R From the drop down list, select the required bank key
Bank Account O Enter the employee’s bank account number,.
Bank Control Key O Specify 01 for checking account, 02 for savings account.. if
left blank system will assume as 01.
Payment Method R Select from the drop down list.
For example, Blank for cash payments
Purpose N/A
Payment Currency C The system will default INR as the currency.
(Note: On above table, in column “R/O/C”; “R” = Required, “O” = Optional, “C” = Conditional)
After keying-in all the required details of info type 0009 (Bank Details Infotype), click the check
mark at the top left corner of the screen. Check for message in the status line.
a) If any error message is displayed on the status line, the cursor will get positioned to the concerned error field and the colour of the field will be shown in yellow colour., Analyse the error message and correct the field accordingly
b) If ‘save your entries’ message appears in the status line, press the save icon to save the record. ‘Record Created’ message appears in the status line. And The system will show the ‘Recurring Payments / Deductions Infotype (IT 0014)’ as the next screen to be created.

Project: MISSION SURE
�!"����"�� �# � ��$�TRF/R2R/4.1�*++&���(++
Page 27 of 45
8 RECURRING PAYMENTS / DEDUCTIONS – INFOTYPE 0014
This Infotype captures the information of payments or deductions which are recurring in
nature. For payroll processing details are taken from this Infotype. .
On the above ‘Recurring Payments / Deductions Infotype (IT 0014)’’ screen key-in information in
the fields as specified in the table below:
Field Name R/O/C User Action and Values
Start and To dates R Key-in the Start and End date till which the payment or
deduction is to be recurred. .
Wage tye R From the drop down list select the required wage type.
Amount C Key in the value of the amount, if required, as the case may
be..
Number / Unit C Key in the Number and its unit of measurement, if required,
as the case may be.
Note: for a wage type either an amount should be entered or
a number with its measuring unit is to be entered.

Project: MISSION SURE
�!"����"�� �# � ��$�TRF/R2R/4.1�*++&���(++
Page 28 of 45
Field Name R/O/C User Action and Values
Assignment Number
Reason for change and
Payment dates fileds
C NA.
(Note: On above table, in column “R/O/C”; “R” = Required, “O” = Optional, “C” = Conditional)
After keying-in all the required details of info type 0014 (Recurring payments / Deductions
Infotype), click the check mark at the top left corner of the screen. Check for message in the status line.
a) If any error message is displayed on the status line, the cursor will get positioned to the concerned error field and the colour of the field will be shown in yellow colour., Analyse the error message and correct the field accordingly
b) If ‘save your entries’ message appears in the status line, press the save icon to save the record. ‘Record Created’ message appears in the status line. And The system will show the ‘Additional Payments / Deductions Infotype (IT
0015)’ as the next screen to be created
9 ADDITIONAL PAYMENTS / DEDUCTIONS – INFOTYPE 0015
This Infotype captures the information of one time payments or deductions for a particular
month. For payroll processing details are taken from this Infotype. .
On the below ‘Additional Payments / Deductions Infotype (IT 0015)’’ screen key-in the
values in the fields as specified in the table below:
Field Name R/O/C User Action and Values
Wage tye R a) During creation the wage type will be defaulted
b) Otherwise, from the drop down list select the
required wage type.
Amount C Key in the value of the amount, if required, as the case may
be..
Number / Unit C Key in the Number and its unit of measurement, if required,
as the case may be.

Project: MISSION SURE
�!"����"�� �# � ��$�TRF/R2R/4.1�*++&���(++
Page 29 of 45
Field Name R/O/C User Action and Values
Note: for a wage type either an amount should be entered or
a number with its measuring unit is to be entered.
Date of Origin R Enter last date of the payroll period, in which payroll run this
info-type’s amount is to be paid or deducted.
Assignment Number
Reason for change
C NA.
(Note: On above table, in column “R/O/C”; “R” = Required, “O” = Optional, “C” = Conditional)
After keying-in all the required details of info type 0015 (Additional Payments / Deductions
Infotype), click the check mark at the top left corner of the screen. Check for message in the status line.
a) If any error message is displayed on the status line, the cursor will get positioned to the concerned error field and the colour of the field will be shown in yellow colour., Analyse the error message and correct the field accordingly

Project: MISSION SURE
�!"����"�� �# � ��$�TRF/R2R/4.1�*++&���(++
Page 30 of 45
b) If ‘save your entries’ message appears in the status line, press the save icon to save the record. ‘Record Created’ message appears in the status line. And The system will show the ‘Education Infotype (IT 0022)’ as the next screen to
be created
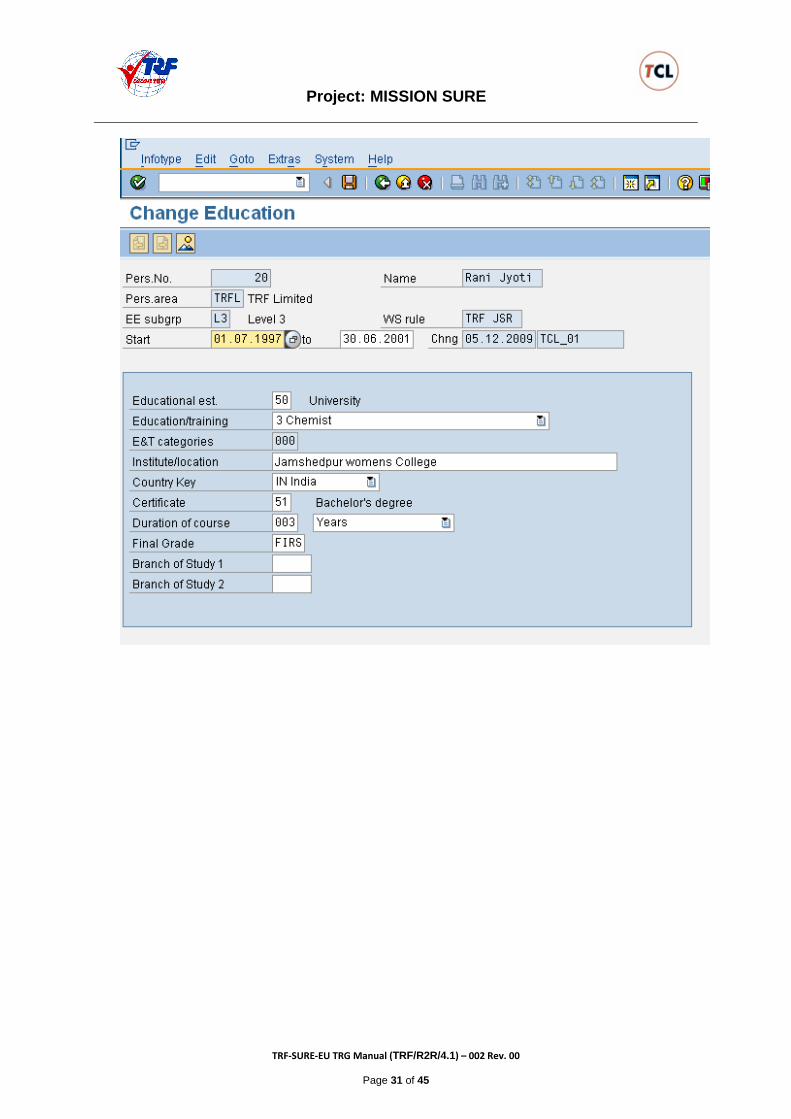
10 EDUCATION – INFOTYPE 0022
This Infotype captures the education information furnished by the employee. It is suggested
that only after verifying the education documents this Infotype is to be created for an
employee.
During the relevant educational period, the following data for each educational history are captured:
• Educational establishment (e.g. primary school, college) • Name and location of the relevant educational establishment (e.g. Boston College) • The country in which the educational institute is located
Find below in the following screens, two educational qualification of this employee is captured. Each qualification is captured in a separate screen.
Project: MISSION SURE
�!"����"�� �# � ��$�TRF/R2R/4.1�*++&���(++
Page 31 of 45

Project: MISSION SURE
�!"����"�� �# � ��$�TRF/R2R/4.1�*++&���(++
Page 32 of 45
On screen Education (Infotype 0022), enter information in the fields as specified in the table below:
Field Name R/O/C User Action and Values
Start and To dates R Key-in the begin and end dates in to the education institute i.e.
admission for the education programme in to the institute and
leaving date after getting the certificate.
Educational est. R From the drop down list select the appropriate value.
Education/Training R Use the drop down menu to select the appropriate
education/training received at the designated institute
E&T Categories NA. System will default this value
Institute/location R Free Text. Key-in the educational Institute Name and its
Location, where the employee has completed the education or
training.
Country Key R Use the drop down menu to select the appropriate country key

Project: MISSION SURE
�!"����"�� �# � ��$�TRF/R2R/4.1�*++&���(++
Page 33 of 45
Field Name R/O/C User Action and Values
Certificate R Use the drop down menu to select the appropriate certificate the
employee has received or acquired at the above mentioned
institute.
Duration of Course O This field has two separate entry boxes:
1) In the left box, enter the number for a specific time unit.
2) In the right box, select the time unit from the drop down list.
Final Grade C Free Text Field. Key-in the valuation of the final marks obtained.
Branch of Study 1 O From the drop down list select appropriate value.
Branch of Study 2 O From the drop down list select appropriate value.
(Note: On above table, in column “R/O/C”; “R” = Required, “O” = Optional, “C” = Conditional)
After keying-in all the required details of info type 0022 (Education Infotype), click the check
mark at the top left corner of the screen. Check for message in the status line.
a) If any error message is displayed on the status line, the cursor will get positioned to the concerned error field and the colour of the field will be shown in yellow colour., Analyse the error message and correct the field accordingly
b) If ‘save your entries’ message appears in the status line, press the save icon to save the record. ‘Record Created’ message appears in the status line. And The system will show the ‘other / Previous Employers Infotype (IT 0023)’ as
the next screen to be created
12 OTHER / PREVIOUS EMPLOYER - INFOTYPE 0023
This Infotype captures data relating to an employee previous employer details, before start
working for our TRF Company. For each previous employer one record is created. An
employee can have been created with as many number of Info type 0023 records as that
many employers he/she has worked previously..

Project: MISSION SURE
�!"����"�� �# � ��$�TRF/R2R/4.1�*++&���(++
Page 34 of 45
On the above screen ‘Other/Previous Employers (Infotype 0023)’, enter information in th fields as
specified in the table below:
Field Name R/O/C User Action and Values
Start and To
date
R Enter the date of joining and date of leaving that company as Start and
To dates..
Employer R Enter the previous employer name
City R A free text field. Enter the city in which the employee has worked in that
company.
Country Key C From the drop down list select country as ‘IN India”
Industry O From the drop down list select appropriate industry
Job O From the drop down list select appropriate Job.
Work Contract O From the drop down list select appropriate work contract (like
permanent or on contract etc.,)
(Note: On above table, in column “R/O/C”; “R” = Required, “O” = Optional, “C” = Conditional)
After keying-in all the required details of info type 0023 (Other /Previous Employer Infotype),
click the check mark at the top left corner of the screen. Check for message in the status line.

Project: MISSION SURE
�!"����"�� �# � ��$�TRF/R2R/4.1�*++&���(++
Page 35 of 45
a) If any error message is displayed on the status line, the cursor will get positioned to
the concerned error field and the colour of the field will be shown in yellow colour., Analyse the error message and correct the field accordingly
b) If ‘save your entries’ message appears in the status line, press the save icon to save the record. ‘Record Created’ message appears in the status line. And The system will show the ‘Monitoring of tasks Infotype (IT 0019)’ as the next
screen to be created
13 MONITORING OF TASKS - INFOTYPE 0019
This Infotype captures data for reminder purpose. Since the concerned HR dept personnel’s
who are dealing with employee’s master data maintenance has to do many activities after a
period of time, those activities or tasks can be entered in to the system for reminding
purpose.
The system does not make any beep sound alert, nor does a blinking light alert or a
message prompt when one open the system. We have to take a report from the system and
check up the list of items printed for that period and decide on tasks to be performed for
various employees as per the printed reminder document..

Project: MISSION SURE
�!"����"�� �# � ��$�TRF/R2R/4.1�*++&���(++
Page 36 of 45
To select the Task type, click on the drop down menu icon to get a drop down list of task
types (as shown in screen below) and select a task type from that list.
.

Project: MISSION SURE
�!"����"�� �# � ��$�TRF/R2R/4.1�*++&���(++
Page 37 of 45
Similarly, to select the ‘Processing Indicator’, click on the drop down menu icon to get a
drop down list of processing indicators (as shown in screen below) and select a processing indicator
from that. While creating a new task type for an employee, always select ‘New Type” as the
processing indicator.
Field Name R/O/C User Action and Values
Date of Task R Enter the Task type date on which it has to happen. In this example the
date (31.03.2009) on which the appraisal has to take place for the
employee...
Reminder date R The system will prompt this date based on the information keyed-in in the
next fields, namely, “Lead / Follow-up time” . Do not enter any date in to
this field, and leave this column Blank.
Lead R Enter the no of days / weeks / months / years in numerical value in this
field

Project: MISSION SURE
�!"����"�� �# � ��$�TRF/R2R/4.1�*++&���(++
Page 38 of 45
Field Name R/O/C User Action and Values
Follow-up time R Click on the ‘follow-up time field’, the ‘drop down’ icon appears at
the end of the field, and click on this icon, to get the drop down list (as
shown in the screen below) from which select the required time unit (for
the number keyed-in in the Lead field), and click on the ‘check mark’
icon of the drop down list, to get the selected value to populated in to the
‘follow-up time’ field..
For the next field i.e “operator” for the “Lead / Follow-up time” field (shown below)

Project: MISSION SURE
�!"����"�� �# � ��$�TRF/R2R/4.1�*++&���(++
Page 39 of 45
Click on the ‘Operator’ for the “Lead / Follow-up time” field, the ‘drop down’ icon
appears at the end of the “Operator” field, and click on this icon, to get the drop down list (as shown in
the above screen) from which select the required operator, and click on the ‘check mark’ icon of
the drop down list, to get the selected value populated in to the ‘Operator’ field..
The drop down list, displays the following three options,
a) Blank – For specific task types
b) – (minus) – Lead time: Reminder takes place before task date / dead line
c) + (plus) - Follow-up time: Reminder takes place after task deadline.
Note: in this example, a – (minus) operator is selected, meaning that the system has to remind 30
days before the date on which the “Appraisal” task ahs to take place for the employee.
After selecting the option, click the enter key or the check mark icon at the top left corner of the
screen. The system will make the values in the ‘Lead / follow-up time’ fields will disappear and a date,
in our example 01.03.2009 (30 days before the task date 31.03.2009) will appear in the Reminder
Date field (refer the screen shown below)
Field Name R/O/C User Action and Values
Comments R This is a 3 line free text field. Any relevant Information or action or
information on the task can be keyed-in in these lines. (Refer screen
below)

Project: MISSION SURE
�!"����"�� �# � ��$�TRF/R2R/4.1�*++&���(++
Page 40 of 45

Project: MISSION SURE
�!"����"�� �# � ��$�TRF/R2R/4.1�*++&���(++
Page 41 of 45
Once the comments are keyed-in and saved the maintain text icon will appear. (Refer above
two screens of Info type 19)
Double click on the maintain text icon the following screen is shown. If required, In this screen
the text can be
After keying-in all the required details of info type 0019 (Monitoring of Tasks Infotype), click the
check mark at the top left corner of the screen. Check for message in the status line.
c) If any error message is displayed on the status line, the cursor will get positioned to the concerned error field and the colour of the field will be shown in yellow colour., Analyse the error message and correct the field accordingly
d) If ‘save your entries’ message appears in the status line, press the save icon to save the record. ‘Record Created’ message appears in the status line. And The system will show the ‘Communication (IT 0105)’ as the next screen to be
created

Project: MISSION SURE
�!"����"�� �# � ��$�TRF/R2R/4.1�*++&���(++
Page 42 of 45
14 COMMUNICATION - INFOTYPE 0105
This Infotype captures data relating to an employee’s various forms of communication /
contact details. The system is configured to capture various communication details, out of
which the following are captured mandatorily.
a) System User Name
b) E-mail
c) Telephone number at work
The screen below shows the different form of communication details which can be captured
for an employee. Select the required ‘communication sub-type’ or form of communication.
For example the ‘communication sub-type’ E-mail is selected.
On the above Communications (Infotype 0105) screen, key-in the information in the fields as
specified in the table below:
Field Name R/O/C User Action and Values
Start and To dates R The system will default the hire date as the start date, and the
end date is defaulted as 31/12/9999 (high date).

Project: MISSION SURE
�!"����"�� �# � ��$�TRF/R2R/4.1�*++&���(++
Page 43 of 45
Field Name R/O/C User Action and Values
Type R From the drop down list, select the communication sub-type. In
this example official E-mail is selected as the type of
communication detail to be captured for this employee..
ID/Number R Enter the official E-mail Id of the employee. (refer screen
below)
(Note: On above table, in column “R/O/C”; “R” = Required, “O” = Optional, “C” = Conditional)
After keying-in all the required details of info type 0105 (Communication Infotype), click the
check mark at the top left corner of the screen. Check for message in the status line.
a) If any error message is displayed on the status line, the cursor will get positioned to the concerned error field and the colour of the field will be shown in yellow colour., Analyse the error message and correct the field accordingly
b) If ‘save your entries’ message appears in the status line, press the save icon to save the record. ‘Record Created’ message appears in the status line. And
The system will show the Personnel Action menu screen (Transaction PA40) as shown
below for creating a new Action for an employee.

Project: MISSION SURE
�!"����"�� �# � ��$�TRF/R2R/4.1�*++&���(++
Page 44 of 45
End of Hiring Action (Transaction PA40) document

Project: MISSION SURE
�!"����"�� �# � ��$�TRF/R2R/4.1�*++&���(++
Page 45 of 45
Once above Hiring Action is completed in SAP HR Module System , the
Applicant is allotted with an Employee number, shift details and the
department details where he is going to work.
And
The Applicant is declared as “joined” the company as an Employee.
After joining the company,
The employee undergoes Induction Training
End of document on - Joining Process TRF/R2R/4.1