Embed Size (px)
Citation preview

Page 110.19.16
Emergency Response Platform (ERP)RadLight & RadViewer v3
Guide
NOTE: This guide is written for iOS 9.8 and app versions 1.7, 1.8. Instructions for updating can be found at: aquilagroup.com/guide
NOTE: The latest version of this manual and a complete training video can always be found at: aquilagroup.com
NOTE: When printed, this guide is intended to be printed on double sided paper and saddle-stitched.

Page 210.19.16
PROPRIETARY RIGHTS NOTICE
This user manual contains proprietary and confidential information of Aquila Technologies. This manual is furnished under license only for the use and information of the licensee, and the content is subject to change without notice. Use of the contents of the manual for any purpose other than that for which it was provided is prohibited, and this manual may not be reprinted or redistributed to any third party without the written consent of Aquila Technologies. Aquila Technologies does not warrant or guarantee the contents of this user manual.
Aquila, RadLight, and RadWatch are trademarks of Aquila Technologies, registered in the United States and other countries. All other company, product, and service names and brands are the trademarks or registered trademarks of their respective owners.
AQUILA©2015 by Aquila Technologies.All rights reserved.

Page 310.19.16
CAUTIONS, NOTES
CAUTIONEntering the wrong passcode 5 times in a row will lock the device for 5 minutes. If the wrong passcode is then entered 5 more times, THE DEVICE WILL LOCK PERMANENTLY! This will require the device to be returned to the factory. The passcode is either set in the factory to 1111 or it is disabled.
CAUTIONDo not apply aluminum asset tags to the RadWatch. They can limit the ability to insert a RadWatch into the RadViewer and inhibit’s the RFID communication between the devices.
CAUTIONWhen reading a RadWatch with the RadLight. Be very careful not to pull the drawer out during the middle of the read or during the initialization process (10 seconds after power ON). Doing so could cause your dosimeter slide to be lost inside the unit. If you do hear a loose dosimeter slide rattling around in the case, open the drawer, turn the RadLight over, and attempt to shake the slide out. Contact support for assistance.
NOTEIgnore prompts to login to iTunes, backup the device, sign into iCloud or to inform you that the iTunes account is being used elsewhere. The factory makes every effort to disable these notifications, but they do occasionally arise. Simply dismiss them. They do not affect the operation of the device in any way. If they appear more than once each time you turn on the device, contact support.
NOTEThe latest version of this manual can always be found at: aquilagroup.com

Page 410.19.16
Summary of Changes
This manual has been updated to reflect changes to the ERP hardware. Version V3 includes the following:• Redesigned power system.
- Better Battery Life - Charger now only has one connector - New RGB LED Charge Indicator
• Reader can export via USB to RadData• Viewer charging port moved to the side of the device• Reader has new quick start decals.• App Versions 1.8 for RadViewer and RadLight should be
available by 1.28.16. They have been modified so that the “Delete Data” command deletes data from both the iPad and internal memory.
• Description of memory storage has been added to themanual.
• Description of battery life has been added to the manual.

Page 510.19.16
Contents
RadViewer . . . . . . . . . . . . . . . . . . . . . . . . . . . . . . . . . . . . . . . . 7Introduction . . . . . . . . . . . . . . . . . . . . . . . . . . . . . . . . . . . . . . . .8Theory of Operation . . . . . . . . . . . . . . . . . . . . . . . . . . . . . . . .8Components . . . . . . . . . . . . . . . . . . . . . . . . . . . . . . . . . . . . . . . .9Best Practices . . . . . . . . . . . . . . . . . . . . . . . . . . . . . . . . . . . . . . .9Powering the RadViewer with 120V AC . . . . . . . . . . . . . 10Assign a RadWatch Dosimeter . . . . . . . . . . . . . . . . . . . . . 11UnAssign a RadWatch Dosimeter . . . . . . . . . . . . . . . . . . . 14Badge Info Tab . . . . . . . . . . . . . . . . . . . . . . . . . . . . . . . . . . . . 15History Tab . . . . . . . . . . . . . . . . . . . . . . . . . . . . . . . . . . . . . . . . 16Data Tab . . . . . . . . . . . . . . . . . . . . . . . . . . . . . . . . . . . . . . . . . . 17Setting up a Wifi Connection . . . . . . . . . . . . . . . . . . . . . . . . 18Export via Email . . . . . . . . . . . . . . . . . . . . . . . . . . . . . . . . . . . . . 19Configuring a RadViewer Email Account . . . . . . . . . . . . . . 19Send Email - Exporting Data as a .CSV via Email . . . . . . . 20Sample Data Export . . . . . . . . . . . . . . . . . . . . . . . . . . . . . . . 21Settings . . . . . . . . . . . . . . . . . . . . . . . . . . . . . . . . . . . . . . . . . . 22RadViewer FAQ . . . . . . . . . . . . . . . . . . . . . . . . . . . . . . . . . . . . 23Troubleshooting . . . . . . . . . . . . . . . . . . . . . . . . . . . . . . . . . . 24
RadLight . . . . . . . . . . . . . . . . . . . . . . . . . . . . . . . . . . . . . . . . . 26Introduction . . . . . . . . . . . . . . . . . . . . . . . . . . . . . . . . . . . . . . 27Components . . . . . . . . . . . . . . . . . . . . . . . . . . . . . . . . . . . . . . 28Charging the RadLight. . . . . . . . . . . . . . . . . . . . . . . . . . . . . 29Turning the RadLight on29Check Locket . . . . . . . . . . . . . . . . . . . . . . . . . . . . . . . . . . . . . . 30Reading A Dosimeter . . . . . . . . . . . . . . . . . . . . . . . . . . . . . . 31Data . . . . . . . . . . . . . . . . . . . . . . . . . . . . . . . . . . . . . . . . . . . . . . 33Setting up a Wifi Connection . . . . . . . . . . . . . . . . . . . . . . . . 33Configuring a RadLight Email Account . . . . . . . . . . . . . . 33Send Email - Exporting Data as a .CSV via Email . . . . . 34Filter . . . . . . . . . . . . . . . . . . . . . . . . . . . . . . . . . . . . . . . . . . . . . 34Settings . . . . . . . . . . . . . . . . . . . . . . . . . . . . . . . . . . . . . . . . . . 35Settings . . . . . . . . . . . . . . . . . . . . . . . . . . . . . . . . . . . . . . . . . . 35Calibration . . . . . . . . . . . . . . . . . . . . . . . . . . . . . . . . . . . . . . . . 36RadLight FAQ . . . . . . . . . . . . . . . . . . . . . . . . . . . . . . . . . . . . . 37RadLight Troubleshooting . . . . . . . . . . . . . . . . . . . . . . . . . 38

Page 610.19.16

Page 710.19.16
RadViewer v3
Guide

Page 810.19.16
IntroductionThe RadViewer is used to assign and view the data of RadWatch Dosimeters. It is a capable of viewing all of the data stored on the RadWatch, storing that data, and exporting it via Email as a .csv file. The RadViewer can assign a 4 digit entity and a 12 digit ID to each RadWatch to be used along with the RadWatch serial number for tracking and chain of custody.
Theory of Operation The RadViewer is used to assign RadWatch dosimeters to emergency responders who may be called to a radiological event, or are on the way to an event.
The RadViewer contains an RFID antenna which communicates with the RFID chip in the RadWatch Dosimeter. The RFID antenna is powered by an internal re-chargeable battery with a charge indicator LED on the bottom of the device. The display has its own separate battery and its charge indicator is located on the screen.

Page 910.19.16
ComponentsThe Radviewer shell is anodized aluminum and 3D printed ABS, encased in a silicone shock boot. The touchscreen interface and interior components are powered with a rechargeable lithium ion battery pack. The round power switch must be ON (I) in order for the hardware to function. An RFID board inside the device communicates wirelessly with the RFID chip inside each RadWatch. An elastic hand strap and capacitive touch pen are included for ease of handling and use.
Best PracticesAdministrators should learn to use the RadLight Emergency Response Platform (ERP) well in advance of it being required for an event. The RadViewer is used to assign dosimeters. It is advised that this task be executed prior to an event.
If it is not possible to assign dosimeters in advance, it is still possible to maintain the crucial chain of custody required for accurate dosimetry. Dosimeters can be handed out en route to an event and read later. As long as serial numbers are tracked along with the members of the entity. The 4 digit entity and 12 digit “Assigned to” field can be assigned at a later date.
Charging the RadViewerThe RadViewer runs on two internal, rechargeable batteries which charge simultaneously but operate different parts of the device. One powers the RFID hardware, it’s power indicator is the LED on the bottom of the device. The other is the battery of the display. The 5V charger will work with both the RadViewer and the RadLight.
1. Connect the charger to the RadViewer charging port (on the lowerright side of the RadViewer, below the RadWatch compartment.)
2. Flip the RadViewer Power Switch to the “ON” position in orderto see the charging status during charging. The RGB LED should illuminate and indicate the charge level.
3. Plug the 5V charging plug into the RadViewer and then plug thewall adapter into a 120V power source.
4. Charge the device for between 6-8 hours for a full charge.

Page 1010.19.16
NOTE: For long term storage, store the device with ~50% charge.
Charge Indicator LegendThe table below explains the charging status of the RadViewer’s internal battery as indicated by the RGB LED on the bottom of the RadViewer:
Powering the RadViewer with 120V ACIf the RadViewer’s batteries are discharged, the device can still be used with the charger once a minimum charge has been established. If the display is completely discharged, it may take up to 5 minutes to develop an minimal charge in order to function under AC Power.
Power ON Flip the switch on the bottom of the RadViewer and press the Sleep / Wake button on the top of the RadViewer in order to turn it on.
Power OFF Take care to completely shut-down the RadViewer after each use. To do this, you must flip the switch on the bottom to the off position, so that the LED is OFF. You must then hold down the Sleep / Wake button until an on-screen prompt directs you to swipe your finger across the screen to shut it down.
NOTEWhen the switch on the bottom of the unit is turned on, or the device is then connected to the charger, the display will also turn on. Always check that the display has been properly shut down by pressing the home button (small round button) on the display to make sure it is not just in sleep mode.

Page 1110.19.16
Assign a RadWatch Dosimeter
1. Turn on the RadViewer. The LED must stay lit. If it turns off, thenthe device requires charging.
2. Press the home button and then slide to unlock the display.
3. Open the app with the Rad symbol at the bottom of the screen.
4. Insert the first RadWatch to be scanned, face down as shownbelow. The alignment holes on the watch should be facing up.
5. Tap the “Scan Badge” button on the display to establishcommunication between the RadWatch and the RadViewer.
6. Select “Edit” in the upper left hand corner of the display.

Page 1210.19.16
NOTEYou may receive warnings that will urge you to read the RadWatch with the RadLight prior to assigning it. These warnings are intended to ensure that arbitrary doses are not assigned to individuals AND to avoid accidental reassignment.
NOTEThe RFID communication with the RadWatch can be sensitive to interference. You may periodically receive an error message stating that communication with the RFID chip has failed. Should this occur, simply repeat the process you were attempting to complete. You may also try turning the RadWatch around and re-inserting it.
NOTEA “Hardware Error” is most likely the result of the power switch not being turned on, or the internal battery having run out of power. If it is neither of these issues, check the plug icon in the upper left hand corner of the screen. If it is disconnected and you’re sure the power is on, you will have to repair your bluetooth connection. See “Repairing the Bluetooth Connection” on page 24.
Assign a RadWatch Dosimeter - Continued

Page 1310.19.16
7. Enter the RadWatch user’s 4 digit Entity and 12 digit ID. This canbe any alphanumeric ID you choose, up to 12 digits. Spaces can be included. Tap “Assign Badge” to complete. The display should read “Assignment Complete.” Tap “OK.”
NOTEIf you enter more than 12 characters, the ID will be truncated to 12 characters by removing the last additional characters.
8. The display should read “RadWatch Assignment Successful.” Tap OK.
NOTEAn assignment will write the information you have entered, as well as the date and time of the write, to the RFID chip in the RadWatch.
Assign a RadWatch Dosimeter - Continued

Page 1410.19.16
UnAssign a RadWatch Dosimeter
1. Follow steps 1-5 in the section “Assign A RadWatch Dosimeter”, if aconnection with the RadWatch has not already been established.
2. Tap “Edit” in the upper left hand corner.
3. The field for “Unassign Badge” will turn orange. Select it. Awarning screen will appear, stating that the badge should be read before being reassigned. Re-read the Dosimeter first if necessary. Otherwise, select “Proceed.”

Page 1510.19.16
Badge Info Tab
The Badge info Tab displays assignment and dose information. It also shows the date of the last read (Dose Date) and the Badge serial number (Badge ID).
1. Follow steps 1-5 in the section “Assign A RadWatch Dosimeter”, if aconnection with the RadWatch has not already been established.
2. Tap the “RadWatch Info” Icon from the bottom icon tray.
3. When finished, tap another icon from the bottom icon panel toexit.
NOTEYou have the option to “Remove Record.” This feature is provided to help de-clutter the Viewer of data, if necessary. You can also delete all locally stored data at once from the data tab.

Page 1610.19.16
History Tab
The history tab shows all data records on the RadViewer: views, assignments and unassignments, and also shows the serial number and date and time of each record. Assignment and dose details can also be seen by tapping the arrow to the right of any record. This screen also provides the option to Remove the record from the RadViewer.
1. Tap the “History” Icon from the bottom icon tray.
2. When finished, tap another icon from the bottom icon panel toexit.

Page 1710.19.16
Data Tab
Click on the Data icon on the bottom of the screen. This screen allows you to export data via Email and to delete data stored on the RadViewer.
1. Tap the “Data” Icon from the bottom icon tray.
2. Use the date filter as needed to see only the data you need.
NOTEA text description of the process will follow the RadLight number if the badge was “Assigned” or “Unassigned.” No description means the badge was simply viewed.

Page 1810.19.16
Data Tab - Continued
Setting up a Wifi Connection A WiFi Connection will allow you to export .csv data files via Email.
1. Exit the RadViewer app by pressing on the physical round buttonon the bottom of the device’s screen.
2. Swipe the home screen to the left to reveal the folder that islabeled with a dot ( . )
3. Tap this folder. In it you will find the Settings Icon. Tap it.
4. Select “Wifi”. It should be the second setting down from the top.
5. The device will detect any available WiFi networks within range.Select your company’s network and enter the password. Consult your IT department if necessary.
6. Once you have completed this process, ensure that Wifi is turnedon and exit to the home screen by pressing the physical round button on the bottom of the touch screen.

Page 1910.19.16
Data Tab - Continued
Export via EmailAn optional back-up feature which allows the user to view data in a .CSV file format.
Configuring a RadViewer Email AccountIn order to enable data export via Email, you must first configure an Email account from the Touch Screen’s settings menu. This Email address should not be used to send or receive any messages other than data exports. Consult with your IT department about creating a new account expressly for this purpose.
1. Exit the RadViewer app by pressing on the physical round buttonon the bottom of the device’s screen.
2. Swipe the home screen to the left to reveal the folder that islabeled with a dot ( . )
3. Tap this folder. In it you will find the Settings Icon. Tap it.
4. Scroll down to, and select “Mail, Contacts, Calendars” towards thebottom of the screen.
5. Select “Add Account” from the top of the right-hand column.
6. Select the account type you would like to add and follow the on-screen prompts to complete the Email configuration process.
7. Once you have set up your Email account, you will be able toexport .CSV data files from the RadViewer, assuming you have a Wifi Connection.

Page 2010.19.16
Data Tab - Continued
Send Email - Exporting Data as a .CSV via EmailOnce you have set up your Email account, exporting via Email is simple. While in the Data Tab, simply tap “Send Email” at the top of the screen. An Email will open with all of the stored data in the reader attached.
Delete Data Delete Data has been moved to the Settings tab: There, you can select “Delete Data.” This will delete data that is stored locally. You may want to export your data to a .CSV file, as described above, before deleting it.
FiltersWithin the Data Tab, you can apply a limiting filter to the search results. Filter by “Read Before: --- “ When no filter is applied, all data will be displayed.

Page 2110.19.16
Data Tab - Continued
Sample Data Export

Page 2210.19.16
Settings
To access the RadViewer Settings, click on the gear icon in the bottom right hand corner of the screen.
AboutDisplays important information about the device, including the App version and the serial number.
ConfigurationProvides the ability to change the displayed units of radiation from cGy / Rad / REM.
Connection Status Displays the connection status of the display with the hardware.
If the hardware icon indicates that it is disconnected, double check that the power switch on the bottom of the device is switched to the ON (I) and the LED next to the switch is illuminated. Cycle the power switch if the LED is illuminated and the hardware connection should re-establish within 3 seconds. If the LED will not stay illuminated with the power switched ON (I), the device requires charging.
Misc. / Factory ConfigurationProvides the factory with access to important App Settings. It is password protected and should not be accessed by the user unless specifically directed to do so by tech support.

Page 2310.19.16
RadViewer FAQ
For the latest updates to this guide and this FAQ, check erp.aquilagroup.com
Q: How long do the batteries last?
A: During use, approximately 8-12 hours. Battery life can be best extended by always remembering to flip the power switch on the bottom of the RadViewer to the Off (O) position AND making sure the display is shut down when not in use. See Appendix A for more information about extending the battery life.
Q: My the battery indicator on my display says 100% but the hardware will not power on. Why?
A: This scenario can occur if the display is shut down but the switch on the bottom of the RadViewer is not switched OFF before storing the RadViewer. Under normal conditions, the battery indicator on the display should be representative of the useful battery life of the device. The internal electronics require very little power and as such, the internal battery should outlast the display battery many times over.
Q: How many View or Assignment records can the RadViewer store?
A: 10,000+
Q: Will there ever be a PC-based App that we can use to organize our data?
A: Yes. It is called RadData and is available as of 12.1.15. Contact support for more information.
Technical SupportFor technical support, comments or suggestions please contact:AQUILA [email protected]

Page 2410.19.16
Troubleshooting
NOTE: Feel free to contact support with any issue you may encounter. We are more than happy to walk you through the process.
Repairing the Bluetooth Connection
Issue: Receiving hardware errors when attempting to view a badge.
Background: The display communicates with the hardware inside the device via bluetooth. If this connection is broken, the device will generate hardware errors. This is rare, and easily fixed.
Fix: 1. Make sure that the power switch on
the device is in the on position and thepower-indicating LED is on.
2. If you are certain the power is on, checkthe plug icon in the upper left handcorner of the screen. If the ends of theplug are not connected and there is an“X” beside them, then your Bluetoothconnection has been lost.
3. Make sure your Bluetooth is on byswiping up from the very bottom of thescreen and highlighting the bluetoothsymbol. It is the center icon. Whenyou have done this. Slide the tab back down out of the way andcontinue on in the iRad app.
4. Tap the “Settings” icon on the bottom right corner of the screen.
5. Scroll all the way down to “Misc” / “Hardware Configuration andtap “Hardware Configuration.”

Page 2510.19.16
NOTE: If your serial number has not been entered on this screen, do that now. The serial number is clearly engraved on the faceplate of your device. It should be entered here to assist with record keeping. You a see a field for this at the top of the Hardware Configuration tab.
6. Move any other Bluetooth enabled devices away from the device you are repairing and then tap “Pair BLE Peripheral.”
7. Accept the Warning messages by tapping “Proceed” and then “Yes.”
8. Assuming your device’s power is still on, the app should show that it has discovered a peripheral with an alphanumeric code (ex. E34366EDDJG56).
9. Tap this code and follow the on screen prompts to complete the pairing. You should receive a message indicating a successful pairing.
10. Tap “Assign Badge” in the lower left hand corner of the screen to return to the main screen. You should now see that the plug icon in the upper left hand corner of the screen shows a connected status.
11. Perform a test View / Read of a Badge to ensure the device is functioning properly.
END OF PROCEDURE
Page 2610.19.16
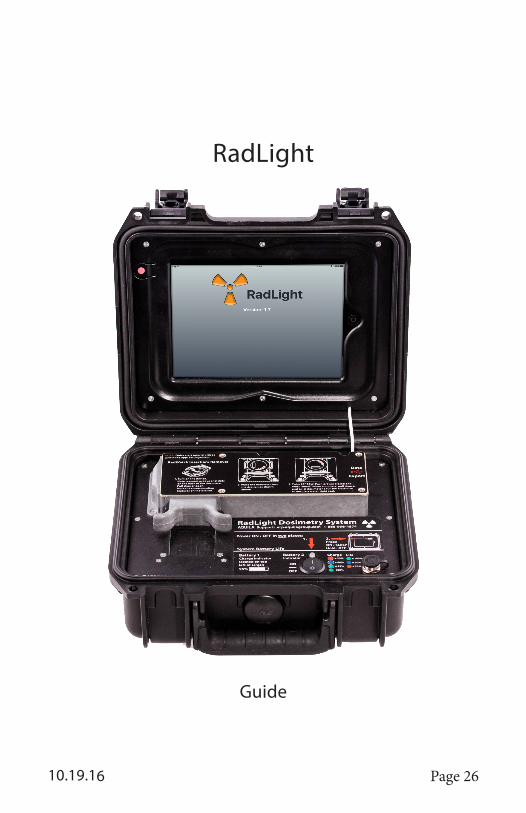
RadLight
Guide

Page 2710.19.16
Introduction
The RadLight is designed to read the gamma radiation dose of the RadWatch dosimeter. The RadWatch is a watch-type dosimeter designed to be worn on the wrist or clipped to the body of anyone who may be exposed to gamma radiation. The RadLight stores individual dose information and writes it to the RFID chip on the RadWatch. The RadLight can export read data via Email and a WiFi connection or via USB (with the v3 hardware upgrade). The exported .csv file includes all crucial dosimetry and chain of custody information (RadWatch serial number and RadViewer Assignment data). The file can be easily organized and processed through the RadData PC program.
CAUTIONS & NOTES NOTE ON DATA STORAGERead data is stored both within the iPad (10,000+ read capacity) and within the hardware (300 read capacity, which overwrites the oldest reads after 300). When exporting data, it is important to note that if you have more than 300 reads, that you should export via email to get the full data set. CAUTIONWhen reading a RadWatch with the RadLight. Be very careful not to pull the drawer out during the middle of the read. Doing so could cause your dosimeter slide to be lost inside the unit. If you do hear a loose dosimeter slide rattling around in the case, open the drawer, turn the RadLight over, and attempt to shake the slide out.

Page 2810.19.16
ComponentsThe RadLight is housed in an SKB case. A manually operated drawer is used to seat each dosimeter, detach the lid of the dosimeter from the bottom and position the dosimeter inside the RadLight where it can be read. The mechanical components of the RadLight run on an internal, rechargeable lithium-ion battery. These components remove the RadWatch slide from its enclosure, read it, and then replace it in its enclosure. During the read process, the RadLight reads both dose information and assignment information stored in the RFID chip. You will hear the encoded motor driving this process during each read. The display of the RadLight is an integrated touch screen tablet connected to the base of the RadLight with a white power cable.
The RadLight is powered with two batteries: An Lithium ion battery pack, which powers the internal electronics, and the battery of the display. The internal battery’s charge and life status is displayed by an RGB LED above the power switch according to the legend below, which is also shown on the baseplate sticker of the RadLight.
In almost every use case, the indicator in the upper right hand corner of the display will indicate the usable life remaining before charging is required. If the display is shut down, and the main ON/OFF switch is not, it is possible that the internal battery could discharge completely while the display battery still held a charge.
Charging the RadLightThe supplied Power Charger / Power Supply uses a barrel connector, which correspond to a connector on the RadLight baseplate or the side of the RadViewer. The charger can be used for both devices. Charging will occur if the power switch is turned off, but the indicator LED will not illuminate.

Page 2910.19.16
Operating on 120V AC. The RadLight and RadViewer can both be operated on 120V AC using the adapter. If the display is completely dead, it may take 5 minutes to build up a sufficient charge before it can be used.
Turning the RadLight onFlipping the main switch on the bottom right of the unit will illuminate the LED and turn on the display if there is charge. To wake / sleep the display, press the button in the upper left hand corner of the display.

Page 3010.19.16
Check LocketThe Check Locket should be the first dosimeter read by the RadLight whenever it is first powered up after being un-powered for 8 or more continuous hours. The Check Locket is provided to allow the user to periodically verify that the RadLight is functioning properly and reading with accuracy within ± 30% of dose, as supported by NVLAP recommendations. In this process, the reader identifies a unique byte on the RFID chip of the Check Locket, which is dosed to 500 cGy, and then determines if the value is within ± 30%. If your RadLight is properly calibrated, a message will pop up which reads “Check Locket Test Passed.” If your RadLight requires calibration, the message will read “Check Locket Test Failed.” If you receive this message, try reading the Check Locket again, or reading another Check Locket. If you continue to receive this message, contact AQUILA to arrange re-calibration. NOTE: Check Locket reads are stored with the rest of the read data. These records may be important in proving that the RadLight was operating correctly.
For instructions on how to use the Check Locket, please see the following section, “Reading a Dosimeter,” in this manual. The process of reading the Check Locket is exactly the same as it is for reading any other Dosimeter.

Page 3110.19.16
Reading A Dosimeter
NOTE: Pull the drawer open before turning on the RadLight. If you forget to pull the drawer before turning on the RadLight, do not pull the drawer for 10-15 seconds while the RadLight initializes. It self-checks the motor positions and pulling the drawer during the middle of this cycle can cause errors if there is a watch in the drawer during this check. 1. Place the RadLight on a stable surface, open the lid and turn the unit ON (I). Do not move the RadLight while it is reading a dosimeter. NOTE: If the screen goes dark, Press the round button on the right side of the screen. Adjust the auto-lock time in Settings / General / Auto-Lock.
2. On the touchscreen, slide to unlock, and then enter your passcode, if any (passcodes are disabled in the factory and can be set in Settings / General / ).
3. Tap the icon for the RadLight App, found in the bottom center of the home screen.
4. Pull the drawer out.
5. Observe the pins and crescent ridge on the dosimeter drawer and the back of the dosimeter.
6. Place the dosimeter in the drawer so that it is flush with the drawer surface and turn it 90 degrees counter-clockwise until it clicks into place.

Page 3210.19.16
7. Push the Drawer into the reader until it clicks into place. 8. Tap the “Read Badge” Button on the screen.
NOTE: If you receive a “Hardware Error” message, this is most likely because the large power switch on the base of the unit is not turned ON(I). If it is in the ON(I) position, but the LED light will not stay illuminated, the RadLight must be charged. You can operate the unit with the charger connected. If you notice that the Connection indicator in the upper left hand corner of the app shows disconnected, refer to “Repairing the RadLight Bluetooth Connection” on page 38. If you have power and a bluetooth connection and you’re still receiving error messages, you may have a bad RadWatch. Try several others to determine if this is the case.
9. When the Read is complete, pull the drawer. Turn the dosimeter a full 90 degrees clockwise to ensure a water-tight seal and remove it.
10. If you are finished using the device, close the drawer, turn off the power to the base. Press and hold the round button in the upper left hand corner of the screen. Follow the on-screen prompt that reads “Slide to Power Off.” Secure the lid and the device is ready for storage.
Reading A Dosimeter - Continued

Page 3310.19.16
Data
Click on the Data icon on the bottom of the screen. This screen allows you to export data via Email. This requires a WiFi Connection.
Setting up a Wifi Connection A WiFi Connection will allow you to export .csv data files via Email. 1. Exit the RadLight app by pressing on the physical round button on the right of the device’s screen.
2. Swipe the home screen to the left to reveal the folder that is labeled with a dot ( . )
3. Tap this folder. In it you will find the Settings Icon. Tap it.
4. Select “Wifi”. It should be the second setting down from the top in the left hand column.
5. The device will detect any available WiFi networks within range. Select your company’s network and enter the password. Consult your IT department if necessary.
6. Once you have completed this process, ensure that Wifi is turned on and exit to the home screen by pressing the physical round button on the bottom of the touch screen.

Page 3410.19.16
Data - Continued
Configuring a RadLight Email AccountIn order to enable data export via Email, you must first configure an Email account from the Tablet’s settings menu. This Email address should not be used to send or receive any messages other than data exports. Consult with your IT department about creating a new account expressly for this purpose.
1. Exit the RadLight app by pressing on the round button to the right of the screen.
2. Touch and swipe the home screen to the left to reveal the folder that is labeled with a dot ( . )
3. Tap this folder. In it you will find the Settings Icon. 4. In the left hand column, select “Mail, Contacts, Calendars” towards the bottom of the screen.
5. Select “Add Account” from the top of the right-hand column.
6. Select the account type you would like to add and follow the on-screen prompts to complete the Email configuration process.
7. Once you have set up your Email account, you will be able to export .CSV data files from the RadLight. Send Email - Exporting Data as a .CSV via EmailOnce you have set up your Email account, exporting via Email is simple. While in the Data Tab, simply tap “Send Email” at the top of the screen. An Email will open with all of the stored data in the reader attached.
FilterWithin the Data Tab, you can apply the “Read Before” filter to filter by date.

Page 3510.19.16
Settings
SettingsThe Settings Tab is used to access information about your device, to complete configuration of the device, to review the device’s connection status and to provide access to factory configuration. Unit ConfigurationThis Section allows the user to change the units displayed by the reader from cGy, to Rad or REM. HelpThis section provides links to both Online (requires a WiFi connection) and Offline (Embedded in the device) support and training material.
DataFrom here, you may delete all of the data on the device. Ensure that you have backed up all data before deleting.
AboutThis section provides information required for configuration and is available for review only. Hardware ConfigurationThis section allows you to input the device’s serial number, and repair the Bluetooth connection, in the rare event that it is lost.
Factory ConfigurationPassword protected area for factory configuration only.

Page 3610.19.16
Calibration
Contact Aquila within two years from the date of purchase of your RadLight to enquire about the need to calibrate the unit.
If you use your Check Locket as instructed in this manual, and you are not receiving any CHECK FAILED messages, then your unit is operating correctly.
If you have any doubt, don’t hesitate to contact us.
RadLight FAQFor the latest updates to this guide and this FAQ, check aquilagroup.com
Q: How long to the batteries last? A: During use, approximately 8-10 hours. Battery life can be best extended by always remembering to flip the power switch on the RadLight baseplate to the Off (O) position and completely shutting down the display by holding the sleep/wake button down until prompted to swipe the screen to completely shut down. Lithium ion battery life can be extended if devices stored long term are completely shut down with approximately 50% battery charge. See Appendix A for more information on extending battery life.
Q: How many reads can the RadLight store?A: 300+ in the device electronics (non-iPad), after which, the oldest reads are overwritten. 10,000+ reads can be stored in the iPad. If you have more than 300 reads, you must export via email in order to export the full data set, stored in the iPad. USB export only draws from the electronics memory, which overwrites after 300 reads.
Q: Is there a PC based app that we can use to organize our data. A: Yes. It is called RadData and is available as of 12.1.15. A product walk-through video can be found at erp.aquilagroup.com

Page 3710.19.16
FAQ - Continued
Q: Does my RadLight need to be calibrated?A: Currently we have data to support a two year calibration cycle, and we currently advise that you contact us regarding calibration after two years from your date of purchase. In the mean time, regular use of the check dosimeter will ensure that your device is operating within spec (+/- 30% of dose).
Q: How do I know my calibration isn’t off?A: Unless you receive a “CHECK FAILED” message and are unable to remedy the issue by repeating the read or using another check locket, your RadLight calibration is correct.
Technical SupportFor technical support, comments or suggestions please contact:AQUILA [email protected] 505-923-3160

Page 3810.19.16
RadLight Troubleshooting
NOTE: Feel free to contact support with any issue you may encounter. We are more than happy to walk you through the troubleshooting process.
Repairing the RadLight Bluetooth Connection Issue: Receiving hardware errors when attempting to view a badge. Background: The display communicates with the hardware inside the devise via bluetooth. If this connection is broken, the device will generate hardware errors. This is rare, and easily fixed. Fix: 1. Make sure that the power switch on the device is in the on
position and the power-indicating LED is on.
2. If you are certain the power is on, check the plug icon in the upper left hand corner of the screen. If the plug is not connected and there is an “X” beside them, then your Bluetooth connection has been lost.
3. Make sure your Bluetooth is on by swiping up from the very bottom of the screen and highlighting the bluetooth symbol. It is the center icon. When you have done this. Slide the tab back down out of the way and continue on in the Rad app.
4. Tap the “Settings” icon on the bottom right corner of the screen.
5. Scroll all the way down to “Misc” / “Hardware Configuration and tap “Hardware Configuration.” NOTE: If your serial number has not been entered on this screen, do that now. The serial number is clearly engraved on the faceplate of your device. It should be entered here to assist with record keeping. You a see a field for this at the top of the Hardware Configuration tab.

Page 3910.19.16
6. Move any other Bluetooth enabled devices away from the device you are repairing and then tap “Pair BLE Peripheral.”
7. Accept the Warning messages by tapping “Proceed” and then “Yes.”
8. Assuming your device’s power is still on, the app should show that it has discovered a peripheral with an alphanumeric code (ex. E34366EDDJG56).
9. Tap this code and follow the on screen prompts to complete the pairing. You should receive a message indicating a successful pairing.
10. Tap “Assign Badge” in the lower left hand corner of the screen to return to the main screen. You should now see that the plug icon in the upper left hand corner of the screen shows a connected status.
11. Perform a test View / Read of a Badge to ensure the device is functioning properly.
END OF PROCEDURE

Page 4010.19.16
APPENDIX A - MAXIMIZING DISPLAY BATTERY LIFE
NOTE: Check with the manufacturer before updating your iOS to ensure that the RadViewer and RadLight apps have been made compatible with it: [email protected] The information will also be made available on http://erp.aquilagroup.com Remember to Shutdown the display completely.
The display may appear to be turned off but not be completely shut down. To check, press the circular home button on the display. If the screen illuminates, you will need to shut down by pressing and holding the Sleep/Wake button until the screen prompts you to swipe to complete the shutdown process. Swipe to shut down as directed.
Set Auto-Lock to the lowest convenient amount of time.Auto-Lock puts the display into a sleep mode when the device is not in use. This factory setting is 2-5 minutes to conserve battery life but can be adjusted as needed within Settings / General / Auto-Lock.
Adjust your screen brightness.
Dim the screen or turn on Auto-Brightness to extend battery life.
To dim, swipe up from the bottom of any screen to open Control Center and drag the Brightness slider to the left.Auto-Brightness adjusts your screen to lighting conditions automatically. To activate it, go to Settings > Display & Brightness and set Auto-Brightness to On.
Enable Low Power Mode.Introduced with iOS 9, Low Power Mode is an easy way to extend the battery life of your iOS device when it starts to get low. Your iOS device lets you know when your battery level goes down to 20%, and again at 10%, and lets you turn on Low Power Mode with one tap. Or you can enable it by going to Settings > Battery. Low Power Mode reduces display brightness, optimizes device performance, and minimizes system

Page 4110.19.16
animations. Apps including Mail will not download content in the background, and features like AirDrop, iCloud sync, and Continuity will be disabled. You can still use the RadLight and RadViewer apps. And when your device charges up again, Low Power Mode automatically switches off.View Battery Usage information

Page 4210.19.16

Page 4310.19.16
AQUILA©2015 by Aquila Technologies.
All rights reserved.