Embed Size (px)
DESCRIPTION
Citation preview

EMC® Symmetrix® Management Console V7.3 andEMC Symmetrix Performance Analyzer V2.2
Installation GuideP/N 300-012-627
REV A01
EMC CorporationCorporate Headquarters:
Hopkinton, MA 01748-9103
1-508-435-1000www.EMC.com

2
Copyright © 2005 - 2011 EMC Corporation. All rights reserved.
Published June, 2011
EMC believes the information in this publication is accurate as of its publication date. The information issubject to change without notice.
THE INFORMATION IN THIS PUBLICATION IS PROVIDED “AS IS.” EMC CORPORATION MAKES NOREPRESENTATIONS OR WARRANTIES OF ANY KIND WITH RESPECT TO THE INFORMATION IN THISPUBLICATION, AND SPECIFICALLY DISCLAIMS IMPLIED WARRANTIES OF MERCHANTABILITY ORFITNESS FOR A PARTICULAR PURPOSE.
Use, copying, and distribution of any EMC software described in this publication requires an applicablesoftware license.
For the most up-to-date regulatory document for your product line, go to the Technical Documentation andAdvisories section on EMC Powerlink.
All other trademarks used herein are the property of their respective owners.
EMC SMC and SPA Installation Guide
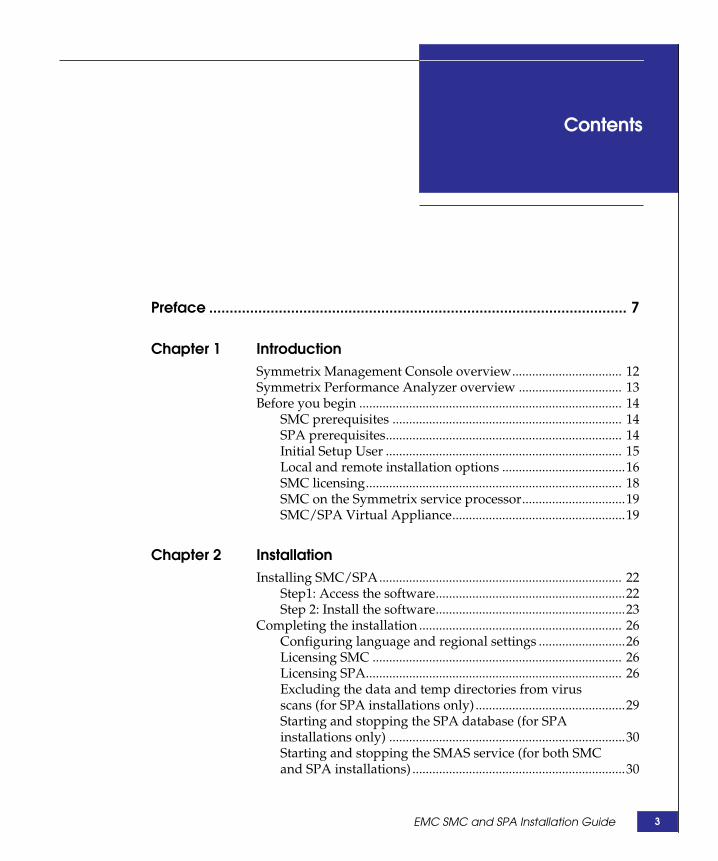
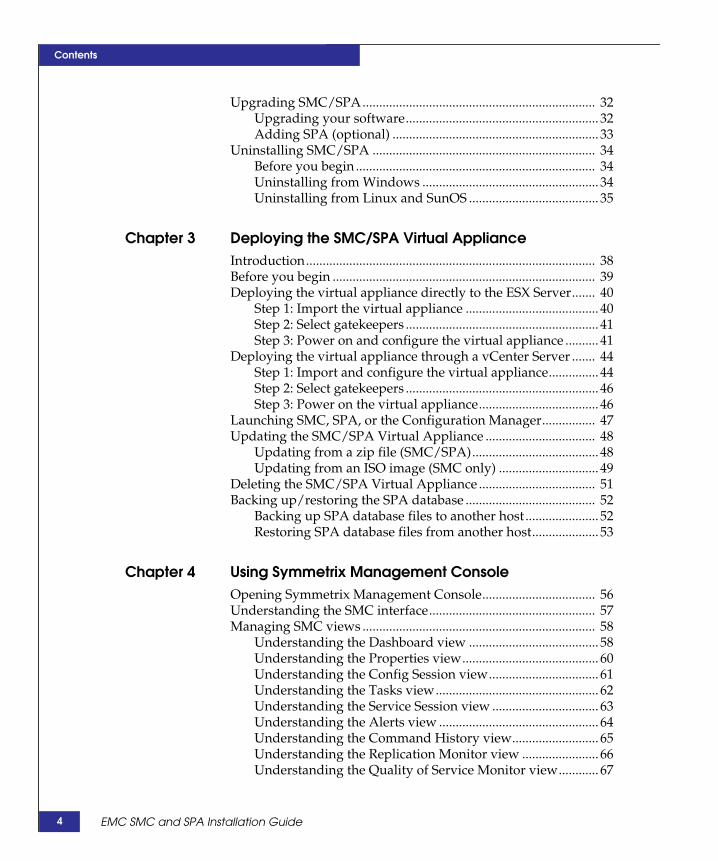
Contents
Preface ...................................................................................................... 7
Chapter 1 IntroductionSymmetrix Management Console overview................................. 12Symmetrix Performance Analyzer overview ............................... 13Before you begin ............................................................................... 14
SMC prerequisites ..................................................................... 14SPA prerequisites....................................................................... 14Initial Setup User ....................................................................... 15Local and remote installation options .....................................16SMC licensing............................................................................. 18SMC on the Symmetrix service processor...............................19SMC/SPA Virtual Appliance....................................................19
Chapter 2 InstallationInstalling SMC/SPA......................................................................... 22
Step1: Access the software.........................................................22Step 2: Install the software.........................................................23
Completing the installation ............................................................. 26Configuring language and regional settings ..........................26Licensing SMC ........................................................................... 26Licensing SPA............................................................................. 26Excluding the data and temp directories from virusscans (for SPA installations only) .............................................29Starting and stopping the SPA database (for SPAinstallations only) .......................................................................30Starting and stopping the SMAS service (for both SMCand SPA installations) ................................................................30
EMC SMC and SPA Installation Guide 3
Contents
Upgrading SMC/SPA...................................................................... 32Upgrading your software.......................................................... 32Adding SPA (optional) .............................................................. 33
Uninstalling SMC/SPA ................................................................... 34Before you begin ........................................................................ 34Uninstalling from Windows ..................................................... 34Uninstalling from Linux and SunOS ....................................... 35
Chapter 3 Deploying the SMC/SPA Virtual ApplianceIntroduction....................................................................................... 38Before you begin ............................................................................... 39Deploying the virtual appliance directly to the ESX Server....... 40
Step 1: Import the virtual appliance ........................................ 40Step 2: Select gatekeepers .......................................................... 41Step 3: Power on and configure the virtual appliance .......... 41
Deploying the virtual appliance through a vCenter Server ....... 44Step 1: Import and configure the virtual appliance............... 44Step 2: Select gatekeepers .......................................................... 46Step 3: Power on the virtual appliance.................................... 46
Launching SMC, SPA, or the Configuration Manager................ 47Updating the SMC/SPA Virtual Appliance ................................. 48
Updating from a zip file (SMC/SPA)...................................... 48Updating from an ISO image (SMC only) .............................. 49
Deleting the SMC/SPA Virtual Appliance ................................... 51Backing up/restoring the SPA database ....................................... 52
Backing up SPA database files to another host ...................... 52Restoring SPA database files from another host.................... 53
Chapter 4 Using Symmetrix Management ConsoleOpening Symmetrix Management Console.................................. 56Understanding the SMC interface.................................................. 57Managing SMC views ...................................................................... 58
Understanding the Dashboard view ....................................... 58Understanding the Properties view......................................... 60Understanding the Config Session view................................. 61Understanding the Tasks view................................................. 62Understanding the Service Session view ................................ 63Understanding the Alerts view ................................................ 64Understanding the Command History view.......................... 65Understanding the Replication Monitor view ....................... 66Understanding the Quality of Service Monitor view............ 67
EMC SMC and SPA Installation Guide4

Contents
Changing the default SMC view...............................................68SMC menu bar ................................................................................... 69
File menu..................................................................................... 69Control menu.............................................................................. 70Help menu options .................................................................... 80
SMC dialog boxes.............................................................................. 81
Chapter 5 Using Symmetrix Performance AnalyzerOpening Symmetrix Performance Analyzer................................. 84SPA Overview.................................................................................... 85
Dashboards view.........................................................................87Real Time view ............................................................................88Diagnostic view...........................................................................89Snapshot View.............................................................................90Trend view .................................................................................. 91
Appendix A Security featuresAuthentication ................................................................................... 94Authorization..................................................................................... 95
Appendix B Third-Party Copyright noticesGNU LESSER GENERAL PUBLIC LICENSE............................. 100MySQL .............................................................................................. 111
5EMC SMC and SPA Installation Guide

Contents
EMC SMC and SPA Installation Guide6

Preface
As part of its effort to continuously improve and enhance the performanceand capabilities of the EMC product line, EMC periodically releases newversions of both the EMC Enginuity Operating Environment andEMC Symmetrix Management Console software. Therefore, some functionsdescribed in this document may not be supported by all versions ofEnginuity or EMC Symmetrix Management Console software currently inuse. For the most up-to-date information on product features, refer to yourproduct release notes.
If an EMC Symmetrix Management Console or EMC SymmetrixPerformance Analyzer feature does not function properly or does notfunction as described in this document, please contact the EMC CustomerSupport Center for assistance.
Audience This document is intended for use by storage administrators who areinstalling and using Symmetrix Management Console andSymmetrix Performance Analyzer.
Readers of this document are expected to be familiar with thefollowing topics:
◆ SYMCLI commands
◆ Solutions Enabler options, environment variables, daemons, andevents
Relateddocumentation
Related documents include:
◆ EMC Symmetrix Management Console Release Notes
◆ EMC Symmetrix Management Console Online Help
◆ EMC Symmetrix Performance Analyzer Release Notes
EMC SMC and SPA Installation Guide 7
8
Preface
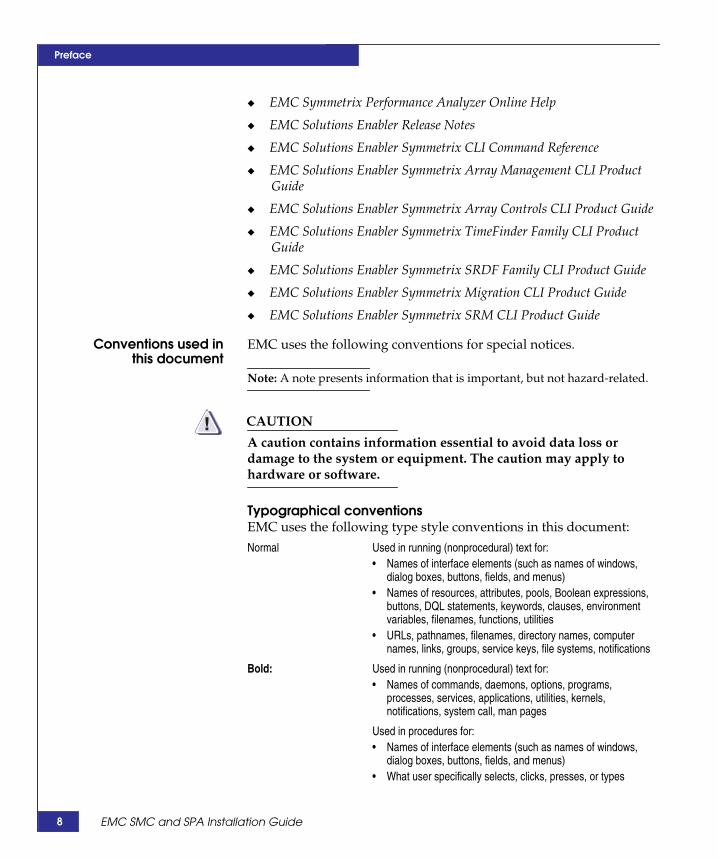
◆ EMC Symmetrix Performance Analyzer Online Help
◆ EMC Solutions Enabler Release Notes
◆ EMC Solutions Enabler Symmetrix CLI Command Reference
◆ EMC Solutions Enabler Symmetrix Array Management CLI ProductGuide
◆ EMC Solutions Enabler Symmetrix Array Controls CLI Product Guide
◆ EMC Solutions Enabler Symmetrix TimeFinder Family CLI ProductGuide
◆ EMC Solutions Enabler Symmetrix SRDF Family CLI Product Guide
◆ EMC Solutions Enabler Symmetrix Migration CLI Product Guide
◆ EMC Solutions Enabler Symmetrix SRM CLI Product Guide
Conventions used inthis document
EMC uses the following conventions for special notices.
Note: A note presents information that is important, but not hazard-related.
CAUTION!A caution contains information essential to avoid data loss ordamage to the system or equipment. The caution may apply tohardware or software.
Typographical conventionsEMC uses the following type style conventions in this document:
Normal Used in running (nonprocedural) text for:• Names of interface elements (such as names of windows,
dialog boxes, buttons, fields, and menus)• Names of resources, attributes, pools, Boolean expressions,
buttons, DQL statements, keywords, clauses, environmentvariables, filenames, functions, utilities
• URLs, pathnames, filenames, directory names, computernames, links, groups, service keys, file systems, notifications
Bold: Used in running (nonprocedural) text for:• Names of commands, daemons, options, programs,
processes, services, applications, utilities, kernels,notifications, system call, man pages
Used in procedures for:• Names of interface elements (such as names of windows,
dialog boxes, buttons, fields, and menus)• What user specifically selects, clicks, presses, or types
EMC SMC and SPA Installation Guide

Preface
Where to get help EMC support, product, and licensing information can be obtained asfollows.
Product information — For documentation, release notes, softwareupdates, or for information about EMC products, licensing, andservice, go to the EMC Powerlink website (registration required) at:
http://Powerlink.EMC.com
Technical support — For technical support, go to EMC CustomerService on Powerlink. To open a service request through Powerlink,you must have a valid support agreement. Please contact your EMCsales representative for details about obtaining a valid supportagreement or to answer any questions about your account.
Your commentsYour suggestions will help us continue to improve the accuracy,organization, and overall quality of the user publications. Please sendyour opinion of this document to:
Italic: Used in all text (including procedures) for:• Full titles of publications referenced in text• Emphasis (for example a new term)• Variables
Courier: Used for:• System output, such as an error message or script• URLs, complete paths, filenames, prompts, and syntax when
shown outside of running text
Courier bold: Used for:• Specific user input (such as commands)
Courier italic: Used in procedures for:• Variables on command line• User input variables
< > Angle brackets enclose parameter or variable values supplied bythe user
[ ] Square brackets enclose optional values
| Vertical bar indicates alternate selections - the bar means “or”
{ } Braces indicate content that you must specify (that is, x or y or z)
... Ellipses indicate nonessential information omitted from theexample
EMC SMC and SPA Installation Guide 9

10
Preface
EMC SMC and SPA Installation Guide

1
Introduction
Invisible Body Tag
This chapter introduces Symmetrix Management Console andSymmetrix Performance Analyzer:
◆ Symmetrix Management Console overview.................................. 12◆ Symmetrix Performance Analyzer overview................................. 13◆ Before you begin ................................................................................ 14
Introduction 11

12
Introduction
Symmetrix Management Console overviewSymmetrix® Management Console (SMC) is a simple, intuitive,browser-based user interface for the configuration and managementof Symmetrix arrays. It was developed to concurrently support all thefeatures of Enginuity™ Version 5671 and higher.
SMC presents the functionality of the Solutions Enabler SYMCLI(command line interface) in a browser interface. You can use SMC to:
◆ Manage Symmetrix access controls, user accounts, and roles
◆ Discover Symmetrix arrays
◆ Perform configuration operations (create devices, map and maskdevices, set Symmetrix attributes, set device attributes, set portflags, create SAVE device pools)
◆ Manage devices (change device configuration, set device status,reserve devices, duplicate devices, create/dissolve metadevices)
◆ Manage Fully Automated Storage Tiering (FAST), VirtualProvisioning™, and Auto-provisioning Groups
◆ Perform and monitor replication operations(TimeFinder®/Mirror, TimeFinder/Snap, TimeFinder/Clone,SRDF®, Open Replicator)
◆ Monitor alerts
◆ Monitor an application’s performance
◆ Dynamically provision storage in virtual computingenvironments (Storage Pool Management)
EMC SMC and SPA Installation Guide

Introduction
Symmetrix Performance Analyzer overviewEMC® Symmetrix® Performance Analyzer (SPA) is an intuitive,browser-based tool used to perform historical trending and analysisof Symmetrix array performance data. SPA was developed to workwith the Symmetrix Management Console (SMC). The SPA interfacecan open in its own web window from the SMC menu, or on its own.
SPA adds an optional layer of data collection, analysis, andpresentation tools to the SMC implementation. You can use SPA to:
◆ Set performance thresholds and alerts
◆ Set e-mail alerts for threshold breaches and system healthchanges
◆ View high frequency metrics in realtime
◆ Perform root cause analysis
◆ View Symmetrix array heat maps and navigate (one click) toDiagnostic view to analyze hot issues
◆ View graphs detailing system performance
◆ Drill-down through data to investigate issues
◆ Monitor performance and capacity over time
◆ Execute scheduled and ongoing queries, and export that data to afile
◆ Customize your own dashboard view
SPA also provides default dashboards for analyzing FAST and FASTVP data movement.
Symmetrix Performance Analyzer overview 13

14
Introduction
Before you beginBefore you begin installing the SMC/SPA, you should review theinformation in this section.
SMC prerequisites SMC V7.3 has the following prerequisites:
◆ Solutions Enabler V7.3 (minimum) must be installed.
Note: The installation wizard will fail if the proper level of SolutionsEnabler is not installed on the host.
◆ SMC can be installed on the same system as the SYMAPI server,or on a system connected to the SYMAPI server. Refer to Figure 1on page 16 and Figure 2 on page 17, respectively.
◆ Java runtime environment must be enabled on the client browser.
◆ If you are changing your SYMAPI connection type(local/remote), you must uninstall SMC before reinstalling it. Forexample, if you change from a local connection to client/server.
◆ If upgrading an SMC V7.2 installation in which the Storage PoolManagement feature was used, you should back up the SPMmetadata prior to starting the upgrade. This will allow you torollback to the previous version of SMC, should the upgrade notgo as planned. Once you are satisfied that the upgrade wassuccessful, back up the SPM metadata again so that you will havea copy of the new SPM metadata.
Note: For additional environment requirements and product updates, refer tothe EMC Symmetrix Management Console Release Notes.
SPA prerequisites SPA V2.2 has the following prerequisites:
◆ If upgrading from SPA 2.1 or higher, back up the SPA databaseusing the Administration, Database Management, Backupoption. After the installation of SPA V2.2, use the Restore option.The SPA online help provides instructions on backingup/restoring the SPA database.
EMC SMC and SPA Installation Guide

Introduction
◆ If upgrading from SPA V2.0 or lower, backup the SPA databaseusing the SPA DB Backup utility. The utility is available onPowerlink. For instructions on using the utility, refer to itsREADME file.
◆ Solaris/Linux installations: Before starting a new SPAinstallation on Solaris or Linux, the mysql user and mysql groupmust be present. In addition, the mysql user must be using thepassword mysql and be a member of the mysql group. Anexample of the MySql instructions follows:
shell> groupadd mysqlshell> useradd -m -g mysql -p mysql mysql
Note: For additional environment requirements and product updates, refer tothe EMC Symmetrix Performance Analyzer Release Notes.
Initial Setup User While installing the software, you will be prompted to specify anInitial Setup User. You can either specify the user ID you currentlyuse to access the Symmetrix array (if User Authorization is enabled),or you can use the default user ID smc. If you plan on using thedefault ID, there must be no user IDs listed in the User Authorizationdatabase. If there are user IDs in the database (regardless of whetheruser authorization is enabled), then you must use SYMCLI to add thedefault user ID (smc) to the database.
The initial setup user's role is to install and set up the SMCenvironment (create users and add roles). It is intended to be atemporary role as it will only allow you to access and performadministrative tasks on Symmetrix arrays that do not have defineduser roles (authorization rules). Once an Administrator orSecurityAdmin is assigned to a Symmetrix array, the initial setup userwill no longer be able to access or even see the array from the SMCconsole. Therefore, it is recommended that users not operate in thisrole for too long.
Note: “Security features” on page 93 contains more information on users androles.
Before you begin 15

16
Introduction
Local and remote installation optionsSMC and SPA can be installed in local or remote configurations. In alocal configuration, install the SMC/SPA software on a host runningSolutions Enabler attached to Symmetrix arrays (Figure 1 onpage 16). In a remote configuration, install the SMC/SPA software ona system (SMC Server) connected to the SYMAPI server (Figure 2 onpage 17).
RDF RDF SMC/SPA
RDF
SMC/SPA Hosts
Figure 1 Local installation: SMC/SPA
EMC SMC and SPA Installation Guide

Introduction
Node name Net port
SYMAPI Server
RDF RDF RDF SMC/SPA
Server
SMC/SPA Hosts
Figure 2 Remote installation: SMC/SPA on system connected to a remoteSYMAPI server
Before you begin 17

18
Introduction
SMC licensing With the release of the Enginuity 5875 Q2 2011 SR and SMC V7.3,SMC licensing is moving from a host-based SMC key model to aSymmetrix-based SMC eLicense model, as was introduced witheLicensing in Enginuity 5875.
With this change to SMC’s licensing model, the ability to manage aSymmetrix array from an SMC host depends on the version of SMCrunning on the host and the version of Enginuity running on thearray.
SMC V7.3 host When accessing a Symmetrix VMAX array running the Enginuity5875 Q2 2011 SR (or higher) from a host running SMC V7.3, you canmanage the VMAX array if it contains an SMC eLicense; otherwise,you can not manage the array from SMC. However, you can obtainand install your SMC eLicense for any array through SMC withoutany SMC host-based keys or SMC entitlements.
When accessing any Symmetrix array running an Enginuity versionlower than the 5875 Q2 2011 SR from a host running SMC V7.3, youcan manage the array regardless of whether the host has the formerlyused host-based SMC license key.
SMC Pre-V7.3 host When accessing a Symmetrix array running the Enginuity 5875 Q22011 SR from a host running an SMC version lower than V7.3, youcan manage the array regardless of whether the array contains anSMC eLicense. However, the host still requires the formerly usedhost-based SMC license key.
Symmetrix VMAX upgrades and SMCWhen a Symmetrix VMAX array that has been managed by SMC isupgraded to the Enginuity 5875 Q2 2011 SR, SMC will continue tooperate with the array even if the proper eLicense for SMC is notpresent. The SMC eLicense will be noted as In Use in the eLicensingreport that is available through SMC. This designation means that therequired eLicense is missing, but access to the array is still allowed toavoid service disruption. You should obtain and apply the properSMC eLicense to clear this designation.
Note: For more information on eLicensing, refer to the EMC Solution EnablerInstallation Guide.
EMC SMC and SPA Installation Guide

Introduction
SMC on the Symmetrix service processorSMC is available on the Symmetrix service processor as part of EMC’smanagement integration. Before deploying SMC in this manner, youshould be aware of the following:
◆ The service processor is shared with EMC Customer service fornormal service operations.
◆ There is no host access to the service processor, thereby limitingyour ability to do backups of your management environment.This will prevent you from backing up SMC and SolutionsEnabler configuration files and/or device groups.
◆ Additionally, you will need to involve Customer Service tostart/stop Solutions Enabler services or the SMC service.
◆ You must involve Customer Service to review Solutions Enablerlogs.
◆ The following features are not supported when running SMC onthe Symmetrix service processor:
• Storage Pool Management (SPM)
• Windows authentication
• RDF consistency groups
• Group name services (GNS)
SMC on the service processor is disabled by default. To enable it,contact EMC Customer Service.
Note: SPA is not available on the Symmetrix service processor.
SMC/SPA Virtual ApplianceSMC and SPA are available as a virtual appliances for ESX V4.0 (andhigher) Servers in a VMware environment. For more information andinstructions on deploying the appliance, refer to “Deploying theSMC/SPA Virtual Appliance” on page 37.
Before you begin 19

20
Introduction
EMC SMC and SPA Installation Guide
2
Installation
Invisible Body Tag
This chapter explains how to install Symmetrix Management Consoleand Symmetrix Performance Analyzer:
◆ Installing SMC/SPA .......................................................................... 22◆ Completing the installation .............................................................. 26◆ Upgrading SMC/SPA ....................................................................... 32◆ Uninstalling SMC/SPA..................................................................... 34
Installation 21

22
Installation
Installing SMC/SPAThis section describes how to access and install the SMC/SPAsoftware.
Step1: Access the softwareSMC/SPA is distributed in the following forms:
◆ On the SMC/SPA installation DVD, which includes kits for allsupported platforms.
◆ As a platform-specific kit download from the Powerlink websiteat:
http://Powerlink.EMC.com
In both cases, the kits are named accordingly:
◆ For Windows 32-bit: SMAS_V7.3.0.x_WINDOWS_X86_32.exe◆ For Windows 64-bit: SMAS_V7.3.0.x_WINDOWS_X86_64.exe◆ For SunOS: SMAS_V7.3.0.x_SUNOS_SPARC_32.bin◆ For Linux: SMAS_V7.3.0.x_LINUX_X86_32.bin
From an install DVD To access the software from an installation DVD:
1. Save all files and exit all applications.
2. Insert the DVD into the DVD drive.
From Powerlink To access the software from Powerlink:
1. Save all files and exit all applications.
2. On Powerlink, select Support > Software Downloads andLicensing > Downloads S > Symmetrix Management Consoleand click the platform-specific installation kit.
3. Save the kit to a directory on the host’s drive.
4. Continue with “Step 2: Install the software” on page 23.
EMC SMC and SPA Installation Guide

Installation
Step 2: Install the softwareYou can install SMC/SPA using an installation wizard, as describedin “Step 2A: Installing SMC/SPA using the wizard” on page 23, orfrom the command line, as described in “Step 2B: InstallingSMC/SPA from the command line” on page 24).
Note: To install SMC/SPA using the wizard in Solaris and Linux, the displaymanager must be enabled; otherwise, the installer will default to consolemode.
Step 2A: Installing SMC/SPA using the wizardTo install SMC/SPA using the wizard:
1. Change directory to the location of the kit and run theappropriate executable for your operating system.
2. In the Introduction page, review the recommendations and clickNext.
3. In the Choose Install Folder page, click Next to accept the defaultdirectory, or click Choose to select another directory.
4. In the Choose Install Set page, click SMC to install SMC or SPAto install SPA, and then click Next.
Note: When selecting the SPA option, if SMC 7.3 is not already installed,the installation program will automatically install it.
5. In the SYMAPI Connection Type page:
a. Specify an initial setup user name (default is smc). You caneither accept the default or use your Windows username ifyou have authorization enabled on the SMC server host.“Initial Setup User” on page 15 explains the role of the initialsetup user.
b. Specify a Connection Type for the initial login based on thefollowing:
Local — On a host with Solutions Enabler installed andattached to Symmetrix arrays.
Remote — On a remote server connected to a SYMAPI server;you must specify the SYMAPI server Node Name and NetPort. The default net port for SYMAPI is 2707.
Installing SMC/SPA 23

24
Installation
Note: “Local and remote installation options” on page 16 providesmore information on each of the connection types.
c. Click Next.
6. In the Ports Configuration page, specify the ports to use/enablewhen connecting to the SMC server.
The default ports of the SMC server and SPA database (ifinstalling SPA) are displayed. If you want to use the default ports,verify that they are available, and click Next to accept and enablethem. Otherwise, you can specify/enable different ports, andclick Next.
Note: Starting with SMC V7.0, the HTTPS port must be enabled.
7. In the Pre-Installation Summary page, verify the summaryinformation, and click Install to continue the installation.
8. In the Install Complete page, click Done.
Step 2B: Installing SMC/SPA from the command lineTo install SMC/SPA from the command line:
1. Save all files and exit all applications.
2. Insert the DVD into the DVD drive.
3. Change directory to the location of the kit.
4. Run the following command:
KitName -i console
Where KitName is one of the following operating system-specifickit names:
• For Windows 32 -bit: SMASV7.3.0.x_WINDOWS_X86_32.exe• For Windows 64-bit: SMASV7.3.0.x_WINDOWS_X86_64.exe• For SunOS: SMAS_V7.3.0.x_SUNOS_SPARC_32.bin• For Linux: SMAS_V7.3.0.x_LINUX_X86_32.bin
5. In the Introduction panel, review the recommendations and pressEnter.
6. In the Choose Install Folder panel, press Enter to accept thedefault directory, or specify a different directory and press Enter.
EMC SMC and SPA Installation Guide

Installation
7. In the Choose Install Set panel, press Enter to install the SMCInstall Set or type 2 and press Enter to install both SMC and SPA.
8. In the SYMAPI Connection Type page:
a. Specify an initial setup user name (default is smc). You caneither accept the default or use your Windows username ifyou have authorization enabled on the SMC server host.“Initial Setup User” on page 15 explains the role of the initialsetup user.
b. Specify a Connection Type for the initial login based on thefollowing:
Local — On a host with Solutions Enabler installed andattached to Symmetrix arrays.
Remote — On a remote server connected to a SYMAPI server;you must specify the SYMAPI server Node Name and NetPort. The default net port for SYMAPI is 2707.
Note: “Local and remote installation options” on page 16 providesmore information on each of the connection types.
9. In the Ports Configuration panel, specify the ports to use/enablewhen connecting to the SMC server.
The default ports of the SMC web server are displayed. If youwant to use the default ports, verify that they are available andpress Enter to accept and enable them. Otherwise, you canspecify/enable different ports, and press Enter.
10. In the Pre-Installation Summary panel, verify the summaryinformation, and then press Enter to continue the installation.
11. In the Install Complete panel, press Enter.
12. Refer to “Completing the installation” on page 26 for instructionson completing the installation.
Installing SMC/SPA 25

26
Installation
Completing the installationThis section describes the tasks to perform post installation.
Configuring language and regional settingsFor users outside the United States, you must configure yourWindows regional and language settings to English (United States) ifyou plan on using the graph feature of the QoS and ReplicationMonitors. To configure your settings:
1. Stop the EMC SMAS service (if it is running).“Starting andstopping the SMAS service (for both SMC and SPA installations)”on page 30 provides instructions.
2. In the Windows Control panel, double-click Regional andLanguage Options.
3. On the Regional Options tab, set the Standards and formats toEnglish (United States).
4. On the Advanced tab, set the Language for non-Unicodeprograms to English (United States) and select Apply all settingto the current user account and to the default user profile.
5. Restart the service.
Licensing SMC Starting with SMC 7.3, you no longer require a host-based license keyto first launch the application. However, before you can manage aSymmetrix array running the Enginuity 5875 Q2 2011 SR, you mustinstall an SMC elicense on the array. For more information, refer to“SMC licensing” on page 18. For instructions on licensing SMC on anarray running the 5875 SR, refer to Installing Licenses in the SMConline help.
Licensing SPA SPA V2.2 uses host-based eLicensing to enter and query its licenses.With V2.2 there is only a single SPA license.
Note: SPA V2.2 utilizes host-based Electronic License Management, thereforeyou will be provided with a License Authorization Code letter for your SPAsoftware. Use this license code to register the SPA software electronically onthe EMC Powerlink® website at:http://Powerlink.EMC.com
EMC SMC and SPA Installation Guide

Installation
Note: As of Q2 2011, EMC no longer requires SPA license files to be locked toboth the Symmetrix ID and the MAC address of the host running SPA. ForLicense files issued as of this date, HOSTID will be set to ANY, instead ofspecific MAC address as was the case previously. License files with theHOSTID set to ANY will allow any version of SPA and associated underlyingversion of Solutions Enabler to run successfully on any supported hostwithout requiring a MAC address.
When SPA is started, it queries Solutions Enabler to see if it is licensed tofunction with the associated Symmetrix VMAX array.
You must install a SPA license file on each SPA host (Windows,Solaris, and Linux x86 processor) using either the following symlmf
command or SMC’s License Manager feature:
symlmf add -type LicenseType-dir PathToDirName | -file PathToFileName
Where:
-type LicenseType — Specifies the type of licenses to be processed.This can either be se which specifies the traditional Solutions Enablerlicense or emclm which specifies the new EMC license. SPA licensesuse the emclm type.
-dir PathToDirName — Specifies a path to a directory that containslicense files with the .lic extension.
-file PathToFileName — Specifies a path to a file that containslicenses.
Note: Installing licenses in the SMC help explains how to license SPA using theLicense Manager.
Entering SPA licensesin client/server mode
Note: The Remote Operations chapter in the EMC Solutions Enabler InstallationGuide explains how to set up client/server for SYMCLI.
Follow these steps to license SPA in a client/server configuration:
Server side
The server has SYMAPI, SYMCLI, and the required gatekeepers.
◆ Verify that the storsrvd process is running.
Completing the installation 27

28
Installation
Client side
1. Edit the netconfg file with the server name.
2. Set the following environment variables:
SYMCLI_CONNECT=SYMAPI_SERVERSYMCLI_CONNECT_TYPE=REMOTE
3. Add the SPA license keys with the symlmf command, as follows:
symlmf -type emclm add -file PathToFileName.lic
4. Enter the following command to verify that the host displays inthe output:
symlmf -type emclm list
This verifies that the SPA license is included in thesymapi_clp_license.dat file on the server system.
Licensing examplesThe following is an example of the symlmf add -dir commandwhich will add licenses from any files with the .lic extension in thedirectory specified to the license database:
symlmf add -type emclm -dir /tmp/licenses
The following is an example of the symlmf add -file commandwhich will add licenses from the file specified to the license database:
symlmf add -type emclm -file /tmp/api57_072809.lic
During the processing of each license one of the following messagesdisplays indicating its processing status:
License FeatureName, SymmID, HostID, IssueDate: StatusThe Status can be either:
Processed successfulNot Processed - unknown Symm IDNot Processed - invalid signatureNot Processed - invalid Host IDNot Processed - ExpiredNot Processed - Licensing error: <error code>
The <error code> is the error returned by the ELM API which isused to process the licenses.
When all the processing is complete a summary displays of the totallicenses successfully and unsuccessfully processed as shown below:
Total licenses Processed : nnTotal licenses Not Processed : nn
EMC SMC and SPA Installation Guide

Installation
Displaying SPA licensesTo display the SPA licenses, use the following form:
symlmf list -type emclm [-v] [-host]
Where:
-host — Indicates that only licenses specified for this host should belisted.
-v —Indicates that the list command should provide a verbose list.
Example The following is sample output for a symlmf list command:
DaysUntil Capacity
Feature Name SymmID Host ID Expr Type Units---------------------- ------------ ----------------- ----- ---- ------SPA_BASE 000012481632 00-22-AA-90-9D-5D - R-TB 1000SPA_BASE 001248163264 00-21-9B-60-9D-5D - - -SPA_BASE 001248163264 00-22-AA-90-9D-5D - - -SPA_BASE 123456789012 00-21-9B-60-9D-5D - R-TB 500SPA_DIAG - - 90 - -
Legend:
Capacity:R-TB = Raw capacity in TBC-TB = Configured capacity in TB
- = No capacity limit
Excluding the data and temp directories from virus scans (for SPA installationsonly)
MySQL advises that you exclude the following directories from anyvirus scan:
◆ The data directory and all its subdirectories(SMAS\jboss\server\default-em\data\msq\data)
◆ The temp directory(SMAS\jboss\server\default-em\data\msq\temp)
Not following this advice may lead to data corruption in the SPAdatabase.
Completing the installation 29

30
Installation
Starting and stopping the SPA database (for SPA installations only)
Linux To start/stop the SPA database (MySQL) in Linux and SunOS, changeto this directory:
install_location/emc/SMAS/jboss/server/default-em/data/msq
and use the following commands:
Action Command
Start (Always start the SPA DBbefore starting the SMAS service.)
./smas_mysql_unix_helper.sh -S
Stop (Always stop the SMAS servicebefore stopping the SPA DB.)
./smas_mysql_unix_helper.sh -k
Windows To start/stop the EMC_smasdb service in Windows, use theControl Panel (Administrative Tools, Services).
Starting and stopping the SMAS service (for both SMC and SPA installations)Starting with SMC V7.3 and SPA V2.2, the applications share acommon service, the EMC Symmetrix Management ApplicationServer (SMAS). Therefore, you should take the necessary precautionsbefore starting/stopping the service, as you will be affecting bothSMC and SPA.
Linux and SunOS To start/stop the SMAS service in Linux and SunOS, change to thisdirectory:
/etc/init.d
and use the following commands:
Action Command
Start server (Always start the SPADB before starting the SMASservice.)
./smas start
Stop server (Always stop the SMASservice before stopping the SPA DB.)
./smas stop
EMC SMC and SPA Installation Guide

Installation
Windows To start/stop the EMC Symmetrix Management ApplicationServer in Windows, use the Services panel (Control Panel,Administrative Tools, Services).
Completing the installation 31

32
Installation
Upgrading SMC/SPAThe installation program will automatically detect which of theapplications (SMC, or SMC and SPA) are currently installed on thehost and upgrade them according to your previous settings (ports,connection type, etc.).
To upgrade SMC to V7.3 and install SPA for the first time, you mustcomplete both procedures, “Upgrading your software” below, and“Adding SPA (optional)” on page 33.
To upgrade SMC to V7.3 and SPA to V2.2, or to just upgrade SMC toV7.3, complete “Upgrading your software” below.
IMPORTANT!Before updating an earlier version of SPA to V2.2, you must backupyour SPA database using the SPA Database Backup Utilityavailable on Powerlink. For instructions on using the utility, referto its README file.
Upgrading your softwareTo upgrade SMC, or SMC and SPA:
1. Access the software, as described in “Step1: Access the software”on page 22.
2. Change directory to the location of the kit and run theappropriate executable for your operating system.
3. In the instance detected message, click Yes.
4. In the Introduction Upgrade Feature page, click Next.
5. In the Pre-Installation Summary page, click Next.
6. Complete the upgrade process by doing any of the following thatapply to your environment:
• If you were using link and launch client registrations to launchSMC from ControlCenter or vSphere VSI clients, you mustre-register your host with SMC. Adding Link & Launch clientregistrations in the SMC help provides instructions.
EMC SMC and SPA Installation Guide
Installation
• If upgrading from SMC V7.2 or higher to SMC V7.3 on asystem configured for LDAP, the Initial Setup User mustre-enter the bind password in the Configure Authenticationdialog box; otherwise, LDAP users will not be able to log in.Configuring Authentication in the SMC help providesinstructions.
Adding SPA (optional)To add SPA V2.2 to a host running SMC V7.3:
1. Access the software, as described in “Step1: Access the software”on page 22.
2. Change directory to the location of the kit and run theappropriate executable for your operating system.
3. In the SMAS Instance detected dialog box, click Add NewFeature.
4. In the Introduction Add Feature page, click Next.
5. In the Ports Configuration page, specify the port to use/enablewhen connecting to the SPA database. The default port isdisplayed.
6. In the Pre-Installation Summary page, click Install.
Upgrading SMC/SPA 33

34
Installation
Uninstalling SMC/SPAThis section describes how to uninstall SMC/SPA.
Before you begin Before you begin uninstalling SMC/SPA, review the following:
◆ Uninstalling SPA will remove the SPA database. The SPA onlinehelp provides instructions on backing up/restoring the SPAdatabase should you want to reuse it at a later time.
◆ During an uninstall, the installation program will prompt you toexport your customized SPA settings (threshold settings only) tofile that can be imported to another SPA environment. The SPAonline help provides instructions on exporting/importing yourcustomized SPA settings.
CAUTION!Uninstalling SMC will terminate all client sessions to the SMCserver and any SYMAPI operations in progress.
Uninstalling from WindowsYou can uninstall SMC/SPA from a Windows host using either theWindows Add/Remove Programs dialog box, the command line, orWindows Explorer.
Using the WindowsAdd/Remove
Programs dialog box
To uninstall SMC/SPA from the Windows Add/Remove Programsdialog box:
1. From the Windows Start menu, select Settings, Control Panel,Add/Remove Programs.
2. In the Add/Remove Programs dialog, select EMC_SMAS andclick Change/Remove.
3. In the Configure EMC_SMAS wizard, click Uninstall Product touninstall both SMC and SPA; or click Remove Features to removeone of the products. Click Next.
4. Complete the remaining steps in the wizard.
EMC SMC and SPA Installation Guide

Installation
Using the commandline
To uninstall SMC/SPA using the command line:
1. Change directory location to:
SMC_SPA_HOME\\SMC\SMAS\_EMC_SMAS_installation
2. Type the following to launch the uninstall wizard:
Uninstall_EMC_SMAS_Installation
3. Complete the steps in the wizard.
Note: A few files will remain after the uninstall operation. To remove themyou can delete the SMAS folder.
Using WindowsExplorer
To uninstall SMC/SPA using Windows Explorer:
1. Double-click the following to launch the uninstall wizard:
SMC_SPA_HOME\\SMC\SMAS\_EMC_SMAS_installation\Uninstall_EMC_SMAS_Installation
2. Complete the steps in the wizard.
Note: A few files will remain after the uninstall operation. To remove themyou can delete the SMAS folder.
Uninstalling from Linux and SunOSYou can uninstall SMC/SPA from a Linux or SunOS host using thecommand line:
1. Change directory location to:
SMC_SPA_HOME\\SMC\SMAS\_EMC_SMAS_installation
2. Type the following to launch the uninstall wizard:
./Uninstall_EMC_SMAS_Installation -i console
3. Complete the steps in the wizard.
Note: A few files will remain after the uninstall operation. To remove themyou can delete the SMAS folder.
Uninstalling SMC/SPA 35
36
Installation
EMC SMC and SPA Installation Guide

3Deploying the
SMC/SPA VirtualAppliance
Invisible Body Tag
This chapter describes how to deploy the Solutions Enabler VirtualAppliance for SMC in a VMware infrastructure environment:
◆ Introduction ........................................................................................ 38◆ Before you begin ................................................................................ 39◆ Deploying the virtual appliance directly to the ESX Server ........ 40◆ Deploying the virtual appliance through a vCenter Server ........ 44◆ Launching SMC, SPA, or the Configuration Manager ................. 47◆ Updating the SMC/SPA Virtual Appliance .................................. 48◆ Deleting the SMC/SPA Virtual Appliance .................................... 51◆ Backing up/restoring the SPA database ........................................ 52
Deploying the SMC/SPA Virtual Appliance 37

38
Deploying the SMC/SPA Virtual Appliance
IntroductionThe Solutions Enabler Virtual Appliance with SMC (from here onreferred to as the SMC Virtual Appliance) and the Solutions EnablerVirtual Appliance with SMC and SPA (from here on referred to as theSPA Virtual Appliance) are VMware ESX Server virtual machines thatprovide all the components you need to manage your Symmetrixenvironment using the storsrvd daemon and Solutions Enablernetwork client access. These include:
◆ EMC Symmetrix Management Console V7.3.0◆ EMC Symmetrix Performance Analyzer V2.21
◆ EMC Solutions Enabler V7.3 (solely intended as a SYMAPI serverfor Solutions Enabler client access)
◆ Linux OS (SUSE 11)2
◆ SMI- S Provider V4.3.0
In addition, the appliances also include a browser-basedconfiguration tool, called the Solutions Enabler Virtual ApplianceConfiguration Manager. This tool enables you to perform thefollowing configuration tasks not available in SMC or SPA from theVirtual Appliance directly:
◆ Launch SMC◆ Launch SPA1
◆ Monitor the application status◆ Start and stop selected daemons◆ Import and export persistent data◆ Configure the nethost file (required for client access)◆ Discover storage arrays◆ Modify options and daemon options◆ Add host-based license keys◆ Run a limited set of Solutions Enabler CLI commands◆ Configure ESX host and gatekeeper devices◆ Load Symmetrix-based eLicenses1
◆ Load SPA host-based licenses1
Note: For information on using the Configuration Manager, refer to its onlinehelp.
1. Only available with the SPA Virtual Appliance.2. Root login is not supported on SUSE 11 virtual machine.
EMC SMC and SPA Installation Guide

Deploying the SMC/SPA Virtual Appliance
Before you beginBefore you begin to deploy the SMC/SPA Virtual Appliance, be sureto complete the tasks listed in this section.
❑ Verify that you are installing the latest version of the appliance bychecking Powerlink for updates.
❑ Verify that the client is running:
• VMware vSphere Client
• Either of the following browsers with cookies an javascriptenabled:
– Internet Explorer 6.0 through 8.0– Firefox 3.5Browsers should have Flash Player 10.2 plug-in installed. Ifyour browser has an outdated version of Flash Player, you willbe prompted to download the latest version when you startthe web console.
❑ Verify that the VMware ESX Server has a dual CPU and meets theminimum requirements listed in Table 1:
Table 1 SMC/SPA Virtual appliance VMware ESX Server requirements
Requirement SMC SPA
ESX Server version 4.0 or higher 4.0 or higher
Disk space 10 GB 120 GB
Memory 2 GB 8 GB
Before you begin 39
40
Deploying the SMC/SPA Virtual Appliance
Deploying the virtual appliance directly to the ESX ServerThis section describes how to deploy the SMC/SPA VirtualAppliance directly to the ESX Server.
Step 1: Import the virtual applianceTo import the virtual appliance:
1. Download the OVF archive file (*.ova) containing theinstallation program from Powerlink to a temporary directory:
• SMC Virtual Appliance file name:smc730_suse11_vapp_OVF10.ova
• SPA Virtual Appliance file name:smas730_suse11_vapp_OVF10.ova
2. Start the vSphere Client and log in to the ESX Server on whichyou will be deploying the appliance.
3. Click Ignore in the security warning message.
4. From the File menu, select Deploy OVF Template.
5. Browse to the OVF archive file, located in the temporary directoryyou created earlier. Select the OVF archive file with the suffix*vapp_OVF10.ova.
6. Click Next.
7. On the Details page, verify the details about the appliance andclick Next.
8. On the End User License Agreement page, select Accept alllicense agreements and click Next.
9. On the Name and Location page, specify a name for theappliance and click Next.
10. On the Disk Format page, select the format in which to store thevirtual machine’s virtual disks and click Next.
11. On the Ready to Complete page, verify the information and clickFinish.
12. In the Completed Successfully message, click Close.
13. Continue with “Step 2: Select gatekeepers” below.
EMC SMC and SPA Installation Guide

Deploying the SMC/SPA Virtual Appliance
Step 2: Select gatekeepersPresent uniquely defined gatekeeper by way of raw device mappings(RDM). For instructions, refer to the appropriate VMwaredocumentation.
Solution Enabler manages Symmetrix arrays through gatekeeperdevices mapped to the virtual appliance as RDM pass-throughdevices. The management is done through EMC proprietarycommands using SCSI 3B/3C write/read commands. For every call,a WRITE command is issued to send the request, and then a READcommand to get the results.
Continue with “Step 3: Power on and configure the virtualappliance” below.
Step 3: Power on and configure the virtual applianceTo power on and configure the virtual appliance:
1. On the Summary page of the Virtual Infrastructure Client, clickPower On.
2. Click the Console tab and watch as the appliance starts up.
3. Read and accept the license by typing yes at the followingprompt and pressing Enter:
Do you agree with the terms of the end user licenseagreement? yes/no [no]:
4. At the following prompt, type y and press Enter to configurestatic IP address:
Do you want to configure static IP address? [y]/n:
• A [y]es response produces the following series of promptsthat will enable you to configure your network:
– IP Address [ ]:Type the address assigned to the appliance and press Enter.
Note: The virtual appliance uses this IP address to query the DNSServer and get its hostname. Therefore, you must ensure that the IPaddress has a hostname mapping in the DNS Server.
Deploying the virtual appliance directly to the ESX Server 41

42
Deploying the SMC/SPA Virtual Appliance
– Netmask [ ]:
Type the mask of the network on which the appliance willbe running and press Enter.
– Gateway [ ]:
Type the gateway address to the network on which theappliance will be running and press Enter.
– Is a proxy server necessary to reach theinternet? y/n [n]:
A [y]es response enables you to specify the IP address ofthe proxy server and the port.
• A [n]o response continues the configuration.
The network is configured at this point.
5. At the following prompt, specify whether you want to set thetime zone:
Do you want to set the time zone? y/[n] :
• A [n]o response continues the configuration. If you select thisoption, you can use the appliance console to specify the timezone at a later time.
• A [y]es response produces the following series of promptsthat will enable you to set the time zone:
– Please select a continent or ocean
Type the number that corresponds to the time zonelocation and press Enter.
– Please select a country
Type the number that corresponds to the country-specifictime zone you want to set and press Enter.
– Please select one of the following time zoneregions
Type the number that corresponds to regional time zoneyou want to set and press Enter.
– Is the above information OK?
EMC SMC and SPA Installation Guide

Deploying the SMC/SPA Virtual Appliance
6. At the following prompt, specify whether you want to enter thehost ESX Server information:
Do you want to set the host ESX Server y/[n]? :
• A n response continues the configuration. If you select thisoption, you can use the Configuration Manager to enter thehost ESX Server details at a later time. For instructions, refer tothe Configuration Manager’s online help.
• A y response prompts you for the ESX Server hostname. Inwhich case you should type the fully qualified hostname ofthe ESX Server and press Enter.
A Welcome dialog box opens. You have now finished installingthe SMC Virtual Appliance.
7. Continue with “Launching SMC, SPA, or the ConfigurationManager” on page 47.
Deploying the virtual appliance directly to the ESX Server 43

44
Deploying the SMC/SPA Virtual Appliance
Deploying the virtual appliance through a vCenter ServerThis section describes how to deploy the SMC/SPA VirtualAppliance through a vCenter Server 4.0 and higher.
Step 1: Import and configure the virtual applianceTo import and configure the virtual appliance:
1. Download the OVF archive file (*.ova) containing theinstallation program from Powerlink to a temporary directory:
• SMC Virtual Appliance file name:smc730_suse11_vapp_OVF10.ova
• SPA Virtual Appliance file name:smas730_suse11_vapp_OVF10.ova
2. Start the vSphere Client and log in to the vCenter InfrastructureServer through which you will be deploying the virtualappliance.
3. Click Ignore in the security warning message.
4. From the navigation tree, select the ESX Server on which you willbe deploying the virtual appliance.
5. From the File menu, select Deploy OVF Template.
6. Browse to the OVF archive file, located in the temporary directoryyou created earlier. Select the OVF archive file with the suffix*vapp_OVF10.ova.
7. Click Next.
8. On the Details page, verify the details about the appliance andclick Next.
9. On the End User License Agreement page, select Accept alllicense agreements and click Next.
10. On the Name and Location page, specify a name for theappliance and click Next. If you want to add gatekeeper devicesautomatically during the first boot of the appliance, you shouldname the appliance with the same fully qualified hostname as theDNS Server. When setup this way, two gatekeeper devices per
EMC SMC and SPA Installation Guide

Deploying the SMC/SPA Virtual Appliance
Symmetrix array will be added the first time the appliance bootsup. In addition, you will be prompted for the ESX Server logincredentials.
11. Select the host/cluster to run the virtual appliance.
12. If the resource pool is available, select it; otherwise, go to step 14.
13. If more than one datastore is attached to the ESX Server, select thedatastore for your appliance; otherwise, go to step 14.
14. Customize the software solution for this deployment by doing thefollowing:
a. Provide valid values for the following OVF properties:
– IP Address– Netmask– Gateway– DNS Server 1– DNS Server 2
b. Optionally, provide/select valid values for the following OVFproperties:
– Time zone: Select the appropriate time zone.– Proxy Server: Enter the IP address of the proxy server and
port. For example:ProxyServer-IP:Port
– ESX Server Name: Enter the fully qualified ESX Serverhostname.
– ESX Server Password: Enter the ESX Server password inbase64 encryption format.
15. On the Ready to Complete page, verify the information and clickFinish.
16. In the Completed Successfully message, click Close.
17. Continue with Step 2: Select gatekeepers below.
Deploying the virtual appliance through a vCenter Server 45

46
Deploying the SMC/SPA Virtual Appliance
Step 2: Select gatekeepers1. Select gatekeepers as described in “Step 2: Select gatekeepers” on
page 41.
You can configure the virtual appliance to add two gatekeeperdevices per Symmetrix array when it firsts boots up. Forinstructions, refer to step 10 in “Step 1: Import and configure thevirtual appliance” on page 44.
2. Continue with “Step 3: Power on the virtual appliance” onpage 46.
Step 3: Power on the virtual applianceTo power on and configure the virtual appliance:
1. On the Summary page of the Virtual Infrastructure Client, clickPower On.
2. Click the Console tab and watch as the appliance starts up.
A Welcome dialog box opens. You have now finished installingthe SMC Virtual Appliance.
Continue with “Launching SMC, SPA, or the ConfigurationManager” on page 47.
EMC SMC and SPA Installation Guide

Deploying the SMC/SPA Virtual Appliance
Launching SMC, SPA, or the Configuration ManagerOnce you have finished installing the appliance, you can eitherlaunch SMC, SPA, or the Configuration Manager, and/or connect tothe API server through the Solutions Enabler client.
Launching SMC To launch SMC:
1. Type the following URL in a browser:
https://appliance_IP:8443
2. On the login window, type smc for both the ID and Password, andthen click Login.
Launching SPA To launch SPA:
1. Type the following URL in a browser:
https://appliance_IP:8443/spa
On the login window, type smc for both the ID and Password, andthen click Login.
Launching the Virtual Appliance Configuration ManagerTo launch the Virtual Appliance Configuration Manager:
1. Type the following URL in a browser:
https://appliance_IP:5480
2. On the log in panel, type seconfig for both the User andPassword, and then click Login.
Note: It is recommended that you change the password from theConfiguration Manager on first login.
The Virtual Appliance Configuration Manager displays. Forinformation on using the Configuration Manager, refer to itsonline help.
Connect to the API serverFor instructions on connecting to the API server, refer to the EMCSolutions Enabler Installation Guide.
Launching SMC, SPA, or the Configuration Manager 47

48
Deploying the SMC/SPA Virtual Appliance
Updating the SMC/SPA Virtual AppliancePeriodically, EMC will release security patches and hot-fixes for thevirtual appliance. These patches and fixes are available on Powerlinkin two forms: zip files and ISO images.
Updating from a zip file (SMC/SPA)To update an existing SMC/SPA Virtual Appliance from a zip file:
1. Log in to the web console of the existing appliance.
2. Click Export Persistent Data to download a zip file containingSolutions Enabler persistent data to your desktop.
3. Extract the zip file to your machine. Note the location of the fileencrypt_se_export_persistent_data_time-stamp.zip.gpg. You willneed this file later to complete this procedure.
4. Power off the old appliance.
5. Import and deploy the new appliance in your ESX server. Forinstructions, refer to “Deploying the virtual appliance directly tothe ESX Server” on page 40 or “Deploying the virtual appliancethrough a vCenter Server” on page 44, depending on yourenvironment.
6. Log in to the new appliance’s web console.
7. Click Import Persistent Data and browse to the location ofthe gpg file you extracted earlier in this procedure.
8. Click Import.
9. When the message Persistent data stored appears, close thedialog. The update is complete.
EMC SMC and SPA Installation Guide

Deploying the SMC/SPA Virtual Appliance
Updating from an ISO image (SMC only)This procedure explains how to upgrade the SMC virtual appliancefrom V7.3 to a higher version. You cannot use this procedure toupgrade from V7.2.x to V7.3 since they are running different versionsof the SuSE Linux operating system.
Note: This procedure can only be used for updating the SMC VirtualAppliance.
To update an existing virtual appliance from an ISO image:
1. Upload the ISO image into the ESX Server using the VI client:
a. Log in to the ESX Server using the VI client.
b. Select the ESX Server on the left panel.
c. Select the Configuration tab on the right panel.
d. Select Hardware, Storage to list the datastores connected tothe ESX Server.
e. Right-click the datastore and select Browse Datastore.
The Datastore Browser window displays.
f. Upload the appliance update ISO file.
g. Exit the dialog.
2. Mount the ISO image on the virtual appliance CD drive:
a. Right-click the virtual appliance and select Edit Settings.
b. On the Hardware tab, select CD/DVD Drive 1.
c. In the right panel, select Datastore ISO File, and click Browseto locate the ISO image in the datastore.
d. Select Device Status, Connected.
e. Click OK to exit the dialog box.
3. Update the appliance:
a. On the Console tab, go to the virtual appliance console.
b. Use the Move Up/Down keys and select Appliance Update.
c. Press Enter to the update.
Updating the SMC/SPA Virtual Appliance 49

50
Deploying the SMC/SPA Virtual Appliance
d. The update will take approximately 10 minutes, after whichthe screen will return to the main console.
EMC SMC and SPA Installation Guide

Deploying the SMC/SPA Virtual Appliance
Deleting the SMC/SPA Virtual ApplianceTo delete the SMC/SPA Virtual Appliance:
1. Optional: If you plan to restore SMC and Solutions Enablerpersistent data, you should back up the persistent data in theSolutions Enabler Virtual Appliance Configuration Manager.
Optional: If you plan to restore the SPA database, you shouldbackup the database according to “Backing up/restoring the SPAdatabase” on page 52
2. In the VMware management interface, power down theappliance.
3. Right-click on the appliance and select Delete From Disk.
4. Click Yes in the confirmation message.
Deleting the SMC/SPA Virtual Appliance 51

52
Deploying the SMC/SPA Virtual Appliance
Backing up/restoring the SPA databaseYou can transfer SPA database files between the appliance andanother host for file backup and restore. There is no facility in theappliance user interface to perform this process. However, whenlogged into the system with the vappadmin user account, you cantransfer these files.
The vappadmin user account is limited to performing the followingcommands for transferring database files:
# passwd - Changes the login password.
# sftp - Transfers database backup files into the appliance fromanother host, or out of the appliance to another host.
# df - Checks disk usage.
# manage_spa_db_backup.sh - Moves files between the backuplocation and staging location, and lists and cleans backup and staginglocations.
Backing up SPA database files to another hostFrom the system console perform the following steps:
1. Log in to SPA (https://host-name:8443/spa) and start thedatabase backup process as described in the SPA help.
2. Log into the system using the vappadmin user account. Forfirst-time log in, use the default password vappadmin. Oncelogged in, change the password by running the # passwd
command, which will prompt for the old and new passwords.
3. View the backup files in the backup location by entering thefollowing command:
# manage_spa_db_backup.sh -list -backup
EMC SMC and SPA Installation Guide

Deploying the SMC/SPA Virtual Appliance
4. Move the backup files from the backup location to the staginglocation by entering the following command:
Note: This operation moves the files from the backup area to the stagingarea (user account vappadmin home directory).
# manage_spa_db_backup.sh -stage
5. View the backup files in the staging location by entering thefollowing command:
# manage_spa_db_backup.sh -list -staging
6. Transfer the backup file copies out of the appliance to the backuphost using the following command syntax:
# sftp <user-name>@<fully-qualified-host-name>
Restoring SPA database files from another hostFrom the system console perform the following steps:
1. Log into the system using the vappadmin user account. Forfirst-time log in, use the default password vappadmin. Oncelogged in, change the password by running the # passwdcommand which will prompt for the old and new passwords.
2. Check for available disk space by entering the followingcommand:
# df -h
3. Transfer the backup file copies from the backup host to theappliance using the following command syntax:
# sftp <user-name>@<fully-qualified-host-name>
4. View the backup files in the staging location by entering thefollowing command:
# manage_spa_db_backup.sh -list -staging
5. Move the backup files from the staging location to the backuplocation by entering the following command:
# manage_spa_db_backup.sh -restore
Backing up/restoring the SPA database 53

54
Deploying the SMC/SPA Virtual Appliance
6. Log in to SPA url (https://<host-name>:8443/spa) and start thedatabase restore process as described in SPA help.
7. Once the restore is complete and backup files are no longerneeded, run the following command to clean backup and staginglocations by entering the following command:
# manage_spa_db_backup.sh -clean -all
EMC SMC and SPA Installation Guide

4
Using SymmetrixManagement Console
Invisible Body Tag
This chapter introduces Symmetrix Management Console andexplains where to find objects in the menus and navigation tree.
◆ Opening Symmetrix Management Console ................................... 56◆ Understanding the SMC interface ................................................... 57◆ Managing SMC views ....................................................................... 58◆ SMC menu bar.................................................................................... 69◆ SMC dialog boxes............................................................................... 81
Using Symmetrix Management Console 55

56
Using Symmetrix Management Console
Opening Symmetrix Management ConsoleOpen your web browser, and point to the hostname (SMC server) andthe port you entered (or accepted) during the installation:
http://host:http_port
or for a secure connection:
https://host:https_port
If you accepted the installation defaults, enter one of the following:
http://localhost:7070 or https://localhost:8443
The EMC Symmetrix Management Web Console login windowappears.
Type a Username and Password. If you accepted the default InitialSetup User, type smc (lowercase) for the Username and Password;otherwise, type the username you provided, and its associatedpassword For example, your Windows username and password.
The SMC Web Console appears.
EMC SMC and SPA Installation Guide
Using Symmetrix Management Console
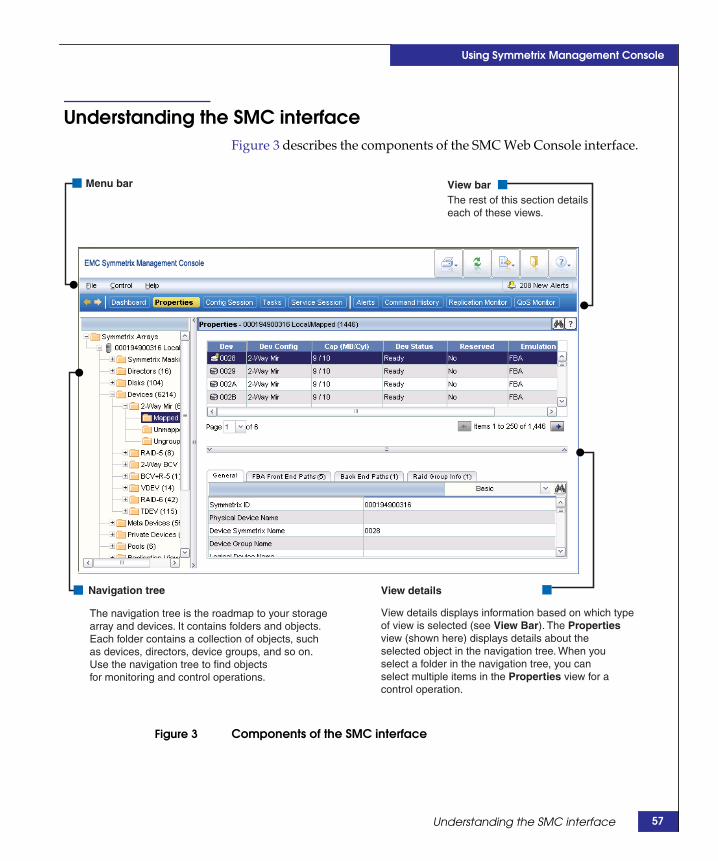
Understanding the SMC interfaceFigure 3 describes the components of the SMC Web Console interface.
Menu bar
The navigation tree is the roadmap to your storage array and devices. It contains folders and objects. Each folder contains a collection of objects, such as devices, directors, device groups, and so on. Use the navigation tree to find objects for monitoring and control operations.
Navigation tree
View details displays information based on which type of view is selected (see View Bar). The Properties view (shown here) displays details about the selected object in the navigation tree. When youselect a folder in the navigation tree, you can select multiple items in the Properties view for a control operation.
View details
View barThe rest of this section detailseach of these views.
Figure 3 Components of the SMC interface
Understanding the SMC interface 57
58
Using Symmetrix Management Console
Managing SMC viewsThis section introduces each of the SMC views (Dashboard,Properties, Config Session, Tasks, Service Session, Alerts,Command History, Replication Monitor, and QoS Monitor), andexplains how to change the default SMC view.
Understanding the Dashboard viewThe Dashboard view (Figure 4 on page 59) provides a quick look atall of the Symmetrix arrays visible to the local host, as well as accessto some common management tasks. To view detailed information ona particular array in this view, click it to display its Properties view.To view the alerts for a particular array, click Alerts to display itsAlerts view. To view the navigation tree, click the vertical bar on theleft side of the view and drag it to the right.
By default, SMC displays this view on login. For instructions on thechanging this default behavior, refer to “Changing the default SMCview” on page 68.
EMC SMC and SPA Installation Guide

Using Symmetrix Management Console
Add New Host: Add a new host and provision thin storage.Create Devices: Create regular, thin, DATA and SAVE devices.Expand Storage Group: Add additional capacity to a storage group.Create Thin Pool: Create pools of DATA devices for use with Thin Provisioning.Manage Local User Accounts: View, add, or edit local SMC user accounts.Manage My SMC Account: Edit your SMC user account and password.Manage Rolls: Add, modify, and delete roles used with user authorization.
Common Tasks
Capacity Bar
Graphic representation of the Symmetrix array's physical and virtual pool capacitiesin the form a bar graph. Use the arrow buttons to toggle between physical and virtualpool capacities.
SMC not elicensed
Indicates that the array does not contain an SMC license. SMC cannot manage a Symmetrix array running Enginuity 5875 Q2 2011 SR or higher unless it contains an SMC elicense. Click the message to open a dialog from which you can license the array.
Figure 4 SMC — Dashboard view
Managing SMC views 59
60
Using Symmetrix Management Console
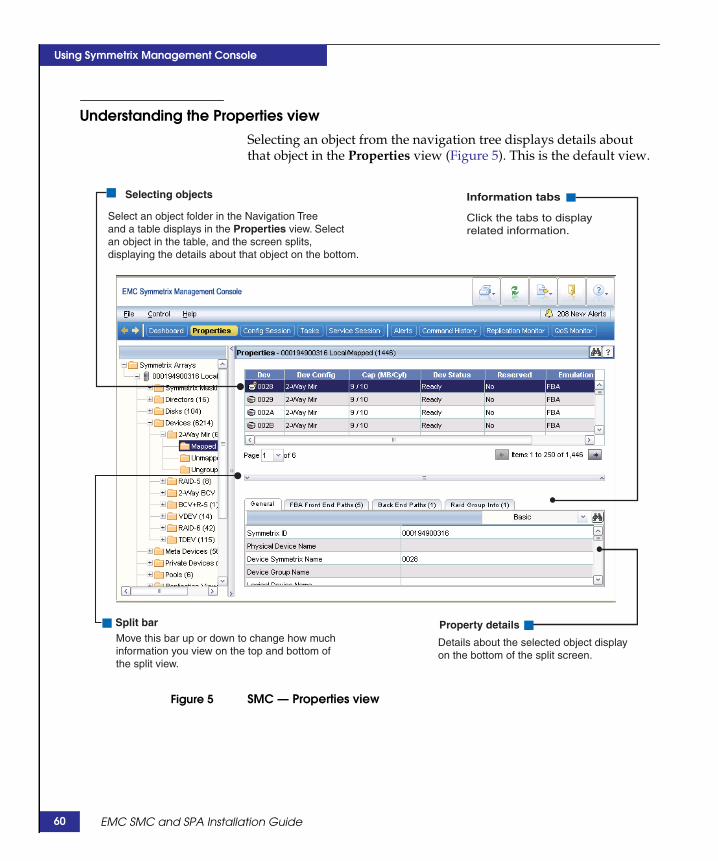
Understanding the Properties viewSelecting an object from the navigation tree displays details aboutthat object in the Properties view (Figure 5). This is the default view.
Split bar
Details about the selected object display on the bottom of the split screen.
Property details
Select an object folder in the Navigation Treeand a table displays in the Properties view. Selectan object in the table, and the screen splits,displaying the details about that object on the bottom.
Selecting objects
Click the tabs to display related information.
Information tabs
Move this bar up or down to change how much information you view on the top and bottom of the split view.
Figure 5 SMC — Properties view
EMC SMC and SPA Installation Guide
Using Symmetrix Management Console
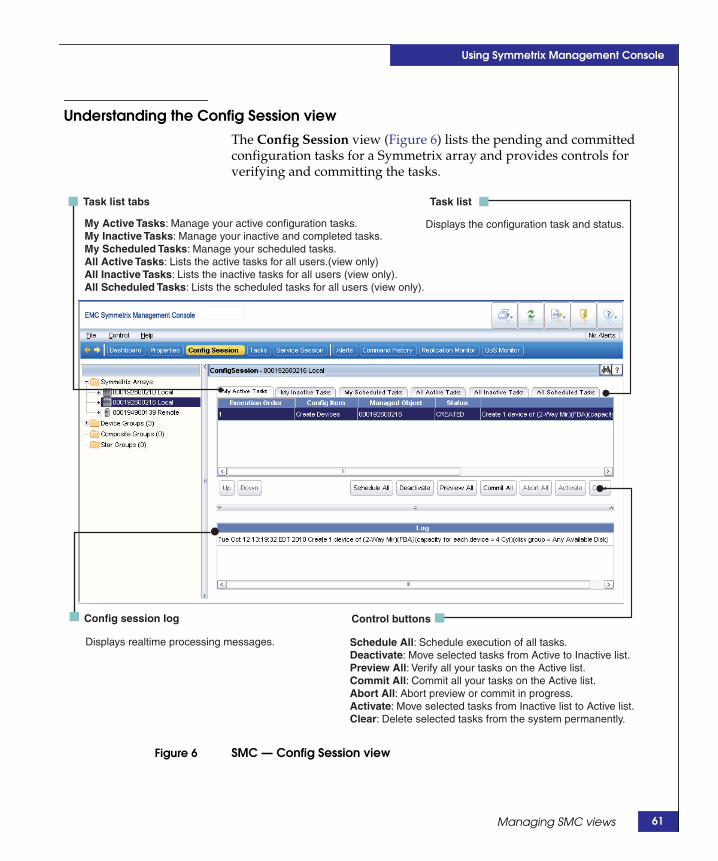
Understanding the Config Session viewThe Config Session view (Figure 6) lists the pending and committedconfiguration tasks for a Symmetrix array and provides controls forverifying and committing the tasks.
Displays the configuration task and status.
Displays realtime processing messages.
Config session log
Schedule All: Schedule execution of all tasks.Deactivate: Move selected tasks from Active to Inactive list.Preview All: Verify all your tasks on the Active list.Commit All: Commit all your tasks on the Active list.Abort All: Abort preview or commit in progress.Activate: Move selected tasks from Inactive list to Active list.Clear: Delete selected tasks from the system permanently.
Control buttons
My Active Tasks: Manage your active configuration tasks.My Inactive Tasks: Manage your inactive and completed tasks.My Scheduled Tasks: Manage your scheduled tasks.All Active Tasks: Lists the active tasks for all users.(view only)All Inactive Tasks: Lists the inactive tasks for all users (view only).All Scheduled Tasks: Lists the scheduled tasks for all users (view only).
Task list tabs Task list
Figure 6 SMC — Config Session view
Managing SMC views 61

62
Using Symmetrix Management Console
Understanding the Tasks viewThe Tasks view (Figure 7) provides quick access to common SMCtasks.
This view is customizable, in that you can minimize any number ofthe task panels (Operations, Monitoring, Administration) within theview. In addition, you can also specify this as your default SMC view.For instructions, refer to “Changing the default SMC view” onpage 68. In both cases, SMC will retain your setting for the next timeyou login.
Figure 7 SMC — Tasks view
EMC SMC and SPA Installation Guide

Using Symmetrix Management Console
Understanding the Service Session viewThe Service Session view (Figure 8) contains a list of service sessionsbeing performed by SMC.
Displays the current service sessions for the selectedSymmetrix array.
Displays realtime processing messages.
Service Session log
Run: Run the selected session.Abort: Abort the selected session.Clear: Delete the selected session.
Control buttons
Service Session list
Figure 8 SMC — Service Session view
Managing SMC views 63

64
Using Symmetrix Management Console
Understanding the Alerts viewThe Alerts view (Figure 9) displays a list of alerts for all Symmetrixarrays or the selected Symmetrix array.
Right-click an alert to view additional details on it, to acknowledge it,or to clear it.
State: Indicates whether the alert is active or acknowledged.Severity: The alert’s severity, as defined by SYMAPI.Object: The object to which the alert is related.Message: A description of the alert.Created: Timestamp for when the alert happened.Last Modified: Timestamp.Acknowledged By: A user name.Category: SYMAPI category.Code: SYMAPI error code.
Alert list
Figure 9 SMC — Alerts view
EMC SMC and SPA Installation Guide

Using Symmetrix Management Console
Understanding the Command History viewThe Command History view (Figure 10) maintains a list of actionstaken by all users on the SMC installation.
The Command History displays for all arrays or the selectedSymmetrix array.
Note: The Command History information is view only.
Time: Date and time of the task. User: SMC user who performed the task. Task: Name of the task performed. Managed Object: The ID of the object affected by the task. Status: Current status of the task (config session). Description: Summary of the task.
Command history list
Figure 10 SMC — Command History view
Managing SMC views 65

66
Using Symmetrix Management Console
Understanding the Replication Monitor viewThe Replication Monitor view (Figure 11) provides progress andstatus for thresholds that are set for replication operations.
Dashboard: Lists groups and shows thestatus of the Replication State and Device State with colors.
Replication Monitor view
General: Provides details about the replication operation.Performance: Provides I/O performance details.Graph: Provides selections for viewing utilization andworkloads over a period of time.Threshold Event: Lists any events for the replication operation.
Replication Monitor tabs
Figure 11 SMC — Replication Monitor view
EMC SMC and SPA Installation Guide

Using Symmetrix Management Console
Understanding the Quality of Service Monitor viewThe QoS Monitor view (Figure 12) provides performanceinformation for the array, a device group, a storage group, or a cachepartition.
Dashboard: QoS monitoring allows you to view an application's performance in the categories of the system, the device group, and the cache partition.
QoS Monitor view
General: Provides performance details for the selected object.Graph: Provides selections for viewing configuredmetrics over a period of time.Threshold Event: Lists any QoS events.
QoS Monitor tabs
Figure 12 SMC — QoS Monitor view
Managing SMC views 67

68
Using Symmetrix Management Console
Changing the default SMC viewBy default, SMC opens displays the Dashboard view. However, youcan change the default view to either the Properties or the Tasksview.
To change the default view:
1. Change to the Tasks view.
2. In the Administration panel, under Templates and Preferences,click Set View Preferences to open the Set View Preferencesdialog box.
3. Select the Default View (Dashboard, Properties or Tasks).
4. Click OK.
EMC SMC and SPA Installation Guide

Using Symmetrix Management Console
SMC menu barStorage configuration and management operations are performed byselecting an object (in the navigation tree or Properties view) andopening a dialog box from the menu bar. There are four pull-downmenus in the menu bar: File, Control, and Help.
File menu The File menu contains controls that are not often used.
Table 2 describes the File menu items.
Table 2 File menu
Menu item Description
Export Opens a dialog box from which you can select the contents of thenavigation tree or the view to export to a file or an image.
Refresh View Refreshes the view (from the selected object down) with the currentcontents of the Symmetrix database.
Symmetrix Discover Opens a dialog box from which you can discover the Symmetrix arrays.
Logout Terminates the user session (the server stays up).
SMC menu bar 69

70
Using Symmetrix Management Console
Control menu Most of the operations performed in SMC are done by selecting anobject, such as an array or a device, in the navigation tree or theProperties view, and then opening a control dialog box by eitherright-clicking the object or clicking the Control menu in the menubar.
In addition, you can also perform an operation on multiple objects atthe same time by either selecting a folder (e.g., Ungrouped) in thenavigation tree or using the Shift key to select multiple objects (e.g.,devices) in a view, and then right-clicking to open the Control menu.
Note: When accessing the Control menu from the folder level, the menuoptions will remain the same; however, they will be enabled/disabled basedon the selected object.
Table 3 maps the Control menu, dialog box names, and specifies theobject you must select to open the control dialog box. After selectingan object you can open the dialog with the right-click menu, or selectControl from the menu bar.
Table 3 Control menu (1 of 10)
Menu item/ Submenu Dialog box name To open the dialog, right-click
Symmetrix Admin(sub-menu)
Service
Manage Licenses
Enginuity Upgrade PreparationPerform Disk ReplacementPerform Health Check
Symmetrix ID
Symmetrix IDSymmetrix IDSymmetrix ID
View Symmetrix Audit Log Symmetrix ID
Symmetrix Lock Maintenance Symmetrix ID
Set Symmetrix Attributes Symmetrix ID
Add Hot Spare Symmetrix ID
Remove Hot Spare Data disk
Reservation Admin Symmetrix ID
Symmetrix Environment Data Symmetrix ID(running Enginuity Version 5771 andlater)
Access Controls Symmetrix ID
EMC SMC and SPA Installation Guide
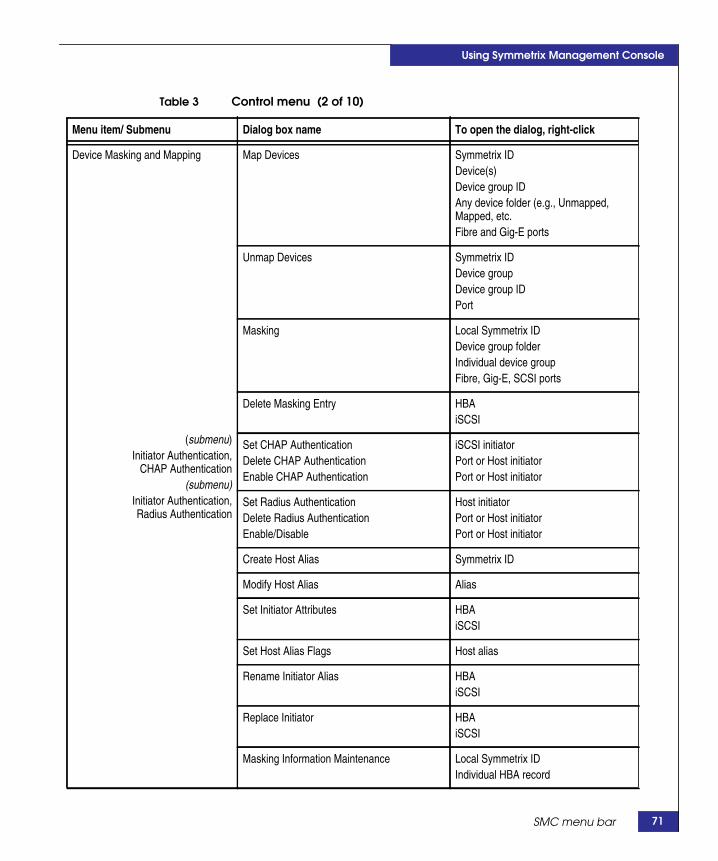
Using Symmetrix Management Console
Device Masking and Mapping
(submenu)Initiator Authentication,
CHAP Authentication(submenu)
Initiator Authentication,Radius Authentication
Map Devices Symmetrix IDDevice(s)Device group IDAny device folder (e.g., Unmapped,Mapped, etc.Fibre and Gig-E ports
Unmap Devices Symmetrix IDDevice groupDevice group IDPort
Masking Local Symmetrix IDDevice group folderIndividual device groupFibre, Gig-E, SCSI ports
Delete Masking Entry HBAiSCSI
Set CHAP AuthenticationDelete CHAP AuthenticationEnable CHAP Authentication
iSCSI initiatorPort or Host initiatorPort or Host initiator
Set Radius AuthenticationDelete Radius AuthenticationEnable/Disable
Host initiatorPort or Host initiatorPort or Host initiator
Create Host Alias Symmetrix ID
Modify Host Alias Alias
Set Initiator Attributes HBAiSCSI
Set Host Alias Flags Host alias
Rename Initiator Alias HBAiSCSI
Replace Initiator HBAiSCSI
Masking Information Maintenance Local Symmetrix IDIndividual HBA record
Table 3 Control menu (2 of 10)
Menu item/ Submenu Dialog box name To open the dialog, right-click
SMC menu bar 71
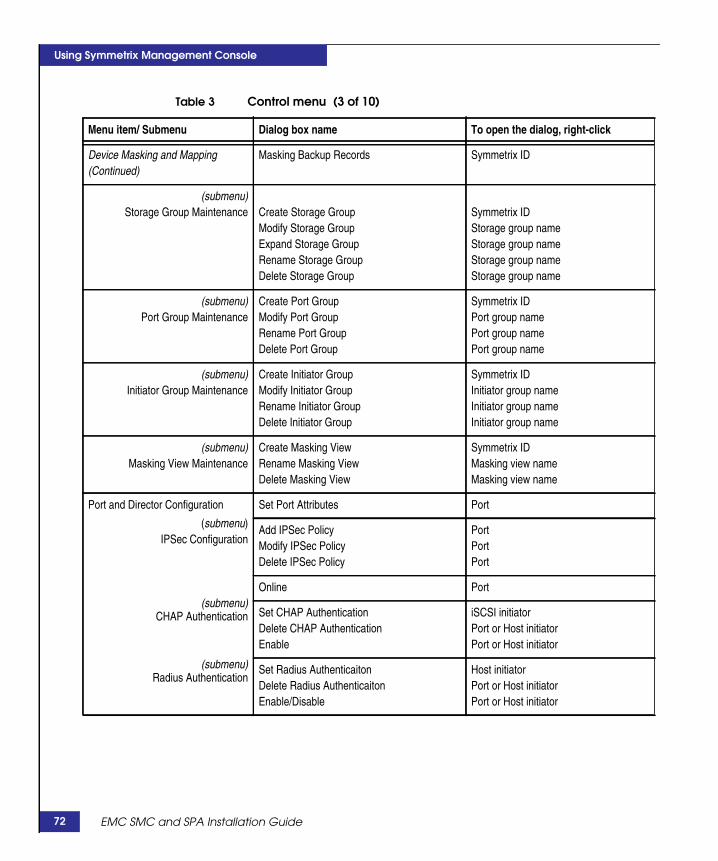
72
Using Symmetrix Management Console
Device Masking and Mapping(Continued)
Masking Backup Records Symmetrix ID
(submenu)Storage Group Maintenance Create Storage Group
Modify Storage GroupExpand Storage GroupRename Storage GroupDelete Storage Group
Symmetrix IDStorage group nameStorage group nameStorage group nameStorage group name
(submenu)Port Group Maintenance
Create Port GroupModify Port GroupRename Port GroupDelete Port Group
Symmetrix IDPort group namePort group namePort group name
(submenu)Initiator Group Maintenance
Create Initiator GroupModify Initiator GroupRename Initiator GroupDelete Initiator Group
Symmetrix IDInitiator group nameInitiator group nameInitiator group name
(submenu)Masking View Maintenance
Create Masking ViewRename Masking ViewDelete Masking View
Symmetrix IDMasking view nameMasking view name
Port and Director Configuration
(submenu)IPSec Configuration
(submenu)CHAP Authentication
(submenu)Radius Authentication
Set Port Attributes Port
Add IPSec PolicyModify IPSec PolicyDelete IPSec Policy
PortPortPort
Online Port
Set CHAP AuthenticationDelete CHAP AuthenticationEnable
iSCSI initiatorPort or Host initiatorPort or Host initiator
Set Radius AuthenticaitonDelete Radius AuthenticaitonEnable/Disable
Host initiatorPort or Host initiatorPort or Host initiator
Table 3 Control menu (3 of 10)
Menu item/ Submenu Dialog box name To open the dialog, right-click
EMC SMC and SPA Installation Guide
Using Symmetrix Management Console
Device Configuration Device Lock Maintenance Symmetrix IDDeviceDevice/Composite group
Create Device Symmetrix ID
Duplicate Device Device
Change Device Configuration Device
Set Device Attributes Device
Set Device Identifiers Device
Set Device Status DeviceDirectorDevice/Composite group
Delete Device Symmetrix IDDevice
Start Allocate/Free/Reclaim Bound thin device
Stop Allocate/Free/Reclaim Bound thin device
FBA Meta Device Configuration Form FBA Meta Symmetrix ID
Add/Remove Meta Members Device
Dissolve Meta Device
Convert Meta Device
Disk Group Configuration Rename Disk Group Disk group
Table 3 Control menu (4 of 10)
Menu item/ Submenu Dialog box name To open the dialog, right-click
SMC menu bar 73
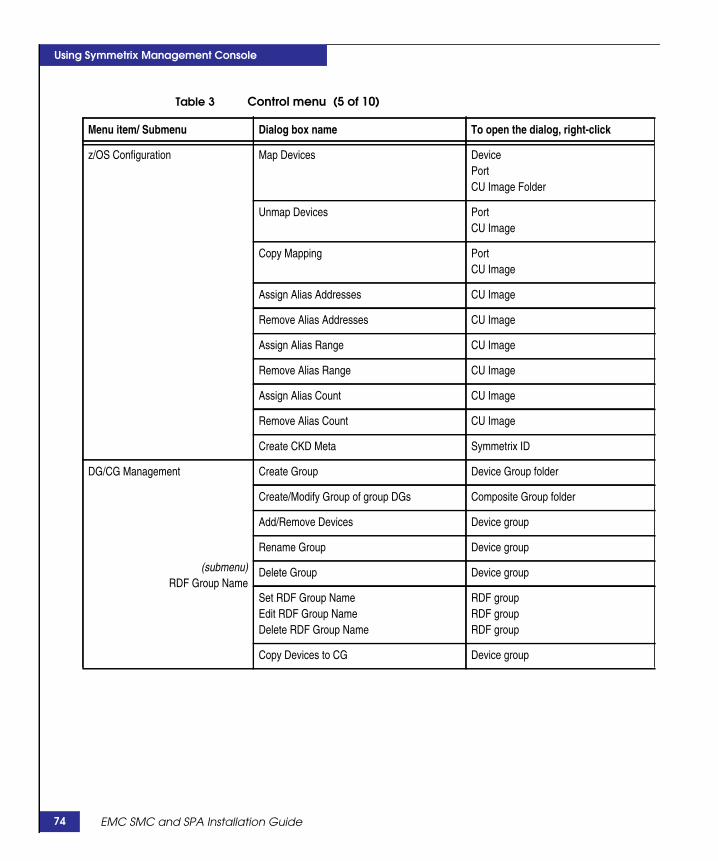
74
Using Symmetrix Management Console
z/OS Configuration Map Devices DevicePortCU Image Folder
Unmap Devices PortCU Image
Copy Mapping PortCU Image
Assign Alias Addresses CU Image
Remove Alias Addresses CU Image
Assign Alias Range CU Image
Remove Alias Range CU Image
Assign Alias Count CU Image
Remove Alias Count CU Image
Create CKD Meta Symmetrix ID
DG/CG Management
(submenu)RDF Group Name
Create Group Device Group folder
Create/Modify Group of group DGs Composite Group folder
Add/Remove Devices Device group
Rename Group Device group
Delete Group Device group
Set RDF Group NameEdit RDF Group NameDelete RDF Group Name
RDF groupRDF groupRDF group
Copy Devices to CG Device group
Table 3 Control menu (5 of 10)
Menu item/ Submenu Dialog box name To open the dialog, right-click
EMC SMC and SPA Installation Guide

Using Symmetrix Management Console
Device Pool Management
(submenu)DATA Device Management
Enable Device Device
Disable Device Device
Activate DeviceDeactivate DeviceStart Draining DeviceStop Draining Device
DATA deviceDATA deviceDATA deviceDATA device
Create Device Pool Symmetrix ID
Add/Remove Pool Members Pool member
Enable All Pool Members Device pool
Disable All Pool Members Device pool
Delete Device Pool Device pool
Expand Device Pool Device pool
Bind/Unbind Thin Devices Thin pool
Rebind Thin Devices Bound thin device
Start Write Balancing Thin pool
Stop Write Balancing Thin pool
Table 3 Control menu (6 of 10)
Menu item/ Submenu Dialog box name To open the dialog, right-click
SMC menu bar 75

76
Using Symmetrix Management Console
Replication(submenu)
Recover Point
(submenu)SRDF Configuration
(submenu)Star
(submenu)Open Replicator
(submenu)Consistency Protection
EnableDisableTerminate Session
Devices, SGs, IGs, and MVsDevices, SGs, IGs, and MVsRecover Point sessions
TimeFinder/Mirror Device group
TimeFinder/Clone Device group
TimeFinder/Snap Device group
SRDF Control Device group
SRDF Settings Device group
Create SRDF GroupRemove SRDF GroupModify SRDF GroupDelete SRDF PairMove SRDF PairSet SRDF/A Group AttributesSwap SRDF GroupConvert SRDF Devices from Static to DynamicAdd SRDF MirrorDelete SRDF Mirror
Symmetrix IDRA groupRA groupSymmetrix IDRA groupRA groupSymmetrix ID/DeviceSRDF device(s)SRDF device(s)SRDF device(s)
SRDF Controls Star GroupStar Site
Create Copy SessionSession ControlSet CeilingRemote Port
Symmetrix IDSymmetrix IDSymmetrix IDSymmetrix ID
Consistency ProtectionAdd DevicesRemove DevicesRecover CG
Composite group/RDF group
QoS Device
Migration Terminate Migration Session Migration session name
Table 3 Control menu (7 of 10)
Menu item/ Submenu Dialog box name To open the dialog, right-click
EMC SMC and SPA Installation Guide

Using Symmetrix Management Console
Tier Management Create Tier Symmetrix ID/Tier folder
Modify Tier Tier name
Rename Tier Tier name
Delete Tier Tier name
FAST(submenu)
FAST Policy Management
(submenu)FAST Control Parameters
FAST Status Report Symmetrix ID
Create PolicyModify PolicyRename PolicyDelete PolicyAssociate FAST PolicyAssociate Storage GroupEdit PriorityConfigure Cross Disk Group RuleRename Cross Disk Group RuleDelete Cross Disk Group Rule
Symmetrix ID/FAST Policies folderPolicy namePolicy namePolicy nameStorage groupPolicy namePolicy nameSymmetrix IDSymmetrix IDSymmetrix ID
Enable/Disable FASTSettingsSwap/Move ListSwap/Move HistoryFAST LogApprove Swap/Move
Symmetrix ID
Pin Devices Devices, Composite Group, or StorageGroup
Unpin Devices Devices, Composite Group, or StorageGroup
Table 3 Control menu (8 of 10)
Menu item/ Submenu Dialog box name To open the dialog, right-click
SMC menu bar 77

78
Using Symmetrix Management Console
Optimizer
(submenu)SwapMove
Start/Stop/Lock/Unlock Symmetrix ID
Enable/Disable Symmetrix ID
Settings Symmetrix ID
Approve SwapManual SwapManual MoveRollbackSwap/Move ListSwap/Move History
Symmetrix IDSymmetrix IDSymmetrix IDSymmetrix IDSymmetrix IDSymmetrix ID
Log Symmetrix ID
Priority Control and Cache Partition Create Dynamic Cache Partition Symmetrix ID
Modify Dynamic Cache Partition Cache partition
Rename Dynamic Cache Partition Cache partition
Remove Dynamic Cache Partition Cache partition
Dynamic Cache Partition Setting Symmetrix ID
Assign Dynamic Cache Partition Device(s)Device groupRDF group
Enable Symmetrix Priority Control Symmetrix ID
Assign Symmetrix Priority Device(s)Device groupSymmetrix ID
Performance Analyzer Trend Symmetrix IDDevice group
Snapshot Symmetrix IDDevice group
SRDF Migration Management Replace Migration session
Terminate Migration session
Table 3 Control menu (9 of 10)
Menu item/ Submenu Dialog box name To open the dialog, right-click
EMC SMC and SPA Installation Guide

Using Symmetrix Management Console
Virtualization Domain Management Automated Virtualization Domain SetupWizard
Virtualization Domains folder
Create Virtualization Domain Virtualization Domains folder
Modify Virtualization Domain Virtualization domain
Delete Virtualization Domain Virtualization domain
Add Thin Pool Virtualization domain
Modify Thin Pool Thin pool
Remove Thin Pool Thin pool
Add Pre-Created LUN Policy Thin pool
Modify Pre-Created LUN Policy Policy
Remove Pre-Created LUN Policy Policy
Adopt LUNs Thin pool
Alerts Details Alert
Clear Alert Alert
Acknowledge Alert Alert
Table 3 Control menu (10 of 10)
Menu item/ Submenu Dialog box name To open the dialog, right-click
SMC menu bar 79
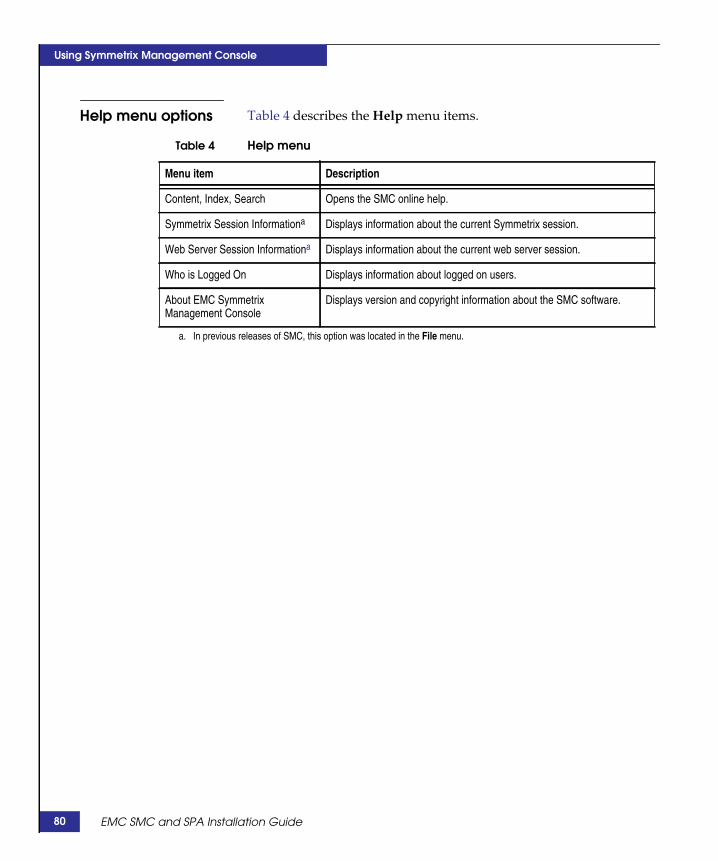
80
Using Symmetrix Management Console
Help menu options Table 4 describes the Help menu items.
Table 4 Help menu
Menu item Description
Content, Index, Search Opens the SMC online help.
Symmetrix Session Informationa
a. In previous releases of SMC, this option was located in the File menu.
Displays information about the current Symmetrix session.
Web Server Session Informationa Displays information about the current web server session.
Who is Logged On Displays information about logged on users.
About EMC SymmetrixManagement Console
Displays version and copyright information about the SMC software.
EMC SMC and SPA Installation Guide

Using Symmetrix Management Console
SMC dialog boxesStorage management and configuration operations are set withincontrol dialog boxes. When a dialog has OK, the operation or task iscompleted immediately. When a dialog has the button Add to ConfigSession List, the task is moved to the Config Session view forprocessing.
Click OK to perform the action and closethe dialog box.
Click Cancel to closethe dialog box withoutperforming the action.
Click Add to Config Session List to send the action to the Config Session view for processing.
Opens the Filter dialogfrom which you specify criteria to narrow the devices displayed in theAvailable Devices list.
To select multiple itemsin a continuous range, holdthe Shift key while clickingthe first and last items inthe range.
To select multiple itemsin non continuous ranges, hold the CTRL key whileclicking the individual items.
SMC dialog boxes 81
82
Using Symmetrix Management Console
EMC SMC and SPA Installation Guide

5
Using SymmetrixPerformance Analyzer
Invisible Body Tag
This chapter introduces Symmetrix Performance Analyzer, describeseach of the views, and explains how to configure SPA using theAdministration menu.
◆ Opening Symmetrix Performance Analyzer.................................. 84◆ SPA Overview .................................................................................... 85
Using Symmetrix Performance Analyzer 83
84
Using Symmetrix Performance Analyzer
Opening Symmetrix Performance AnalyzerThe SPA installation is layered over the SMC software, therefore themost common gateway to SPA is through SMC, however, SPA canalso be opened independently of SMC.
From SMC Right-click an object from the SMC navigation tree, such as aSymmetrix array, and select Performance Analyzer, and thenSnapshot, or Trend.
From a web browser Open the web browser and enter:
http://localhost:7070/spaor
https://localhost:8443/spa
The EMC Symmetrix Performance Analyzer login window appears.
Type your SMC Username and Password. When using SPA, youhave the same access controls and privileges as you have in SMC.
EMC SMC and SPA Installation Guide

Using Symmetrix Performance Analyzer
SPA OverviewSPA provides these views for analyzing Symmetrix array data.
◆ Dashboards — The Dashboards view provides supplied views ofthe Symmetrix arrays, and allows you to define and manage yourown dashboard. A dashboard can contain charts or a Symmetrixheat map.
◆ Real Time — The Real Time view provides high frequency datacollection and displays the selected metrics as they becomeavailable. This view also allows for data saves for a 1-hour timewindow.
◆ Diagnostic — The Diagnostic view analyzes high- and low-levelmetrics. It provides an intuitive root cause analysis engine thatprovides access to all available metrics and includes compositecomparison charts of related metrics. It also has device-levelviews, and typically focuses on a short time, such as a couple ofhours.
◆ Snapshot — The Snapshot view displays a calculation of thecollected data over time and shows the relationship between thephysical (array, disk, director) and logical (device group,application) components of the array.
◆ Trend — The Trend view can best show the consumption ofresources over time. The Trend view also supports linearprojection lines, which can be used with user-defined thresholdsas the basis for capacity planning.
In addition, there are several dialogs that you can configure beforeusing SPA, as follows:
Table 5 SPA Administration dialog box descriptions
Administration dialog box Description
Data Collection Registration Register the Symmetrix arrays for data collection.
Set Global Policy Set the data saving requirements, such as polling times.
System Alerts Activate e-mail alerts for critical database errors, low disk space for SPAdata, missing real-time data, and missing diagnostic data. (E-mailcontacts are set in SMC.)
Thresholds and Alerts The performance thresholds that you set become the defaults in the AlertConfiguration dialog box. Create both in one dialog.
SPA Overview 85

86
Using Symmetrix Performance Analyzer
Alert Management Create, modify, and delete alerts for threshold breaches.
Real Time Trace Management Schedule a real time data trace.
Query Management Query the SPA database ad hoc or on a schedule and export the results.
Metric Management Customize the key performance indicators for your environment. Filterany nonessential metrics from the SPA view.
User Preferences Set the default time range for the Snapshot and Trend views only. Thetime range can be adjusted in each SPA view.
Thresholds and Alerts Select one of the following:• Threshold Alert and Management to customize system-wide
thresholds and tie them to e-mail alerts.• Default Thresholds to view the current threshold settings, and
optionally restore the thresholds to the defaults.• Restore Default Settings to open a confirmation that you want to
restore all the thresholds to the defaults.
Settings Export customized threshold values to an XML file, which can later beimported to other SPA systems in the environment.
User Defined Dashboards Define your own SPA dashboard; add charts or a Symmetrix array heatmap. Modify existing dashboards. Create a folder structure for heatmaps.
Database Management Backup and restore the SPA database.
Table 5 SPA Administration dialog box descriptions
Administration dialog box Description
EMC SMC and SPA Installation Guide

Using Symmetrix Performance Analyzer
Dashboards viewThe Dashboards view (Figure 13) provides a quick overall look at thestorage environment. SPA provides a few dashboards, and newdashboards can be user-defined and organized in folders.
Dashboards display in the navigation tree.Use the right-click or Administration menu toadd, modify, or organize your dashboards.
This dashboard displays a heat mapof one entire Symmetrix; front-end directorsand ports, cache, back-end directors and portsand the disk distribution.
Heat MapDashboards
Figure 13 SPA — Dashboards view
SPA Overview 87

88
Using Symmetrix Performance Analyzer
Real Time viewUse the Real Time view (Figure 14) to analyze an hour ofhigh-frequency data (2 - 5 second data points).
Format: Represents a rangeof counts that SPA collects.in Real Time, the data displays in very high frequency (2 seconds).The Format option allows tables to show minimum and maximum data that is averaged out in 5 or 10 minutes intervals.
Format
Time Range: Displays a drop-downlist of saved captures.Capture: Saves the previous hour’sdata in a file.Selected Time Range: Allows a scrollthrough an hour time range.
Time Range
The Explore (tab) view provides additionalperformance metrics you can use to createyour own combinations of metrics in a chart.Explore charts/graphs can be saved, printed,and deleted.
Explore Chart display
GEN-001244
User-defined charts display in this area.When needed, a scroll bar allows easyviewing for multiple charts.
Figure 14 SPA — Real Time view
EMC SMC and SPA Installation Guide
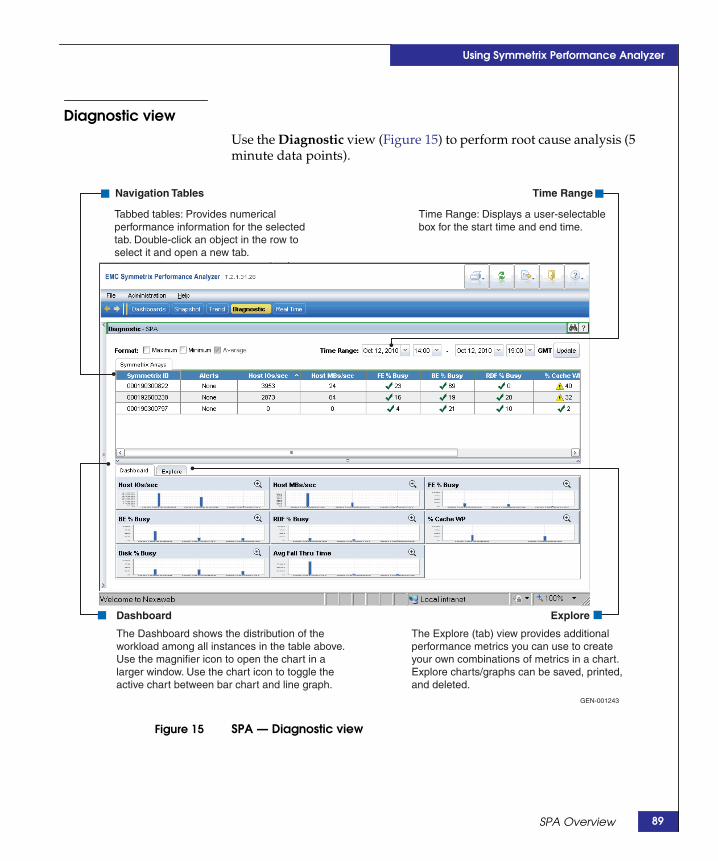
Using Symmetrix Performance Analyzer
Diagnostic viewUse the Diagnostic view (Figure 15) to perform root cause analysis (5minute data points).
Tabbed tables: Provides numericalperformance information for the selectedtab. Double-click an object in the row toselect it and open a new tab.
Navigation Tables
Time Range: Displays a user-selectablebox for the start time and end time.
Time Range
The Dashboard shows the distribution of the workload among all instances in the table above.Use the magnifier icon to open the chart in a larger window. Use the chart icon to toggle theactive chart between bar chart and line graph.
Dashboard
The Explore (tab) view provides additionalperformance metrics you can use to createyour own combinations of metrics in a chart.Explore charts/graphs can be saved, printed,and deleted.
Explore
GEN-001243
Figure 15 SPA — Diagnostic view
SPA Overview 89

90
Using Symmetrix Performance Analyzer
Snapshot ViewUse the Snapshot view (Figure 16) to evaluate system and dataperformance over time (15 minute data points).
Quickly change the time range onthe view. Set the default time rangein the Administration menu.
Time RangeDashboards: Create your own SPA view.Snapshot: Displays default charts for time selected.Trend: Displays performance trends for planning.Diagnostic: Displays metrics for root cause analysis.Real Time: Displays high frequency data pointsfor analysis.
View Bar
The navigation tree is the roadmap to your storage array and devices. It contains folders and objects. The navigation tree is used in Snapshot and Trendviews; tabular navigation is used in Real Time andDiagnostic views.
Navigation Tree
The graphs in this view display performance data organized by physical hardware (top),logical software (middle), and time (bottom).
Performance Details
GEN-001245
Figure 16 SPA — Snapshot view
EMC SMC and SPA Installation Guide

Using Symmetrix Performance Analyzer
Trend view Use the Trend view (Figure 17) for trending and capacity planning.
Displays performance datafor capacity planning and trending.
Trend ViewTime Range: Displays a user-selectablebox for the start time and end time.
Time Range
Navigation Tree
Left icon: Toggle chart from bar chart to line chart.Middle icon: Open linear projection; set forecastpoints and show thresholds.Right icon: Open chart in larger, separate window.
Trend Chart Icons
GEN-001246
The navigation tree contains folders and objects. Each folder contains a collection of objects, such as disks, directors, device groups, and pools. Use the navigation tree to find objects in Snapshotand Trend views.
Figure 17 SPA — Trend view
SPA Overview 91

92
Using Symmetrix Performance Analyzer
EMC SMC and SPA Installation Guide

A
Security features
This appendix provides a brief overview of the security features usedto secure access to SMC, SPA, and Symmetrix arrays. The SMC helpsystem contains specific configuration procedures required to enablethese features. References to those procedures are provided whereappropriate.
◆ Authentication.................................................................................... 94◆ Authorization ..................................................................................... 95
Security features 93

94
Security features
AuthenticationSMC/SPA supports the following types of authentication:
◆ Windows (local and domain based): Users login with Windowsdomain\username and password (if they have a Windowsaccount on the SMC server).
◆ LDAP: Users login with their LDAP-SSL username and password(if they have a user account stored on a LDAP-SSL server).
To use this method, an SMC Administrator or SecurityAdminmust set up LDAP-SSL authentication in SMC. Configuringauthentication in the SMC online help contains instructions.
◆ Local SMC users: Users login with their SMC username andpassword (if they have a local SMC user account).
To use this method, an SMC Initial Setup User, Administrator, orSecurityAdmin must create a local SMC user account for the user.Local user accounts are stored locally on the SMC server host andwork in much the same way as the other methods to validate usercredentials. Adding local SMC user accounts in the SMC online helpcontains instructions.
EMC SMC and SPA Installation Guide

Security features
AuthorizationUser authorization is a tool for restricting the managementoperations users can perform on a Symmetrix array. By default,authorization on a Symmetrix array is enabled for SMC users,regardless of whether it has been enabled on the Symmetrix array.
When configuring user authorization, an Administrator orSecurityAdmin maps individual users or groups of users to specificroles, which determine the operations the users can perform.
Roles are typically set for an entire Symmetrix array. However, whenadding roles for use with the Storage Pool Management (SPM)feature, they are set for the component level (thin pool and storagegroup). Understanding Storage Pool Management in the SMC onlinehelp contains more information on SPM.
User roles The following introduces the available roles. Roles and their associatedpermissions in the SMC online help provides more details on thepermissions associated with each role.
◆ None — Provides no permissions.
◆ Monitor — Performs read-only (passive) operations on aSymmetrix array excluding the ability to read the audit log orAccess Control definitions.
◆ StorageAdmin — Performs all management (active or control)operations on a Symmetrix array in addition to all Monitoroperations. This role does not allow users to perform securityoperations.
◆ Administrator — Performs all operations on a Symmetrix array,including security operations in addition to all StorageAdminand Monitor operations.
◆ SecurityAdmin — Performs security operations on a Symmetrixarray in addition to all Monitor operations.
◆ Auditor — Grants the ability to view, but not modify, securitysettings for a Symmetrix array (including reading the audit log,symacl list, and symauth) in addition to all Monitor operations.This is the minimum role required to view the Symmetrix auditlog.
Authorization 95
96
Security features
In addition to the above user roles, SMC includes two administrativeroles:
◆ SMC Initial Setup User — Defined during installation, thistemporary role provides administrator-like permissions for thepurpose of adding local users and roles to SMC. For moreinformation on the Initial Setup User, see the online help.
◆ StorageAdmin - Virtualization Domain — Exists for the solepurpose of setting up an Storage Pool Management environment.
Individual and group rolesUsers gain access to a Symmetrix array or component either directlythrough a role assignment and/or indirectly through membership ina user group that has a role assignment.
User groups enable administrators to assign roles to multiple userssimultaneously. User groups are created on the SMC server accordingto its operating system and assigned roles with SMC.
If a user has two different role assignments (one as an individual andone as a member of a group), the permissions assigned to the userwill be combined. For example, if a user is assigned a Monitor roleand a StorageAdmin role through a group, the user will be grantedMonitor and StorageAdmin rights.
User IDs Users and user groups are mapped to their respective roles by IDs.These IDs consist of a three-part string in the form:
Type:Domain\Name
Where:
Type Specifies the type of security authority used toauthenticate the user or group. Possible types are:
L Indicates a user or group authenticated byLDAP. In this case, Domain specifies thedomain controller on the LDAP server. Forexample:
L:danube.com\Finance
Indicates that user group Finance logged inthrough domain controller danube.com.
EMC SMC and SPA Installation Guide

Security features
Within role definitions, IDs can be either fully qualified (as above),partially qualified, or unqualified. When the Domain portion of the IDstring is an asterisk (*), the asterisk is treated as a wildcard, meaningany host or domain.
Note: When configuring group access, the Domain portion of the ID must befully qualified.
C Indicates a user or group authenticated bythe SMC server. For example:
C:Boston\Legal
Indicates that user group Legal logged inthrough SMC sever Boston.
H Indicates a user or group authenticated bylogging into a local account on a Windowshost. In this case, Domain specifies thehostname. For example:
H:jupiter\mason
Indicates that user mason logged in on hostjupiter.
D Indicates a user or group authenticated bya Windows domain. In this case, Domainspecifies the domain or realm name. Forexample:
D:sales\putman
Indicates user putman logged in through aWindows domain sales.
V Indicates a user or group authenticated bya virtualization domain. In this case,Domain specifies virtualization domainname.
Name Specifies the username relative to that authority. Itcannot be longer than 32 characters and spaces areallowed if delimited with quotes. Usernames can befor individual users or user groups.
Authorization 97

98
Security features
For example:
D:ENG\jones Fully qualified path with a domain andusername (for individual domain users).
D:ENG.xyz.com\ExampleGroup
Fully qualified domain name and group name(for domain groups).
D:*\jones Partially qualified that matches username joneswith any domain.
H:HOST\jones Fully qualified path with a hostname andusername.
H:*\jones Partially qualified that matches username joneswithin any host.
jones Unqualified username that matches any jones inany domain on any host.
In the event that a user is matched by more than one mapping, theuser authorization mechanism uses the more specific mapping. If anexact match (e.g., D:sales\putman) is found, that is used; if a partialmatch (e.g., D:*\putman) is found, that is used; if an unqualifiedmatch (e.g., putman) is found, that is used; otherwise, the user isassigned a role of None.
EMC SMC and SPA Installation Guide

A
Third-Party Copyrightnotices
This appendix contains third-party copyright notices.
◆ GNU LESSER GENERAL PUBLIC LICENSE.............................. 100◆ MySQL............................................................................................... 111
Third-Party Copyright notices 99

100
Third-Party Copyright notices
GNU LESSER GENERAL PUBLIC LICENSEVersion 2.1, February 1999
Copyright (C) 1991, 1999 Free Software Foundation, Inc.
59 Temple Place, Suite 330, Boston, MA 02111-1307 USA
Everyone is permitted to copy and distribute verbatim copies of thislicense document, but changing it is not allowed.
[This is the first released version of the Lesser GPL. It also counts asthe successor of the GNU Library Public License, version 2, hence theversion number 2.1.]
PreambleThe licenses for most software are designed to take away yourfreedom to share and change it. By contrast, the GNU General PublicLicenses are intended to guarantee your freedom to share and changefree software--to make sure the software is free for all its users.
This license, the Lesser General Public License, applies to somespecially designated software packages--typically libraries--of theFree Software Foundation and other authors who decide to use it.You can use it too, but we suggest you first think carefully aboutwhether this license or the ordinary General Public License is thebetter strategy to use in any particular case, based on theexplanations below.
When we speak of free software, we are referring to freedom of use,not price. Our General Public Licenses are designed to make surethat you have the freedom to distribute copies of free software (andcharge for this service if you wish); that you receive source code orcan get it if you want it; that you can change the software and usepieces of it in new free programs; and that you are informed that youcan do these things.
To protect your rights, we need to make restrictions that forbiddistributors to deny you these rights or to ask you to surrender theserights. These restrictions translate to certain responsibilities for you ifyou distribute copies of the library or if you modify it.
For example, if you distribute copies of the library, whether gratis orfor a fee, you must give the recipients all the rights that we gave you.You must make sure that they, too, receive or can get the source code.If you link other code with the library, you must provide completeobject files to the recipients, so that they can relink them with the
EMC SMC and SPA Installation Guide
Third-Party Copyright notices
library after making changes to the library and recompiling it. Andyou must show them these terms so they know their rights.
We protect your rights with a two-step method: (1) we copyright thelibrary, and (2) we offer you this license, which gives you legalpermission to copy, distribute and/or modify the library.
To protect each distributor, we want to make it very clear that there isno warranty for the free library. Also, if the library is modified bysomeone else and passed on, the recipients should know that whatthey have is not the original version, so that the original author'sreputation will not be affected by problems that might be introducedby others.
Finally, software patents pose a constant threat to the existence of anyfree program. We wish to make sure that a company cannoteffectively restrict the users of a free program by obtaining arestrictive license from a patent holder. Therefore, we insist that anypatent license obtained for a version of the library must be consistentwith the full freedom of use specified in this license.
Most GNU software, including some libraries, is covered by theordinary GNU General Public License. This license, the GNU LesserGeneral Public License, applies to certain designated libraries, and isquite different from the ordinary General Public License. We use thislicense for certain libraries in order to permit linking those librariesinto non-free programs.
When a program is linked with a library, whether statically or using ashared library, the combination of the two is legally speaking acombined work, a derivative of the original library. The ordinaryGeneral Public License therefore permits such linking only if theentire combination fits its criteria of freedom. The Lesser GeneralPublic License permits more lax criteria for linking other code withthe library.
We call this license the "Lesser" General Public License because itdoes Less to protect the user's freedom than the ordinary GeneralPublic License. It also provides other free software developers Lessof an advantage over competing non-free programs. Thesedisadvantages are the reason we use the ordinary General PublicLicense for many libraries. However, the Lesser license providesadvantages in certain special circumstances.
For example, on rare occasions, there may be a special need toencourage the widest possible use of a certain library, so that itbecomes a de-facto standard. To achieve this, non-free programs
GNU LESSER GENERAL PUBLIC LICENSE 101

102
Third-Party Copyright notices
must be allowed to use the library. A more frequent case is that a freelibrary does the same job as widely used non-free libraries. In thiscase, there is little to gain by limiting the free library to free softwareonly, so we use the Lesser General Public License.
In other cases, permission to use a particular library in non-freeprograms enables a greater number of people to use a large body offree software. For example, permission to use the GNU C Library innon-free programs enables many more people to use the whole GNUoperating system, as well as its variant, the GNU/Linux operatingsystem.
Although the Lesser General Public License is Less protective of theusers' freedom, it does ensure that the user of a program that is linkedwith the Library has the freedom and the wherewithal to run thatprogram using a modified version of the Library.
The precise terms and conditions for copying, distribution andmodification follow. Pay close attention to the difference between a"work based on the library" and a "work that uses the library". Theformer contains code derived from the library, whereas the lattermust be combined with the library in order to run.
GNU LESSER GENERAL PUBLIC LICENSE
TERMS AND CONDITIONS FOR COPYING, DISTRIBUTION ANDMODIFICATION
0. This License Agreement applies to any software library or otherprogram which contains a notice placed by the copyright holder orother authorized party saying it may be distributed under the termsof this Lesser General Public License (also called "this License"). Eachlicensee is addressed as "you".
A "library" means a collection of software functions and/or dataprepared so as to be conveniently linked with application programs(which use some of those functions and data) to form executables.
The "Library", below, refers to any such software library or workwhich has been distributed under these terms. A "work based on theLibrary" means either the Library or any derivative work undercopyright law: that is to say, a work containing the Library or aportion of it, either verbatim or with modifications and/or translatedstraightforwardly into another language. (Hereinafter, translation isincluded without limitation in the term "modification".)
"Source code" for a work means the preferred form of the work formaking modifications to it. For a library, complete source code
EMC SMC and SPA Installation Guide

Third-Party Copyright notices
means all the source code for all modules it contains, plus anyassociated interface definition files, plus the scripts used to controlcompilation and installation of the library.
Activities other than copying, distribution and modification are notcovered by this License; they are outside its scope. The act of runninga program using the Library is not restricted, and output from such aprogram is covered only if its contents constitute a work based on theLibrary (independent of the use of the Library in a tool for writing it).Whether that is true depends on what the Library does and what theprogram that uses the Library does.
1. You may copy and distribute verbatim copies of the Library'scomplete source code as you receive it, in any medium, providedthat you conspicuously and appropriately publish on each copyan appropriate copyright notice and disclaimer of warranty; keepintact all the notices that refer to this License and to the absence ofany warranty; and distribute a copy of this License along with theLibrary.
You may charge a fee for the physical act of transferring a copy,and you may at your option offer warranty protection inexchange for a fee.
2. You may modify your copy or copies of the Library or anyportion of it, thus forming a work based on the Library, and copyand distribute such modifications or work under the terms ofSection 1 above, provided that you also meet all of theseconditions:
a. The modified work must itself be a software library.
b. You must cause the files modified to carry prominent noticesstating that you changed the files and the date of any change.
c. You must cause the whole of the work to be licensed at nocharge to all third parties under the terms of this License.
d. If a facility in the modified Library refers to a function or atable of data to be supplied by an application program thatuses the facility, other than as an argument passed when thefacility is invoked, then you must make a good faith effort toensure that, in the event an application does not supply suchfunction or table, the facility still operates, and performswhatever part of its purpose remains meaningful.
GNU LESSER GENERAL PUBLIC LICENSE 103
104
Third-Party Copyright notices
(For example, a function in a library to compute square rootshas a purpose that is entirely well-defined independent of theapplication. Therefore, Subsection 2d requires that anyapplication-supplied function or table used by this functionmust be optional: if the application does not supply it, thesquare root function must still compute square roots.)
These requirements apply to the modified work as a whole. Ifidentifiable sections of that work are not derived from theLibrary, and can be reasonably considered independent andseparate works in themselves, then this License, and its terms,do not apply to those sections when you distribute them asseparate works. But when you distribute the same sections aspart of a whole which is a work based on the Library, thedistribution of the whole must be on the terms of this License,whose permissions for other licensees extend to the entirewhole, and thus to each and every part regardless of whowrote it.
Thus, it is not the intent of this section to claim rights orcontest your rights to work written entirely by you; rather, theintent is to exercise the right to control the distribution ofderivative or collective works based on the Library.
In addition, mere aggregation of another work not based onthe Library with the Library (or with a work based on theLibrary) on a volume of a storage or distribution medium doesnot bring the other work under the scope of this License.
3. You may opt to apply the terms of the ordinary GNU GeneralPublic License instead of this License to a given copy of theLibrary. To do this, you must alter all the notices that refer to thisLicense, so that they refer to the ordinary GNU General PublicLicense, version 2, instead of to this License. (If a newer versionthan version 2 of the ordinary GNU General Public License hasappeared, then you can specify that version instead if you wish.)Do not make any other change in these notices.
Once this change is made in a given copy, it is irreversible for thatcopy, so the ordinary GNU General Public License applies to allsubsequent copies and derivative works made from that copy.
This option is useful when you wish to copy part of the code ofthe Library into a program that is not a library.
EMC SMC and SPA Installation Guide

Third-Party Copyright notices
4. You may copy and distribute the Library (or a portion orderivative of it, under Section 2) in object code or executable formunder the terms of Sections 1 and 2 above provided that youaccompany it with the complete corresponding machine-readablesource code, which must be distributed under the terms ofSections 1 and 2 above on a medium customarily used forsoftware interchange.
If distribution of object code is made by offering access to copyfrom a designated place, then offering equivalent access to copythe source code from the same place satisfies the requirement todistribute the source code, even though third parties are notcompelled to copy the source along with the object code.
5. A program that contains no derivative of any portion of theLibrary, but is designed to work with the Library by beingcompiled or linked with it, is called a "work that uses theLibrary". Such a work, in isolation, is not a derivative work of theLibrary, and therefore falls outside the scope of this License.
However, linking a "work that uses the Library" with the Librarycreates an executable that is a derivative of the Library (because itcontains portions of the Library), rather than a "work that uses thelibrary". The executable is therefore covered by this License.Section 6 states terms for distribution of such executables.
When a "work that uses the Library" uses material from a headerfile that is part of the Library, the object code for the work may bea derivative work of the Library even though the source code isnot. Whether this is true is especially significant if the work canbe linked without the Library, or if the work is itself a library. Thethreshold for this to be true is not precisely defined by law.
If such an object file uses only numerical parameters, datastructure layouts and accessors, and small macros and smallinline functions (ten lines or less in length), then the use of theobject file is unrestricted, regardless of whether it is legally aderivative work. (Executables containing this object code plusportions of the Library will still fall under Section 6.)
Otherwise, if the work is a derivative of the Library, you maydistribute the object code for the work under the terms of Section6. Any executables containing that work also fall under Section 6,whether or not they are linked directly with the Library itself.
GNU LESSER GENERAL PUBLIC LICENSE 105

106
Third-Party Copyright notices
6. As an exception to the Sections above, you may also combine orlink a "work that uses the Library" with the Library to produce awork containing portions of the Library, and distribute that worknder terms of your choice, provided that the terms permitmodification of the work for the customer's own use and reverseengineering for debugging such modifications.
You must give prominent notice with each copy of the work thatthe Library is used in it and that the Library and its use arecovered by this License. You must supply a copy of this License.If the work during execution displays copyright notices, youmust include the copyright notice for the Library among them, aswell as a reference directing the user to the copy of this License.Also, you must do one of these things:
a. Accompany the work with the complete correspondingmachine-readable source code for the Library includingwhatever changes were used in the work (which must bedistributed under Sections 1 and 2 above); and, if the work isan executable linked with the Library, with the completemachine-readable "work that uses the Library", as object codeand/or source code, so that the user can modify the Libraryand then relink to produce a modified executable containingthe modified Library. (It is understood that the user whochanges the contents of definitions files in the Library will notnecessarily be able to recompile the application to use themodified definitions.)
b. Use a suitable shared library mechanism for linking with theLibrary. A suitable mechanism is one that (1) uses at run timea copy of the library already present on the user's computersystem, rather than copying library functions into theexecutable, and (2) will operate properly with a modifiedversion of the library, if the user installs one, as long as themodified version is interface-compatible with the version thatthe work was made with.
c. Accompany the work with a written offer, valid for at leastthree years, to give the same user the materials specified inSubsection 6a, above, for a charge no more than the cost ofperforming this distribution.
d. If distribution of the work is made by offering access to copyfrom a designated place, offer equivalent access to copy theabove specified materials from the same place.
EMC SMC and SPA Installation Guide

Third-Party Copyright notices
e. Verify that the user has already received a copy of thesematerials or that you have already sent this user a copy.
For an executable, the required form of the "work that uses theLibrary" must include any data and utility programs neededfor reproducing the executable from it. However, as a specialexception, the materials to be distributed need not includeanything that is normally distributed (in either source orbinary form) with the major components (compiler, kernel,and so on) of the operating system on which the executableruns, unless that component itself accompanies the executable.
It may happen that this requirement contradicts the licenserestrictions of other proprietary libraries that do not normallyaccompany the operating system. Such a contradiction meansyou cannot use both them and the Library together in anexecutable that you distribute.
7. You may place library facilities that are a work based on theLibrary side-by-side in a single library together with other libraryfacilities not covered by this License, and distribute such acombined library, provided that the separate distribution of thework based on the Library and of the other library facilities isotherwise permitted, and provided that you do these two things:
a. Accompany the combined library with a copy of the samework based on the Library, uncombined with any other libraryfacilities. This must be distributed under the terms of theSections above.
b. Give prominent notice with the combined library of the factthat part of it is a work based on the Library, and explainingwhere to find the accompanying uncombined form of thesame work.
8. You may not copy, modify, sublicense, link with, or distribute theLibrary except as expressly provided under this License. Anyattempt otherwise to copy, modify, sublicense, link with, ordistribute the Library is void, and will automatically terminateyour rights under this License. However, parties who havereceived copies, or rights, from you under this License will nothave their licenses terminated so long as such parties remain infull compliance.
9. You are not required to accept this License, since you have notsigned it. However, nothing else grants you permission tomodify or distribute the Library or its derivative works. These
GNU LESSER GENERAL PUBLIC LICENSE 107

108
Third-Party Copyright notices
actions are prohibited by law if you do not accept this License.Therefore, by modifying or distributing the Library (or any workbased on the Library), you indicate your acceptance of thisLicense to do so, and all its terms and conditions for copying,distributing or modifying the Library or works based on it.
10. Each time you redistribute the Library (or any work based on theLibrary), the recipient automatically receives a license from theoriginal licensor to copy, distribute, link with or modify theLibrary subject to these terms and conditions. You may notimpose any further restrictions on the recipients' exercise of therights granted herein.
You are not responsible for enforcing compliance by third partieswith this License.
11. If, as a consequence of a court judgment or allegation of patentinfringement or for any other reason (not limited to patentissues), conditions are imposed on you (whether by court order,agreement or otherwise) that contradict the conditions of thisLicense, they do not excuse you from the conditions of thisLicense. If you cannot distribute so as to satisfy simultaneouslyyour obligations under this License and any other pertinentobligations, then as a consequence you may not distribute theLibrary at all. For example, if a patent license would not permitroyalty-free redistribution of the Library by all those who receivecopies directly or indirectly through you, then the only way youcould satisfy both it and this License would be to refrain entirelyfrom distribution of the Library.
If any portion of this section is held invalid or unenforceableunder any particular circumstance, the balance of the section isintended to apply, and the section as a whole is intended to applyin other circumstances.
It is not the purpose of this section to induce you to infringe anypatents or other property right claims or to contest validity of anysuch claims; this section has the sole purpose of protecting theintegrity of the free software distribution system which isimplemented by public license practices. Many people havemade generous contributions to the wide range of softwaredistributed through that system in reliance on consistentapplication of that system; it is up to the author/donor to decideif he or she is willing to distribute software through any othersystem and a licensee cannot impose that choice.
EMC SMC and SPA Installation Guide

Third-Party Copyright notices
This section is intended to make thoroughly clear what isbelieved to be a consequence of the rest of this License.
12. If the distribution and/or use of the Library is restricted in certaincountries either by patents or by copyrighted interfaces, theoriginal copyright holder who places the Library under thisLicense may add an explicit geographical distribution limitationexcluding those countries, so that distribution is permitted onlyin or among countries not thus excluded. In such case, thisLicense incorporates the limitation as if written in the body of thisLicense.
13. The Free Software Foundation may publish revised and/or newversions of the Lesser General Public License from time to time.Such new versions will be similar in spirit to the present version,but may differ in detail to address new problems or concerns.
Each version is given a distinguishing version number. If theLibrary specifies a version number of this License which appliesto it and "any later version", you have the option of following theterms and conditions either of that version or of any later versionpublished by the Free Software Foundation. If the Library doesnot specify a license version number, you may choose any versionever published by the Free Software Foundation.
14. If you wish to incorporate parts of the Library into other freeprograms whose distribution conditions are incompatible withthese, write to the author to ask for permission. For softwarewhich is copyrighted by the Free Software Foundation, write tothe Free Software Foundation; we sometimes make exceptions forthis. Our decision will be guided by the two goals of preservingthe free status of all derivatives of our free software and ofpromoting the sharing and reuse of software generally.
NO WARRANTY15. BECAUSE THE LIBRARY IS LICENSED FREE OF CHARGE,
THERE IS NO WARRANTY FOR THE LIBRARY, TO THEEXTENT PERMITTED BY APPLICABLE LAW. EXCEPT WHENOTHERWISE STATED IN WRITING THE COPYRIGHTHOLDERS AND/OR OTHER PARTIES PROVIDE THELIBRARY "AS IS" WITHOUT WARRANTY OF ANY KIND,EITHER EXPRESSED OR IMPLIED, INCLUDING, BUT NOTLIMITED TO, THE IMPLIED WARRANTIES OFMERCHANTABILITY AND FITNESS FOR A PARTICULARPURPOSE. THE ENTIRE RISK AS TO THE QUALITY AND
GNU LESSER GENERAL PUBLIC LICENSE 109

110
Third-Party Copyright notices
PERFORMANCE OF THE LIBRARY IS WITH YOU. SHOULDTHE LIBRARY PROVE DEFECTIVE, YOU ASSUME THE COSTOF ALL NECESSARY SERVICING, REPAIR OR CORRECTION.
16. IN NO EVENT UNLESS REQUIRED BY APPLICABLE LAW ORAGREED TO IN WRITING WILL ANY COPYRIGHT HOLDER,OR ANY OTHER PARTY WHO MAY MODIFY AND/ORREDISTRIBUTE THE LIBRARY AS PERMITTED ABOVE, BELIABLE TO YOU FOR DAMAGES, INCLUDING ANYGENERAL, SPECIAL, INCIDENTAL OR CONSEQUENTIALDAMAGES ARISING OUT OF THE USE OR INABILITY TO USETHE LIBRARY (INCLUDING BUT NOT LIMITED TO LOSS OFDATA OR DATA BEING RENDERED INACCURATE ORLOSSES SUSTAINED BY YOU OR THIRD PARTIES OR AFAILURE OF THE LIBRARY TO OPERATE WITH ANY OTHERSOFTWARE), EVEN IF SUCH HOLDER OR OTHER PARTY HASBEEN ADVISED OF THE POSSIBILITY OF SUCH DAMAGES.
EMC SMC and SPA Installation Guide

Third-Party Copyright notices
MySQLMySQL is a registered trademark of MySQL AB in the United States,the European Union and other countries.
MySQL 111

112
Third-Party Copyright notices
EMC SMC and SPA Installation Guide