Embed Size (px)
Citation preview

Electronic Case Filing
User Manual
U.S. District Court Eastern District of Michigan
Last updated: April 27, 2015

ECF User Manual i U.S. District Court, Eastern District of MI
Last Updated April 27, 2015
Table of Contents 1 Information to Get Started ................................................................................................................ 1
1.1 Introduction ....................................................................................................................................... 1 1.2 Requirements for Electronic Filing .................................................................................................... 1
2 Preparing Documents for E‐Filing ...................................................................................................... 2 2.1 Converting Electronic Documents to PDF Documents ...................................................................... 2 2.2 Scanning Documents ......................................................................................................................... 3 2.3 Dividing Oversized Files ..................................................................................................................... 3 2.4 Combining Two PDF Files .................................................................................................................. 5 2.5 Certificates of Service ........................................................................................................................ 6
3 Guide to Filing in the ECF System ...................................................................................................... 7 3.1 Entering the ECF System .................................................................................................................... 8 3.2 General Rules and Manipulations ................................................................................................... 11
3.2.1 Progressing Through the Screens ....................................................................................... 11 3.2.2 Use of the Brower’s Back Buttons ...................................................................................... 11 3.2.3 Completion of the Filing ...................................................................................................... 12 3.2.4 Security Information Warning............................................................................................. 13
3.3 Using the Search Feature ................................................................................................................ 13 3.4 Uploading Documents ..................................................................................................................... 14
3.4.1 Filing Attachments .............................................................................................................. 17 3.4.2 Filing Voluminous Exhibits .................................................................................................. 20
4 Civil Events ....................................................................................................................................... 25 4.1 On‐Line Civil Case Submission ......................................................................................................... 25
4.1.1 JS 44/Civil Cover Sheet ........................................................................................................ 25 4.1.2 Adding/Creating a New Party ............................................................................................. 30 4.1.3 Adding Alias ......................................................................................................................... 36 4.1.4 Adding Corporate Parent or Other Affiliate information .................................................... 37
4.2 Filing Civil Initiating Document ........................................................................................................ 39 4.3 Filing a New Miscellaneous Case ..................................................................................................... 50
4.3.1 General Information ........................................................................................................... 51 4.3.2 Adding Parties to Miscellaneous Case ................................................................................ 52 4.3.3 Filing Initiating Document ................................................................................................... 62 4.3.4 Payment Information .......................................................................................................... 62 4.3.5 Additional Information Required ........................................................................................ 63
4.4 Filing an Attorney Appearance ........................................................................................................ 65 4.5 Filing an Answer to Complaint ......................................................................................................... 68 4.6 Filing of Discovery Materials ........................................................................................................... 73
4.6.1 Fed. R. Civ. P. 5(d) [Effective 12/01/00] ........................................................................ 73 4.6.2 LR 26.2 Filing of Discovery Material [Effective 7/01/01] .................................................... 74
4.7 Filing a Civil Motion ......................................................................................................................... 74 4.8 Filing Summons Returned Executed ................................................................................................ 77
5 Filing Documents Under Seal ........................................................................................................... 81 5.1.1 Filing Sealed Initiating Documents ...................................................................................... 84 5.1.2 Filing Exhibits Under Seal .................................................................................................... 84
6 Criminal Events ................................................................................................................................ 85

ECF User Manual ii U.S. District Court, Eastern District of MI
Last Updated April 27, 2015
6.1 Filing a Criminal Motion .................................................................................................................. 85 6.2 Filing a Notice of Joinder/Concurrence to Motion .......................................................................... 88
7 Query ............................................................................................................................................... 92 7.1 Querying the ECF System ................................................................................................................ 92
7.1.1 Name Search Tips ................................................................................................................ 94 7.1.2 Running Query .................................................................................................................... 94
8 Reports ............................................................................................................................................ 96 8.1 Docket Sheet.................................................................................................................................... 96 8.2 Written Opinions Report ............................................................................................................... 100
9 Utilities ........................................................................................................................................... 104 9.1 Updating Address Information ...................................................................................................... 104 9.2 Changing Email Information and Preferences ............................................................................... 106 9.3 Changing Login and Password ....................................................................................................... 109 9.4 Determining Appropriate Service of Papers .................................................................................. 110 9.5 Utilities Features – Proposed Orders ............................................................................................ 111
10 Logging Out .................................................................................................................................... 113 10.1 Logging Out of the ECF System ............................................................................................. 113

Information to Get Started
ECF User Manual 1 U.S. District Court, Eastern District of MI
Last Updated April 27, 2015
1 Information to Get Started
1.1 Introduction The Eastern District of Michigan implemented Electronic Case Filing (ECF) June 1, 2004 as part of a nationwide implementation by the Federal Judiciary. As of June 1, 2004, the official record of filed cases is maintained electronically. E‐filing became mandatory for attorneys after November 30, 2005. User Manual – Staying Current Readers are encouraged to refer to the on‐line version of documents for the most current information because a previously printed hard copy of the User Manual may become obsolete. Help Desk A CM/ECF Help Desk has been established to respond to inquiries. The help desk is staffed Monday through Friday, 8:30 a.m. and 4:30 p.m. The number is (313) 234‐5000. There are several pre‐recorded topics that pertain to the most common questions the help desk receives. We encourage callers to listen to the pre‐recorded topics available. If after listening to the available topics, the question is still not answered, there is an option to speak to Help Desk staff.
1.2 Requirements for Electronic Filing The ECF Policies & Procedures are required reading before using the ECF system. For a copy of the Policies & Procedures, visit the following Web site: http://www.mied.uscourts.gov/CMECF. The rules contained in the Policies & Procedures will be referred to throughout the User Manual. The Policies & Procedures will be revised from time to time and it is advisable to periodically check the web site for the most current materials. The hardware and software needed to electronically file, view and retrieve case documents are:
A personal computer running a standard platform such as Windows® or Macintosh®
Electronic PDF conversion software, such as Adobe Acrobat Writer® to convert documents from a word processor format to portable document format (PDF) and Adobe Acrobat Reader®
A PDF‐compatible word processor application like Microsoft Word® or Corel WordPerfect®
Internet access, preferably cable modem or DSL
Internet service with Internet Explorer® or Firefox (more current versions advised)
A scanner or access to a scanner for the creation of electronic papers from documents that are non‐computerized
The user should also be familiar with PACER (Public Access to Court Electronic Records) and have access to an active PACER account. More information is available on PACER’s web site, http://pacer.uscourts.gov/.
Preparing Documents for E‐Filing
ECF User Manual 2 U.S. District Court, Eastern District of MI
Last Updated April 27, 2015
2 Preparing Documents for E‐Filing
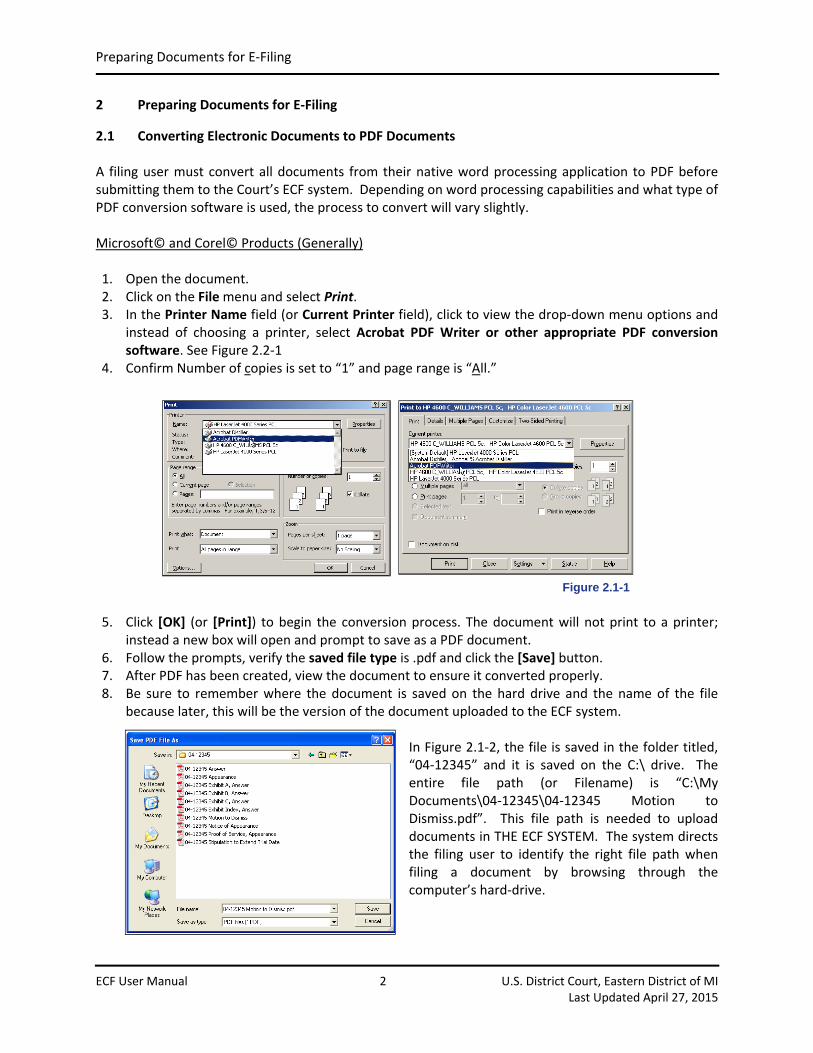
2.1 Converting Electronic Documents to PDF Documents A filing user must convert all documents from their native word processing application to PDF before submitting them to the Court’s ECF system. Depending on word processing capabilities and what type of PDF conversion software is used, the process to convert will vary slightly. Microsoft© and Corel© Products (Generally) 1. Open the document. 2. Click on the File menu and select Print. 3. In the Printer Name field (or Current Printer field), click to view the drop‐down menu options and
instead of choosing a printer, select Acrobat PDF Writer or other appropriate PDF conversion software. See Figure 2.2‐1
4. Confirm Number of copies is set to “1” and page range is “All.”
5. Click [OK] (or [Print]) to begin the conversion process. The document will not print to a printer;
instead a new box will open and prompt to save as a PDF document. 6. Follow the prompts, verify the saved file type is .pdf and click the [Save] button. 7. After PDF has been created, view the document to ensure it converted properly. 8. Be sure to remember where the document is saved on the hard drive and the name of the file
because later, this will be the version of the document uploaded to the ECF system. In Figure 2.1‐2, the file is saved in the folder titled, “04‐12345” and it is saved on the C:\ drive. The entire file path (or Filename) is “C:\My Documents\04‐12345\04‐12345 Motion to Dismiss.pdf”. This file path is needed to upload documents in THE ECF SYSTEM. The system directs the filing user to identify the right file path when filing a document by browsing through the computer’s hard‐drive.
Figure 2.1-1

Preparing Documents for E‐Filing
ECF User Manual 3 U.S. District Court, Eastern District of MI
Last Updated April 27, 2015
If there are problems loading and using ECF with a
personal computer, consider the following:
The Court has verified that its version of ECF is compatible with current versions of Microsoft’s Internet Explorer® and Firefox. ECF users might experience compatibility issues with other web browsers or older versions of Internet Explorer® and Firefox.
Any version of a Web browser will frequently require the filing user to clear the temporary Internet files. This ensures the screens viewed within ECF display all available options.
Clearing temporary files/history in Internet Explorer ONLY (Other web browsers may have a similar process to clear temporary files, consult the help section for that particular browser for more information)
Open an Internet Explorer® window and select Tools. Select Internet Options.
In the “Browsing History” section, select [Delete] and choose Temporary Internet Files.
2.2 Scanning Documents Use a scanner only if it is not possible to electronically prepare papers using word processing software and converting to PDF. When scanning papers for the ECF system, the Court recommends scanning at a resolution of 300 dpi. All papers should be scanned with a “black and white” setting whenever possible and should be 8.5” x 11”. After scanning a document, review the file to make sure the images are not upside down or scanned in landscape.
2.3 Scanning Color Documents If the document being scanned is a color photo or illustration and the image needs to retain the color, scan the image using the lowest setting to keep the file size as small as possible. Filing a color photo or illustration will display in color in the CM/ECF system.
2.4 Dividing Oversized Files
If the document being scanned is exceptionally long (usually an exhibit), be aware of the file size limitation. THE ECF SYSTEM will not accept a file larger than 12.5 MB or approximately 12,500 KB. If a single exhibit is larger than 12.5 MB, it must be divided into smaller segments. To see what size a document is, locate the document and right click on the file name, then choose “properties.” See Figure 2.4‐1. If the pages are scanned and in PDF, Adobe software allows the user to divide the file without rescanning. Note: This function is not available in free versions of Adobe Reader.
Figure 2.4-1
Figure 2.1-2

Preparing Documents for E‐Filing
ECF User Manual 4 U.S. District Court, Eastern District of MI
Last Updated April 27, 2015
To divide a PDF document into smaller files, follow these steps: (These instructions are for use with Adobe Acrobat Software. The process may not be the same if you are using other PDF conversion software.)
STEP ACTION
1 Open the scanned pages in Adobe and click on “Document” in the File Menu. Click “Extract Pages.”
2 In the pop‐up box, choose a range of pages to separate, check the box “Delete Pages After Extracting” and click [OK].
3 Answer [Yes] to the prompt.
4 The extracted pages are now shown and should be immediately saved. Click on “Save As” and save the file with a new name including the page range to differentiate from the other file.

Preparing Documents for E‐Filing
ECF User Manual 5 U.S. District Court, Eastern District of MI
Last Updated April 27, 2015
STEP ACTION
5 After saving the extracted pages, return to the original file and save the changes. Note: The original oversized file should now be two smaller files.
These instructions were created using Adobe Acrobat 8.0. Newer versions might require a variation of this step‐by‐step instruction. Refer to Adobe Help online, other specific PDF conversion software instructions, or call the ECF Help Desk.
2.5 Combining Two PDF Files
At times, it may be necessary to combine files that were scanned as two or more separate documents. For instance a motion and a brief will need to be combined with the proof of service before being e‐filed. In this situation, as long as the separate files are all saved as PDF files, Adobe software or other conversion software will allow the user to join the files together. To combine PDF files, follow these steps:
STEP ACTION
1 Open the file with the pages that should appear first. Click on “Document” in the File Menu and choose “Insert Pages.”

Preparing Documents for E‐Filing
ECF User Manual 6 U.S. District Court, Eastern District of MI
Last Updated April 27, 2015
STEP ACTION
2 Navigate to the PDF file that needs to be combined with the open file. Click on the file and click the [Select] button in the lower right‐hand corner.
3 Insert the new PDF pages after the last page or where they would be most appropriate and click [OK].
4 Save changes to file before closing.
Note: These instructions were created using Adobe Acrobat 8.0. Newer versions might require a variation of this step‐by‐step instruction. Refer to Adobe Help online, other specific PDF conversion software instructions, or call the ECF Help Desk.
2.6 Certificates of Service Pursuant to Fed R. Civ 5(d), a certificate of service is required to be filed within a reasonable time after service. The certificate of service should be included as part of the e‐filed paper, rather than a separate filing. To determine whether the paper will be served electronically on a registered attorney via a Notice of Electronic Filing, log into THE ECF SYSTEM, click on “Utilities” and click on “Mailings” under the heading “Miscellaneous”. Choose “Mailing Info for a Case”. The system will list which parties are registered filing users, receiving NEFs and which parties are non‐filing users, possibly requiring service in the traditional manner.

Guide to Filing in the ECF System
ECF User Manual 7 U.S. District Court, Eastern District of MI
Last Updated April 27, 2015
3 Guide to Filing in the ECF System
3.1 Definitions The following are a list of definitions important to a filing user while navigating in the ECF System. Client Code – A code created by the user that is entered on the PACER/ECF login screen along with a PACER account. The code allows the user to track filings and PACER usage by client. The quarterly billing statements from PACER will show the total amount due according to each client code. Contact PACER for more information. Court‐issued Login – A login and password given to every filing user by the Eastern District of Michigan. The login and password allow users to electronically file in the ECF system. The court‐issued login and password will serve as a signature on all electronically filed documents. Electronic Service – A Notice of Electronic Filing (NEF) automatically generated by the ECF system constitutes service on a registered filing user when a paper is e‐filed by an attorney. Service of Process and service on a non‐filing user must be done in the traditional manner. Free‐text box – At some points in the ECF system, the filing user has the ability to type whatever he or she feels is appropriate to add to the docket text. These free‐text boxes are optional. Main Menu Bar – The blue bar at the top of all ECF screens. The bar guides a user through the different functions of ECF and has seven different features: Civil, Criminal, Query, Reports, Utilities, Search and Logout. If Civil and Criminal are omitted, the filing user is logged in with a PACER account. Clicking any of the options in the Menu Bar will negate the current filing and allow the filing user to start over. Filing users are encouraged to click on the selected option instead of the drop down menu as the former may cause “page not found” errors.

Guide to Filing in the ECF System
ECF User Manual 8 U.S. District Court, Eastern District of MI
Last Updated April 27, 2015
3.2 Entering the ECF System Enter the ECF system by accessing the Internet and going to the Court’s Web site, http://www.mied.uscourts.gov. The top middle section of the web site is devoted to electronic filing. Click on “Login” or click on the Electronic Filing header to review the CM/ECF page with the most up‐to‐date information, policies and announcements. See Figures 3.2‐1 and 3.2‐2.
To file an electronic document, use the Court‐issued ECF login and password assigned to the attorney on whose behalf a paper is being filed. To view and retrieve court documents only, use a PACER login and password.
All ECF logins and passwords are case sensitive
Figure 3.2-1
Figure 3.2-2

Guide to Filing in the ECF System
ECF User Manual 9 U.S. District Court, Eastern District of MI
Last Updated April 27, 2015
Enter the login and password. The filing user must also check the box to the right of the authentication box. This indicates that the filing user has read, understands and agrees to abide by the court’s redaction rules. See Figure 3.2‐3. Redaction rules are covered in Fed.R.Civ.P.5.2 or Fed.R.Crim.P. 49.1. After entering the correct login and password, click on the [Login] button to access the ECF system.
3.3 Login and Password Failure If the ECF system does not recognize the login and password, it will display the following error message on the screen, see Figure 3.3‐1.
Click the [Back] button and re‐enter the correct login and password. Note: After 5 failed attempts, the CM/ECF system will lock the filing user out for five minutes. Each failed attempt after adds another minute to the lock out time.
What is the Client Code?The client code provides a way to track filings and PACER usage billed to a specific client. Enter the client’s name, law office file number or some distinctive code. It is not necessary to register the client code with the Court or with PACER. The quarterly billing statements from PACER will show the total amount due according to each client code. Detailed transactions with client codes are available on the PACER Service Center Web site or through a PACER statement email service. Contact PACER for more information. A filing user should not enter anything in the client code field if logging in to e‐file a paper.
Figure 3.2-3
Figure 3.3-1

Guide to Filing in the ECF System
ECF User Manual 10 U.S. District Court, Eastern District of MI
Last Updated April 27, 2015
3.4 Login and Password Reset If the filing user has forgotten the correct login and/or password, follow these instructions to reset:
Step Action
1 Click “Forgot login/password?”
2 Enter the required information and click [Submit].
3 The system will attempt to validate the information entered.
4 Once the message “Your information has been validated…” displays, go to your email address to retrieve your new login and password information. Note: Be sure to check your junk mail if the email is not in your inbox.
5 If the information provided cannot be validated, a new screen will appear. Enter the requested information and click [Submit].
6 The following message will display.

Guide to Filing in the ECF System
ECF User Manual 11 U.S. District Court, Eastern District of MI
Last Updated April 27, 2015
Once the new password has been received, login to CM/ECF and change the password as soon as possible. Passwords must contain:
at least eight characters;
one upper case character;
one lower case character; and
one digit or special character (@,#,$,%,&,*,+). If you have any questions, email [email protected] or call 313‐234‐5000 and select the option for “assistance with electronic filing.”
3.5 General Rules and Manipulations
There are several routines and screens that are common throughout the e‐filing system, regardless of the document being filed or the event being used. This section describes this information. Filing users should be familiar with these terms and concepts before beginning to file anything in the ECF system.
3.5.1 Progressing Through the Screens Most event screens have two buttons associated with data entry. See Figure 3.5‐1.
Use the [Next] button to accept entered data, display the next data‐entry screen or commit and finalize the transaction. Sometimes, instead of [Next], the button is [Submit].
Use the [Clear] button to remove all characters entered in its associated field or box.
Many screens will display the case number at the top as a hyperlink. Clicking this hyperlink will prompt the user to log into PACER. Upon logging into PACER a docket report for that case will display. PACER Fees will apply. See Figure 3.5‐2.
3.5.2 Use of the Brower’s Back Buttons The use of the [Back] button (Figure 3.5‐3) on the browser toolbar to return to the previous screen and correct any data entry errors is possible; however this may produce a “page not found” error. If this occurs the filing will most likely
need to be started again from beginning.
Figure 3.5-1
Figure 3.5-2
Clicking here will prompt user
to enter a PACER Login and Password
Figure 3.5-3

Guide to Filing in the ECF System
ECF User Manual 12 U.S. District Court, Eastern District of MI
Last Updated April 27, 2015
The [Back] button may be used to correct most screens until the “Attention!!” warning message, which appears immediately before the transaction is committed. Clicking the [Next] button after seeing this message means the document has been filed with the Court and the user will not be able to go back and fix mistakes. See Figure 3.5‐4.
3.5.3 Completion of the Filing Once the final [Next] button is clicked, the court docket will be updated with the given docket text and the Notice of Electronic Filing (NEF) will display. See Figure 3.5‐5. Any mistakes discovered after this point can only be corrected by the Clerk’s Office. Please make sure the submitted information is correct and accurate. The Clerk’s Office may edit a docket entry to correct or clarify, however docket entries will not be automatically modified upon request. Once an entry has been made the entry becomes part of the court’s official docket. Documents filed in error cannot be removed without an Order from the Court. If a mistake is recognized after a paper has been filed, contact the CM/ECF help desk at (313) 234‐5000 or by emailing [email protected]. The Notice of Electronic of Electronic Filing (NEF) includes the following information:
Date and the time of the filing
E‐filer’s name
Case name and case number (quick link to the docket report, PACER fees apply)
Filer (party) name
Document number (quick link to the PDF image, the first click is free, PACER fees apply on subsequent viewings)
Docket text
NEF recipients
Non e‐filers (if any, see ECF Policies & Procedures Rule 8 concerning service)
Electronic document stamp (unique identifier for internal court tracking)
The NEF is sent to all registered e‐filers in a case. In addition, the NEF has a hyperlink to the PDF document that was filed. Non‐efiling parties must be served in the traditional manner.
Figure 3.5-4
Figure 3.5-5

Guide to Filing in the ECF System
ECF User Manual 13 U.S. District Court, Eastern District of MI
Last Updated April 27, 2015
3.5.4 Security Information Warning When trying to access certain areas of the ECF System, especially the area to send proposed orders, a pop‐up may appear (Figure 3.5‐6). Users must click [Yes], otherwise, the screens will not display correctly.
3.5.5 Using the Search Feature After logging into the ECF system with a Court issued login and password, click on the words “Civil” or “Criminal” or hover over the words to active the cascading menu. Locate and click on the appropriate event from the cascading list or the screen. See Figure 3.5‐7.
If the user clicks on “Civil” or “Criminal”, the system displays a menu of all event options. The black text denotes categories of filings. The underlined blue texts are hyperlinks to types of filings and the events contained within them. See Figure 3.5‐8.
Figure 3.5-6
Figure 3.5-7
Figure 3.5-6
Figure 3.5-8

Guide to Filing in the ECF System
ECF User Manual 14 U.S. District Court, Eastern District of MI
Last Updated April 27, 2015
If unsure of the appropriate event to use when filing a document, click on “Search” in the Main Menu bar. A pop‐up box will appear prompting the user to enter a keyword. See Figure 3.5‐9. For example, if a user was filing an Objection to a Magistrate’s Report and Recommendation, he or she could type the word “objection” and click Search. A new screen would display with the search results.
From the list of results, the user would find “Objection to Report and Recommendation” located under the heading Civil Events Other Answers and Criminal Events Other Documents. See Figure 3.5‐10. NOTE: Pay careful attention because both civil and criminal events are displayed and many are similarly named. If the right event cannot be found, please call the help desk for assistance at (313) 234‐5042.
3.6 Uploading Documents Documents must be converted to PDF, before uploading into e‐filing system. (See Preparing Documents for E‐Filing for more information). The screen to upload documents is the same regardless of the event selected. See Figure 3.6‐1.
Figure 3.5-9
Figure 3.5-10

Guide to Filing in the ECF System
ECF User Manual 15 U.S. District Court, Eastern District of MI
Last Updated April 27, 2015
The document upload screen is split into two sections:
Main Document – Should be used to upload the main document that is being filed. Example: The PDF containing a Motion, Brief, and Certificate of Service; the PDF containing the Complaint or Notice of Removal with supporting documents.
Attachments – Should be used when uploading Exhibits, other types of attachments, OR when the main document exceeds the file size limit and must be broken into smaller files. See 3.6.3 Filing Attachments for more information.
Follow these steps to upload the Main document:
STEP ACTION
1
Click on the [Browse…] button.
2 Navigate through the drives on the computer or network being used to access the ECF System to locate the saved PDF document. Once located, click on file to highlight. Note: If the correct folder does not display the PDF document, click on the down arrow for the “Files of type” and highlight “All Files (*.*)”. This will display all types of files in the folder. See the arrow in Figure.
Figure 3.6-1
Guide to Filing in the ECF System
ECF User Manual 16 U.S. District Court, Eastern District of MI
Last Updated April 27, 2015
STEP ACTION
More likely than not, there are two versions of the document saved. There will be a word processing version and a PDF version. Be sure to select the PDF version to upload to the system. The ECF system only accepts PDF documents for filing.
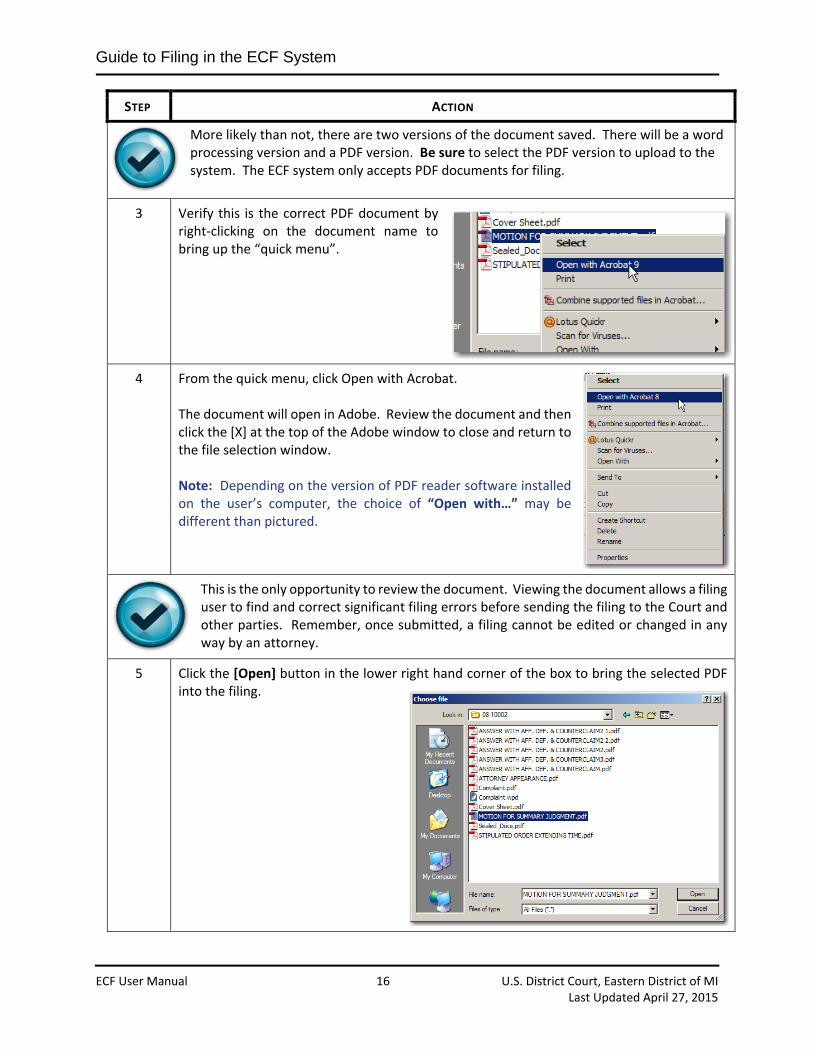
3 Verify this is the correct PDF document by right‐clicking on the document name to bring up the “quick menu”.
4 From the quick menu, click Open with Acrobat. The document will open in Adobe. Review the document and then click the [X] at the top of the Adobe window to close and return to the file selection window. Note: Depending on the version of PDF reader software installed on the user’s computer, the choice of “Open with…” may be different than pictured.
This is the only opportunity to review the document. Viewing the document allows a filing user to find and correct significant filing errors before sending the filing to the Court and other parties. Remember, once submitted, a filing cannot be edited or changed in any way by an attorney.
5
Click the [Open] button in the lower right hand corner of the box to bring the selected PDF into the filing.

Guide to Filing in the ECF System
ECF User Manual 17 U.S. District Court, Eastern District of MI
Last Updated April 27, 2015
STEP ACTION
6 The pop‐up box will disappear and the path to the Filename will appear in the Main Document box. If there were attachments to upload, the process is similar, however, consult Filing Attachments section for instructions. Once main document and attachments (if included) are uploaded, click [Next] to continue.
7 Continue the filing.
3.6.1 Filing Attachments If there are two or more exhibits, the first attachment must be an index of exhibits. Each additional exhibit should be individually attached and must be identified in the electronic record with an exhibit identifier and brief narrative description. See below. (For more information, see ECF Policies and Procedures Rule 18, Exhibits).
Example In this example, there is an Index of Exhibits and three exhibits: Exhibit A – Claim Statement, Exhibit B – Email Correspondence and Exhibit C – January 2006 Contract. Follow these steps to upload attachments:
STEP ACTION
1 The Main Document should already be uploaded before uploading the attachments. In the Attachments area of the screen, click [Browse…]
Sample Index of Exhibits
Exhibit Title/Description A Claim Statement B Email Correspondence C January 2006 Contract
Guide to Filing in the ECF System
ECF User Manual 18 U.S. District Court, Eastern District of MI
Last Updated April 27, 2015
STEP ACTION
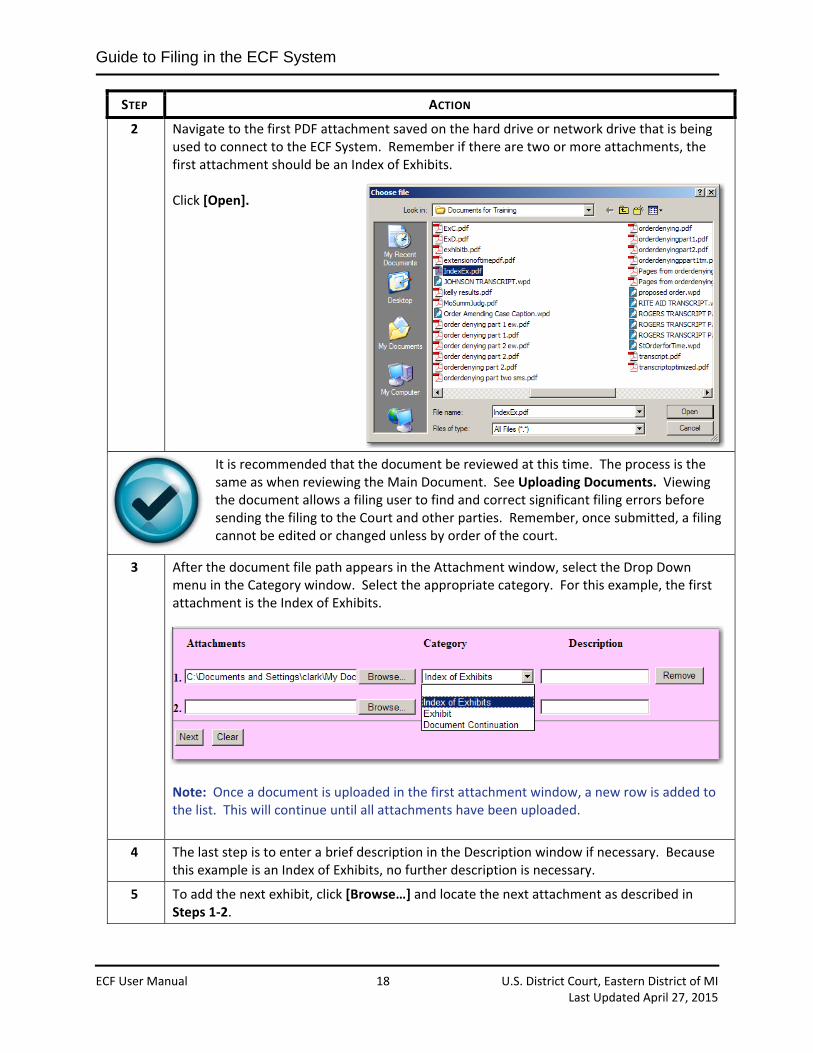
2 Navigate to the first PDF attachment saved on the hard drive or network drive that is being used to connect to the ECF System. Remember if there are two or more attachments, the first attachment should be an Index of Exhibits. Click [Open].
It is recommended that the document be reviewed at this time. The process is the same as when reviewing the Main Document. See Uploading Documents. Viewing the document allows a filing user to find and correct significant filing errors before sending the filing to the Court and other parties. Remember, once submitted, a filing cannot be edited or changed unless by order of the court.
3 After the document file path appears in the Attachment window, select the Drop Down menu in the Category window. Select the appropriate category. For this example, the first attachment is the Index of Exhibits.
Note: Once a document is uploaded in the first attachment window, a new row is added to the list. This will continue until all attachments have been uploaded.
4 The last step is to enter a brief description in the Description window if necessary. Because this example is an Index of Exhibits, no further description is necessary.
5 To add the next exhibit, click [Browse…] and locate the next attachment as described in Steps 1‐2.

Guide to Filing in the ECF System
ECF User Manual 19 U.S. District Court, Eastern District of MI
Last Updated April 27, 2015
STEP ACTION
6 In the Category drop down menu, select the appropriate category. In this example, the category is Exhibit.
7 Because this attachment needs more description, enter a brief description in the Description window. In this example the description is “A – Claim Statement.”
8 Repeat steps 5 – 7 for each additional exhibit.
If an attachment was added in error, it can be deleted by clicking the [Remove] button next to the incorrect attachment. If, however, an attachment is removed and then re‐added, the new attachment will be added to the end of the list and will appear out of order on the docket sheet. File names, Categories and Descriptions CAN BE edited until the [Next] button is clicked. Be sure to double check the information in this screen before continuing on.
9 Once all exhibits have been uploaded and properly described, click [Next].
10 Continue the filing.

Guide to Filing in the ECF System
ECF User Manual 20 U.S. District Court, Eastern District of MI
Last Updated April 27, 2015
3.6.2 Filing Voluminous Exhibits Exhibits, no matter the quantity or length can be e‐filed if the following guidelines are adhered to.
1. Know your system. If you have a slow modem or slow Internet service, you may want to keep the total file size below the recommended 50MB. Also, keep in mind the time of day you are e‐filing may impact how quickly your system transmits the documents.
2. Monitor and adjust the total file size of what you are e‐filing. A general guideline is to keep the total file size (main document plus attachments) around 50 MB. If your total file size exceeds 50MB, e‐file your exhibits as separate group filings, receiving multiple Notices of Electronic Filings (see example below). Remember, the system does not accept any one PDF file larger than 12.5 MB, so any single exhibit larger than 12.5 MB must be divided into parts.
3. Don’t get “timed out” of the ECF System by trying to send too much at one time. The connection to the ECF System is lost if it takes longer than 20 minutes to move from one screen to the next and the move from the final docket text screen to the notice of electronic filing is when your filing is actually being transmitted to the court.
4. To file voluminous exhibits in groups, file the main document along with a portion of your exhibits.
After receiving a Notice of Electronic Filing, go back to the Civil Events menu. Go to “Other Documents” and select “Exhibit.” Upload the next sequential exhibit as the main document and file the next several exhibits as attachments to this filing. Continue this process until all of your exhibits are filed. (See below for an example of filing a motion for summary judgment with 15 exhibits)
Example
File your motion with the first group of exhibits, kept under a 50 MB. Receive a Notice of Electronic Filing with the docket text similar to the below example. See Figure 3.6‐2.
Figure 3.6‐2

Guide to Filing in the ECF System
ECF User Manual 21 U.S. District Court, Eastern District of MI
Last Updated April 27, 2015
Once the Main Document and the first set of exhibits have been filed, follow these steps to continue filing the remaining exhibits:
STEP ACTION
1 From the main menu, click Civil Other Documents.
2 Select Exhibit from the Available Events window. Click [Next].
Check that only the intended event is listed in the Selected Event window. If another event is listed there, click the incorrect event in the Selected Event window and this will remove that event. The user can also click the [Clear] button to remove all events from the Selected Event window.
3 Enter the case number and click [Find This Case]. Once the case number is found, the Next button will activate. Click [Next].
Guide to Filing in the ECF System
ECF User Manual 22 U.S. District Court, Eastern District of MI
Last Updated April 27, 2015
STEP ACTION
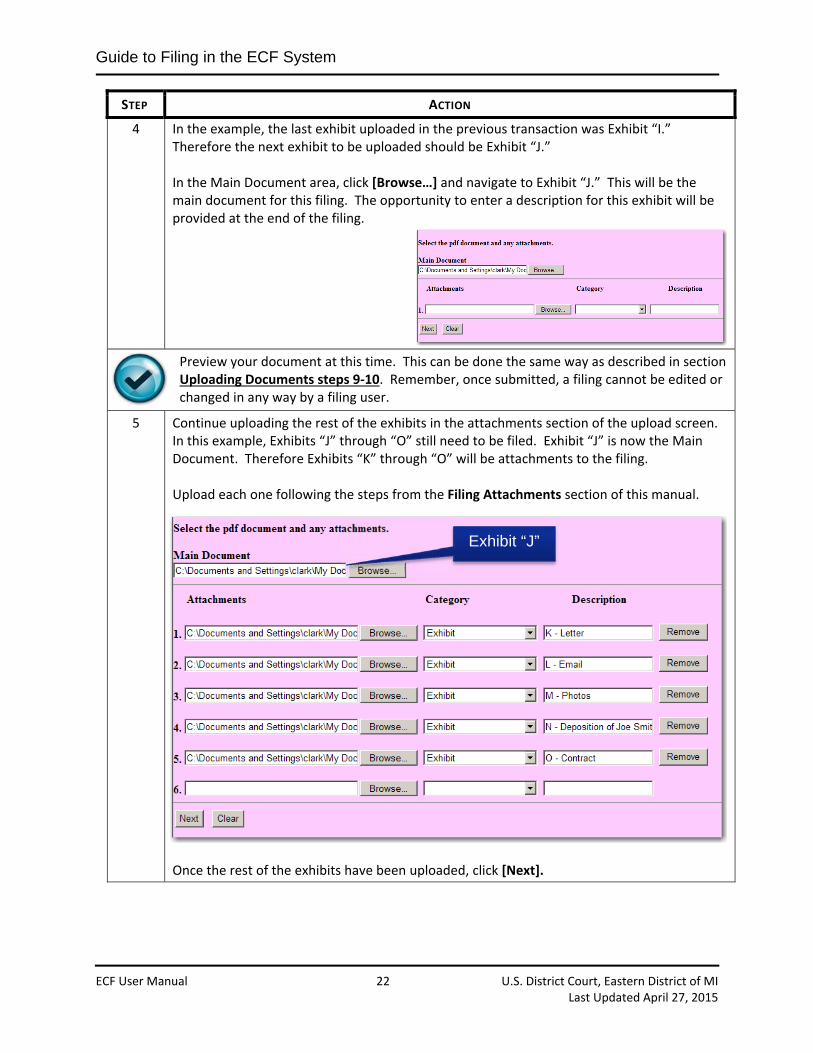
4 In the example, the last exhibit uploaded in the previous transaction was Exhibit “I.” Therefore the next exhibit to be uploaded should be Exhibit “J.” In the Main Document area, click [Browse…] and navigate to Exhibit “J.” This will be the main document for this filing. The opportunity to enter a description for this exhibit will be provided at the end of the filing.
Preview your document at this time. This can be done the same way as described in section Uploading Documents steps 9‐10. Remember, once submitted, a filing cannot be edited or changed in any way by a filing user.
5
Continue uploading the rest of the exhibits in the attachments section of the upload screen. In this example, Exhibits “J” through “O” still need to be filed. Exhibit “J” is now the Main Document. Therefore Exhibits “K” through “O” will be attachments to the filing. Upload each one following the steps from the Filing Attachments section of this manual.
Once the rest of the exhibits have been uploaded, click [Next].
Exhibit “J”
Guide to Filing in the ECF System
ECF User Manual 23 U.S. District Court, Eastern District of MI
Last Updated April 27, 2015
STEP ACTION
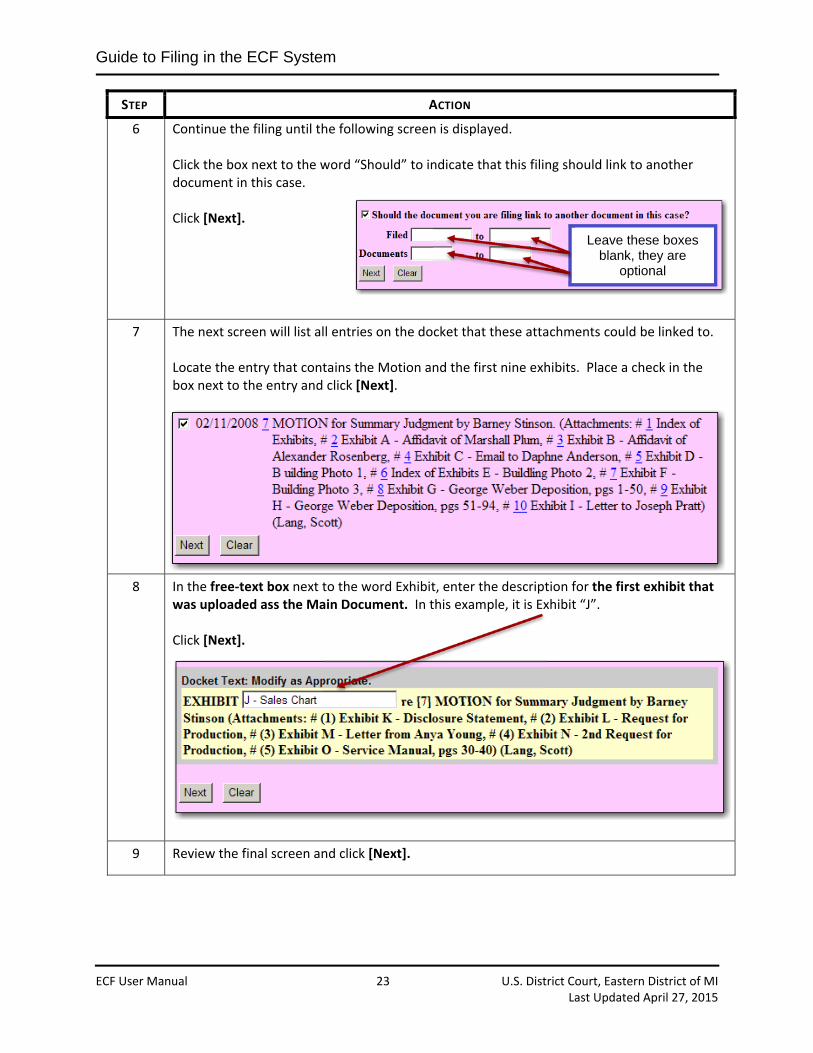
6 Continue the filing until the following screen is displayed. Click the box next to the word “Should” to indicate that this filing should link to another document in this case. Click [Next].
7 The next screen will list all entries on the docket that these attachments could be linked to. Locate the entry that contains the Motion and the first nine exhibits. Place a check in the box next to the entry and click [Next].
8 In the free‐text box next to the word Exhibit, enter the description for the first exhibit that was uploaded ass the Main Document. In this example, it is Exhibit “J”. Click [Next].
9 Review the final screen and click [Next].
Leave these boxes blank, they are
optional

Guide to Filing in the ECF System
ECF User Manual 24 U.S. District Court, Eastern District of MI
Last Updated April 27, 2015
STEP ACTION
10 The NEF will display. This is an example of the docket text for this entry.

Civil Events
ECF User Manual 25 U.S. District Court, Eastern District of MI
Last Updated April 27, 2015
4 Civil Events
4.1 On‐Line Civil Case Submission
The online case submission program is used to open a new civil or miscellaneous case. The following civil cases can be opened using the Open a New Civil Case:
Complaint
Interpleader Complaint
Notice of Removal
Petition for Writ of Habeas Corpus
Re: Application of Arbitration Award
For information on filing a miscellaneous case, see Filing a New Miscellaneous Case. The steps to opening a new civil are: 1. Provide jurisdictional information 2. Add parties to the case 3. Upload the initiating document 4. Pay the filing fee Sections 4.1.1 through 4.1.4 will discuss each of these four steps in detail. Section 4.2 Filing Initiating Civil Documents will illustrate the actual process of opening a new civil case.
4.1.1 JS 44/Civil Cover Sheet During the filing of a new civil case, the filing user must provide information regarding the jurisdiction of the case (figure 4.1‐1). This information can be found on the JS 44/Civil Cover Sheet (figure 4.1‐2). This section will provide explanations of each area of this screen and provide comparisons between the jurisdiction information screen and the civil cover sheet.

Civil Events
ECF User Manual 26 U.S. District Court, Eastern District of MI
Last Updated April 27, 2015
Figure 4.1-2
Figure 4.1-1

Civil Events
ECF User Manual 27 U.S. District Court, Eastern District of MI
Last Updated April 27, 2015
Table of JS44 Explanations
Jurisdiction Code Select the appropriate Jurisdiction code. If there is more than one basis for jurisdiction, precedence is given in the following order:
1. United States Plaintiff – Jurisdiction based on 28 U.S.C. 1345 and 1348. Suits by agencies and officers of the United States are included.
2. United States Defendant – The plaintiff is suing the United States, its officers or agencies. 3. Federal Question – Suits brought under 28 U.S.C. 1331, where jurisdiction arises under the
Constitution of the United States, an amendment to the Constitution, an act of Congress or a treaty of the United States.
4. Diversity of Citizenship – Suits brought under 28 U.S.C. 1332, where parties are citizens or businesses of different states or counties. Citizenship for plaintiff and defendant must be entered in the corresponding fields.
Cause of Action and Nature of Suit Enter the appropriate Nature of Suite and Cause of Action.
To quickly locate the code, use the filters next to each option.

Civil Events
ECF User Manual 28 U.S. District Court, Eastern District of MI
Last Updated April 27, 2015
Table of JS44 Explanations
Origin Select an origin code. When entering an Origin code, choose between 1 (Original Proceeding) and 2 (Removal from State Court). All other options are for internal use only.
Citizenship Enter the Citizenship of the Plaintiff and Defendant ONLY if the jurisdiction of the case is 4 (Diversity). Be sure to select Citizen if the party is a person; and Incorporated/Principal Place of Business if the party is a business.
Jury Demand If plaintiff is filing a Jury demand, change to “p (Plaintiff)”. If filing a Notice of Removal and both parties have demanded a jury, or if the defendant relied on plaintiff’s jury demand, select “b (Both)” from the drop‐down list. If filing a Notice of Removal and only the defendants are demanding a jury,
change to “d (Defendant).” If none of these scenarios apply, change to “n (None)”.
Class Action If requesting class action status, change the drop‐down menu to “y”.
Demand

Civil Events
ECF User Manual 29 U.S. District Court, Eastern District of MI
Last Updated April 27, 2015
Table of JS44 Explanations
Enter a monetary Demand, if applicable. Enter the demand to the nearest thousand. For example, if the demand is $100,000, enter “100” in the text field.
County
Based on LR 83.10, select the appropriate County found within the Eastern District of Michigan according to the following priority:
1. If filing a Notice of Removal, choose the county in which the case was pending in State Court 2. The county in which the plaintiff resides 3. The county in which the claim arose 4. If a defendant is a US employee or officer being sued in an official capacity, or if the
defendant is a US agency, choose the county in which an office is located 5. The county in which the defendant resides or has a place of business
Filing Fee Status The filing fee defaults to “pd (paid).” If the filing fee is waived or if filing for the United States, change the Fee Status field to “wv (waived or USA)”. If an Application to Proceed In Forma Pauperis will be included with the initial documents, change the Fee Status field to “fp (in forma pauperis).” Leave the Fee date set to the default.
Arbitration Code and Date Transfer

Civil Events
ECF User Manual 30 U.S. District Court, Eastern District of MI
Last Updated April 27, 2015
Table of JS44 Explanations
Do not enter anything in the Arbitration or Date transfer boxes.
4.1.2 Adding/Creating a New Party The second step during the opening of a new civil case is to add parties to the case. All parties listed on the complaint, notice of removal, or other initiating document must be added at the time of filing. Clerk’s office staff will not add party names if they are missed. A notice of error will be entered informing the filer to correct the problem. In addition, there are other times when it is necessary to add parties to a case after the original parties have been added, such as when a third party complaint is filed. The party entry screen is divided into two sections. On the left is the participant tree. As each new party is added to the case, the party will be listed in the participant tree on the left. The + and – icons for each branch expand or collapse the branch, respectively. The right side of the screen is used to search for parties to add to the case.
The following table provides a description for each of the icons that may appear in the participant tree.
Icon Description
Delete this party from the case.
Add new alias, corporate parent, or attorney.
Edit the party, alias, corporate parent or attorney. Only displays beside actual names of participants, so if no participant has been added, this icon is suppressed.
The first step in the process when adding new parties to a case is to initiate a search of the court’s database to see if a party’s name already exists. To search for a party, enter the last name of the individual or a business name in the search fields. (Figure 4.1‐3)

Civil Events
ECF User Manual 31 U.S. District Court, Eastern District of MI
Last Updated April 27, 2015
Depending on the outcome of the search, the party will either be available to select from a list of results, or it will not appear. Follow these steps to search for and add parties to a new or existing case:
STEP Action
1 To begin, enter the first party in the search windows on the right side of the screen and click the [Search] button.
Hints:
The search is not case sensitive.
You can enter a wild card before the letters, if desired, to take the place of other letters. For example, entering “*am”, will display Bob Cunningham and the United States of America.
Try alternative searches if the first search was not successful.
Party Search
Participant Tree
Figure 4.1-3

Civil Events
ECF User Manual 32 U.S. District Court, Eastern District of MI
Last Updated April 27, 2015
STEP Action
2 The results of the party name search will be displayed in the Search Results window below.
If… Then…
this is the party to be added Click the party name in the Search Results window and click [Select Party].
this is not the correct party Create a new party by clicking the [Create New Party] button.

Civil Events
ECF User Manual 33 U.S. District Court, Eastern District of MI
Last Updated April 27, 2015
STEP Action
3 Once a selection is made, the Party Information screen is displayed. Do not add information in this screen except as described in Steps 3A‐3D. Once the information has been entered, click [Add Party].
3A If creating a new party, be sure to enter the full name in the First, Last, Middle name, and Generation fields.
DO NOT enter anything in the Title field.
3B Select the appropriate party Role.

Civil Events
ECF User Manual 34 U.S. District Court, Eastern District of MI
Last Updated April 27, 2015
STEP Action
3C If the party will NOT be represented by an attorney, enter the party’s address information. Otherwise, leave the address blank. Note: If the party selected displays a prison address, but the party is NOT a prisoner, do not use this person record. Instead, click [Add New Party] to return to the party search screen.
3D Use the Party Text field if additional identifying information is needed. Examples of party text include: “Individually and as surviving spouse”, “Individually and in his official capacity”, “A minor”, “Estate of” and “Trustees of”. See the Party Name Data Conventions for the ECF System for additional examples of Party text information.

Civil Events
ECF User Manual 35 U.S. District Court, Eastern District of MI
Last Updated April 27, 2015
STEP Action
4 The new party will be added to the participant tree on the left. Alias If the party has an alias, enter the alias information at this time. See 4.1.3 Adding Alias for instructions. Corporate Parent If the party has a Corporate Parent or other affiliate, enter that information at this time. See 4.1.4 Adding Corporate Parent for instructions. Review the participant tree. Double check that the party roles are correctly identified. If changes need to be made, click the edit icon. The party information screen will display on the right. Make the changes and click [Save Changes]. Note: Once a party has been added, the name cannot be edited. The party CAN be deleted by clicking the delete icon and then added again correctly. The party will not be in the correct order in the participant tree, but will appear correctly on the docket sheet. To add another party, click [Add New Party] or, when all parties have been entered, click [Create Case]. Warning: Once [Create Case] has been clicked, you cannot go back and make changes to the parties including deleting them.
5 Continue the filing.

Civil Events
ECF User Manual 36 U.S. District Court, Eastern District of MI
Last Updated April 27, 2015
4.1.3 Adding Alias Part of adding new parties to a case involves adding alias information to parties which have an alias. Alias information is added to parties in the alias information screen after the party has been added to the case. Follow these steps to add alias information:
STEP ACTION
1 From the Participant list on the left hand side of the Add New Party screen, click the Add Alias icon below the name of the party to which an alias is to be added.
2 Search for the alias in the search fields and click [Search].
3 If the name is found, select it from the list and click [Select Alias]; if the name is not found, select [Create New Alias].

Civil Events
ECF User Manual 37 U.S. District Court, Eastern District of MI
Last Updated April 27, 2015
STEP ACTION
4 Fill in the first name, middle name, and generation if necessary.
Select the appropriate alias Type. aka = also known as dba = doing business as fka = formally known as nka = now known as other = other (type not listed) Leave the start date set to the default date. Click [Add Alias].
5 Now the alias appears under Charles Johnson in the Participant Tree. Repeat steps 1‐5 to add additional aliases.
4.1.4 Adding Corporate Parent or Other Affiliate information Also part of adding a new party is the addition of corporate parent or other affiliate information to corporate parties. Note: Don’t forget, if the party has a corporate parent they are required to submit a Statement of Disclosure of Corporate Affiliations and Financial Interest.

Civil Events
ECF User Manual 38 U.S. District Court, Eastern District of MI
Last Updated April 27, 2015
Follow the steps below to add corporate parent information:
STEP ACTION
1 From the Participant tree on the left hand side of the Add New Party screen, click the Add Corporate Parent or other affiliate icon below the name of the party to which a corporate parent is to be added.
2 Enter the corporate parent in the search field and click [Search].
3 If the name is found, select it from the list and click [Select Corporate parent]; if the name is not found, select [Create New Corporate Parent].
4 Fill in the first name, middle name, and generation if necessary. Select either Corporate Parent or Other Affiliate from the Type window. Leave the start date set to the default date. Click [Add Corporate Parent].
5 Now the Corporate Parent appears under Downriver Pontiac Corporation in the Participant Tree. Repeat steps 1‐5 to add additional Corporate Parent information.

Civil Events
ECF User Manual 39 U.S. District Court, Eastern District of MI
Last Updated April 27, 2015
4.2 Filing Civil Initiating Document
This section will illustrate the filing of a new civil case. Part of filing a new civil case involves adding the parties as described in the previous section. Before a user begins opening a new case, the following should be compiled to minimize any mistakes and to provide the court with accurate information compliant with local rules and ECF policies:
1. The initiating document saved as a PDF document.
a. Any accompanying documents, including exhibits, should be saved as separate PDF
documents.
b. The 12.5 MB limit applies to any single PDF file.
2. Valid credit card to pay filing fees, if applicable (VISA, MasterCard, American Express, Discover,
Diner’s Club).
3. A completed civil cover sheet for easy reference when entering case statistical information into
the ECF System. It is NOT necessary to upload a PDF copy of the civil cover sheet.
4. Names of all parties, including aliases and corporate parents. Review the Party Name Data
Conventions for the ECF System prior to adding parties.
Once all necessary documents and information is gathered and formatted properly, follow these steps to file the new case:
STEP ACTION
1 Log into the ECF System.
2 Click on Civil.
3 Click on Open a Civil Case.

Civil Events
ECF User Manual 40 U.S. District Court, Eastern District of MI
Last Updated April 27, 2015
STEP ACTION
4 This screen lists the types of cases that can be opened using this program. It also reminds the filer to have a completed civil cover sheet for review while submitting the case. Once the message has been read, click [Next].
5 If filing a removal from state court, enter the court name in the Other court name field (e.g. Wayne County Circuit Court or 36th District Court). Also enter the Other court number in the corresponding field. Leave Office and Case Type boxes at the default setting.
Click [Next].

Civil Events
ECF User Manual 41 U.S. District Court, Eastern District of MI
Last Updated April 27, 2015
STEP ACTION
6
The next screen requires the information from the civil cover sheet to be entered. See 4.1.1 JS 44/Civil Cover Sheet section for an explanation of the information requested in this screen.
Enter the information required and click [Next].
7 Add the parties.
Remember all parties should be added at this time. See 4.1.2 Adding/Creating New Parties for instructions on adding parties.

Civil Events
ECF User Manual 42 U.S. District Court, Eastern District of MI
Last Updated April 27, 2015
STEP ACTION
8 Once all parties, aliases, and corporate affiliates have been added to the case, click [Create Case]. Note: Be sure to double check all party information in the participant on the left hand side of the screen before clicking [Create Case] as corrections can easily be made before moving on, but will be more difficult after the case has been created.
9 Click [Yes] at the prompt.
10 The case number will be displayed. Make a note of the case number for future reference. Click Docket Lead Event? to continue.
11 Select Complaint, Notice of Removal, or other Appropriate Event from the Available Events window. The selected event will display in the Selected Event window. Click [Next].

Civil Events
ECF User Manual 43 U.S. District Court, Eastern District of MI
Last Updated April 27, 2015
STEP ACTION
Check that only the intended event is listed in the Selected Event window. The user can click the [Clear] button to remove all events from the Selected Event window.
12 The new case number displayed in step 10 should be populated in the case number field. If it is not, enter it now, and click [Find this Case]. Click [Next].
13 Select the filer from the Select the Party window on the right side of the screen. Click [Next]. Note: to select multiple parties hold down the Ctrl button on the computer keyboard and use the mouse to select desired parties. Warning: You may only select a party for which the filing user has an appearance on the record. The other parties are greyed out.
If some parties were not added during the earlier filing of this document, they can be added now by clicking [New Filer]. See 4.1.2 Adding Parties for more information.
14 Associate the attorney to the filing party/parties by keeping the checkmarks in the boxes. This will designate the attorney as an attorney of record and from this point forward, the filer will receive Notices of Electronic Filing in this case. Click [Next].

Civil Events
ECF User Manual 44 U.S. District Court, Eastern District of MI
Last Updated April 27, 2015
STEP ACTION
15 Select the party against whom the document is being filed. If any of the defendants were not added previously, add them now by clicking [New Party]. See 4.1.2 Adding Parties for more information. Note: Select multiple parties by holding the Ctrl key down on the keyboard and using the mouse to highlight more than one name. Click [Next].
16 Upload the PDF file containing the Complaint or Notice of Removal. Click [Browse] and locate the document to be filed. See 3.6 Uploading Documents for more information. Once the file or files have been uploaded, click [Next].
Preview your document at this time. This can be done the same way as described in section 3.6 Uploading Documents steps 9‐10. Remember, once submitted, a filing cannot be edited or changed in any way by an attorney.

Civil Events
ECF User Manual 45 U.S. District Court, Eastern District of MI
Last Updated April 27, 2015
STEP ACTION
17 To ensure accurate information is captured by the Court to determine the appropriate place of court is assigned to the case, enter the requested county information. Click [Next].
18 If the case being filed has been previously dismissed from either this court or another court, select “yes” and click [Next] to continue. Otherwise, leave the selection at “no” and click [Next].
19 If there is a possible companion case, change the selection to “yes” and click [Next] to continue. Note: Companion cases are matters in which it appears substantially similar evidence will be offered or the same or related parties are present and the cases arise out of the same transaction or occurrence.
20 Indicate whether there is a Jury Demand contained within the Complaint. Click [Next].
Civil Events
ECF User Manual 46 U.S. District Court, Eastern District of MI
Last Updated April 27, 2015
STEP ACTION
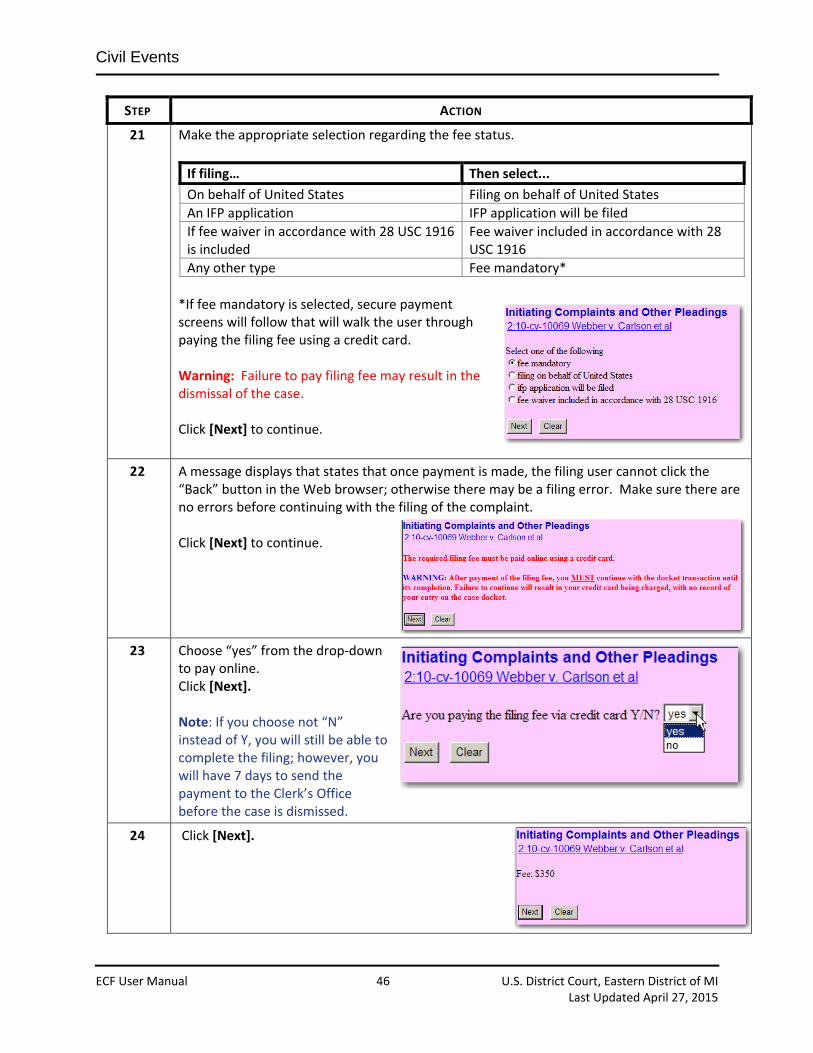
21 Make the appropriate selection regarding the fee status.
If filing… Then select...
On behalf of United States Filing on behalf of United States
An IFP application IFP application will be filed
If fee waiver in accordance with 28 USC 1916 is included
Fee waiver included in accordance with 28 USC 1916
Any other type Fee mandatory*
*If fee mandatory is selected, secure payment screens will follow that will walk the user through paying the filing fee using a credit card. Warning: Failure to pay filing fee may result in the dismissal of the case. Click [Next] to continue.
22 A message displays that states that once payment is made, the filing user cannot click the “Back” button in the Web browser; otherwise there may be a filing error. Make sure there are no errors before continuing with the filing of the complaint. Click [Next] to continue.
23 Choose “yes” from the drop‐down to pay online. Click [Next]. Note: If you choose not “N” instead of Y, you will still be able to complete the filing; however, you will have 7 days to send the payment to the Clerk’s Office before the case is dismissed.
24 Click [Next].

Civil Events
ECF User Manual 47 U.S. District Court, Eastern District of MI
Last Updated April 27, 2015
STEP ACTION
25 The Secure Payment Screen now loads. Continue to step 26.
26 Enter the required information to charge the filing fee to an accepted credit card. Remember to enter the security code shown on the back of the credit card. After entering all information marked by a red asterisk, click [Continue with Plastic Card Payment].

Civil Events
ECF User Manual 48 U.S. District Court, Eastern District of MI
Last Updated April 27, 2015
STEP ACTION
27 Review the information. To have a copy of the receipt emailed to the filing user, enter the fling user’s email address in the window below.
Click the check box next to the “authorize” statement. Click [Submit Payment].
28 The notice displays indicating the credit card has been charged. DO NOT click the back button at this time. Doing so may charge the credit card twice for the same transaction.
Click [Next].
Civil Events
ECF User Manual 49 U.S. District Court, Eastern District of MI
Last Updated April 27, 2015
STEP ACTION
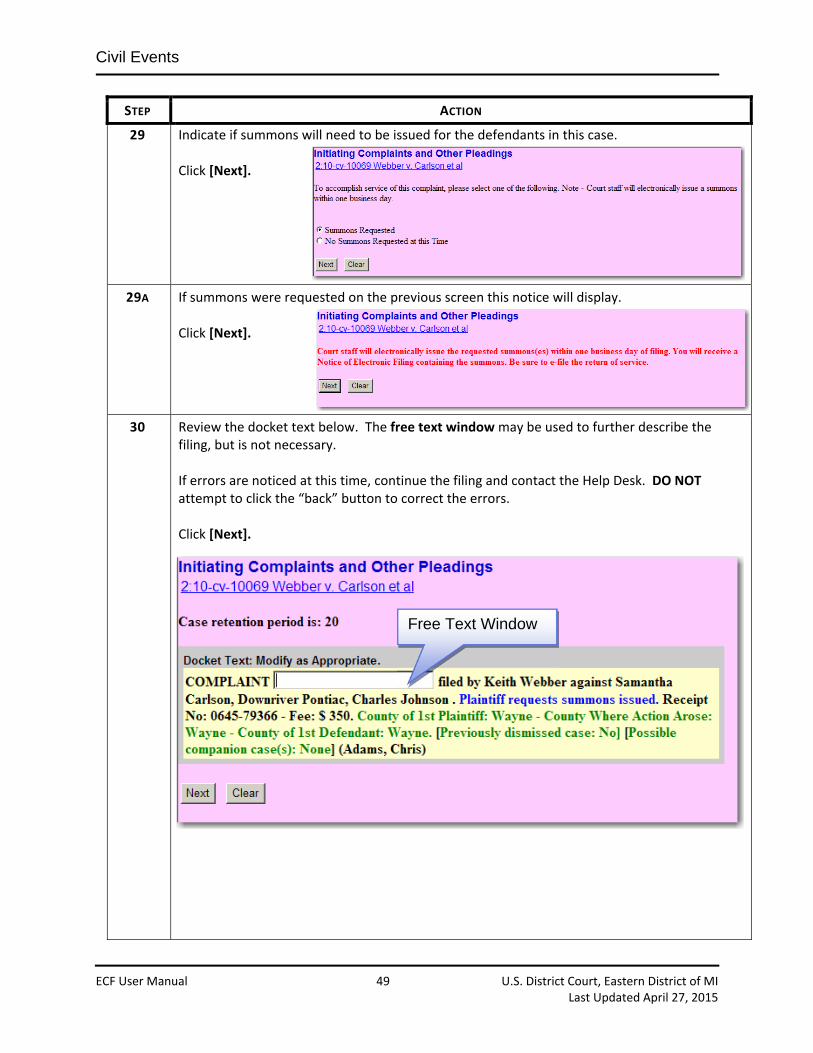
29 Indicate if summons will need to be issued for the defendants in this case. Click [Next].
29A If summons were requested on the previous screen this notice will display. Click [Next].
30
Review the docket text below. The free text window may be used to further describe the filing, but is not necessary. If errors are noticed at this time, continue the filing and contact the Help Desk. DO NOT attempt to click the “back” button to correct the errors. Click [Next].
Free Text Window

Civil Events
ECF User Manual 50 U.S. District Court, Eastern District of MI
Last Updated April 27, 2015
STEP ACTION
31 This is the final review screen. Click [Next].
32 The filing is now complete and the NEF will display.
4.3 Filing a New Miscellaneous Case
E‐Filing users may initiate a new civil miscellaneous case in the CM/ECF system. The following types of cases can be opened with this event:
Appointments of Receiver
Incoming Letters Rogatory
Motions/Petitions to Quash
Registrations of Judgment
Petitions to Enforce IRS Summons (U.S. Attorney Only)
Applications for Writs of Continuing Garnishment (U.S. Attorney Only)

Civil Events
ECF User Manual 51 U.S. District Court, Eastern District of MI
Last Updated April 27, 2015
4.3.1 General Information Generally, all miscellaneous cases are opened in the Open a Miscellaneous Case link in CM/ECF. Follow these steps to open a new civil miscellaneous case:
STEP ACTION
1 Log into CM/ECF and click Civil from the Blue Menu Bar.
2 Select Open a Miscellaneous Case from the Open a Case category.
3 This screen describes the types of cases that can be filed using this event. If your case does not conform to these examples, you will need to use the Open a Civil Case link from the Civil Menu. Otherwise, Click [Next].
4 Click the Case Type drop‐down menu and select “mc.” Change the Office to one of the following only:
Detroit
Bay City
Flint
If this action is a result of another court action, enter that court information in the Other court name and Other court number fields. Click [Next].
Civil Events
ECF User Manual 52 U.S. District Court, Eastern District of MI
Last Updated April 27, 2015
STEP ACTION
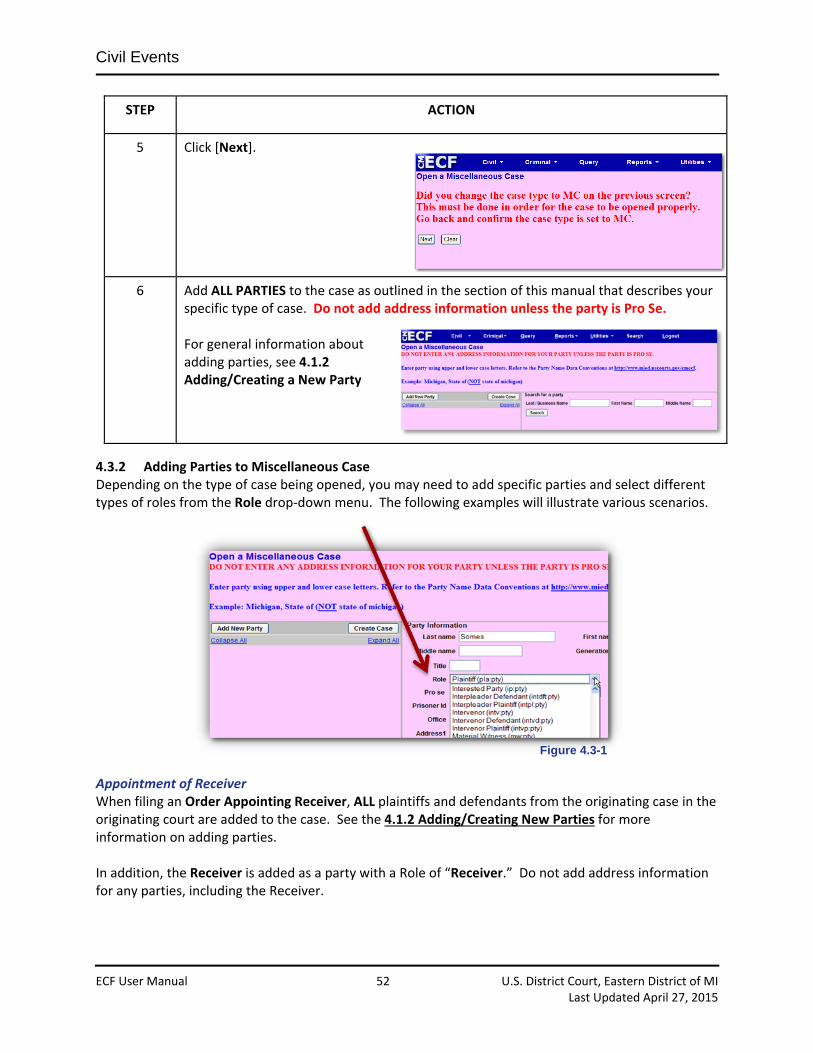
5 Click [Next].
6 Add ALL PARTIES to the case as outlined in the section of this manual that describes your specific type of case. Do not add address information unless the party is Pro Se. For general information about adding parties, see 4.1.2 Adding/Creating a New Party
4.3.2 Adding Parties to Miscellaneous Case Depending on the type of case being opened, you may need to add specific parties and select different types of roles from the Role drop‐down menu. The following examples will illustrate various scenarios.
Appointment of Receiver When filing an Order Appointing Receiver, ALL plaintiffs and defendants from the originating case in the originating court are added to the case. See the 4.1.2 Adding/Creating New Parties for more information on adding parties. In addition, the Receiver is added as a party with a Role of “Receiver.” Do not add address information for any parties, including the Receiver.
Figure 4.3-1

Civil Events
ECF User Manual 53 U.S. District Court, Eastern District of MI
Last Updated April 27, 2015
Example: Entering an Order Appointing Receiver signed by a judge from the U.S. District Court in Missouri Eastern. The Receiver appointed is Morris‐Anderson and Associates, Limited.
STEP ACTION
1 Add the Plaintiffs and Defendants to the case. See 4.1.2 Adding/Creating New Parties for information on how to add a party to the case.
2 In the Party Search Screen, enter Morris‐Anderson and Associates, Limited in the Last/Business Name field. Click [Search].
3 If the search produces a result, click on the name in the Search Results window and click [Select Party]. If the name does not return any results, click [Create New Party].
4 From the Role drop‐down menu, click Receiver (rc:pty).
5 Click [Add Party].

Civil Events
ECF User Manual 54 U.S. District Court, Eastern District of MI
Last Updated April 27, 2015
STEP ACTION
6 Click [Create Case].
7 Click the Docket Lead Event link and Select Misc. Case – Appointment of Receiver. Continue the filing. For more information see Filing Initiating Document and Additional Information Required sections.
Letters Rogatory When filing Letters Rogatory, ALL plaintiffs and defendants from the originating case in the originating court are added to the case. See the 4.1.2 Adding/Creating New Parties for more information on adding parties. In addition, the Letters Rogatory the party is entered as an “In Re:” party type. Example: Request by Italy pursuant to the treaty between the USA and Italian Republic on mutual assistance in criminal matters in the matter of Giuseppe D’Anna.
STEP ACTION
1 Add the plaintiff and defendant in the traditional manner. (See 4.1.2 Adding/Creating New Parties for more information).
2 Enter in the Last/Business Name field: “Letters Rogatory.” Click [Search]. The search will return a result. Click Letters Rogatory in the Search results and click [Select Party].
3 In the Role drop‐down menu, select “In Re (inre:pty).”

Civil Events
ECF User Manual 55 U.S. District Court, Eastern District of MI
Last Updated April 27, 2015
STEP ACTION
4 Click [Add Party].
5 Click [Create Case].
6 Click the Docket Lead Event link and Select Misc. Case – Initiating Document, Other . Continue the filing. For more information see Filing Initiating Document and Additional Information Required sections.
Motion/Petition to Quash When filing a motion or petition to quash, ALL plaintiffs and defendants from the originating case are added to the case. If the party filing the Motion to Quash is not a party to the case, add the moving party with a party role of “movant.” Example: ACME Products, Inc. is served a subpoena requesting production of documents for a case in another district. ACME Products, Inc. is located in this district and files the Motion to Quash in this court. ACME Products, Inc. is not a party to this case.
STEP ACTION
1 Add the plaintiff and defendant in the traditional manner. (See 4.1.2 Adding/Creating New Parties for more information).
2 Enter in the Last/Business Name field: “ACME Products, Inc.” Click [Search]. Click [Select Party] or [Create New Party].

Civil Events
ECF User Manual 56 U.S. District Court, Eastern District of MI
Last Updated April 27, 2015
STEP ACTION
3 Select “Movant(mov:pty)in the Role drop‐down men.”
4 Click [Add Party].
5 Click [Create Case].
6 Click the Docket Lead Event link and Select Misc. Case – Initiating Motion . Continue the filing. For more information see Filing Initiating Document and Additional Information Required sections.
Registration of Judgment When filing a Registration of Judgment, ALL plaintiffs and defendants from the originating case in the originating court are added to the case. See the 4.1.2 Adding/Creating New Parties for more information on adding parties. In addition, the Certification of Judgment is added as a party with a Role of “In Re.” Do not add address information for any parties. Example: Case Number 94‐C‐6629 Judgment from the Northern District of Illinois to be registered in the Eastern District of Michigan.
STEP ACTION
1 Add the plaintiff and defendant in the traditional manner. (See 4.1.2 Adding/Creating New Parties for more information).

Civil Events
ECF User Manual 57 U.S. District Court, Eastern District of MI
Last Updated April 27, 2015
STEP ACTION
2 Enter in the Last Name Field: “Certification of Judgment” followed by the case number and name of the other court. Click [Search]. Most of the time, the search will return no results or results that do not match your search. Click [Create New Party].
3 Make sure the Last name field contains the entire information: Certification of Judgment + Case Number + Court For this example if the Last Name field could be expanded, it would look like this:
4 Select “In Re (inre:pty)” from the Role drop‐down menu.
5 Click [Add Party].
6 Click [Create Case].
tion of Judgment

Civil Events
ECF User Manual 58 U.S. District Court, Eastern District of MI
Last Updated April 27, 2015
STEP ACTION
7 Click the Docket Lead Event link and Select Misc. Case – Registration of Judgment. Continue the filing. For more information see Filing Initiating Document and Additional Information Required sections.
Petition to Enforce IRS Summons (For use by United States Attorney’s Office only) When filing a Petition to Enforce IRS Summons, the United States is added as a party with the role of “Petitioner” and the subject of the IRS Summons is added as the “Respondent.” Example: A Petition to Enforce IRS Summons is being filed against Daniel Princinsky. The United States initiates a Miscellaneous Case with the Petition as the initiating document.
STEP ACTION
1 Enter in the Last/Business Name field: “United States of America” Click [Search]. Select the United States of America from the list. Click [Select Party].
2 Set the Role to “Petitioner.”
3 Click [Add Party].

Civil Events
ECF User Manual 59 U.S. District Court, Eastern District of MI
Last Updated April 27, 2015
STEP ACTION
4 Enter the subject of the Summons in the Last/Business Name and First Name fields. Click [Search]. Click [Select Party] or [Create New Party].
5 Set the Role to “Respondent.”
6 Click [Add Party].
7 Click [Create Case].
8 Click the Docket Lead Event link and Select Misc. Case – Petition to Enforce IRS Summons. Continue the filing. For more information see Filing Initiating Document and Additional Information Required sections.

Civil Events
ECF User Manual 60 U.S. District Court, Eastern District of MI
Last Updated April 27, 2015
Applications for Writs of Continuing Garnishment (For use by United States Attorney’s Office only) When an Application for Writ of Continuing Garnishment is filed and relates to a previous criminal case, open the case as described in the General Information section. Add the parties as follows:
Plaintiff: United States of America
Defendant: Only the criminal defendant the garnishment pertains to
Once the parties have been added, the case is created and the following screen displays. IMPORTANT!! When filing an Application for Writ of Continuing Garnishment that relates to a previous criminal case and is the FIRST document being filed, DO NOT click the Docket Lead Event link shown in the screen above. Follow these instructions to docket the Application:
STEP ACTION
1 After receiving the case number, instead of clicking “Docket Lead Event,” click Civil from the main menu.
2 Click Post‐Judgment Collection Documents.
Figure 4.3-2
Civil Events
ECF User Manual 61 U.S. District Court, Eastern District of MI
Last Updated April 27, 2015
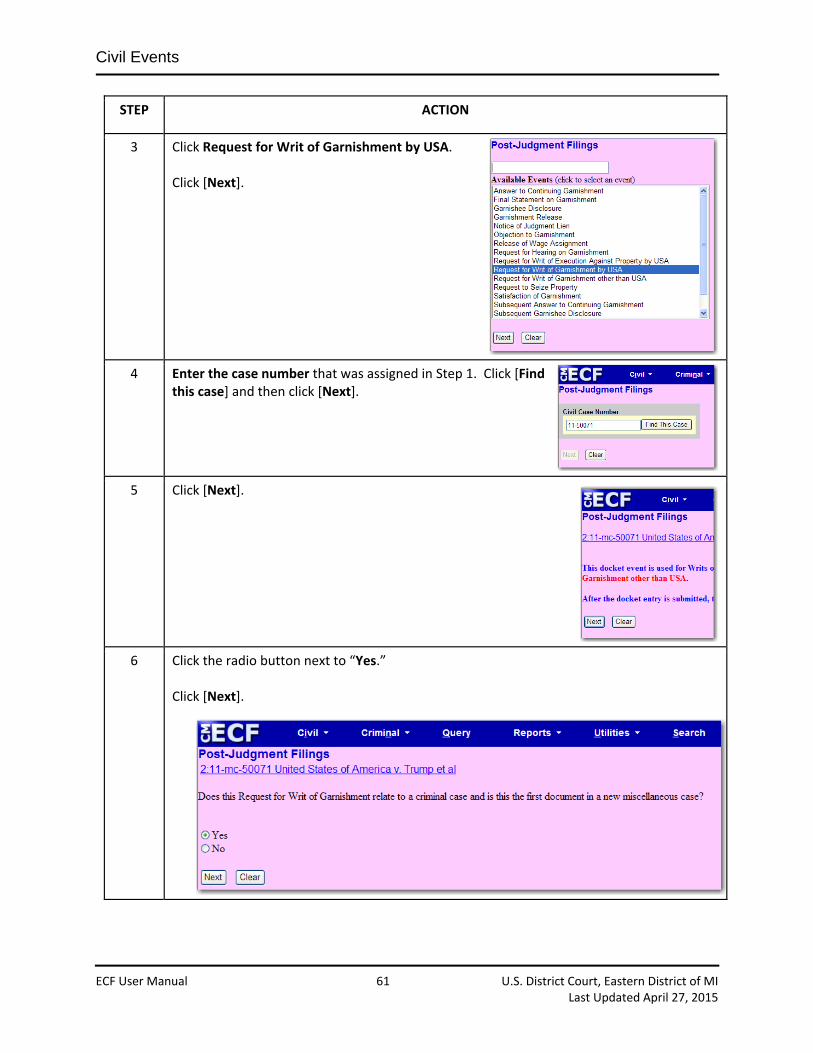
STEP ACTION
3 Click Request for Writ of Garnishment by USA. Click [Next].
4 Enter the case number that was assigned in Step 1. Click [Find this case] and then click [Next].
5 Click [Next].
6 Click the radio button next to “Yes.” Click [Next].
Civil Events
ECF User Manual 62 U.S. District Court, Eastern District of MI
Last Updated April 27, 2015
STEP ACTION
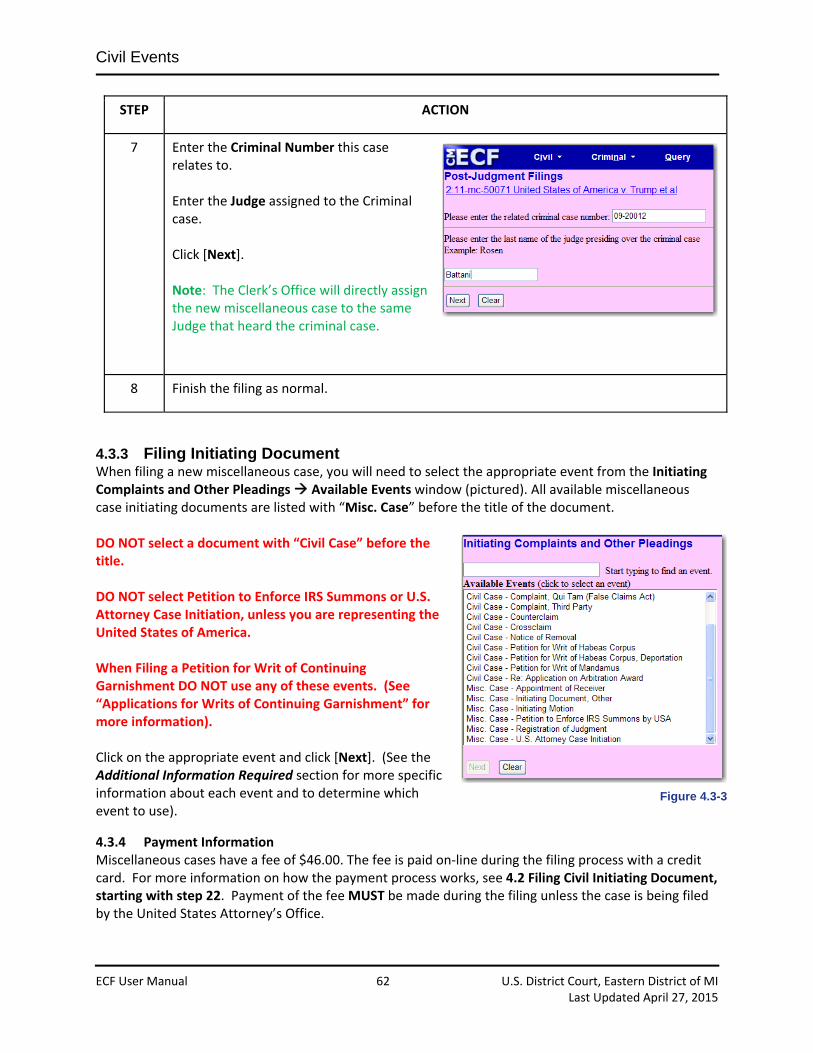
7 Enter the Criminal Number this case relates to. Enter the Judge assigned to the Criminal case. Click [Next]. Note: The Clerk’s Office will directly assign the new miscellaneous case to the same Judge that heard the criminal case.
8 Finish the filing as normal.
4.3.3 Filing Initiating Document When filing a new miscellaneous case, you will need to select the appropriate event from the Initiating Complaints and Other Pleadings Available Events window (pictured). All available miscellaneous case initiating documents are listed with “Misc. Case” before the title of the document. DO NOT select a document with “Civil Case” before the title. DO NOT select Petition to Enforce IRS Summons or U.S. Attorney Case Initiation, unless you are representing the United States of America. When Filing a Petition for Writ of Continuing Garnishment DO NOT use any of these events. (See “Applications for Writs of Continuing Garnishment” for more information). Click on the appropriate event and click [Next]. (See the Additional Information Required section for more specific information about each event and to determine which event to use).
4.3.4 Payment Information Miscellaneous cases have a fee of $46.00. The fee is paid on‐line during the filing process with a credit card. For more information on how the payment process works, see 4.2 Filing Civil Initiating Document, starting with step 22. Payment of the fee MUST be made during the filing unless the case is being filed by the United States Attorney’s Office.
Figure 4.3-3

Civil Events
ECF User Manual 63 U.S. District Court, Eastern District of MI
Last Updated April 27, 2015
4.3.5 Additional Information Required Depending on the type of document selected, there may be additional screens that require specific information. The table below will detail these screens and what information is required:
TYPE OF MISCELLANEOUS CASE SCREEN SHOT AND EXPLANATION
Appointment of Receiver:
1. The name of the court the Receiver was appointed in must be entered in the first field. The case number must be entered in the second field.
2. Select whether the image of the Order Appointing Receiver is a Certified or Non‐Certified image.
Initiating Document – Other:
1. This screen reminds the filer that this event is not to be used if the document being filed is a Registration of Judgment, Appointment of Receiver, or a Motion.
2. This screen requires that the title of the document be typed in the field. Example: Letters Rogatory
Initiating Motion:
1. This screen advises the filer that this event should only be used when filing a motion that initiates a case.
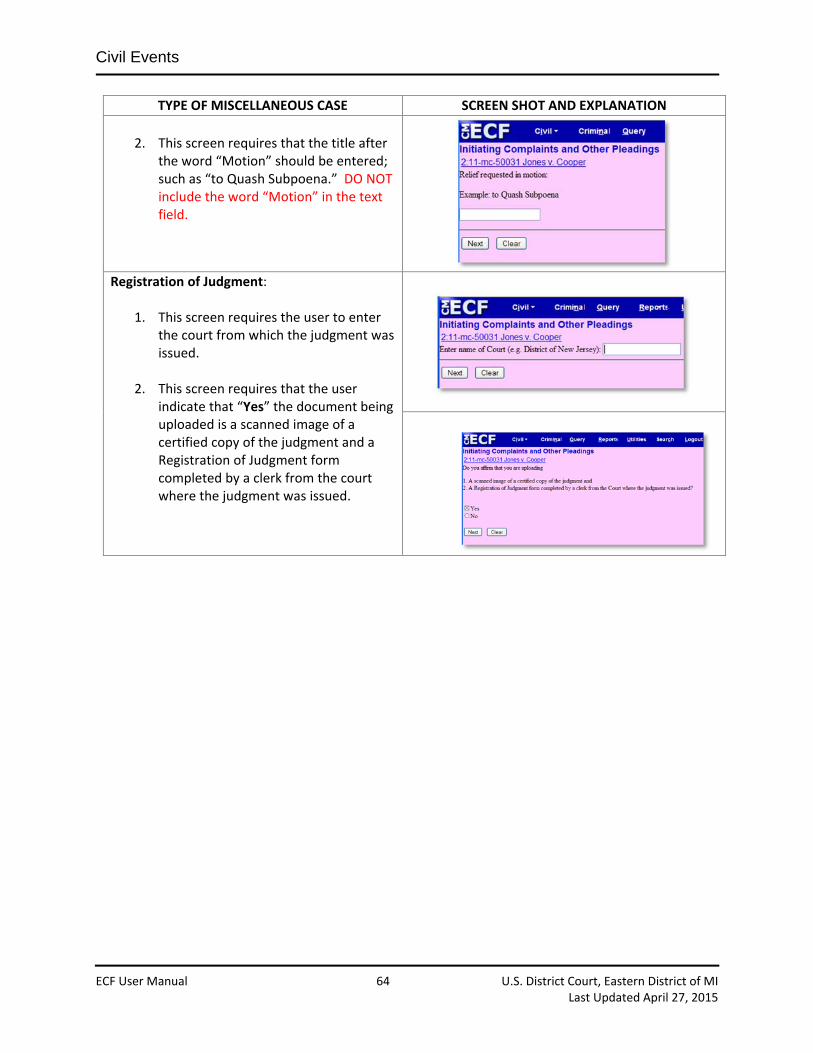
Civil Events
ECF User Manual 64 U.S. District Court, Eastern District of MI
Last Updated April 27, 2015
TYPE OF MISCELLANEOUS CASE SCREEN SHOT AND EXPLANATION
2. This screen requires that the title after
the word “Motion” should be entered; such as “to Quash Subpoena.” DO NOT include the word “Motion” in the text field.
Registration of Judgment:
1. This screen requires the user to enter the court from which the judgment was issued.
2. This screen requires that the user indicate that “Yes” the document being uploaded is a scanned image of a certified copy of the judgment and a Registration of Judgment form completed by a clerk from the court where the judgment was issued.
Civil Events
ECF User Manual 65 U.S. District Court, Eastern District of MI
Last Updated April 27, 2015
4.4 Filing an Attorney Appearance Filing an Appearance is necessary in order to link an attorney to a specific party in a case. Linking an attorney to a party ensures the attorney receives notices of electronic filing in a case. To file an attorney appearance, follow these steps:
STEP ACTION
1
Click on Other Documents under the category Other Filings.
2 A list displays with all available events in the Other Documents category. To find “Attorney Appearance,” scroll through the list or begin to type the desired event. The list will grow shorter as the system narrows the possible choices that match the criteria. Click the desired event, and the name will appear on the right in the Selected Event box.
Check that only the intended event is listed in the Selected Event window. The user can click the [Clear] button to remove all events from the Selected Event window.
3 Enter the case number and click [Find This Case].

Civil Events
ECF User Manual 66 U.S. District Court, Eastern District of MI
Last Updated April 27, 2015
STEP ACTION
4
Once the case number is found, the Next button will activate. Click [Next].
5
This screen serves as a reminder that e‐filing an attorney appearance adds to the case only the attorney whose login and password is used to e‐file the document. If multiple attorneys need to be added to a case, each attorney must e‐file an attorney appearance under his/her own login and password. To continue, Click [Next].
6
Upload the .PDF file containing the Attorney Appearance. Click [Browse…] and locate the document to be filed. See 3.6 Uploading Documents for more information. Once the file or files have been uploaded, click [Next].
Preview your document at this time. This can be done the same way as described in section 3.6 Uploading Documents steps 9‐10. Remember, once submitted, a filing cannot be edited or changed in any way by an attorney.

Civil Events
ECF User Manual 67 U.S. District Court, Eastern District of MI
Last Updated April 27, 2015
STEP ACTION
7 The Select Filer screen displays. On the left side of the screen all the parties for the case will be listed. On the right side of the screen, select the party on whose behalf the filing user is appearing. In this example, it is Lilly Alread. Click to highlight the party and click [Next].
8 At this point, the filing user is not associated with this case. This screen indicates that the attorney will now be associated with the party he or she is filing on behalf of. It is important that the boxes on this screen remain checked.
First Box Second Box
A checkmark in this box means the filing user will be added to the court docket as the attorney of record in this case for the listed party.
A checkmark in the second box means the filing user wants electronic notice of filings.
Click [Next].

Civil Events
ECF User Manual 68 U.S. District Court, Eastern District of MI
Last Updated April 27, 2015
STEP ACTION
9 This screen is the final check before committing this transaction. Look through the docket text to make sure it is correct, and verify the case number at the top of the screen. Notice the Source Document Path as another check that the correct PDF is uploaded to the record. At this point it is still possible to click back and make changes. Click [Next] to submit Note: Once the Next button is clicked, the transaction cannot be cancelled or changed.
10 The Notice of Electronic Filing displays.
4.5 Filing an Answer to Complaint Follow these steps to file an answer to complaint, claim, counterclaim, cross‐claim or third‐party complaint.
STEP ACTION
1 To file an answer to complete, click on “Answer to Complaints/Amended Complaints/Habeas Petitions” under the category of Initial Pleadings and Service. Note: DO NOT use this event if filing an answer to a document that is NOT a complaint, claim, cross‐claim, counterclaim, cross‐claim or third party complaint. Instead, use “Other Answers.”
2
Enter the case number and click [Find This Case].

Civil Events
ECF User Manual 69 U.S. District Court, Eastern District of MI
Last Updated April 27, 2015
STEP ACTION
3
If the case number is found, the [Next] button will activate. Click [Next] to continue.
4
The Select Filer screen displays. To select the filer, click on the filer’s name on the right hand side of the screen in the Select the Party window. In this example, the defendant, Lily Alread is selected. Click [Next].
5
At this point, the filing user is not associated with this case. This screen indicates that the attorney will now be associated with the party he is filing on behalf of. It is important that the boxes on this screen remain checked.
First Box Second Box
A checkmark in this box means the filing user will be added to the court docket as the attorney of record in this case for the listed party.
A checkmark in the second box means the filing user wants electronic notice of filings.
Click [Next].

Civil Events
ECF User Manual 70 U.S. District Court, Eastern District of MI
Last Updated April 27, 2015
STEP ACTION
6 The system now displays all of the complaints and claims, including notices of removal, counterclaims, cross‐claims and third‐party complaints, for which an answer is still due in the case. Check the box next to the entry that this answer relates to and click [Next].
Note: If the complaint was originally filed in another court and the case has been removed to federal court, select the Notice of Removal.
For more information about the complaint, click on the complaint’s document number hyperlink (1) to log into PACER and view the electronic image of the complaint. PACER fees will apply.
7 This screen reminds the filer of the obligation to file a Statement of Disclosure of Corporate Affiliations and Financial Interest if representing a corporate party. Once the filing of the answer to complaint is complete, the user should prepare and e‐file the Statement (if required) as a separate filing. (This form can be found on the court’s web site at www.mied.uscourts.gov in the Forms section.)
Click [Next] to continue.

Civil Events
ECF User Manual 71 U.S. District Court, Eastern District of MI
Last Updated April 27, 2015
STEP ACTION
8 Upload the PDF file containing the Answer. Click [Browse] and locate the document to be filed. See 3.6 Uploading Documents for more information. Once the file or files have been uploaded, click [Next].
Preview your document at this time. This can be done the same way as described in section 3.6 Uploading Documents steps 9‐10. Remember, once submitted, a filing cannot be edited or changed in any way by an attorney.
9 The next screen asks if there are additional documents included with the answer to complaint. Answer appropriately and click [Next].
10
If the answer in step 9 is “yes,” the screen below displays.
Put a check mark in the box by the appropriate question and click [Next].

Civil Events
ECF User Manual 72 U.S. District Court, Eastern District of MI
Last Updated April 27, 2015
STEP ACTION
Depending on the selection above, new parties may need to be added to the case. See 4.1.2 Adding/Creating a New Party for information on how to add a new party to a case.
11 If the answer includes a jury demand, choose “Yes”. If a reliance on jury demand is included, choose “Yes”. If neither applies, choose “No”. Click [Next] to continue.
12 If the answer includes affirmative defenses, choose “Yes”. If not, choose “No”. Click [Next] to continue.
13 If necessary, modify the docket text to be entered on the official case record in the ECF system. Use the free‐text boxes and drop‐down boxes, but only add text that is necessary to adequately describe the document. Click [Next] to continue.

Civil Events
ECF User Manual 73 U.S. District Court, Eastern District of MI
Last Updated April 27, 2015
STEP ACTION
If there are any mistakes in the docket text, it is still possible to fix them. Click on the “Back” button in the browser or click on “Civil” to start over.
14 The next screen is the final check before committing this transaction. Once again, review the docket text to make sure it is correct. Verify the case number at the top of the screen. Notice the text in red and blue. Once the information is verified, click the [Next] button.
15 The Notice of Electronic Filing will display.
4.6 Filing of Discovery Materials The District Court does not accept discovery material in accordance with Federal Rule of Civil Procedure 5(d) and Eastern District of Michigan Local Rule 26.2:
4.6.1 Fed. R. Civ. P. 5(d) FILING CERTIFICATE OF SERVICE: All papers after the complaint required to be served upon a party, together with a certificate of service, must be filed with the court within a reasonable time after service, but disclosures under Rule 26(a)(1) or (2) and the following discovery requests and responses must not be filed until they are used in the proceeding or the court orders filing: (i) depositions, (ii) interrogatories, (iii) requests for documents or to permit entry upon land, and (iv) requests for admissions. Note that “Discovery requests” include deposition notices and “Discovery responses” include objections. [Please review Fed. R. Civ. P. 30, 31, 33, 34, and 36.]

Civil Events
ECF User Manual 74 U.S. District Court, Eastern District of MI
Last Updated April 27, 2015
4.6.2 LR 26.2 Filing of Discovery Material [Effective 7/01/01] (a) Depositions, interrogatories, requests for the production of documents, requests for admission and responses to such discovery material shall not be filed with the Clerk except:
(1) When discovery material provides factual support of a motion, response, or reply, the party relying on the material must file it as an exhibit or attachment to the motion, response, or reply.
(2) When discovery material is to be read or otherwise used during a trial, hearing or other
miscellaneous proceeding, the party relying on the material must file it at the start of the trial, hearing or proceeding or at such later time as the Court permits.
(b) Filing of all deposition material shall be only in written form. If audiotaped or videotaped, a written transcript of the depositions will be accepted for filing. (c) The party taking the deposition, initiating interrogatories, requesting the production of documents and admissions and any responses to such requests shall maintain custody of the deposition or other discovery material until it is filed with the Court, or until six months after the expiration of the last applicable appeal period, or until the Court directs otherwise. When the Court orders filing, the party charged with custody of the discovery material must file it with the Court within 10 days of service of the order, unless the Court directs otherwise. (d) If discovery material not previously filed with the Clerk is needed for an appeal in a case, the party maintaining custody of the discovery material shall file it with the Clerk either on stipulation of the parties or on order of the Court. Note: See Notice Regarding Filing of Deposition and/or Other Discovery Material (Local Rule 26.2)
4.7 Filing a Civil Motion Follow the steps below to file a motion in a civil case:
STEP ACTION
1 After logging into the system and clicking on “Civil”, choose Motions under Motions and Related Filings.

Civil Events
ECF User Manual 75 U.S. District Court, Eastern District of MI
Last Updated April 27, 2015
STEP ACTION
2 The next screen displays a reminder about proper format of motions and briefs in support of motions. Click [Next].
3 The next screen displays a list of motion types. Click to select the desired motion type. To select multiple motion types click the additional types and they will be displayed in the Selected Events window. If the specific relief the motion is asking for is not in this list, select “Motion ‐ Free.” The ECF system will prompt for a description of the relief on a later screen. Click [Next].
Check that only the intended event is listed in the Selected Event window. The user can click the [Clear] button to remove all events from the Selected Event window.
4
The system prompts for the case number. Enter the case number and select [Find This Case].
5
If the case number is found, the [Next] button will activate. Click [Next] to continue.

Civil Events
ECF User Manual 76 U.S. District Court, Eastern District of MI
Last Updated April 27, 2015
STEP ACTION
6 The pick filer screen opens. Select the party filing this document from the Select Party window on the right side of the screen. Click [Next] to continue.
7
Upload the PDF file containing the Motion. Click [Browse] and locate the document to be filed. See 3.6 Uploading Documents for more information. Once the file or files have been uploaded, click [Next].
Preview your document at this time. This can be done the same way as described in section 3.6 Uploading Documents steps 9‐10. Remember, once submitted, a filing cannot be edited or changed in any way by an attorney.
8 Modify the docket text if necessary by using the drop down window or the free‐text window. Verify that all the information is correct and click [Next].
If there are any mistakes in the docket text, it is still possible to fix them. Click on the “Back” button in the browser or click on “Civil” to start over.
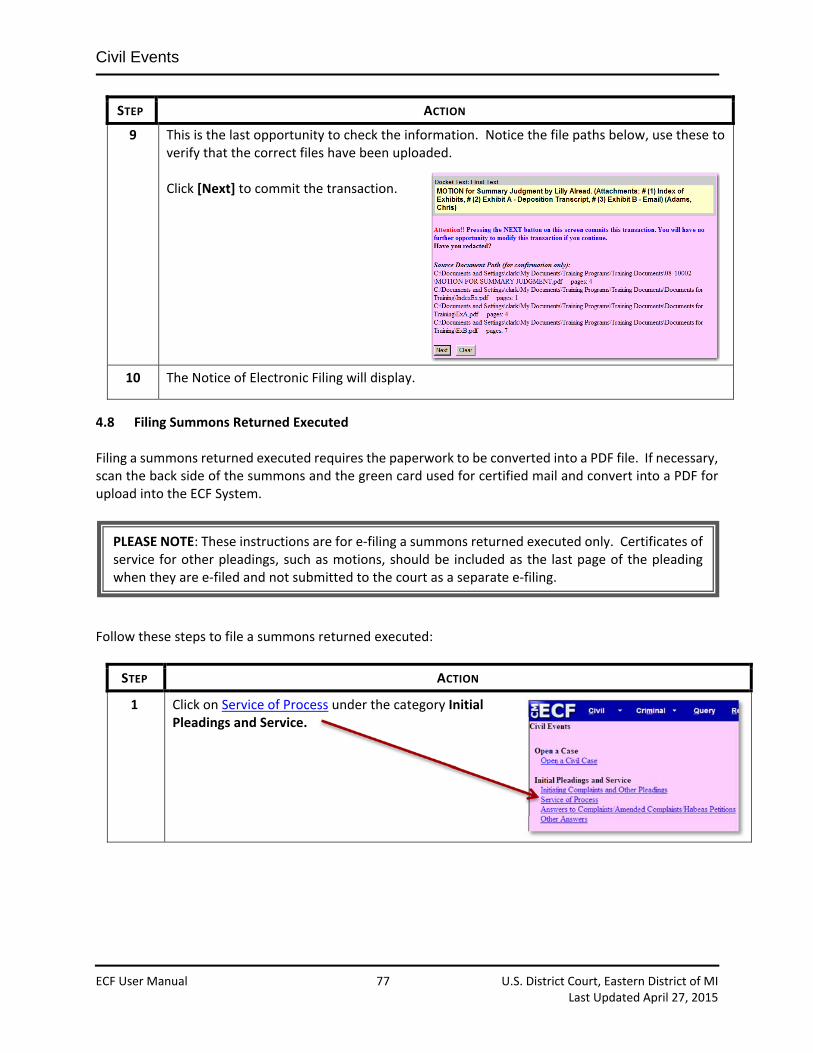
Civil Events
ECF User Manual 77 U.S. District Court, Eastern District of MI
Last Updated April 27, 2015
STEP ACTION
9 This is the last opportunity to check the information. Notice the file paths below, use these to verify that the correct files have been uploaded. Click [Next] to commit the transaction.
10 The Notice of Electronic Filing will display.
4.8 Filing Summons Returned Executed Filing a summons returned executed requires the paperwork to be converted into a PDF file. If necessary, scan the back side of the summons and the green card used for certified mail and convert into a PDF for upload into the ECF System. Follow these steps to file a summons returned executed:
STEP ACTION
1 Click on Service of Process under the category Initial Pleadings and Service.
PLEASE NOTE: These instructions are for e‐filing a summons returned executed only. Certificates of service for other pleadings, such as motions, should be included as the last page of the pleading when they are e‐filed and not submitted to the court as a separate e‐filing.

Civil Events
ECF User Manual 78 U.S. District Court, Eastern District of MI
Last Updated April 27, 2015
STEP ACTION
2 Click on the event “Certificate of Service/Summons Returned Executed” so it appears in the Selected Events list and click [Next].
3 Enter the assigned case number and click [Find This Case].
4 If the case number is found, the [Next] button will become active.
5 Click [Next] to continue.
6 The next step is to upload the PDF file containing the summons returned executed into the ECF system. The NOTICE reminds the user to be sure that the summons was properly served. If it was not, this event should not be used. Click [Browse] and locate the document to be filed. See 3.6 Uploading Documents for more information. Once the file or files have been uploaded, click [Next].
Preview your document at this time. This can be done the same way as described in section 3.6 Uploading Documents steps 9‐10. Remember, once submitted, a filing cannot be edited or changed in any way by an attorney.

Civil Events
ECF User Manual 79 U.S. District Court, Eastern District of MI
Last Updated April 27, 2015
STEP ACTION
7 If the party served was the U.S. Government, or an agency, department or official of the U.S. Government, type “y”. If not, type “n” and click [Next].
8 Select the party that was served the summons. DO NOT pick the filer of this document. In this case the plaintiff is verifying the defendant was properly served, therefore the defendant should be highlighted. Click the appropriate party and click [Next]. Note: If the party served is not listed, add the party by clicking [New Party]. For more information see 4.1.2 Adding/Creating New Party
9 Enter the date the party was served. After entering the “Date Served,” the “Date Answer Due” field will automatically populate. The formula takes into account days when the court is closed and weekends. Click [Next]. NOTE: Be sure to enter the date served, not the date the summons was issued.
10 Click [Next].

Civil Events
ECF User Manual 80 U.S. District Court, Eastern District of MI
Last Updated April 27, 2015
STEP ACTION
11 Review the final docket text before completing the filing. Also review the Source Document Path to make sure the proper PDF is going to be uploaded in the system.
Click [Next].
12 The Notice of Electronic Filing will display.

Filing Documents Under Seal
ECF User Manual 81 U.S. District Court, Eastern District of MI
Last Updated April 27, 2015
5 Filing Documents Under Seal Civil documents can be filed under seal using the ECF System. When a document is filed under seal, a Notice of Electronic Filing (NEF) will be sent to all parties; however, the document will not be viewable via the hyperlink contained in the NEF. The filing party must send copies to the other case participants. Although the capability exists to file a document under seal at any time, LR 5.3 and LR26.4 still require the filer obtain leave of the Court before filing a document under seal. Note: At this time criminal documents cannot be filed under seal and must be filed in the traditional manner. The following procedural steps can be applied to any sealed document. The events progress the same as unsealed events with the exception of several new screens.
STEP ACTION
1 From the ECF System Main Menu, click Civil.
2 Click Sealed Documents.
3 Select document type from the list of available events and click [Next]. Note: If the specific type of document being filed is not listed, select Sealed Document – Other.

Filing Documents Under Seal
ECF User Manual 82 U.S. District Court, Eastern District of MI
Last Updated April 27, 2015
STEP ACTION
4 Enter Case Number and click Find This Case. Note: The [Next] button will become active when case is found. Click the [Next] button to continue.
5 Select the party filing the document and click [Next].
6 This screen informs the filer that the document can only be filed pursuant to Local Rules 5.3 or 26.4. It also advises that the document must be served in the traditional manner. After reading the screen, click Yes to affirm compliance with Court Rules and click [Next].
7 Click [Browse] and locate the document to be filed. See 3.6 Uploading Documents for more information. Once the file or files have been uploaded, click [Next].

Filing Documents Under Seal
ECF User Manual 83 U.S. District Court, Eastern District of MI
Last Updated April 27, 2015
STEP ACTION
Preview your document at this time. This can be done the same way as described in section 3.6 Uploading Documents steps 9‐10. Remember, once submitted, a filing cannot be edited or changed in any way by an attorney.
8 Fill in the relief requested in the text box. Click [Next].
9 If this document relates to another document on the docket, indicate this by clicking the box on this screen and click [Next]. If this document does not relate to another document on the docket, leave the check box blank and click [Next]. Note: The Filed and Documents boxes are optional to narrow down options on the next screen.
10
Review docket entry. Use the optional text box to further describe the filing if necessary. Click [Next]. Note: Be sure the word SEALED appears before the event that you are filing. If it does not, stop the filing and use the Sealed Category of events.
11 Review the final docket text before completing the filing. Also review the Source Document Path to make sure the proper PDF is going to be uploaded in the system.

Filing Documents Under Seal
ECF User Manual 84 U.S. District Court, Eastern District of MI
Last Updated April 27, 2015
STEP ACTION
Click [Next].
12 The Notice of Electronic Filing will display.
5.1.1 Filing Sealed Initiating Documents Filing a new case under seal is different than filing documents under seal. Before filing the new case, contact the help desk at 313‐234‐5042. Note: The help desk is only available 8:30 a.m. to 4:30 p.m., Monday through Friday. For emergency after‐hour filings, contact the U.S. Marshals Service Control Center at 313‐234‐5656.
5.1.2 Filing Exhibits Under Seal
When filing a document that contains exhibits, there are two different scenarios:
Some or all of the exhibits are being filed under seal, but the main document is not.
The main document is being filed under seal as well as the exhibits.
IF... THEN...
Some or all of the exhibits are being filed under seal, but the main document is not,
File main document in the appropriate civil category; and use the “Sealed Exhibit” event to file the exhibits that are under seal. Be sure to relate those exhibits to the main document when prompted.
Main document and exhibits are being filed under seal,
Use the appropriate sealed event to file the main document, and then select “Yes” to the attachments question to upload the exhibits that are under seal.

Query
ECF User Manual 85 U.S. District Court, Eastern District of MI
Last Updated April 27, 2015
6 Criminal Events
6.1 Filing a Criminal Motion Follow these steps to file a motion in a criminal case:
STEP ACTION
1 After logging into the ECF system and reaching the Welcome Screen, click on the word Criminal in the Main Menu Bar.
2
Click Motions.
3 This screen reminds the filer that when filing a motion, the required brief and certificate of service must be included as one complete document. Do not make the brief an attachment to the main paper and do not send the brief as a separate filing. Click [Next].

Query
ECF User Manual 86 U.S. District Court, Eastern District of MI
Last Updated April 27, 2015
STEP ACTION
4 Enter the case number and click [Find This Case].
5
If there is more than one defendant in the case, the system displays the main case and a list of the individual defendant cases. Select the defendant(s) this motion applies to. In this example, it is the seventh defendant, Markus Sloane. After selecting that defendant’s name, click [Next].
6 The Select Filer screen displays. On the left side of the screen all the parties for the case will be listed. On the right side of the screen, select the party who is filing this motion. Click to highlight the party and click [Next]. Warning: You may only select a party for which the filing user has an appearance on the record. The other parties are greyed out.

Query
ECF User Manual 87 U.S. District Court, Eastern District of MI
Last Updated April 27, 2015
STEP ACTION
7 The next screen displays a list of motion types. Click to select the desired motion type. To select multiple motion types click the additional types and they will be displayed in the Selected Events window. If the specific relief that you are seeking is not in this list, select “Miscellaneous Relief.” The ECF system will ask for a description of the relief on a later screen. Click [Next].
8 The next step is to upload the PDF file containing the motion, brief, and certificate of service into the ECF system. Click [Browse] and locate the document to be filed. See 3.6 Uploading Documents for more information. Once the file or files have been uploaded, click [Next].
Preview your document at this time. This can be done the same way as described in section 3.6 Uploading Documents steps 9‐10. Remember, once submitted, a filing cannot be edited or changed in any way by an attorney.
9 If necessary, modify the docket text appropriately. It is possible to further describe the motion with the drop down and free‐text boxes. Click [Next].

Query
ECF User Manual 88 U.S. District Court, Eastern District of MI
Last Updated April 27, 2015
STEP ACTION
10 This screen is the final check before submitting this transaction. Once again, look through the docket text to make sure it is correct, and verify the case number at the top of the screen. Notice the text in red and blue. Click [Next].
11 The Notice of Electronic Filing will display.
6.2 Filing a Notice of Joinder/Concurrence to Motion In multi‐defendant cases, an attorney will sometimes file a notice of joinder to a co‐defendant’s motion.
STEP ACTION
1
Click on Criminal in the Main Menu Bar.
2 Click on Notices under the heading Other Filings.
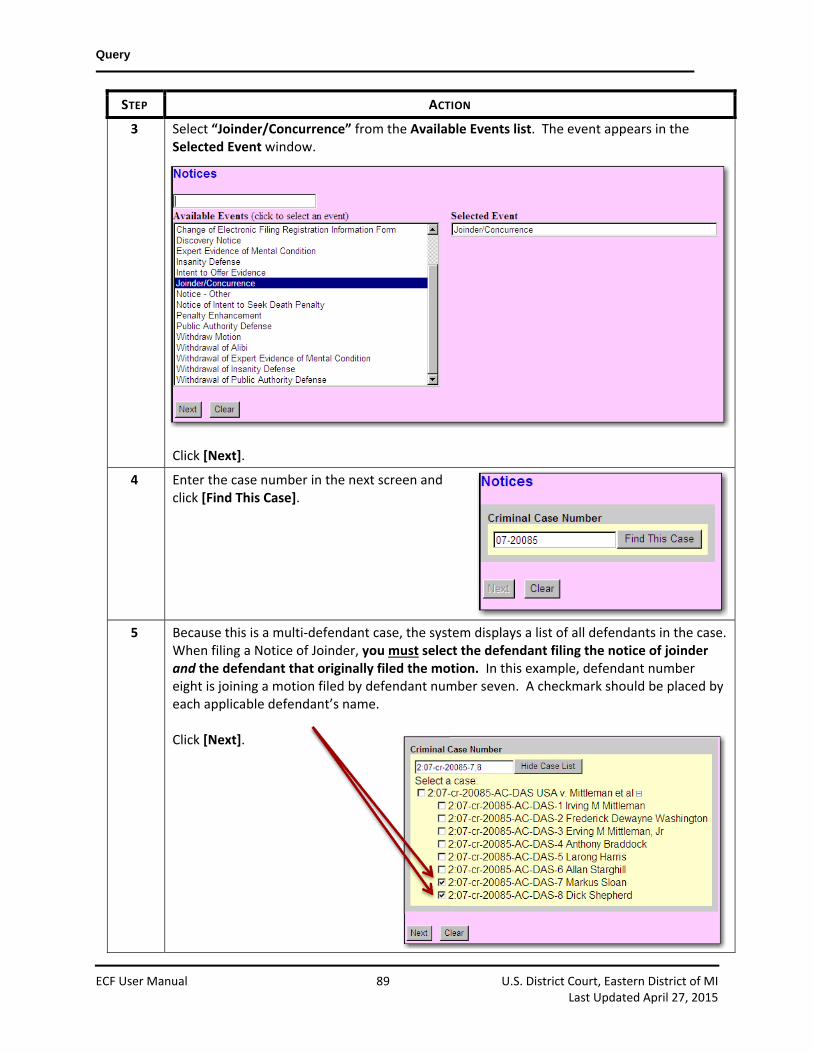
Query
ECF User Manual 89 U.S. District Court, Eastern District of MI
Last Updated April 27, 2015
STEP ACTION
3 Select “Joinder/Concurrence” from the Available Events list. The event appears in the Selected Event window.
Click [Next].
4 Enter the case number in the next screen and click [Find This Case].
5 Because this is a multi‐defendant case, the system displays a list of all defendants in the case. When filing a Notice of Joinder, you must select the defendant filing the notice of joinder and the defendant that originally filed the motion. In this example, defendant number eight is joining a motion filed by defendant number seven. A checkmark should be placed by each applicable defendant’s name. Click [Next].

Query
ECF User Manual 90 U.S. District Court, Eastern District of MI
Last Updated April 27, 2015
STEP ACTION
6 Click [Next] to continue to file the Notice.
7 The system displays the parties in the case. On this screen, only select the party filing this notice. Click on the filer’s name and click the [Next] button. Warning: You may only select a party for which the filing user has an appearance on the record. The other parties are greyed out.
8 The next step is to upload the PDF file containing the Notice of Joinder into the ECF system. Click [Browse] and locate the document to be filed. See 3.6 Uploading Documents for more information. Once the file or files have been uploaded, click [Next].
Preview your document at this time. This can be done the same way as described in section 3.6 Uploading Documents steps 9‐10. Remember, once submitted, a filing cannot be edited or changed in any way by an attorney.
9
The next screen is a reminder to users that a co‐defendant’s motion will only appear as an available document to link to if the user selected that co‐defendant’s case at the beginning of the filing. Click [Next].

Query
ECF User Manual 91 U.S. District Court, Eastern District of MI
Last Updated April 27, 2015
STEP ACTION
10 The system displays the applicable events from each of the defendant’s cases. If filing on a large case, scrolling slowly through each case may be necessary to locate more recent filings made by other defendants. In this example, the attorney is joining a co‐defendant’s motion to suppress evidence. Check the corresponding box to document number 10 and click [Next].
11 If necessary, modify the docket text using the free‐text box. Click [Next].
12 Look through the docket text to make sure it is correct, and verify the case number at the top of the screen and the Source Document Path. Notice the text in red and blue. Click [Next] to continue.
13 The Notice of Electronic Filing will display.

Query
ECF User Manual 92 U.S. District Court, Eastern District of MI
Last Updated April 27, 2015
7 Query
7.1 Querying the ECF System At any time during an ECF session, a filing user can click Query on the Main Menu Bar to search for case information by case number, date filed, nature of suit, party name or attorney name. See Figure 7.1‐1.
The system displays a PACER login screen. Enter a PACER login and password and a client code if desired. See Figure 7.1.‐2.
If a filing user logs into the system for querying purposes only and not to electronically file documents, there is no need to enter a Court‐issued login and password. Enter a PACER login and password instead. See 3.2 Entering the ECF system for further information. Once a PACER login and password is entered, the Query Screen displays. See Figure 7.1‐3.
Figure 7.1-1
Figure 7.1-2

Query
ECF User Manual 93 U.S. District Court, Eastern District of MI
Last Updated April 27, 2015
There are several ways to search, as explained in the table below:
Field Explanation
Case Number Search by full or partial case number. Examples: Full Case Number = 2:10cv12345 Partial Case Number = 10‐12345
Case Status Use this option to narrow down results when searching other criteria.
Filed Date This will search for cases that were filed between a given start and end date. Use Format: mm/dd/yy.
Last Entry Date This will search for cases that have a last entry that falls between a given start and end date. Use Format: mm/dd/yy.
Nature of Suit Search by the type of case filed. Example: Social Security, Habeas, Civil Rights
Cause of Action Search by the Federal Cause of Action Code
Name Search by Business/Last Name, First Name, Middle Name. If searching for a company, enter the entire company name in the Business/Last Name field.
Type Search for either a Party or an Attorney.
Figure 7.1-3
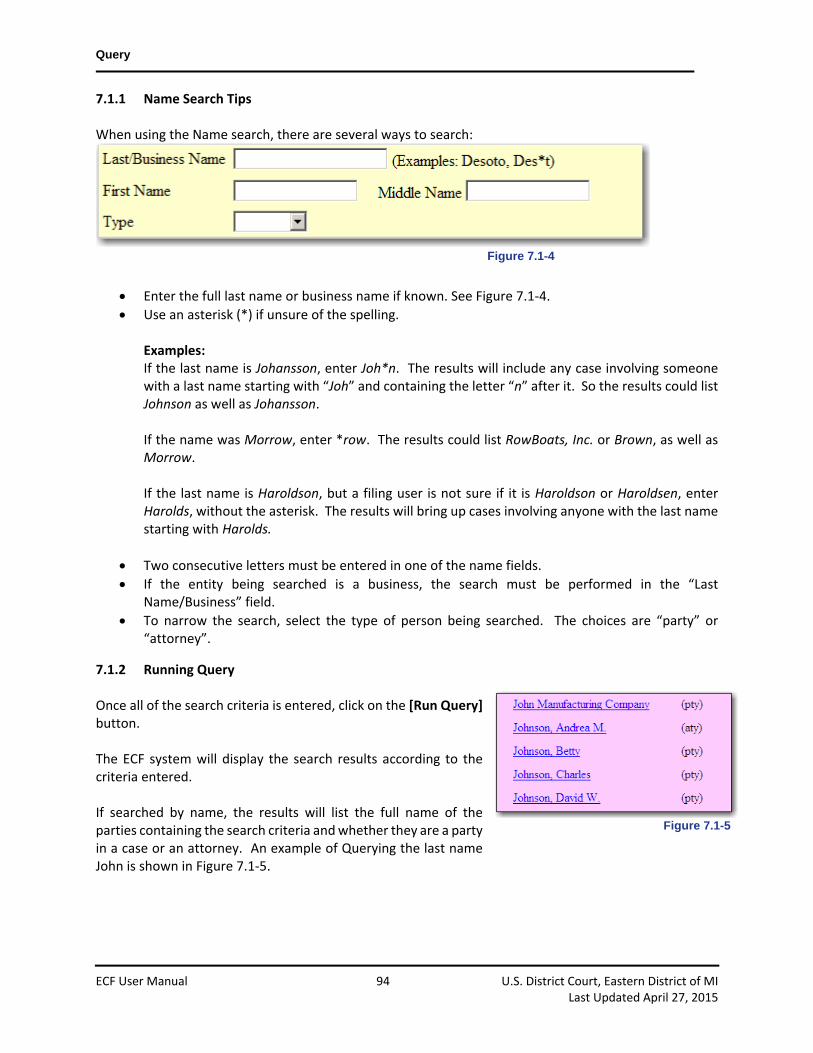
Query
ECF User Manual 94 U.S. District Court, Eastern District of MI
Last Updated April 27, 2015
7.1.1 Name Search Tips When using the Name search, there are several ways to search:
Enter the full last name or business name if known. See Figure 7.1‐4.
Use an asterisk (*) if unsure of the spelling. Examples: If the last name is Johansson, enter Joh*n. The results will include any case involving someone with a last name starting with “Joh” and containing the letter “n” after it. So the results could list Johnson as well as Johansson.
If the name was Morrow, enter *row. The results could list RowBoats, Inc. or Brown, as well as Morrow.
If the last name is Haroldson, but a filing user is not sure if it is Haroldson or Haroldsen, enter Harolds, without the asterisk. The results will bring up cases involving anyone with the last name starting with Harolds.
Two consecutive letters must be entered in one of the name fields.
If the entity being searched is a business, the search must be performed in the “Last Name/Business” field.
To narrow the search, select the type of person being searched. The choices are “party” or “attorney”.
7.1.2 Running Query Once all of the search criteria is entered, click on the [Run Query] button. The ECF system will display the search results according to the criteria entered. If searched by name, the results will list the full name of the parties containing the search criteria and whether they are a party in a case or an attorney. An example of Querying the last name John is shown in Figure 7.1‐5.
Figure 7.1-4
Figure 7.1-5

Query
ECF User Manual 95 U.S. District Court, Eastern District of MI
Last Updated April 27, 2015
If information is entered in the “Filed Date” field, the system will list the results by case number. An example of a Query of cases filed within a date range is shown in Figure 7.1‐6.
If the party selected is involved in more than one case, the system will list all of the case numbers associated with that party. After entering the appropriate query criteria and selecting the case number or party name queried, a Query Menu will be displayed. The Query Menu allows a review of specific case information. See Figure 7.1‐7. Perform any of the following tasks:
Alias: See a list of any aliases for the parties in the case
Associated Cases: Retrieve case numbers of any associated cases
Attorney: View the names and contact information for all attorneys involved in the case.
Case File Location: View Case File Location (usually available electronically)
Case Summary: Retrieve a case summary
Deadlines/Hearings: Review upcoming deadlines and hearings
Docket Report: Run a docket report listing all entries on the case. See 7.1 Docket Sheets for more information
Filers: See a list of filers in the case
History/Documents: View the history of the case with the ability to look at a specific date range or certain docket events
Party: See a list of all parties of the case
Related Transactions: Find transactions in the case related to one another
Status: Look at any pending statuses
View a Document: View a specific document, if the docket entry number is known
Figure 7.1-6
Figure 7.1-7

Reports
ECF User Manual 96 U.S. District Court, Eastern District of MI
Last Updated April 27, 2015
8 Reports
8.1 Docket Sheet The system allows a filing user to run a number of reports, the most common one is the docket report. To run a docket report, click on “Reports” in the Main Menu Bar. See Figure 8.1‐1.
The next screen gives a list of reports. Click on Docket Sheet. See Figure 8.1‐2.
Figure 8.1-1
Figure 8.1-2

Reports
ECF User Manual 97 U.S. District Court, Eastern District of MI
Last Updated April 27, 2015
If logged into the system with a Court‐issued login, the system will ask for a PACER login and password before displaying the next screen. See Figure 8.1‐3.
Depending on the options selected when the report is requested, the report shows every party and attorney on a case and the docket text of every event. When creating the docket sheet report, the system displays the following report selection screen. See Figure 8.1‐4.
#1
#2
Figure 8.1-3
Figure 8.1-4
Reports
ECF User Manual 98 U.S. District Court, Eastern District of MI
Last Updated April 27, 2015
Explanation Screen Area
Enter the case number in the “Case number” field and click [Find This Case].
The next fields are the date range fields. Use these fields to search for events filed or entered between a specified start date and end date, inclusive.
If only a start date is entered, the report will include events filed or entered on or after that date.
If only an end date is entered, the report will include events filed or entered on or before that date.
If the fields are left blank, the report will show all events regardless of filed or entered date, depending on other entries on this screen.
Use the Documents field to display documents that adhere to the criteria entered only.
The system will not display unnumbered events, such as minute sheet entries of court proceedings.
Enter only a beginning range number and the report will include documents with that number or higher.
Enter only an ending range number and the report will include documents with that number or lower.
Leave these fields blank and the report will show all documents and events regardless of document number, depending on other entries on this screen.
Parties and Counsel: If checked will display Case caption with parties, roles and attorneys.
Terminated parties: If checked will display parties even if they have been previously terminated from the case.
List of member cases: Will list any linked member cases that are associated with this case.
Links to Notices of Electronic Filing: The docket sheet will have a silver ball next to the docket number of those items which have a Notice of Electronic Filing. If generating the docket to print it, it is not necessary to include the links.
Checking Include headers when displaying PDF documents will display all PDF documents with a banner on top of each page containing the case number, docket entry number, date filed and page number on it. The option to “View Multiple Documents” allows a user to select multiple docket entries and combine them to be one PDF.

Reports
ECF User Manual 99 U.S. District Court, Eastern District of MI
Last Updated April 27, 2015
Explanation Screen Area
The “Sort by” option allows the user to specify the order in which the events listed in the report will be sorted. Oldest date first is the traditional order. This means that the events will be shown in the order they were filed or entered, with the most recent event at the end of the report. Most recent date first would put the first event last. Since oldest date first is the most common display, that is the default selection.
After entering the preferred options for viewing the docket, click [Run Report]. The docket report will generate. See Figures 8.1‐5, 8.1‐6, and 8.1‐7 for explanations of the screen.
An example of the heading and the case summary of the docket sheet report are shown below. See Figure 8.1‐5.
This part of the docket sheet report contains the court, the case number, and the basic case information, most of which was entered when the case was opened.
Figure 8.1-5
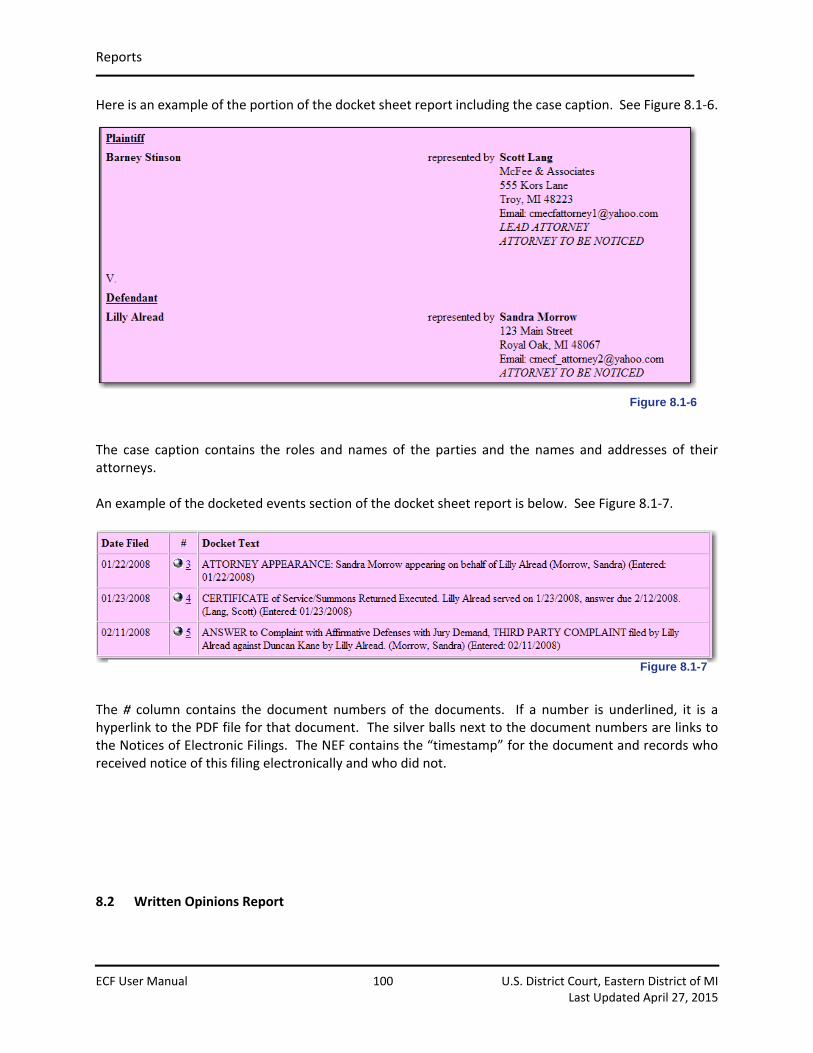
Reports
ECF User Manual 100 U.S. District Court, Eastern District of MI
Last Updated April 27, 2015
Here is an example of the portion of the docket sheet report including the case caption. See Figure 8.1‐6.
The case caption contains the roles and names of the parties and the names and addresses of their attorneys. An example of the docketed events section of the docket sheet report is below. See Figure 8.1‐7.
The # column contains the document numbers of the documents. If a number is underlined, it is a hyperlink to the PDF file for that document. The silver balls next to the document numbers are links to the Notices of Electronic Filings. The NEF contains the “timestamp” for the document and records who received notice of this filing electronically and who did not.
8.2 Written Opinions Report
Figure 8.1-6
Figure 8.1-7

Reports
ECF User Manual 101 U.S. District Court, Eastern District of MI
Last Updated April 27, 2015
Pursuant to the E‐Government Act of 2002 and starting in April 2005, a filing user has the ability to view written opinions free of charge using PACER. To run a report of written opinions by district and magistrate judges in the Eastern District of Michigan, click on “Reports” in the Main Menu Bar. See Figure 8.2‐1.
Click on the link Written Opinions. See Figure 8.2‐2.
Figure 8.2-1
Figure 8.2-2

Reports
ECF User Manual 102 U.S. District Court, Eastern District of MI
Last Updated April 27, 2015
There are several search options available. A filed start and end date must be entered. The system will automatically enter dates a month apart. See Figure 8.2‐3.
Search Options:
To search by case number, enter a valid format in the “Case Number” field (e.g. 05‐50000).
To search by party, enter the last name or company name. For valid search options, see 7.1 Querying the ECF System.
To search by nature of suit, select one of the codes with its accompanying description. The nature of suit describes the basic issue of the case chosen by the plaintiff in the case from a pre‐determined list that is part of the civil cover sheet.
A user can also search by case type, and search according to case flags. Always leave the cause code blank. The Eastern District of Michigan does not use cause codes to identify cases.
To narrow the search results, use a combination of search options, ex. Last Name, Nature of Suit and date.
The results will show the case number and the date the order was filed. To view the written opinion, click on the document number to open the PDF image, see the arrow in Figure 8.2‐4. The case number is an optional link to the docket sheet, but PACER fees apply, if activated.
Figure 8.2-3

Reports
ECF User Manual 103 U.S. District Court, Eastern District of MI
Last Updated April 27, 2015
To save the document to the computer’s hard drive or to print a copy of the document, click on the icons shown below the ECF System Main Menu Bar. See Figure 8.2‐5.
Figure 8.2-4
Figure 8.2-5

Utilities
ECF User Manual 104 U.S. District Court, Eastern District of MI
Last Updated April 27, 2015
9 Utilities
The Utilities section of the ECF system allows a filing user to update his or her contact information, change login and password, electronically send proposed orders to chambers, change certain PACER information and to determine which attorneys are registered users in a specific case. To access this information, click on Utilities in the Main Menu Bar. See Figure 9.1‐1.
9.1 Updating Address Information According to LR 11.2, if there is a change in an attorney’s contact information, the attorney must file and serve a notice with the new contact information. Failure to file promptly current contact information may subject that person or party to appropriate sanctions, which may include dismissal, default judgment, and costs. Once the notice has been filed per LR 11.2, the attorney must also update the information in their CM/ECF Profile. Follow these steps to update the filing user’s name, mailing address and phone number:
STEP ACTION
1 From the Utilities menu, click on Maintain Your Address
Figure 9.1‐1

Utilities
ECF User Manual 105 U.S. District Court, Eastern District of MI
Last Updated April 27, 2015
STEP ACTION
2 Make any appropriate changes and click [Submit].
3 The next screen asks if all, none or just particular cases should be updated with the new information. THE COURT HIGHLY RECOMMENDS THAT THE ATTORNEY UPDATE ALL CASES SO CONTACT INFORMATION IS ALWAYS ACCURATE. After choosing ***Update All*** click [Submit].

Utilities
ECF User Manual 106 U.S. District Court, Eastern District of MI
Last Updated April 27, 2015
STEP ACTION
4 The system displays a confirmation screen to indicate that the change has been made.
9.2 Changing Email Information and Preferences Follow the steps below to change the primary and secondary e‐mail addresses and e‐mail preferences:
STEP ACTION
1 From the Utilities Menu, click Maintain Your E‐Mail.
2
The e‐mail information for the filing user will display. To add an additional e‐mail address to the account, click add new e‐mail address. To edit an e‐mail address, click the address to be edited.

Utilities
ECF User Manual 107 U.S. District Court, Eastern District of MI
Last Updated April 27, 2015
STEP ACTION
3 Make changes as required.
“Should this e‐mail address receive notices?” This should ALWAYS be “Yes.” If not, the filing user will not receive notices when documents are filed in all cases the attorney is associated with.
How should notices be sent to this e‐mail address is a matter of preference: o If Per Filing is selected, the NEF’s will be sent to the attorney as each
document is filed. o If Summary Report is selected, the filing user will receive one email a day
that contains a report of all the filings that occurred the previous day. If Summary Report is selected, the option below that asks if an email
should be sent indicating “no activity” when nothing is filed in any of the filing user’s case needs to be answered.
Format of the emails can be either in HTML or Text: o HTML: Most emails can accept HTML emails and will allow hyperlinks to be
included to allow the user to click on the link to view documents filed. o Text: Should only be used when a filing user’s email client does not allow for
HTML.
Should this email receive general announcements from the court can be set to yes or no, however, if it is set to no, the filing user may miss important system outage messages.
The [Show all cases for this e‐mail address] button will display a list that indicates all the cases this email address is associated with. This is useful when determining which cases a Notice of Change of Address must be filed in.

Utilities
ECF User Manual 108 U.S. District Court, Eastern District of MI
Last Updated April 27, 2015
STEP ACTION
4 The second half of the screen allows for case specific options to be selected.
To receive notices in a case that the filing user is not associated with (attorney is not listed in the caption), enter the case number in the Add additional cases for noticing box. NOTE: Notices received in these cases will not provide the filing user with a “free look” at the document filed.
It is possible to select certain cases that should be received in the opposite type than what is selected above.
o Select the cases that should you want to change the method of receipt for and click the [Change selected cases to…] button. Note when a case has been selected and changed, it will not appear in the other box.
o The filing user can also choose to stop receiving notices in a particular case, by selecting that case and clicking [Remove selected cases]. NOTE: If the attorney is a participant in the case, the system will not allow the case to be removed from the box. This should only be used when an “additional case” has been added and now is to be removed.
5 Repeat steps 2‐4 for changes to secondary email addresses.
6 Once all changes have been made, click [Submit Changes].

Utilities
ECF User Manual 109 U.S. District Court, Eastern District of MI
Last Updated April 27, 2015
9.3 Changing Login and Password Follow these steps to change a filing user’s login and password.
STEP ACTION
1 Click on Maintain Your Login/Password from the Utilities menu.
2 Choose a Login and Password and enter them in the appropriate boxes. The password is limited to eight characters, but may contain letters, numbers and symbols. Click [Submit].
3 The login and password are now changed.

Utilities
ECF User Manual 110 U.S. District Court, Eastern District of MI
Last Updated April 27, 2015
9.4 Determining Appropriate Service of Papers
Use the Mailings Category in the Utility Screen to determine which parties in a particular case require paper service. This information is required to accurately complete a certificate of service. Follow these steps to determine the e‐filing status of attorneys in a particular case:
STEP ACTION
1 From the Utilities Menu, click on Mailings...
2 Click on Mailing Info for a Case.
3 Enter the case number, find the case and click [Submit].
4 The system lists all parties in the case and whether or not each party is a filing user.
This attorney would need manual service

Utilities
ECF User Manual 111 U.S. District Court, Eastern District of MI
Last Updated April 27, 2015
9.5 Utilities Features – Proposed Orders The Proposed Orders link is used to submit proposed orders, stipulated orders and stipulations and orders combined into one document to judicial officers. If a document requires a signature of the judicial officer, it generally should be submitted using this link, see E.D. Mich. LR 58.1(c). All proposed orders should be saved and submitted in a format compatible with WordPerfect. Do not convert the proposed order to PDF. Follow these steps to submit a proposed order.
STEP ACTION
1 From the Utilities Menu, click on Proposed Orders.
2 Click on Submit Proposed Order.
3 From the drop down menu, select the judicial officer that should receive the proposed order Enter the attorney’s email address Enter the Case Number Add a brief comment
5 Attach the proposed order by clicking on the [Browse] button and locating the proposed order in the computer’s drives, following the instructions given to upload any document to the ECF system. The document should be saved as a format compatible with WordPerfect, not PDF. (Microsoft Word is compatible) Click [Submit Proposal].
6 The system will show a confirmation screen stating the proposal has been submitted. In addition, the system will send an e‐mail to the e‐mail address entered in the “from” field as

Utilities
ECF User Manual 112 U.S. District Court, Eastern District of MI
Last Updated April 27, 2015
STEP ACTION
confirmation that the proposed order was submitted. No notices of electronic filing are sent. A copy of the proposed order should be provided to all other parties by the submitting
attorney according to Rule 11 of the ECF Policies & Procedures. To return to the ECF System to perform other functions, click on “Return to CM/ECF“ in the Main Menu Bar.

Logging Out
ECF User Manual 113 U.S. District Court, Eastern District of MI
Last Updated April 27, 2015
10 Logging Out
10.1 Logging Out of the ECF System Logout of CM/ECF after completing all transactions for a particular session. Simply closing the browser window is not enough. Instead, click on Logout in the Main Menu Bar. This will automatically log out of the ECF system and return the filing user to the ECF main login screen. See Figure 10.1‐1.
Figure 10.1-1