Embed Size (px)
Citation preview

ECE 477 Final ReportSpring 2004
Team Code Name: ____Universal Exports_________________________ Team ID: __5__
Team Members (#1 is Team Leader):
#1: __Edward Sheriff______________ Signature: ____________________ Date: _________
#2: __Dan Sparks_________________ Signature: ____________________ Date: _________
#3: __Mike Klockow______________ Signature: ____________________ Date: _________
#4: __Jon Hopp__________________ Signature: ____________________ Date: _________
Due Wednesday, May 5, at 5:00 PM
Submit a ring/spiral-bound hard copy of this report along with a CD-R of your complete web site image
Mike Klockow Ed Sheriff Dan Sparks Jon Hopp
Please print this document single-sided!

ECE 477 Final Report Spring 2004
REPORT EVALUATION
Component/Criterion Score Multiplier Points
Abstract 0 1 2 3 4 5 6 7 8 9 10 X 1
Project Overview and Block Diagram 0 1 2 3 4 5 6 7 8 9 10 X 2
Team Success Criteria/Fulfillment 0 1 2 3 4 5 6 7 8 9 10 X 2
Constraint Analysis/Component Selection 0 1 2 3 4 5 6 7 8 9 10 X 2
Patent Liability Analysis 0 1 2 3 4 5 6 7 8 9 10 X 2
Reliability and Safety Analysis 0 1 2 3 4 5 6 7 8 9 10 X 2
Ethical/Environmental Impact Analysis 0 1 2 3 4 5 6 7 8 9 10 X 2
Packaging Design Considerations 0 1 2 3 4 5 6 7 8 9 10 X 2
Schematic Design Considerations 0 1 2 3 4 5 6 7 8 9 10 X 2
PCB Layout Design Considerations 0 1 2 3 4 5 6 7 8 9 10 X 2
Software Design Considerations 0 1 2 3 4 5 6 7 8 9 10 X 2
Version 2 Changes 0 1 2 3 4 5 6 7 8 9 10 X 1
Summary and Conclusions 0 1 2 3 4 5 6 7 8 9 10 X 1
References 0 1 2 3 4 5 6 7 8 9 10 X 2
Appendix A: Individual Contributions 0 1 2 3 4 5 6 7 8 9 10 X 4
Appendix B: Packaging 0 1 2 3 4 5 6 7 8 9 10 X 2
Appendix C: Schematic 0 1 2 3 4 5 6 7 8 9 10 X 2
Appendix D: Top & Bottom Copper 0 1 2 3 4 5 6 7 8 9 10 X 2
Appendix E: Parts List Spreadsheet 0 1 2 3 4 5 6 7 8 9 10 X 2
Appendix F: Software Listing 0 1 2 3 4 5 6 7 8 9 10 X 2
Appendix G: User Manual 0 1 2 3 4 5 6 7 8 9 10 X 2
Appendix H: FMECA Worksheet 0 1 2 3 4 5 6 7 8 9 10 X 2
Technical Writing Style 0 1 2 3 4 5 6 7 8 9 10 X 5
CD-R of Website Image 0 1 2 3 4 5 6 7 8 9 10 X 2
TOTAL
-ii-
Comments:

ECE 477 Final Report Spring 2004
TABLE OF CONTENTS
Abstract 1 1.0 Project Overview and Block Diagram 2 2.0 Team Success Criteria and Fulfillment 4 3.0 Constraint Analysis and Component Selection 5 4.0 Patent Liability Analysis 9 5.0 Reliability and Safety Analysis 13 6.0 Ethical and Environmental Impact Analysis 18 7.0 Packaging Design Considerations 22 8.0 Schematic Design Considerations 27 9.0 PCB Layout Design Considerations 3010.0 Software Design Considerations 3211.0 Version 2 Changes 3912.0 Summary and Conclusions 4013.0 References 41Appendix A: Individual Contributions A-1Appendix B: Packaging B-1Appendix C: Schematic C-1Appendix D: PCB Layout Top and Bottom Copper D-1Appendix E: Parts List Spreadsheet E-1Appendix F: Software Listing F-1Appendix G: User Manual G-1Appendix H: FMECA Worksheet H-1
-iii-

ECE 477 Final Report Spring 2004
Abstract
This design of a wireless ordering device (WOrD) will allow a customer to view limited
menus and possibly other information at a commercial establishment (e.g. a restaurant or bar). A
transmitter connected to a host computer will serve as a base station transmitting menus and
other information. A remote device will act as a user interface receiving the transmitted
information and transmitting orders to the base station. This remote device’s interface will
include an LCD display and menu navigation buttons. The aim of this system is to increase
restaurant throughput and profit margins while enhancing the customers dining experience.
-1-

ECE 477 Final Report Spring 2004
1.0 Project Overview and Block Diagram
The WOrD system allows a user to remotely access a menu, and select items from that
menu. The remote device accepts menu information from a base station. The user will then
navigate these menus and select their choices. An LCD display will be used to view the menu
information and navigation buttons are provided for the user to access menu items and make
their selection. Remote devices communicate with the base station through an RF link. While
Bluetooth or 802.11 is an option for communication they are deemed too costly in terms of
development and integration. A serial transceiver provides the basic functionality needed with
much less overhead and is actually more commonly used for similar devices. This requires the
development of a communication/ authentication protocol between the host and remote devices.
A two channel transceiver for our prototype design is used because of cost and design overhead,
but a commercially viable system would utilize a transceiver with more channels when more
units are implemented. A bank of LED’s is controlled by the remote device’s microcontroller
and be illuminated when the remote device has been alerted by the base station that the user’s
table is ready. The remote device is powered by a single battery. In addition, interface software
allows a user to create menus and update remote devices. This software allows a user to view
orders submitted by remote devices as well as alert the devices when tables are ready. The goal
of this system is to enable a user to order drinks and appetizers from an easy to navigate menu
and have those items waiting at their table when they are seated.
The Wireless Ordering device is composed of two main units. First, the base station is
connected to the serial port of the host computer. It acts as a buffer between the PC serial port
and the remote device network through the RF link as shown in Figure 1-1.
-2-

ECE 477 Final Report Spring 2004
Figure 1-1 Base Station Block Diagram
The remote unit is a little more complicated. At the heart of its design is an Atmel
ATmega162v microcontroller. It receives its data from the same Atmel transceiver that is in the
Base Station as well as five user navigational buttons on the device. From this, it decodes the
signal and controls the menu displayed on the LCD module as well as the status of the
notification LEDs as shown in Figure 1-2. The remote device also transmits order information
and confirmation through the RF link.
Figure 1-2 Remote Unit Block Diagram
-3-
ECE 477 Final Report Spring 2004
2.0 Team Success Criteria and Fulfillment
Success Criteria Status Details
Ability for remote device to send
order information wirelessly and
confirm order.
FAILED Problems arose from reference design.
Not enough development tools available
to debug and fix RF connection.
Ability for the base station to alert
remote unit and illuminate LEDs.
COMPLETE Base station sends alert message to turn
LEDs on and another to turn them off.
Ability for the base station to send
menu information to remote device.
COMPLETE Base station sends menu information
through a wired link to remote device.
Ability for remote device to decode
and display menu information on
the LCD display.
COMPLETE Remote device decodes messages from
bases station, decodes them and correctly
displays them on the LCD display.
Ability for user to easily navigate
menu on remote unit’s LCD
display.
COMPLETE Intuitively arranged navigation buttons
make it easy to navigate the menu.
Ability to edit menu information on
base station through a software
interface.
COMPLETE Graphical user interface parses menu text
file and allows a user to easily modify
and save it.
-4-

ECE 477 Final Report Spring 2004
3.0 Constraint Analysis and Component Selection
This design of a Wireless Ordering Device (WOrD) will allow a customer to view limited
menus and possibly other information at a commercial establishment (e.g. a restaurant or bar). A
transmitter connected to a host computer will serve as a base station transmitting menus and
other information. A remote device will act as a user interface receiving the transmitted
information and transmitting orders to the base station. This remote device’s interface will
include an LCD display and menu navigation buttons. The focus will be on developing a small,
user friendly portable device that is also cost efficient. The handheld unit must have low power
consumption and also be able to send and receive data from anywhere within the immediate
vicinity of the establishment.
Analysis of Design Constraints
Computational Requirements:
Most parts of the handheld unit are fairly small and are not computationally intensive.
Data transfer will be transmitted relatively slowly. The menu interface on the device does not
need to be particularly fast, and will be handled mainly by the display adapter. The bulk of the
computational requirement will be on the base station which will be able to edit the menu
selections that are on the device.
Interface Requirements:
The main interfacing with our design is mainly a graphical LCD display and the RF
transmitter/receiver units. Along with this, we will also have multiple push buttons for
selections made on the device and LED’s which will light up when signaled.
While Bluetooth or 802.11 is an option for communication they are deemed too costly in
terms of development and integration. A serial transceiver provides the basic functionality
needed with much less overhead and is actually more commonly used for similar devices. This
-5-

ECE 477 Final Report Spring 2004
requires the development of a communication/authentication protocol between the host and
remote devices. It must be possible for many remote devices to be in operation at the same time.
The protocol must have a way to validate received orders or request the re-transmission of an
order and the remote device must re-transmit any order if it has not received a confirmation of
that order within a certain time. A two channel transceiver will be used for the design because of
cost and design overhead, but a commercially viable system would utilize a transceiver with
more channels.
Power Supply Constraints:
The portable device will be running on batteries and therefore need to consume as little
power as possible. The microprocessor should also be chosen so that it will consume minimal
power to perform the required operations. A watchdog timer will be needed should the battery
voltage drop below its critical level or if any electromagnetic interference or electrostatic
discharge causes the microcontroller to execute erroneous instructions.
Another constraint on the handheld device is the clock speed. Since the design doesn’t
need a high computing power, a slow clock can be chosen for the design. However, we need to
be able to choose a frequency of operation that is fast enough to handle the LCD display as well
as the RF transmissions. The base station can be run on an external power supply and therefore
does not have to be subject to the same constraints as the portable unit. The computer attaches to
the RF adapter directly and therefore the power comes from the computer directly.
Packaging Constraints:
The device should be small and light as to be carried around a restaurant easily. It should
not be much bigger than an average drink coaster, but still need to have a readable display and
easy to use interface with moderately sized buttons.
Cost Constraints:
-6-
ECE 477 Final Report Spring 2004
The LCD screen will be the most expensive part of the design. Some of the larger
graphical displays can be up to $60 or $80, while some of the text only displays can be between
$20 and $40. Since one of the main focuses of our project is cost, we decided to send out many
requests for LCD displays and see what companies responded. In doing so, Microtips agreed to
supply us with their 128x128 Graphics Display for no cost. The Atmel microcontroller and
transceiver we have chosen also are each under $10. Therefore the total cost with all the other
minor parts will hopefully be under $35.
Rationale for Component Selection
Microcontroller:
We considered a few different microcontroller solutions, but we decided that the
ATmega88 [3-2] was the best to fit our needs. Atmel chips were originally chosen because they
offer a wide variety of chips with many I/O ports, on-chip peripherals, memory sizes, and low
power consumption. Along with this, the Atmel chips cost considerably less than Rabbit chips
[3-1] which have extra features and overhead that are not needed for our design. The PIC family
of microcontrollers is also worth a look. Although they are also low in cost, PIC
microcontrollers are designed to be high performance, and thus have a high clock frequency
which would not be as suitable for our needs since power consumption is a major factor in our
design.
Within the Atmel family, we decided to use the “Mega” series because of their extended
I/O pins and large amount of SRAM and EEPROM needed in the graphical menu display. The
memory size summary is shown below:
Device Flash EEPROM Interrupt Vector Size SRAM
ATmega48 4K Bytes 256 Bytes 1 instruction word/vector 512 Bytes
ATmega88 8K Bytes 512 Bytes 1 instruction word/vector 1K Bytes
ATmega168 16K Bytes 512 Bytes 2 instruction words/vector 1K Bytes
-7-

ECE 477 Final Report Spring 2004
All three of these designs have a dual USART capability which is a must for our project
design. These three devices differ in only memory sizes, boot loader support, and interrupt
vector sizes. Also, power consumption for each of these three designs is similar. For our design,
we need to have a considerable amount of memory for the graphical LCD menu display for
storage of graphics and character generation. We chose the ATmega88 over the ATmega44
because it has twice as much EEPROM and SRAM memory where the ATmega168 contains the
same amount of EEPROM and SRAM as the ATmega88.
LCD Monitor:
There was much debate about which LCD display to use for the design. We disagreed on
using either a 20x4 character display or a small graphics display. We decided that a graphic LCD
display would be preferable if we could sample a part for free, but if not, we would just buy a
character display since the graphical models cost around $60 or more. While we were rejected
by Hantronix for parts sampling, Microtips agreed to send us the 128x128 Graphics Display [3-
5]. This cuts down on our budget considerably since the LCD monitor would have been the most
expensive part in our entire design.
Transceiver:We discussed both a Bluetooth/802.11 and a Serial RF solution. It was tentatively
decided that Serial RF was easier to integrate and cheaper to implement. Our design does not
need to have a high data rate since the menus will be uploaded around once a day or less. Also
the data sent from the handheld device to the base station will be encoded such that the amount
of data sent is small as possible. The Serial RF solution allows us to eliminate the software
overhead that would be required with the Bluetooth/802.11 implementation.
Initially we didn’t find many low cost solutions out there for single chip transceivers.
Two that we did happen to find were the AT86RF211 [3-3] from Atmel and the nRF401 [3-4]
Transceiver from Nordic VLSI.
-8-

ECE 477 Final Report Spring 2004
4.0 Patent Liability Analysis
The goal of this project is to create a wireless ordering device that allows one to send
orders for food into the kitchen of a restaurant while waiting for a table and have that order
prepared and ready to eat as soon as a table is available. This system consists of one or more
remote devices that communicate menu and ordering information over an RF link to a base
computer. The base computer receives orders and is where the menu information can be
changed and sent to the remote devices. The remote device contains a microcontroller that
interfaces with an LCD module to store the menu information to be displayed. It also features
several LEDs that illuminate to alert the user that their table is ready. As patents deal with the
function of objects and the manner in which they implement that functionality, the best
candidates for patent infringement are the functionality of transmitting order information and
also of alerting the user that their table is ready. The communication protocol the system uses
may be patented as well.
Results of Patent Search
Much time was spent searching through the U.S. Patent Office’s website. Searches were
run on wireless communication, wireless devices, coaster pagers, portable transceivers, portable
display units and ordering systems. Similar products were also searched for and patents assigned
to the company producing those products were looked up. Jtech [4-1] makes a coaster pager that
simply lights up and/or vibrates to signal the user. A company called Commtech Wireless [4-2]
implements a variety of similar systems. The biggest maker of wireless devices that use
networks to send and receive information is NTN Communications [4-3]. NTN would parallel
much of the menu display and communication functionality of the project.
Surprisingly, NTN has no patents assigned to them and Jtech has only patented the case
of their coasters. Commtech has no patents. This could mean either that similar devices are not
unique enough to patent, that another party has patented the unique functionality of those
devices, or that it is possible to write a new patent. The search of the U.S. Patent Office’s
archives produced several patents that may be relevant to the project. Below are the most
relevant patents that could be found and a summary of how they coincide with the wireless
-9-

ECE 477 Final Report Spring 2004
ordering system. The search for patents was quite difficult and time consuming because a
similar device was not found that could help narrow down a search.
D371,054 Coaster and Pager [4-4]
Figures portray a square coaster with an arrangement of LEDs inside its transparent
casing. Nothing is said about how the coaster is alerted to light up.
6,681,109 Server Call System [4-5]
This patent covers a system where each table has a keypad and they enter a code for what
they want and the information is transmitted to a central computer. The keypads contain an LED
that lights up when the order is confirmed. The central computer alerts servers, who carry
remote units for this purpose, when orders are made by their tables. Both table keypads and
server units contain transponders used to locate the units. This patent covers many features of
our system. It describes a central computer and remote units that communicate user input to the
central computer, wireless communication between central computer and remote devices, and a
need for a communication protocol. The crux of our project lies in the concept of a central
computer and remote units transmitting information back and forth.
6,208,976 Order Management and System with Auto Menu Updating [4-6]
This patent describes an ordering device that utilizes a menu layout almost exactly like
the layout designed for the project. It uses a hierarchical list with sub menus organized into a
tree. When the ordering device is started up, it queries a central computer to see if any changes
have been made to the menu, receiving any new information if changes have been made. The
patent describes using interfaces like touch screens and keypads. The perceived use of this
system is for drive-thrus at fast food establishments. The claims section specifically describes
the system as wired.
Analysis of Patent Liability
D371,054 Coaster and Pager [4-4]
-10-

ECE 477 Final Report Spring 2004
This would be an infringement under the doctrine of equivalents. The project will
certainly utilize LEDs to inform users that their table is ready for them. It is most likely easy to
circumvent this infringement by arranging the LEDs in a distinctly different pattern. This design
patent covers only the design. No patent was found that covered the method used to
communicate to the coaster the need to illuminate the LEDs. A substantially different look
should make the remote device unique enough to not conflict with this patent.
6,681,109 Server Call System [4-5]
This could be interpreted as a literal infringement. The patent mentions a keypad and
display for entering information and receiving messages. The devised project does not
implement separate units for servers, as the main focus of the project is to receive and prepare
orders before people get their table. It would cheapen the restaurant experience to talk to a box
at the table instead of a waiter. Also, the ordering device has a menu that the user can navigate
through instead of a list of codes for different orders. This entering of order information is
completely different than the patent. The purpose of the patent is to alert a server that a table has
a request for something so that the server will take care of the customers. The purpose of the
project is to tell a server what customers would like to have at their table when they are seated.
The order is sent straight to the kitchen and the server doesn’t need to think about it until the
customers are ready to be seated, then the server simply checks to see if any food is up for that
table. This argues that the patent and the project do not perform substantially the same function.
The patent describes a different method for communication as well. It utilizes a keypad and list
of codes that are translated by the central computer into an order. The project utilizes a
navigable menu with descriptions of menu items to help the user determine their order.
Navigation buttons are used to scroll through menu options whereas the patent uses numeric
codes. The menu display versus the list of codes is substantially different ways of going about
ordering food.
6,208,976 Order Management and System with Auto Menu Updating [4-6]
This would be an infringement under the doctrine of equivalents, as the patent describes a
menu display implementation nearly identical to the layout of the project the focus on the fact
-11-

ECE 477 Final Report Spring 2004
that the patent specifically mentions wired communication and the project specifically calls for
wireless. This is a substantially different way of communicating.
Action Recommended to Avoid Infringement
For patent D371,054 it would be best to avoid an arrangement of LEDs that looks similar
to the arrangement depicted in the figures published with the patent. As it is a design patent,
only the final appearance of the project would be considered an infringement.
For patent 6,681,109 it would be necessary to go into detail about the purpose of the
project, focus on the difference in function of these two ideas. Proving the method of
implementing the claims of each idea would be more difficult as both use wireless
communication and simple authentication protocols. The biggest difference lies in the user
interface, but both require the user to push buttons. The focus of the patent is in a system of
communicating with servers and the focus of the project is to facilitate a diner’s eating
experience by reducing the setup time to eat.
For patent 6,208,976 the definition of the project should suffice to avoid patent
infringement. While both ideas use the same menu structure and display, one communicates to a
central computer wirelessly and the other does not. If this is not a sufficient difference, it would
be necessary to alter the menu layout. It could be argued that a hierarchical menu organization is
an obvious organization and therefore not subject to grounds of infringement.
-12-
ECE 477 Final Report Spring 2004
5.0 Reliability and Safety Analysis
For your consideration, our project has been called the “Wireless Ordering Device,” with
the unfortunate acronym “WOrD.” This device will not only perform the same function as
current restaurant seating devices, which light up when a waiting customer’s table is ready, but
adds the functionality of being able to order drinks and appetizers while waiting, so that they can
be ready when the table is. The device itself will be a low-powered battery operated box about
the size of a coaster, with an LCD screen and a few small buttons. The coaster will communicate
via RF with a small device hooked up to the serial port of a computer that will display the
appetizer and drink orders. Since the coaster is battery powered and the batteries are in a
separate sealed compartment, there is little to no risk of a malfunction physically harming
anyone. The base module likewise is not much of a threat due to it never needing to be in any
contact with people except during install, and there are so few components that the chance of
malfunction is small.
Reliability Analysis
As with many designs, the most vulnerable part of the device’s design is in the power
supply. Voltages and current tend to run higher here, as well as temperatures, and parts tend to
wear down faster under those conditions. Even though power consumption has been minimized
to run on a battery, there are places where smaller pieces handle larger current. There are also
some delicate portions in the RF that, although not especially vulnerable, could cause nearly
untraceable malfunctions if something like frequency drift happened. The components that I will
look at are the 1N5822 Zener diode, the Si9435 transistor, our rather high-valued 150uF
polarized capacitor, and our .07 ohm resistor.
1N5822 Zener Diode
According to the reference documentation, the equation for the failure rate of a diode is:
λp = λb πT πS πC πQ πE
-13-
ECE 477 Final Report Spring 2004
For a Schottky Power Diode, base failure rate λb = 0.0030. According to the graphs in the
design specs, we can expect our diode to run around 85C with the current draw estimated during
design time, making πT = 5.7. For Voltage stress πS, since the Voltage applied isn’t near the
maximum rated voltage, the value of 0.054 can be used. An appropriate Quality factor was 5.5,
or commercial grade, and contact construction looked like 2.0. And while we frequently feel that
CL (factor listed in the RPEE as “Launched from a Cannon”) is an appropriate environment, GM
(Ground, Mobile) will be the environment for all components, so πE = 9.0.
λp = 0.0030 * 5.7 * 0.054 * 2.0 * 5.5 * 9.0 = 0.091 failures/ 106 hour.
MTTF = 1/ λp = 1.17 hours, or around 1250 years.
Si9435 Power MOSFET
The equation for transistors is very similar to that for diodes, with a few different values
for constants.
λp = λb πT πA πQ πE
Base rate λb = 0.012 for MOSFETs. I couldn’t find appropriate information on operating
temperature, so I will assume it to be near that of the power diode (it should be close, and
hopefully not too much over), so πT = 3.0. Since 5W is the maximum power of the power
MAX776, we will use that value and get 2.0 for πA, the application factor. The quality and
environment values of 5.5 and 9.0 remain the same, so
λp = 0.012 * 3.0 * 2.0 * 5.5 * 9.0 = 3.6 failures/ 106 hour.
MTTF = 1/ λp = 2.8x10⁵ hours, or about 32 years. This might be a problem, so it would
be wise to try to find a solution to this. First, we could run tests to find out more accurately how
hot this component is getting, and lower it with a heat sink if needed. Perhaps a component with
a higher quality rating could be used as well, at some expense. This may be the component that
causes the most complaint.
Power Resistor
The equation for a power resistor is:
-14-

ECE 477 Final Report Spring 2004
λp = λb πR πQ πE
λb takes into account both temperature and stress factors. If we go with earlier temperature
considerations, and assume high stress, 0.017 should be a safe base rate. However, maximum
stress cannot be calculated because at that assumed temperature, maximum would be beyond
tolerance, and our design may or may not push the line. Testing and measurements will tell, so
we will assume it is high. πR did not have a resistance in the range of the Power Resistor in our
design. Since it is less than 1Ω we will choose the closest range and use 1.0. Quality and
environmental standards are the same, except the constants are different in this table, making
them 3.0 and 10 respectively.
λp = 0.017 * 1.0 * 3.0 * 10 = .51 x 10-6.
MTTF = 1/ λp = 2.0x10⁶ hours, or around 223 years, an iffy figure.
150uF Polarized Capacitor
The equation this time is:
λp = λb πCV πQ πE
It is very similar to that of the resistor, except with a capacitance factor instead of a
resistance factor. For the Base Failure Rate, we will once again assume a similar high
temperature and high stress, since this is in the power supply, and get a rate of 0.077. This time,
there is no mention of being out of tolerance. The Capacitance Value will need to be calculated
by hand, since the value is high. The equation is
πCV = 1.1C (uF) 0.085 = 1.1 (150)0.085 = 1.68.
Quality factors are still to be assumed on the low end and Environment still
mobile/ground, so the values in this case are both 10.
λp = 0.077 * 1.68 * 10 * 10 = 12.9 / 106
-15-

ECE 477 Final Report Spring 2004
This result is not surprising, considering we assumed a low quality capacitor and high
stress and temperature. However, actual values may be within a power of 10.
Using this value, MTTF = 1/ λp = 77,519 hours. This is a lousy value. Before accepting
this, I would want to go back and measure temperature and stress levels in an actual circuit,
because this capacitor is scheduled to blow in under 8 years of use. In a commercial product,
this is utterly unacceptable. Steps would be taken to make sure this component was kept cool
and was a high quality component, and the circuit might be redesigned (maybe splitting the load
among parallel capacitors). But for development, this will have to do. And it must be taken into
account that factors used in estimation are very conservative, and temperature estimates may not
reflect actual running temperatures.
FMECA
For our evaluation, the two levels of criticality are Low (below 106 days MTTF) and
Notable (greater than 106 days MTTF). Nothing really deserves a higher rating than that,
because there is little to no risk of physical injury. The worst risk is the LCD screen going out
and someone getting mad and throwing it at someone, which is beyond our responsibility if we
round out the corners. The failure divisions are noted below. Please note that, although we do
have 2 microprocessors and 2 RF units, they are almost nearly identical, and are lumped
together. Only a single example of each will be included. Also, the power supplies of both the
base and mobile units have been lumped together.
Abbreviation Unit
RF RF Module
PS Power Supply
MC Microcontroller
LED LEDs
LCD LCD Screen and Logic Converters
COM RS-232 Communication
-16-
ECE 477 Final Report Spring 2004
Conclusion
It was surprising how quickly components can fail under high temperature and
high stress situations. Although some assumptions made may have been toward the extreme
conservative side, it shows how these considerations need to be taken into account during design
time. It is interesting to note that the Power MOSFET and Power Diode are rated to last longer
than the capacitor and resistor, likely because they were designed specifically for use in power
supplies.
-17-

ECE 477 Final Report Spring 2004
6.0 Ethical and Environmental Impact Analysis
The wireless ordering device (WOrD) allows a customer to view limited menus and
possibly other information at a commercial establishment (e.g. a restaurant or bar). A transmitter
connected to a host computer will serve as a base station transmitting menus and other
information. A remote device will act as a user interface receiving the transmitted information
and transmitting orders to the base station. This remote device’s interface will include an LCD
display and menu navigation buttons. In the design and development of both the base station and
remote unit the safety of the end user is the foremost priority. Precautions should be taken to
ensure that there are no safety concerns and that the software is fully tested. In addition, the
environmental impact of the remote and base station units must be considered. Precautions
during the production, lifetime, and disposal should be taken to limit or prevent negative
environmental impact.
Ethical Impact Analysis
Through out the design and development phase, the ethical impact must be considered.
During the design period, there is a direct need to work towards producing a high quality and
dependable product which is safe for the end user. This requires additional time in component
selection and circuit design in order to minimize points of failure and more importantly minimize
chances of injury to the end user. After the initial design phase, extensive testing must be
completed. This is a must, since adequate testing can lead to the discovery of unexpected errors
which may have otherwise prevented the device from functioning correctly. The entire design
and development process, from start to finish, must be completed in an ethical fashion so that
problems can be prevented before they happen.
In the design phase of the WOrD system an additional goal must be added to the list of
success outcomes: provide a product that is dependable and safe. For the WOrD system, this
means that several precautions must be taken throughout the design phase. First, in the design of
both the base and remote units, all traces must have appropriate sizes and all components must
be grounded correctly. It is important to design the power supplies for such that risk of shock is
minimized. This requires the use of proper ground of all components and special care in
-18-

ECE 477 Final Report Spring 2004
grounding the LCD case since it requires a slightly higher bias supply. This will ensure that no
shorts or excessive currents will cause harm to the user. Also, it is necessary to pay close
attention to the RF sections of both the base unit and the remote unit in order to prevent
interruption of service to any other FCC certified devices. This means that these units must be
designed such that there are little or no spurious emissions. This thought must continue into the
design of the digital section in order to prevent any digital noise from being transmitted. Next,
when designing the remote device, it is expected that the circuit construction and packaging will
be able to stand up to adequate shock since it will be used by an untrained end user. This
requires that it is physically able to withstand being dropped from heights in excess of five feet,
which in turn requires special attention to component selection and packing layout. The case
should also be designed so that it is water proof. This will prevent any accidental spills from
causing the device to fail. In addition these packaging requirements, the packaging should be
designed for ease of usability since the end user will most like have little or no instruction on its
use. This will ensure that the remote device will serve its function and prevent frustration and
provide its intended services. Finally, completing a reliability and safety analysis (such as in
homework nine) before the product is expected in the market can add additional insight into the
ethical impact of the system.
After the initial design phase, the software development and design phase must be
completed is such a way as to prevent any unexpected glitches in the operation of the device.
While it would be possible to ship the device with software that provides basic functionality,
additional software development can greatly reduce the likelihood of device malfunction and
improper usage. In this stage it is important to test all software functions and ensure that the
software can handle all user inputs (even unexpected ones) with out failing. This can prevent
problems such as locking up when a user presses buttons in an unexpected combination or
getting stuck in a look where food items may be ordered over and over. In addition, by adding
built-in self tests, external hardware can be checked by the microcontroller to ensure proper
functionality of each attached section. These tests can include things suck as a power on self test
where the microcontroller can attempt to communicate with all hardware and when a failure
occurs an error message can be displayed. Other tests can check for low power during operation
and verify that the RF section is within range. Again, the results could be display when there are
errors thus preventing the end user from using a malfunctioning device.
-19-
ECE 477 Final Report Spring 2004
In addition to the above suggestions on ethical design several other steps can be taken.
These include adding warning labels in appropriate places to advise the end user that attempting
repair of the device may result in injury. Also, warning of repeated shaking or dropping may
result in damage. This ensures that the end user will know how to prevent damage to the unit
and protect themselves from injury. Additional warnings that advise of proper cleaning and care
of the device can be placed in the operating manual. This will allow those familiar with the
device to be able to care for it without using any methods that may result in damage to the device
or themselves.
Environmental Impact Analysis
Similar to the ethical impact, throughout the design and development process the
environmental impact must be considered. There are several stages that the system will go
through in its lifetime. These include manufacturing, shipping, normal use, and disposal.
Throughout these different phases, the impact on the environment must be considered and extra
precautions must be taken in order to limit the negative impact.
During the development and manufacturing phase several considerations can be made.
First, smart engineering can reduce the amount of power utilized by the system. This idea of
“green engineering” can not only save the end user money, but also reduce energy consumption
and increase battery lifetime. This process only require a little extra thought when designing the
power supplies and attempting to produce the most efficient power supplies possible. During the
manufacturing phase the use of utilizing lead free solder and non-ozone depleting de-fluxing
chemicals can help reduce the damage to the environment. Also, utilizing a PCB manufacturing
process that complies with EPA regulations should be considered throughout this phase. The
waste created through the manufacturing process should be minimized, chemical byproducts
should be disposed of through environmental friendly methods, and every attempt should be
made to recycle and reuse these chemicals.
Once the manufacturing phase has been completed, the product should be shipped in
environmentally friendly ways. This can include minimizing the product packaging size and
using biodegradable packing materials. At this point the end user will receive the system and it
-20-

ECE 477 Final Report Spring 2004
will enter its normal usage phase. Even though the product will have a minimum environmental
impact at the time, several precautions should be taken. Since the remote unit will utilize battery
power, the consumer should be educated in proper recycling methods. By placing warning labels
on batteries and in the user’s manual, the end user will have a better understanding of disposal
and recycling methods. This, in turn, can help to reduce the effects on the environment due to
improper disposal of batteries.
After the product has successfully completed its lifetime obligations and the end user is
ready for disposal, it is important to consider the environmental impact that disposal can have.
It is important for the LCD display to be disposed of properly since it can contain mercury or
cadmium and these chemicals can cause sever damage to the environment. To assist with this
problem appropriate warning labels should be placed on the device and further information about
appropriate disposal methods and recycling should be placed in the user’s manual. In addition,
many of the integrated circuits and even the PCB can have a negative effect on the environment.
These parts of the system can contain lead, mercury, arsenic and other heavy metals which
should not be placed in the trash. They can be recycled and many of the metals can be extracted
for reuse. Again, appropriate warnings can be placed in the user manual and information of
proper disposal and recycling can be suggested.
Conclusion
Throughout the design and development process many ethical and environmental issues
should be considered. By putting a little extra effort into the design process many of the hazards
associated with a product can be reduced. Fully testing software and adding extra routines such
as built in self tests can improve usability and help to keep the device functioning properly.
Using environmental friendly manufacturing processes and recycling and proper disposal of
chemicals can reduce the environmental impact of the product. Finally, consumer education of
correct recycling methods can have a great impact on the safety of the environment.
-21-
ECE 477 Final Report Spring 2004
7.0 Packaging Design Considerations
This design for a wireless ordering device (WOrD) will allow a customer to view limited
menus and possibly other information at a commercial establishment. A transmitter connected to
a host computer will serve as a base station transmitting menus and other information. On the
host side physical size and weight are not too important. This device will only have a 9-pin
serial connection, thus, it will require a cutout for the serial connection and external power. The
remote device will act as a user interface receiving the transmitted information and transmitting
orders to the base station. This device will be constrained by size and weight since it will be
carried by users of all ages. In addition, it needs to be user friendly with a layout that is inviting
to use and easy to figure out. This remote device’s interface will include an LCD display and
menu navigation buttons, thus this device will require a cutout for the display, the buttons, and a
battery pack.
Analysis of Similar Products
J-Tech GuestAlert Guest Paging System and Other Similar Devices:
Figure 7-1: J-Tech GuestAlert Guest Paging System
-22-

ECE 477 Final Report Spring 2004
Figure 7-2: Similar Devices produced by
Visiplex, NTN, and Microframe
The J-Tech GuestAlert Guest Paging System (figure 7-1) allows establishments to
silently notify their guests. The hostess device features [7-2] an FM mode transmission
operating in UHF (450-470 MHz) at 2 watts of power and is powered from a standard 110V
outlet. J-Tech offers a range of guest units, so for this comparison the most popular one has been
selected, the Glowster Plus [7-3]. This device vibrates and flashes when table is ready. In
addition, the device offers optional voice notification messages alerting guests when their table is
ready or if they are out of range. There are also other competing companies that provide several
products (figure 7-2 [7-4], [7-5], [7-7]) that are very similar to the J-Tech Paging System in
appearance and functionality. The physical dimensions for the J-Tech hostess device could not
be found, but as a reference it is slightly smaller than a laptop computer. It is made of hard
plastic and is relatively durable. The guest pager measures approximately 4.5” x 4.5” and 1”
deep and weighs about 8 ounces. It is made of hard plastic that is slightly translucent. This
allows for durability while maintaining the visibility of the LED’s. In addition, it has a
rechargeable battery connection and a mounting space for additional advertisements.
Some positive features in this design are that it offers durability while still maintaining a
relatively small size and weight. Also, it is extremely functional for alerting guests over a wide
area. Having a motor which causes the unit to vibrate along with the flashing LEDs, increases the
effectiveness of the device. The bad part about this device is its lack of functionality. It does not
have any sort of graphical interface, nor does it allow the user to send information of any kind
back to the host device.
From the Glowster Plus, the device to be made will incorporate the basic alerting system
by using flashing LEDs. The motor used to cause the unit to vibrate will be removed for the
design to be made, but may easily be added later if the design were to go into commercial
production. RF communication between the base station and the handheld units will be adapted
for the design such that it is bi-directional. The size and weight of the Glowster is a component
that would ideally be duplicated, but will not be possible with the addition of an LCD screen and
buttons.
-23-
ECE 477 Final Report Spring 2004
In contrast to the design to be made, it does not offer a bi-directional communication link
nor does it allow the guest to receive menus and other information. In order to achieve this, an
LCD, buttons, and a unique menu system will have to be developed for the handheld device.
The integration with a display and simple user interface could greatly increase its usefulness in
the restaurant industry.
The NTN Playmaker [7-6]:
Figure 7-3: NTN Playmaker System
The NTN Playmaker (figure 7-3) is a game board that allows users to play in a
community within an establishment. Users can read questions on a TV screen and send and
receive data through a handheld unit to a computer. It uses a 900 MHz transceiver to
communicate data between the units and the system computer. The LCD screen that the
Playmaker uses is an 8-line back-lit LCD. Along with this, the Playmaker has a 14-hour
battery life allowing for units to be played all day before having to be recharged.
The large LCD screen with a back light is a good feature. Running the device at 900
MHz transceiver frequency allows the Playmaker to have a wide range of service while still
allowing a long battery life. On the bad side, the Playmaker is large because of its need to
have a QWERTY keyboard type of inputs as well as its other input buttons. It also is not a
-24-

ECE 477 Final Report Spring 2004
paging service; its only use is for an interactive gaming environment. In addition, they are
more expensive than conventional restaurant paging services.
The bi-directional communication used by the RF transceiver in the Playmaker is a
feature that will be adopted. Also, the large (preferably graphical) display is a very important
feature that will be required in the design. Since this is a wireless device, long battery life, and
therefore low power consumption and high efficiency are major concerns and will be similar
to the game board. If time permits, menu and help functions would be features that would be
nice to implement as well in the design.
The Wireless ordering system to be designed is different from this in that it will have a
navigable menu environment that will allow users to place orders or select various other items
from the screen. It will also use a graphical LCD screen to display the data on the wireless
devices. Since the number of buttons will be considerably less, a smaller size and lighter
weight device will be designed as compared to the Playmaker.
Specifications for the Design Packaging
Materials List:
LCD Display
5 push button switches [7-10]
16 LEDs
6” x 4” x 2” Project Box
3” x 2” x 1” Project Box
DB-9 Connector [7-9]
Tooling Requirements:
The project packaging design uses common parts that are of standard form and are
readily available. The off the shelf project boxes will need to be cut to accommodate the display,
LEDs, buttons, and the battery pack. In addition, the PC board will be screwed into the project
-25-

ECE 477 Final Report Spring 2004
box [7-8] and all other devices will be mounted to the surface of the PC board. Parts that will be
needed are:
Soldering equipment
Drilling and cutting tools
Screwdrivers
Wire strippers
Estimate of Packaging Weight and Cost
Part Type Weight (lbs)
(Base Station + Remote)
Cost ($)
LCD Display 0.3 0
Push Buttons (5) 0.1 2
Project Boxes (2) 0.6 10
Screws 0.1 1
Total 1.1 13
-26-

ECE 477 Final Report Spring 2004
8.0 Schematic Design Considerations
The goal of our project is to design a wireless ordering device (WOrD) which will allow
a customer to view limited menus and possibly other information at a commercial establishment
(e.g. a restaurant or bar). The end purpose of this project is to allow a patron of a restaurant to be
able to order drinks and appetizers while they wait for a table and have their order waiting for
them as they are seated. A transceiver connected to a host computer’s serial port will serve as a
base station transmitting menus and other information to the remote devices via an RF
transceiver. Each remote device will enable a user to navigate the menu and place orders which
will be sent to the host computer. A bank of LEDs will illuminate on the remote device when the
host computer alerts it that the user’s table is ready. Each remote device’s interface will include
an LCD display, menu navigation buttons and a bank of LEDs.
An asynchronous RF transceiver will be used to allow communication between the host
computer and remote devices. This allows for a low-power, relatively simple hardware
implementation. It is possible to use a single chip solution with a printed antenna to minimize
board and package size. A 128x128 graphic LCD display [7-1] will be used to display and
navigate menu information. The viewing area allows for a user to easily read the menu without
the need for scrolling. The LCD display allows for 16 lines of 22 characters, this is ample for
multiple level menus as well as food price and information. The LCD driver contains an 8K
SRAM module, allowing ample room to store menu text and graphics. Because the LCD module
uses 5V logic, the remote device will be powered by a 6V battery pack.
Theory of Operation
The microcontroller on both the host computer and remote device is the Atmel
ATmega162V [1]. The ATmega162V can operate at both 3.3V and 5V logic. The remote
device requires the 3.3V level for lower power consumption, it also needs the large number of
I/O pins to interface with the RF transceiver, LCD module and navigation buttons. The remote
device’s microcontroller can be operated at 3.3V and 1MHz to lower power consumption. The
ATmega162V also has dual USARTs which the base station requires to interface with both the
PC and remote devices. The primary function of the remote device’s microcontroller is to relay
-27-

ECE 477 Final Report Spring 2004
information to the LCD driver memory, monitor the RF transmission line and detect and
debounce button presses. Running at 1MHz is certainly enough to handle these tasks easily,
meaning that no external oscillator is needed.
The graphic LCD display used is the Microtips MTG-S12128XRGNS [2] with and Epson
SED1335 driver [3]. The chief reason for this choice was the fact that the company was willing
to sample the near $60 part. This built-in driver makes operating the LCD and programming text
into memory easy. The display allows for 16 lines of 22 characters each, enabling a menu
system that is not overly complicated by scrolling lists. A simple memory map can be
implemented to allow for constant offsets in menu navigation instead of complex calculations. It
is also possible to incorporate a layer of graphics over the text with minimal effort. A 22 pin
header is all that is required to interface the LCD module to the PCB. The driver contains 8K of
internal SRAM, which is enough to store over 300 lines of text. The only drawback is the need
for a -15V supply to bias the LCD logic voltage. The Maxim MAX776 3.3V to -15V DC to DC
converter [7] is to be used with the Microtips LCD module. This converter requires few external
components, though the large polarized capacitors needed may cause large amounts of noise on
the 3.3V supply powering the microcontroller.
The LCD module also requires a 5V logic supply. The Texas Instruments
SN74LVC4245A octal 3.3V to 5V shifter [4] will be used to interface the 3.3V microcontroller
to the LCD module. This shifter also operates with little power dissipation. Unfortunately, it is
not possible to find a single chip large enough to handle all the data signals the LCD module
requires, so two chips are used.
The RF solution used is the Atmel AT86RF211 smartRF chip [5]. This device accepts a
single serial stream of data and performs all the front and back end processing with few external
components. It is a low cost and low power (3.3V) wireless solution. This device also operates
in the public domain ISM band and performs FSK modulation, a more robust way to handle
noisy environments than the typical OOK method. It is software scalable in transmit power and
takes care of addressing for the microcontroller. If it is ever necessary to improve range or
performance of the remote device it is possible to add SAW filters to the design. There is an
inherent risk in using a reference design to implement our RF transceiver, but this chip is ideal
for our application.
-28-

ECE 477 Final Report Spring 2004
For the remote device, the LCD module dictates the level of the battery supply. A 6V
power supply is easily made using a number of combinations of batteries. It was decided to use
4 AA alkaline batteries. AA alkaline batteries are 1.5V compared to the 1.2V lithium ion and
nickel metal hydride batteries. This supply can be regulated to 5V and 3.3V levels using
National Semiconductor LP2992 low drop-out voltage converters [8]. The low power
dissipation of our remote device design minimizes strain and prolongs battery life. The base
computer will be powered by a 5V wall-wart and regulated to 3.3V.
The base computer is quite similar to the remote device setup. The most significant
difference is in the need to interface with a PC through a serial port. The remote device includes
a DB9 connector that uses the Maxim MAX3222 RS232 logic level translator [6] to translate the
signal from the serial port into TTL logic for the RF transceiver. The 3222 is a low-cost, one-
chip solution that works at 3.3V. No logic translation is needed between the translator and the
RF device.
-29-
ECE 477 Final Report Spring 2004
9.0 PCB Layout Design Considerations
The wireless ordering device (WOrD), which allows customers to view limited menus,
requires two separate PCBs: one for the base unit and one for the remote unit. A serial port
connection with the host computer serves as the interface between the base station and the
computer providing control. This PCB is not size critical and only requires special RF
considerations. The remote device will act as a user interface between the user and the base
station. The PCB for this device must be made as small as possible to reduce size and weight for
the user. In addition, this device also requires special considerations for the RF section.
PCB Layout Considerations
The WOrD has two separate PCBs layouts. On the base side there was one main concern
was the RF section. First, the specification sheet1 for the AT86RF211 recommends that there are
no traces or components underneath any of the traces. This helps to prevent noise from coupling
onto the RF lines on the top side of the board. Since this component is obviously sensitive to
noise, a separate ground pour was placed under the entire RF section. This is intended to
minimize the amount of noise on the ground plane and to isolate it from the noise created by the
digital components. The final major consideration in laying out the RF section is the necessity to
place all external components close to the RFIC. Since this design uses lumped element
components, this requires trace lengths to remain much less than a wavelength.
The digital system of the base unit does not have any special considerations, but several
precautions should be taken to eliminate excess noise on the digital lines2. First, the power lines
are decoupled near the microcontroller pins in order to reduce the most noise possible. Next, the
digital traces are routed such that there are a minimum number of lines crossing perpendicular to
one another and they are all separated from one another by the maximum distance. This should
prevent digital signal lines from excessively coupling to one another. Finally, a ground pour was
placed under the entire digital section. This is intended to reduce the trace distance between
components and ground.
Similar to the base station layout, the remote unit layout also required the same
considerations for the RF section and digital section. Just as above, the intent is to keep the RF
-30-
ECE 477 Final Report Spring 2004
and digital sections separated so that as little noise as possible passes between them. In addition
to the base station requirements, the remote unit layout is intended to reduce the overall size of
the device. This should help minimize weight and reduce total package size such that it is small
enough to be comfortably held in the user’s hand. The -15V inverting power supply is placed
near the display where it is required and is placed as far as possible from the RF section. This
should reduce most of the excess EMI from the switching supply. Finally, the user control
buttons are connected to a header and they should be laid out separately from the rest of the
device. This allows the switches to remain in the fixed shape as intended, while still being
removed from the main PCB by simply cutting off this section.
-31-
ECE 477 Final Report Spring 2004
10.0 Software Design Considerations
Group five’s project, the Wireless Ordering Device, is a tool which is aimed for a
commercial industry. This device, about the size of a coaster, will have an LCD screen interface
that will allow customers waiting to be seated the chance to order and have drinks and appetizers
waiting at their table when they are ready to sit. However, the project is not simply confined to
the device itself. It needs to be able to communicate to a computer, which means it will need a
separate hardware receiver to enable communication to a base computer. Both the mobile device
and the base device will need to be programmed separately, and a program written for the base
computer that will tabulate orders received from the base module, which it will talk to via serial
port. That makes 3 separate software packages in total, each with its own complexities.
Software Design Considerations
Memory Models
On the base module, there is ample memory so that efficiency is of little to no concern.
Application code will only take a fraction of the available flash, and there is ample extra memory
to store a small character buffer when receiving data from the wireless unit. Data received from
the wireless unit will amount to a character string less than 20 characters long, containing only
the ID of the device and a memory address corresponding to the location of the memory map that
the name of the ordered item is located. A copy of the memory map will be on both the wireless
device and the base computer, so the base computer can decode and display the appropriate text
string.
Memory on the mobile module will be a little tighter. First of all, a memory map will
need to be implemented in the LCD’s extended memory, which will be discussed further in the
next section. Program code will take a little more space, but because of the memory mapping
scheme, there should be sufficient room. The alternative to a memory map was to create linked
list data structures for the menu structure, which more than likely would have taken too much
room, and would have easily overflowed the stack.
Memory Maps
-32-
ECE 477 Final Report Spring 2004
Because we are implementing a memory map model, our code and stack will be
relatively sleek, but we will need a chunk of space to store it. However, external memory is not
needed because of the built-in 8k memory of the LCD module. The memory map will be
structured like the screen itself… each “line” of memory will be a line of text on the menu. The
first line is 0x00-0x1F (0-31); the second line is 0x20-0x3F and so forth. Each screen is one
“page” of 8 lines. Each screen can be accessed as a simple mathematical operation based on the
location passed as the beginning of the first line. A corresponding (and smaller) function map
will store whether or not the line is simply text or a menu, and if a menu, the memory location of
the submenu to display should the current item be displayed.
Startup Code
The base and mobile units will each have different but similar start-up sequences. Flow
charts of start-up procedures are included in the appendix.
The LCD module has rather specific startup instructions. The sample start-up sequence
for the LCD is 32 steps long, so for details please refer to the documentation listed in the
References section. Only a general flow chart will be provided to start-up the LCD, separate
from the other start-up flow charts. Several details need to be initialized on the driver chip, such
as the dimensions of the LCD screen and the number of “layers” to use, such as text layer and
graphics layer. The module is 128x128 pixels, and will only use the text layer.
The RF startup sequence will be the same on both the base and mobile units. Where the
LCD needs 32 steps, the RF needs 4; and order is not so important so long as they are done
before data needs to be sent. A flow chart of this is also included in the appendix.
Organization of Embedded Application Code
The embedded application code will be written in embedded C. Aside from the start-up
sequence, the program will tell the unit to sleep and wait for changes in input on the interrupt
pins to run service routines (according to lecture, the “interrupt-driven” solution). The wireless
device will wake up on a button press, calculate the next memory address, navigate the menu,
send an order if needed, and go back to sleep to save power. It will also wait for an interrupt
from the RF chip, at which point it will receive a new menu from the base computer and store it
-33-
ECE 477 Final Report Spring 2004
in its memory map. Low power consumption is the key feature to interrupt driven programs, and
important for the battery driven wireless device.
Coding the base station will also be interrupt driven, simply because most of the time it
will be inactive. After initialization, the base unit will wait for one of two events. The first is an
interrupt from the RF module, which will cause the processor to buffer the whole string and then
pass that string through to the computer along the serial port. The second event is a signal from
the serial port, which the unit will pass directly through to the RF module along its serial data
line after switching to “transmit” mode.
Software Design Narrative – Base Module
RF Interrupt
The RF interrupt routine is crucial to the task of receiving an order to display it on the
computer. The function will be relatively simple. The first step after running the routine will be
to store the character received in a string, which will act as a buffer. At each clock pulse from
the RF unit, a new character will be stored on the buffer. When the terminating character is
received (in our case, ‘+’), the program will then open the line to the serial port and send the
string through. The unit will then go back to sleep until the next interrupt.
Serial Interrupt
A serial interrupt will mean that the base computer is trying to send a new page of
memory map to the wireless units. When this happens, instead of allocating a string, the unit
will send the character straight through to the RF device and toggle the clock signal. The unit
will then go back to sleep.
Software Design Narrative – Mobile Module
RF Interrupt
An RF interrupt on the mobile module means that the base computer is trying to send a
new page of memory map to the wireless units. The first thing that is to be received is the
location to be stored. Once this is set, each character received will be written directly to the LCD
-34-

ECE 477 Final Report Spring 2004
memory. Simultaneously, the LCD screen will be set to show “Updating… Please Wait” until
the process is over, when it will resume normal function by displaying the main menu and going
back to sleep.
Button Interrupt
The button interrupt indicates that someone is moving through the menu structure.
Pressing the “up” arrow will cause the current item to be deselected and the item above it In the
list to be highlighted, if such an item exists. The down arrow will do the same thing, only in
reverse. “Highlighted” means that the pixels are to be XOR’ed, and the text is blank while the
background is liquid crystal. A press of the right arrow key will cause the entry for the current
line in the function map to be accessed. If it is text, nothing will happen. If it is a sub-menu
item, the new menu will be called and displayed. If it an item, it will send the order and return to
the main menu. A press of the left arrow button will return to the main menu (a sort of
“cancel”).
LCD Functions
Because of the complexity of access to the LCD unit, several general functions are being
written.
LCD_print() - Takes in 2 arguments, the memory location of the line and the line number
to be displayed.
LCD_invert() – Takes in 1 argument, the line to be inverted.
LCD_write() – Takes in the memory location and the character to write to it.
Several more functions may get written as the software is being developed, as their usefulness
become apparent.
Software Design Narrative – Base Computer
Much has been said about the embedded application code, but it is not the only software
that needs to be written. Another program has been written for the base computer that will
receive and interpret orders, and send new menus to the mobile device. The program was written
in Visual Basic and was not entirely complicated to make, so not much will be said about its
-35-

ECE 477 Final Report Spring 2004
inner workings here. A picture of the program and function of the current version of source code
will be included in the Appendix.
-36-

ECE 477 Final Report Spring 2004
-37-
Set Ports A-E to In/Out/Tri-state
Initialize LCD*
Display Welcome Message on LCD
Initialize RF**
Set RF module to Receive mode
Display Main Menu
Sleep until Interrupts
Set Wake-up Control Register
enable
Set Wake-up Data Register
enable
Set Wake-up Data Rate
Register enable
Set Wake-up Address Register
enable
Wireless Start-up Sequence
RF Start-up Sequence
ECE 477 Final Report Spring 2004
-38-
Initialize LCD size information
Initialize start Addresses of each Layer
Blank Screen
Set Cursor Initial Position
Set Ports A-E to In/Out/Tri-state
Initialize RF**
Set RF module to Receive mode
Sleep until Interrupts
Base Start-up Sequence
Hide Cursor
LCD Start-up Sequence (simplified)

ECE 477 Final Report Spring 2004
11.0 Version 2 Changes
Throughout the development of this project we have thought of better ways to implement our
objectives as well as wished for features that we could add. If we were to develop a second
version of our project we would like to incorporate the following:
Power LED on Base station
Access to reset switches – pin hole access
Utilize 0603 and 0402 component sizes
Redesigned RF solution – single chip with printed filters reduces component count and
board size, printed antenna to reduce package size
Custom molded plastic packaging, watertight
Larger onboard memory in Remote Device to store larger menu
Vibrate on alert
Rechargeable battery with built-in charger
Page hostess/waitress button
Added prices and descriptions for menu items
Generate order summary and total cost
Variable size menu
User selectable serial port for communication with Base Station
Implement games on Remote Devices
Upgraded user interface for sleek appearance and functionality
Integrate software with point-of-sale software
-39-

ECE 477 Final Report Spring 2004
12.0 Summary and Conclusions
The hardest lesson to learn this semester was to implement our objectives in the simplest
way possible. It’s easy to fall into the trap of envisioning a fantastic final product, but having no
previous experience with the hardware means that the development lead time is huge. We placed
too much faith in our RF reference design and it ultimately let us down. Aside from the RF, our
schematic and board layout were excellently done. No fly-wiring or extra components were
needed to realize our design. The software required much less lead time once our hardware was
working properly. We learned how important it is to communicate with each other and plan our
project in stages. Problems were more easily fixed when we were all in the loop. Our project
would not have been successful if we didn’t have so much experience to draw on from the
classes we’ve taken. We utilized our strengths in designing and building our project. It’s
impossible to escape a learning curve in a situation like this, but our backgrounds made learning
new material easier. We all feel that this project was an invaluable experience, the best
preparation for work in the outside world that we have gained so far. We are proud of the work
we’ve done and the near complete realization of our project goals.
-40-

ECE 477 Final Report Spring 2004
13.0 References
3-1. Rabbit 2000: http://www.rabbitsemiconductor.com/products/rcm2000/index.shtml
3-2. ATmega88: http://www.atmel.com/dyn/products/product_card.asp?part_id=3302
3-3. AT86RF211: http://www.atmel.com/dyn/products/product_card.asp?part_id=2575
3-4. nRF401 Transceiver: http://www.nvlsi.no/index.cfm?
obj=product&act=display&pro=56
3-5. MTG-S12128XRGNS LCD Display:
http://www.microtipsusa.com/product_pdfs/Graphic%20Module/128x128/12128X/
MTG-S12128XRGNS.pdf
4-1. The Jtech Glowster paging system: http://www.jtech.com/products/people_alert.htm
4-2. The Commtech Wireless Patron Pager system:
http://www.commtechwireless.com/pages/products/restaurant.php
4-3. NTN Communications GuesetCall system:
http://www.ntn.com/Restaurant_Paging.asp
NTN Communications Interactive Entertainment (NTN Trivia boards):
http://www.ntn.com/Interactive_Entertainment.asp
4-4. Patent D371,054 Coaster and Pager:
http://patft.uspto.gov/netacgi/nph-Parser?
Sect1=PTO1&Sect2=HITOFF&d=PALL&p=1&u=/netahtml/
srchnum.htm&r=1&f=G&l=50&s1=D371,054.WKU.&OS=PN/
D371,054&RS=PN/D371,054
4-5. Patent 6,681,109 Server Call System:
http://patft.uspto.gov/netacgi/nph-Parser?
Sect1=PTO1&Sect2=HITOFF&d=PALL&p=1&u=/netahtml/
srchnum.htm&r=1&f=G&l=50&s1=6,681,109.WKU.&OS=PN/6,681,109&RS=PN/
6,681,109
4-6. Patent 6,208,976 Order Management and System with Auto Menu Updating:
http://patft.uspto.gov/netacgi/nph-Parser?
Sect1=PTO1&Sect2=HITOFF&d=PALL&p=1&u=/netahtml/
-41-

ECE 477 Final Report Spring 2004
srchnum.htm&r=1&f=G&l=50&s1=6,208,976.WKU.&OS=PN/6,208,976&RS=PN/
6,208,976
5-1. 1N5822 ON Semiconductor Reference Sheet:
http://www.onsemi.com/pub/Collateral/1N5820-D.PDF
5-2. Department of Defense. Reliability Prediction of Electronic Equipment:
http://shay.ecn.purdue.edu/~dsml/ece477/Homework/Spr2004/Mil-Hdbk-217F.pdf
5-3. MAXIM MAX776 Reference Sheet:
http://pdfserv.maxim-ic.com/en/ds/MAX774-MAX776.pdf
5-4. Meyer, D.G. Module 9: Designing for Reliability, Maintainability, and Safety:
http://shay.ecn.purdue.edu/~dsml/ece477/Notes/PDF/4-Mod9.pdf
5-5. Novacek, George. Designing for Reliability, Maintainability, and Safety:
http://shay.ecn.purdue.edu/~dsml/ece477/Notes/PDF/4-Mod9_ref.pdf
6-1. Engineering Education Reform:
http://shay.ecn.purdue.edu/~dsml/ece477/Homework/Spr2004/enviro_refs.pdf
6-2. Environmental Protection Agency: http://www.epa.gov
6-3. Federal Communications Commission: http://www.fcc.gov/
6-4. Energy Star: http://www.energystar.gov/
6-5. Energizer and the Environment: http://www.energizer.com/learning/environment.asp
6-6. Printed Circuit Board Manufacturing Pollution Prevention Opportunities Checklist:
http://es.epa.gov/techinfo/facts/cheklst7.html
6-7. The Online Ethics Center for Engineering and Science: http://onlineethics.org/
6-8. Problems with Disposal of LC Displays: http://www.heise.de/ct/english/99/12/096/
6-9. Circuit Board Disposal:
http://www.uwm.edu/Dept/EHSRM/HAZEXCEPTIONS/cb1.html
7-1. MTG-S12128XRGNSLCD Display:
http://www.microtipsusa.com/product_pdfs/Graphic%20Module/128x128/12128X/
MTG-S12128XRGNS.pdf
7-2. People Alert: http://www.jtech.com/products/people_alert.htm
-42-

ECE 477 Final Report Spring 2004
7-3. JTech GuestAlert ®: http://www.jtech.com/products/guest_alert.htm
7-4. MicroFrame Coaster Pager: http://www.restaurantpager.com/coaster.htm
7-5. NTN Guest Paging:
http://www.ntn.com/hospitality_tech/products_services/paging_communication/
guest_paging.asp
7-6. NTN iTV Network:
http://www.ntn.com/hospitality_tech/products_services/entertainment_promotion/
itv_network.asp
7-7. Visiplex VP-Coaster: http://www.visiplex.com/products/coaster.htm
7-8. Project Box: http://www.radioshack.com/product.asp?catalog
%5Fname=CTLG&category%5Fname=CTLG
%5F011%5F002%5F012%5F000&product%5Fid=270%2D1806
7-9. 9 Pin D-SUB Connector:
http://www.allelectronics.com/cgi-bin/category.cgi?category=191&item=RAD-
9P&type=store
7-10. Mini Pushbutton:
http://www.allelectronics.com/cgi-bin/category.cgi?category=700&item=MPB-
132&type=store
8-1. Atmel ATmega162V microcontroller data sheet:
http://www.atmel.com/dyn/resources/prod_documents/doc2513.pdf
8-2. Microtips MTG-S12128XRGNS 128x128 graphic LCD display data sheet:
http://www.microtipsusa.com/product_pdfs/Graphic%20Module/128x128/12128X/
MTG-S12128XRGNS.pdf
8-3. Epson SED13353 display driver data sheet:
http://www.cec-mc.ru/comp/lcd/pdf/sed1335.pdf
8-4. Texas Instruments SN74LVC4245A octal 3.3V to 5V shifter data sheet:
http://focus.ti.com/lit/ds/symlink/sn74lvc4245a.pdf
8-5. Atmel AT86RF211 smartRF transceiver data sheet:
http://www.atmel.com/dyn/resources/prod_documents/DOC1942.PDF
8-6. Maxim MAX3222 transceiver data sheet:
-43-

ECE 477 Final Report Spring 2004
http://pdfserv.maxim-ic.com/en/ds/MAX3222-MAX3241.pdf
8-7. Maxim MAX776 3.3V to -15V DC to DC converter:
http://pdfserv.maxim-ic.com/en/ds/MAX774-MAX776.pdf
8-8. National Semiconductor LP2992 low-drop out voltage regulator:
http://www.national.com/ds/LP/LP2992.pdf
9-1. AT86RF211 Data Sheet:
http://www.atmel.com/dyn/resources/prod_documents/DOC1942.PDF
9-2. System Design and Layout Techniques for Noise Reduction in MCU-Based Systems:
http://shay.ecn.purdue.edu/~dsml/ece477/Homework/Spr2004/AN1259.pdf
10-1. SED 1335 - LCD Driver Documentation:
http://shay.ecn.purdue.edu/~477grp5/datasheets/SED1335.pdf
10-2. Atmel AT86RF211 - RF Transmitter Documentation:
http://www.atmel.com/dyn/resources/prod_documents/AT86RF211.pdf
-44-

ECE 477 Final Report Spring 2004
Appendix A: Individual Contributions
Contributions of Edward Sheriff:
Throughout the semester I took on many important roles in the design and development
of this project. Initially, Dan and I came up with the idea of the project and we determined the
main characteristics and goals of the project. Then as a group we refined these into our project
specific outcomes. As we did this, I took the role of leader since I helped to guide this process
and successfully assisted in finding each persons niche within the group. In this role I helped our
group work together in a more efficient and productive fashion.
In addition to my leadership role, I migrated toward the hardware design and
development. Since I am an electrical engineer and have more experience with hardware and
slightly less with software than other group members, I immediately became the hardware guy
and worked on developing the hardware design constraints. This process entailed the
development of our block diagram and component selection. Working with Dan at this stage, we
worked for many hours on the schematic design. At the same time, I continued to try and push
everyone to work together as I lead by example. This process was necessary as to be successful
as a group all members needed to say involved. To do this, I continued to keep Mike and Jon
(PC software guys) in the loop so that they could begin developing the software for the system
and also keep us informed of any additional hardware requirements that they may have.
After completion of the schematic, I worked diligently with Dan on the PCB layout. This
process took many hours since there were many design requirements. It was important to ensure
that every single trace was routed correctly since we only had one shot at getting it correct. If
this was incorrect, it could lead to the failure of our project. In addition to this, for our project it
was important to place all components as close together as possible in order to minimize package
size.
Once we received the completed circuit board, I was responsible for nearly all of the
surface mount soldering. This was not terribly difficult, but for it to be done accurately require a
lot of time. Since I did the soldering and I had done a lot of the design work, I worked with Dan
and sometimes Mike on verifying that the sections were working correctly. When there were
sections that did not function I put in many hours in an attempt to troubleshooting them. I
A-1
ECE 477 Final Report Spring 2004
worked hard to ensure that all portions of the design would be successful. During this time I also
learned a lot about coding and I wrote several functions that were used to set up the LCD module
and to test the RF section. In order to accomplish this I spent many hours going through the data
sheets for nearly all the major components in order to determine startup sequences and work
through timing diagrams.
After each individual section appeared to work alone, I oversaw the integration of all the
components. This period saw many challenges since there were several issues that came up
during integration. When the system was first put together I worked with Dan and Mike to
troubleshoot the errors that we were receiving. When we determined that there was a problem I
went through the data sheets in order to determine what could be done to solve it. Once we
figured it out I continued to work with the software guys to ensure that the system functioned
correctly. Finally, I worked with Dan and Mike to package the hardware into the project boxes
to form the final project.
Through out the semester I put in many hours on the design and development of our
project. This utilized all of the skills that I had acquired here at Purdue and allowed me and my
partners to show our talents. In addition to completing the PCB Layout homework and the
Ethical and Environmental Impact homework, I acted as the group leader and I worked on the
hardware design, PCB layout, hardware troubleshooting, firmware development, system level
integration, and product packaging. Because of the effort I put forth in this project, I strongly
believe that I will receive an A in this course.
Contributions of Dan Sparks:
I was involved in the constraints and requirements specification, component selection and
project schematic, PCB layout, hardware troubleshooting and firmware programming and
integration.
As soon as the idea for the project was conceptualized, I helped list system requirements,
system constraints, interface requirements and packaging considerations. I was deeply involved
in the debate between using a character LCD display vs. a graphic LCD display. Eventually, I
settled the debate by procuring a graphic LCD sample for the group, allowing for the solution
with the most potential and saving the group a significant amount of money. I helped narrow
A-2

ECE 477 Final Report Spring 2004
down system components, trying to find low power dissipation parts that operated at the 3.3V
level that was ideal for the design. It was my goal to have the final remote device package small
enough to be easily held and operated while still allowing for a large information viewing area.
I was responsible for the circuit design and theory of operation homework. This involved
creating the project schematic from the list of components the group had selected. During the
creation of the schematic, the data sheets for each component had to be studied thoroughly to
understand how each component interacted with the others. Before the schematic was finished,
the RS232 to 3.3V logic converter solution had to be changed and a -15V supply for the LCD
module had to be created. The only flaw in the schematic was the inclusion of button
debouncers, which were discarded in favor of software debouncing. Virtually no fly-wiring was
needed to successfully finish the project.
Though not primarily responsible for PCB layout, I contributed many hours toward the
creation of final PCB. My intimate understanding of the device schematics helped me to
organize the components into functional blocks to simplify trace routing. I helped route a
portion of both the base station and remote device layouts.
As the project was built up incrementally, I helped test functionality by testing traces and
using the oscilloscope to confirm heartbeat programs. I helped troubleshoot the problems with
the -15V supply. My studying of the data sheets narrowed down the problem, a larger inductor
was used and the power supply worked successfully. I also suggested that testing the clock of
our inoperative microcontroller might indicate if it was broken or not. I spent several hours
agonizing over the failed RF circuit. I contacted Atmel customer support and studied the data
sheets to no avail. I also trouble shot the communication problem between the base station and
remote device by theorizing that the significant difference in their clock speeds might create
enough disparity in packet generation and detection to cause the remote device to incorrectly
interpret the packets. Once the two clocks were calibrated, the two microcontrollers
communicated flawlessly.
Getting the hardware running was a true milestone. Once the physical aspect of the
design was finished, programming the firmware was quickly accomplished. I helped create the
communication protocol the project used, modeling it after the internet protocol. I programmed
the base station to transmit packets to the appropriate destinations and drop packets with bad
checksums, similar to a router on a network. I programmed the remote device to accept packets
A-3
ECE 477 Final Report Spring 2004
and decode them properly as well as transmit packets based on button presses that were
debounced in software. I interfaced the LCD module with the remote device microcontroller so
that data sent to the remote device could easily be written to the appropriate address in the LCD
memory. I helped integrate the firmware and PC software so that the two worked together
flawlessly.
I have contributed great time and effort in driving this project to meet its success criteria.
It is only because of the lack of time and resources that he was unable to fulfill the failed criteria
about wireless communication. I’ve worked with other group members in trouble shooting and
system integration, striving to build the functionality of the project as quickly as possible.
Because I worked hard myself and with my team mates to get this project working and because I
overcame many obstacles standing in the way of success, I deserve an A in this course.
Contributions of Mike Klockow:
I felt that I was able to contribute much to our senior design group this year. Along with
developing the base software and designing the serial interface, I was the webmaster and edited
the demonstration video. At the beginning of the semester, we decided to split into two groups.
Dan and Ed would be the hardware group, and would be responsible for designing the hardware
aspects as well as actual construction. Jon and I would be working on the software, since the
project had many software requirements.
Since there was not a lot to do in the beginning of the semester, I decided to spend my
time working on the website. I decided to exercise my programming skills by programming a
CGI script in Perl to accept information from a web form, and molded this into a script for the
group to add entries to their online Lab Notebook via the web. During the course of the
semester, I added design specification sheets to their own page as we selected different
components for use in our project.
There was a lot in terms of software that I worked on for this project. I worked on
developing the embedded software and came up with various test code during the process of
testing. Learning how to use the compiler and upload code to our device was a chore,
considering that our processor was surface mount and non-standard. I also wrote the embedded
A-4

ECE 477 Final Report Spring 2004
code that ended up in the remote unit, and contributed to the base unit code (this code was very
simple).
I contributed a small portion to hardware design. I was responsible for researching and
designing our serial port hardware. I found out that we needed a level translator for the actual
serial communication, so I chose one of those for our design. I also found what pins were
needed for communication.
I also completed the base server software. We decided to start working on it Visual C++,
but had trouble adapting the sample code for the serial interface, so switched to Visual Basic
because of its ability to access plug-in attachments with ease. Most of the functionality and any
part that dealt with communication with the remote unit I wrote.
Since my homework assignments were integrated into the final paper, I’ll briefly mention
them there. Since I was the software liaison, my professional paper was the Software Design
Considerations paper. I had a good idea what was needed in terms of software, and I did well on
this paper. My design report was on safety and reliability, which I was given because it had less
to do with actual hardware design considerations.
The last contribution I made was editing the demonstration video. I needed to time the
voice over that Dan and I did, and added visual and audio effects to punctuate parts of the video.
I had a lot of fun doing this. Too much fun in fact; most of the special effects I used Ed
requested I take out because they may have made our video look unprofessional, so I put them on
the website for fun.
My contributions this semester were varied. I did a lot of software design, and a lot of
miscellaneous tasks not directly related to the project itself, such as the website. I work
diligently on the PC side software and the embedded software, dealt with the communications
aspects of the hardware design, put a lot into website design, and edited our video, as well as
kept up with my homework assignments. Because of the quality and quantity of my work, and
my co-operation with the fellow members of my group, I believe I deserve an A in the class.
Contributions of Jon Hopp:
Soon after our group was assigned, we broke up the future tasks to utilize the strength of
each team member. From the start, we all agreed that Ed and Dan would be in charge of the
A-5

ECE 477 Final Report Spring 2004
hardware side of our product, while Mike and I felt we would be better off working with the
software design and implementation of the product. Through the course of this semester, my
main area of contribution was through the software on the PC end. Together with Mike, we were
in charge of all software related programs and development for the design.
The first task that Mike and I worked on was the serial transmission. We started working
with sample code written in Visual C++, but found this to be more trouble than it was worth.
Once we tried Visual Basic we found that serial communication could be handled with just a few
lines of code. After this, Mike and I developed an initial version of the server program, and
tested it by using HyperTerminal to connect to another computer that simulated the base station
in our design.
My main contribution to the team was developing a way for our memory map of the
menu to be easily edited and implemented in the server software. Initially I wrote a non-
graphical C++ program for menu editing that simulated what the final remote device would
show. This program allows the user to view the menu as well as the sub-menus and easily edit
any line within. It also has some error checking to validate user input in such a way that the
remote device will not cause any unexpected or unwanted effects.
I also worked on the server software and implemented the menu as a linked list data
structure. This program, which was written in Visual Basic, had to open the file saved by the
Menu Editor, create the linked list based on the information in the file, traverse the list based
upon the button pressed, display the correct menu based upon the location in the list, as well as
update the order count if a menu item is selected. After both of these were accomplished, our
group decided that we needed a graphical editor for the menu. I then made another Visual Basic
program that did this with the ability to open a saved menu file, save the file to disk, and limit
any individual entry to a certain character length string all while showing the entire menu
contents and being able to edit each element quickly and easily.
Along with this, it was also my job to complete the Design Constraint Analysis
homework assignment. Therefore, I was also involved in selecting the major components of our
design (display, CPU, wireless transmission, etc.). The details of this can be found in Section 3.0
of this paper. The Packaging Specifications homework was also my task. This can be found in
Section 7.0. In this homework, similar items are discussed and our first representation of the
final external design is created.
A-6

ECE 477 Final Report Spring 2004
Along with this, I also helped out other team members whenever I could. With Mike I
helped interface blinking LEDs to our microcontroller when we first got our development board.
Also, along with everyone else I helped debug the microcontroller when we were unable to send
and receive serial data from the remote unit. This proved to be a major hurdle that took a
considerable amount of time to find the source of the error. Once this was corrected, however,
everyone’s productivity increased dramatically as the project neared completion. The final
contribution I had to this project is this final report. I assembled and formatted everyone’s
homework assignments as well as the other documents and pictures in a more standard manner.
I also set up the reference section of this report based on the supplied references for each of the
individual homework assignments.
Throughout the course of this semester, I feel that our team has put forth a considerable
amount of time, money, and effort toward the completion of this product. I feel that if we had
chosen an easier project to design, we would have completed the design, but however we would
not have gained as much knowledge as we did from our current project. Therefore, even though
we may not have successfully completed all of our success criteria, I still feel as though we each
deserve an A for this course.
A-7

ECE 477 Final Report Spring 2004
Appendix B: Packaging
Figure B-1. Initial CAD drawing of Base Station
Figure B-2. Initial CAD drawing of Remote Device
B-1

ECE 477 Final Report Spring 2004
Figure B-3. Photoshop Rendition of Base Station
Figure B-4. Photoshop Rendition of Remote Device
B-2
ECE 477 Final Report Spring 2004
Figure B-6. Base Station and Power Connecter
Figure B-5. Remote Device
B-3

ECE 477 Final Report Spring 2004
Appendix C: Schematic
C-1

ECE 477 Final Report Spring 2004
Figure C-1 Base Device Headers Schematic
C-2

ECE 477 Final Report Spring 2004
Figure C-2. Base Device MAX3222 Schematic
Figure C-3. Base Device Power Supply Schematic
C-3

ECE 477 Final Report Spring 2004
Figure C-4. Base Device RF Module Schematic
C-4
ECE 477 Final Report Spring 2004
Figure C-5 Base Device Microcontroller Schematic
C-5

ECE 477 Final Report Spring 2004
Figure C-6. Remote Device Button Schematic
C-6

ECE 477 Final Report Spring 2004
Figure C-7. Remote Device Headers Schematic
C-7

ECE 477 Final Report Spring 2004
Figure C-8. Remote Device LCD Interface Schematic
C-8

ECE 477 Final Report Spring 2004
Figure C-9. Remote Device LED Schematic
C-9
ECE 477 Final Report Spring 2004
Figure C-10. Remote Device Power Supply Schematic
C-10

ECE 477 Final Report Spring 2004
Figure C-11. Remote Device RF Module Schematic
C-11

ECE 477 Final Report Spring 2004
Figure C-12. Remote Device Microcontroller Schematic
C-12

ECE 477 Final Report Spring 2004
Appendix D: PCB Layout Top and Bottom Copper
Figure D-1. Remote Device Top Copper Layer
D-1
ECE 477 Final Report Spring 2004
Figure D-2. Remote Device Bottom Copper Layer
D-2

ECE 477 Final Report Spring 2004
Figure D-3. Base Device Top Copper Layer
D-3

ECE 477 Final Report Spring 2004
Figure D-4. Base Device Bottom Copper Layer
D-4

ECE 477 Final Report Spring 2004
Appendix E: Parts List Spreadsheet
Component Vendor Part Number Cost
Microcontroller (x 2) Atmel ATmega162V $14
Transceiver (x 2) Atmel AT86RF211 $20
LCD Screen Microtips MTG-12128XRGNS $0 (regularly $60)
Project Box (x2) Radioshack 270-1806 $10
Total: $44 (regularly $104)
E-1
ECE 477 Final Report Spring 2004
Appendix F: Software Listing
Base Firmware (Embedded C)
/*********************************************This program was produced by theCodeWizardAVR V1.23.8d StandardAutomatic Program Generator© Copyright 1998-2003 HP InfoTech s.r.l.http://www.hpinfotech.roe-mail:[email protected]
Project : Version : Date : 04/23/2004Author : Chuck Barnett Company : Purdue University Comments:
Chip type : ATmega162VProgram type : ApplicationClock frequency : 8.000000 MHzMemory model : SmallExternal SRAM size : 0Data Stack size : 256*********************************************/
#include <mega162.h>
#define RXB8 1#define TXB8 0#define UPE 2#define OVR 3#define FE 4#define UDRE 5#define RXC 7
#define FRAMING_ERROR (1<<FE)#define PARITY_ERROR (1<<UPE)#define DATA_OVERRUN (1<<OVR)#define DATA_REGISTER_EMPTY (1<<UDRE)#define RX_COMPLETE (1<<RXC)
// USART0 Receiver buffer#define RX_BUFFER_SIZE0 24char rx_buffer0[RX_BUFFER_SIZE0];unsigned char rx_wr_index0,rx_rd_index0,rx_counter0;// This flag is set on USART0 Receiver buffer overflowbit rx_buffer_overflow0;
// USART0 Receiver interrupt service routine#pragma savereg-interrupt [USART0_RXC] void uart0_rx_isr(void){
F-1
ECE 477 Final Report Spring 2004
char status,data;#asm push r26 push r27 push r30 push r31 in r26,sreg push r26#endasmstatus=UCSR0A;data=UDR0;if ((status & (FRAMING_ERROR | PARITY_ERROR | DATA_OVERRUN))==0) { rx_buffer0[rx_wr_index0]=data; if (++rx_wr_index0 == RX_BUFFER_SIZE0) rx_wr_index0=0; if (++rx_counter0 == RX_BUFFER_SIZE0) { rx_counter0=0; rx_buffer_overflow0=1; }; };#asm pop r26 out sreg,r26 pop r31 pop r30 pop r27 pop r26#endasm
}#pragma savereg+
#ifndef _DEBUG_TERMINAL_IO_// Get a character from the USART0 Receiver buffer#define _ALTERNATE_GETCHAR_#pragma used+char getchar(void){char data;while (rx_counter0==0);data=rx_buffer0[rx_rd_index0];if (++rx_rd_index0 == RX_BUFFER_SIZE0) rx_rd_index0=0;#asm("cli")--rx_counter0;#asm("sei")return data;}#pragma used-#endif
// USART1 Receiver buffer#define RX_BUFFER_SIZE1 2char rx_buffer1[RX_BUFFER_SIZE1];unsigned char rx_wr_index1,rx_rd_index1,rx_counter1;// This flag is set on USART1 Receiver buffer overflowbit rx_buffer_overflow1;
F-2

ECE 477 Final Report Spring 2004
// USART1 Receiver interrupt service routine#pragma savereg-interrupt [USART1_RXC] void uart1_rx_isr(void){char status,data;#asm push r26 push r27 push r30 push r31 in r26,sreg push r26#endasmstatus=UCSR1A;data=UDR1;if ((status & (FRAMING_ERROR | PARITY_ERROR | DATA_OVERRUN))==0) { rx_buffer1[rx_wr_index1]=data; if (++rx_wr_index1 == RX_BUFFER_SIZE1) rx_wr_index1=0; if (++rx_counter1 == RX_BUFFER_SIZE1) { rx_counter1=0; rx_buffer_overflow1=1; }; };#asm pop r26 out sreg,r26 pop r31 pop r30 pop r27 pop r26#endasm}#pragma savereg+
// Get a character from the USART1 Receiver buffer#pragma used+char getchar1(void){char data;while (rx_counter1==0);data=rx_buffer1[rx_rd_index1];if (++rx_rd_index1 == RX_BUFFER_SIZE1) rx_rd_index1=0;#asm("cli")--rx_counter1;#asm("sei")return data;}#pragma used-// Write a character to the USART1 Transmitter#pragma used+void putchar1(char c){while ((UCSR1A & DATA_REGISTER_EMPTY)==0);UDR1=c;
F-3
ECE 477 Final Report Spring 2004
}#pragma used-
// Standard Input/Output functions#include <stdio.h>
// Declare your global variables here
void main(void){// Declare your local variables hereint i;int checksum;int input;// Crystal Oscillator division factor: 1CLKPR=0x80;CLKPR=0x00;
// Input/Output Ports initialization// Port A initialization// Func0=Out Func1=Out Func2=Out Func3=Out Func4=In Func5=In Func6=In Func7=In // State0=0 State1=0 State2=0 State3=1 State4=T State5=T State6=T State7=T PORTA=0x08;DDRA=0x0F;
// Port B initialization// Func0=In Func1=In Func2=In Func3=In Func4=In Func5=In Func6=In Func7=In // State0=T State1=T State2=T State3=T State4=T State5=T State6=T State7=T PORTB=0x00;DDRB=0x00;
// Port C initialization// Func0=In Func1=In Func2=In Func3=In Func4=In Func5=In Func6=In Func7=In // State0=T State1=T State2=T State3=T State4=T State5=T State6=T State7=T PORTC=0x00;DDRC=0x00;
// Port D initialization// Func0=In Func1=In Func2=In Func3=In Func4=In Func5=In Func6=In Func7=In // State0=T State1=T State2=T State3=T State4=T State5=T State6=T State7=T PORTD=0x00;DDRD=0x00;
// Port E initialization// Func0=In Func1=In Func2=In // State0=T State1=T State2=T PORTE=0x00;DDRE=0x00;
// Timer/Counter 0 initialization// Clock source: System Clock// Clock value: Timer 0 Stopped// Mode: Normal top=FFh// OC0 output: DisconnectedTCCR0=0x00;TCNT0=0x00;OCR0=0x00;
F-4
ECE 477 Final Report Spring 2004
// Timer/Counter 1 initialization// Clock source: System Clock// Clock value: Timer 1 Stopped// Mode: Normal top=FFFFh// OC1A output: Discon.// OC1B output: Discon.// Noise Canceler: Off// Input Capture on Falling EdgeTCCR1A=0x00;TCCR1B=0x00;TCNT1H=0x00;TCNT1L=0x00;OCR1AH=0x00;OCR1AL=0x00;OCR1BH=0x00;OCR1BL=0x00;
// Timer/Counter 2 initialization// Clock source: System Clock// Clock value: Timer 2 Stopped// Mode: Normal top=FFh// OC2 output: DisconnectedASSR=0x00;TCCR2=0x00;TCNT2=0x00;OCR2=0x00;
// External Interrupt(s) initialization// INT0: Off// INT1: Off// INT2: Off// Interrupt on any change on pins PCINT0-7: Off// Interrupt on any change on pins PCINT8-15: OffMCUCR=0x00;EMCUCR=0x00;
// Timer(s)/Counter(s) Interrupt(s) initializationTIMSK=0x00;ETIMSK=0x00;
// USART0 initialization// Communication Parameters: 8 Data, 1 Stop, No Parity// USART0 Receiver: On// USART0 Transmitter: On// USART0 Mode: Asynchronous// USART0 Baud rate: 9600UCSR0A=0x00;UCSR0B=0x98;UCSR0C=0x86;UBRR0H=0x00;UBRR0L=0x33;
// USART1 initialization// Communication Parameters: 8 Data, 1 Stop, No Parity// USART1 Receiver: On// USART1 Transmitter: On
F-5

ECE 477 Final Report Spring 2004
// USART1 Mode: Asynchronous// USART1 Baud rate: 9600UCSR1A=0x00;UCSR1B=0x98;UCSR1C=0x86;UBRR1H=0x00;UBRR1L=0x33;
/*// USART0 initialization// Communication Parameters: 8 Data, 1 Stop, No Parity// USART0 Receiver: On// USART0 Transmitter: On// USART0 Mode: Asynchronous// USART0 Baud rate: 4800UCSR0A=0x00;UCSR0B=0x98;UCSR0C=0x86;UBRR0H=0x00;UBRR0L=0x67;
// USART1 initialization// Communication Parameters: 8 Data, 1 Stop, No Parity// USART1 Receiver: On// USART1 Transmitter: On// USART1 Mode: Asynchronous// USART1 Baud rate: 4800UCSR1A=0x00;UCSR1B=0x98;UCSR1C=0x86;UBRR1H=0x00;UBRR1L=0x67;*/
// Analog Comparator initialization// Analog Comparator: Off// Analog Comparator Input Capture by Timer/Counter 1: Off// Analog Comparator Output: OffACSR=0x80;
// Global enable interrupts#asm("sei")
OSCCAL = 0x5c;
while (1) { /* If rx_counter0 == 23 and rx_buffer_overflow0 == 0 then full packet received from PC. Computer checksum for packet and transmit to remote. */
if (rx_counter0 == 23) { //&& rx_buffer_overflow0 == 0) {//Use get_char 24 times and xor bytes to compute checksum//Transmit byte as you xor//Transmit checksum
checksum = 0x0;for (i = 0; i < 24; i++) {
input = getchar();
F-6

ECE 477 Final Report Spring 2004
checksum = checksum ^ input;putchar1(input);
}putchar1(checksum);
}
/* If rx_counter1 == 1 and rx_buffer_overflow1 == 0 then full packetreceived from remote unit. Check checksum and if matches transmit to
PC. */if (rx_counter1 == 1) { //&& rx_buffer_overflow1 == 0) {//Use getchar1 2 times and compare bytes//If those bytes match, send one of them to the PC
input = getchar1();if (input == getchar1()) {
putchar(input);}
}
};}
F-7

ECE 477 Final Report Spring 2004
Remote Firmware (Embedded C)
/*********************************************This program was produced by theCodeWizardAVR V1.23.8d StandardAutomatic Program Generator© Copyright 1998-2003 HP InfoTech s.r.l.http://www.hpinfotech.roe-mail:[email protected]
Project : Version : Date : 04/23/2004Author : Group 5 Company : Purdue University Comments:
Chip type : ATmega162VProgram type : ApplicationClock frequency : 8.000000 MHzMemory model : SmallExternal SRAM size : 0Data Stack size : 256*********************************************/
#include <mega162.h>#include <delay.h>
#define RXB8 1#define TXB8 0#define UPE 2#define OVR 3#define FE 4#define UDRE 5#define RXC 7
#define FRAMING_ERROR (1<<FE)#define PARITY_ERROR (1<<UPE)#define DATA_OVERRUN (1<<OVR)#define DATA_REGISTER_EMPTY (1<<UDRE)#define RX_COMPLETE (1<<RXC)
void write_LCD(int Ao, int LCD_in);// USART1 Receiver buffer#define RX_BUFFER_SIZE1 25char rx_buffer1[RX_BUFFER_SIZE1];unsigned char rx_wr_index1,rx_rd_index1,rx_counter1;// This flag is set on USART1 Receiver buffer overflowbit rx_buffer_overflow1;
// USART1 Receiver interrupt service routine#pragma savereg-interrupt [USART1_RXC] void uart1_rx_isr(void){
F-8

ECE 477 Final Report Spring 2004
char status,data;//int i;#asm push r26 push r27 push r30 push r31 in r26,sreg push r26#endasm
status=UCSR1A;data=UDR1;//write_LCD(0, '*');if ((status & (FRAMING_ERROR | PARITY_ERROR | DATA_OVERRUN))==0) {// write_LCD(0, '@');/* write_LCD(0, 'F'); if (FRAMING_ERROR == 0) {write_LCD(0, '0'); write_LCD(0, ' ');} else {write_LCD(0, '1'); write_LCD(0, ' ');} write_LCD(0, 'P'); if (PARITY_ERROR == 0) {write_LCD(0, '0'); write_LCD(0, ' ');} else {write_LCD(0, '1'); write_LCD(0, ' ');} write_LCD(0, 'D'); if (DATA_OVERRUN == 0) {write_LCD(0, '0'); write_LCD(0, ' ');} else {write_LCD(0, '1'); write_LCD(0, ' ');} */ rx_buffer1[rx_wr_index1]=data; if (++rx_wr_index1 == RX_BUFFER_SIZE1) rx_wr_index1=0; if (++rx_counter1 == RX_BUFFER_SIZE1) { rx_counter1=0; rx_buffer_overflow1=1; }; }; /*if (rx_counter1 == 24) { write_LCD(0, '&'); rx_counter1 = 0; for (i = 0; i < 24; i++) {write_LCD(0, rx_buffer1[i]);} //button_press = 0;}*/ #asm pop r26 out sreg,r26 pop r31 pop r30 pop r27 pop r26#endasm}#pragma savereg+
// Get a character from the USART1 Receiver buffer#pragma used+char getchar1(void){char data;while (rx_counter1==0);
F-9

ECE 477 Final Report Spring 2004
data=rx_buffer1[rx_rd_index1];if (++rx_rd_index1 == RX_BUFFER_SIZE1) rx_rd_index1=0;#asm("cli")--rx_counter1;#asm("sei")return data;}#pragma used-// Write a character to the USART1 Transmitter#pragma used+void putchar1(char c){while ((UCSR1A & DATA_REGISTER_EMPTY)==0);UDR1=c;}#pragma used-
// Declare your global variables hereint lineh[] = { 0x00, 0x00, 0x00, 0x00, 0x00, 0x00, 0x00, 0x00, 0x00, 0x00, 0x00, 0x00, 0x01, 0x01, 0x01, 0x01 };int linel[] = { 0x00, 0x16, 0x2C, 0x42, 0x58, 0x6E, 0x84, 0x9A, 0xB0, 0xC6, 0xDC, 0xF2, 0x08, 0x1E, 0x34, 0x4A };int button_press = 0;void write_LCD(int Ao, int LCD_in){
PORTD.5 = Ao; // Aodelay_us(0x01);PORTD.6 = 0; // _WrPORTD.7 = 1; // _RdPORTC = LCD_in;delay_us(1);PORTD.6 = 1; // _WrPORTD.7 = 1; // _Rddelay_us(1);
return;}
void main(void){// Declare your local variables hereint i, j, checksum;char input[25];// Crystal Oscillator division factor: 1CLKPR=0x80;CLKPR=0x00;
// Input/Output Ports initialization// Port A initialization// Func0=In Func1=In Func2=In Func3=Out Func4=In Func5=In Func6=In Func7=In // State0=T State1=T State2=T State3=0 State4=T State5=T State6=T State7=T PORTA=0x08;DDRA=0x08;
// Port B initialization// Func0=In Func1=In Func2=In Func3=In Func4=In Func5=In Func6=In Func7=In // State0=T State1=T State2=T State3=T State4=T State5=T State6=T State7=T
F-10

ECE 477 Final Report Spring 2004
PORTB=0x00;DDRB=0x00;
// Port C initialization// Func0=Out Func1=Out Func2=Out Func3=Out Func4=Out Func5=Out Func6=Out Func7=Out // State0=0 State1=0 State2=0 State3=0 State4=0 State5=0 State6=0 State7=0 PORTC=0x00;DDRC=0xFF;
// Port D initialization// Func0=Out Func1=Out Func2=Out Func3=Out Func4=Out Func5=Out Func6=Out Func7=Out // State0=0 State1=0 State2=0 State3=0 State4=0 State5=0 State6=0 State7=0 PORTD=0x1B;DDRD=0xFD;
// Port E initialization// Func0=In Func1=In Func2=Out // State0=T State1=T State2=0 PORTE=0x00;DDRE=0x04;
// Timer/Counter 0 initialization// Clock source: System Clock// Clock value: Timer 0 Stopped// Mode: Normal top=FFh// OC0 output: DisconnectedTCCR0=0x00;TCNT0=0x00;OCR0=0x00;
// Timer/Counter 1 initialization// Clock source: System Clock// Clock value: Timer 1 Stopped// Mode: Normal top=FFFFh// OC1A output: Discon.// OC1B output: Discon.// Noise Canceler: Off// Input Capture on Falling EdgeTCCR1A=0x00;TCCR1B=0x00;TCNT1H=0x00;TCNT1L=0x00;OCR1AH=0x00;OCR1AL=0x00;OCR1BH=0x00;OCR1BL=0x00;
// Timer/Counter 2 initialization// Clock source: System Clock// Clock value: Timer 2 Stopped// Mode: Normal top=FFh// OC2 output: DisconnectedASSR=0x00;TCCR2=0x00;TCNT2=0x00;
F-11
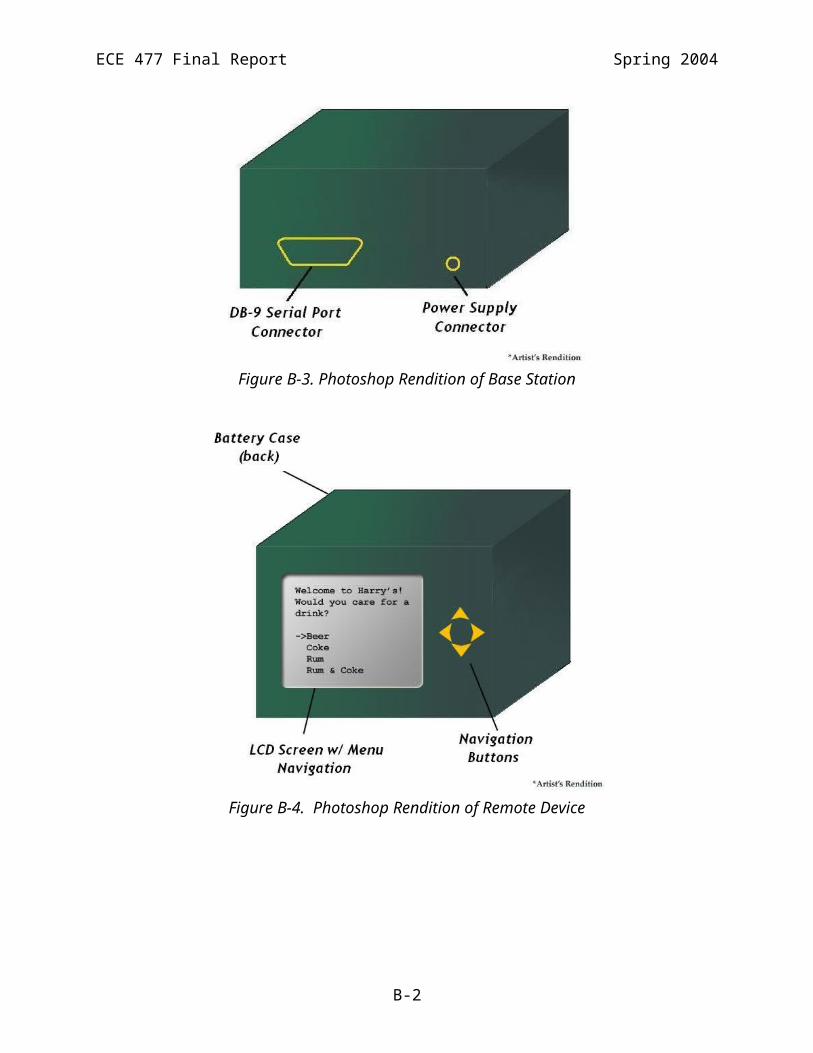
ECE 477 Final Report Spring 2004
OCR2=0x00;
// External Interrupt(s) initialization// INT0: Off// INT1: Off// INT2: Off// Interrupt on any change on pins PCINT0-7: Off// Interrupt on any change on pins PCINT8-15: OffMCUCR=0x00;EMCUCR=0x00;
// Timer(s)/Counter(s) Interrupt(s) initializationTIMSK=0x00;ETIMSK=0x00;
// USART1 initialization// Communication Parameters: 8 Data, 1 Stop, No Parity// USART1 Receiver: On// USART1 Transmitter: On// USART1 Mode: Asynchronous// USART1 Baud rate: 9600UCSR1A=0x00;UCSR1B=0x98;UCSR1C=0x86;UBRR1H=0x00;UBRR1L=0x33;
/*// USART1 initialization// Communication Parameters: 8 Data, 1 Stop, No Parity// USART1 Receiver: On// USART1 Transmitter: On// USART1 Mode: Asynchronous// USART1 Baud rate: 4800UCSR1A=0x00;UCSR1B=0x98;UCSR1C=0x86;UBRR1H=0x00;UBRR1L=0x67;*/
// Analog Comparator initialization// Analog Comparator: Off// Analog Comparator Input Capture by Timer/Counter 1: Off// Analog Comparator Output: OffACSR=0x80; //reset the LCD module
delay_ms(50);PORTA.3 = 0;delay_ms(10);PORTA.3 = 1;
// Display Start-up Sequencewrite_LCD(1, 0x40); // System Setwrite_LCD(0, 0x30); //P1
F-12
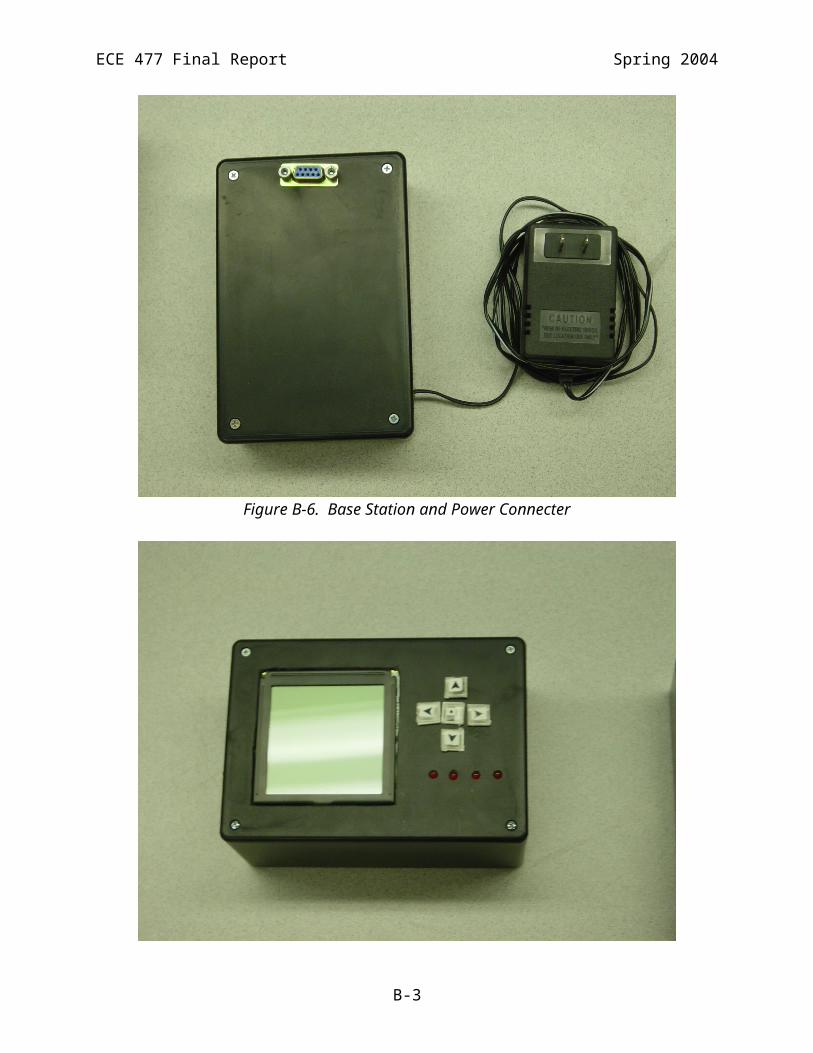
ECE 477 Final Report Spring 2004
write_LCD(0, 0x05); // P2write_LCD(0, 0x07); // P3write_LCD(0, 0x17); // P4write_LCD(0, 0x21); // P5write_LCD(0, 0x7F); // P6write_LCD(0, 0x16); // P7write_LCD(0, 0x00); // P8
write_LCD(1, 0x44); //Scrollwrite_LCD(0, 0x00); // SAD 1Lwrite_LCD(0, 0x00); // SAD 1Hwrite_LCD(0, 0x80); // SL1
write_LCD(1, 0x5a); //HDOT SCRwrite_LCD(0, 0x00);
write_LCD(1, 0x5b); //OVLAYwrite_LCD(0, 0x01);
write_LCD(1, 0x58); // Display Offwrite_LCD(0, 0x04);
write_LCD(1, 0x46); // Set cursor to address 00hwrite_LCD(0, 0x00); write_LCD(0, 0x00);write_LCD(1, 0x42); // write to cursor address/*clearing memory of display to blank */for (i = 0; i <= 0x0FFF; i++){ write_LCD(0,0x20);
}for (i = 0x1000; i <= 0x4FFF; i++){ write_LCD(0,0x00);
}
write_LCD(1, 0x46); //Move Cursor to Start of Displaywrite_LCD(0, 0x00);write_LCD(0, 0x00);
write_LCD(1, 0x5d); //CSR Formwrite_LCD(0, 0x04);write_LCD(0, 0x86);
write_LCD(1, 0x59); // Display On
write_LCD(1, 0x4c); // Shift Cursor Direction = Right
write_LCD(1, 0x42);write_LCD(0, ' ');write_LCD(0, ' ');write_LCD(0, 'U');write_LCD(0, 'n');write_LCD(0, 'i');write_LCD(0, 'v');write_LCD(0, 'e');write_LCD(0, 'r');
F-13

ECE 477 Final Report Spring 2004
write_LCD(0, 's');write_LCD(0, 'a');write_LCD(0, 'l');write_LCD(0, ' ');write_LCD(0, 'E');write_LCD(0, 'x');write_LCD(0, 'p');write_LCD(0, 'o');write_LCD(0, 'r');write_LCD(0, 't');write_LCD(0, 's');write_LCD(0, ' ');write_LCD(0, ' ');write_LCD(0, ' ');
write_LCD(0, ' ');write_LCD(0, ' ');
write_LCD(0, ' '); write_LCD(0, ' ');
write_LCD(0, ' '); write_LCD(0, ' '); write_LCD(0, ' ');
write_LCD(0, ' '); write_LCD(0, ' '); write_LCD(0, ' ');
write_LCD(0, ' '); write_LCD(0, ' '); write_LCD(0, ' ');
write_LCD(0, ' '); write_LCD(0, ' ');
write_LCD(0, ' ');write_LCD(0, ' ');
write_LCD(0, ' '); write_LCD(0, ' ');
write_LCD(0, ' '); write_LCD(0, ' ');
write_LCD(0, ' ');
write_LCD(0, ' ');write_LCD(0, 'W');write_LCD(0, 'a');write_LCD(0, 'i');write_LCD(0, 't');write_LCD(0, 'i');write_LCD(0, 'n');write_LCD(0, 'g');write_LCD(0, ' ');write_LCD(0, 'f');write_LCD(0, 'o');write_LCD(0, 'r');write_LCD(0, ' ');write_LCD(0, 'M');write_LCD(0, 'e');write_LCD(0, 'n');write_LCD(0, 'u');write_LCD(0, '.');write_LCD(0, '.');
F-14

ECE 477 Final Report Spring 2004
write_LCD(0, '.');write_LCD(0, ' ');write_LCD(0, ' ');
for (i = 67; i <= 0x0FFF; i++){ write_LCD(0,0x20);
} #asm("sei")while (1) { /*if (USART1_RXC != 0) { write_LCD(0, '%'); putchar1(getchar1());
}*/ /*If rx_counter1 == 24 and rx_buffer_overflow == 0 then a full packet has been received from the PC (base station). Compute and check checksum then transmit confirmation and act accordingly. */ if (rx_counter1 == 24) { //&& rx_buffer_overflow1 == 0) {
checksum = 0; for (i = 0; i < 25; i++) { input[i] = getchar1(); checksum = checksum ^ input[i]; } button_press = 0; // if (checksum == getchar1()) { // valid packet // now that buffer is empty, check to see if packet is for me (remote 0000) // if (input[0] == 0 ) { //ok, it's for me, and it's a data packet! // send confirm packets 0x07, 0x07 and clear button press flags// //putchar1(0x07); //putchar1(0x07); button_press = 0; //set cursor of display to the appropriate address write_LCD(1, 0x46);
write_LCD(0, linel[input[1]]); write_LCD(0, lineh[input[1]]);
//write data write_LCD(1, 0x42); for (i = 2; i < 23; i++) { //write_LCD(0, (i+0x30)); //if (i < 2) { write_LCD(0, (input[i]+0x30)); } //else { write_LCD(0, input[i]); //} } for (i = ++(input[1]); i < 16; i++) { write_LCD(1, 0x46);
write_LCD(0, linel[i]); write_LCD(0, lineh[i]);
F-15

ECE 477 Final Report Spring 2004
write_LCD(1, 0x42); for (j = 0; j < 22; j++) { write_LCD(0, ' '); } } } else if (input[0] == 1) { //it's for me, and it's an alert packet!!!! // send confirm packets 0x07, 0x07 and clear button press flags// putchar1(0x07); putchar1(0x07); button_press = 0; // light up LEDs, delay for a few seconds, turn off LEDs PORTD.0 = !PORTD.0; PORTD.1 = !PORTD.1; PORTD.3 = !PORTD.3; PORTD.4 = !PORTD.4;/* delay_ms(5000); PORTD.0 = 1; PORTD.1 = 1; PORTD.3 = 1; PORTD.4 = 1; */ } } // } /* scan inputs from buttons. if a button is selected w/ debounce send appropriate packet and flag that button as pressed. If a button is flagged as pressed and not pressed, turn off that flag */ if (button_press == 0) { //check for button press if (PINA.5 == 0) { //enter key pressed delay_ms(12); if (PINA.5 == 0) { // yes, it's really pressed button_press = 1; //send enter press packet w/ checksum! putchar1(0x06); putchar1(0x06);// write_LCD(0, 'E'); } } else if (PINA.4 == 0) { //up key pressed delay_ms(12); if (PINA.4 == 0) { // yes, it's really pressed button_press = 1; //send up press packet w/ checksum! putchar1(0x02); putchar1(0x02);// write_LCD(0, 'U'); }
F-16
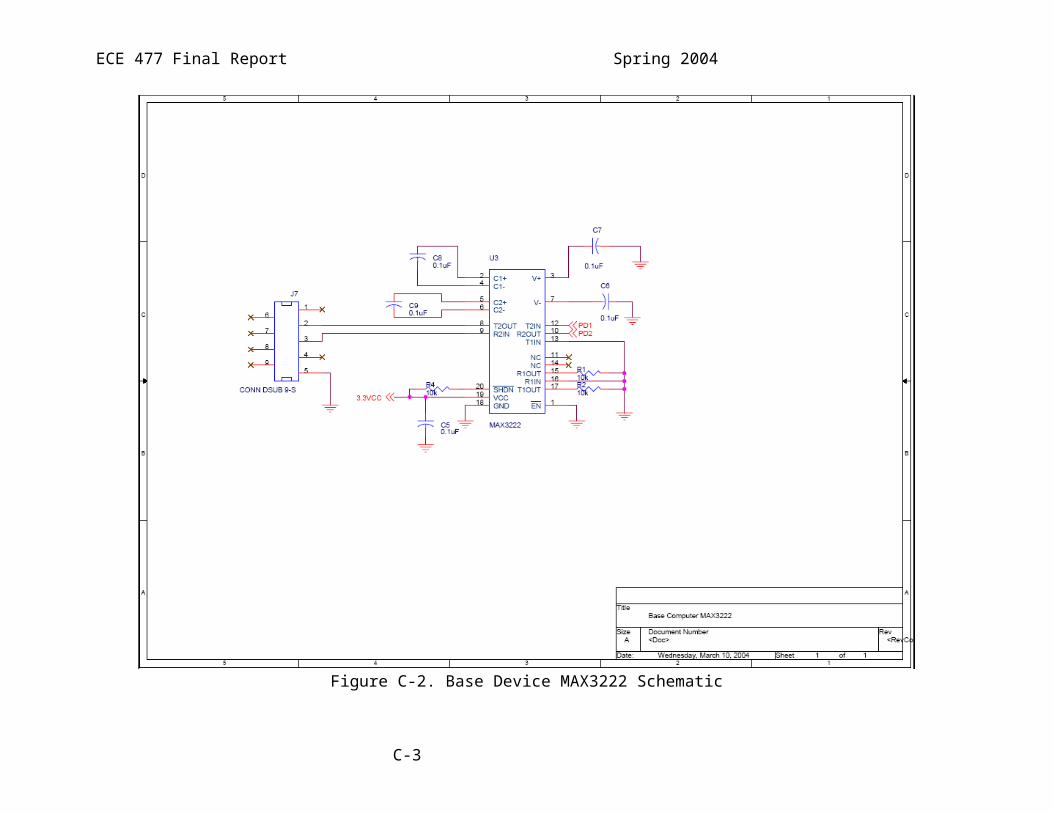
ECE 477 Final Report Spring 2004
} else if (PINA.6 == 0) { // down key pressed delay_ms(12); if (PINA.6 == 0) { // yes, it's really pressed button_press = 1; //send down press packet w/ checksum! putchar1(0x03); putchar1(0x03);// write_LCD(0, 'D'); } } else if (PINA.7 == 0) { // left key pressed delay_ms(12); if (PINA.7 == 0) { // yes, it's really pressed button_press = 1; //send left press packet w/ checksum! putchar1(0x04); putchar1(0x04);// write_LCD(0, 'L'); } } else if (PINE.0 == 0) { // right key pressed delay_ms(12); if (PINE.0 == 0) { // yes, it's really pressed button_press = 1; //send right press packet w/ checksum! putchar1(0x05); putchar1(0x05);// write_LCD(0, 'R'); } } } };}
F-17

ECE 477 Final Report Spring 2004
PC Server Software (Visual Basic)
Const CATMAX = 3 'Category MaximumConst ITEMMAX = 13 'Item MaximumConst SPACE = " " 'Space characterConst ARROW = "~" 'ARROW character
Dim item_type(CATMAX) As StringDim item1(ITEMMAX) As StringDim item2(ITEMMAX) As StringDim item3(ITEMMAX) As String
Dim item_menu(CATMAX) As New menu_screenDim item1_screen(ITEMMAX) As New menu_screenDim item2_screen(ITEMMAX) As New menu_screenDim item3_screen(ITEMMAX) As New menu_screenDim item1_cN(ITEMMAX) As New menu_screenDim item2_cN(ITEMMAX) As New menu_screenDim item3_cN(ITEMMAX) As New menu_screenDim item1_cY(ITEMMAX) As New menu_screenDim item2_cY(ITEMMAX) As New menu_screenDim item3_cY(ITEMMAX) As New menu_screen
Dim NoStr As StringDim YesStr As String
'Dim drinks As New menu_screen'Dim app As New menu_screen''Dim beer As New menu_screen'Dim coke As New menu_screen'Dim sprite As New menu_screen
'Dim cheez As New menu_screen'Dim nacho As New menu_screen'Dim wings As New menu_screen''Dim beer_c As New menu_screen'Dim coke_c As New menu_screen'Dim sprite_c As New menu_screen
'Dim cheez_c As New menu_screen'Dim nacho_c As New menu_screen'Dim wings_c As New menu_screen
Dim CurMenu As New menu_screen
Private Sub CmdDown_Click() Call Menu_move(2, CurMenu)End Sub
Private Sub CmdLeft_Click() Call Menu_move(4, CurMenu)End Sub
F-18

ECE 477 Final Report Spring 2004
Private Sub CmdRight_Click() Call Menu_move(3, CurMenu)End Sub
Private Sub CmdUp_Click() Call Menu_move(1, CurMenu)End Sub
Private Sub Command1_click() Dim Items() As String Dim Counter As Integer Dim QTY As Integer Dim Found As Boolean Items = Split(Text1.Text, ",") Found = False For Counter = 0 To (List1.ListCount - 1) If (Items(0) = List1.List(Counter)) And (Items(1) = List2.List(Counter)) Then QTY = List3.List(Counter) QTY = QTY + 1 List3.List(Counter) = QTY Found = True End If Next If Not Found Then List1.AddItem (Items(0)) List2.AddItem (Items(1)) List3.AddItem ("1") Found = False For Counter = 0 To (Combo1.ListCount - 1) If Items(1) = Combo1.List(Counter) Then Found = True End If Next If Not Found Then Combo1.AddItem (Items(1)) End If End If
End Sub
Public Sub Menu_move(dir As Integer, Ptr As menu_screen)
Select Case dir Case 1: 'up If (Not (Ptr.up.menu = "")) Then Set Ptr = Ptr.up End If
F-19

ECE 477 Final Report Spring 2004
Case 2: 'down If Not (Ptr.down Is Nothing) Then Set Ptr = Ptr.down End If Case 3: 'right If Not (Ptr.item = "") Then 'Item Order Screen Text1.Text = Ptr.item + ",1" Call Command1_click Text1.Text = "" Set Ptr = item_menu(0) ElseIf Not (Ptr.right Is Nothing) Then Set Ptr = Ptr.right End If Case 4: 'Set Ptr = item_menu(0) If Not (Ptr.left Is Nothing) Then Set Ptr = Ptr.left End If End Select Call SendToSerial(Ptr.menu)
End Sub
Private Sub Dir1_Change() Dir1.Path = Drive1.Drive File1.Path = Dir1.Path' File1.Pattern = "*.txt" End Sub
Private Sub Drive1_Change() ChDrive Drive1.Drive Call Dir1_ChangeEnd Sub
Private Sub File1_Click() Text2.Text = File1.Path + "\" + File1.FileNameEnd SubPrivate Function Trunc_Width(TruncMe As String) As StringDim TempStr As String
If Len(TruncMe) > 21 Then TempStr = Mid(TruncMe, 1, 21) TempStr = TempStr + " " Trunc_Width = TempStr Else TempStr = TempStr End If
End FunctionPrivate Sub Form_Load()
F-20

ECE 477 Final Report Spring 2004
MSComm1.CommPort = 1 ' Set the port number MSComm1.Settings = "9600,N,8,1" ' Set UART parameters MSComm1.PortOpen = True ' Required, might lock port
Call SendToSerial(CurMenu.menu)
End SubPrivate Sub Happy_Delay() 'pause for 0.1 seconds to allow RF buffer to send Start = Timer 'Microsoft.VisualBasic.DateAndTime.Timer Finish = Start + 0.02 ' Set end time for .05-second duration. Do While Timer < Finish ' Do other processing while waiting for time to elapse. Loop
End Sub
Private Sub SendToSerial(InTxt As String)
Dim Lines() As StringDim Final As StringDim temp As String
DOutput.Text = ""
Lines = Split(InTxt, vbNewLine)
'Final = ""
Dim Addr As IntegerAddr = 3
MSComm1.Output = Chr(0) + Chr(0) + " Welcome To "Call Happy_DelayMSComm1.Output = Chr(0) + Chr(1) + " The Casino Royale "Call Happy_DelayMSComm1.Output = Chr(0) + Chr(2) + "----------------------"Call Happy_Delay
For Each i In Lines 'pad to 22 characters temp = i Do While (Len(temp) < 22) temp = temp + " " Loop 'Final = Final + Temp If Addr <= 15 Then MSComm1.Output = Chr(0) + Chr(Addr) + Trunc_Width(temp) End If Addr = Addr + 1 Call Happy_Delay
F-21

ECE 477 Final Report Spring 2004
'MSComm1.Output = Temp 'CheckSum = 0 'temp = i 'For j = 1 To Len(temp) ' k = Mid(temp, j, 1) ' CheckSum = CheckSum Xor AscW(k) 'Next j 'MsgBox CheckSum DOutput.Text = DOutput.Text + Trunc_Width(temp) + vbNewLine Next i
'DOutput.Text = Join(Lines)
End SubPrivate Sub MenuLoad_Click()'Const CATMAX = 3 'Category Maximum'Const ITEMMAX = 16 'Item Maximum
'Dim i As IntegerDim i As IntegerDim j As IntegerNoStr = ARROW + " No" + vbNewLine + SPACE + " Yes" + vbNewLineYesStr = SPACE + " No" + vbNewLine + ARROW + " Yes" + vbNewLine
Dim item_menu(CATMAX) As New menu_screenDim item1_screen(ITEMMAX) As New menu_screenDim item2_screen(ITEMMAX) As New menu_screenDim item3_screen(ITEMMAX) As New menu_screenDim item1_cN(ITEMMAX) As New menu_screenDim item2_cN(ITEMMAX) As New menu_screenDim item3_cN(ITEMMAX) As New menu_screenDim item1_cY(ITEMMAX) As New menu_screenDim item2_cY(ITEMMAX) As New menu_screenDim item3_cY(ITEMMAX) As New menu_screen
For i = 0 To CATMAX - 1 item_type(i) = "" Next i For i = 0 To ITEMMAX - 1 item1(i) = "" item2(i) = "" item3(i) = "" Next i Open Text2.Text For Input As #1 For i = 0 To CATMAX - 1 Input #1, item_type(i) Next i For i = 0 To ITEMMAX - 1
F-22
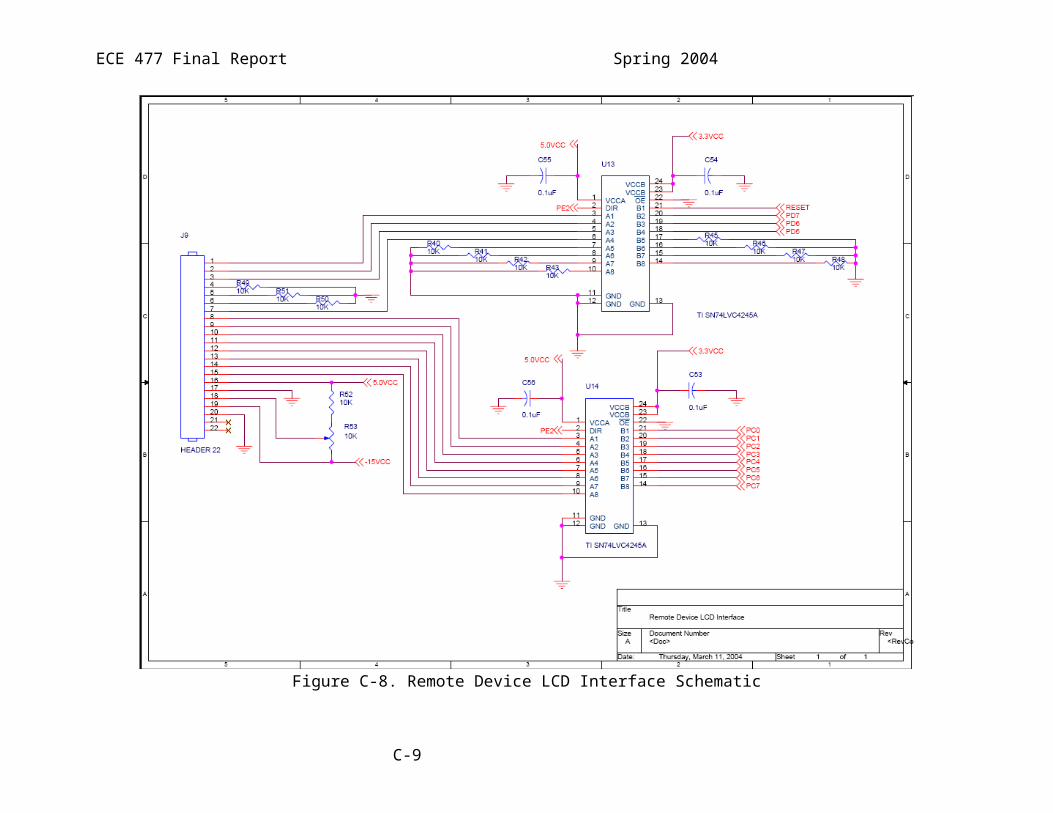
ECE 477 Final Report Spring 2004
Input #1, item1(i) Next i For i = 0 To ITEMMAX - 1 Input #1, item2(i) Next i For i = 0 To ITEMMAX - 1 Input #1, item3(i) Next i Close #1 Set CurMenu = item_menu(0)' -mike- Call SendToSerial(CurMenu.menu)
'Call MenuLoad_Click
Set CurMenu = item_menu(0) ' ********TOP LEVEL********* For i = 0 To CATMAX - 2 Set item_menu(i).down = item_menu(i + 1) Next i Set item_menu(0).right = item1_screen(0) Set item_menu(1).right = item2_screen(0) Set item_menu(2).right = item3_screen(0) For i = 1 To CATMAX - 1 Set item_menu(i).up = item_menu(i - 1) Next i For i = 0 To CATMAX - 1 For j = 0 To CATMAX - 1 If i = j Then item_menu(i).menu = item_menu(i).menu + ARROW Else item_menu(i).menu = item_menu(i).menu + SPACE End If item_menu(i).menu = item_menu(i).menu + item_type(j) + vbNewLine Next j Next i ' ********SECOND LEVEL********* ' ******** ITEM 1 ********* For i = 0 To ITEMMAX - 2 Set item1_screen(i).down = item1_screen(i + 1) Next i For i = 0 To ITEMMAX - 1 Set item1_screen(i).right = item1_cN(i) Set item1_screen(i).left = item_menu(0) Next i
F-23

ECE 477 Final Report Spring 2004
For i = 1 To ITEMMAX - 1 Set item1_screen(i).up = item1_screen(i - 1) Next i For i = 0 To ITEMMAX - 1 For j = 0 To ITEMMAX - 1 If i = j Then item1_screen(i).menu = item1_screen(i).menu + ARROW Else item1_screen(i).menu = item1_screen(i).menu + SPACE End If item1_screen(i).menu = item1_screen(i).menu + item1(j) + vbNewLine Next j Next i ' ********SECOND LEVEL********* ' ******** ITEM 2 ********* For i = 0 To ITEMMAX - 2 Set item2_screen(i).down = item2_screen(i + 1) Next i For i = 0 To ITEMMAX - 1 Set item2_screen(i).right = item2_cN(i) Set item2_screen(i).left = item_menu(0) Next i For i = 1 To ITEMMAX - 1 Set item2_screen(i).up = item2_screen(i - 1) Next i For i = 0 To ITEMMAX - 1 For j = 0 To ITEMMAX - 1 If i = j Then item2_screen(i).menu = item2_screen(i).menu + ARROW Else item2_screen(i).menu = item2_screen(i).menu + SPACE End If item2_screen(i).menu = item2_screen(i).menu + item2(j) + vbNewLine Next j Next i ' ********SECOND LEVEL********* ' ******** ITEM 3 ********* For i = 0 To ITEMMAX - 2 Set item3_screen(i).down = item3_screen(i + 1) Next i For i = 0 To ITEMMAX - 1 Set item3_screen(i).right = item3_cN(i) Set item3_screen(i).left = item_menu(0) Next i For i = 1 To ITEMMAX - 1
F-24

ECE 477 Final Report Spring 2004
Set item3_screen(i).up = item3_screen(i - 1) Next i For i = 0 To ITEMMAX - 1 For j = 0 To ITEMMAX - 1 If i = j Then item3_screen(i).menu = item3_screen(i).menu + ARROW Else item3_screen(i).menu = item3_screen(i).menu + SPACE End If item3_screen(i).menu = item3_screen(i).menu + item3(j) + vbNewLine Next j Next i ' ********THIRD LEVEL*********
For i = 0 To ITEMMAX - 1 Set item1_cN(i).left = item1_screen(i) item1_cN(i).menu = "Are you sure you want a(n)" + vbNewLine + SPACE + item1(i) + vbNewLine + NoStr + vbNewLine Set item1_cN(i).right = item_menu(0) Set item1_cN(i).down = item1_cY(i) Set item1_cY(i).up = item1_cN(i) item1_cY(i).item = item1(i) Set item1_cY(i).left = item1_screen(i) item1_cY(i).menu = "Are you sure you want a(n)" + vbNewLine + SPACE + item1(i) + vbNewLine + YesStr + vbNewLine Next i For i = 0 To ITEMMAX - 1 Set item2_cN(i).left = item2_screen(i) item2_cN(i).menu = "Are you sure you want a(n)" + vbNewLine + SPACE + item2(i) + vbNewLine + NoStr + vbNewLine Set item2_cN(i).right = item_menu(0) Set item2_cN(i).down = item2_cY(i) Set item2_cY(i).up = item2_cN(i) item2_cY(i).item = item2(i) Set item2_cY(i).left = item2_screen(i) item2_cY(i).menu = "Are you sure you want a(n)" + vbNewLine + SPACE + item2(i) + vbNewLine + YesStr + vbNewLine Next i For i = 0 To ITEMMAX - 1 Set item3_cN(i).left = item3_screen(i) item3_cN(i).menu = "Are you sure you want a(n)" + vbNewLine + SPACE + item3(i) + vbNewLine + NoStr + vbNewLine Set item3_cN(i).right = item_menu(0) Set item3_cN(i).down = item3_cY(i) Set item3_cY(i).up = item3_cN(i) item3_cY(i).item = item3(i) Set item3_cY(i).left = item3_screen(i) item3_cY(i).menu = "Are you sure you want a(n)" + vbNewLine + SPACE + item3(i) + vbNewLine + YesStr + vbNewLine
F-25
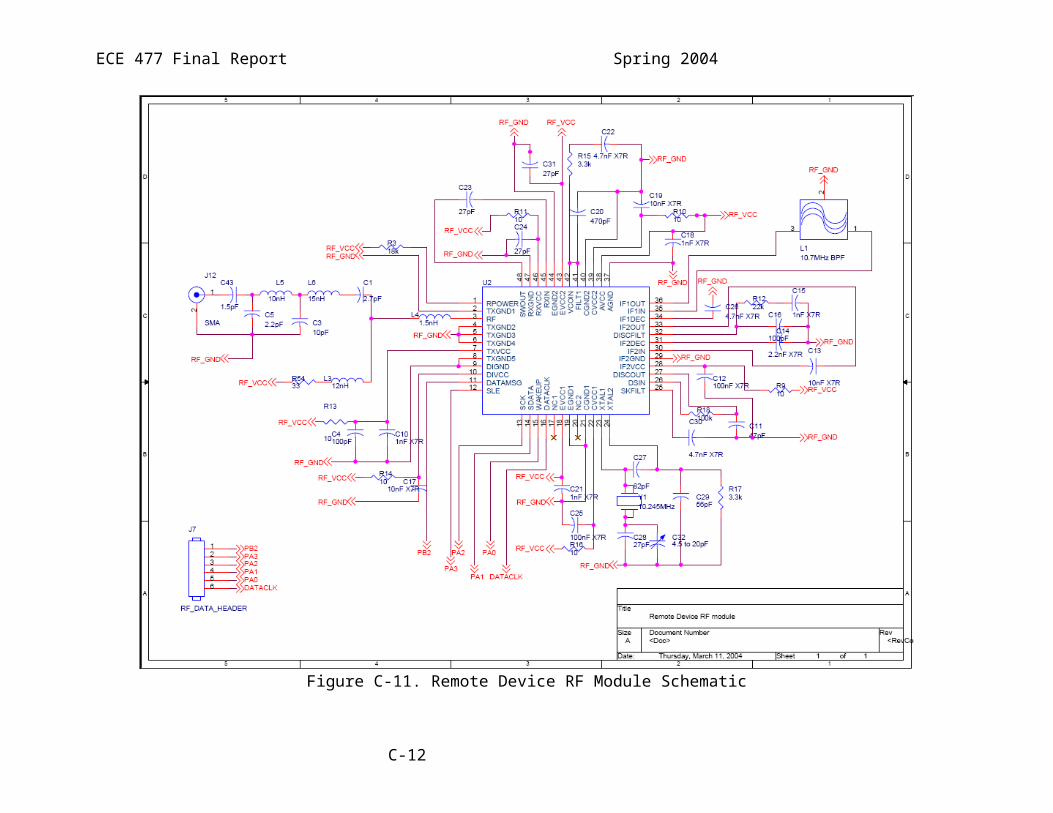
ECE 477 Final Report Spring 2004
Next i Call SendToSerial(item_menu(0).menu)
End Sub
Private Sub MSComm1_OnComm()
Dim temp As String
MSComm1.Output = OutgoingText.Text ' Send data Buffer$ = Buffer$ & MSComm1.Input ' Read data temp = Buffer$' If Temp = "+" Then' Call Command1_click
' Text1.Text = ""' Else' Text1.Text = Text1.Text & Temp' End If'MsgBox (Temp)
Select Case tempCase Chr(2) 'up Call CmdUp_ClickCase Chr(3) 'down Call CmdDown_ClickCase Chr(4) 'left Call CmdLeft_ClickCase Chr(5), Chr(6) 'right Call CmdRight_ClickEnd Select
End Sub
Private Sub SendText_Click()'Dim Temp As String MSComm1.Output = OutgoingText.Text ' Send data End Sub
Private Sub TableReady_Click()
Dim Counter As Integer Dim Address As Byte Dim OpCode As Byte Dim Cmd As Integer Dim myString As String For Counter = 0 To (List2.ListCount - 1) If (Combo1.Text = List2.List(Counter)) Then List1.RemoveItem (Counter) List2.RemoveItem (Counter) List3.RemoveItem (Counter)
F-26

ECE 477 Final Report Spring 2004
Counter = Counter - 1 End If Next myString = Combo1.Text For Counter = 0 To (Combo1.ListCount - 1) If (Combo1.List(Counter) = myString) Then Combo1.RemoveItem (Counter) Counter = Counter - 1 End If Next 'Combo1.RemoveItem (Counter) Address = 0 OpCode = 1 Cmd = &H100 MSComm1.Output = Chr(1) + Chr(0) + Chr(0) + Chr(0) + Chr(0) + Chr(0) + Chr(0) + Chr(0) + Chr(0) + Chr(0) + Chr(0) + Chr(0) + Chr(0) + Chr(0) + Chr(0) + Chr(0) + Chr(0) + Chr(0) + Chr(0) + Chr(0) + Chr(0) + Chr(0) + Chr(0) + Chr(0) SendToSerial " Your Table Is Ready!" End Sub
F-27

ECE 477 Final Report Spring 2004
Menu Editor (Visual Basic)
Dim Counter As Integer
Private Sub Dir1_Change() Dir1.Path = Drive1.Drive Call File1_ClickEnd Sub
Private Sub Drive1_Change() ChDrive Drive1.Drive Call Dir1_ChangeEnd Sub
Private Sub File1_Click() File1.Path = Dir1.Path Location.Text = File1.Path + "\" + File1.FileNameEnd Sub
Private Sub OpenFile_Click()Dim sTemp(42) As String
If Not Location.Text = "" Then
Open Location.Text For Input As #1
Counter = 0
Do While Not EOF(1) Line Input #1, sTemp(Counter) Counter = Counter + 1 Loop Close #1
For Counter = 0 To 2 Cat.Item(Counter) = sTemp(Counter) Next
For Counter = 3 To 15 Item1.Item(Counter - 3) = sTemp(Counter) Next
For Counter = 16 To 28 Item2.Item(Counter - 16) = sTemp(Counter) Next
For Counter = 29 To 41 Item3.Item(Counter - 29) = sTemp(Counter) Next
End IfEnd Sub
Private Sub Save_Click()
F-28
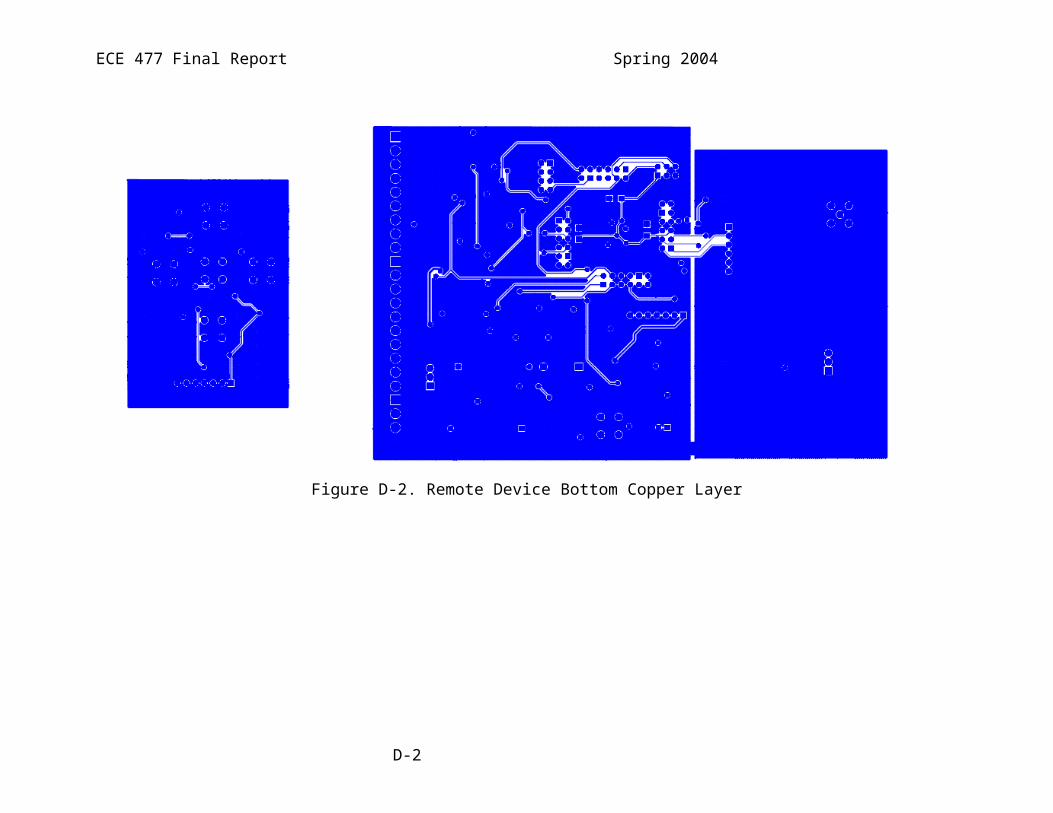
ECE 477 Final Report Spring 2004
Open Location.Text For Output As #1
For Counter = 0 To 2 Print #1, Cat.Item(Counter) Next For Counter = 0 To 12 Print #1, Item1.Item(Counter) Next For Counter = 0 To 12 Print #1, Item2.Item(Counter) Next For Counter = 0 To 12 Print #1, Item3.Item(Counter) NextClose #1
Debug1.Text = "Saved " + Location.Text
End Sub
F-29

ECE 477 Final Report Spring 2004
Menu Editor (C++)/* Name: Jon Hopp Compiler/OS Used: gcc UNIX ECE 477 Group 5 - Simple Menu Editor*/
#include <iostream>#include <fstream>#include <sstream>#include <iomanip>#include <string>
#define CHARMAX 20#define ITEMMAX 16#define CATMAX 3
using namespace std;
string openTextFile( string filename ) {
string s1 ="";// converts the string into a char*const char* newname = filename.c_str();
// opens the file to the editorifstream from( newname );if ( !from ) {
cout << "Cannot open input file: " << filename << endl;return ("");
}char ch;while ( from.get( ch ) )
s1 += ch;from.close();return s1;
} // openTextFile()
void saveTextFile( string text, string filename ) {
// converts the string into a char*const char* newname = filename.c_str();
//saves fileofstream from( newname );if ( !from )
cout<< "Cannot open output file: " << filename << endl;from << text;from.close();
return;
F-30
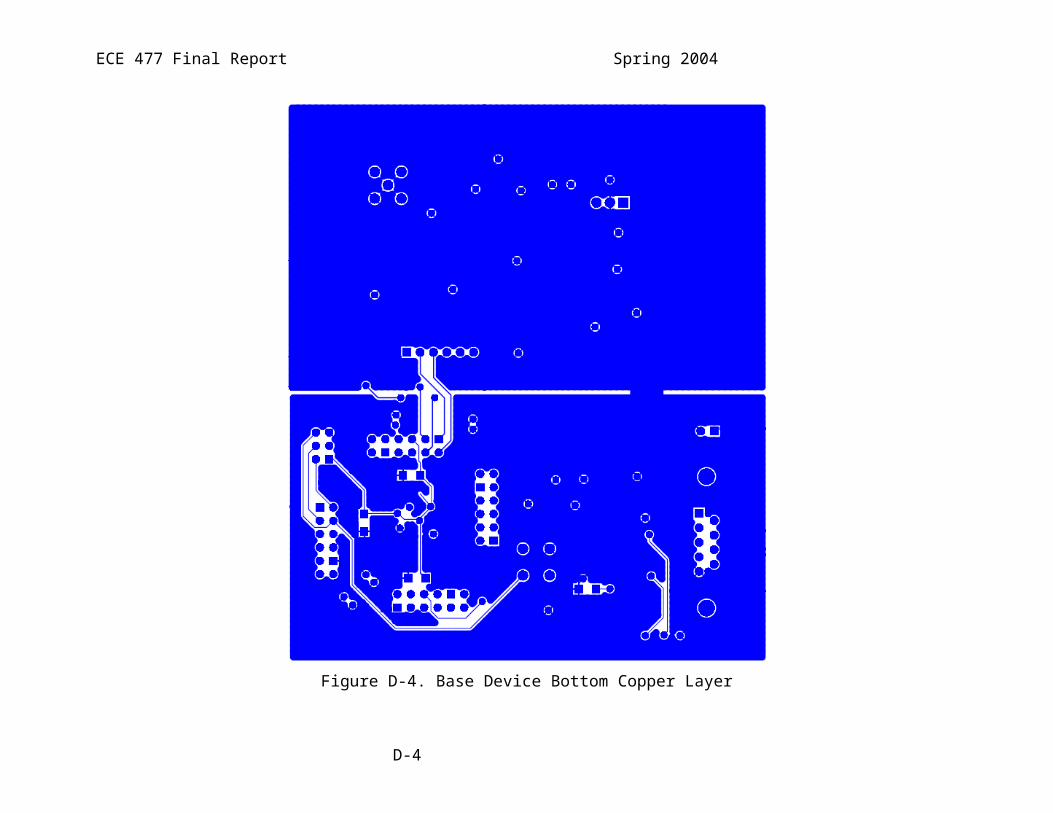
ECE 477 Final Report Spring 2004
} // saveTextFile()
void setStrings(string text, char s1[], char s2[], char s3[]) { int i; int i2 = 0; int i3 = 0; int s = 1; const char* cp = text.c_str(); for (i = 0; i < 3*CHARMAX; i++) { if (cp[i] == '\n') s++; else {
switch (s) {case 1:
if (i < CHARMAX) s1[i] = cp[i];break;
case 2:if (i2 < CHARMAX) s2[i2] = cp[i];i2++;break;
case 3:if (i3 < CHARMAX) s3[i3] = cp[i];i3++;break;
default: break;
} } }
}
void printMenu(string filename, char str1[][CHARMAX]) {
cout << "****************************" << endl; cout << "\t" << filename << endl; cout << "****************************" << endl; for (int i = 0; i < CATMAX; i++) cout << " " << str1[i] << endl; cout << "****************************" << endl;
}
void clearBuff (char buffer[]) {
for (int i = 0; i < CATMAX * CHARMAX * ITEMMAX; i++) buffer[i] = '\0';}
F-31
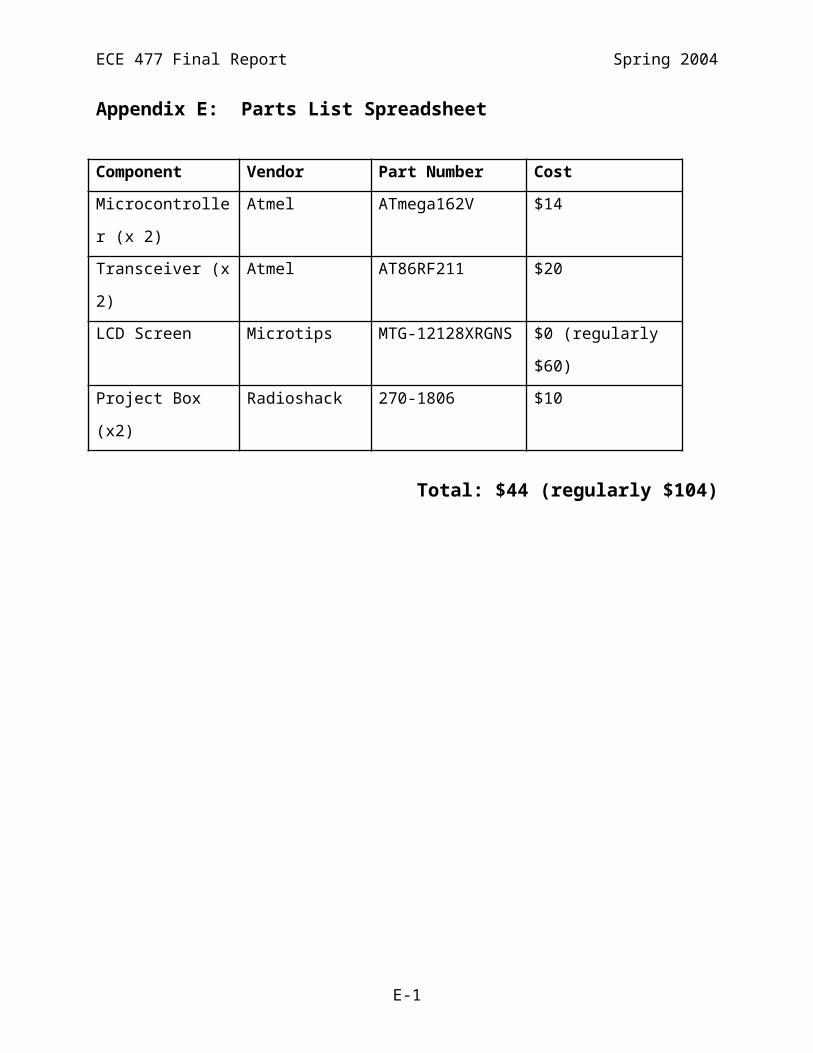
ECE 477 Final Report Spring 2004
void newscreen () {
for (int i = 0; i < 50; i++) cout << endl;}
int main(){ int i,j,k; int selection1; int submSel; string subMore = ""; int editNum = 0; int editNum2 = 0; //char text[4 + 3*CHARMAX] = ""; string stext = ""; string filename = "<No File Loaded>"; char item_menu[CATMAX][CHARMAX]; char cat_menus[CATMAX][ITEMMAX][CHARMAX]; char s1[CHARMAX] = ""; char s2[CHARMAX] = ""; char s3[CHARMAX] = ""; char newstr[CHARMAX] = ""; char n[2] = "\n"; char * sptr; char buff[CATMAX * CHARMAX * ITEMMAX]; cout<< "Welcome to SimpleMenu 1.0" << endl << endl; for (i = 0; i < CATMAX; i++) for (j = 0; j < CHARMAX; j++) item_menu[i][j] = '\0'; for (i = 0; i < CATMAX; i++) for (j = 0; j < ITEMMAX; j++) for (k = 0; k < CHARMAX; k++) cat_menus[i][j][k] = '\0';
for (i = 0; i < CATMAX * CHARMAX * ITEMMAX; i++) buff[i] = '\0'; do {// printMenu(filename, s1, s2, s3);
//printMenu(filename, item_menu[0], item_menu[1], item_menu[2]);newscreen();printMenu(filename, item_menu);
cout<< "1 : Load Menu" << endl;cout<< "2 : Save" << endl;cout<< "3 : Save As... " << endl;cout<< "4 : Show Sub-Menu" << endl;cout<< "5 : Edit Menu" << endl;cout<< "6 : Exit" << endl; cout<< "Enter Selection (1-6): ";cin >> selection1;
F-32

ECE 477 Final Report Spring 2004
switch (selection1) {case 1:
//newscreen();cout<< "File to Load: ";cin >> filename;stext = openTextFile(filename);
if ( stext == "" ) filename = "<No File Loaded>";else { //setStrings(stext, s1, s2, s3); strcpy (&buff[0], stext.c_str()); sptr = strtok (buff,"\n"); for (i = 0; i < CATMAX; i++) { strcpy(item_menu[i], sptr); sptr = strtok (NULL,"\n"); //cout<< item_menu[i] << endl; } for (i = 0; i < CATMAX; i++) { for (j = 0; j < ITEMMAX; j++) { strcpy(cat_menus[i][j], sptr); sptr = strtok (NULL,"\n"); //cout<< cat_menus[i][j] << endl; } } }break;
case 2:clearBuff(buff);
for (i = 0; i < CATMAX; i++) { strcat (buff,item_menu[i]); strcat (buff,n);}
for (i = 0; i < CATMAX; i++) { for (j = 0; j < ITEMMAX; j++) { strcat (buff,cat_menus[i][j]); strcat (buff,n); }} saveTextFile(buff,filename);break;
case 3:cout<< "Save to File: ";cin >> filename;
clearBuff(buff);
for (i = 0; i < CATMAX; i++) { strcat (buff,item_menu[i]);
F-33
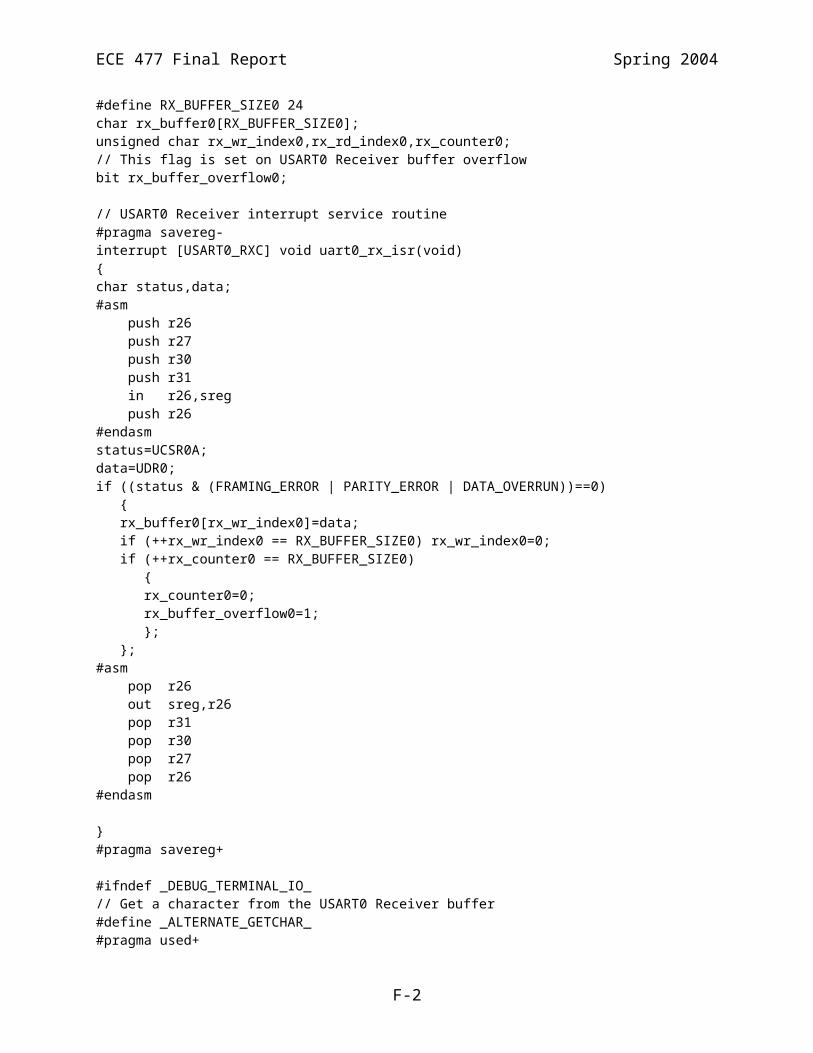
ECE 477 Final Report Spring 2004
strcat (buff,n);}
for (i = 0; i < CATMAX; i++) { for (j = 0; j < ITEMMAX; j++) { strcat (buff,cat_menus[i][j]); strcat (buff,n); }} saveTextFile(buff,filename);break;
case 4: do { //cout << endl << endl; do { newscreen(); cout << "****************************" << endl; for (int i = 0; i < CATMAX; i++) cout << i+1 << ": " << item_menu[i] << endl; cout << "****************************" << endl;
cout<< "Show which submenu?: "; cin >> submSel; } while ( (submSel-1 < 0) || (submSel-1 >= CATMAX) );
newscreen(); cout << "****************************" << endl; cout << "\t" << item_menu[submSel-1] << endl; cout << "****************************" << endl; for (int i = 0; i < ITEMMAX; i++) cout << cat_menus[submSel-1][i] << endl; cout << endl; cout<< "Show another Sub-menu? "; cin >> subMore;} while( (strcmp(subMore.c_str(),"Yes") == 0) || (strcmp(subMore.c_str(),"Y" ) == 0) ||
(strcmp(subMore.c_str(),"yes") == 0) || (strcmp(subMore.c_str(),"y" ) == 0) );
break;case 5:
newscreen();cout << "****************************" << endl;cout << "\t" << "---EDITING---" << endl;cout << "****************************" << endl;
for (i = 0; i < CATMAX; i++) cout<< i+1 << ": " << item_menu[i] << endl;
cout << endl; for (i = 0; i < CATMAX; i++) cout<< CATMAX + i + 1 << ": " << "SUB-MENU of " <<
item_menu[i] << endl;
F-34

ECE 477 Final Report Spring 2004
cout<< endl << 2*CATMAX + 1 << ": Cancel" << endl;cout<< "Edit line number to Edit: ";cin >> editNum;
if ( (editNum >= 1) && (editNum <= CATMAX) ) {
cin.getline(newstr, 1);cout<< "Enter replacement string: ";cin.getline(newstr, CHARMAX);
strcpy(item_menu[editNum-1],newstr);break;
}
if ( (editNum >= CATMAX + 1) && (editNum <= 2*CATMAX) ) {
newscreen();cout << "****************************" << endl;cout << "\t" << "---EDITING " << item_menu[editNum -
CATMAX - 1];cout << "---" << endl;cout << "****************************" << endl;for (int i = 0; i < ITEMMAX; i++) cout<< i+1 << ": " << cat_menus[editNum - CATMAX -
1][i] << endl;cout << endl;
cout<< "Edit line number to Edit: ";cin >> editNum2;
cin.getline(newstr, 1);cout<< "Enter replacement string: ";cin.getline(newstr, CHARMAX);
cout << newstr << endl;
if ( (editNum-1 >= 0) && (editNum-1 <= ITEMMAX-1) ) strcpy(cat_menus[editNum - CATMAX - 1][editNum2-
1],newstr);
break;}
break;
case 6:newscreen();cout<< "Goodbye" << endl;break;
default:cout << "INVALID SELECTION! NUMBERS 1-6 ONLY!" << endl;break;
} } while (selection1 != 6);
F-35

ECE 477 Final Report Spring 2004
return(0); }
F-36

ECE 477 Final Report Spring 2004
Appendix G: User Manual
WIRELESSWIRELESSORDERINGORDERINGDEVICEDEVICESYSTEMSYSTEM
20042004
G-1

ECE 477 Final Report Spring 2004
Universal ExportsUniversal ExportsPatent pendingPatent pending
THANK YOUTHANK YOU
You have purchased the key to revolutionizing your patron’s dining You have purchased the key to revolutionizing your patron’s dining experience. With Wireless Ordering Devices (WODs) it is now possible to experience. With Wireless Ordering Devices (WODs) it is now possible to reduce lead time in serving your customers. reduce lead time in serving your customers.
As the customer waits for their table, they can utilize the easy to use WOD toAs the customer waits for their table, they can utilize the easy to use WOD to communicate their order to the kitchen. Imagine their satisfaction to sit communicate their order to the kitchen. Imagine their satisfaction to sit down at their table and have their order fresh and waiting for them. down at their table and have their order fresh and waiting for them.
Virtually eliminate the need for the waitress to take down drink and Virtually eliminate the need for the waitress to take down drink and appetizer orders, turn them in to the kitchen, and wait for those orders to be appetizer orders, turn them in to the kitchen, and wait for those orders to be processed. Now, a customer can start enjoying their experience from the processed. Now, a customer can start enjoying their experience from the moment they sit at your table.moment they sit at your table.
WODs are simple to use. Intuitively arranged navigation buttons make WODs are simple to use. Intuitively arranged navigation buttons make viewing the menu and ordering simple and frustration free. Base station viewing the menu and ordering simple and frustration free. Base station software is also easy to understand. A simple and friendly environment software is also easy to understand. A simple and friendly environment allows you to view orders, alert customers and edit menu information with a allows you to view orders, alert customers and edit menu information with a few simple clicks.few simple clicks.
This User’s Manual with walk you through the setup and use of your WOD This User’s Manual with walk you through the setup and use of your WOD system.system.
G-2

ECE 477 Final Report Spring 2004
Table of ContentsTable of Contents
Table of Table of Contents…………………………………………………………………………………………Contents……………………………………………………………………………………………….3…….3
Setting up the Setting up the system…………………………………………………………………………………………4system…………………………………………………………………………………………4
Using the Using the hardware…………………………………………………………………………………………hardware…………………………………………………………………………………………….5….5
Using the software……………….Using the software……………….…………………………………………………………………………….7…………………………………………………………………………….7
Safety Safety Information………………………………………………………………………………………Information………………………………………………………………………………………………11………11
Troubleshooting………………………………………………………………………………Troubleshooting………………………………………………………………………………………………….12………………….12
G-3
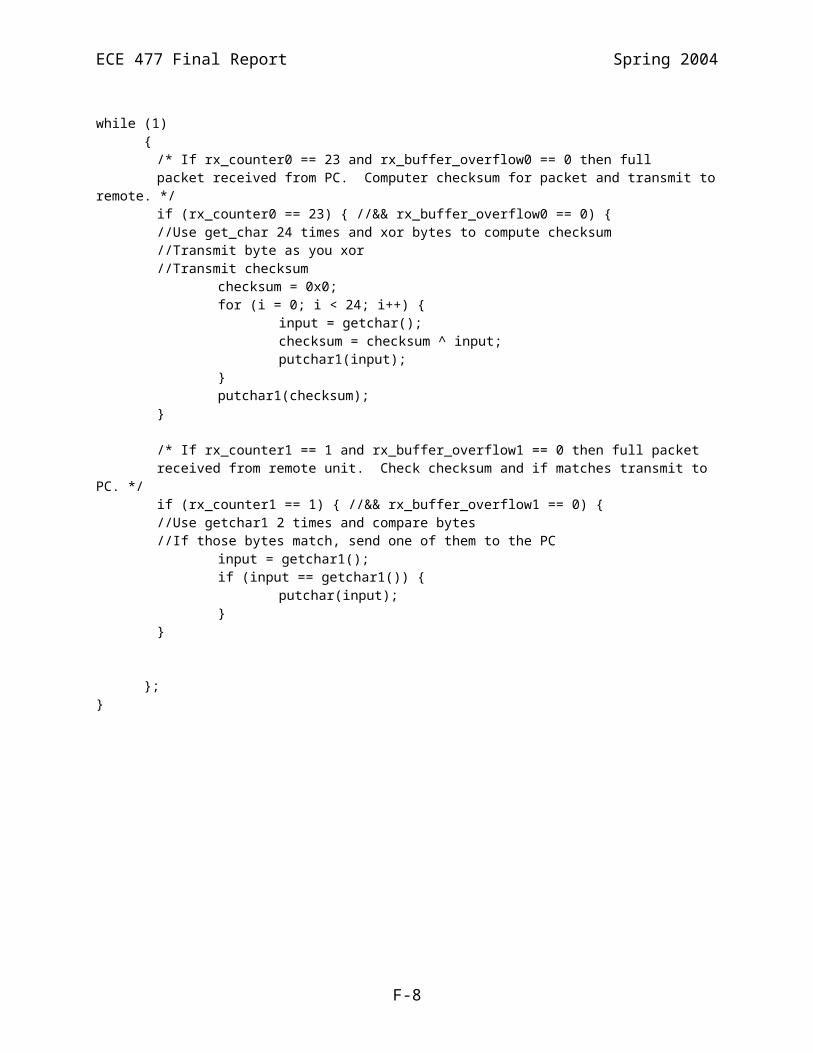
ECE 477 Final Report Spring 2004
Setting up the systemSetting up the system
Minimum System Requirements:Minimum System Requirements:PC running Microsoft Windows® 98, 2000, NT, XP or laterPC running Microsoft Windows® 98, 2000, NT, XP or laterAMD Athlon® or compatible microprocessor running at 667MHz or AMD Athlon® or compatible microprocessor running at 667MHz or
fasterfaster32MB unused memory32MB unused memoryCD-ROM driveCD-ROM driveUnused serial portUnused serial port
Step 1:Step 1:Install batteries into the remote unit and move power switch to on.Install batteries into the remote unit and move power switch to on.
Step 2:Step 2:Plug the base station’s power supply into the wall.Plug the base station’s power supply into the wall.
Step 3:Step 3:Plug the serial cable of the base station into the COM1 serial port of Plug the serial cable of the base station into the COM1 serial port of your computer.your computer.
Step 4:Step 4:Turn on your computer.Turn on your computer.
Step 5:Step 5:Insert Wireless Ordering Device System CD into your CD-ROM drive.Insert Wireless Ordering Device System CD into your CD-ROM drive.Copy WOD_system.exe onto your hard drive.Copy WOD_system.exe onto your hard drive.Start software by double-clicking WOD_system.exeStart software by double-clicking WOD_system.exe
G-4
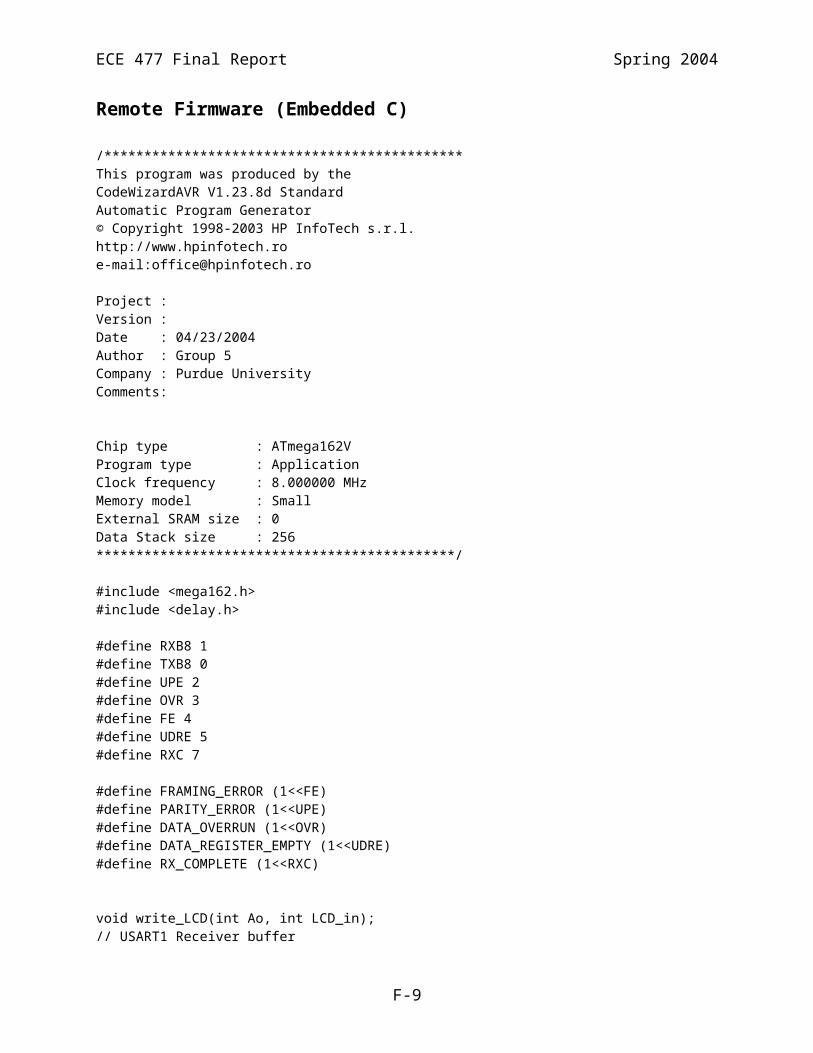
ECE 477 Final Report Spring 2004
Using the hardwareUsing the hardware
Hardware OverviewHardware Overview
The WOD System contains a base unit and multiple remote units (quantity The WOD System contains a base unit and multiple remote units (quantity depends upon system purchased). The base unit has two connectors.depends upon system purchased). The base unit has two connectors.
The DB-9 Serial Port connector (on the left) must be connected between the The DB-9 Serial Port connector (on the left) must be connected between the base unit and your computer using the supplied cable. Then, the power base unit and your computer using the supplied cable. Then, the power cable must be connected between the base unit an electrical outlet using thecable must be connected between the base unit an electrical outlet using the supplied 5V power adaptor.supplied 5V power adaptor.
The remote unit has no external connections, but four AA batteries must be The remote unit has no external connections, but four AA batteries must be installed into the rear of the unit and the power switch must be move to the installed into the rear of the unit and the power switch must be move to the on position.on position.
G-5

ECE 477 Final Report Spring 2004
The remote unit is intended to be simple to use and menu navigation should The remote unit is intended to be simple to use and menu navigation should be intuitive for all user. An arrow will appear next to the current selection be intuitive for all user. An arrow will appear next to the current selection and the up and down navigation buttons can be used to scroll up and down and the up and down navigation buttons can be used to scroll up and down the list. Once the selection arrow is next to the desired item, the right the list. Once the selection arrow is next to the desired item, the right navigation button can then be used to select the item and the left navigationnavigation button can then be used to select the item and the left navigation button can used to move back to the prior menu. button can used to move back to the prior menu.
G-6

ECE 477 Final Report Spring 2004
Using the softwareUsing the software
Set upSet up
Before running your new WOD System, you need to set up the available Before running your new WOD System, you need to set up the available menu items on your device. From CD Drive, run menu.exe and open the menu items on your device. From CD Drive, run menu.exe and open the menu. menu.
Create up to 3 submenus (e.g. Drinks, Appetizers) and save them. Then, editCreate up to 3 submenus (e.g. Drinks, Appetizers) and save them. Then, edit the submenus and add in as many items as you would like available to the the submenus and add in as many items as you would like available to the customers on their device. customers on their device.
G-7
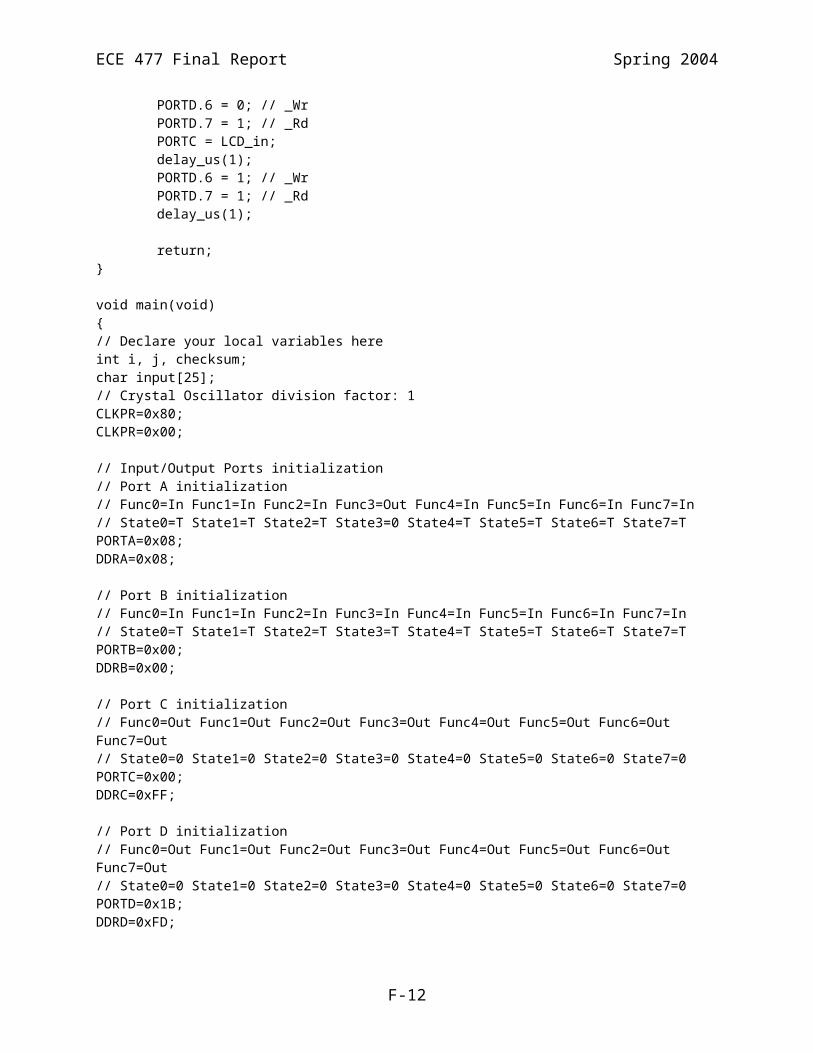
ECE 477 Final Report Spring 2004
Once you are satisfied, save and close them menu, and run Once you are satisfied, save and close them menu, and run WOD_system.exe.WOD_system.exe.
Normal OperationNormal Operation
WOD_system.exe is the brains of the WOD System environment. From here, WOD_system.exe is the brains of the WOD System environment. From here, remote devices get their menu items and tell servers that they have an orderremote devices get their menu items and tell servers that they have an order from the customer. from the customer.
G-8

ECE 477 Final Report Spring 2004
Once running, everything is done automatically. The only thing that needs Once running, everything is done automatically. The only thing that needs to be done is to observe the order window for new customer requests. to be done is to observe the order window for new customer requests.
Once a customer is ready to be sat, select the device number from the drop Once a customer is ready to be sat, select the device number from the drop down menu…down menu…
G-9

ECE 477 Final Report Spring 2004
…and their information will be cleared from the list……and their information will be cleared from the list…
…and a message will be sent to light the remote device and alert the …and a message will be sent to light the remote device and alert the customer that their table is ready.customer that their table is ready.
G-10

ECE 477 Final Report Spring 2004
Safety InformationSafety Information
•• Do not submerge base station or remote devices in water. If any Do not submerge base station or remote devices in water. If any component becomes wet or dirty, wipe moisture off with soft, dry cloth and component becomes wet or dirty, wipe moisture off with soft, dry cloth and let component air dry for a minimum of 2 hours.let component air dry for a minimum of 2 hours.
•• Do not tamper with internal components of base station or remote devices.Do not tamper with internal components of base station or remote devices. There are no user serviceable parts inside the cases. The only maintenance There are no user serviceable parts inside the cases. The only maintenance this system needs is to replace the batteries in remote devices as they fail. this system needs is to replace the batteries in remote devices as they fail. (See troubleshooting).(See troubleshooting).
•• Small parts such as screws, batteries, etc. pose a CHOKING HAZARD to Small parts such as screws, batteries, etc. pose a CHOKING HAZARD to small children and infants.small children and infants.
•• Do not clean the LCD screen with alcohol or astringent cleaner. Use only Do not clean the LCD screen with alcohol or astringent cleaner. Use only water, mild soap, and a soft cloth.water, mild soap, and a soft cloth.
•• Base station operates off of standard electrical supplies. Take appropriate Base station operates off of standard electrical supplies. Take appropriate precautions when plugging and unplugging this device.precautions when plugging and unplugging this device.
•• If any damage occurs, cease use and return to manufacturer for If any damage occurs, cease use and return to manufacturer for appropriate disposal.appropriate disposal.
G-11

ECE 477 Final Report Spring 2004
TroubleshootingTroubleshooting
ProblemProblem SolutionSolutionLCD screen on remote LCD screen on remote device is not turning device is not turning on when remote is on when remote is powered on.powered on.
Ensure batteries are fresh and that power Ensure batteries are fresh and that power switch is set to ON. To replace batteries, switch is set to ON. To replace batteries, unscrew remote device, locate and open unscrew remote device, locate and open battery case, and replace with 4 fresh new AA battery case, and replace with 4 fresh new AA batteries.batteries.
LCD screen displays LCD screen displays wrong information.wrong information.
Use the update feature of the software to Use the update feature of the software to refresh the information on the remote device.refresh the information on the remote device.
Navigation buttons areNavigation buttons are unresponsive.unresponsive.
Make sure WOD_system.exe is running on Make sure WOD_system.exe is running on your base computer and that base station is your base computer and that base station is powered and plugged into COM1. If all of powered and plugged into COM1. If all of these conditions are met, ensure that remote these conditions are met, ensure that remote device is operating within 50 meters of base device is operating within 50 meters of base station and no heavy wireless interference is station and no heavy wireless interference is present.present.
WOD_system.exe WOD_system.exe hangs or crashes hangs or crashes unexpectedly.unexpectedly.
Restart computer and run WOD_system.exe Restart computer and run WOD_system.exe again.again.
If problems persist, please contact Universal Exports customer service at If problems persist, please contact Universal Exports customer service at (765) 743-5555.(765) 743-5555.
G-12

ECE 477 Final Report Spring 2004
Appendix H: FMECA Worksheet
Failure No.
Failure Mode Possible Causes Failure Effects Method of Detection
Criticality Remarks
RF-1 Frequency drift Any Capacitor filters fail, any Inductor filters fail, crystal drift
Wireless communication failure (order not received)
Observation Low Frequency drift could interfere with local wireless devices and violate FCC regulations
RF-2 RF Signal loss Bandpass filter failure
Wireless communication failure (order not received)
Observation Low
PS-1 Output = 0V Failure in grounding capacitors, shorting power to ground
Loss of function, possibly drained battery, unit non-functional
Observation Low
PS-2 LCD Screen off D5, Q1, C7, C47, or other power supply component fails
unit non-functional
Observation Notable According to group leader, “weakest part of our design.” Still no risk of injury.
MC-1 Improper or lack of Input/Output
Power supply failure, software
Unpredictable. Observation Low
H-1

ECE 477 Final Report Spring 2004
LED-1 All LEDs fail to light
Power supply failure, software malfunction, LED failure
Unit will not flash; Patron will not know table is ready.
Observation Low If only 1 LED fails, Failure Effects negligible.
LCD-1 LCD Screen outputs improperly
Power Supply Failure, U13/U14 failure causing improper logic translation
Unpredictable Observation Low
COM-1 Lack of communication between base unit and Computer
C9 or C33 fail Order will not be received; Patron will not know table is ready.
Observation Low
H-2