Embed Size (px)
Citation preview

303Edvo-Kit #303
Exploring Biotechnology with Green Fluorescent Protein (GFP)
Experiment Objective:
The objective of this set of experiments is to develop an understanding of bacterial transformation by pGFP plasmid DNA, and purification and characterization of the recombinant protein.
See page 3 for storage instructions.
&REVISED
UPDATED
303.180423
SAMPLE LITERATURE
Please
refer
to in
cluded
weblin
k for c
orrect
versi
on.

Page Experiment Components 3 Experiment Requirements 4 Background Information 5
Experiment Overview 10 Laboratory Safety 11 Module I: Transformation of E. coli with pGFP 12 Module II: Isolation of GFP 16 Module III: Purification of GFP by Column Chromatography 19 Module IV: Analysis of GFP by Denaturing SDS-Gel Electrophoresis 22 Study Questions 30 Instructor's Guide 31 Notes to the Instructor 32 Pouring LB-Agar Plates 34 Preparation of E. coli Source Plates 37 Pre-Lab Preparations 38 Experiment Results and Analysis 41 Study Questions and Answers 43
Appendices Troubleshooting Guides 46 Student Worksheet 49
Safety Data Sheets can be found on our website: www.edvotek.com/safety-data-sheets
Table of Contents
Exploring Biotechnology with Green Fluorescent Protein (GFP) EDVO-Kit 303
1.800.EDVOTEK • Fax 202.370.1501 • [email protected] • www.edvotek.com
2
Duplication of any part of this document is permitted for non-profit educational purposes only. Copyright © 2006-2018 EDVOTEK, Inc., all rights reserved. 303.180423
EDVO-Kit 303Exploring Biotechnology with Green Fluorescent Protein (GFP)

Experiment Components
This experiment is designed for
10 lab groups.
All experiment components are intended for educational research only. They are not to be used for diagnostic or drug purposes, nor admin-istered to or consumed by
humans or animals.
Components for Transformation (Module I) Storage Check (√)
• BactoBeads™ E. coli GFP Host 4° C (with desiccant) q
• BactoBeads™ E. coli pt-GFP (pre-transformed with GFP) 4° C (with desiccant) q
A Ampicillin Freezer q B IPTG Freezer q C CaCl2 Freezer q
D Supercoiled pGFP Freezer q • Growth Additive Freezer q • Bottle Luria Broth Medium for Recovery, sterile (also referred to as “Recovery Broth”) Room temp. q
Components for Isolation and Purification (Modules II & III)
E Lysozyme Freezer q F TEG buffer (Tris, EDTA, Glucose) Freezer q
G Column Elution Buffer (10x) Freezer q
H Dry Molecular Sieve Matrix Room temp. q
I Control Cell Extract containing GFP Freezer q
Components for Electrophoresis (Module IV)
J Protein Molecular Weight Standards Freezer q
K Protein Denaturing Solution Freezer q
L 50% Glycerol Solution Freezer q
• Tris-Glycine-SDS Electrophoresis Buffer (10x) Room temp. q
• Protein InstaStain® Room temp. q
REAGENTS & SUPPLIESStore all components below at room temperature.
Component Check (√)
• 2 Bottles (1 large & 1 small) of ReadyPour™ Luria Broth Agar, sterile (also referred to as “ReadyPour Agar”) q • Petri plates, small q
• Petri plates, large q
• Plastic microtipped transfer pipets q
• Wrapped 10 ml pipet (sterile) q
• Wrapped 1 ml pipets (sterile) q
• Inoculating loops (sterile) q
• Microcentrifuge tubes q
• Microtiter strips (for collecting column fractions) q
• Chromatography Columns q
EDVOTEK, The Biotechnology Education Company, and InstaStain are registered trademarks of EDVOTEK, Inc. BactoBead and ReadyPour are trademarks of EDVOTEK, Inc.
IMPORTANT READ ME!
Transformation experiments contain antibiotics which are
used for the selection of trans-formed bacteria. Students who
have allergies to antibiotics such as penicillin, ampicillin,
kanamycin or tetracycline should not participate in this
experiment.
Exploring Biotechnology with Green Fluorescent Protein (GFP)EDVO-Kit 303
3
1.800.EDVOTEK • Fax 202.370.1501 • [email protected] • www.edvotek.com
Duplication of any part of this document is permitted for non-profit educational purposes only. Copyright © 2006-2018 EDVOTEK, Inc., all rights reserved. 303.180423
EDVO-Kit 303 Exploring Biotechnology with Green Fluorescent Protein (GFP)

Requirements for Transformation
• Adjustable Volume Micropipet (5-50 µl) and tips• Two Water baths (37° C and 42° C)• Thermometer • Incubation Oven (37° C)• Pipet pumps or bulbs• Ice• Marking pens• Bunsen burner, hot plate or microwave oven• Hot gloves• Long wave UV light (Cat. #969 recommended)
Requirements for Purification
• Vertical Gel Electrophoresis Apparatus (Cat. #581 EDVOTEK® MV10 recommended)• D.C. Power Source• Adjustable Volume Micropipet (5 -50 µl) and Tips (Cat. #638 Fine Tip Micropipet Tips recommended)• Balance• Ice Buckets and Ice• Long wave UV lamps (Cat. #969 recommended)• Ring stands and column clamps• 1 ml pipets and pipet pumps• Microtest tubes• Polyacrylamide Gels (3)• Glacial acetic acid• Ethanol• Distilled water
Requirements
Exploring Biotechnology with Green Fluorescent Protein (GFP) EDVO-Kit 303
1.800.EDVOTEK • Fax 202.370.1501 • [email protected] • www.edvotek.com
4
Duplication of any part of this document is permitted for non-profit educational purposes only. Copyright © 2006-2018 EDVOTEK, Inc., all rights reserved. 303.180423
EDVO-Kit 303Exploring Biotechnology with Green Fluorescent Protein (GFP)

DNA CAN BE TRANSFERRED BETWEEN BACTERIA
In nature, DNA is transferred between bacteria using two main methods— transformation and conjugation. In transformation, a bacterium takes up exogenous DNA from the surrounding environment (Figure 1a). In contrast, conjugation relies upon direct contact between two bacterial cells. A piece of DNA is copied in one cell (the donor) and then is transferred into the other (recipient) cell (Figure 1b). In both cases, the bacteria have acquired new genetic information that can be inherited by daughter cells.
Frederick Griffith first discovered transformation in 1928 when he observed that living cultures of a normally non-pathogenic strain of Streptococcus pneumonia were able to kill mice, but only after being mixed with a heat-killed pathogenic strain. Because the non-pathogenic strain had been “transformed” into a pathogenic strain, he named this transfer of virulence “transformation”. In 1944, Oswald Avery and his col-leagues purified DNA, RNA and protein from a virulent strain of S. pneumonia to determine which was responsible for transformation. Each component was mixed with a non-pathogenic strain of bacteria. Only those recipient cells exposed to DNA became pathogenic. These transformation experiments not only revealed how this virulence is transferred but also led to the recognition of DNA as the genetic material.
The exact mode of transformation can differ between bacteria species. For example, Haemophilus influenzae uses membrane-bound vesicles to capture double-stranded DNA from the environment. In contrast, S. pneumoniae expresses competency factors that allow the cells to take in single-stranded DNA molecules. In the laboratory, scientists can induce competent cells—bacteria that are able to take up DNA from the environment—to take up DNA and become transformed. To accomplish this, DNA is added to the cells in the presence of specific chemicals (like calcium, rubidium, or magnesium chloride), and the suspension is “heat shocked”—moved quickly between cold and hot temperatures. It is believed that a combination of chemical ions and the rapid change in temperature alters the permeability of the cell wall and membrane, allowing the DNA molecules to enter the cell.
GENETIC ENGINEERING USING RECOMBINANT DNA TECHNOLOGY
Many bacteria possess extra, non-essential genes on small circular pieces of double-stranded DNA in addition to their chromosomal DNA. These pieces of DNA, called plasmids, allow bacteria to exchange beneficial genes. For example, the gene that codes for ß-lactamase, an enzyme that provides antibiotic resistance to ampicillin, can be carried between bacteria on plasmids. Ampicillin inhibits cell growth by interfering with cell wall synthesis, but cells containing the plasmid can secrete ß-lactamase to degrade the antibiotic. Thus, bacteria expressing this gene can grow in the presence of ampicillin.
Background Information
Figure 1: Transferring DNA into bacteria.
Exploring Biotechnology with Green Fluorescent Protein (GFP)EDVO-Kit 303
5
1.800.EDVOTEK • Fax 202.370.1501 • [email protected] • www.edvotek.com
Duplication of any part of this document is permitted for non-profit educational purposes only. Copyright © 2006-2018 EDVOTEK, Inc., all rights reserved. 303.180423
EDVO-Kit 303 Exploring Biotechnology with Green Fluorescent Protein (GFP)

Scientists can combine genes from multiple different sources to create new bacterial plasmids, known as recombinant DNA (Figure 2). The specialized plasmids, called vectors, contain the following features:
1. Origin of Replication: a DNA sequence that allows bacteria to copy the plasmid.
2. Multiple Cloning Site: a short DNA sequence that contains many unique restriction enzyme sites and allows scientists to easily introduce specific genes into the plasmid.
3. Promoter: a DNA sequence that is typically located just before (“upstream” of) the coding sequence of a gene. The promoter recruits RNA polymerase to the beginning of the gene sequence, where it can begin transcription.
4. Selectable marker: a gene that codes for resistance to a specific antibiotic (usually ampicillin, kanamycin or tetracycline). Only cells containing the marker should grow on media containing the antibiotic, allowing researchers to easily identify cells that have the plasmid.
CONTROL OF GENE EXPRESSION
Recombinant DNA technology is used extensively by researchers examining DNA and protein biology. Scientists can regulate the expression of proteins using vectors containing a genetic “on/off” switch called an inducible pro-moter. These sequences allow for precise control because expression of the gene will only “turn on” in the pres-ence of the correct inducer. Many common inducible promoters are activated in the presence of small molecules like arabinose, tetracycline, or IPTG (isopropyl- ß-D-thiogalactopyranoside). In this experiment, we will use IPTG to regulate Green Fluorescent Protein (GFP) expression in the transformed cells.
The gene expression mechanism used in this lab requires two systems: a T7 expression host, genetically engi-neered bacteria that can express the T7 RNA Polymerase, and an expression vector. The Edvotek GFP/Chromo-genic host E.coli bacteria have been genetically engineered to express the T7 RNA polymerase under the control of the lac promoter (Figure 3a). Under normal circumstances, the bacteria make a protein called lac repressor which binds to this promoter and blocks expression of the T7 polymerase. However, IPTG can bind and inactivate the lac repressor, allowing for T7 polymerase to be expressed. Therefore, by adding IPTG to the bacterial culture scientists can turn on expression of T7 polymerase.
Figure 2: Standard Vector Features
Plasmid Map
SelectableMarker
Promoter
Origin ofReplication
Multiple cloning site
Figure 3: Expression from pFluoroGreen plasmid.
1.800.EDVOTEK • Fax 202.370.1501 • [email protected] • www.edvotek.com
6
Duplication of any part of this document is permitted for non-profit educational purposes only. Copyright © 2006-2018 EDVOTEK, Inc., all rights reserved. 303.180423
Exploring Biotechnology with Green Fluorescent Protein (GFP) EDVO-Kit 303

The pFluoroGreen™ expression vector in this experiment has been specifically designed to work with the T7 ex-pression host. This vector contains the ß-lactamase gene, providing resistance to ampicillin, and a GFP gene under the control of a T7 promoter (Figure 3b). The ß-lactamase gene is controlled by a constitutive promoter, which will continuously produce the protein. Conversely, without T7 polymerase the GFP gene cannot be expressed, and cells will not fluoresce. However, when IPTG is present the lac repressor will be inactivated, and T7 polymerase can be expressed. This polymerase specifically recognizes the T7 promoter and transcribes large quantities of the GFP mRNA (Figure 3c). Finally, the mRNA is translated to produce GFP protein, allowing the cells to fluoresce.
GREEN FLUORESCENT PROTEIN
The pFluoroGreen™ plasmid that we will be using to transform our E. coli has been engineered to express high levels of GFP. This small protein (approximately 27 kilodaltons) possesses the ability to absorb blue light and emit green light in response. This activity, known as fluorescence, does not require any additional special substrates, gene products or cofactors to produce visible light.
GFP was first isolated from the jellyfish Aequorea victoria in the 1970’s. Once scientists identified its DNA se-quence, they were able to use genetic engineering to introduce fluorescent proteins into other organisms, such as E. coli and the nematode Caenorhabditis elegans. Scientists also identified particular amino acid substitutions in GFP that altered the behavior of its ‘chromophore’, a special structure within the protein that is responsible for light production. Different changes bring about different patterns of light absorption and emission, allowing scientists to develop a rainbow of fluorescent proteins. For their discovery and development of GFP and other fluo-rescent proteins, Osamu Shimomura, Martin Chalfie and Roger Tsien were awarded the Nobel Prize in Chemistry in 2008.
GFP and its related fluorescent proteins have become an es-sential tool in cell and molecular biology. Using DNA cloning strategies, proteins can be “tagged” with fluorescent proteins and then expressed in cells. GFP-labeled proteins can be tracked using UV light, simplifying protein purification experi-ments. Additionally, researchers can determine where those proteins are normally found in the cell. Similarly, using GFP as a reporter, scientists can observe biological processes as they occur within living cells. For example, in the model organ-ism zebrafish (Danio rerio), scientists use GFP to fluorescently label blood vessel proteins so they can track blood vessel growth patterns and networks. Scientists also tag regulatory DNA sequences with the GFP coding sequence so they can ob-serve patterns of when and where the gene is expressed. In this way, GFP can reveal the role these regulatory sequences might normally play in a cell. In summary, GFP and fluores-cent microscopy have enhanced our understanding of many biological processes by allowing scientists to watch these events in real-time.
PURIFICATION OF GREEN FLUORESCENT PROTEIN BY COLUMN CHROMATOGRAPHY
Once transformed with an expression vector, the E.coli bacte-ria will operate as biological factories to produce the recom-binant protein. In the case of highly active promoters, the target protein can comprise up to 70% of all proteins in a cell. Figure 4: Size-exclusion column chromatography.
Small molecules enter many pores in the gel, equilibrating between the gel and moving buffer, and so travel slowly and are eluted later.
Medium molecules enter some pores in the gel, equilibrating between the gel and moving buffer.
Large molecules enter few pores in the gel, and so travel rapidly and are eluted sooner.
Column
Reservoir filledwith buffer
Molecular sievematrix
Frit
Elutant spout
7
1.800.EDVOTEK • Fax 202.370.1501 • [email protected] • www.edvotek.com
Duplication of any part of this document is permitted for non-profit educational purposes only. Copyright © 2006-2018 EDVOTEK, Inc., all rights reserved. 303.180423
Exploring Biotechnology with Green Fluorescent Protein (GFP)EDVO-Kit 303

Despite this high expression, the cells will still contain large amounts of additional proteins that must be removed. Choosing the correct purification method allows scientists to optimize the purity of their final solution. One of the most common methods for purification is by column chromatography.
In column chromatography, a bacterial lysate is added to a long, thin column containing a molecular matrix, a semi-solid substance used to separate proteins (Figure 4). The matrix is supported by the frit, a membrane or porous disk that retains the matrix in the column but allows buffer and dissolved solutes to pass. In size-exclusion chromatography, the method utilized in this experiment, the matrix contains microscopic pores and internal chan-nels. The larger the molecule, the more difficult it is for it to pass through the pores. Instead, larger molecules tend to flow around and in between the beads. Smaller molecules will tend to spend more time in the maze of channels and pores in the bed. Consequently, the larger, higher molecular weight proteins will move more rapidly through the matrix and will be the first to drip out of the column, or elute.
ANALYSIS OF GFP PURIFICATION USING DENATURING POLYACRYLAMIDE GELS
Once the protein has been purified it is ready for further investigation. To analyze proteins, researchers often make use of a technique called polyacrylamide gel electrophoresis, or PAGE. This is a simple but powerful method that provides information about the expression and purity of a molecule, along with its molecular weight. PAGE uses acrylamide and bis-acrylamide polymers to create a gel with a network of microscopic pores and channels.
Once the transformed bacteria has been lysed and the protein purified by chromatography, scientists can con-firm the presence and purity of the protein using techniques such as mass spectrometry or SDS-PAGE. To perform PAGE, a gel is prepared, placed in an electrophoresis chamber and flooded with buffer. Next, the protein samples are loaded into small indentations, or wells, in the top of the gel. Finally, an electrical current is applied to the gel box, pushing the charged proteins through the gel towards the positive elec-trode (Figure 6). The pore size in polyacrylamide gels is controlled by the gel concentration and the degree of cross-linking, allowing researchers to customize the gel to meet the specific needs of the experiment. As the proteins mi-grate they are forced through the pores of the gel; smaller proteins have an easier time fitting than larger proteins and will migrate further in the same amount of time.
Protein Denaturation for Electrophoresis
Proteins are polymers, composed of hundreds to thousands of smaller organic compounds known as amino acids. During protein synthesis a specific sequence of amino acids is connected together to form a continuous chain. Adjacent amino acids in the chain are linked to each other by peptide bonds. These strong covalent bonds link the carboxyl group of one amino acid and the amine group of a second amino acid (Figure 5). A chain of linked amino acids is known as a polypeptide, and one or more polypeptides combine to make a protein. The amino acid sequence gives each protein specific properties, including molecular weight, charge and shape. This three-dimen-sional configuration, including twists, folds, and interactions between multiple polypeptides, is critical to protein function. For example, mutating just a single amino acid can convert GFP to BFP (blue fluorescent protein).
H H
H
H
H
H
H
H
CC
CC
CC
N
N
N
O
O
O
O
R1
R2
R3
Figure 5: Polypeptide of three linked amino acids.
R=side chain
1.800.EDVOTEK • Fax 202.370.1501 • [email protected] • www.edvotek.com
8
Duplication of any part of this document is permitted for non-profit educational purposes only. Copyright © 2006-2018 EDVOTEK, Inc., all rights reserved. 303.180423
Exploring Biotechnology with Green Fluorescent Protein (GFP) EDVO-Kit 303

Proteins produce a unique challenge for electrophoresis because they have complex shapes and distinct charges, both of which affect how proteins migrate through the gel. Structural differences can cause two proteins with similar molecular weights to migrate at different rates - a complicated, spread-out protein will move slower through the gel than one with a compact shape. Similarly, positively and negatively charged proteins will migrate in differ-ent directions through the electric field in a gel. Scientists can solve these problems by using chemicals that denature the proteins, "eliminating" the complex structure, and neutralize the charge of the native protein.
Sodium Dodecyl Sulfate (SDS) is a common detergent used to disrupt interactions between amino acids. The SDS molecule con-sists of a hydrocarbon chain bonded to a negatively charged sulfate group. When incubated with proteins and heated, SDS will unfold the protein’s three-dimensional structure (Figure 6). To break the stronger disulfide bonds in proteins researchers use reducing agents such as ß-mercaptoethanol (ß-ME) or Dithiothreitol (DTT). Although the amino acid composition and sequence stay the same, the protein will no longer have biological activity because the specific three-dimensional shape has changed. The prepared protein sample can then be separated on a polyacrylamide gel. This tech-nique is commonly called SDS-PAGE (sodium dodecyl sulfate-PAGE). By comparing the results of native and denatured PAGE samples we can obtain important information about a protein’s shape, structure, and charge.
EXPERIMENT OVERVIEW
In this experiment, chemically competent E. coli will be transformed with pFluoroGreen™, a plasmid containing genes for ampicillin re-sistance and GFP. Transformants will be selected for the presence of plasmid using LB-ampicillin plates. In addition, transformed bacteria will be examined for GFP expression with and without IPTG to dem-onstrate the utility of inducible promoters. Highly expressing bacte-ria will be cultured and the GFP will be purified using size-exclusion chromatography. Finally, the purified samples will be analyzed by SDS-PAGE in denaturing and non-denaturing conditions, allowing students to better characterize their recombinant GFP.
NOTE:While size-exclusion chroma-tography and SDS-PAGE can both separate proteins by size, the experimental results are completely different. Size-exclusion chromatogra-phy will elute large proteins first, while SDS-PAGE allows small proteins to migrate faster.
Figure 6: An Overview of SDS-PAGE.
Stain to visualize.Protein Bands are separated by size.
Protein
Add SDS
Then, load samples onto SDS-PAGE gel.
negatively charged SDS molecules
9
1.800.EDVOTEK • Fax 202.370.1501 • [email protected] • www.edvotek.com
Duplication of any part of this document is permitted for non-profit educational purposes only. Copyright © 2006-2018 EDVOTEK, Inc., all rights reserved. 303.180423
Exploring Biotechnology with Green Fluorescent Protein (GFP)EDVO-Kit 303

EXPERIMENT OBJECTIVE
The objective of this set of experiments is to develop an understanding of bacterial transformation by pGFP plas-mid DNA, and purification and characterization of the recombinant protein.
LABORATORY NOTEBOOKS
Scientists document everything that happens during an experiment, including experimental conditions, thoughts and observations while conducting the experiment, and, of course, any data collected. Today, you'll be document-ing your experiment in a laboratory notebook or on a separate worksheet.
Before starting the Experiment:• Carefully read the introduction and the protocol. Use this information to form a hypothesis for this experiment. • Predict the results of your experiment.
During the Experiment: • Record your observations in your lab notebook or in the Student Handout in Appendix B.
After the Experiment:• Interpret the results – does your data support or contradict your hypothesis? • If you repeated this experiment, what would you change? Revise your hypothesis to reflect this change.
BRIEF DESCRIPTION OF EXPERIMENT
In this experiment, you will transform a strain of competent E. coli with pGFP plasmid DNA. The pGFP plasmid codes for the green fluorescent protein (GFP) and also has a gene for antibiotic resistance. Bacterial cells will be se-lected for the presence of plasmid by plating them on agar medium containing ampicillin. Only bacterial cells that are transformed with the plasmid will survive selection on ampicillin agar plates and will produce green fluores-cent colonies which will be visible under long wave UV Light. Transformed cells will be grown on bacterial plates, harvested and lysed. The GFP contained in the lysate will be purified using column chromatography and analyzed on polyacrylamide gels.
The following are the four modules to this experiment:
Module I Transformation of Host by pGFP Plasmid Module II Isolation of GFPModule III Purification of GFP by ChromatographyModule IV Analysis of GFP by Denaturing SDS-Polyacrylamide Gel Analysis
Experiment Overview
Exploring Biotechnology with Green Fluorescent Protein (GFP) EDVO-Kit 303
1.800.EDVOTEK • Fax 202.370.1501 • [email protected] • www.edvotek.com
10
Duplication of any part of this document is permitted for non-profit educational purposes only. Copyright © 2006-2018 EDVOTEK, Inc., all rights reserved. 303.180423
EDVO-Kit 303Exploring Biotechnology with Green Fluorescent Protein (GFP)

Laboratory Safety
IMPORTANT READ ME!
Transformation experiments contain antibiotics to select for transformed bacteria. Students who have allergies to antibiotics such as penicillin, ampicillin, kanamycin or tetracycline should not participate in this experiment.
1. Wear gloves and goggles while working in the laboratory.
2. Exercise extreme caution when working in the laboratory - you will be heating and working with high volt-ages, which could be dangerous if performed incorrectly.
3. DO NOT MOUTH PIPET REAGENTS - USE PIPET PUMPS OR BULBS.
4. The E. coli bacteria used in this experiment is not considered pathogenic. Regardless, it is important to follow simple safety guidelines in handling and disposal of materials contaminated with bacteria.
A. Wipe down the lab bench with a 10% bleach solution or a laboratory disinfectant.
B. All materials, including petri plates, pipets, transfer pipets, loops and tubes, that come in contact with bacteria should be disinfected before disposal in the garbage. Disinfect materials as soon as possible after use in one of the following ways:
• Autoclave at 121° C for 20 minutes. Tape several petri plates together and close tube caps before disposal. Collect all contaminated materials
in an autoclavable, disposable bag. Seal the bag and place it in a metal tray to prevent any possibility of liquid medium or agar from spilling into the sterilizer chamber.
• Soak in 10% bleach solution. Immerse petri plates, open tubes and other contaminated materials into a tub containing a 10% bleach
solution. Soak the materials overnight and then discard. Wear gloves and goggles when working with bleach.
5. Always wash hands thoroughly with soap and water after working in the laboratory.
6. If you are unsure of something, ASK YOUR INSTRUCTOR!
Wear gloves and safety goggles
Exploring Biotechnology with Green Fluorescent Protein (GFP)EDVO-Kit 303
11
1.800.EDVOTEK • Fax 202.370.1501 • [email protected] • www.edvotek.com
Duplication of any part of this document is permitted for non-profit educational purposes only. Copyright © 2006-2018 EDVOTEK, Inc., all rights reserved. 303.180423
EDVO-Kit 303 Exploring Biotechnology with Green Fluorescent Protein (GFP)

Module I Overview
In Module I, you will transform the GFP host E.coli bacteria with the pFluoroGreen plasmid. The bacteria will be grown for 18-22 hours on LB-agar “source plates”, collected using a sterile loop, and made competent in CaCl
2.
Next, the plasmid will be added to half of the cells before they are briefly heat shocked. Finally, the bacteria will be allowed to briefly recover before they are plated on LB-Agar plates and incubated at 37° C overnight.
30 - 40 min.
Transformation
Overnight at 37° C
Transformed plates can be storedfor up to 1 week at 4° C
Stopping Points
Incubation
TIMING REQUIREMENTS:
Add 250 µlRecovery Broth
AddpFluoroGreen
plasmid
Transfer approx. 5 colonies.
-DNA -DNA/+Amp +DNA/+Amp +DNA/+Amp/+IPTG
E. coli source plate
INCUBATE PLATESovernight at 37°C.
Transfer250 µl to
+DNA tube
PLATE THE CELLS
-DN
A
+D
NA
99
+D
NA
—D
NA
42° C
10min.
45sec.
2min.
99
37° C
10min.
-DN
A
+D
NA
HEATSHOCK
PREPAREBACTERIAL
CELLS
1.800.EDVOTEK • Fax 202.370.1501 • [email protected] • www.edvotek.com
12
Duplication of any part of this document is permitted for non-profit educational purposes only. Copyright © 2006-2018 EDVOTEK, Inc., all rights reserved. 303.180423
Exploring Biotechnology with Green Fluorescent Protein (GFP) EDVO-Kit 303

REMINDER:
For best results, make sure that the cells are completely resuspended.
Module I: Transformation of E. coli with GFP
1. 2.
5.
4.
99
42° C
+D
NA
E.coli source plate
—D
NA
3.
+D
NA
—D
NA
250 µl+
DN
A
10 µl pFluoroGreen
Approx.5
colonies
6.
10min.
7.
45sec.
+D
NA
—D
NA
8.2
min.
+D
NA
—D
NA
9.
250 µlRecovery
Broth
—D
NA
+ DN
A
99
37° C10. 11.
-DNA-DNA+Amp
+DNA+Amp
+DNA+Amp+IPTG
Do NOT add to the“-DNA” tube!
10min.
—D
NA
1. LABEL the microcentrifuge tube containing ice cold CaCl2 as “-DNA” and the empty microcentrifuge tube as
"+DNA".2. Using a sterile inoculation loop, TRANSFER approx. 5 well-isolated colonies (each colony should be approx.
1-1.5 mm in size) from the E. coli source plate to the “-DNA” tube. 3. TWIST the loop between your fingers to free the cells. RESUSPEND the bacterial cells in the CaCl2 solution by
pipetting up and down until no clumps of cells are visible and the cell suspension looks cloudy.4. TRANSFER 250 µl of the cell suspension to the tube labeled “+ DNA”. PLACE both tubes on ice.5. ADD 10 µl of pFluoroGreen™ DNA to the tube labeled “+ DNA” and gently flick to mix. DO NOT add plasmid to
the “-DNA” tube.6. INCUBATE the tubes on ice for 10 minutes.7. PLACE the transformation tubes in a 42° C water bath for exactly 45 seconds. 8. Immediately RETURN the tubes to the ice bucket and INCUBATE for two minutes.9. TRANSFER 250 µL of Recovery Broth to each tube using a sterile 1 ml pipet. Gently MIX by flicking the tube.10. INCUBATE the cells for 10 minutes in a 37° C water bath.11. While the cells are recovering, LABEL the bottom of four agar plates as indicated below. -DNA (plate with no stripe) -DNA/+Amp (plate with one stripe) +DNA/+Amp (plate with one stripe) +DNA/+Amp/+IPTG (plate with two stripes) continued
Make sure tokeep the actual labels small!
IMPORTANT:
For best results, ensure that the CaCl
2 is ice cold and that
the cells are rapidly moved from ice to 42° C and then immediately back to ice. Follow all times exactly.
Exploring Biotechnology with Green Fluorescent Protein (GFP)EDVO-Kit 303
13
1.800.EDVOTEK • Fax 202.370.1501 • [email protected] • www.edvotek.com
Duplication of any part of this document is permitted for non-profit educational purposes only. Copyright © 2006-2018 EDVOTEK, Inc., all rights reserved. 303.180423
EDVO-Kit 303 Exploring Biotechnology with Green Fluorescent Protein (GFP)

Module I: Transformation of E. coli with GFP, continued
12. After the recovery period, REMOVE the tubes from the water bath and place them on the lab bench.13. Using a sterile 1 ml pipet, TRANSFER 250 µL recovered cells from the tube labeled “ –DNA “ to the middle of
the -DNA and -DNA/+Amp plates.14. Using a new sterile 1 ml pipet, TRANSFER 250 µL recovered cells from the tube labeled “ +DNA “ to the middle
of the +DNA/+Amp and +DNA/+Amp/+IPTG plates.15. SPREAD the cells over the entire plate using an inoculating loop. Use one sterile loop to spread both -DNA
samples. Change to a fresh loop before spreading the +DNA samples. Make sure the cells have been spread over the entire surface of the plates. COVER the plates and WAIT five minutes for the cell suspension to be absorbed by the agar.
16. STACK the plates on top of one another and TAPE them together. LABEL the plates with your initials or group number. PLACE the plates in the inverted position (agar side on top) in a 37° C bacterial incubation oven for overnight incubation (16-18 hours). If you do not have an incubator, colonies will form at room temperature in approximately 24 - 48 hours.
17. VISUALIZE the transformation and control plates using long wave UV light. For each of the plates, RECORD the following:
• The number of colonies on the plate. • The color of the bacteria under UV light.NOTE: If possible, take a photo of the results for your lab notebook.
12. 13.
15.
37° C
-DNA
—D
NA
Cover & Wait
250 µl
16. 17.
- D
NA
+ D
NA
-DNA/+Amp
250 µl 14.
+DNA/+Amp
+D
NA 250 µl
+DNA/+Amp/+IPTG
250 µl
5min.
Wear UV Safety Goggles!
NOTE For Step 16:
It may take longer for the cells to absorb into the medium. Do not invert plates if cells have not com-pletely been absorbed.
1.800.EDVOTEK • Fax 202.370.1501 • [email protected] • www.edvotek.com
14
Duplication of any part of this document is permitted for non-profit educational purposes only. Copyright © 2006-2018 EDVOTEK, Inc., all rights reserved. 303.180423
Exploring Biotechnology with Green Fluorescent Protein (GFP) EDVO-Kit 303

Module I: Experiment Results and Analysis
DETERMINATION OF TRANSFORMATION EFFICIENCY
Transformation efficiency is a quantitative determination of the number of cells transformed per 1 µg of plasmid DNA. In essence, it is an indicator of the success of the transformation experiment.
You will calculate the transformation efficiency using the data collected from your experiment.
1. Count the number of colonies on the plate that is labeled: +DNA/+Amp/+IPTG. A convenient method to keep track of counted colonies is to mark each colony with a lab marking pen on the outside of the plate.
2. Determine the transformation efficiency using the following formula:
x =
final vol. at recovery (ml)
vol. plated (ml)
Number of transformants
per µg
Number of transformants
µg of DNA
Example:Assume you observed 40 colonies.
40transformants
0.05 µg
1600(1.6 x 10³)
transformants per µg
x0.5 ml
0.25 ml=
Quick Reference for Experiment 303:
50 ng (0.05 µg) of DNA is used.The final volume at recovery is 0.50 ml The volume plated is 0.25 ml
DATA COLLECTION
1. Observe the results you obtained on your transformation and control plates.
Control Plates: (-) DNA Transformation Plates: (+) DNA • -DNA • +DNA/+Amp • -DNA/+Amp • +DNA/+Amp/+IPTG
2. Draw and describe what you observe. For each of the plates, record the following: • How much bacterial growth do you observe? If possible, determine the total number of colonies. • What color are the bacteria? • Why do different members of your class have different transformation efficiencies? • If you did not get any results, what factors could be attributed to this fact?
3. Compare your transformation efficiency to the other groups in your class. What factors could have contributed to differences in efficiency between groups?
Exploring Biotechnology with Green Fluorescent Protein (GFP)EDVO-Kit 303
15
1.800.EDVOTEK • Fax 202.370.1501 • [email protected] • www.edvotek.com
Duplication of any part of this document is permitted for non-profit educational purposes only. Copyright © 2006-2018 EDVOTEK, Inc., all rights reserved. 303.180423
EDVO-Kit 303 Exploring Biotechnology with Green Fluorescent Protein (GFP)

Module II Overview
In Module II, you will select GFP-expressing colonies from the transformation plates created in Module I. The bac-teria will be grown overnight on LB-agar plates containing Ampicillin and IPTG. Next, the bacteria will be collected and lysed to release the GFP for later purification.
15 min. + Overnight incubation
Growing transformed bacteria
90 min.
• Plated transformed cells can be saved up to 1 week @ 4° C.
• Bacterial lysate can be saved at -20° C.
Stopping Points
Isolating GFP
TIMING REQUIREMENTS:
Scrape cells
Pick 4-5colonies.
Transformation plate
99
37° C
10min.
37° C
10min.
ISOLATION OF GFP
PLATINGTRANSFORMED
CELLSLB/AMP/IPTG plate
Cover & incubateovernight
Check growth
15min.
MAX.
10min.
37° C
GFP cellextract
Repeat 2X
1.800.EDVOTEK • Fax 202.370.1501 • [email protected] • www.edvotek.com
16
Duplication of any part of this document is permitted for non-profit educational purposes only. Copyright © 2006-2018 EDVOTEK, Inc., all rights reserved. 303.180423
Exploring Biotechnology with Green Fluorescent Protein (GFP) EDVO-Kit 303

Module II: Isolation of GFP
PLATING OF TRANSFORMED CELLS
1. OBTAIN two LB/AMP/IPTG plates. 2. USE your +DNA/AMP/IPTG transformation plate (results plate from Module I) as
the source of your seed culture. If necessary, you can share a plate with another group or control plate.
3. With an inoculating loop PICK 4-5 isolated GFP expressing (glowing) colonies.4. SPREAD the cells evenly and thoroughly over the entire surface. Turn the plate
90° and thoroughly spread again using the same loop.5. REPEAT steps 3-4 for the second plate. 6. REPLACE cover onto the plates. 7. INCUBATE the set of plates in a 37° C incubator overnight. 8. CHECK to make sure there is a confluent lawn of growth on at least one of the
plates.
After overnight incubation, proceed to Isolation of GFP. If additional time is needed after the 37° C incubation, the plates can be stored in a plastic bag at 4° C for up to 7 days.
IMPORTANT:
Do not allow the plates to incubate longer than 24 hours at 37° C.
IPTG induced expression in our cells is very high and cell lysis can occur at extended incubation time.
1. 2.
2 LB/AMP/IPTG platesTransformation plate
from Module I
REPEAT steps 3-4for second plate.
COVER plates. INCUBATE overnight. CHECK growth.
PICK 4-5 glowing colonies
37° C
5. 6.
4.3.
7. 8.
NOTE:
Control Bacteria have been provided for use if the transformation was unsuccessful. These bacteria contain the same pGFP plasmid as the transformed bacteria.
Exploring Biotechnology with Green Fluorescent Protein (GFP)EDVO-Kit 303
17
1.800.EDVOTEK • Fax 202.370.1501 • [email protected] • www.edvotek.com
Duplication of any part of this document is permitted for non-profit educational purposes only. Copyright © 2006-2018 EDVOTEK, Inc., all rights reserved. 303.180423
EDVO-Kit 303 Exploring Biotechnology with Green Fluorescent Protein (GFP)

Module II: Isolation of GFP, continued
ISOLATION OF GFP
1. COLLECT a 1.5 ml microcentrifuge tube containing lysis buffer and LABEL the tube with your initials.2. SELECT a GFP plate showing the highest GFP expression (maximum glow) after overnight incubation at 37° C.
Using a sterile loop, carefully SCRAPE the entire cell growth off of the GFP plate. 3. TWIRL the loop containing the colonies in the tube containing lysis buffer. Twirl vigorously until the cells are
dislodged into the buffer. 4. VORTEX the tube at maximum speed until cells are thoroughly resuspended.5. INCUBATE the tube for 10 minutes in a 37° C water bath. 6. PLACE your microcentrifuge tube containing the GFP cells in the -20° C freezer for 15
minutes, or until frozen. LAY the tube on its side to ensure rapid freezing. 7. After the cell suspension is completely frozen, REMOVE the microcentrifuge tube
from the freezer, and put it in a 37° C waterbath to THAW the cells. 8. VORTEX the samples vigorously for 30 seconds.9. REPEAT steps 6 – 8 two more times. (Freezing and thawing will help lyse the cells.) 10. CENTRIFUGE the tube in a microcentrifuge for 10 minutes at maximum speed. NOTE: Make sure you have balanced your tube before starting the microcentrifuge!11. At this point, the supernatant should contain the green fluorescent protein (it should be bright green). NOTE: If the supernatant is not fluorescent and/or the cell pellet is fluorescent, repeat the freezing/thaw-
ing/centrifugation steps (steps 5 - 10) until the green fluorescent protein (GFP) is released into the super-natant.
12. TRANSFER 200 µl of “glowing” supernatant to a clean tube and LABEL it “GFP cell extract”. STORE the extract and any leftover supernatant in the freezer for use in Module III: Purification of GFP by Column Chromatography.
NOTE FOR STEP 6:
Lay the tubes on their sides in the freezer - cells will freeze quicker.
OPTIONAL STOPPING POINT
Cell extracts can be stored at -20° C until needed for Module III.
1. 2. 3. 4.
TC
99
37° C5.
10min.
6. 15min.
99
37° C7. 8. 30 sec. 10.9. REPEAT steps 6-8
TWO more times.
MAX.
10min.
11. 12.
GFP cell extract
200 µl
MAX.
1.800.EDVOTEK • Fax 202.370.1501 • [email protected] • www.edvotek.com
18
Duplication of any part of this document is permitted for non-profit educational purposes only. Copyright © 2006-2018 EDVOTEK, Inc., all rights reserved. 303.180423
Exploring Biotechnology with Green Fluorescent Protein (GFP) EDVO-Kit 303

Module III Overview
30 min.
Packing column
30 min.
Packed column can be stored at 4° C,GFP fractions can be stored at
-20° C until needed.
Stopping Points
Purifying GFP
TIMING REQUIREMENTS:CAP AND STOREAT 4°C UNTIL
NEEDED
PACKING THECOLUMN
COLLECTINGCOLUMN
FRACTIONS
ADD1 ml
ElutionBuffer
ADDSlurry
ADD5 ml
ElutionBuffer
REMOVECAP
REMOVECAP
GFP cellextractfrom
Module II
0.2 mlGFP
Extract
ADDElutionBuffer
COLLECT dropsIDENTIFY brightest well
GFPnative
GFPdenatured
TRANSFER30µl to
each tube
In Module III, the GFP-containing cellular lysate from Module II will be purified by column chromatography. First, columns will be packed with a molecular sieve matrix and equilibrated with a wash buffer. The cellular lysate will be run through the column and the GFP will be collected using a microtiter strip. Highly fluorescent fractions will be saved for analysis in Module IV.
19
1.800.EDVOTEK • Fax 202.370.1501 • [email protected] • www.edvotek.com
Duplication of any part of this document is permitted for non-profit educational purposes only. Copyright © 2006-2018 EDVOTEK, Inc., all rights reserved. 303.180423
Exploring Biotechnology with Green Fluorescent Protein (GFP)EDVO-Kit 303

Module III: Purification of GFP by Column Chromatography
PACKING AND EQUILIBRATING THE COLUMN
1. Vertically MOUNT the column on a ring stand. Make sure it is straight and that the white cap is firmly attached to the bottom of the column.
2. ADD 1 ml of 1X elution buffer to the column and confirm that the bottom cap is sealed.3. MIX the slurry (molecular sieve matrix) thoroughly by swirling or gently stirring.4. Carefully PIPET 4 ml of the mixed slurry into the column by letting it stream down
the inside walls of the column. If the flow is stopped by an air pocket, stop adding the slurry and firmly tap the
column until the air is removed and the slurry continues to flow down the side of the column.
5. PLACE an empty beaker under the column to collect 1X elution buffer. REMOVE the cap from the bottom of the column and allow the matrix to pack into the column. Some fine sediment may drip through the column but the majority will form a uniform solid matrix.
NOTE: The matrix should fill ~2/3 of the narrow part of the column. If the packed matrix is too low, additional slurry can be added to raise the volume.
6. WASH the packed column with 5 ml of 1x elution buffer. Always keep a thin layer of elution buffer on top of the packed matrix to prevent drying.
7. SLIDE the cap onto the spout and make sure it does not drip.
NOTE:
The loading of the column and subsequent elution will be done at room temperature. The elution buffers and the fractions collected will be stored on ice as they elute from the column.
Do not allow the column to dry!
OPTIONAL STOPPING POINT
Packed columns can be stored at 4° C until needed. Ensure that the column is capped and sealed to prevent the slurry from drying out.
1. 2. 4.3.
ADD1 ml
1X elutionBuffer
ADD5 ml
1X elutionBuffer
ADDSlurry
7.5. 6.
MIXSlurry
Exploring Biotechnology with Green Fluorescent Protein (GFP) EDVO-Kit 303
1.800.EDVOTEK • Fax 202.370.1501 • [email protected] • www.edvotek.com
20
Duplication of any part of this document is permitted for non-profit educational purposes only. Copyright © 2006-2018 EDVOTEK, Inc., all rights reserved. 303.180423
EDVO-Kit 303Exploring Biotechnology with Green Fluorescent Protein (GFP)

Module III: Purification of GFP by Column Chromatography, continued
COLLECTING COLUMN FRACTIONS OF (GFP) PROTEIN
1. Slowly LOAD the column with 0.2 ml of the GFP extract you saved from Module II. REMOVE the cap and allow the extract to completely enter the column, collecting the "flow-through" waste in your beaker.
NOTE: If you do not have GFP extract from Module II, you can use the provided Control Cell Extract containing GFP.
2. Begin to ELUTE the column with 1X elution buffer. ADD buffer slowly (several drops at a time) to avoid diluting the protein sample.
REMEMBER: Do not allow the column to dry! 3. MONITOR the progress of the GFP in the gel matrix by illuminating the column with
the long wave UV light source (it may help to dim the lights in the lab/classroom). Allow the column to DRAIN into the waste beaker.
4. When the GFP protein band almost reaches the bottom of the column (near the frit), start collecting the fractions in the microtiter plate. COLLECT 4 drops per well starting with well 1 of the microtiter plate and work your way from left to right.
NOTE: To prevent loss of the GFP protein, you should begin collecting fractions BEFORE the GFP reaches the bottom of the column.
5. Continue to MONITOR the progress of the GFP in the column and COLLECT fractions until the GFP has been com-pletely eluted. The column can then be capped and set aside.
6. CHECK the fractions in the microtiter plate by using the long wave UV light. IDENTIFY the well that contains the brightest levels of fluorescent proteins.
7. TRANSFER 30 µl of the brightest elution to a screw-top microcentrifuge tube. LABEL the tube "GFP native".8. TRANSFER an additional 30 µl of the same elution to a second screw-top microcentrifuge tube. LABEL this
tube "GFP denatured".
WEAR UV SAFETY GOGGLES
Monitor the elution of GFP by shining a long wave UV light on the side of the column.
Do not use short wave UV light, which can cause burns and serious dam-
age to the eyes.
OPTIONAL STOPPING POINT
If time does not permit you to continue with the SDS polyacrylamide analysis, you may freeze the fractions at -20° C and perform the assays at a later date.
1. 2. 5.3.
LOAD0.2 mlGFP
Extract
ADD1X elution
Buffer
4. 6.
7. 30 µl
GFPnative
8. 30 µl
GFPdenatured
21
1.800.EDVOTEK • Fax 202.370.1501 • [email protected] • www.edvotek.com
Duplication of any part of this document is permitted for non-profit educational purposes only. Copyright © 2006-2018 EDVOTEK, Inc., all rights reserved. 303.180423
Exploring Biotechnology with Green Fluorescent Protein (GFP)EDVO-Kit 303

In Module IV, GFP fractions from Module III will be ana-lyzed using SDS-PAGE. “Native” samples will be mixed with glycerol, while “Denatured” samples will be mixed with a denaturing solution and boiled. Both samples will then be run on an SDS-PAGE Gel and analyzed.
Module IV Overview
TIMING REQUIREMENTS:
SDS-GELELECTROPHORESIS
STAININGTHE GEL
GFPnative
GFPdenatured
PREPARED PROTEINS
PREPAREpolyacrylamide
gel cassette
INSERT cassetteinto chamber.ADD buffer.
LOADSamples.
PLACE cover, CONNECT leads,and PERFORM
electrophoresis.
Protein InstaStain®Protoo ein InstaStain®
1hour
STOP
START
RPMTIMEDRUN
CONTINUOUS
RUN
Protein InstaStain®
REMOVEcassette.
TRANSFER to tray.ADD solution.
PLACE Protein InstaStain™ sheet.
REMOVE InstaStain™ sheet.AGITATE overnight.
VISUALIZEresults.
10 min.
Preparing samples
60 min.
Stained gels can be stored in water for up to 24 hours.
Stopping Points
Running gel
5 minutes + overnight incubation
Staining
1.800.EDVOTEK • Fax 202.370.1501 • [email protected] • www.edvotek.com
22
Duplication of any part of this document is permitted for non-profit educational purposes only. Copyright © 2006-2018 EDVOTEK, Inc., all rights reserved. 303.180423
Exploring Biotechnology with Green Fluorescent Protein (GFP) EDVO-Kit 303

Module IV: Analysis of GFP by Denaturing SDS-Gel Electrophoresis
PREPARING NATIVE PROTEIN (UNBOILED)
1. ADD 10 µl of 50% glycerol to the tube labeled "GFP native".2. MIX and set this tube aside for electrophoresis.
PREPARING DENATURED PROTEINS (BOILED)
3. To denature the protein sample, ADD 10 µl of protein denaturing solution to the tube labeled "GFP denatured" and MIX well. The denaturing solution contains sodium dodecyl sulfate (SDS) and 2-mercaptoethanol.
4. Bring a beaker of water, covered with aluminum foil, to a BOIL on a hot plate.
NOTE: A 95-100° C water bath can be used in place of a hot plate for heating pro-tein samples. One beaker or water bath can be shared by multiple groups. 5. PUSH bottom of GFP sample tube to be denatured (boiled) through the foil and
IMMERSE in the boiling water. The tube should be kept suspended by the foil.
NOTE: Make sure the sample tubes are tightly CAPPED (and THAWED if samples have been stored at -20° C).
6. BOIL the GFP sample for 5 minutes. 7. REMOVE the sample tube from the beaker and allow it to COOL for a few minutes
at room temperature.
CAUTION:
Always use screw-top tubes for boiling denatured samples.
QUICK REFERENCE:
Proteins unfold and lose their tertiary structures by boiling for 5 minutes in the presence of denaturing solu-tions which contain SDS and 2-mercaptoethanol. In the absence of boiling, regions of the protein can remain intact in their native state.
1. 2. REMOVE tubes & COOL at room temp.
PROCEED to
electrophoresis.
5. 6. 7.
8.
5min.
10 µl50% Glycerol
GFPnative
3. 4.10 µl
Proteindenaturing
SolutionGFP
denaturedGFP
native
DENATURING THE STANDARD PROTEIN MARKERS
If your standard protein marker has not been rehydrated and boiled by your instructor, add 130 µl of distilled or deionized water to it and let the sample rehydrate for several minutes. Vortex or mix vigorously. Then, proceed to denature the standard protein markers by boiling for 5 minutes as described above.
Exploring Biotechnology with Green Fluorescent Protein (GFP)EDVO-Kit 303
23
1.800.EDVOTEK • Fax 202.370.1501 • [email protected] • www.edvotek.com
Duplication of any part of this document is permitted for non-profit educational purposes only. Copyright © 2006-2018 EDVOTEK, Inc., all rights reserved. 303.180423
EDVO-Kit 303 Exploring Biotechnology with Green Fluorescent Protein (GFP)
Module IV: Analysis of GFP by Denaturing SDS-Gel Electrophoresis, continued
A polyacrylamide gel cassette in the EDVOTEK® Vertical Electrophoresis Apparatus, Model #MV10.
Negative ElectrodeBlack Dot (-)
BufferLevel
Sample Well
Long Cassette Plate
Polyacrylamide Gel
Viewing Level(cut out area on
front support panel)
Platinum wire
Short Cassette Plate
Gel CassetteClip
Micropipet withFine tip
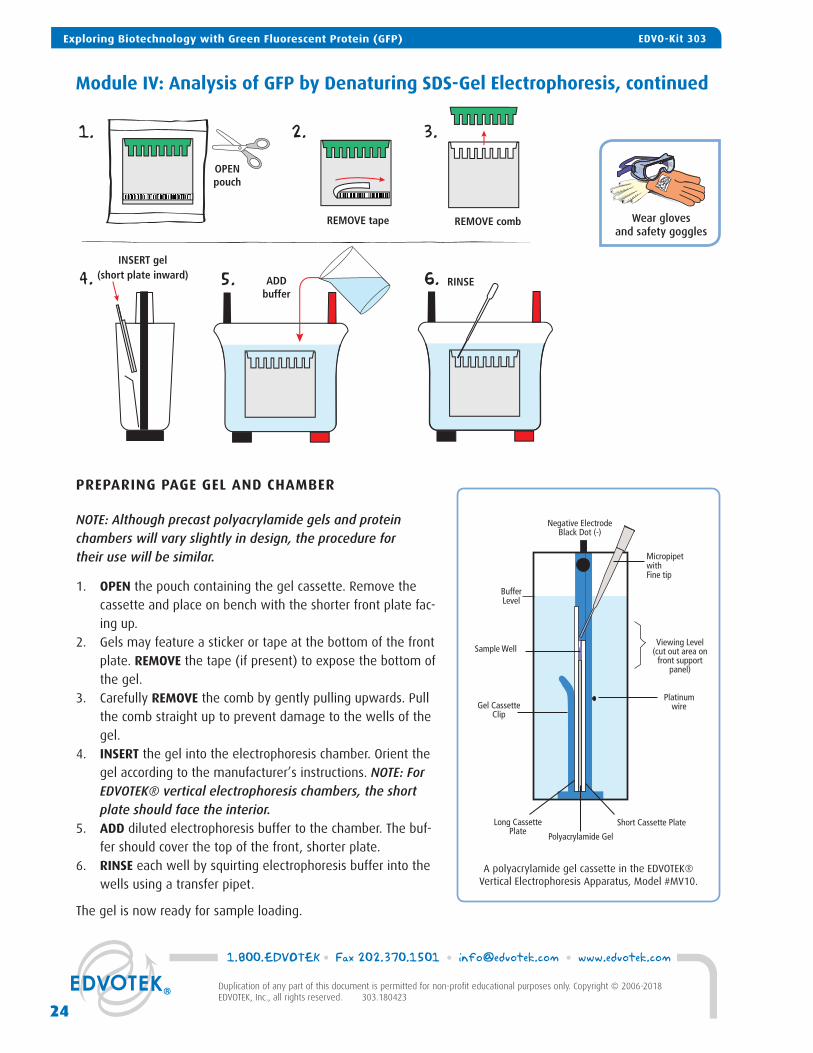
PREPARING PAGE GEL AND CHAMBER
NOTE: Although precast polyacrylamide gels and protein chambers will vary slightly in design, the procedure for their use will be similar.
1. OPEN the pouch containing the gel cassette. Remove the cassette and place on bench with the shorter front plate fac-ing up.
2. Gels may feature a sticker or tape at the bottom of the front plate. REMOVE the tape (if present) to expose the bottom of the gel.
3. Carefully REMOVE the comb by gently pulling upwards. Pull the comb straight up to prevent damage to the wells of the gel.
4. INSERT the gel into the electrophoresis chamber. Orient the gel according to the manufacturer’s instructions. NOTE: For EDVOTEK® vertical electrophoresis chambers, the short plate should face the interior.
5. ADD diluted electrophoresis buffer to the chamber. The buf-fer should cover the top of the front, shorter plate.
6. RINSE each well by squirting electrophoresis buffer into the wells using a transfer pipet.
The gel is now ready for sample loading.
Wear gloves and safety goggles
1.
4. 5. 6.
2. 3.
OPENpouch
REMOVE tape REMOVE comb
INSERT gel(short plate inward) ADD
bufferRINSE
1.800.EDVOTEK • Fax 202.370.1501 • [email protected] • www.edvotek.com
24
Duplication of any part of this document is permitted for non-profit educational purposes only. Copyright © 2006-2018 EDVOTEK, Inc., all rights reserved. 303.180423
Exploring Biotechnology with Green Fluorescent Protein (GFP) EDVO-Kit 303

Module IV: Analysis of GFP by Denaturing SDS-Gel Electrophoresis, continued
LOADING THE PROTEIN SAMPLES
Up to four student groups can share one gel. Some of the samples contain denaturing solution which contains SDS and 2-mercaptoethanol. Wear gloves and UV safety goggles.
2 0
.0
1. 2.
2 0.0
3. 4. REPEATsteps 1-3
for all samples.
6. 7. 8.
5.5.
Lane Sample Time Boiled
1
2
3
4
5
6
7
8
9
10
Standard Protein Marker 5 min.
GFP Native (Group 1) Not Boiled
GFP Denatured (Group 1) 5 min.
GFP Native (Group 2) Not Boiled
GFP Denatured (Group 2) 5 min.
Standard Protein Marker 5 min.
GFP Native (Group 3) Not Boiled
GFP Denatured (Group 3) 5 min.
GFP Native (Group 4) Not Boiled
GFP Denatured (Group 4) 5 min.
Table 1: Gel Loading
Time and Voltage Guidelines
MinimumVolts
100
125
150
80 min.
60 min.
50 min.
Table
ARecommended Time
Optimal
95 min.
75 min.
60 min.
EDVOTEK® Cat. #638, Fine Tip Micropipet Tips are recom-mended for loading samples into polyacrylamide gels. A regular micropipet tip may damage the cassette and result in the loss of protein samples.
1. Using a fresh fine tip micropipet tip, MEASURE 20 µl of the first sample as indicated in Table 1.
2. PLACE the pipet tip under the buffer and directly above the sample well, resting gently against the back plate of the gel cassette.
3. Slowly DISPENSE the sample by depressing the plunger.4. REPEAT steps 1-3 for remaining samples in Table 1, changing the tip
between each new sample.
NOTE: Be sure to change pipet tips between loading each sample!
5. Once all samples have been loaded, carefully PLACE the cover onto the electrode terminals.
6. CONNECT the electrical leads to the power supply. 7. SET the voltage of the power supply and PERFORM electrophoresis
(See Table A for time and voltage guidelines). Allow the proteins to separate on the gel for the recommended length of time, or until the tracking dye reaches the bottom of the gel.
NOTE: Shine the long wave UV light on the gel while the native proteins are separating. Be sure wear UV safety goggles!
8. After the electrophoresis is finished, TURN OFF the power supply, disconnect the leads, and carefully REMOVE the cover. The gel can now be removed from the chamber. Immediately proceed to staining instructions on page 26.
25
1.800.EDVOTEK • Fax 202.370.1501 • [email protected] • www.edvotek.com
Duplication of any part of this document is permitted for non-profit educational purposes only. Copyright © 2006-2018 EDVOTEK, Inc., all rights reserved. 303.180423
Exploring Biotechnology with Green Fluorescent Protein (GFP)EDVO-Kit 303

Module IV: Analysis of GFP by Denaturing SDS-Gel Electrophoresis, continued
STAINING THE GEL
1. After electrophoresis, LAY the cassette down and REMOVE the front plate by placing a thin spatula or screwdriver at the side edge and gently lift it away from the larger back plate. In most cases, the gel will stay on the back plate. If it partially pulls away with the front plate, let it fall onto the back plate. Handle very carefully as the thin gels are extremely fragile.
2. TRANSFER the gel on the back plate to a clean tray.3. ADD a sufficient volume (approximately 100 ml) of the staining/destaining solution
into the tray to COVER the gel and back plate. (Use enough solution to cover the gel.)
4. Carefully REMOVE the back plate from the tray, leaving just the gel in the tray con-taining the fixative solution.
NOTE: If the gel sticks to the plate, pipet some of staining/destaining solution onto the gel and gently nudge the gel off the plate.
5. Gently FLOAT a sheet of Protein InstaStain® with the stain side (blue side down) in the staining/destaining solution. COVER the gel with plastic wrap to prevent evaporation.
6. Allow the Protein InstaStain® paper to STAIN the gel for about an hour at room temperature with gentle occasional or continuous agitation.
7. REMOVE the paper after an hour and allow the gel to gently AGITATE on a rocking platform or just on the lab bench for 1-3 hours or overnight.
Overnight staining of protein gels yields a more optimal result. Pour off the staining solution from step 7 the following day and add fresh staining/destaining solution to cover the gel.
8. After staining, Protein bands will appear medium to dark blue against a light background* and will be ready for excellent photographic results.
*If the gel is too dark, destain at room temperature with continuous agitation in several changes of fresh stain-ing/destaining solution until the appearance and contrast of the protein bands against the background improve.
STOP
START
RPMTIMEDRUN
CONTINUOUS
RUN
Protein InstaStain®
Protein InstaStain®
1.1.
5. 6. 7. 8.
2. 4.3.
Protein InstaStain®Protein InstaStSS ain®
1hour
WEAR GLOVES AND SAFETY GOGGLES
Gloves must be worn during this procedure. Avoid touching the gel or Protein InstaStain® paper without gloves.
Polyacrylamide gels are very thin and fragile.
Use care in handling to avoid tearing the gel.
1.800.EDVOTEK • Fax 202.370.1501 • [email protected] • www.edvotek.com
26
Duplication of any part of this document is permitted for non-profit educational purposes only. Copyright © 2006-2018 EDVOTEK, Inc., all rights reserved. 303.180423
Exploring Biotechnology with Green Fluorescent Protein (GFP) EDVO-Kit 303

Module IV: Analysis of GFP by Denaturing SDS-Gel Electrophoresis, continued
STORING THE GEL
• Gel may be left in deionized water for several hours with no loss in sensitivity and band intensity. This step should be performed once a desired background and stained protein bands are obtained. Pour off the destain-ing solution from Step 7 and add a sufficient amount of deionized water to cover the gel.
• For permanent storage, the gel can be dried between two sheets of cellophane (saran wrap) stretched in an embroidery hoop. Air dry the gel for several days until the gel is paper thin. Cut the “extra” saran wrap sur-rounding the dried gel. Place the dried gel overnight between two heavy books to avoid curling. Tape it into a laboratory book.
27
1.800.EDVOTEK • Fax 202.370.1501 • [email protected] • www.edvotek.com
Duplication of any part of this document is permitted for non-profit educational purposes only. Copyright © 2006-2018 EDVOTEK, Inc., all rights reserved. 303.180423
Exploring Biotechnology with Green Fluorescent Protein (GFP)EDVO-Kit 303

Module IV: Analysis of GFP by Denaturing SDS-Gel Electrophoresis, continued
DETERMINATION OF MOLECULAR WEIGHTS
1. MEASURE the migration distance, in centimeters (to the nearest millimeter) of every major band in the gel. All measurements should be from the bottom of the sample well to the bottom of the protein band.
2. Using semilog graph paper, PLOT the migration distance or relative mobility (Rf) of each standard protein on the non-logarithmic x-axis versus its molecular weight on the logarithmic y-axis. CHOOSE your scales so that the data points are well spread out.
3. DRAW the best average straight line through all the points. This line should roughly have an equal number of points scattered on each side of the line. As an example, refer to the figure at left. This method is a linear approximation.
4. Using your standard graph, DETERMINE the molecular weight of the native and denatured GFP. This can be done by finding the Rf (or migration distance) of the unknown band on the x-axis and drawing a straight vertical until the standard line is intersected.
5. A straight line is then made from the intersection across to the y-axis where the approximate molecular weight can be determined.
8
10
76
5
4
3
2
1
9
876
5
4
3
2
1
9
876
5
4
3
2
1
9
100,000
10,000
6 7 8 9 10
Centimeters
Mol
ecul
ar W
eigh
t
Phosphorylase
Bovine Serum Albumin
Ovalbumin
Carbonic anhydrase
5
Soybean Trypsin Inhibitor
Lysozyme
Centimeters
Mol
ecul
ar W
eigh
t
In this experiment, the standard molecular weights are:
94,000 30,000 67,000 20,000 38,000 14,000
1.800.EDVOTEK • Fax 202.370.1501 • [email protected] • www.edvotek.com
28
Duplication of any part of this document is permitted for non-profit educational purposes only. Copyright © 2006-2018 EDVOTEK, Inc., all rights reserved. 303.180423
Exploring Biotechnology with Green Fluorescent Protein (GFP) EDVO-Kit 303

80,000
100,000
70,00060,000
50,000
40,000
30,000
20,000
90,000
800 700 600
500
400
300
200
100
9001,000
10,000
8,000 7,000 6,000
5,000
4,000
3,000
2,000
9,000
X-axis: Migration distance (cm)
1 cm 2 cm 3 cm 4 cm 5 cm 6 cm
Y-a
xis:
Mo
lec
ula
r We
ight
29
1.800.EDVOTEK • Fax 202.370.1501 • [email protected] • www.edvotek.com
Duplication of any part of this document is permitted for non-profit educational purposes only. Copyright © 2006-2018 EDVOTEK, Inc., all rights reserved. 303.180423
Exploring Biotechnology with Green Fluorescent Protein (GFP)EDVO-Kit 303

Study Questions
Answer the following study questions in your laboratory notebook or on a separate worksheet.
1. Exogenous DNA does not passively enter E. coli cells that are not competent. What treatment do cells require to be competent?
2. Why did the recovery broth used in this experiment not contain ampicillin?
3. What evidence do you have that transformation was successful?
4. What is the purpose of a positive and negative control in an experiment? During the transformation experi-ment, you set up 3 control plates (-DNA, -DNA+AMP, +DNA+AMP). Explain the purpose of each control and why it is necessary to run all three.
5. What is the source of the fluorescence in the transformed colonies?
6. Why is the molecular sieve matrix swelled prior to packing the column?
7. What is the basis of molecular sieve chromatography?
8. Why might the native and denatured versions of the same protein show large differences in migration on a PAGE gel?
Exploring Biotechnology with Green Fluorescent Protein (GFP) EDVO-Kit 303
1.800.EDVOTEK • Fax 202.370.1501 • [email protected] • www.edvotek.com
30
Duplication of any part of this document is permitted for non-profit educational purposes only. Copyright © 2006-2018 EDVOTEK, Inc., all rights reserved. 303.180423
EDVO-Kit 303Exploring Biotechnology with Green Fluorescent Protein (GFP)

Safety Data Sheets can be found on our website:www.edvotek.com/safety-data-sheets
Instructor's Guide
31
1.800.EDVOTEK • Fax 202.370.1501 • [email protected] • www.edvotek.com
Duplication of any part of this document is permitted for non-profit educational purposes only. Copyright © 2006-2018 EDVOTEK, Inc., all rights reserved. 303.180423
INSTRUCTOR'S GUIDEEDVO-Kit 303 Exploring Biotechnology with Green Fluorescent Protein (GFP)
IMPORTANT READ ME!
Transformation experiments contain antibiotics which are used for the selection of transformed bacteria. Students who have allergies to antibiotics such as penicillin, ampicillin, kanamycin or tetracycline should not participate in this experiment.
ORGANIZING AND IMPLEMENTING THE EXPERIMENT
Class size, length of laboratory sessions, and availability of equipment are factors which must be considered in the planning and the implementation of this experiment with your students.
The guidelines that are presented in this manual are based on ten laboratory groups consisting of two, or up to four students. The following are implementation guidelines, which can be adapted to fit your specific set of circumstances. If you do not find the answers to your questions in this section, a variety of resources are available at the EDVOTEK web site. In addition, Technical Service is available from 8:00 AM to 5:30 PM, Eastern time zone. Call 1-800-EDVOTEK for help from our knowledgeable technical staff.

NATIONAL CONTENT AND SKILL STANDARDS
By performing this experiment, students will develop skills necessary to do scientific inquiry, learn new techniques using several types of biotechnology equipment, and will learn standard procedures used in transformation. Analy-sis of the experiments will provide students the means to transform an abstract concept into a concrete explana-tion.
SUGGESTED IMPLEMENTATION SCHEDULENOTE: Overnight incubations are necessary for certain steps. Multiple steps can be performed in one day.
Prior to the Lab (At least two days before the start of the experiment) • Prepare agar plates (1 day to 2 weeks before preparing E. coli). • Prepare E. coli Cells (18-22 hour incubation). • Dispense the DNA and buffers.
Module I: Transformation of E. coli with pGFP
Day 1: (Day of Lab Experiment) • Equilibrate water baths at 37° C and 42° C. • Equilibrate incubation oven at 37° C. • Prepare ice for each group and pre-chill reagents. • Students transform cells and plate for overnight incubation.
Day 2: (Day after Lab Experiment) • Students observe transformants and controls. • Students calculate transformation efficiency. • Follow clean up and disposal procedures as outlined in the Laboratory Safety section. • Students save the plates with GFP transformants for Module II.
Module II: Isolation of GFP
Day 3 • Prepare lysis buffer and assemble materials. • Students plate Transformed Cells for GFP Purification (overnight incubation).
Day 4 • Students harvest Transformed Cells and Cell Lysis. • Students prepare Column for Chromatography.
Module III: Purification of GFP by Column Chromatography
Day 5
• Students purify GFP by Column Chromatography.
Module IV: Analysis of GFP by Denaturing SDS-Gel Electrophoresis
Day 6 • Prepare electrophoresis buffer, protein molecular weight standards, and staining solution. • Students prepare native and denatured GFP samples. • Students analyze GFP by Denaturing SDS-Polyacrylamide Gels.
Notes to the Instructor
1.800.EDVOTEK • Fax 202.370.1501 • [email protected] • www.edvotek.com
32
Duplication of any part of this document is permitted for non-profit educational purposes only. Copyright © 2006-2018 EDVOTEK, Inc., all rights reserved. 303.180423
INSTRUCTOR'S GUIDE Exploring Biotechnology with Green Fluorescent Protein (GFP) EDVO-Kit 303

APPROXIMATE TIME REQUIREMENTS
MO
DU
LE I
MO
DU
LE II
2-14 days before use. 1 hourPrepare LB Agar Plates
What to do: When: Time Required:
34
The day before performingthe experiment.
20 min. to streak,18-22hours to incubate plates
Prepare E.coli Source Plates andControl GFP plates 37
One day to 30 mins before performing the experiment 30 min.Dispense pGFP, CaCl2, and
recovery broth38
MO
DU
LE II
IM
OD
ULE
IV
Anytime before performing the experiment
10 min.Prepare and aliquot Elution Buffer 39
60 mins before performing the experiment 60 min.Prepare and aliquot Molecular
Sieve Matrix39
Anytime before performing the experiment
30 min.Dispense lysis buffer, assemble
materials, & equilibrate water bath at 37° C
38
Anytime before performing the experiment
10 min.Equilibrate water baths at 37° Cand 42° C and incubator at 37° C
38
Anytime before performing the experiment
10 min.Aliquot Protein denaturation
solution and 50% glycerol 39
Before or during the experiment 30 min.Reconstitute and boil Protein
Molecular Weight Standards39
Anytime before performing the experiment 10 min.Prepare Electrophoresis buffer 40
Anytime before performing the experiment 10 min.
Prepare Staining and Destaining Solution
40
Page
NOTE: If control GFP extract is needed, it should be aliquoted here.
Notes to the Instructor, continued
33
1.800.EDVOTEK • Fax 202.370.1501 • [email protected] • www.edvotek.com
Duplication of any part of this document is permitted for non-profit educational purposes only. Copyright © 2006-2018 EDVOTEK, Inc., all rights reserved. 303.180423
INSTRUCTOR'S GUIDEEDVO-Kit 303 Exploring Biotechnology with Green Fluorescent Protein (GFP)
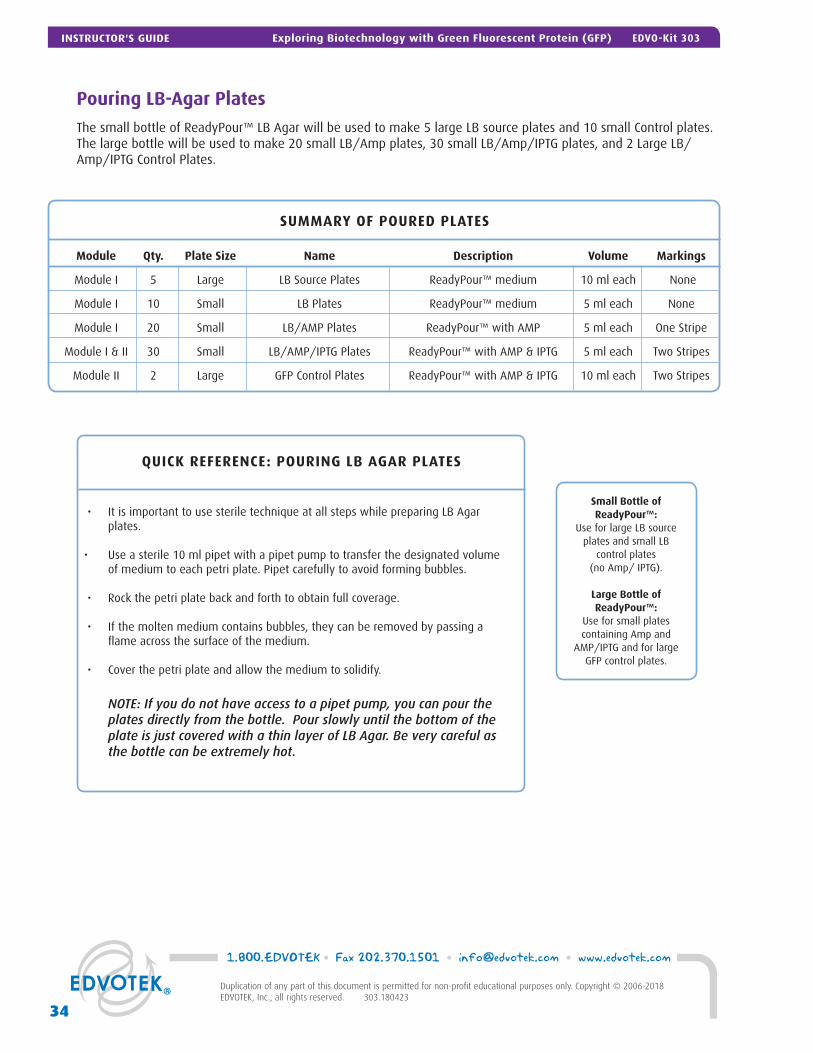
Pouring LB-Agar Plates
The small bottle of ReadyPour™ LB Agar will be used to make 5 large LB source plates and 10 small Control plates. The large bottle will be used to make 20 small LB/Amp plates, 30 small LB/Amp/IPTG plates, and 2 Large LB/Amp/IPTG Control Plates.
Small Bottle of ReadyPour™:
Use for large LB source plates and small LB
control plates (no Amp/ IPTG).
Large Bottle of ReadyPour™:
Use for small plates containing Amp and
AMP/IPTG and for large GFP control plates.
SUMMARY OF POURED PLATES
Module Qty. Plate Size Name Description Volume Markings
Module I 5 Large LB Source Plates ReadyPour™ medium 10 ml each None
Module I 10 Small LB Plates ReadyPour™ medium 5 ml each None
Module I 20 Small LB/AMP Plates ReadyPour™ with AMP 5 ml each One Stripe
Module I & II 30 Small LB/AMP/IPTG Plates ReadyPour™ with AMP & IPTG 5 ml each Two Stripes
Module II 2 Large GFP Control Plates ReadyPour™ with AMP & IPTG 10 ml each Two Stripes
• It is important to use sterile technique at all steps while preparing LB Agar plates.
• Use a sterile 10 ml pipet with a pipet pump to transfer the designated volume of medium to each petri plate. Pipet carefully to avoid forming bubbles.
• Rock the petri plate back and forth to obtain full coverage.
• If the molten medium contains bubbles, they can be removed by passing a flame across the surface of the medium.
• Cover the petri plate and allow the medium to solidify.
QUICK REFERENCE: POURING LB AGAR PLATES
NOTE: If you do not have access to a pipet pump, you can pour the plates directly from the bottle. Pour slowly until the bottom of the plate is just covered with a thin layer of LB Agar. Be very careful as the bottle can be extremely hot.
1.800.EDVOTEK • Fax 202.370.1501 • [email protected] • www.edvotek.com
34
Duplication of any part of this document is permitted for non-profit educational purposes only. Copyright © 2006-2018 EDVOTEK, Inc., all rights reserved. 303.180423
INSTRUCTOR'S GUIDE Exploring Biotechnology with Green Fluorescent Protein (GFP) EDVO-Kit 303

Pouring LB-Agar Plates, continued
1. In BOTH the large and small ReadyPour™ LB Agar bottles, BREAK solid agar into small chunks by vigorously squeezing and shaking the plastic bottles.
2. LOOSEN, but DO NOT REMOVE, the caps on the ReadyPour™ Agar bottles. This allows the steam to vent during heating. CAUTION: Failure to loosen the cap prior to heating may cause the bottle to break or explode.
3. One bottle at a time, MICROWAVE on high for 60 seconds to melt the agar. Carefully REMOVE from the microwave, re-tighten the cap, and MIX by swirling the bottle. Loosen the cap and continue to HEAT the solution in 30-second intervals until the agar is completely dissolved (the amber-colored solution should be clear and free of small particles).
NOTE: Use extra care and make sure the agar does not boil out of the bottle. Pay close attention and stop the heating if it starts to bubble up.
4. COOL the bottles of ReadyPour™ Agar to 60° C with gentle swirling to promote even dissipation of heat. 5. While the medium is cooling, OPEN the sleeves of petri dishes and LABEL them in the following manner: • Neatly STACK 20 small plates. Using a permanent marker, STRIPE them with one line by placing the
marker at the bottom of the stack and dragging it vertically to the top plate. These 20 plates will be used for the LB/Amp plates.
• Neatly STACK 30 small plates. STRIPE them with two lines. These 30 plates will be the LB/Amp/IPTG plates.
• Neatly STACK 2 large plates. STRIPE them with two lines and label as "Control". These will be used for the transformation control plates if needed for Module II.
• DO NOT label the remaining 10 small plates. These will be the control LB plates. • DO NOT label the remaining 5 large plates. These will be for the LB source plates.6. Using a 10 ml pipet and pipet pump, POUR 5 large LB source plates by pipetting 10 ml of the cooled Ready-
Pour™ Agar from the SMALL bottle into each of the 5 large unlabeled petri dishes. 7. Using the same 10 ml pipet, POUR 10 small control plates by pipetting 5 ml of the cooled ReadyPour™ Agar
from the SMALL bottle into each of the 10 small unlabeled petri dishes.
:601. 3. 4.
5. 6.
2.Agar
Loosen
Agar
60°C
20 LB/Amp30 LB/Amp/IPTG
Pour
5
7.
Pour
10
8.
Agar
Add Amp& GrowthAdditive
10.
Agar
AddIPTG
10 ml 5 ml
9.
Pour
205 ml
11.
Pour
305 ml
Large LB source plates Small control plates
Small LB/Amp plates Small LB/Amp/IPTG plates
2 LB/Amp/IPTGControl plates
LargeBottle
Large Bottle Large Bottle
Agar
SmallBottle
60°C
12.
Pour
210 ml
Large LB/Amp/IPTG control plates
10 Control
5 LB source plates
Wear Hot Gloves and Goggles!
35
1.800.EDVOTEK • Fax 202.370.1501 • [email protected] • www.edvotek.com
Duplication of any part of this document is permitted for non-profit educational purposes only. Copyright © 2006-2018 EDVOTEK, Inc., all rights reserved. 303.180423
INSTRUCTOR'S GUIDEEDVO-Kit 303 Exploring Biotechnology with Green Fluorescent Protein (GFP)

NOTE: If you do not have access to a pipet pump, you can pour the plates directly from the bottle. Pour slowly until the bottom of the plate is just covered with a thin layer of LB Agar. Be very careful as the bottle can be extremely hot.
Pouring LB-Agar Plates, continued
:601. 3. 4.
5. 6.
2.Agar
Loosen
Agar
60°C
20 LB/Amp30 LB/Amp/IPTG
Pour
5
7.
Pour
10
8.
Agar
Add Amp& GrowthAdditive
10.
Agar
AddIPTG
10 ml 5 ml
9.
Pour
205 ml
11.
Pour
305 ml
Large LB source plates Small control plates
Small LB/Amp plates Small LB/Amp/IPTG plates
2 LB/Amp/IPTGControl plates
LargeBottle
Large Bottle Large Bottle
Agar
SmallBottle
60°C
12.
Pour
210 ml
Large LB/Amp/IPTG control plates
10 Control
5 LB source plates
REMINDER:Only add reagents to cooled agar (60° C)!
8. ADD the entire amount of the Ampicillin (A) to the entire bottle of the Growth Additive and swirl to mix. ADD this solution to the LARGE bottle of ReadyPour™ Agar. RECAP the bottle and SWIRL to mix the reagents. NOTE: Swirl gently to avoid introducing bubbles into the LB Agar.
9. Using a fresh 10 ml pipet, POUR 5 ml of the LB/Amp medium into the 20 small petri plates with one stripe.
10. ADD the entire amount of IPTG liquid (B) to the LARGE ReadyPour™ Agar bottle. Because the volume of IPTG is small, we recommend using a transfer pipet or a micropipet to add the IPTG to the bottle. RECAP the bottle and SWIRL to mix the reagents.
11. Using a fresh 10 ml pipet, POUR 5 ml of the LB/Amp/IPTG medium into the 30 small petri plates with two stripes.
12. Using the same 10 ml pipet, POUR 10 ml of the LB/Amp/IPTG medium into the two remaining large plates. LABEL each plate as "Control".
13. COVER and WAIT at least twenty minutes for the LB-agar plates to solidify. For optimal results, leave plates at room temperature overnight.
14. STORE plates at room temperature for no more than two days. Plates should be inverted and placed in a seal-able plastic bag to ensure that they do not dry out.
NOTE: If plates will be prepared more than two days before use, they should be left on the bench overnight to solidify and dry. Then, store inverted plates in a plastic bag in the refrigerator (4° C). Remove the plates from the refrigerator and warm in a 37° C incubator for 30 minutes before use.
1.800.EDVOTEK • Fax 202.370.1501 • [email protected] • www.edvotek.com
36
Duplication of any part of this document is permitted for non-profit educational purposes only. Copyright © 2006-2018 EDVOTEK, Inc., all rights reserved. 303.180423
INSTRUCTOR'S GUIDE Exploring Biotechnology with Green Fluorescent Protein (GFP) EDVO-Kit 303

Preparation of E. coli Source Plates
For best results, the E. coli source plates should be streaked 18-22 hours before the experiment is performed. Preparing the source plates more than 24 hours before the laboratory may compromise the success of the trans-formation experiment.
1. REMOVE a single BactoBead™ from the E.coli GFP Host vial using a sterile inoculating loop. Using aseptic technique, TRANSFER the bead to the edge of a large petri plate (LB source plate) and replace lid. CAP the vial immediately after using to limit exposure to moisture in the air.
2. DISSOLVE the bead by adding 10 µL of recovery broth.3. STREAK the loop back and forth through the dissolved BactoBead™ to make a primary streak at the top of
the plate. Try not to gouge the loop into the medium. 4. STREAK the loop through primary streak to a clean part of the agar several times to create a secondary
streak.5. ROTATE the plate. STREAK the loop through the secondary streak to a clean part of the agar several times. 6. ROTATE the plate once more. STREAK the loop through the third streak to a clean part of the agar. This
should produce isolated colonies.7. COVER the plate and INCUBATE INVERTED at 37° C for 18-22 hours. If you do not have an incubator, colo-
nies will form at room temperature in approximately 24 - 48 hours, although transformation efficiency will decrease.
8. REPEAT the above steps for each of the five large LB source plates using a new loop for each plate.
NOTE: Ideal colonies will be 1-1.5 mm in diameter. If growth on plates is heavy (i.e. lawn of colonies), instruct students to transfer a small loopful of cells into the CaCl2 solution.
9. RETRIEVE the two large LB/AMP/IPTG plates.10. REPEAT steps 1-7 using the E.coli pt-GFP BactoBeads™.
NOTE: These Control GFP plates will be used in Module II if transformation is unsuccessful. They should be prepared ahead of time, incubated at 37° C overnight, and stored at 4° C until needed.
1. 2. 3. 5.4.10 µl recovery
broth
37° C
7. 8.Cover &Invert
6. REPEAT Steps 1-7 for eachLB source plates.
9. RETRIEVE the 2 large LB/Amp/IPTG plates.
10. REPEAT Steps 1-7 for each LB/Amp/IPTG platesusing the pt-GFP BactoBeads™.
37
1.800.EDVOTEK • Fax 202.370.1501 • [email protected] • www.edvotek.com
Duplication of any part of this document is permitted for non-profit educational purposes only. Copyright © 2006-2018 EDVOTEK, Inc., all rights reserved. 303.180423
INSTRUCTOR'S GUIDEEDVO-Kit 303 Exploring Biotechnology with Green Fluorescent Protein (GFP)

MODULE I (Experiment begins on page 12)
Transformation of E. coli with GFP
1. Equilibrate waterbaths at 37° C and 42° C; set the incubator at 37° C.2. Prepare ice or ice-water baths for each group. Small ice cubes will help to
rapidly cool the bacteria after the heat shock.3. Dispense 0.5 ml of CaCl
2 (C) into microcentrifuge tubes for each of the 10
groups and place on ice.4. Dispense 1.5 ml of Luria Broth Medium ("Recovery broth") into tubes for
each of the 10 groups and keep at room temperature. Alternatively, the Recovery Broth bottle can be placed at a classroom pipetting station for students to share. NOTE: Maintain sterile technique while aliquoting Recovery Broth.
Preparation of pFluoroGreen™ Plasmid DNA
Aliquots of plasmid DNA can be prepared the day before the lab and stored at 4° C.
5. Place the tube of Supercoiled pGFP (D) on ice to thaw.6. Label 10 microcentrifuge tubes "pGFP".7. Before dispensing, tap the tube of pFluoroGreen™ until all the sample is at the tapered bottom of the tube.8. Using an adjustable volume micropipet, dispense 12 µl of the plasmid DNA to each of the microcentrifuge
tubes labeled "pGFP". Cap the tubes and place them on ice.
NOTE: If prepared ahead of time, the pGFP and CaCl2 aliquots can be stored at 4° C for up to 24 hours. Always
provide pGFP and CaCl2 on ice to assist the heat shock procedure.
MODULE II (Experiment begins on page 16)
Isolation of GFP
1. Add entire contents of Lysozyme (E) tube to the bottle of TEG buffer (F) and swirl to mix. Label solution as "Lysis Buffer".
2. Dispense 500 µl of Lysis Buffer for each group.3. Assemble remaining materials for student groups.4. If needed, retrieve the two control GFP plates that you prepared
earlier. These can be used by students with poor transformation results.
Pre-Lab PreparationsFor Module I,
Each Group Requires:
• Sharing - one of five E. coli source plates• 1 tube (0.5 ml) CaCl
2
• 1 tube pGFP plasmid DNA (12 µl)• 1 tube (1.5 ml) “Recovery
broth”• 2 one-striped plates• 1 two-striped plate• 1 unstriped plate• 4 sterile 1 ml pipets• 3 sterile inoculating loops• 1 microcentrifuge tube
Classroom Equipment:
• Waterbath(s)• Incubation Oven
For Module II, Each Group Requires:
• 2 plates of ReadyPour™ (LB) medium containing AMP/ IPTG• 2 Inoculating loops• 1 tube (500 µl) of Lysis Buffer• Microcentrifuge tube• Micropipets and pipet tips
1.800.EDVOTEK • Fax 202.370.1501 • [email protected] • www.edvotek.com
38
Duplication of any part of this document is permitted for non-profit educational purposes only. Copyright © 2006-2018 EDVOTEK, Inc., all rights reserved. 303.180423
INSTRUCTOR'S GUIDE Exploring Biotechnology with Green Fluorescent Protein (GFP) EDVO-Kit 303

Pre-Lab Preparations
MODULE III (Experiment begins on page 18)
Column Elution Buffer
1. Dilute the Column Elution Buffer by mixing 35 ml of 10X Column Elution Buffer (G) with 315 ml of Distilled water.
2. Save 70 ml of the diluted column elution buffer for the preparation of the molecular sieve matrix (next step) and dispense the remaining buffer for 10 student groups, 25 ml per group. Label this buffer "1X Column Elution Buffer".
Preparation of the Molecular Sieve Matrix
3. Add 70 ml of the 1x Column Elution Buffer to the bottle containing Dry Molecular Sieve Matrix (H).4. Gently swirl or stir the bottle of matrix to ensure there are no clumps. Incubate for 30-60 min., stirring occa-
sionally to fully rehydrate. 5. Aliquot 6 ml for each of the 10 groups. NOTE: The prepared Molecular Sieve Matrix can be used immediately or stored covered at 4° C for up to 24
hours.
Control Cell Extract Containing GFP
This control extract is provided for use by students that do not have positive results from Module I or Module II.
6. Thaw the frozen Control Cell Extract containing GFP (I) at room temperature and immediately place on ice.7. Label tubes with "GFP extract". Aliquot 220 µl of the extract into the tubes. Place immediately back on ice.
Use this only in Module III if a student group's extraction has failed.
MODULE IV (Experiment begins on page 20)
Reconstitution of Lyophilized Protein Molecular Weight Standards
Once rehydrated, the tube of Protein Molecular Weight Standards (J) contains enough material for loading 6 wells. The tube can be boiled ahead of time or in conjunction with students boiling the denatured GFP extracts.
1. Add 130 µl of distilled or deionized water to the tube of Protein Molecular Weight Standards (J) and allow the material to hydrate for several minutes. Vortex or mix vigorously.
2. Bring a beaker of water, covered with aluminum foil, to a boil. Remove from heat.3. Make sure the sample tube is tightly capped (in screw-top tubes) and well-labeled. The bottom of the tube
should be pushed through the foil and immersed in boiling water for 5 minutes. The tube should be kept suspended by the foil.
4. The markers can be aliquoted for each pair of student groups, or students can share the rehydrated sample stock tube. Have students load samples onto the polyacrylamide gel while the samples are still warm to avoid aggregation. The volume of sample to load per well is 20 µl.
5. Store any unused portion of reconstituted sample at -20° C.
For Module III, Each Group Requires:
2 Screw-top microcentrifuge tubes 1 Chromatography column 1 Ring stand with clamp 1 Microtiter strip 6 ml Molecular Sieve Matrix (hydrated H) 25 ml 1x Column Elution Buffer (diluted G) 220 µl "GFP extract" (I) - if needed Adjustable volume micropipet & tips
For Module IV, Each Group Requires:
1 Tube Protein Denaturing Solution (50 µl)1 Tube 50% Glycerol Solution (50 µl)Protein Standard markers (shared)
39
1.800.EDVOTEK • Fax 202.370.1501 • [email protected] • www.edvotek.com
Duplication of any part of this document is permitted for non-profit educational purposes only. Copyright © 2006-2018 EDVOTEK, Inc., all rights reserved. 303.180423
INSTRUCTOR'S GUIDEEDVO-Kit 303 Exploring Biotechnology with Green Fluorescent Protein (GFP)

Pre-Lab Preparations
MODULE IV, CONTINUED
Other Components
6. Dispense 50 µl of Protein Denaturing Solution (K) into 10 microcentrifuge tubes.7. Dispense 50 µl of 50% Glycerol (L) into 10 microcentrifuge tubes.8. If desired, preheat beakers of water or water bath to boiling to save time during the lab.
Preparation of the Electrophoresis Buffer
Prepare the electrophoresis buffer by adding and mixing 1 part Tris-Glycine-SDS electrophoresis buffer (10x) to 9 parts distilled water.
The approximate volume of 1X electrophoresis buffer required for EDVOTEK® Protein Vertical Electrophoresis units are listed in the table below. The buffer should just cover the back plate of the gel cassette.
Electrophoresis Time and Voltage
Your time requirements will dictate the voltage and the length of time for your samples to separate by electro-phoresis. Approximate recommended times are listed in the table below.
Conc. (10x) Distilled Total Buffer + Water = Volume
58 ml 522 ml 580 ml
95 ml 855 ml 950 ml
EDVOTEK Model #
MV10
MV20
Tris-Glycine-SDS Electrophoresis Buffer
Volts Recommended Time
Minimum Optimal
125 60 min 75 min
Time and Voltage
Preparation of the Staining and Destaining Buffer
An Ethanol, acetic acid, and water solution is used for both staining and destaining with Protein InstaStain®. This stain is safe for classroom use and does not require specialized methods for cleanup or disposal.
• Prepare a stock solution of Ethanol and Glacial Acetic Acid by combining 180 ml Ethanol, 140 ml Distilled wa-ter, and 40 ml Glacial Acetic Acid. Label the solution as "Staining/destaining buffer".
1.800.EDVOTEK • Fax 202.370.1501 • [email protected] • www.edvotek.com
40
Duplication of any part of this document is permitted for non-profit educational purposes only. Copyright © 2006-2018 EDVOTEK, Inc., all rights reserved. 303.180423
INSTRUCTOR'S GUIDE Exploring Biotechnology with Green Fluorescent Protein (GFP) EDVO-Kit 303

Experiment Results and Analysis
+DNA/+AMP/+IPTGplated with transformed cells (pFluoroGreen™)
Result: Individual colonies that will fluoresce when exposed to long wave UV light.
Demonstrates: Cells become resistant to Ampicillin when transformed with the pFluoroGreen™. Production of GFP protein is turned on in the presence of IPTG.
+DNA/+AMPplated with transformed cells (pFluoroGreen™)
Result: white colonies.May look like a smeared layer of cells.
Demonstrates: Cells become resistant to Ampicillin when transformed with the pFluoroGreen™.
GFP protein is not produced in the absence of IPTG.
-DNA/+AMPplated with
non-transformed cells (no DNA)
Result: No growth
Demonstrates: Cells are sensitive to ampicillin. Without pFluoroGreen™, they are not ampicillin-resistant.
-DNA plated with
non-transformed cells (no DNA)
Result: No fluorescent cells visible. White colonies. Will likely look like a smeared layer of cells (lawn).
Demonstrates: Host bacterial cells are viable in the absence of ampicillin.
TRANSFORMATION
41
1.800.EDVOTEK • Fax 202.370.1501 • [email protected] • www.edvotek.com
Duplication of any part of this document is permitted for non-profit educational purposes only. Copyright © 2006-2018 EDVOTEK, Inc., all rights reserved. 303.180423
INSTRUCTOR'S GUIDEEDVO-Kit 303 Exploring Biotechnology with Green Fluorescent Protein (GFP)

Experiment Results and Analysis, continued
When proteins samples are boiled for 5 minutes in the presence of SDS and 2-mercaptoethanol, proteins lose their tertiary structure and are denatured. This will cause the relative sizes of the proteins to change, although the actual sizes are not altered. In the absence of these denaturing reagents, complete denaturation is not achieved and local native structures in pro-teins can be maintained.
The size of the GFP is about 34 KD for the native protein and 26.9 KD for denatured.
Student Groups #1 and #2Lane 1 20 µl of standard protein markers (boiled for 5 min.)Lane 2 20 µl of GFP native (Group #1) (not boiled)Lane 3 20 µl of GFP denatured (Group #1) (boiled for 5 min.)Lane 4 20 µl of GFP native (Group #2) (not boiled)Lane 5 20 µl of GFP denatured (Group #2) (boiled for 5 min.)
Student Groups #3 and #4Lane 6 20 µl of standard protein markers (boiled for 5 min.)Lane 7 20 µl of GFP native (Group #3) (not boiled)Lane 8 20 µl of GFP denatured (Group #3) (boiled for 5 min.)Lane 9 20 µl of GFP native (Group #4) (not boiled)Lane 10 20 µl of GFP denatured (Group #4) (boiled for 5 min.)
ELECTROPHORESIS
1.800.EDVOTEK • Fax 202.370.1501 • [email protected] • www.edvotek.com
42
Duplication of any part of this document is permitted for non-profit educational purposes only. Copyright © 2006-2018 EDVOTEK, Inc., all rights reserved. 303.180423
INSTRUCTOR'S GUIDE Exploring Biotechnology with Green Fluorescent Protein (GFP) EDVO-Kit 303

Please refer to the kit insert for the Answers to
Study Questions

Please refer to the kit insert for the Answers to
Study Questions

A Troubleshooting Guides
B Student Worksheet
Safety Data Sheets:
Now available for your convenient download on www.edvotek.com/Safety-Data-Sheets
Appendices
45
1.800.EDVOTEK • Fax 202.370.1501 • [email protected] • www.edvotek.com
Duplication of any part of this document is permitted for non-profit educational purposes only. Copyright © 2006-2018 EDVOTEK, Inc., all rights reserved. 303.180423
APPENDICESEDVO-Kit 303 Exploring Biotechnology with Green Fluorescent Protein (GFP)

Appendix ATroubleshooting Guides
TRANSFORMATION TROUBLESHOOTING GUIDE
PROBLEM: CAUSE: ANSWER:
Poor cell growth on source plate
Incubation time too short Continue to incubate source plate at 37ºC for a total of 18-22 hours.
Antibiotic added to source plate When pouring plates, be sure to add antibiotics & additives at the correct step.
Colonies appeared smeary on transformation plate
Plates containing transformants were inverted too soon
Allow cells to fully absorb into the medium before inverting plates.
Experimental plates too moistAfter pouring plates, allow them dry overnight at room temp.Alternatively, warm plates at 37°C for 30 min. before plating cells
Incorrect host cells used for transformation Confirm that correct bacterial strain was used for transformation
Cells were not properly heat shocked Ensure that temp. was 42ºC & heat shock step took place for exactly 45 seconds.No colonies seen on transformation plates
Cells were not properly quadrant streaked.
Have students transfer a small loopful of bacteria to the CaCl2.No individual colonies seen on source plates
Plasmid DNA not added to transformation mix
Ensure plasmid DNA was added to transformation tube.
Incorrect incubation temperature Use a thermometer to check incubator temperature. Adjust temp. to 37°C if necessary.
Make sure that pipets are used properly and are properly calibrated.
Satellite colonies seen on transformation plate
Incorrect concentration of antibioticsin plates
Antibiotic is degraded
Ensure the correct concentration of antibiotic was added to plates - Make sure ReadyPour is cooled to 60°C before adding antibiotic.
Make sure ReadyPour is cooled to 60°C before adding antibiotic.
Incubate the plates overnight at 37ºC (18-22 hours).
Incorrect antibiotics Be certain that the correct antibiotic was used.
Cells not well resuspended in CaCl2Completely resuspend the cells in the CaCl2, leaving no cell clumps (vortex or pipet up and down to fully resuspend cells). Cell suspension should be cloudy.
Low transformation efficiency
Not enough cells used for transformation
Source plates were incubated for more than 20 hours
Experimental plates too old
Cells not well resuspended in CaCl2
CaCl2 solution not cold enough
Cell solution not cold enough
Too much or too little plasmid DNA added to cell suspension
Cells were not properly heat shocked
Antibiotics were degraded prior to pouring plates
Incorrect concentration of antibiotics
Pick more colonies from source plate (5 colonies @ 1-1.5 mm width per 500µl CaCl2)
Important that source cells grow no longer than 20 hrs. Refrigerate plates after 20 hrs if necessary. Do not use source plates that have been incubatedlonger than 24 hours (refrigerated or not).
Prepare transformation plate and use shortly after preparation
Completely resuspend the cells in the CaCl2, leaving no cell clumps (vortex or pipet up and down to fully resuspend cells). Cell suspension should be cloudy.
Pre-chill CaCl2 before adding cells to the CaCl2
Extend incubation of celll suspension on ice 10-15 min. (should not exceed 30 min. total). This increases the transformation efficiency.
Ensure that correct volume of plasmid was added to the transformation tube. If using micropipets, make sure students practice using pipets.
Ensure that temperature was 42ºC and that heat shock step took place for no more than 45 seconds.
Make sure ReadyPour is cooled to 60°C before adding antibiotic.
Ensure that the correct concentration of antibiotic was used in plates.
Plates were incubated too long
1.800.EDVOTEK • Fax 202.370.1501 • [email protected] • www.edvotek.com
46
Duplication of any part of this document is permitted for non-profit educational purposes only. Copyright © 2006-2018 EDVOTEK, Inc., all rights reserved. 303.180423
APPENDICES Exploring Biotechnology with Green Fluorescent Protein (GFP) EDVO-Kit 303

Appendix ATroubleshooting Guides
ISOLATION OF GFP TROUBLESHOOTING GUIDE
PROBLEM: CAUSE: ANSWER:
Poor cell growth Plates were incorrectly poured Ensure that plates were properly prepared and stored.
Antibiotic or IPTG is degraded Make sure ReadyPour is cooled to 60° C before adding antibiotic.
PURIFICATION OF GFP BY COLUMN CHROMATOGRAPHY TROUBLESHOOTING GUIDE
Poor Cell Lysis (GFP in pellet)
Lysozyme in lysis buffer is inactive Prepare lysis buffer immediately before use.
Cells were not fully frozenLay tube on its side and allow adiquate time for cell suspension to fully freeze.
Air bubbles Pour matrix slowly to avoid bubbles. Tap gently on bench to remove.
Too much matrix Ensure that column is filled approximately 2/3 with matrix.
Packed Matrix is not uniform
Clumps of dry matrix
Repeat additional freeze-thaw cycle.
Ensure that matrix is fully rehydrated and uniform before packing column
Weak GFP expression in cells
Antibiotic or IPTG is degraded
Incubation time too short
Make sure ReadyPour is cooled to 60° C before adding antibiotic.
Continue to incubate plates at 37° C for a total of 18-22 hours.
Wrong elution buffer Ensure buffer is correct and properly diluted.
Very high protein concentration Continue with collection and select brightest eluted fraction.
Flow is very slow
GFP does not elute as compact band
No GFP seen in fractions
GFP eluted before collecting fractions Montor elution with a UV light. Repeat procedure to purify GFP.
GFP has not yet eluted Monitor elution with a UV light. Continue to elute and collect fractions once GFP reaches the frit.
47
1.800.EDVOTEK • Fax 202.370.1501 • [email protected] • www.edvotek.com
Duplication of any part of this document is permitted for non-profit educational purposes only. Copyright © 2006-2018 EDVOTEK, Inc., all rights reserved. 303.180423
APPENDICESEDVO-Kit 303 Exploring Biotechnology with Green Fluorescent Protein (GFP)

Appendix ATroubleshooting Guides
PROBLEM: CAUSE: ANSWER:
Gel is not running properly.
Poor band resolutionor separation.
Smiling or frowingof bands.
No bands on gel/smallest bands missingfrom gel.
Running buffer was not properly prepared. Check buffer protocol, make fresh buffer.
Wrong buffer used. Check gel recipe, buffer must be compatible with the gel.
Buffer volume is too low. Buffer must fully cover the sample wells throughout the entire experiment.
Gel is inserted in the wrong orientation. Check with manufacturer for proper setup of the electrophoresis chamber.
Malfunctioning electrophoresis chamber or power supply.
Consult with manufacturer of electrophoresis chamber or power supply.
Tape at bottom of precast gel not removed. Carefully remove tape before running the gel.
Electrodes not connected or polarity reversed.
Check electrode connections at the gel box and power supply.
Diffusion of samples before power was turned on.
Minimize time between loading samples and the start of electrophoresis.
The gel is old or expired. Make fresh gels or order new pre-cast gels.
Wrong concentration of acrylamide gel. The kit is designed for 12% acrylamide gels, other concentrations will affect results.
Proteins have been overloaded. EDVOTEK ® has optimized this kit to avoid overloading. Be sure to load the amount recommended by the protocol.
Wrong buffer was used. Check gel recipe, the buffer must be compatible with the gel.
Bands are faint.
Proteins have diffused or faded. Follow protocol for Protein InstaStain® to increase the contrast of protein bands (appendix A).
Too little protein was loaded. EDVOTEK ® has optimized this kit to avoid underloading. Be sure to load the amount recommended by the protocol.
Incorrect voltage supplied to the gel. Check the protocol for the recommended voltage (page 13).
Proteins ran off gel.
Use the appropriate length of time for the chosen voltage. Be sure to monitor the tracking dye while the gel is running. For best results, the tracking dye should run 8-9 cm and should not be allowed to run off the gel.
Proteins have accumulated in the wells of the gel.
Proteins have aggregated. Ensure proteins have fully denatured; boil proteins for 5 min.and load while still warm.
Bands are smeary and distorted.
The gel has overheated. Reduce voltage, check buffer concentration and dilute if necessary.
SDS-GEL ELECTROPHORESIS TROUBLESHOOTING GUIDE
1.800.EDVOTEK • Fax 202.370.1501 • [email protected] • www.edvotek.com
48
Duplication of any part of this document is permitted for non-profit educational purposes only. Copyright © 2006-2018 EDVOTEK, Inc., all rights reserved. 303.180423
APPENDICES Exploring Biotechnology with Green Fluorescent Protein (GFP) EDVO-Kit 303

Appendix BStudent Worksheet
MODULE I
1 E.coli source plate (shared) q 1 Snap-top microcentrifuge tube containing 0.5 ml CaCl2 q 1 Snap-top microcentrifuge tube containing pGFP plasmid q 1 Snap-top microcentrifuge tube containing 1.5 ml Recovery broth q 1 Small plate containing LB-Agar (unstriped) q 2 Small plates containing LB-Agar plus Ampicillin (1 stripe) q 1 Small plate containing LB-Agar plus Ampicillin/IPTG (2 stripes) q 4 Sterile 1 ml pipets q 3 Sterile inoculating loops q 1 Snap-top microcentrifuge tube q
Incubation on ice - 10 minutes (Step 7): Start___________________Heat shock at 42° C - 45 seconds (Step 8): Start___________________Incubation on ice - 2 minutes (Step 9): Start___________________Recovery at 37° C - 10 minutes (Step 11): Start___________________
MODULE II
Overnight Incubation of Bacteria: 2 Small plates containing LB-Agar plus Ampicillin/IPTG (2 stripes) qProtein Isolation: 2 Sterile inoculating loops q 1 Snap-top microcentrifuge tube containing Lysis Buffer q 1 Snap-top microcentrifuge tube q
Incubation at 37° C - 10 minutes (Step 5): Start___________________Freeze #1: Start______________ Freeze #2: Start__________________ Freeze #3: Start__________________
MODULE III:
2 Screw-top microcentrifuge tubes q 1 Chromatography column q 1 Ring stand and clamp q 1 8-well microtiter plate q 6 ml Molecular Sieve Matrix q 25 ml 1x Column Elution Buffer q 220 µl Control GFP Extract - If needed q
Well with highest fluorescence: #___________________
MODULE IV:
50 µl Protein Denaturing Solution q 50 µl 50% Glycerol Solution q 20 µl Protein molecular weight marker (shared) q
Location of native GFP: Lane___________________Location of denatured GFP: Lane___________________
49
1.800.EDVOTEK • Fax 202.370.1501 • [email protected] • www.edvotek.com
Duplication of any part of this document is permitted for non-profit educational purposes only. Copyright © 2006-2018 EDVOTEK, Inc., all rights reserved. 303.180423
APPENDICESEDVO-Kit 303 Exploring Biotechnology with Green Fluorescent Protein (GFP)