Embed Size (px)
Citation preview

1
TheCenterForInstructionandTechnology Datelastupdated:8/13/2013
ECHO Personal Capture Introduction to Lecture Capture Lecture capture technology allows instructors to create audio/video recordings of classroom lectures or presentations. With lecture capture, instructors can record their presentations (both audio and video) including any material that gets projected onto the classroom's screen. The ECHO 360 classrooms offer this capability. ECHO Personal Capture allows you to record a lecture or other resources outside of the classroom. Use Personal Capture to record a lecture for future presentation or create short audio and video resources for your class. Personal Capture is supported on both PC and Mac.
Downloading the software First, you will need to access the online request form located at: http://itsreservations.usfca.edu/ and fill out the information for requesting an Echo Personal Capture account. Once the account process has been completed, you can then login to the Echo Active Learning Platform site at: https://echo360.org Click on the link Log In via Institution; select University of San Francisco out of the dropdown menu to pick an institution and click Log In. You will be redirected to the myUSF login page; enter your USF username and password and click Login to Access your Echo account page.
2
TheCenterForInstructionandTechnology Datelastupdated:8/13/2013
Once logged in, click on the gear icon in the upper right side of the page and select Downloads.
In the Downloads area, click on the link for the software installer to download and install the Echo Personal Capture software on your Mac or PC. Setting up your Computer for ECHO Personal Capture Setting up Your Mac for Audio and Video
Video Camera If you are using a Macbook Pro or iMac, the Facetime video camera will be selected by default. If you have a Mac Mini or a Mac Pro, plug in a USB web cam of your choice. You can also use any USB web cam on a MacBook Pro if you need an external video camera feed.
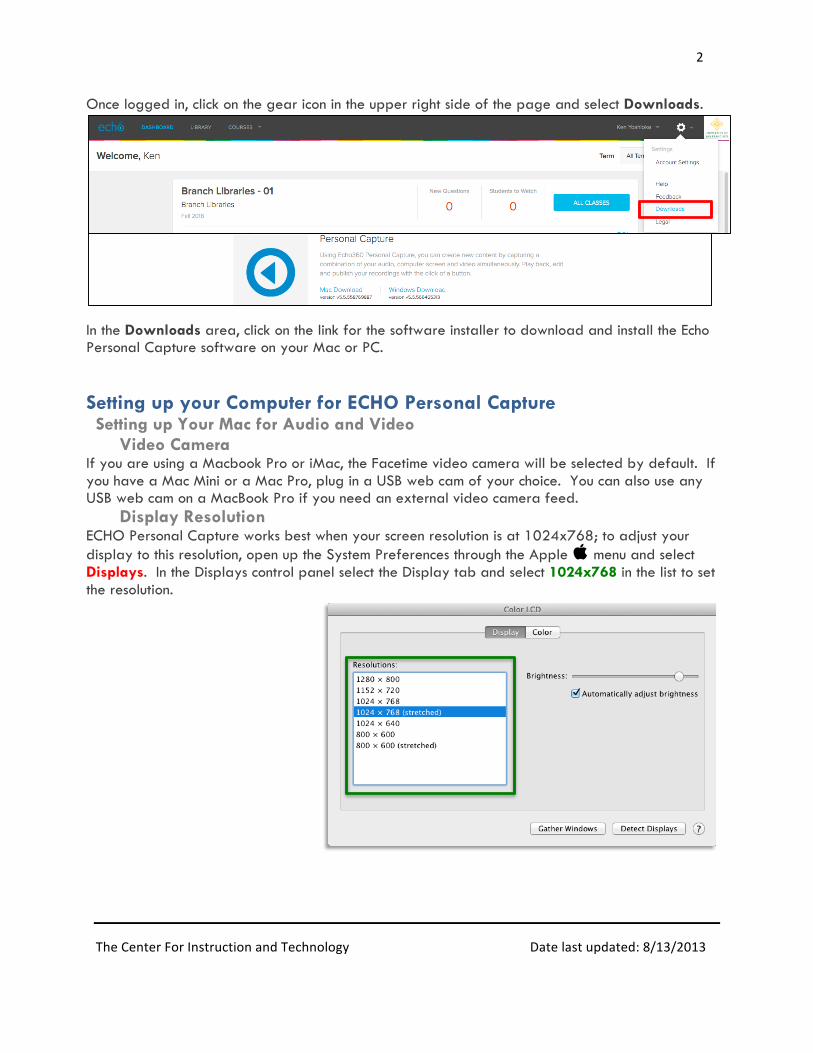
Display Resolution ECHO Personal Capture works best when your screen resolution is at 1024x768; to adjust your display to this resolution, open up the System Preferences through the Apple menu and select Displays. In the Displays control panel select the Display tab and select 1024x768 in the list to set the resolution.

3
TheCenterForInstructionandTechnology Datelastupdated:8/13/2013
Audio If you are using a Macbook Pro or an iMac the internal microphone will be selected by default. If you have a Mac Mini or Mac Pro, plug in a USB microphone of your choice. You can also use a USB microphone on a MacBook Pro or iMac if you need an external audio pickup. Next, open up the
System Preferences through the Apple menu and select SOUND. In the Sound control panel select the INPUT tab and make sure that the microphone you want to use for the recording is selected. You can also adjust the gain or sensitivity of the microphone through the Input volume slider.Close the System Preferences to finish. Setting up Your PC for Audio and Video
Video Camera Many PC laptops and some desktops have built-in webcams which are ready to be used. If not, you can connect an external USB video camera to your computer, which should be detected automatically and ready for use.
Display Resolution
4
TheCenterForInstructionandTechnology Datelastupdated:8/13/2013
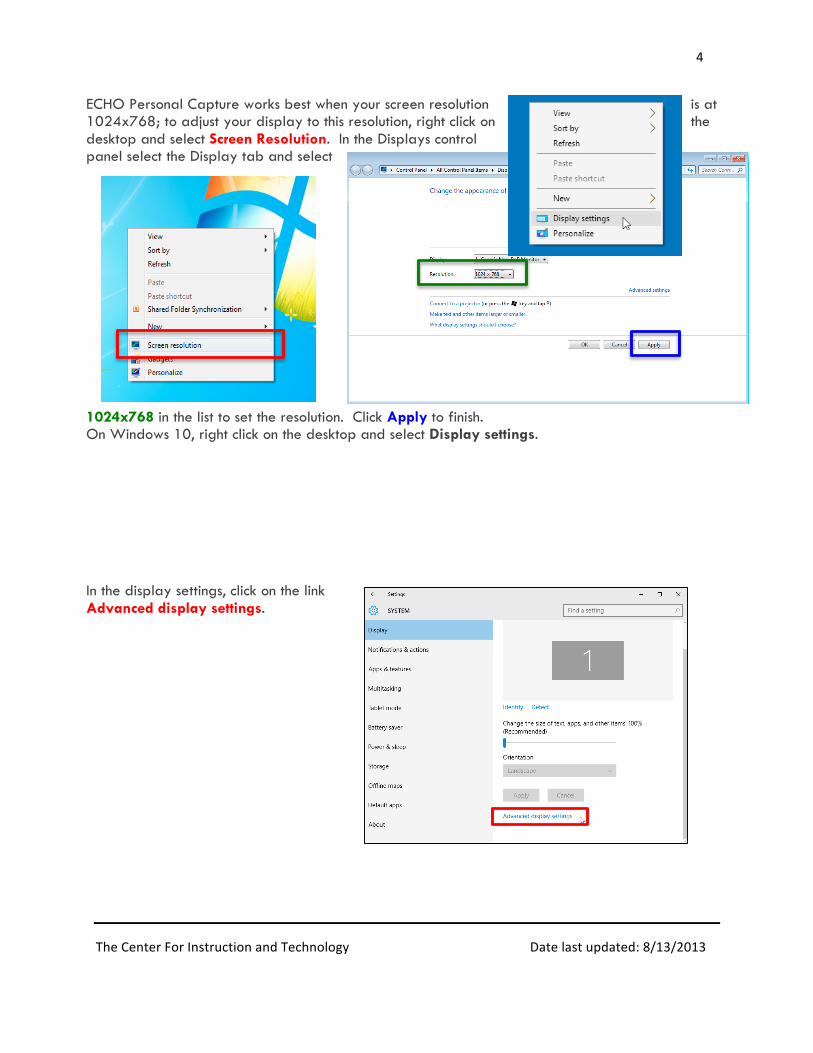
ECHO Personal Capture works best when your screen resolution is at 1024x768; to adjust your display to this resolution, right click on the desktop and select Screen Resolution. In the Displays control panel select the Display tab and select
1024x768 in the list to set the resolution. Click Apply to finish. On Windows 10, right click on the desktop and select Display settings. In the display settings, click on the link Advanced display settings.
5
TheCenterForInstructionandTechnology Datelastupdated:8/13/2013
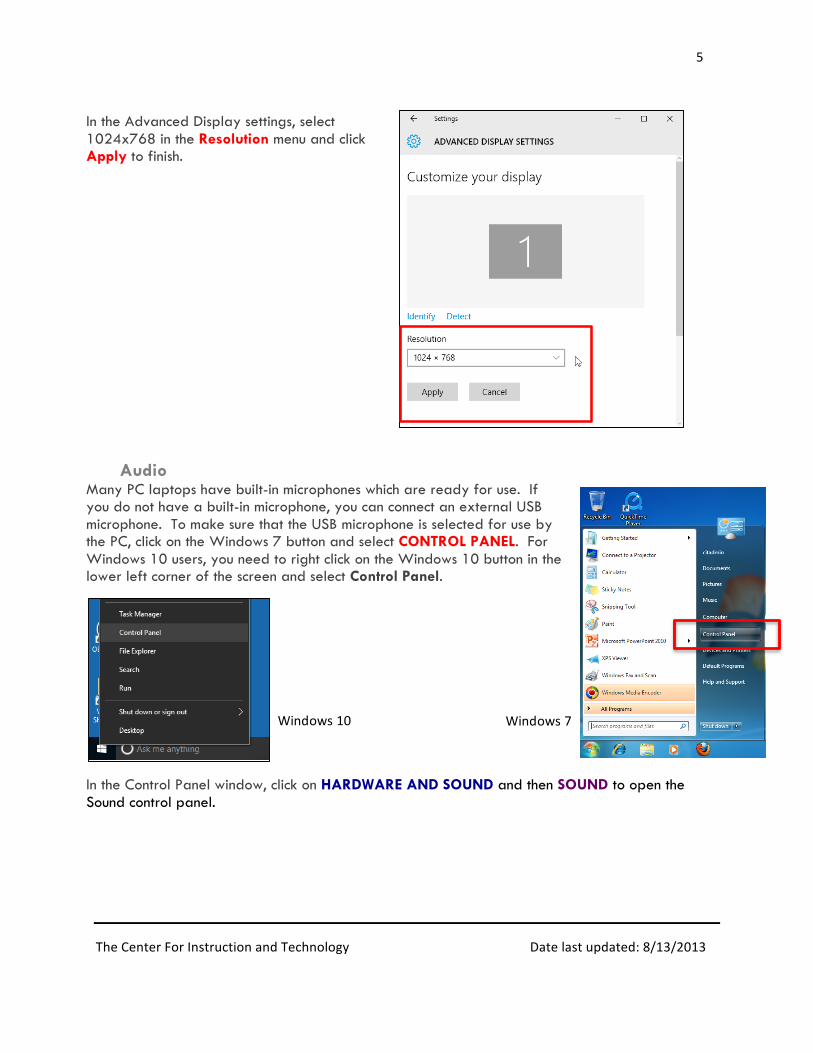
In the Advanced Display settings, select 1024x768 in the Resolution menu and click Apply to finish.
Audio Many PC laptops have built-in microphones which are ready for use. If you do not have a built-in microphone, you can connect an external USB microphone. To make sure that the USB microphone is selected for use by the PC, click on the Windows 7 button and select CONTROL PANEL. For Windows 10 users, you need to right click on the Windows 10 button in the lower left corner of the screen and select Control Panel.
In the Control Panel window, click on HARDWARE AND SOUND and then SOUND to open the Sound control panel.
Windows10 Windows7

6
TheCenterForInstructionandTechnology Datelastupdated:8/13/2013
7
TheCenterForInstructionandTechnology Datelastupdated:8/13/2013
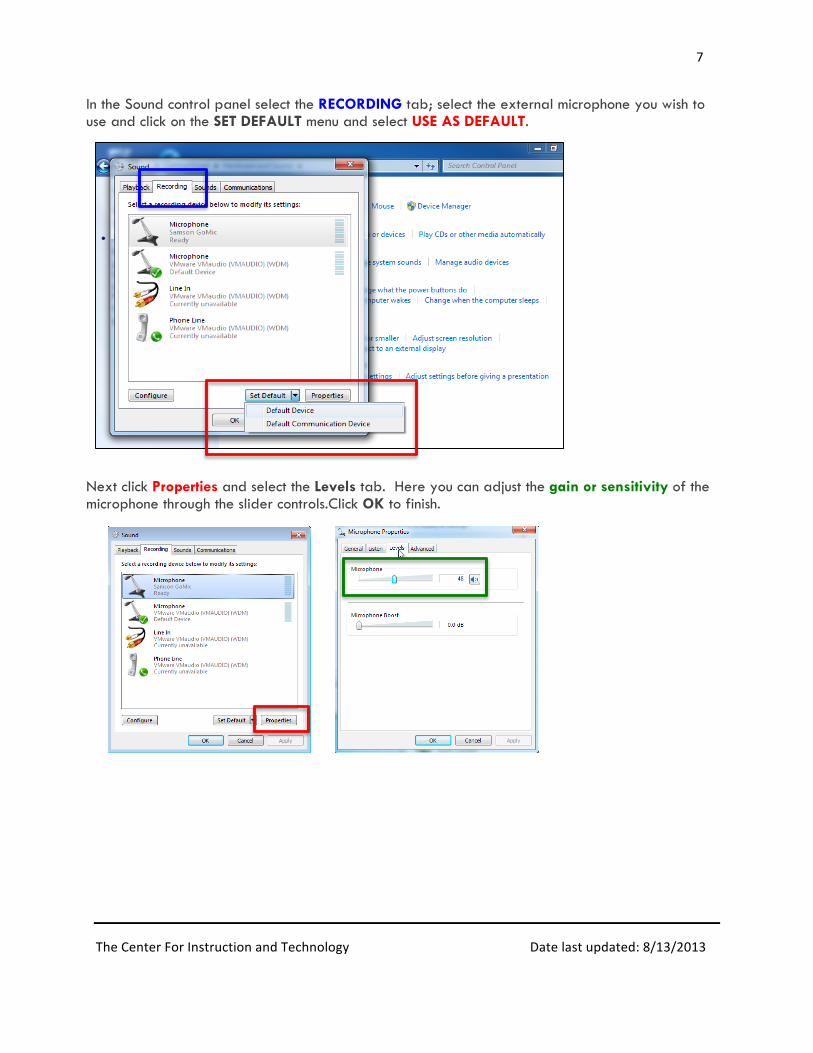
In the Sound control panel select the RECORDING tab; select the external microphone you wish to use and click on the SET DEFAULT menu and select USE AS DEFAULT.
Next click Properties and select the Levels tab. Here you can adjust the gain or sensitivity of the microphone through the slider controls.Click OK to finish.

8
TheCenterForInstructionandTechnology Datelastupdated:8/13/2013
Using ECHO Personal Capture on the Mac Configure Personal Capture
Open ECHO Personal Capture and select START RECORDING.
On the Mac you will see a preview screen of the desktop capture and the selected devices for video and audio. If the audio and video devices selected do not match the ones you wish to use, click on the CONFIGURE button.
9
TheCenterForInstructionandTechnology Datelastupdated:8/13/2013
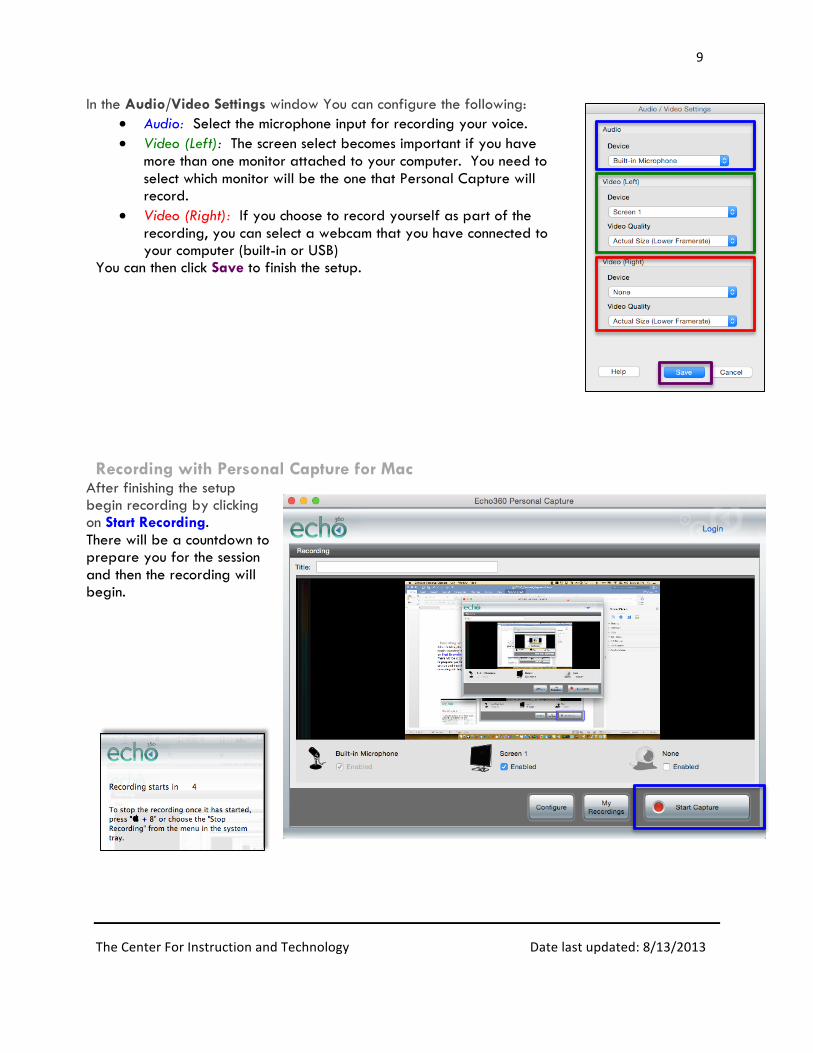
In the Audio/Video Settings window You can configure the following: • Audio: Select the microphone input for recording your voice. • Video (Left): The screen select becomes important if you have
more than one monitor attached to your computer. You need to select which monitor will be the one that Personal Capture will record.
• Video (Right): If you choose to record yourself as part of the recording, you can select a webcam that you have connected to your computer (built-in or USB)
You can then click Save to finish the setup.
Recording with Personal Capture for Mac After finishing the setup begin recording by clicking on Start Recording. There will be a countdown to prepare you for the session and then the recording will begin.

10
TheCenterForInstructionandTechnology Datelastupdated:8/13/2013
During the recording session everything displayed on the screen and audio from the microphone is captured. It is recommended that you rehearse what you want to record to provide the best results and to minimize the times you need to re-record. If you need to pause the recording for any reason click on the ECHO Personal capture menu at the top of the screen and select Pause Recording. To resume, click on the same Echo menu and select Resume Recording. When you are finished, click on the ECHO Personal Capture menu and select Stop Recording.
Editing your Recording
Now that you have finished recording you can do some basic trimming of the recording to remove any unneeded portions. To do this, click and drag the selection cursors to match the area you would like to trim. Next, place the play cursor near the beginning of the selection and click the
Play button to check that portion. Click the Trim tool to then remove the selection. You can always undo the trim by clicking Clear Cuts or apply the changes by clicking Apply Edits.

11
TheCenterForInstructionandTechnology Datelastupdated:8/13/2013
Managing your Recordings You can manage your recordings in the My Recordings window. Single click on any recording to perform the following actions: Delete the selected recording View/edit the selected recording Publish the selected recording
Publishing Your Personal Capture
Now you are ready to publish your ECHO for distribution. The Publish Recording button, can be found at the bottom of the recording list or Edit Recording window.
Click on Publish Recording and you will be asked to login to your Echo360 account. Click login to continue.

12
TheCenterForInstructionandTechnology Datelastupdated:8/13/2013
A web browser window will open and ask you to enter your USF email address. Click Submit to continue.
If you have not logged into Personal Capture recently, you will be re-directed to the myUSF login page to enter your USF username and password to login. You will then see a dialog box asking to open the Echo Personal Capture app to complete the login. Once back in the Personal Capture app, click Publish again to start the process.
Each user will need to have a course created by the ECHO administrator to be able to publish their recordings. Select the course you would like the published ECHO to be associated with or select Personal Library. If you are a student using Echo Personal Capture, the only choice will be Personal Library. Click Next to continue.

13
TheCenterForInstructionandTechnology Datelastupdated:8/13/2013
Finally, confirm the name for the published recording and click Publish. The time it takes to publish will depend on the length of the recording. The recording list will show the progress.
*Note that the Echo server still needs to process the uploaded recording; you will receive an email notification when the published recording is ready for viewing.

14
TheCenterForInstructionandTechnology Datelastupdated:8/13/2013
Using ECHO Personal Capture on the PC Configure Personal Capture
Open Echo Personal Capture and on the left side of the window are the configuration settings for the microphone, desktop to capture and webcam to select.
Recording With Echo Personal Capture for PC
Once you have the microphone and webcam configured, you can begin recording your screen. Click on the Record button and wait for the 5 second countdown;
15
TheCenterForInstructionandTechnology Datelastupdated:8/13/2013
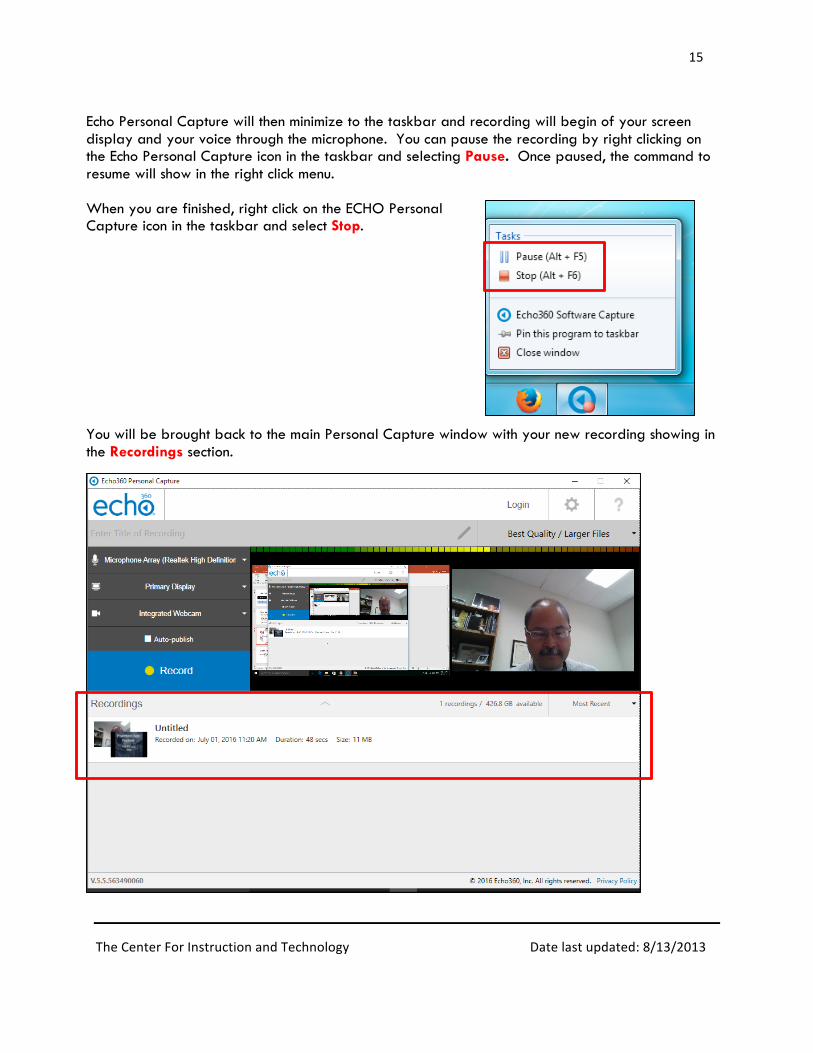
Echo Personal Capture will then minimize to the taskbar and recording will begin of your screen display and your voice through the microphone. You can pause the recording by right clicking on the Echo Personal Capture icon in the taskbar and selecting Pause. Once paused, the command to resume will show in the right click menu. When you are finished, right click on the ECHO Personal Capture icon in the taskbar and select Stop. You will be brought back to the main Personal Capture window with your new recording showing in the Recordings section.

16
TheCenterForInstructionandTechnology Datelastupdated:8/13/2013
Hover your cursor over the right hand side of the listed recording will reveal the options to manage the recording.
Delete recording
Clicking the X button will permanently delete the recording from your computer.
Edit Recording
Here you can trim unwanted portions of the recording from the final product by clicking on the pencil icon to Edit.
In the Editor, move the play cursor to the place you would like to begin the cut and play the recording from that point to make sure you have the right portion to trim.
17
TheCenterForInstructionandTechnology Datelastupdated:8/13/2013
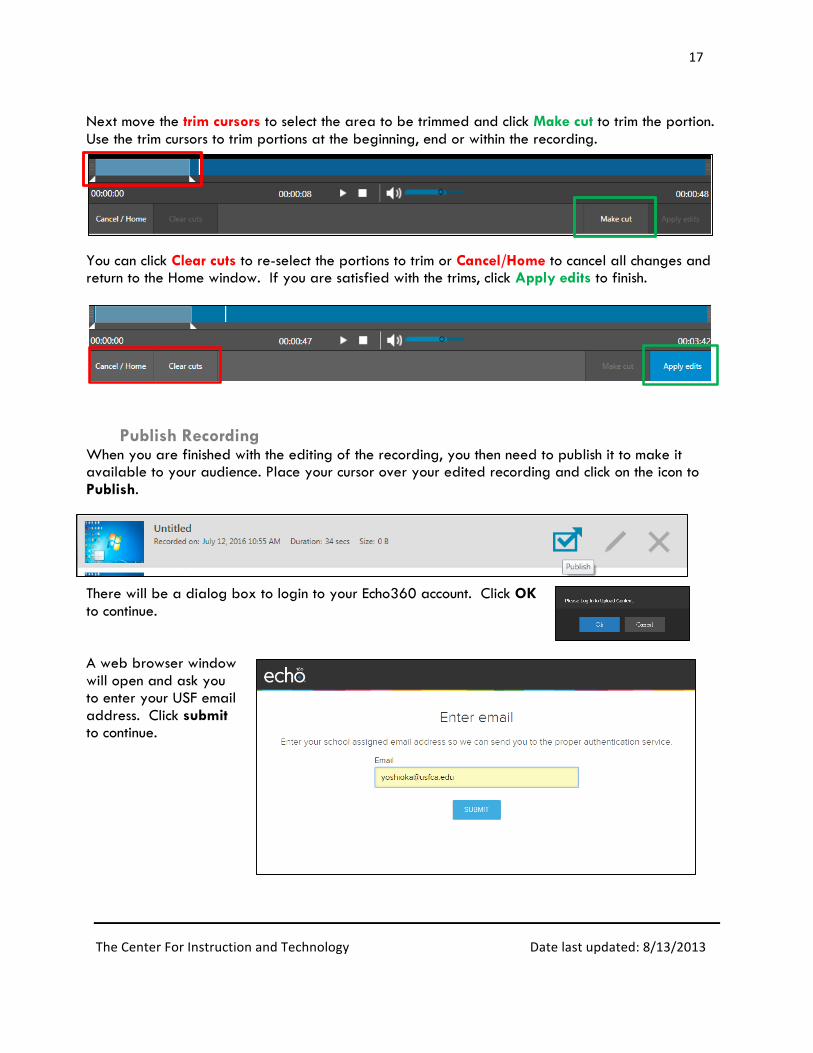
Next move the trim cursors to select the area to be trimmed and click Make cut to trim the portion. Use the trim cursors to trim portions at the beginning, end or within the recording.
You can click Clear cuts to re-select the portions to trim or Cancel/Home to cancel all changes and return to the Home window. If you are satisfied with the trims, click Apply edits to finish.
Publish Recording
When you are finished with the editing of the recording, you then need to publish it to make it available to your audience. Place your cursor over your edited recording and click on the icon to Publish.
There will be a dialog box to login to your Echo360 account. Click OK to continue. A web browser window will open and ask you to enter your USF email address. Click submit to continue.

18
TheCenterForInstructionandTechnology Datelastupdated:8/13/2013
If you have not logged into Personal Capture recently, you will be re-directed to the myUSF login page to enter your USF username and password to login. You will return to the Echo Personal Capture app where you can now click the icon to Publish. The publishing window allows you to title or re-title your recording.
The Upload To menu allows you to choose where you would like to upload your recording, either to your Echo Personal Library or to a course that ITS can create for you when the account is created.

19
TheCenterForInstructionandTechnology Datelastupdated:8/13/2013
Once you have titled and selected a desitnation for your recording, click Upload to begin publishing. After Echo Personal Capture finishes uploading, the recording listing will show it as published.
*Note that the Echo server still needs to process the uploaded recording; you will receive an email notification when the published recording is ready for viewing. Viewing and Sharing ECHO Recordings The email for the published recording will confirm that the video is ready for viewing; to obtain the link to share the video click on the Echo360 logo to login to the Echo360 Active Learning Platform site.
Login through the link Log in via Institution. and click on the Library link at the top of the page to access your recording.

20
TheCenterForInstructionandTechnology Datelastupdated:8/13/2013
Once in your Library, single click on the published content you wish to share to view the recording.
Once in the View window, click on the Sharing tab to access the Public Links area.
Click on the button Add Public Link in the Public Links area.

21
TheCenterForInstructionandTechnology Datelastupdated:8/13/2013
ALP will generate a link that you can click on to copy and send via email to share the recording. Remember that this link is a public link, requiring no login to view.
Finally, you can also generate an embed code similar to YouTube to actually embed the recording on a web page. Click on Embed to show the code for the recording.
In the Embed window, click on the Copy button to copy the code that can then be pasted into any web page that allows HTML editing, like a Canvas page.