Embed Size (px)
Citation preview

e-‐Recording User Guide Financial Sector Deepening

E-‐Recording User Guide
Version 1.0.0.1
Contents
1. INTRODUCTION ............................................................ 2
2. ABOUT THE PHONE ....................................................... 2
3. SETTING UP THE PHONE ................................................ 3
3.1 INSTALLINGE-‐RECORDING ....................................... 3 3.1.1 Copying e-‐Recording file ...................................... 3 3.1.2 Installing the APK File .......................................... 3 3.1.3 E Recording from Google play ............................. 6
HOW TO ADD AN EXISTING GMAIL ACCOUNT TO YOUR PHONE .................................................................................. 6
HOW TO DOWNLOAD APPLICATION FROM GOOGLE PLAY .... 7
3.2 UN INSTALLING ERECORDING .................................. 7 3.3 FIND E-‐RECORDING .................................................. 9
4 GETTING STARTED ........................................................ 9
4.1 GROUP RECOVERY ................................................. 10 4.2 GROUP REGISTRATION ........................................... 13 4.3 MEMBER REGISTRATION ........................................ 15 4.4 CREATE CYCLE ........................................................ 18 4.5 CREATE CONSTITUTION ......................................... 19
4.5.1 Constitution information: Savings funds ............... 19 4.5.2. Constitution information: Loans and interest ........ 22 4.5.3 Constitution information: Money safe place ............... 25 4.5.4 Constitution information: Fees .............................. 25
5 ACCESSING THE SYSTEM ............................................. 27
5.1 OVERVIEW ............................................................. 27 5.1.1 MEMBERS .......................................................... 27
Edit member details ............................................................. 28 Deactivate an active member ............................................. 29 Member activation .............................................................. 31
5.1.2 START CYCLE ...................................................... 32 5.1.3 CONSTITUTION .................................................. 33
Non editable constitution sections ...................................... 33 Editable constitution sections ............................................. 33
5.1.4 REPORTS ............................................................ 34 5.1.4.1 Member reports ................................................ 34 5.1.4.2 Group reports ................................................... 35
5.1.5 SHARE OUT ........................................................ 36 5.1.6 RESET PIN .......................................................... 37 5.1.7 BACK UP ............................................................. 38
5.1.7.1 Getting Connected ............................................ 38 5.1.8 SIGN OUT ........................................................... 39 5.1.9 SIGN IN .............................................................. 40 5.1.10 START MEETING ............................................ 41
5.2 MAIN SCREEN ........................................................ 41 5.2.1 REGISTER ........................................................... 42 5.2.2 BANK/ CASH BALANCE CONFIRMATION ........... 44 5.2.3 CONTRIBUTION ................................................. 46
Record contribution amount .............................................. 46 Edit contribution amount ................................................... 49
5.2.4 FINES AND FEES ................................................. 49 Charge fine or fee ............................................................... 49 Pay fine or fee ..................................................................... 51 Cancel fine or fee ................................................................ 52
5.2.5 ISSUE LOAN ....................................................... 53 Loan application and issue ................................................. 53 Loan Edit ............................................................................. 54 Delete loan issued ............................................................... 55
5.2.6 PAY LOAN .......................................................... 56 Payment of due loan ........................................................... 56 Payment of late loan .......................................................... 57 5.2.6.1 Rollover ............................................................ 60
5.2.7 FUND PAY OUT .................................................. 63 Fund pay-‐out ....................................................................... 63 Fund pay-‐out edit ............................................................... 64 Fund pay-‐out delete ........................................................... 65
5.2.8 PAY SOCIAL FUND ............................................. 67 5.2.9 WITHDRAWALS ................................................. 69
Withdrawal ......................................................................... 69 Edit withdrawal ................................................................... 70 Delete withdrawal .............................................................. 71
5.2.10 GROUP EXPENSE ........................................... 73 Expense add ........................................................................ 73 Expense edit ........................................................................ 74 Expense delete .................................................................... 74
5.2.11 GROUP INCOME ............................................ 75 Income add ......................................................................... 75 Income edit ......................................................................... 76
FIGURE 81: EDIT INCOME SCREEN ....................................... 77
Delete income record ......................................................... 77 5.2.12 MEMBER EXIT ............................................... 78
Exit member ........................................................................ 78 Exited member share out payment .................................... 80
5.2.13 RESET PIN ...................................................... 82 5.2.14 CLOSE MEETING ............................................ 83
Cash in ................................................................................. 83 Cash out .............................................................................. 84 Social fund ........................................................................... 85 Other fund ........................................................................... 86 Summary ............................................................................. 87

Figures
FIGURE 1: UNLOCKING THE PHONE ............................................. 2 FIGURE 2: ACCESSING THE PHONE SETTINGS ................................. 4 FIGURE 3: E-‐RECORDING INSTALLATION FILE ................................. 4 FIGURE 4: E-‐RECORDING INSTALLATION DIALOGUE ........................ 5 FIGURE 5: APPLICATION INSTALLATION CONFIRMATION .................. 5 FIGURE 6: MANAGE APPLICATIONS SCREEN .................................. 8 FIGURE 7: E-‐RECORDING UN INSTALLATION SCREEN ....................... 8 FIGURE 8: E-‐RECORDING UN INSTALLATION .................................. 9 FIGURE 9: E-‐RECORDING APPLICATION ICON ................................. 9 FIGURE 10: GROUP RECOVERY DIALOGUE .................................. 11 FIGURE 11: GROUP RECOVERY OVERVIEW .................................. 12 FIGURE 12: GROUP RECOVERY SCREEN PROGRESS BAR .................. 12 FIGURE 13: GROUP REGISTRATION DIALOGUE ............................. 13 FIGURE 14: GROUP REGISTRATION SCREEN ................................. 14 FIGURE 15: GROUP REGISTRATION SCREEN 2 .............................. 15 FIGURE 16: MEMBER REGISTRATION DIALOGUE .......................... 16 FIGURE 17: MEMBER REGISTRATION SCREEN .............................. 17 FIGURE 18: MEMBER REGISTRATION SCREEN-‐ ADDING NEXT MEMBER
................................................................................. 18 FIGURE 19: CREATE CYCLE SCREEN ............................................ 19 FIGURE 20: CONSTITUTION INFORMATION-‐ SHARES ..................... 20 FIGURE 21: CONSTITUTION INFORMATION-‐ SAVINGS .................... 21 FIGURE 22: CONSTITUTION INFORMATION: SOCIAL FUND/ OTHER
FUND ......................................................................... 22 FIGURE 23: CONSTITUTION INFORMATION-‐ LOANS AND INTEREST ... 23 FIGURE 24: CONSTITUTION INFORMATION-‐ LOANS ROLL OVER OPTION
................................................................................. 24 FIGURE 25: CONSTITUTION INFORMATION-‐LOAN TOP UP SCREEN ... 24 FIGURE 26: CONSTITUTION INFORMATION-‐ MONEY SAFE PLACE
SCREEN ....................................................................... 25 FIGURE 27: FINES AND FEES SCREEN ......................................... 26 FIGURE 28: CONSTITUTION INFORMATION SUMMARY SCREEN ........ 26 FIGURE 29: E-‐RECORDING OVERVIEW ....................................... 27 FIGURE 30: MEMBER EDIT SCREEN ........................................... 28 FIGURE 31: EDIT MEMBER DETAILS SCREEN ................................ 29 FIGURE 32: DEACTIVATE MEMBER-‐ EDIT MEMBER ....................... 30 FIGURE 33: MEMBER DEACTIVATION PROMPT ............................ 30 FIGURE 34: LIST OF GROUP MEMBERS WITH STATUS ..................... 31 FIGURE 35: MEMBER ACTIVATION SCREEN ................................. 32 FIGURE 36: E-‐RECORDING SUMMARY ....................................... 33 FIGURE 37: SELECT REPORT TYPE SCREEN ................................... 34 FIGURE 38: MEMBER REPORTS SCREEN ..................................... 35 FIGURE 39: GROUP REPORTS SCREEN ........................................ 36 FIGURE 40: RESET PIN SCREEN ................................................ 37 FIGURE 41: SIGN OUT SCREEN ................................................. 40 FIGURE 42: LOGIN SCREEN ...................................................... 41
FIGURE 43: APPLICATION OVERVIEW ......................................... 42 FIGURE 44: MEETING ATTENDANCE SCREEN ................................ 43 FIGURE 45: MEMBER REGISTER OVERVIEW ................................. 43 FIGURE 46:BANK CASH CONFIRMATION ENTRY FIELDS ................... 45 FIGURE 47: CASH IN THE BOX CONFIRMATION SCREEN ................... 46 FIGURE 48: SAVINGS CONTRIBUTION SCREEN ............................... 47 FIGURE 49: MEETING CONTRIBUTIONS OVERVIEW SCREEN ............. 48 FIGURE 50: EDIT CONTRIBUTION SCREEN .................................... 49 FIGURE 51: FINES AND FEES OVERVIEW SCREEN ........................... 51 FIGURE 52: FINE PAY SCREENS .................................................. 51 FIGURE 53: FINE CANCELLATION SCREEN ..................................... 52 FIGURE 54: LOAN ISSUE SCREEN ................................................ 53 FIGURE 55: EDIT LOAN ISSUED .................................................. 55 FIGURE 56: DELETE LOAN ........................................................ 55 FIGURE 57: LOAN ISSUE OVERVIEW ........................................... 56 FIGURE 58: PAY LOAN SCREEN .................................................. 57 FIGURE 59: OVERDUE LOAN PAY SCREEN .................................... 58 FIGURE 60: PAY LOAN IN FULL SCREEN ....................................... 59 FIGURE 61: PARTIAL LOAN PAYMENT OF AN OVERDUE LOAN ........... 59 FIGURE 62: LOAN PAYMENT AND ROLLOVER ................................ 60 FIGURE 63: ROLLOVER CONFIRMATION SCREEN ............................ 61 FIGURE 64: ROLLOVER LOAN OVERVIEW ..................................... 62 FIGURE 65: PAY LOAN OVER VIEW ............................................. 63 FIGURE 66: PAY OUT SCREEN ................................................... 64 FIGURE 67: FUND EDIT SCREEN ................................................. 65 FIGURE 68: DELETE FUND PAY-‐OUT ........................................... 66 FIGURE 69: FUND PAY-‐OUT SCREEN ........................................... 66 FIGURE 70: SOCIAL FUND PAY BACK SCREEN ................................ 67 FIGURE 71: SOCIAL FUND FINE CHARGE ...................................... 68 FIGURE 72:PAY BACK SOCIAL FUND OVERVIEW ............................. 69 FIGURE 73: CASH WITHDRAWAL ............................................... 70 FIGURE 74: SAVINGS WITHDRAWAL EDIT .................................... 71 FIGURE 75: SAVINGS WITHDRAWAL DELETE ................................. 72 FIGURE 76: WITHDRAWAL SCREEN OVERVIEW ............................. 72 FIGURE 77: GROUP EXPENSE SCREEN ......................................... 73 FIGURE 78: GROUP EXPENSE EDIT SCREEN ................................... 74 FIGURE 79: GROUP EXPENSE OVERVIEW ..................................... 75 FIGURE 80: INCOME RECORD SCREEN ......................................... 76 FIGURE 81: EDIT INCOME SCREEN ............................................. 77 FIGURE 82: OTHER INCOME OVERVIEW ...................................... 78 FIGURE 83: EXIT PROCESS ........................................................ 79 FIGURE 84:EXIT PROCESS 2 ...................................................... 79 FIGURE 85: MEMBER EXIT SCREEN ............................................ 80 FIGURE 86: MEMBER EXIT SHARE OUT PAYMENT .......................... 81 FIGURE 87: EXIT MEMBER SHARE OUT CONFIRMATION .................. 81 FIGURE 88: MEMBER EXIT OVERVIEW SCREEN ............................. 82 FIGURE 89: RESET PIN SCREEN ................................................. 83

E-‐Recording User Guide
1 Version 1.0.0.2
FIGURE 90:MEETING SUMMARY -‐ CASH IN ................................. 84 FIGURE 91: CASH OUT SUMMARY ............................................. 85 FIGURE 92: SOCIAL FUND SUMMARY ......................................... 86 FIGURE 93: OTHER FUND SUMMARY ......................................... 87 FIGURE 94: MEETING SUMMARY -‐ TO CASH BOX ......................... 88
FIGURE 95: MEETING SUMMARY -‐ TO BANK ................................ 89 FIGURE 96: CLOSE MEETING SUMMARY ...................................... 90

E-‐Recording User Guide
1 Version 1.0.0.2
STATEMENT OF CONFIDENTIALITY – SOFTWARE GROUP has prepared this document for the sole use of the addressee. The
contents of this document are confidential and ©copyright 2013 to SOFTWARE GROUP. They should not be communicated to
any other party without prior written approval of SOFTWARE GROUP.

E-‐Recording User Guide
2 Version 1.0.0.2
1. INTRODUCTION
Welcome to the e-‐Recording User Guide. Thismanual is intended for users who have an android smart phone, are comfortable
using computers or mobile devices and have basic knowledge of how to use a touch screen phone.
The purpose of this manual is to introduce new users to e-‐Recording configuration, functionalityand administration.
This manual is task orientated i.e. it follows in details all common activities and tasks that e-‐Recording users perform. This
provides the reader with easier navigation and quicker search for instructions about currently available tasks.
If you have any questions or suggestions about this manual, kindly visit www.softwaregroup-‐bg.com
2. ABOUT THE PHONE
The phone currently in use for e-‐Recording is HUAWEI U8185. But this is not restricted. Other android enabled smart phones
which are compatible with the e-‐Recording application can be used. HUAWEI U8185 smart phone will be mentioned for the
purpose of this document.
To access the phone, touch the locked padlock sign and slide the padlock button to the right hand side to unlock
Figure 1: Unlocking the phone

E-‐Recording User Guide
3 Version 1.0.0.2
3. SETTING UP THE PHONE
3.1 INSTALLINGE-‐RECORDING
Note:You must have an APK file copied on the phone storage. The APK file is a 1.9 MB android package that contains the
source code compiled. This is the file that you will need for installation of e-‐Recording.
ü Ability to use the e-‐Recording application is dependent on successful installation of e-‐Recording on the phone. In
case there are challenges encountered when installing the app, kindly contact the Software Group support
ü It is required to copy this file into your phones memory to be able to do installation.
3.1.1 Copying e-‐Recording file
a. Connect your phone to your computer machine with the phones USB cable. Usually, any USB cable that has the
same pins as your phone can be used.
b. Select USB connected so as to enable selecting of files to and from your computer.
c. Turn on USB storage.
d. In your computer, open folder to view files. This is the phones folder. You can copy the APK file in the download
folder or on the root of the removable disk. It is recommended that you save the APK file in a folder for easier
management of subsequent APK files that you might get in future.
e. After you have copied the APK file into your phone memory, turn off USB storage.
3.1.2 Installing the APK File
f. Touch the settings menu option at the bottom of the phones screen presented by

E-‐Recording User Guide
4 Version 1.0.0.2
Figure 2: Accessing the phone settings
g. Navigate to File Manager menu in your phone.
h. Locate the APK file that you have just copied into your phone. If you copied it into the download folder, touch on
Download.
Figure 3: E-‐Recording installation file
i. Touch on the APK file to start the installation process. Be sure to take note of the warning that is given
j. Touch OK

E-‐Recording User Guide
5 Version 1.0.0.2
k. To complete the installation process, touch Install. Be sure to note the information shown before you select the
Install button on install.
Figure 4: E-‐Recording installation dialogue
l. When installation is complete and application has been installed, touch done to exit screen OR touch open to
open e-‐Recording application
Figure 5: Application installation confirmation

E-‐Recording User Guide
6 Version 1.0.0.2
3.1.3 E Recording from Google play
Note:
ü To be able to install the application from Google play using the Play Store menu on your phone, you
must have a Gmail account created or existing in your phone. This is a Google condition
ü The phone must be connected to the internet to be able to access the application
ü A new updated application is available for download approximately two hours after the upload has
been done
How to add a gmail account
If you do not have a Google email account in your phone, you will need to create one before accessing the Google play store.
1. Select the settings menu option at the bottom of the phones screen by selecting on the squared button.
2. Navigate to the Gmail menu icon
3. Read the ‘Adding an account’ instructions and then touch next
4. On the question ‘Don’t have a Google Account?’ touch on Create if there is no existing Google account in your phone
5. Enter your first name and last name. The username will be your Gmail account. For example, my username field I will enter Josephine, so that my G-mail account is [email protected]. Touch next
6. Google automatically creates for you your new Gmail account
How to add an existing Gmail account to your phone
You need to sign in with your Gmail account if you are doing this for the first time. The reason for this is to have your Gmail account set up in your phone.
1. Select the settings menu option at the bottom of the phones screen by selecting on the squared button.
2. Navigate to the Gmail menu icon
3. Read the ‘Adding an account’ instructions and then touch next
4. Touch sign in to enter the details of your Gmail account
5. Enter your username and password
6. Finish the setup by touching on finish setup
After you have setup your Gmail account or created a new Gmail account, you can now download the e-Recording application from the Play Store.

E-‐Recording User Guide
7 Version 1.0.0.2
How to download application from Google Play
1. Select the settings menu option at the bottom of the phones screen by selecting on the squared button.
2. Navigate to the Play Store menu icon
3. Touch on accept play store conditions
4. Select on the magnifier icon in Google play to quickly search for e-Recording
5. Enter the search name e recording and select on search
6. Touch the screen and scroll down to locate e recording application
7. You can now install the application according to these conditions
- If you are downloading the application in your phone for the first time, touch download to download and install the application
- If you are upgrading e recording for the first time from Google play, touch uninstall then install to upgrade. The uninstall option uninstalls your application first then does the installation. This is because of the conflicting signature key of the application in your phone and the one on Google play
If you are upgrading e recording for the second time, simply select on install to install the application
3.2 UN INSTALLING ERECORDING
WARNING: If you uninstall e-‐Recording from your phone, you will risk losing your data. It is therefore important to ensure
that your data is backed before doing the uninstallation.
1. Go to settings
2. Touch on Applications
3. Touch manage applications

E-‐Recording User Guide
8 Version 1.0.0.2
Figure 6: Manage applications screen
4. Find e-‐Recording icon and touch
Figure 7: E-‐Recording un installation screen
5. Touch uninstall option

E-‐Recording User Guide
9 Version 1.0.0.2
Figure 8: E-‐Recording un installation
3.3 FIND E-‐RECORDING
How to find e-‐Recording application location in the phone
1. E-‐Recording application presents the user with an E sign in orange color.
2. To find the application
a. Select the Settings menu option and scroll to the right side or downwards and locate the e-‐Recording
application
Figure 9: E-‐Recording application icon
b. To create a short cut icon to the desktop of your phone, touch and hold e-‐Recording icon and when it
vibrates, place it on the desktop
4 GETTING STARTED
The business functionalities available are
• Group Recovery

E-‐Recording User Guide
10 Version 1.0.0.2
• Group Setup
• Member Registration
• Cycle Setup
• Group Constitution
• Savings Fund
• Loans
• Fines and Fees
• Income-‐Recording and Expense-‐Recording
• Share-‐out/Liquidation
• Member Exit
4.1 GROUP RECOVERY
Recover group: This functionality enables you to ‘pull’ data that has been backed up in the server. The request allows you to
initiate and restore your group and group data to the phone.
Important to note:
ü To be able to use the recover group functionality, a group must exist in the server as a backup.
ü The phone to recover the group with should not have a group ID same as the group ID to be recovered
1. Touch on Recover group to start group recovery process

E-‐Recording User Guide
11 Version 1.0.0.2
Figure 10: Group recovery dialogue
2. Validation is required in order to complete the process.
ü Enter your group phone number
ü Enter your group PIN number
ü Touch on Recover group to start the initiation process

E-‐Recording User Guide
12 Version 1.0.0.2
Figure 11: Group recovery overview
3. The recovery process shows you a time bar indicating the recovery process. A successful group recovery indicates
success after completion of the process
Figure 12: Group recovery screen progress bar
4. After you have recovered the group, you need to cancel the recovery screen in order to login to the group

E-‐Recording User Guide
13 Version 1.0.0.2
4.2 GROUP REGISTRATION
Notes:
ü The application requires that you have an existing group with a unique phone number and a PIN number in order
to navigate through the system
ü No two groups can have the same phone number
ü The group phone number is a ten digit number that will be used to login to the application to start e-‐Recording
ü The PIN number is a four digit number. The user must remember to keep the PIN number secret to avoid
unauthorized people from having access to group information
Registration steps:
1. Select on Register group to create a group in e-‐Recording
Notes:
ü Every time you want to use e-‐recording you need to sign in with your phone number and pin code. Do NOT forget
which phone number and pin you have chosen. You are not able to access your records when you have lost
them. To start registration you need a working internet
Figure 13: Group registration dialogue
2. Enter group phone number
3. Enter PIN number
4. Confirm PIN number
5. Enter group name

E-‐Recording User Guide
14 Version 1.0.0.2
6. Register group. Selecting Stop registration exits group registration screen and stops the registration process
Figure 14: Group registration screen
7. Stop registration – exits the group registration module
8. Enter location of group
9. Enter group village
10. Select group creation date
11. Select group facilitator
Notes:
ü Facilitator options available are CARE, CRS, Aga Khan foundation
12. Register group

E-‐Recording User Guide
15 Version 1.0.0.2
Figure 15: Group registration screen 2
Successful group registration takes you to the next step of member registration
4.3 MEMBER REGISTRATION
Notes:
ü A group must have at least two active members
ü Allow member to enter data in this application: This allows an appointed member to record data in the
application
ü Members are encouraged to appoint at least two members who can record data in the application
ü A member who can record data in the application must have a valid phone number and a PIN number entered
during member registration

E-‐Recording User Guide
16 Version 1.0.0.2
Figure 16: Member registration dialogue
1. Member number – mandatory field: The number is selected for you by default and the number is incremental to the
next available number
2. Enter Member name – mandatory field
3. Enter national ID – optional field
4. Enter phone number – optional field
a. The member phone number can be used for as many number of times as possible so long as the number has
not been marked ‘This member is allowed to record data in this App’
5. Enter PIN number – optional field

E-‐Recording User Guide
17 Version 1.0.0.2
Figure 17: Member registration screen
6. Select gender – optional field. This is already selected. The member should edit gender accordingly
7. Enter year of birth – mandatory field
8. Enter next of kin name -‐ optional field
9. Enter next of kin number -‐ optional field
10. Select member official status
b. Enter other official status if the member status is not among the drop down list
11. Select this member is allowed to record data in this app
c. This option gives the member rights to access and record data in the app
12. Select Register member
d. Stop member registration stops the member registration process and exits the member registration screen
13. After you select register member, changes are saved. Select Yes to add a new member
14. Repeat member registration process for each new member to register

E-‐Recording User Guide
18 Version 1.0.0.2
Figure 18: Member registration screen-‐ adding next member
When you select no, you exit from member registration screen
4.4 CREATE CYCLE
Notes:
ü A cycle is a unique number and cannot be repeated in a group’s life
1. Enter cycle number
2. Select cycle start date
3. Save cycle to create cycle

E-‐Recording User Guide
19 Version 1.0.0.2
Figure 19: Create cycle screen
4.5 CREATE CONSTITUTION
Important to note:
ü You cannot edit the constitution mid cycle apart from
o Fines and fees section
o Save money option section
ü You can reuse a constitution in a new cycle
ü Constitution has three sections. Savings funds, loans and fines & fees. To create a complete constitution you must
complete these three sections.
4.5.1 Constitution information: Savings funds
1. Share based group
a. Where the group is share based, enter the share value amount
b. If the group would want to restrict on the share amount a member can contribute, enter the maximum
number of shares
- In this example, the value of a share is a hundred shillings

E-‐Recording User Guide
20 Version 1.0.0.2
- The maximum number of shares a member can contribute in a meeting is ten
shares or one thousand shillings
Figure 20: Constitution information-‐ Shares
2. Savings based group
c. Where the group is savings based, ignore the share value field
d. If the group would want to restrict on the savings amount a member can contribute, enter the maximum
savings contribution

E-‐Recording User Guide
21 Version 1.0.0.2
Figure 21: Constitution information-‐ savings
Notes:
ü You can contribute more than the maximum number of shares or the maximum number of savings defined in
the first meeting. But in consecutive meetings, the maximum share amount or the maximum savings for
contribution is restricted to maximum value entered
e. If the group would want to restrict on the savings amount a member can contribute, enter the maximum
savings contribution
3. Enter minimum savings amount if you want members to have a minimum amount of savings or shares they can
contribute in a meeting
4. Specify the savings fund contribution per meeting. Savings fund is a mandatory amount
5. Specify the other fund contribution per meeting. This is not a mandatory amount

E-‐Recording User Guide
22 Version 1.0.0.2
Figure 22: Constitution information: Social fund/ other fund
6. Select on continue to save the changes and move to the loans and interest section
4.5.2. Constitution information: Loans and interest
1. Enter the interest rate. This rate will apply to loans issued
2. Enter the loan index.
a. This represents the number of times a member can take a loan based on their savings or share amount

E-‐Recording User Guide
23 Version 1.0.0.2
Figure 23: Constitution information-‐ Loans and interest
3. Allow rollover by selecting on the No sign to change to Yes.
b. Rollover refers to the number of instalments (months) a member can be allowed to pay for the outstanding
loan. This is in the event the member does not complete the loan in one instalment
4. Enter the number of rollovers to be allowed.
c. This means how many times a member can be allowed to carry over a loan to the next instalment (month).
In the example shown the member can be allowed to carry over a loan for two instalments (months)
5. Allow recalculate interest on amount rolled over.
d. This means that if a member carries over the loan to the next month, they are charged an interest
6. Allow charge fine after the maximum rollovers have been exceeded.
e. This means that if the member carries over a loan more than has been specified in the number or rollovers,
they are charged a fine to the outstanding loan balance

E-‐Recording User Guide
24 Version 1.0.0.2
Figure 24: Constitution information-‐ Loans roll over option
7. Allow top up
f. This refers to increasing the outstanding loan balance
Figure 25: Constitution information-‐Loan top up screen

E-‐Recording User Guide
25 Version 1.0.0.2
4.5.3 Constitution information: Money safe place
8. Select option on money safe place
g. Cash box option refers to group saving money in the cash box
h. Cash box and bank refers to group saving money in the bank and cash box
Figure 26: Constitution information-‐ Money safe place screen
4.5.4 Constitution information: Fees
9. Register all the fees applicable to the group. Do not forget to add other fees charged example maximum rollover
exceeded, failure to pay social fund

E-‐Recording User Guide
26 Version 1.0.0.2
Figure 27: Fines and fees screen
10. The last step in completing the creation of constitution allows the user to revise the settings that have been set. If
the user needs to change any setting, they should do so before confirming the constitution settings.
Figure 28: Constitution information summary screen
Select save to keep the settings or cancel to exit from the constitution.

E-‐Recording User Guide
27 Version 1.0.0.2
Notes:
ü If you select the cancel button in any of the constitution screen, the constitution is not saved. The user will
repeat the process again in order to create the constitution
5 ACCESSING THE SYSTEM
Note:
ü At least two active members, cycle and constitution must have been created and configured before this process.
If it is not done, you will not be able to start a meeting.
5.1 OVERVIEW
The overview screen presents the user with menus for the meetings
Figure 29: E-‐Recording overview
5.1.1 MEMBERS
All group members created can be viewed, edited or deactivated from Members. To be able to do this, open the menu and
select on a member you would like to view details, edit details or deactivate.
The icons for editing or deactivating the member are shown at the top of the menu screen

E-‐Recording User Guide
28 Version 1.0.0.2
Figure 30: Member edit screen
Edit member details
i. Select member to edit details by selecting the check box
ii. At the member details screen right hand top, select the Edit option
iii. Member details are displayed on the screen
iv. You can edit any member details apart from the member number
Note: The member number cannot be edited mid cycle. It can only be edited at the beginning of a
new cycle.
v. Edit the necessary and save the changes.
vi. If you select on cancel, the changes will not be saved and the edit screen will be closed
Deactivate icon
Edit icon

E-‐Recording User Guide
29 Version 1.0.0.2
Figure 31: Edit member details screen
Deactivate an active member
There are two steps of making an active member inactive
ü Option 1: Deactivate from edit member screen
i. Select a member to edit details by selecting the check box
ii. Select Edit option at the top right hand of the screen
iii. In the edit member details screen, scroll to member active
iv. Uncheck member active option to deactivate
v. Save changes

E-‐Recording User Guide
30 Version 1.0.0.2
Figure 32: Deactivate member-‐ Edit member
ü Option 2: Deactivate member by selecting Deactivate option
i. Select an active member to deactivate
ii. Select the Deactivate option at the right hand top of the screen
iii. A prompt message is shown to confirm that the member has been deactivated
Figure 33: Member deactivation prompt

E-‐Recording User Guide
31 Version 1.0.0.2
After making a member inactive, the member is shown with their status as inactive
Figure 34: List of group members with status
Member activation
To activate an inactive member, there are two options of doing this
ü Option 1: Activate member by editing member
i. Select an inactive member to activate
ii. Select Edit option which at the top right hand corner of the screen
iii. Scroll to Member active option
iv. Select the check box to activate the member
v. Save changes
Option 2: Activate a member by selecting Activate option
i. Select an inactive member to activate
ii. Select activate button at the top right hand corner
iii. A prompt message is shown to show the member has been activated

E-‐Recording User Guide
32 Version 1.0.0.2
Figure 35: Member activation screen
5.1.2 START CYCLE
After a cycle has been created, this option is made inactive until the end of the current cycle. A cycle ends when share out has
been done.
The icon for share out is darkened to differentiate it from other active menus
A group cannot have two cycles in their life
E-‐Recording User Guide
33 Version 1.0.0.2
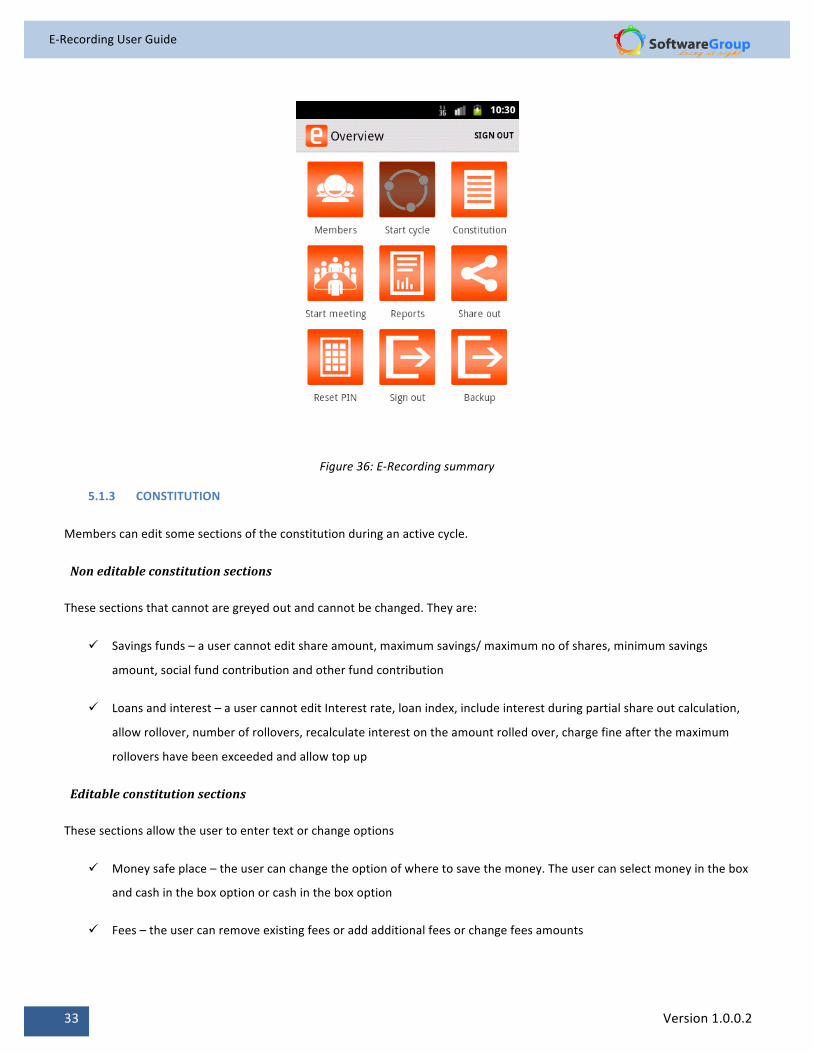
Figure 36: E-‐Recording summary
5.1.3 CONSTITUTION
Members can edit some sections of the constitution during an active cycle.
Non editable constitution sections
These sections that cannot are greyed out and cannot be changed. They are:
ü Savings funds – a user cannot edit share amount, maximum savings/ maximum no of shares, minimum savings
amount, social fund contribution and other fund contribution
ü Loans and interest – a user cannot edit Interest rate, loan index, include interest during partial share out calculation,
allow rollover, number of rollovers, recalculate interest on the amount rolled over, charge fine after the maximum
rollovers have been exceeded and allow top up
Editable constitution sections
These sections allow the user to enter text or change options
ü Money safe place – the user can change the option of where to save the money. The user can select money in the box
and cash in the box option or cash in the box option
ü Fees – the user can remove existing fees or add additional fees or change fees amounts

E-‐Recording User Guide
34 Version 1.0.0.2
5.1.4 REPORTS
E-‐Recording has reports which have been formatted to fit in the phone for easy viewing. All reports have a date filter and
meeting number that a user can use to select and backdate the report. A user cannot view a report in future because there is
no meeting date and meeting number. A meeting must have been done in order to view the details.
To select a report for viewing, select the reports menu and select member report or group report
Figure 37: Select report type screen
5.1.4.1 Member reports
There reports show individual member details

E-‐Recording User Guide
35 Version 1.0.0.2
Figure 38: Member reports screen
i. Member saving -‐ shows individual savings per member
ii. Social fund -‐ shows individual social fund records per member
iii. Member loan-‐ shows individual member loan details such as loan number, original amount issued, amount payable
which is principal plus interest, amount paid and loan balance
iv. Member fine-‐ shows fines charged and paid by member
v. Member summary-‐ shows all active members and their details as entered at member registration. These details are
member phone number, ID number, next of kin name and member status which by default is active
5.1.4.2 Group reports
These reports show group information

E-‐Recording User Guide
36 Version 1.0.0.2
Figure 39: Group reports screen
i. Share out today -‐ this is a share out simulator with the option of including unpaid loans and fines amount in the share
out amount. The report shows the profit each active member will get if a share out was to be done today
ii. Balance sheet report-‐ shows details on the value of the group. Such details are total assets , total equity and total social
funds
iii. Meeting summary-‐ shows the details of a meeting such as cash brought forward, money in, money out and cash
remaining to be carried forward at the close of the meeting
iv. Constitution summary-‐ shows the details of the constitution and what has been set up as part of the constitution
v. Fines and fees-‐ shows the fines and fees that have been collected in each meeting whether paid or not
vi. Unpaid fines and fees-‐ shows the fines and fees which have not been paid
vii. Late loan-‐ shows outstanding loan balances with member names and due date
viii. Member summary-‐ shows all active members and their details as entered at member registration. These details are
member phone number, ID number, next of kin name and member status which by default is active
5.1.5 SHARE OUT
This is an end of cycle process where members liquidate all their shares and profit earned from loans borrowed and fines and
fees charged and paid and share out among the group members. E-‐Recording performs calculations for the share out with an
inbuilt formula which will determine what portion of the earnings goes to each member according to their contribution.

E-‐Recording User Guide
37 Version 1.0.0.2
Note:
ü Ensure that all loans and fines and fees with balances have been cleared
ü Completion of share out closes the cycle and the cycle cannot be reopened
5.1.6 RESET PIN
Use this menu to reset member PINS in case they want to change or they have forgotten
i. Select member to reset PIN
ii. Enter new Pin
iii. Re-‐enter new Pin
iv. Select on reset PIN to save changes
v. If you cancel this process, the Pin will not be reset, and user will be exited from reset Pin screen
vi. Select Done to exit the reset Pin module
Figure 40: Reset PIN screen

E-‐Recording User Guide
38 Version 1.0.0.2
5.1.7 BACK UP
This module is used to save your data in the cloud. Users should remember to always back up their data after closing each
meeting. Important reasons are
ü Group data will be secure
ü Recovery will be possible in case e-‐Recording application is deleted or the phone is lost and another phone
acquired
ü To be able to view portal reports
The phone must be connected to a data network. Use wireless connection or connect to a mobile network provider depending
on the SIM you are using i.e. Safaricom, Airtel, YU mobile.
5.1.7.1 Getting Connected
Mobile Networks
Your mobile phone will be automatically configured to use your network operator’s 2G/3G service (if available) when you turn
on the phone for the first time. Note that the SIM/UIM card must be inserted (some CDMA mobile phones have an integrated
UIM card and do not need a separate UIM card)
Checking the Network Connection
i. Touch >Settings.
ii. Touch Wireless & networks >Mobile networks >Network Settings.
iii. Touch Network operators or Access Point Names to check the network connection. Your mobile phone will
automatically read the access point settings from the SIM/UIM card (if any). For this reason, do not change the access
point parameters; otherwise, you might not be able to access network resources.
Turning on the Data Service
i. Touch >Settings.
ii. Touch Wireless & networks >Mobile networks.
iii. Select the Data enabled check box to turn on the data connection.
Wi-‐Fi
Wi-‐Fi gives you wireless access to broadband Internet. To use Wi-‐Fi on your mobile phone, you must have an access to
wireless access points (hotspots). Obstacles that block the Wi-‐Fi signal will reduce its strength.
Turning On Wi-‐Fi
i. Touch >Settings.
ii. Touch Wireless & networks, and then select the Wi-‐Fi check box to turn on Wi-‐Fi.

E-‐Recording User Guide
39 Version 1.0.0.2
Connecting to a Wireless Network
i. After turning on Wi-‐Fi, touch >Settings.
ii. Touch Wireless & networks >Wi-‐Fi settings. You will see a list of detected Wi-‐Fi networks in the Wi-‐Fi networks
section.
Touch a Wi-‐Fi network to connect to it.
i. If you select an open network, you will be automatically connected to the network.
ii. If you select a network that is secured with Wired Equivalent Privacy (WEP) and connect to it for the first time, enter
the password as prompted, and then touch Connect. If you connect to a secured wireless network that you have
already used, you will not be prompted to enter the password again unless you have reset your mobile phone to its
default settings.
iii. On the Wi-‐Fi settings screen, touch Add Wi-‐Fi network to add a new Wi-‐Fi network.
Reference: HUAWEIU8185-‐1 User guide. download-‐
c.huawei.com/tcpsdownload/downLoadCenter?category=&flay=document&downloadID=NDY3NTI=
5.1.8 SIGN OUT
Sign out menu enables the user to completely exit e-‐Recording. This is important so that the group data is secured from
unauthorised people accessing it. One must have a registered phone number and Pin to be able to login.
i. Select sign out menu to sign out of e-‐Recording
ii. A prompt message will ask you if you are sure you want to sign out
iii. Select Yes to sign out or no to cancel

E-‐Recording User Guide
40 Version 1.0.0.2
Figure 41: Sign out screen
5.1.9 SIGN IN
After you have signed out you will need to sign in with a valid phone number and Pin number.
Note:A valid phone number and Pin is one that is
ü Registered as group phone number and Pin during group creation
ü A member has been registered with a phone number and Pin
i. After a sign out, the application presents the user with phone number and Pin to enter to be able to login on
ii. On the screen shown below as shown, enter the phone number and the password
iii. Select sign in

E-‐Recording User Guide
41 Version 1.0.0.2
Figure 42: Login screen
5.1.10 START MEETING
This menu allows you to be able to access the activities that occur during group meetings. The activities are:
ü Attendance monitoring
ü Bank/Cash Confirmation
ü Savings/ shares deposit and social fund contribution
ü Loan repayment
ü Fee/Fine charges and payment
ü Savings/Shares withdrawal
ü Social Fund Withdrawal
ü Loan Issue
ü Group Expenses
ü Meeting summary
5.2 MAIN SCREEN
After a successful login, this is the screen displayed to the user. It displays all the functionality that can be performed by a user
logged in depending on his\her user rights.
E-‐Recording User Guide
42 Version 1.0.0.2
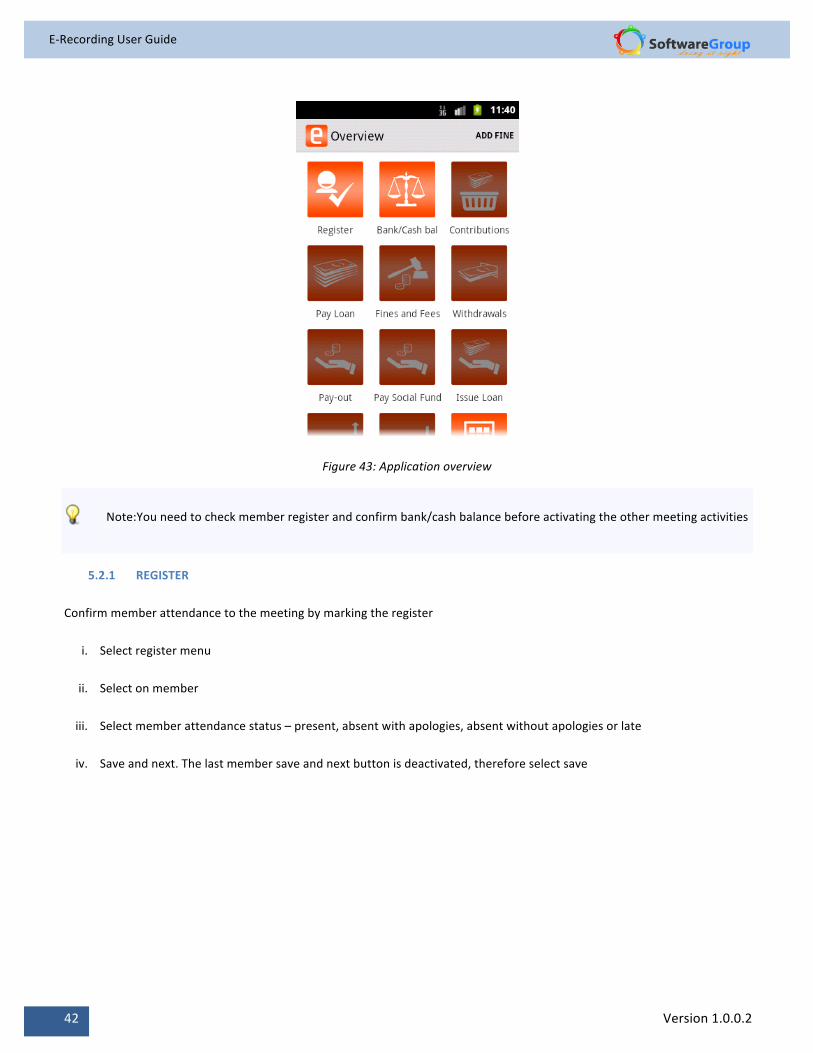
Figure 43: Application overview
Note:You need to check member register and confirm bank/cash balance before activating the other meeting activities
5.2.1 REGISTER
Confirm member attendance to the meeting by marking the register
i. Select register menu
ii. Select on member
iii. Select member attendance status – present, absent with apologies, absent without apologies or late
iv. Save and next. The last member save and next button is deactivated, therefore select save

E-‐Recording User Guide
43 Version 1.0.0.2
Figure 44: Meeting attendance screen
After marking the register on member attendance, colour code is used to indicate attendance status as shown in figure
Figure 45: Member register overview
Colour codes used in member attendance status
GREEN – Member is present

E-‐Recording User Guide
44 Version 1.0.0.2
YELLOW – Member is late
ORANGE – Member is absent with apology
RED – Member is absent without apology
5.2.2 BANK/ CASH BALANCE CONFIRMATION
Use this menu to confirm amount of money the group closed with, from the previous meeting. This is the actual cash brought
forward in the box and/or in the bank
Note:Constitution settings for money safe place are:
ü Cash in the box – if the user selects this option in the constitution, only cash in box will be displayed in
bank/cash confirmation
ü Cash in the box and bank – if the user selects this option in the constitution, both cash and bank fields will be
displayed in cash/bank confirmation
ü To be able to withdraw amount brought forward, you need to deposit the amount in the bank. Indicate which
amount is to be deposited to the loan fund or social fund or other fund at meeting summary
In the bank balance fields, enter:
i. Previous bank balance – this field is computed as the summation of theentire amount entered for bank balance at
each meeting summary less any withdrawal amount from the bank. It is the total amount brought forward
ii. Expected money banked – this field is computed as the amount entered for bank balance at previous meeting
summary
iii. Amount banked as per deposit slip
iv. Total amount withdrawn as per withdrawal slip
Of the total amount withdrawn, indicate how much:
v. Loan fund withdrawn
vi. Social fund withdrawn
vii. Other fund withdrawn
viii. Current bank balance amount will be computed from amount banked as per deposit slip less total amount withdrawn

E-‐Recording User Guide
45 Version 1.0.0.2
Note:
ü If expected money banked is zero, all bank fields will also be zero because you cannot bank zero amount or
withdraw zero amount from the bank
ü Previous bank balance will be zero if all the money was withdrawn from the bank at the start of the previous
meeting and none was banked
ü Total amount withdrawn must be equal to loan fund withdrawn + social fund withdrawn + other fund
withdrawn
ü Expected money banked must be equal to amount banked as per deposit slip
Figure 46:Bank cash confirmation entry fields
In the cash in the box fields, enter values:
i. Expected cash in the box-‐ this is the total cash amount brought forward from the previous meeting
ii. Actual cash in the box-‐ this amount is expected cash in the box + total amount withdrawn from the bank
iii. Expected social fund
iv. Expected other fund
v. Expected loan fund – this is the actual cash in the box less social fund less other fund

E-‐Recording User Guide
46 Version 1.0.0.2
Figure 47: Cash in the box confirmation screen
5.2.3 CONTRIBUTION
Note:We are going to assume that our group is share based and not savings based and shall mention ‘share or amount
of share’
Record contribution amount
Record member cash or shares deposits, social fund and other funds from this menu
i. Select contribution
ii. Select member to save
iii. Enter deposit savings. If the group is share based, the cumulative number of shares contributed in the cycle and share
amount contributed in the meeting is calculated and shown
iv. Enter social fund savings
v. Enter other fund savings
vi. Select save and next to move to the next member.

E-‐Recording User Guide
47 Version 1.0.0.2
Figure 48: Savings contribution screen
Additional information presented to the user at the deposit screen
ü Share value -‐ amount set in the constitution as the value of one share
ü Total No. of share-‐ cumulative amount of shares the user has contributed in the current cycle. Present
meetings contribution is also included
ü Share contribution-‐ number of shares contributed in the present meeting
ü Total social funds-‐ cumulative amount of social fund contributed in the current cycle. Present meeting
contribution is included
ü Social fund contribution-‐ amount of social fund contributed in the present meeting
ü Total other funds-‐ cumulative amount of other fund contributed in the current cycle. Present meeting
contribution is included
ü Other fund contribution-‐ amount of other fund contributed in the present meeting
After the contributions have been recorded, the user is able to see the overview screen with summary contribution as shown
in figure 38

E-‐Recording User Guide
48 Version 1.0.0.2
Figure 49: Meeting contributions overview screen
Additional information presented to the user at the deposit screen
ü Meeting savings-‐ total amount of deposits recorded. This amount can be used to tally the physical deposits
collected in the present meeting against what has been entered in e-‐Recording
ü Social fund-‐ total amount of social fund recorded. This amount can be used to tally the physical social fund
cash collected in the present meeting against what has been entered in e-‐Recording
ü Other fund-‐ total amount of other fund recorded. This amount can be used to tally the physical other fund
cash collected in the present meeting against what has been entered in e-‐Recording
Additional information presented to the user under each member
ü Deposit savings-‐ amount of contribution recorded for the user in the current meeting
ü Total savings -‐ cumulative deposit amount by member in the current cycle. Present meeting contributions
are also included
ü Social fund contribution-‐ social fund contribution in the current meeting
ü Total social funds-‐ cumulative social fund contributed in the current cycle. Present meeting contribution is
also included
ü Other funds contribution-‐ other fund contribution in the current meeting

E-‐Recording User Guide
49 Version 1.0.0.2
ü Total other funds-‐ cumulative other fund contributed in the current cycle. Present meeting contribution is
also included
Edit contribution amount
You can also edit contribution amount entered before the meeting have been closed. You can edit deposit/ share amount,
social fund or other fund amount.
i. Select user with incorrect contribution amount.
− You can check which user has incorrect amount from the contribution over view and look for deposit savings or social
fund contribution or other fund contribution depending on which amount you want to edit
ii. Edit the amount
iii. Select save button to save only that record. Selecting save and next will take you to the next member which is not
necessary unless you want to make changes to the contributions of the next member
Figure 50: Edit contribution screen
5.2.4 FINES AND FEES
Charge fine or fee
Use this module to charge fines and fees to members.

E-‐Recording User Guide
50 Version 1.0.0.2
Note:
ü You must have fees and fines existing in the constitution to be able to use this menu
ü When you mark the register withmember status as absent without, absent with apology and late, the fines
are automatically charged and added in this screen
ü List of fines fully paid are not shown in the next meeting
ü List of fines partially paid or not paid are shown in the next meeting to notify the user which fines are pending
payment
i. Select fines and fee menu
ii. Select add fine at the top right corner
iii. Select member to charge fee or fine to
iv. Select fee to charge member
v. Amount is tied to the fee or fine selected
Note: User can change this amount to adjust. For example if absent with apology is charged 20 shillings, member can
increase this fine to 40 by changing the amount
vi. Enter actual amount the member has paid

E-‐Recording User Guide
51 Version 1.0.0.2
Figure 51: Fines and fees overview screen
Pay fine or fee
You can also pay for the fine and fee by selecting pay at the top right corner of the screen
Figure 52: Fine pay screens
Additional information presented to the user at fines and fees payment overview screen

E-‐Recording User Guide
52 Version 1.0.0.2
ü Meeting fines and fees-‐ total amount of fines and fees charged and paid during the current meeting. Use this
amount to tally physical fines and fees collected and what has been recorded as paid
ü Total fines and fees-‐ cumulative fines and fees charged and paid during the cycle. Current meetings
payments are also included
Additional information presented to the user under each member charged a fine or fee
ü Charged on date-‐ date the fine or fee was charged
ü Balance-‐ fee or fine amount due to be paid
ü Original amount-‐ original amount the fee or fine was charged
Cancel fine or fee
You can also cancel a fine or fee that has been charged and not paid
i. Select member with fine or fee charged and not paid
ii. Select Cancel at the right top corner. This deletes the charged fine and a message is shown to the user with a prompt
indicating that the fine or fee has been cancelled
iii. If you try to cancel a fee or fine that has been partially paid, you will get a prompt message informing you that the fee
cannot be cancelled
Figure 53: Fine cancellation screen

E-‐Recording User Guide
53 Version 1.0.0.2
5.2.5 ISSUE LOAN
Use the issue loan menu to apply for and issue a loan to a member
Note:
ü The amount of loan applied to the member will depend on loan index as set in the constitution. In our group
example, we set loan index as three. This means that a member will get a loan three times their contribution
ü A member with an existing loan cannot get another loan. A member can only have one loan balance at a time
Loan application and issue
Select member without a loan to issue a loan to
i. Enter loan amount to issue
ii. Select issue date
iii. Select payment date
iv. Select guarantor – Optional field
v. Save the loan. This is also loan issue
Figure 54: Loan issue screen

E-‐Recording User Guide
54 Version 1.0.0.2
Information on loan issue screen
ü Group cash balance-‐ total amount in cash the group has available to issue
ü Loan number-‐ count of number of loans issued
ü Loan issue date-‐ the date the loan is applied for and issued to the member
ü Amount to borrow-‐ actual cash amount the member will receive as loan
ü Payment date-‐ date the member is supposed to have paid the loan
ü Payment period-‐ Duration of months the member is to have the loan before full payment. This is the
instalment number. In this case number of instalment is one
ü Total interest (rate) -‐ Interest amount and loan rate. The interest rate should be defined in the constitution.
In our example, our interest rate as set in the constitution is 10 per cent. Total interest will therefore be:
(10/100)*2200 = 220
ü Total loan-‐ amount to borrow plus total interest
ü Guarantor-‐ member who gives as guarantee to the loan; the member will assume responsibility for the
borrowed loan
Loan Edit
You can edit amount of loan issued to a member before the meeting has been closed. You can also edit the issue date or the
payment date
i. Select member with loan issued during the meeting
ii. Select edit button at the top right hand corner
iii. Edit loan amount, issue date or payment date
iv. Select save to save changes and to re-‐issue the loan

E-‐Recording User Guide
55 Version 1.0.0.2
Figure 55: Edit loan issued
Delete loan issued
You can delete a loan issued before meeting is closed
i. Select member with loan issued during the meeting
ii. Select delete button at the top right hand corner
Figure 56: Delete loan

E-‐Recording User Guide
56 Version 1.0.0.2
Information shown on overview of loan issue screen
Figure 57: Loan issue overview
ü Meeting loan issue-‐ total amount of loan issued during the present meeting
ü Total loan issue-‐ cumulative amount of loan issued during the cycle
Under each member name, we have additional information
ü Amount borrowed-‐ total amount of cash that the member got. This is exclusive of interest amount
ü Outstanding amount-‐ loan balance to be paid back
ü Issued on-‐ date the loan was issued
5.2.6 PAY LOAN
Use this menu to pay back outstanding loan balance
Payment of due loan
i. Select pay loan menu
ii. Select member to pay loan
iii. Enter amount of loan to pay
iv. Select save to save the amount paid

E-‐Recording User Guide
57 Version 1.0.0.2
Figure 58: Pay loan screen
Information on loan payment screen
ü Loan amount borrowed-‐ total cash amount the member got as a loan
ü Amount left-‐ loan amount plus interest; in our example, our loan amount applied was 2200, interest amount
is therefore 220. Total loan amount due that the member should pay back is 2200 + 220 = 2420
ü After this payment-‐ loan amount left after a payment has been paid. In our case, our amount left is 2420.
Amount paid is 2000. The loan balance is therefore 420
ü Performing loan-‐ a loan that is not late in payment; in our case, the loan is not running beyond one month
ü Nonperforming loan-‐ a loan that is in default; in our case the loan has not been paid after the one month
instalment
ü Rollover-‐ option for transferring the loan to the next month or to the second instalment where the member
is unable to pay the loan balance within one month
Payment of late loan
When paying for a loan that has exceeded the supposed loan duration, the user is presented with a different screen which has
additional options on how to deal with the loan
Overdue loans are presented to the user with a status button that is yellow in colour to indicate that the loan duration has
exceeded one month without being cleared by the member

E-‐Recording User Guide
58 Version 1.0.0.2
Figure 59: Overdue loan pay screen
The options for paying an overdue loan are:
i. Pay in full-‐ select this option if the member has the full amount of loan balance to clear the loan
a. Select pay in full option
b. Select continue
c. The total loan amount due is indicated
d. Select continue to save and pay loan in full

E-‐Recording User Guide
59 Version 1.0.0.2
Figure 60: Pay loan in full screen
ii. Pay loan-‐ make a normal loan payment. In this case this is partial payment
a. Select pay loan option
b. Enter amount to be paid
c. Select continue to save the amount
Figure 61: Partial loan payment of an overdue loan

E-‐Recording User Guide
60 Version 1.0.0.2
Rollover-‐ This option is used to carry over the loan balance to the next month. The steps to follow are the same as outlined in
below rollover section
5.2.6.1 Rollover
Use the rollover option to carry over the loan balance to the next month or instalment. The user has the option of making a
payment and rollover or just rollover the loan balance
i. Select pay loan menu
ii. Select member to rollover loan balance
iii. If a member is making a payment and rollover, enter amount paid. The rolled over amount with be the remaining
loan balance amount
iv. If a member is not making any payments towards the loan, the you will just select roll over option and amount left
which is the actual loan balance will be rolled over
v. Select rollover option
vi. Select continue
Figure 62: Loan payment and rollover
vii. Therefore the loan balance rolled over in our example is the amount left less amount paid which is 435 shillings

E-‐Recording User Guide
61 Version 1.0.0.2
Figure 63: Rollover confirmation screen
viii. From our example above, the interest added to the loan is 43 shillings whereas from the calculation it is 43.5 shillings.
Rounding off is done to the nearest whole number, thus .5 shillings is ignored.
ix. In the overview in figure, the new outstanding loan balance is 480 shillings. This is because the loan balance is always
rounded off to the nearest five where the balance is not a multiple of five or the loan balance has decimals.
From actual calculations, we see that
Amount left = 550
Amount paid = 115
Loan balance to roll over = 550-‐115
= 435
After rollover, interest amount to be paid = 10% * 435
= 43.5
New loan balance = 435 + 43.5
= 478.5

E-‐Recording User Guide
62 Version 1.0.0.2
Figure 64: Rollover loan overview
x. The rolled over loan changes status to orange to indicate the loan has been rolled over
Information presented to the user on pay loan view
ü Meeting loan payment-‐ total amount of loan payment made during the meeting
ü Total loan payment-‐ cumulative amount of loan payment done during the cycle
Under each member, additional information presented to the user is
ü Outstanding amount-‐ loan balance to be paid
ü Due on-‐ date the loan balance should be paid in full

E-‐Recording User Guide
63 Version 1.0.0.2
Figure 65: Pay loan over view
Colour codes have been used to indicate the different loan status. These are:
ORANGE – this indicates a loan rollover
YELLOW – this indicates a loan which has not been paid on time, which is within one month
GREEN – this indicates a loan that is on time, or it has not yet ran past one month without being paid
5.2.7 FUND PAY OUT
Fund pay-‐out
Use this menu to give out social fund or other fund as grant or as a soft loan
i. Select pay out menu
ii. Select issue at the top right corner
iii. Select date of pay out
iv. Select member to pay-‐out to
v. Select which fund you are issuing out, social fund or other fund
vi. Enter pay-‐out amount to issue. This amount must not be greater than the amount indicated at available funds
vii. Check box will be paid back if the fund issued out is to be paid back in full

E-‐Recording User Guide
64 Version 1.0.0.2
viii. When pay back option is selected, payment date is loaded on the screen. Select the date when the fund should be
paid back in full
ix. Enter reason for pay-‐out
x. Enter beneficiary or the person to receive the pay-‐out
xi. Select save to issue out fund
Figure 66: Pay out screen
Fund pay-‐out edit
You can also edit the fund pay-‐out issued. This should be done before closing the meeting
i. Select pay-‐out menu
ii. Select member to edit fund paid out
iii. Select edit at top right corner of the screen
iv. Edit the necessary pay-‐out details. This can be change of member to pay-‐out fund to, date of issue and payment of
fund, fund pay-‐out amount, reason and beneficiary name. However, you cannot change the fund type. If you edit
social fund details, you cannot change to other fund

E-‐Recording User Guide
65 Version 1.0.0.2
Figure 67: Fund edit screen
Fund pay-‐out delete
A social fund or other fund pay out can be deleted before the meeting is closed
i. Select pay out menu
ii. Select member issued with fund during the meeting
iii. Select delete at top right corner of the screen
iv. User will get a prompt asking them to confirm deletion of the fund pay-‐out
v. Select yes to confirm and no to stop deleting

E-‐Recording User Guide
66 Version 1.0.0.2
Figure 68: Delete fund pay-‐out
Fund pay-‐out overview
Figure 69: Fund pay-‐out screen
Additional information shown on pay-‐out screen
ü Meeting social fund payout-‐ total amount of social fund issued during the current meeting

E-‐Recording User Guide
67 Version 1.0.0.2
ü Total social fund payout -‐ cumulative amount of social fund paid out during the cycle
ü The screen is also divided into two sections
- Repayable social funds-‐ social fund to be repaid back. During pay-‐out, the user will have selected ‘to be paid
back’ checkbox to allow paying back of social fund – Indicates amount issued and outstanding balance to be
paid back
- Non repayable social funds-‐ social fund will not be repaid back – indicates amount issued out
- Other funds -‐ other funds issued out
5.2.8 PAY SOCIAL FUND
Use this menu to pay back social fund or other fund issued to member and member is to pay back
i. Select pay social fund
ii. Select member who is making a payment to social fund or other fund
iii. Enter amount paid back
iv. If a member is not being charged a fine, select continue to complete the process
v. If member should be charged a fine for e.g. late payment, select charge fine to check the box
Figure 70: Social fund pay back screen

E-‐Recording User Guide
68 Version 1.0.0.2
i. Select continue to charge the fine
ii. The fine menu is screen is loaded with member name loaded
iii. Select fine to charge
iv. The fee type loads the fee amount
v. Enter amount paid as fine
vi. Touch on add fine to complete the process of fine charge
vii. The fine charging and payment also completes the process of social fund pay back
Figure 71: Social fund fine charge
E-‐Recording User Guide
69 Version 1.0.0.2
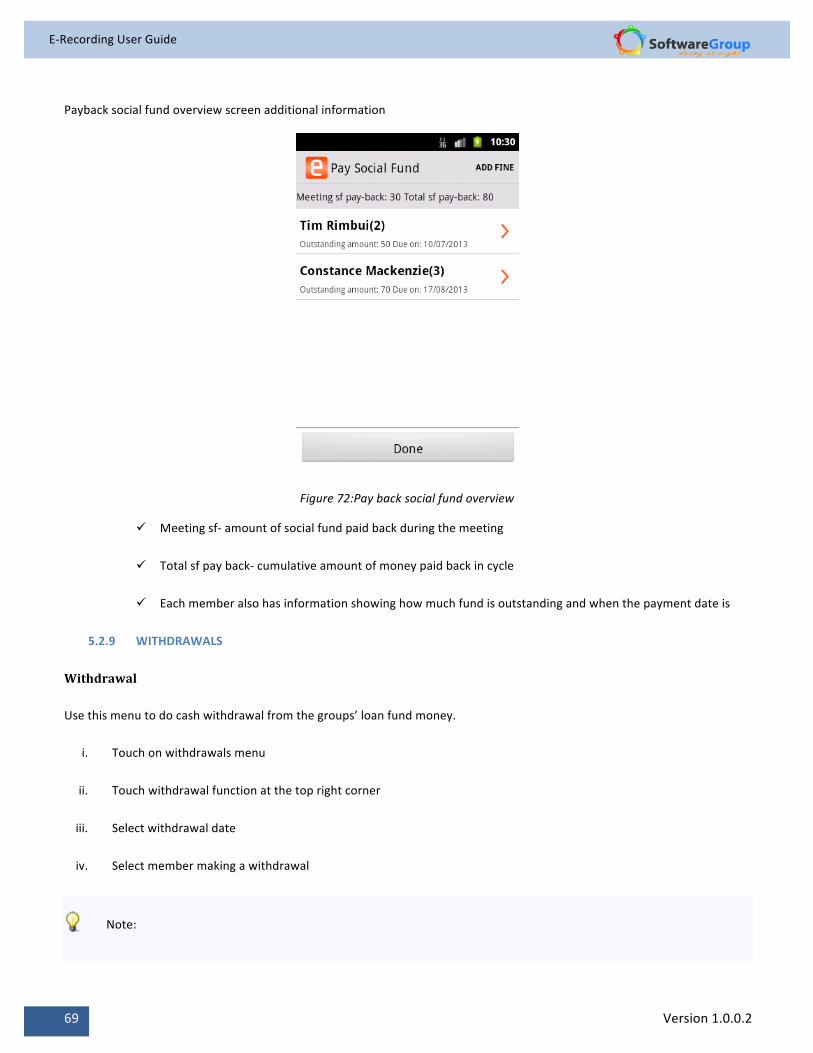
Payback social fund overview screen additional information
Figure 72:Pay back social fund overview
ü Meeting sf-‐ amount of social fund paid back during the meeting
ü Total sf pay back-‐ cumulative amount of money paid back in cycle
ü Each member also has information showing how much fund is outstanding and when the payment date is
5.2.9 WITHDRAWALS
Withdrawal
Use this menu to do cash withdrawal from the groups’ loan fund money.
i. Touch on withdrawals menu
ii. Touch withdrawal function at the top right corner
iii. Select withdrawal date
iv. Select member making a withdrawal
Note:

E-‐Recording User Guide
70 Version 1.0.0.2
ü A member cannot withdraw more than is available in group cash balance
ü A member cannot withdraw more than they have saved in cash contribution
ü If a member has a loan balance, the loan balance amount is deducted from the cash balance available for
withdrawal. In our example below:
Tim Rimbui total contributions to date = 2000
Outstanding loan balance = 880
Available amount for withdrawal = 2000 – 800 = 1120
v. Enter amount to withdraw. If a user attempts to withdraw more than is available in the group or more than the
member has contributed, they will get a message that ‘Exceed Balance’
vi. Touch save to complete the withdrawal
Figure 73: Cash withdrawal
Edit withdrawal
Edit the amount withdrawn by member before closing the meeting
i. Select the withdrawal menu
ii. Select member you want to edit withdrawal done

E-‐Recording User Guide
71 Version 1.0.0.2
iii. Select withdraw option at the top right corner
iv. Edit necessary withdrawal details-‐ date, withdrawal amount
v. Touch on save to save the changes
Figure 74: Savings withdrawal edit
Delete withdrawal
You should delete a withdrawal done in current meeting before closing the meeting
i. Select the withdrawal menu
ii. Select member you want to edit withdrawal done
iii. Select delete option at the top right corner
iv. A prompt message is shown to user to confirm the withdrawal
v. Select yes to complete the process or no to cancel the process

E-‐Recording User Guide
72 Version 1.0.0.2
Figure 75: Savings withdrawal delete
The overview of withdrawal screen has additional information after withdrawal transactions have been made
Figure 76: Withdrawal screen overview
ü Meeting withdrawal-‐ total amount of withdrawals done during the current meeting
ü Total withdrawal-‐ cumulative withdrawal amount during cycle
ü Current savings-‐ how much is left of his contributions after withdrawing

E-‐Recording User Guide
73 Version 1.0.0.2
ü Withdrawn savings-‐ amount of contributions withdrawn in the meeting
5.2.10 GROUP EXPENSE
Expense add
Use this menu to pay for a group expense incurred by the group. This is a withdrawal from the group loan fund balance
i. Select group expense
ii. Select add option at the top right corner of the screen
iii. Select date of expense
iv. Enter expense description
v. Enter amount
vi. Touch on save to save the expense transaction
Note:
ü Group cannot withdraw money as an expense in excess of what the group cash balance is
Figure 77: Group expense screen

E-‐Recording User Guide
74 Version 1.0.0.2
Expense edit
You can also edit an expense and this should be done before closing the meeting
i. Select group expense menu
ii. Select the expense recorded during the meeting
iii. Select edit option at the top right corner of the screen
iv. Edit expense details – date incurred, expense description or expense amount to be withdrawn
v. Touch on save to save changes
vi. Note, the group balances change after you have saved the group expense
Figure 78: Group expense edit screen
Expense delete
i. You can also delete an expense before meeting is closed
ii. Select group expense menu
iii. Select expense recorded to delete. This deletes the expense record
iv. The record is deleted

E-‐Recording User Guide
75 Version 1.0.0.2
Group expense over view information
Meeting expense-‐ this is the amount withdrawn from group cash balance
Total expense-‐ this is the cumulate amount withdrawn from group cash balance during the cycle
Figure 79: Group expense overview
5.2.11 GROUP INCOME
Income add
Use this menu to record income records added to the group cash
i. Select other income menu
ii. Select add option at the top right corner of the menu
iii. Select date of income
iv. Enter income description
v. Enter income amount
vi. Select save to complete the transaction

E-‐Recording User Guide
76 Version 1.0.0.2
Figure 80: Income record screen
Income edit
You can also edit income details recorded during the meeting
i. Select other income menu
ii. Select income record to edit
iii. Select edit option at the right top corner
iv. Edit necessary income details – date of income, income description and income amount
v. Touch on save to save the changes

E-‐Recording User Guide
77 Version 1.0.0.2
Figure 81: Edit income screen
Delete income record
You can also delete an income record before closing the meeting
i. Select other income menu
ii. Select income record to be deleted
iii. Select delete option at the top right corner
iv. The record is deleted
Other income overview menu
ü Meeting other income-‐ total amount of income recorded during the meeting
ü Total other income-‐ cumulative income amount recorded during the cycle

E-‐Recording User Guide
78 Version 1.0.0.2
Figure 82: Other income overview
5.2.12 MEMBER EXIT
Exit member
Use this module to permanently remove a member from the group. Note that this is not deleting member records but it is a
process of removing a member from the group. Deleting means erasing member records even from the database
Note:
ü A member must not have pending loan balance
ü A member must not have pending fines and fees
i. Select member exit menu
ii. Select date of exit
iii. Select exit reason. The options are voluntary, expulsion, death
iv. Select perform share out
- This refers to giving the member their contribution and profit earned from their contributionup to the time
of their exit

E-‐Recording User Guide
79 Version 1.0.0.2
- If you do not perform share out at exit process, the member will get their dues at the end of the cycle and profit earned will be up to the date they exited. Additional group profit earned after the member has exited will not be shared with this member
Figure 83: Exit process
v. Select Exit member to go to the next step
vi. A pop up message is displayed to the user to confirm the action
Figure 84:Exit process 2

E-‐Recording User Guide
80 Version 1.0.0.2
vii. Select yes to confirm the process. If you select no, you will stop the exit process
Exited member share out payment
i. After you have exited the member, you will need to pay share out amount. From figure 75, member is indicated as
exited, and the share amount is indicated as due
Figure 85: Member exit screen
ii. To pay out the amount for the exited user, select the user name
iii. A prompt message is presented to the user to confirm if payment should be made. If payment is not done at this
point, the share out amount will be paid at the end of the cycle and the amount to be paid at share out will be
contribution and profit earned up to that point

E-‐Recording User Guide
81 Version 1.0.0.2
Figure 86: Member exit share out payment
iv. Share out details are shown to the use for confirmation. At this point, the user can choose to cancel the share out
payment
v. To confirm payment, select pay
Figure 87: Exit member share out confirmation

E-‐Recording User Guide
82 Version 1.0.0.2
Exit member overview
The member exit screen overview indicates which members have been exited and received their share out amount, which
members have been exited and not received their share out amount, which members are ready for exit and which members
will not be exited due to unpaid loan balances or fines and fees
Figure 88: Member exit overview screen
5.2.13 RESET PIN
i. Use this menu to reset member PIN
ii. Select reset PIN menu
iii. Select member to reset pin
iv. Enter new pin and confirm new pin
v. Touch on reset pin to save changes

E-‐Recording User Guide
83 Version 1.0.0.2
Figure 89: Reset Pin screen
5.2.14 CLOSE MEETING
Use this menu to close the meeting and to confirm meeting activities of cash in and cash out. Confirm physical cash with
meeting summary entries
Note:
ü Use the meeting summary to confirm physical cash and what has been in e-‐Recording
Cash in
This is total amount of loan fund recorded in

E-‐Recording User Guide
84 Version 1.0.0.2
Figure 90:Meeting summary -‐ cash in
Cash In-‐ summation of all recorded amount in cash in summary. This is the total of loan fund in
i. Withdrawn from the bank-‐ group cash withdrawn from the bank. The withdrawn amount is confirmed at bank/cash
balance confirmation
ii. Cash carried forward-‐ total group cash balance in the box from previous meeting
iii. Total savings-‐ total contributions recorded during the meeting
iv. Total loan repayments-‐ total loan repayments recorded during the meeting
v. Total fines-‐ total fines and fees paid during the meeting
vi. Other income received-‐ total amount recorded in other income menu
Cash out
This is the total amount of loan fund withdrawn from group loan fund. It is the total of loan fund out

E-‐Recording User Guide
85 Version 1.0.0.2
Figure 91: Cash out summary
Cash out-‐ summation of total cash out in cash out summary
Total loans issued-‐ number of loans issued during the meeting
i. Amount issued (loans) -‐ total amount of loan issued during the meeting. This the actual amount member received as
loan and not loan issued plus interest
ii. Savings withdrawal-‐ total amount of cash withdrawn from members account
iii. Expenses paid-‐ total amount withdrawn from group loan fund. This is recorded at group expense menu
Social fund
Shows summary of social fund income and expenses. It is social fund in minus social fund out

E-‐Recording User Guide
86 Version 1.0.0.2
Figure 92: Social fund summary
Withdrawn from bank-‐ social fund amount that has been withdrawn from the bank; indicate this amount withdrawn at bank/
cash balance confirmation menu
Social fund balance-‐ total social fund amount from previous meeting carried forward
Social fund collected-‐ total social fund recorded during the meeting
Social fund pay-‐out-‐ total social fund amount paid out to a member during the meeting
Other fund
Shows a summary of other fund income and expenses. It is other fund in minus other fund out

E-‐Recording User Guide
87 Version 1.0.0.2
Figure 93: Other fund summary
Withdrawn from bank-‐ other fund amount that has been withdrawn from the bank; indicate this amount withdrawn at bank/
cash balance confirmation menu
Other fund balance-‐ total other fund amount from previous meeting carried forward
Other fund collected-‐ total other fund recorded during the meeting
Other fund pay-‐out-‐ total other fund amount paid out to a member during the meeting
Summary
Enter the actual cash confirmation in these entry fields.
Note:
ü To be able to close the meeting, the cash confirmation entered in the entry fields must tally with amount
shown as expected. Each entry field indicates to the user how much total is expected
ü If the physical cash does not tally with this information shown as amount expected, then the user should go
to each e-‐Recording menu where a record has been entered and confirm the correct recording
ü If the member set in the constitution option for money in safe place as both bank and cash, both of this
options will be loaded in meeting summary window.

E-‐Recording User Guide
88 Version 1.0.0.2
ü If the user selects only cash in the box, then all the money will be kept in the box and confirmation summary
will only be cash in box
i. Expected total cash-‐ total amount of cash balance collected during the meeting. This is the calculation of cash in plus
social fund balance plus other fund balance minus cash out
To Cash Box
Figure 94: Meeting summary -‐ to cash box
ii. Enter how much loan fund will be kept in the box. The balance indicated is what is expected to go to the bank
iii. Enter social fund to be kept in the box. If no social fund will be banked, confirm the full amount in the entry field. The
balance expected will be zero
iv. Enter other fund to be kept in the box. The balance amount shown will be what is expected to go to the bank

E-‐Recording User Guide
89 Version 1.0.0.2
To bank
Figure 95: Meeting summary -‐ to bank
v. The amount to be confirmed for bank will be the balances indicated as expected. Note that these balances are total of
what is expected minus total to cash in the box.
vi. Loan fund available for bank-‐ in our example in figure 96 total loan fund expected is 3611. Total loan fund to be kept
in the box is 3000. Therefore the balance available for bank is 3611 – 3000 = 611. Therefore amount to be confirmed
to bank is 611 is indicated. Confirm this balance by indicating in the entry field
vii. Social fund available for bank-‐ in our example in figure 96, our total social fund expected is 30. The total social fund
expected was confirmed to go to the box; therefore no social fund is expected to go to the bank. In this entry field,
we indicate the amount as zero
viii. Available for bank-‐ again in our example as shown in figure 96, total expected other fund amount is 120. We
confirmed to the box amount as 100. Total expected to go to the bank is 20 and this is the amount to be confirmed

E-‐Recording User Guide
90 Version 1.0.0.2
Figure 96: Close meeting summary
ix. A summary of total cash in the box and total amount to bank is indicated after confirming these entry fields.
x. The amount to the box will be amount carried forward in the next meeting
xi. After member has confirmed these entry fields, touch on confirm meeting to confirm the entries and close the
meeting
Note:After meeting has been confirmed and closed, it is important to sign out of e-‐Recording to stop unauthorised
users from starting another meeting and accessing group data


![Manual Pre-Amplificador MESA BOOGIE Rectifier Recording [SONIGATE]](https://img.dokumen.tips/doc/110x75/568c38a71a28ab02359fa4ac/manual-pre-amplificador-mesa-boogie-rectifier-recording-sonigate.jpg)
